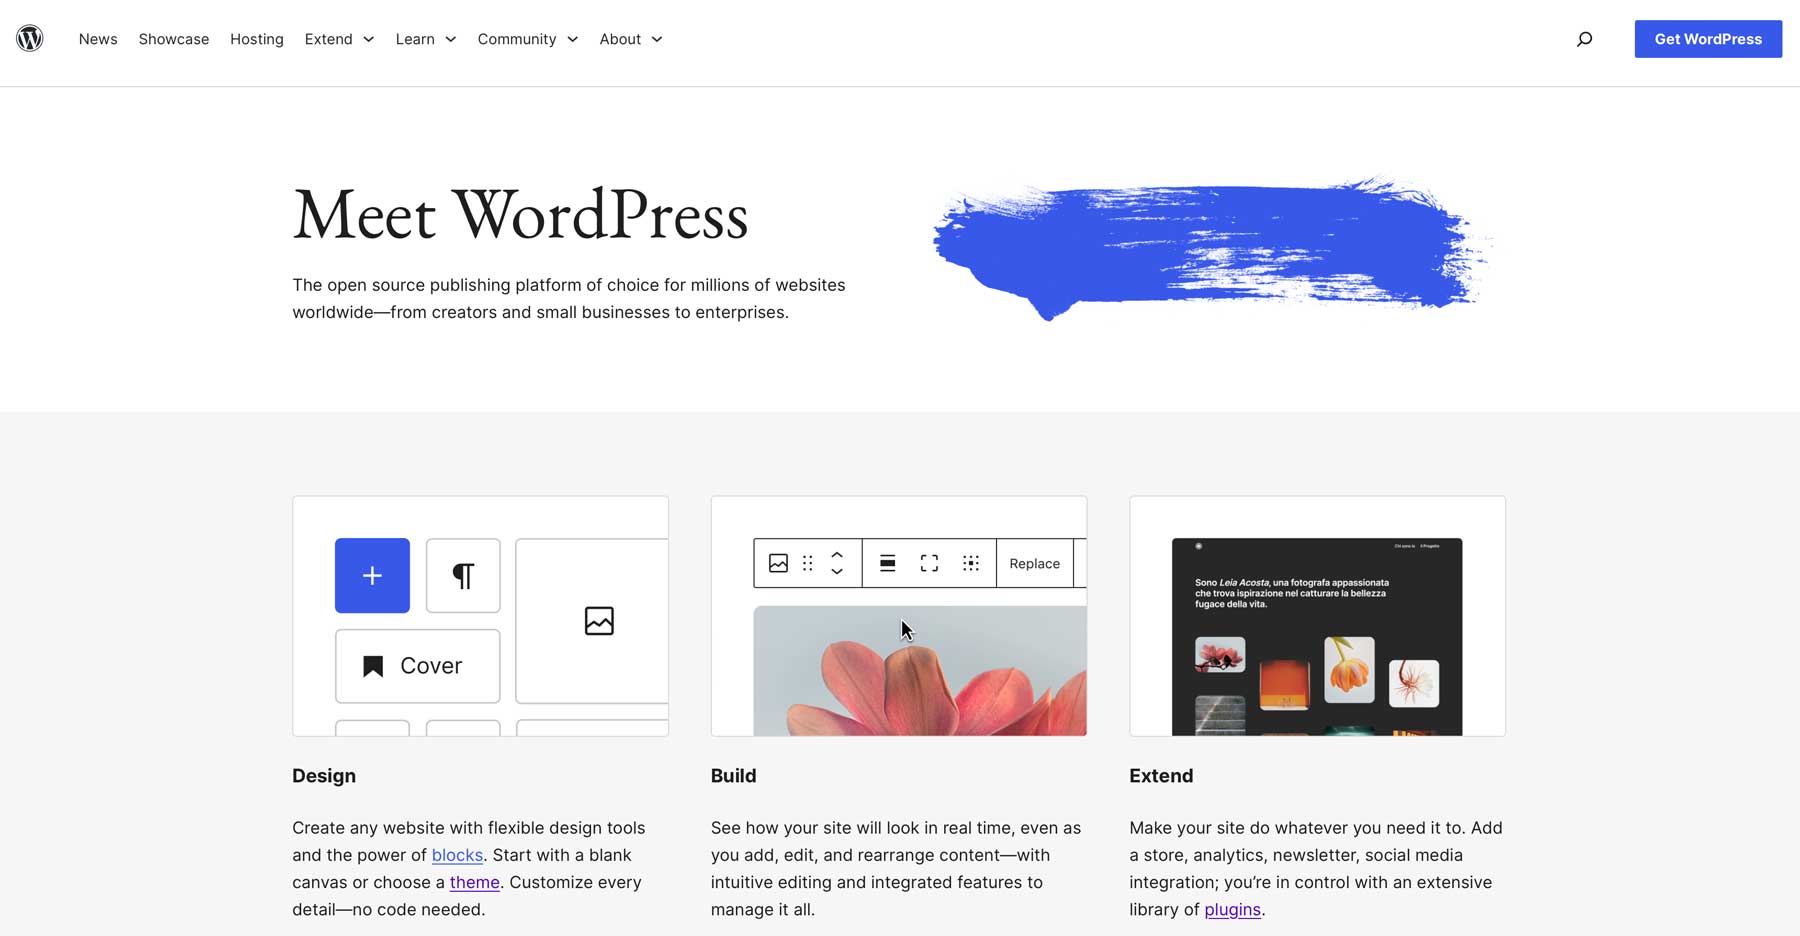
Does your church need a user-friendly and visually appealing website to connect with your congregation and reach a wider audience? That’s where WordPress comes in. WordPress is a powerful, simple content management system (CMS) that allows you to create any type of website you want. From business to ecommerce and everything in between, WordPress can do it all.
This step-by-step guide will show you how to make a church website with WordPress. We’ll cover everything from purchasing a domain name and choosing a hosting provider to designing stunning pages with Divi. We’ll even explore popular plugins to enhance your website’s functionality.
By the end of this guide, you’ll be well on your way to establishing a strong online presence for your church. Let’s dive in.
What You’ll Need To Make A Church Website With WordPress
When planning your church website, you’ll need to consider a few essential pieces of the puzzle. First of all, you will need a domain name. This will serve as your church’s web address. It’s a unique name for your online property. You’ll also require a WordPress hosting plan. A WordPress host stores all your website’s files and makes them accessible online. Think of it as a rented space where your website lives.
Most importantly, you’ll need the WordPress software. It’s a free and user-friendly platform that allows you to build and maintain your website without needing any coding knowledge. Most web hosting providers, like SiteGround, Cloudways, and Flywheel offer one-click installs, simplifying the process of installing WordPress. Other optimal things you’ll need include a WordPress theme and must-have plugins, especially if you plan to make a church website with added functionalities like live chat, events, or a member’s area.
Lastly, you need content for your website, such as information about your church, ministries, service times, sermons, and contact details. Thankfully, artificial intelligence (AI) tools like Divi AI can help with that. To be successful, take the time to plan your website’s structure and navigation. This includes deciding which pages you want to include and how visitors will find the information they are looking for. With these pieces in place, you can easily make a church website with WordPress.
How To Make A Church Website With WordPress
Launching your church website requires building a solid foundation. The first step involves securing your online presence with a domain name that reflects your church’s identity. We’ll then guide you through choosing a reliable hosting provider to ensure your website remains live and secure. Finally, we’ll show you how to effortlessly install WordPress on your hosting platform.
Subscribe To Our Youtube Channel
Step 1: Purchase a Domain Name
As mentioned, your domain name is your church’s unique online address, just like a street address for your physical location. It’s the first impression potential visitors see, so choosing the right domain is important. A memorable and relevant domain name makes it easier for people to find your church online. It also projects a professional image and reinforces your church’s brand identity.
When considering domain names, there are a few tips to remember. First, keep it short and easy to remember. If it’s difficult to spell or type, you’ll likely miss out on opportunities with potential parishioners. Also, include keywords relevant to your church, like church, community, or location. Lastly, check for availability with extensions like .com, .org, or similar. Some domain name extensions are better for SEO than others, so bear that in mind when making a decision.
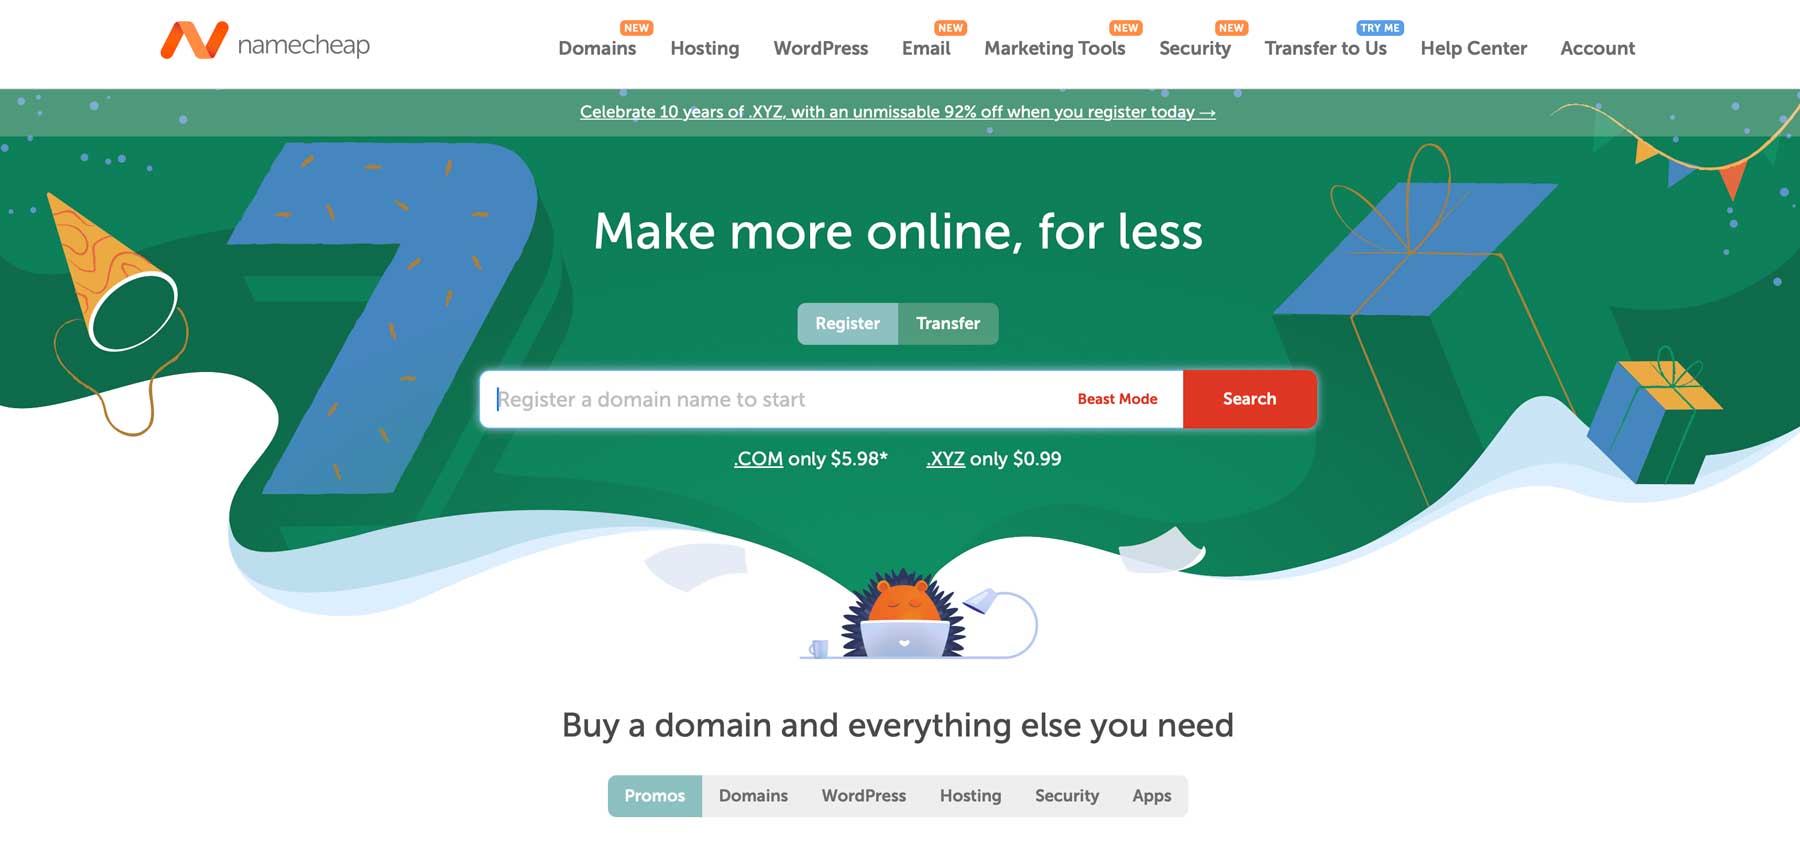
The most important thing, though, is to choose a good domain registrar, like Namecheap. Domain registrars act as sellers of digital real estate, allowing you to register your chosen domain for a yearly fee. Namecheap is one of the more affordable options, with .com domains available for as little as $5.98 per year. The registrar offers a user-friendly interface where you can easily search for a potential domain, purchase any associated domains or add-ons for WordPress hosting, an SSL certificate, and premium DNS, which guarantees 100% uptime and DDoS attack protection.
Step 2: Choose a WordPress Web Host
The next step in our guide on how to make a church website with WordPress is purchasing a hosting plan. A hosting provider rents secure space for your website’s files and data. This allows visitors to connect to your website and view your content. Hosting plans come in various price points, especially depending on your hosting type. For most people starting out, shared hosting is a good deal. However, it’s always best to opt for hosting that’s optimized for WordPress. The differences between shared and WordPress hosting are vast, so it’s important to compare them to determine which type is right for you.
Optimized WordPress Hosting Is The Best Choice
We prefer to opt for WordPress hosting, mainly because of the benefits that it offers. For one, WordPress hosts are designed for WordPress websites. They offer robust security and enhanced speed and handle all your updates. Plus, WordPress hosts can be of any type, including shared, managed, dedicated, or VPS hosting.
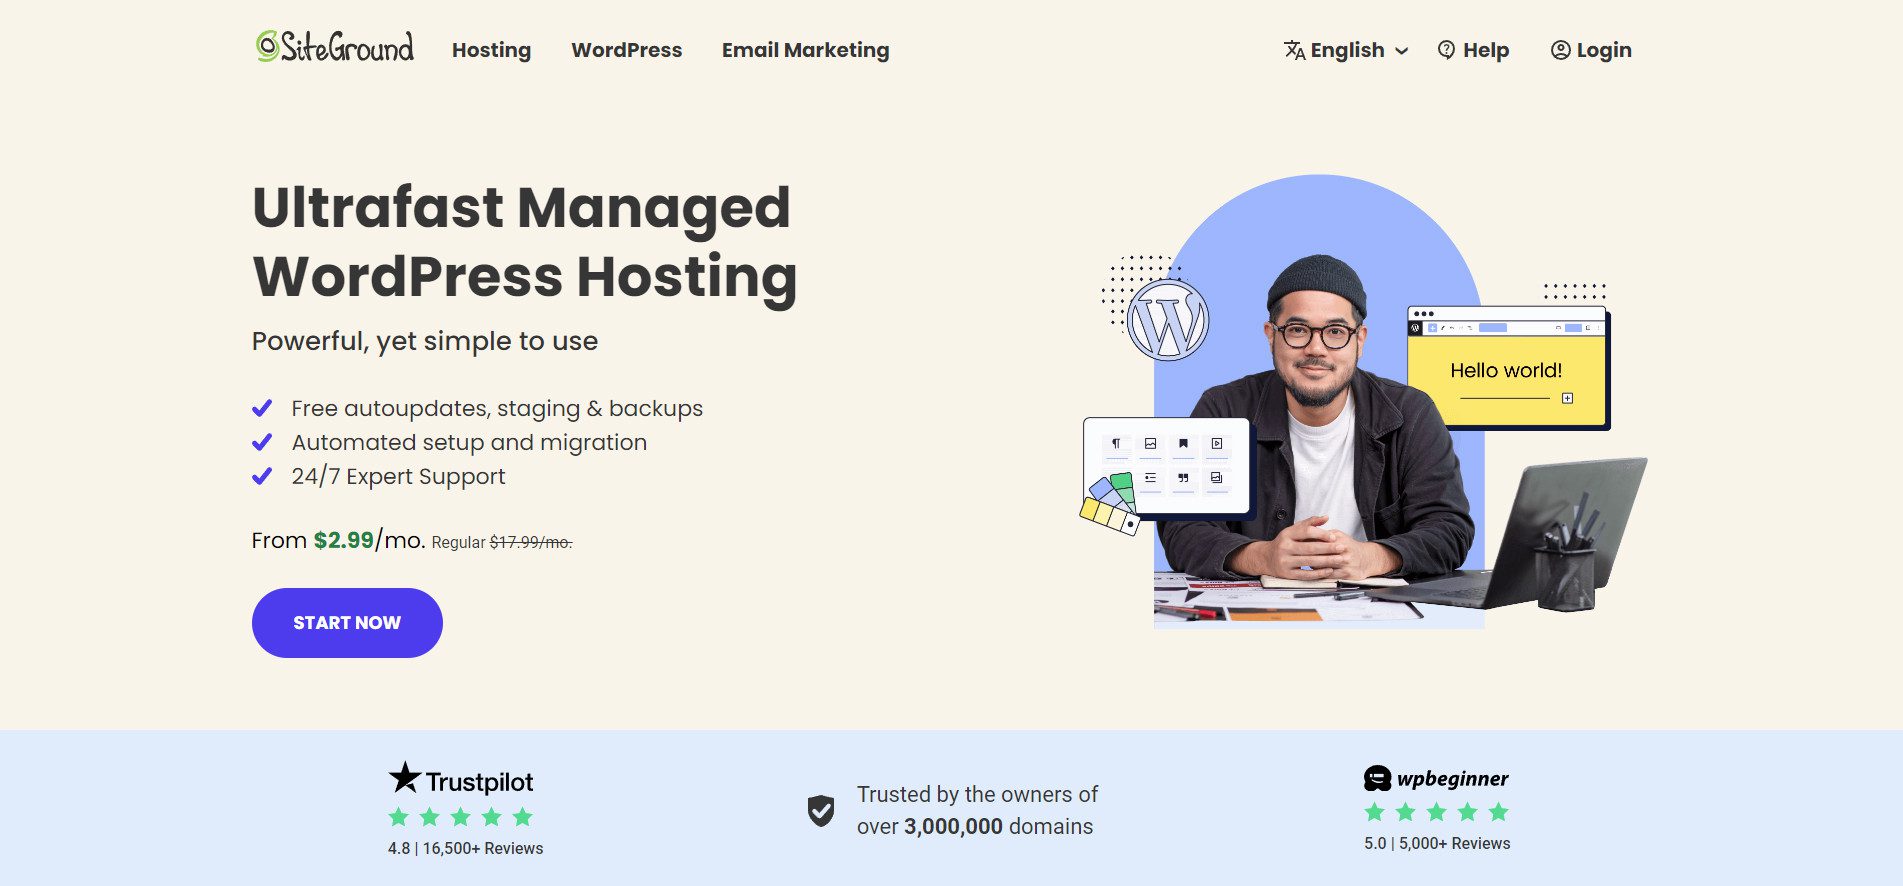
One of the best options available is SiteGround. As a managed WordPress host, SiteGround handles everything you’ll need to start with WordPress, including one-click installs. Most WordPress hosts include a custom dashboard to handle all aspects of WordPress.
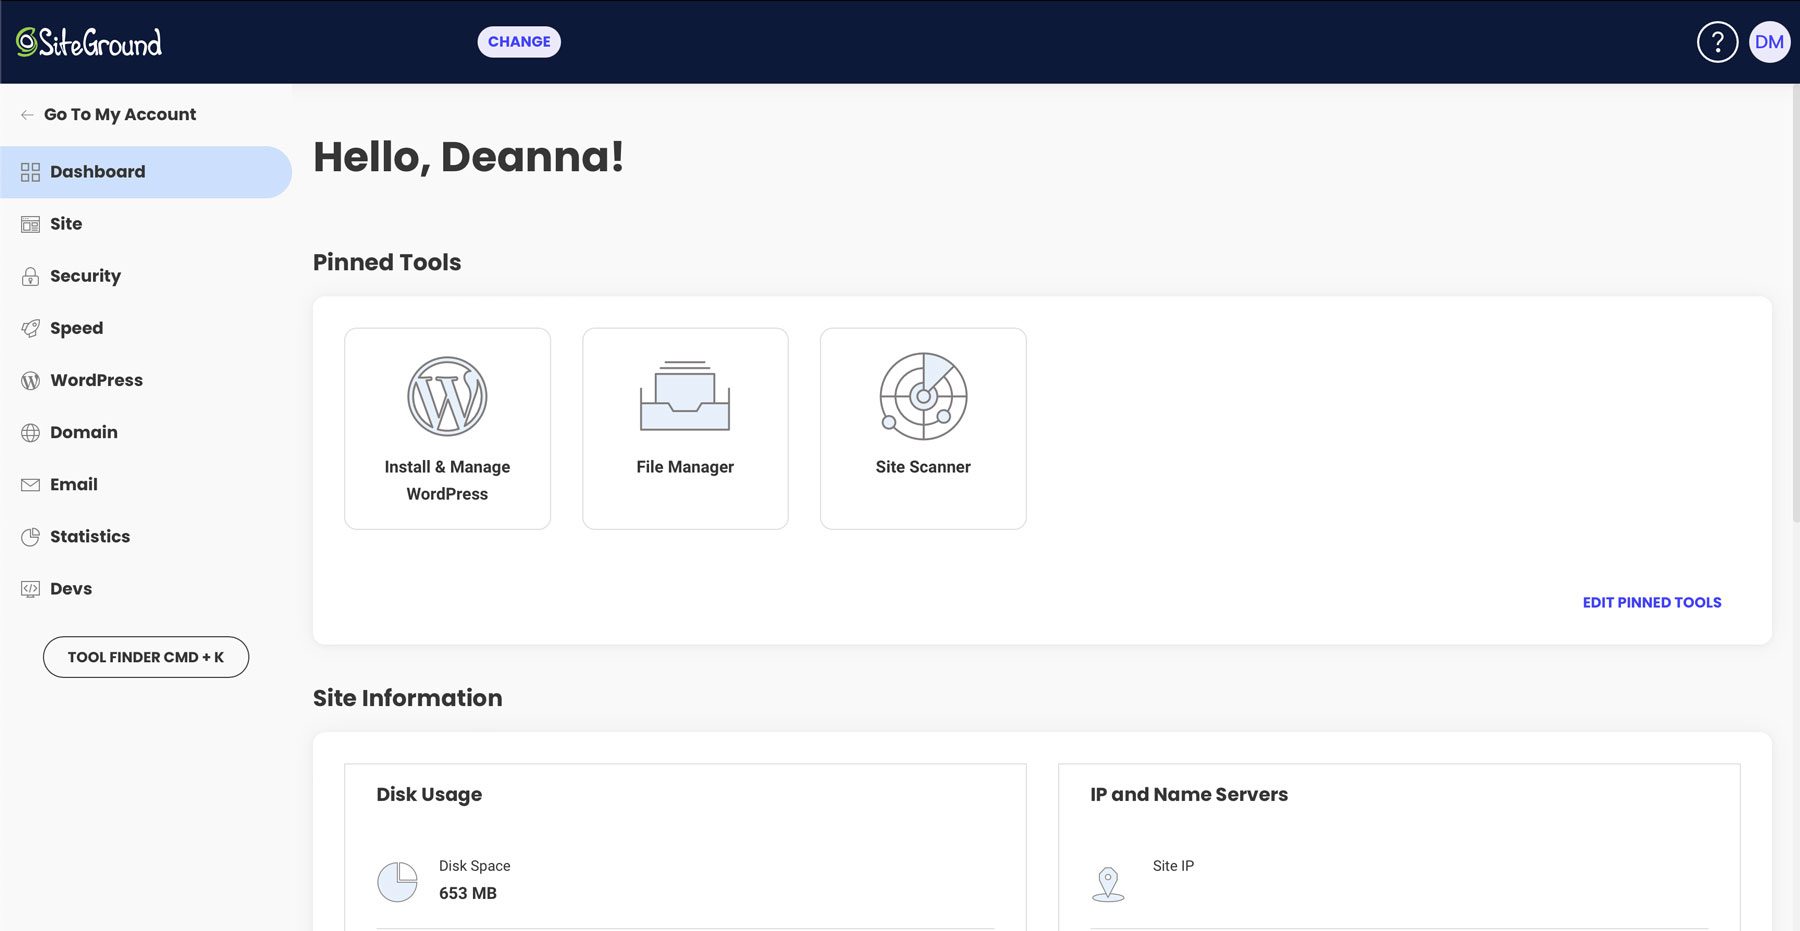
SiteGround uses a proprietary setup called Site Tools. It allows you to easily manage your domain, create and access email accounts, install an SSL certificate, and access Dev tools, amongst other tools. There is also a boatload of freebies, including free email, an SSL certificate, a domain for one year, WordPress installation, a content delivery network (CDN), and site migrations. With SiteGround, you’ll never have to worry about security, either, thanks to an AI-powered anti-bot that scans the server for malware and other threats, and a web application firewall (WAF) with millions of security rules written daily.
SiteGround offers three plans, starting at a very affordable $2.99 per month. This StartUp plan features 10GB of storage, unmetered traffic, and 10,000 monthly visits, which is more than enough for a basic church website. Should you need to upgrade, you can easily swap to one of SiteGround’s more robust plans with no downtime.
Step 3: Install WordPress
With a domain and hosting plan purchased, we can move on to the next step in our how to make a church website with WordPress guide: installing WordPress. There are multiple ways to do it, with the most user-friendly way coming in the form of a one-click install. To demonstrate how easy the process is, we’ll walk you through it using our chosen hosting provider, SiteGround.
After purchasing a hosting plan, log into your SiteGround account. On the dashboard, you’ll see a Set Up Site button on the Home Screen. Click it to begin the process.
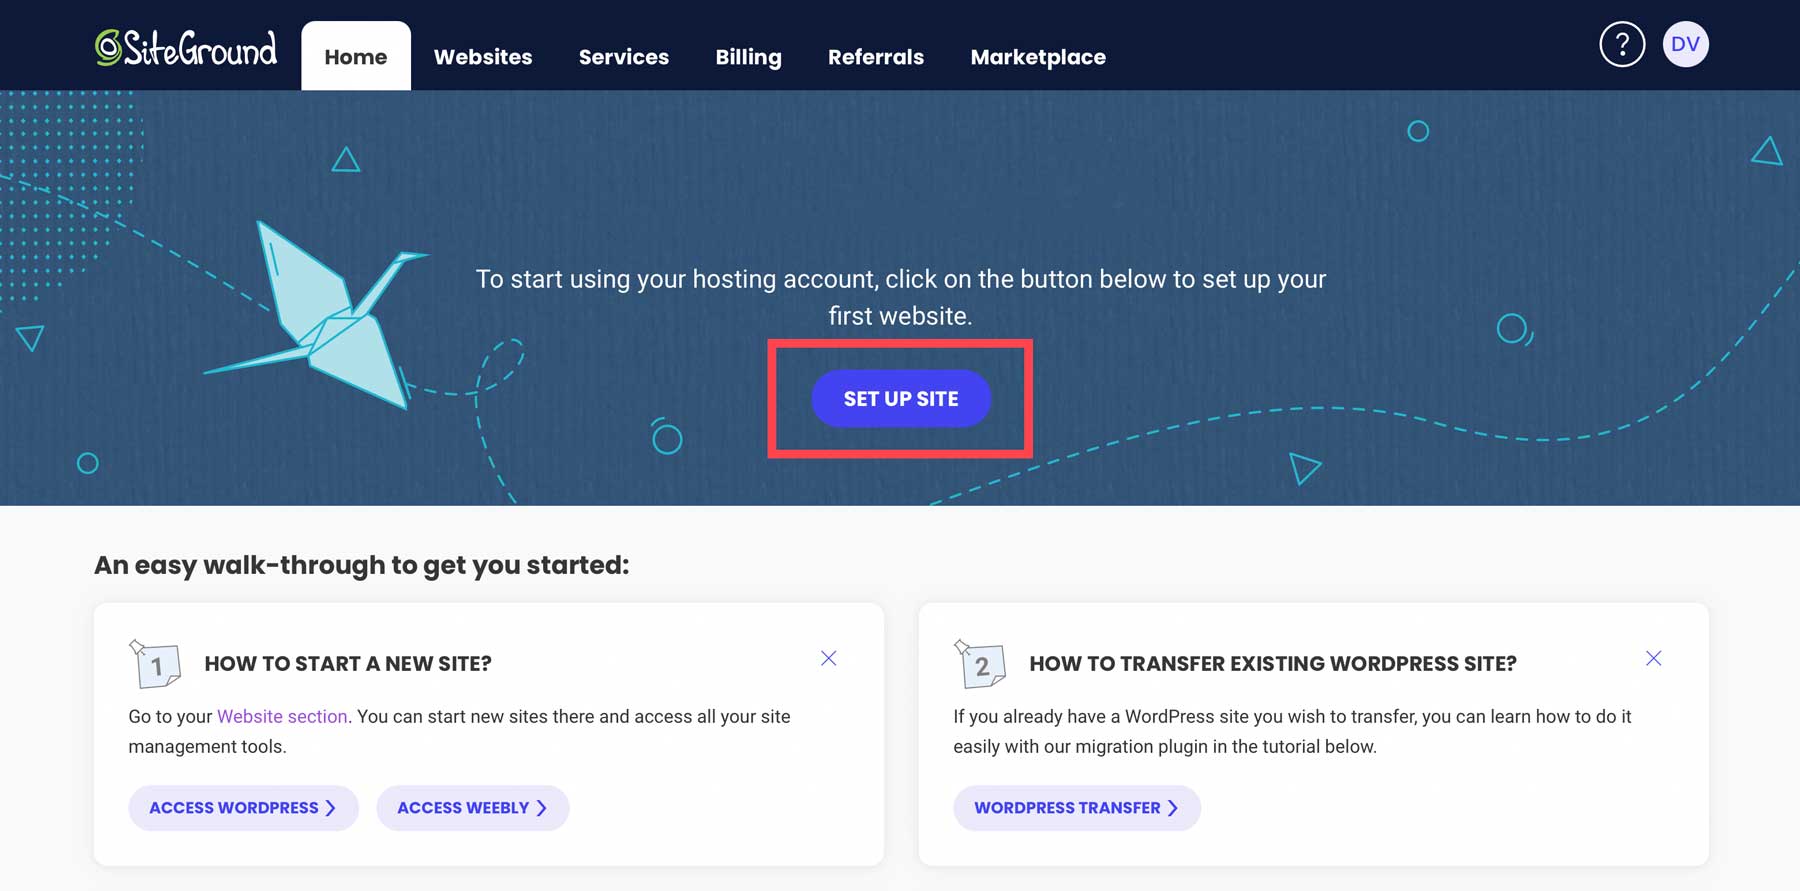
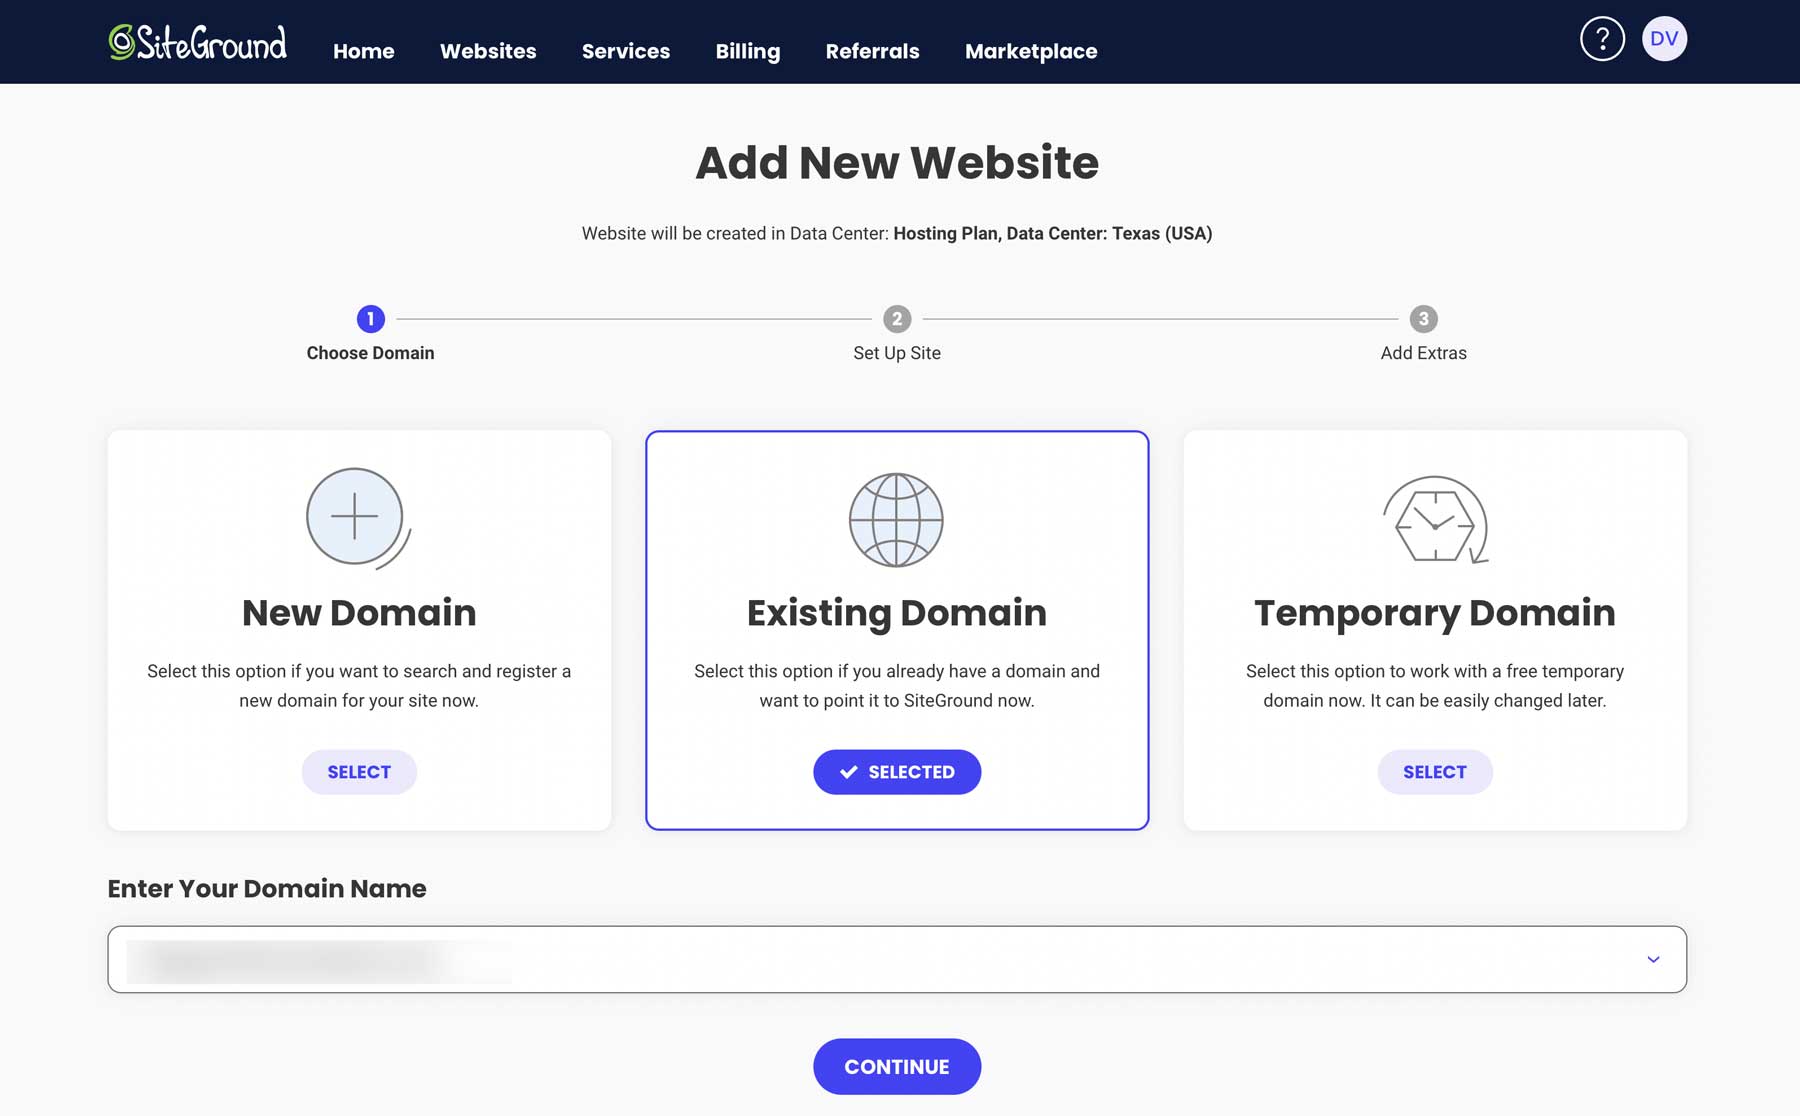
Next, choose whether to install WordPress on a new, existing, or temporary domain. We’ll assume you purchased a domain in the previous step, so click Existing Domain and input your domain name to continue.
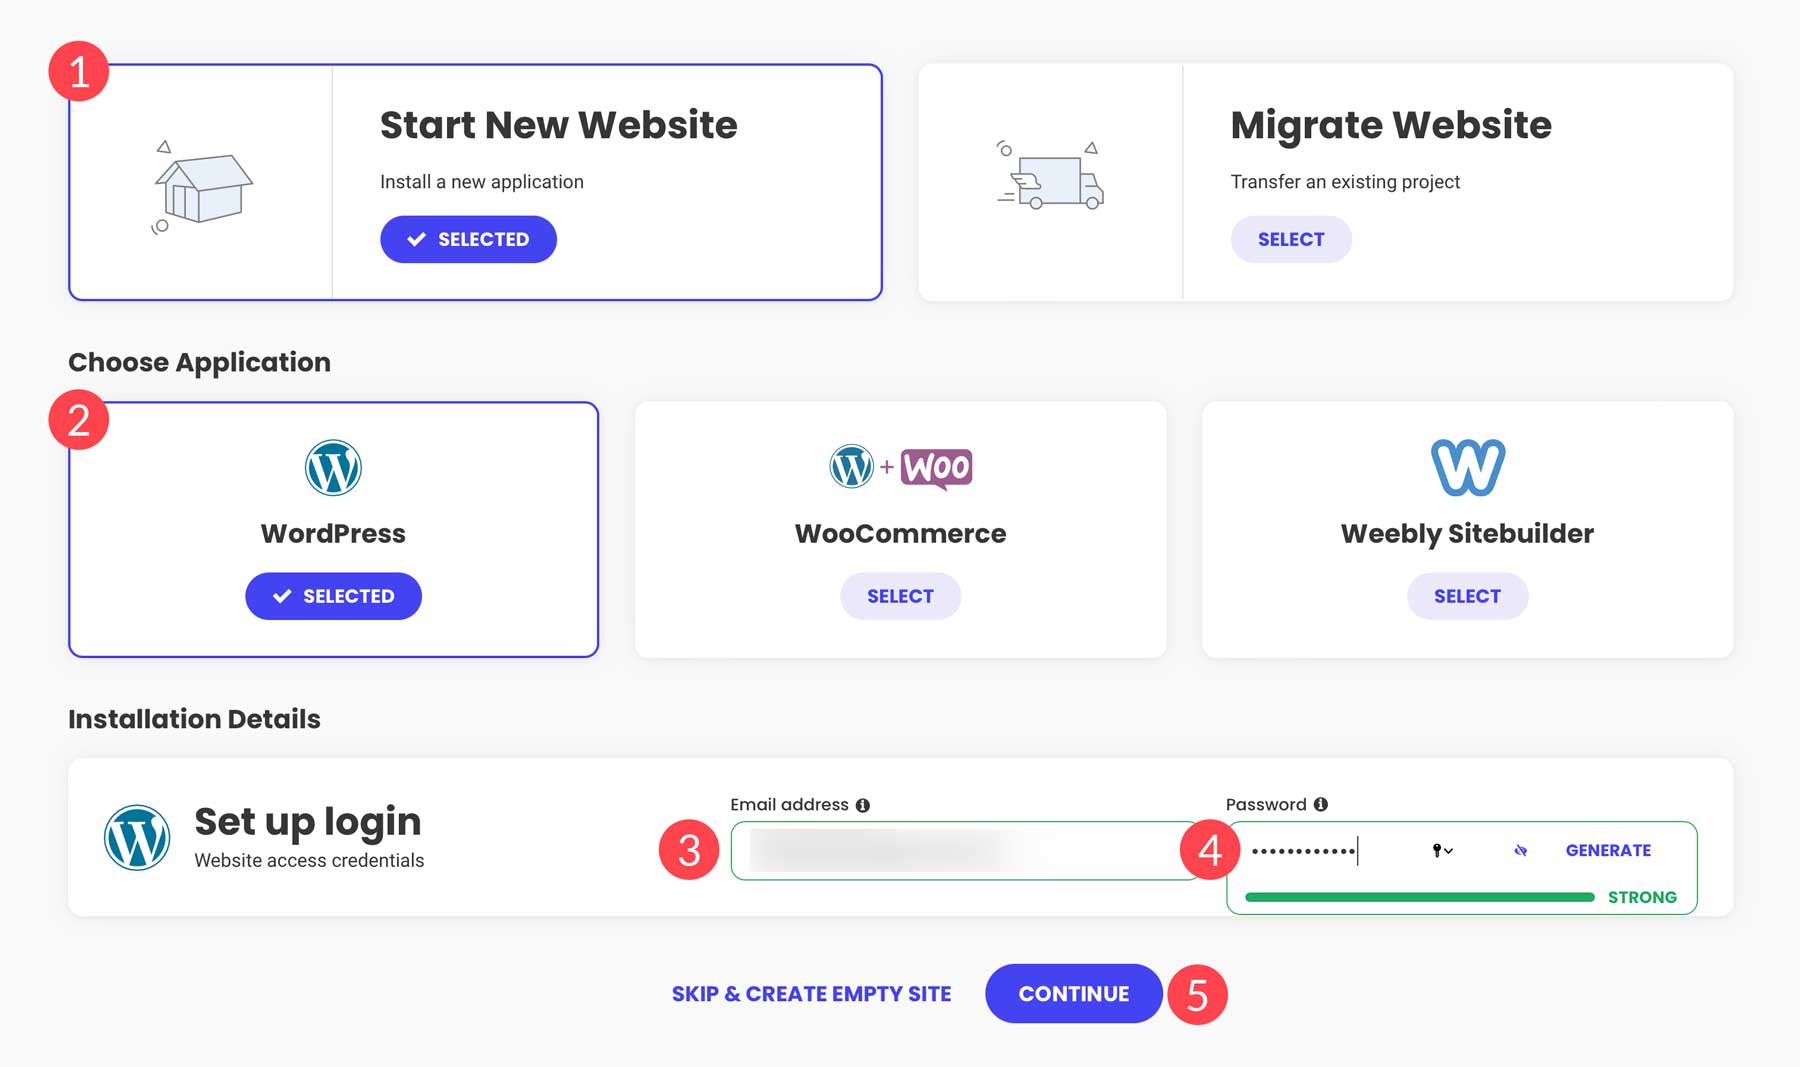
Select Start New Website, select WordPress as the application, set up an email and password (WordPress login credentials), and click Continue.
That’s it! SiteGround makes the process of installing WordPress so easy. Over the next few minutes, SiteGround will create space on its server for your website. It’ll also optimize the space for the platform and install a suite of plugins, including the Speed Optimizer and Security Optimizer plugins.
Step 4: Purchase and Install Divi
Once you have your foundation set, it’s time to design your church’s online home. In this section, we’ll show you how easy it is to purchase and install a WordPress theme. While we may seem biased, we’re going to use the Divi theme because it gives you the most back for your buck.
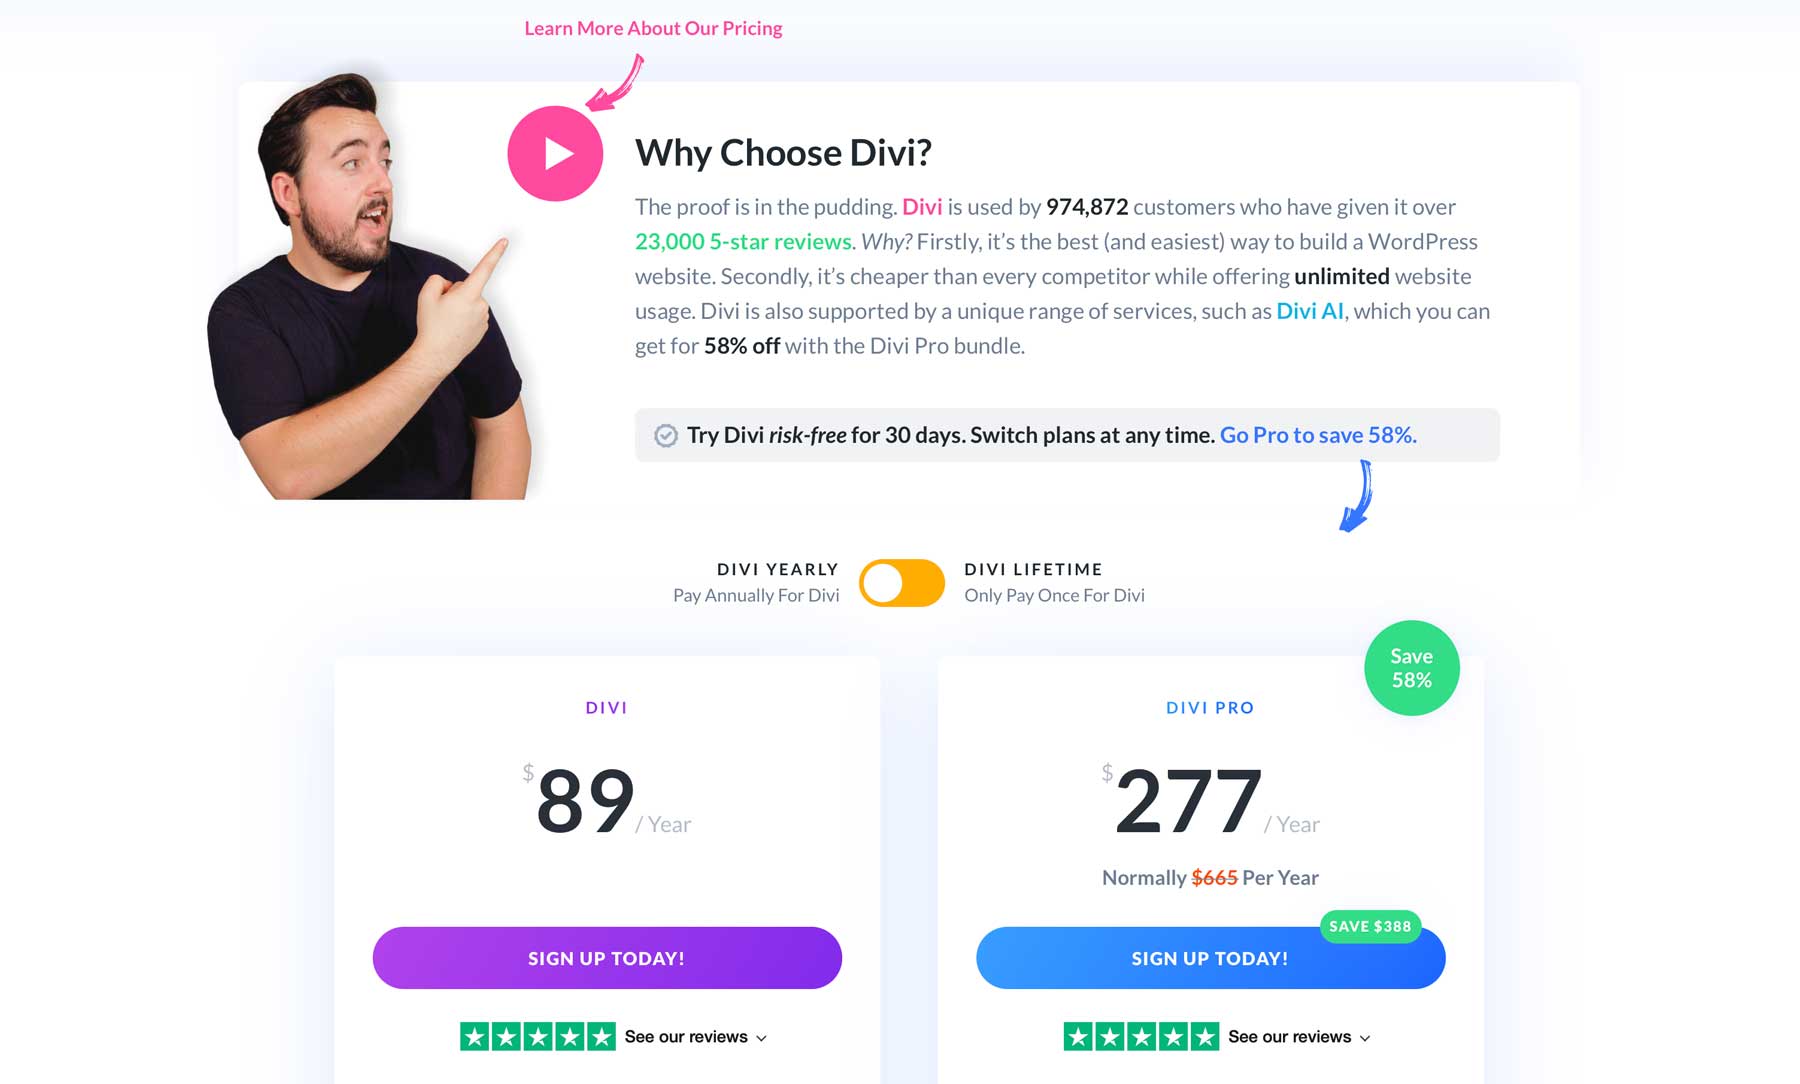
For $89 per year, you’ll get the Divi theme and much more. Every Elegant Themes plan comes with the Divi theme and its powerful page builder plugin, the Visual Builder. You can also design every aspect of your site, including headers and footers, using the Theme Builder. Beyond the theme, Elegant Themes offers products to enhance your church website-building experience. For example, every purchase comes with access to Divi’s vast library of premade templates.
For those who need more, you can sign up for Divi add-ons, like Divi Cloud, which allows you to store Divi Modules, sections, and full layouts in the cloud. Another great product, Divi Teams, is a great way to grant access to more than one user. Teams foster collaboration between team members, allowing the account owner to grant access to any Divi product they own, assign permissions based on user type, and more. Divi Teams makes it easy if you have more than one user who needs to access your account, such as a web developer.
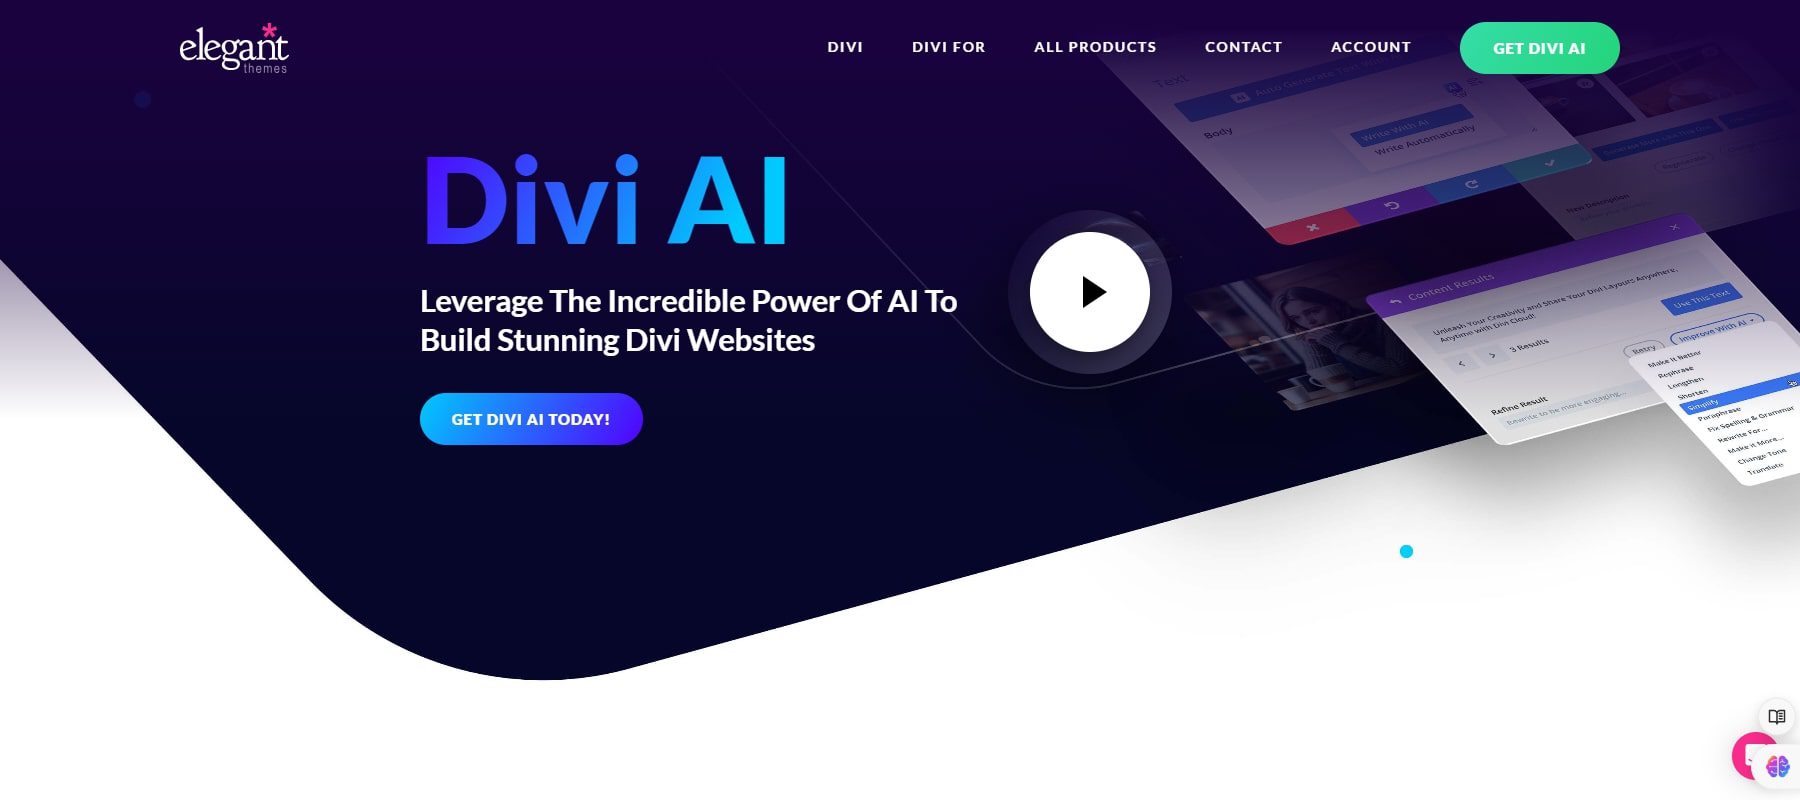
For those looking for a little AI-powered design help, Divi AI is a great tool. You can generate text, images, code, and full layouts for as little as $16.08 per month. It serves as your personal design assistant, helping you to produce amazing designs, complete with text and photos, perfect for your church website.
Signing Up for an Elegant Themes Subscription
To sign up, start by clicking the Pricing button at the top right of the Elegant Themes home page.

Select the plan you want to purchase and tap Sign Up Today.
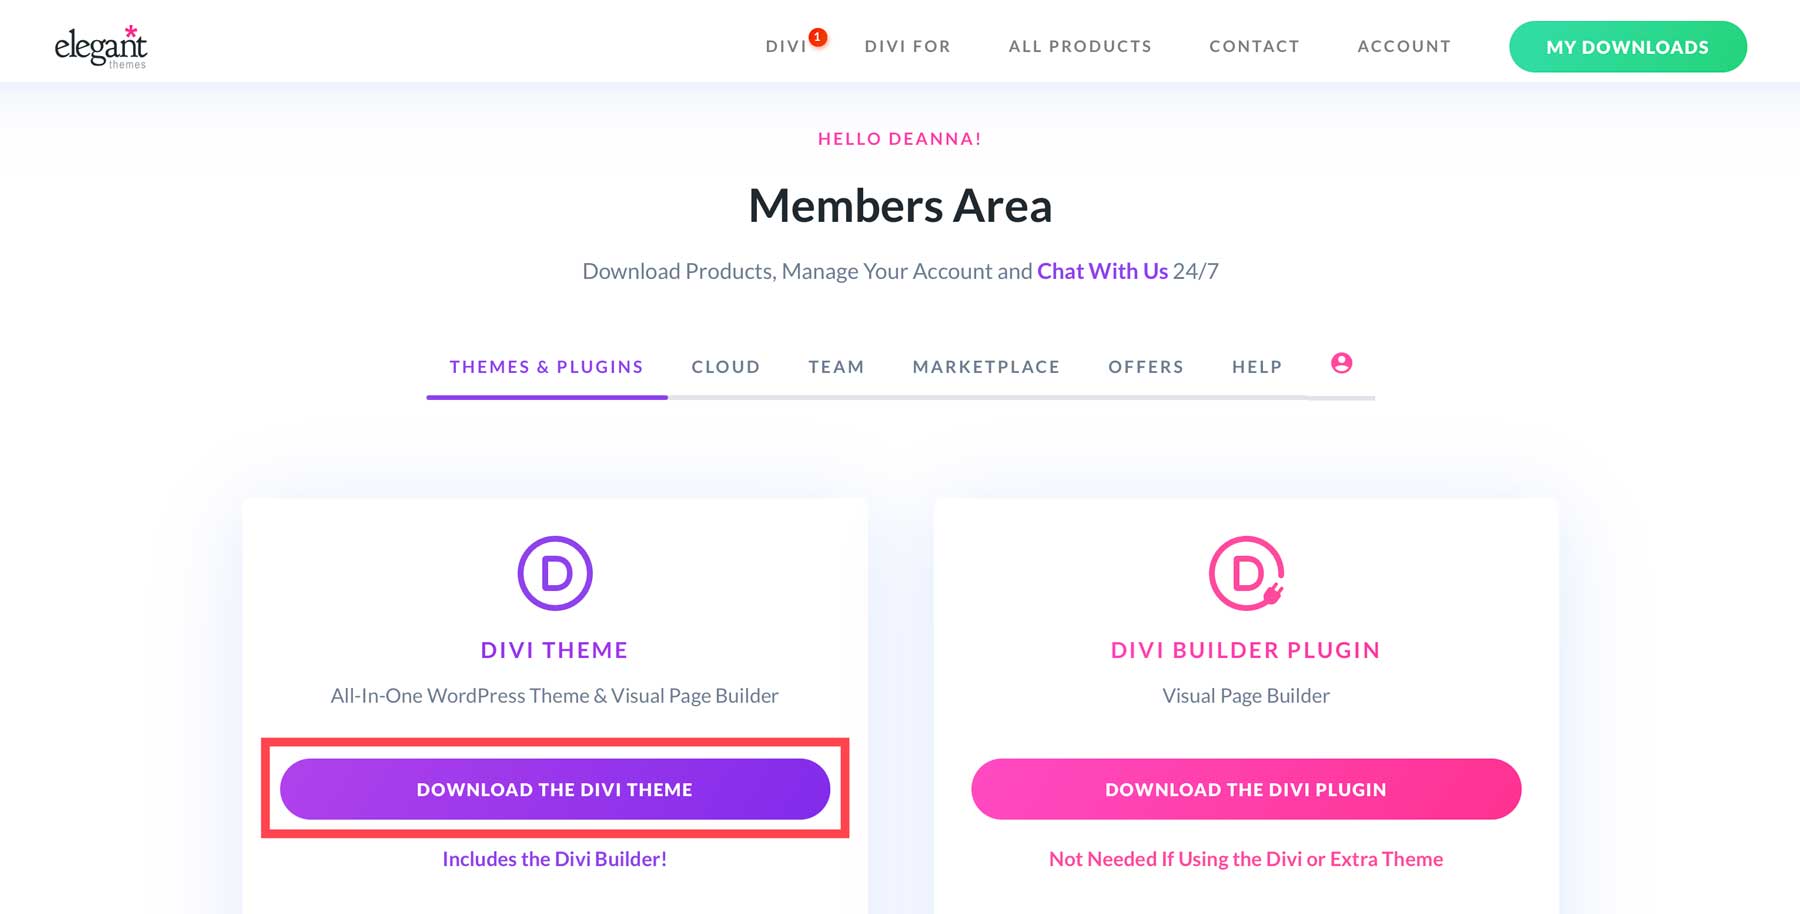
After completing your purchase, you can download the Divi theme with one click.
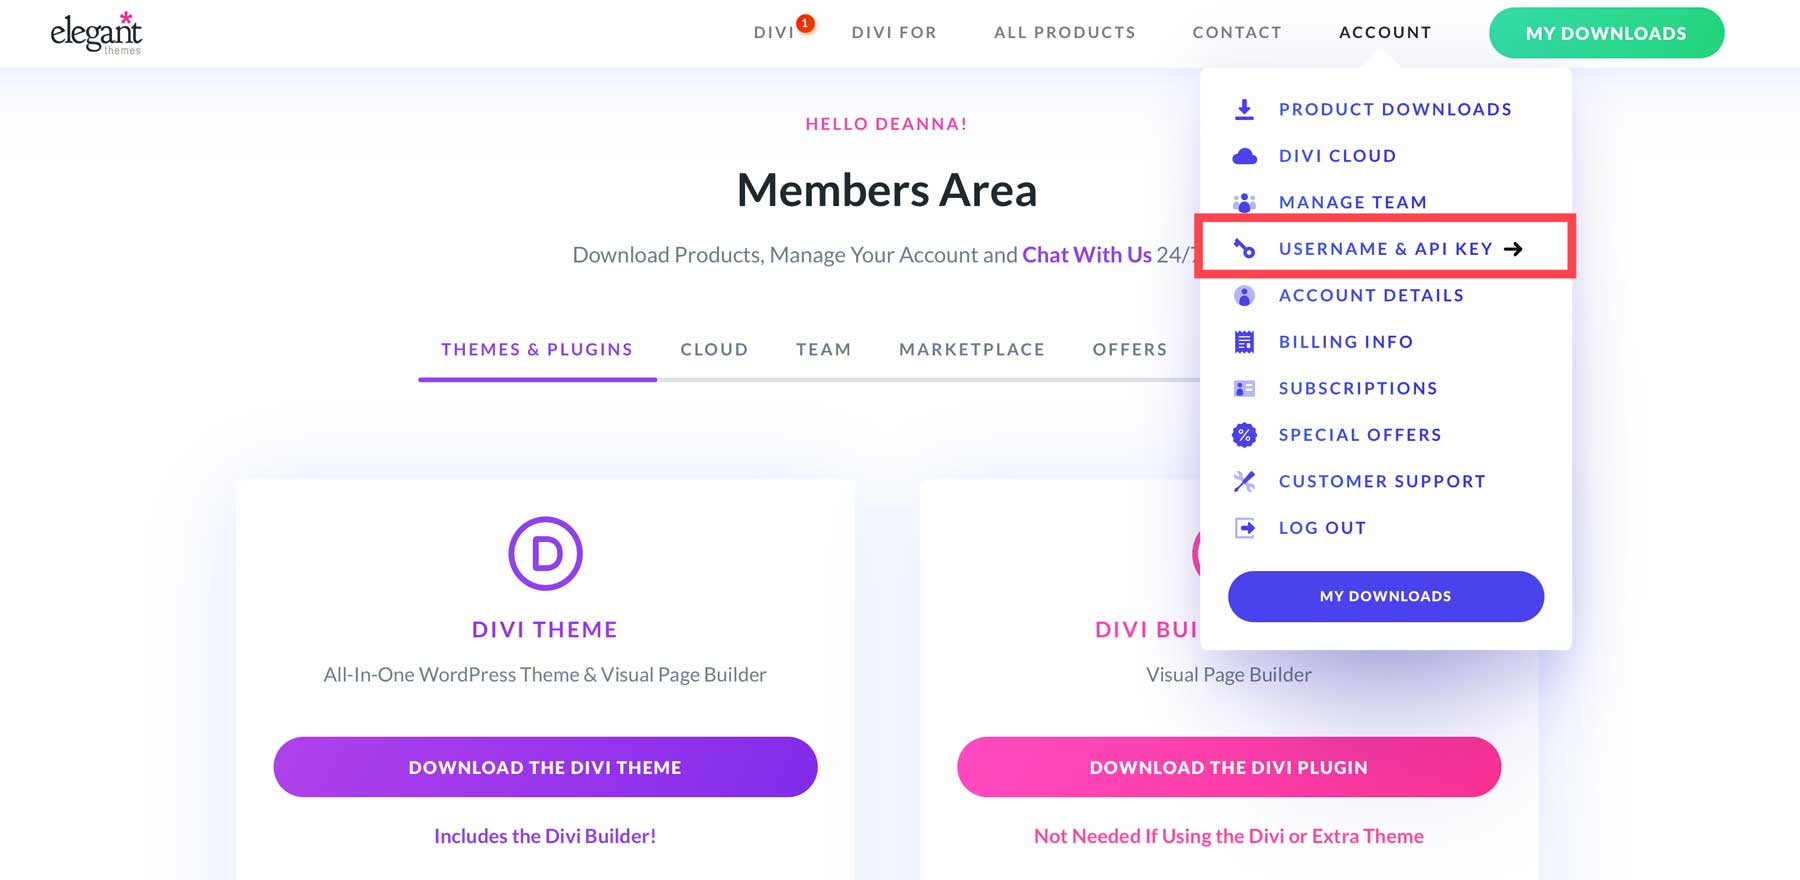
Create an API Key
To ensure Divi stays up to date and you have access to its newest features, you must generate an Elegant Themes API Key. Navigate to the Account Tab and click Username & API Key within the dropdown menu.
When the page refreshes, scroll down until you see the Generate New API Key button.
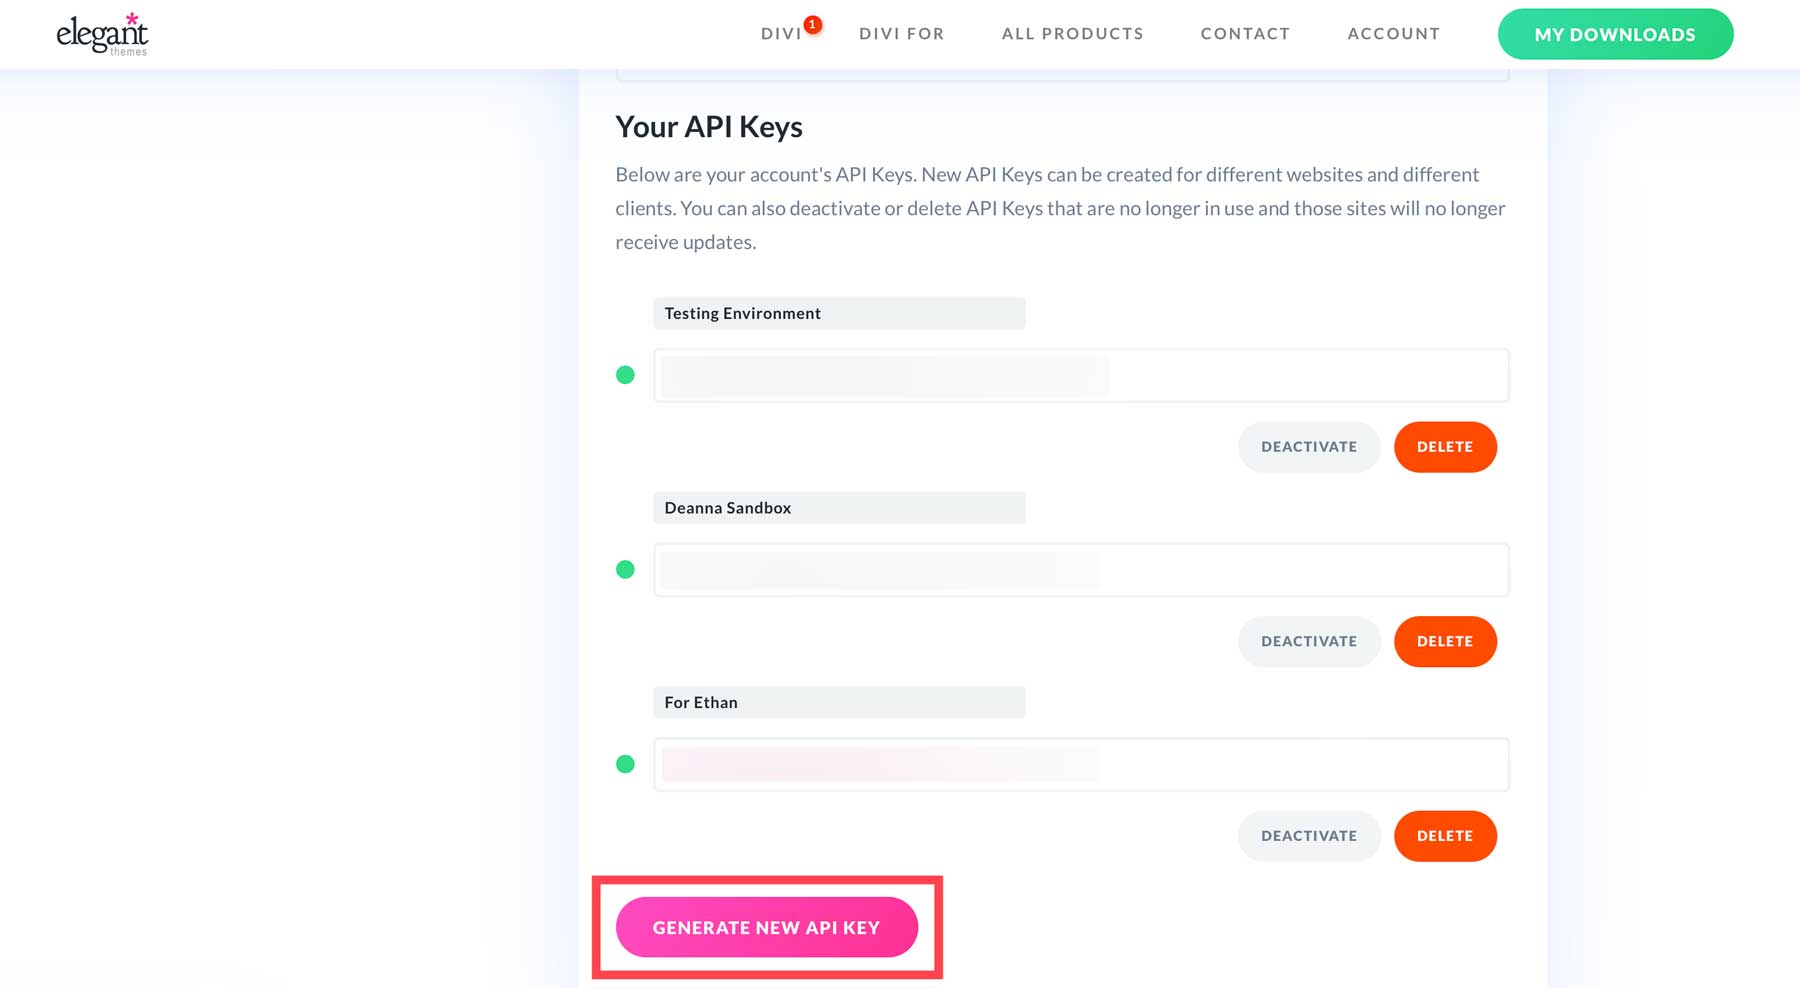
Give the key a label and copy the key to save it to a safe place. You’ll need it in the next step.
Login To Your WordPress Dashboard
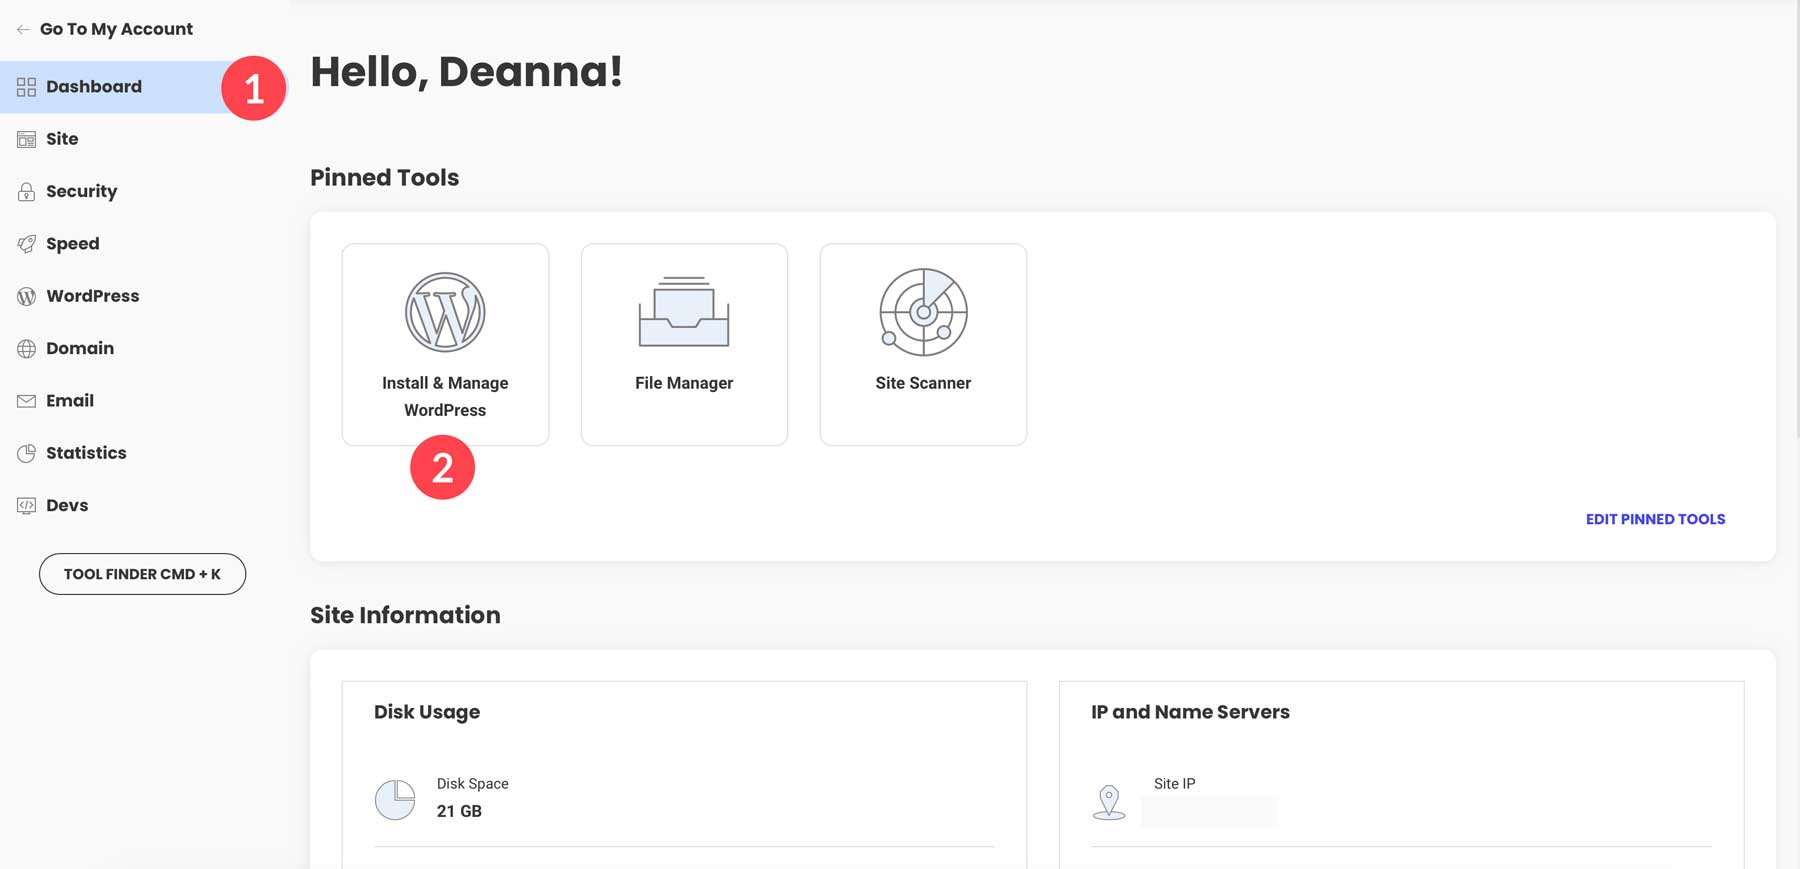
To add Divi to WordPress, navigate to your WordPress dashboard. In SiteGround, click on the dashboard tab, then install & manage WordPress.
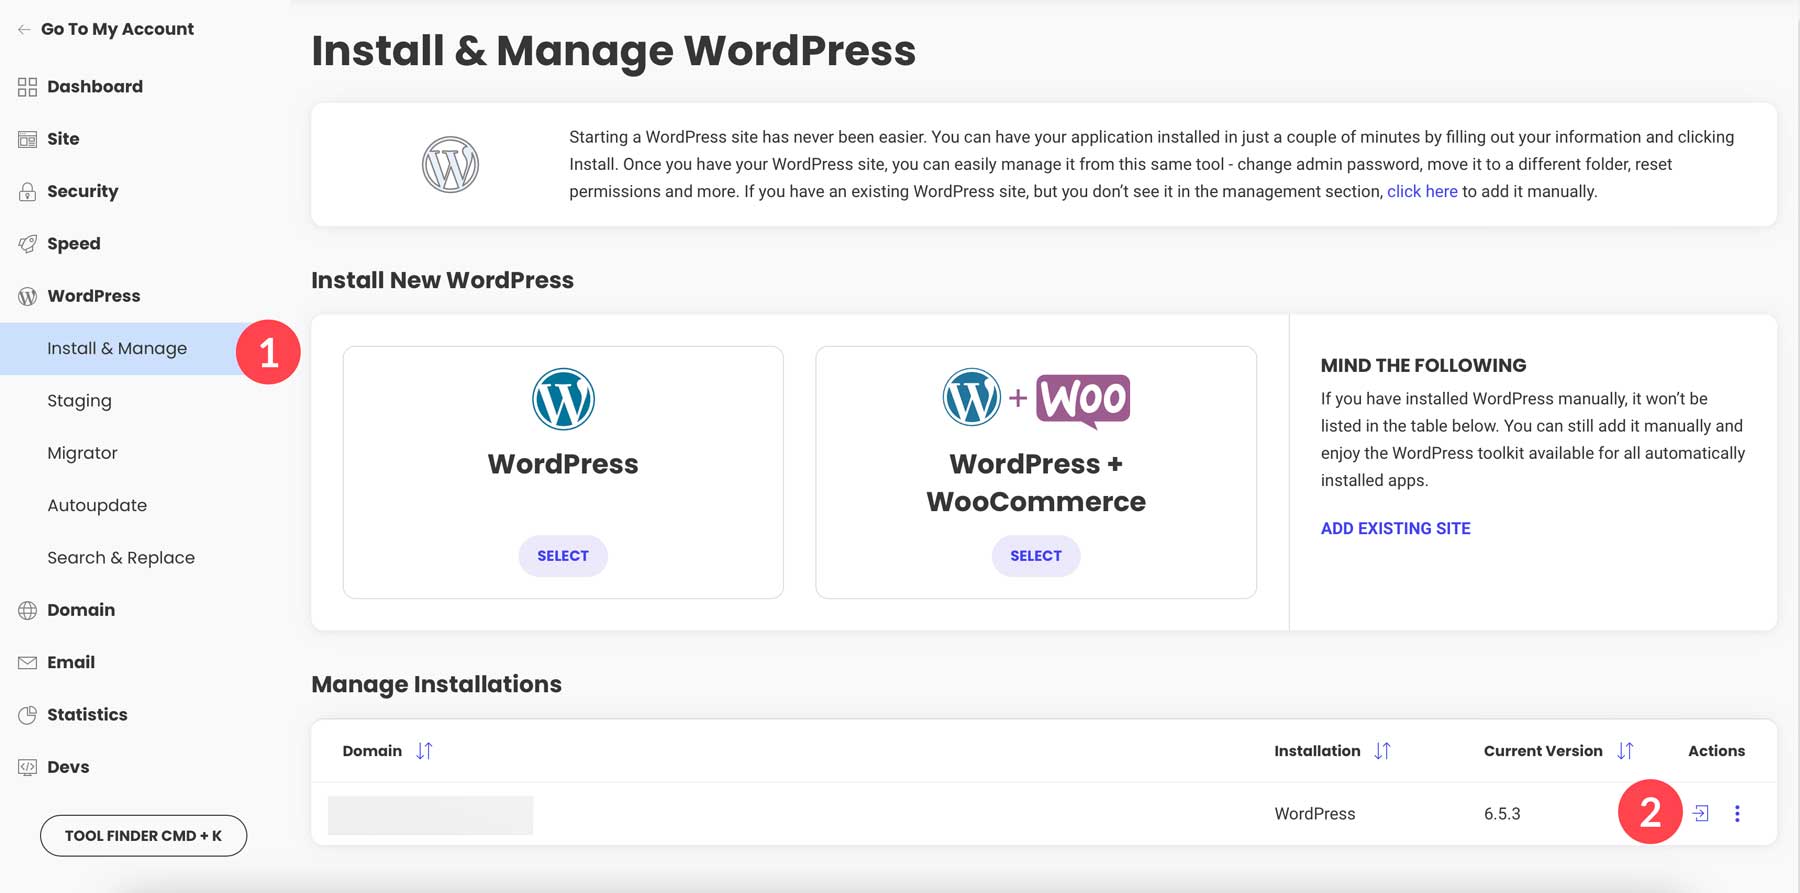
On the Install & Manage tab, click the icon under the Actions tab to access the admin dashboard.
Alternatively, you can navigate to yoursitename.com/wp-admin and input the login credentials you created when setting up your SiteGround account.
Installing Divi on WordPress
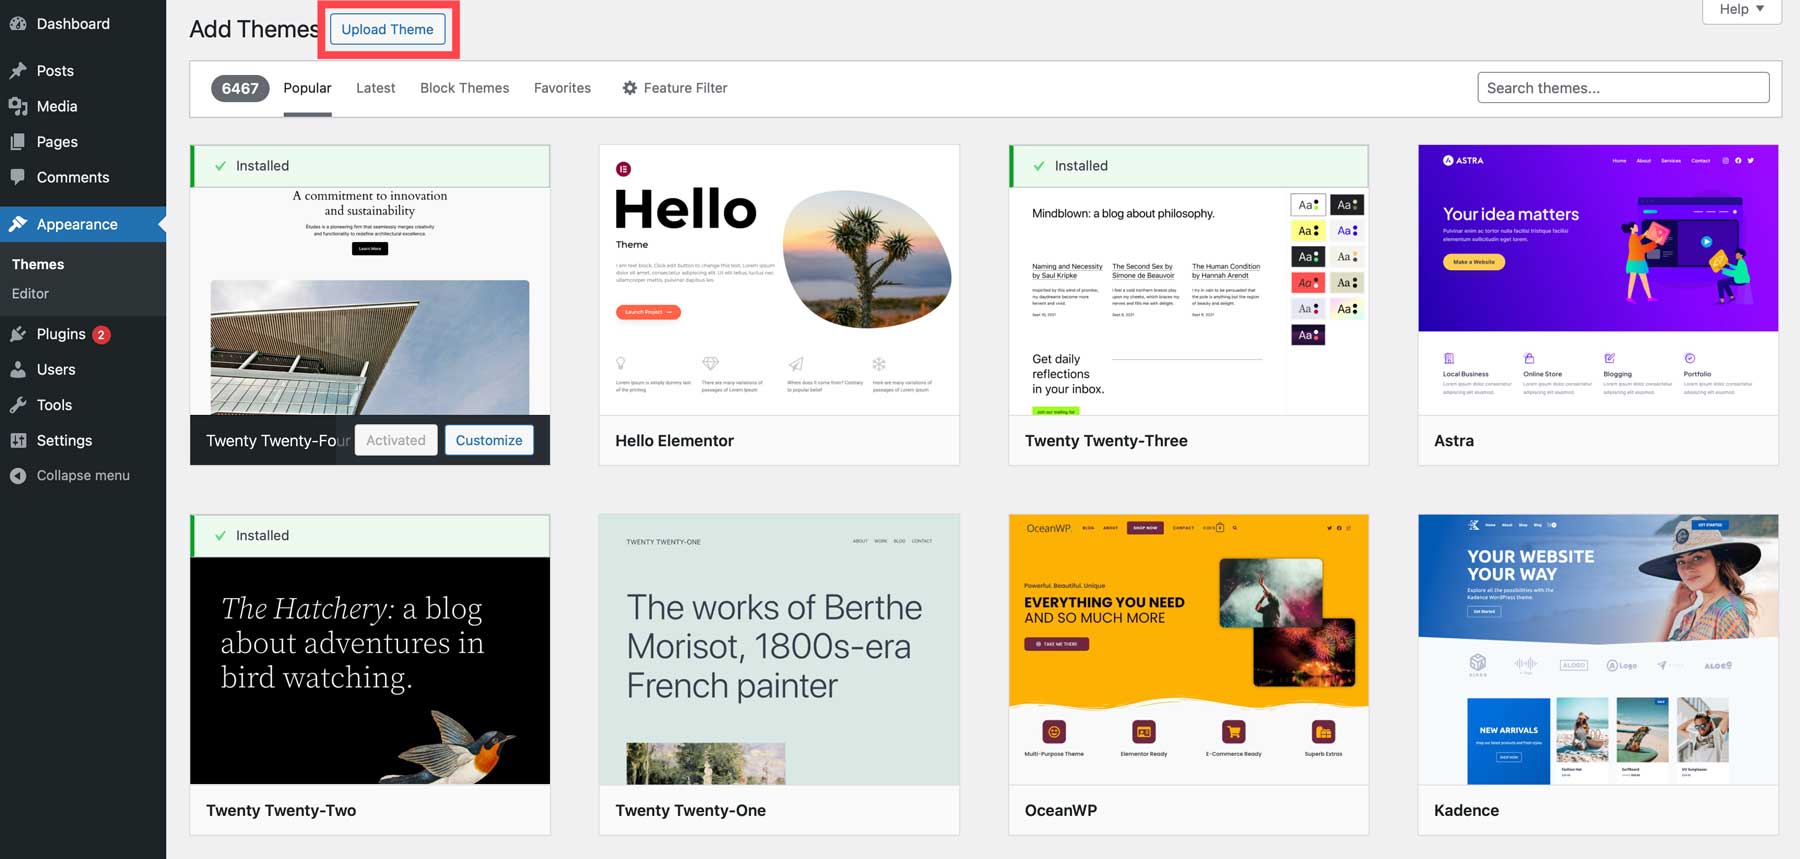
Once logged into WordPress, navigate to Appearance > Themes > Add New Theme.

To install Divi, click upload theme.
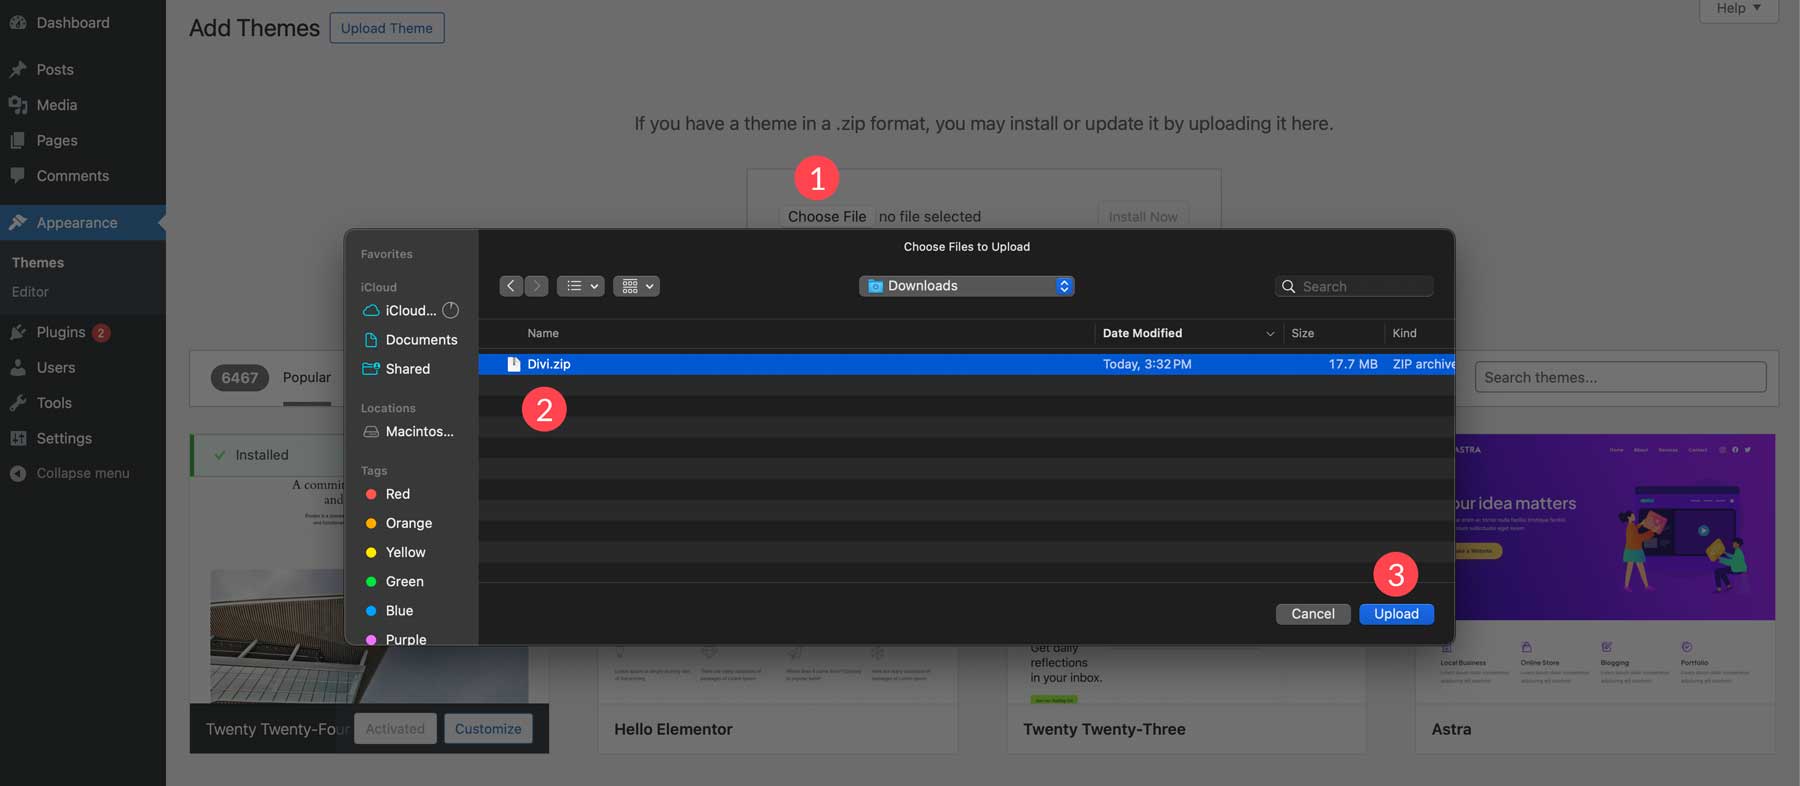
Choose the zipped Divi folder on your computer and click the upload button.
Click Install Now with the file loaded.
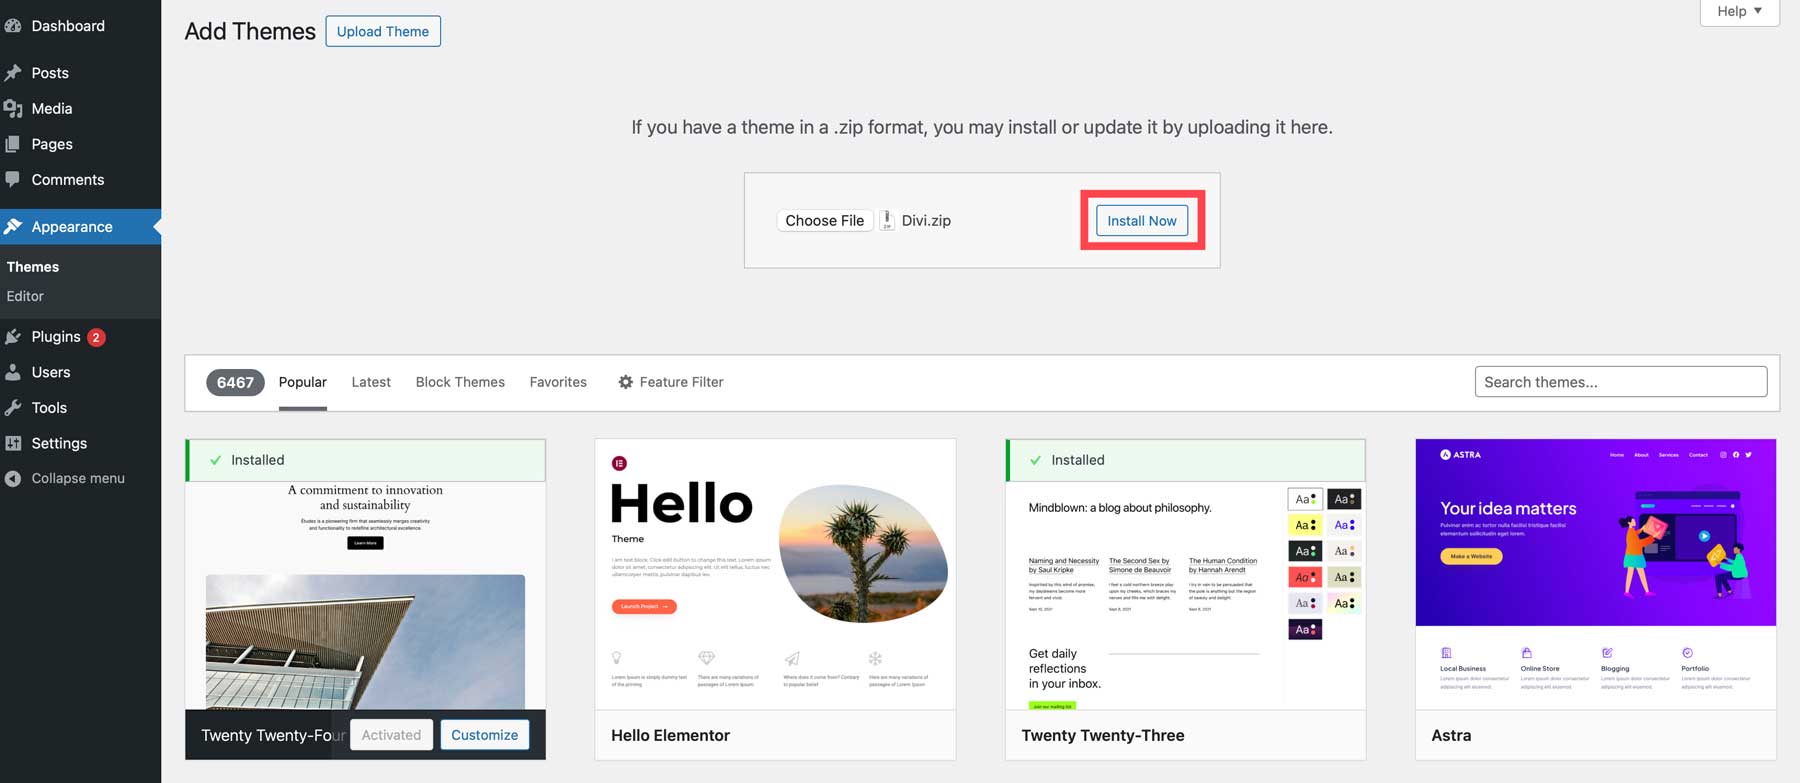
Finally, click the activate link to activate the Divi Theme on your WordPress website.

Adding The Divi API Key
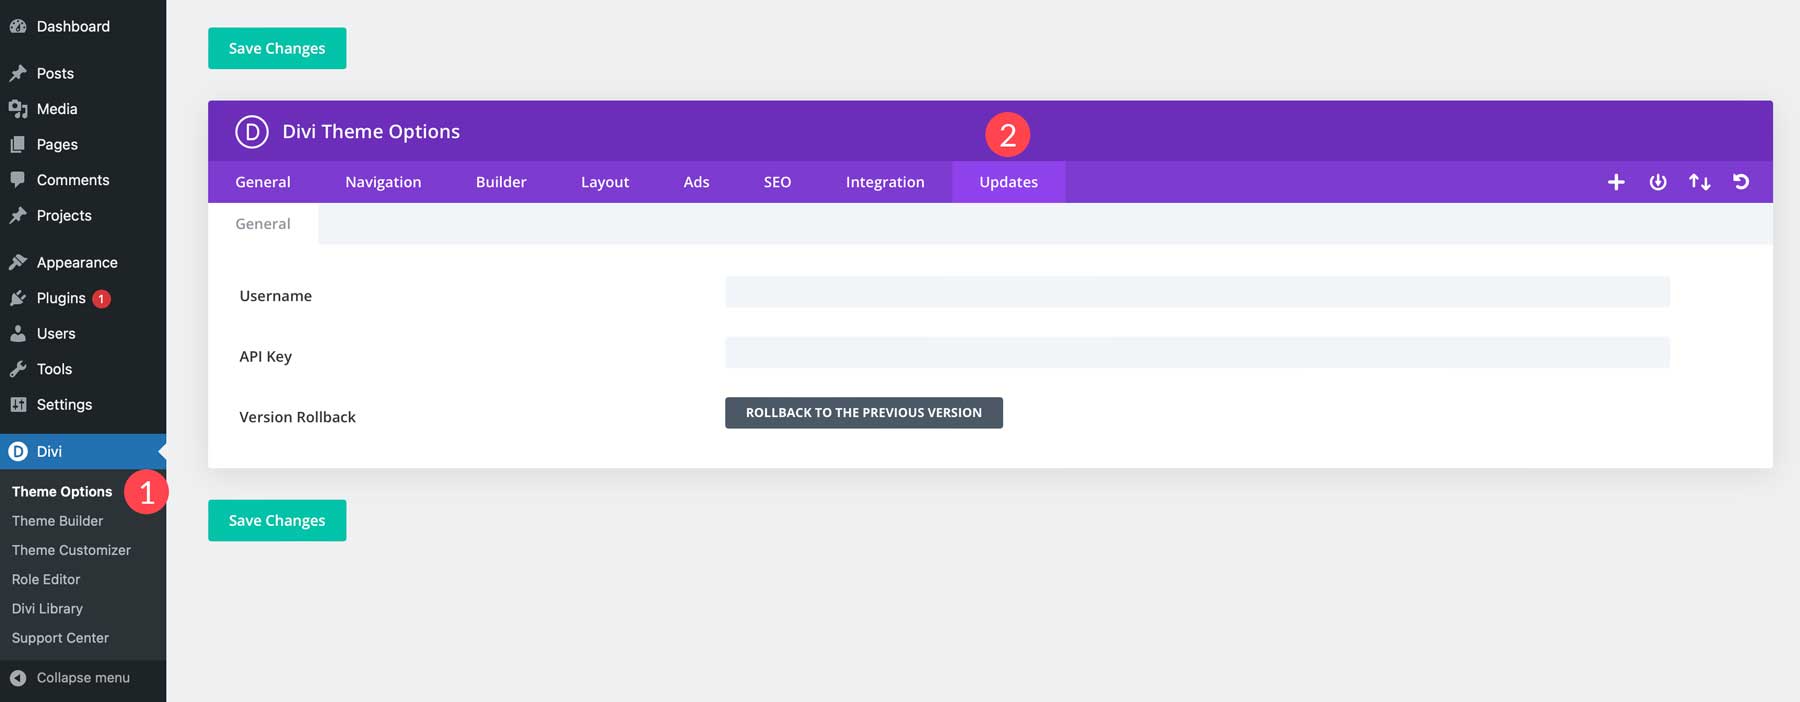
As previously mentioned, adding an API Key to your Divi website ensures that it stays up to date and grants you access to Divi’s library of premade layouts and future features. To install the key, navigate to Divi > Theme Options > Updates.
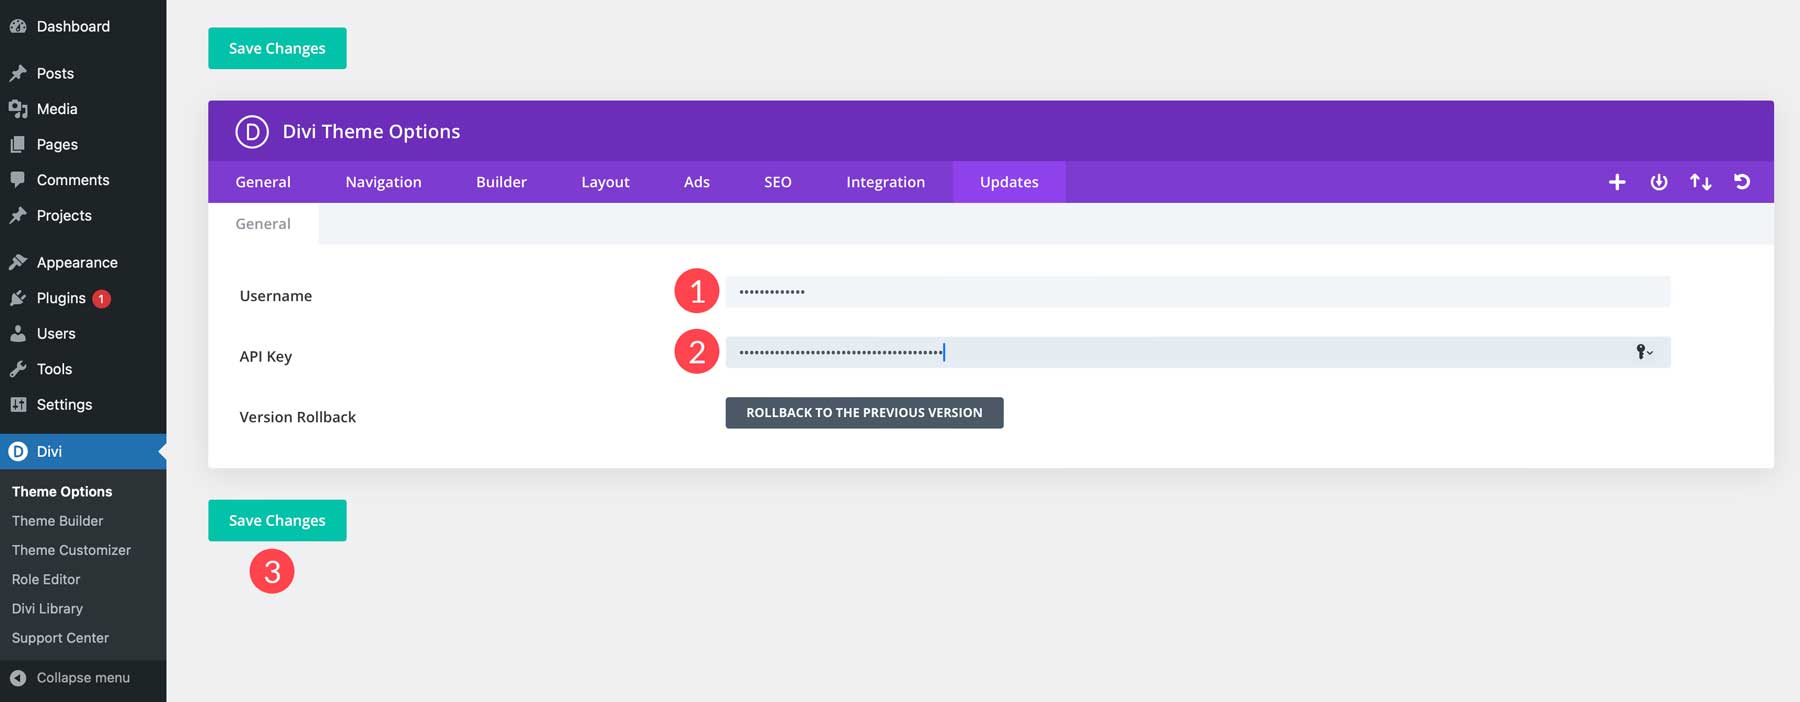
Finally, retrieve your username and API Key and paste them into their associated fields. When complete, click Save Changes.
Step 5: Setting Up Your Website’s Structure
Before getting into your church website’s design, planning your website’s structure and navigation is crucial. This acts as a roadmap to guide visitors to the information they seek. Having a well-organized website is beneficial for a couple of reasons. First, visitors should be able to easily find what they want. A clear structure avoids confusion and frustration, encouraging them to stay on your website. A messy, unorganized site is terrible for bounce rate, which can really hurt your position in the search engine ranking pages (SERPs).
Another reason you should plan your site’s structure is for SEO purposes. Search engines like Google favor websites with clear structures and well-organized content, which ensures it’s easier for people to discover your church online. Some essential pages to consider are home, about, ministries, sermons, events, giving, and contact. While this is just a starting point, it gives you a general idea of your site’s structure.
Creating Your Church Website’s Pages
Creating a page with WordPress is easy. Start by navigating to Pages > All Pages > Add New Page.

Once the page refreshes, give the page the title of Home and then click the Publish button.

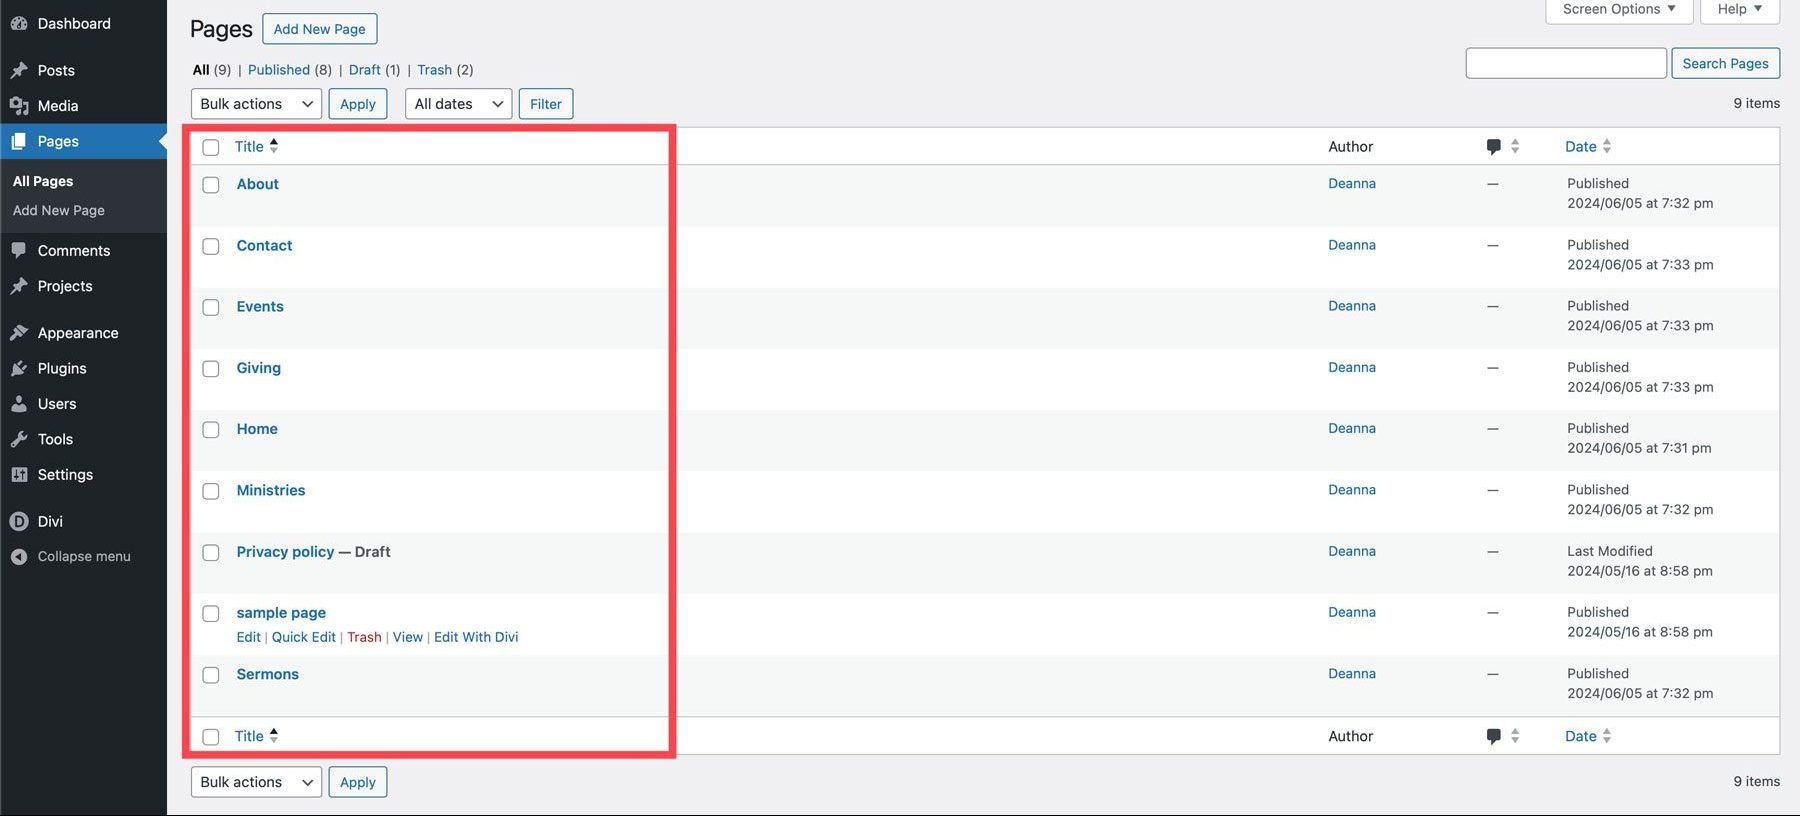
Repeat the steps above to create the remaining pages for your church website. Once complete, your page structure should look similar to the screenshot below:
Creating a Navigation Menu
The next step in our how to make a church website with WordPress guide is creating a navigational menu. Navigate to Appearance & Menus.
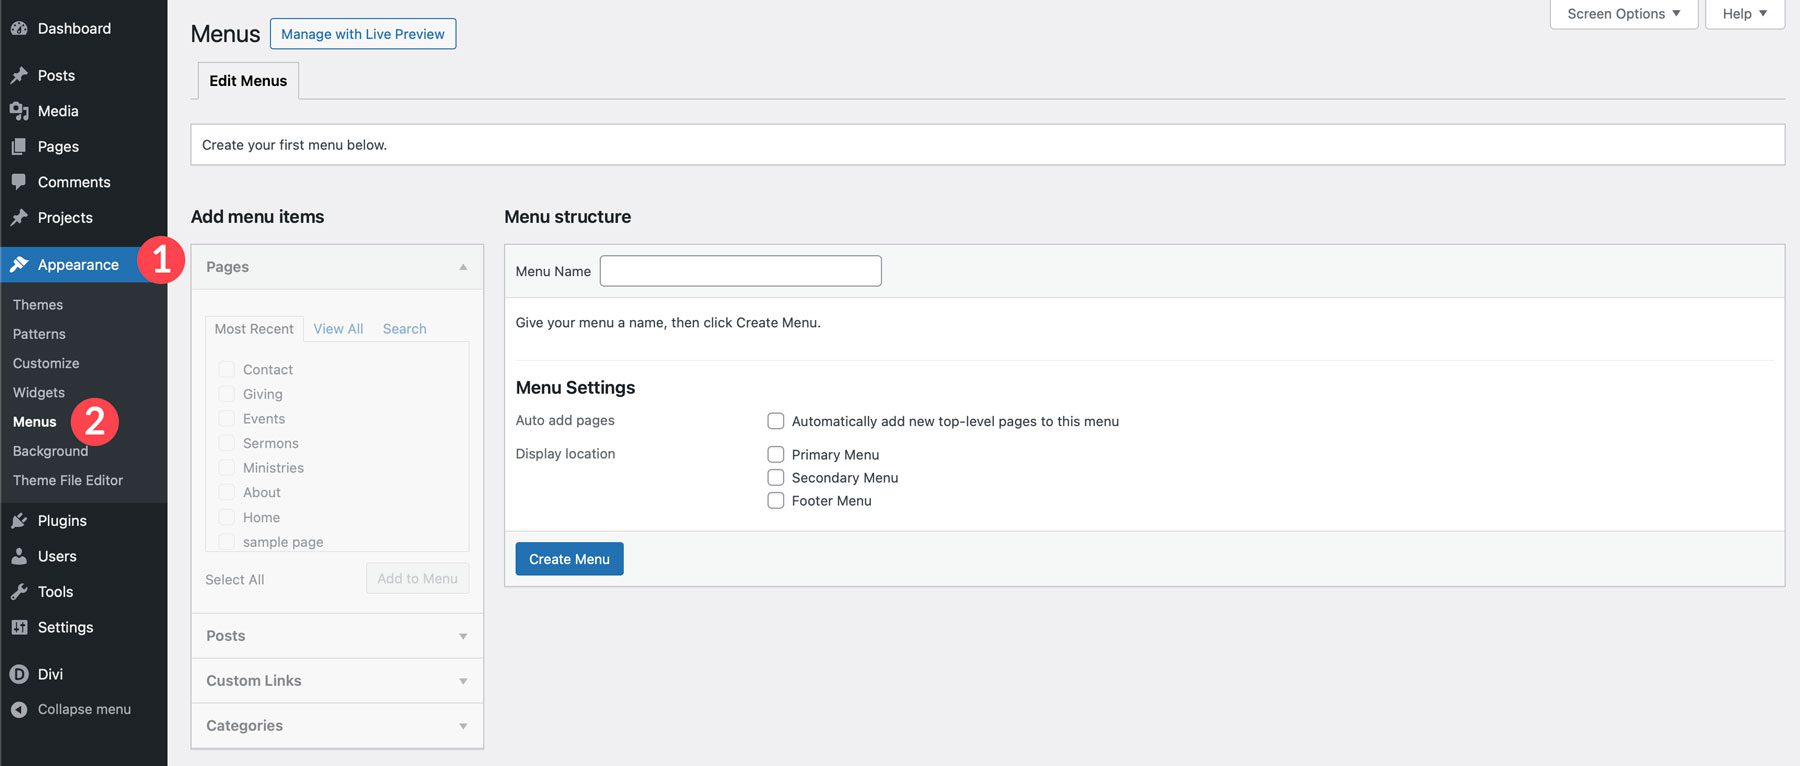
Next, give the menu a name, such as main navigation, assign it to the primary menu location, and click the Create Menu button.
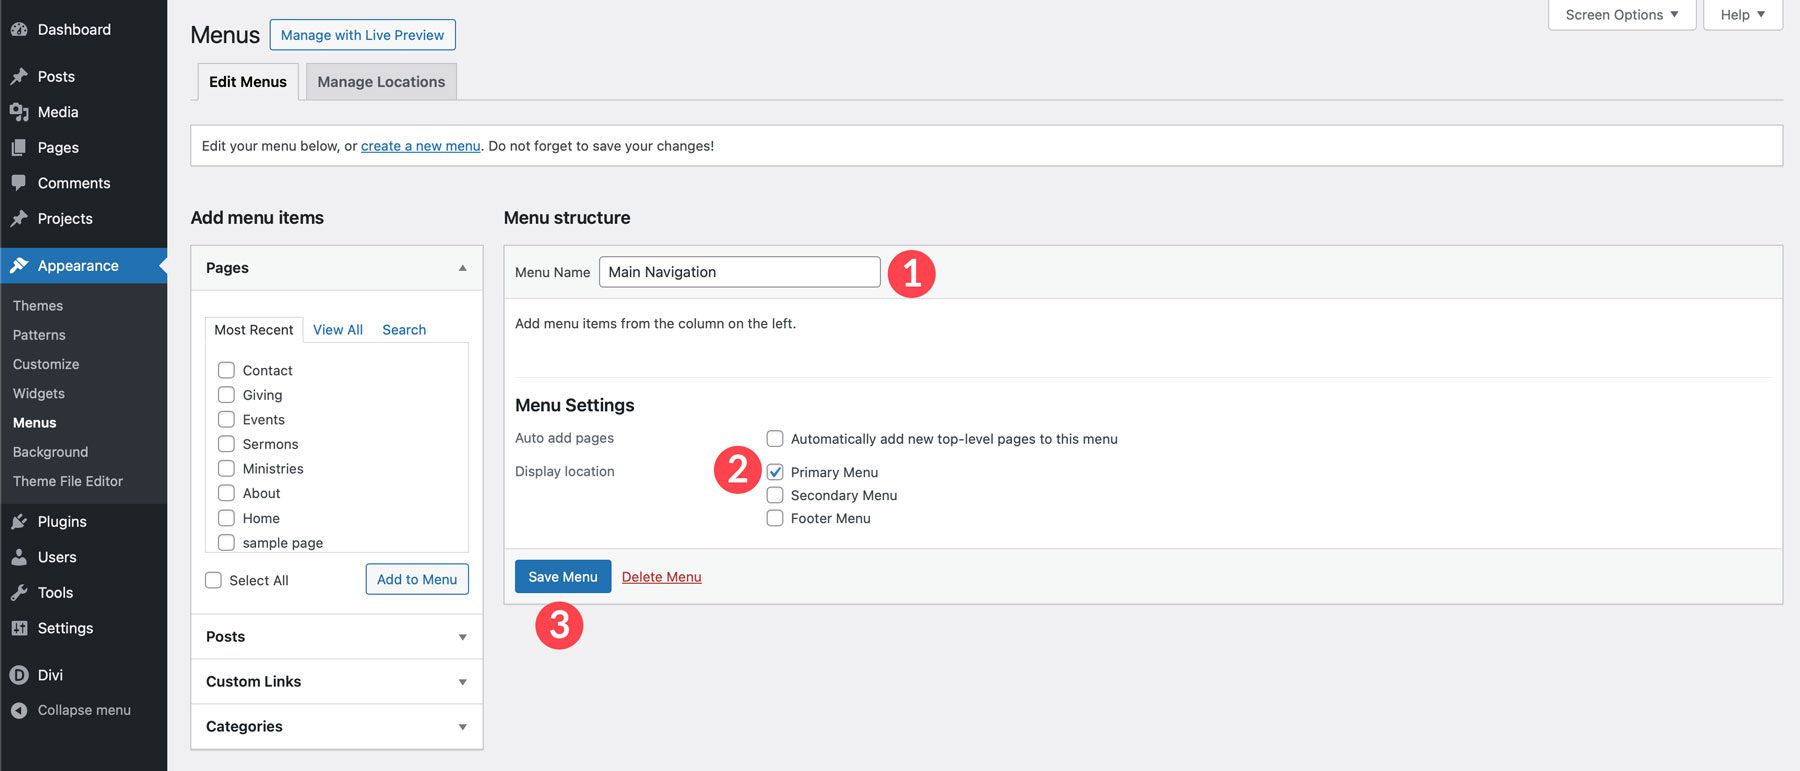
To add links to the menu, click to select each page (or select all) and click the Add to Menu button.
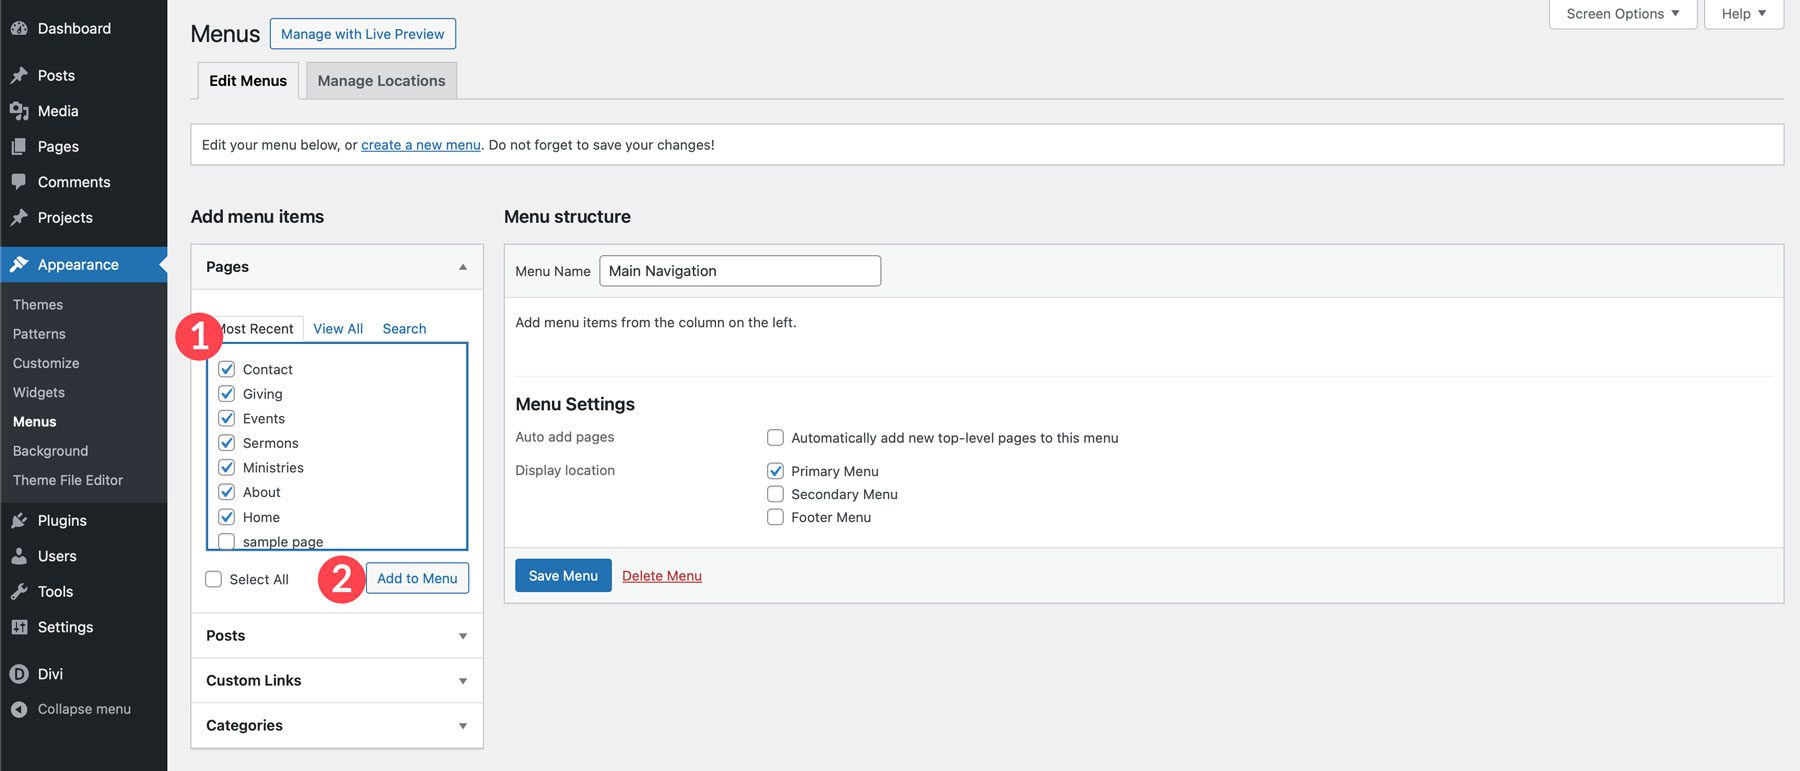
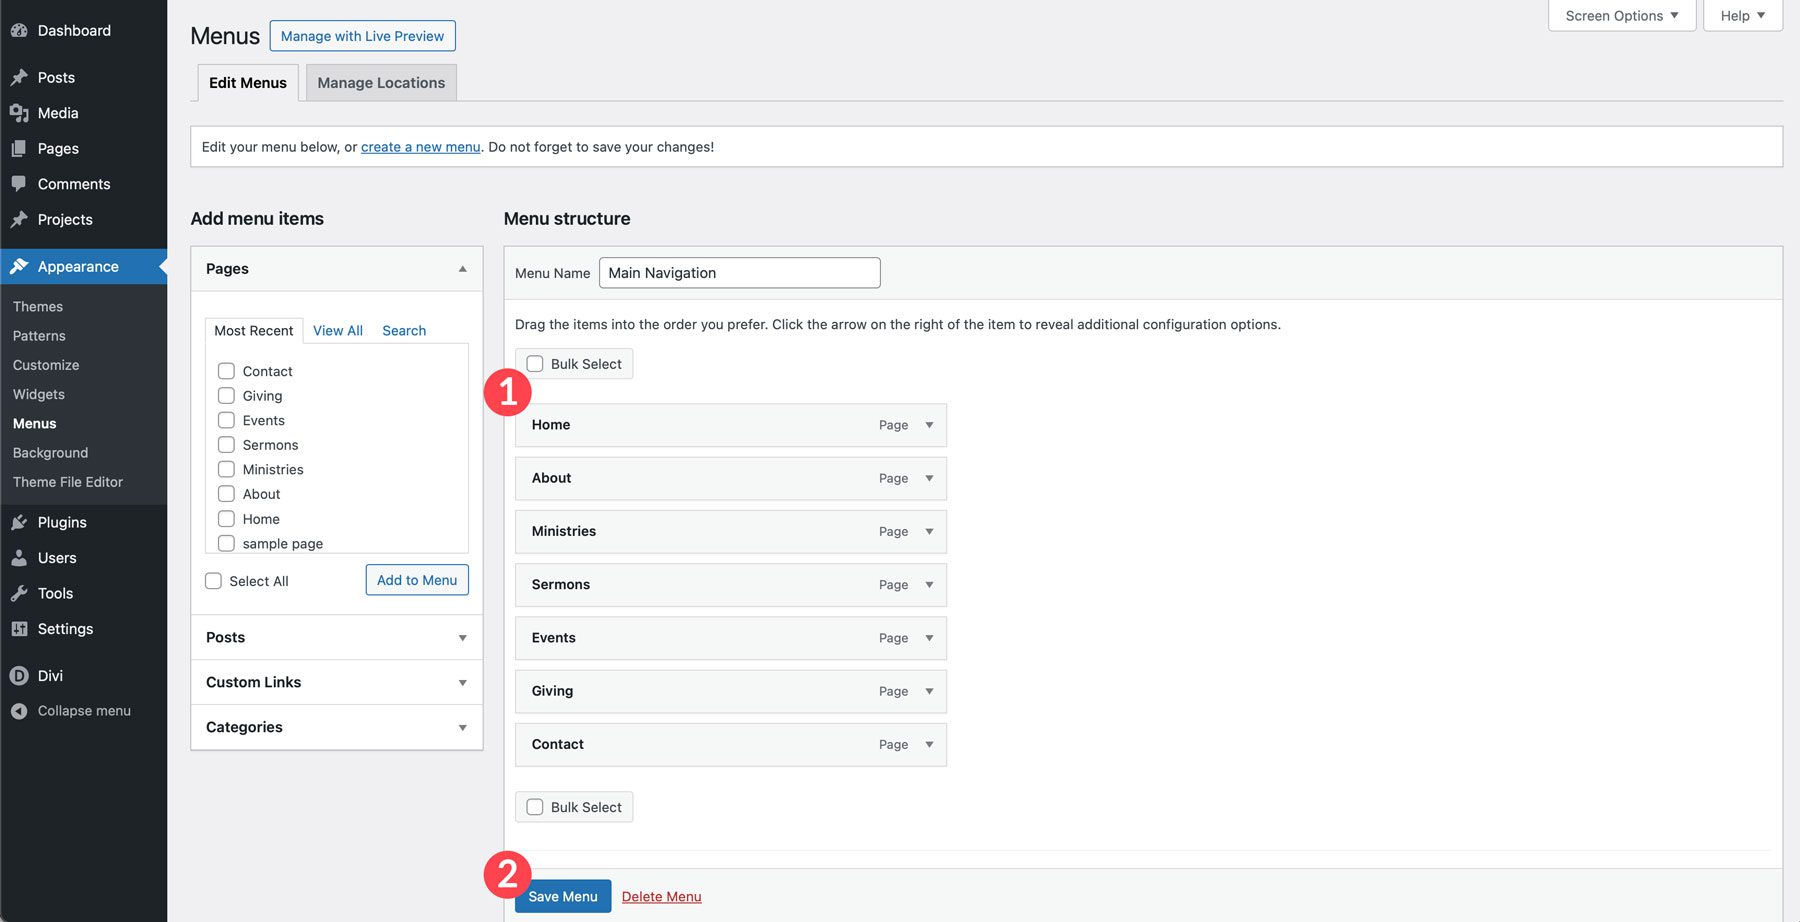
You can rearrange the links in the order in which you wish them to appear. Once you’ve arranged the links how you want, click the Save Menu button to set your primary menu.
How To Set A Home Page In WordPress
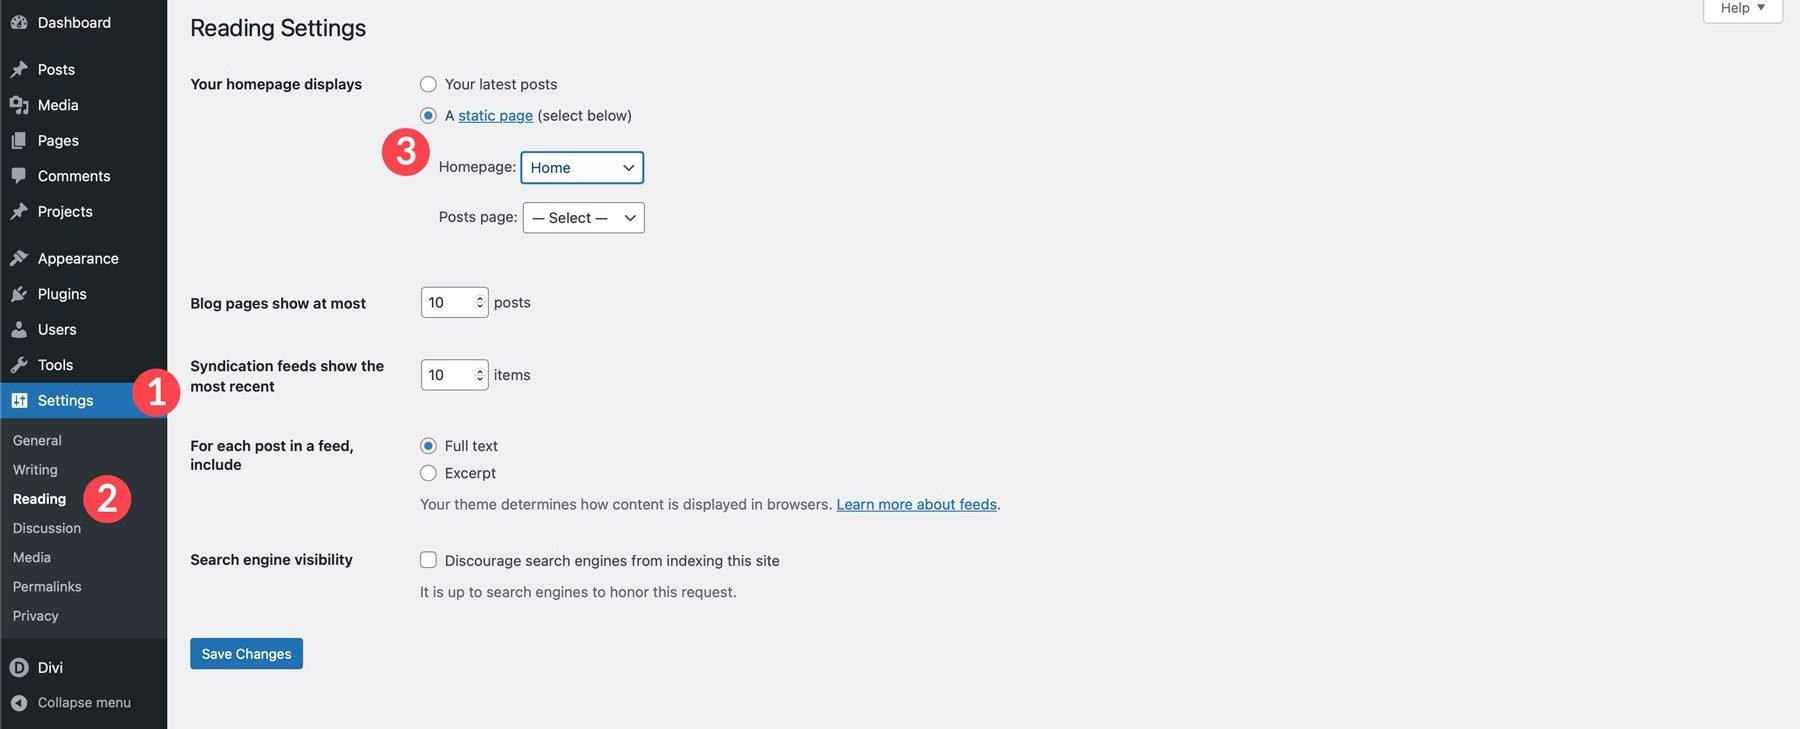
Before we start creating our pages, we need to set up a home page. Navigate to Settings > Reading. Click the radio for a static page and select the Home page.
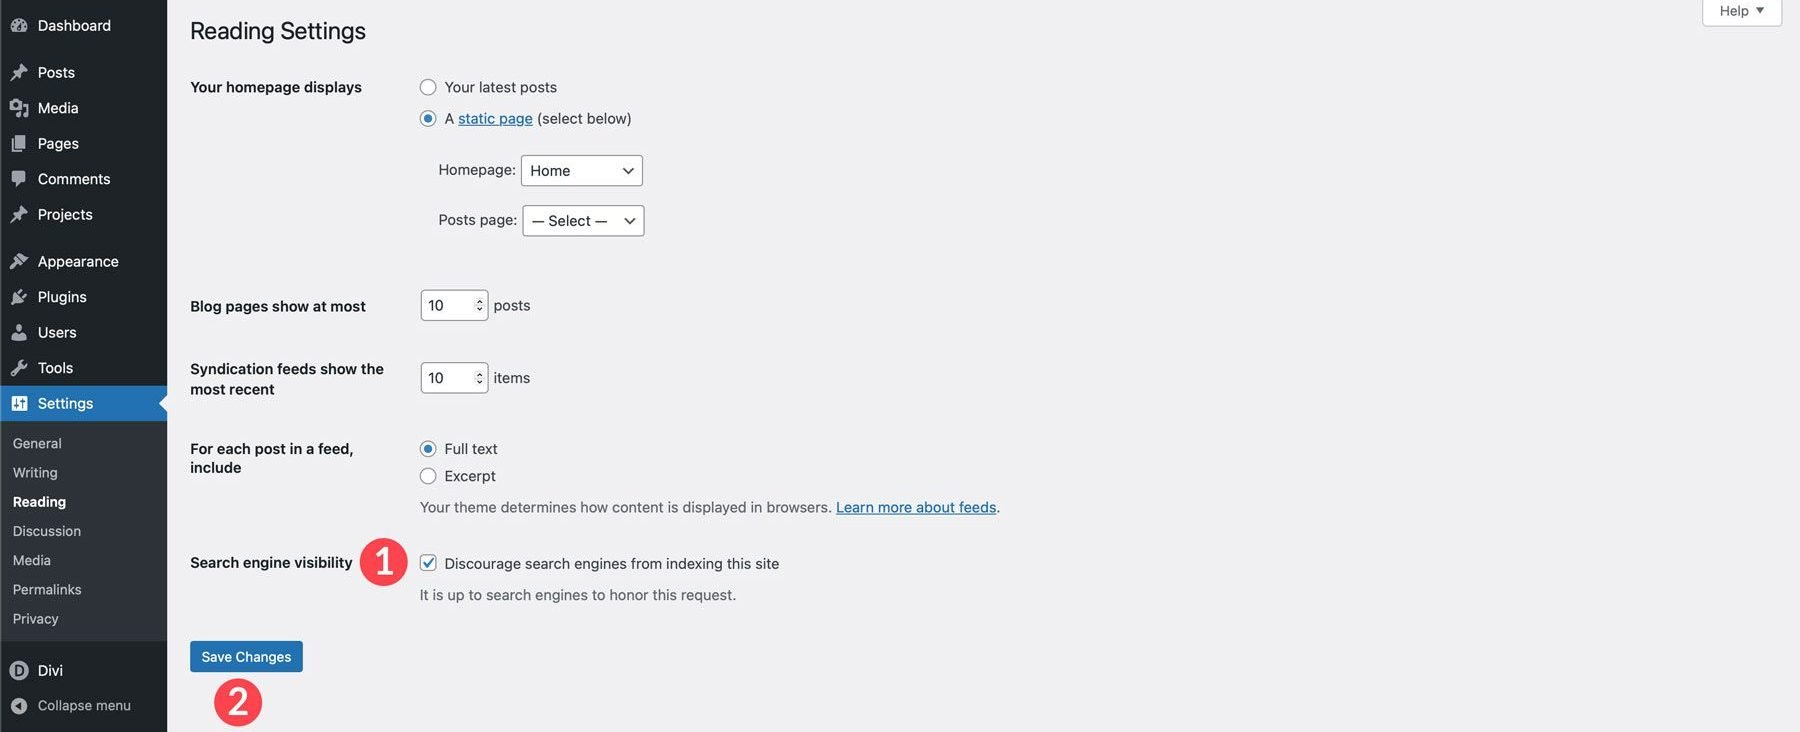
It’s also a good idea to check the search engine visibility checkbox to ensure your site won’t be crawled until you launch. Once those settings have been added, click the Save Changes button.
Step 6: Create A Web Page With Divi AI
Divi AI is a great tool for WordPress users looking for a quick way to write content, generate images, and build full web pages. Divi AI is engrained within the Divi theme’s framework, giving it a unique benefit over other AI website builders. It understands your website, so it can easily create on-brand content. With Divi AI, you get unlimited text, image, code, and page generations for one low monthly price of $16.08 (billed annually).
Let’s start by creating a beautiful home page for your church. Navigate to Pages > All Pages. Either click on the title of the home page or hover over it to reveal the submenu and click edit.
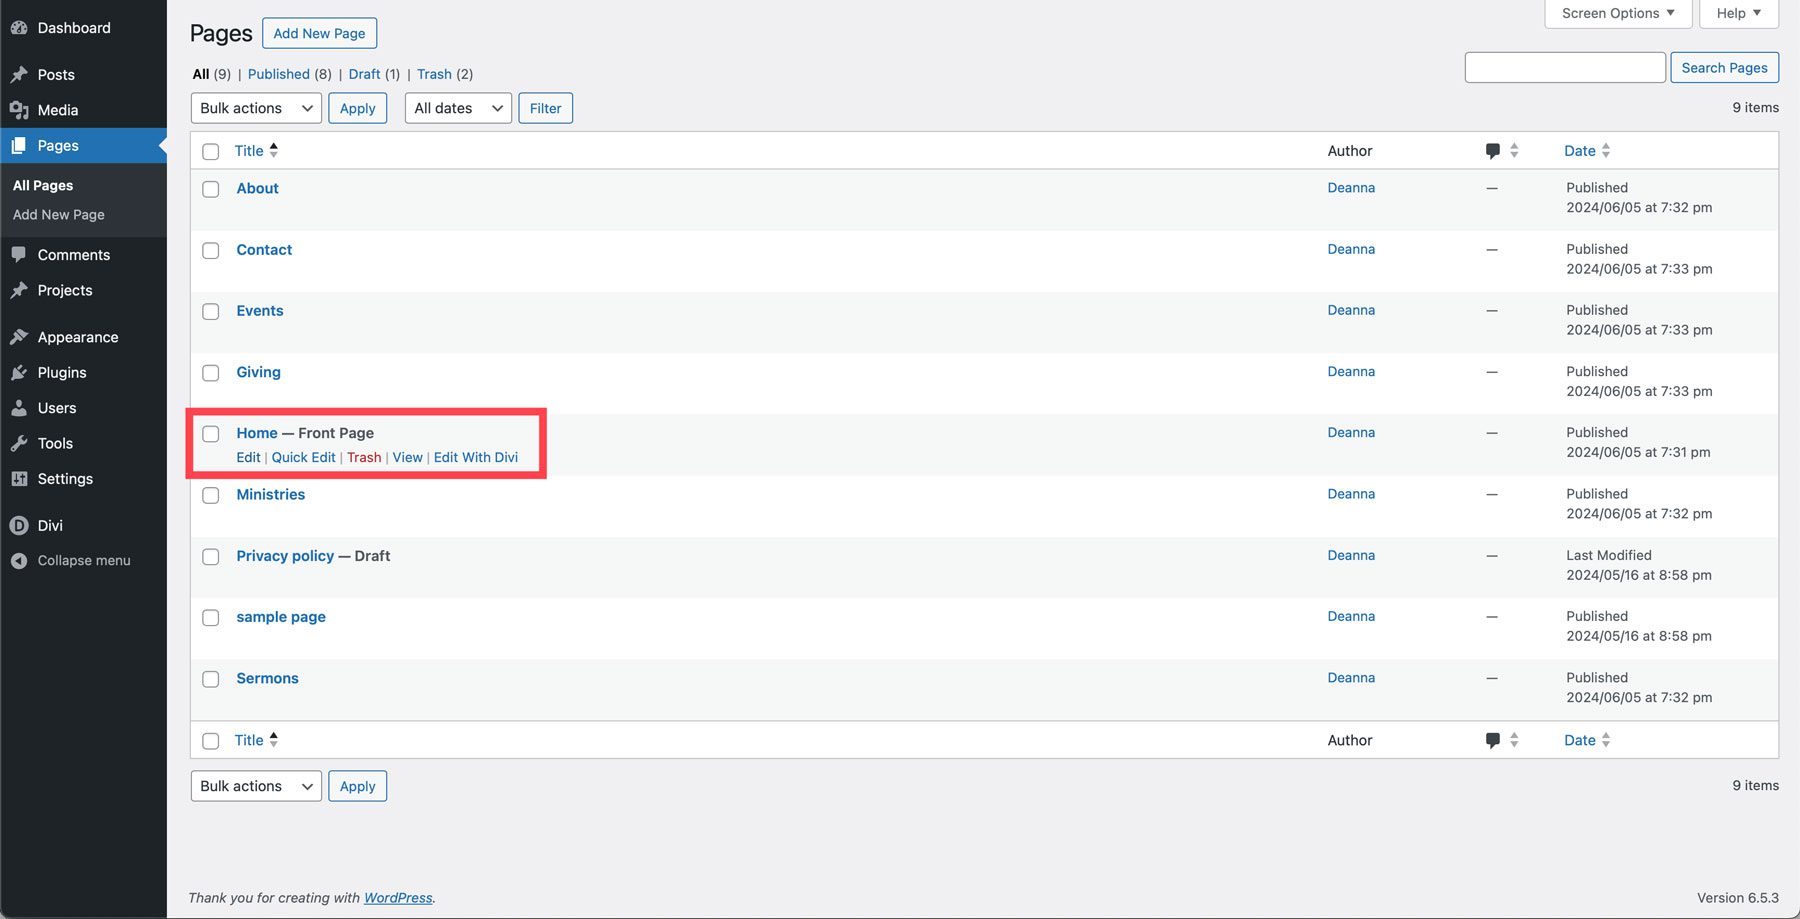
Click Edit With The Divi Builder when the page refreshes.

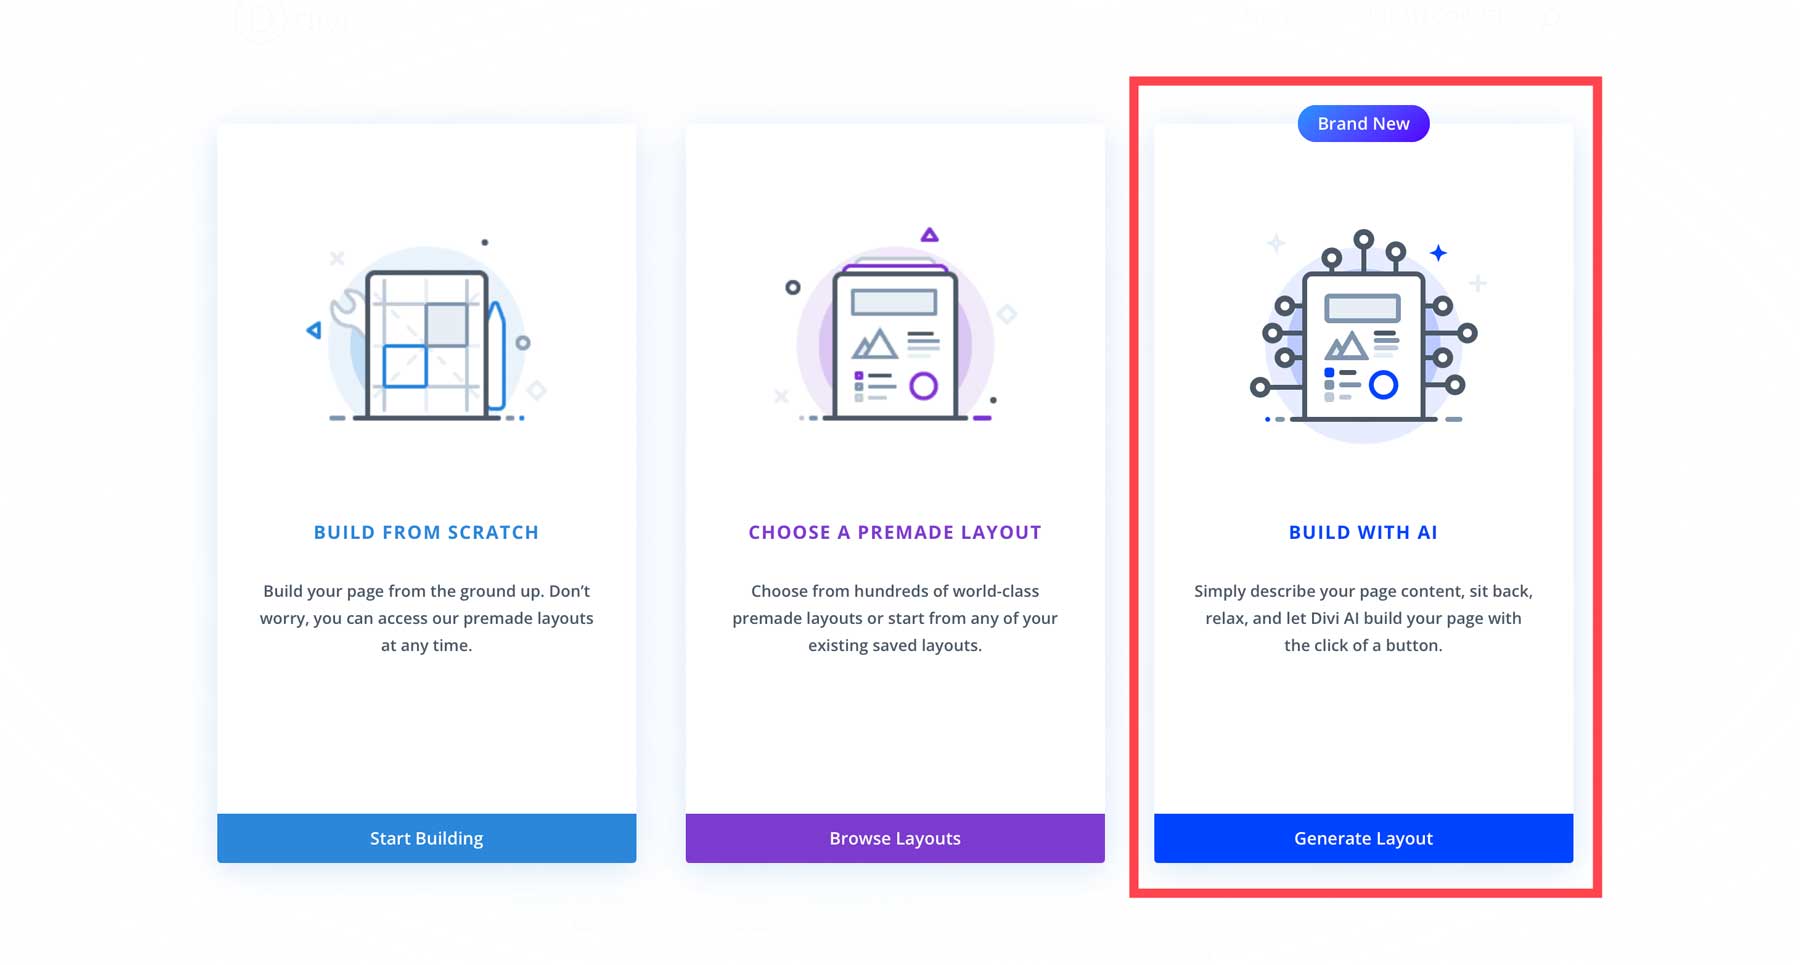
You’ll have three options: Build from scratch, Choose a premade layout, or Build with AI. Select Build With AI.
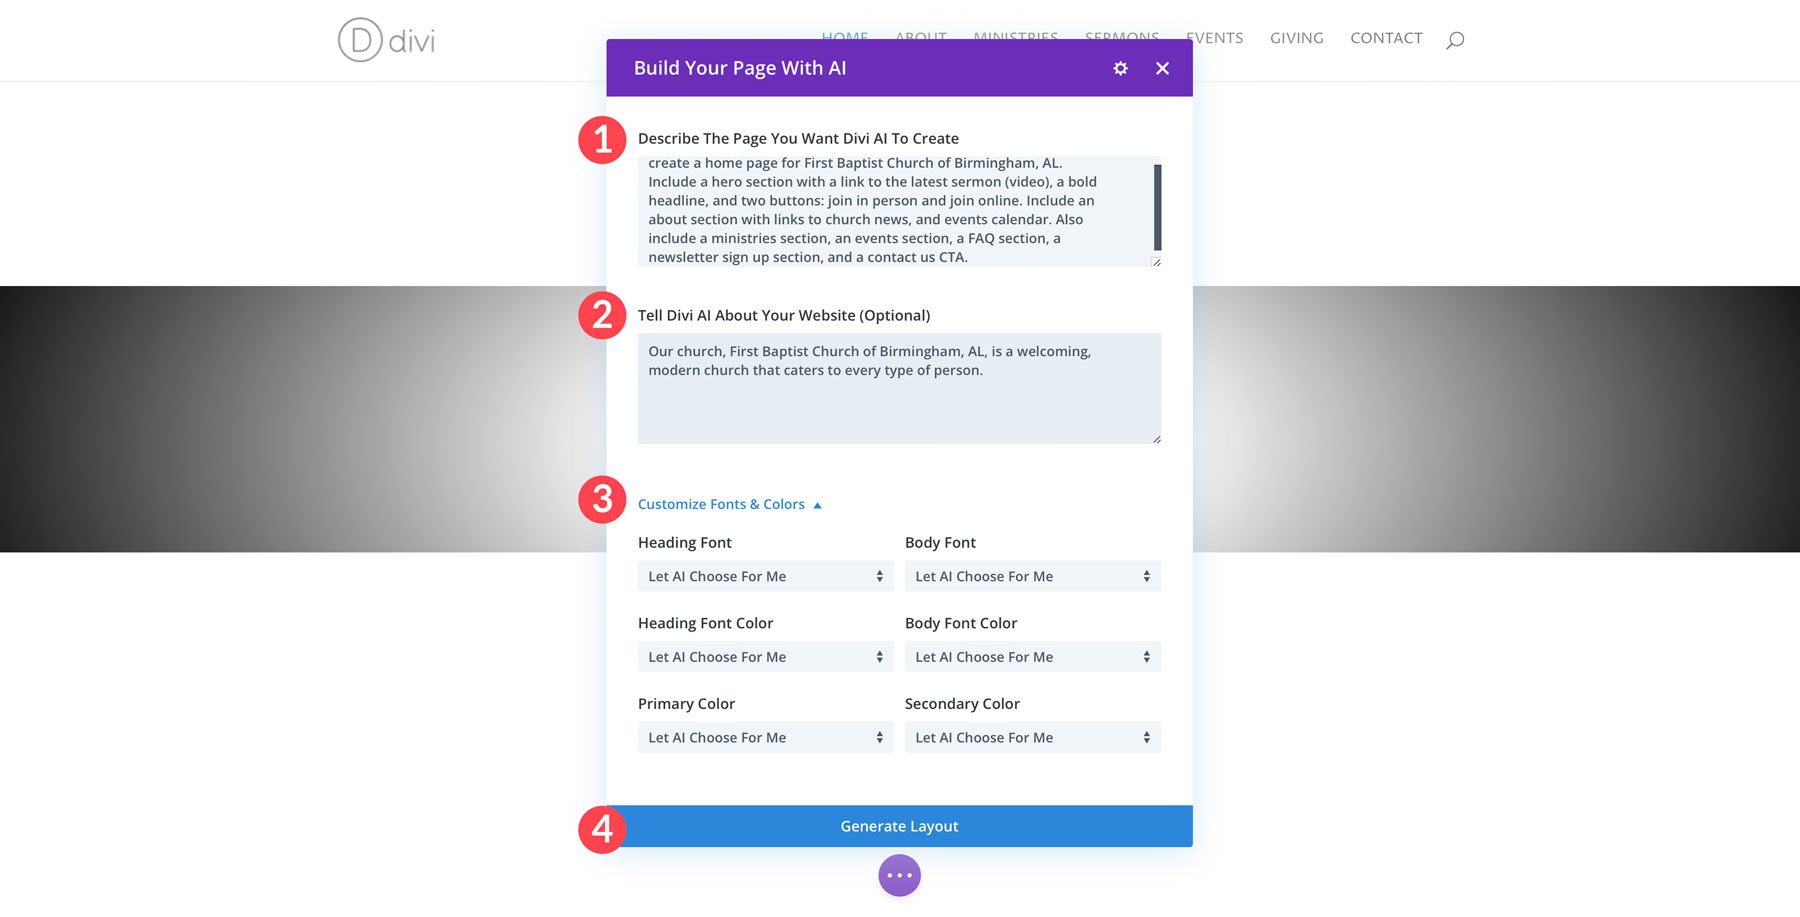
On the next screen, you will describe the type of page you want to create. You can also provide Divi AI with additional information, such as a mission statement, business name, or other important information you want the AI to know. Finally, you can customize the fonts and colors for your page. You can choose a specific font, let AI choose one, or opt for the website defaults. Since we haven’t specified any fonts and colors, we’ll select Let AI Choose For Me. Once you’ve added all the needed info, click the Generate Layout button.
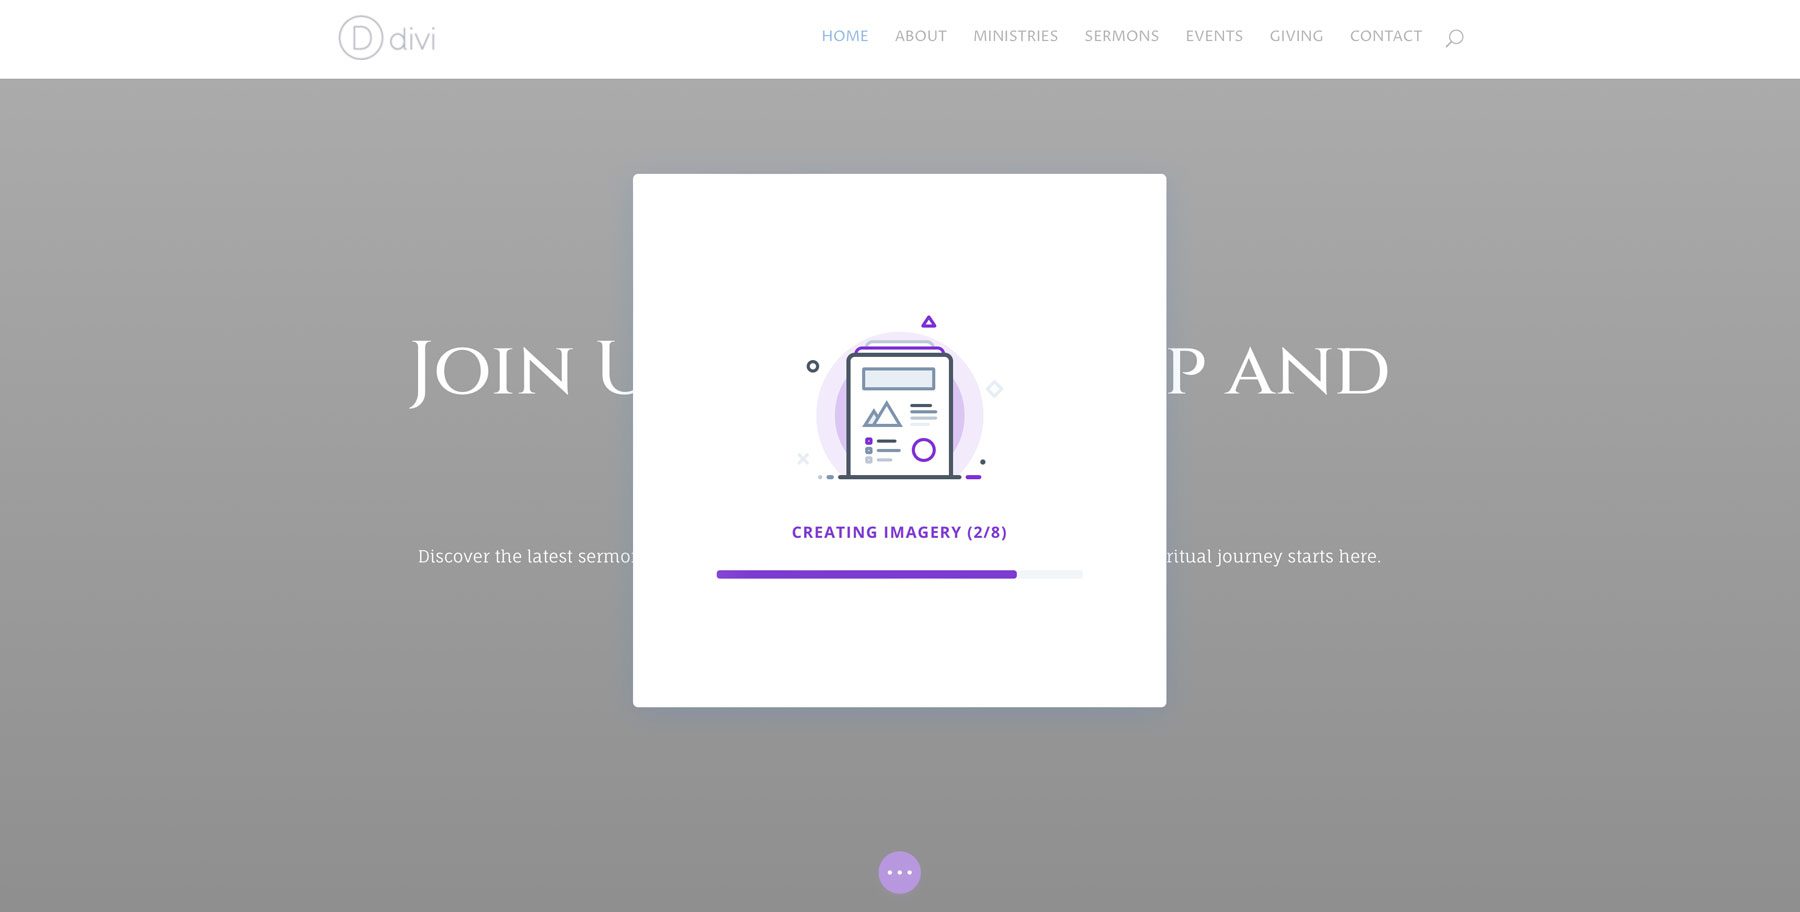
Divi AI will create the structure of your page, complete with Divi design elements, text, and images. You can watch the process as it unfolds.
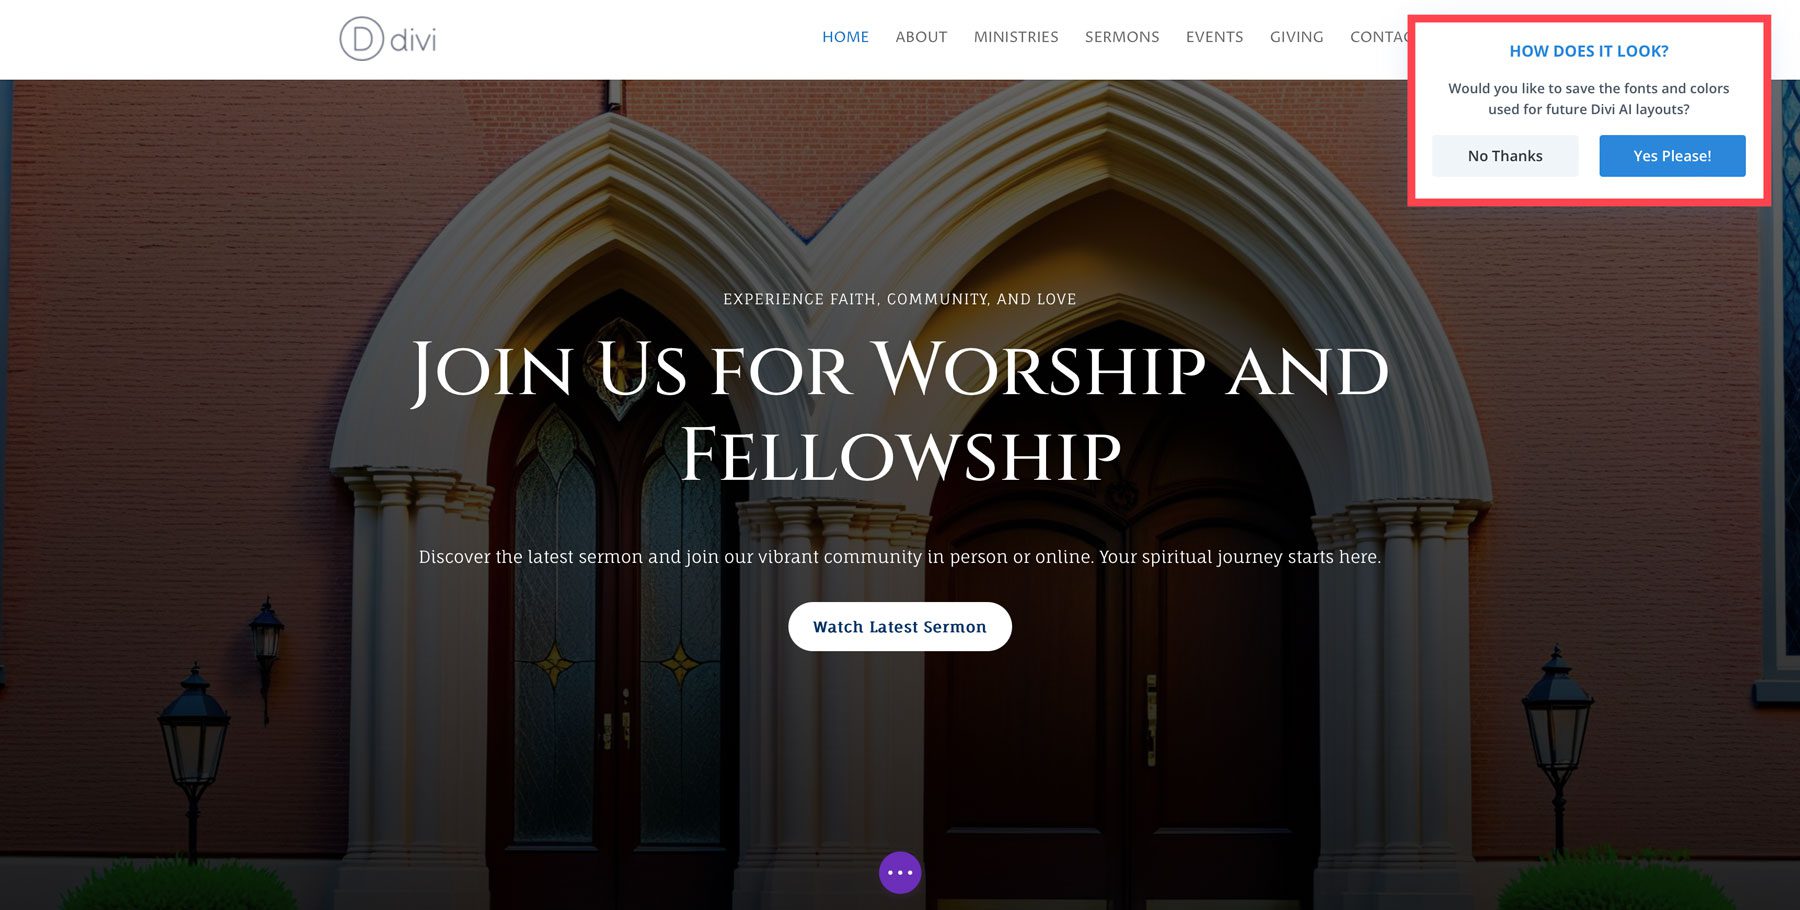
Once Divi AI completes the layout, you can save the styles and apply them to any additional pages you create.
Repeat the steps outlined above to create the rest of the pages for your website.

Use a Premade Layout
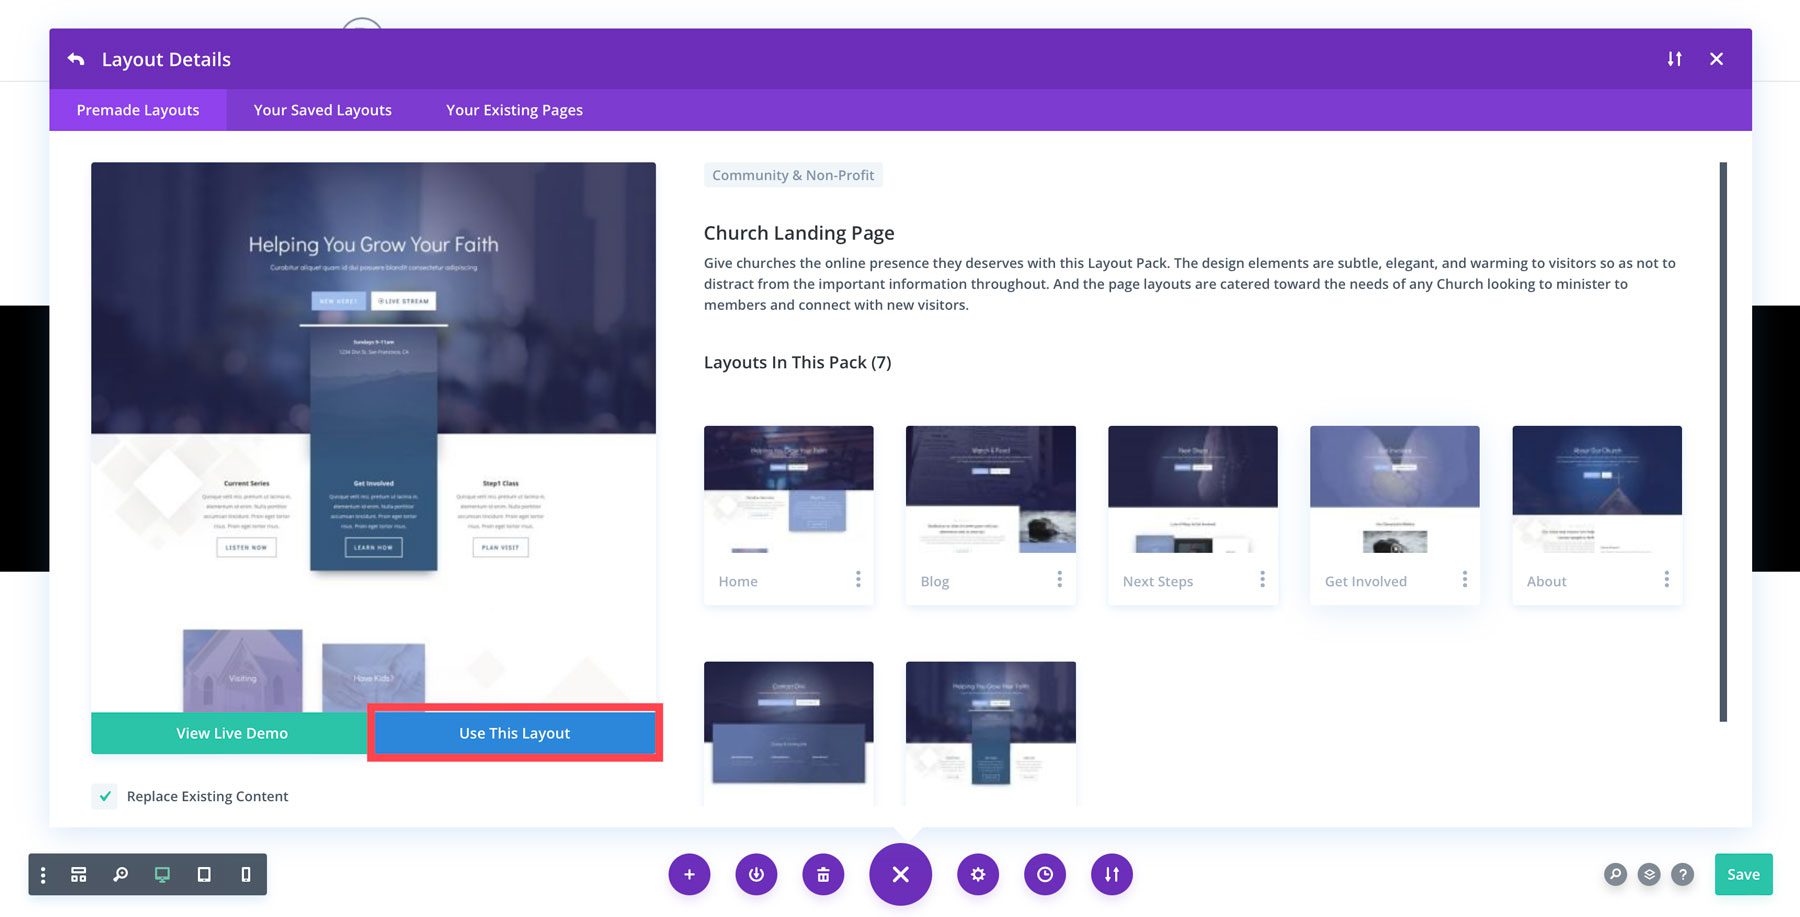
Alternatively, you can create your website with one of Divi’s premade layout packs. There are over 2000 layouts in all, many of which can be used for a church website. For example, you can use the Church Layout Pack for Divi, which comes with 7 layouts to build your website. To install a layout using Divi, simply click Choose a Premade Layout.
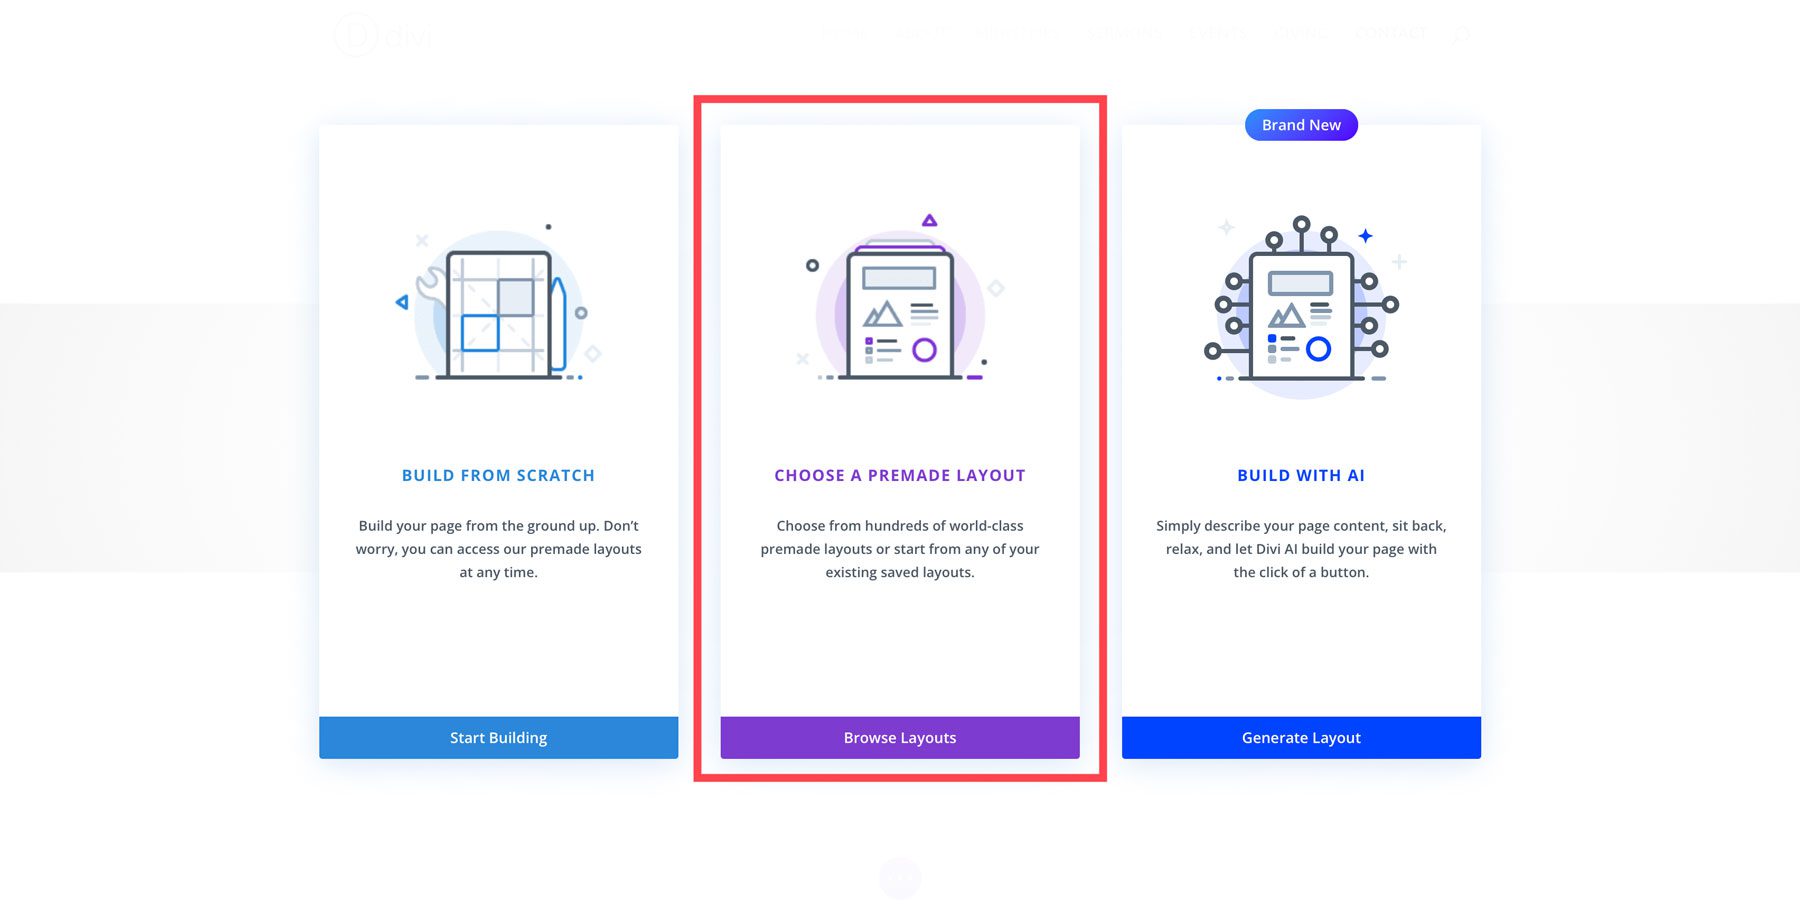
From there, search for the Church Layout Pack for Divi, select a page to load, and click the Use This Layout button.
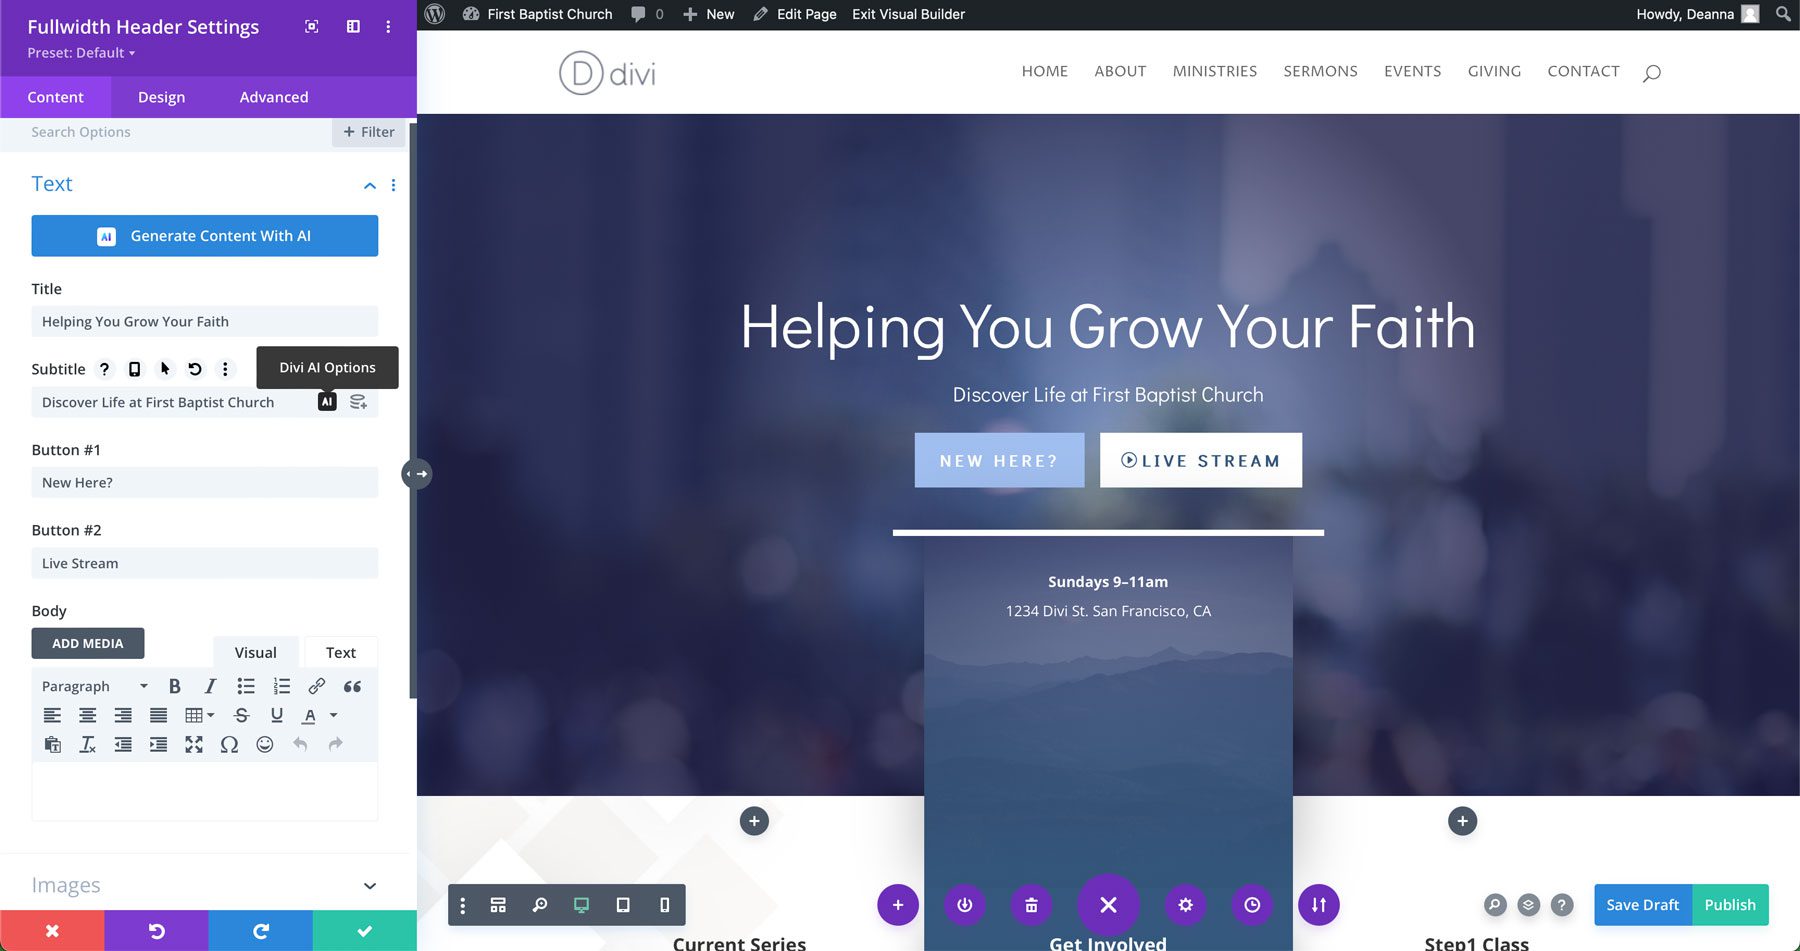
When the page refreshes, you can use the Visual Builder to make design changes or Divi AI to generate text for your page. To learn how to use Divi AI to generate text, images, and code, check out our How to Use Divi AI guide.
Step 7: Select Optional Plugins
Although Divi offers many features, you can enhance your church website further by adding plugins. A plugin is an add-on that extends the capabilities of your WordPress website. Although WordPress offers a ton of free plugins in the WordPress repository, there is a vast selection of premium plugins by third-party vendors that could be useful when building a church website.
Some common plugins you might consider are as follows:
- Membership Plugins: A plugin such as MemberPress is a great way to add relevant content available only to church members. You could include an online registration form for accessing sermon archives, automated email reminders, and more.
- Event Calendar Plugins: Display upcoming events on your website with a plugin like The Events Calendar. Church members can view a calendar or list of events or search for an upcoming event on your church website.
- Donation Plugins: Make giving to your church easier by integrating an online donation plugin like GiveWP or WP Forms. These plugins allow visitors to donate securely through your website using credit cards and other payment methods.
- SEO Plugins: To help get your church seen in search engine results, an SEO plugin is a must. Opt for a good plugin like Rank Math to help you configure your SEO and set up your church website for success.
- Anti-Spam Plugins: Another issue to consider is moderating your WordPress comments and protecting your website from spam. Using a plugin like CleanTalk, you can manage your website’s comments, filtering out any spam. It’s also a good option to combine with MemberPress to control registration spam.
Add Divi-Specific Extensions From the Divi Marketplace
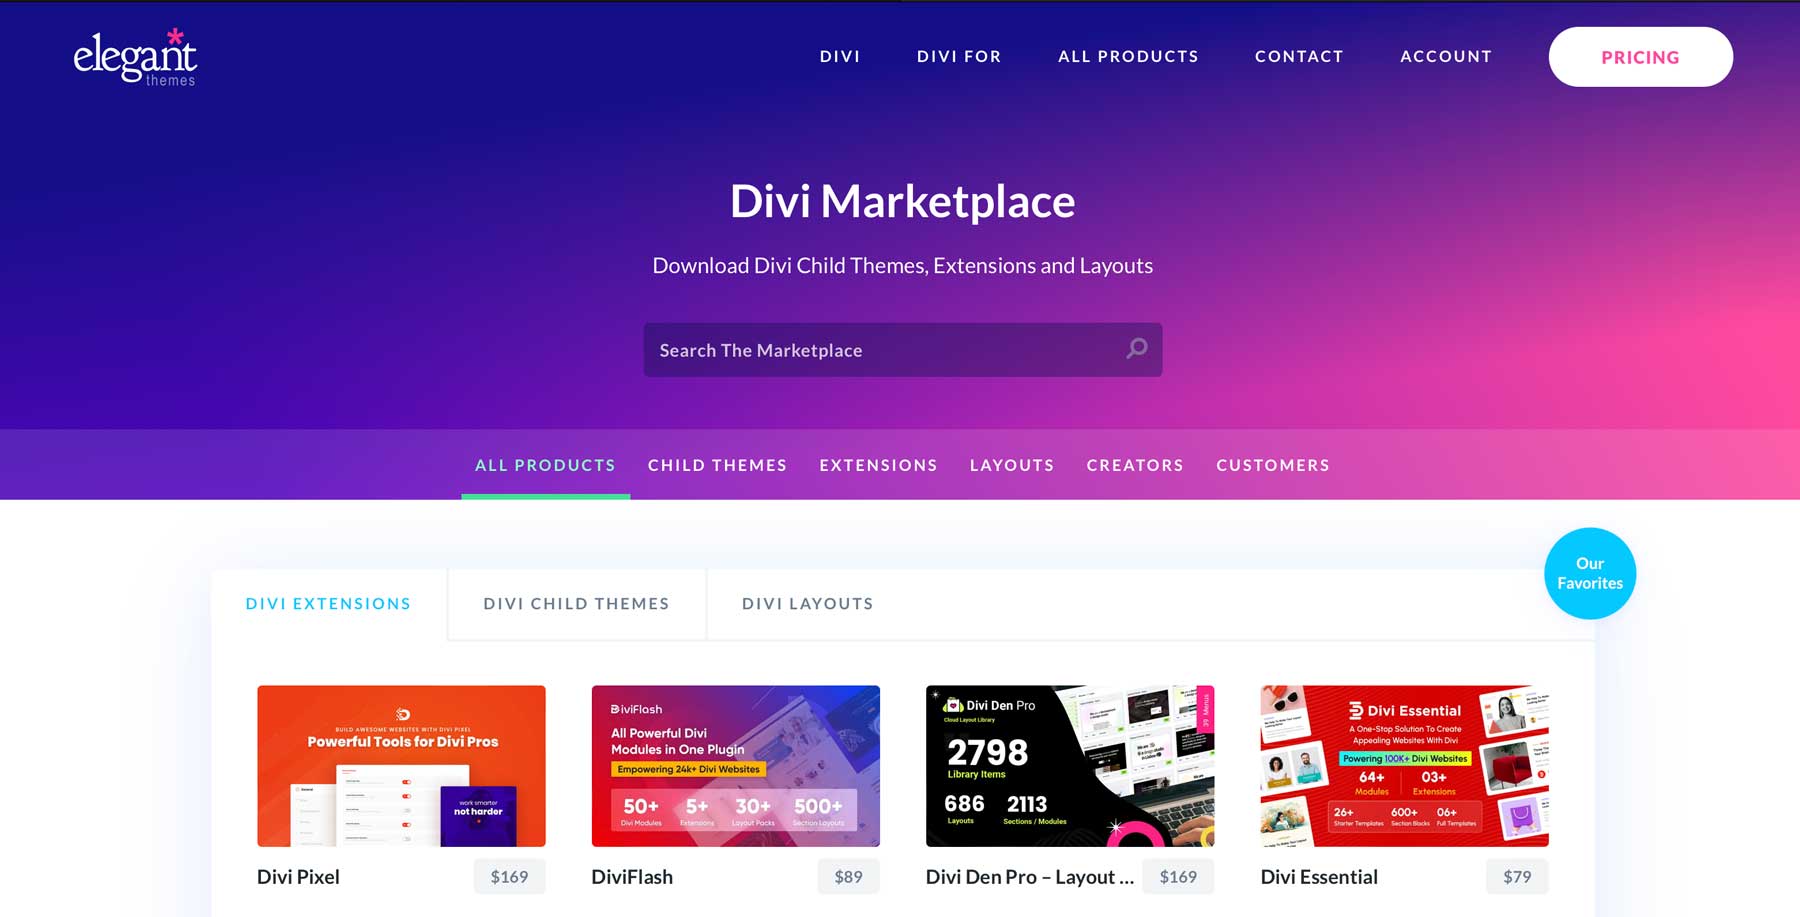
In addition to free and premium plugins, Divi users can benefit from the Divi Marketplace. It’s an online platform where third-party developers can sell extensions, child themes, and layout packs designed for the Divi Theme. While Divi itself provides an incredible foundation for building your church website, there may be a situation where you may want to purchase a child theme or layout pack to change up the look.
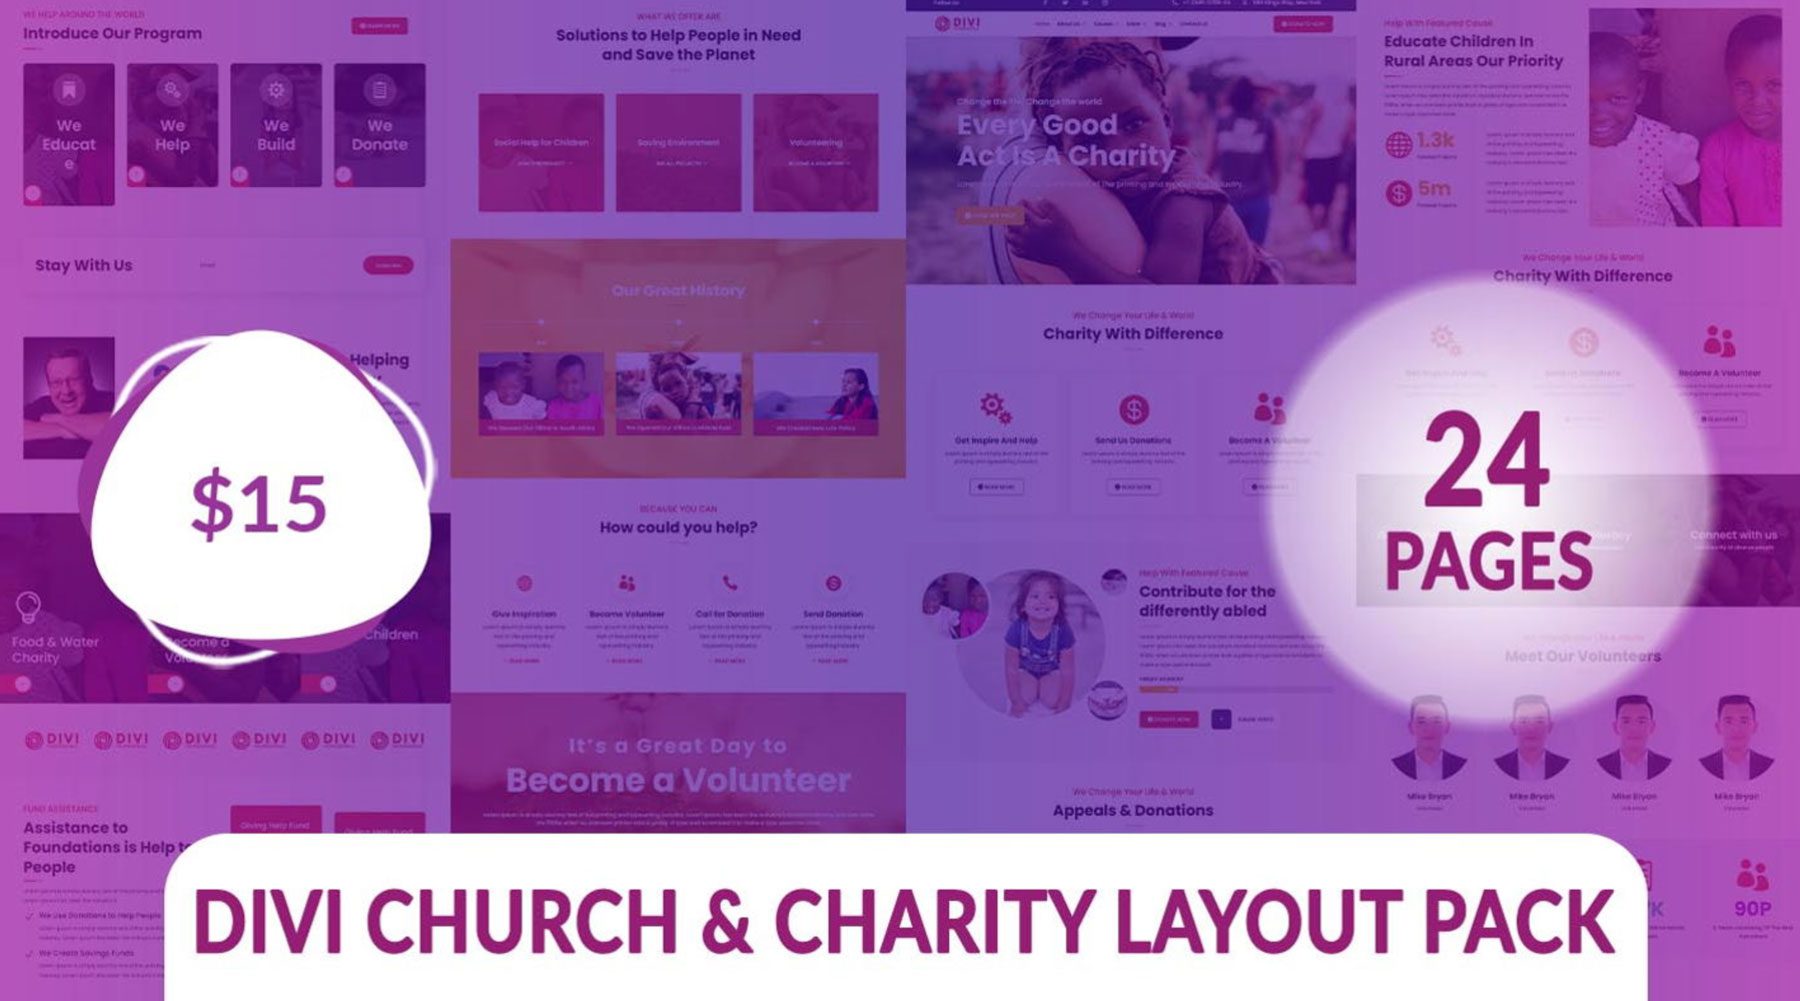
The Divi Church & Charity Layout Pack provides 24 layouts specifically designed for non-profits and churches. It boasts fully responsive layouts, meaning they’ll look good no matter what device your visitors use. The best part? You can get this pack for $15.
Get Divi Church & Charity Layout Pack
Another great option is Flexile – Multipurpose Child Theme. For $19, you’ll get 20+ home page designs, 25 blog and post layouts, 40 hero sections, 5 about pages, and more. While not specifically designed for churches, this multipurpose theme is suitable for building any website.
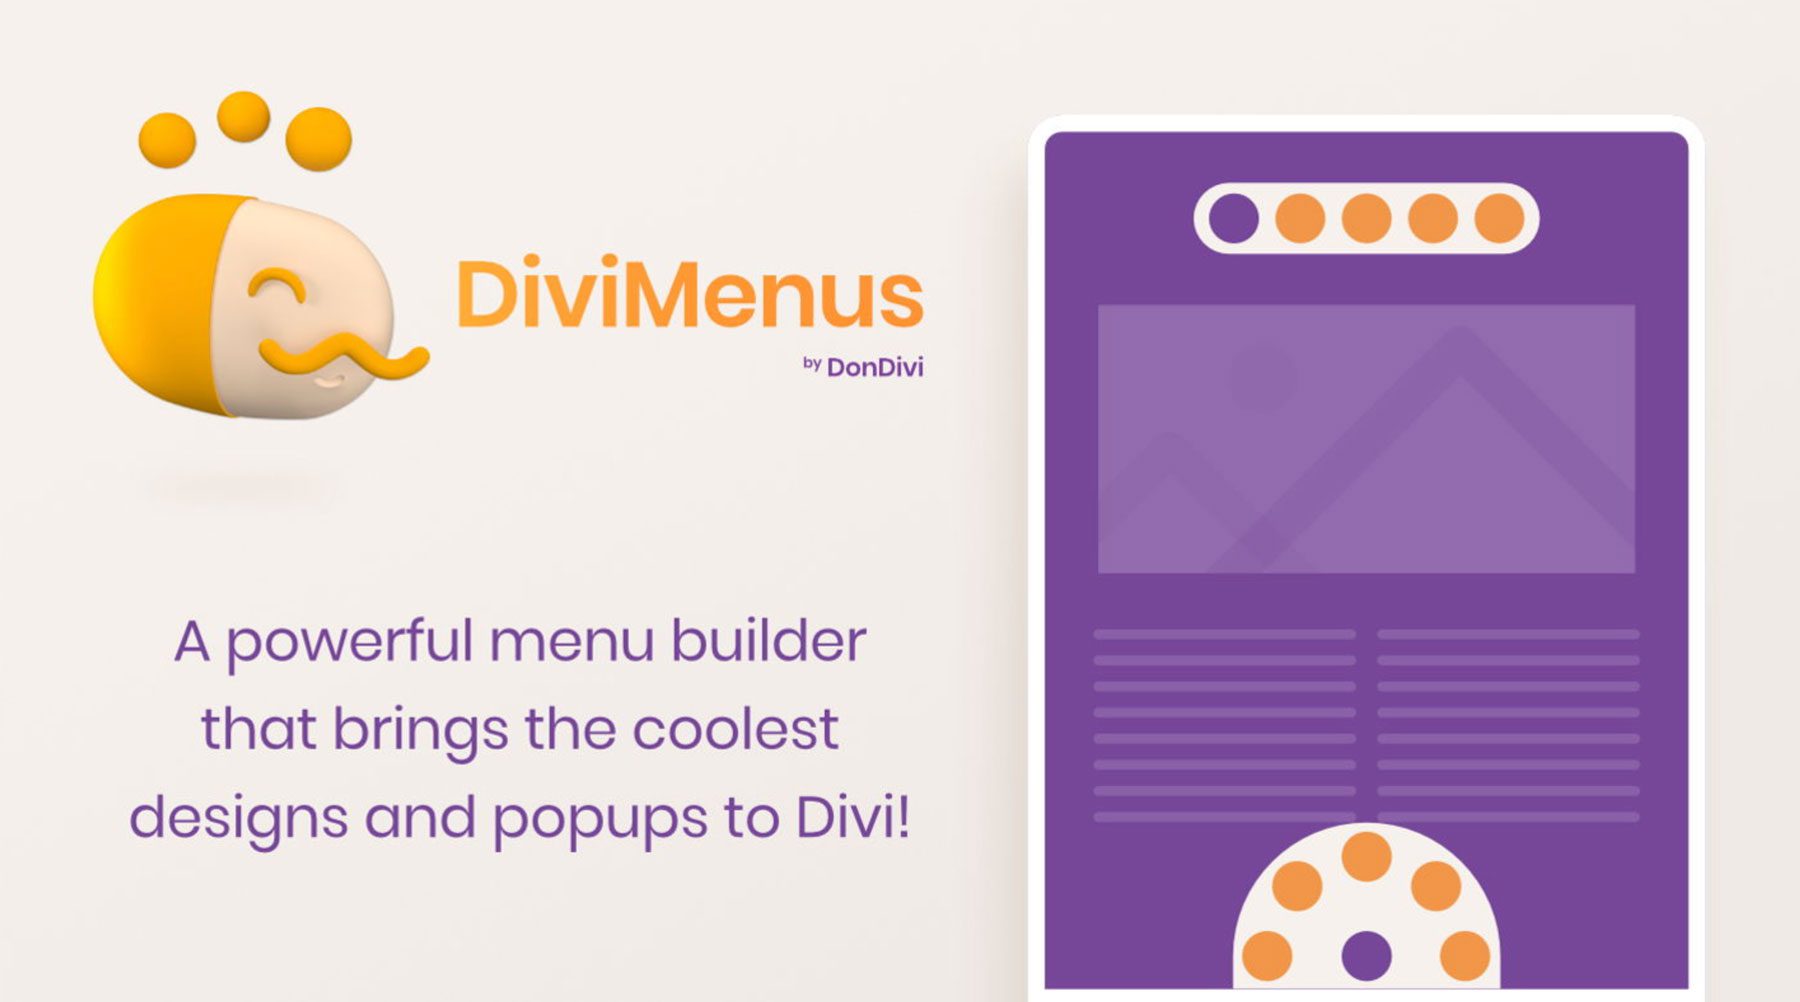
Another great product in the Divi Marketplace is Divi Menus. It allows you to create incredible mega menus with images, social media icons, or anything else you’d like using Divi’s proprietary Visual Builder. Divi Menus comes with two modules, DiviMenus and DiviMenus Flex, which allow you to build any type of menu you can dream of, all for the low price of $49.
Divi Is The Perfect WordPress Theme For Church Websites
This guide provides a step-by-step guide showcasing how to make a church website with WordPress. By following this simple guide, you’ve taken a significant step towards establishing a beautiful and functional website for your church. Between securing a domain name with Namecheap to signing up with SiteGround to building your church website with Divi + Divi AI, you can eliminate a lot of the stress associated with building a website.
Remember, this guide serves as a good starting point. As you delve deeper into the world of WordPress and Divi, you’ll discover even more ways to customize and enhance your website. If you’d like to learn more about the ins and outs of Divi, be sure to check out our documentation. Want to learn more about WordPress in general? No problem! Our blog has an extensive library of WordPress tutorials, recommended plugins, and tips and tricks to help get you up to speed.
To learn more about the products in this article, refer to the table below, which highlights pricing and links for each product.
| Products Mentioned | Starting Price | Description | Action | |
|---|---|---|---|---|
| 1 | Namecheap | $5.98/year | Domain Registrar | Get |
| 2 | SiteGround | $2.99/month | Hosting Provider | Get |
| 3 | Cloudways | $12/month | Hosting Provider | Get |
| 4 | Flywheel | $13/month | Hosting Provider | Get |
| 5 | Divi | $89/year | WordPress Theme | Get |
| 6 | Visual Builder | Included with Divi | Page Builder Plugin | Get |
| 7 | Design Elements | Included with Divi | Page Builder Plugin | Get |
| 8 | Theme Builder | Included with Divi | Full Site Editing | Get |
| 9 | Divi AI | $16.08/month (billed annually) | AI Website Builder | Get |
| 10 | Divi Cloud | $6/month | Cloud Storage | Get |
| 11 | Divi Teams | $1.50/month per user | Team Collaboration | Get |
| 12 | Divi Marketplace | Prices Vary | Extensions, Child Themes, and Layouts for Divi | Get |
| 13 | Divi Church & Charity Layout Pack | $15/year | Chuck Layout Packs | Get |
| 14 | Flexile | $19/year | Child Theme | Get |
| 15 | Divi Menus | $49/year | Mega Menu Builder | Get |
| 16 | MemberPress | $179.50/year | Membership Plugin | Get |
| 17 | The Events Calendar | Free, $99/year | Events Plugin | Get |
| 18 | Give WP | Free, $149/year | Donation Plugin | Get |
| 19 | WP Forms | Free, $49.50/year | Contact Form Plugin | Get |
| 20 | Rank Math | Free, $6.99/month | SEO Plugin | Get |
| 21 | CleanTalk | $12/year | Anti-Spam Plugin | Get |
Frequently Asked Questions
Although we’ve provided you with an extensive guide on how to make a church website with WordPress, you may still have questions. Check out the FAQ below to get answers.





Leave A Reply