If you’re ready to transition your site to a cloud-based environment, you might be curious about Google Cloud WordPress hosting. This platform can boost your site’s performance, and it enables you to pay for only the resources you need. However, it can feel daunting to launch your WordPress website on Google Cloud for the first time. Google Cloud as a platform can be intimidating. But it doesn’t have to be. (Partially thanks to Cloudways!)
In this guide, we’ll give a brief overview of Google Cloud hosting. Then we’ll explain how to deploy your WordPress site on this hosting platform.
Let’s get started!
What Is Google Cloud Hosting?
Google Cloud hosting operates on top of the Google Cloud computing service. Your WordPress blog or dynamic website will store its contents and files on a remote server. When visitors access your site, they’ll be served content almost instantly from the cloud:
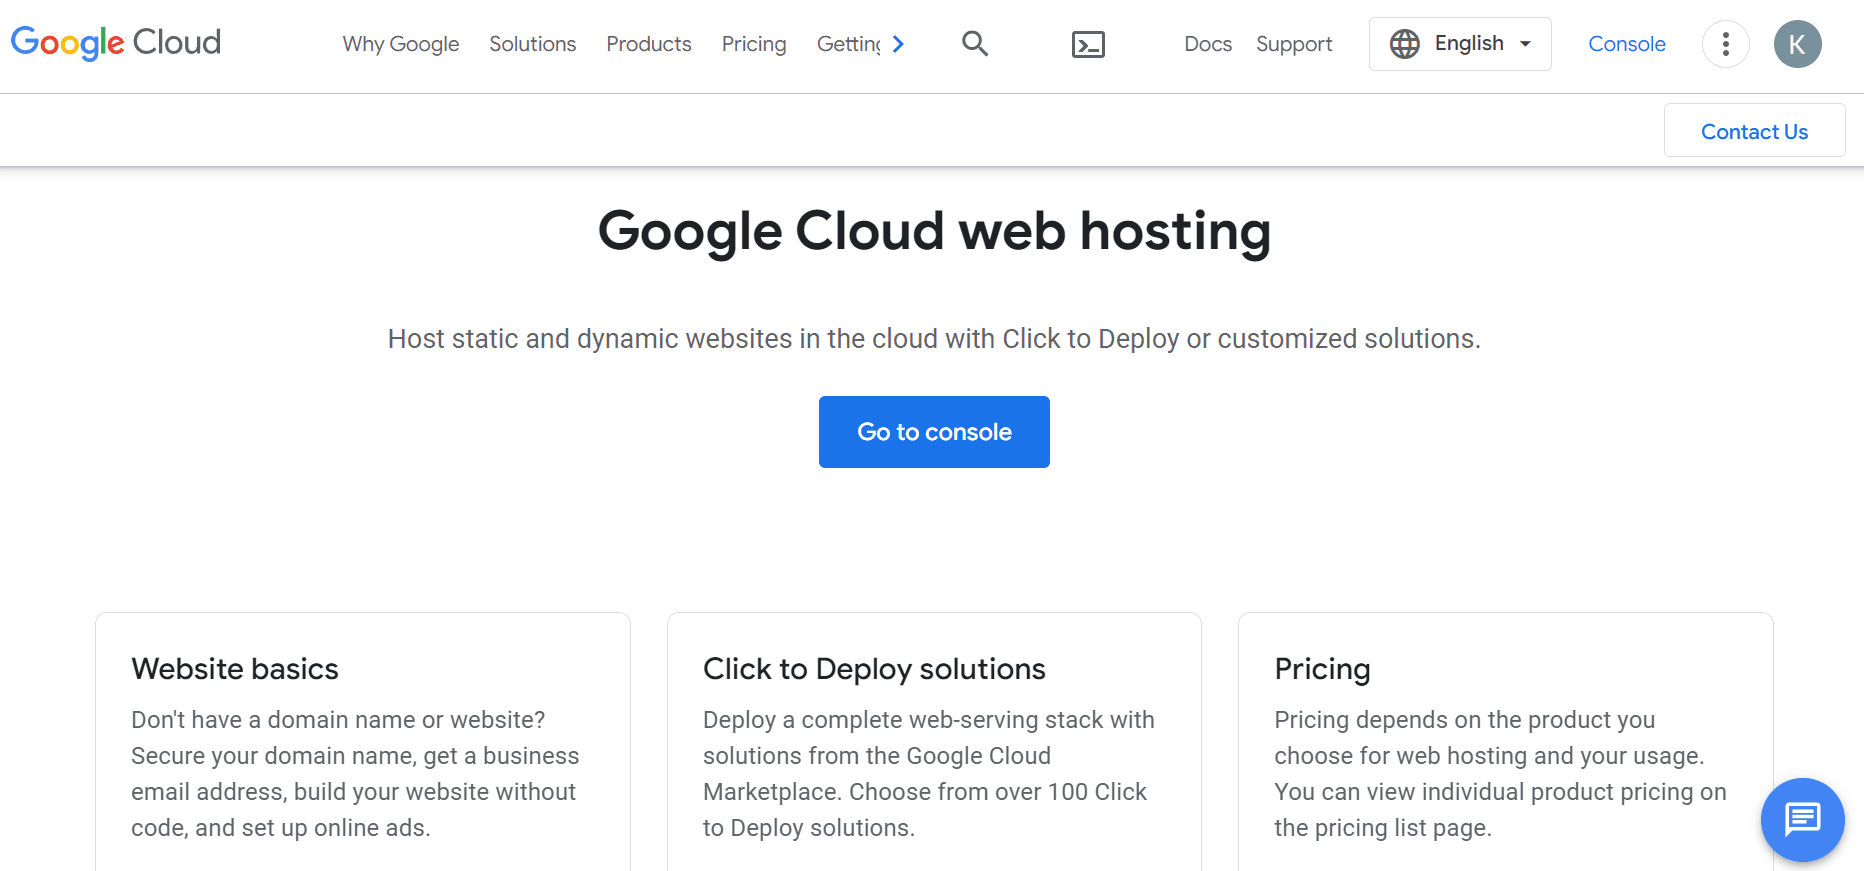
Google Cloud WordPress hosting uses a “pay as you go” model. Rather than subscribing to a monthly or annual plan, you’ll simply pay for the resources and services you need. As such, Google’s hosting can be an affordable and efficient option in the long term.
Furthermore, using cloud hosting can be highly beneficial for your website’s performance. Google offers multiple Network Service tiers to serve content quickly and securely to numerous locations worldwide. Its hosting service also has excellent uptime and availability to ensure that your site is accessible at all times.
Google Cloud hosting can be more challenging to use than more traditional providers because you’ll need a good idea of the resources necessary for your website. The Google Cloud console is also reasonably complicated and has multiple customization options. However, if you have some technical know-how and the time to learn how the service works, you can easily customize a hosting solution to fit your needs.
For more information, we recommend checking out our complete Google Cloud hosting review!
How to Install WordPress on Google Cloud (in 3 Steps)
You’ll first need to sign up for a Google Cloud account. At the time of this writing, first-time users will get a $300 credit towards their hosting services. However, you’ll need to use this credit within the first 90 days, or it will expire.
The one-click WordPress deployment is one of the most straightforward options when launching a site on Google Cloud. Google recommends using this approach if you have a blog or simple website with low to medium traffic.
Note: Google Cloud also has hosting options for dynamic sites, different server types, and various operating systems. However, we’ll be focusing on typical WordPress websites for this tutorial.
Step 1: Start a New Project
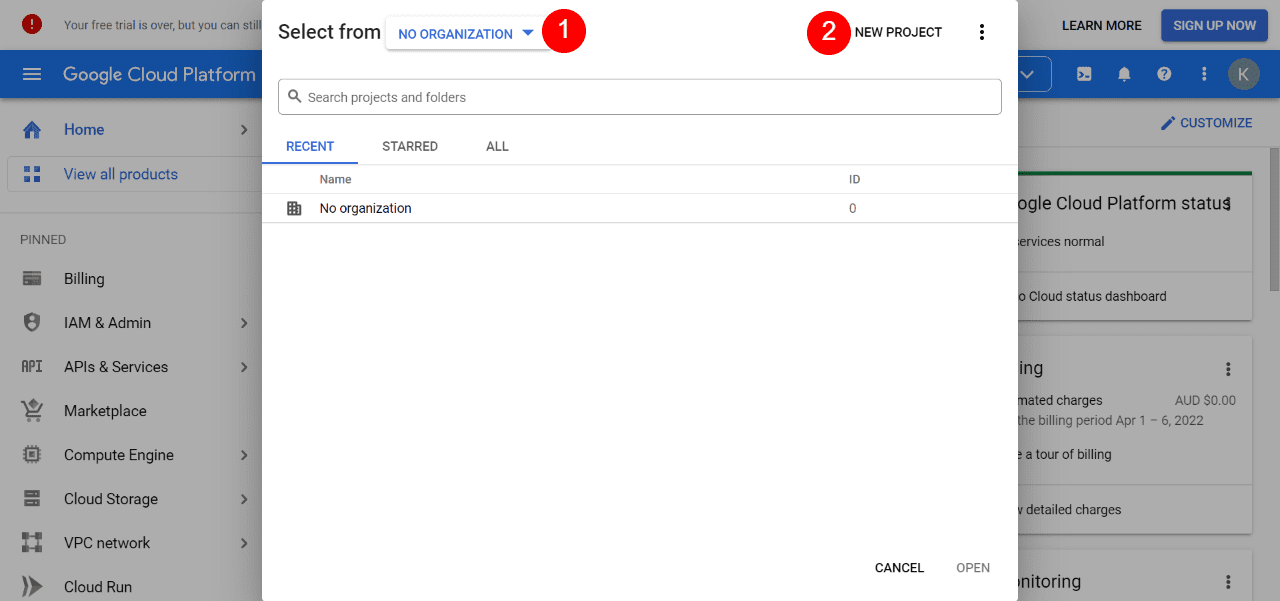
To begin, you’ll need to start a new project from your Google Cloud console. To do this, find the Select from… drop-down menu at the top of the dashboard (1) and choose NEW PROJECT (2):
You’ll need to give your project a name (1), choose the associated organization (2), and select a location (3). Then hit CREATE:
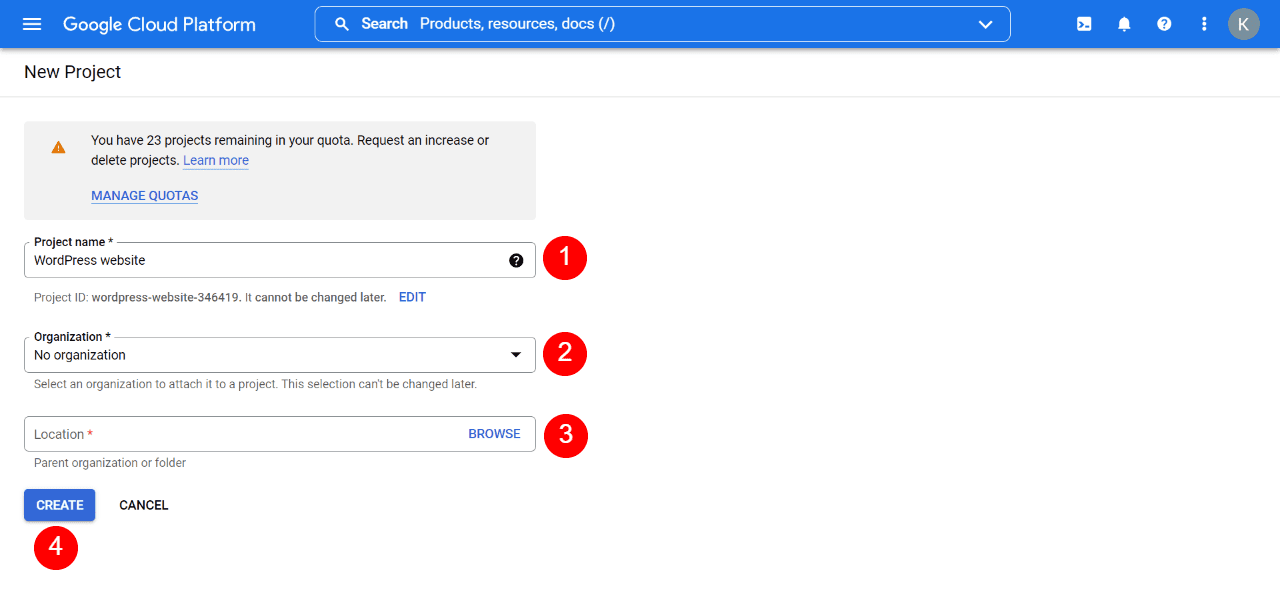
Google Cloud will now create a project for your WordPress site. Whenever you navigate to the Google Cloud console, it will direct you straight to this project.
Step 2: Deploy WordPress
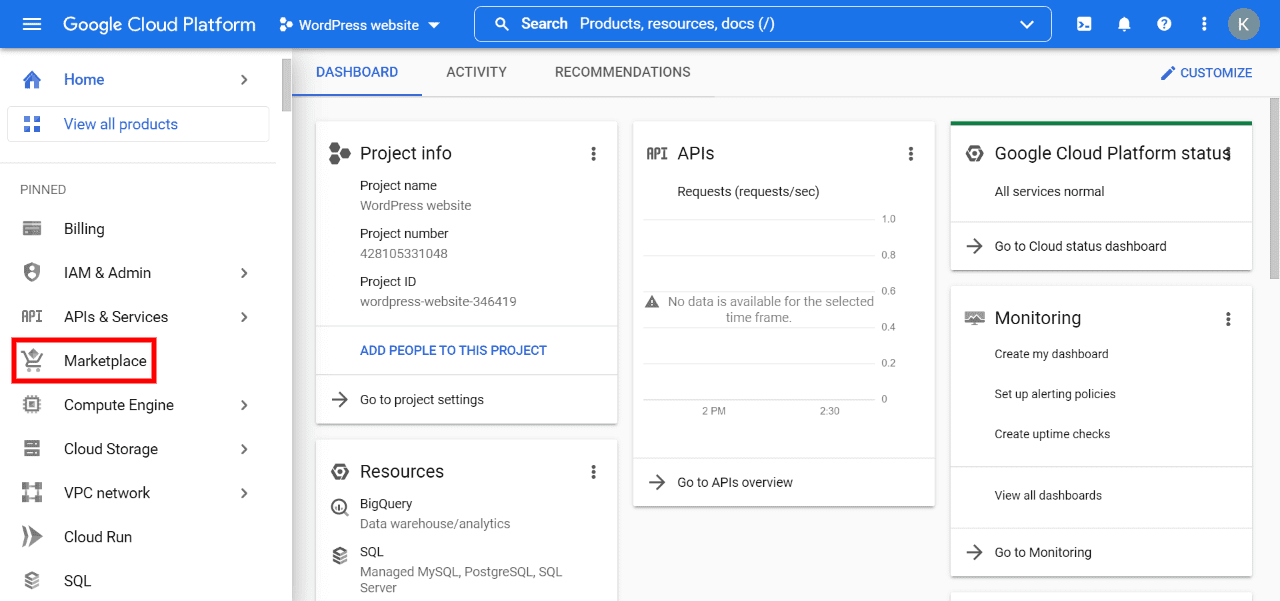
Next, navigate to Marketplace in the left-hand menu:
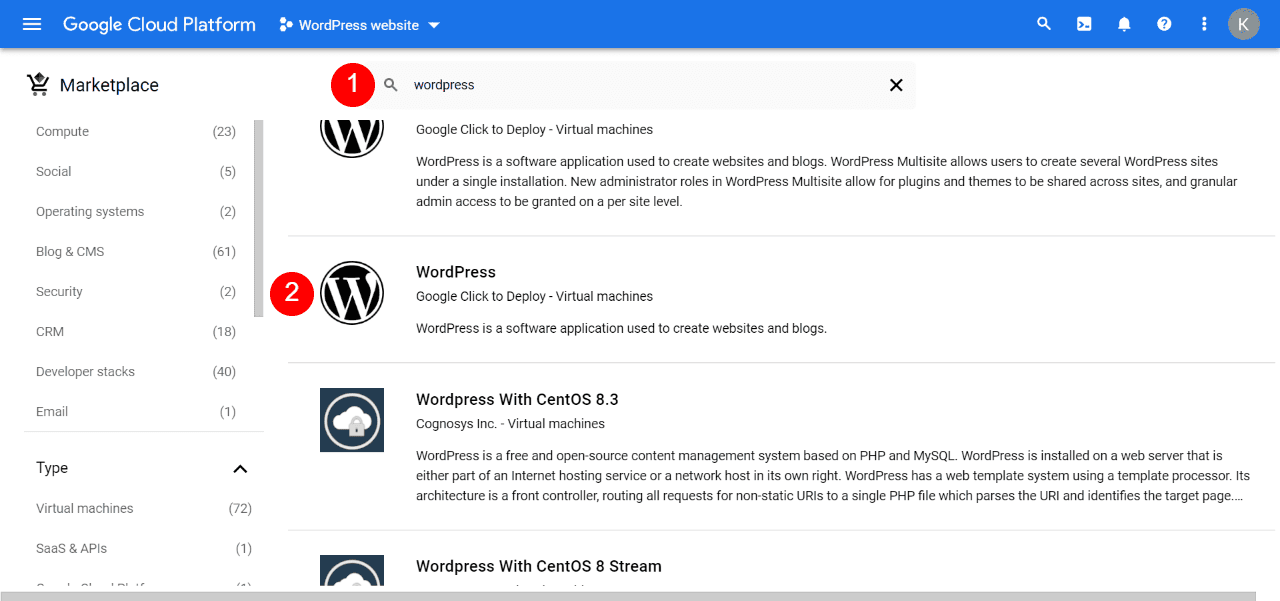
Type “WordPress” into the search bar (1) and hit your Enter key. Then choose one of the deployment options from the populated list (2). We’ll be using the most simple “WordPress” option, but there are also multi-site and alternate server configurations:
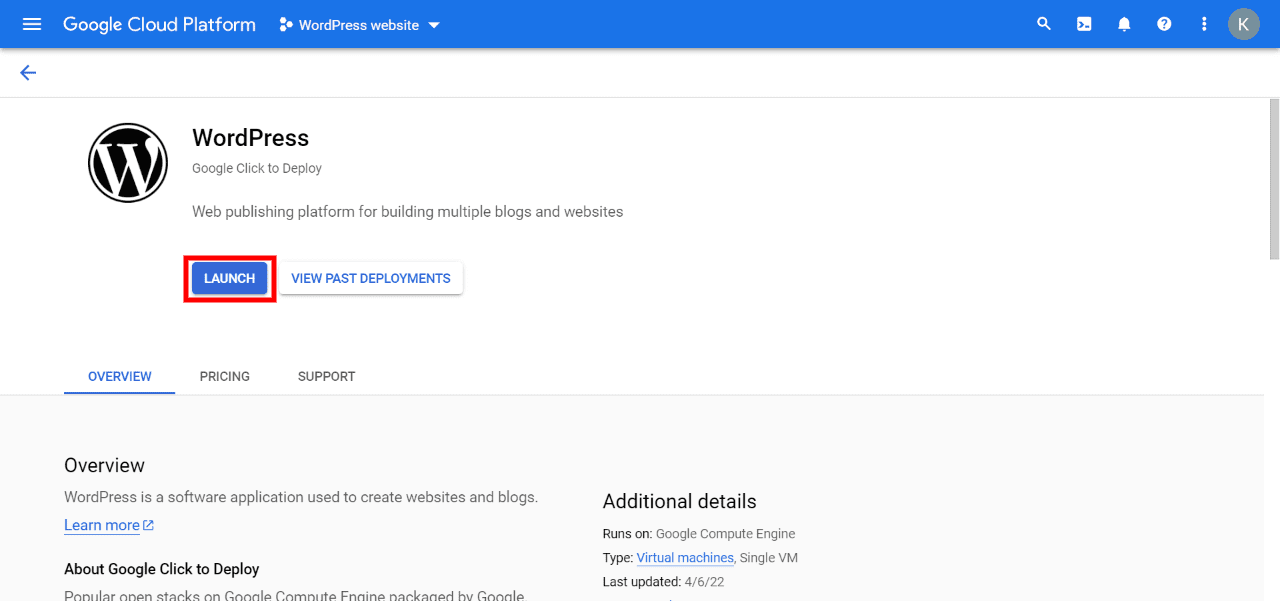
You’ll now see an overview of this installation option. Later on, you can customize your deployment configuration. For now, press the LAUNCH button:
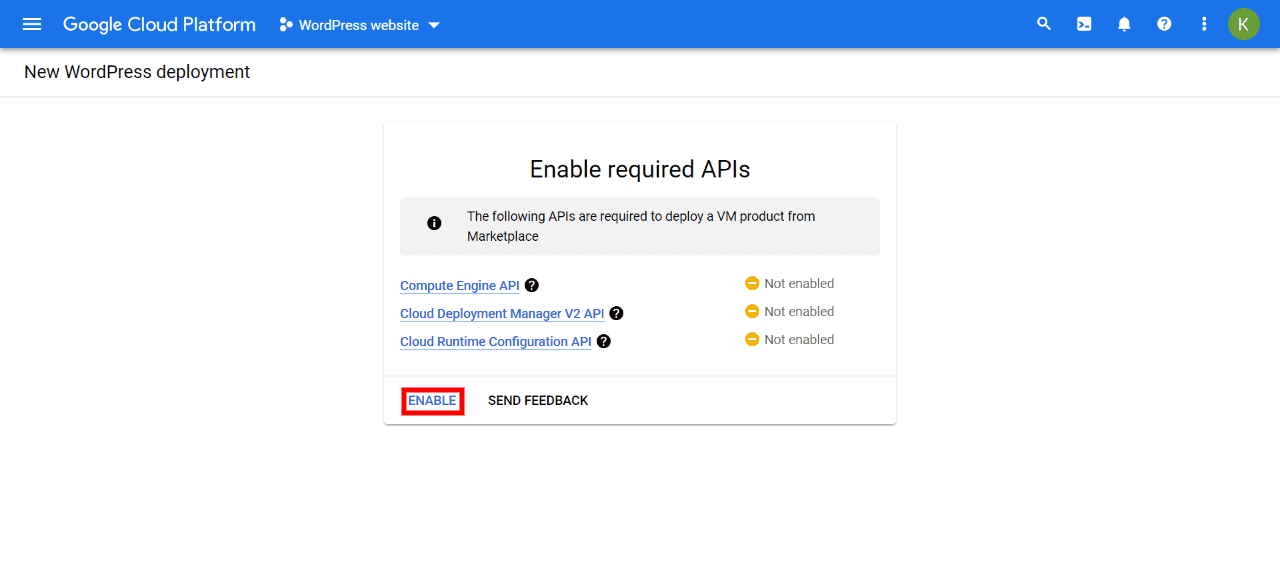
You’ll then be asked to enable various APIs so that Google Cloud can launch your WordPress site. Hit ENABLEand wait for a few minutes:
You’ll see a success screen when the APIs have finished installing, and you can click through to start customizing your deployment.
Step 3: Customize Your WordPress Deployment
On the next screen, you can customize your Google Cloud hosting deployment. For example, you can select your geographical zone (1), Virtual Machine (VM) series (2), and machine type (3):
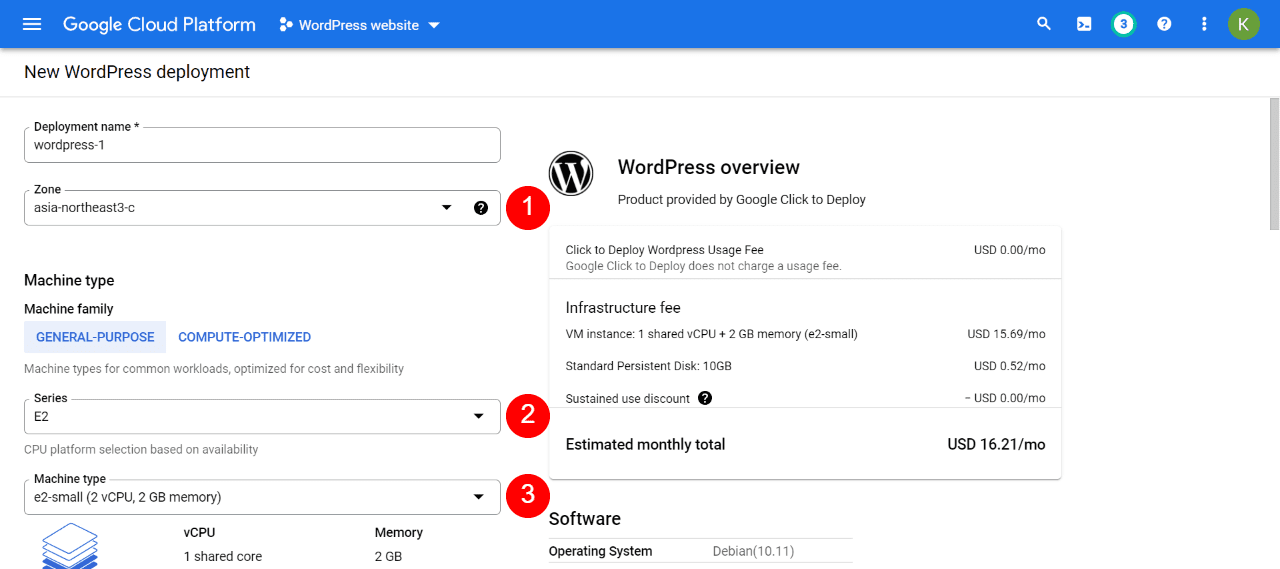
We recommend choosing the closest geographical location so that Google Cloud can serve your content faster. You might also want to check out different machine series and types to see which ones fall within your budget. Sometimes having a more powerful server architecture can scale better for a minimal increased cost.
As you change your settings, the price will increase and decrease on the right side of the screen. Further down the page, we recommend ticking the boxes next to Install phpMyAdmin (1) and HTTPS Enabled (2). These settings can help you manage your databases more easily and secure your site with HTTPS:
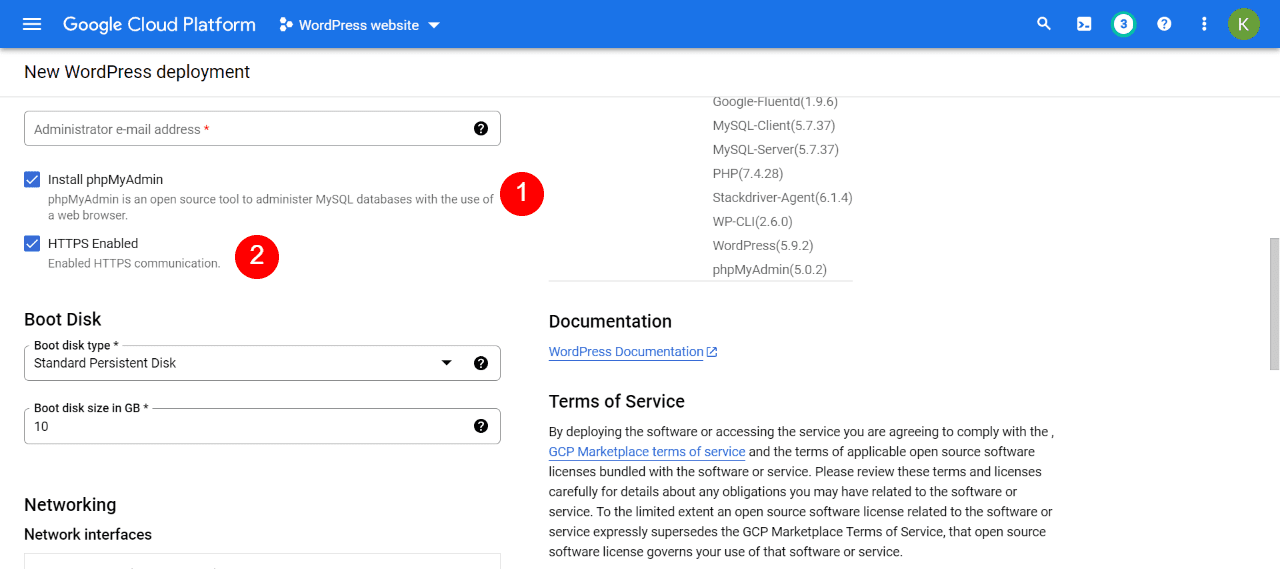
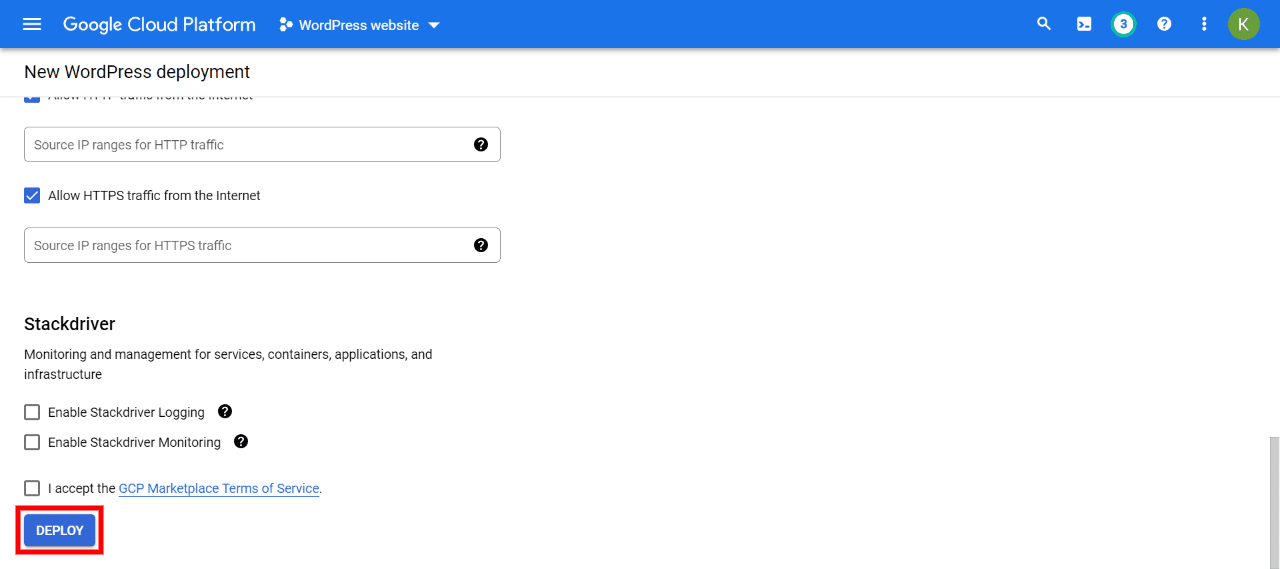
Furthermore, you can customize your boot disk and type, network interfaces, and firewall settings. Once you’re happy with all your choices, accept the terms and conditions, and click the DEPLOY button:
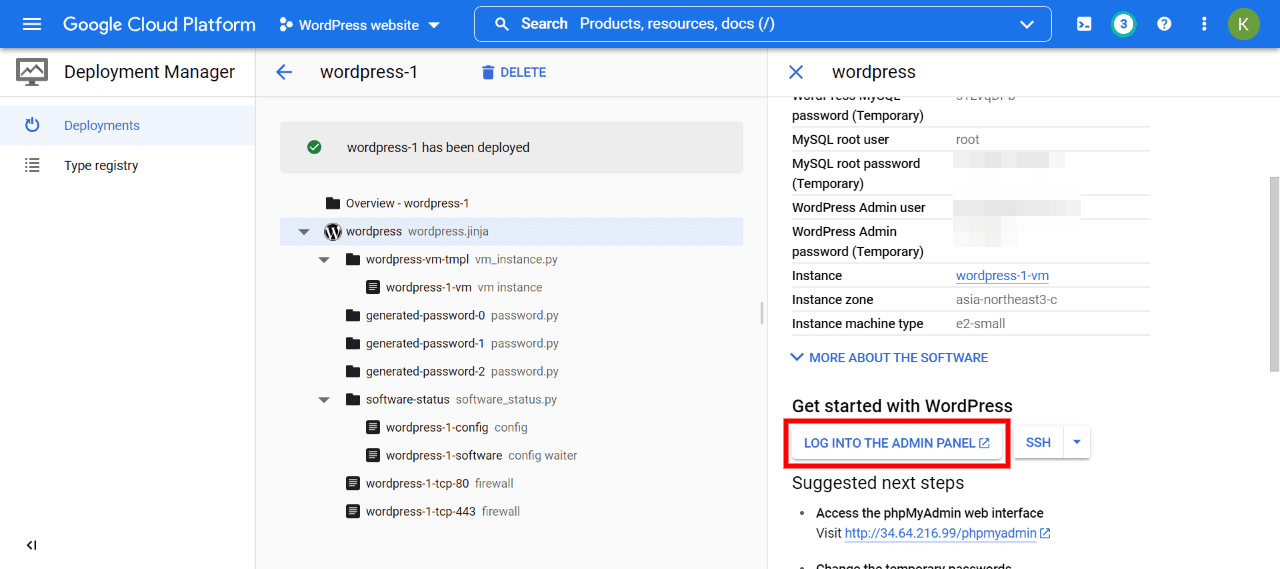
After a few moments, your WordPress website should finish deploying. You can now see your site’s data on the right side, and access it by clicking on LOG INTO THE ADMIN PANEL:
That’s it! Your WordPress site is now running on Google Cloud web hosting. If you have any issues with your admin panel not loading, give it a few minutes. It should be ready to go relatively quickly.
At this point, you might also want to sign up for additional Google Cloud Networking services, such as Cloud CDN or Cloud Load Balancing. These services can further optimize your WordPress site’s performance and improve its user experience.
How to Install WordPress on Google Cloud Using Cloudways
Alternatively, your hosting provider might offer Google Cloud hosting through its dashboard. One of the best cloud WordPress hosts, such as Cloudways, enable you to choose your preferred data centers.
Then you can manage your site from your Cloudways dashboard while taking advantage of Google Cloud’s infrastructure:
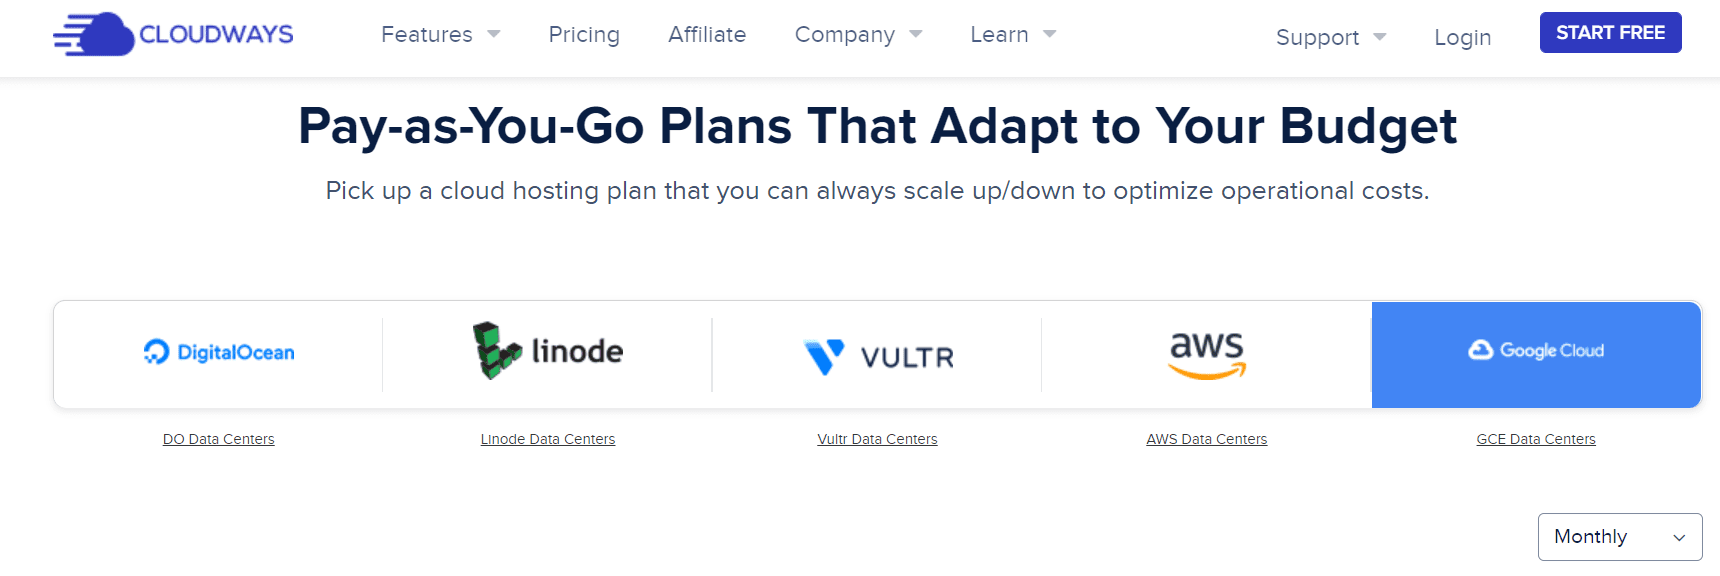
After signing up for a Cloudways account, simply select your WordPress version (1) and then Google Cloud Platform (2):
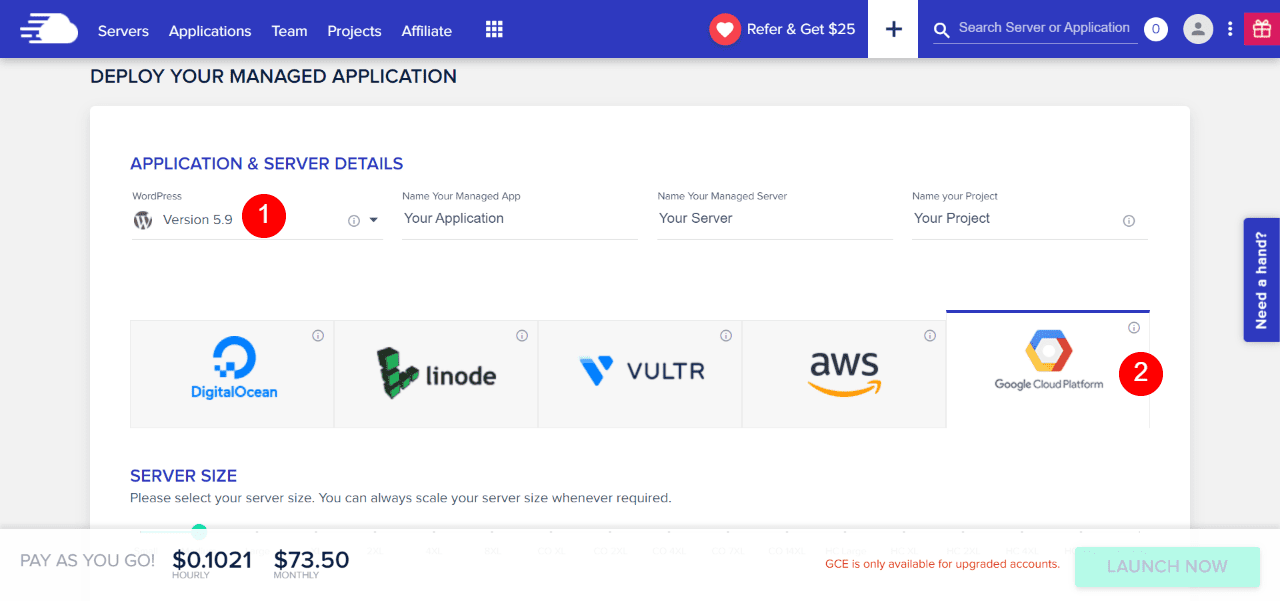
Then you can customize your server size, bandwidth, and storage in the same way we went through above. You can also select the closest server location to you.
And if you’re an Elegant Themes member, use Google Cloud WordPress hosting that’s optimized for Divi with our Divi hosting partnership with Cloudways.
Conclusion
Google Cloud offers cloud-based data storage and server space to host your WordPress website. Using this platform can speed up your site and, in turn, improve your user experience. Furthermore, Google Cloud hosting is highly customizable to fit your website’s needs, whether it’s virtual server specs, datacenter location, or the webserver software that runs everything behind the scenes.
If you’re looking for other managed WordPress hosts that are a bit different from Google Cloud, check out Pressable, SiteGround, and Flywheel.
Do you have any questions about Google Cloud WordPress hosting? Let us know in the comments section below!




Worked like a charm. Moved from DigitalOcean to GCP
According to me, Google official cloud hosting not suitable for beginners. I have tried cloudways hosting simple easy to use cloud server dashboard. It’s really easy for manage & control google cloud server. I would love to recommended google cloud hosting service by cloudways
Thanks for your guideline! It’s helps a lot
You’re welcome, Mithun 🙂
Thanks for sharing the content. I once attempted to do this on AWS using EC3 and end up paying $50+
Wouldn’t the same happen with Google cloud, how can I avoid this unexpected charges.
Thank you
You’re welcome!
Many thanks! I’d been struggling for weeks to get a proper WordPress installation to work on a Google Cloud Hosting, and this tutorial finally got me there!
You’re welcome, Rohit! That’s so great to hear that this guide helped you out.
Thanks for helping us.
You’re welcome, Harry.
Google should also provide some type of managed hosting for WordPress users. As beginners can take advantage of the GCP, power users are way ahead.
Please do more of these,
Cover google cloud setup, HTACCESS and other PHP memory configurations, also cover google cloud and google CDN optimized for Divi and Costs vs alternatives like kinsta.
You will get a ton of traffic for stuff like this.
Thanks for the suggestions! We’re definitely working on more content like this, so keep an eye out 🙂
Google’s marketplace deployed WP has an estimated monthly total hosting cost of $16~, with an additional, unspecified potential $15-20~ more for egress traffic costs for a middling WP site of 50k-100k visitors/month. Even worse, its not fixed – so you can end up having hundreds of dollars of bandwidth costs in a given month out of the blue. Google cloud’s egress traffic costs that harken back to the prices of mid 2000s make it impossible for Google to appeal to anyone other than enterprise users. Variable, unpredictable bandwidth costs at excessive pricing are not something any WP site owner would want. Especially when neither their premium traffic network nor their normal traffic network provide any tangible advantage over the networks of any common WP web hosting provider or the more reasonable cloud options.