The navigation menu is one of the most important elements of your website. Without it, your visitors will not be able to get to the content they need, won’t understand what content you offer, and will generally exist in a state of confusion regarding your site. Unfortunately, the WordPress menu system is not the most intuitive part of the CMS (content management system). We understand that and want to show you how to best navigate the WP navigation system. So that you and your users have the best experience possible.
Now, before we even dig into the WP menu structure, let’s take a second to plan this out. While creating a menu is simple (just go to Appearance – Menus and start clicking), creating a useful menu is a little more in-depth. Essentially, ask yourself two questions:
- Who am I making a menu for?
- Where do I want my visitors to go?
Regarding who am I making a menu for?, it might seem silly. Because the answer is undoubtedly “your users.” But it’s not so straightforward. Different users need different things. Will new users need the same pages as returning ones? Do logged in members see the same menus as those who are not signed in?
By thinking of the folks who will use this specific menu, you’re able to keep it simple. You can avoid stuffing it full of pages that will overwhelm people who look at it. The great thing about WordPress menus is that you can create many versions and display them in different places.
Which brings us to question number two: where do I want my visitors to go? Hand in hand with which users need which menus, deciding where you want those users to go will determine what kind of menus you create.
ElegantThemes.com as a Real-World Example
For example, we did a header menu redesign here at Elegant Themes a while back. We wanted to focus on driving traffic to our Facebook group, Divi Theme Users, and our Meetup network. In addition to Divi itself, but that goes without saying. To do this, we simplified the menu structure to only give the user a handful of options, compared to the more robust version that used to exist.
 Hover over Divi, and you will see links to not only the theme features, but also our social networks that we wanted to highlight. All Products will also show Divi as a flagship product, and so will Pricing as folks look at our membership options. Account sits outside of that new-user paradigm, but it gives new users quick access to their memberships — as well as provides the option for new-member sign-up. Contact, too, is there for everyone.
So as you can see, each and every menu item directs a chosen segment of visitors to the pages we want them to see the most. That said, we also have a more-complete menu in the footer of the page that links out to places like our blog, resources, individual product pages, and so on.
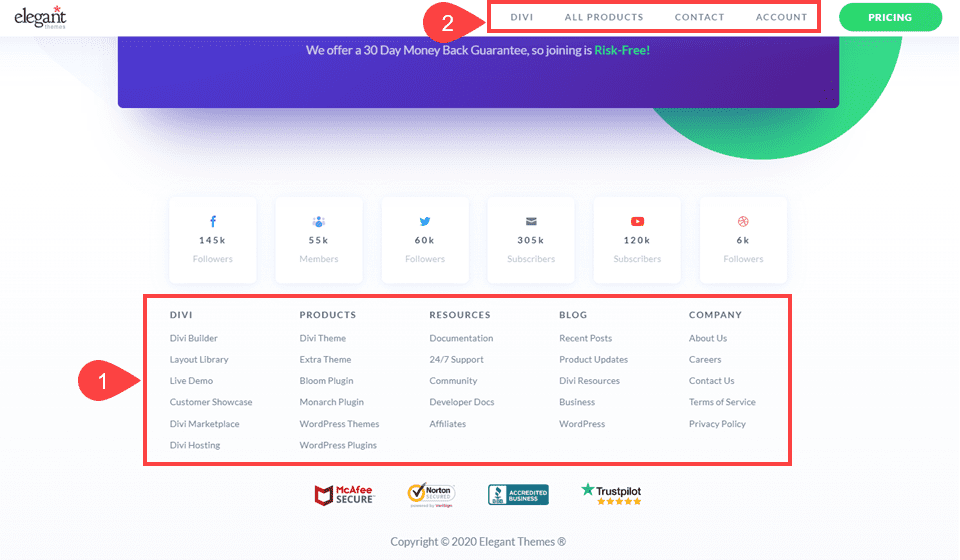
The header menus is still there, too. But we know that the menu at the bottom of the page is going to be used by people with a more specific need, who know to look for another menu (as is the web standard these days) to find what they seek.
With that in mind, you have likely figured out who you’re creating the menu for and what you want them to do. So let’s get to building your WordPress menu.
Head over to Appearance – Menus in your WordPress dashboard. You should see something like this:
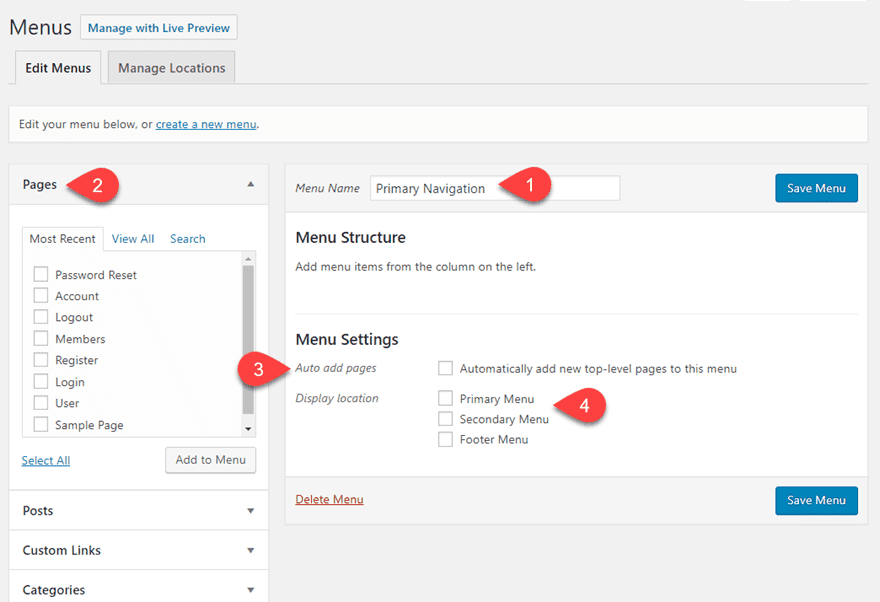
This page isn’t the most user-friendly part of WordPress, but you will see a few parts that tie into what we discussed above.
The Menu Name is for your reference. No users will see this. Keep track of which menu goes where by naming it appropriately. To the left, you see Pages, Posts, Custom Links, and Categories. Some themes include more options here. Yours may or may not. Menu items can be individual posts or pages, as well as category links. Additionally, Custom Links lets you link to anything at all, just remember the https:// or your links may end up dead.
Under Menu Settings, we highly suggest that you keep Automatically Add Pages disabled. This option adds all new Pages created on your site to the WordPress menu. Most people will never check this box.
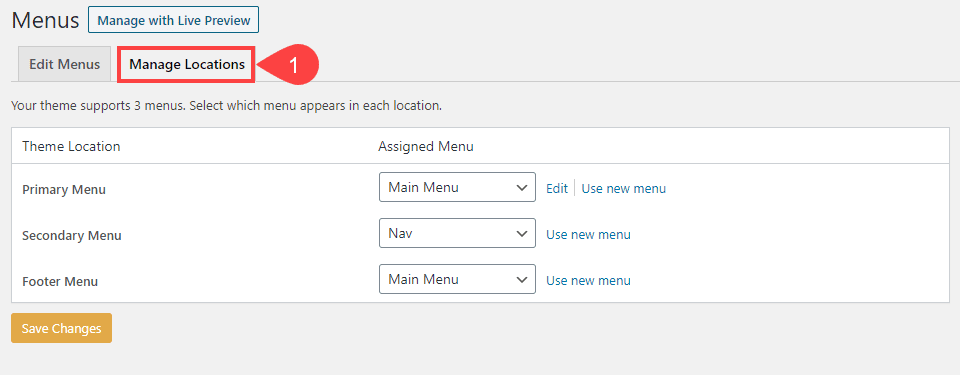
Now the Display Location options will vary from theme to theme because each theme has a different layout in terms of where they allow WordPress menus to display. However, these are the places within your site that your menu can appear in full. You can get itno more fine-tuned adjustment for menu locations under he Manage Locations tab at the top of the screen
Next, add any content that you want in the menu itself. Simply check the box beside it and click Add to Menu. Doing so adds it under Menu Structure. Click the arrow to display other options like Navigation Label.
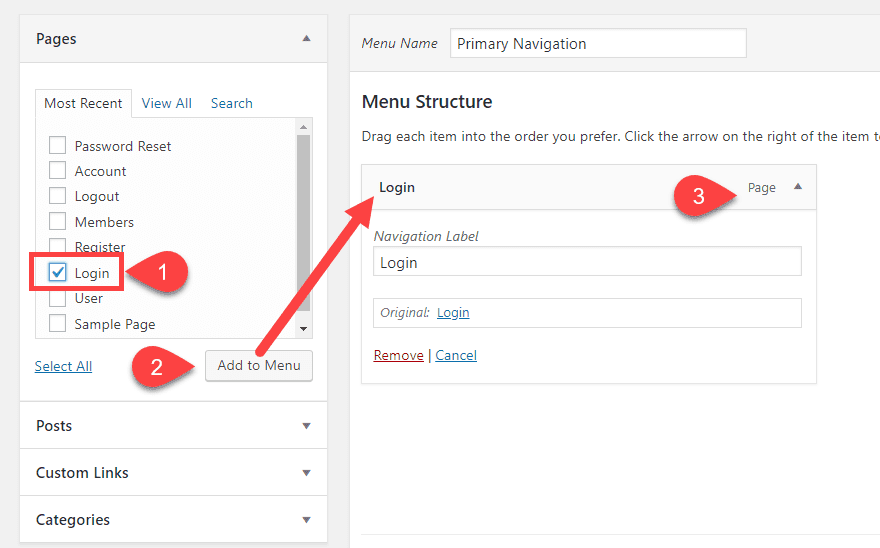
Keep in mind that the Navigation Label will show the to users. This is the part that appears in the menu. So if you have a page title that’s too long, you can shorten it here.
Now, the most important part of creating WordPress menus (and perhaps one of the most forgotten actions in all of the platform) is to click Save Menu to the right of the screen.
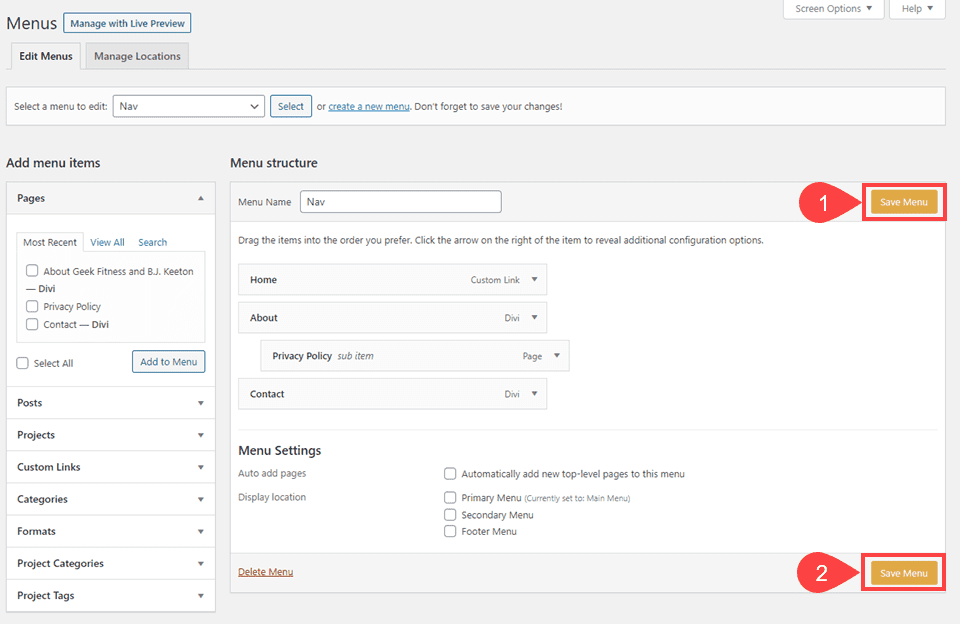
Once saved, the menu will go live. If it is already displaying on your site, the changes will be immediate.
For the most part, the steps above are the same for creating a drop-down menu in WordPress, too. However, there is another step that you need to follow to make the submenus appear.
Under the Menu Structure section, each of the items is draggable. To create a drop-down menu, simply click the item you want and drag it to the item you want as its parent. WordPress is smart enough to know that if you bring an item to another, you want to next them. Nesting them will then create a drop-down menu on the front-end.
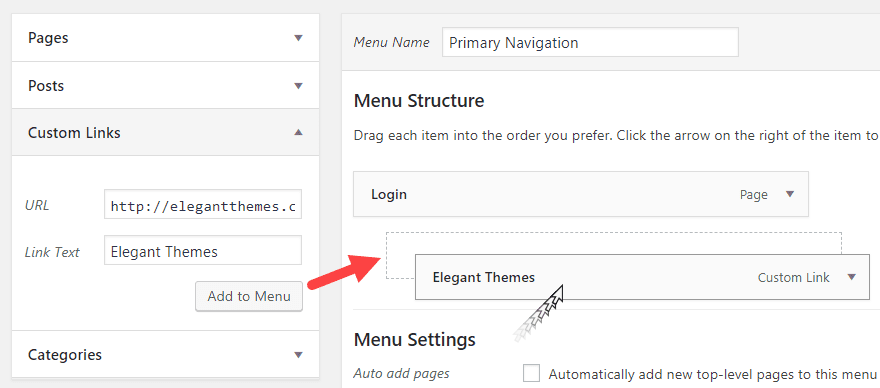
Repeat this for as many items as you want in the drop-down. The nested hierarchy is easy-to-understand. Each time a new level is created in the structure, that’s an additional drop-down the menu will have.
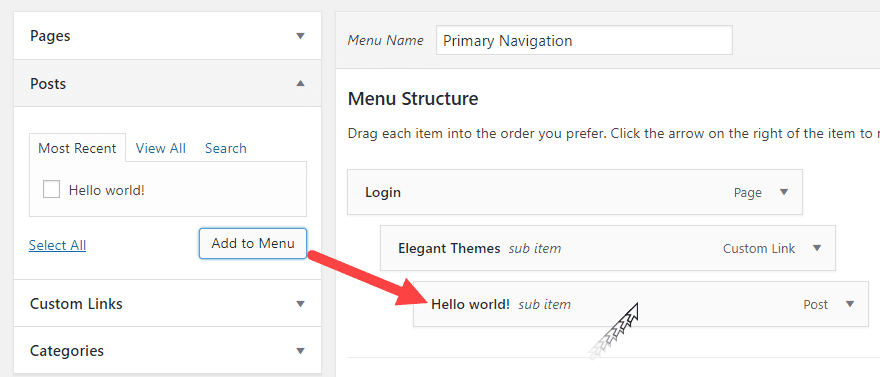
On the front-end, it will look similar to this:

Now, these steps assume that you’re using menu items that exist. However, if you don’t want the item that triggers the drop-down menu to be a navigable link, you can simply create a Custom Link that has a # instead of a URL.
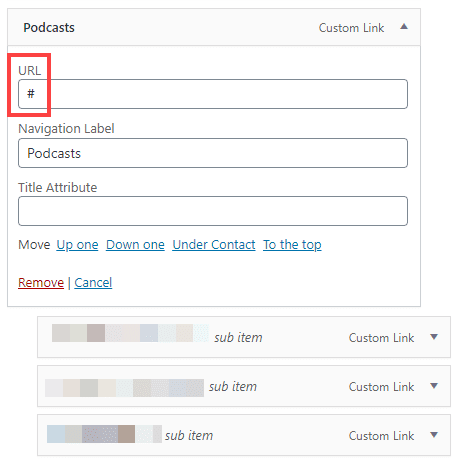
Doing so will create a menu item, but clicking it will do nothing but expand the drop-down menu.
If you want greater control over your mega menus, consider using a mega menu plugin like UberMenu or Max Mega Menu. Menu plugins like these bring a wide array of functionality and design to your WordPress menus.
Going back to what we discussed earlier, we want to make sure each menu that we display is focused. Sometimes mega menus are the best choice for site navigation. For example, Amazon is a great example of a site that makes great use of a mega menu. However, most sites that use mega menus don’t need them. They unnecessarily complicate site navigation.
If, however, you do have a large site and it can be compartmentalized, using multiple menus across your site will almost always be the better option. The fewer choices a user has to make means the more likely they’ll make the choice you want them to.
Now, as example, let’s say that you want to create a menu that only appears in blog sidebars to help direct users around. We might name the menu something like Sidebar Widget to keep track of it. But if you look at the Display Location or the Manage Locations tab, there might not be a sidebar option.

That just means we’ll have to manually place the menu. In the WordPress dashboard, head over to Appearance – Widgets and find the Navigation Menu widget.
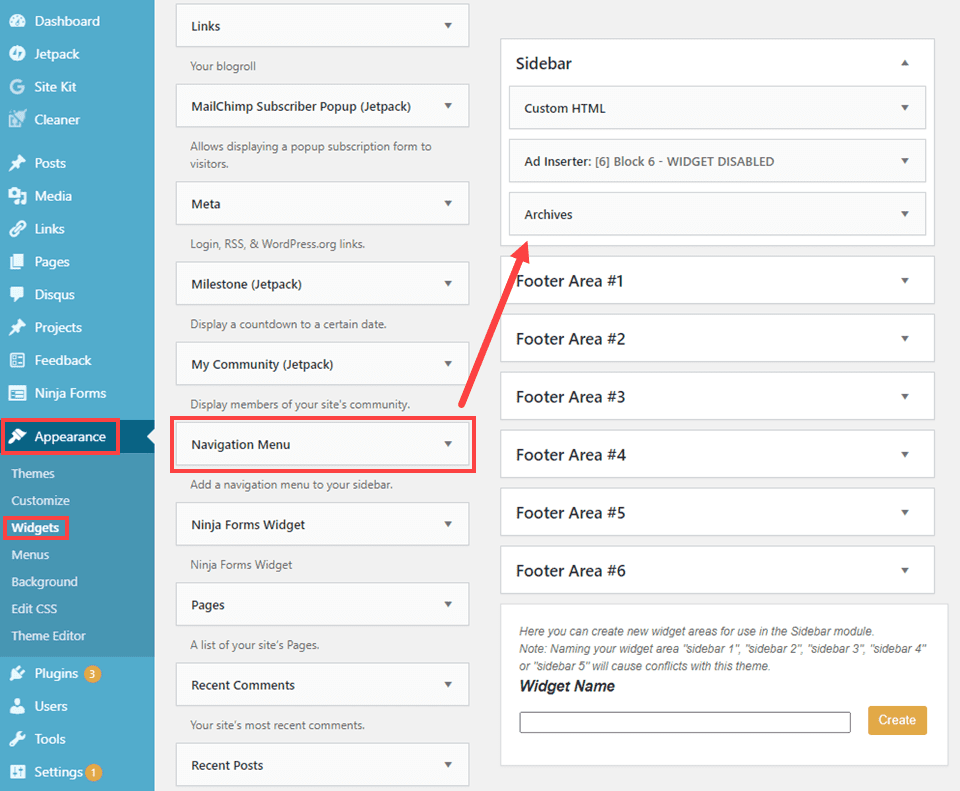
For the most part, your theme will have a generic Sidebar option. The Navigation Menu widget is default to WordPress. So you this will work regardless of your theme. However, your theme might have something else for menu widgets, and the basic steps should still apply.
Like the drop-down menu items, click and drag it to the Sidebar area. Because of how widgets work in WordPress, the widget will immediately appear on your site. However, you haven’t chosen a menu to display, so it will be blank space.
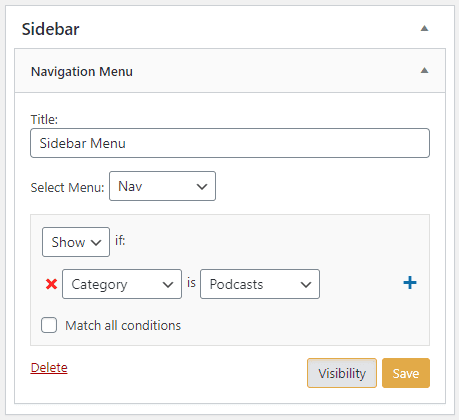
If you choose a Title, it will appear as a headline above the menu. The Select Menu option is where you choose the specific menu that you want displayed. You can also click the Visibility link and open the extra box that you see above. This new box gives you options for conditional visibility. For this, we may only want this menu to appear on posts categorized as Podcasts, so when we click Save, the changes take hold.

That’s all their is to it. You should keep in mind that anything that you created as a drop-down for header menus will appear as a nested menu in the sidebar widget. So if you created any placeholder URLs using #, that will be an unclickable link in this menu. Just plan your WordPress menu creation accordingly.
The WordPress menu system doesn’t have to be intimidating. It might seem a bit unclear at times, but as you can see, it’s an easily navigable process that can be quite powerful once you know how to do it. Remember, though, as you continue to create your own site navigation, menus aren’t one-size-fits-all. Be sure to take into consideration who you want to find what pages on your site and create the menu system to create that experience. Not every page and post and link has to appear in the same menu. In the case of WordPress menus, less certainly can be more.
How do you structure your WordPress menus? How many different menus does your site have?
Article featured image by Julia Tim / shutterstock.com


First of all, Divi is MAGIC and I mean it. It has made my life so easy. Now I create websites with ease just because of you guys. Kudos Elegant themes for creating marvelous DIVI. And thanks for this tutorial for creating Menus in WordPress. It’s really helpful for beginners and even for some advanced users.
Hi Keeton,
Your article reminded me of the days when I wander for navigation menus but don’t understand how to use it. You described every step clearly and beautifully. I think there will be no doubts after reading this guide to the newbies.
Thanks for sharing the crucial information in such a beautiful way.
Regards,
Nitin Dabas
That’s actually what prompted it, Nitin. My wife is just learning WordPress for a new job, and she called me multiple times asking about X, Y, or Z regarding menus. So I figured other people had those issues, too! 😀
WordPress 5.6 Trac shall be updating to new type of navigation system, mainly from WP dashboard. Can you confirm?
Thanks JP.
Question regarding the widget visibility option. Does this come standard in WP or do you have a plugin installed? My widgets do not give me this option by default.
Thanks.
Hi, Lee! Thanks for pointing this out to me. I had taken it for granted that it was default because all my personal sites have it enabled. I dug around a little bit in the settings of some of them, and I discovered that it is actually a Jetpack setting under the Writing tab. It seems to be default behavior for WordPress.com sites, but not for self-hosted .org installations. Sorry for the confusion. I learned something today!