Email marketing has been a constant staple for over 20 years. Its success is because of steady consumer email behaviors and the continuous development of exceptional email marketing platforms. These platforms make it easy to send emails that get results. Mailchimp has been a leading email marketing platform used by millions to grow their audience and business. In this post, we’ll show you how to start using Mailchimp for Email Marketing step by step.
- 1 Why Use Email Marketing?
- 2 What is Mailchimp?
-
3
How to Use Mailchimp for Email Marketing – 8 Steps
- 3.1 Get Started with Mailchimp Email Marketing Account
- 3.2 How to Create a Contact List
- 3.3 Create a Signup Form
- 3.4 Add the Signup form to your WordPress Website
- 3.5 Create a Mailchimp Email Marketing Template
- 3.6 Create a Mailchimp Email Marketing Campaign
- 3.7 Sending and Scheduling a Campaign
- 3.8 Following Up On Campaign Reports
- 4 FAQs
- 5 Conclusion
Why Use Email Marketing?
Marketing your website or business is an interesting challenge. Technology, strategies, and platforms constantly change, making it hard to stay on top. The fact is email marketing remains one of the most effective ways to reach customers. It has a high return on investment (ROI), with an average of $36 for every $1 spent. Many marketers are investing a lot of time and money in building their lists and cultivating email campaigns with segmentation and automation tools to help streamline the growth of their business.
If you’re not already using email marketing, now is the time to start.
What is Mailchimp?
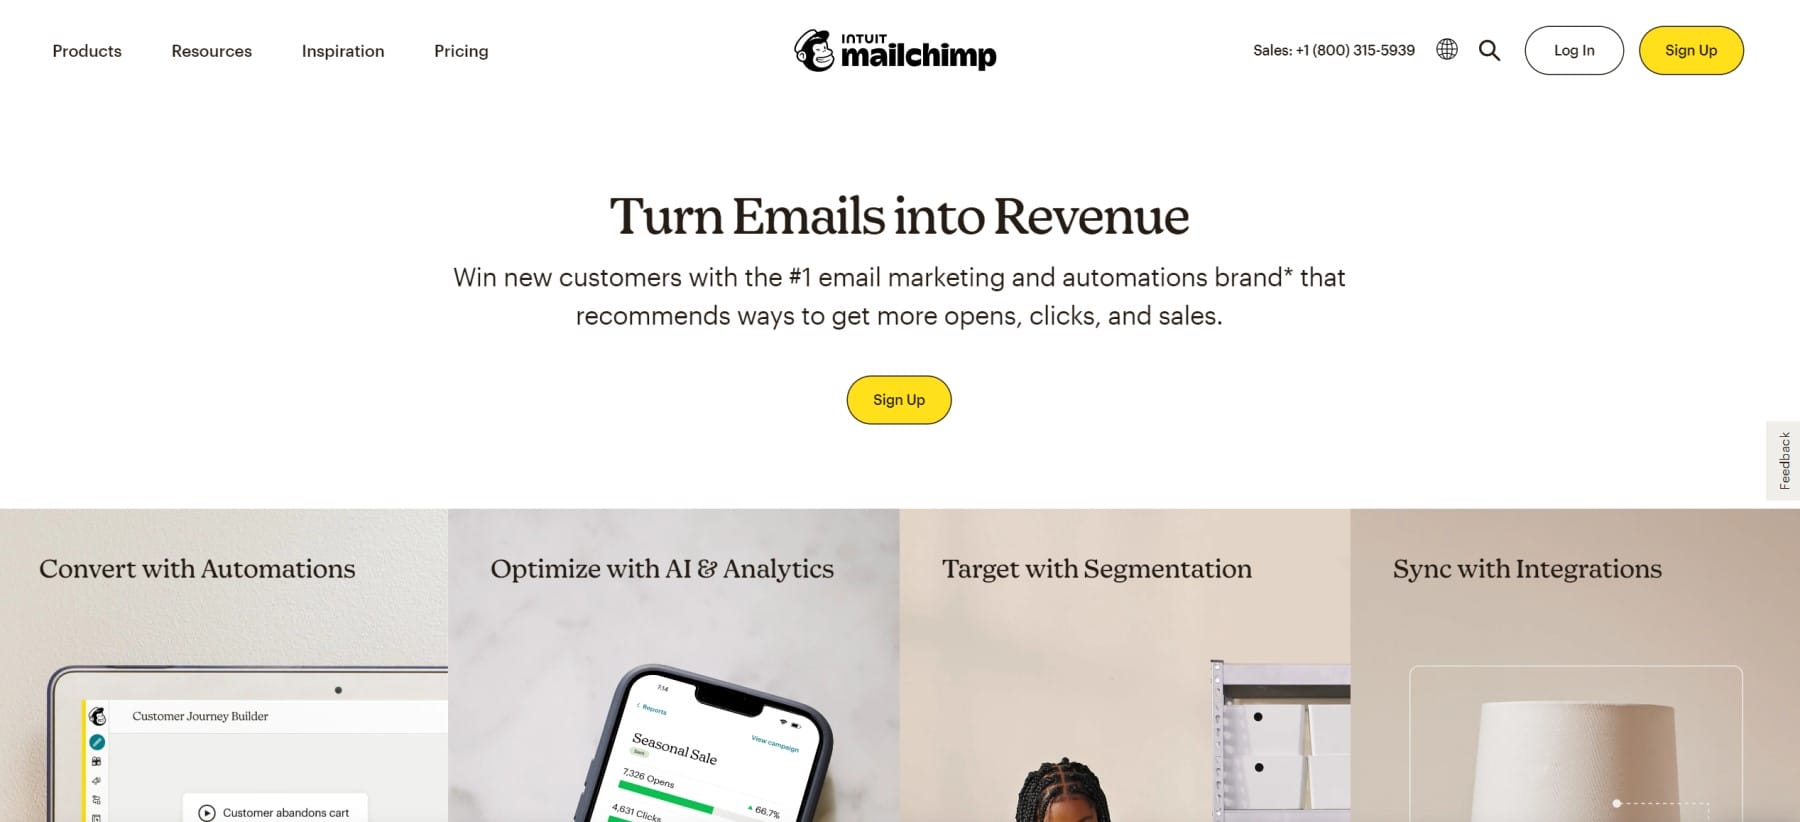
Mailchimp is primarily known as an email marketing service provider. Mailchimp had its founding in Atlanta circa 2001. It now enjoys over 11 million account users who send more than 18 billion monthly emails through the platform. The service includes features like contact segmentation, opt-in forms, automation, and a digital marketing platform. Mailchimp is clearly one of the most popular email marketing platforms used by businesses of all sizes.
WordPress users love Mailchimp because it offers easy integration with their sites with a free tier, much like many plugins they use in the Repo—which allows them to scale at will. Divi even sports a built-in MailChimp integration.
How to Use Mailchimp for Email Marketing – 8 Steps
In order to string together a successful email marketing campaign, you need to establish a few things between Mailchimp’s marketing platform and your website. We’ll look into how to use Mailchimp for email marketing with a WordPress website.
Get Started with Mailchimp Email Marketing Account
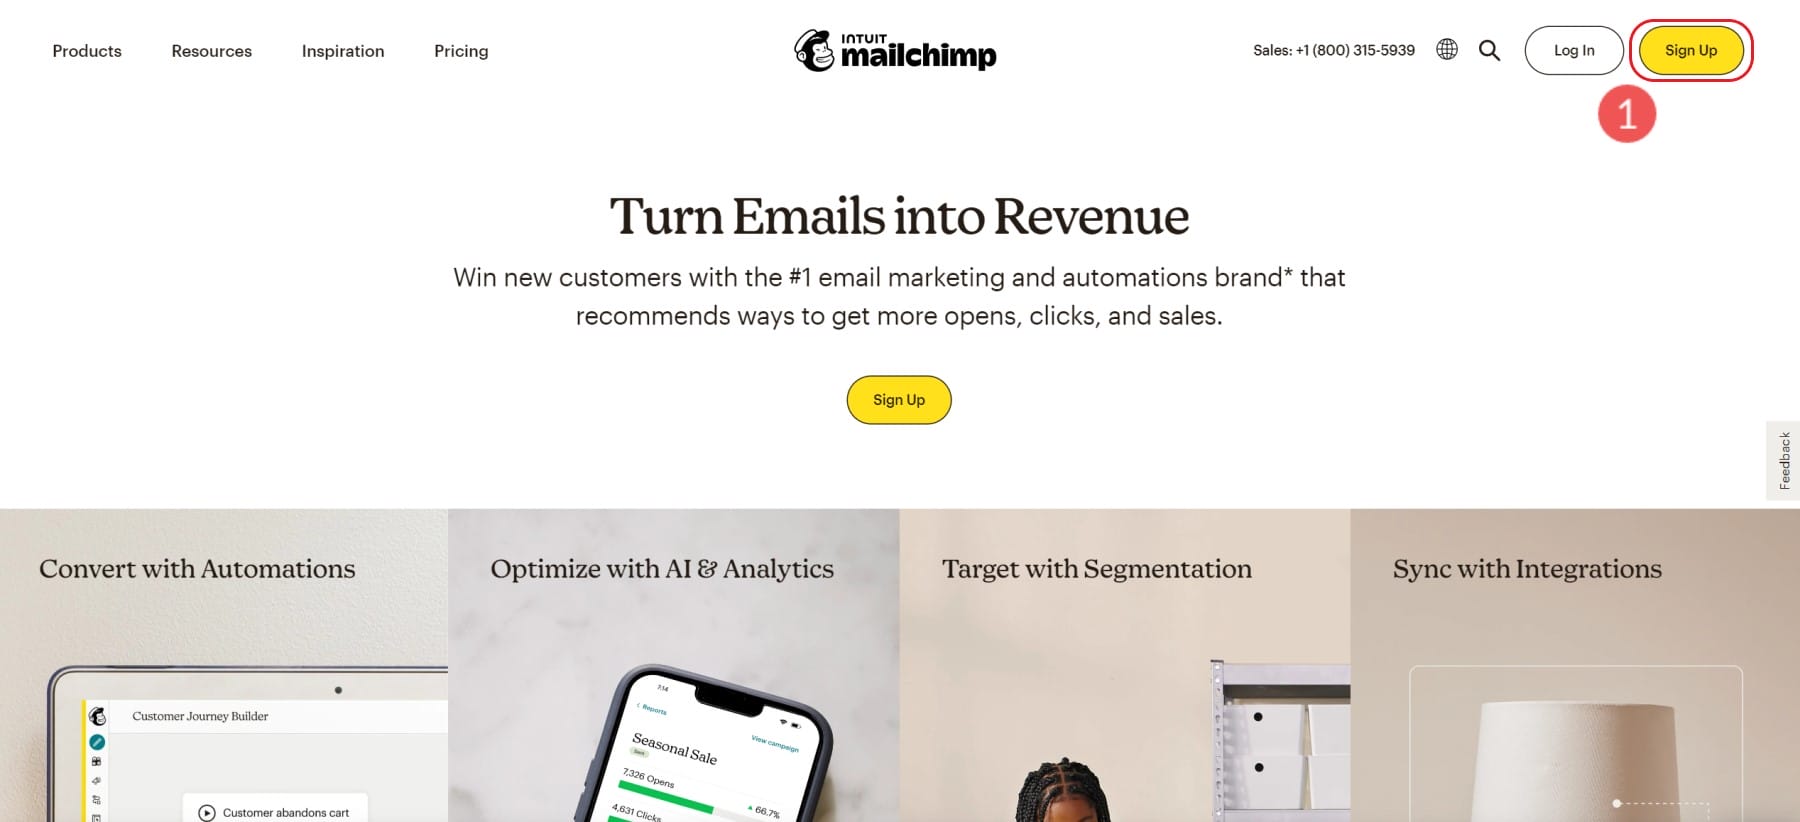
The obvious first step, if you’ve not already done this, is to sign-up for a Mailchimp account. It takes less than 2 minutes to get into the actual account.
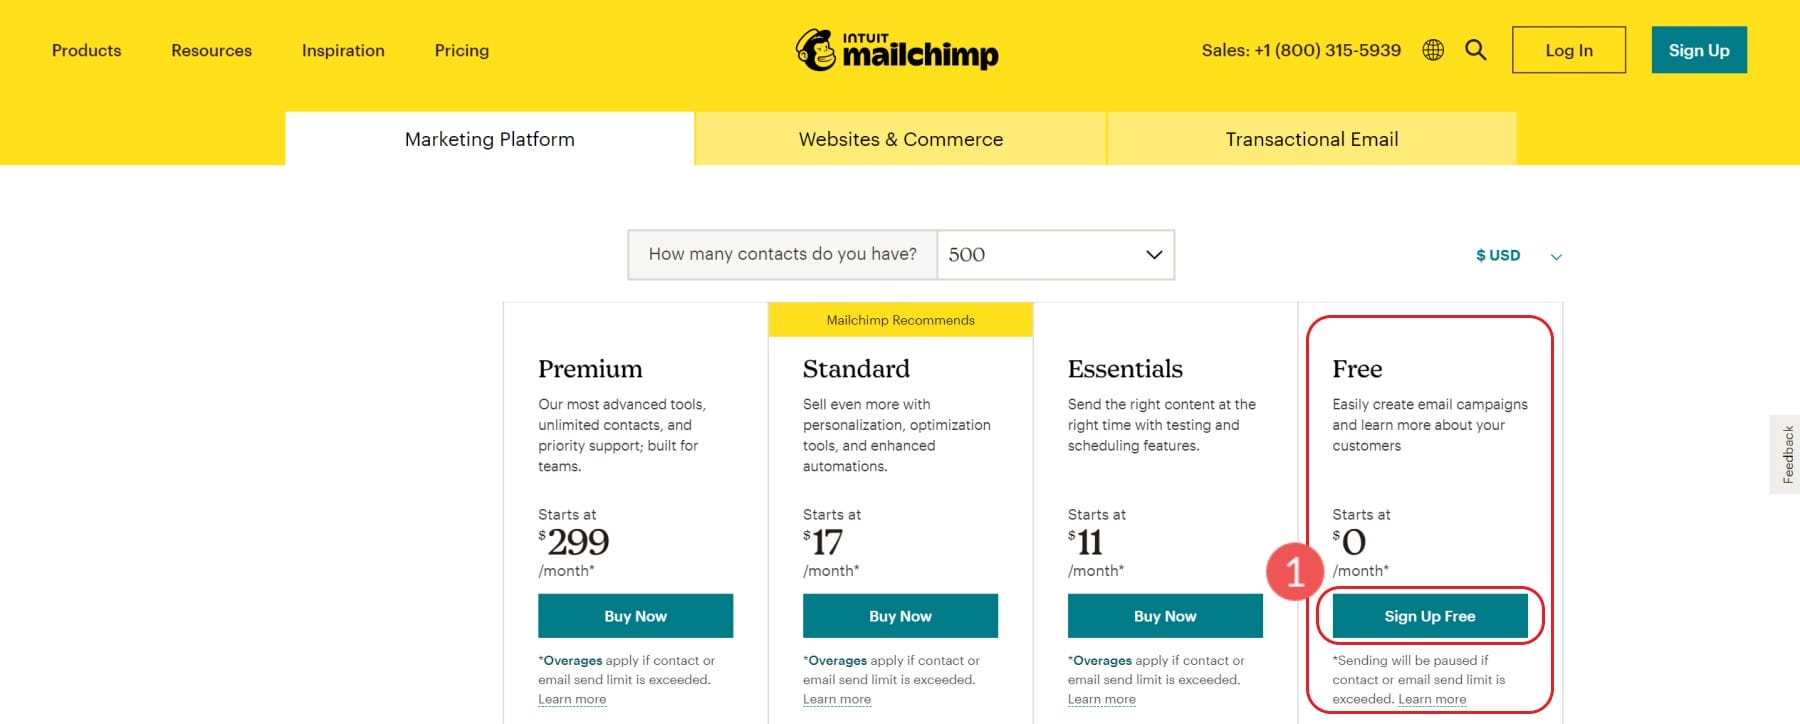
If you have a particular pricing tier in mind, you can select that. Of course, they offer a free plan with all the basic needs included (for up to 500 contacts and 1000 monthly email sends).
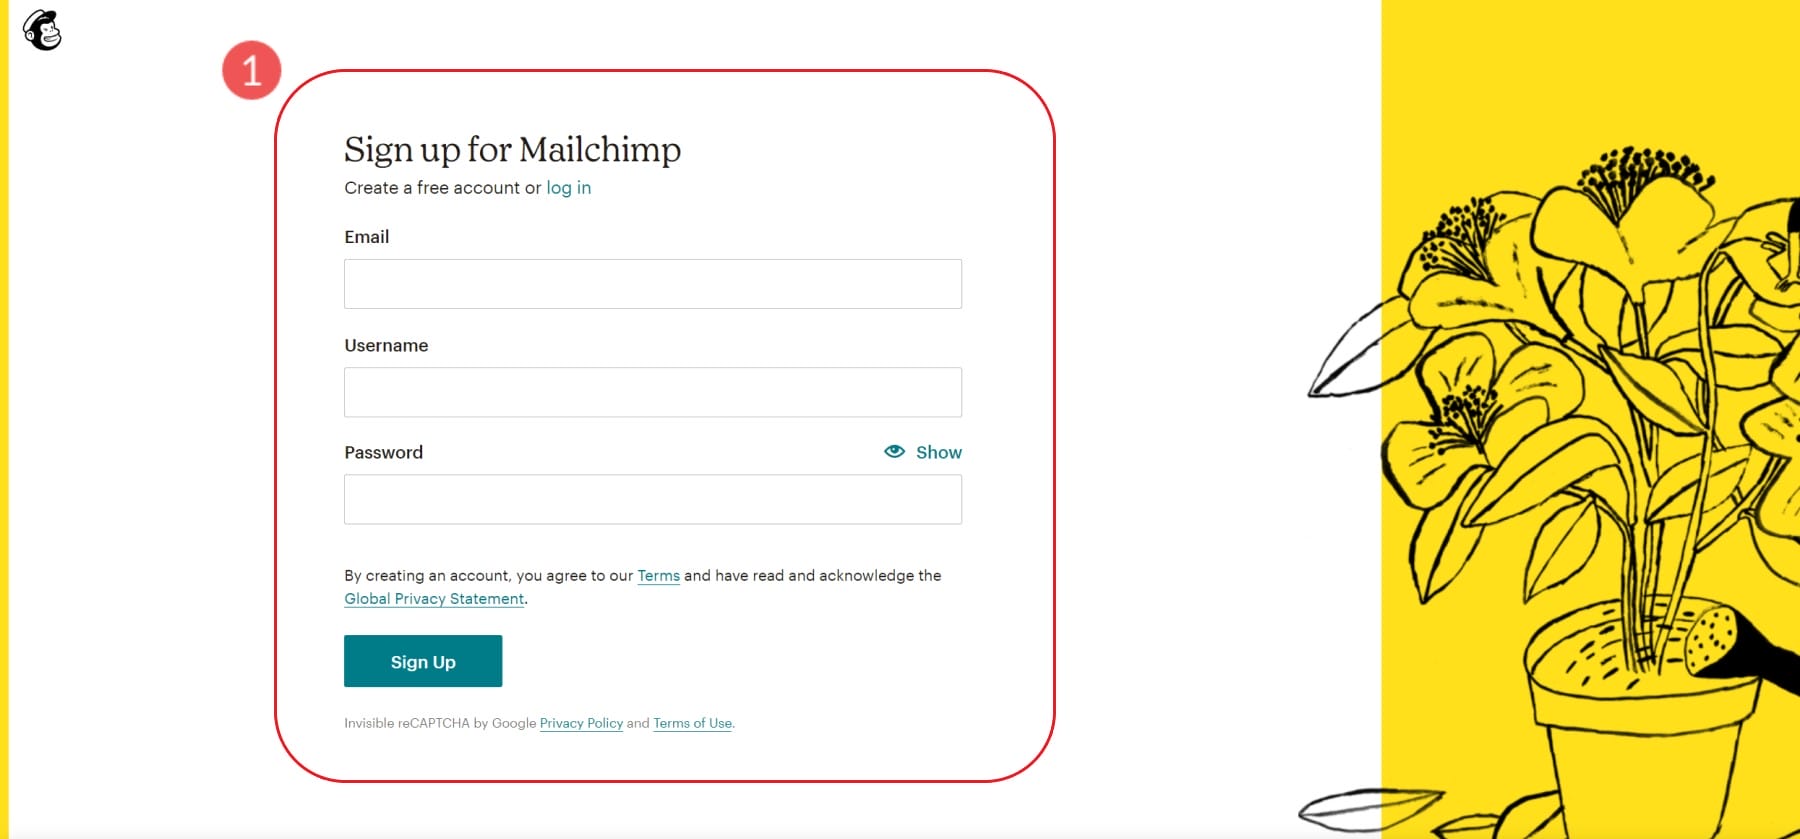
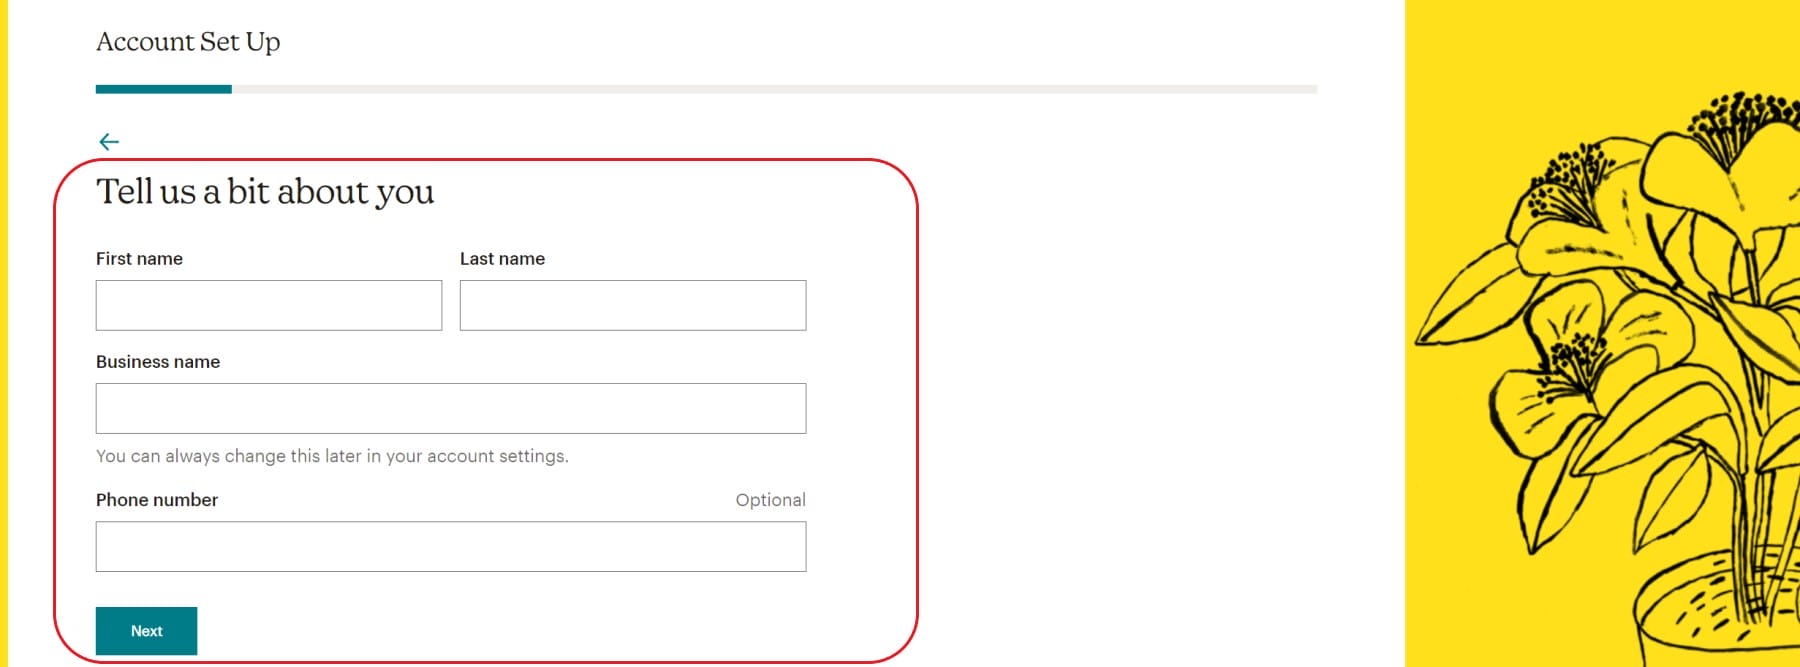
Then, you need to set up your account by providing your email, username, and password preferences for Mailchimp.
Mailchimp offers a smooth onboarding experience. It’ll ask you several stages of questions that will populate your account with the correct settings. Very important among these are your business information, physical business address, and the type of business/how you plan to use Mailchimp. Each of your answers creates a customized onboarding experience where they show you what they’d recommend you set up to achieve success.
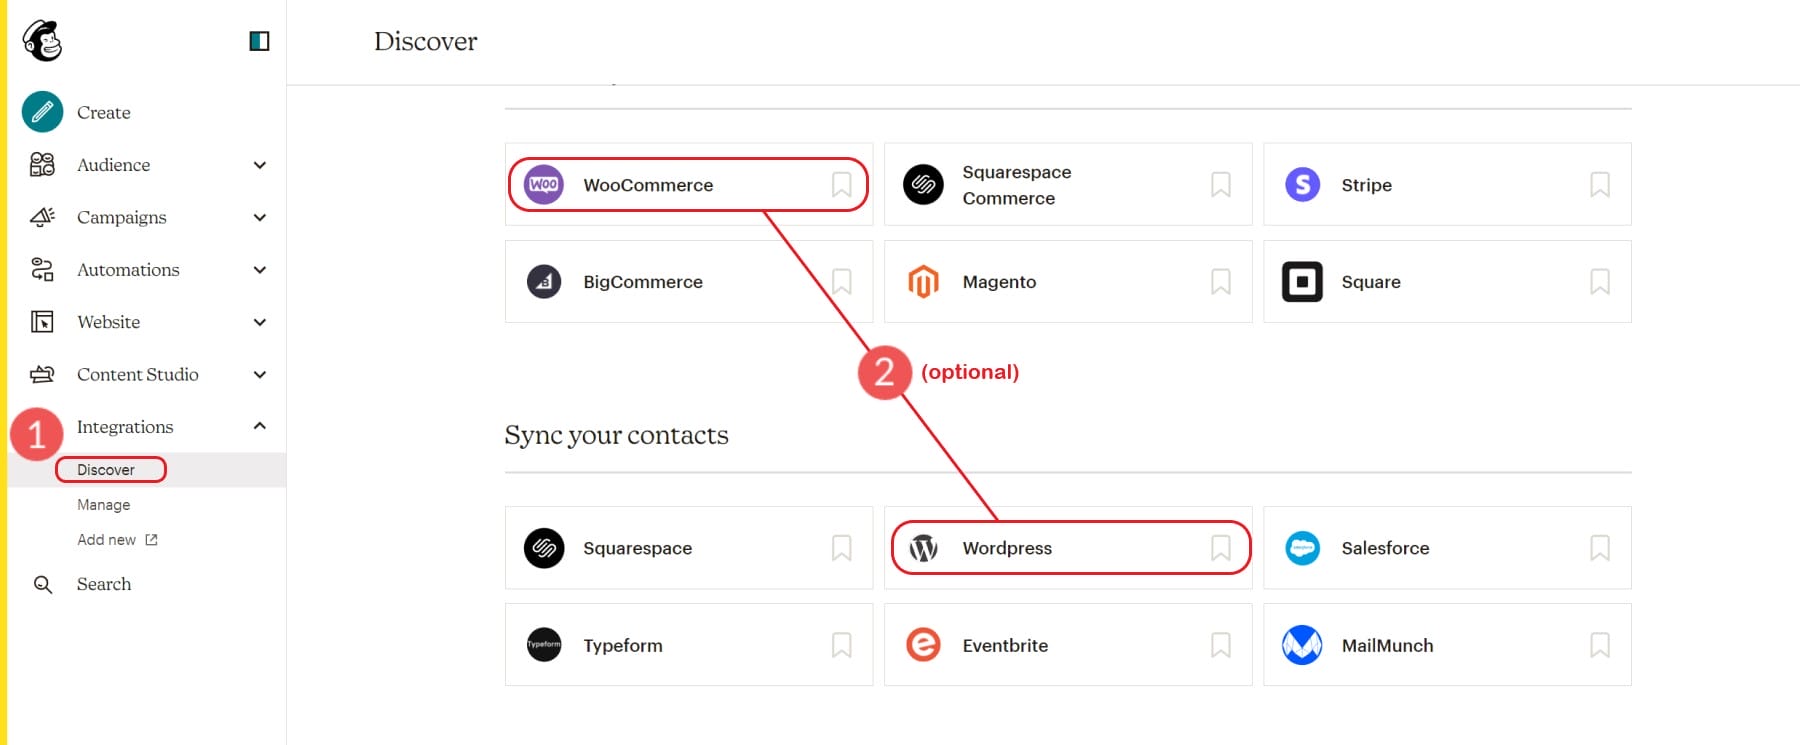
Once you’ve set up your accounts, there are two very nice WordPress-focused integrations you can set up between Mailchimp and your website. They are:
- WooCommerce Integration
- WordPress Subscriber Integration
The WooCommerce integration connects your store information (buyers, purchases, and inventory) to your Mailchimp accounts, giving you eCommerce marketing abilities within Mailchimp (subject to Mailchimp’s pricing tiers).
The general WordPress integration with Mailchimp brings your site’s subscriber information into Mailchimp. It essentially creates an easy import of those contacts into Mailchimp, so you don’t have to export your WordPress subscribers into an Excel file and import it into Mailchimp.
At this point, your account is created, and you can start diving into the depths. Next, we’ll quickly show you how to add contacts not found in WordPress or WooCommerce.
How to Create a Contact List
Mailchimp’s email marketing platform has multiple terms used for creating mailing lists. The big bucket term for Mailchimp is “Audiences”. Mailchimp recommends most businesses use 1 audience though you are allowed to use multiple should your needs be more advanced.
You can categorize and separate your audience into smaller chunks using “Groups”, “Tags”, and “Segments”. Each helps organize and filter audiences with specific criteria allowing you to send specific messages/emails to the exact people you want to.
- Mailchimp Groups: From Mailchimp, “Groups are specialized audience fields that let contacts self-categorize based on interests or preferences using uniform responses you set.” You can think of groups as Custom Fields that you can insert into contact forms for user-generated data.
- Mailchimp Tags: From Mailchimp, “Tags are labels you create to help organize your contacts. Tagging lets you bring your own contact structure into Mailchimp and label contacts based on data you know about them.” Tags are not seen on signup forms or by your contacts. They are an internal designation that you can set up to create a customized organizational structure based on your business processes and data collection practices.
- Mailchimp Segments: From Mailchimp, “Your audience contains a lot of information about your contacts, like when they were added, where they live, and how they interact with your marketing. You can use this information to filter contacts into segments, and then target them with email, postcards, or ad campaigns.” Segments are groups of filtered contacts based on available data. These segments routinely update so you can send automated campaigns based on the platform’s conditional logic.
So, creating a contact list involves data management. To get started, however, we can easily add contacts to our audience. If you are starting a new venture and have no contacts to add, you can skip down to creating a sign-up form to use on your website to start getting contacts.
How to Add/Import Contacts into Mailchimp
To start, click under “Audience” in the Mailchimp sidebar or select the “Audience dashboard” sub-item. This will show an “Add Your Contacts” button that you can click on.

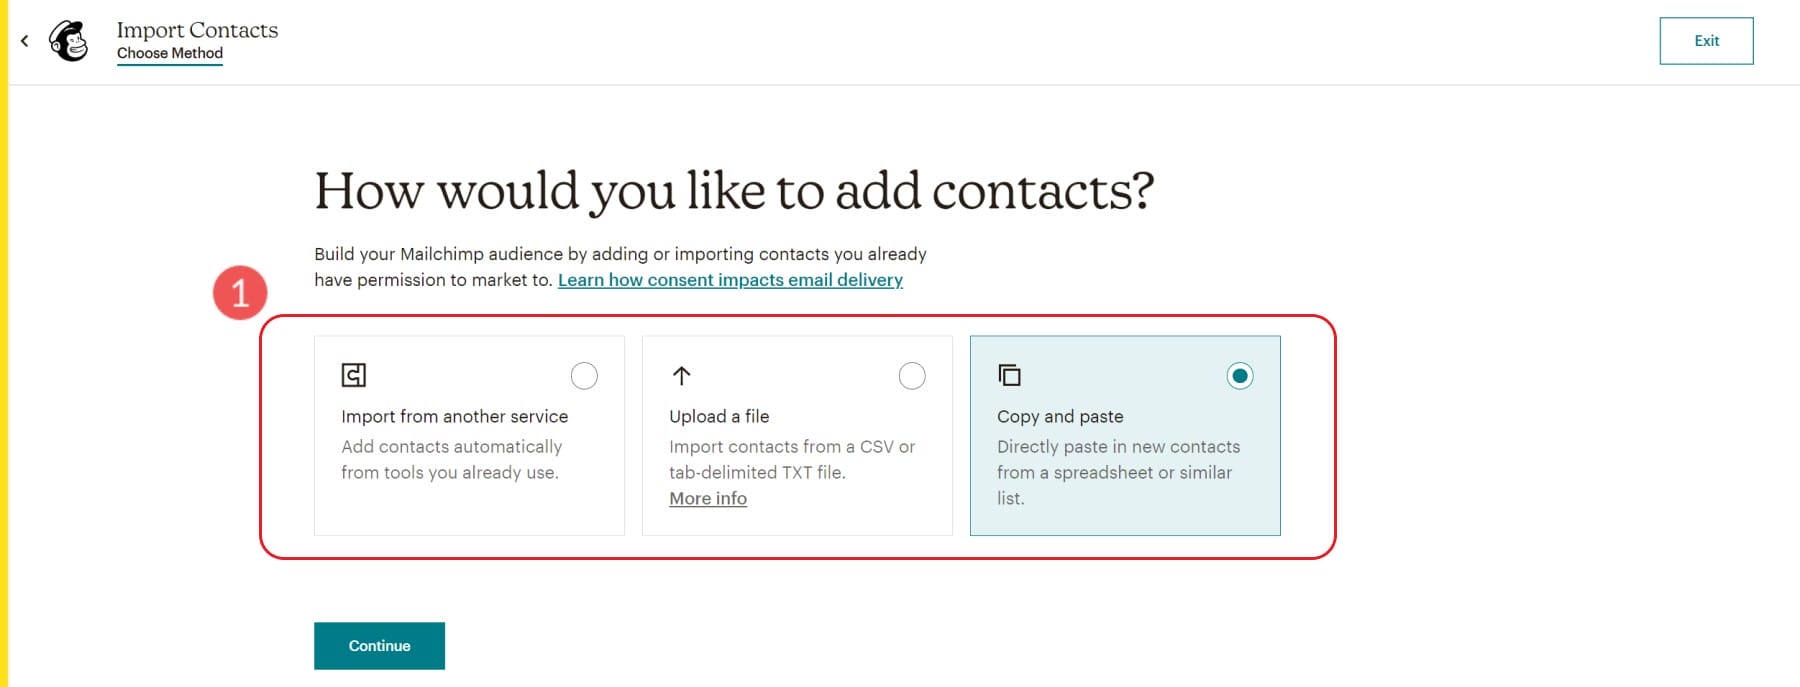
This will bring you to a few import options you have at your disposal. You can import from:
- Another Service
- Contact File
- Copy and Paste (Manual Entry)
Import Contacts from another service
Mailchimp allows you to import contacts from the following services:
- Zapier
- Salesforce
- WooCommerce
- QuickBooks Online
- Squarespace Commerce
- Shopsync
Import Contacts from File
Mailchimp uses CSV files to import contacts into an audience. If you have a past website, CRM, or accounting software that allows contact export, you can usually bring that into Mailchimp. The only required piece of data is a unique email address for each contact.
Once exported from your program, you can edit or clean up the contact list in a program like Google Sheets or Microsoft Excel. Save the list as a CSV file format and import it into Mailchimp. It should let you know if your file has errors or invalid formatting.
Manually Enter Contacts
Mailchimp also allows for a manual entry of contacts where you can copy and paste data from your various programs and files. This is a great way to collect data from random and disparate places (like email threads, text messages, and sticky notes) and add them to your account. This isn’t recommended for entering large amounts of data. You should compile large amounts of contact data into CSV files when possible.
Create a Signup Form
Whether or not you are starting out with contacts, adding a Signup form is very important to your email lists’ continued growth and health. Mailchimp is flexible and allows you to use one of several newsletter signup plugins, or you can use native Mailchimp forms that are built right into the platform. We’ll go through creating these forms in Mailchimp itself to get you started a little quicker.
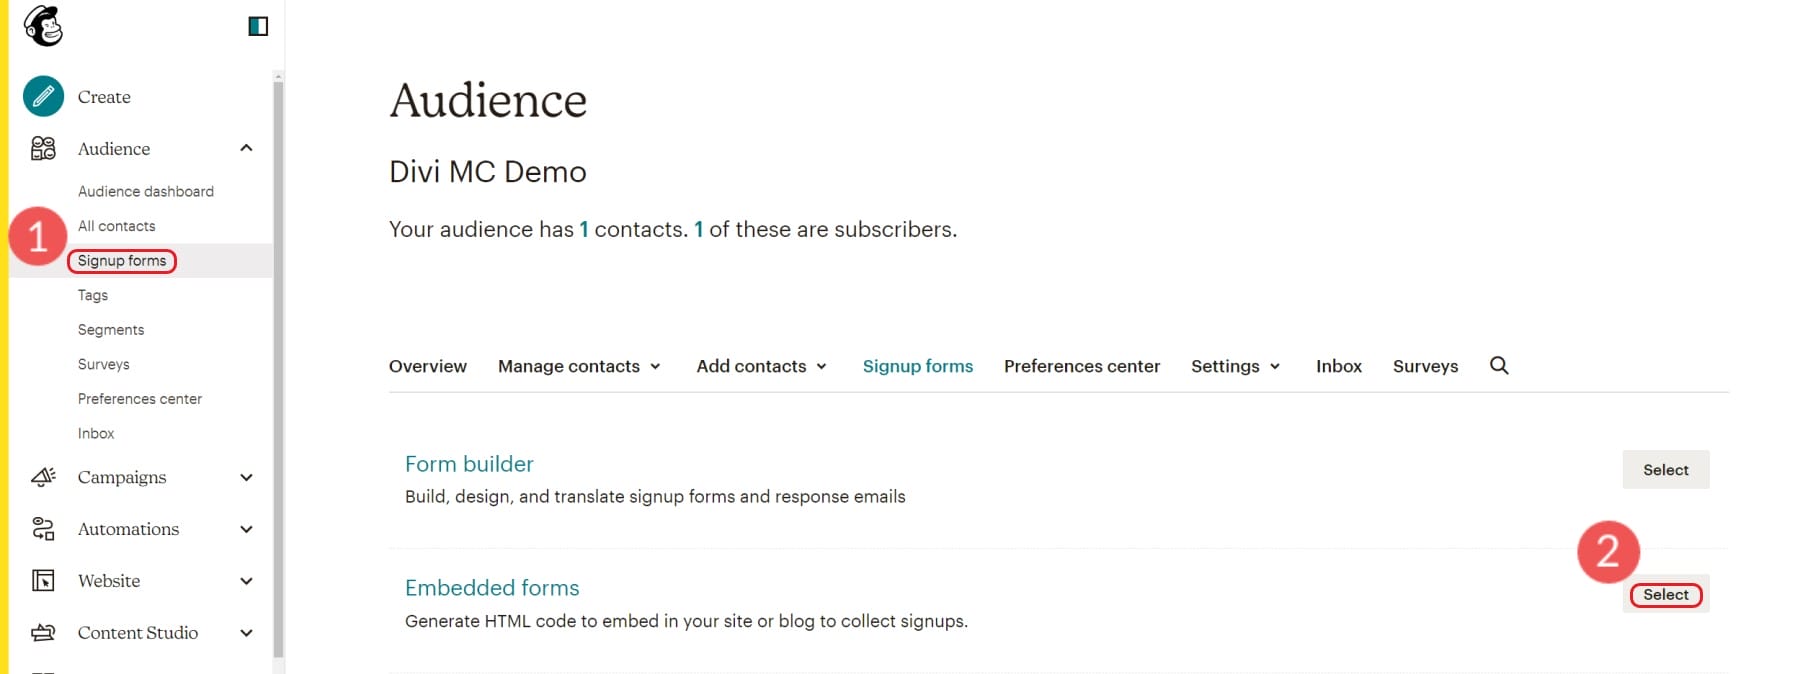
To start creating a signup form, click ” Signup forms ” under the “Audience” sidebar section, and click “Signup forms”. To create a form in your account for use on your website, select the “Embedded forms” option, which gives you an HTML code for installation on your site.
There is also an option to create a Pop-up form right under the Embedded form option. Note that poorly designed and intrusive popups can harm your SEO by affecting website UX which in some cases is taken into consideration for ranking by Google. They are also typically pretty effective at gathering new subscribers (up to 11% conversion rate) from frequent website visitors.

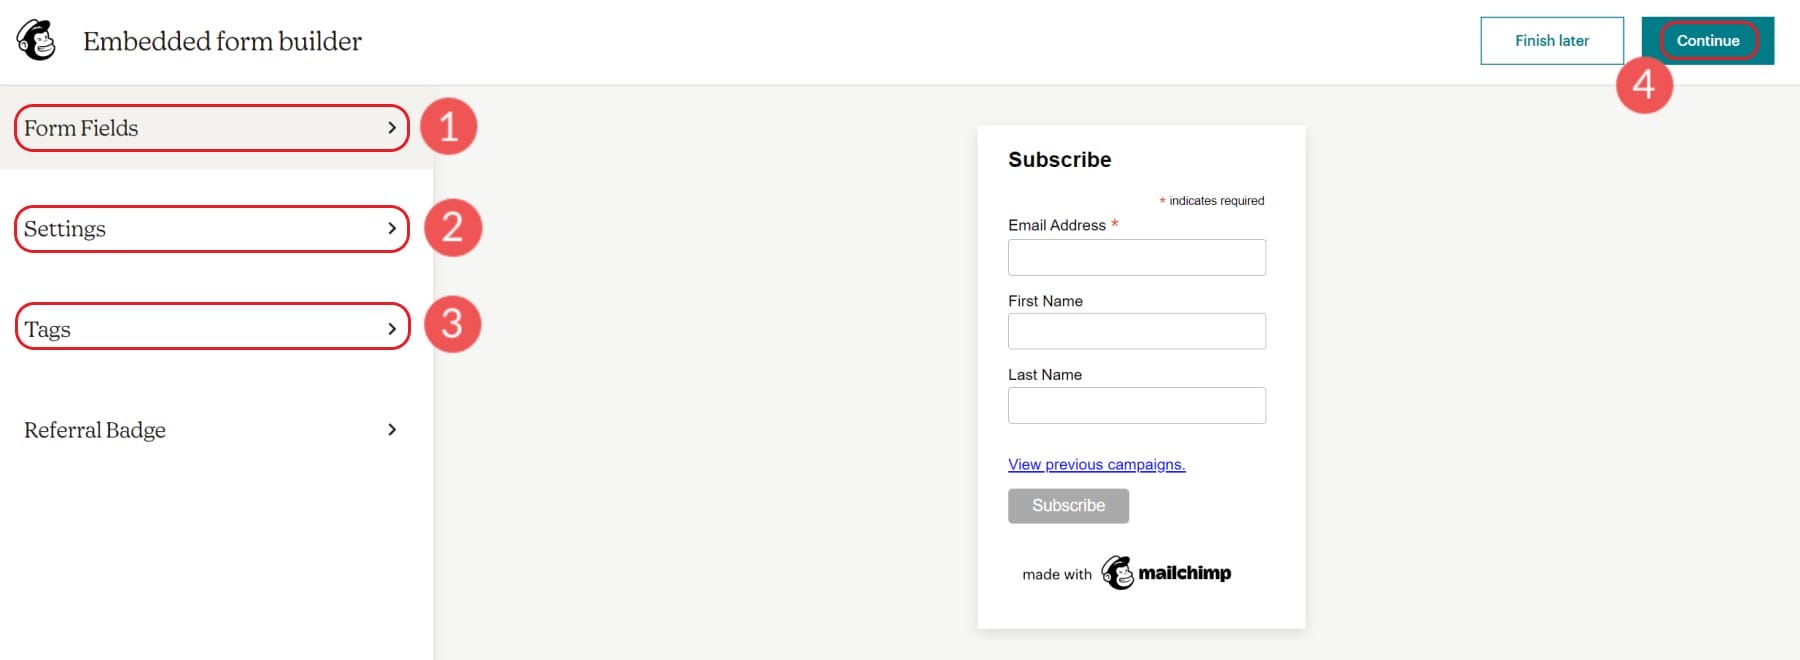
Next, you will see the Embedded Form Builder page. You can edit displayed form fields (and required fields) and various form settings. You will always see a live preview of your visual changes in the center of your screen.
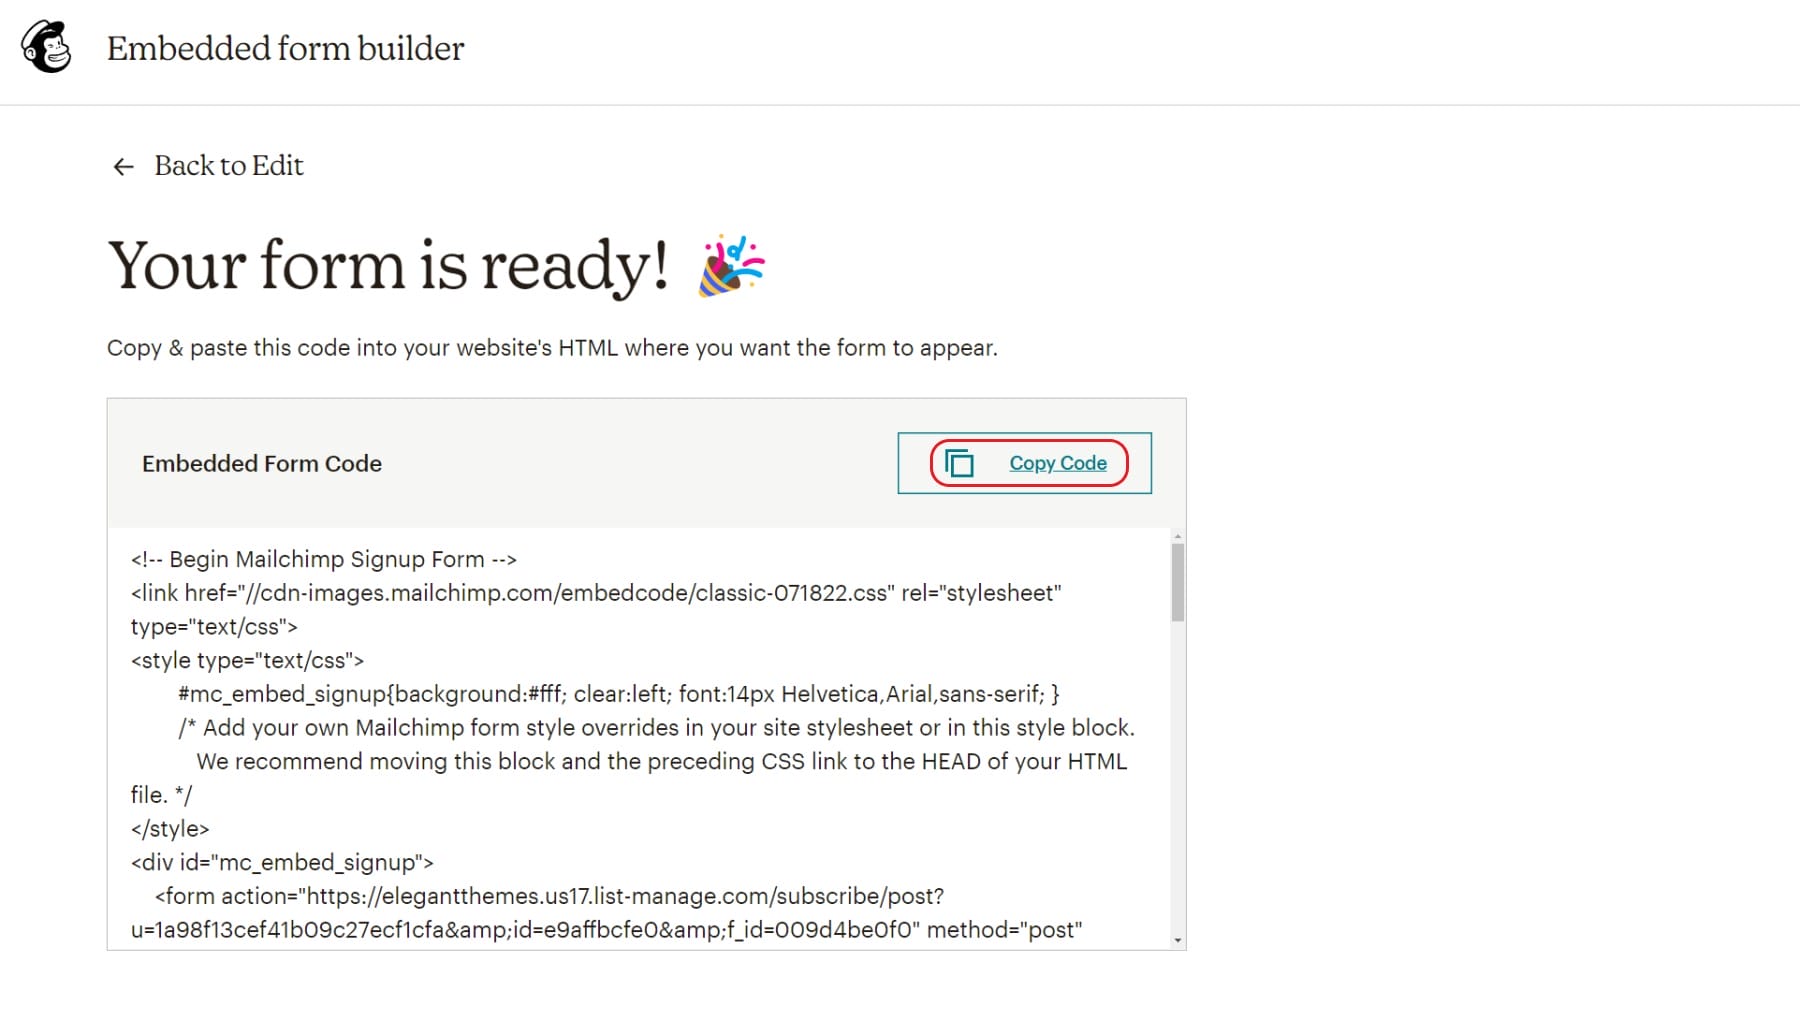
Once you’re happy with your form, click “Copy Code” to save the HTML code to your clipboard.
Add the Signup form to your WordPress Website
You can now add the form to your website. We’ll briefly go over a few ways of doing this with links to specific instructions for deploying custom inline code on your website.
Add Mailchimp Embeddable Form Code Using Custom HTML Block
On your preferred WordPress Page or Post, open the Block Editor. Add an HTML Block where you want it, and paste the HTML code.
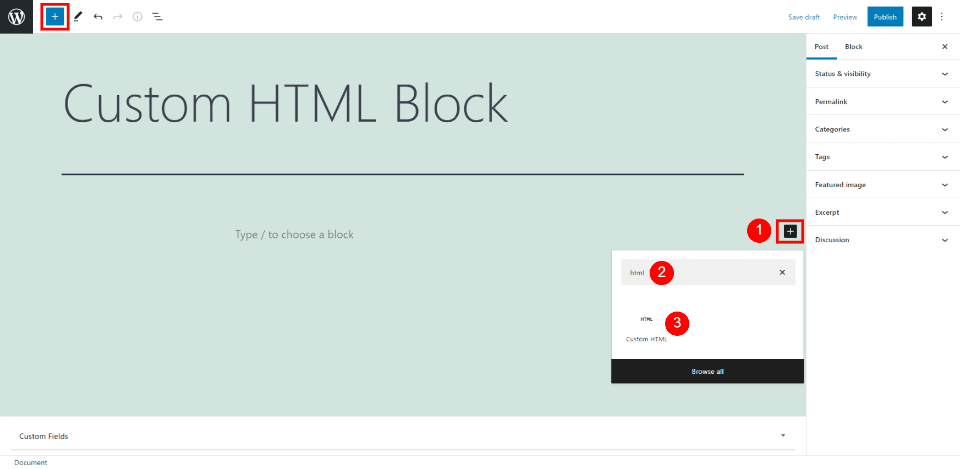
For more information, learn how to use the WordPress Custom HTML Block.
Create Opt-in Forms and Popups with Bloom that Connect to Mailchimp
Bloom is an advanced email opt-in form builder for WordPress websites that integrates with Mailchimp. It is built by the developers of the Divi Theme so you can trust that it allows for maximum design freedom.
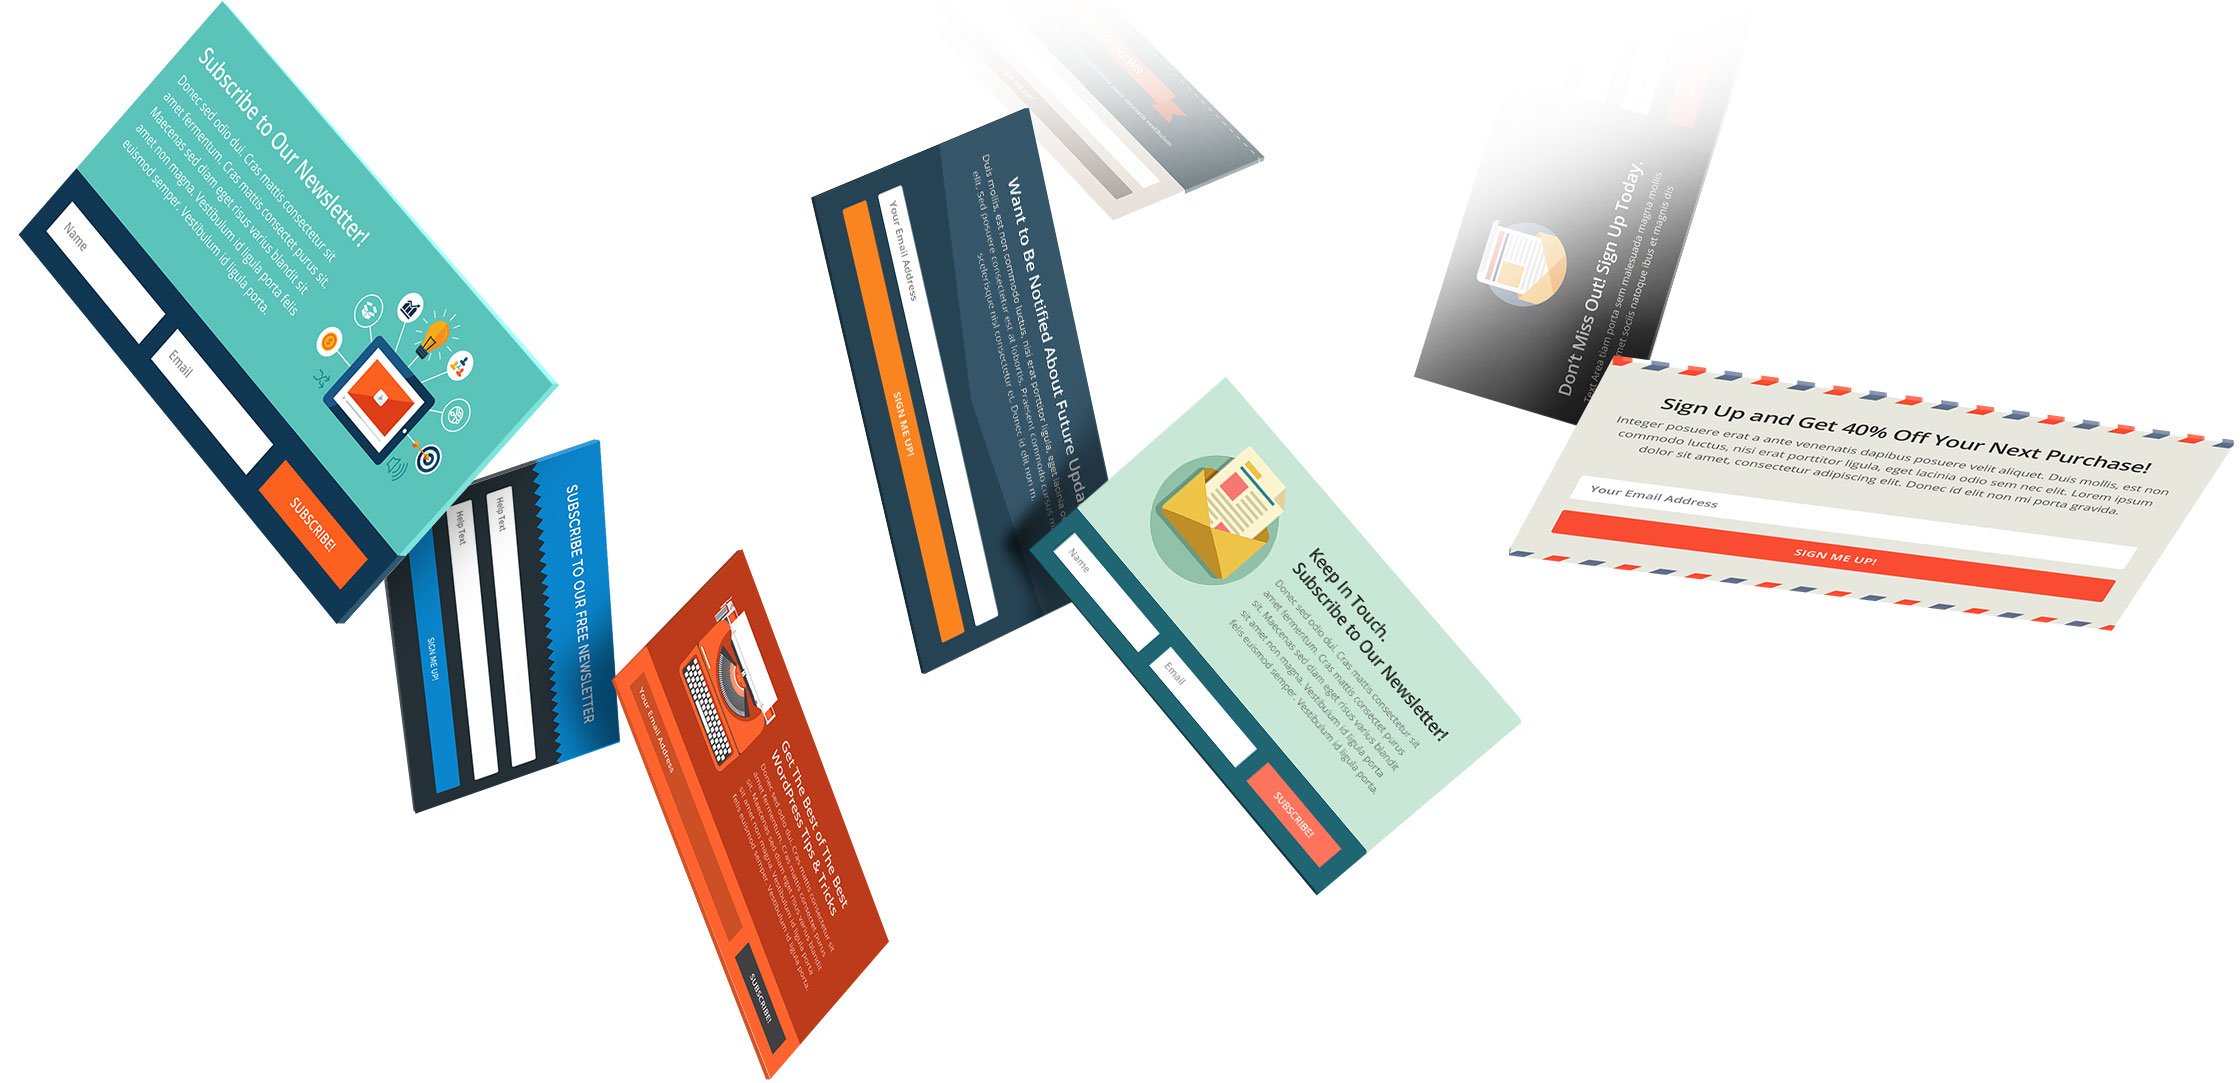
To set up the Mailchimp Integration with Bloom, install the Bloom Plugin. After that, you’ll want to follow the steps in this video to set up your Mailchimp API in the Bloom plugin settings. Mailchimp set-up instruction ends at 5 minutes and 17 seconds. Once you’ve set up your Mailchimp account integration, you can create opt-in forms in Bloom that feed new contacts to your Mailchimp account.
Of course, you have a wide range of available popup form-building plugins to choose from when you use WordPress.
Create a Mailchimp Email Marketing Template
Email templates can save a lot of time in your email campaign workflow. Reusing or repurposing an email template means you don’t have to start from a blank screen while creating your emails. Templates also keep your email uniform which helps build brand recognition and trust over time.
To create a template, on the “Campaigns” section of the sidebar, select “Templates”.

This will open up your first options. There are pre-made templates that you can choose from. You can choose between basic layouts and fully built templates that Mailchimp calls “themes”.
The layouts are nice if you know what you want to build but don’t want to undo a bunch of design settings when you insert your branding into an email. The themes are nice when you are unsure of how to use the email editor and want a quick start. Sometimes you can also find something really close to your business’ branding. Either way, the time savings are massive.
It is worth knowing that with the free tier of Mailchimp, there are limitations to which templates you are able to use.
From there, you can go on designing your template email. If you are having trouble with the email builder or just want a quick primer, see the support doc for using the email builder.
Once your template is designed, you can go ahead and save it and give it a name that you’ll remember.
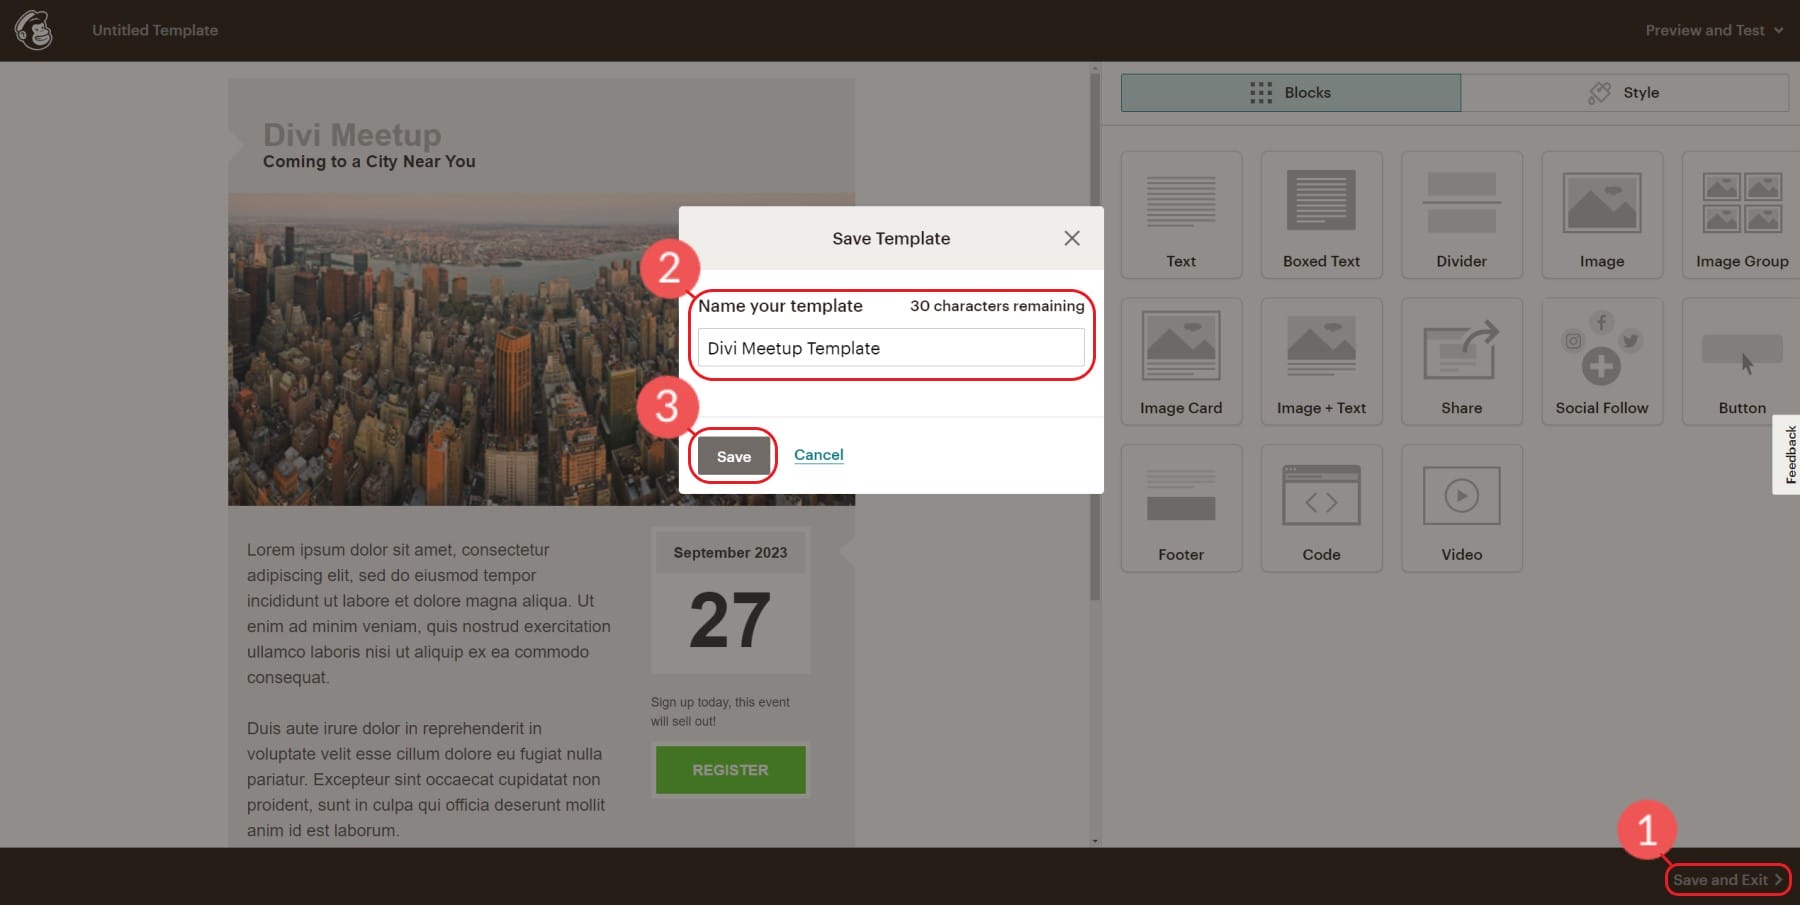
We can now use the Mailchimp template that we created for a campaign we’ll send to our lists.
Create a Mailchimp Email Marketing Campaign
After you’ve created a template in Mailchimp, we can use that to create an email campaign. To do that, on the template window, find your template, click the dropdown arrow, and select “Create campaign”. This will create a new campaign based on the template without altering the template.
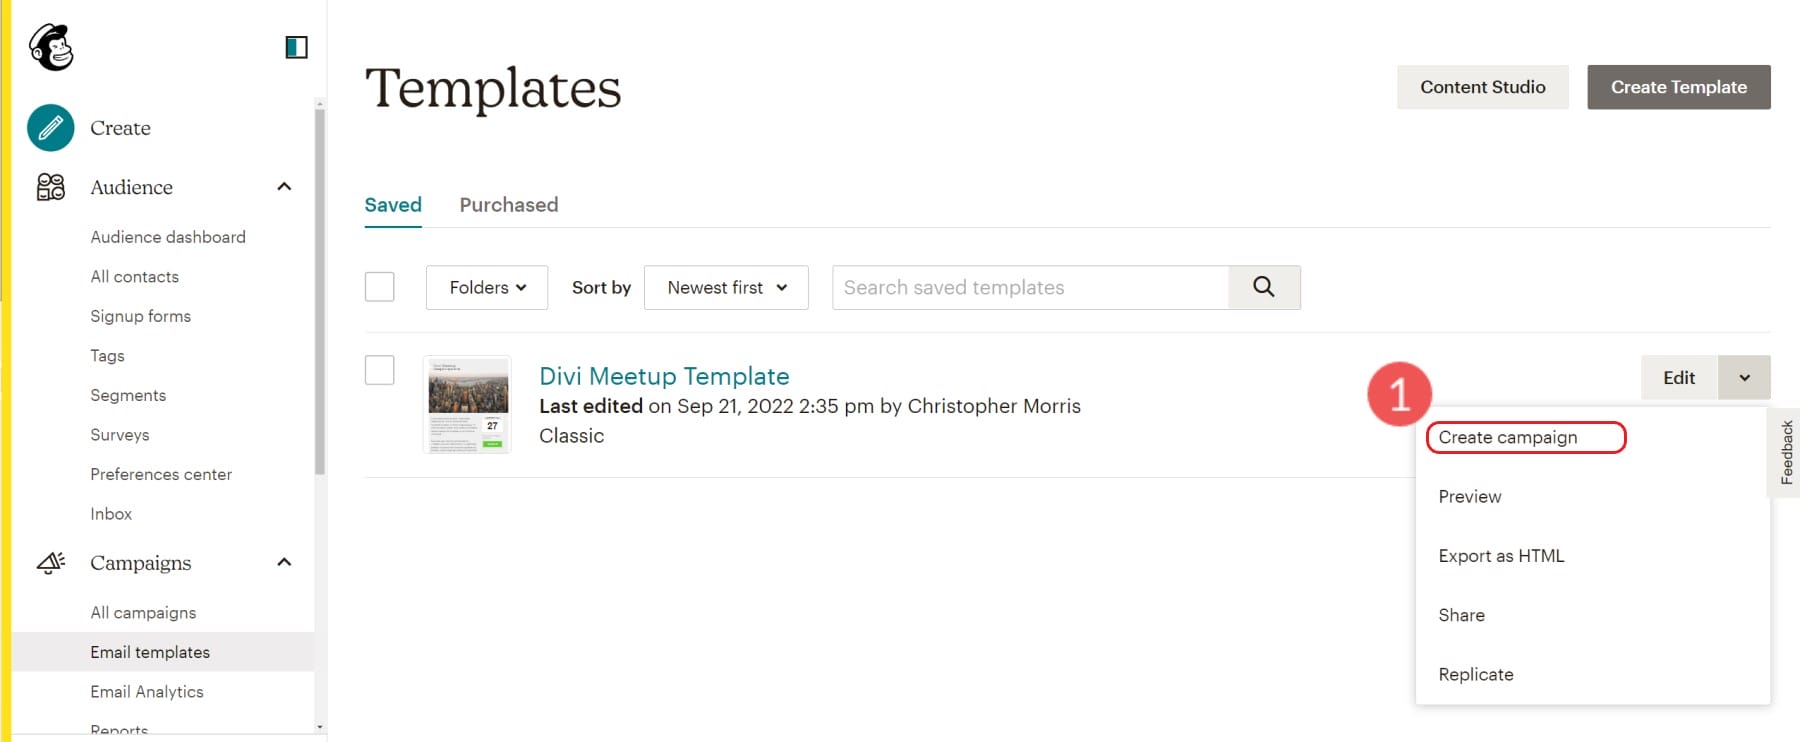
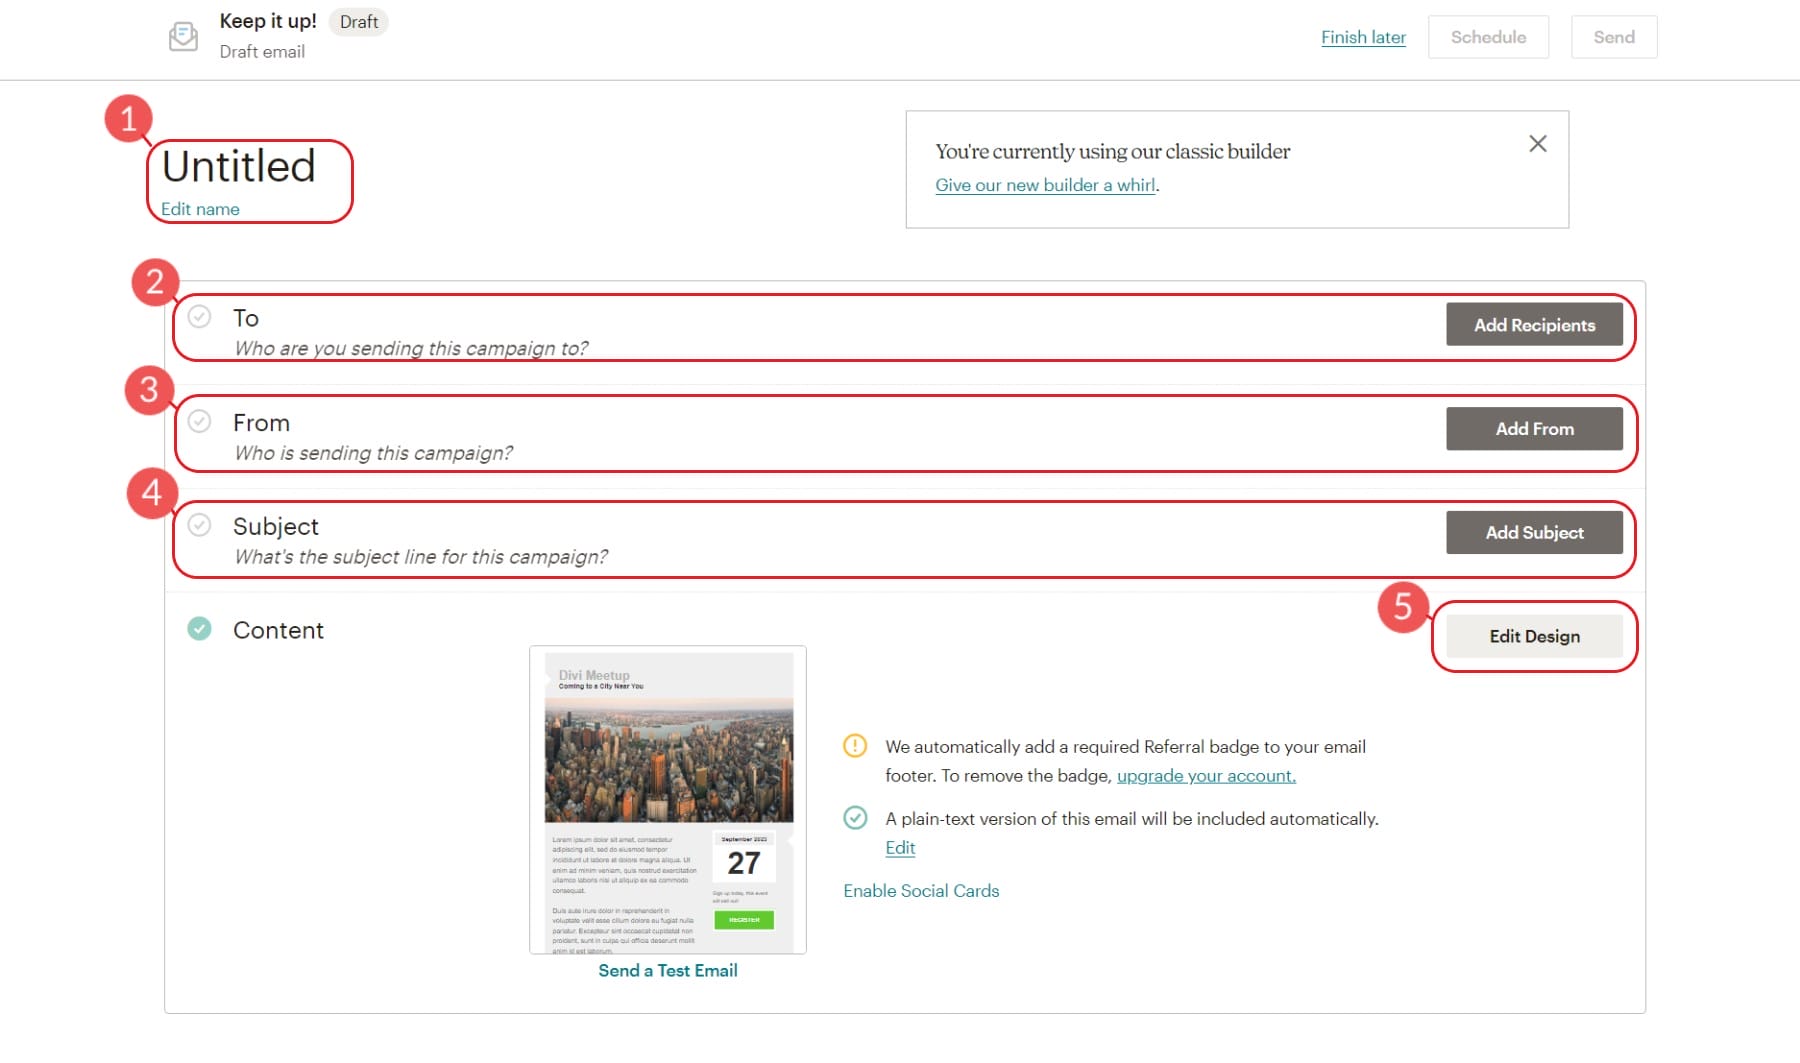
To create a campaign, a few pieces of information must be in place before sending it to your contacts.
- Campaign Name
- To Field: Who is it that you are sending this campaign to?
- From Field: What display name and email address will this email look like it is coming from?
- Subject: What email subject line will your contacts see in their email client?
- Campaign Design: Iterating off your template to create a campaign that is ready to send
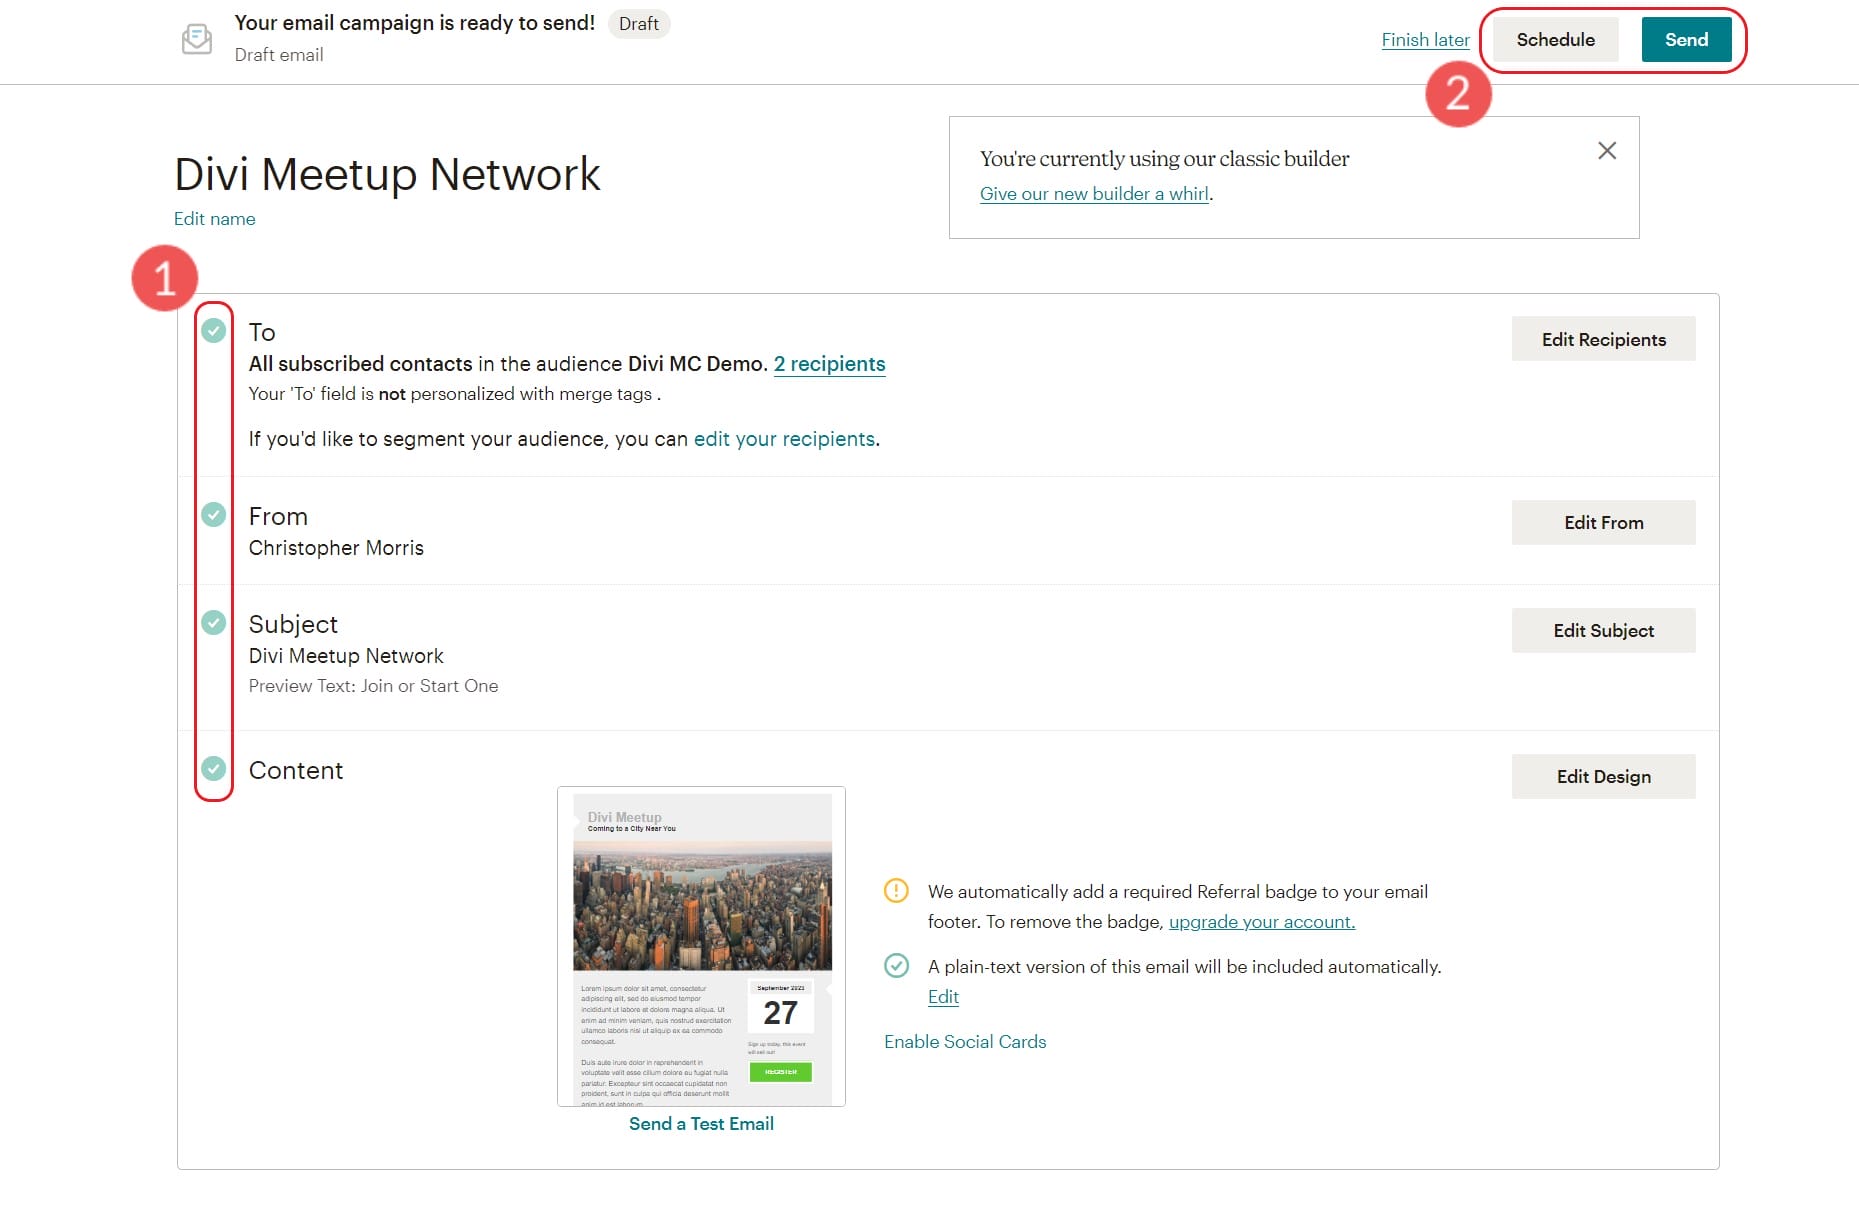
Once you’ve completed each of these steps and have a green checkmark next to them,, you can schedule or send your email.
Sending and Scheduling a Campaign
Scheduling lets you schedule a send into the future to try and send it at the perfect time. Mailchimp also has tools that can help you find your best email-sending times.
You also have the ability to send the email right away. This will let the email send to your contacts when Mailchimp servers are ready to handle the request. This usually does not take much time at all but may be longer for first-time senders.
From templates to campaigns, Mailchimp makes it easy to send business newsletters and marketing emails.
Following Up On Campaign Reports
The last thing for you to do is analyze the results of your campaign. Don’t stare at the campaign report dashboard for too long after sending your campaign because it could be hours or even upwards of 2 days for the final results of your email to come in.
When the dust has settled, here’s what to look for:
- Opens: Opens correspond with how many people opened your campaign. This number is growing more unreliable because of the transition away from cookies
- Clicks: This is how many link and image clicks happened in your email.
- Bounces: Bounces are an email delivery term indicating how many times your email went to email addresses that could not receive it. There are different types of bounces but this number reflects your overall list health.
- Unsubscribes: This is how many times this campaign was used to unsubscribe from all your future emails. This number indicates good list growth practices, consistent branding, and content that is relevant to your audience.
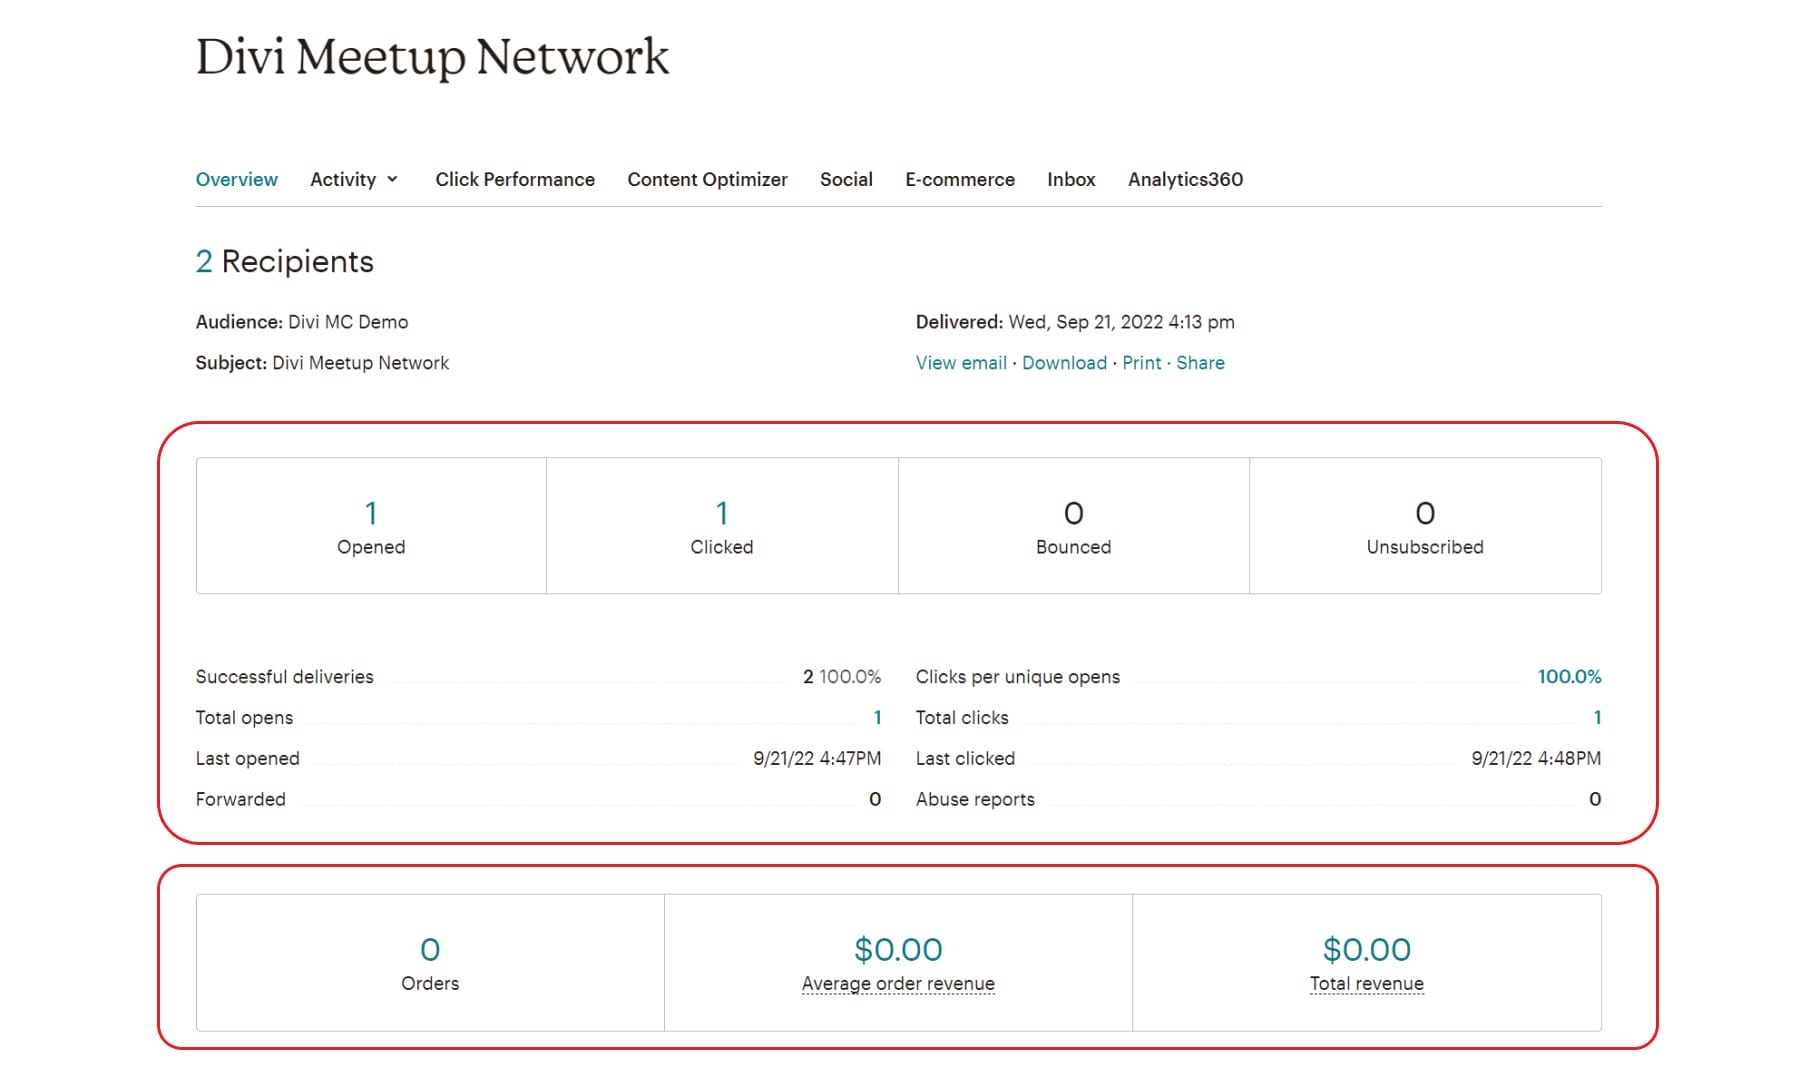
If you have the WooCommerce integration for Mailchimp, you may see eCommerce stats populate at the bottom of the report. These numbers are those that Mailchimp can prove that this campaign helped achieve. It shows the number of orders and revenue figures for that specific campaign.
FAQs
Got questions about Mailchimp, WordPress, and Divi? We’ve got answers.
Is Mailchimp Free?
Does Mailchimp Work with WordPress?
Can I integrate my email opt-in form with Mailchimp?
Does Mailchimp integrate with Divi?
Conclusion
In conclusion, if you are looking for an easy way to get started with email marketing, Mailchimp is a great option. With its user-friendly interface and integrations with popular WordPress plugins, Mailchimp makes creating and sending newsletters, automated emails, and targeted campaigns simple. Plus, its affordable pricing makes it a good choice for small businesses and startups.
Have you used MailChimp for Email Marketing? If so, share your experience in the comments below.
Featured Image via premiumicon / shutterstock.com



Hi, we have tags set up in Mailchimp, and we’d like to set tags in Bloom, but can’t find the option.
Does Divi Bloom allow you to set tags in the opt-in forms?
I am afraid tags are not supported yet. I recommend using MailChimp groups instead. Here’s how to use it in Divi:
How To Add Mailchimp Groups To The Divi Optin Module
I use mailchimp, but sending mails by mailchimp has a high risk to finish in the spamming box, especially for the gmail addresses. Is there a way to improve this.
Yes, there is! Try setting up “Email Domain Authentication”. This adjusts DMARC sending rules so that you are building and using your own sender reputation instead of relying on Mailchimp’s.
Also, avoid words/phrases that could easily trigger spam/promotions filters, like: FREE, Open NOW, and hundreds of other simple trigger words. Also, work on “List Hygiene” by deleting contacts that don’t open your emails. Better to not pay for those contacts and not have them lower your % of opened mail by ESP.
Hope that helps Auke