Maybe you’ve been using various tools in your Google Drive for some time, but have you tried to add a page in a Google Doc? How about adding a header or page number? Google Docs is packed full of functions, but you may not be aware of all of the formatting options it offers. In this article, we’ll look at some of the key functions that will make your documents look their best.
-
1
10 Google Docs Tips & Best Practices
- 1.1 1. Adding a Page
- 1.2 2. Adding Page Numbers
- 1.3 3. Adding Fonts
- 1.4 4. Adding a Table of Contents
- 1.5 5. Checking Your Word Count
- 1.6 6. Changing Page Margins
- 1.7 7. Inserting Headers and Footers
- 1.8 8. Spelling and Grammar Check
- 1.9 9. Uploading a Word Document into Google Docs
- 1.10 10. Google Docs Shortcut Keys
- 2 In Closing
10 Google Docs Tips & Best Practices
1. Adding a Page
As you add content to your Google doc, pages are automatically added to the end. If you want to insert a new page within the document, first place your cursor where you want the page inserted. Click the Insert menu, navigate to Break, then choose Page Break.
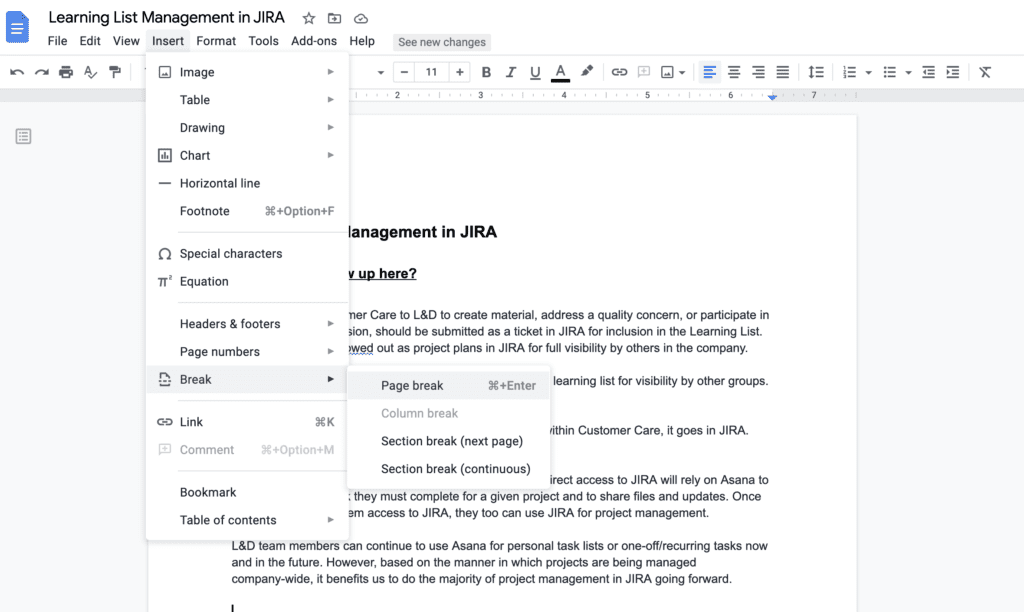
Alternatively, you can place your cursor where you want the break, the press Command + Enter to insert the page break.
2. Adding Page Numbers
From the Insert menu, choose Page Numbers. From there you can select your numbering preference using the page icons. Choices are
- Place number in the header or footer, right side only.
- Number every page, including the first page.
- Don’t number the first page.
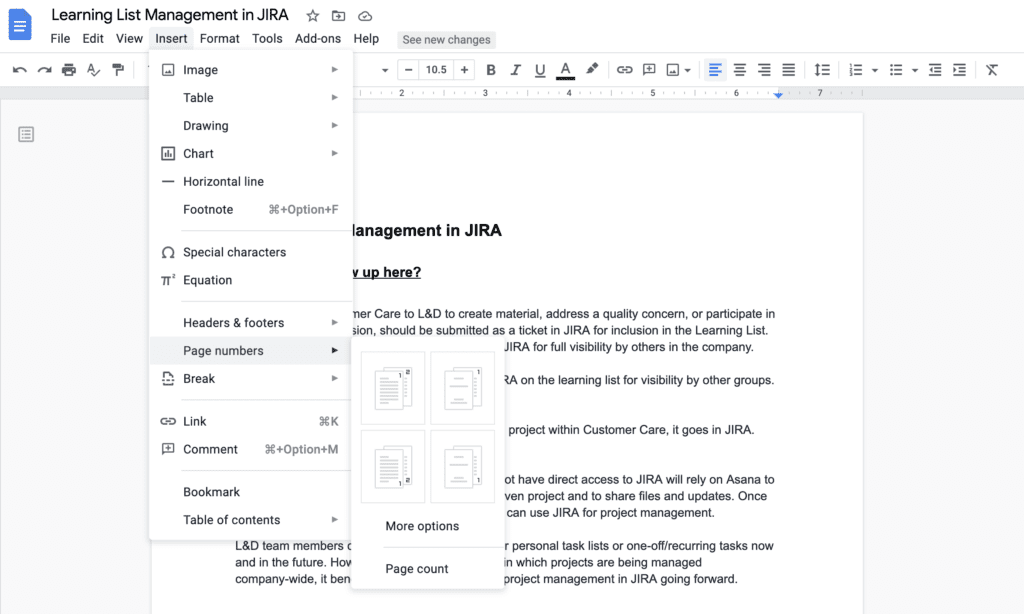
Click the icon that represents your choice from the options above. If you want to manually set those options, or want to start your numbering at a number other than 1, choose More Options from the Numbering submenu to make those changes.
3. Adding Fonts
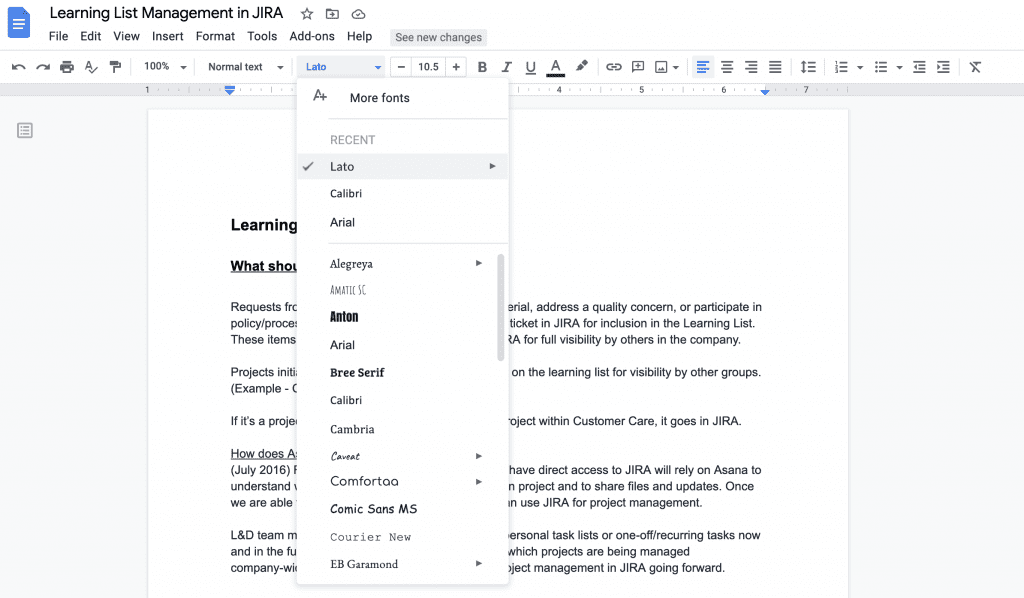
Your font list is available in a drop-down list in your top editing toolbar. Numerous default fonts are available, but if you want to explore others click the More Fonts option.
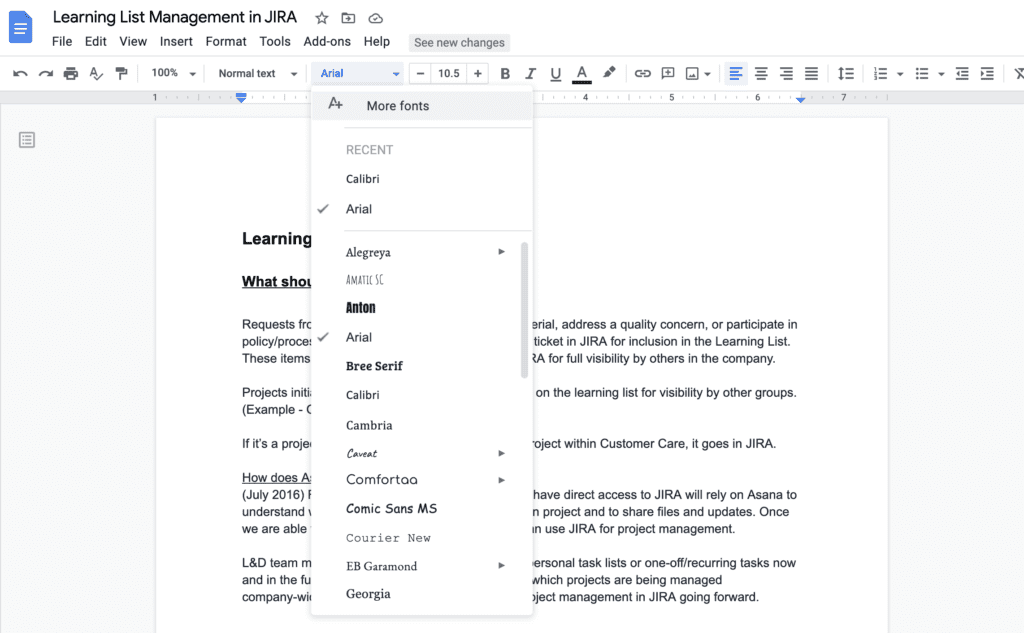
This will display a Fonts menu with several options for sorting to find the specific font you want to use, or you can enter the font name in the search box. To add your font to your list, check the name of the font in the list, then click OK to add it.
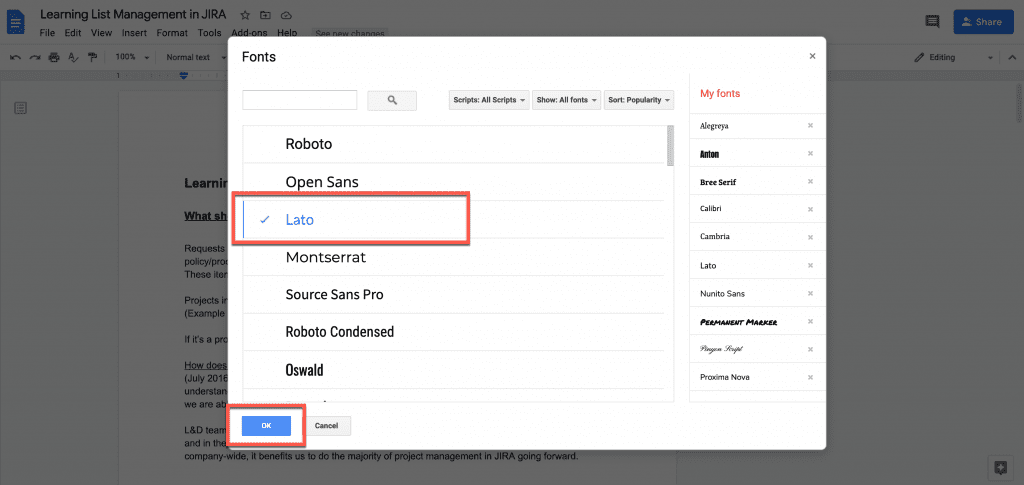
When you return to your top editing toolbar, you should see the new font in the dropdown list.
4. Adding a Table of Contents
There are two options for your Table of Contents. You can display a sidebar for navigation or add an actual Table of Contents to the document.
Your heading settings in your document will determine the layout of your Table of Contents. Heading 1 will be the top line of the Table of Contents, with subheadings listed underneath. Before you decide on an in-document display or sidebar navigation, make sure you have these set up. For more on that, see this page.
To create a navigation sidebar, choose the Add-ons menu option, and select Get add-ons.

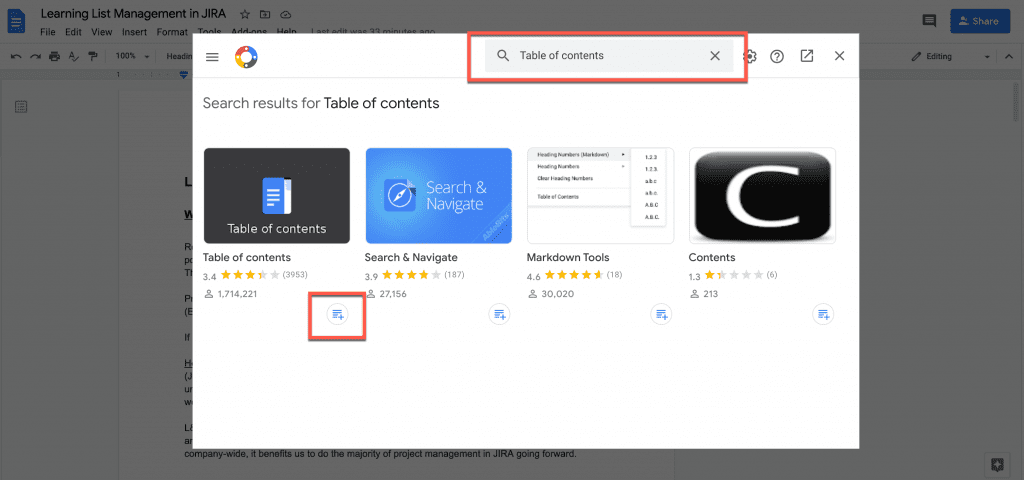
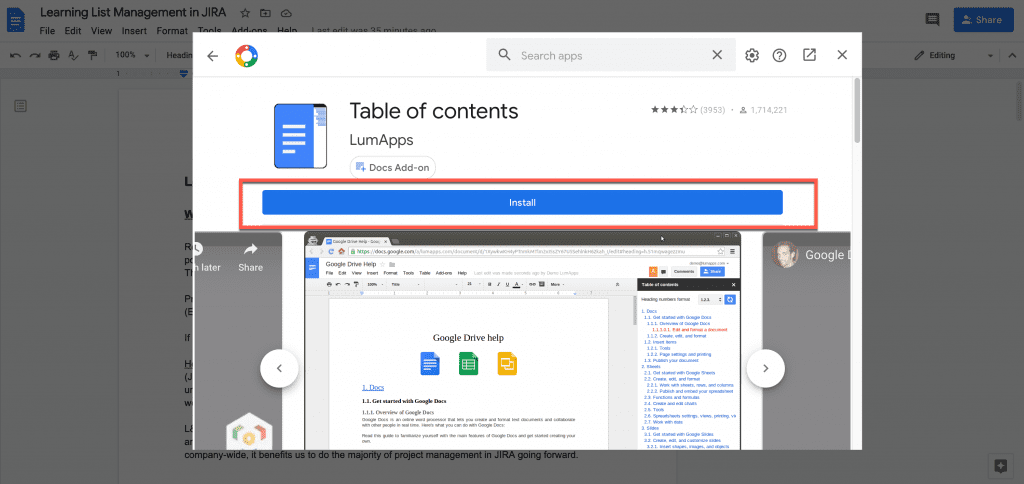
In the window that appears, search for Table of Contents. Choose the option you want, then click Install.
Once installed, the Table of Contents will display on the right side of your document.
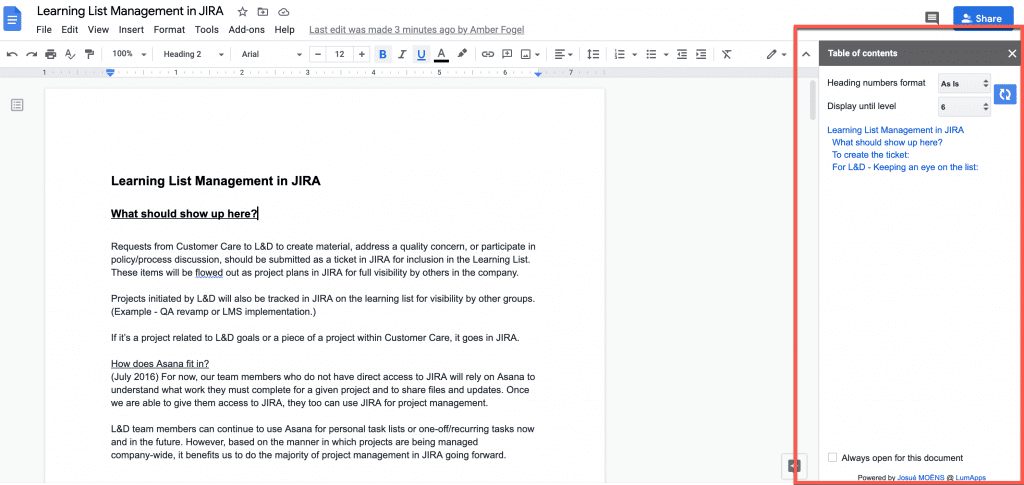
If you decide you don’t want to show the sidebar, you can click the X in the upper-right corner of the sidebar to close it. To display it again, go back to the Add-ons menu. The installed add-on will be in your add-on list, and you can select it again.
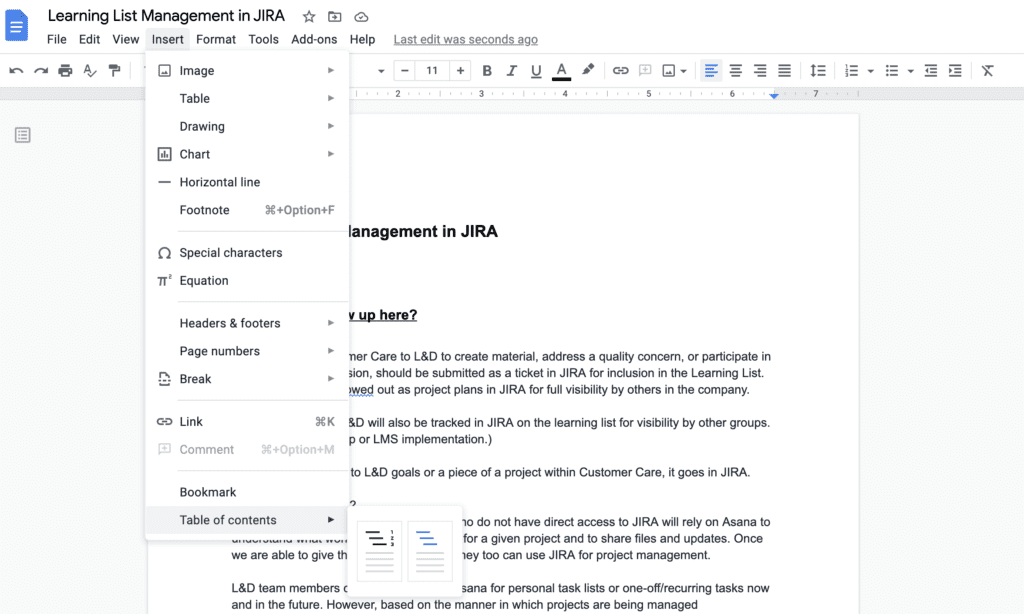
To add a Table of Contents into the document, place your cursor where you want the table to display. Choose the Insert menu, then select Table of Contents. From this option, you can choose whether or not to include the page numbers with the table.
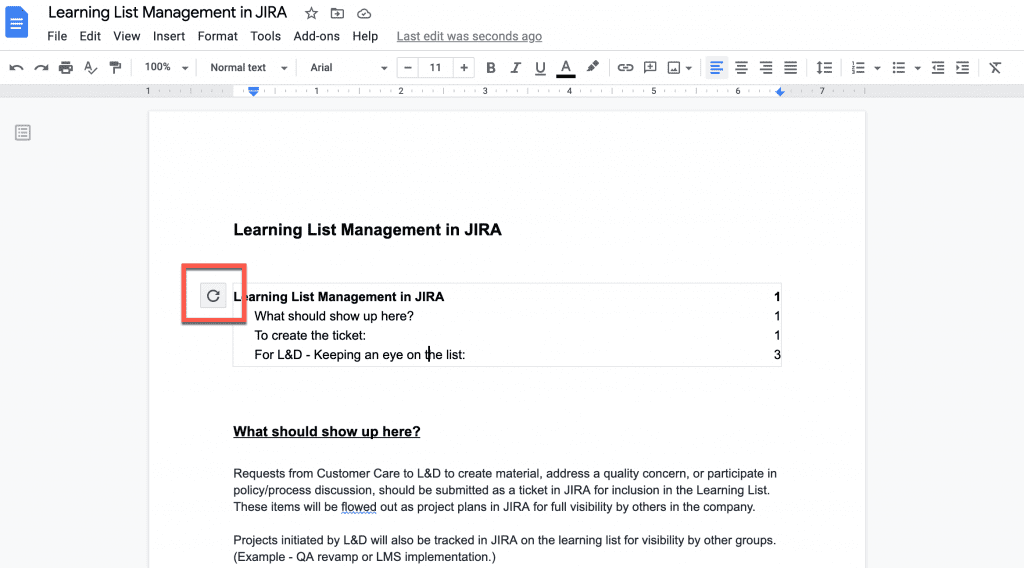
Once you make your selection, the table will display where you placed your cursor. You will need to manually update the Table of Contents as you add content to your document. To do this, go back to the Table of Contents and click the refresh icon.
5. Checking Your Word Count
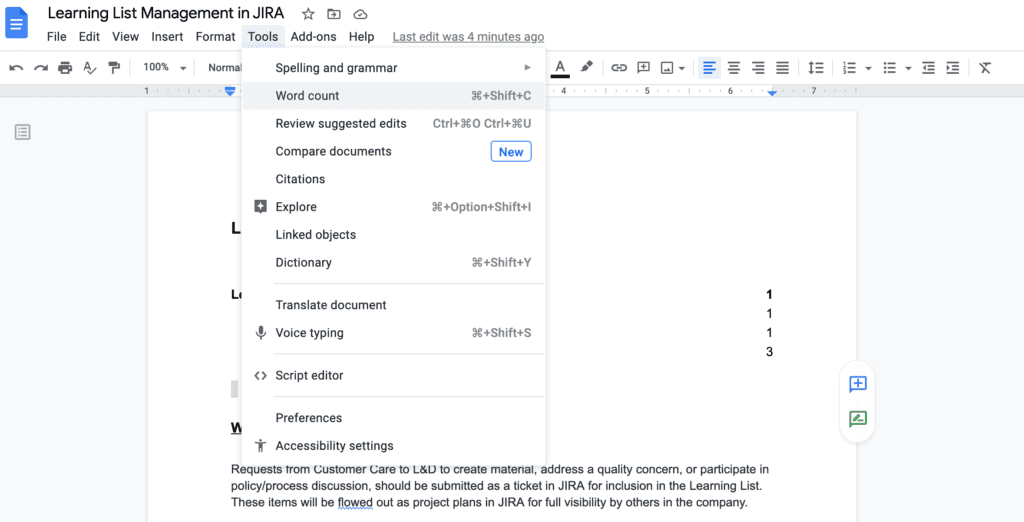
Word count is an important tool for many users of Google Docs. This function can be found under the Tools Menu. When you choose Word Count, the widget that appears will show the word count and several others:
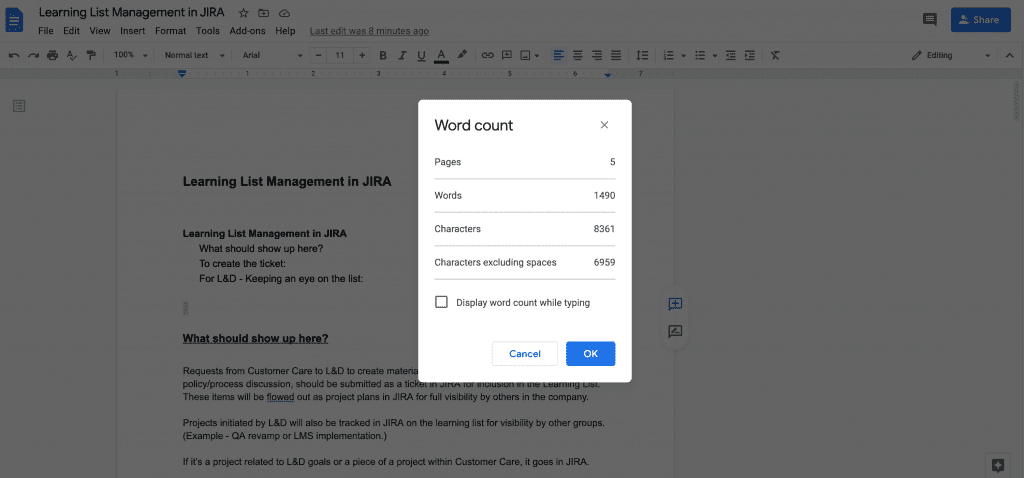
If you want to keep track of your word count as you work in your document, check the “Display word count while typing” box. The word count will display in a box in the lower-left corner of your screen as you continue to work.
6. Changing Page Margins
To change the size of your margins, choose the File menu, then select Page Setup.
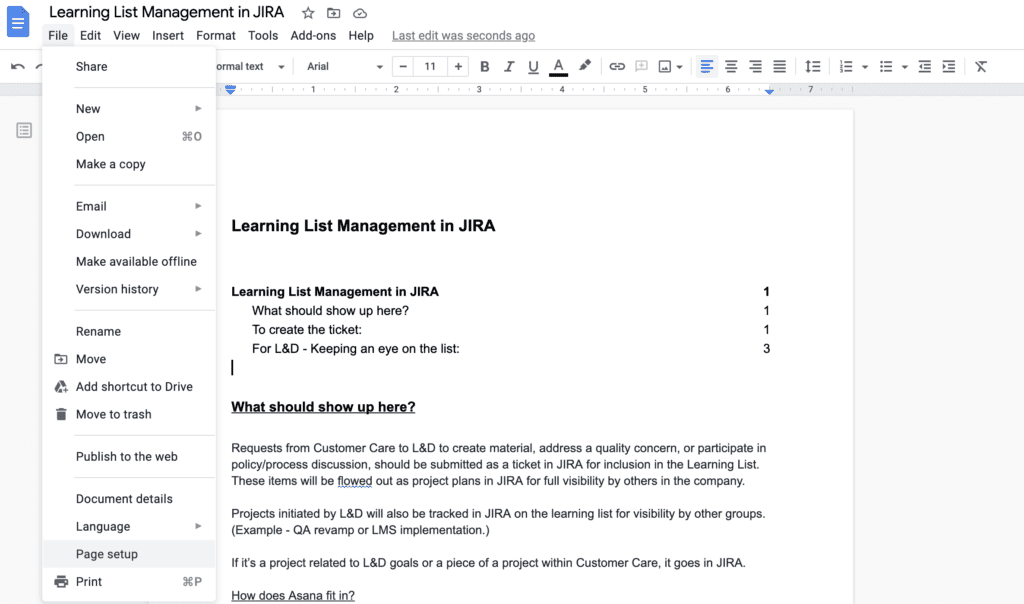
From the menu that appears, you can set the margin size to your liking as well as change the page orientation, page size and/or page color.
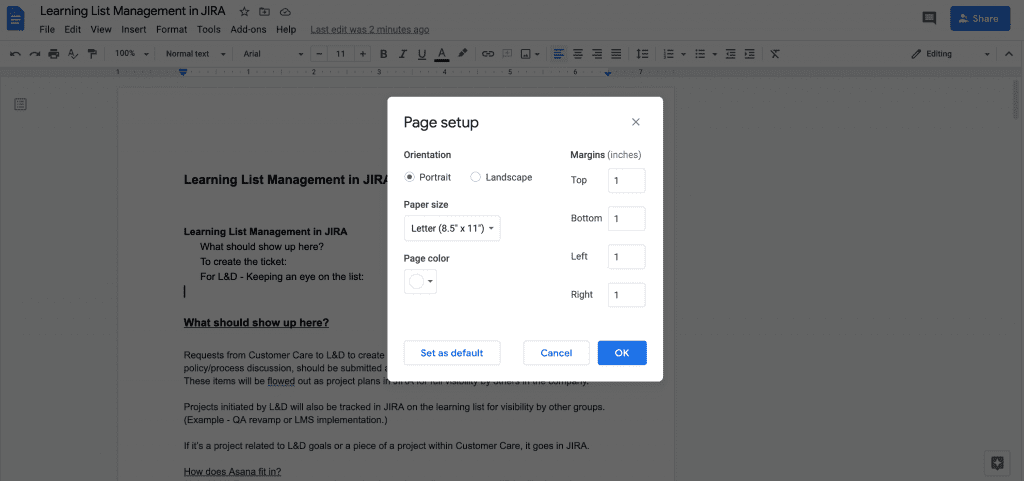
Click Ok to save your changes, and your document will automatically adjust to the new settings.
Headers and footers can be useful reference points for you and your readers. You can include the title and page number or even indicate “Last Updated” to indicate how recently the document was edited.
To include a Header or Footer, select the Insert menu then the Header and Footer option.
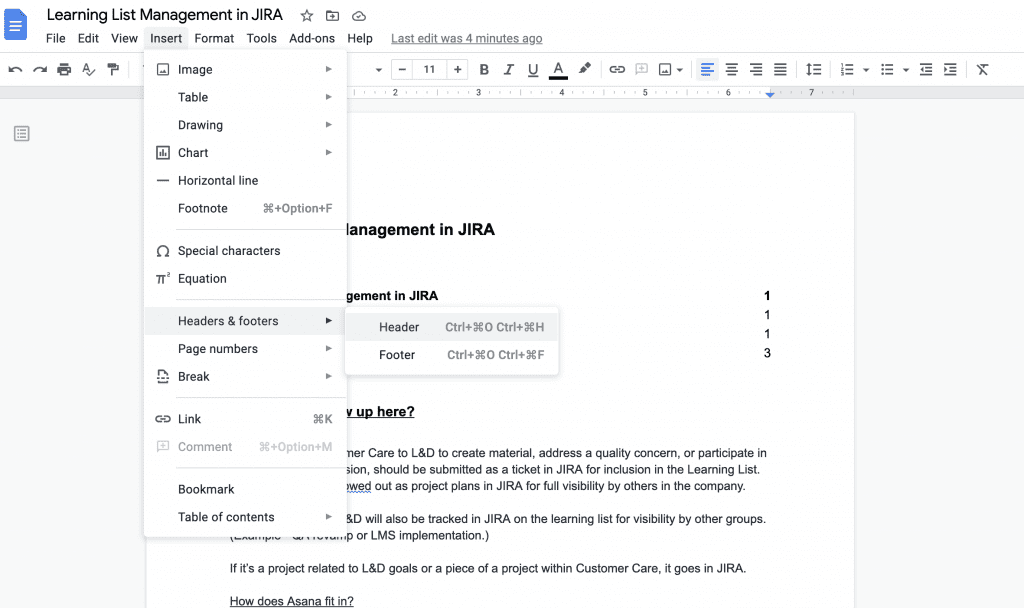
Choose the option you want, and a template section for the header/footer will appear on your page.
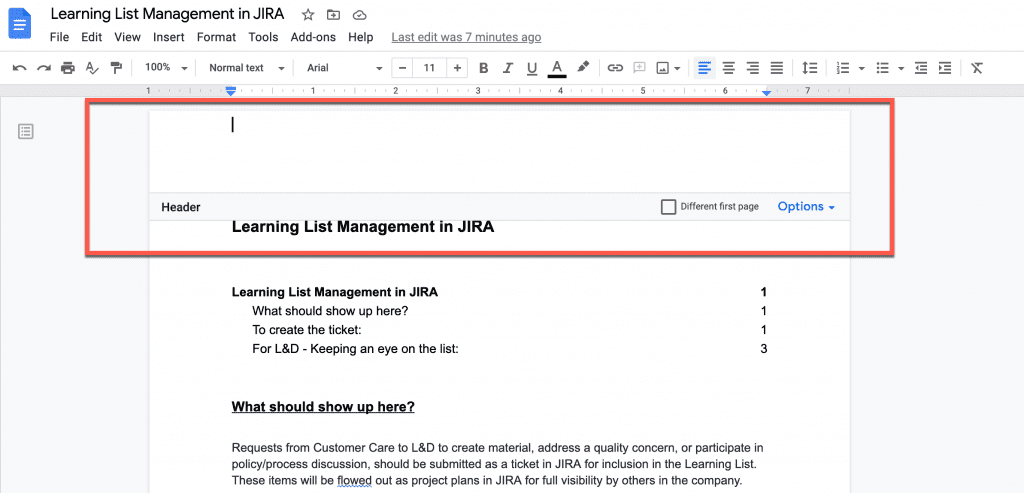
Type the content you want in the header/footer. You can edit the text in the header using the same tools you use for the content in the body of your document. From the header/footer format bar, you can click the check box to remove the header from the first page of the document or click the Options drop-down to adjust the margins and display. Click Apply to save your changes.
To exit the header section, click back into your document.
8. Spelling and Grammar Check
Checking your spelling and grammar before sharing or publication is essential. Luckily, Google Docs makes it easy to track errors and suggestions as you write. To enable these features, choose the Tools menu, then select Spelling and Grammar.
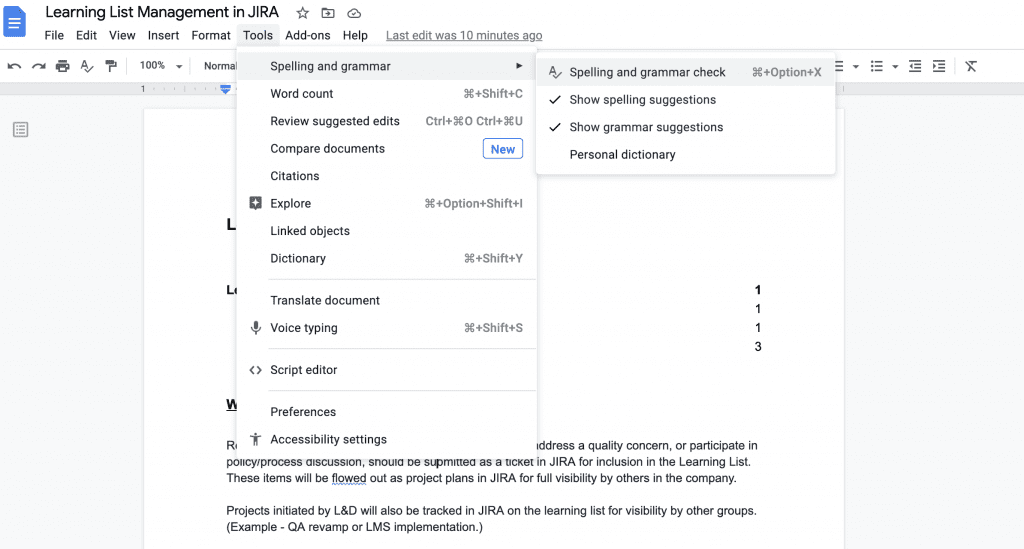
From the submenu that appears, you can choose Spelling and grammar check to run a check at the moment, or you can select “Show spelling/grammar suggestions” to get those suggestions in the document as you work. With these options checked, errors in your document will be indicated with a colored, squiggled line. Spelling errors are underlined in red, grammar errors in blue.
9. Uploading a Word Document into Google Docs
If you’ve created a document in Microsoft Word but now want to work with and share as a Google Doc, you can easily upload it to your Google Drive.
Open your Google Drive and click New. Choose File Upload to choose files from your local computer drive.
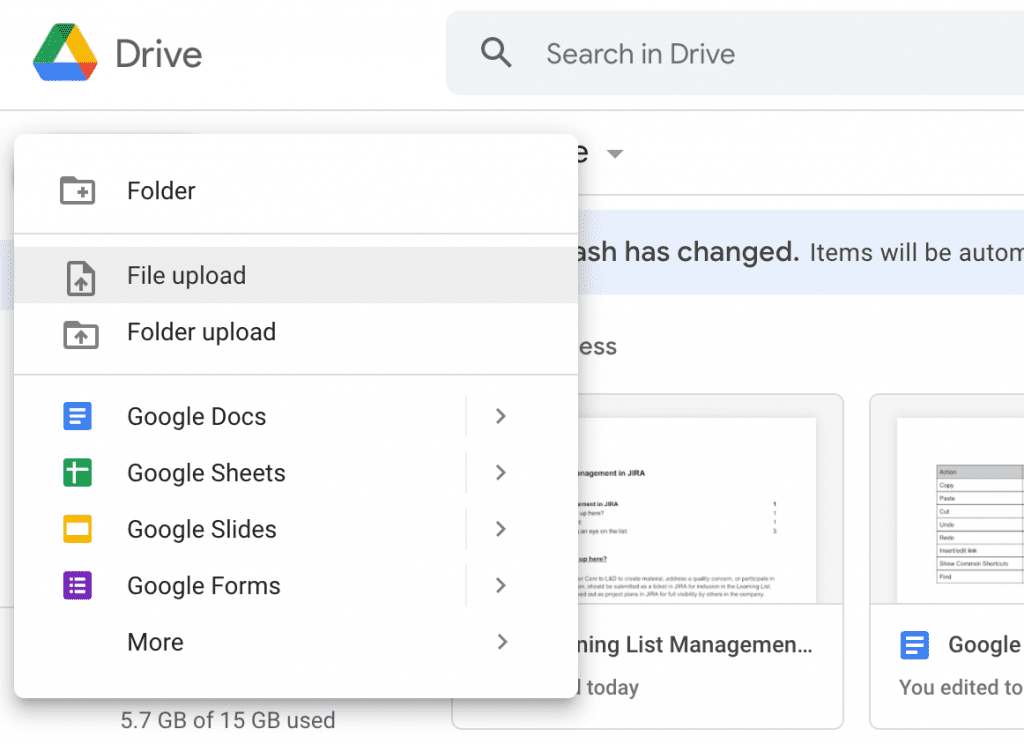
Choose your Word document, and click to open it. This action uploads your document into Google Drive. Once it’s uploaded, it may open in Google Docs, but will still be labeled as a .doc or .docx file type.

To save it as a Google Doc, choose the File menu, then use the Save as Google Docs option.

10. Google Docs Shortcut Keys
It’s most efficient to keep your hands on the keys when working in Google Docs. Here are commonly used shortcut keys to help with that:
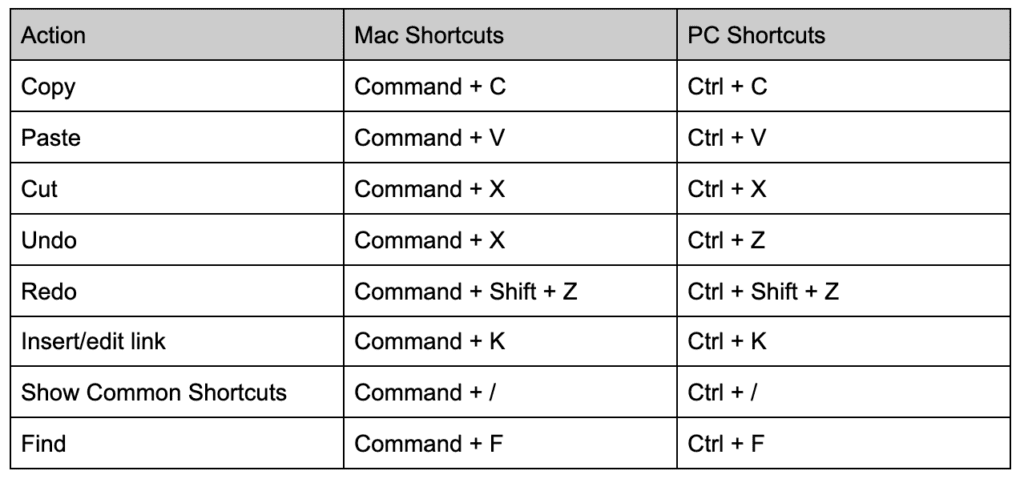
For a more comprehensive list of Mac, PC, Android, iPhone, and iPad shortcuts, see this page.
In Closing
These primary tips and shortcuts can help you work more efficiently in Google Docs and ensure your documents are easy to navigate and reference. For more comprehensive training and help using Google Docs see this page from Google Support.
If you’ve used these functions we want to hear about your experience! What other functions have you found helpful? Tell us in the comments.
Featured Image via muchomoros / shutterstock.com





I have been using Google doc since 2019 According to me,it’s a must have tool for content writing stuff.I can open the doc file from pc and mobile at the same time.also,file sharing option really love it. Another great point I would love to mention,I can copy the content from Google doc file and paste to the WordPress without any further changes.
Thanks for sharing your thoughts with us.
There’s a default table of contents button within G.Docs already.
Looks far cleaner than that messy add-on too.
That add on is useful but unrefined.
Top left of the page (within the workspace) is a small grey button. Looks kind of like a menu button.
I just recently created a website for my village community car service and used Google Sheets for a passenger list – we need to retain details ofthe journey undertaken, the driver, the time etc etc but most importantly we needed to share that document with a small number of journey co-ordinators and that’s where Google Sheets really helped as we were all able to see and edit the spreadsheet without it being seen publicly. No doubt the same sharing could be applied to Google docs as well.