
")
Are you seeking cost-effective resources to create a website without needing expensive professional services? Non-profit organizations often operate on tight budgets, so you need to be careful with your approach. Creating a non-profit website is crucial in establishing an online presence for your organization. This guide will walk you through the essential steps to build an effective and engaging non-profit website quickly and easily with Divi.
What You Will Need to Build a Non-Profit Website?
Building a non-profit website requires careful planning and the right tools and resources. Here’s a comprehensive list of what you’ll need:
- Domain and Hosting: Choose a memorable and relevant domain name representing your non-profit organization. Next, select a reliable web hosting provider. Siteground offers special pricing for non-profits, so it’s worth exploring their options.
- WordPress (CMS): WordPress is a popular CMS that powers many non-profit websites. Its intuitive interface makes it easy for anyone to create and manage content. WordPress is highly recommended due to its flexibility, ease of use, and extensive range of plugins.
- Theme and Site Design: You’ll need a theme with designs (pages, templates, etc.) tailored for the non-profit or charity niche. Divi is our theme and website builder packed with design tools, including pre-designed layout packs for non-profit sites to jumpstart your design. It can generate your entire site in 2 minutes (with everything you need) and tailor it to your brand with minimal effort.
- Essential Plugins for Non-Profit Sites: Your non-profit site will need additional plugins and tools to add certain functionality. Most will need a donation plugin like GiveWP to manage online payments or contributions. Your site may also need a quality event management plugin like The Events Calendar to schedule and promote events on our site.
What About Content?
Creating high-quality content for your website (copy, images, etc.) is key to effectively communicating your brand and mission. Don’t have your copy or images ready yet? Don’t worry. You can always add this later. If you are using Divi (or a comparable theme), you’ll have royalty-free images and mock text content on those premade templates you can use for now. Divi AI can help generate all that for you later. Or, if you want to speed up the process even more, you can use Divi’s AI Website Builder to generate a complete website with on-brand content already in place.
Now that you know what you need, let’s start building!
How to Build a Non-Profit Website in 7 Steps
Building your own non-profit website with WordPress is not hard once you know the steps and are using the right tools. Whether you are a complete beginner or a professional developer, you can have a stunning website up and running with ease. Here are the steps:
1. Get Domain and WordPress Hosting
Before you start building your site, you’ll need to a few things in place beforehand – your domain, hosting provider, and WordPress.
Siteground can handle all of this for you, so we recommend starting with them if you don’t have a hosting provider in place.
Domain
Your domain (or domain name) is your website’s address on the internet (i.e. elegantthemes.com), and it’s essential to choose one that reflects your non-profit’s mission and is easy to remember. Moreover, your domain name should give visitors an idea of what your non-profit is about.
Once you have decided on your domain name, look for the best domain registrars to register it. We recommend Namecheap. Or, if you choose Siteground for hosting, you can get your domain with them directly at a discount.
If you already have a domain, you can easily point it to your hosting provider by updating the nameservers.
WordPress Hosting
Your website needs a place to live online. That’s where hosting comes in. Since we are going to be using WordPress, choose a quality WordPress hosting provider. A good host will ensure your site is easy to manage and optimized for performance, speed, and security.
Siteground has WordPress hosting plans starting at $3.99 monthly, making it a cost-effective solution. Setting up WordPress hosting with Siteground is easy.
Check out how to set up your domain and hosting in the video below.
Install WordPress
Most WordPress hosting providers like Siteground offer one-click WordPress installation during the onboarding process.
If not, you can go to your hosting provider’s dashboard. Click on the WordPress installer and follow the prompts. Once the installation is complete, you’ll receive a confirmation email with your login details. Go to yourwebsite.com/wp-admin and log in with the credentials you set during installation.
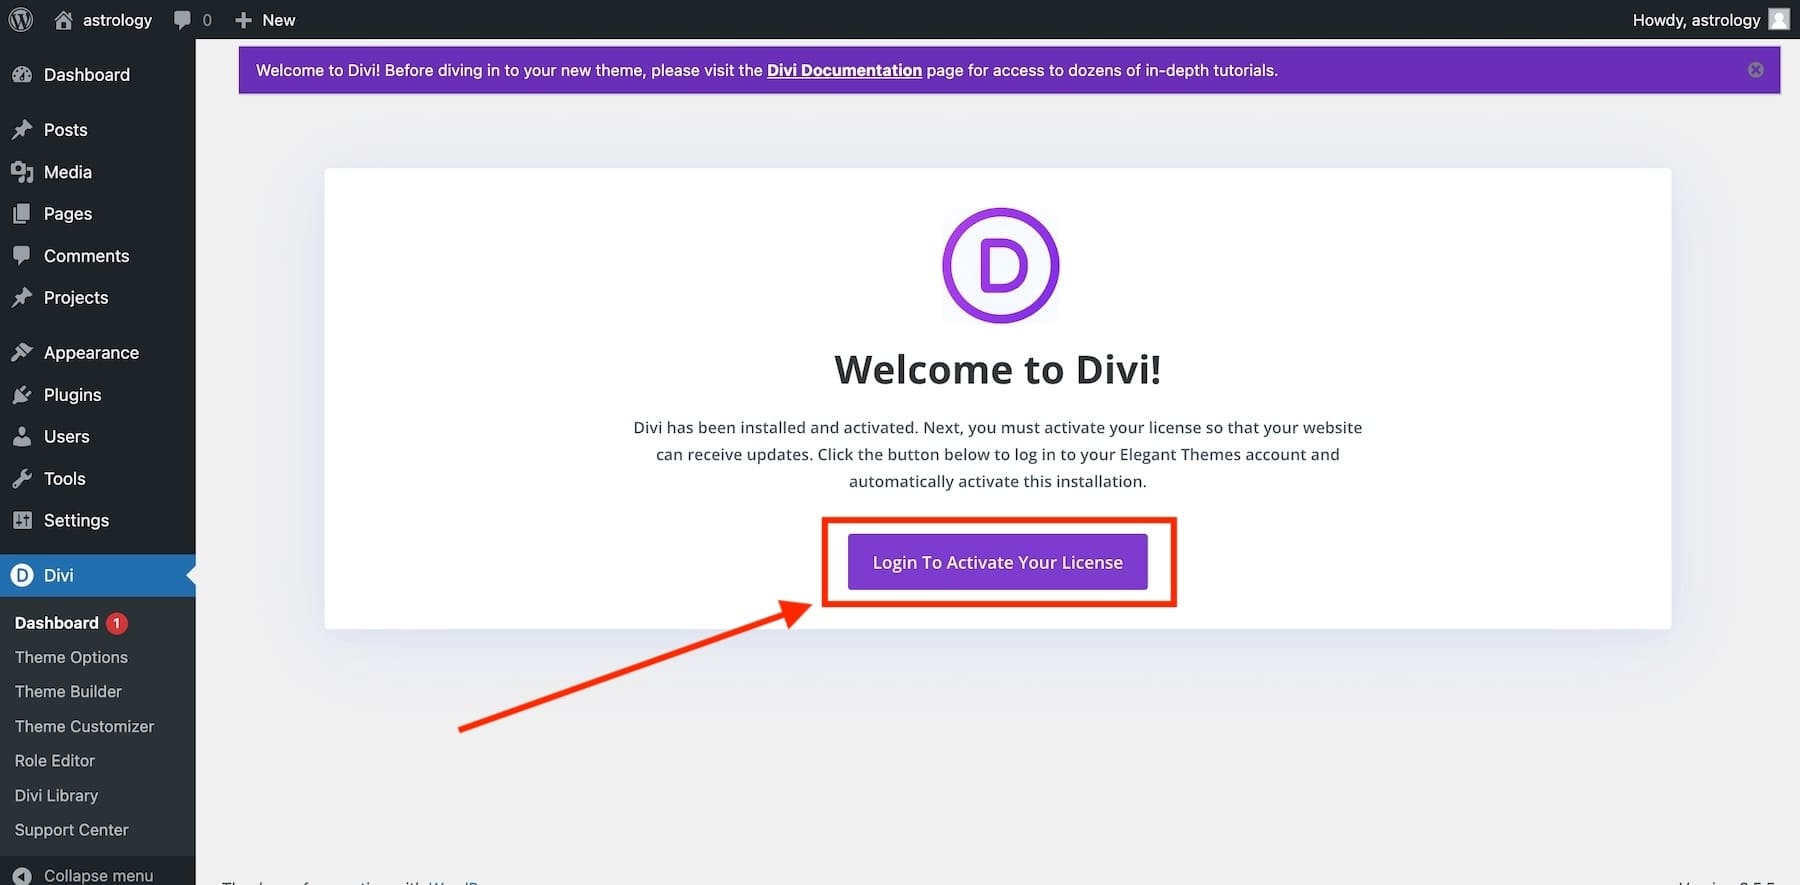
2. Install the Divi Theme
Creating your non-profit website with Divi is hasn’t been as easy ever before. This theme allows you to create stunning, fully customizable websites without coding experience. Divi is renowned for its powerful design capabilities, providing a wealth of pre-made layouts for different non-profit websites. It connects almost every sect of the audience due to its powerful features, such as real-time visual editing, responsive design capabilities, and a thriving marketplace for extensions and child themes.
Regarding the non-profit websites, Divi seems to be the ideal fit.
- In addition to having 2500+ premade layouts for web design, it provides users with 14 layout packs (96 total layouts) that can be used for non-profit websites.
- It easily integrates with popular donation platforms such as PayPal, Stripe, and GiveWP, enabling non-profits to accept donations directly through the website.
- The Divi Builder allows you to create and customize layouts using a simple drag-and-drop interface.
- Divi Quick Sites enables users to create a non-profit website within two minutes. They must pick a non-profit starter site and add the required details about the website’s aim. This feature will do the rest.
- Divi AI can generate a completely custom non-profit website for you in minutes. You can also use Divi’s powerful AI tools right inside the builder to add text, images, sections, layouts, and more.
Find more Divi tools for your non-profit site in the Divi Marketplace. They even have child themes like DLS Charity, which is designed for charities, NGOs, and other nonprofit organizations.
Download and Install Divi
You can buy it from Elegant Themes with a yearly license for $89 or a lifetime license for $249. After purchase, you can download the theme to be installed on your WordPress site. To install the theme:
- Go to Appearance > Themes.
- Click on Add New and then Upload Theme.
- Choose the Divi .zip file you downloaded and click Install Now.
- Once installed, click Activate to make Divi your active theme.
Check out the video below for more details.
That takes care of the setup process. Now, it is time to start building. If you want to learn more before building your website, go through our tutorial of how to use Divi Builder.
3. Build Your Website
Once the Divi Theme is installed in WordPress, you’re ready to build your non-profit site. Don’t sweat it. With Divi Quick Sites, you won’t have to start from scratch. Divi can build the site for you automatically!
Launch Onboarding Wizard
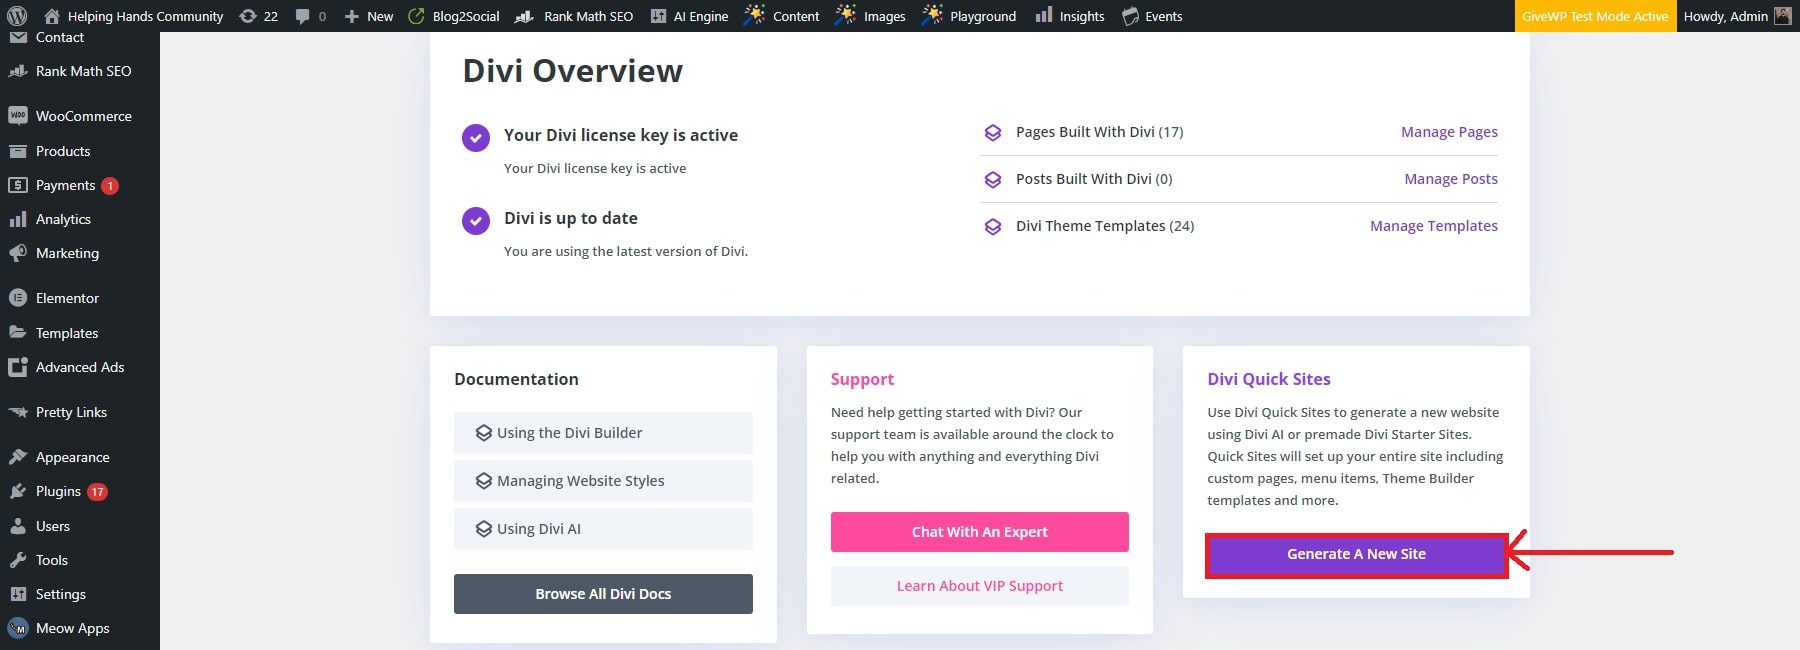
Once you activate the Divi Theme in WordPress, you’ll encounter Divi’s onboarding wizard to guide you through the process. Click the button to log in and activate your Divi license.
Once logged in, you’ll land on the main Divi Dashboard. This is where you can manage your Divi website, access documentation, get support, and create a new site using Divi Quick Sites. To create a website with Divi Quick Sites, click “Generate A New Site” from the Divi Dashboard.
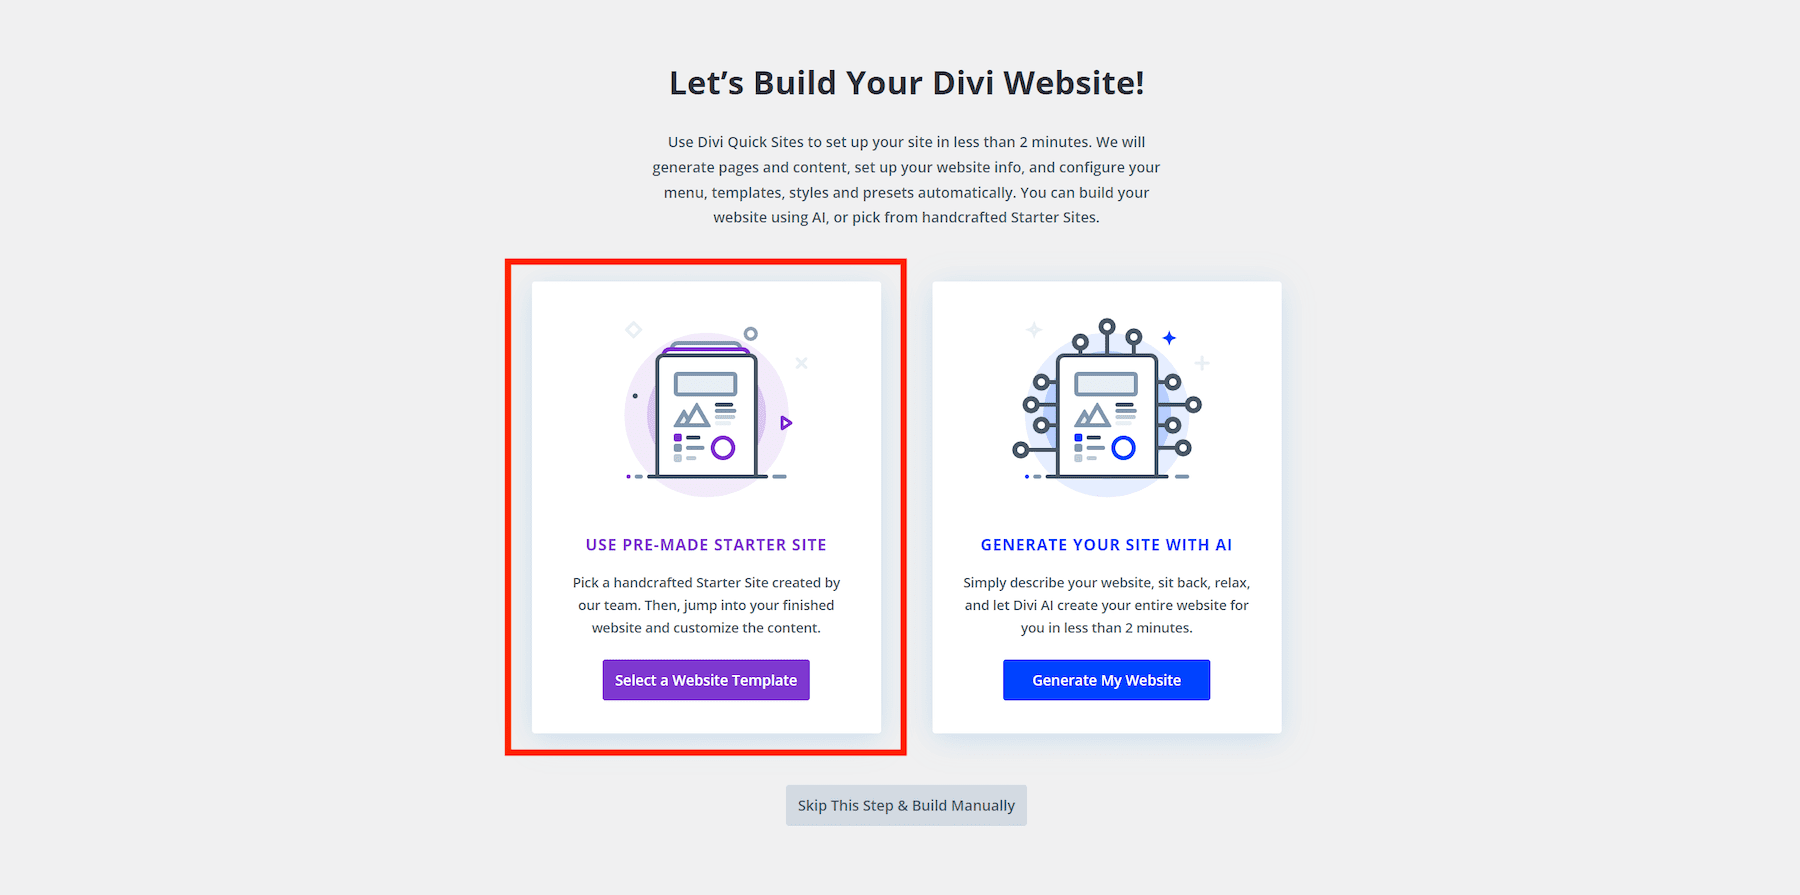
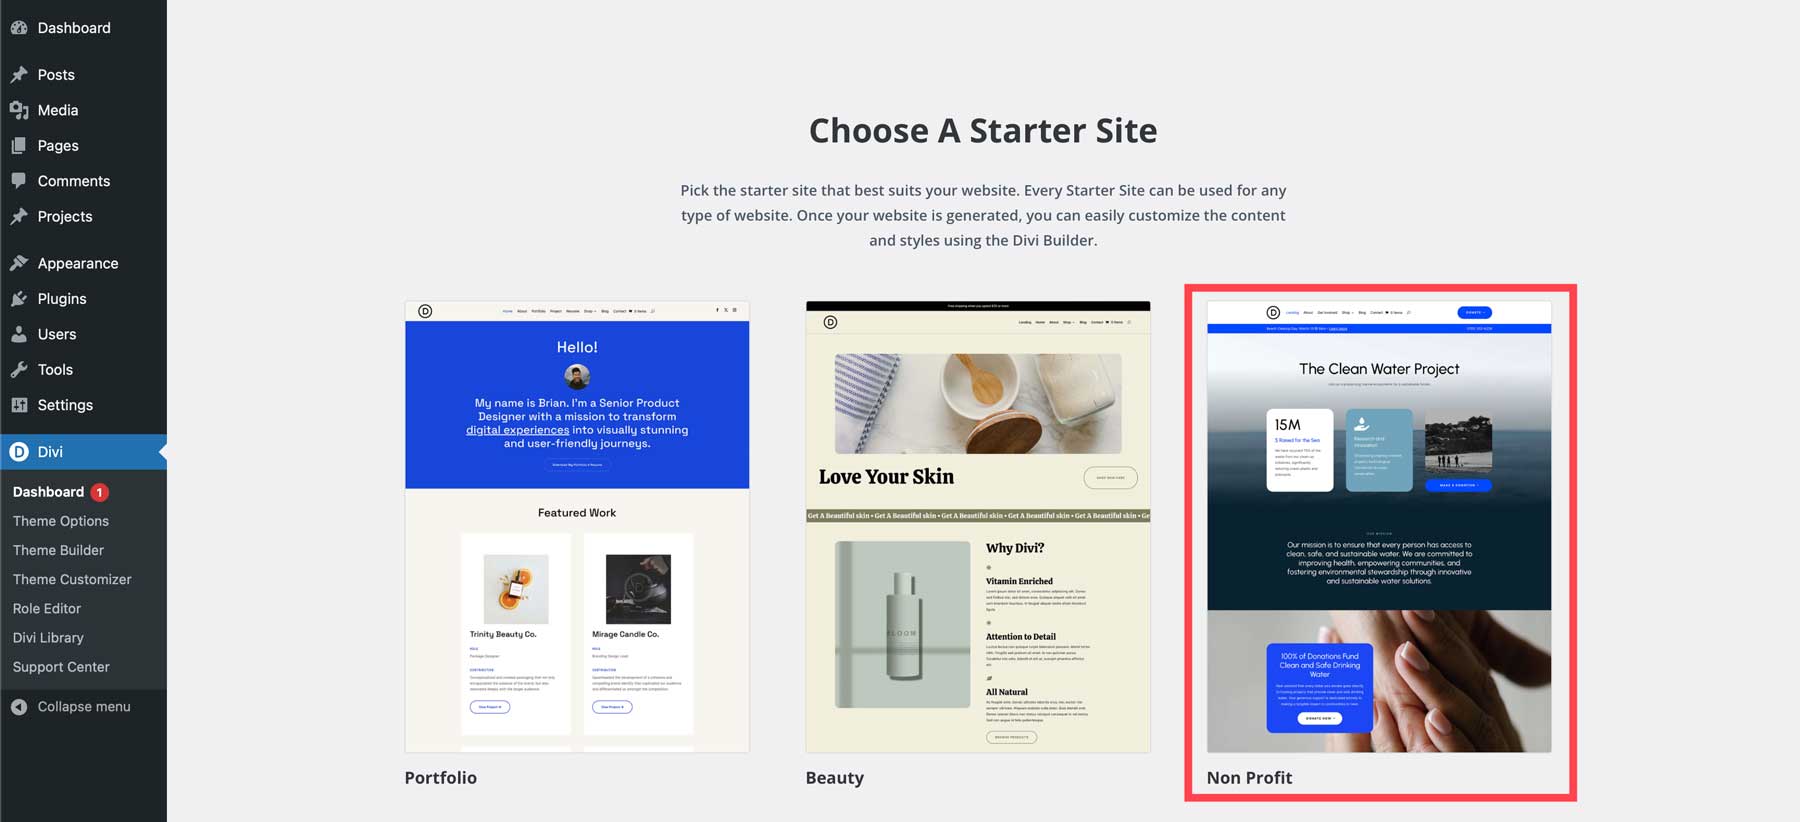
Generate Your Site with the Non-Profit Starter Site (or with AI)
Next, you can choose to build your new non-profit website either by using a pre-made starter site or with Divi’s AI website builder. Since Divi already has a beautiful Non-Profit Starter Site template you can use, click “Select a Website Template.”
On your screen, you will see a handful of Starter site templates. Select to use the Non-Profit Starter Site. If you worry that the template doesn’t match your branding (colors, fonts, text, images, etc.), this can be adjusted later.
Divi Quick Sites will then ask for information about your new website and the pages you want. Simply fill out the form:
- Add your Site Name, Site Slogan, and Site Logo.
- Upload your logo so Divi can add it to your site automatically (if you have one)
- Check the pages you want to include from the Starter Site. If you know you will need them, you can add additional custom pages to jumpstart the process.
- When ready, click the “Generate & Publish My Website” button.
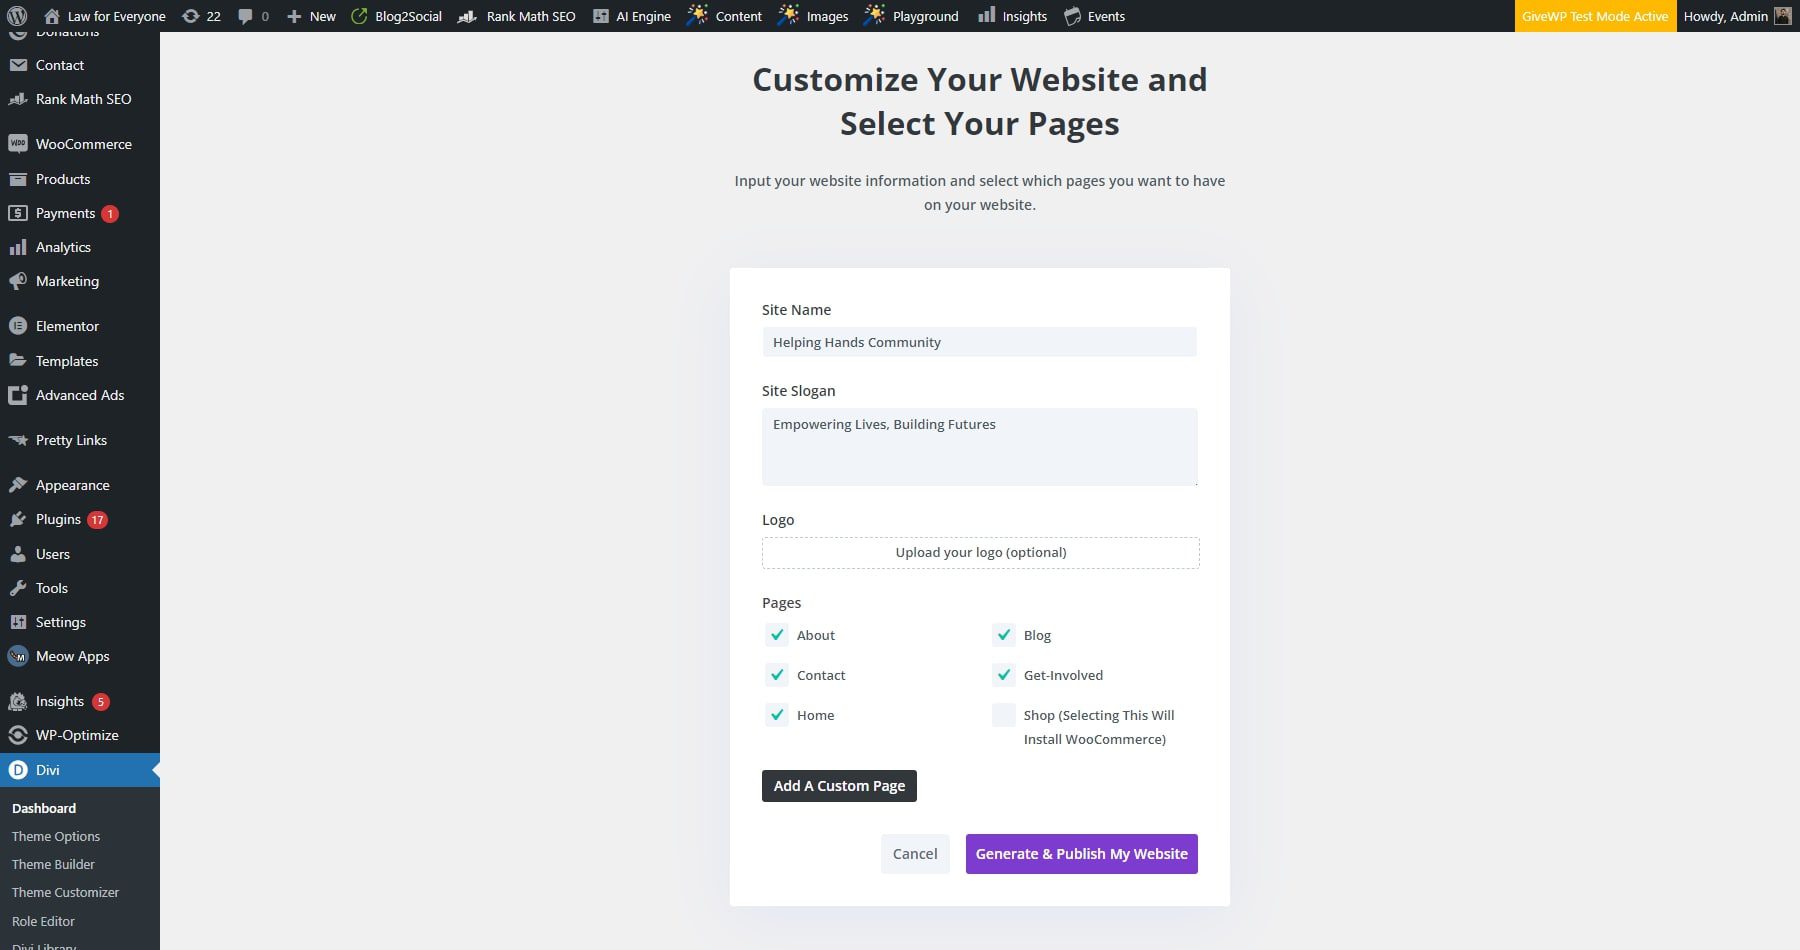
NOTE: Selecting the Shop page will install WooCommerce and premade pages for adding an online store to your site (shop, product template, checkout, etc.). However, as a non-profit, you mainly need a way to collect donations so we can leave out the shop page.
Once you have provided your website information, Based on your information and input, Divi Quick Sites will take less than two minutes to build the website. In doing so, it will create everything related to your website, such as the pages, templates, styles, and navigation bars.

Once your site is ready, you’ll see a confirmation page saying, “Your Site is Ready!” You’ll also see a list of all the Website Pages and Theme Templates created and links to Tutorials and Documentation to help you start working on your established website.
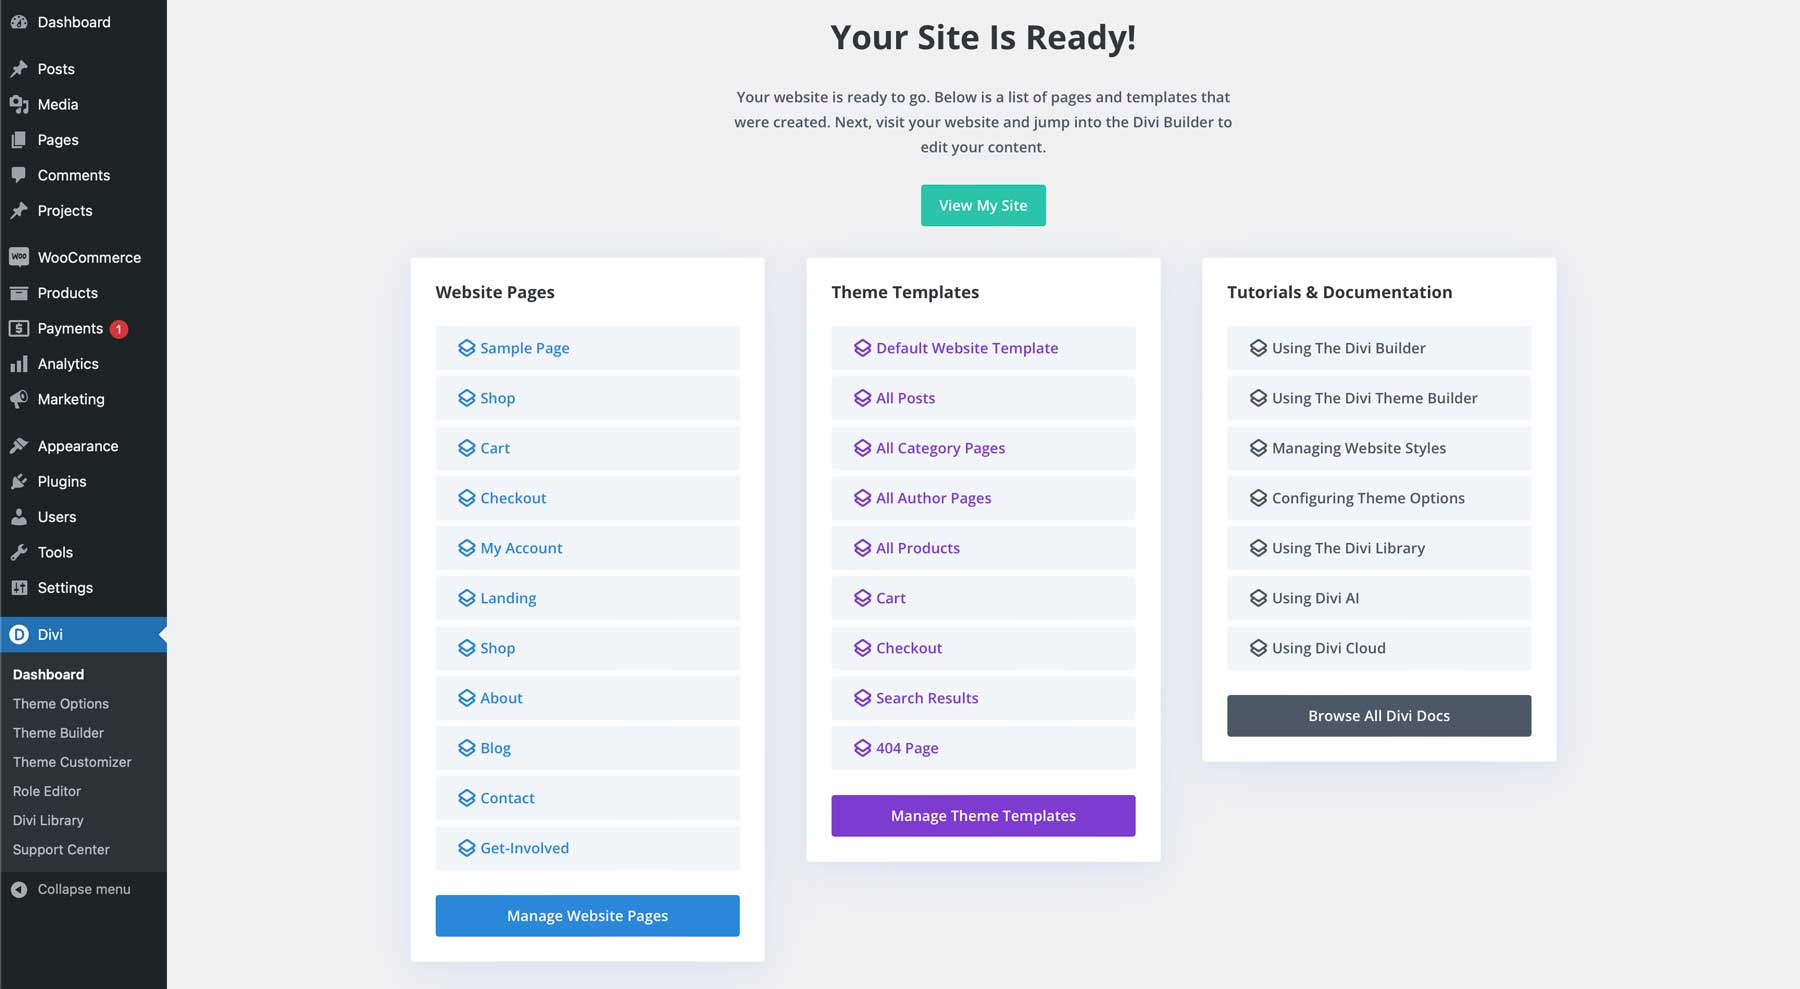
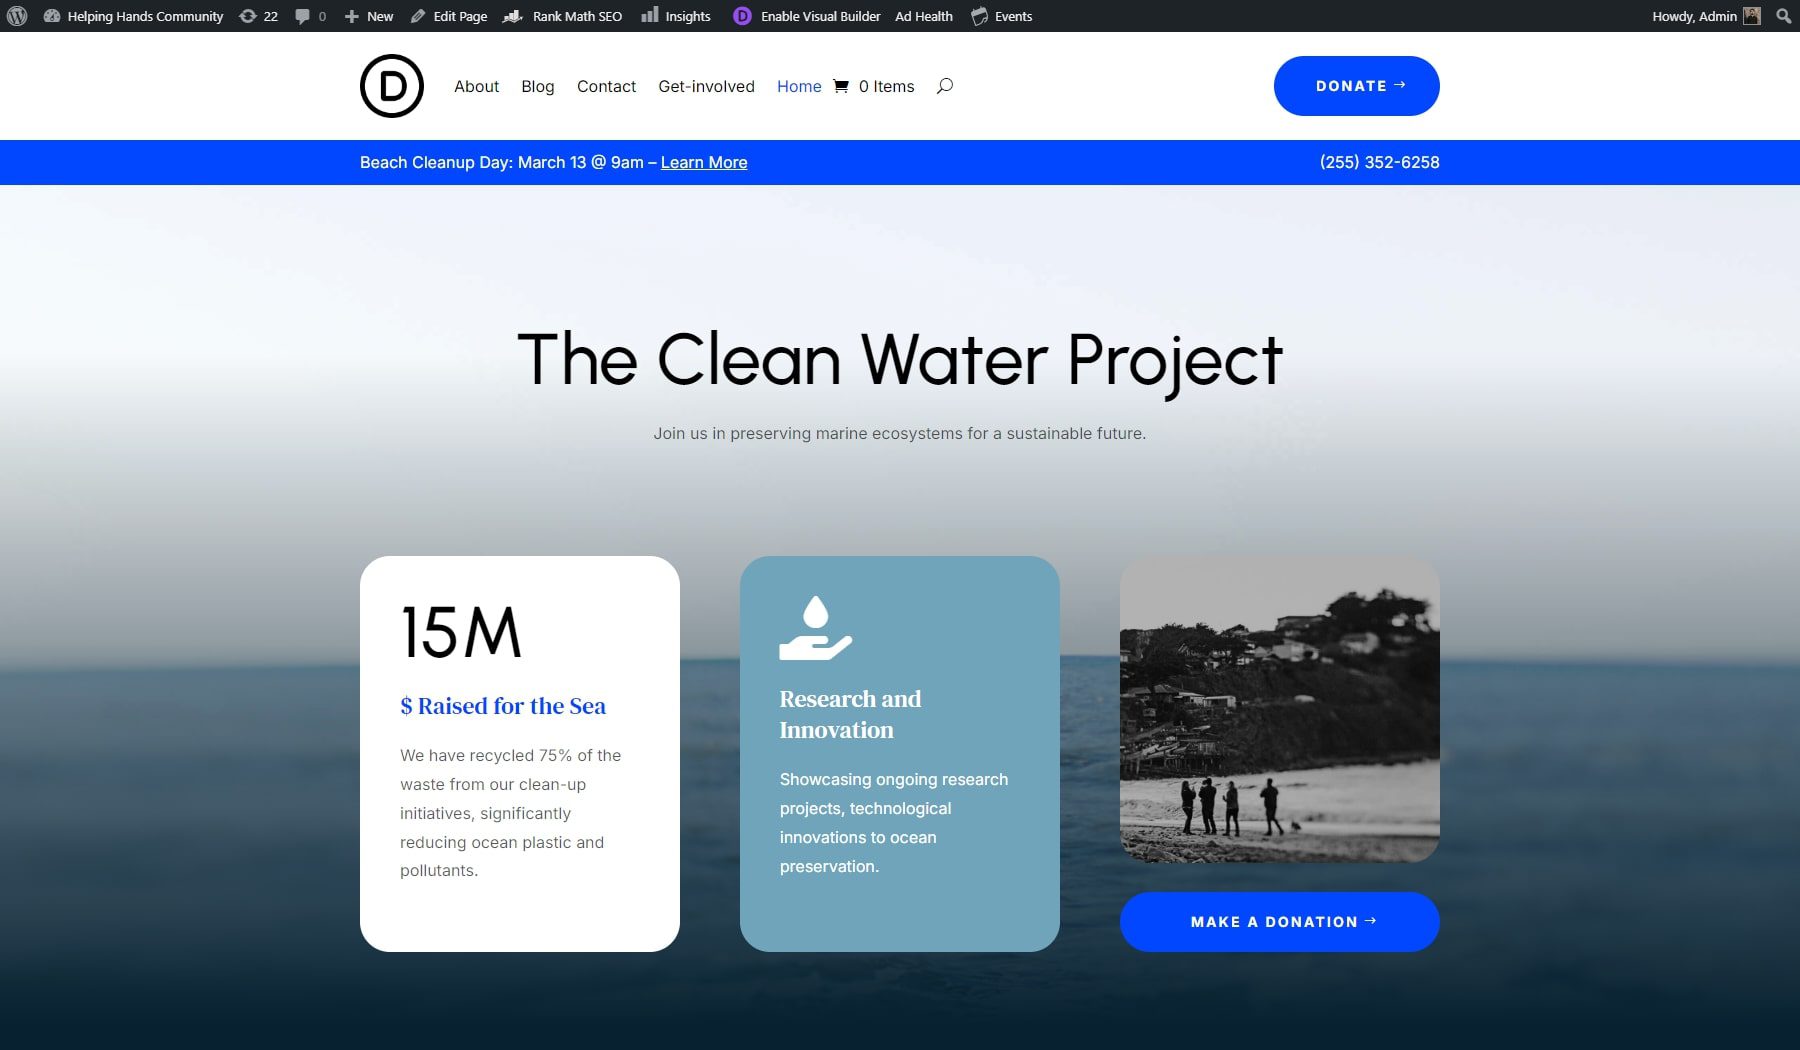
You can now browse your live site!
4. Design and Customize Your Non-Profit Website
The Divi Builder makes it easy to customize your designs visually on the front end without having to mess with code. You can drag and drop elements anywhere you want. You can add new content with dozens of modules to choose from. Plus, you have complete control over the design of each element on the page with hundreds of built-in design settings.
Since we are using a starter site, most of the design heavy lifting is taken care of already. The main thing to do now is match the current design with your brand. Instead of spending hours tweaking each element’s style manually, you can customize your site quickly and easily with Divi.
Here’s how.
Edit Global Presets
Like every Divi starter site, the non-profit has its own presets – saved designs that can be used on multiple elements. The presets allow you to maintain the consistency of your design across the website. Want to update the style of all your h1 headers? Simply update the preset design once and it will get applied instantly to all your pages with the same preset.
To access presets, open the settings of any module or element in the Divi Builder. The, click the preset dropdown menu at the top to see the list of presets associated with the module. In the example below, you can see that the image module has the preset ‘Non-Profit Rounded Corners’ assigned to it.
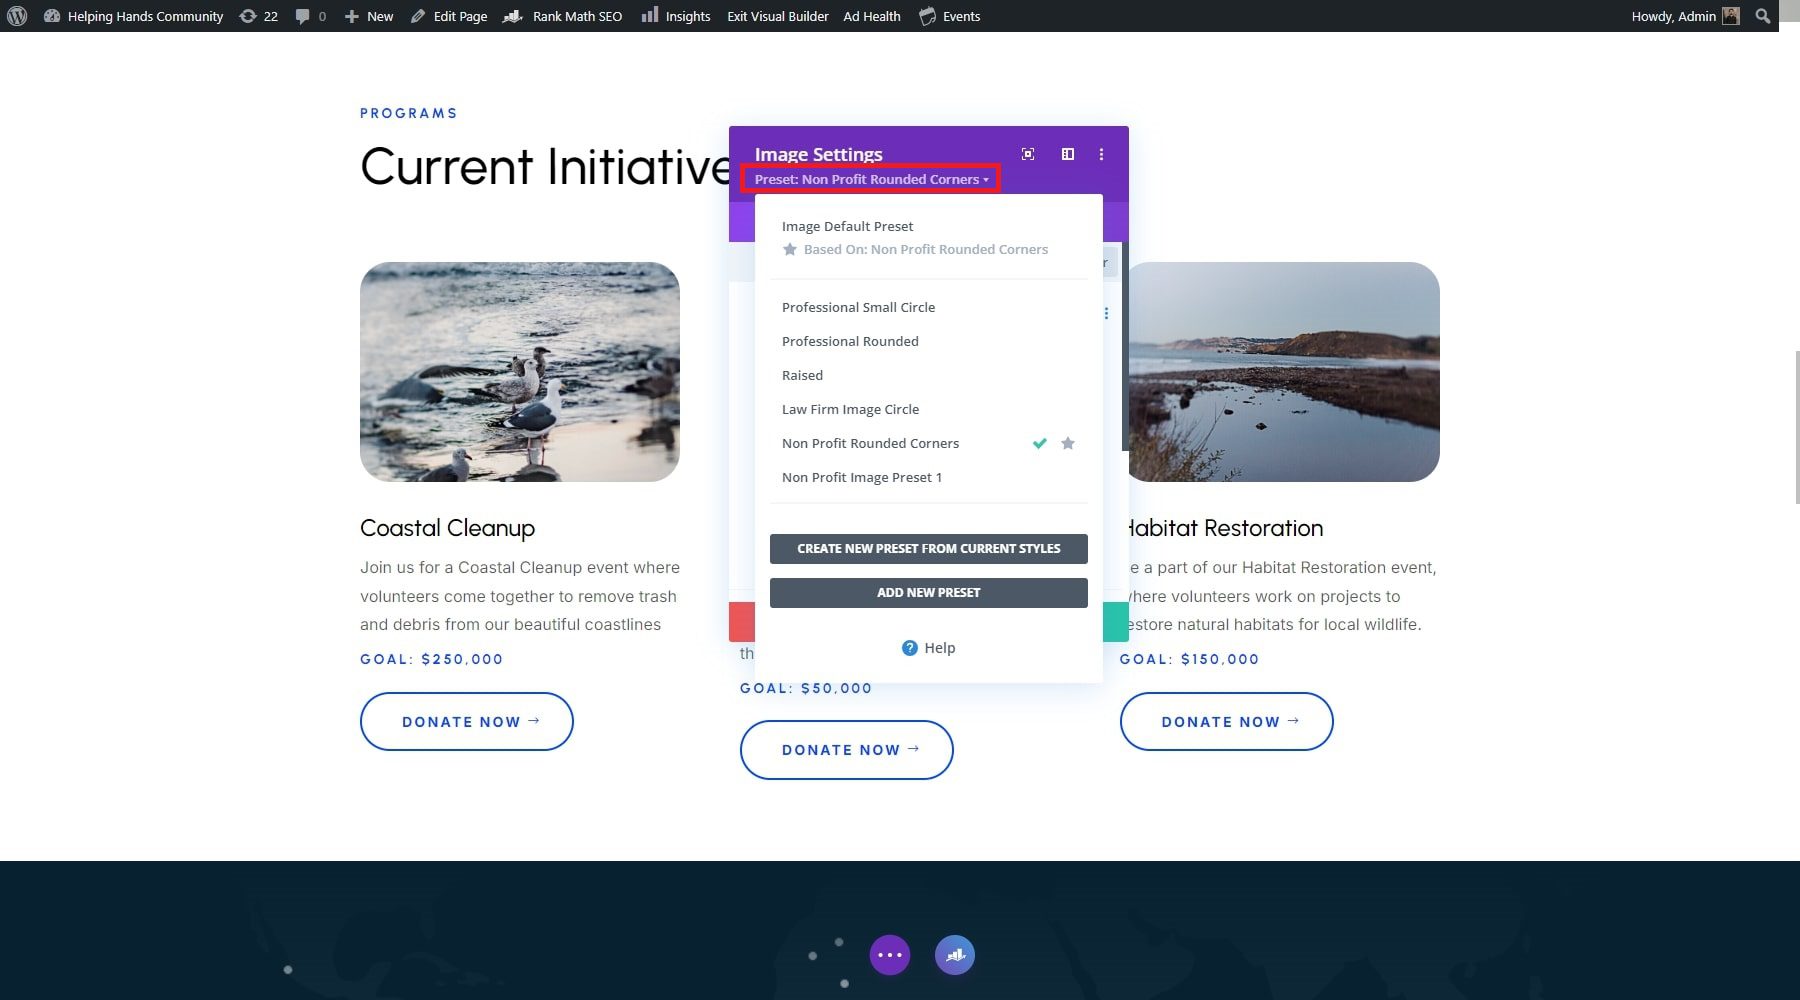
We can make the changes to the preset by hovering over the preset and clicking the pencil icon. It is important to note that when changing the preset, the Divi module turns its color to grey, suggesting that Divi is making all the required changes. Once you have made all the required changes, a dialogue box will appear at the bottom of the page, requiring confirmation from your side. Click on ‘Yes’ and finalize all your new settings.

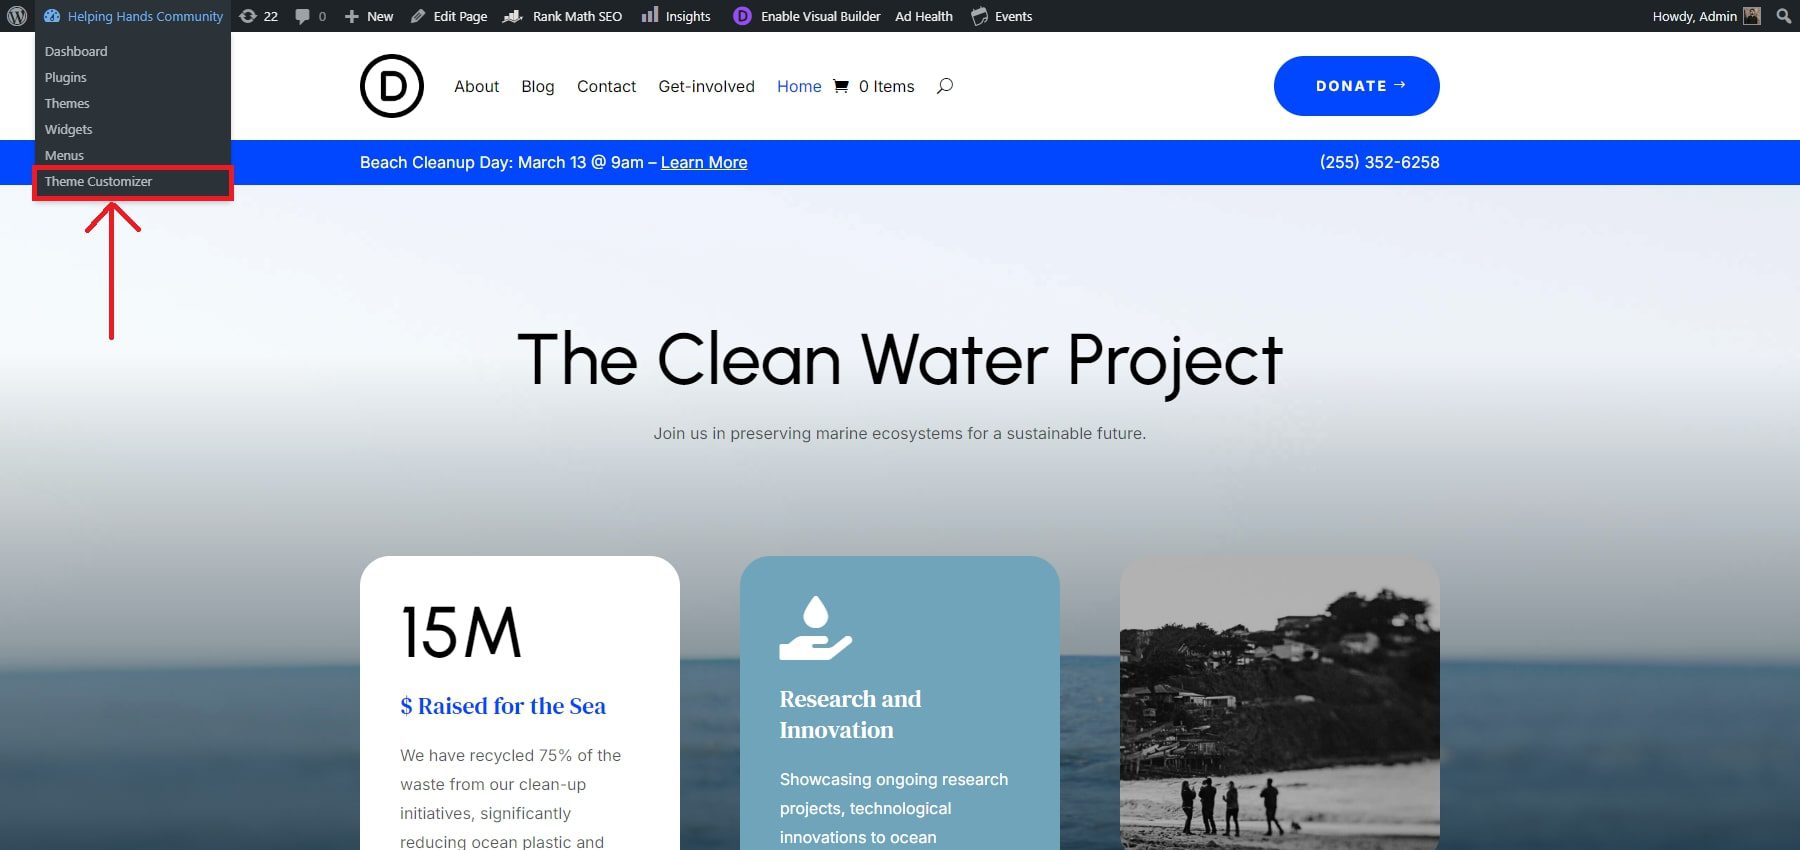
Customize Global Fonts and Colors
Divi lets you change your starter site’s global fonts and colors through the theme customizer. The changes you make through the theme customizer will applied across the entirety of your website. You can access it from your website’s dashboard or the dropdown menu from your website’s front end.
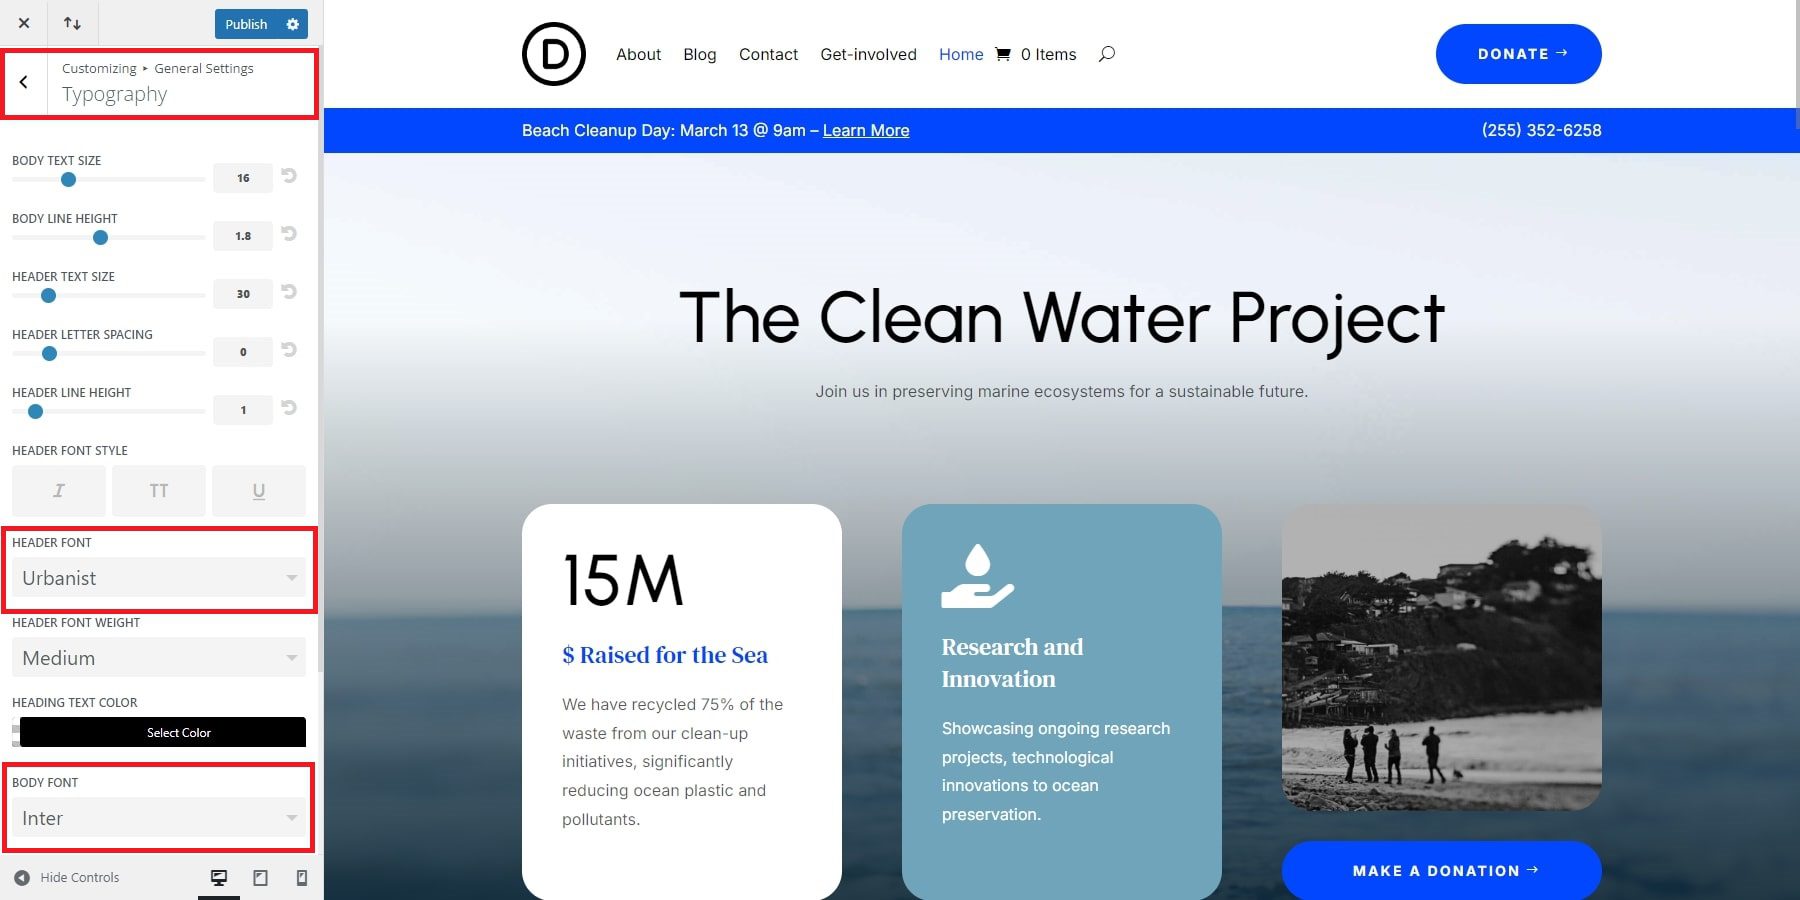
Once in the theme customizer, you need to access four key aspects. Firstly, you look for typography, which allows you to change the heading, body font, font size, and more by clicking General Settings > Typography.
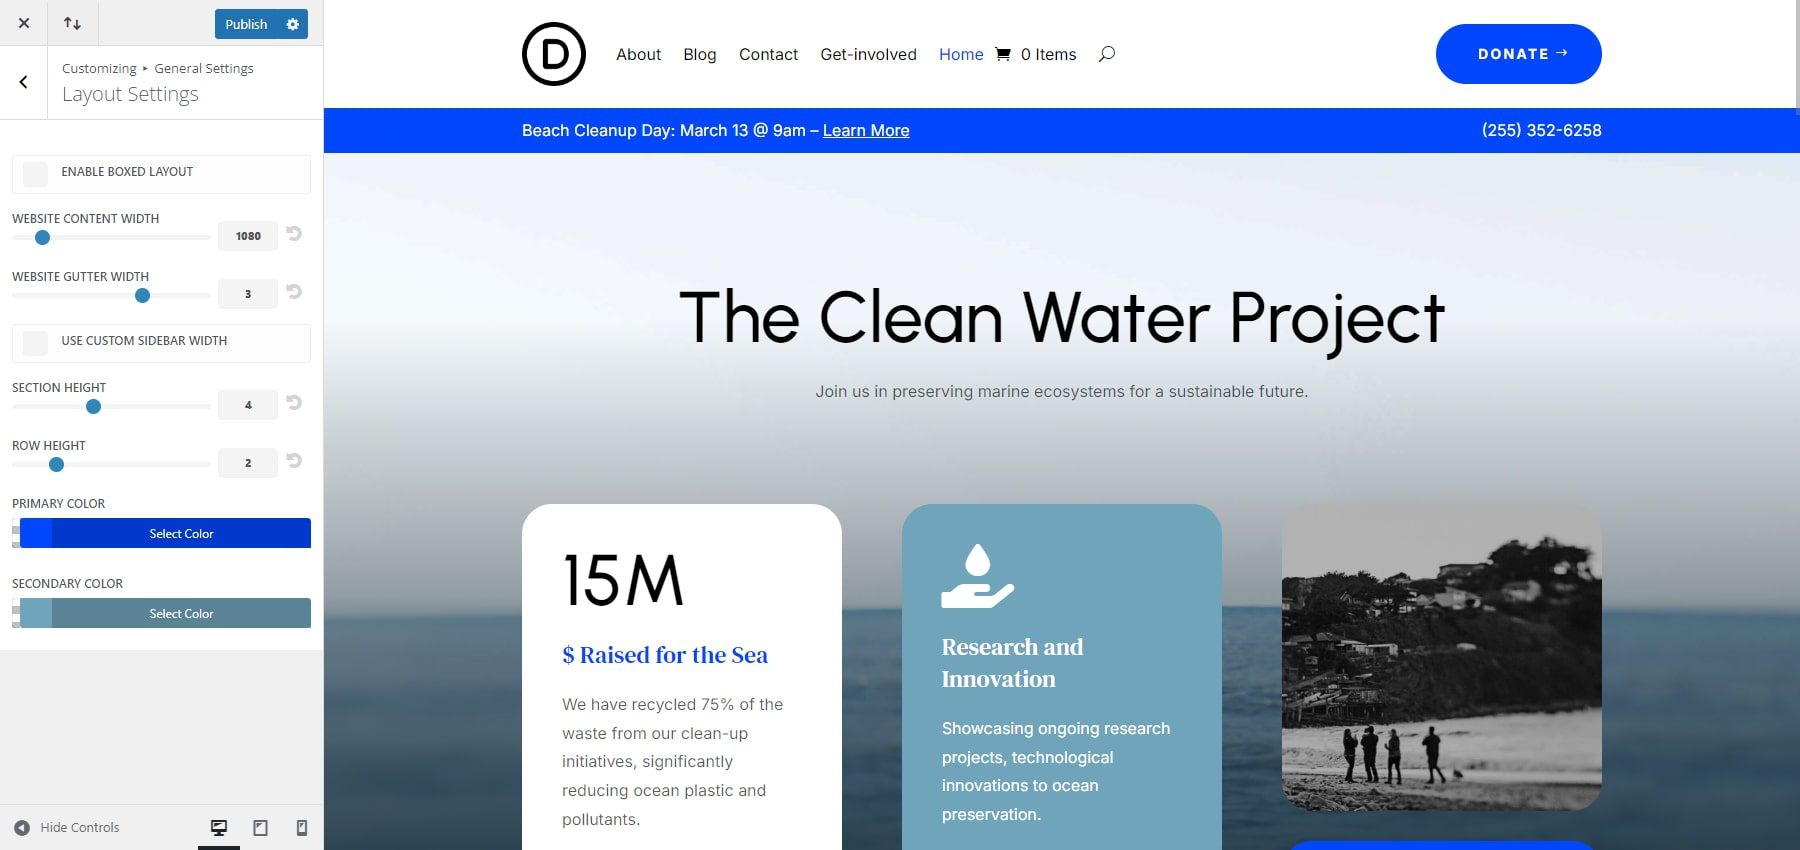
Secondly, you can move to General > Layout Settings. After entering this page, you can make adjustments to your website’s primary and secondary colors. Moreover, you can modify the site width.
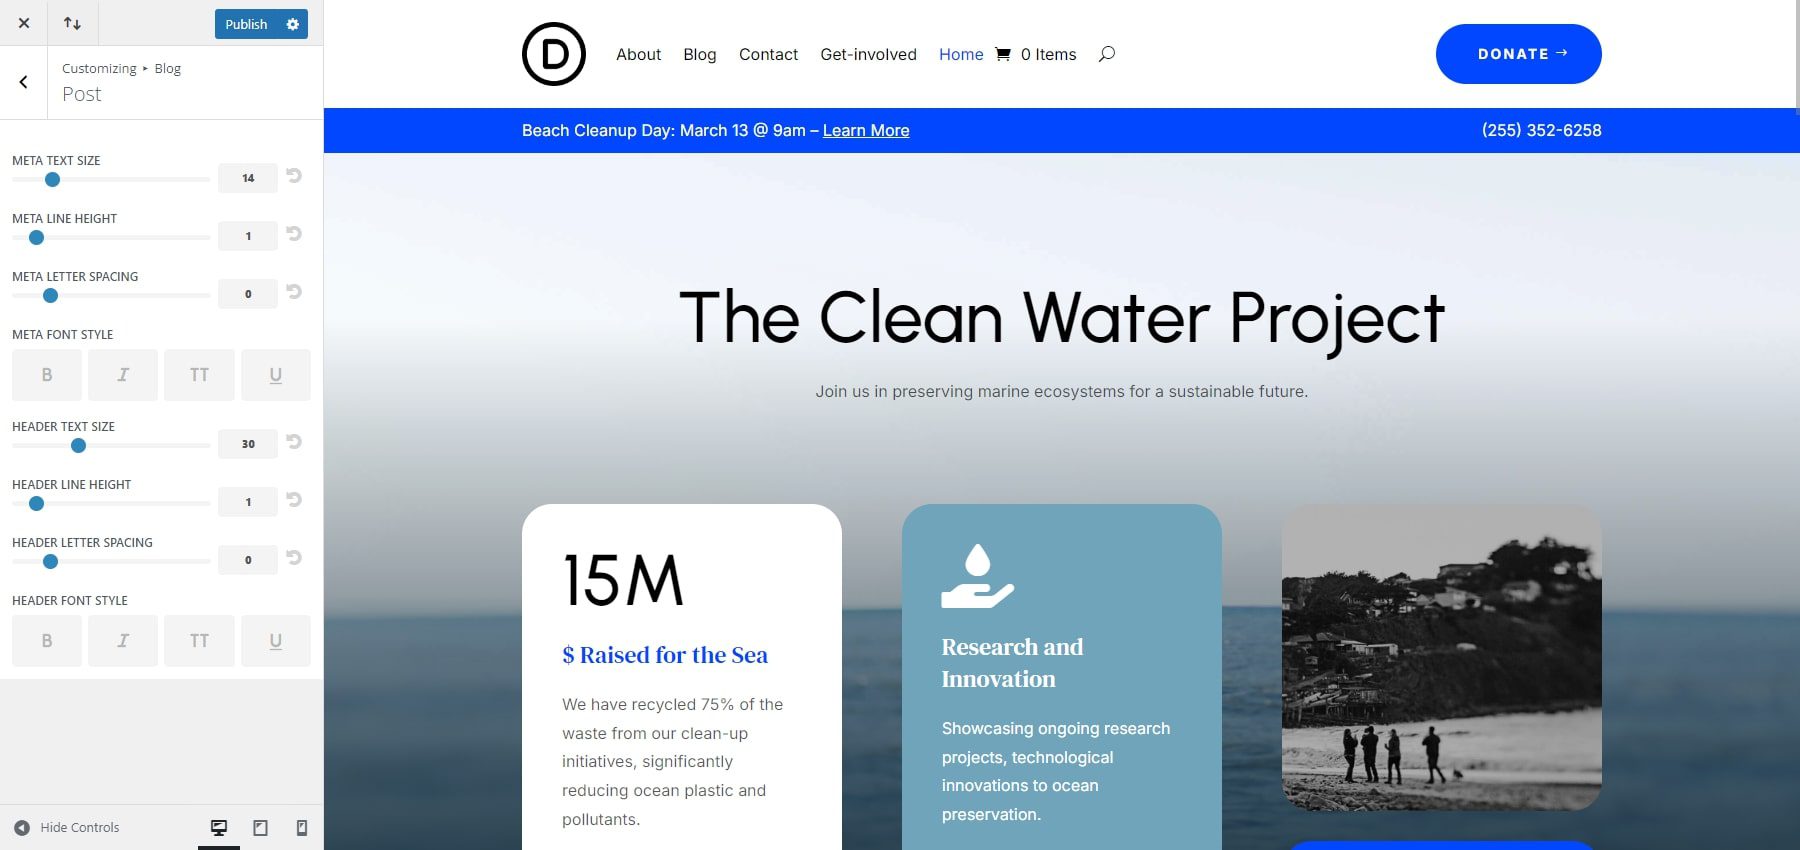
Divi enables you to customize your website beyond font and website colors. For example, within a few clicks, you can change multiple aspects of your blog posts, such as meta text size, meta line height, meta font style, etc.
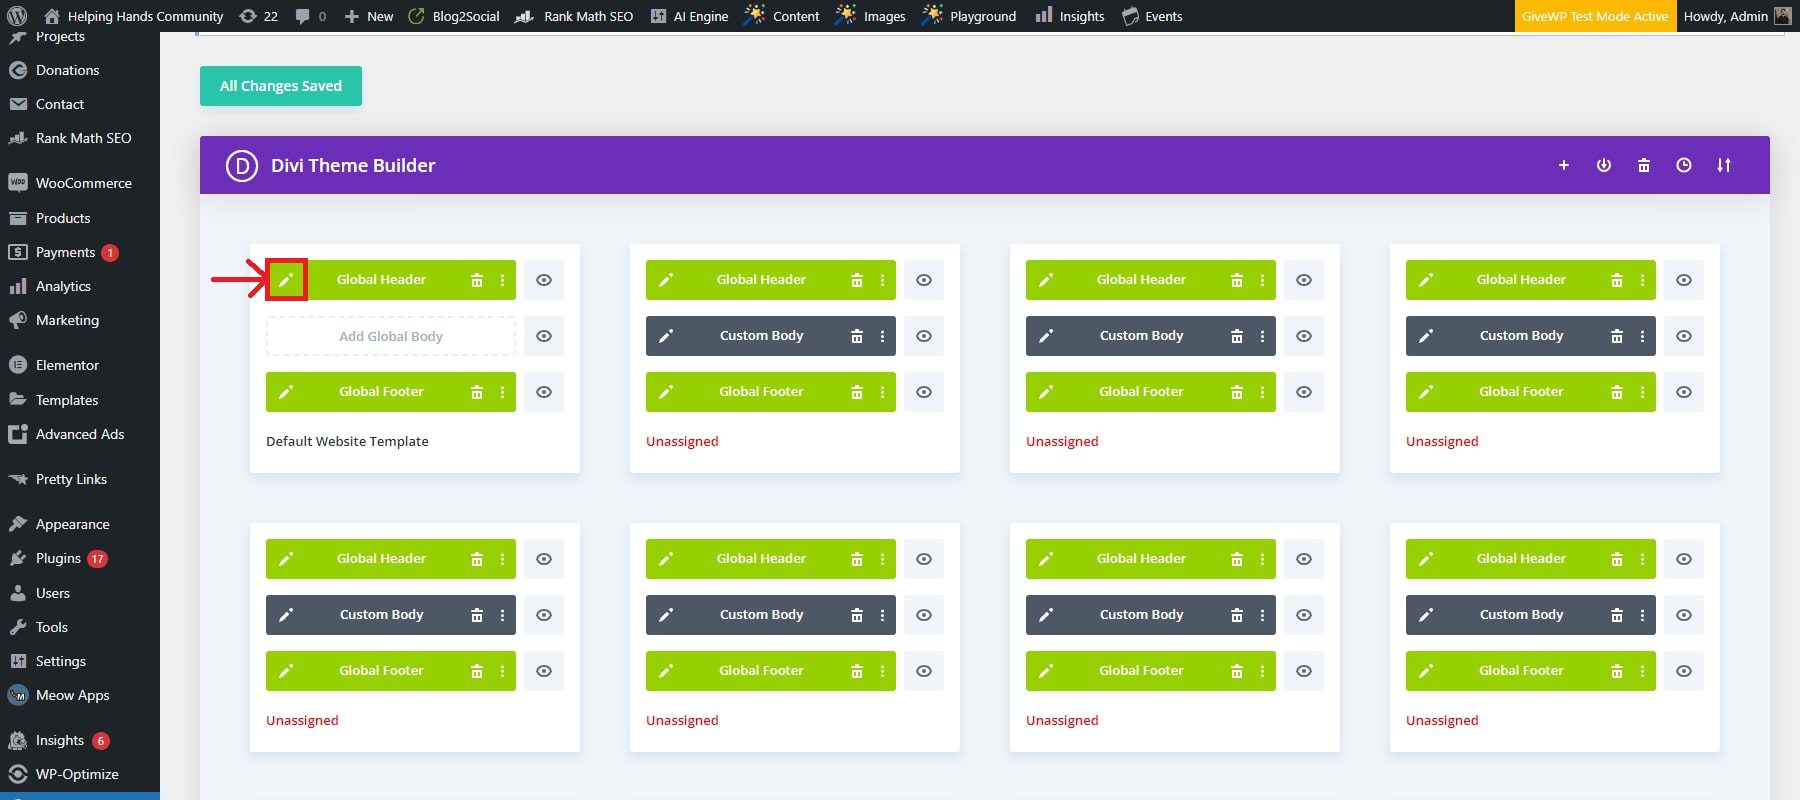
Edit Your Starter Site Theme Builder Templates
Divi Quick Sites generates Theme Builder templates from the Starter site and integrates them into your website. You can access these templates in your WordPress dashboard through Divi > Theme Builder. The Theme Builder allows you to customize any template using the Divi Builder. Simply click the pencil icon on the left side of any template area. This will launch the Divi Page Builder, allowing you to adjust global designs for all pages assigned to that template.
For instance, you can edit your Global Header to customize your main header (menu, logo, font, text size, background color, etc.). In this case, we have decided to change the background color.
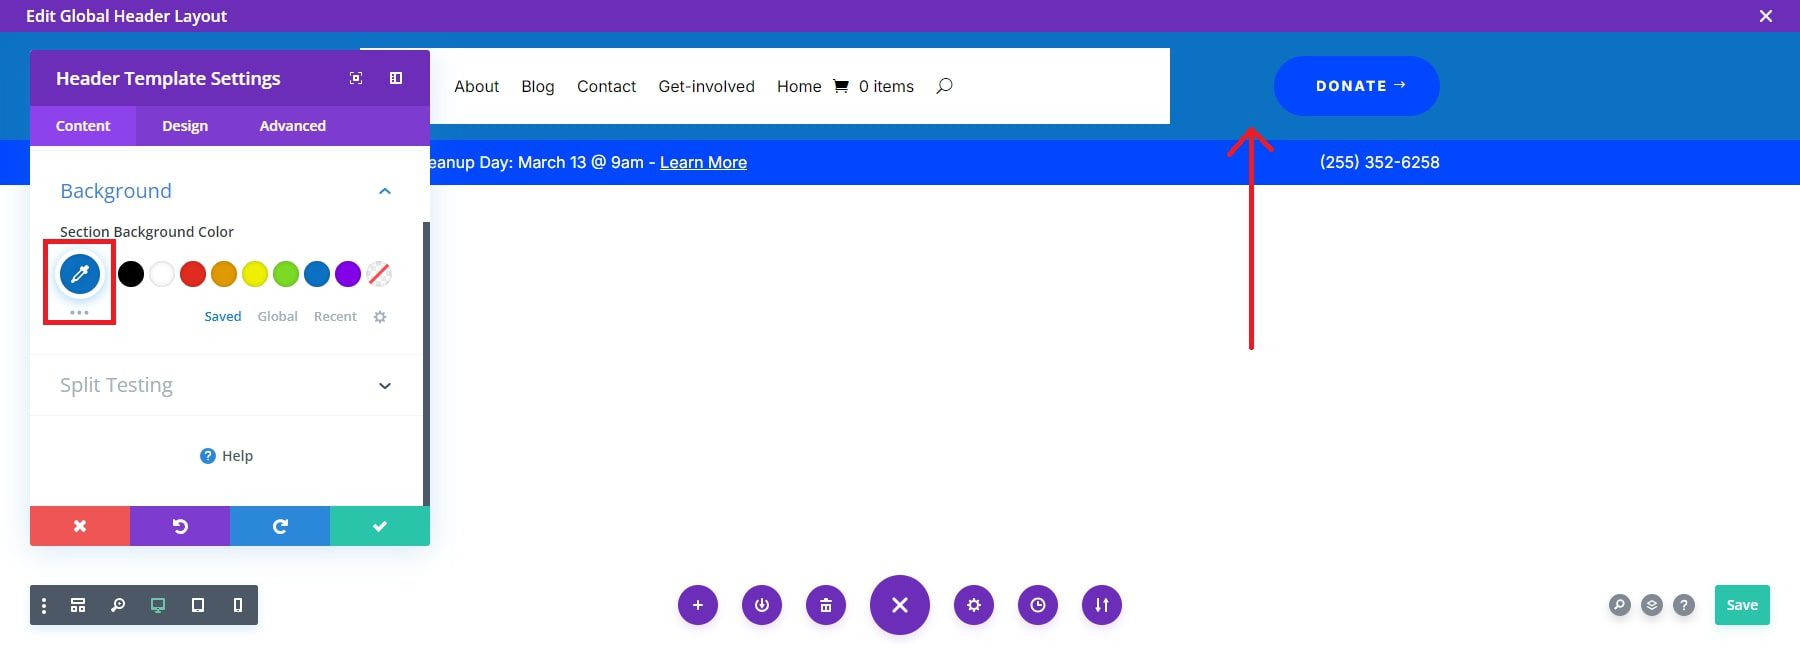
Once you make the changes to the global header, they will be applied to all the pages of your website. For further details, explore the robust features of the Theme Builder.
5. Add Functionality for Non-Profit Website
Donation Forms
Accepting donations online is crucial for non-profits. A donation plugin can help you collect funds seamlessly. One popular choice is the GiveWP plugin. The configuration of GiveWP is fairly easy. Go to Donations > Settings and follow the setup wizard to configure the donation forms, payment gateways, and email notifications.
Navigate to Donations > Add Form to create your first donation form. Enter a title for your donation form, such as “Support Our Cause”. Configure the donation options, including suggested donation amounts, recurring donation options, and the required form fields such as name, email, and address. To add the donation form to your website, embed it on any page or post using the provided shortcode. After saving the form, copy the shortcode.
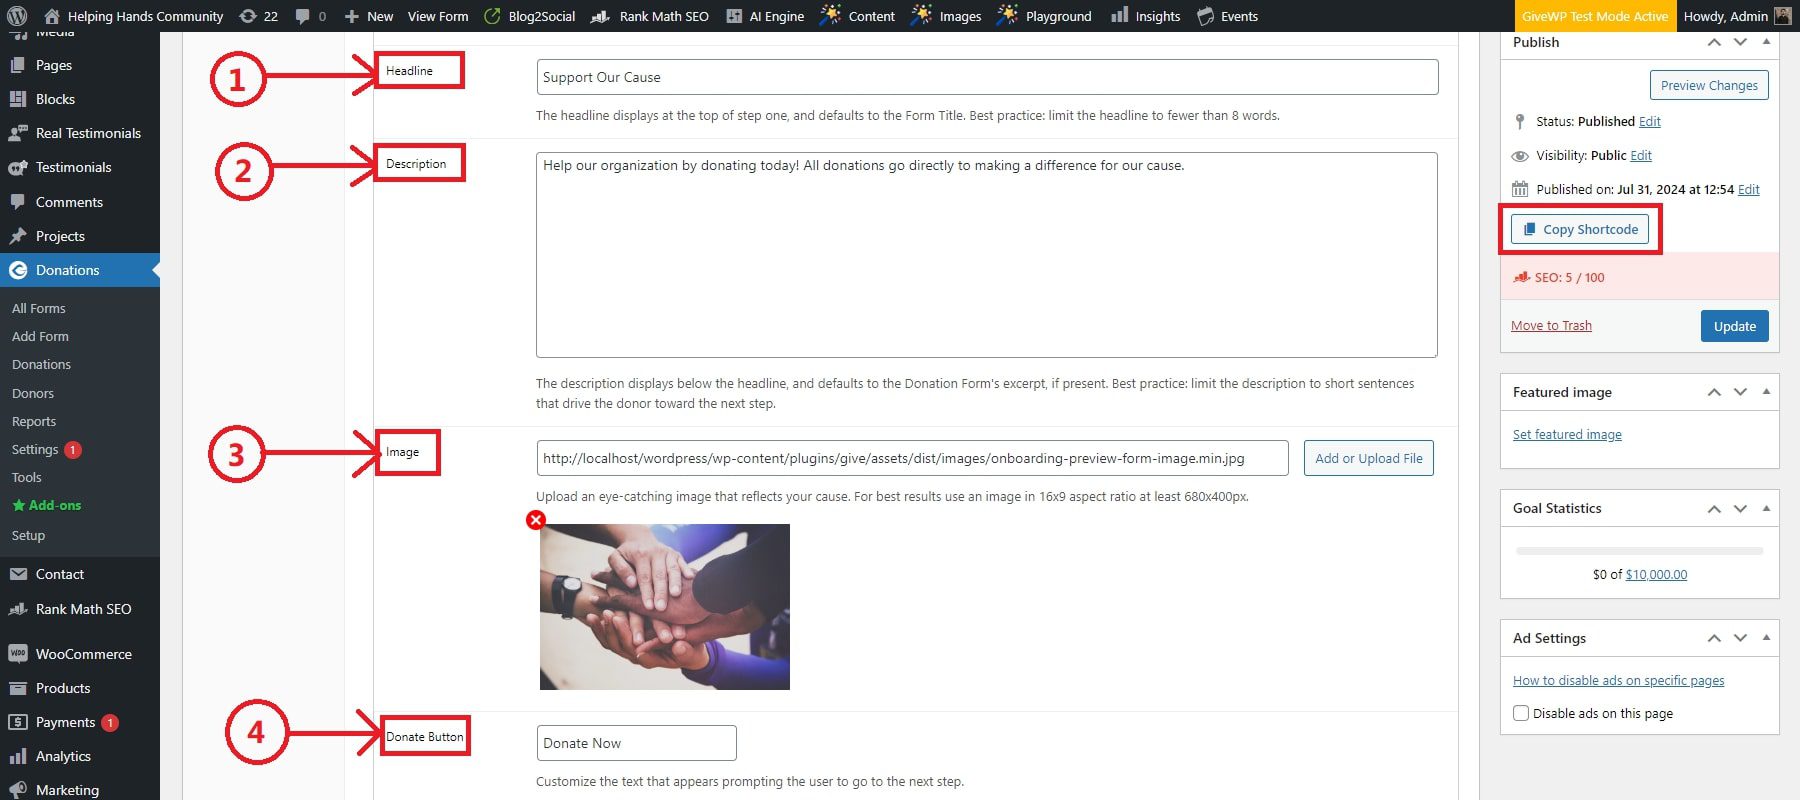
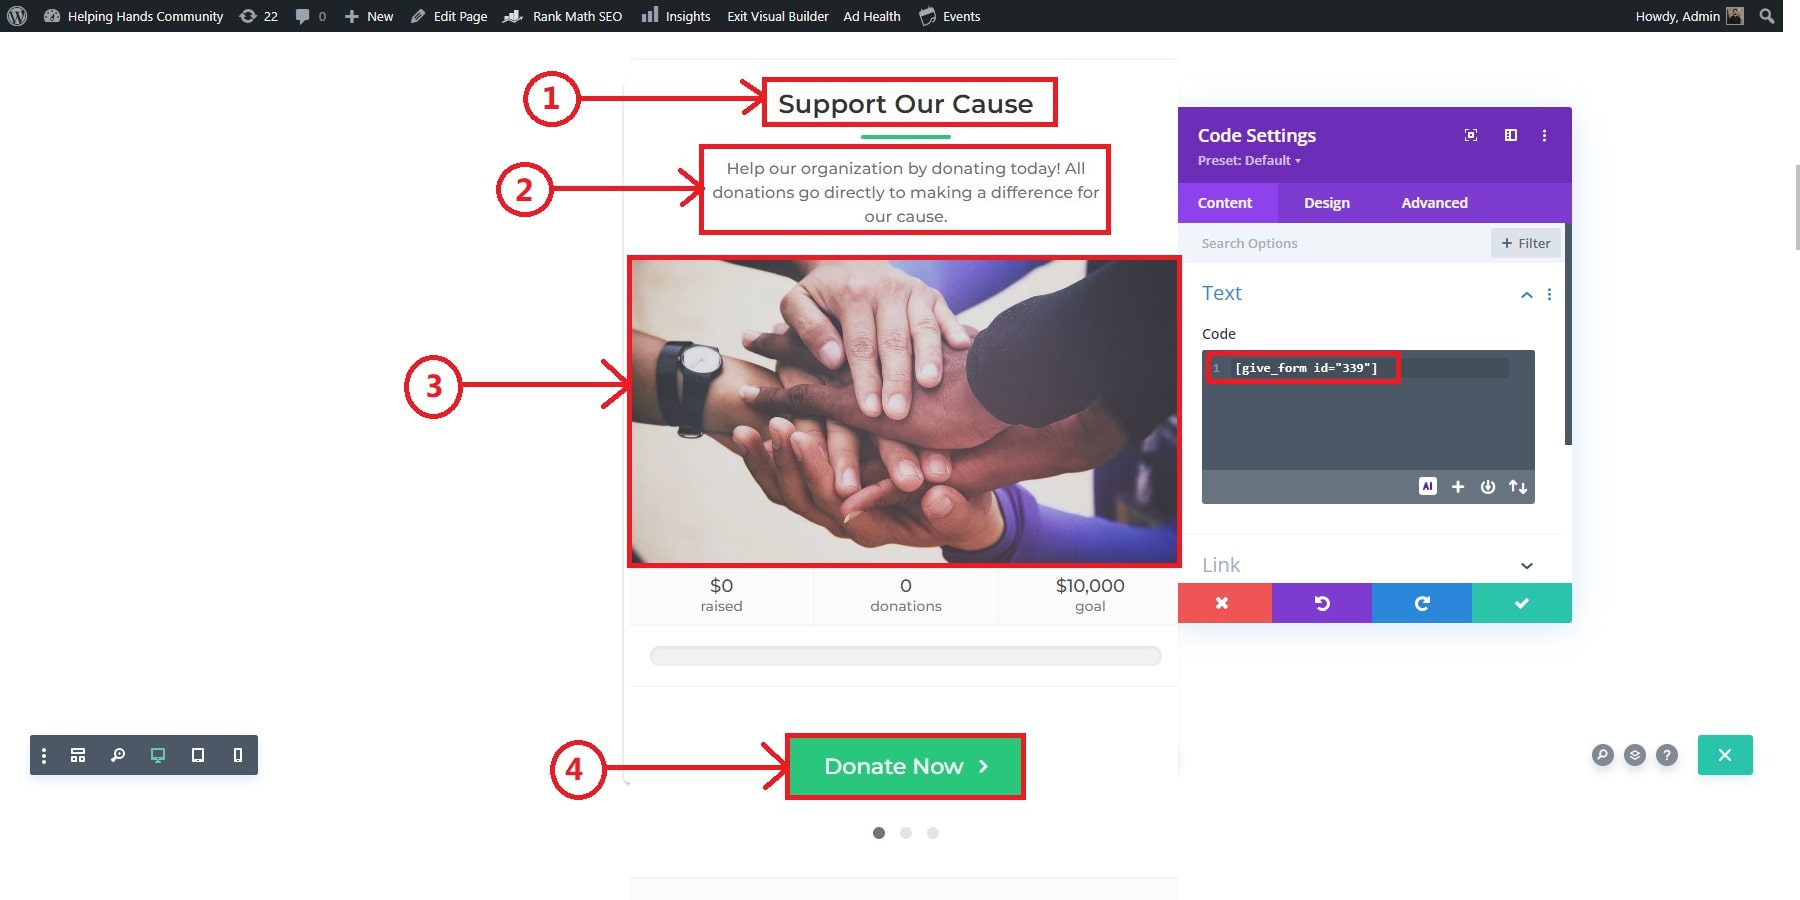
If you’re using the Divi Builder, go to the page where you want to add the donation form, click Edit with Divi, add a new Code module, and paste the shortcode. Using Divi’s design options, customize the layout and appearance of the donation form to match your site’s branding.
Events
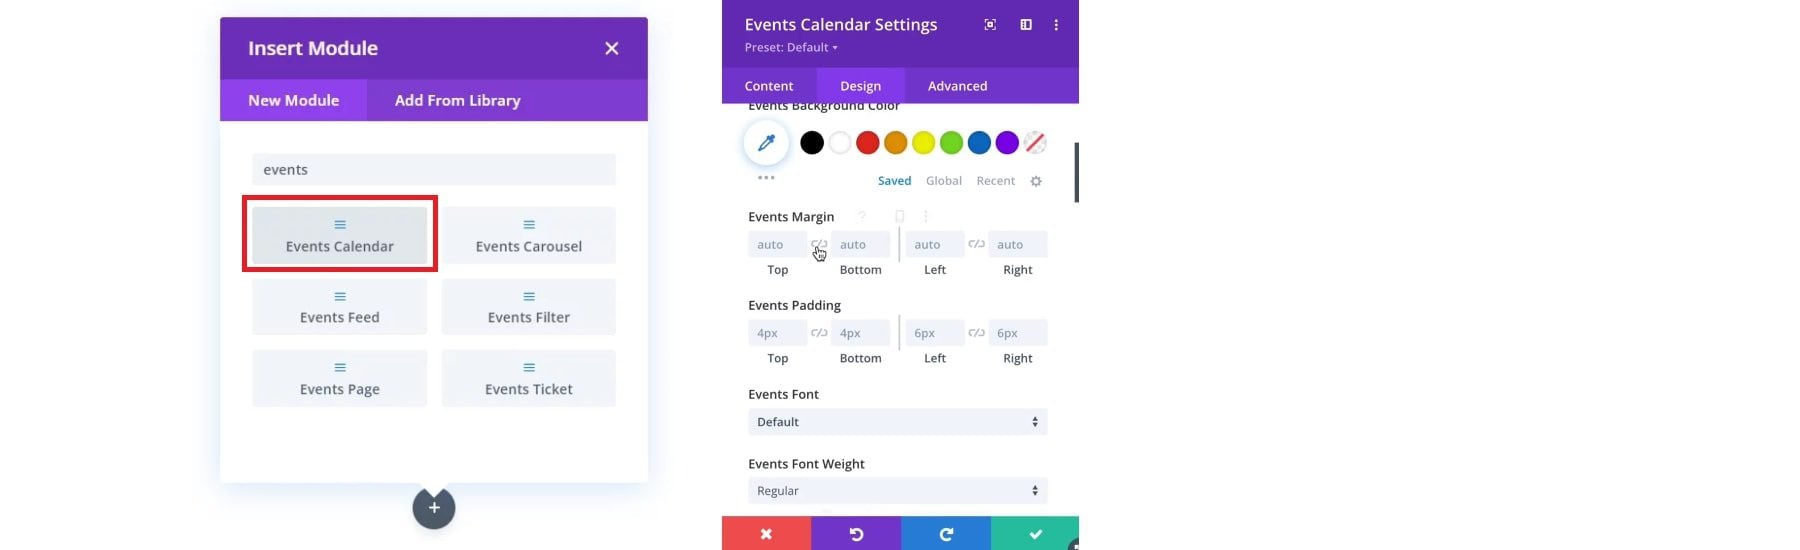
Integrating an event management system is essential to enhance your non-profit website’s functionality. The Events Calendar plugin is a popular choice that works seamlessly with Divi. Moreover, Divi has gone one step ahead by creating an extension in association with Pee-Aye Creative. Hence, the users will get events as part of the Divi custom modules, allowing you to add and customize events in multiple styles.
First, make sure to purchase and install the Divi Events Calendar plugin. It will cost you $54 from the Divi Marketplace. After that, install The Events Calendar plugin by navigating to Plugins > Add New from your WordPress dashboard. In the search bar, type The Events Calendar and click the Install Now button next to the plugin. Once the installation is complete, click Activate. After activation, you will see a new menu item, Events, in your WordPress dashboard.
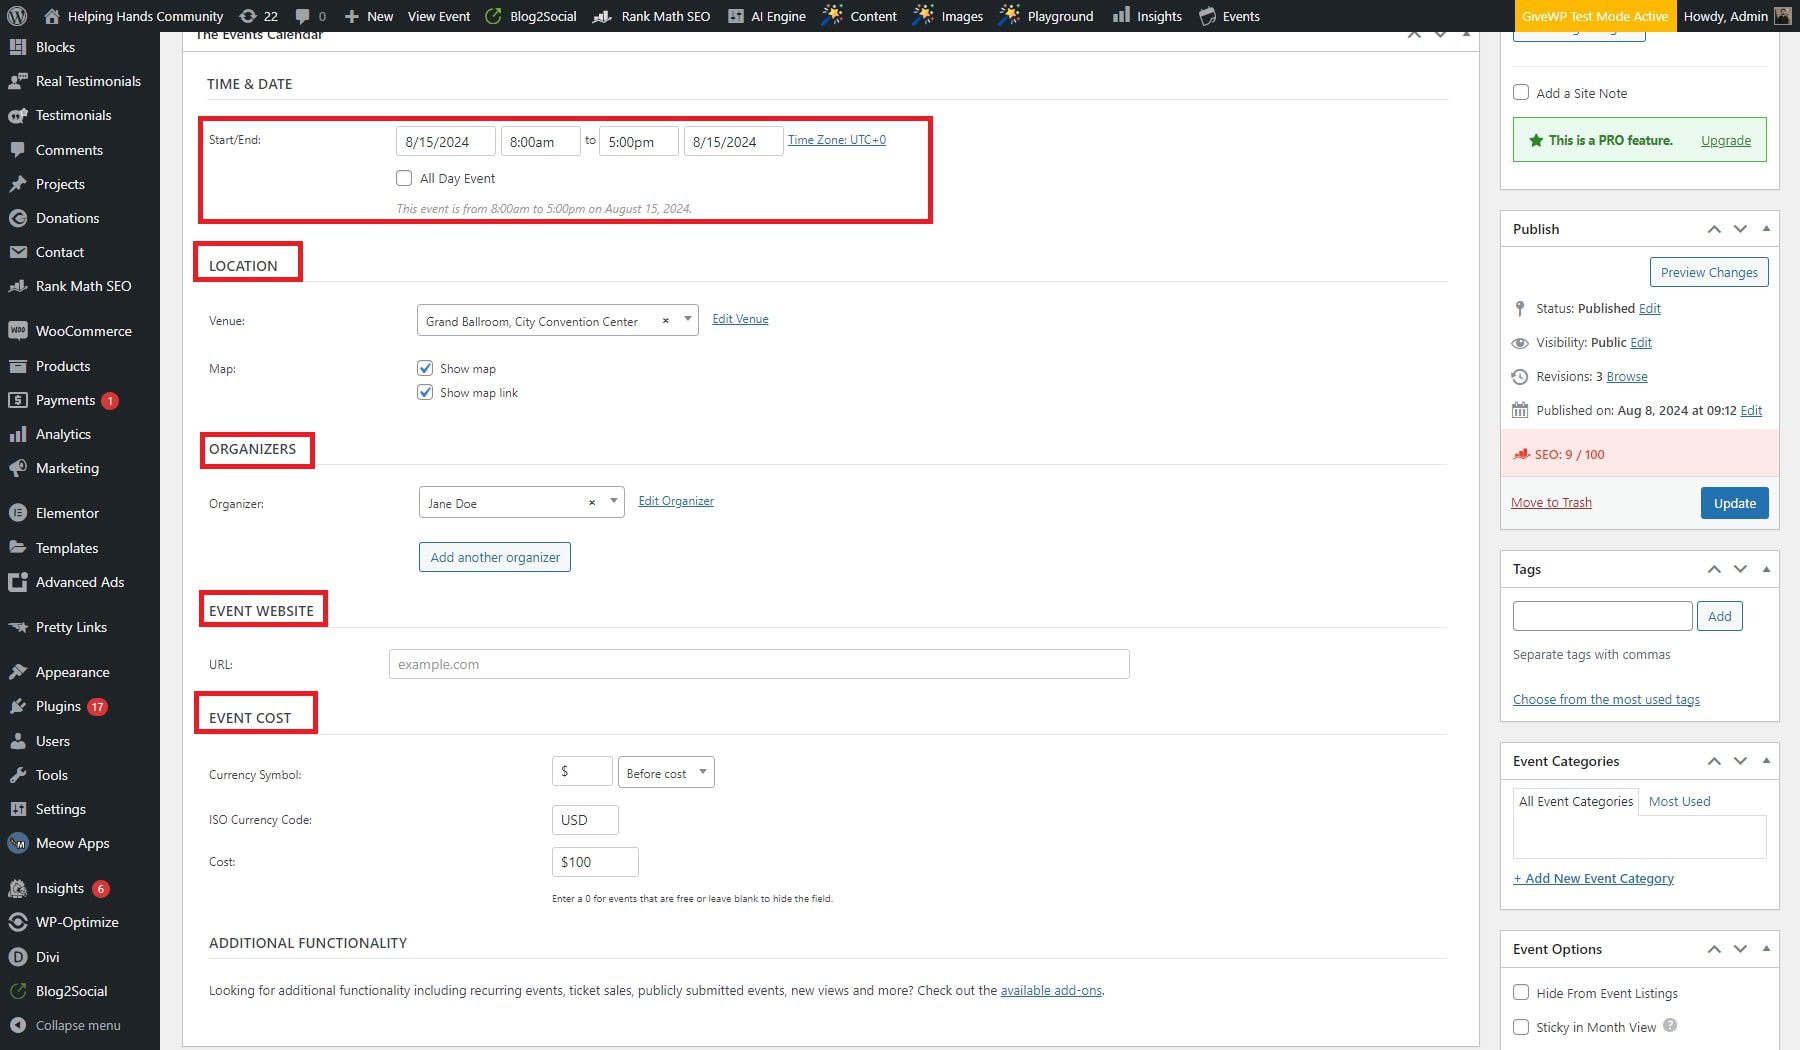
To create an event, navigate to Events > Add New. Enter the event title and detailed description, including any necessary information. Specify your event’s start and end times and dates, and enter the location details, including the venue name, address, and integration with Google Maps if applicable. Provide information about the event organizer, including name, phone number, email, and website. If the event has a cost, enter the ticket price or indicate if the event is free. Include the link if there is an external website with more information or registration.
Now, move to the Divi Visual Builder and add one of the event modules. In this case, we have added the Events Calendar module. Customize the selected module through its design features before adding it to your website.
Essential WordPress Plugins
There are plugins that every WordPress site can benefit from. Here are just a few examples of must-have plugins you can use with WordPress:
- SEO Plugins (like Rank Math)
- Backup Plugins (like UpdraftPlus)
- Image Optimization Plugin (like EWWW Image Optimizer)
- Speed Optimization Plugins (like WP Rocket)
- Security Plugins (like Solid Security or Sucuri)
- Social Media Plugins
- Marketing Plugins
6. Promote Your Site with SEO and Marketing
Optimizing your non-profit website for Search Engine Optimization (SEO), email opt-ins, and social media sharing is essential to promote your site and grow your audience. Divi has built-in optimization and marketing tools and seamlessly integrates with the best WordPress plugins for SEO, social media sharing, and email options. Here are a few tools to get you started.
SEO
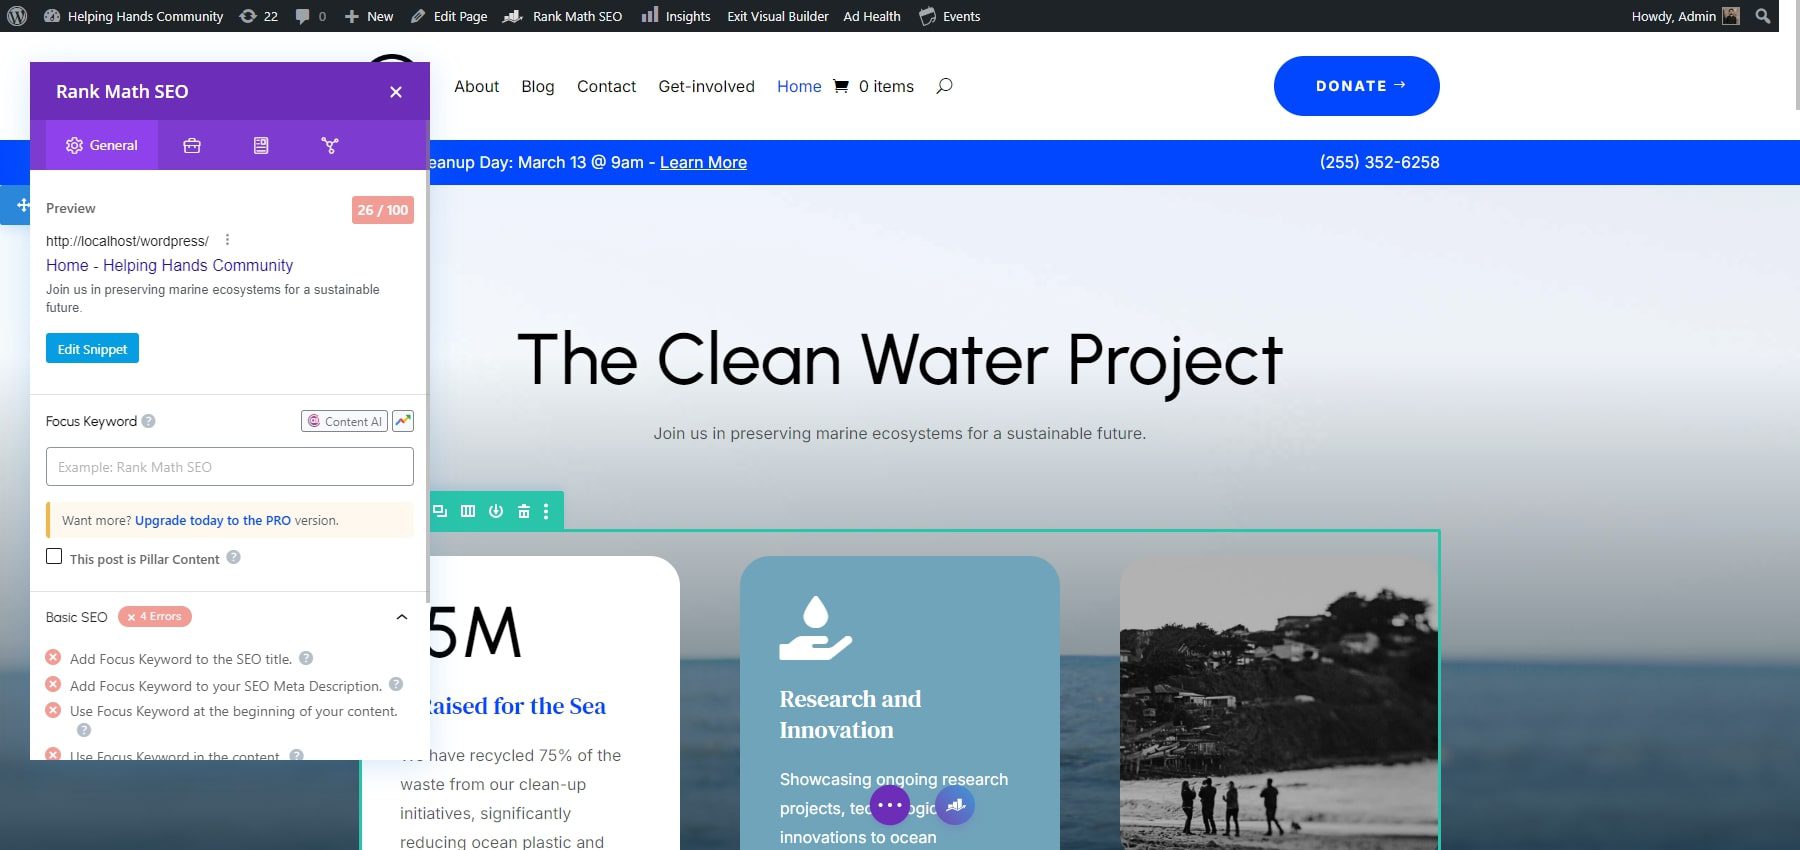
Rank Math helps you optimize your content with SEO best practices, including meta tags, keyword optimization, and readability analysis. After activation, configure the plugin by following the setup wizard to ensure your site is properly optimized for search engines. You can check the Rank Math analysis by clicking its icon at the bottom of the page. Rank Math will provide you with an SEO scoreline and highlight your web page’s deficiencies from an SEO perspective.
Email Marketing
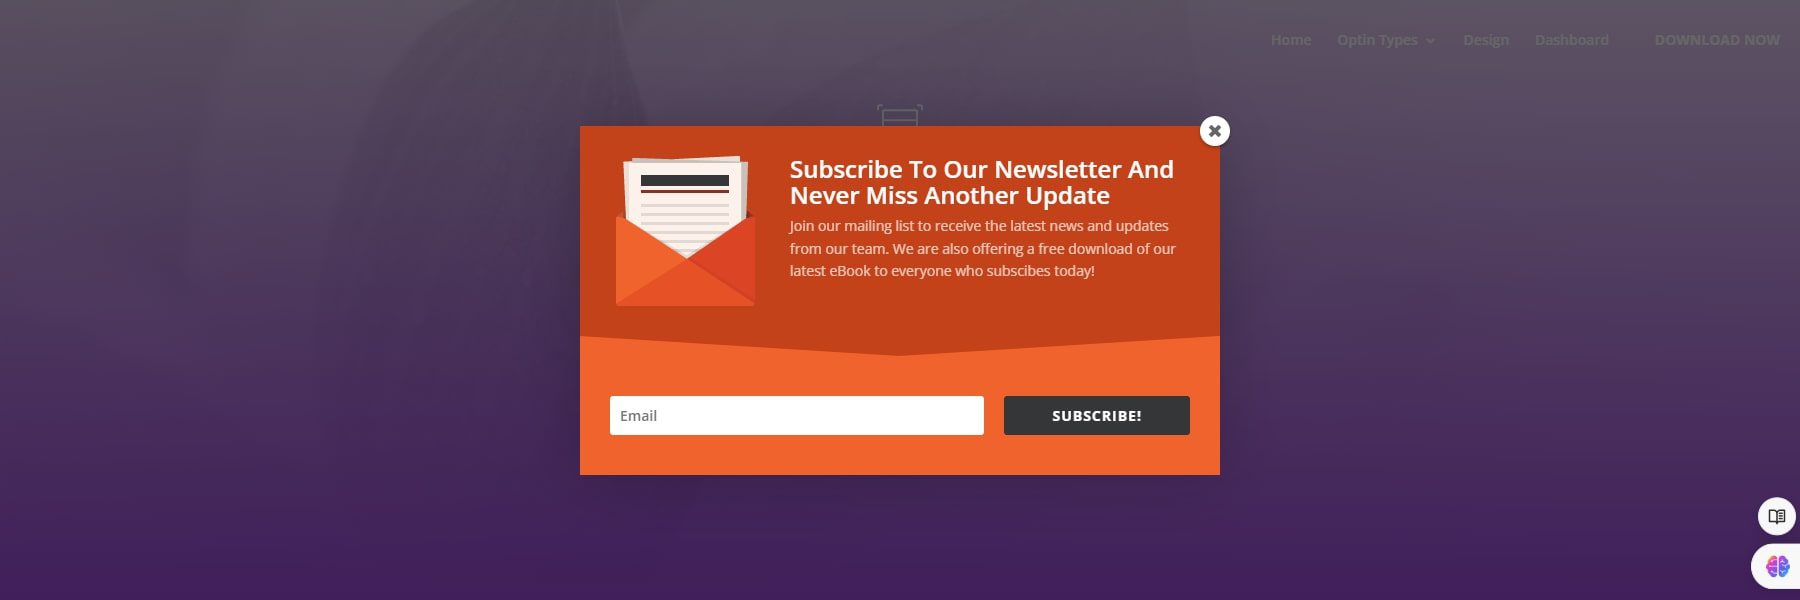
Building an email list is vital for engaging your audience and keeping them updated on your non-profit’s activities. The Bloom plugin by Elegant Themes is a powerful tool for creating attractive email opt-in forms. After its installation, create and customize opt-in forms that fit your site’s design and needs. You can integrate Bloom with various email marketing services to manage your email list effectively and automate communications.
Social Media Sharing
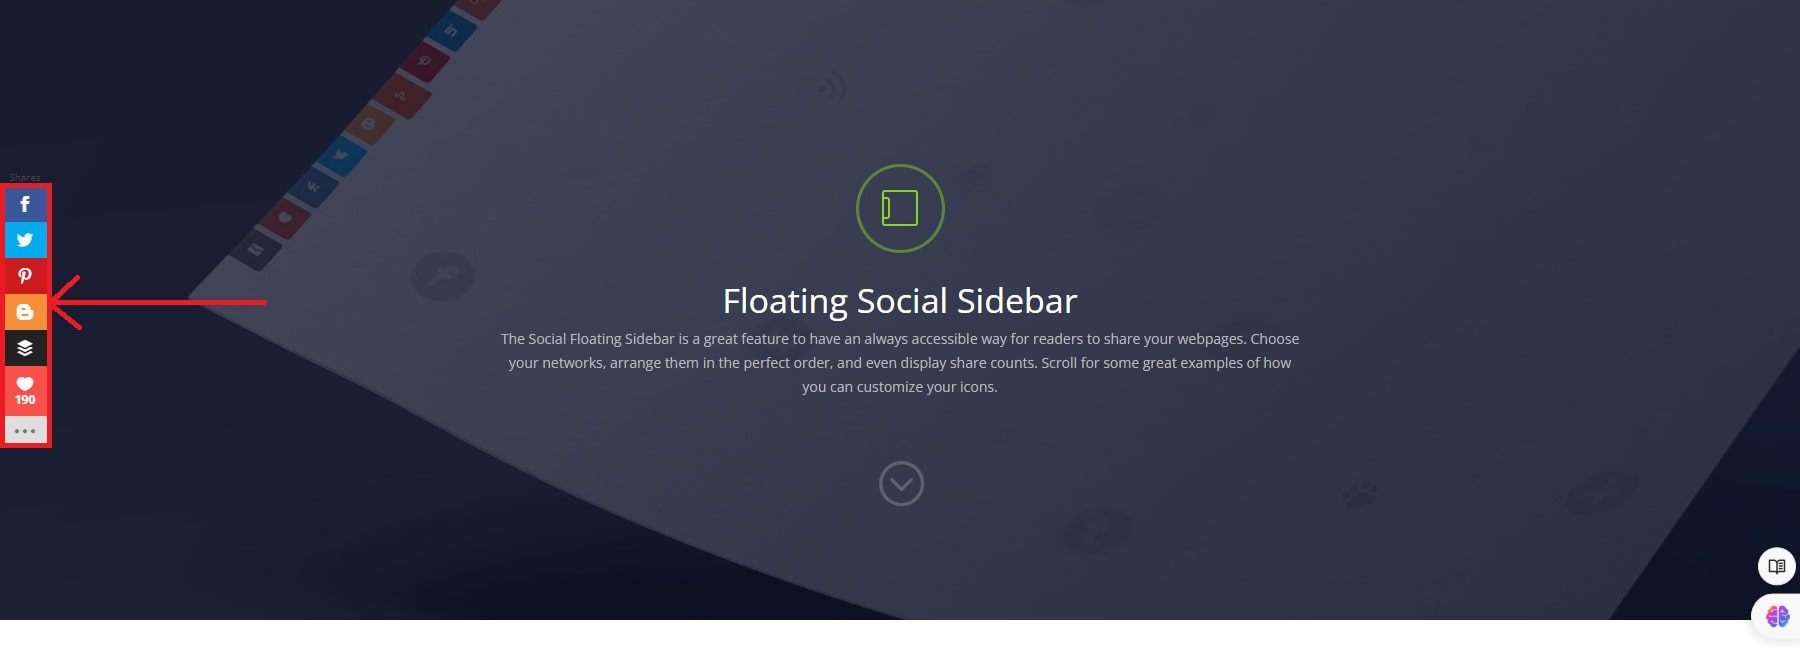
The Monarch plugin by Elegant Themes makes adding social sharing buttons to your site easy. After its activation, configure Monarch to display social sharing buttons in strategic locations on your site, such as the header, footer, or within posts. This will encourage visitors to share your content and increase your non-profit’s visibility across social media platforms.
7. Final Steps
Before officially launching your non-profit website, it’s crucial to perform thorough testing and ensure you have a reliable backup plan. This will help you avoid potential issues and ensure a smooth launch experience.
Ensure that all website features are working as intended. This includes testing forms, donation processes, event registrations, and interactive elements. Check that all links are functional and lead to the correct pages. Verifying that donation and contact forms are properly integrated and functioning for a non-profit site is especially important.
Test your website across various browsers (such as Chrome, Firefox, Safari, and Edge) and devices (desktop, tablet, and mobile) to ensure a consistent user experience. This will help you identify and resolve any issues related to layout or functionality that might occur on different platforms.
Check your website’s load time and performance using tools like Google PageSpeed Insights or GTmetrix. Ensure your site loads quickly and efficiently to provide a positive user experience. Optimize images and minimize code where necessary to improve performance.
Alongside testing, create a complete website backup, including the database and all files. This will ensure that you have a restore point in case anything goes wrong during the launch. You can use the best backup plugins like UpdraftPlus to create and store your backup.
Why Create a Non-Profit Website?
Creating a non-profit website offers numerous benefits to help your organization thrive and achieve its mission. Here are some key reasons to consider:
- Increased Visibility and Reach: A non-profit website extends your organization’s reach beyond local boundaries. It makes your mission, goals, and activities accessible to a global audience, increasing awareness and engagement.
- Fundraising Opportunities: A website provides a platform for online donations, allowing supporters to contribute easily and securely anywhere. You can also host fundraising campaigns and events and sell merchandise.
- Volunteer Recruitment: Your website can serve as a hub for recruiting volunteers. By providing detailed information about volunteer opportunities and allowing online sign-ups, you can attract more people to support your cause.
- Credibility and Trust: A website can create a community among your supporters. Through forums, blogs, social media integration, and newsletters, you can foster a connected and engaged community around your cause.
- Continuous Engagement: A website can help you maintain continuous engagement with your audience. Regular updates, blogs, and newsletters keep your supporters informed and involved in your ongoing activities and achievements.
Creating a non-profit website is a strategic move to enhance your organization’s visibility, credibility, and effectiveness. It helps you achieve your mission more efficiently and effectively.
Get Started Today
Divi’s intuitive tools and extensive design options make it ideal for non-profits looking to craft a visually appealing website without needing advanced technical skills. The step-by-step website development process ensures a professional and functional platform for your organization. You can easily bring your non-profit’s vision to life and connect with your audience, all while maintaining control over every aspect of your site’s design and functionality.
Interested in building your non-profit website? Get started with Divi and establish the website of your dreams. You can also go through our provided table of plugins and tools that you might find useful for your non-profit website:
| Products Mentioned | Starting Price | Description | ||
|---|---|---|---|---|
| 1 | Siteground | $2.99 per month | Hosting Provider and Domain Registrar | Visit |
| 2 | Divi | $89 per year | Theme and Page Builder | Visit |
| 3 | GiveWP | $149 per year | Donation Plugin | Visit |
| 4 | The Events Calendar | $99 per year | Event Management Plugin | Visit |
| 5 | Rank Math | $78.96 per year | SEO Plugin | Visit |
| 6 | Bloom | $89 per year (Available with an Elegant Themes membership) | Email Optin Plugin | Visit |
| 7 | Monarch | $89 per year | Social Media Plugin | Visit |
| 8 | UpdraftPlus | $70 per year | Backup Plugin | Visit |


Leave A Reply