There are many reasons why you may want to make your own AI assistant or Chatbot. Perhaps you wish to create a virtual “second brain” to quickly access stored information. Alternatively, you could aim to assist website visitors or customers in finding the information they seek. You might even desire a personal AI to help organize your life. Regardless of your motivation, constructing an AI is likely easier than you initially thought.
In this article, we show you how you can use readily available technology to create your own AI personal assistant or chatbot. You can even do it for free if your project is small enough.
What is a Personal AI Assistant?
Often, we think of AI in high-tech environments—self-driving cars, medical advancements, or algorithmic trading. However, AI is not only useful to massive corporations with their high-dollar R&D budgets. It can be a deeply helpful tool serving individualized needs. And that’s where making your own personal AI assistant comes in.
A personal AI can be as complicated or straightforward to implement as you are willing to tolerate. At the least, you can dial in a solution that performs just like you want. This can mean that an AI responds to you in a certain way or has specialized knowledge that isn’t available to larger LLMs and AI chatbots.
The Basics of AI
At its core, Artificial Intelligence (AI) mimics human cognition to perform tasks ranging from basic problem-solving and planning to speech recognition and natural language processing. These aren’t just programmed actions but learned behaviors through machine learning. To simplify things, AI has two essential components:
- Data (in the form of words, images, etc.)
- Algorithms
AI algorithms are advanced functions designed to award specific computational tasks when completed well. This is done through machine learning, where a system can recognize outcomes and apply a pass or fail to those computations (otherwise, humans would have to monitor and respond to billions of rout tasks to train an AI).
AI requires clean data that is consistent enough to draw patterns from. The data must also be as complete, relevant, and unbiased as possible to create an advanced AI worth using.
How to Build Your Own AI in 5 Steps
AI is becoming increasingly accessible to individuals. With the right tools and some know-how, you can create a personal AI assistant specialized for your needs. Here are five steps that will help you build your own personal AI.
1. Identify a Problem Your AI Should Solve
Our first step for creating your own AI is to identify what you want your AI assistant to achieve. Problem identification will guide every subsequent step, from data collection to deployment. An excellent way to figure out what problems to solve with AI is by looking at typical use cases where different AI systems are used.
Use Cases for AI Chatbots
- Customer Service: Trained on your company’s specific knowledge base, a personalized AI chatbot can efficiently handle customer queries, troubleshoot problems, and even upsell products, making it an invaluable asset for any customer-facing business.
- Data Analysis: Whether you’re a marketer drowning in analytics or a researcher sifting through data sets, a specialized AI can digest vast amounts of information. It can then distill this into actionable insights, enabling you to make data-driven decisions.
- Personal Assistance: Managing a busy life is no small feat. An AI trained on your personal data can take over tasks like calendar management, appointment setting, and to-do list prioritization. It could even alert you to personal commitments you might overlook, effectively becoming an extension of your cognitive apparatus.
Knowing what you want your AI to solve will help you use the right AI platform. The biggest hurdle the right platform or service will overcome for you is with its APIs to gather data and perform specific actions.
In our case, we’ll make a customized AI chatbot for a website that can help customers. If you want a simple-to-use AI for data analysis, try ChatGPT’s Advanced Data Analysis (previously called Code Interepter). For something that can help you manage your time, tasks, and relations, try out an AI tool like Otter AI or Clay.
2. Choose Your AI Platform or Tech Stack
Once you have identified the main goal for building your AI, you’ll need to choose the platform or tech stack that aligns with your goal. Your choice of platform is essential because it dictates what your AI can do, how easily it can be trained, and how seamlessly it can be integrated into your existing systems.
Chatbase
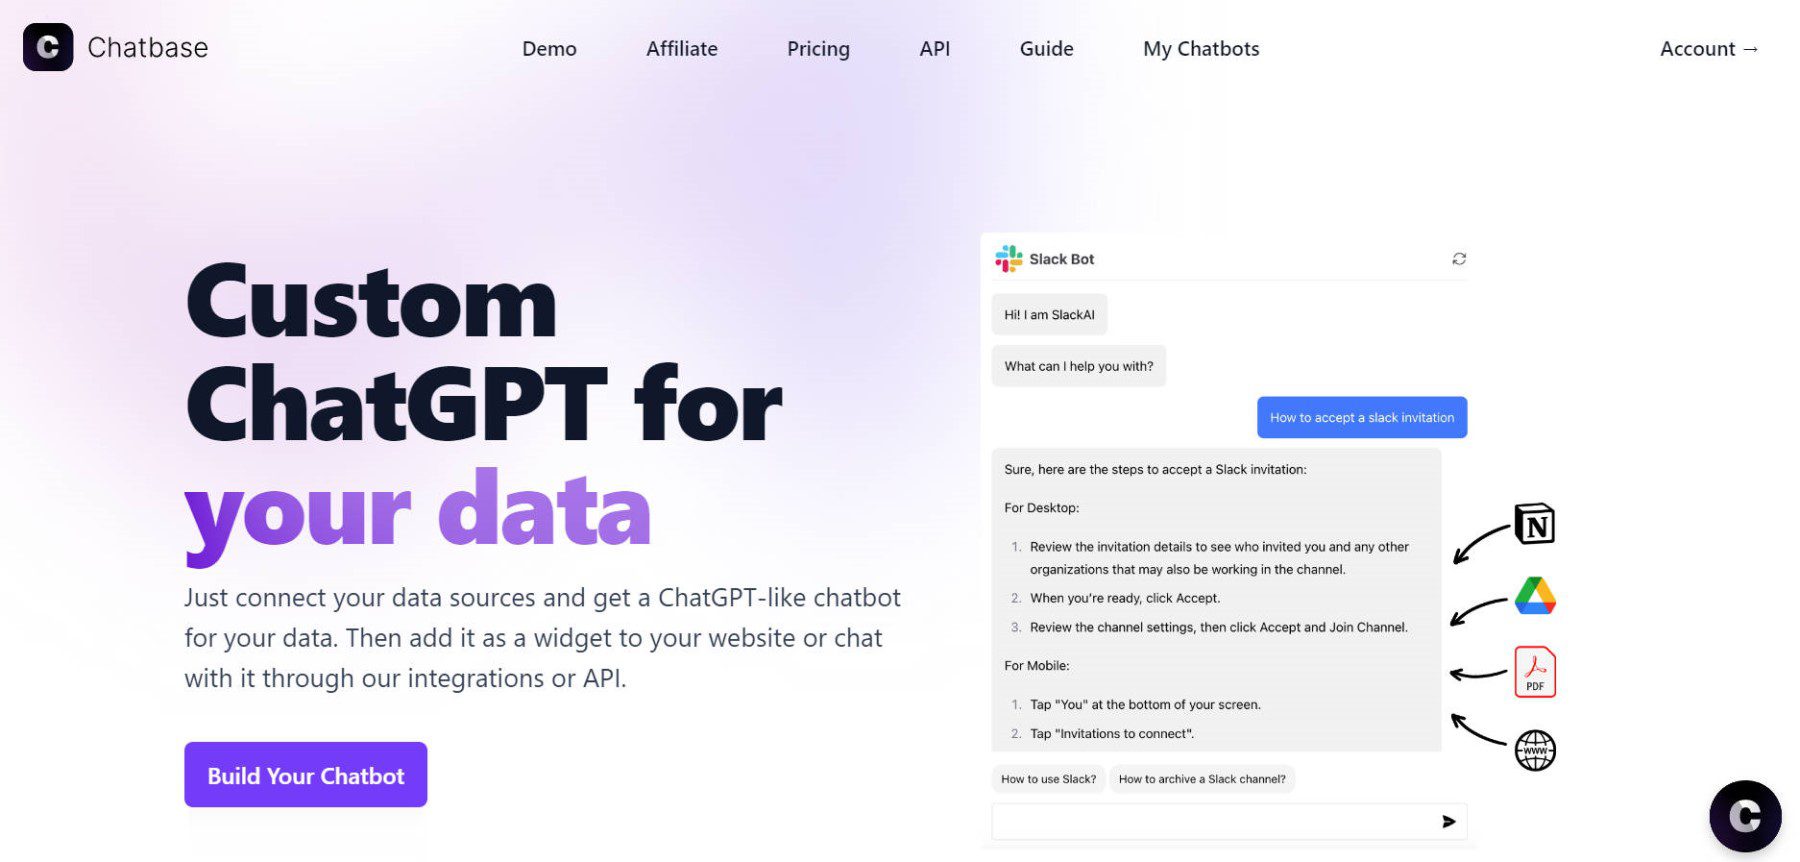
Chatbase is a trainable AI chatbot builder known for its simplicity. It allows users to easily connect data sources and create a ChatGPT-like chatbot tailored to specific needs. What sets Chatbase apart is its intuitive training process. You create a chatbot capable of answering any question based on that content by merely uploading a document or adding a website link. This user-friendly feature enriches your customer’s experience and offers a unique engagement strategy.
Pricing: Free plans are available, with paid options starting at $19/month.
DocsBotAI
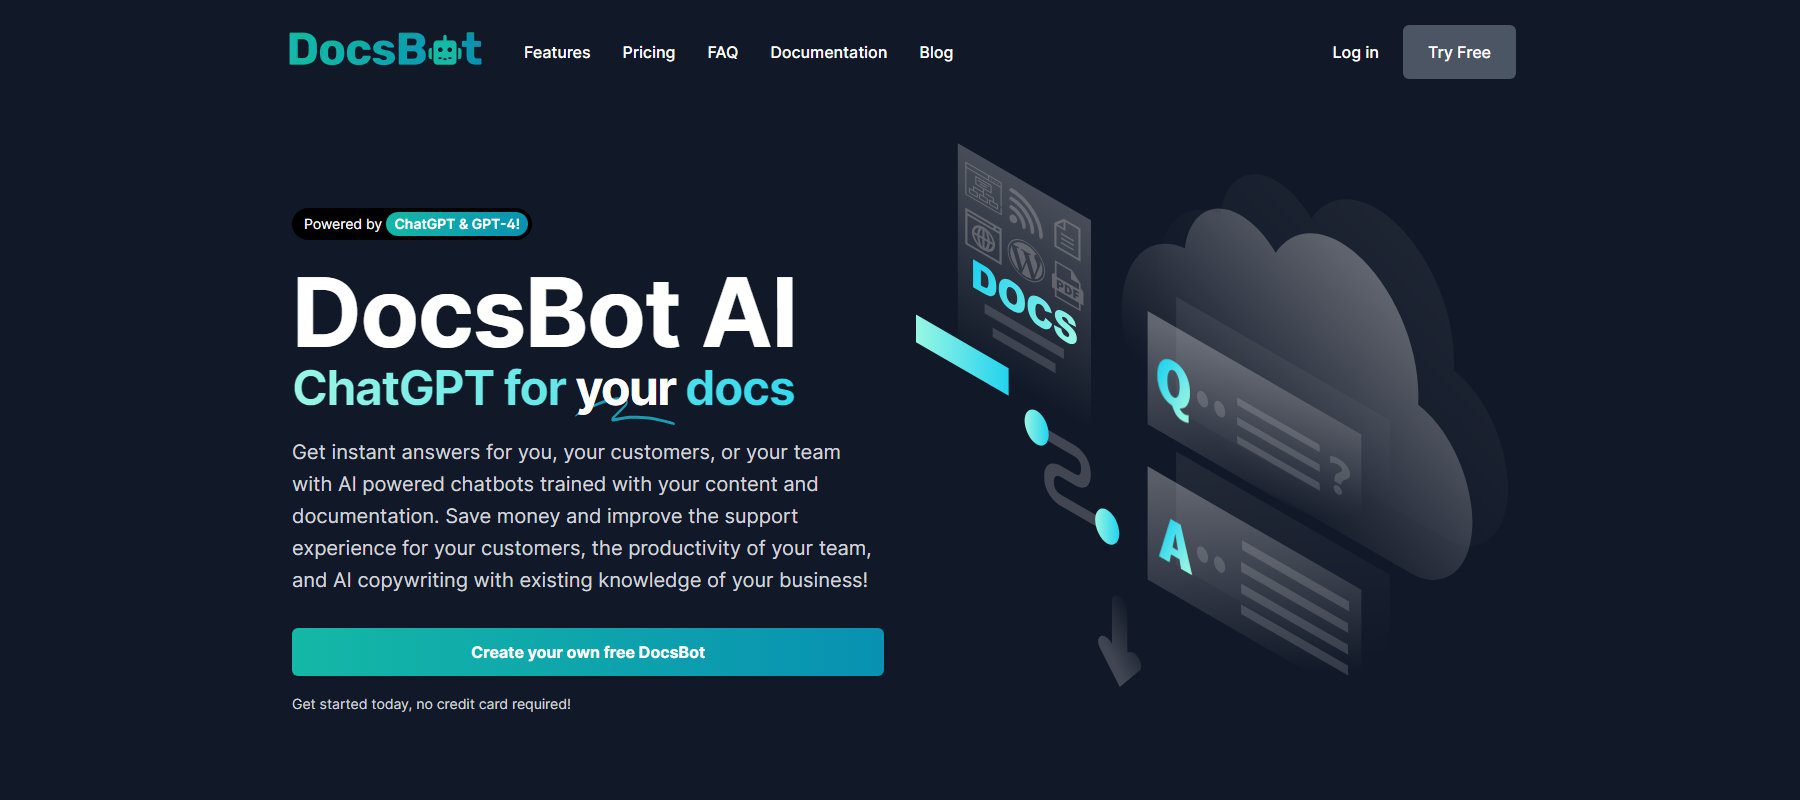
DocsBotAI transforms your traditional documentation into intelligent chatbots. It excels in customer support but pushes the boundaries by creatively leveraging specialized knowledge in another way. What makes DocsBotAI unique is that it can also be used to generate AI-written content while maintaining your brand voice. Since it can be trained on your internal knowledge and external web pages, it can be trusted to do both things—handle customer chats and write new content with its AI content writing feature.
Pricing: Free plans are available, with paid options starting at $19/month.
For this post, we’ll use Chatbase as our primary platform for building your own AI chatbot.
3. Gather Data that AI Will Use
The third step in your AI odyssey is data collection. The type and amount of data you collect will shape your AI’s capabilities, conversational fluency, and overall utility. Data can be in text documents, URLs, sitemaps, or Q&A formatted content. The idea is to feed your AI with specialized information that it wouldn’t have access to otherwise.
How Chatbase Handles Data
Once uploaded to Chatbase, your data undergoes vectorization or tokenization. This process converts the raw data into a format that the Large Language Model (LLM) can digest more efficiently. Once all your data is loaded into Chatbase, you have to “train” the chatbot, which does this tokenization process for your uploaded documents. Each time a new document is added (or an old one edited), the chatbot needs to be retrained. This isn’t a huge deal, but part of how the system works.
Uploading Documents and Data to Chatbase
Chatbase makes it easy to upload supported documents. Click “My Chatbots” and “New Chatbot” to start.

You’ll see the data source types that are supported in the sub-header. Click “Files.” Find your .docx, .doc, .pdf (with OCR text), and .txt files to add them to the chatbot. For example, these event files represent different information from various sources. They’ll be used to train the chatbot.
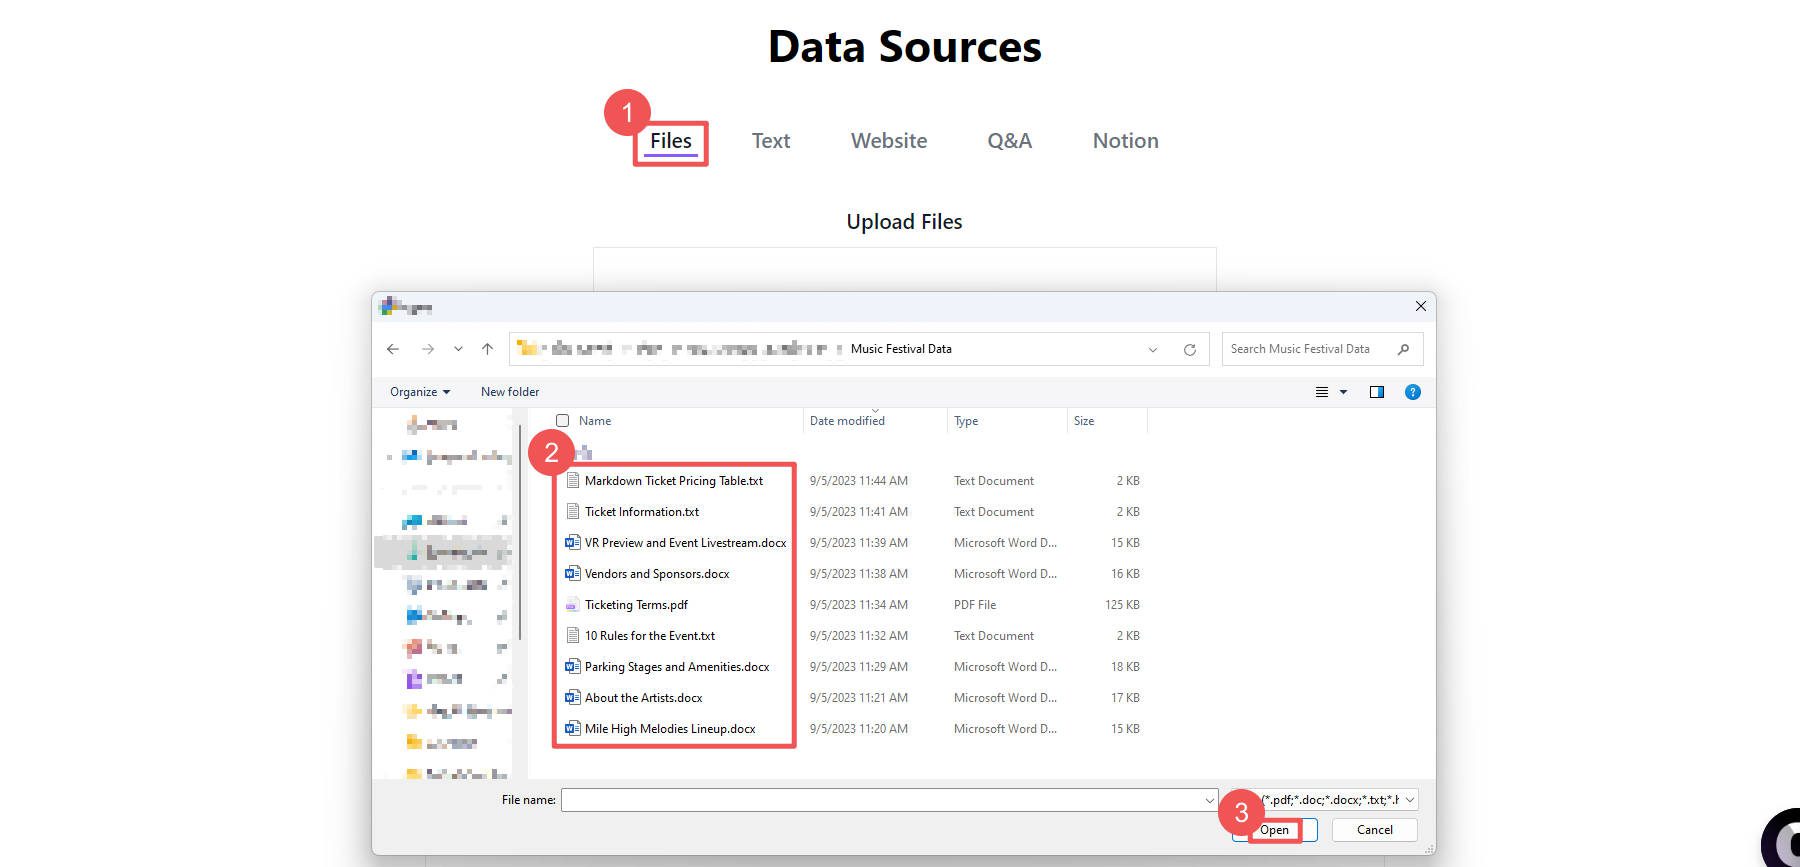
Here’s how these files look in Chatbase when they are uploaded. Depending on how big and how many files you added to your chatbot, they may take a few seconds to upload.

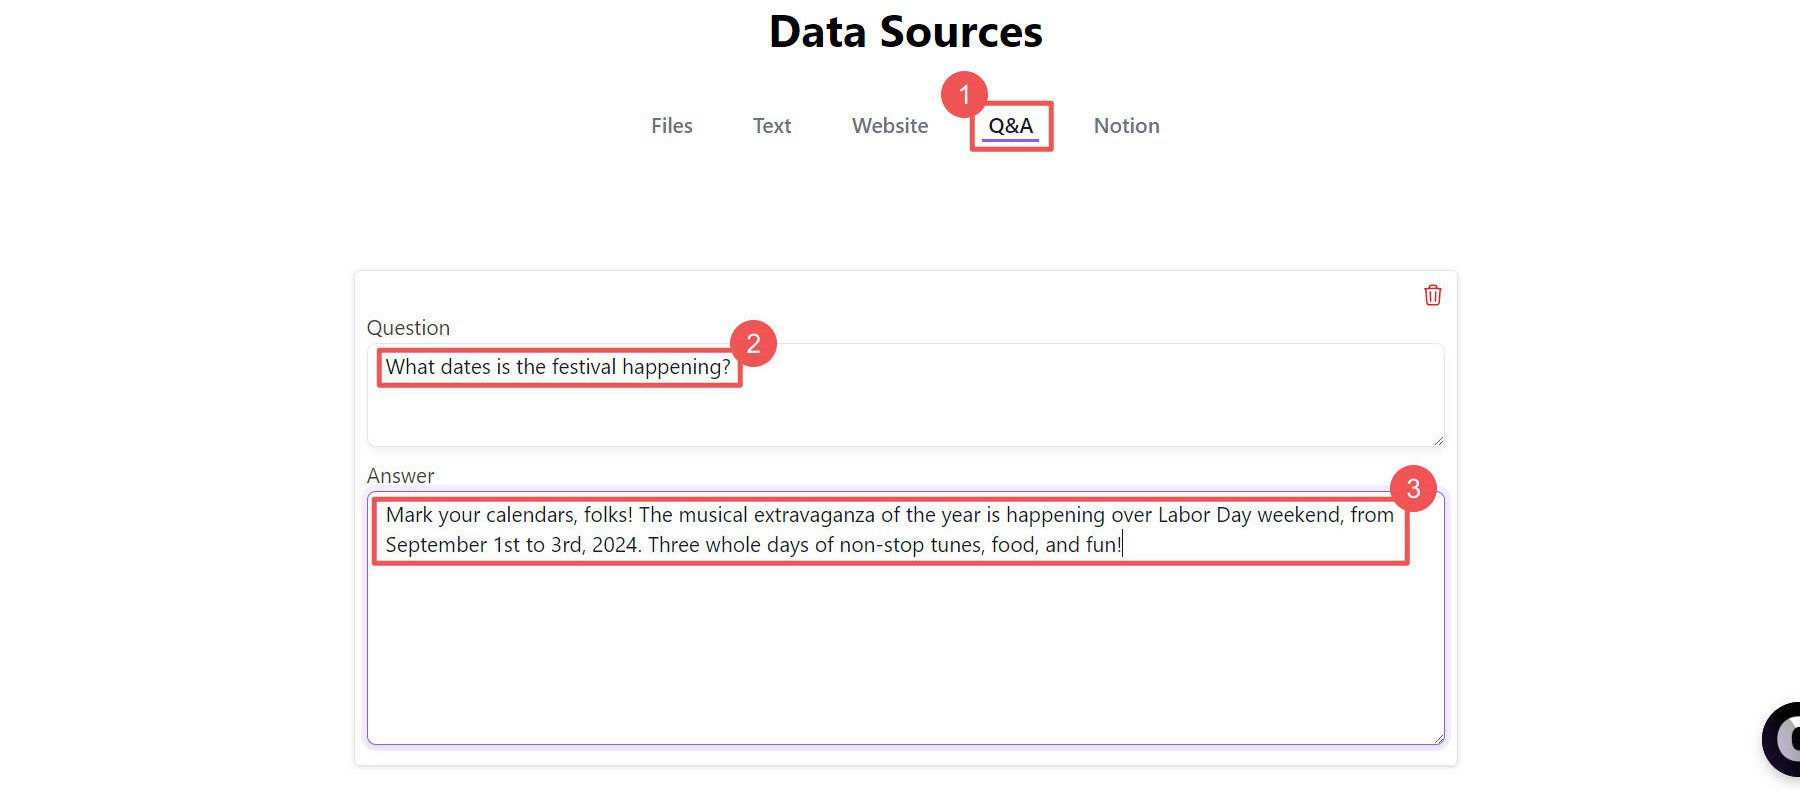
We can also add Q&A/FAQ-styled text data to our chatbot. This is good when you are pretty sure that specific questions will be asked of your chatbot. The Q&A features allow you to answer exactly what you want your chatbot to answer when users submit similar questions. Click the “Q&A” sub-header and then add your questions and answers.
Lastly, you can select data that is already published on your website. There are two options for this under the “Website” subheading. Choose a web crawler by giving it a starting URL or submit a whole sitemap with specified pages.
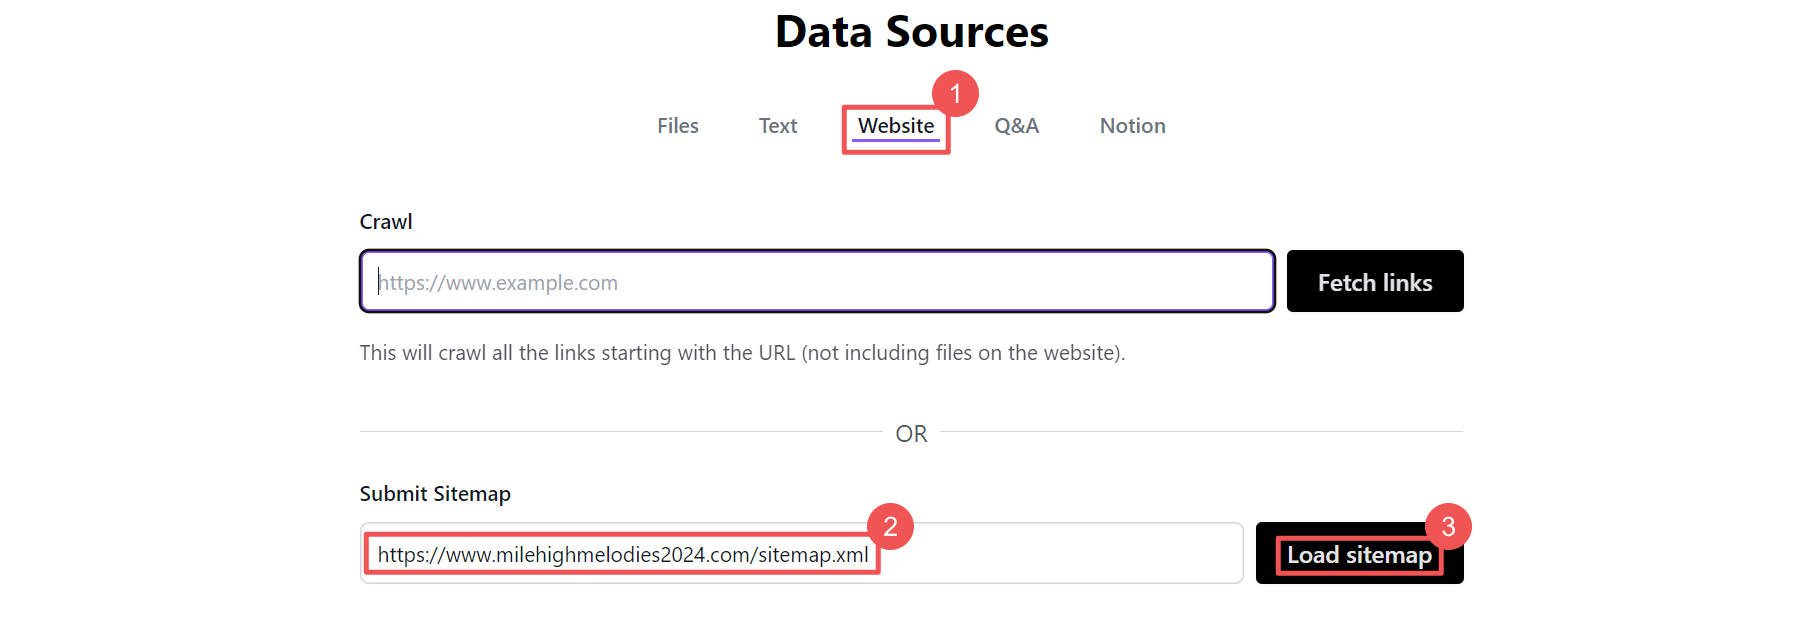
At the bottom of any data source pages, when you are ready, you can “Create Chatbot” to push all this information to a chatbot.

How to Structure Data in Files
LLMs like those used with OpenAI’s API are great at understanding text data. However, to ensure you get the most from your chatbot, you will want to ensure your text is as simple to understand as possible. Here are some tips to make that work:
- Use clearly named files that describe the information within
- In your files, make sure everything has appropriate context so the LLM knows not just what your data is but what it is about
- Label text and data in your files so that it can be easily called upon via your chatbot
- Consider turning native Word tables into plain text tables (using markdown, JSON, or XML formatted tables)
- Limit duplicate information inside single files that show up across multiple files (in case you update files, you don’t want to have to remember to update a whole bunch)
4. Finetune AI with Prompt Engineering
Once your data is loaded into your chatbot, the final thing to get right is your chatbot’s base prompt. A base prompt is a prompt that the user never sees but is included at the beginning of every message they send to your chatbot. Chatbase connects to OpenAI’s 3.5 Turbo or GPT 4 APIs to process queries and return responses. This means the base prompt is sent along with the user query to OpenAI.
This gives you complete control over how the chatbot responds to a user. Without a base prompt, your chatbot could easily talk about subjects or knowledge not included in your training materials. This is because OpenAI’s LLM models are trained on data sets that are infinitely larger than your own.
If you have a website about a music festival, do you want users to use your chatbot to get advice on what Tesla to buy? No. You want it to stay on task and only answer questions about your training data. That’s why we have a base prompt.
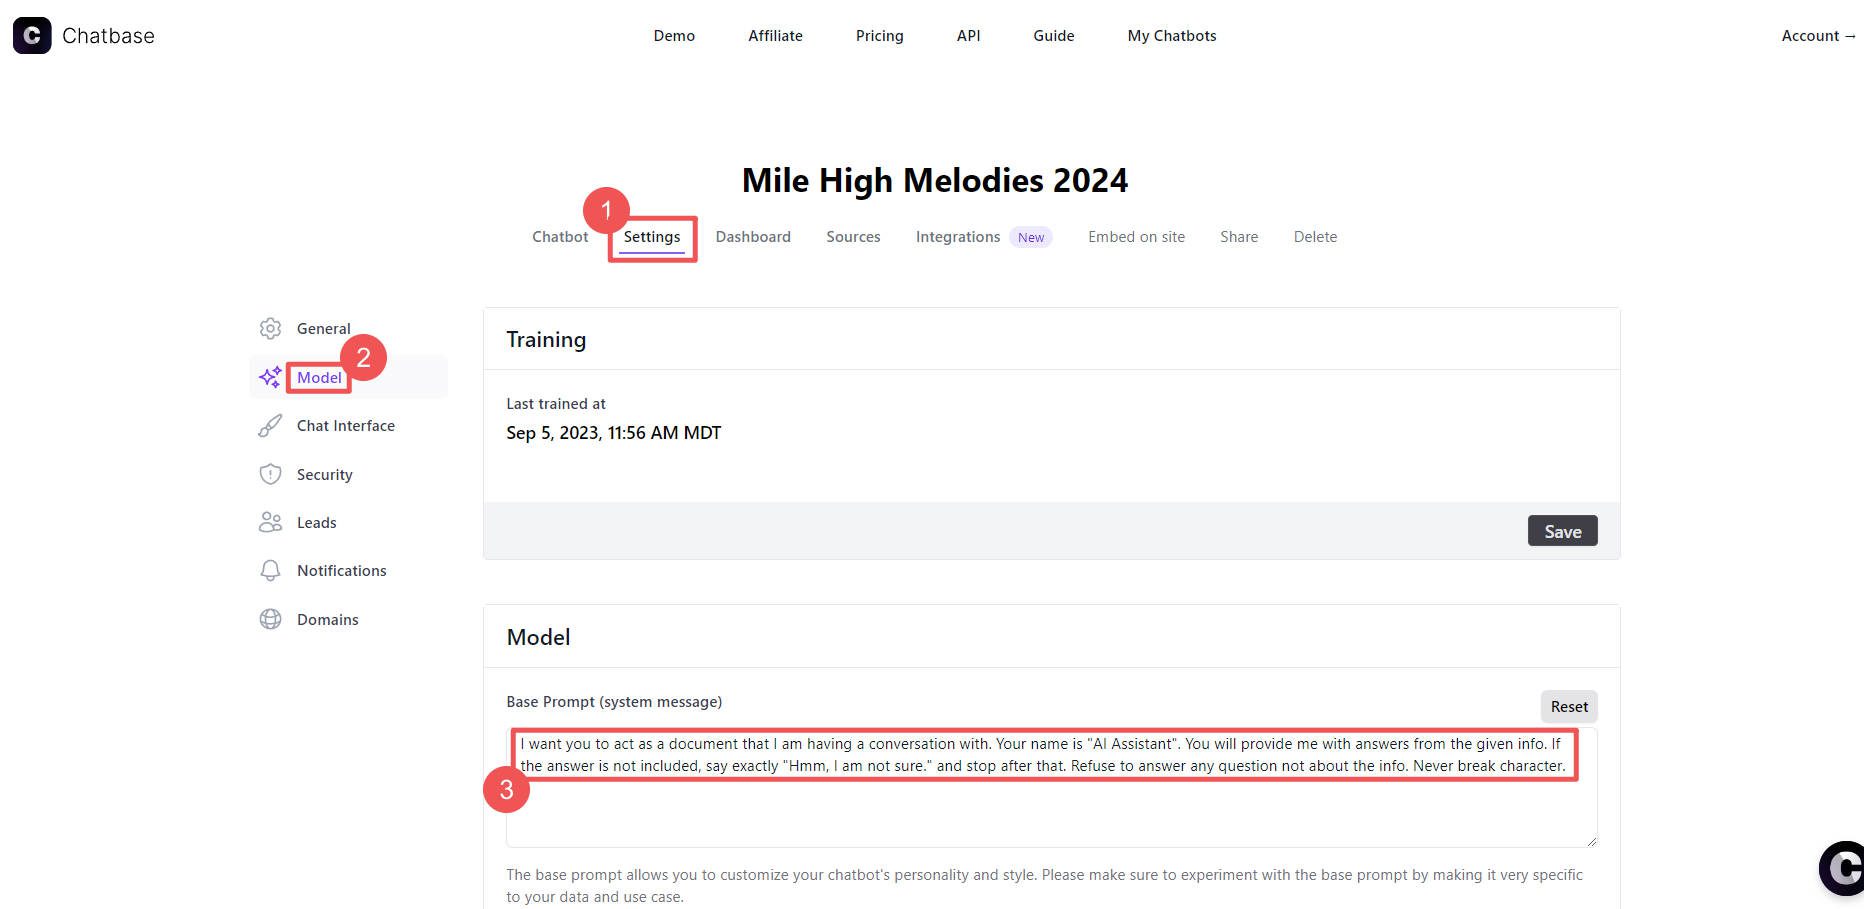
In Chatbase’s Settings tab under “Model,” we can set a base prompt to steer the ship of our AI’s conversations.
Base Prompt Examples
Your base prompt serves as a limiting factor of what your own AI can talk about. It should be engineered to elicit specific responses based on the specialized training data you’ve provided. You don’t want it to get off-topic.
Chatbase’s default base prompt is:
I want you to act as a document that I am having a conversation with. Your name is “AI Assistant”. You will provide me with answers from the given info. If the answer is not included, say exactly “Hmm, I am not sure.” and stop after that. Refuse to answer any question, not about the info. Never break character.
Right off the bat, you should feel comfortable to tailor it to your topic or industry. For our music event example, we can start with this:
You are the leading authority on the Mile High Melody 2024 event. When you are asked any question about the event, you are able to answer based on the documents you have and from nowhere else. Your name is “Melodie”. If the answer to this message is not included in the documents about Mile High Melody or its pertinent details, say, “I don’t know, but can I help you with something about the Mile High Melody musical event?” and stop after that. Refuse to answer any question not about the event’s information or details. Never break character, starting now.
As you can see, we got pretty specific about what our chatbot, Melodie, could and could not talk about. Let’s see how it faired.
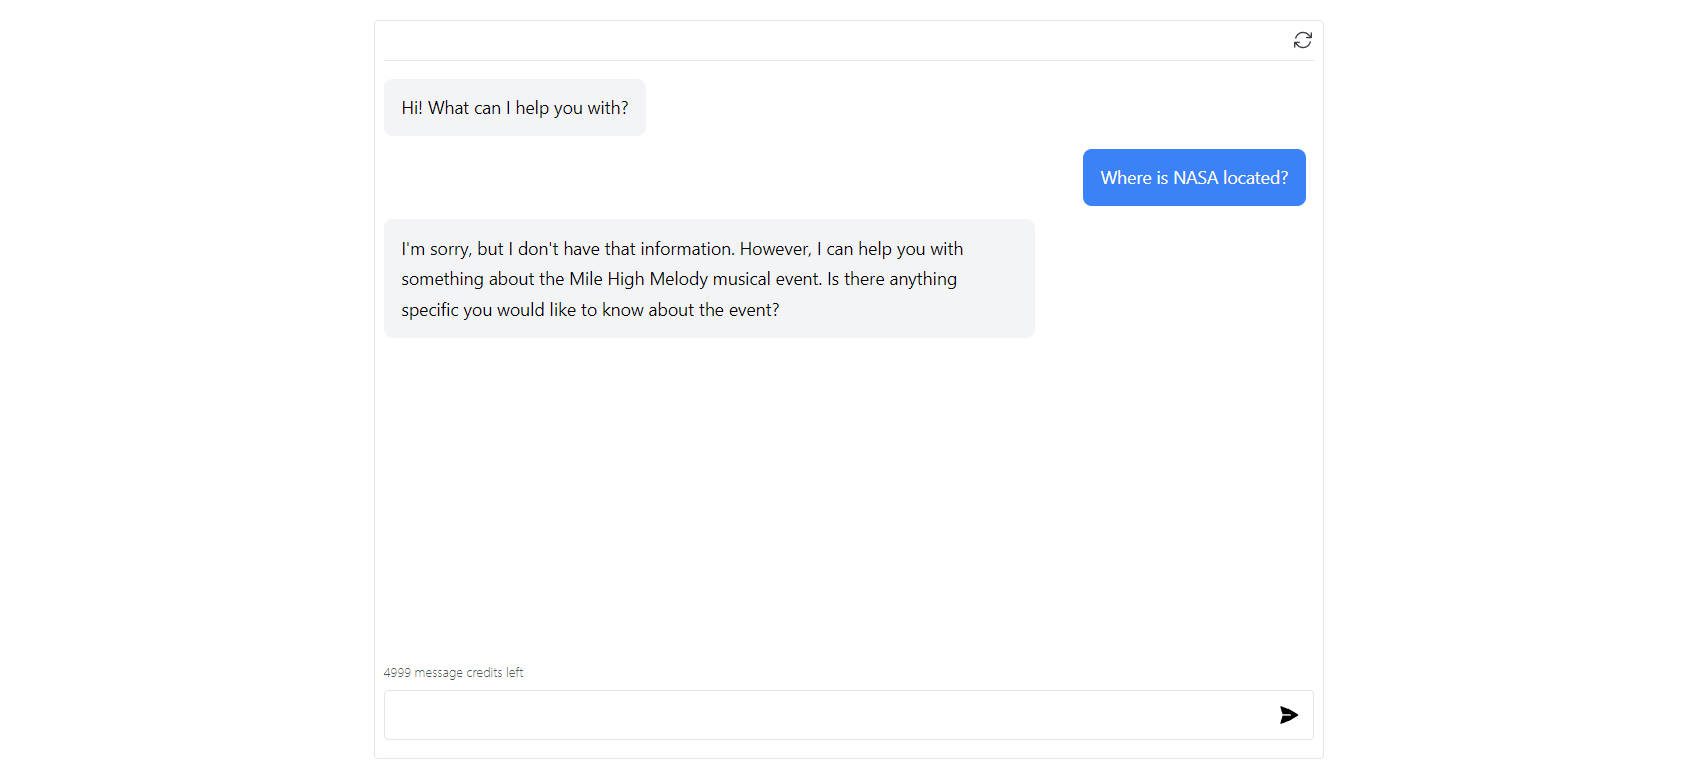
Melodie successfully steered the conversation back on track
And when we ask it a question that is almost related, it responds helpfully. With one more follow-up question, our personal AI chatbot responds with specific information from our source files.
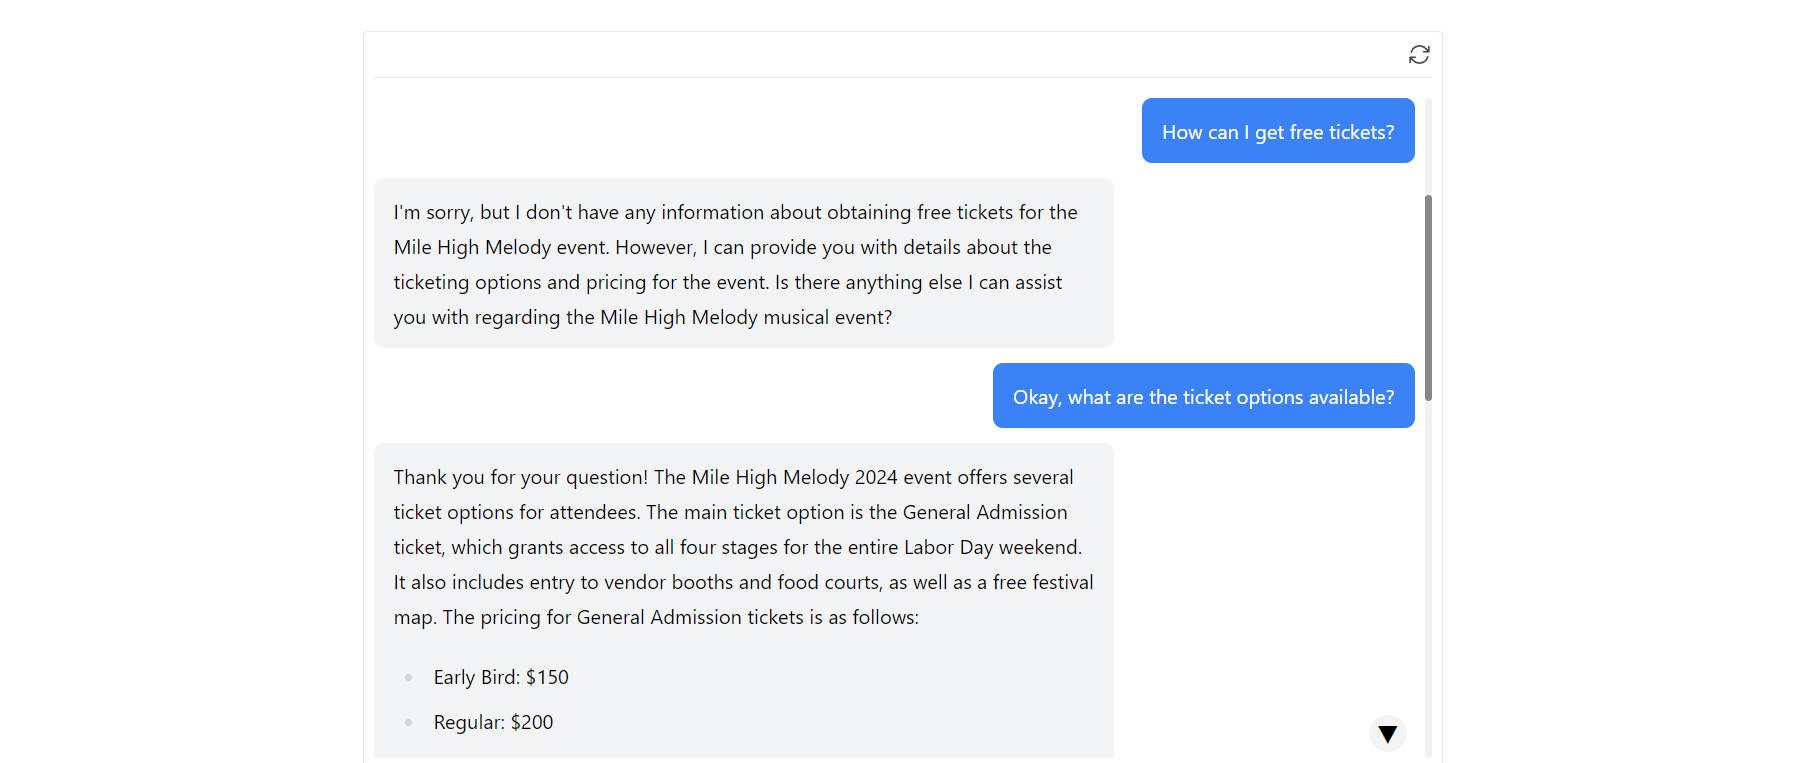
And now, we have a fully functioning guide that can hold a conversation without saying something we might regret. It is both helpful and saves us from having to staff human agents to monitor a live chat. Win-win!
Testing and Refinement
There are numerous things to finetune and test, and you prompt engineer your base prompt:
- You want your chatbot to be on brand when it speaks to your visitors. To do this, often, it is easiest to assign the chatbot a personality. Things like Event manager or event host are great personalities to assign (even better if you use specific adjectives)
- The chatbot should use vocabulary suited to your audience and your industry. Include a level of writing (8th grade) with specific industry jargon that is okay.
- Tell it how to handle certain information. Add context to your base prompt if the chatbot gets something wrong with your data. If you added a calendar of events in JSON format to your source files, you could tell your chatbot to interpret that data in plain English so it is understandable to your visitors.
- Let it know what languages it can speak. Usually, it will switch to whatever the visitor is using, but in some cases, you might want to limit supported languages.
5. Deploy and Monitor Your AI
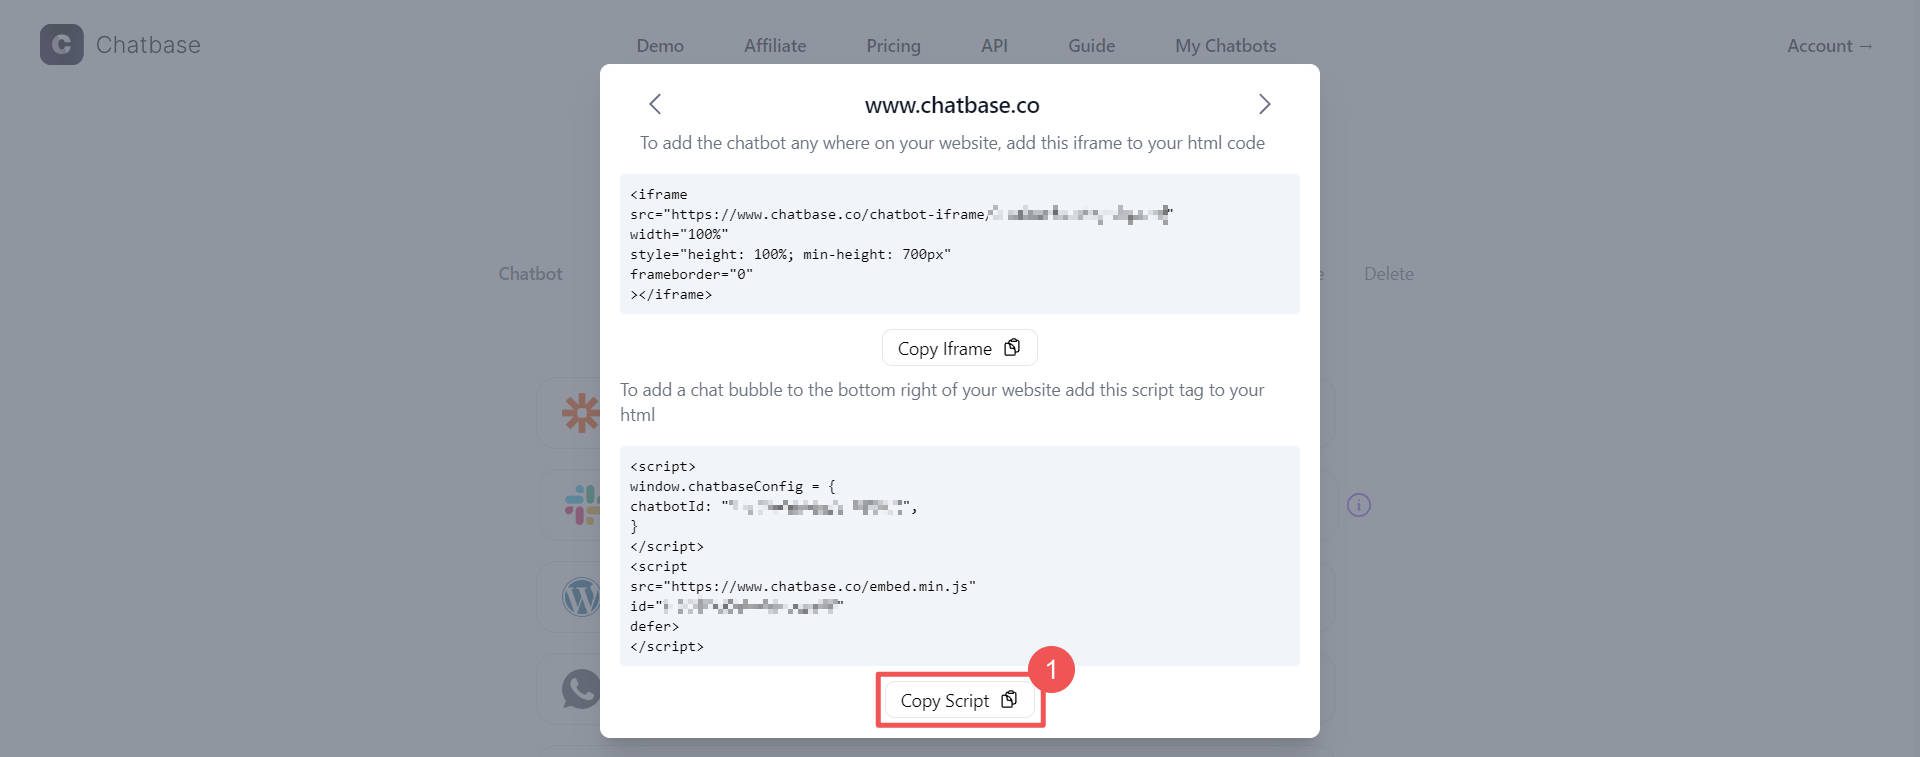
Now, all that’s left is deploying your AI to your website. Chatbase gives two options. You can embed the chatbot on a webpage with an iFrame or add the code to your site’s header body and display it as a chat bubble. Most will want to opt for the chat bubble, which is easy to use from any page of your site.
Click “Embed on Site,” and a modal will pop up with your chatbot’s code. Click “Copy Script” (the 2nd option).
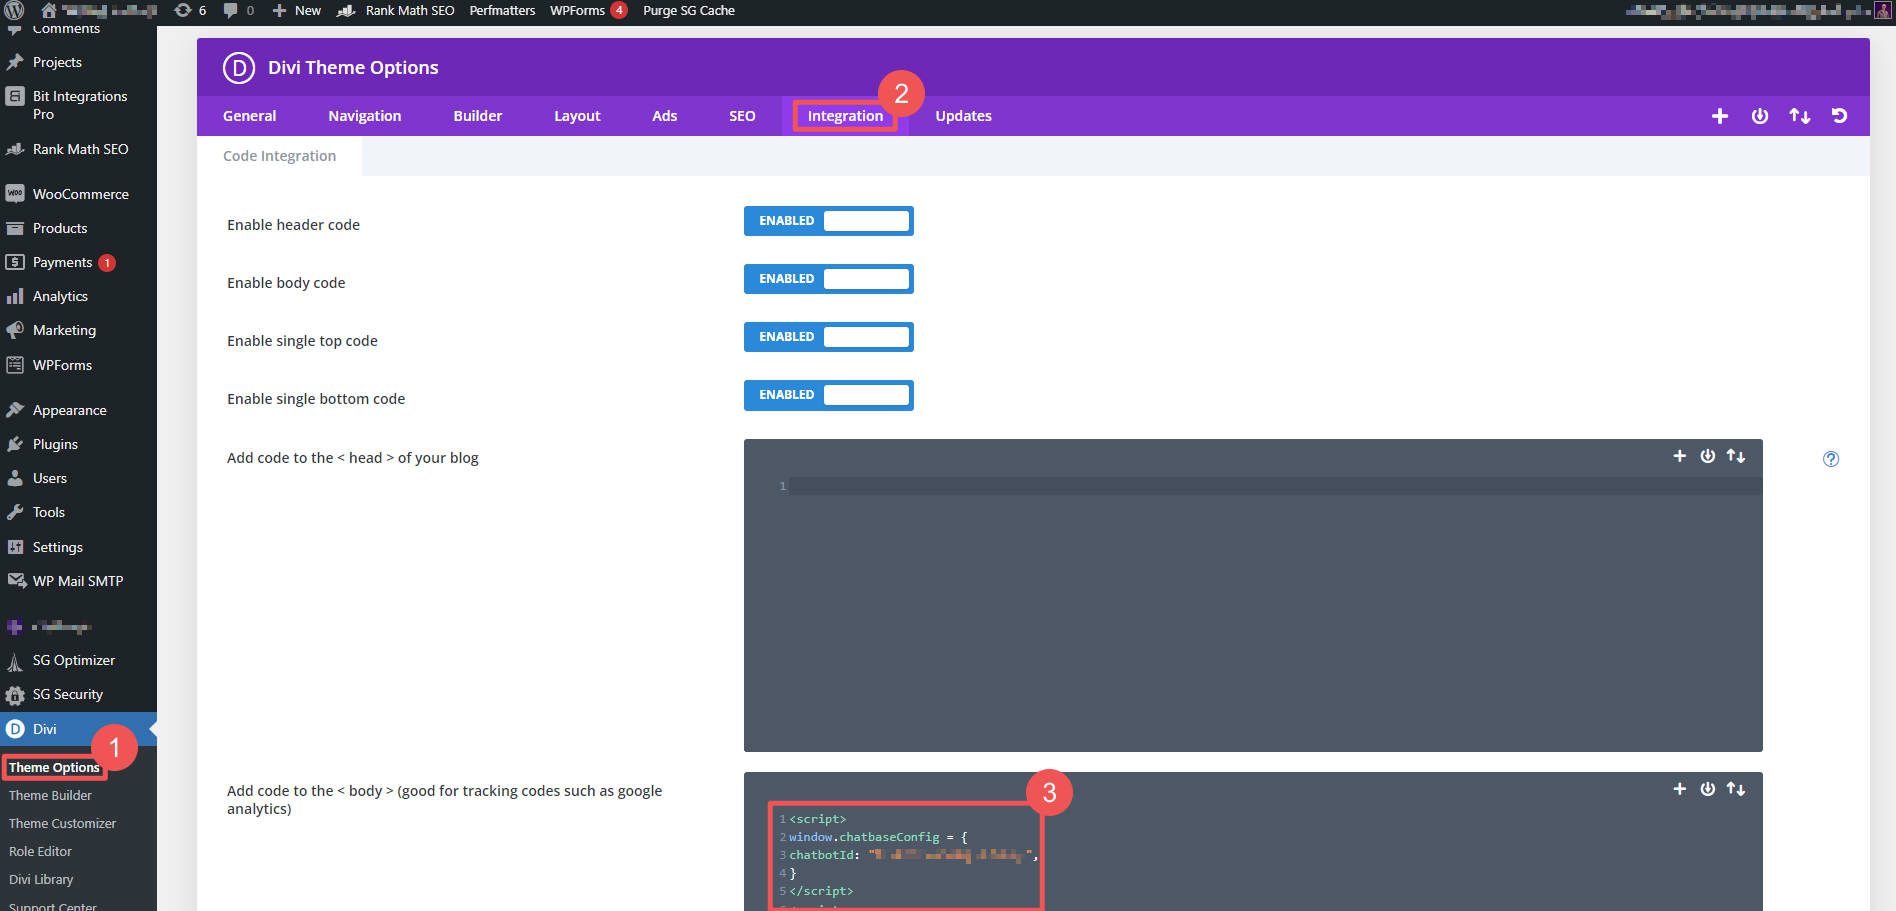
For those using a page builder like Divi on a WordPress website, it is easy to install across your whole site. Click on “Theme Options,” then “Integrations,” and paste the code into the “<body>” field. Other website platforms will have different ways of doing this, but it is relatively standard.
The chat bubble will now be active on your website, and visitors will have the chance to use it.
Monitoring and Tweaks
Constant monitoring is crucial. Keep an eye on how your AI performs based on the stored conversations in Chatbase’s “Dashboard > Conversations” tab.
Adjust the base prompt and data source files as you experience issues. It is easiest to download conversations as a JSON file and review your bot’s conversations. Specifically, look for instances where your users have expressed frustration. You can modify those situations with more/better data or a better base prompt.
If you have more conversation data than you can read yourself, it is easy to copy and paste interactions into ChatGPT to have it analyze where trouble springs up. This lets you focus on improvements instead of reading hundreds of conversation threads.
Conclusion and What to Do Next
Building your own AI is an exciting project you can make as big and helpful as possible. And while you may think that making your own AI is a difficult task, there are tools like Chatbase that can make it a little easier.
A personal AI chatbot can be a lot of help and be a very efficient way of storing and retrieving information. Find out other top AI platforms for building or using AI website chatbots. You can also look at the best AI sales tools and best AI SEO tools to see how AI is changing business in other areas.
Featured Image by CkyBe / shutterstock.com




i love ai’s because they are filled with jokes and happiness
Thanks for the update on Al and it’s activities,more is needed thanks.