Do you want to convert your struggling physical store to an online business? An online business can tap into a broader audience and improve sales. Many users today desire to expand a traditional business online or start a new venture in the digital marketplace. This guide provides a step-by-step approach to creating a successful eCommerce website that boosts sales and enhances customer interaction. We’ll cover how to generate a complete online store in minutes with Divi and WooCommerce, how to design it to fit your brand, and much more.
Why Do You Need to Build an Ecommerce Website?
Building an eCommerce website has become essential in today’s business world for several reasons, especially as shopping habits shift online. Here are some key reasons why it’s important to build one:
- Expanded Reach: An eCommerce site allows your business to reach customers beyond your local area. You can sell to people anywhere, anytime—24/7, no physical boundaries.
- Convenience for Customers: People love the ease of shopping online. Whether they’re using a phone, tablet, or computer, customers can shop at their convenience. With an eCommerce site, you make the buying process smooth and accessible.
- Cost Efficiency: Running an eCommerce site can be more cost-effective than running a brick-and-mortar store. You can cut down on overhead costs like rent, utilities, and, in some cases, staff.
- Data and Analytics: eCommerce websites offer rich data that can help you understand your customers better. You can track their shopping habits, see what products perform best, and use that data to improve marketing strategies and customer experience.
Let’s start building, as you know, the reasons for making an eCommerce website!
How to Build an Ecommerce Website in 7 Steps
Creating your own eCommerce website with WordPress becomes straightforward when you follow the right steps and use the appropriate tools. Whether a novice or an experienced developer, you can effortlessly launch a visually appealing online store. Here’s how to do it:
1. Get Domain and WordPress Hosting
Before building your site, you’ll need a few essentials ready—your domain, hosting service, and WordPress setup.
If you’re still looking for a hosting provider, SiteGround offers a convenient solution by managing all these aspects.
Domain
Your domain (or domain name) is the web address for your site (e.g., elegantthemes.com), and it’s crucial to pick one that reflects your brand and is easy to remember. Ideally, your domain should give visitors an idea of your eCommerce business.
After selecting your domain name, search for a reliable domain registrar to register it. Namecheap is a good option, or you can get a discounted domain directly through SiteGround if you choose them for hosting.
If you own a domain, you can easily connect it to your hosting provider by updating the nameservers.
WordPress Hosting
Your website needs a reliable home online, where hosting comes into play. Since we will be using WordPress, choosing a high-quality WordPress hosting provider is important. A good host will make managing your site simple while ensuring it performs well in speed and security.
SiteGround offers WordPress hosting plans starting at $3.99 per month, providing a budget-friendly option. Setting up WordPress hosting with SiteGround is straightforward.
Watch the video below to learn how to set up your domain and hosting.
Install WordPress
Many WordPress hosting providers, such as SiteGround, offer a one-click WordPress installation during the setup process.
If this option isn’t available, simply head to your hosting provider’s dashboard. Select the WordPress installer and follow the steps provided. Once the installation is finished, you’ll receive a confirmation email with your login details. To access your site, go to yourwebsite.com/wp-admin and log in using the credentials you created during installation.
2. Install the Divi Theme
Building your eCommerce website with Divi has never been easier. This versatile theme empowers you to create visually stunning and fully customizable websites without any coding experience. Divi is well-known for its robust design features and offers a wide array of pre-made layouts tailored for different types of eCommerce websites.
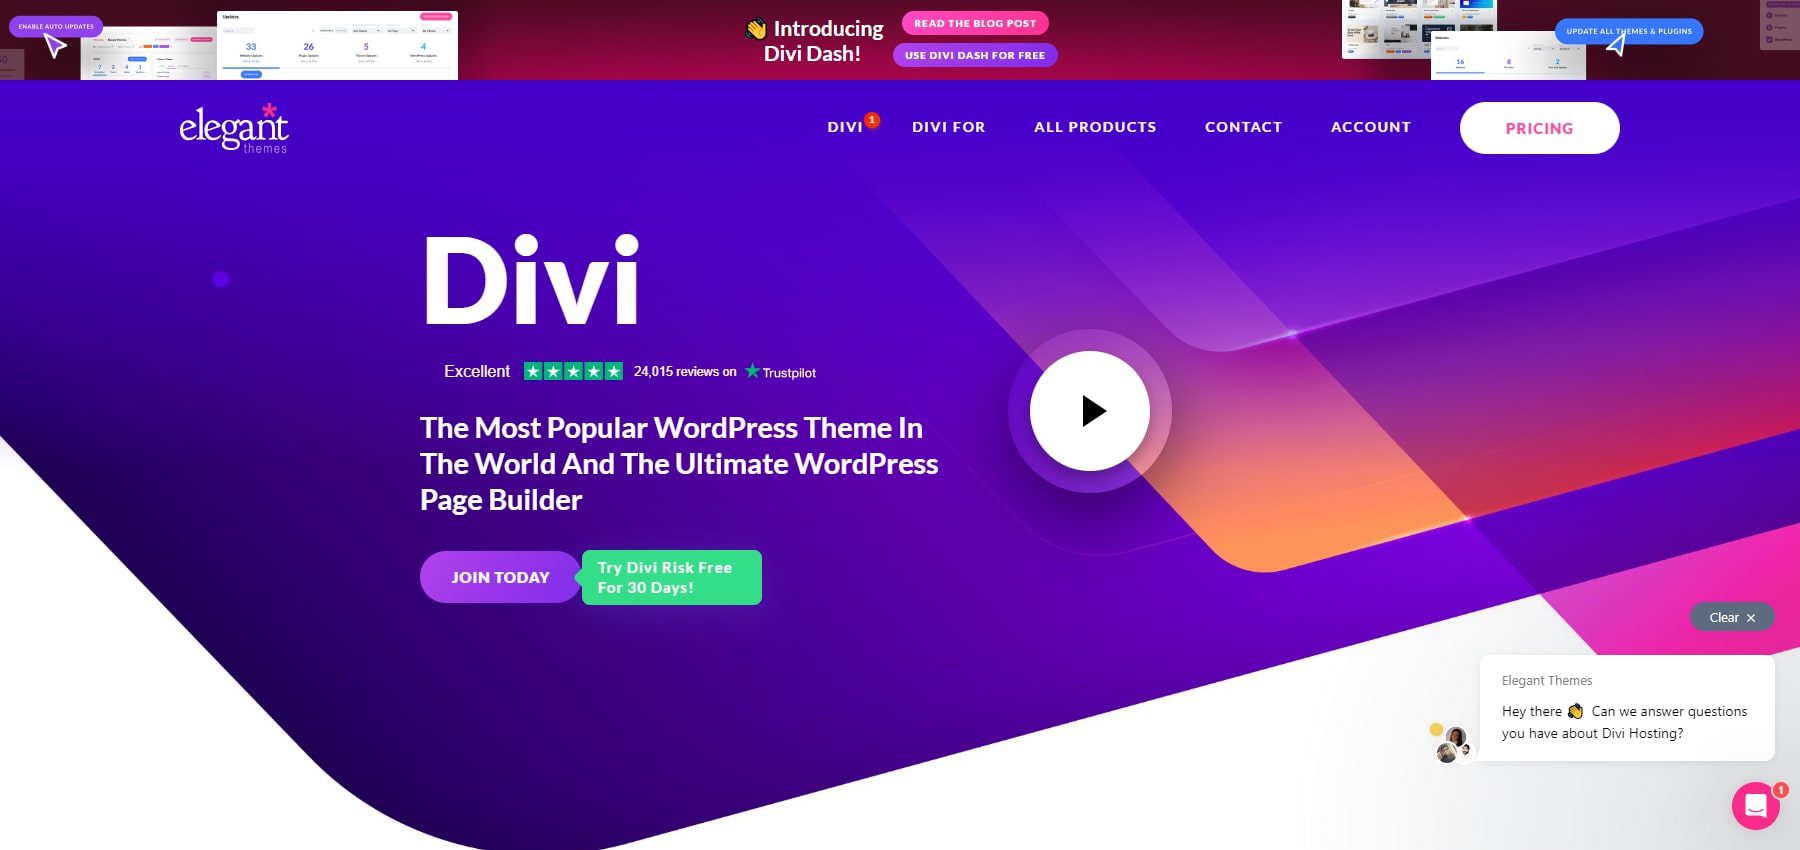
Divi connects all the dots for the eCommerce websites:
- It easily enables you to design and customize your online store using a visual drag-and-drop interface, eliminating the need for coding.
- Divi offers 211 pre-designed layouts and 30 layout packs specifically for eCommerce, allowing you to create product pages, checkout pages, and more with minimal effort.
- Divi’s WooCommerce modules allow you to display, filter, and customize your products. Moreover, you can create unique product page layouts with drag-and-drop modules, showing product details, reviews, images, and more.
- You can access the marketplace for Divi extensions to integrate multiple payment gateways, such as PayPal and Stripe.
Download and Install Divi
You can purchase Divi from Elegant Themes with an annual license for $89 or a lifetime license for $249. After purchasing, download the theme and install it on your WordPress site by following these steps:
- Navigate to Appearance > Themes.
- Click on Add New and then Upload Theme.
- Select the Divi .zip file you downloaded and click Install Now.
- After installation, click Activate to set Divi as your active theme.
Watch the video below for more information.
With the setup complete, you’re ready to start building. If you’d like to learn more before diving in, check out our tutorial on using the Divi Builder.
3. Build Your Ecommerce Website
After installing the Divi Theme on WordPress, you can build your eCommerce site. No need to worry—Divi Quick Sites can automatically create your store, so you won’t have to start from scratch!
Launch Onboarding Wizard
After activating the Divi Theme in WordPress, you’ll gain access to Divi’s onboarding wizard, which will walk you through the setup process. Simply click the button to log in and activate your Divi license.
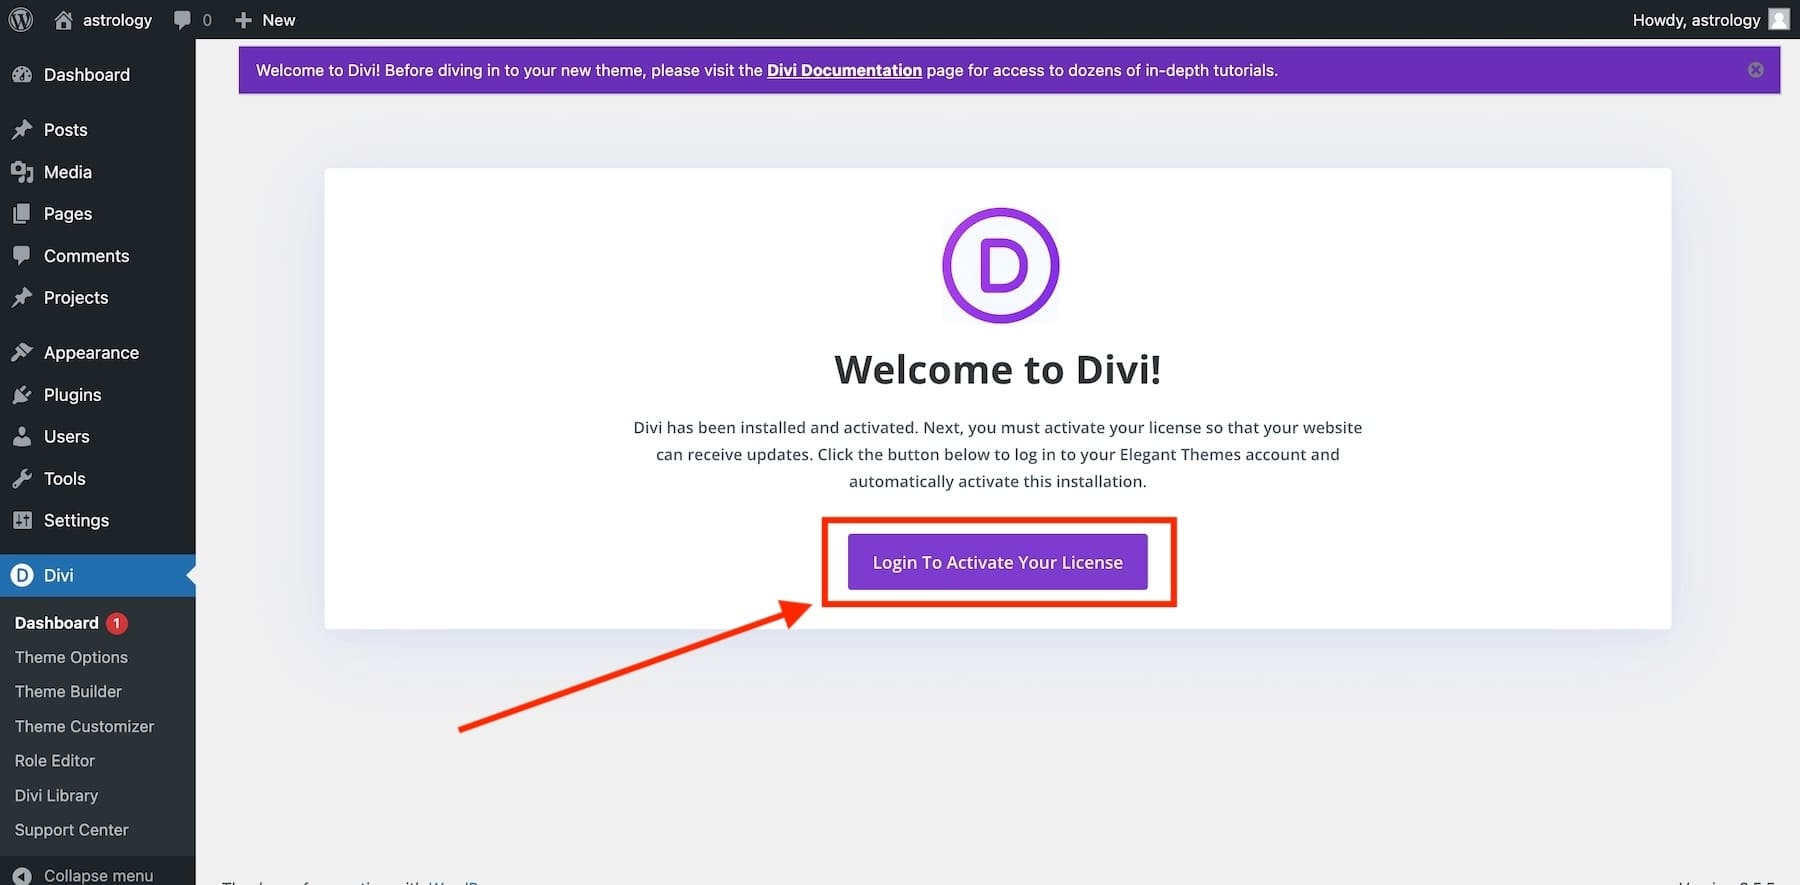
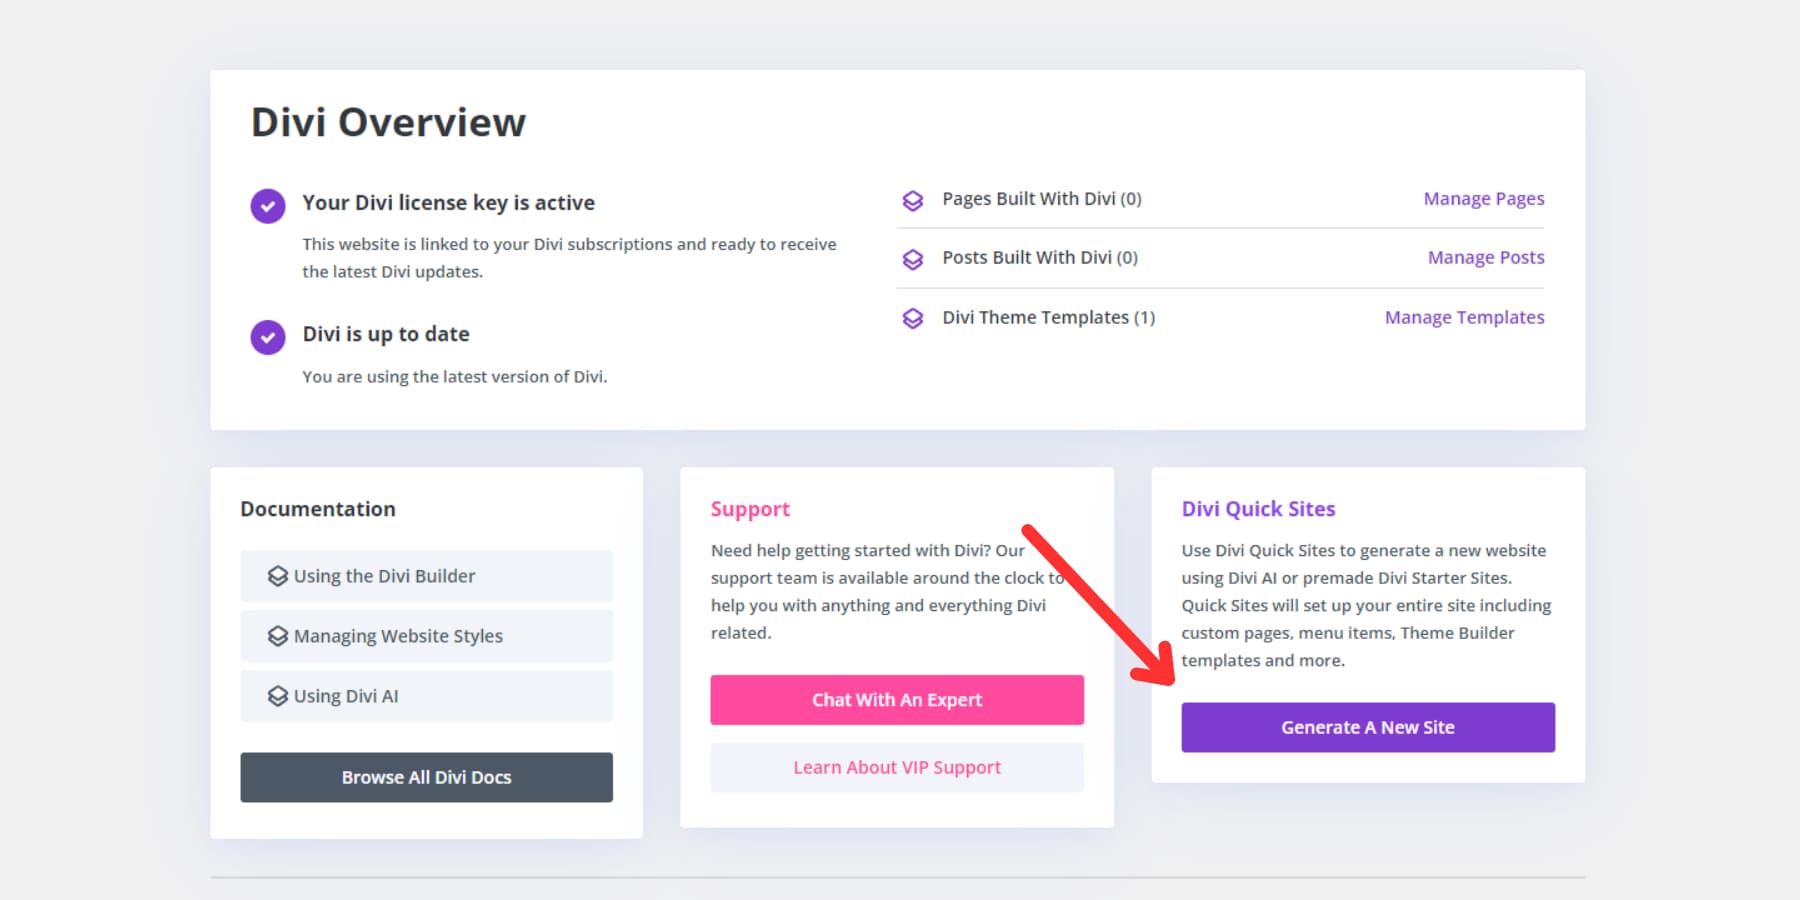
After logging in, you’ll arrive at the main Divi Dashboard. Here, you can manage your site, access documentation, get support, and start building a new site with Divi Quick Sites. To begin, simply click ‘Generate A New Site’ from the Divi Dashboard.
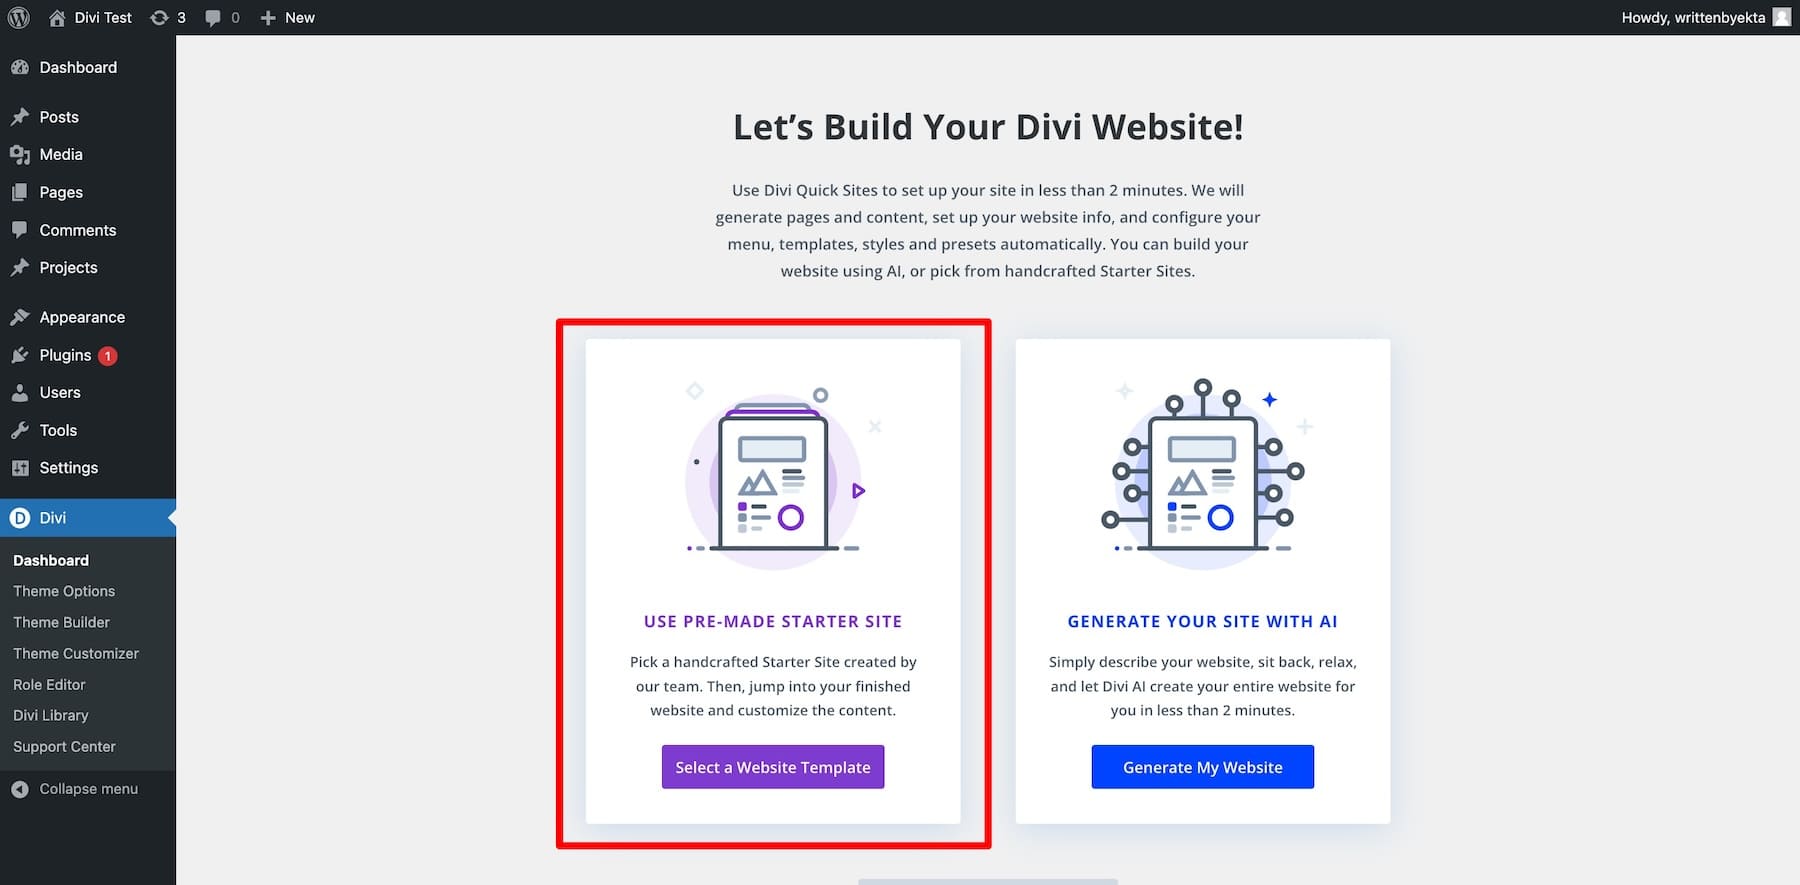
Generate Your Site with an Ecommerce Starter Site (or with AI)
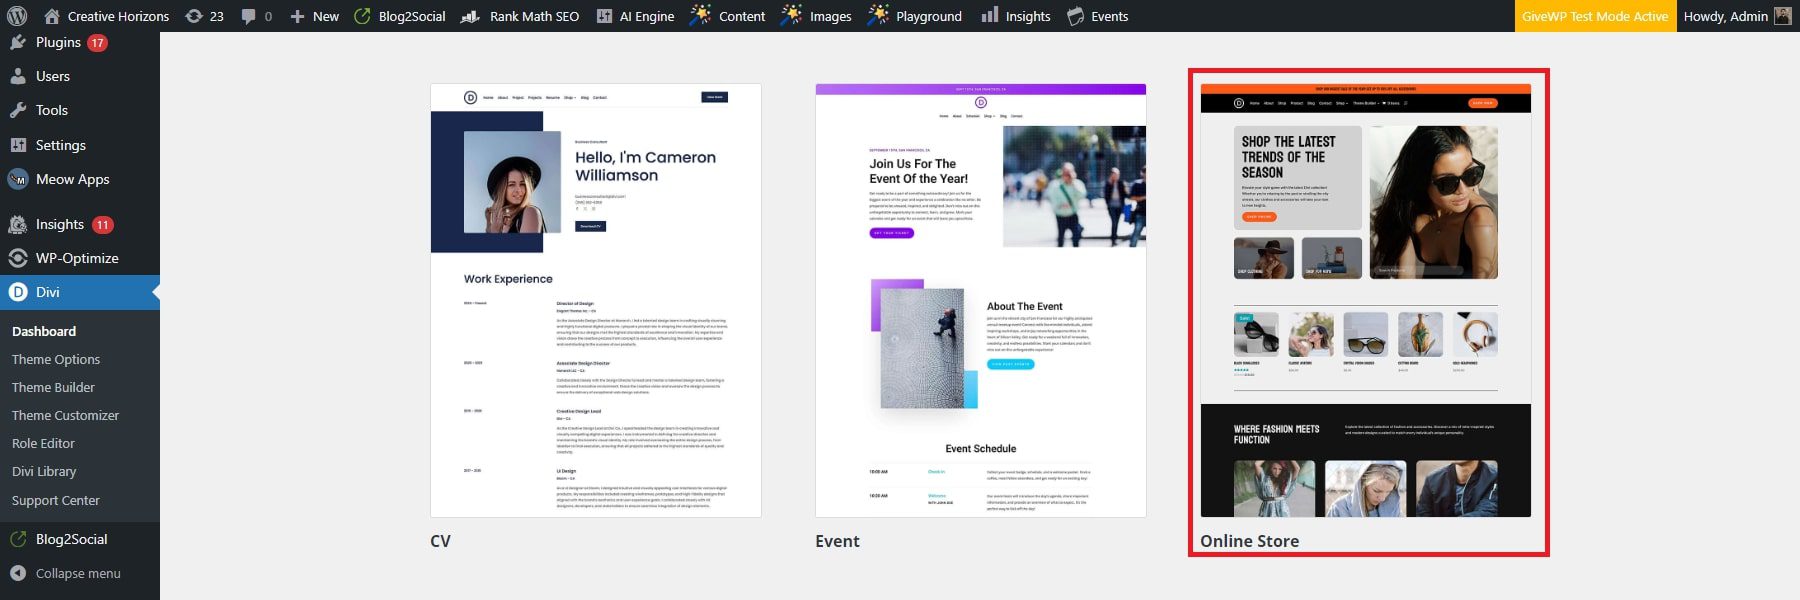
Next, you can choose to build your new eCommerce website using either a pre-made starter site or Divi’s AI website builder. Divi offers a stunning online store starter site template, so click ‘Select a Website Template’ to get started.
On your screen, you will see several Starter site templates. Choose the online store starter site. If you’re concerned that the template doesn’t align with your brand’s colors, fonts, or images, don’t worry; these can be customized later.
Divi Quick Sites will prompt you to provide details about your new website and the pages you want to include.
- Fill out the form with your Site Name, Slogan, and Logo.
- Upload your logo to add it to your site (if available) automatically.
- Select the pages you want from the Starter Site and, if necessary, add custom pages to initiate the process.
- Once ready, click the ‘Generate & Publish My Website’ button.
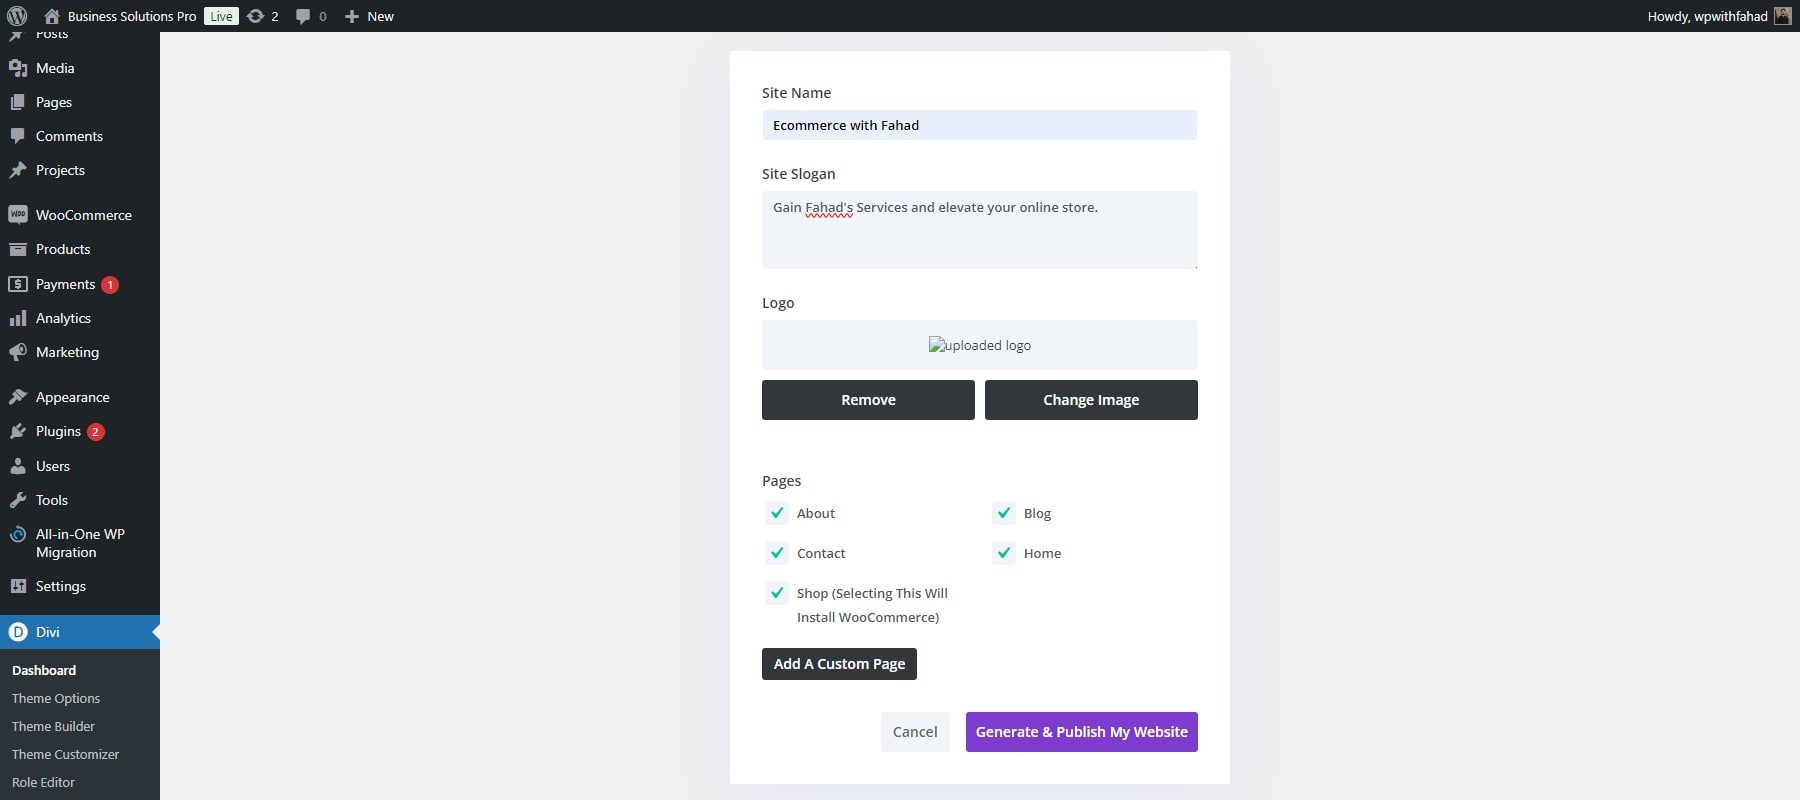
NOTE: Selecting the Shop page will automatically install WooCommerce and pre-built pages for your online store (shop, product templates, checkout, etc.). Since you’re building an eCommerce website, including the Shop page to enable product listings and transactions is essential.
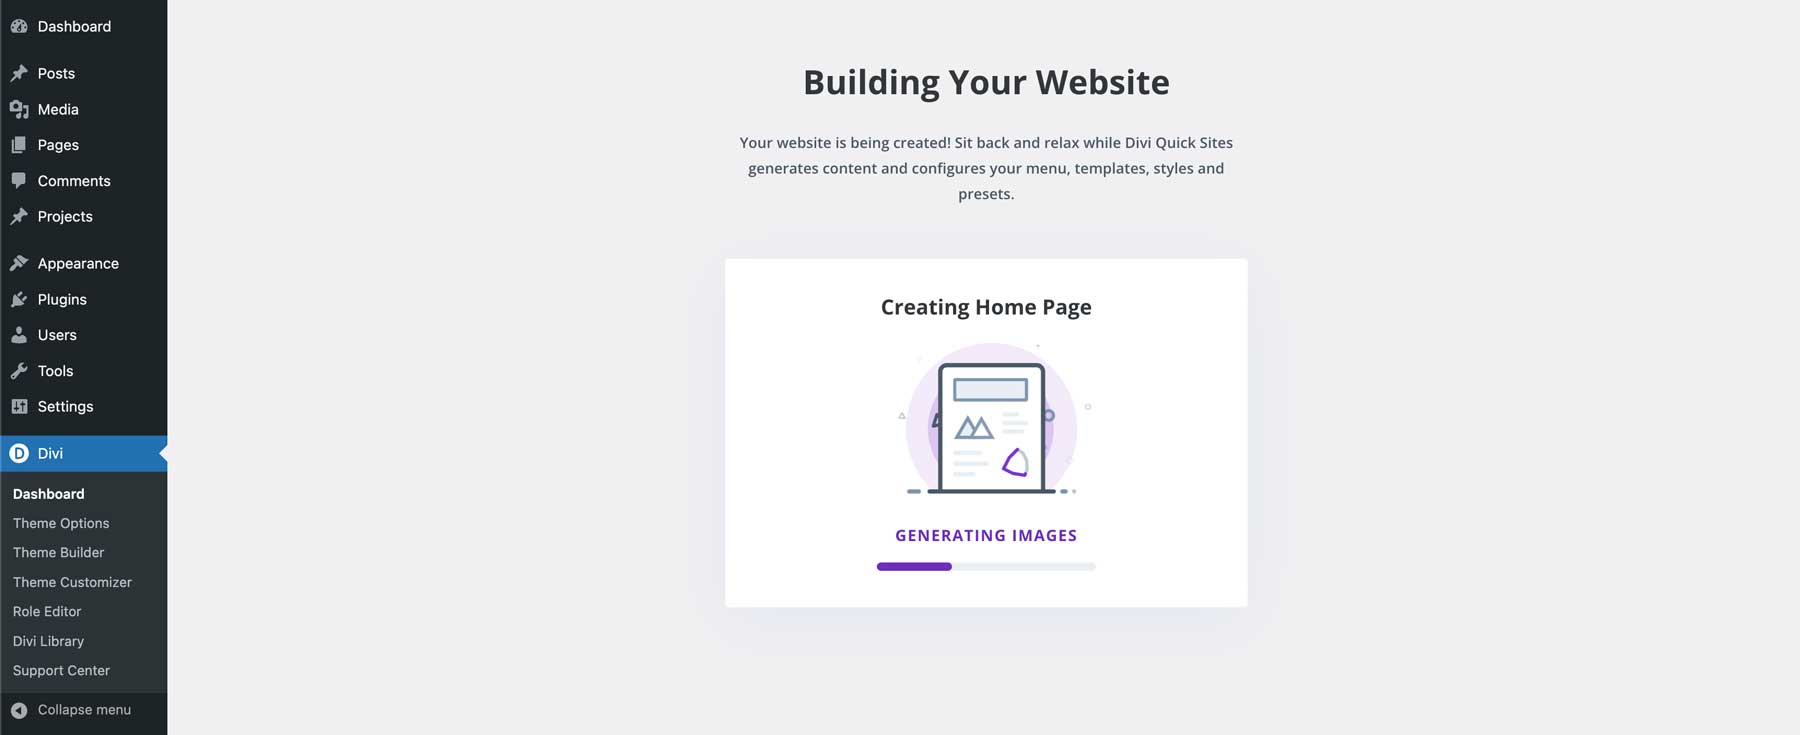
After entering your website details, Divi Quick Sites will use your input to generate the website in under two minutes. It will automatically create all necessary elements, including pages, templates, styles, and navigation menus.
Once your site is ready, a confirmation page will appear with the message ‘Your Site is Ready!’
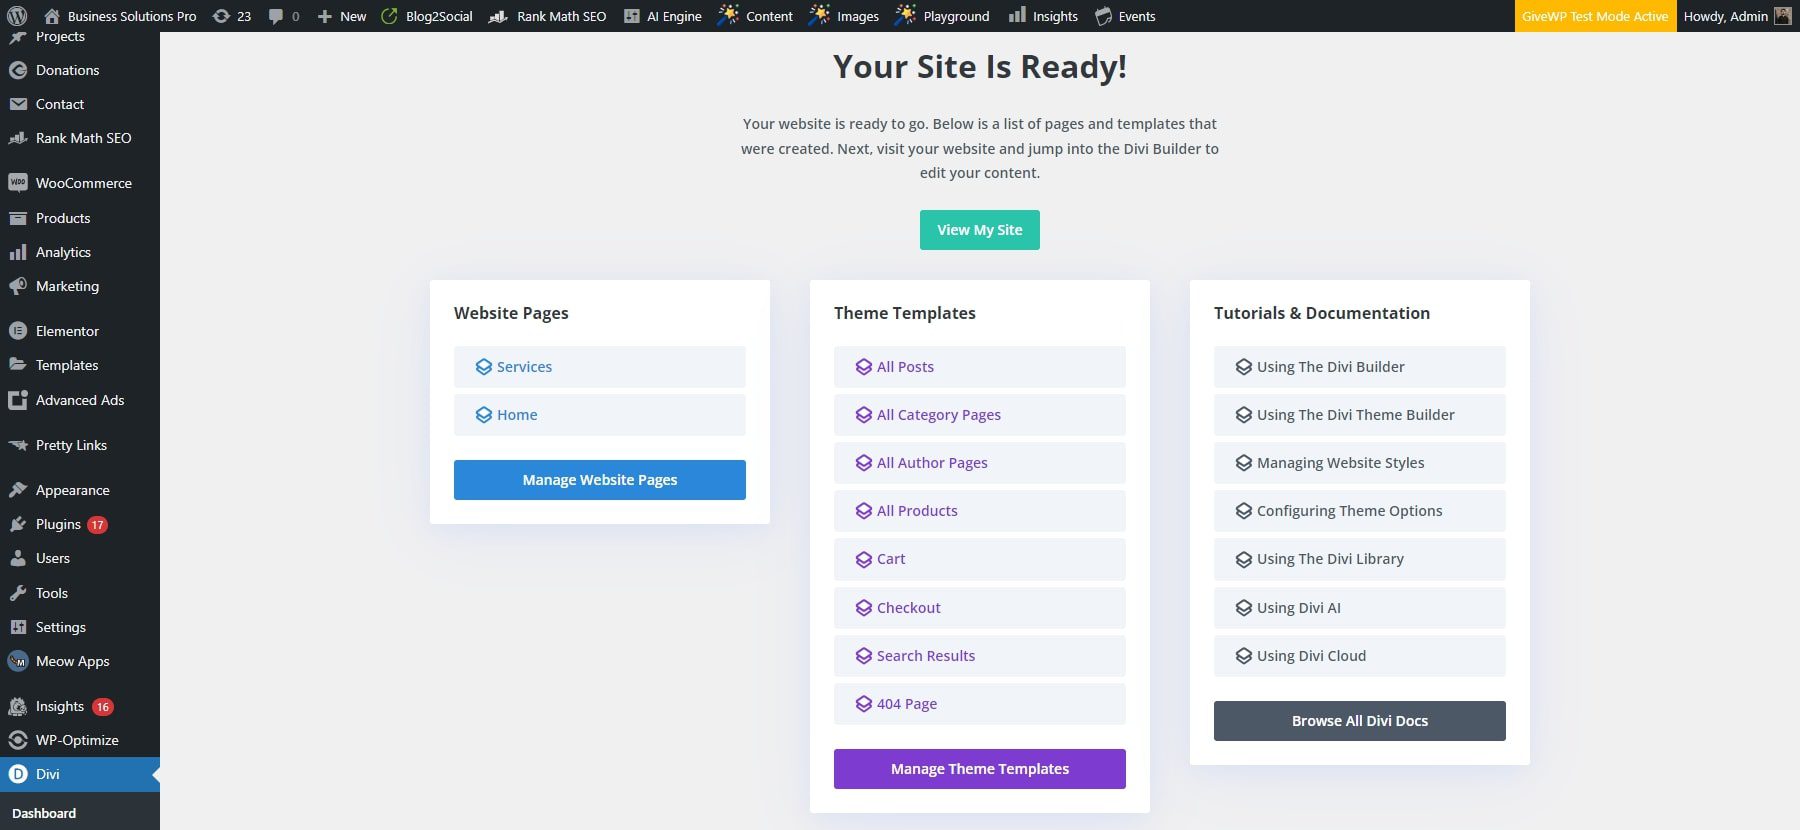
You will also see a list of all the pages and theme templates created, along with links to tutorials and documentation to help you begin customizing your new website.
4. Checkout Your New Site
Before we continue with the rest of the process, you can view your live site to explore your brand-new online store design.
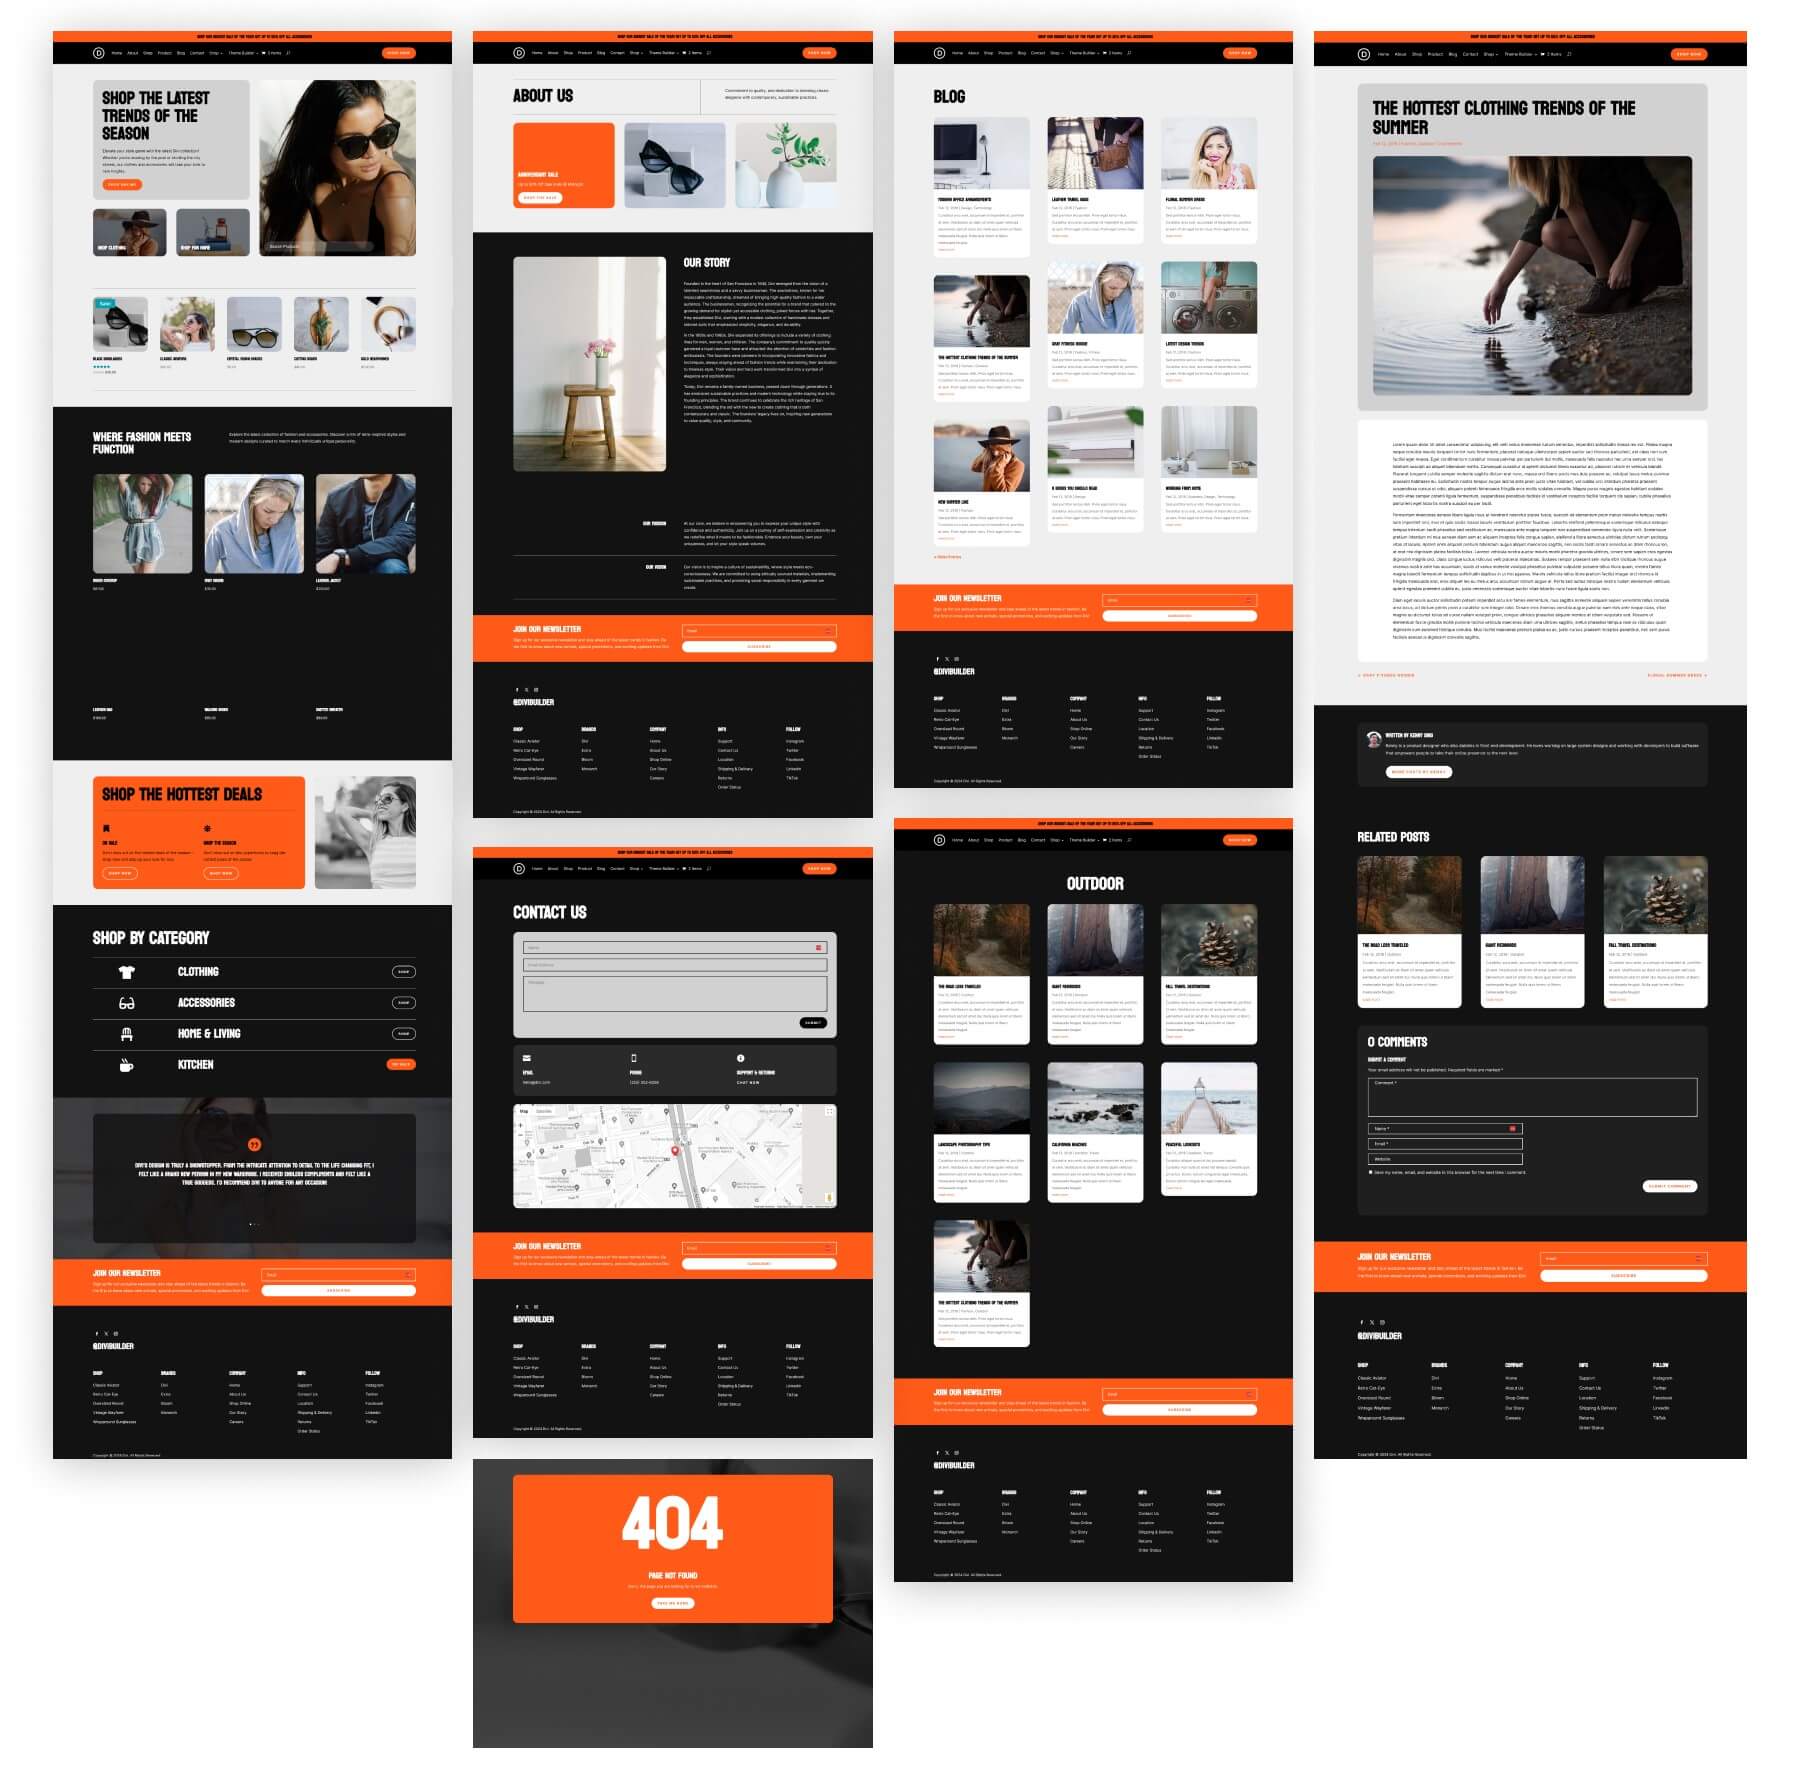
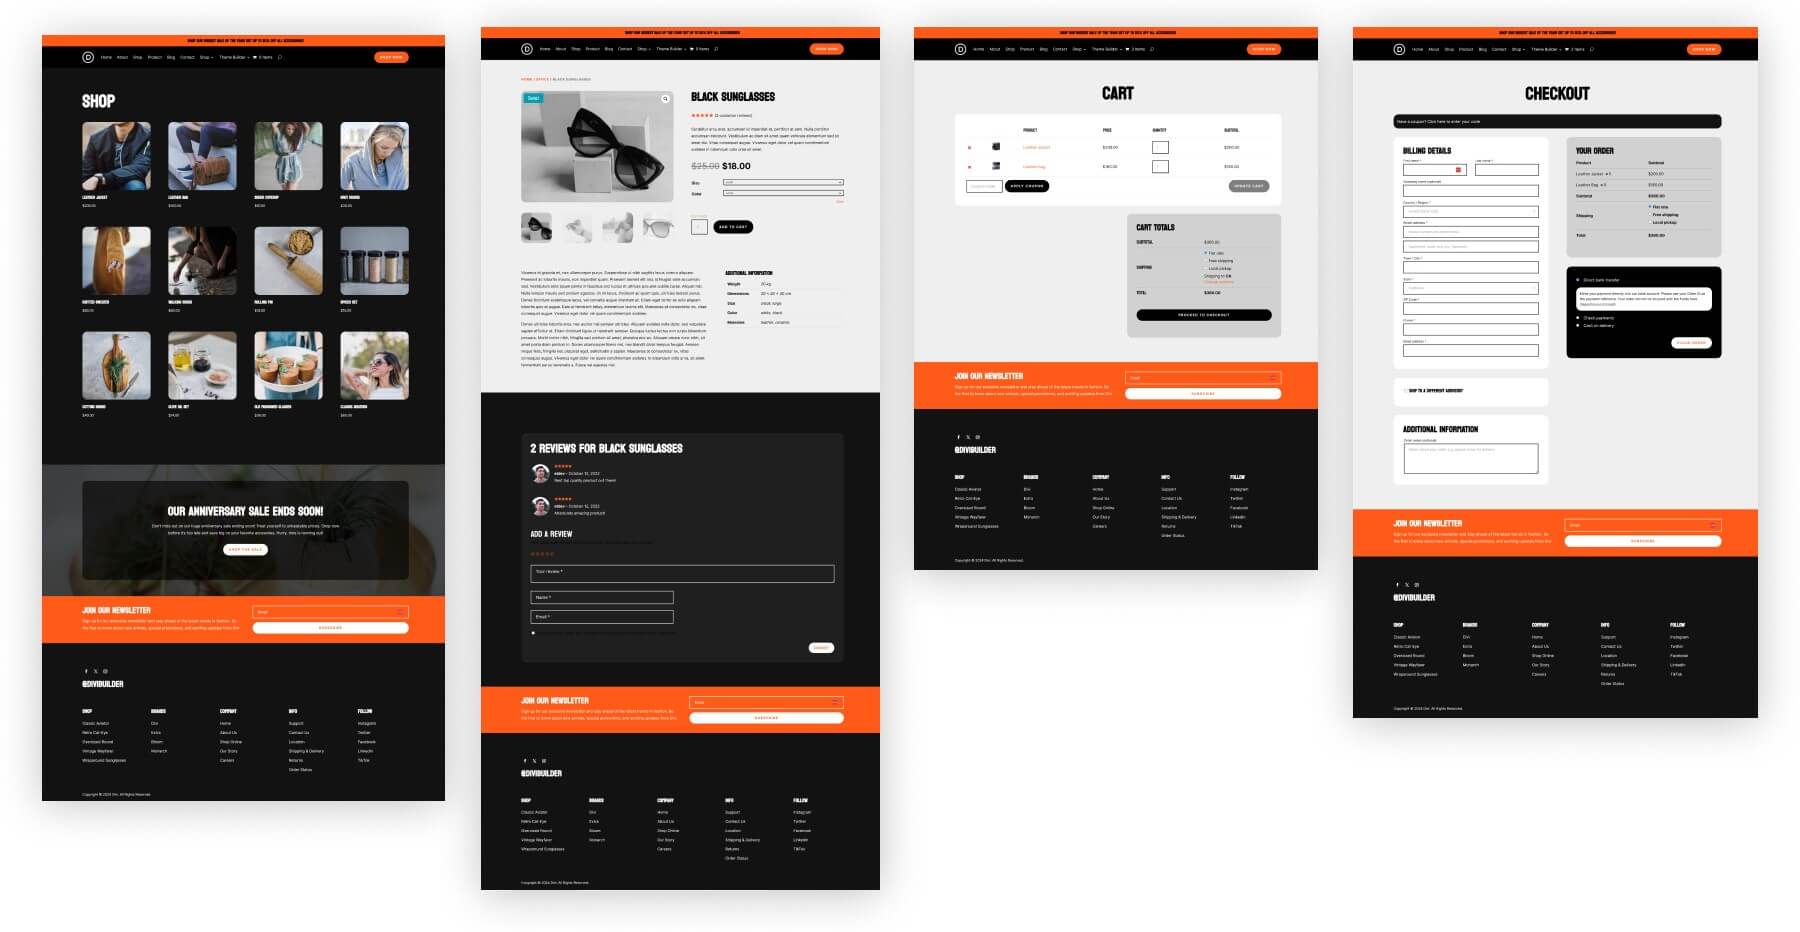
Here is a look at all the pages and templates of your site that will be generated automatically, including WooCommerce pages and templates.
Website Pages
WooCommerce Shop, Product, Cart, and Checkout Page Templates
5. Configure WooCommerce and Add Products
Since WooCommerce has already been installed in the Divi Quick Sites website generation process, we can use the WooCommerce setup wizard to simplify the process.
WooCommerce Setup Wizard
Once activated, WooCommerce automatically prompts you to begin the setup wizard. This is where WooCommerce guides you through the key setup steps for your store. To begin the setup wizard, navigate to the WooCommerce section and select Home.
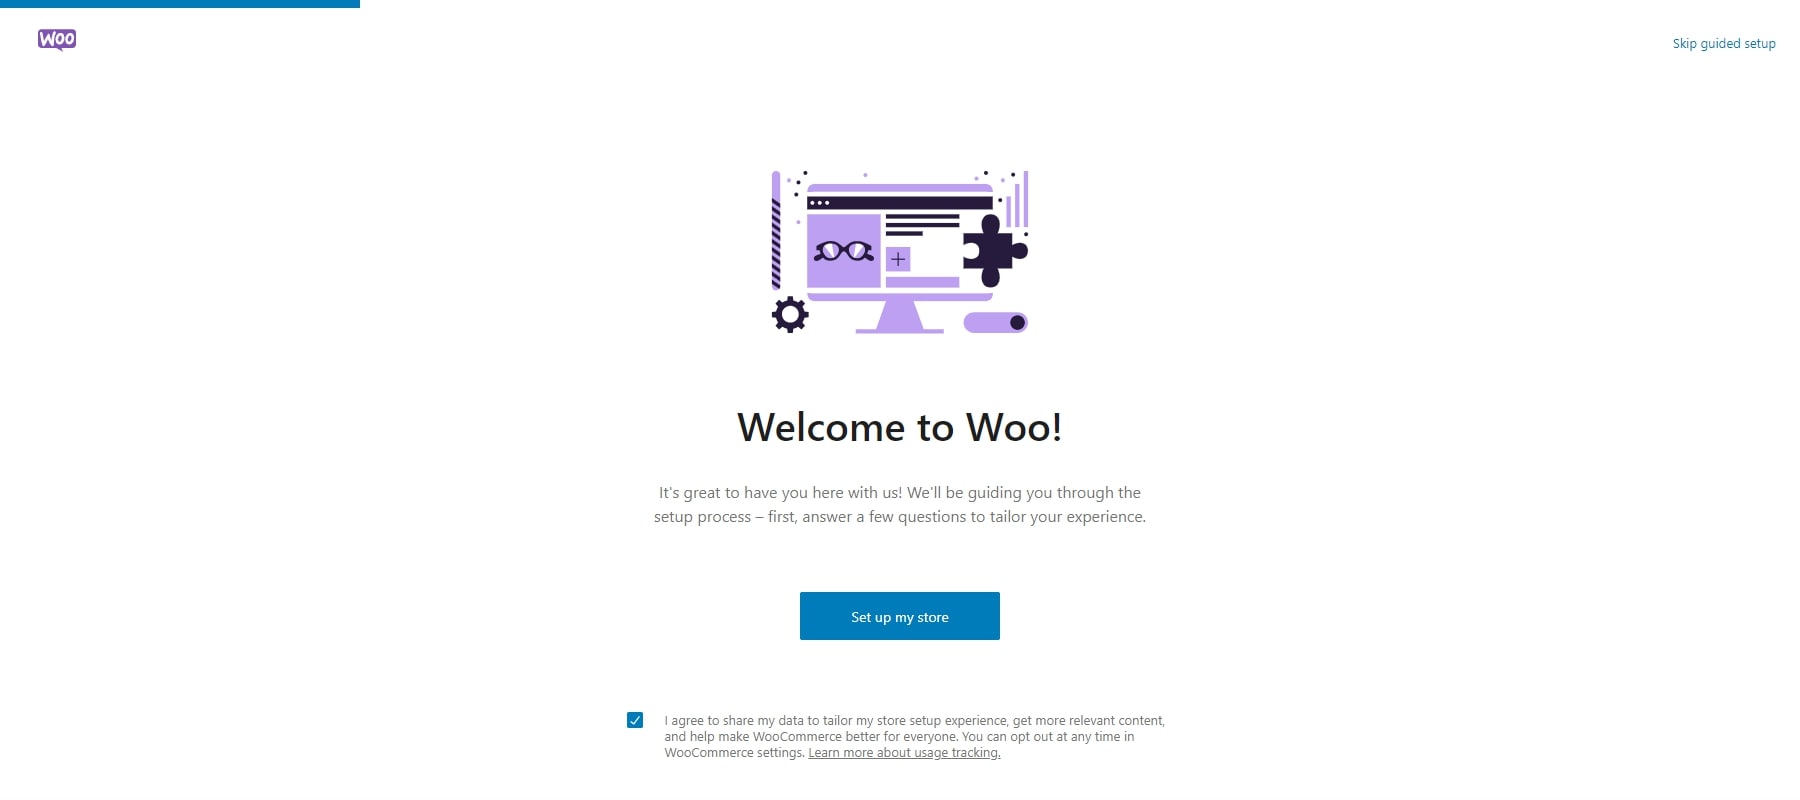
The setup wizard will prompt you to enter details about your store, such as your address and email.
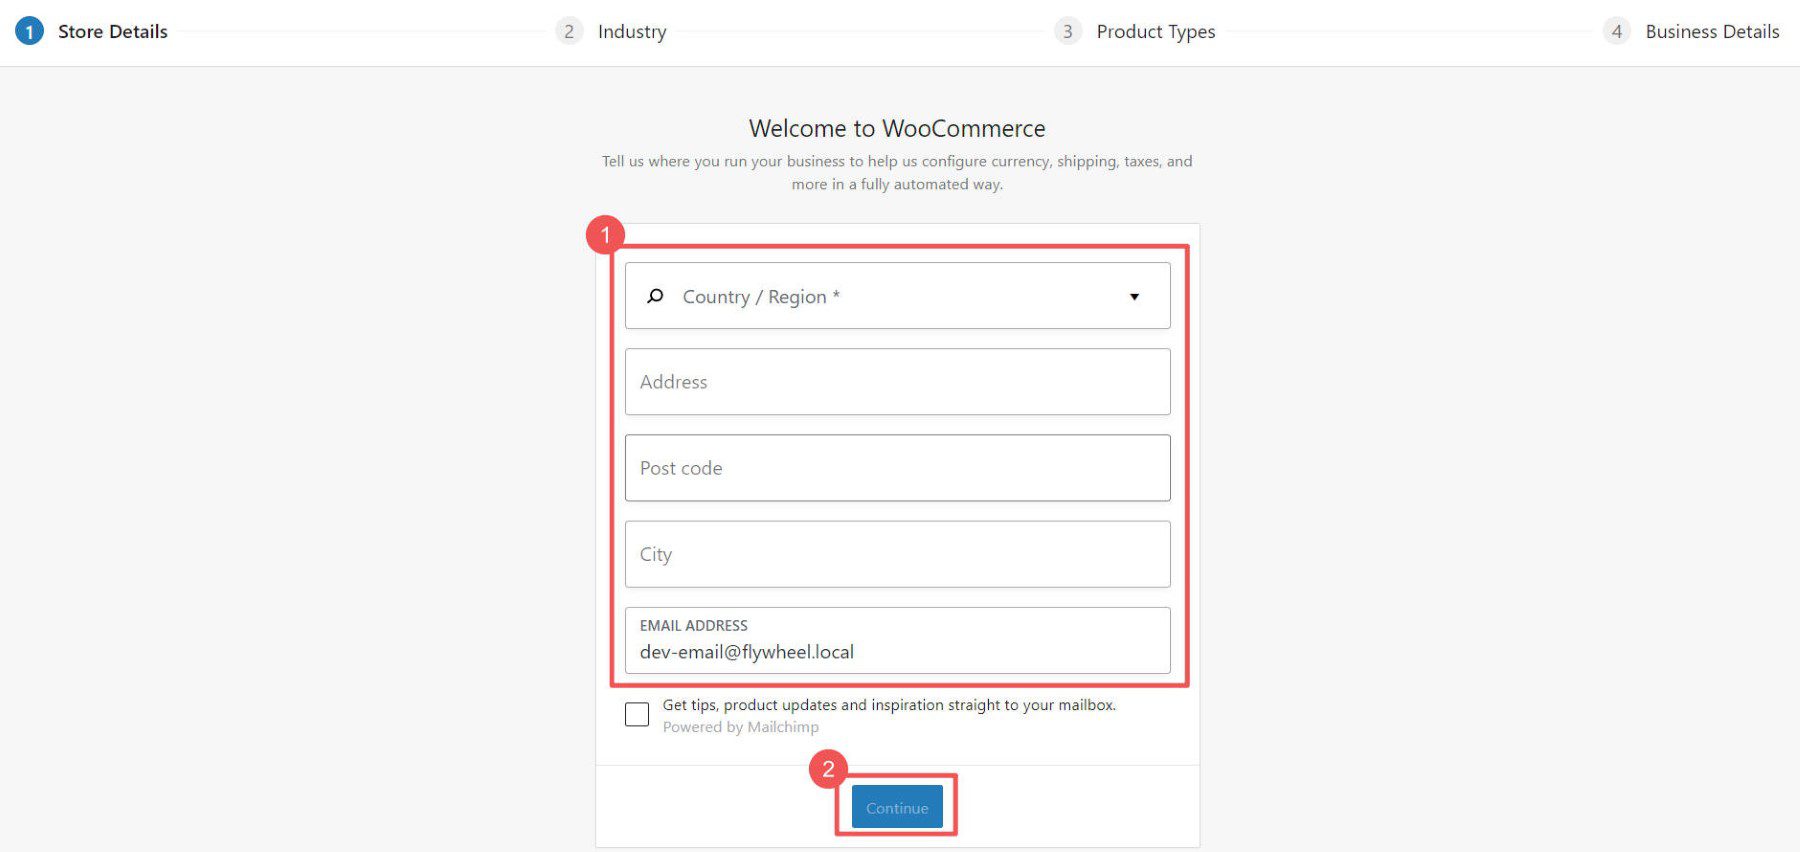
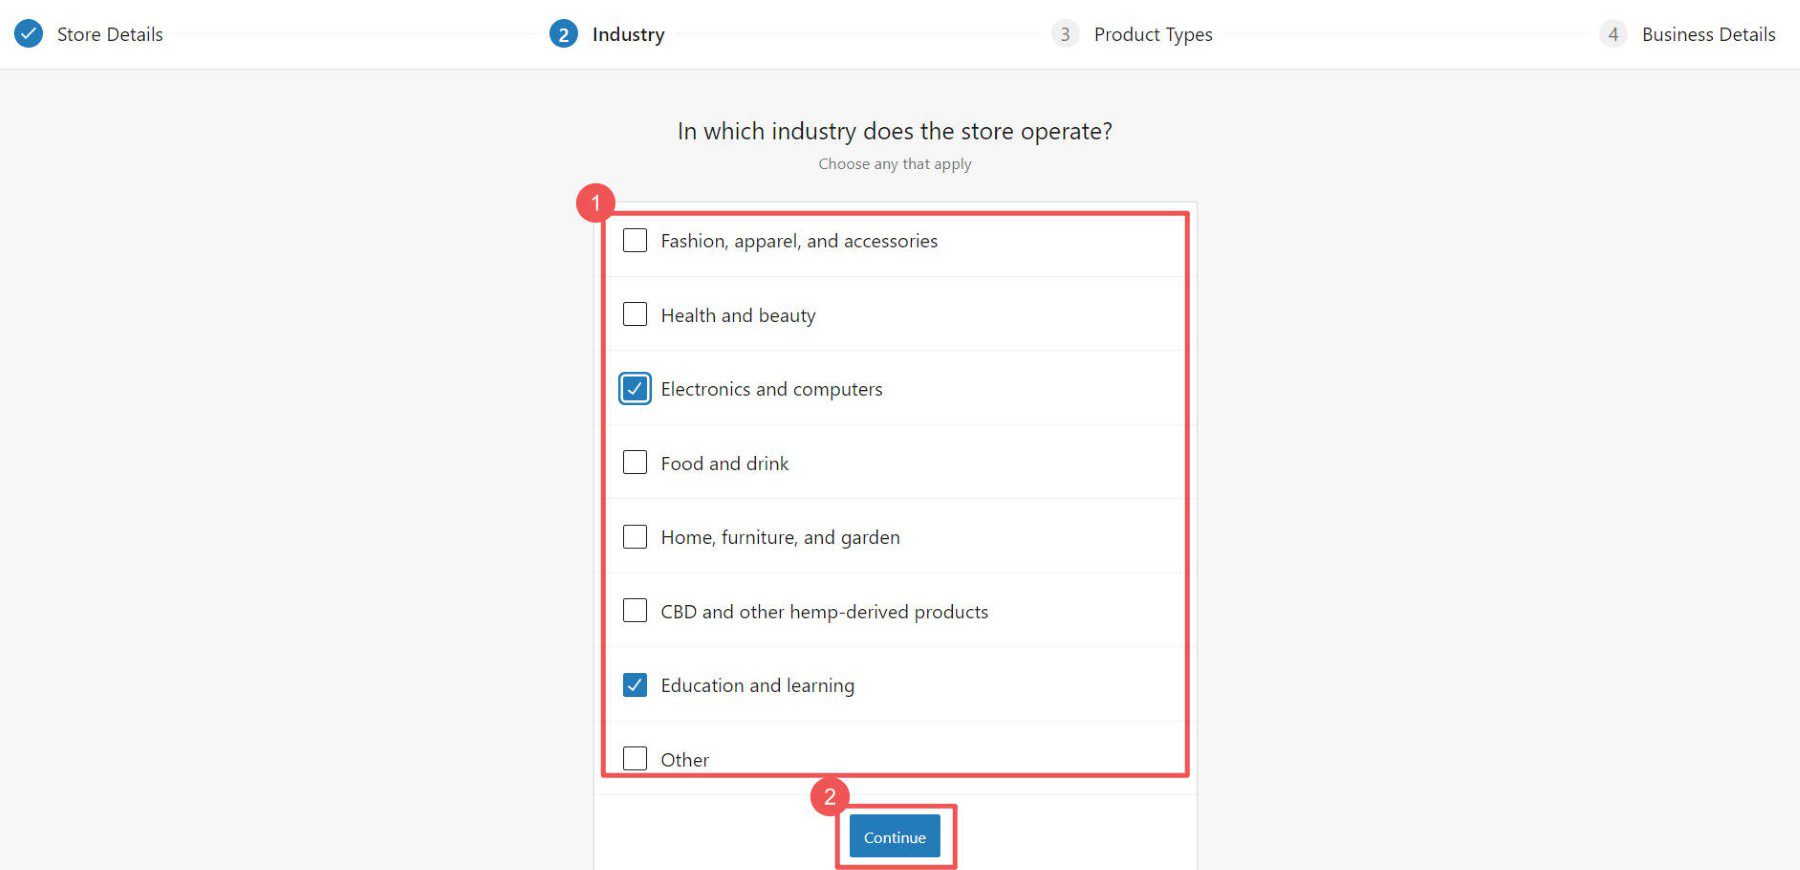
Choose the industry and product categories that best represent your store.
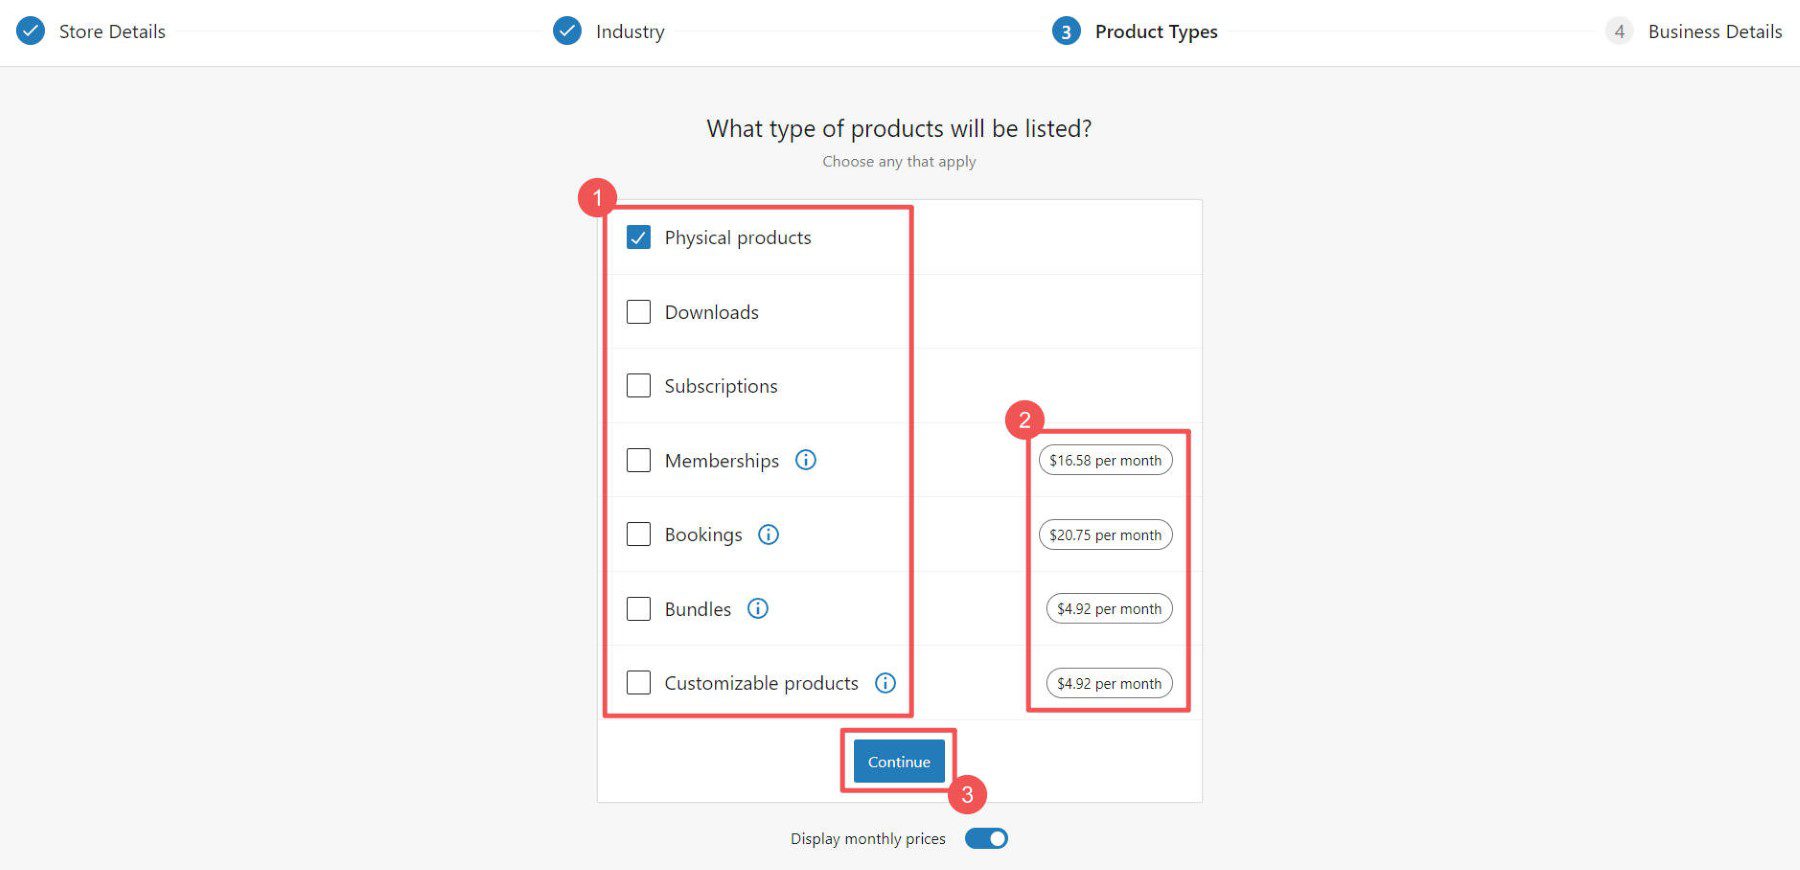
Next, choose what type of products you plan to include in your store. Some options (Memberships, Bookings, etc.) require installing additional plugins on your site.
NOTE: Plugins come in both paid and free versions. Explore our recommended plugins for memberships, bookings, and more to enhance your eCommerce site. For instance, tools like Memberpress or Paid Memberships Pro can help you build a subscription-based store with multiple payment options. Additionally, plugins like Amelia allow you to create a booking site with features such as appointment calendars for visitors to schedule bookings.
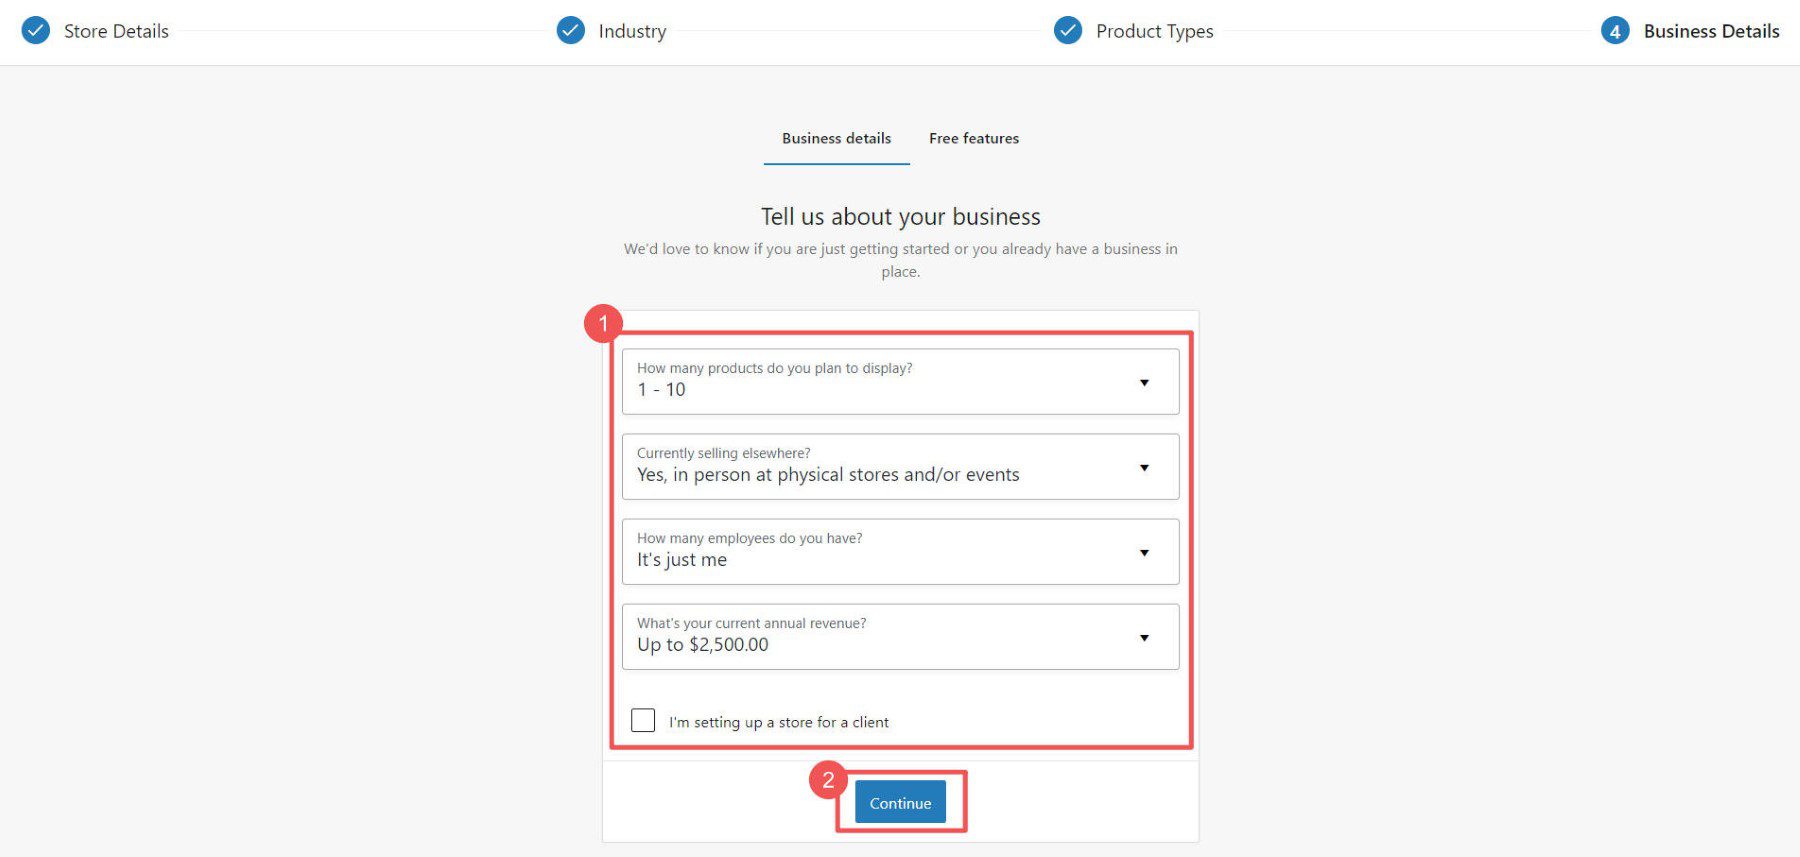
The setup wizard will prompt you with additional questions regarding your store.
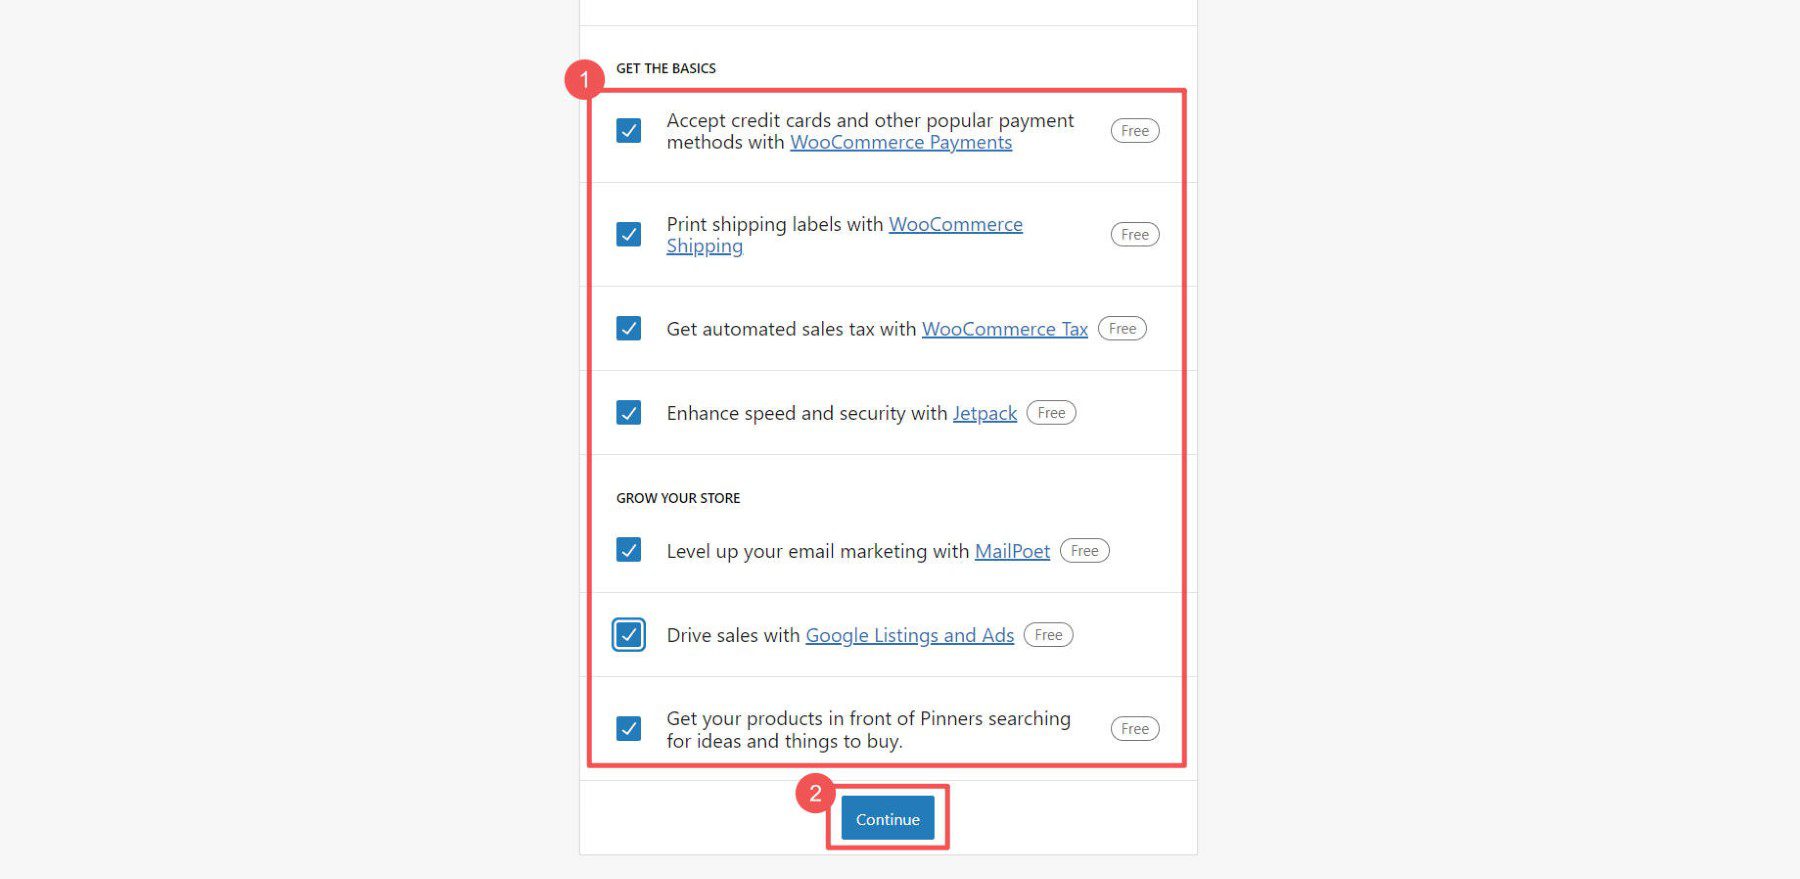
Choose any additional plugins you might need. You can check out Jetpack and MailPoet to determine if they fit your needs. However, if you expect to collect taxes, process credit card payments, or manage shipping, these free plugins could be beneficial.
At this point, you can shift focus towards the additional settings in WooCommerce.
WooCommerce Settings
Setting up an eCommerce store can be challenging, but WooCommerce simplifies the process. Here’s what you can manage:
- General settings: Currency, products, and checkout options.
- Product settings: Item display and inventory management.
- Shipping settings: Delivery methods and costs.
- Payment settings: Customer payment options.
- Account settings: User registrations and privacy controls.
- Email settings: Store communication preferences.
- Advanced settings: Custom configurations for your store.
For further assistance, refer to our WooCommerce settings guide, which provides step-by-step instructions for navigating these essential pages.
Add Product Categories
Categories make it easier for customers to find items in your store. For instance, if you’re selling clothing, you might create categories such as Handbags, Chairs, and Tables. It’s a good idea to set these up before adding products.
To create categories, navigate to WooCommerce > Products in your dashboard and click on Categories. They function similarly to WordPress post categories and tags. Fill in all the required fields for your category before adding them to your store.
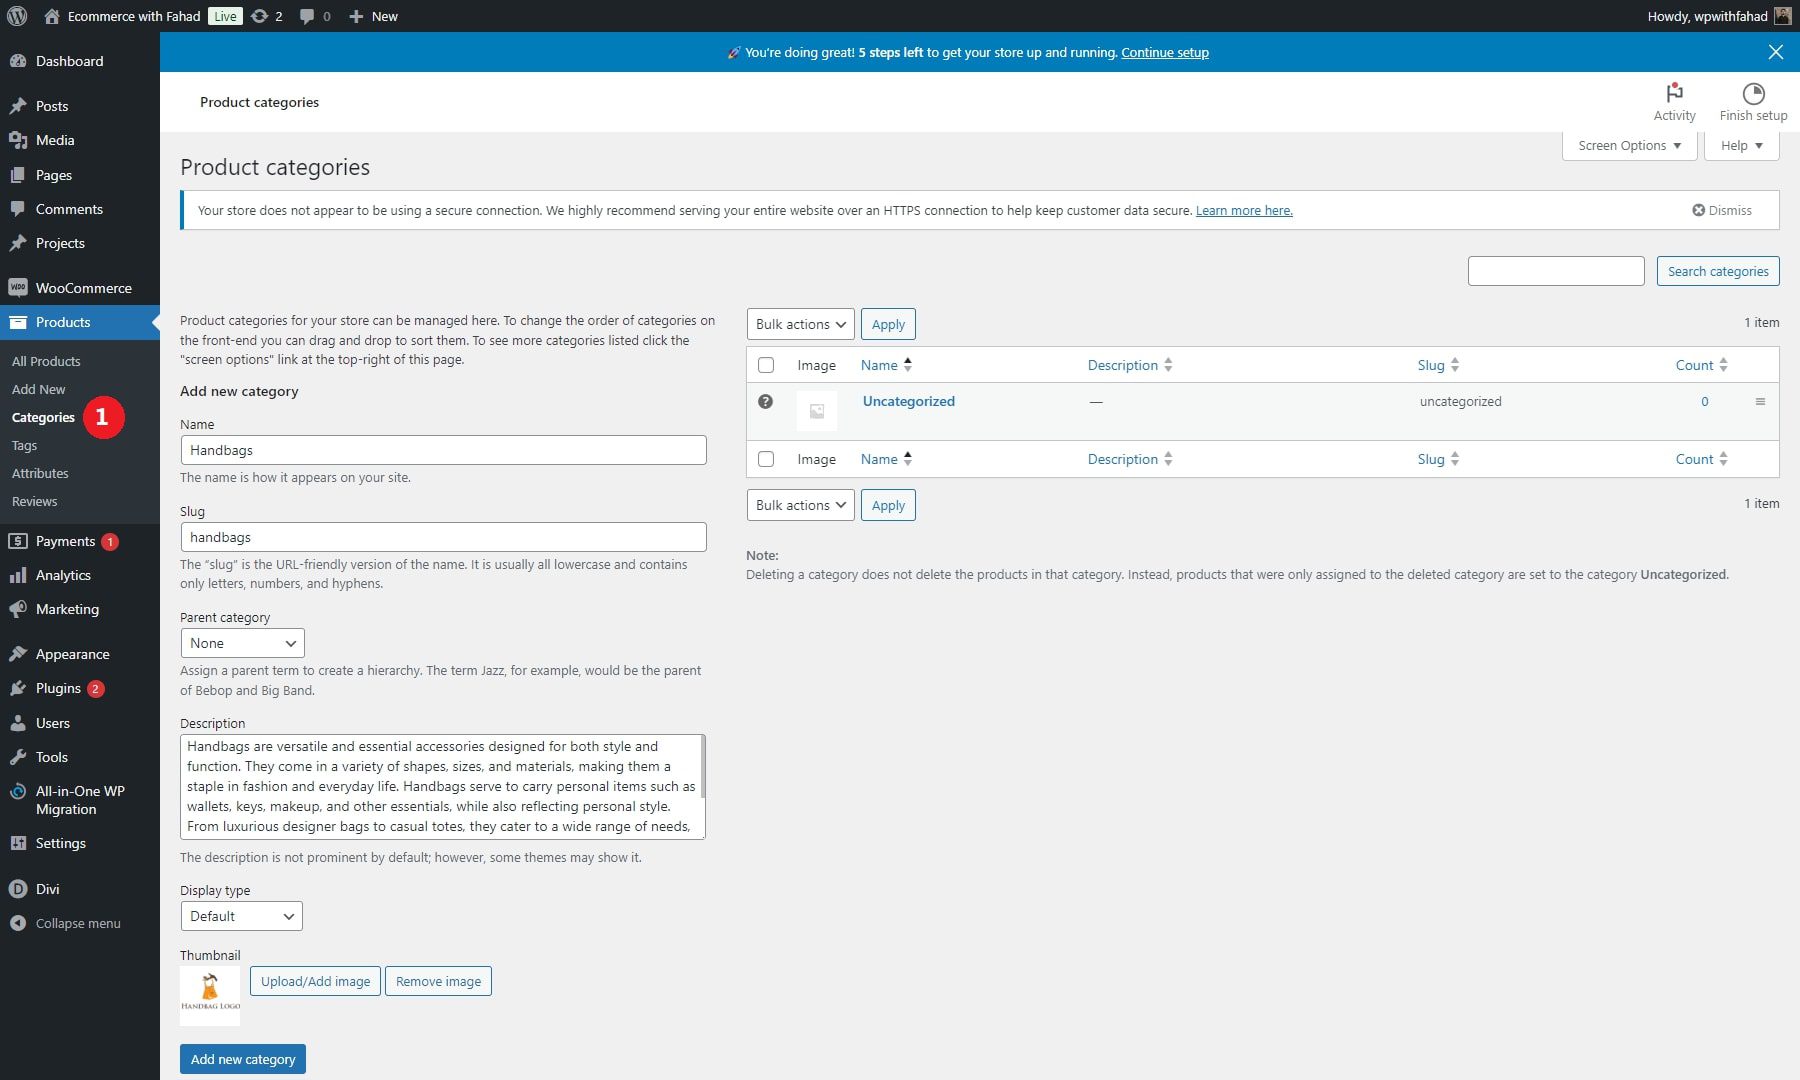
If there are any placeholder categories, you can either edit or delete them. When selecting categories and tags, consider the most intuitive and easy for your customers to understand.
Add Products to Your WordPress eCommerce Store
You can add products individually or import them simultaneously using a CSV file.
To add products individually, navigate to Products > Add New.

Input the product name.

Provide a product description and upload the product image.

First, choose the type of product you want to create. Then, determine the price for your item and adjust the inventory levels as needed. You can also specify shipping details for individual products. You can assign categories and tags to your product on the right sidebar.

Once you’re satisfied, click Publish. You can add as many products to your store as you like.
Manage your product inventory with WooCommerce, and check out our comprehensive guide on setting up shipping in WooCommerce.
Set Up Payment and Shipping
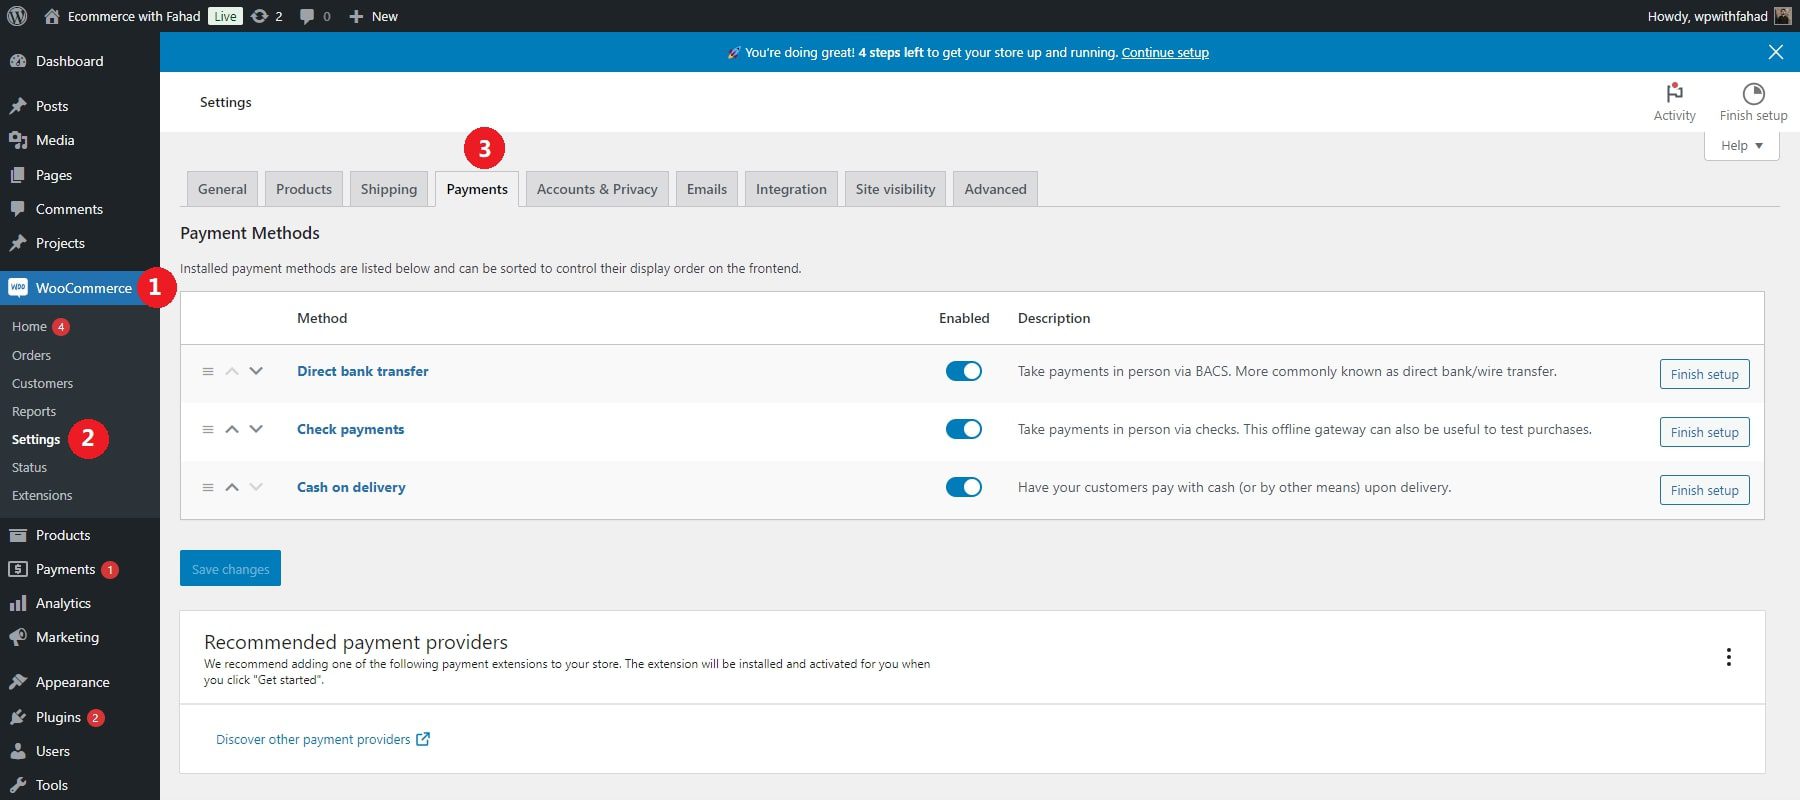
Providing diverse payment options is essential to keeping customers satisfied. WooCommerce supports multiple gateways, such as PayPal, Stripe, and bank transfers. However, when combined with Divi’s builder and Woo checkout module, you can fully customize your checkout page design.
WooCommerce settings let you select the payment methods that best suit your business. Based on your preferences, enable payment methods such as direct bank transfer, cash on delivery, or check payments.
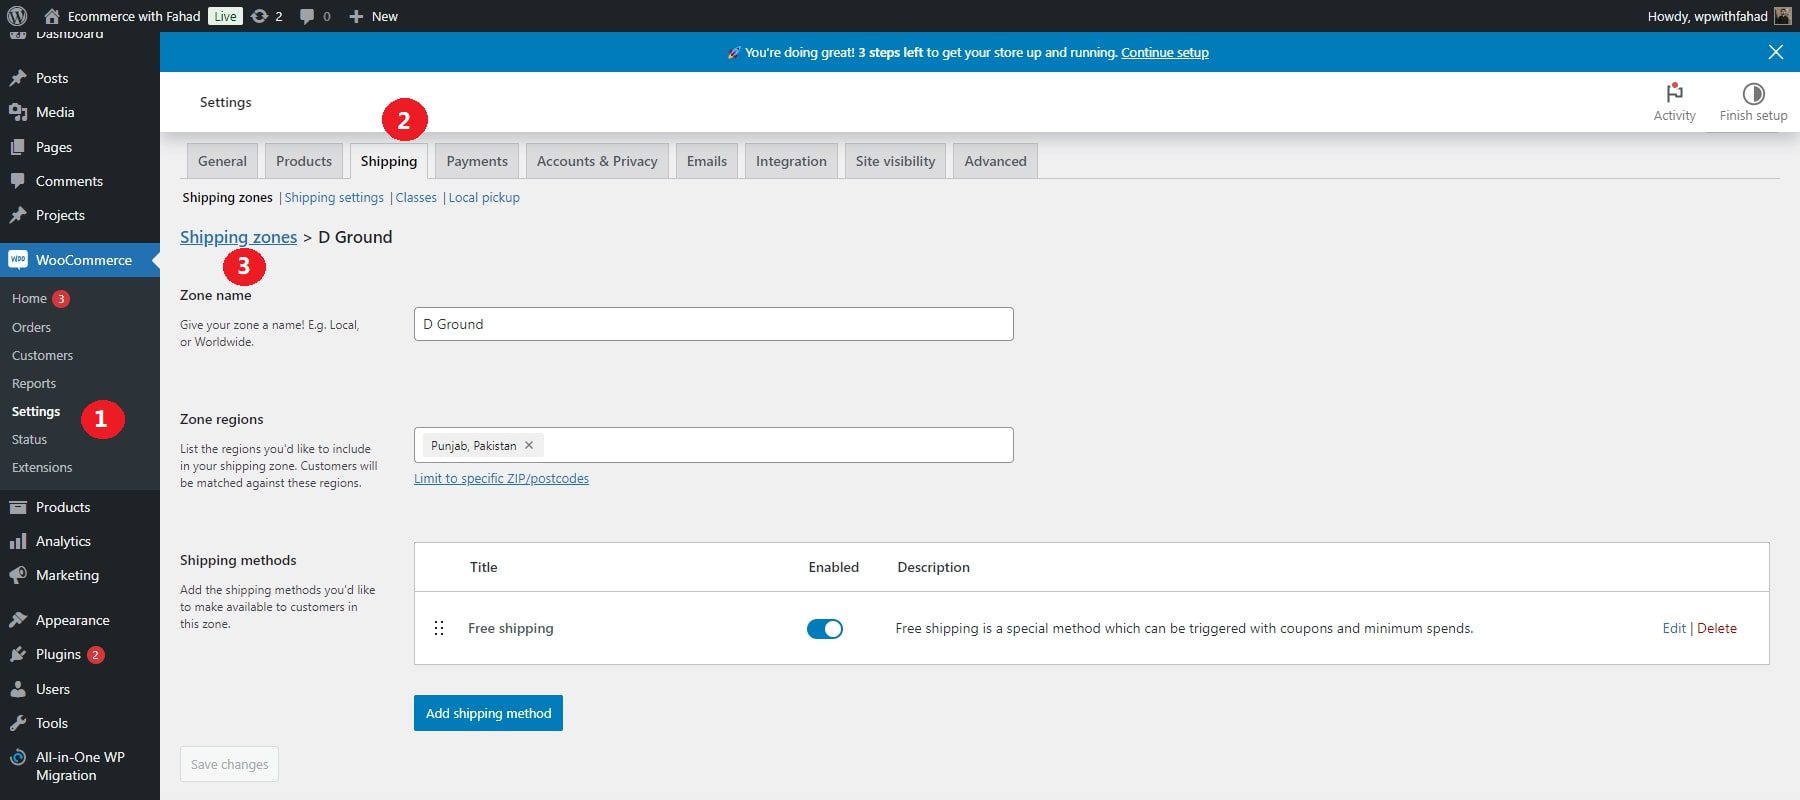
WooCommerce’s flexibility ensures that your shipping options are tailored to meet customer expectations. Here are the steps involved in finalizing your shipping details for your store:
- Go to WooCommerce > Settings > Shipping
- Define zones based on geographic regions
- Assign specific shipping methods to each zone, such as flat rate, free shipping, or local pickup.
6. Design and Customize Your Ecommerce Website
Now that your Starter Site is live, it’s time to align it with your brand. Rather than spending hours adjusting each element individually, you can quickly and efficiently customize your site using a faster and more effective method.
Design WooCommerce Pages
WooCommerce provides a set of essential pages for your store, which can be easily customized with Divi. These include:
- The Shop page, where all your products are displayed
- The Cart page, which shows the contents of your shopping cart
- The Checkout page, where customers can complete their purchases
- The My Account page for managing user accounts
- Additional pages, such as those for product categories and tags
With Divi, you can use the Divi Builder to edit each page directly or create custom templates for these pages using the Theme Builder.
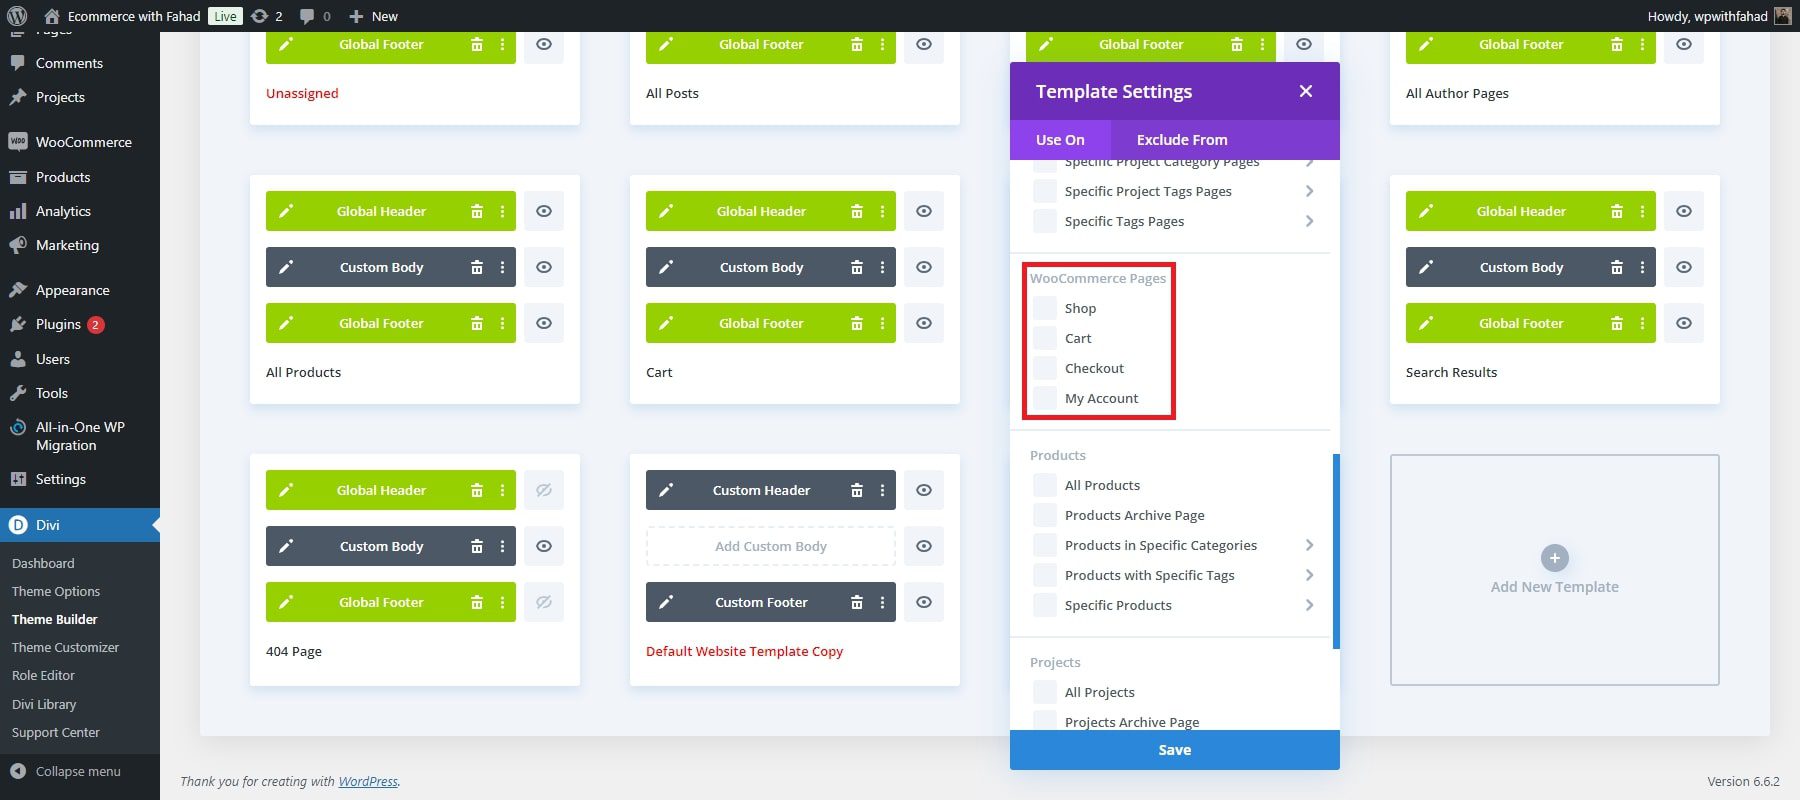
The Divi Theme Builder is especially helpful for creating templates for product pages, category pages, and other design elements across your site.
For instance, you can download a free product page template from the blog and apply it to the theme builder, giving all your products a consistent, attractive layout. Alternatively, you can design your product page template from the ground up.
For additional support, refer to the guides on building a cart page, configuring a checkout page, and using Divi with WooCommerce pages.
Edit Divi Starter Site Theme Builder Templates
Each Divi Starter Site includes Theme Builder templates that manage the layout of key sections of your website, such as headers, footers, and blog posts. After setting up your site, you can view these templates by visiting Divi > Theme Builder.
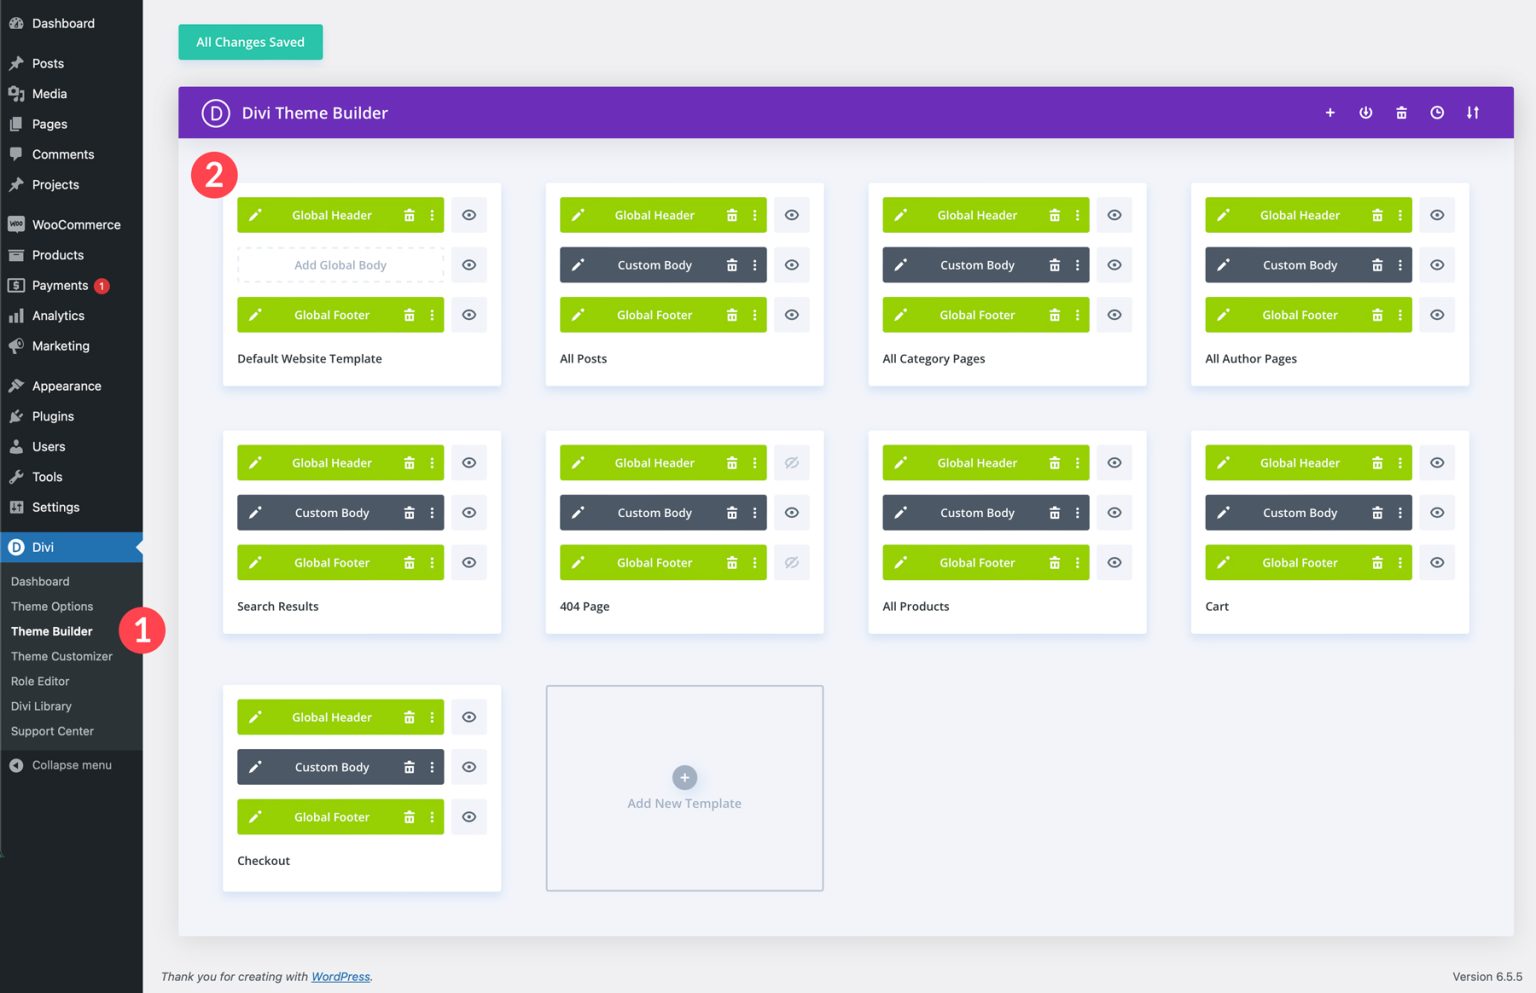
You can modify any Starter Site’s templates by selecting the pencil icon next to the global header, custom body, or global footer sections. Any changes made to the header or footer will apply across all templates. To see this in action, click the pencil icon for the Default Website Template.
Once you open the template, you can change the header’s background color, insert a logo, and adjust fonts and colors using the Visual Builder’s menu settings. You can also add, remove, and style Divi modules as you would on a web page.
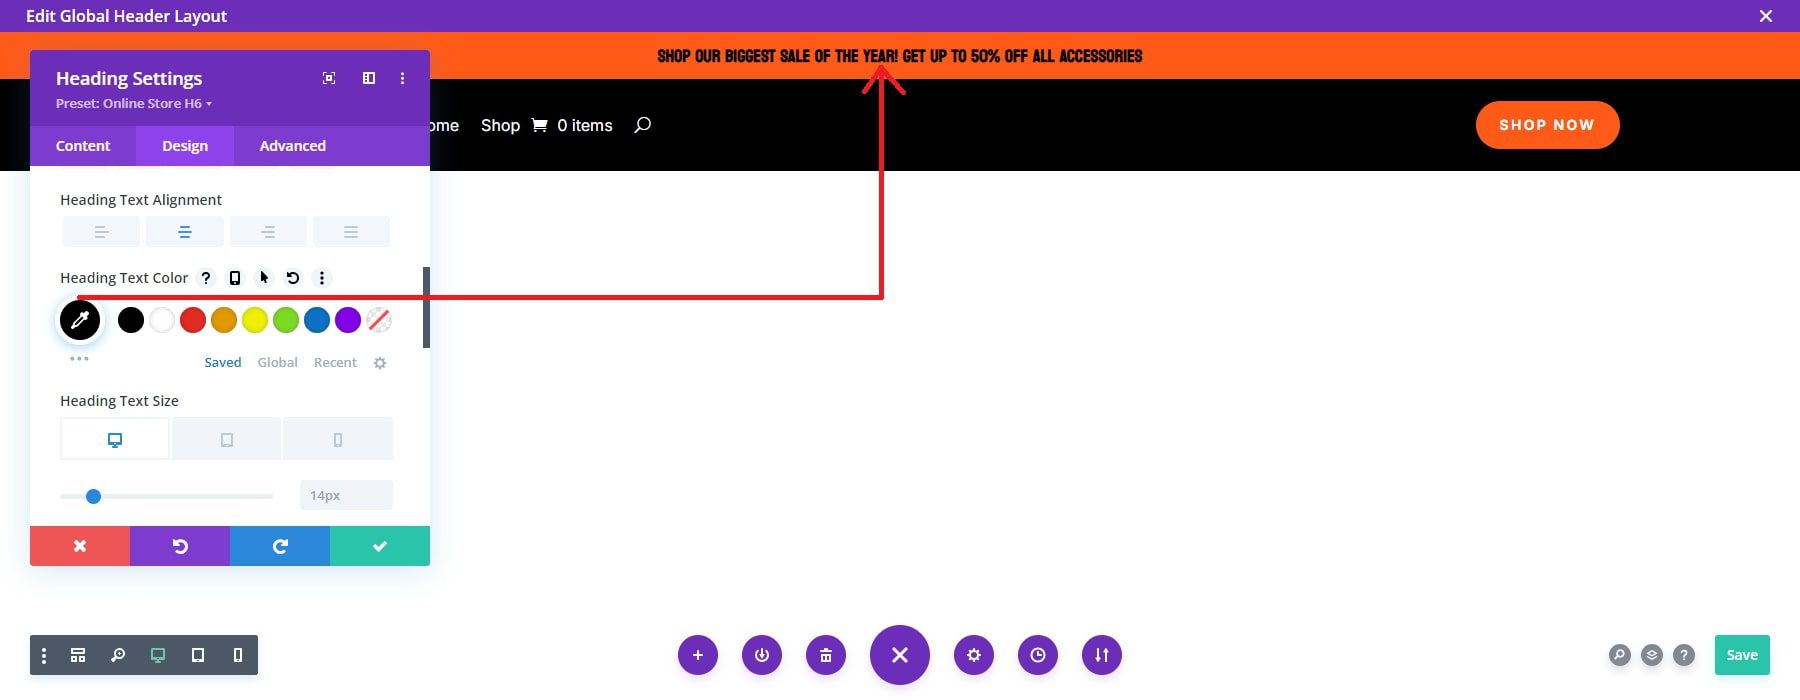
The advantage of using templates is that any adjustments to the Header (or other Theme Builder templates) will be automatically reflected throughout your entire website.
Customize Global Fonts and Colors
Personalizing your Starter Site to align with your brand is simple. There’s no need to adjust each color or font for every element on every page. The site comes with pre-configured Global colors and fonts. You can modify these Global settings while editing elements in the Divi Builder, and any updates will automatically apply across the entire site.
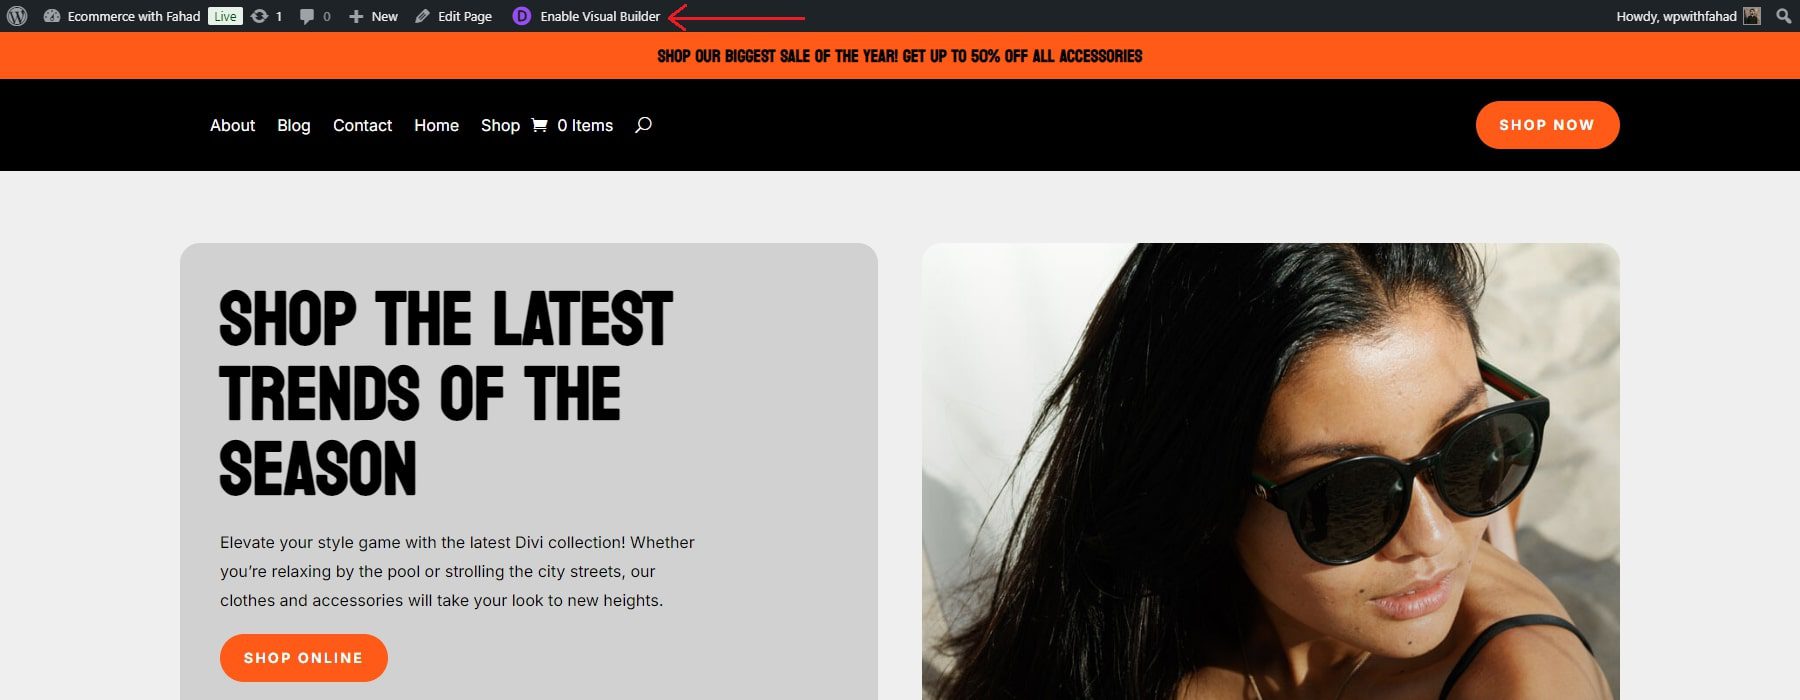
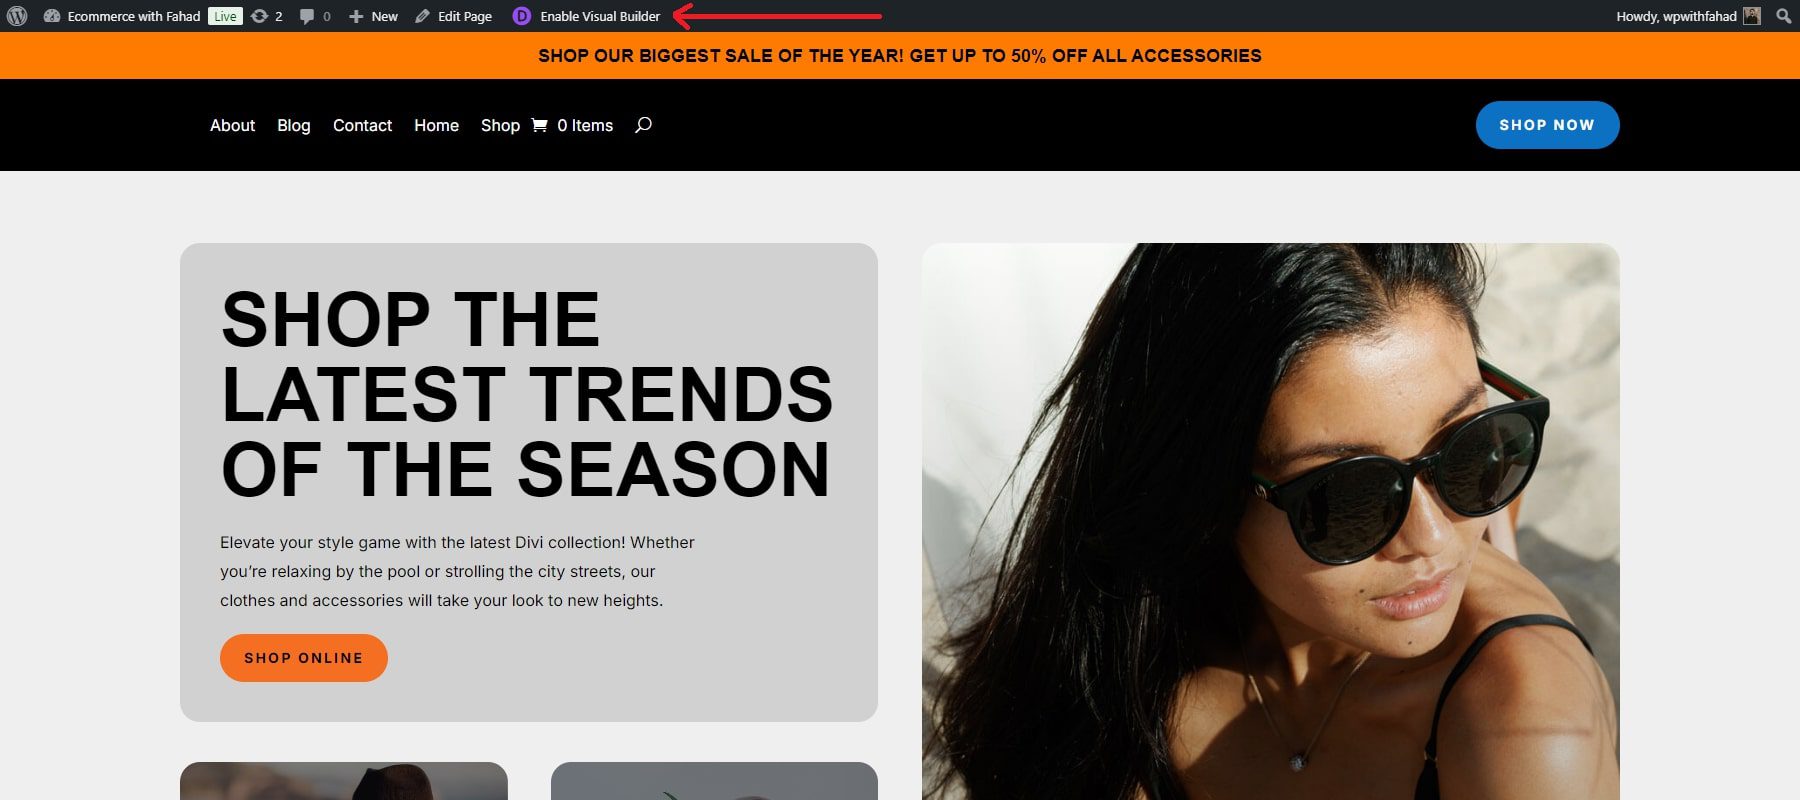
To modify global fonts and colors on the home page of the new starter site, click “Enable Visual Builder” from the front end.
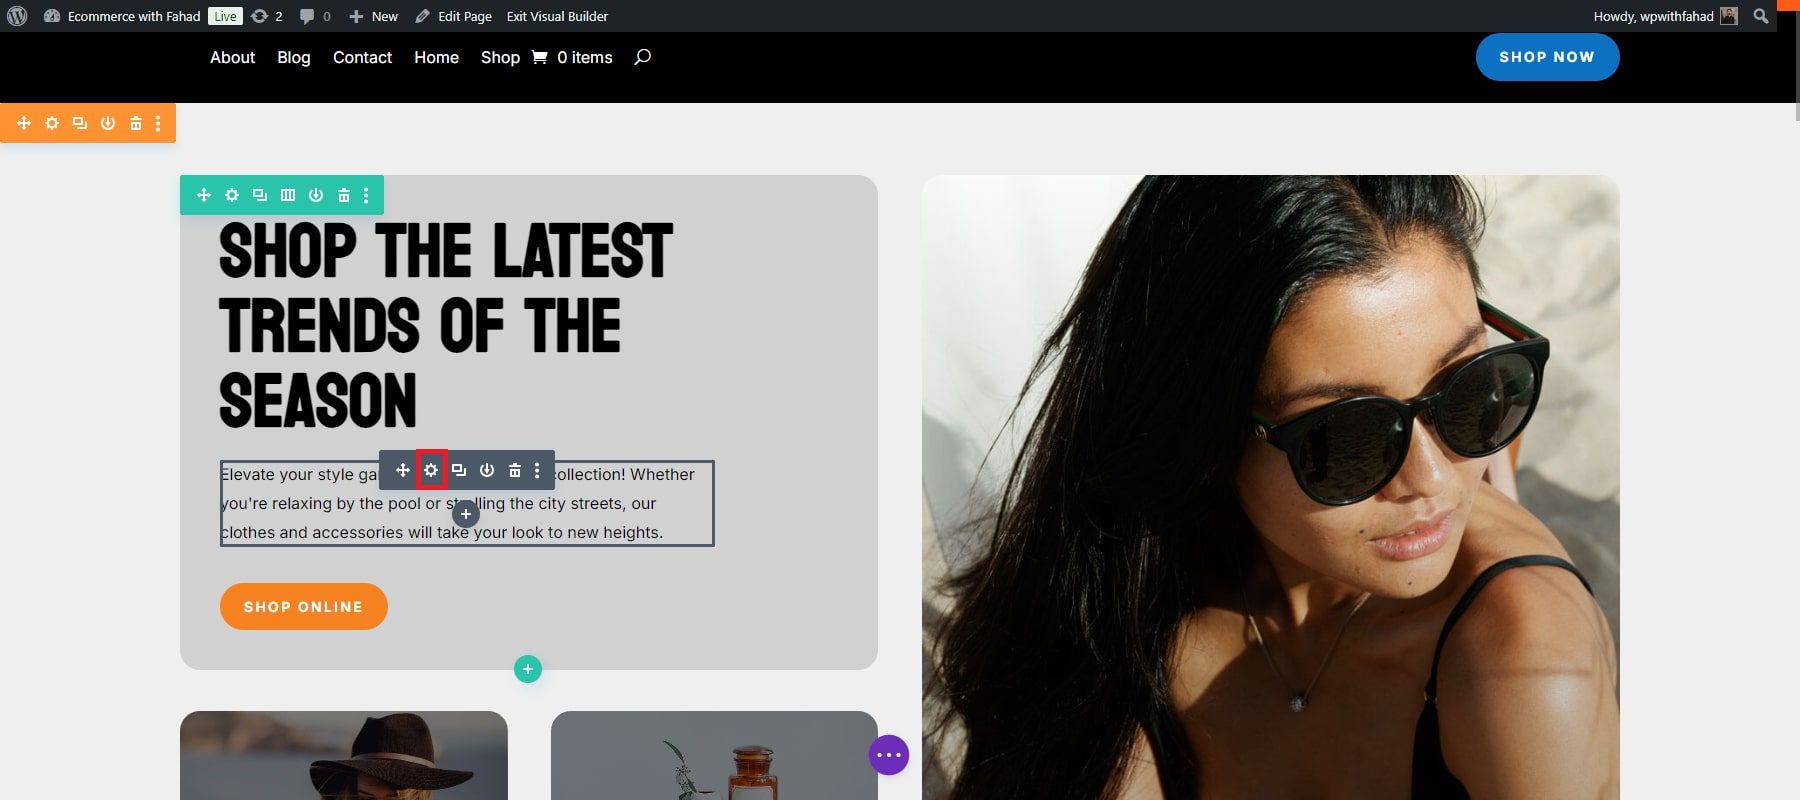
Click on the module that you want to customize. We will customize a text module on our homepage to prioritize the global fonts first. Click on the wheel icon to open the tabs for modification.
The starter site you created includes pre-set global fonts that can be kept or replaced with your brand-specific fonts. You can easily customize the global fonts using the Divi Builder. Navigate to the Design tab, scroll to the Text section, and choose Font.
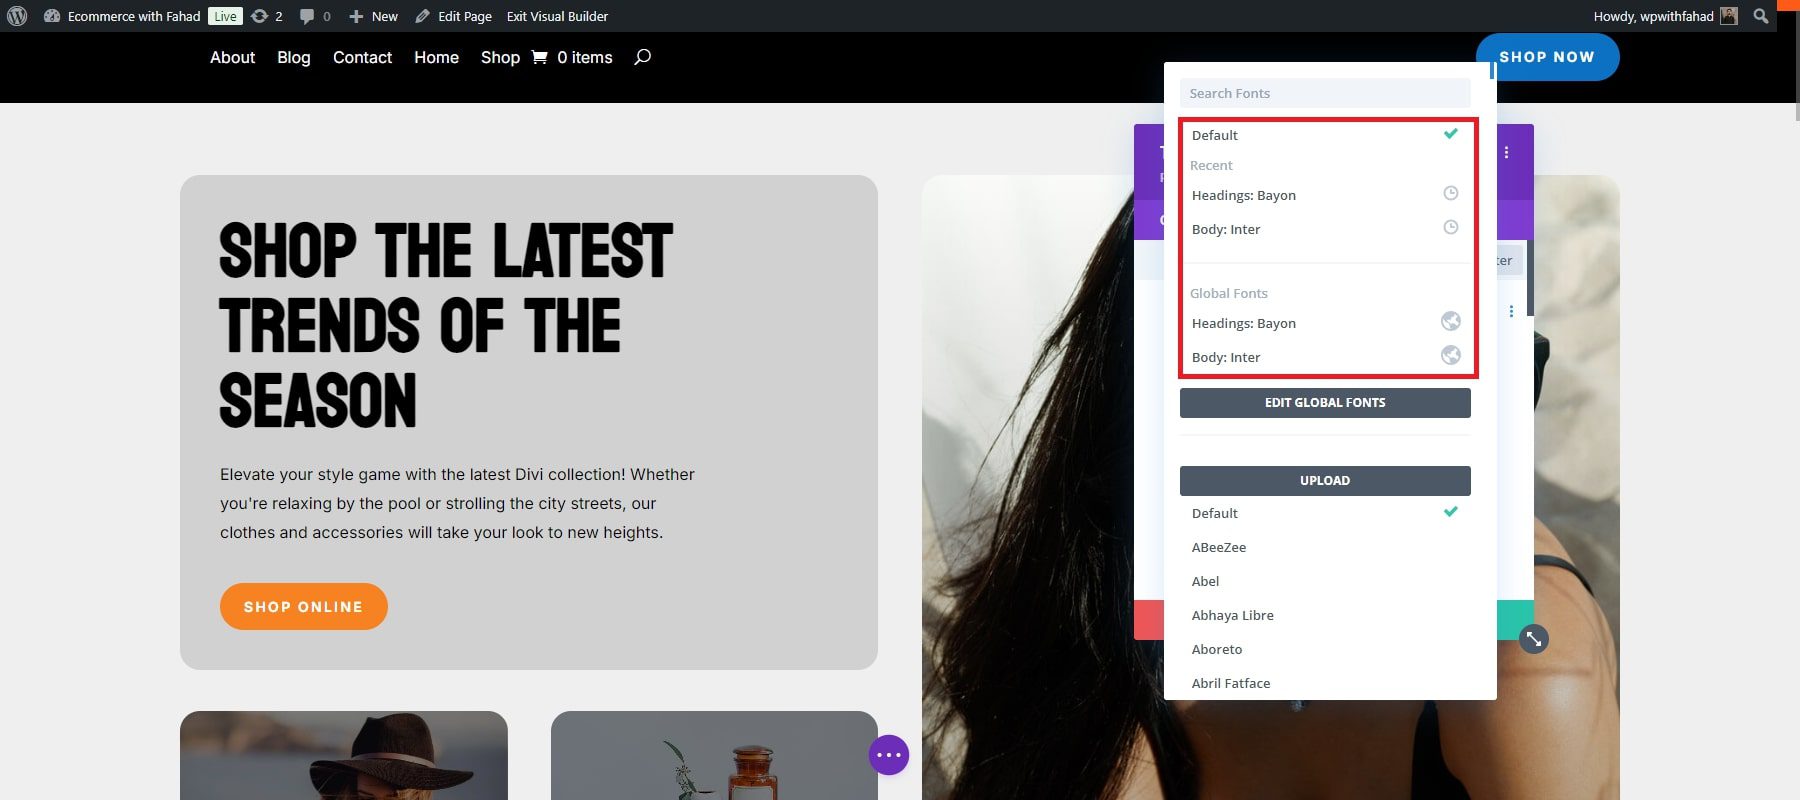
You can also upload your own fonts or select from our library, which includes Google fonts.
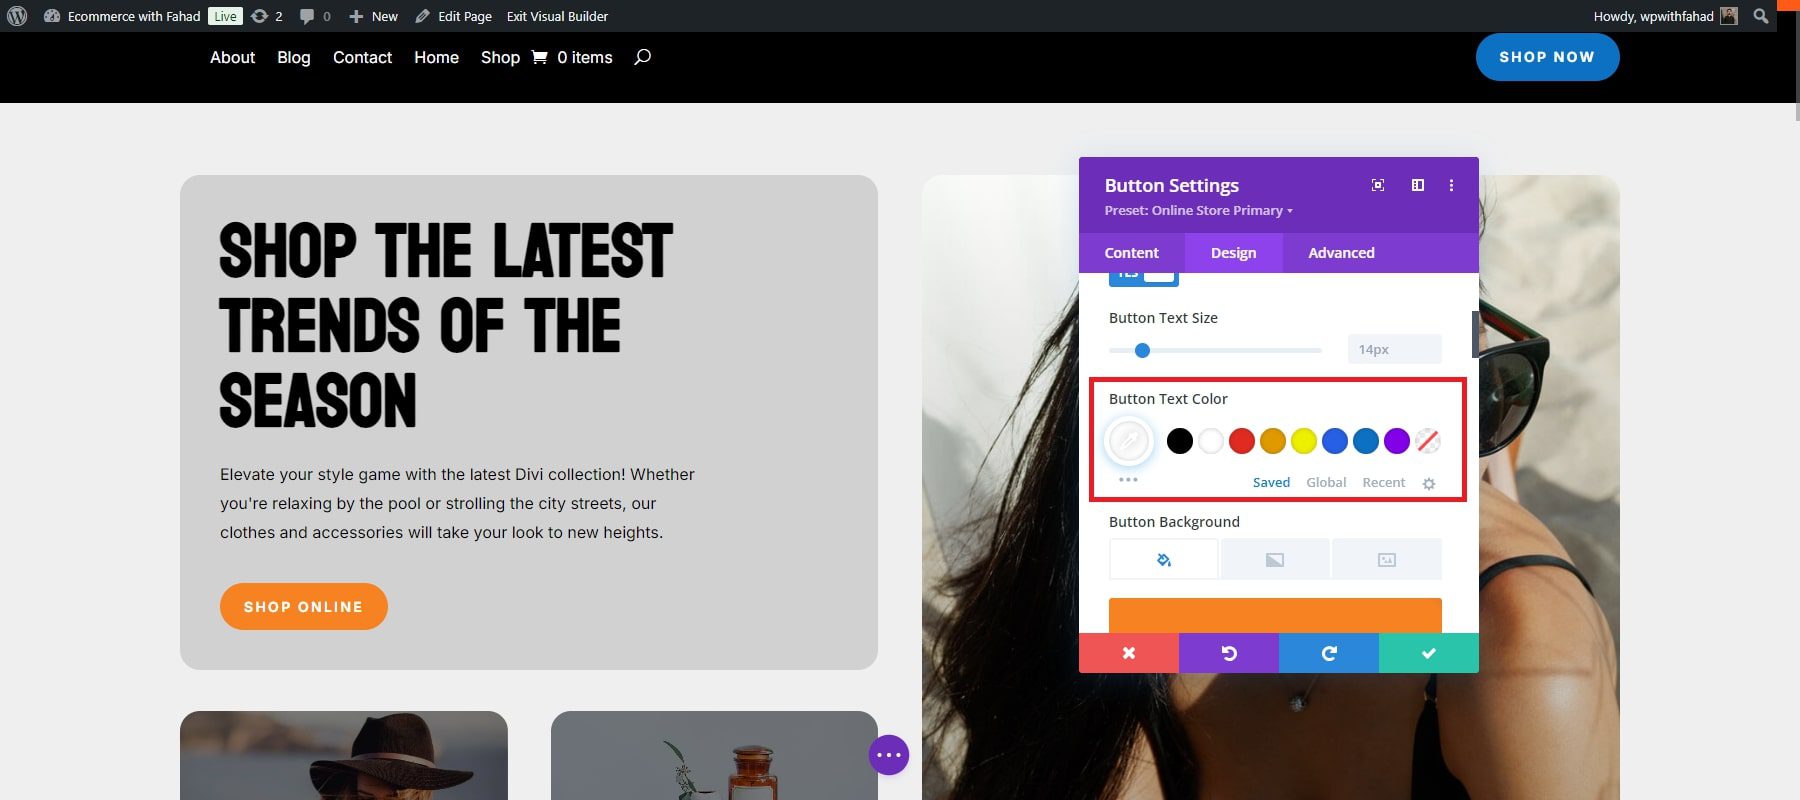
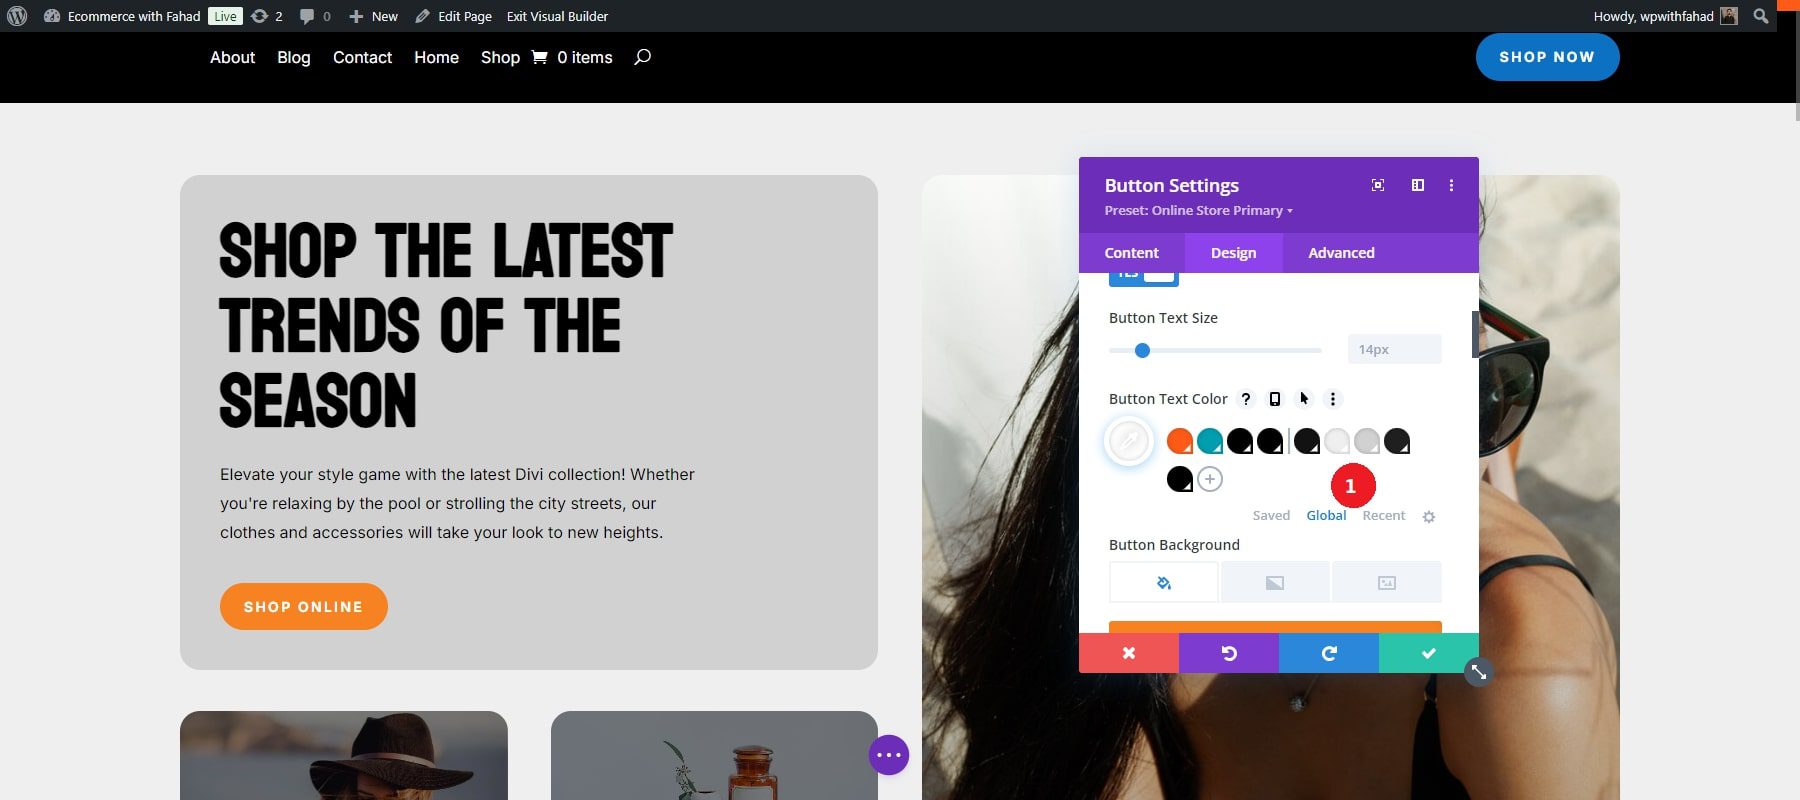
We can choose to prioritize the global colors of the same text module, but in our case, we have chosen to customize the global colors of the button module. You’ll need to modify the Global Colors settings to customize your brand colors. Like Global Fonts, the existing global colors are inherited from the eCommerce starter site.
Click on the wheel icon of the button module to get things started.
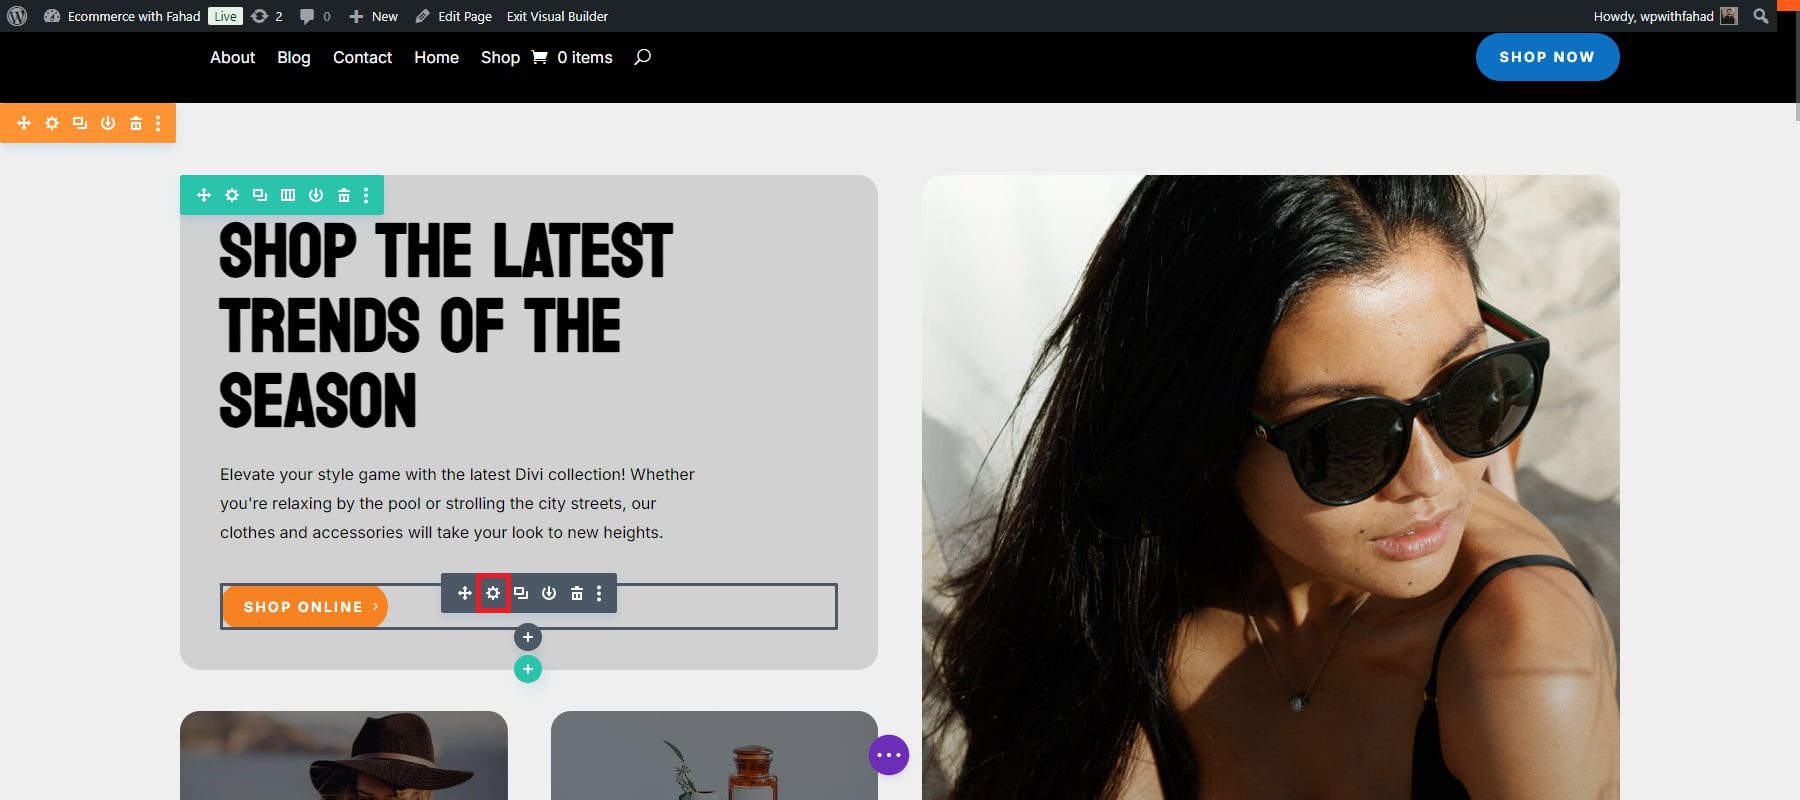
Scroll down to the Button section and adjust the button text color.
Switch to the Global tab from the Saved tab to view the current Global Colors.
To make changes, click on each color and select your preferred option. You can also enter your hex codes for custom colors. In our case, we have changed the text color from white to black.
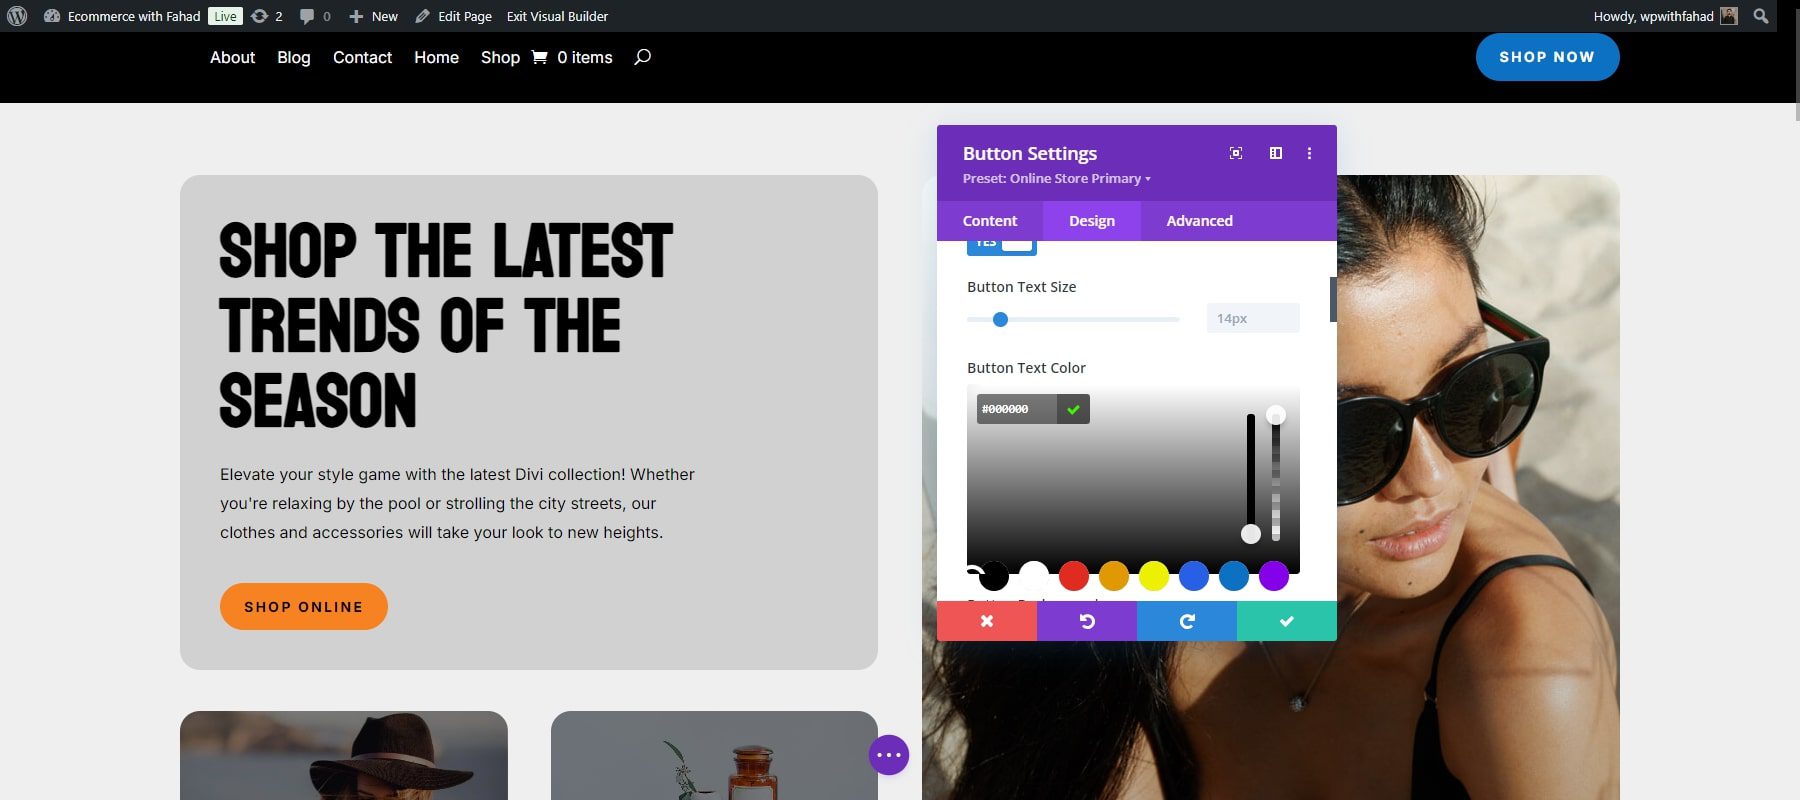
In the same way, modify all the colors as needed. To add additional colors, simply click the plus icon next to the last Global Color.
Edit Global Presets
Divi global presets allow you to reuse styles across different Divi modules. Think of them as style templates that can be applied to buttons, text modules, blurbs, and other elements. By creating a global preset for a module, like a button, you can set it as the default style or create different presets for various buttons on your site. This ensures consistency when applying your preferred styles, whether for buttons, text, or other frequently used modules. Divi Starter Sites include presets for all modules used in their templates, so you typically don’t need to create new ones. However, you can easily adjust these existing presets to align with your brand’s styling.
As in the case of editing the global fonts and colors, start by clicking “Enable Visual Builder” from the front end.
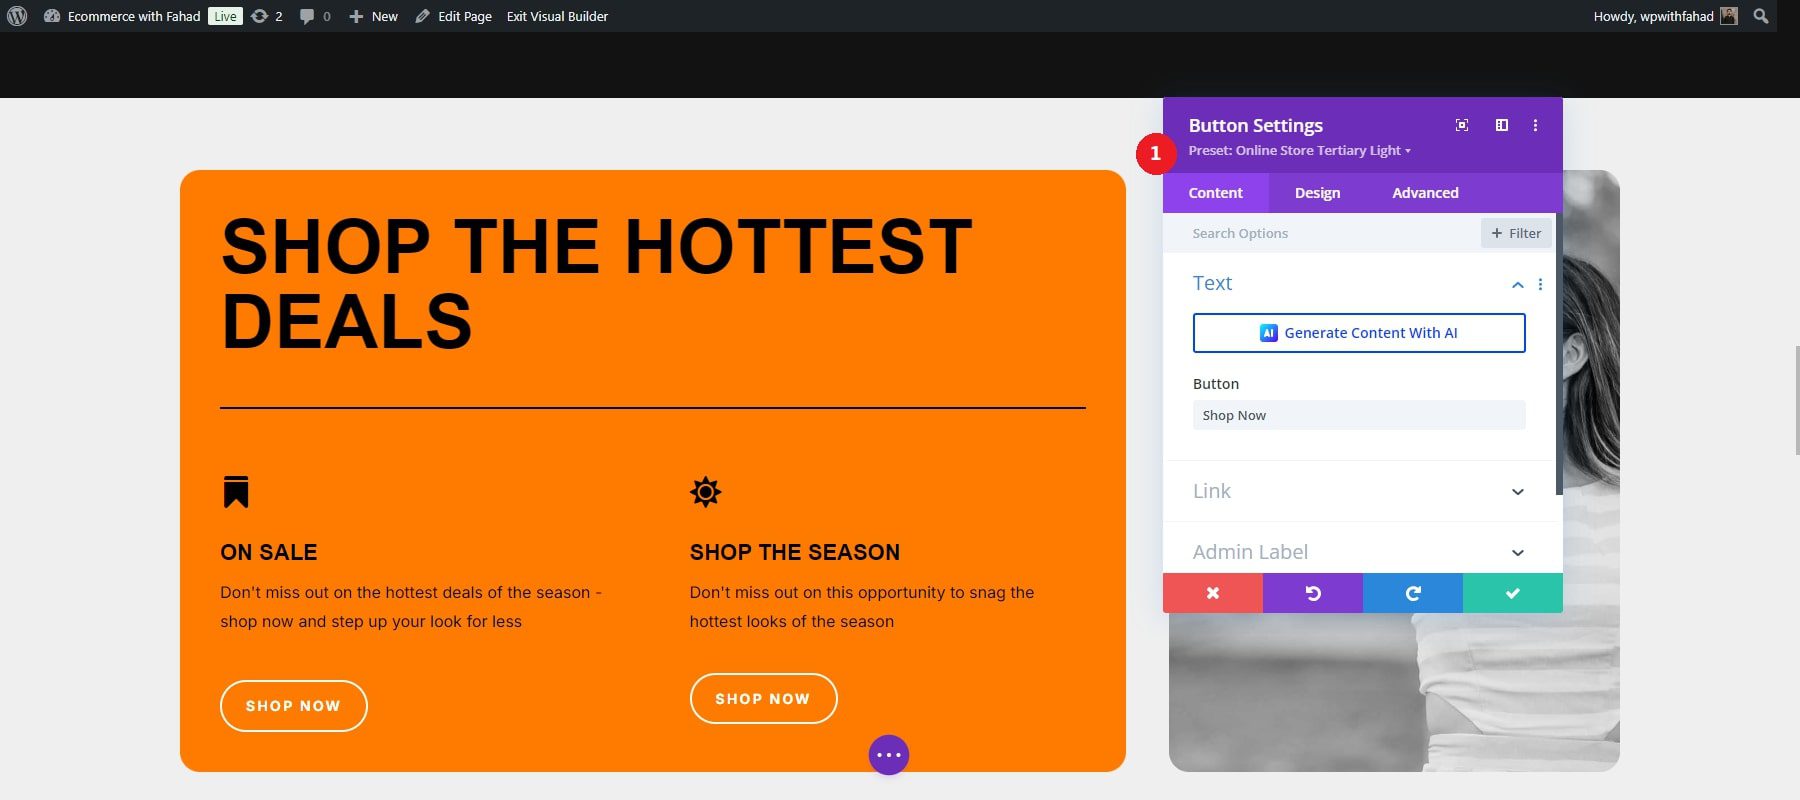
As noted earlier, each Divi Starter Site has its own presets. For instance, to modify an existing button preset on a Starter Site, click the dropdown arrow next to the preset section under the module’s header. In our case, we are modifying a button in the deal section of our eCommerce starter site.
Next, find the module preset, such as “Online Store Tertiary Light,” in our case. Hover over the preset to display its menu, then click the pencil icon to make edits.
![]()
When modifying Divi presets, the module’s header changes from purple to grey, signaling that design adjustments are being made.
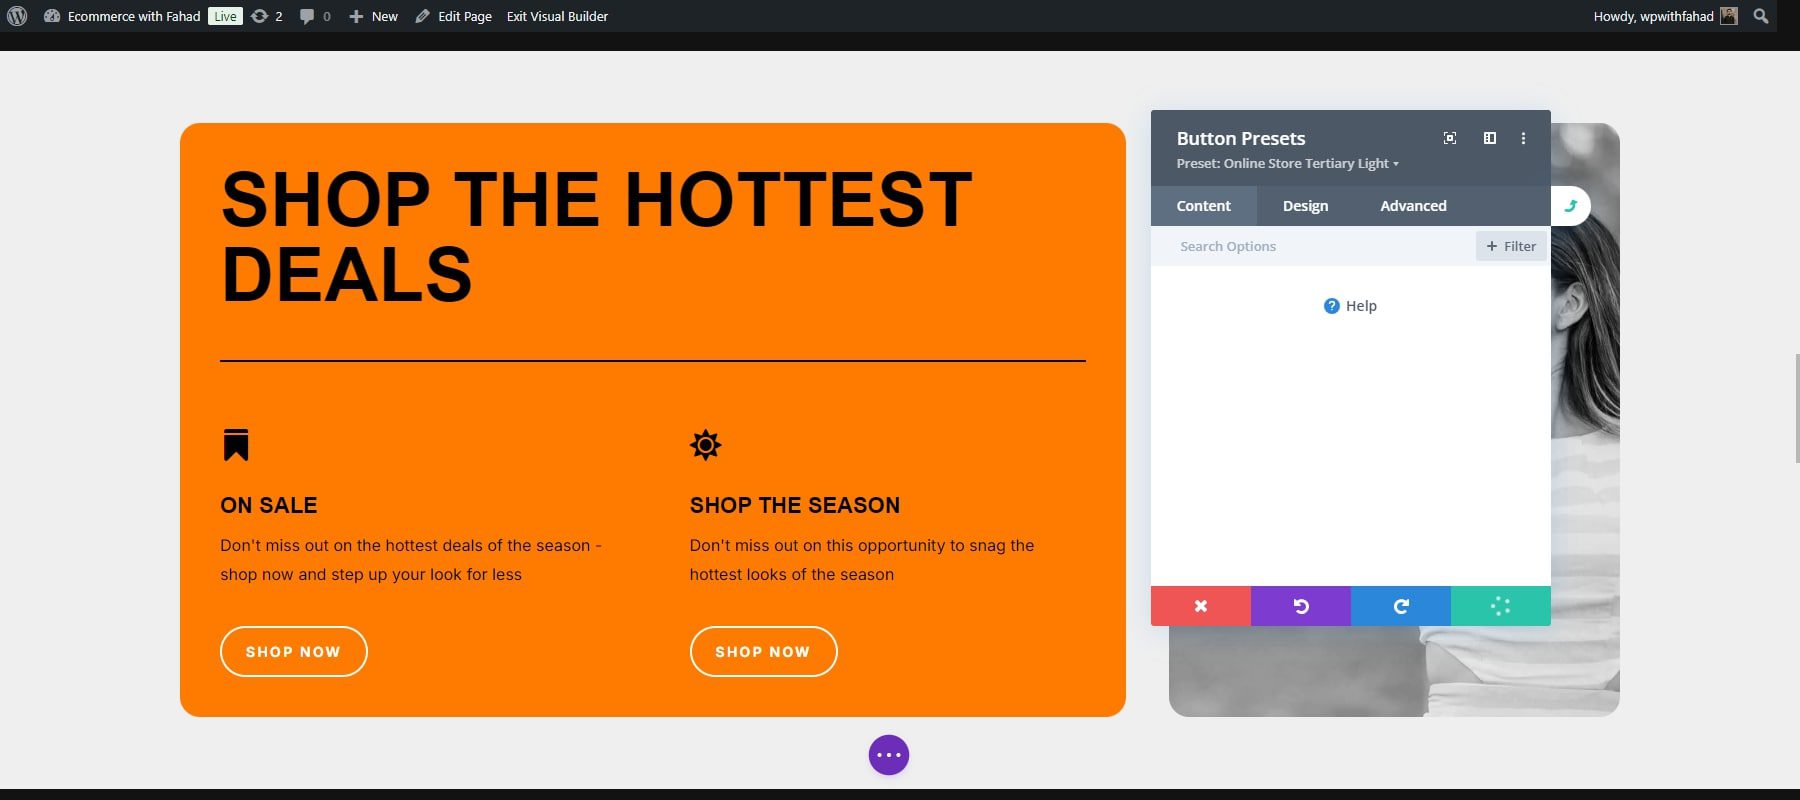
Feel free to apply any design modifications you prefer, then save the module by selecting the green checkmark. In this case, we have changed the colors of the buttons from orange to black.
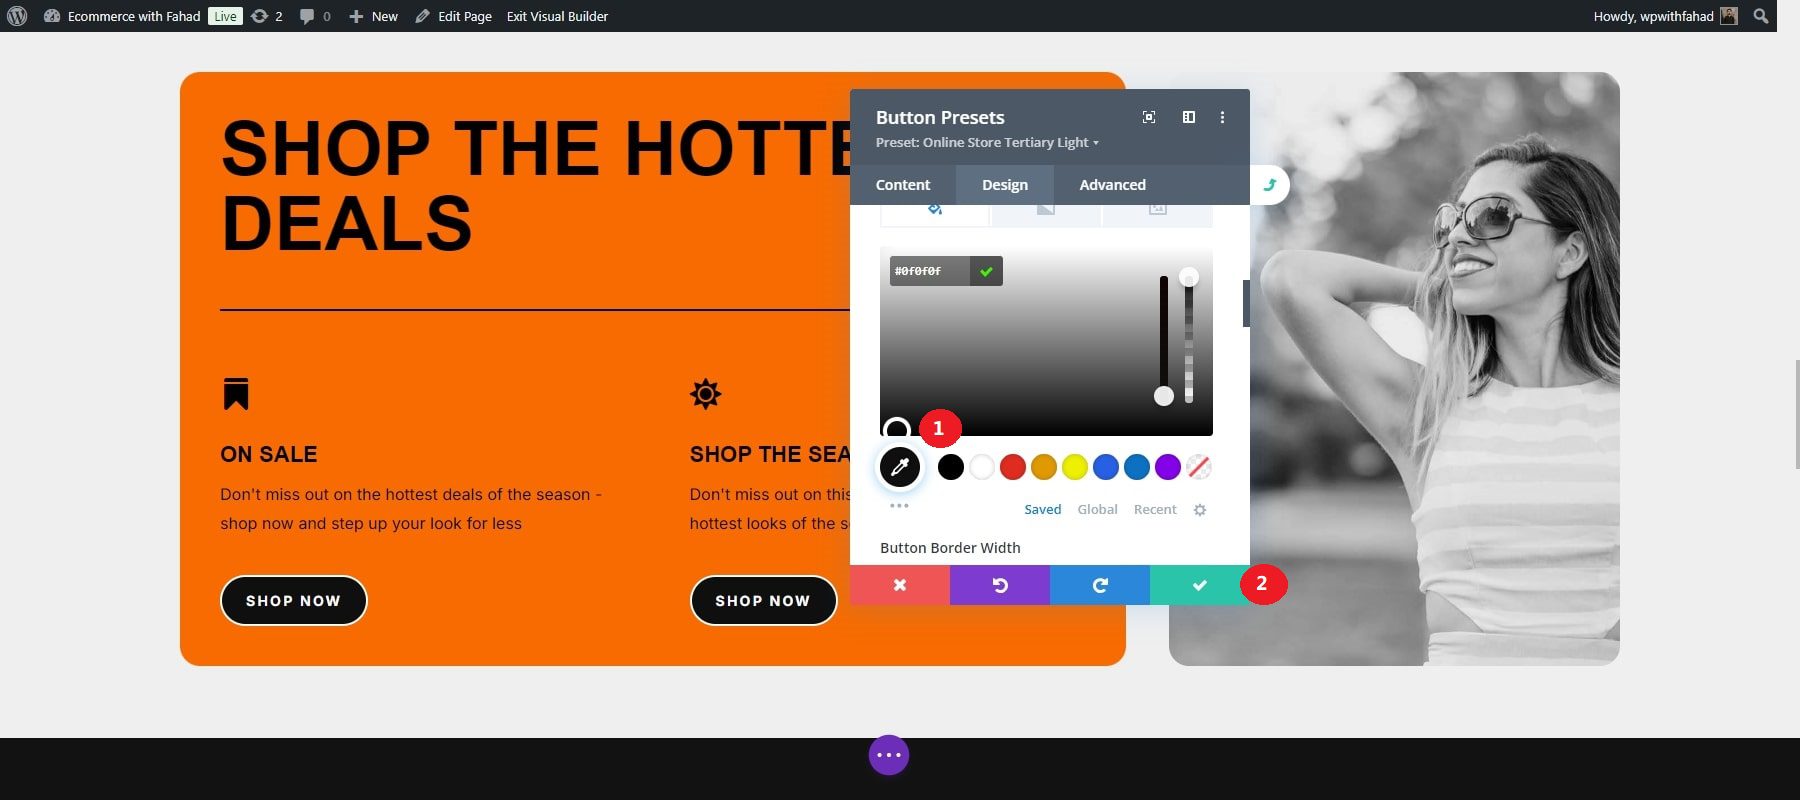
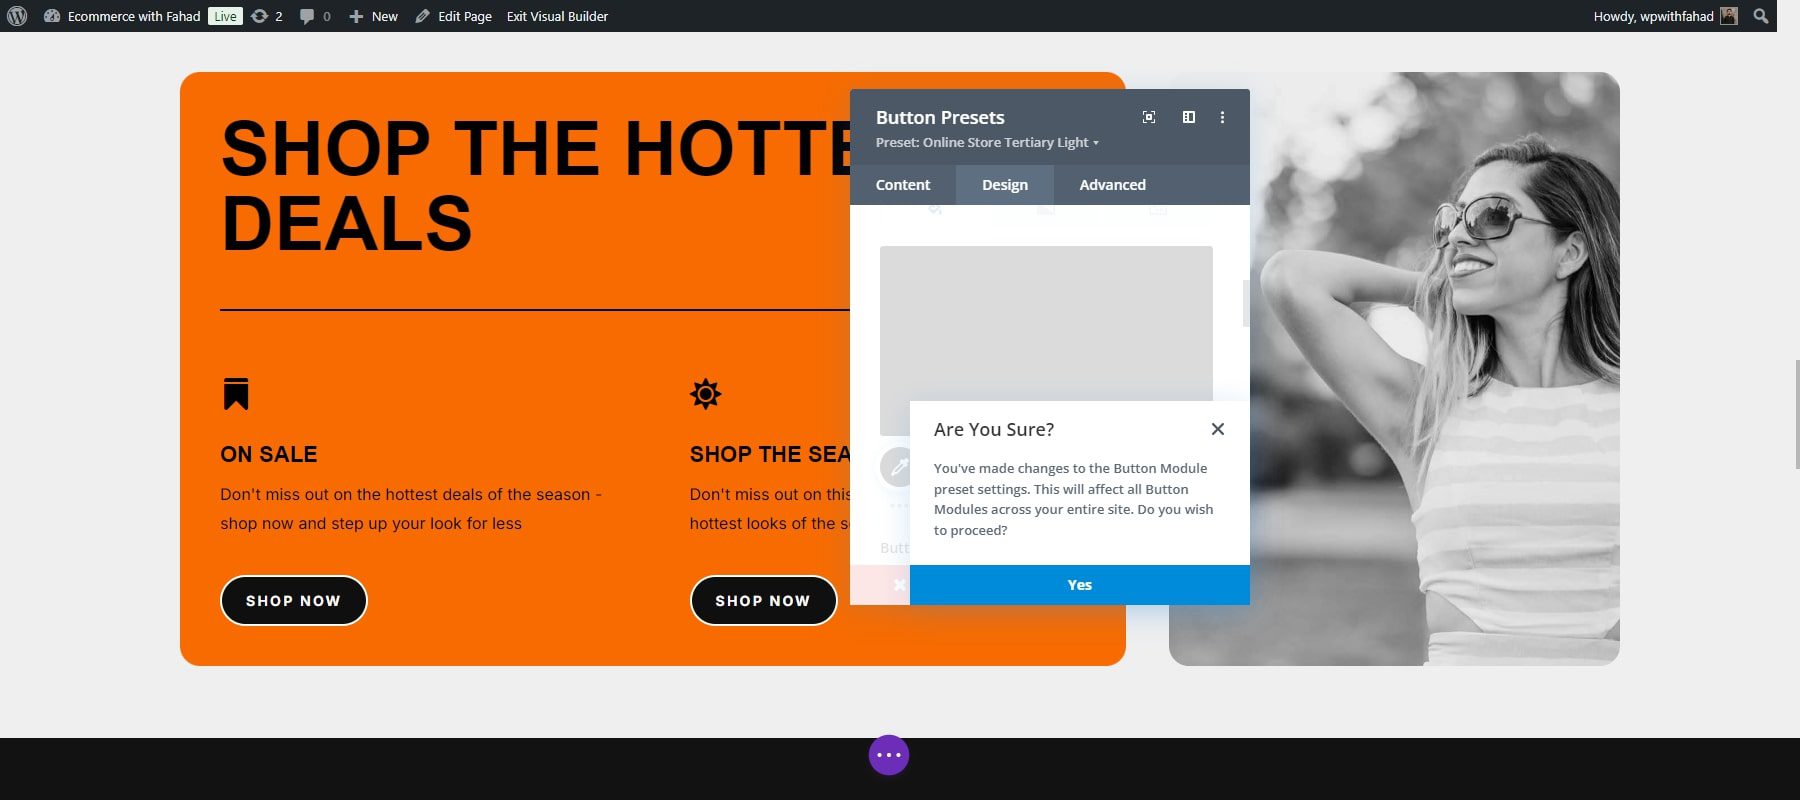
A confirmation dialog box will pop up at the bottom, asking if you’d like to proceed with changes to the preset. Click ‘Yes’ to save your adjustments.
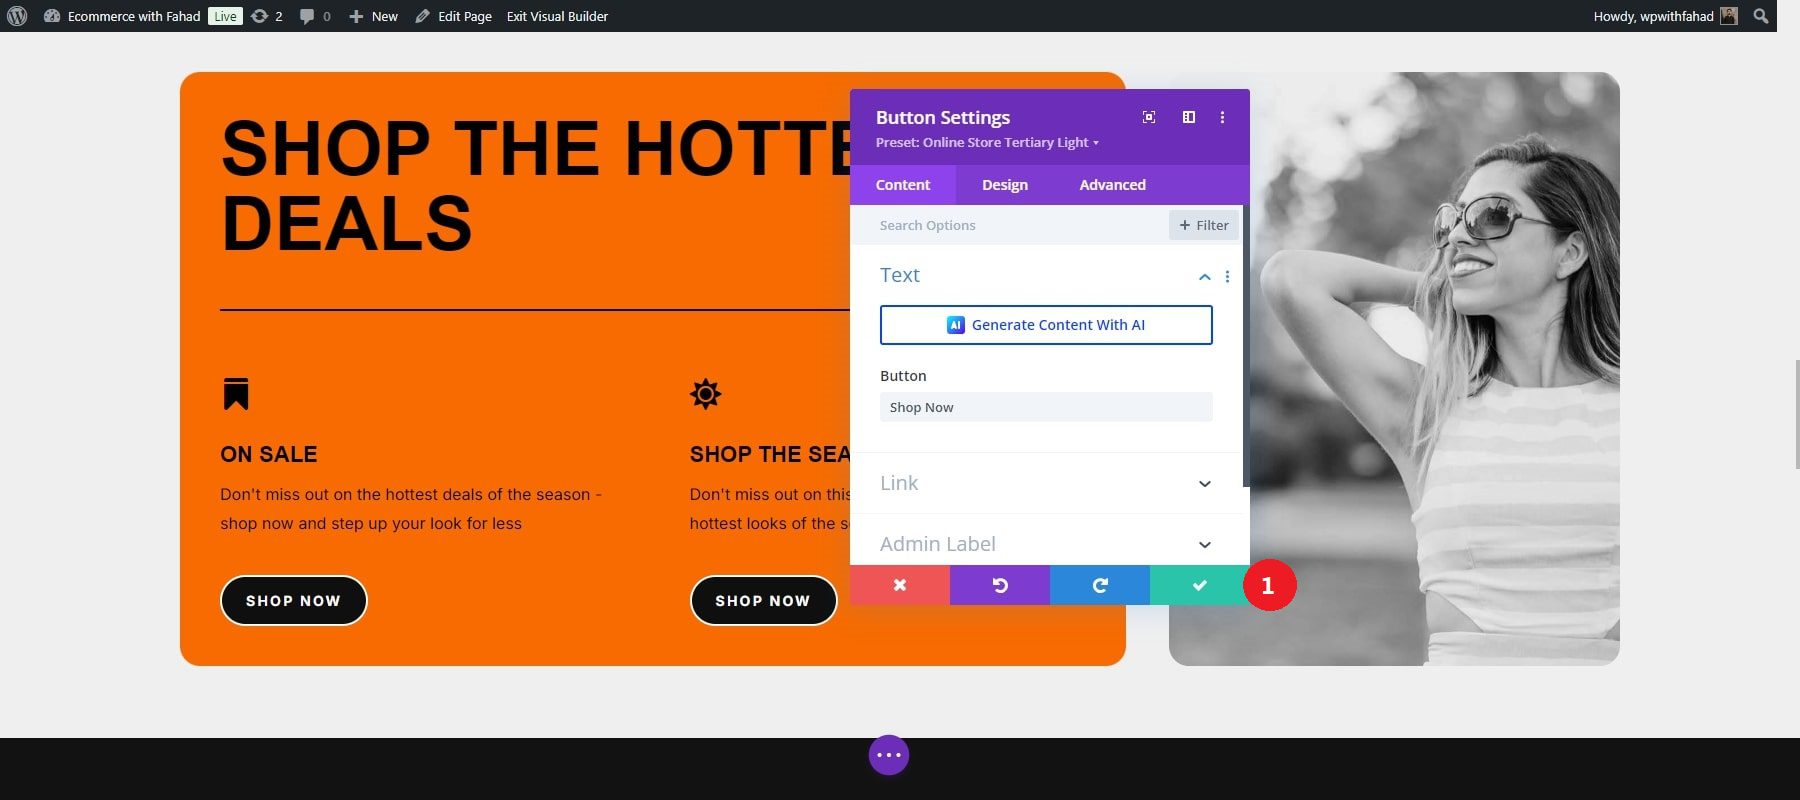
The module’s header will revert to purple. Press the green save button one last time to finalize the preset.
7. Boost Your eCommerce Site with Plugins and Integrations
Focusing on email sign-ups and social media sharing can help your eCommerce website attract more traffic and increase sales. Divi offers built-in optimization tools and works smoothly with popular WordPress plugins for social media and email sign-ups. Here are a few tools to help you begin.
Email Marketing
Growing an email list is crucial for staying connected with your audience and informing them about your eCommerce store’s updates. The Bloom plugin by Elegant Themes is an excellent tool for designing eye-catching email opt-in forms. After installing the plugin, you can customize forms to match your site’s style and requirements. Bloom also integrates with several email marketing platforms, allowing you to manage your list and automate communications efficiently.

Social
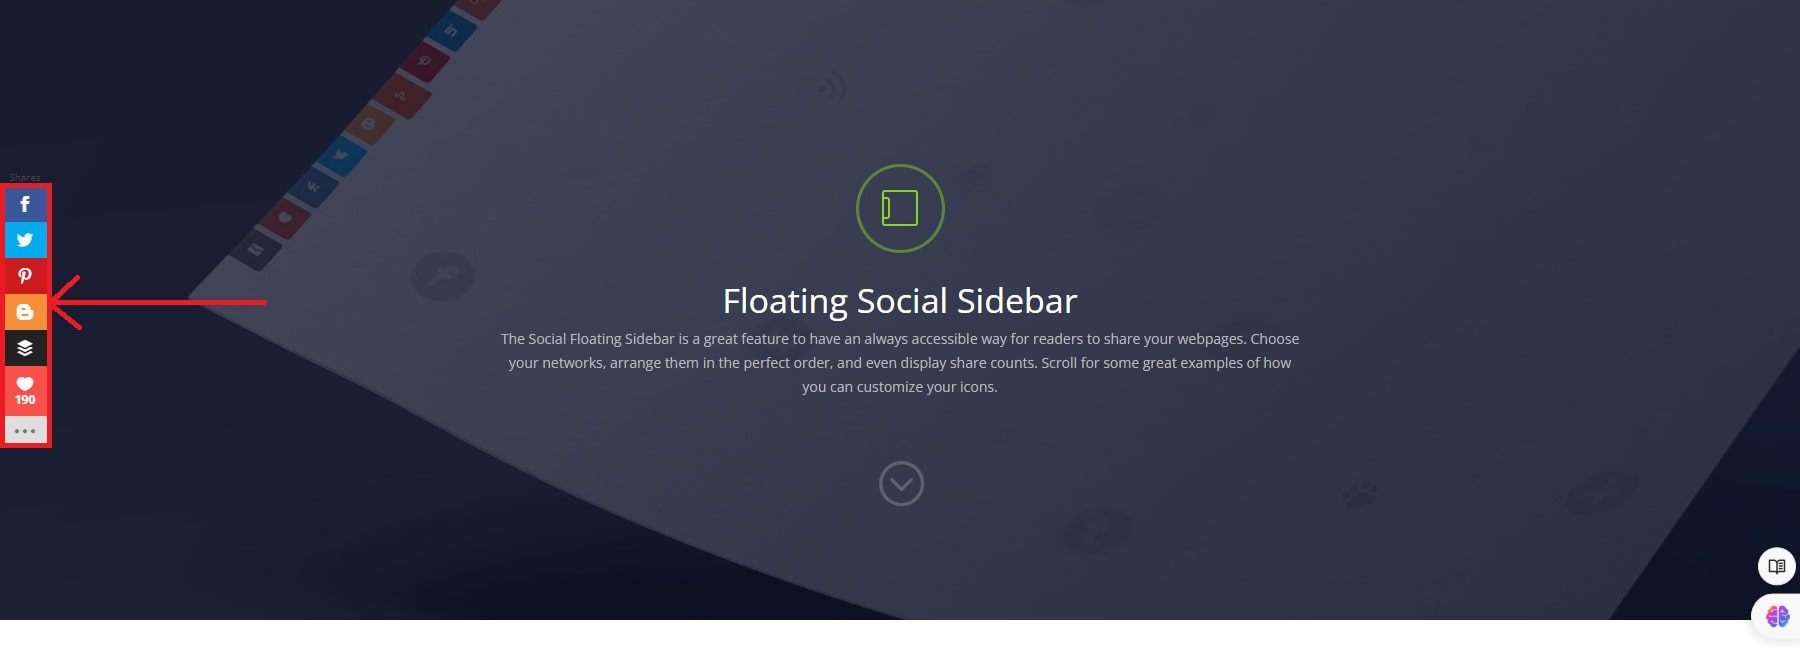
You can easily add social sharing buttons to your site with the Monarch plugin by Elegant Themes. After activation, set up Monarch to position these buttons in prominent spots like the header, footer, or within your posts. This encourages visitors to share your content, increasing your eCommerce site’s presence on social media.
Products in the Divi Marketplace
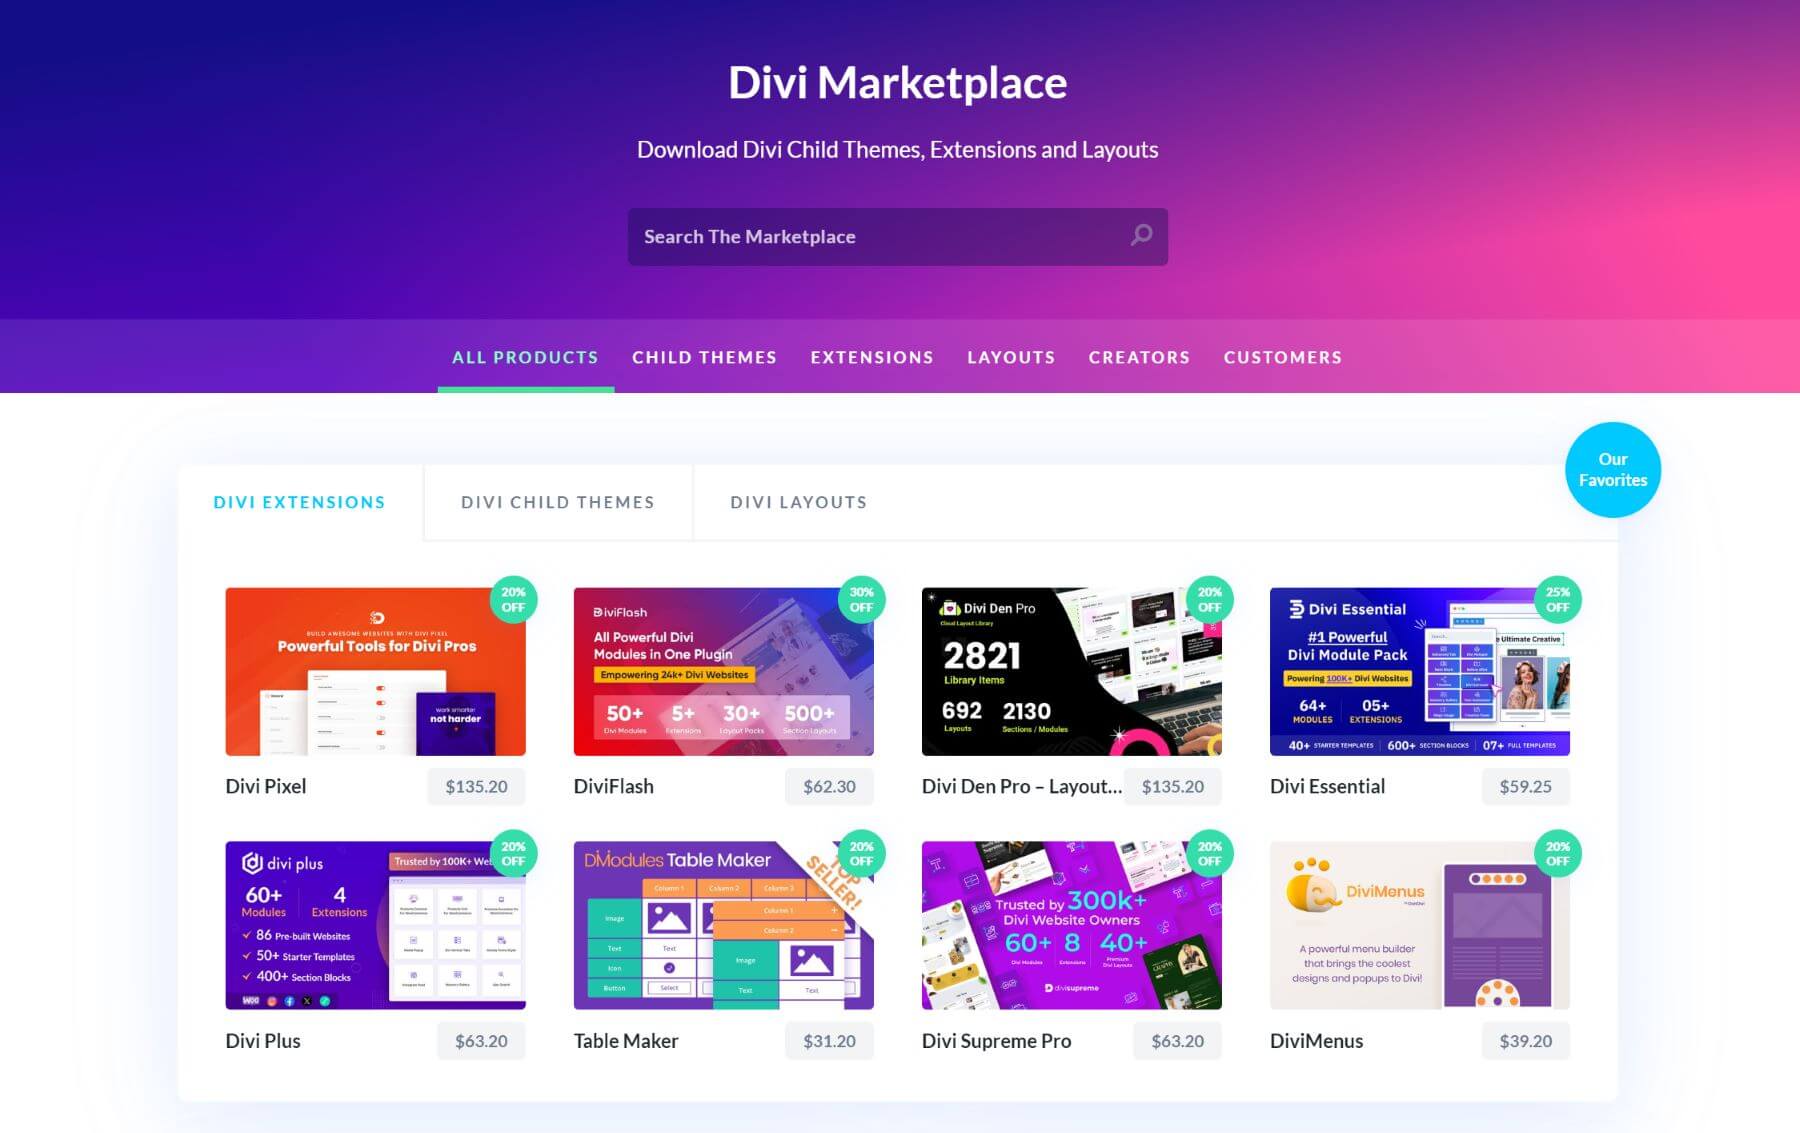
Divi offers a vibrant marketplace of plugins, extensions, and child themes specifically designed to enhance your Divi-powered eCommerce website. You can purchase these and integrate them into your website.
For example, Carousel for Divi is a popular extension display featuring best-selling or on-sale products in a visually appealing way. It’s perfect for driving attention to specific items and boosting sales. You can buy it for $3.19 from the marketplace. To test it out, you can review its screenshots and live demos.
Essential WordPress Plugins
Every WordPress site can greatly benefit from certain essential plugins. Here are a few examples of highly recommended plugins that you can use with WordPress:
- SEO Plugins (like Rank Math)
- Backup Plugins (like UpdraftPlus)
- Image Optimization Plugin (like EWWW Image Optimizer)
- Speed Optimization Plugins (like WP Rocket)
- Security Plugins (like Solid Security or Sucuri)
- Social Media Plugins
- Marketing Plugins
Get Started Today
Launching a successful eCommerce site requires more than just functionality; it’s about creating a seamless, engaging experience for your customers. Divi empowers you to craft a visually captivating, user-friendly store that reflects your brand’s identity while delivering top-tier performance. By integrating smart plugins and leveraging the powerful customization options within Divi, your site becomes more than just a storefront.
Want to build your first eCommerce website? Get started with Divi and boost your eCommerce business. You can explore our curated table of plugins and tools that may prove valuable for your eCommerce website.
| Products Mentioned | Starting Price | Description | ||
|---|---|---|---|---|
| 1 | Siteground | $2.99 per month | Hosting Provider and Domain Registrar | Visit |
| 2 | Divi | $89 per year | Theme and Page Builder | Visit |
| 3 | Rank Math | $78.96 per year | SEO Plugin | Visit |
| 4 | Bloom | $89 per year (Available with an Elegant Themes membership) | Email Optin Plugin | Visit |
| 5 | Monarch | $89 per year | Social Media Plugin | Visit |
| 6 | Carousel for Divi | $3.19 | Divi Extension | Visit |



Leave A Reply