YouTube is the second largest search engine in the world. Second only to Google, which technically owns YouTube. So if you’re optimizing your content for Google and not specifically for YouTube, you’re missing out on an incredibly important and lucrative audience. You should take advantage of this even if your primary content isn’t video (or even audio). These tools can help you open your business up to the wide world of YouTube marketing.
- 1 Phase 1: Creating Your Channel
- 2 Phase 2: Setting Up Your Channel
- 3 Setting Your YouTube Channel URL
- 4 Phase 3: Planning and Creating Content
- 5 Phase 4: Optimizing YouTube SEO and Other Ranking Factors
- 6 Phase 5: Some Simple YouTube Marketing Strategies
- 7 Phase 6: Understanding Analytics and Metrics
- 8 Conclusion
Phase 1: Creating Your Channel
The most basic thing that you need to begin growing your business using YouTube is simple: a YouTube account. Well, technically a Google account. So if you have a Gmail account already, just log into it and head over to YouTube. If not, you can sign up for an account here.
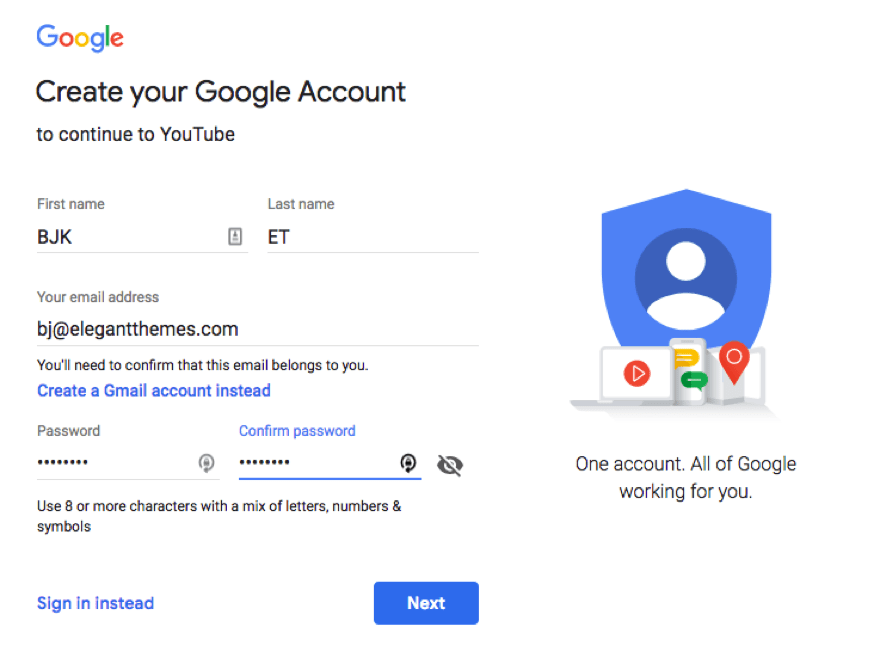
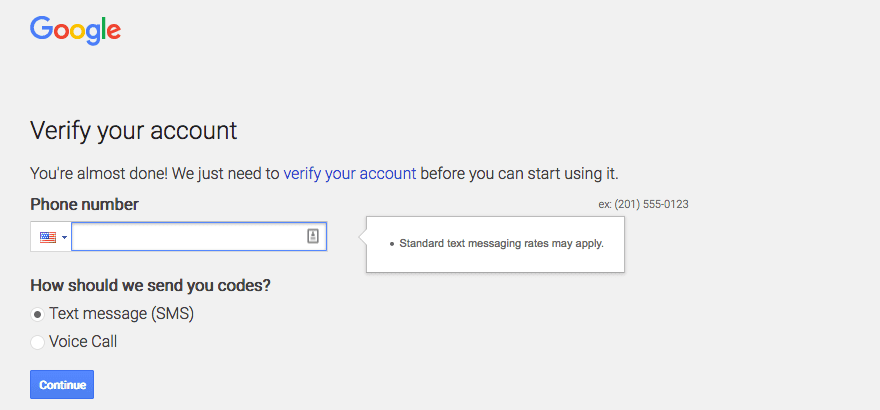
You have to verify that you’re a person. In doing so, you will be required to enter a phone number. It is optional as a contact method for the overall account, but Google will require a one-time SMS verification that you are a real human being.
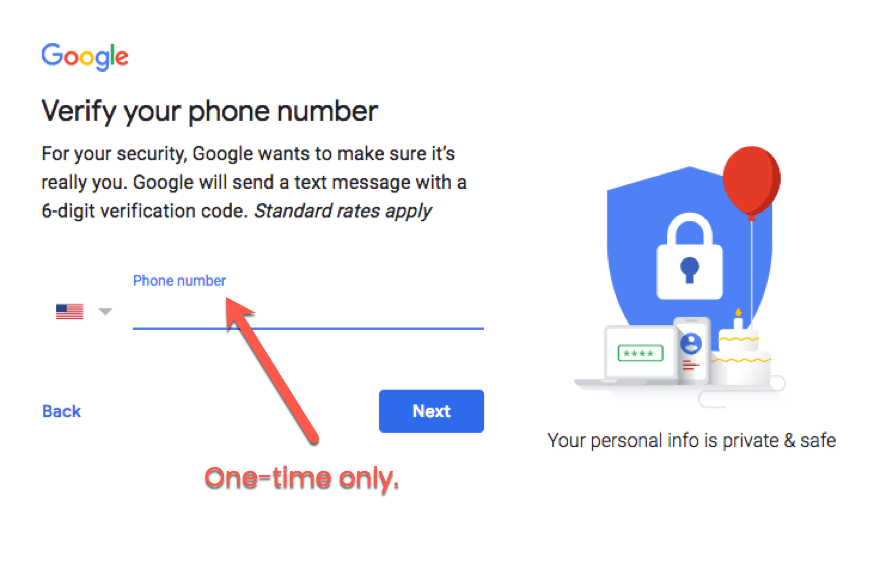
When you’re through all that and Google recognizes that you are a person who wants a YouTube account for real reasons and not spammy reasons, you will be taken to your home screen.
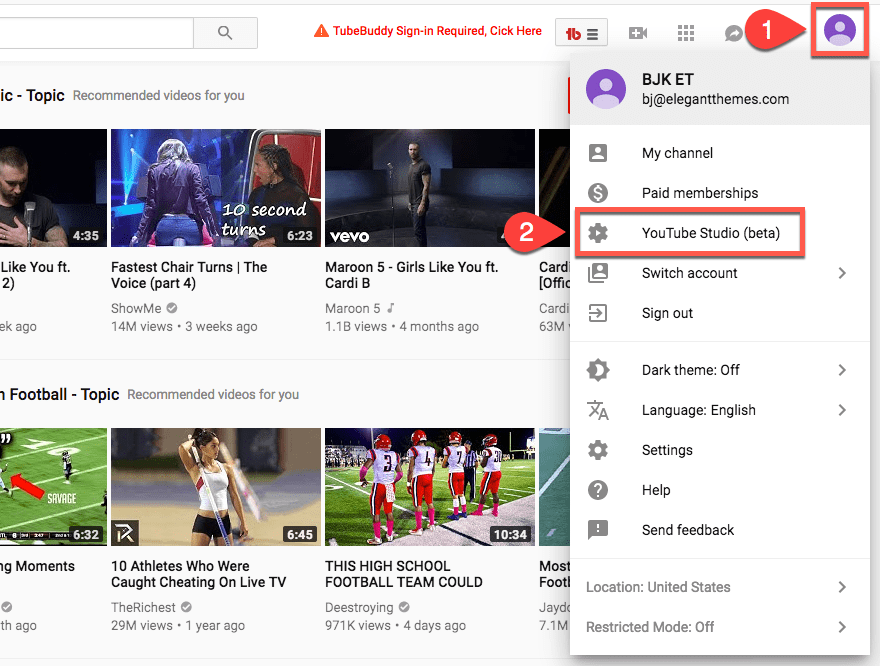
At this point, you can either watch some videos (which we all would do at this point, honestly. Oh, look 10 athletes who were caught cheating on live TV…) or you can click the circle icon of a person in the top-right corner of the screen to expand the menu. Find the YouTube Studio entry, and click on it. (I know it’s tempting to click on My Channel first, but don’t yet. We’ll get there in due time.) Here’s why:
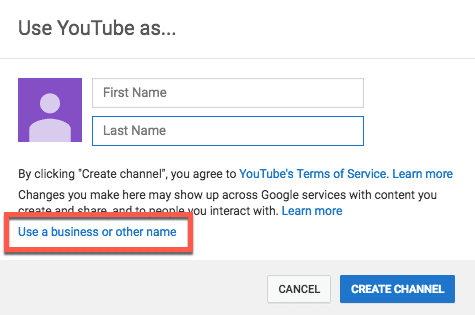
That’s right, you don’t even have a channel yet. You just have an account. This is the point at which you will name your channel. The messaging on YouTube’s end is not very clear, but by Use YouTube As… they actually mean Your Channel Name Will Be…
If you don’t want that channel to be named after you as a person, click on the Use a business or other name link underneath all the fine print to create a YouTube brand account. (Note that you can still do this even if you are signed in on your personal Gmail account.)
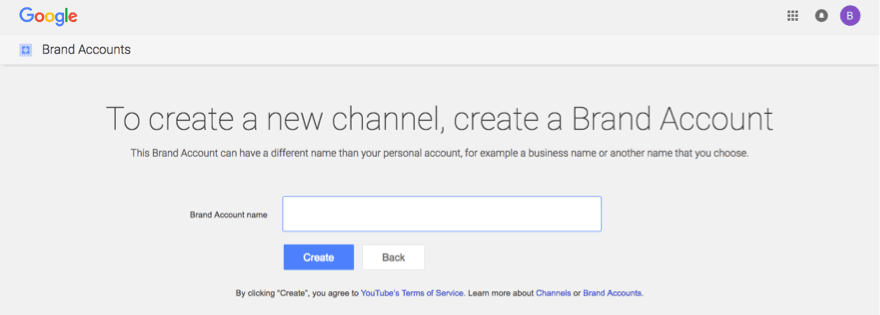
You have to re-verify your phone number with them. Also a one-time thing.
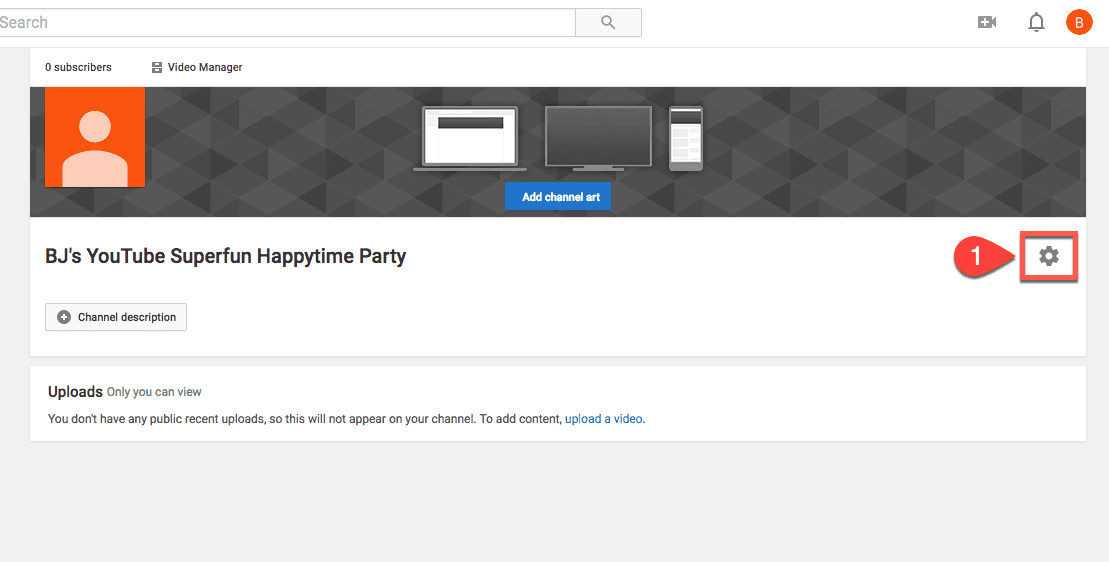
Once you’re done, you’re taken once again to your new channel page. Which is empty. So now you get to click on Customize Channel.

Phase 2: Setting Up Your Channel
The first thing you will see should be a familiar site. A blank channel template. As with most things that are new, make sure you hit the settings first. Click on the gear icon to the right.
A modal will pop up, and you will have 4 options. The first three are entirely up to your own preferences. You can hide or share your subscriptions, likes, and saved playlists. It’s the bottom option we care about. Enable the toggle to Customize the layout of your channel.
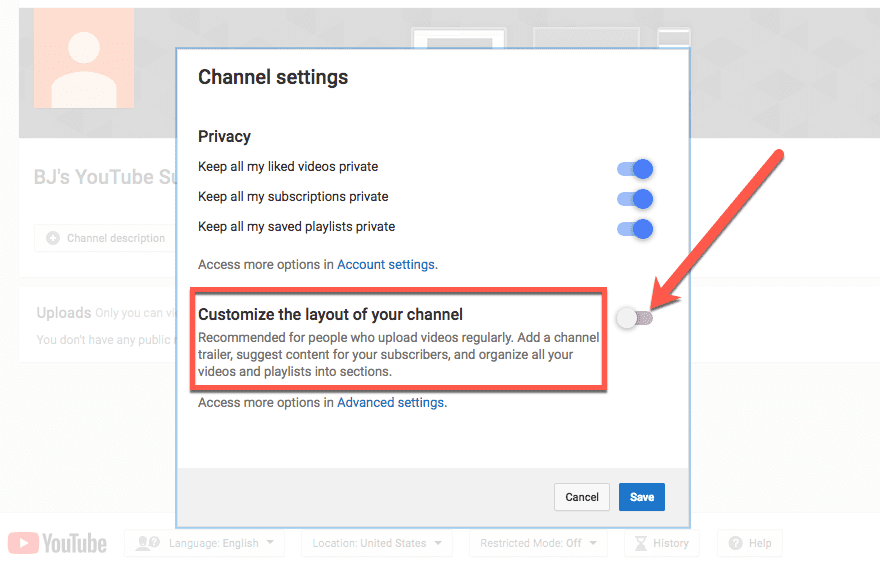
When you press save, your screen will refresh, and you will have many more options on your channel. Because you can now customize its layout. Makes sense, right? Next, you have three tasks that are imperative to the success of your YouTube marketing. You need a logo, YouTube channel art, and links.

Channel Links and Art
Editing links is the easy part. You click Edit Links and type the URLs in. But getting the channel art and profile image right is a slightly different monster because the image will show up slightly differently based on what client your viewers are using. What may look good on a tablet, may look absolutely terrible on a television. (Yes, many folks use TV to watch YouTube now, so that’s very important.)
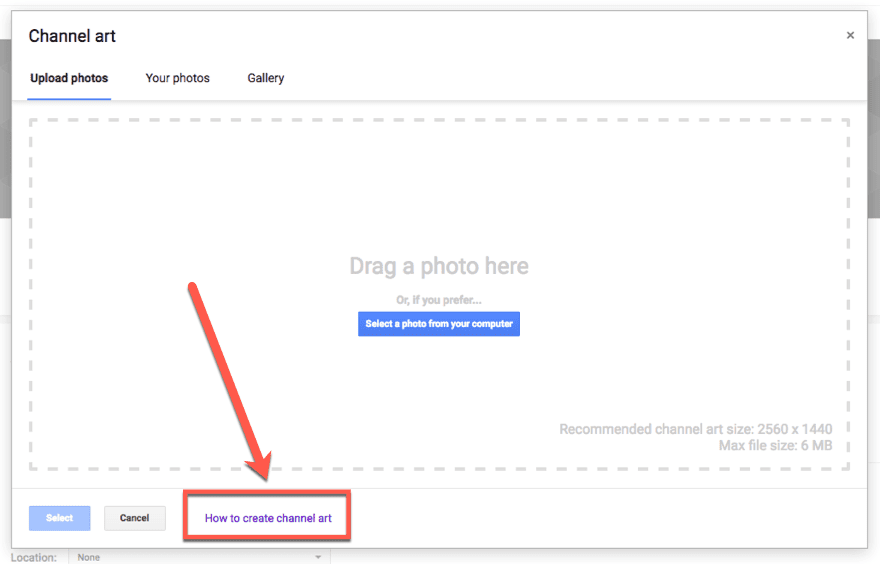
When you press the Add Channel Art button, you will see a standard upload modal. If you’re not sure exactly what YouTube channel art should be, click on the How to create channel art link at the bottom of the window. From there, you can browse the help section on the topic, which includes a graphic and dimension list.
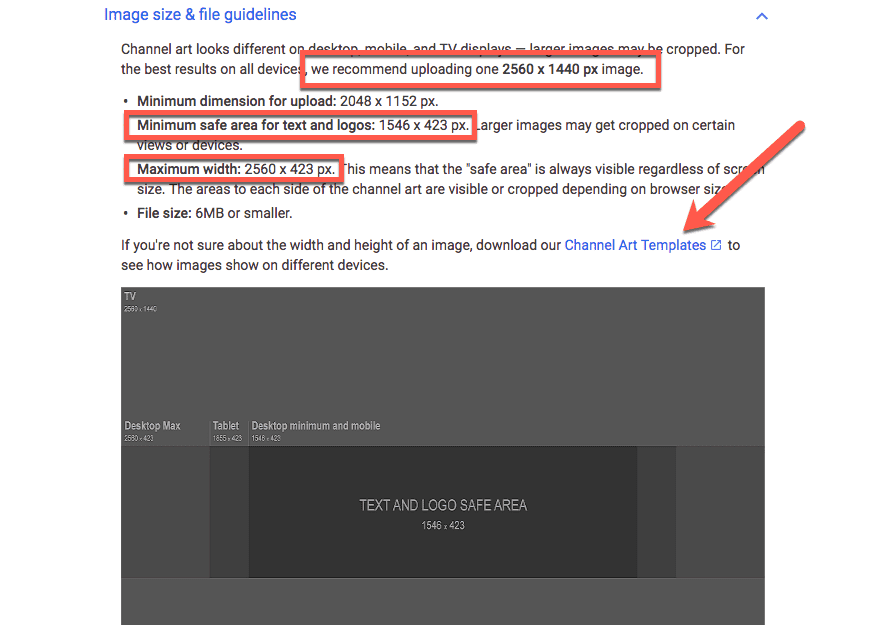
In summary, the YouTube channel art dimensions are:
- Maximum size: 2560 x 1440 px (6MB or smaller file size)
- Minimum safe area for logo and graphics: 1546 x 1423 px
- TV: 2560 x 1440 px
- Desktop: 2560 x 423 px
- Tablet: 1855 x 423 px
- Mobile: 1546 x 423 px
If you have difficulty keeping to these image dimensions, I highly suggest using their downloadable YouTube Channel Art templates. Or if you like, Canva has a great selection of templates you can customize for free. They’re great for folks without a lot of graphic design experience who want to put together a professional YouTube channel banner on the cheap.
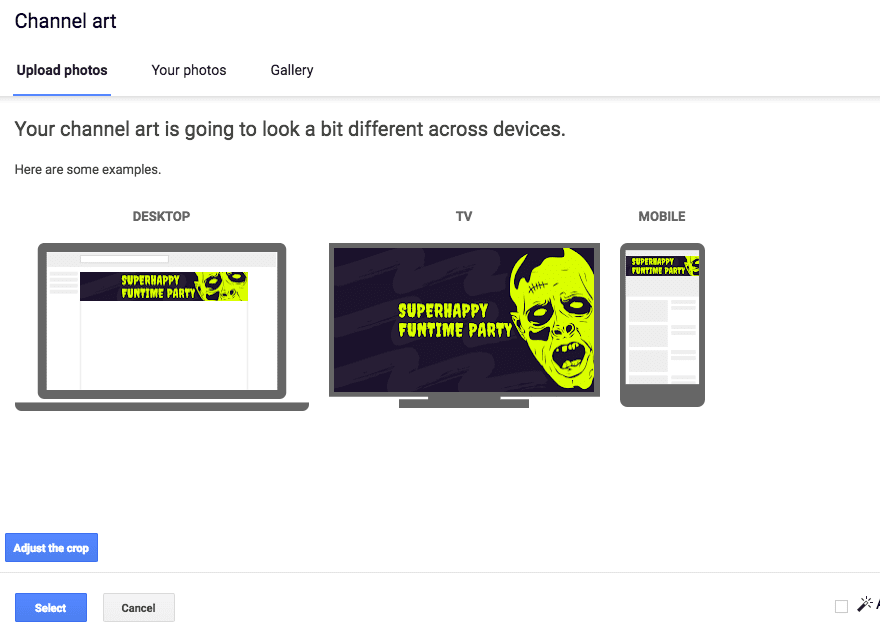
Just choose your art, verify it looks right, and add it to the channel.
YouTube Channel Icon
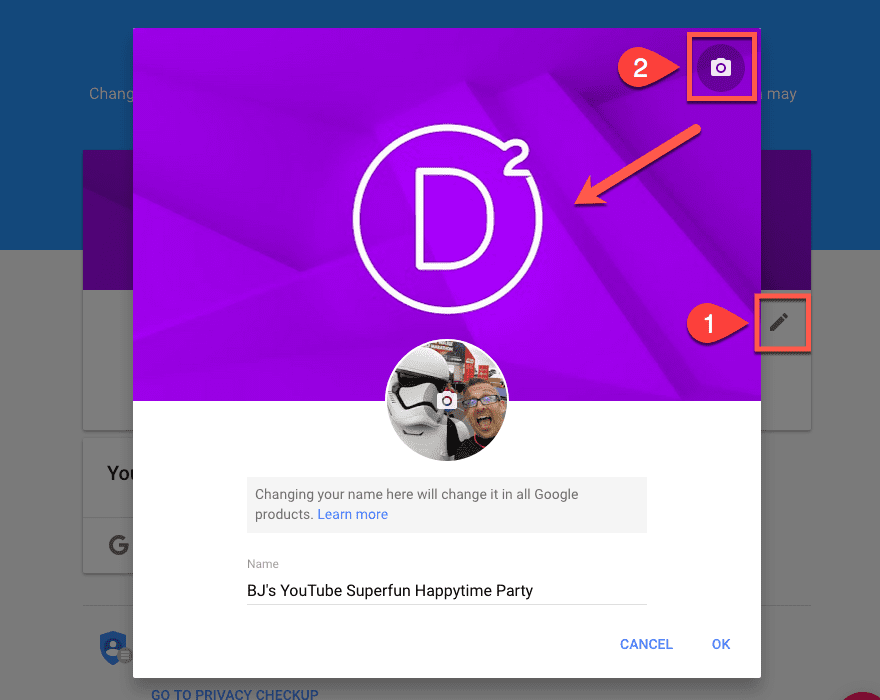
When you click the edit pencil for the square channel avatar (or as they call it, the channel icon), a modal will pop up if you’ve set up a brand account. (Which since you’re looking at YouTube marketing for your business, I will assume you did.)
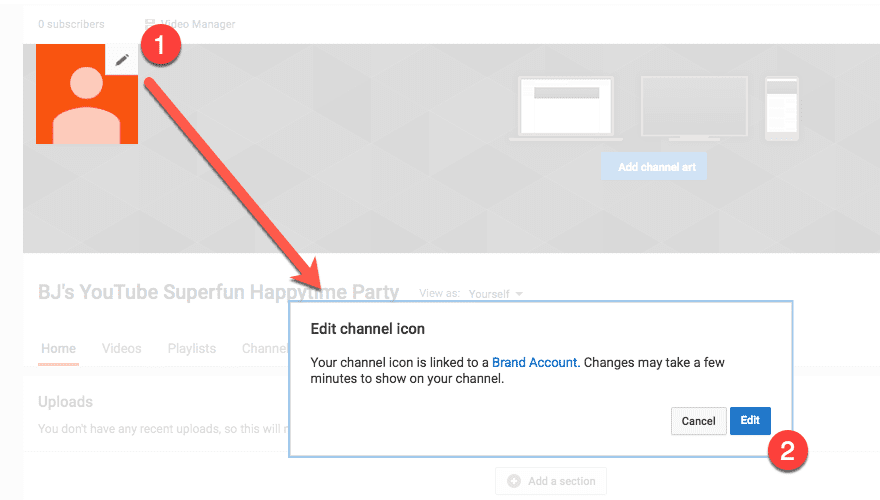
When you press Edit, the screen will change and take you to the brand management page. You upload an image from your computer here.
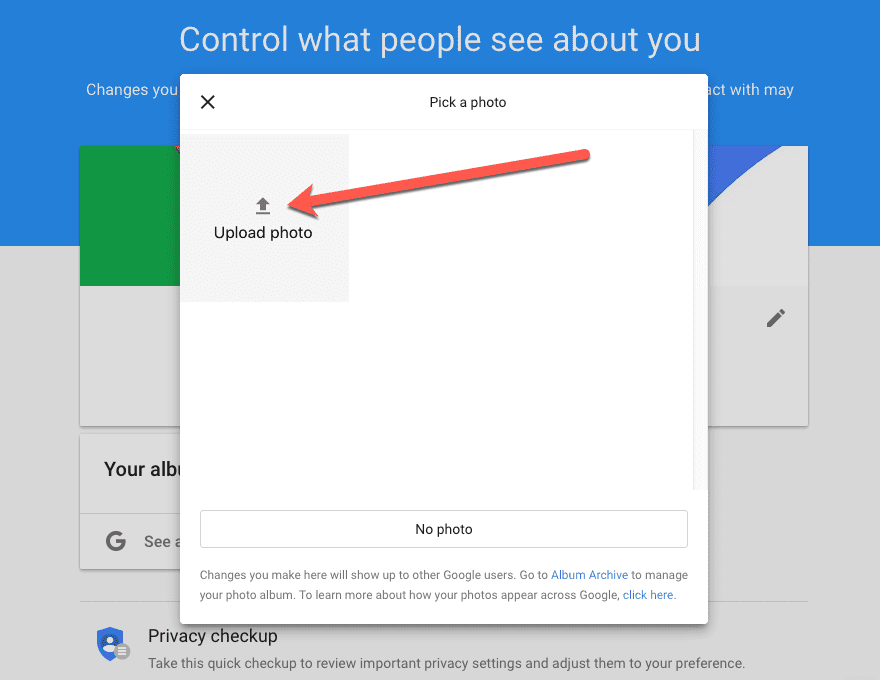
You will crop them to fit the square box. Remember, though, many of the YouTube icons show up as circles now, so the center of the square is most important. Additionally, you have the option of setting a cover banner here, too. This is not the YouTube Channel Art. It will only show up on your brand account page when people seek that out. It’s not imperative that you set this, but it can’t really hurt, either. It makes you look professional and prepared, so it’s best to do it. Feel free to double-up on your channel art here.
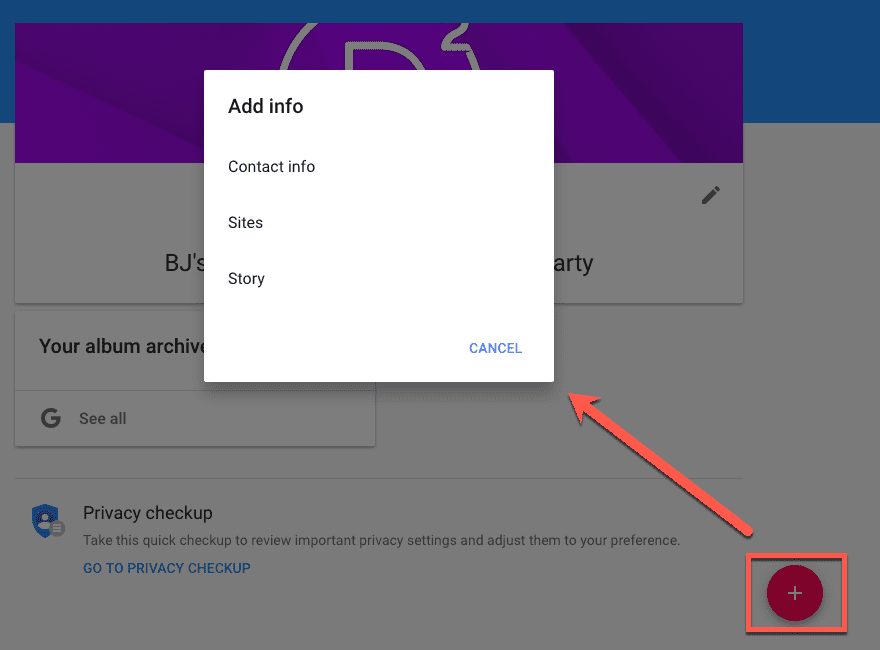
Additionally, you can add in contact info, sites, and a story for your business by pressing the red + at the bottom of the screen. But that won’t show up on your YouTube channel, either. Just this page. Again, it’s a good idea to fill out, but don’t stress over it not being here. This page gets some traffic, but not a lot.
After all that, you can close that window and go back to your channel customization.
Featured Channels
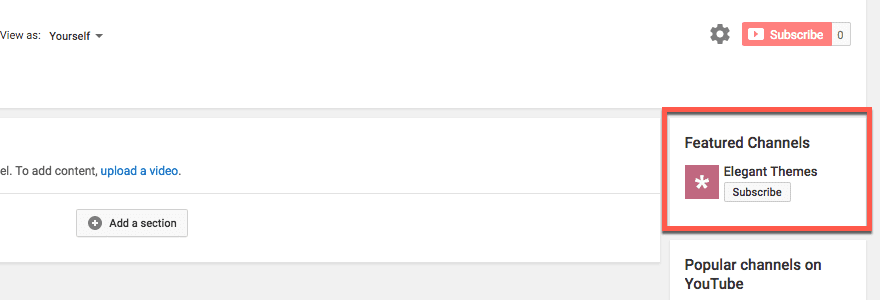
Back at your channel, you will see even more options to add customization. First, you can choose to add Featured Channels to your own page. This section is great if you want to highlight a sister page or a different department of your brand. Or even just something you think would be a benefit to your own viewers and customers. Click the Add Channels button.
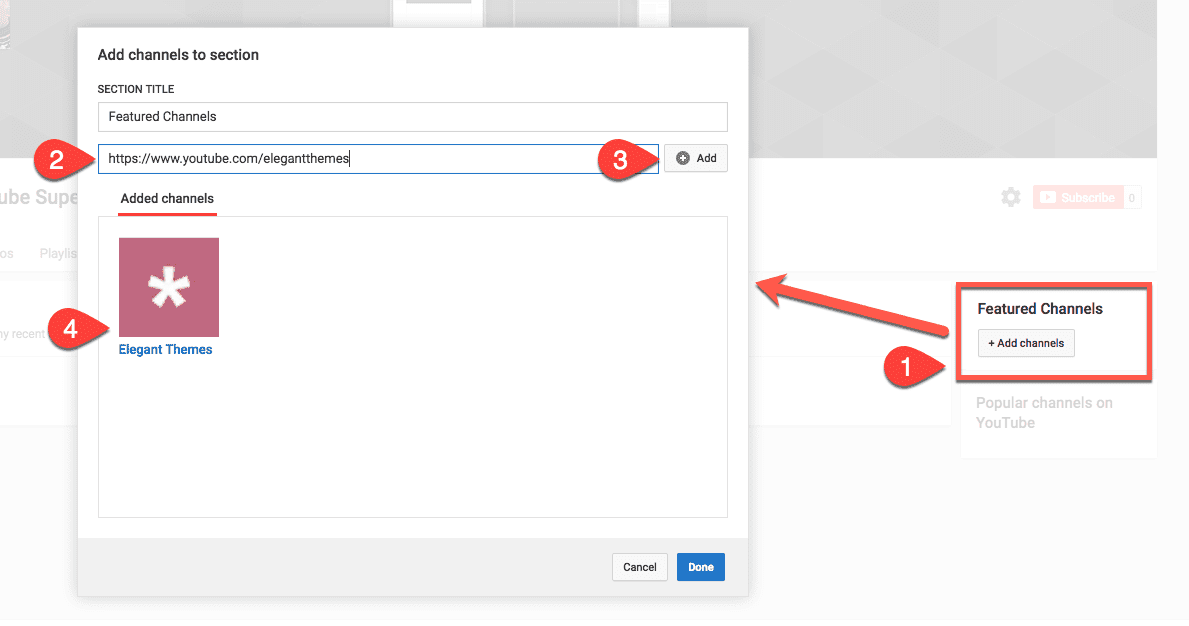
Then it’s just a quick URL drop and a press of the Add button, you have a featured channel (or channels) on your channel. If you don’t want that box on the page, you also have an option to remove it.
Adding Sections to Your YouTube Channel
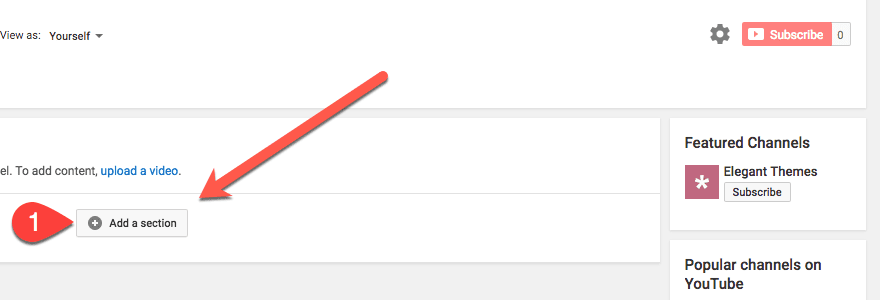
When you finish featuring other channels, the real building-out of your own channel is adding sections to the page itself. So press the Add a Section button.
At this point, you will get two dropdowns with each option that you have to include on your channel’s main page. You can have any number of these on your page, but it’s a good idea to limit them to a reasonable number. Otherwise, you risk overwhelming visitors. Once you get to over a dozen sections (because sometimes you have a lot of playlists and videos), it becomes a bit much.
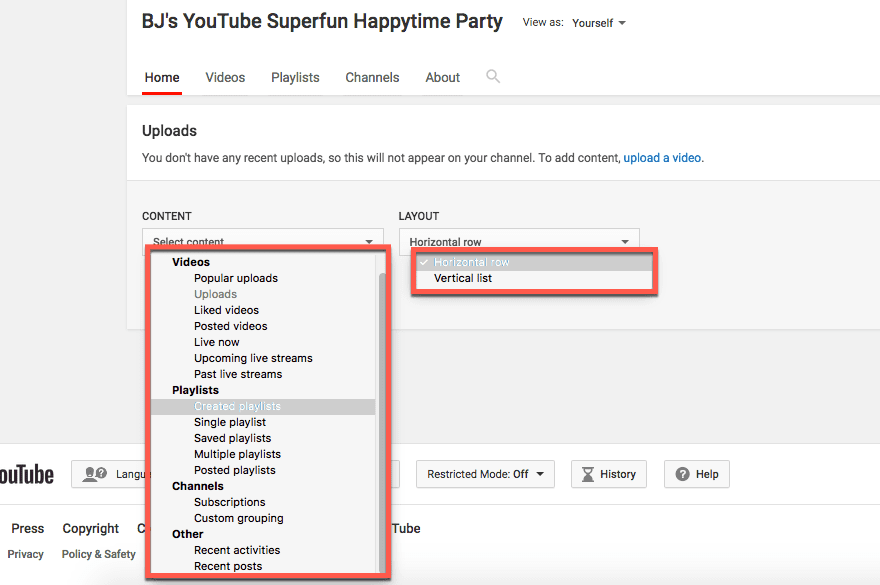
Your options for YouTube Channel sections include:
- Popular uploads
- Uploads
- Liked videos
- Posted videos
- Live now
- Upcoming live streams
- Past live streams
- Single playlist
- Saved playlists
- Multiple playlists
- Posted playlists
- Channel Subscriptions
- Custom channel groups
- Recent activities
- Recent posts
Any of these items may be displayed in either a horizontal row or vertical column on your site. You may need to try a few different alignments before landing on the one that converts the best for you and your business.
Adding Video
In terms of setting everything up, the last (and maybe most crucial) piece of the puzzle is actually uploading your videos. And once you have at least one video uploaded, you can then add a channel trailer.
While there are approximately one gazillion places where you can upload a video through your dashboard (they are seriously everywhere), the simplest at this point is under the Uploads section of your channel. Click the link labeled Upload a Video.
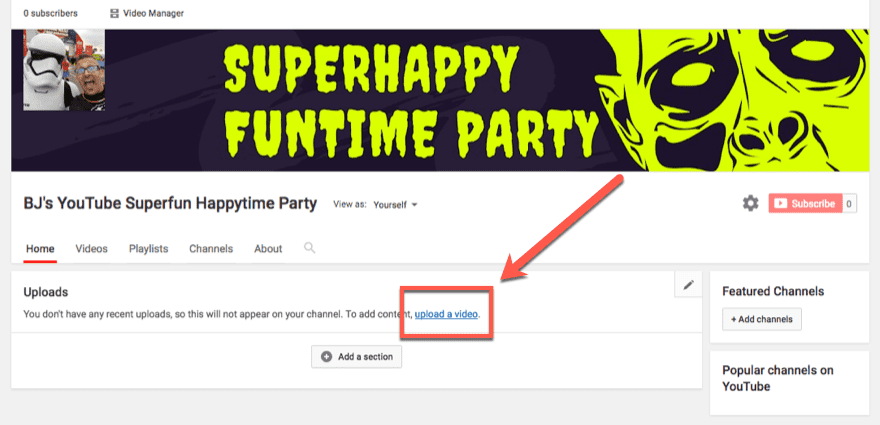
After you do this once, the link goes away, and you will find the easiest upload button in your YouTube Studio‘s menu bar.

After you select the file from your computer, you choose what its visibility is public, private, unlisted, and scheduled.
Public videos are self-explanatory. They’re open to the public and anyone can watch them. Private videos are only visible to you (and your team members if you have added any on a brand account). Unlisted videos are accessible only via direct link. Anyone with the link can view it, but it will not show up in searches or your videos. Scheduled is where you, well, schedule your video for later release.
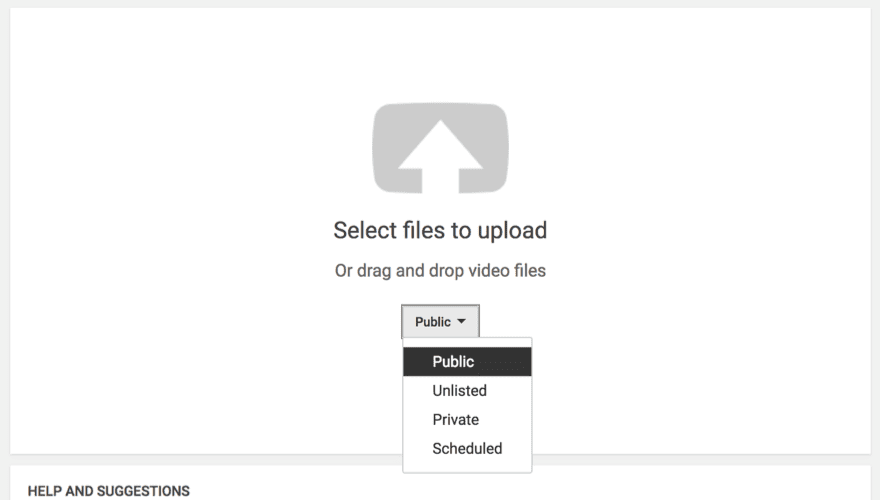
Once that’s done, you fill in all of your video information.
Instead of going too much into how utterly and completely important this information is to the success of the video, we are going to wait to cover that in all of the sections on YouTube marketing and SEO. Just know it’s important.
You can choose to publish it immediately or schedule a premiere so that your audience is alerted and can all join in and watch it together. Premieres are different than normally scheduled videos in that premiering a video is an event where all your subscribers are notified and given a special direct link to watch the video at the same time, almost like a live stream.
Either way, it will now show up on your channel and in your Studio dashboard.
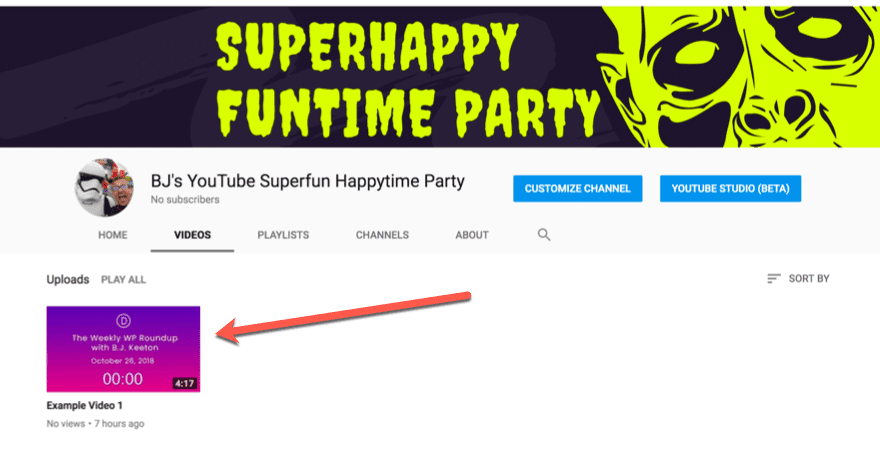
Adding a Channel Trailer
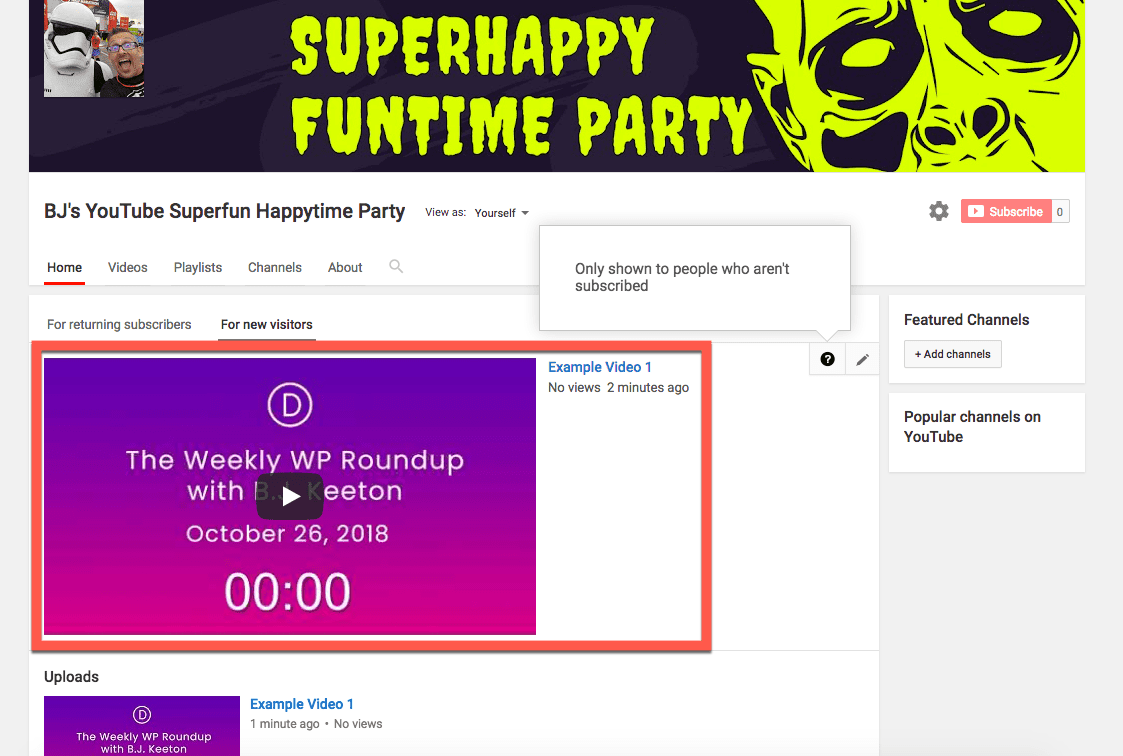
Now that you have a video uploaded, you have the option to set it as the channel trailer. That means that whenever a new or unsubscribed visitor comes to your channel, they get a video introduction of what your channel is about. Or a video you want to highlight.
Once again, you’re going to want to click on the Customize Channel button, and when you do, navigate to the Home tab. You should now see two tabs: For Returning Visitors and For New Visitors. You want to select For New Visitors, under which you see an empty section, directing you to add a channel trailer.
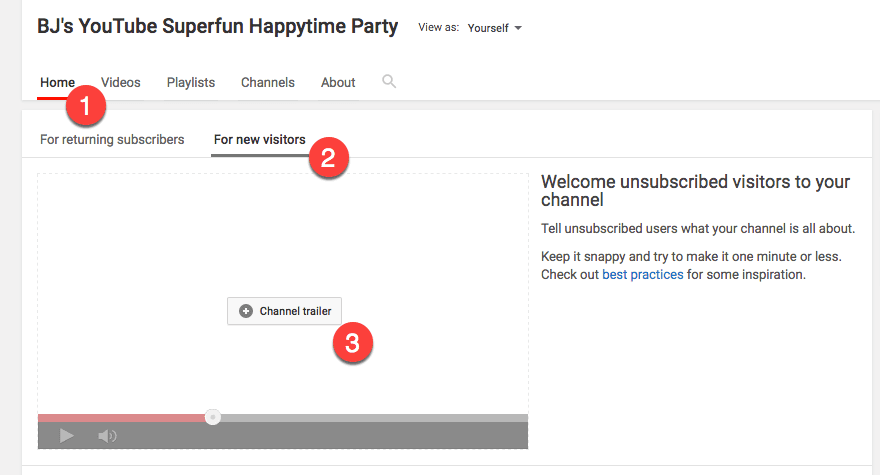
Click on the +Channel Trailer button to get the selection modal. You can either add a video by selecting it or add it by URL.
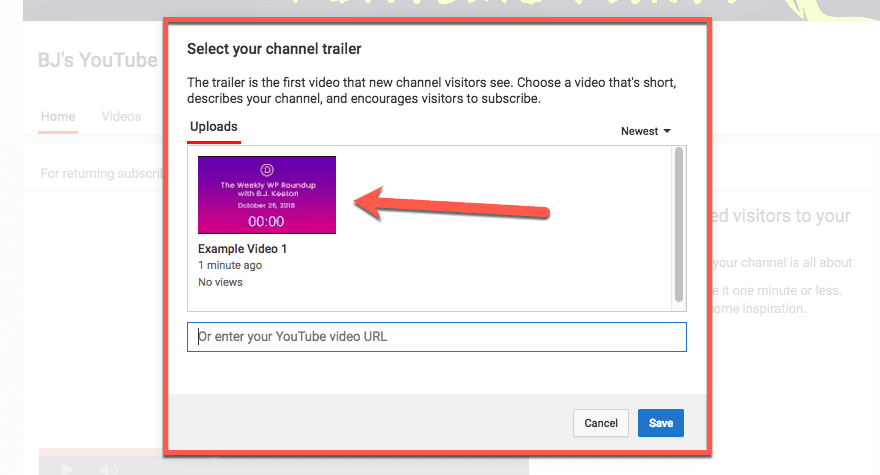
Press Save. You are now the proud owner of a YouTube channel with a trailer! Feel’s good, right?
Setting Your YouTube Channel URL
At this point, you’re almost ready to dig into the primary part of YouTube marketing. However, one thing that may be on your mind is how you can direct people there. How can you get the cool URL like https://www.youtube.com/elegantthemes instead of https://www.youtube.com/channel/UCFhQQikiX8fCDdSD5X2BX-Q? It’s actually pretty easy. But you can’t do it right now.
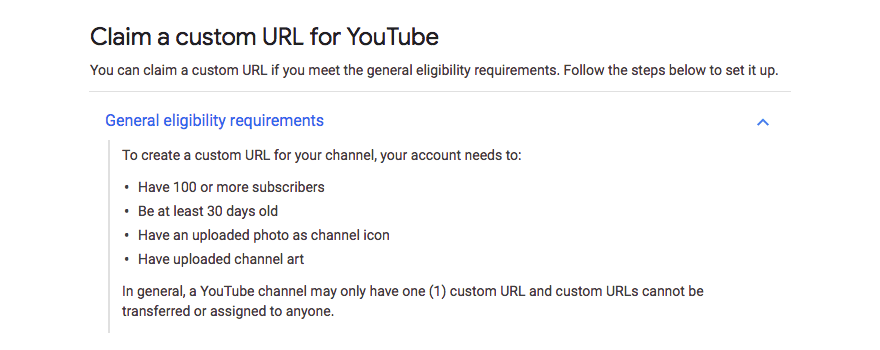
You can request a custom URL once your channel has reached 100 subscribers, is 30 days old, and has an icon and channel art. Also, note that you can get 1 custom URL ever. You cannot change your YouTube custom URL later.
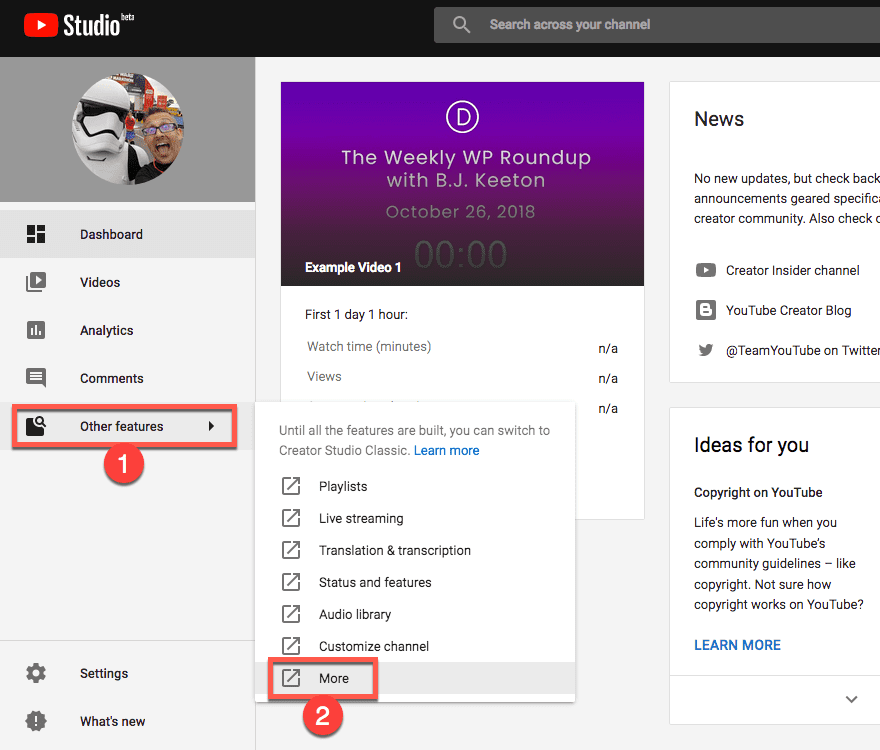
However, once you meet those requirements, you can choose your URL by going into your YouTube Studio dashboard and hovering over Other Features and clicking More.
You will be in a new dashboard here. Navigate to Channel and its submenu item: Status and Features. You will see a huge grid of boxes, some enabled, some not. One of these is for setting up your custom URL, and it will light up once you meet the requirements.
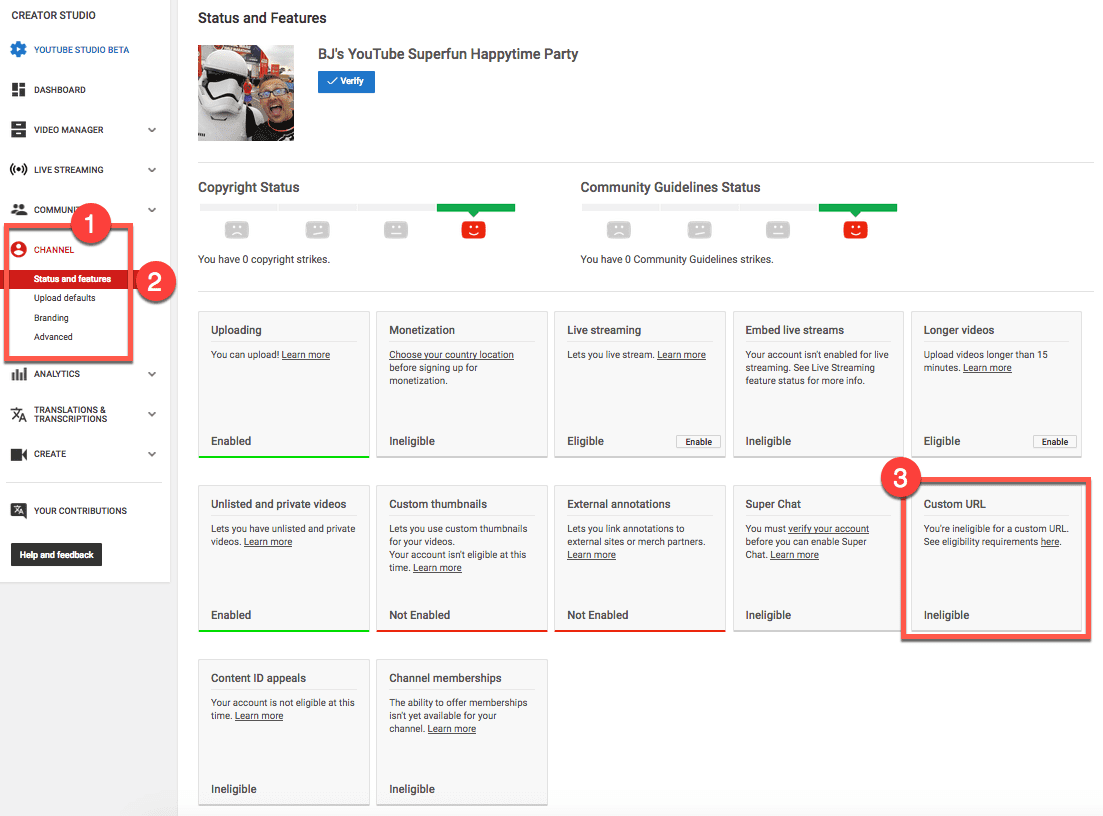
At that point, you can follow the steps to fill out your custom URL. Again, remember it can’t be changed, so choose wisely.
Inviting Your Team
And finally, it’s time to make sure your business is ready to leap into YouTube marketing face first. As with children, it takes a village to successfully raise a YouTube channel. Inviting folks to help manage the YouTube channel is a cinch, and you can always adjust permissions on the fly.
All you need to do is click on your profile icon in the upper-right corner of the screen. A drop-down menu will appear, and you will click the gear icon to go into YouTube settings. From there, make sure you’re in the Account tab and find the Add or Remove Managers link near the bottom.
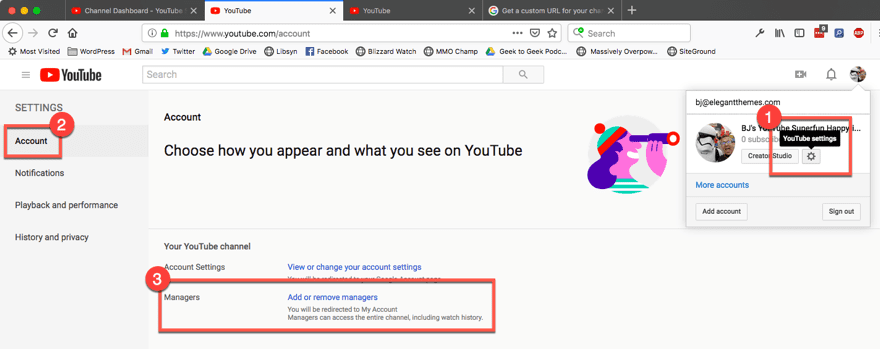
Click the link. On this page, you need to press the Manage Permissions button.
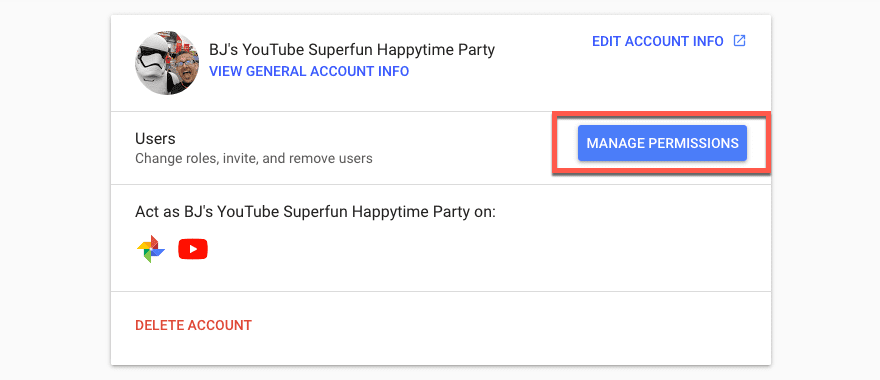
A modal will appear that lists all of your current managers. In that modal, you need to find the icon of a person with a + symbol in the upper-right corner. Pressing that button gives you the chance to choose your channel managers, as well as assign them roles. It will be these roles that define their permissions on the YouTube channel.
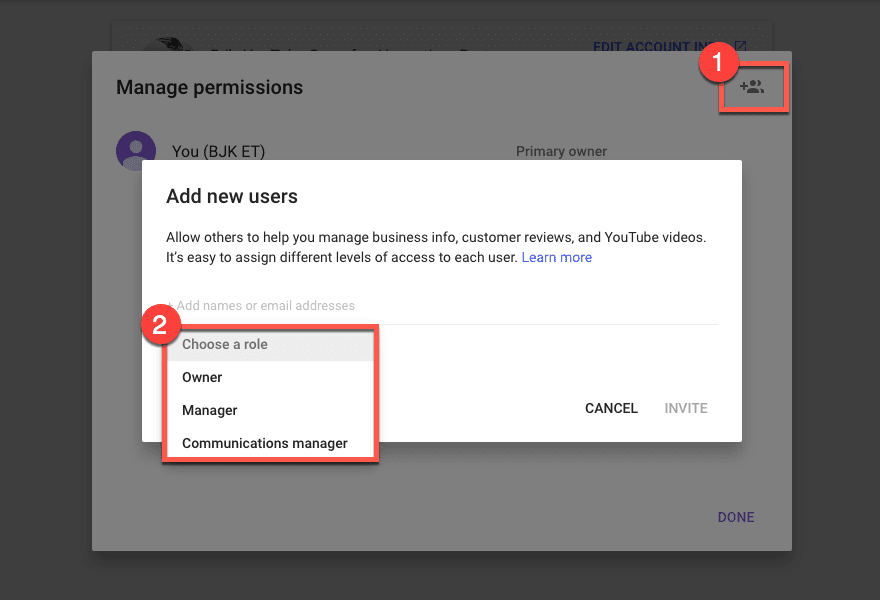
YouTube channels can have three types of users: Owner, Manager, and Communications Manager. Every account has to have at least one Owner (makes sense, right?), and anyone with this permission can do anything with the account. Managers can post and edit videos on YouTube, go live, and see analytics. They get some of the same options as Owners, but not down to the Brand Account level. Most likely, you’ll just add a lot of Managers as you grow.
And finally, you probably don’t want a Communications Manager on your YouTube marketing team because they can’t use YouTube. Kind of defeats the purpose.

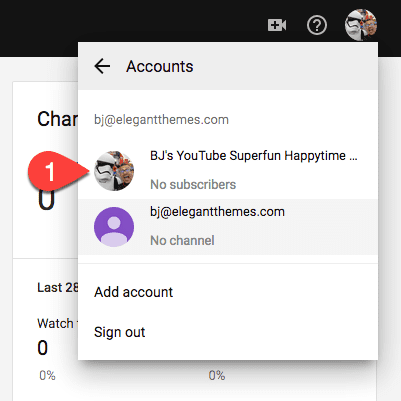
You can always come back here and add folks to the team whenever you want. As they get added as a Manager, they have the option of using the channel to log in and add the channel to services such as Restream.io and others. The channel will also show in their Switch Accounts tab under their profile.
And finally — finally! — you have reached the point where you are truly ready to dive into the nuts and bolts of YouTube marketing. So stand up, get a drink, make a sandwich, and come back refreshed so that we can work on your SEO strategy and so much more.
Phase 3: Planning and Creating Content
Step 1: Choosing a Video Format
Optimizing your YouTube channel marketing is central to one element alone: creating the right content. Every business will need a slightly different set of content to take advantage of the benefits YouTube can bring them. Some will need to do more live videos and audience interactions than others. Your business might thrive on informative videos, while another may do best with vlog-style content that highlights employees as individuals. We just need to figure out what kind of content you need to plan for.
Vlog
The first thing most people think of when they think of YouTube are the floating-head videos of people talking at a camera. For good reason, too: they can generate massively high engagement with your customer base. The appeal here is showing your staff as real people. These kinds of videos are generally informal, maybe with slightly lower production standards, but high on energy and fun and interaction. If part of your business ethos is storytelling, you should consider vlog content on your YouTube channel.
Pros: Inexpensive to produce, quick to film and edit, very personal, high engagement
Cons: Can appear unprofessional, hard to stand out, potentially short lifespan and relevance
Information/Educational
Some YouTube channels take the pure opposite approach to their content. Instead of making content based around them as a person (or maybe persona is the better term), these videos are centered on the topic itself. Maybe you want your viewers to learn about mantis shrimp so they will be interested in your exotic aquarium business, or you work for a non-profit and your mission is to create awareness about human trafficking and what is being done to stop it. Some may include a presenter who serves almost a teacher-like role, while other videos are documentary-style with a voiceover on top of your footage. Educational videos are oftentimes a high-level look at a topic, but not typically problem-solving.
Pros: Generally long-lasting, able to perform well over a long time period, invites sharing, can be edited into segments for marketing and advertising
Cons: Relatively expensive to produce, time-consuming to both record and edit, much research must be done, production quality matters a lot so you need good equipment
Tutorial/How-To
How-to videos are different from informational ones, actually. Instead of trying to educate an audience on a topic, you are trying to solve a specific problem. The Elegant Themes YouTube channel is generally a how-to channel. Instead of presenting information about WordPress and web design on a high level, we dig in on the steps you need to take to solve a single problem or to create a specific design, etc. When creating tutorial videos, you’re not looking for broad appeal or going viral, but you’re setting yourself up as an expert in a specific field, which then sets you above your competitors. Plus, how do I… and how can I… are some of the highest searched queries around. And since you are able to record a tutorial, you probably already have the resources you need to show the process. That lowers your cost significantly.
Pros: Incredibly high SEO potential, can be quick and easy to film and edit, generally inexpensive, easy to capitalize on trends and fads and new ideas, can be average production quality as long as the process is visible and understandable
Cons: Can become outdated as the products being featured are refined and updated, must be or find an expert in your subject area, must be able to break complex ideas down into their simplest form (this is very hard for some people) and explain them adequately
Review
Review videos are pretty straightforward. You find something that people want to know about (as a business, this should be something within your industry or niche), and you give a straightforward overview of its features and whether it works and is worth the money (or time or resources) versus the competition. It can be difficult to be impartial on these sometimes. For instance, if Elegant Themes did a review video of Elementor or Beaver Builder, it may be hard to stay neutral despite those products being very good options for users. So you should probably avoid those where you have an obvious bias. Regardless, these videos can be great sources of income depending on your business model. You can get sponsored posts, free items, as well as lucrative affiliate commissions from companies. Just remember to be honest in the reviews. Viewers can tell a sham review easily.
Pros: Can be a vlog-style video, lower cost (depending on product), quicker production time, simple to find products to review (just think of what you use and like)
Cons: Easy to be biased, people may claim your review is not legitimate when it is
Sneak Peeks/Trailers
If you regularly keep a schedule for releasing updates or new products, creating a sneak peek video may garner a lot more interest in it and engagement. Letting your customers and clients know what’s coming in the near future can generate tons of engagement, as well as gain much-needed feedback on the direction your business is headed. Many brands who regularly put out long-form content such as documentary videos or podcasts may get good results from producing a trailer for the upcoming videos. Marc Maron does this for all of his WTF podcast episodes.
Pros: Simple to compile with resources you already have, high engagement, generates excitement, viral possibilities, can gain important feedback from users and customers,
Cons: May be looked down on as redundant content, consumes resources and time that could be used on primary video content
Livestreaming
Everyone is livestreaming these days. The true benefit of livestreaming is being able to interact with your audience in real time. The content is important, too, but interaction is the real game changer. While you can livestream vlog content or even any of the other kinds of videos we’ve discussed at random, it’s always a good idea to have a general topic for your streams. Your brand might host different streams with different content on each one at different times during the week or month. For instance, on Mondays, you might do a lunchtime troubleshooting stream, while on Tuesdays and Fridays, you have product tutorials and walkthroughs. The single most important thing to remember about livestreaming, however, is that no matter what platform you choose to broadcast from (Facebook, YouTube, Twitch, Periscope, Instagram, Snapchat…whew…or something else entirely), you must keep a set schedule to build an audience.
Pros: easy and simple to get started (press “Go Live” in most apps), popular with many viewers, can be off-the-cuff or prepared and either will be acceptable, can give customers an inside look at your brand to see you as real people, most platforms let subscribers get notified the moment you go live which increases viewership
Cons: regular schedules can be hard to keep, takes time to actually build up an audience, not everyone is able to successfully field comments and questions off-the-cuff, streaming technology can be somewhat unreliable, stable and fast internet is absolutely required for quality content
Embed your Livestream on your site with a livestreaming plugin.
Interviews
One of the most popular video formats on YouTube, interviews can be a double whammy. Your audience gets the content, and the interviewee will (hopefully) share with theirs as well. You and your channel get exposed to more potential customers, and you did nothing extra to gain it. This can be especially beneficial when you interview someone with a larger audience than you have. The biggest issues with interviews are that, well, not everyone is a great interviewer (I am not, personally) and finding/scheduling guests that work can be a hassle. When done right, interview videos are one of the best forms of YouTube marketing because they’re beneficial to pretty much everyone.
Pros: Potential for huge audience engagement with guest’s following, can go viral easily, easy to snip down into bite-sized elements for social sharing, constantly changing content so channel doesn’t get stale and redundant, networking opportunities abound
Cons: Scheduling, finding a constant stream of guests, scheduling working with awkward or hard-to-interview guests, being a good interviewer, scheduling, going with the flow and following a conversation instead of sticking to a pre-defined question list, and did we mention scheduling?
Critiques
And worth a quick mention are critique videos. They’re similar to review videos, but they’re taking user-submitted content (or popular content within your niche or industry) and offering a rundown of what works and what doesn’t. Website critiques are a popular category within this particular genre, and the videos tend to offer advice and commentary based on the creator’s expertise. Sometimes these go over well, and sometimes they don’t pick up traction. You have to walk a fine line with critique videos your audience members send in of their own stuff because most of us have paper-thin skin and even though we think we can take criticism, we can’t. You don’t want to lose customers, so tread carefully. That said, you can make a lot of fans by offering “free advice” that can turn into revenue in the long run for your business.
Pros: “Free” marketing of your skills, user-submitted content, little to no prep work involved, great livestreaming content,
Cons: Drama
Step 2: Planning Your Video
Now that you know what kinds of videos you will be making, you need to figure out what all you need to actually create it. What exactly you have to do will depend on a lot of factors that are specific to you and your circumstances, but let’s go through some broad generalizations about video production.
Script or Outline Your Video
It really doesn’t matter if your video is a vlog or an interview or a docuseries on the joys of remote work, you need to have a plan. For some videos, that means writing out a whole script. You will need to include scene transitions, voiceover, dialogue, and what footage to use where. If you do interviews, have a basic question list (but don’t feel bad about going away from them to keep the conversation organic). Even vlogs and livestreams go better if you’ve jotted down a quick outline of what points you absolutely need to hit on during the recording.
Choose Where and What You’ll Be Filming for B-Roll Footage
You will most likely be shooting the primarily in one spot. Since you’re looking at YouTube marketing for a business, you probably won’t be traveling a great deal to scout locations that need to change every episode. However, you will need B-roll footage (those scenes of landscapes, people walking, a walkthrough of an office, etc.) to complement your primary video. And you need to figure out where you’ll get that stuff. It doesn’t have to be fancy, but it should be something that’s not distracting that you can intersperse between main points in your video. If you talk about software, you may be able to demo that software as a screencast or show someone using it while the host speaks over it, for instance.
Secure Media Assets
You’re going to need music, sound effects, and potentially graphic art for your videos. You may need a catchy intro or a jingle that plays as an outro. Whatever it is that your video needs, this is the point at which you figure that out. There’s nothing worse than getting caught in Final Cut and realize that you don’t have a score for the video and have to spend time finding something that should have already been taken care of. Remember to license or create whatever assets you use in your videos because YouTube is _strict_ about copyright. You can lose everything you worked for if you get flagged for a violation, and if it turns out you didn’t have rights to something…you’re banned.
Step 3: Recording Your Video
Actually recording your video is probably the most important part of the whole process. After all, without a video, you’re not going to be doing much YouTube marketing, right? So let me point you in the direction of Wistia. Wistia is a video hosting and production company that has some of the best tutorials and guides about video production on the internet.
That said, you will need to know a few things in terms of recording your video, and if you’re just getting started, you really can’t go wrong by following the Wistia guides. So instead of rehashing the information here, check out these guides and then come back to move into Phase 4.
- Use good, professional recording equipment. Sure, an iPhone can work to begin with, but you’ll eventually want to upgrade.
- Know how to use the equipment you’re using to record.
- You will need proper lighting for your video, and that doesn’t mean an open window or a floor lamp. (More lighting resources here.)
- Choose a background that’s appropriate. This can change the whole tone of your video.
- Properly account for the sound in your video. It is just as important an element as the visual side.
- How you act on camera matters.
- So does how you look. And how you dress.
- Know how to edit the raw footage into your final video.
Once you’ve perfected all that (no problem, right?), just go through the steps above and post your video. Now, finally, you can dig into the big money topic you’ve been waiting for: YouTube SEO.
Phase 4: Optimizing YouTube SEO and Other Ranking Factors
YouTube is the second biggest search engine in the world. That makes sense because it’s owned by Google, and they share all the searchy goodness between brands. Because of that, however, you can take some of the tactics that you apply to traditional SEO and get results on YouTube. There are also some specific YouTube tactics that you can apply to your videos that will cause your videos to skyrocket in their position in searches.
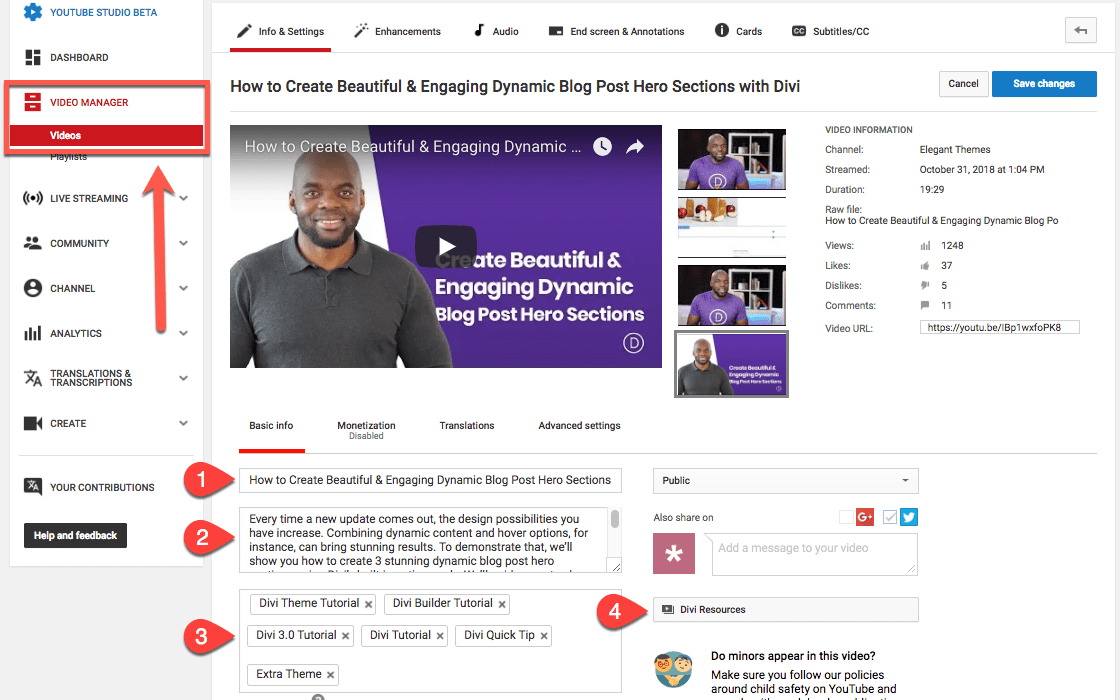
1. Titles Matter
This should come as no surprise. The title of your video may be the most important aspect of getting people to watch it. The hard part with titling a video is balancing keyword optimization, coherence, relevance, and grabbing the viewer’s attention in the first place.
Some folks do this with click-baity titles such as You’ll never believe how much money I’ve made with Divi and its new dynamic content feature! Obviously these work, but they’re also frowned upon by most people. You probably won’t make many lasting fans this way.
Titles such as the one above are what you should aim for. How to Create Beautiful & Engaging Dynamic Blog Post Hero Sections with Divi succeeds on a number of levels:
- it tells the viewer what topic the video covers
- views immediately know what problem the video solves (remember what I said earlier about tutorial videos)
- the video title consists of both short-tail and long-tail keywords: hero sections, blog post hero sections, dynamic blog post, hero sections with Divi, how to create hero sections with Divi (and so on)
- contains attention-grabbing descriptors like beautiful and engaging
By incorporating these elements into your title, you will not only do well with the algorithms but with viewers as well. It can take some practice to get them right (Mak is a genius when it comes to them, so that’s why I used his video as an example), but when you do, it pays off.
2. Write a Detailed Description
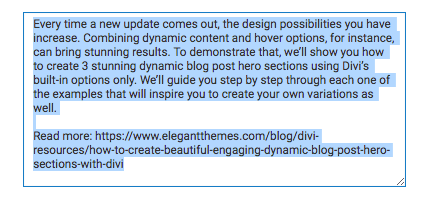
You don’t want your video description to be a blog post, but you do want it to fully encapsulate what the video itself is about. Write it in a style that mimics how you worked with the title, including keywords, what the video’s purpose is, as well as making sure to include any relevant links to resources your viewers may want. Companion blog posts, mentioned software, even your social handles and website links so that folks can easily find their way to you elsewhere.
Just like a blog post, keeping your tags short, succinct, and relevant are imperative to your content’s success. You don’t want to overdo it. Don’t cram as many tags as you can, but the YouTube search algorithms take your tags into consideration as keywords when categorizing your videos and including them in results and recommendations for users.
It is absolutely in your best interest to include tags, even a couple, on every video you make. Just be sure to keep them relevant to the content of the video itself (not so much the channel, but this particular video) and try to re-use as many as you can across your videos to get some cross-pollination and search dominance.
4. Playlists
Did you know that playlists come up in searches, too? If not, you do now. By including your videos in well-titled playlists, you can get extra eyes on them. People may be looking for a related topic, but instead, come across an entire series you’ve done of interrelated videos.
In the example above, Mak has included this one in the Divi Resources playlist. That way, anyone who searches for that term (or a video that is also on the playlist) may see this video as well.
The best part about playlists is that you can set up an auto-add rule so that you don’t ever have to worry about it again. And they’re really easy to set up. First, from your Creator Studio, go into Videos – Playlists in the left toolbar. Find the playlist you want to create the rule for and click on the Edit button.

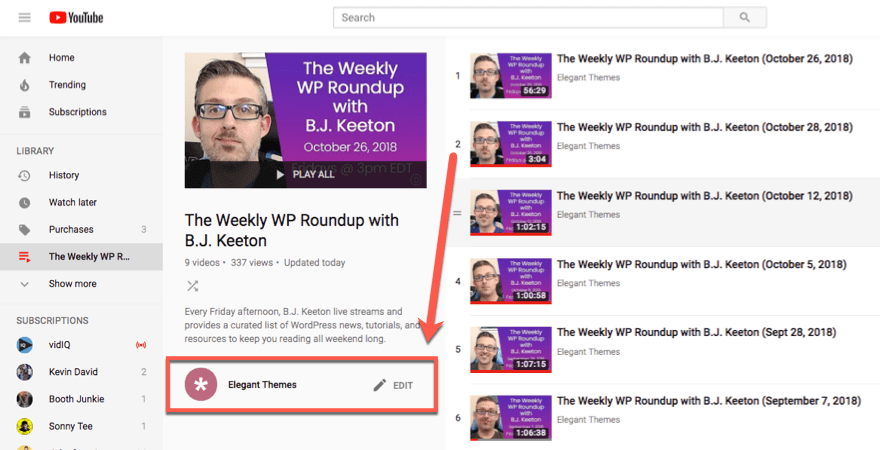
Inside the edit screen, you will see your channel name and another Edit button. Click that one, too.
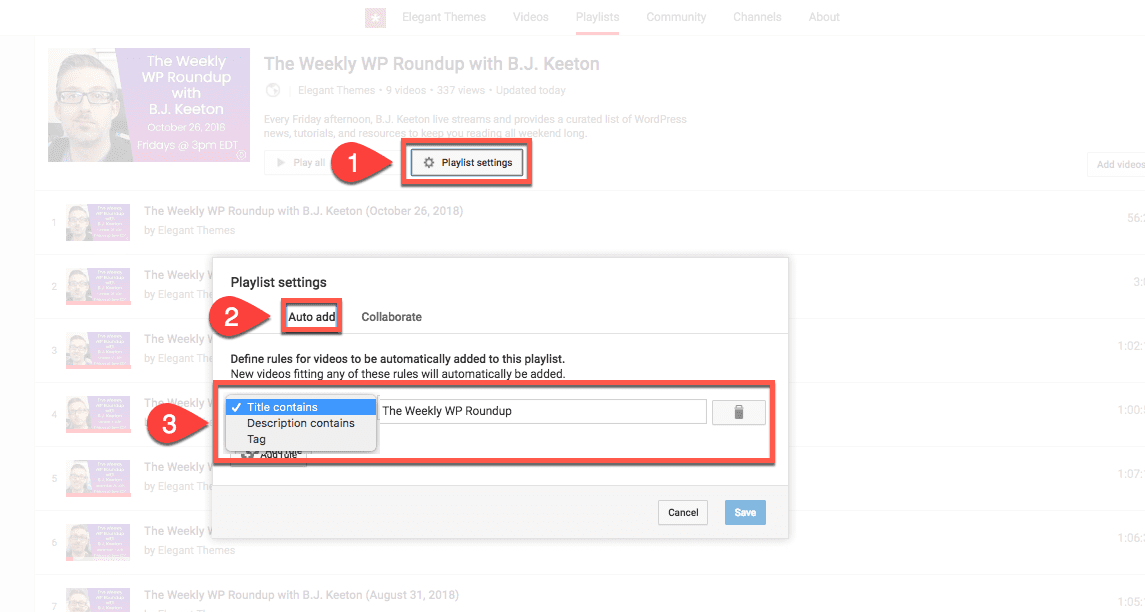
This screen will present you with a list of all the videos currently in this playlist. It may be empty. That’s okay. Click on the Playlist Settings button. A modal will appear, and you will click the Auto Add tab. Inside this tab, you can choose if you want to add a rule to automatically add videos that have certain words in the title, certain words in the description, or have been tagged something specific. I personally suggest and use the title because my livestream has the same title every week, and it is automatically added without me having to edit the video to add a tag. Same goes for the description. Regardless of your method, just fill in the info and click Save. Then you’re good to go.
5. End Screen, Cards, and Thumbnails
These three elements are as much about ranking and getting views as keywords, and while they do get counted into the YouTube algorithms, much of their utility is with viewers themselves. YouTube end screens, cards, and thumbnails are about clickthrough more than anything else. You’re putting stuff in your video to grab the viewer’s attention and make them want to click on it.
The Thumbnail
The thumbnail is the most important. Every single video on YouTube has a thumbnail. It is the single frame that shows up in search results. YouTube itself automatically generates 3 thumbnails from the video, but you don’t want to use those. You want to add a custom one that you put together in Photoshop (or an alternative). You can see the difference in appeal in the image below between auto-generated and custom thumbnails.
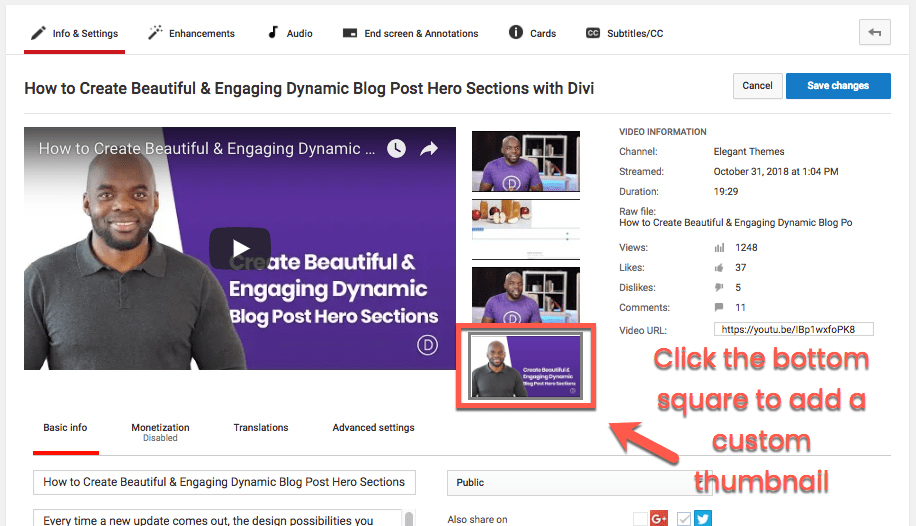
If your YouTube account is still running the creator studio, then you will click the box under the 3 automatically generated ones to upload your custom. If you are using the newer YouTube Studio, then you will see a gigantic box for you to upload your custom thumbnail under the thumbnail tab inside every video.
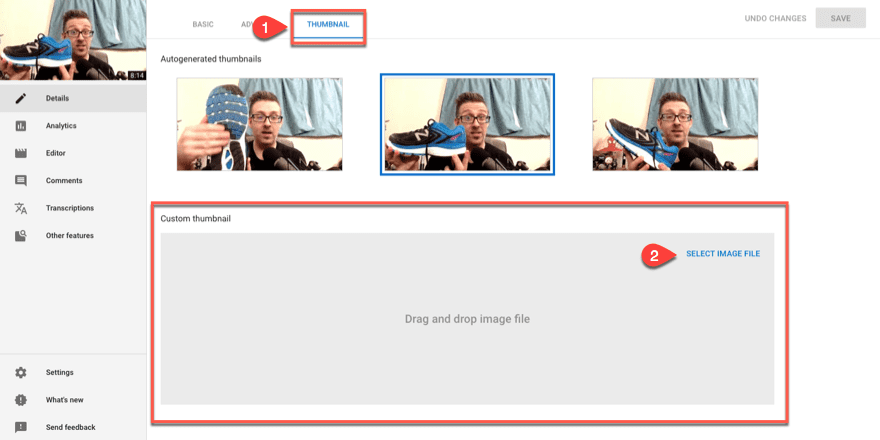
End Screen
Whenever a video approaches its closing, you’ve probably seen various things pop up on your screen. Subscribe buttons, links, thumbnails for other videos…stuff like that. Those are all customizable within your dashboard and are incredibly easy to set up.
Go into the video you want to edit and head to the End Screen & Annotations tab and click on the big, blue Add Element button. You can then choose which kind of element you want to show for the final 20 seconds of your video. You can add a video or playlist, a subscribe button, a link to a different channel, or a link to a website.
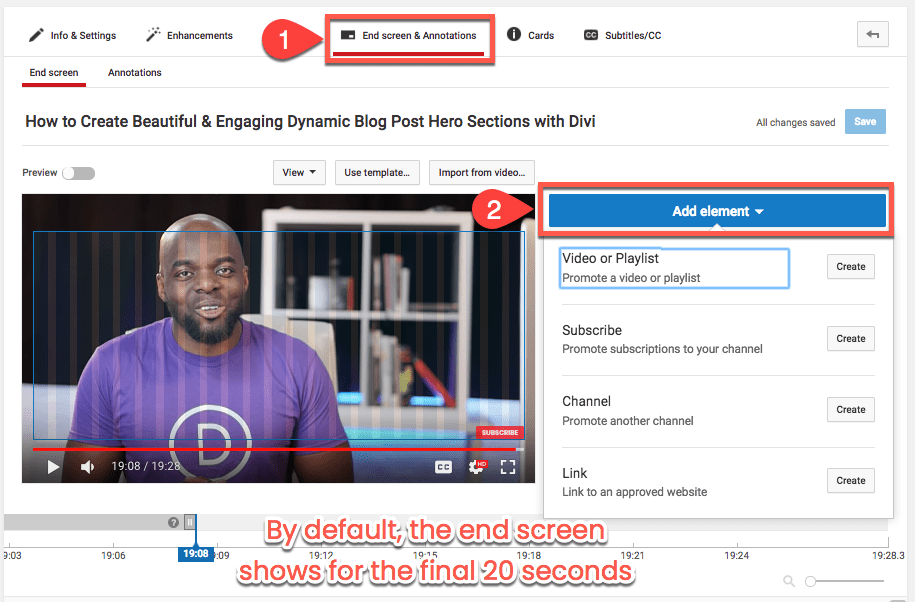
Whatever you select (in this, we’ll use Subscribe), the element will show up in the blue box on top of the video preview. You can then drag it around to position it wherever you like. When satisfied, you can save it, and the end screen element will begin showing immediately.
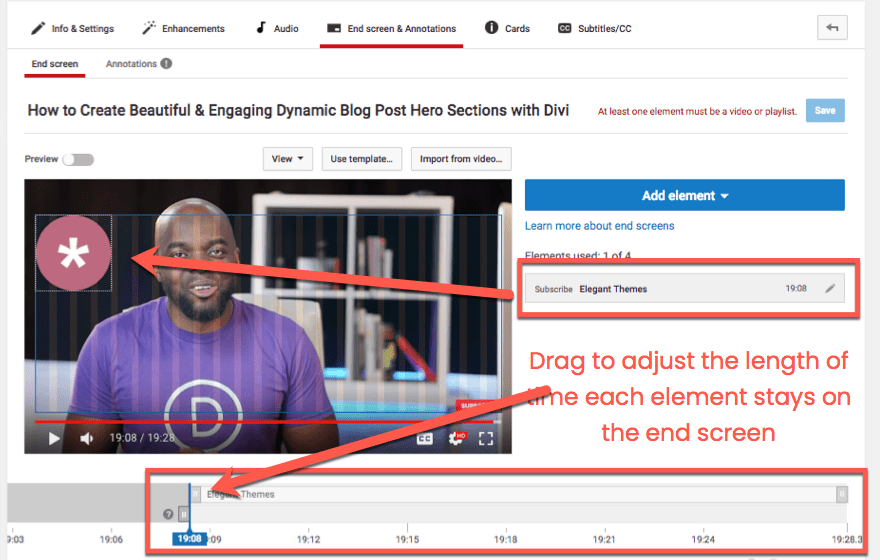
Also keep in mind that you can use the sliders under the video preview to adjust how long each element stays on-screen, as well as the overall duration of the end screen itself. That is limited to 20 seconds maximum. So forget about keeping these as a full-video overlay the entire time.
Cards
YouTube has phased out the old feature called Annotations in favor of a much more versatile system of Cards. You can find these under the Cards tab inside the video editor. Cards are like temporary alerts that pop up over the video at specific timestamps that you choose. Just like the end screen, you can press the Add Card button to see the types of cards you can display to your viewers.
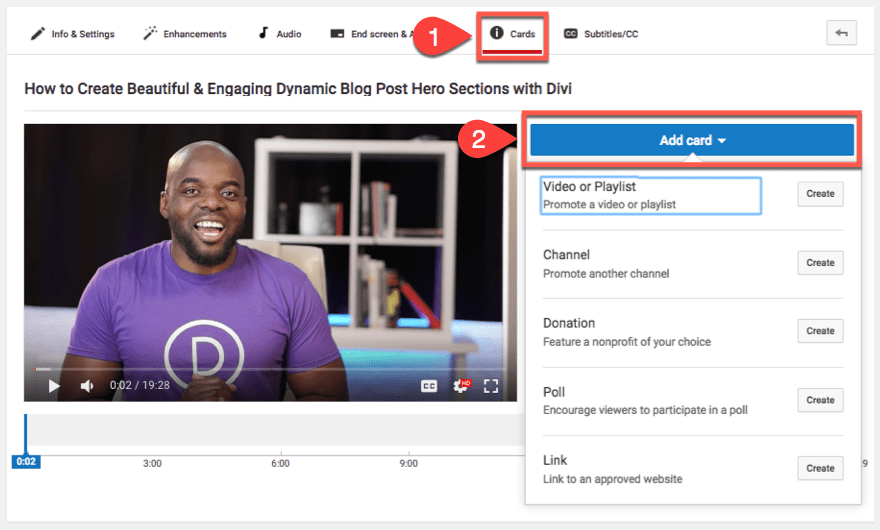
Let’s say that you want to promote another video you’ve created. It’s related to this one, and your viewers will gain a lot from seeing it, too. You can click the Create button next to Video or Playlist. Next, choose a video or playlist from the modal that pops up. Remember to customize the text on the card if you want.
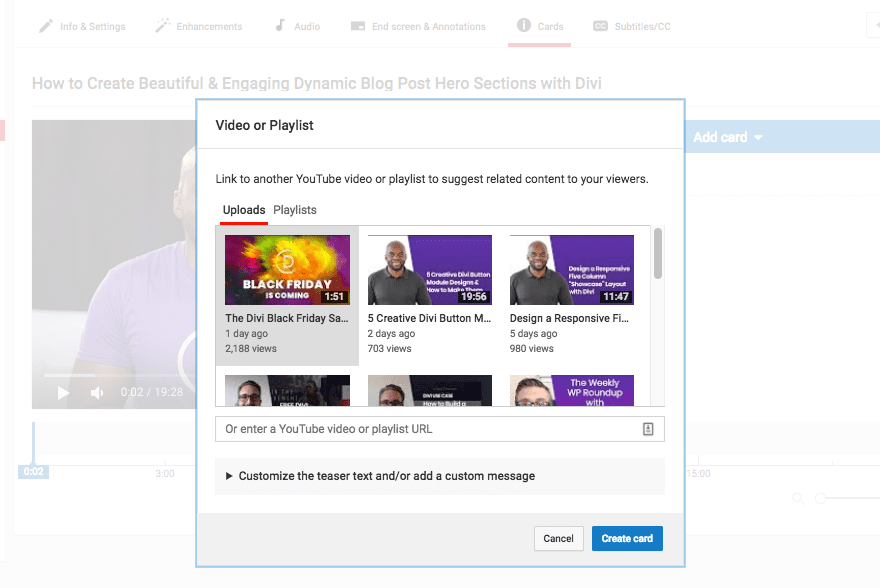
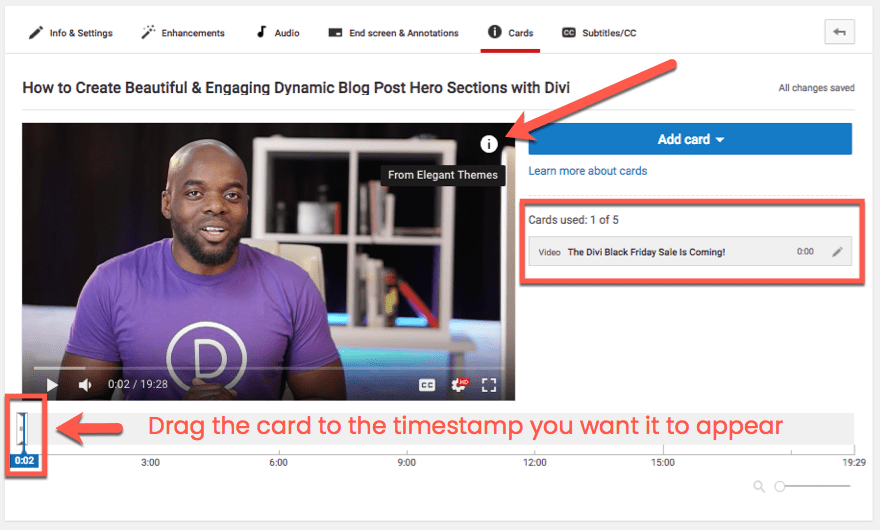
When you click Create Card, a round icon appears in the upper-right corner of the video preview. Under the video, you can drag the card to any position along the timeline you want. Each card is 5 seconds long.
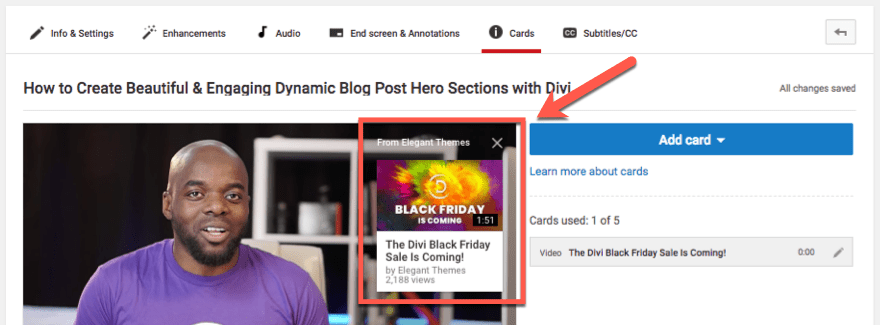
Your viewers will be able to click it to expand into the full card. This works on mobile and desktop.
It will take some time to find out what works for you and your audience. As you get more used to the platform, going through and adding end screens and cards, optimizing tags and keywords, and everything else this section has covered will come as second nature to you. I won’t lie to you — it can be intimidating at first. It feels like a lot. And it kind of is. But if you get the process down and learn where things are and how YouTube is set up, it becomes just another workflow like creating a blog or writing a Facebook post.
Phase 5: Some Simple YouTube Marketing Strategies
When starting out (or even continuing with) YouTube marketing, you have a lot of options outside of on-platform SEO and in-video cards. In many ways, promoting your videos and YouTube channel to an existing audience can be worked into your daily habits. When I say that, I don’t even mean your daily workflow, but your daily personal habits. If you’re a consumer of YouTube content or on social media a lot, you don’t even have to go far out of your way to integrate promotion and marketing.
Comment as Your Channel, Not Yourself
Even if you’re setting up a brand channel to start your YouTube marketing strategy, you likely have a personal YouTube account, too. You know, the one where you subscribe to a dozen cute cat and dog channels, some pimple popping videos, and whatever else you spend your free time watching. You probably also have this one under your own name.
But whenever you decide to comment on a video, do so with your brand account instead of your personal one. Unless you’re being that YouTuber, the comment will be civil and on-topic. So having your brand account linked to it will garner clickthroughs and reputation gain that may not transfer from your personal account.
Just keep these comments as professional as possible, and if you’re going to troll someone, then do it under your personal account. (Or your troll account if you have one. But please don’t have one.)
You share stuff on Twitter. Your followers love what you share on Facebook. Self-promotion is okay and expected — if you do it right. Social media for brands should provide value to your followers, so as you work toward presenting them ideas and content from reputable sources in your industry, share your own videos. Make requests for followers and subscriptions. Do livestreams and promote the scheduled time for a while beforehand.
Just don’t inundate them with it. As I said, self-promotion is expected. It happens. But it shouldn’t be all you do. Of course your stuff provides value to your followers, but it also can lose that value if that’s all they ever see from you. Asking for subscriptions every day is annoying. It becomes noise they tune out. Sharing the same videos over and over again gets them scrolled past. Fast. But if you keep the content fresh and relevant as you’re sharing whatever else you share (on branded or personal social media), you’ll get a lot more interaction and engagement because it’s fresh, relevant, and personal.
Email (and Blog Posts)
You have an email list. Because of course you do. But when you’re sending that email, make the video more than just a simple link. Make it an image link that has a play button over it, and you will get many, many more clicks.
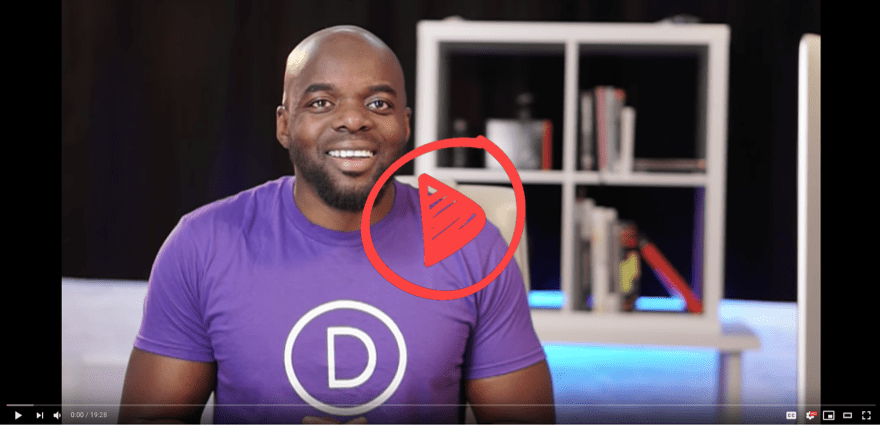
It will look like an embedded video in the email (and most email clients don’t allow for that, still), so with an image link, you get the same action, but a redirection to the channel itself.
And it’s easy to make an image like this. All you have to do is take a screenshot of the video itself and superimpose the play button it using pretty much any screen capture program. I used Snagit to do the example above, and it took less than a minute to do. With the stamp tool and the fill tool (to make the button red instead of black).
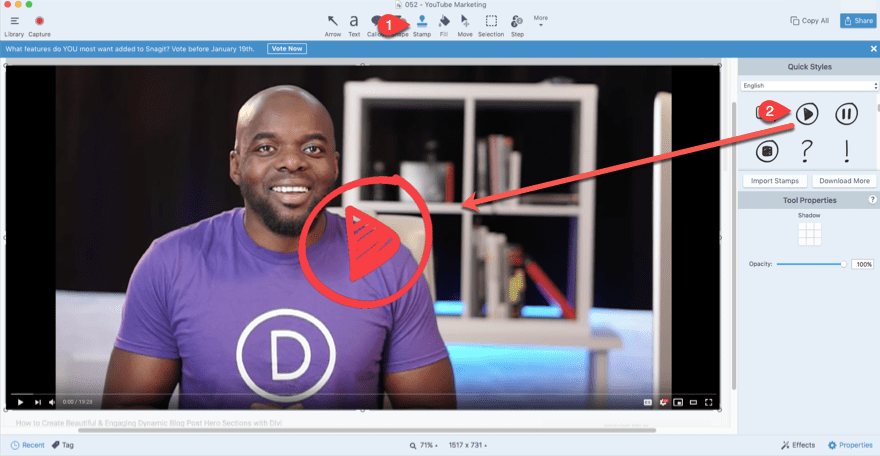
Additionally, you can use this same technique to promote the video on your website, too, by writing a blog post about its release. But here’s the thing: you don’t want to embed it on your blog, either. Why not? Because people can’t subscribe and click the notification bell on embedded videos. If you follow the same thumbnail strategy, you can garner more subs and views over the long term.
Work with Other YouTubers (or Podcasters)
Another great way of marketing these YouTube videos is working with other folks on the platform. Cross-pollination is a fantastic way of gaining more viewers, and working with other YouTubers is pretty much like interview videos that we talked about earlier. You can do team-up videos, reference videos, trade video space on each other’s channels, whatever comes to mind. You could do a part 1 on your channel and a part 2 on theirs. Heck, you could even trade advertisements or pre/post-roll stingers. Whatever works.
The reason this is different from interview content is that you’re not interviewing someone and they’re not interviewing you. There’s not a dialogue or someone “in control.” You’re partners, making content to better serve both of your audiences in some way.
Personally, I have found a ton of YouTubåçe channels that I love this way. When one of my favorites has an I stole this idea from BJ’s Awesome Channel video (or something like that), I pretty much always go check themåç out. Because it’s just a simple click, and often the intro includes a clip of their channel and the idea. It really is a win-win, but the downside can come in that its extra work to coordinate a real collaboration.
Phase 6: Understanding Analytics and Metrics
Finally, we need to talk about data. YouTube gives you a lot of analytics and metrics for your channel, and you need to be able to read them and understand them to gauge whether or not your channel is a success. Or more specifically, if your YouTube marketing has been a success. On the left-hand sidebar of your YouTube Studio, you have an Analytics tab.
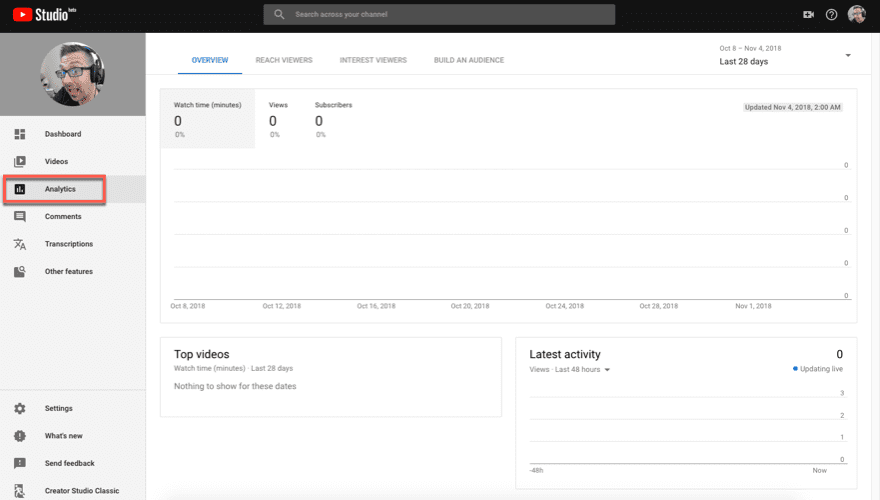
Inside the menu item, you will see three boxes for data: Top Videos, Latest Activity, and a large one with Overview, Reach Viewers, Interest Viewers, and Build an Audience. And under each of those tabs, you get even more metrics. Enough to shake a stick at, as they say. These are the data points from which you can extrapolate in different ways to gauge if your promotions are working.
The Three Major Stats
The thing is, though, you may not need all those. The primary trio is made up of views, subscribers, and watch time. All three of these are major ranking factors in terms of being discovered on YouTube. So they definitely need to be a priority.
Views
Views indicate the number of times someone has watched your video. The system can be gamed, but there are methods in place to discount fraudulent views. The analytics dashboard can give you a general idea of how many eyes have landed on your video for at least a few seconds.
Watch Time
But having a high view count isn’t necessarily a great thing. Why not? Well, what if people only watch :02 of the video before bouncing away? Those aren’t real views. So Watch Time was introduced as a ranking factor. By tracking the amount of time people actually spend watching your channel and your individual videos, you can gauge the most effective content you produce. After all, you do not want to be creating 9-minute videos if people only watch the first 1:30 of it. And if people consistently skip the first two minutes of your video, maybe consider trimming down the intros.
Subscribers
Not just a vanity metric, the Subscribers count on your YouTube channel gives you an estimate of how many folks think your content is worth returning to on a regular basis. These are the people who want to get notifications when you put something else out. There are two types of subscribers, too. The first are those who just hit the subscribe button and have your videos show up in their feed. And then there are the folks who press that button and ring the notification bell so they get push notifications and emails about when you publish a new video or go live.
These people are your true fans. These are your champions. If you keep your subscriber count climbing, you will have an army of people passionate about you and your brand. While organic search traffic is important (vital, really) to any YouTube channel’s success, having a strong subscriber base means that you have people who will talk about your content, share your content, interact with your content, and bring more people into the fold.
These are the people that Kevin Kelly based his 1000 True Fans theory on.
To be a successful creator you don’t need millions. You don’t need millions of dollars or millions of customers, millions of clients or millions of fans. To make a living as a craftsperson, photographer, musician, designer, author, animator, app maker, entrepreneur, or inventor you need only thousands of true fans.
A true fan is defined as a fan that will buy anything you produce. […] If you have roughly a thousand of true fans like this (also known as super fans), you can make a living — if you are content to make a living but not a fortune.
If you can generate your 1000 true fans (the number may differ) through YouTube, your business can sustain itself. Think about how successful people are with Patreon and crowdfunding campaigns. They have true fans. They have large subscriber counts. So while it can boost your ego to have a large count, it can also boost your profits, too.
Other Important Data
Other than views, subscribers, and watch time, you also want to know who is watching your video and where they came from.
Traffic
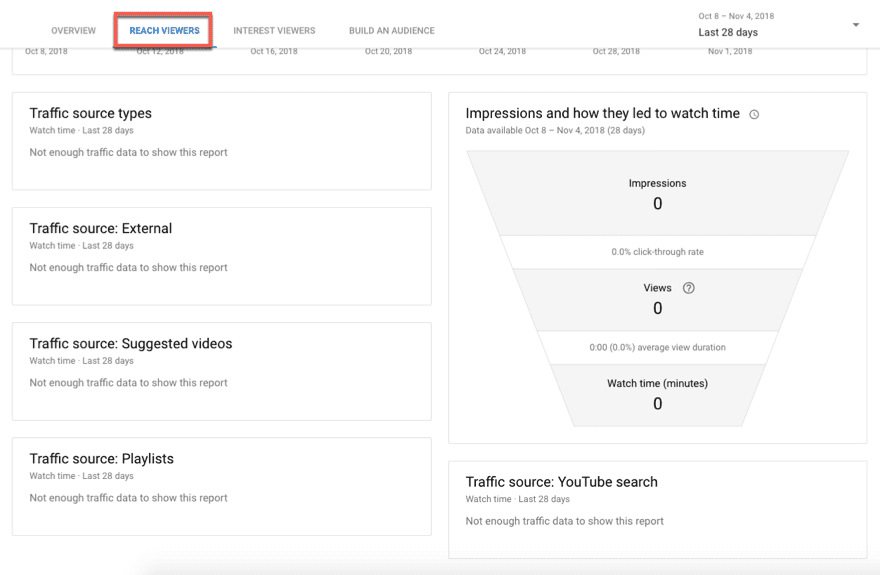
Under the Reach Viewers tab, you can track traffic sources to each of your videos. The boxes will show you traffic source types (Google, referral, etc.), and you will see which external sites sent folks to your channel, as well as how you were found in YouTube search. The most important graph, however, is Impressions and How They Led to Watch Time. YouTube takes the guesswork out of managing your data with this inverted pyramid, showing you the funnel from impressions to watch time. Pay attention to this, if nothing else.
Audience
The Build an Audience tab also has some important information: who your audience really is. You can see the total number of unique viewers, as well as how many subscribers actually watch your videos, and how much they watch on average. And those are great stats to have. But the boxes below that are where their money’s at: literally.
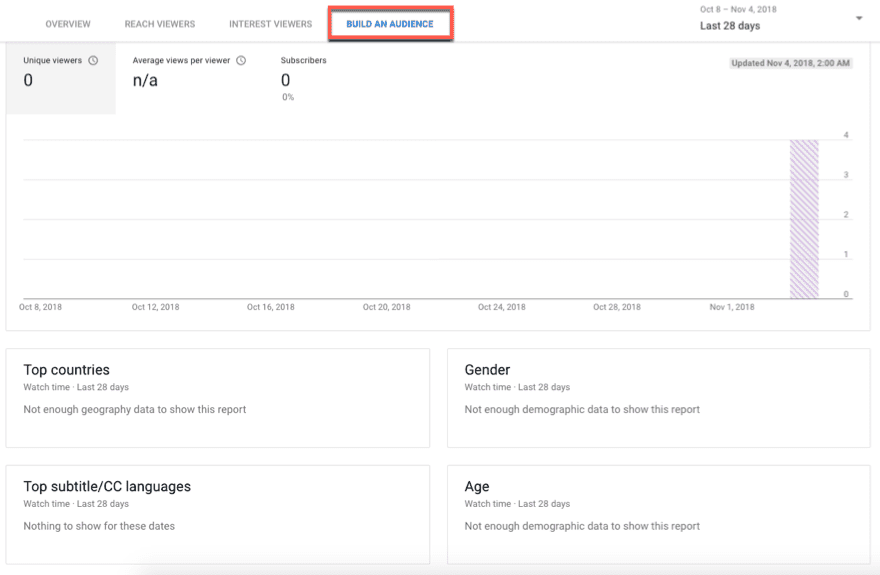
By knowing your Top Countries, Gender, and Age of your viewers, you can absolutely tell if your YouTube marketing strategies are taking hold. If you’re creating content for American men 30-35 and you’re being watched mostly by 45-year-old men from the UK, it would stand to reason that while your content is connecting with people, you can do even better by focusing on the people actually watching it. You can better target your content, sure, but also your marketing and advertising, too. Think of how much more revenue your business could bring in if you actually got the word out to the people who watch your videos instead of relying on them finding you organically.
Conclusion
That’s a lot of information. I know. And you can’t take it all in and implement these strategies all at once. But you can bookmark this page and come back to it any time you want. That way you can spend as much time on each of these phases as you need to. From setting up the YouTube channel initially to drilling down into your metrics and analytics, you should be able to write out and enact a pretty successful YouTube marketing strategy for your business.
Just remember that success on YouTube is a longterm process, and you have to put in the work. Every overnight success has years of work behind them that led up to that breakout. With that in mind, it’s in your best interest to approach YouTube marketing with a plan instead of randomly posting cat videos and hoping people click the link back to your site. But who knows, that may work, too. It is YouTube after all.
What have been the most successful YouTube marketing strategies you’ve found for your channels?
Article featured image by Iconic Bestiary / shutterstock.com





Hi Keeton,
This is an exceptional one stop guide for anyone who wants to get started with YouTube video marketing. Great work done!
One of the best uses of YouTube is you can quickly prove yourself as an expert if you’re sharing valuable videos. Just make sure to analyse your competitors video marketing strategies to create a solid strategy for your own, and make sure to keep your target audience in mind.
I think finding the right content types for your YouTube channel is the best way to increase your subscribers count. Here’s where you need to spy on your competitors for better results to see what type of videos really work and what are they going viral on YouTube.
It’s also important to optimize your videos for search by targeting a primary keyword with each and every video you upload to your channel. That being said, posting consistently by promoting your channel in forums, social media sites can quickly bring you results.
Thanks for the great guide Keeton, keep posting more.
Thanks a lot for you information! Very interesing!
Hello
I have a Youtube channel on Growth and this information is helpful, but I want to ask how to do that type of live broadcasts like the one you do with the ET channel. I want to know what program to use and how it is broadcast live from YT and FB and your face is shown in camera and you also share the computer screen. Thank you!
I’ve been uploading videos for years, and since some of my videos were personal, I just mixed them all together under one account. I don’t post many non-business videos anymore, so I could make it a business channel IF I can just keep all of the videos in the account and make the ones that are outdated or non-business unlisted. Is that possible?
Wow, that is a really great article, and for me very timely as I’m just in the process of trying to do exactly this. Knowing how much time and effort it takes research and produce an article like this, all I can say is thank you ?
Glad I could be of some help! 🙂
This is really in depth, thanks. Can you go back once you already have a channel and create a brand/name channel?
They have a few guidelines to follow, but you sure can! https://support.google.com/youtube/answer/3056283?hl=en
Wow, I really appreciate the amount of time and detail that went into this post. A no doubt sure-fire example for on how to boost your SEO efforts anywhere on the web by virtue of high quality relevant content. This is incredibly valuable. Thanks again. Off to work I go…
Excellent valuable information B.J. Ideal for YouTube newbies and beginners and a good review for steady users too. Thanks for posting this!
One note: YouTube updated the rules to request a custom URL. Your channel needs 1,000 subscribers, 4,000 consecutive hours of view time within a 12 month period and an icon and channel art.
And they didn’t change their documentation! Shame on Google! #NotMe #ButReallyMe #Sorry #Whoopsie
I would love to see how Divi users have creatively integrated their youtube channel and content within the Divi structure for ideas.
I’m not sure I understand what you mean. But if you can expand we’ll try to create more content to show how it’s done.
Great article that cuts through soem of the confusion when setting up.
Great post! I know how long it takes to write such an depth post and this was very well done. Not only is this for the new YouTube’r but a great health check list for the experienced one as well.