Chances are if you’re reading this, you’re involved in a local meetup. Maybe even a few meetups? Do you love it? Has it provided such a benefit to your life that you now have the desire to start your own meetup community? If so, we’re here to help! The idea can be daunting if you’ve never done it. There are many facets of hosting a meetup, which is why in this post we’ve created a step-by-step guide to starting and growing a meetup community.
Let’s Start a Meetup!
Before starting, you’re going to want to be sure of the type of meetup you want to start as some types will require some pre-setup ahead of time. For instance, if you desire to start a WordPress or Divi meetup, this is a tech-based meetup and you will need a place to meet. More than likely most of your meetups will be presenter-style so an office or co-working space with screens and projectors would be ideal. This needs to be figured out ahead of time so tap into your network and confirm residency. If your desire is to start a hiking group or a driving club, well, finding a venue ahead of time really isn’t necessary for obvious reasons.
Of course, in light of our world today, choosing a virtual venue is just as important. Just as you must find a physical place to meet, you must decide on a virtual platform to use. Zoom, Meet, and Teams are just a few to name. And there are plenty of freemium options to start you off nicely.
Once you decide the type of meetup community you want to build, you can decide on a meetup plan to purchase. It’s possible to use WordPress for this (using booking plugins or RSVP plugins), but what is nice about Meetup is that it is a familiar place for many people with millions of monthly views. Software + Community is a powerful combo.
Meetup.com plan price points
Meetup has a couple of pricing options based on what country you live in.
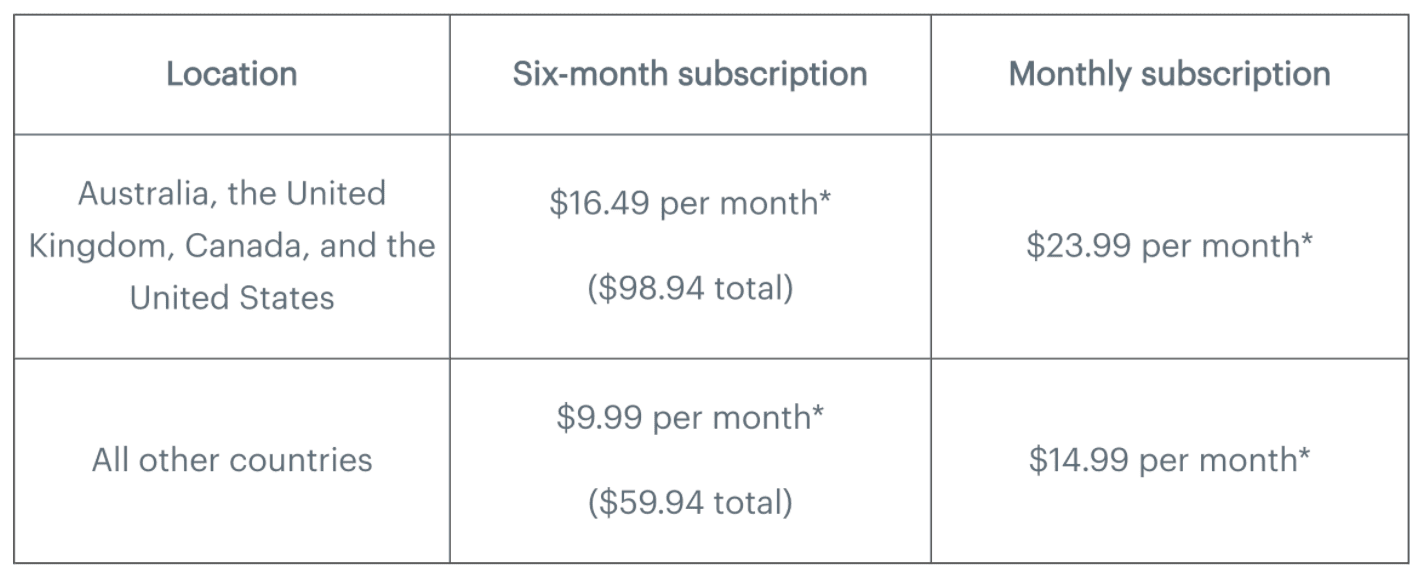
Once you choose the plan that best suits you, you’ll unlock all the features and amenities to start your group. Your group will go through a short review period from the powers that be, but you will have access to customize your group still. You’ll be led through a series of questions allowing you to express your group’s mission. We suggest you do not put this off but complete it immediately. Finally, you’ll be directed to your brand-new group. A blank slate but ready for community building. Meetup will start promoting your new group to local, like-minded folks, so create your header photo as soon as possible. Once this is completed, it’s time to create your first event!
Hosting a Meetup
This is where the magic happens. Where community-building thrives. But, before we get ahead of ourselves, let’s be sure we have all of our ducks in a row. So let’s dive into best practices pre, during, and post your meetup.
Pre-Meetup
First things first, decide on the format of the meetup. Whether a social, a Q&A, or a traditional presentation, you need to know ahead of time. Will you be presenting or will you have a guest speaker? Reach out and confirm.
Next, you’ll need to reserve your venue or schedule it with the virtual video conferencing platform of your choice. Now you have all the necessary logistical information to schedule your event. Let’s proceed.
Scheduling your meetup event
The process of creating an event is quite simple and the Meetup platform makes it straightforward. Eyes from your local area will start to see your group within hours of creation, so, create your first event as soon as possible. Here’s how:
1. Click that big, red button
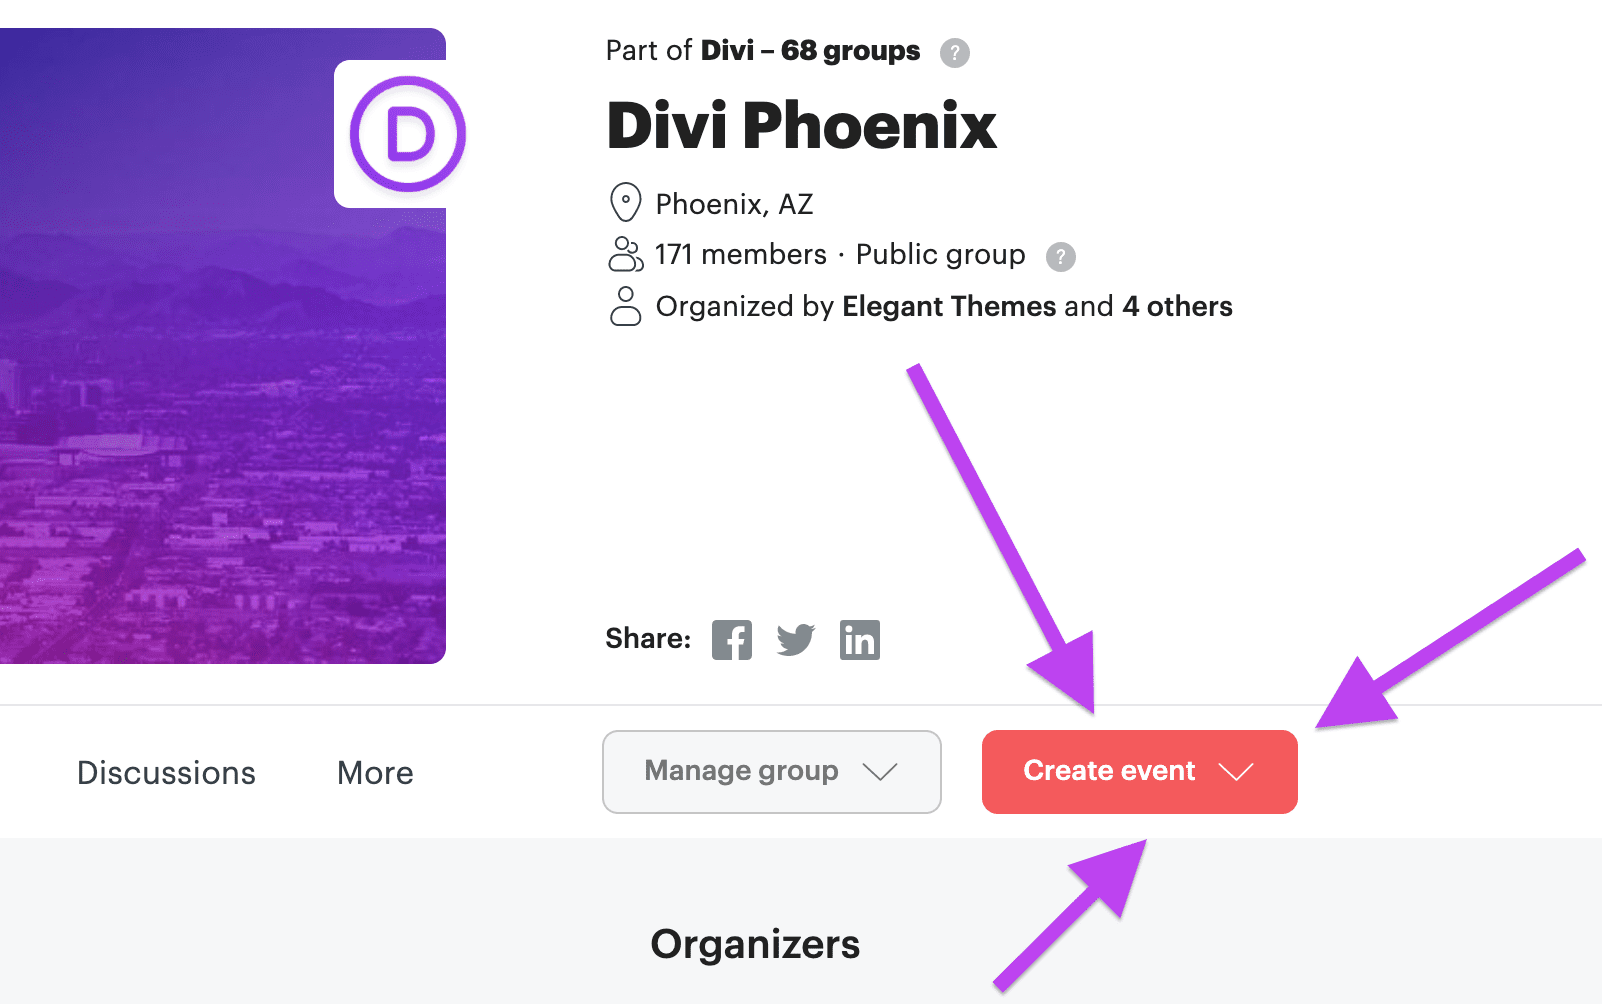
2. You’ll be directed to an easy form to fill out complete with extra tips as needed.
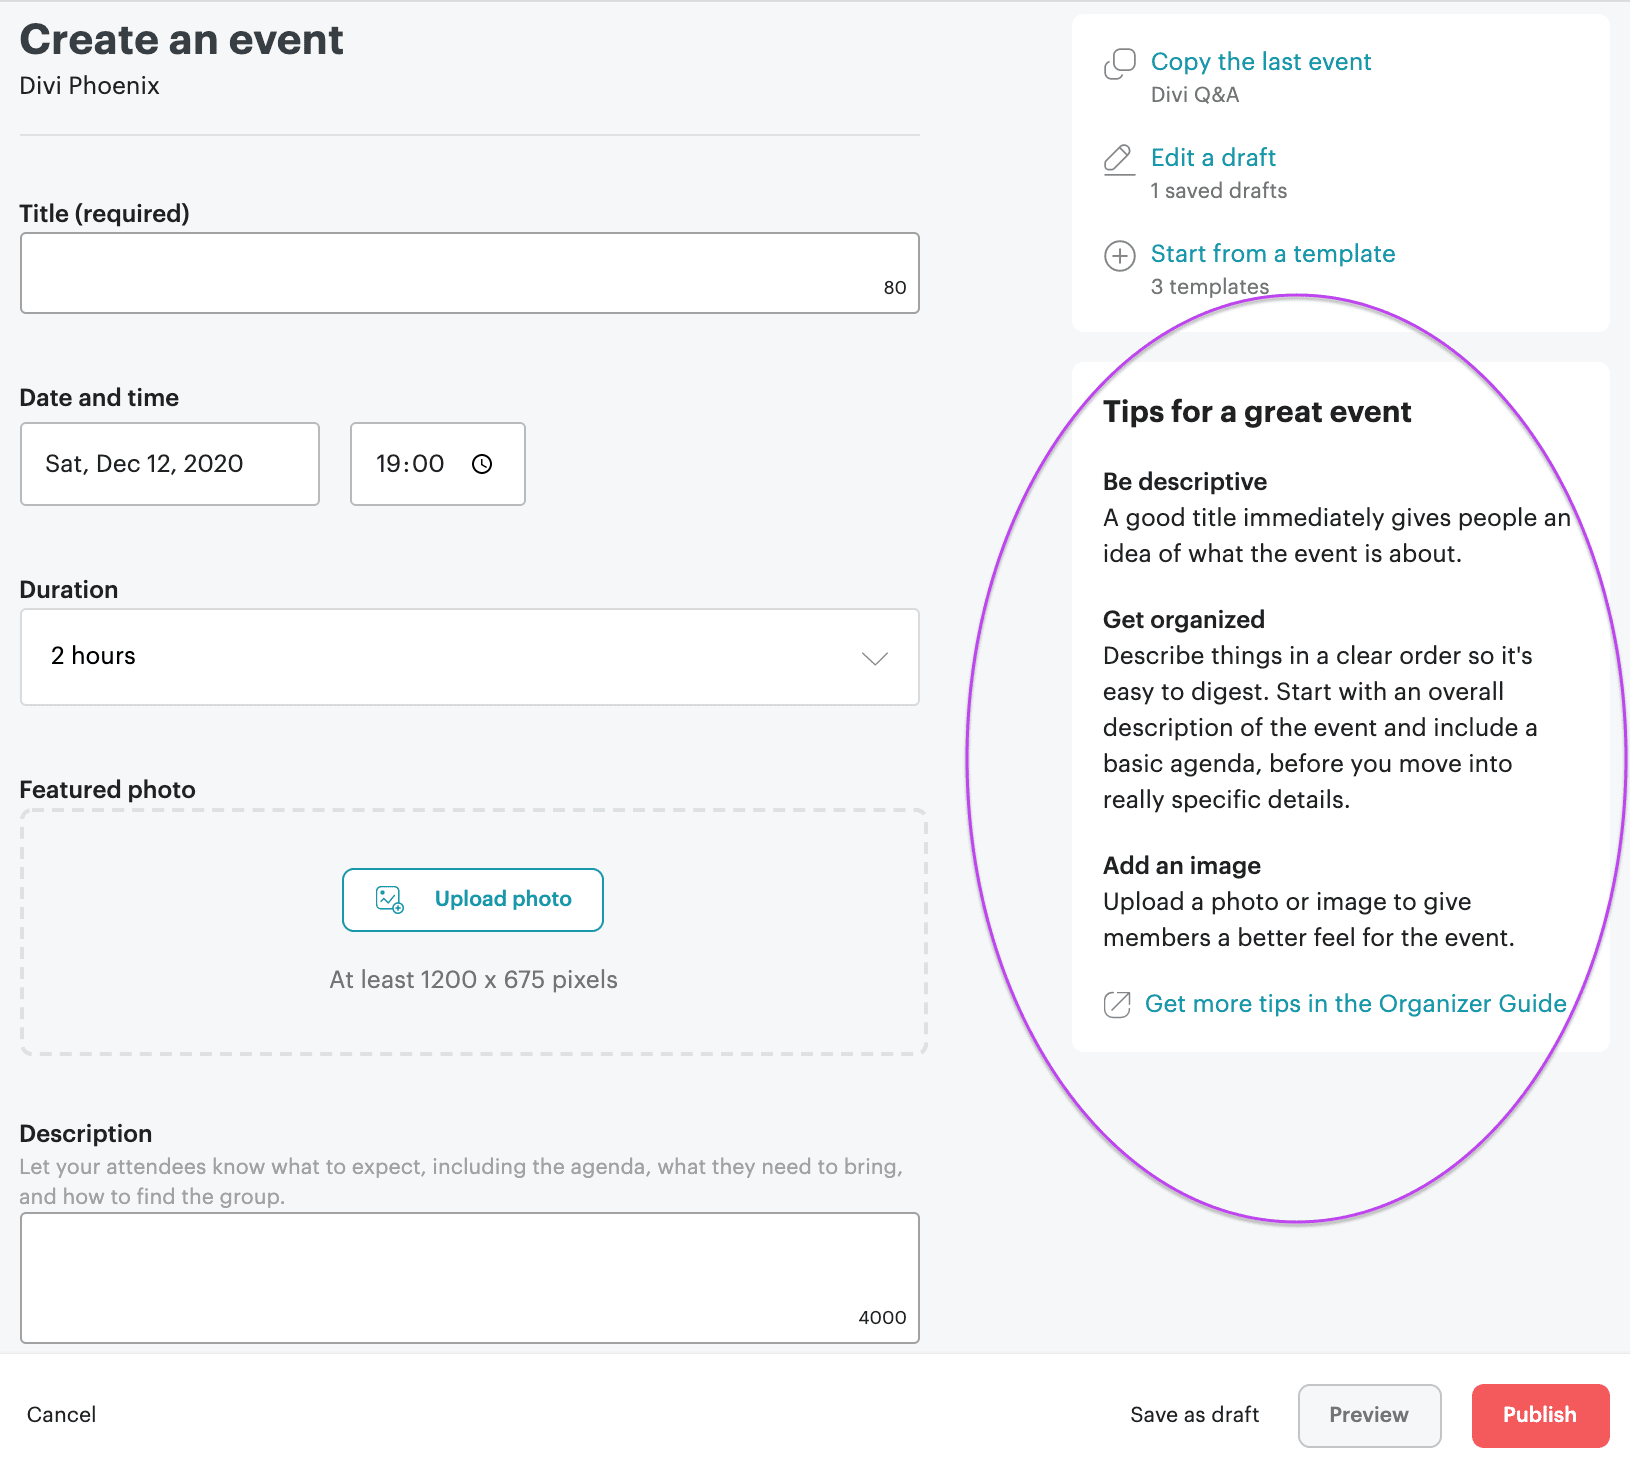
Carefully craft your Title and Featured Photo making sure they reflect each other in relativity. Then, hunker down and fill out that Description box. Notice that it allows up to 4000 characters, so, use it. The more descriptive your event content is, the more potential questions are answered. So, write a small intro, detail the event title, and layout the event’s entire itinerary. Do you have a guest speaker? If so, provide their job title and bio. Make it so that there’s so much information no one will have any clarifying questions to ask.
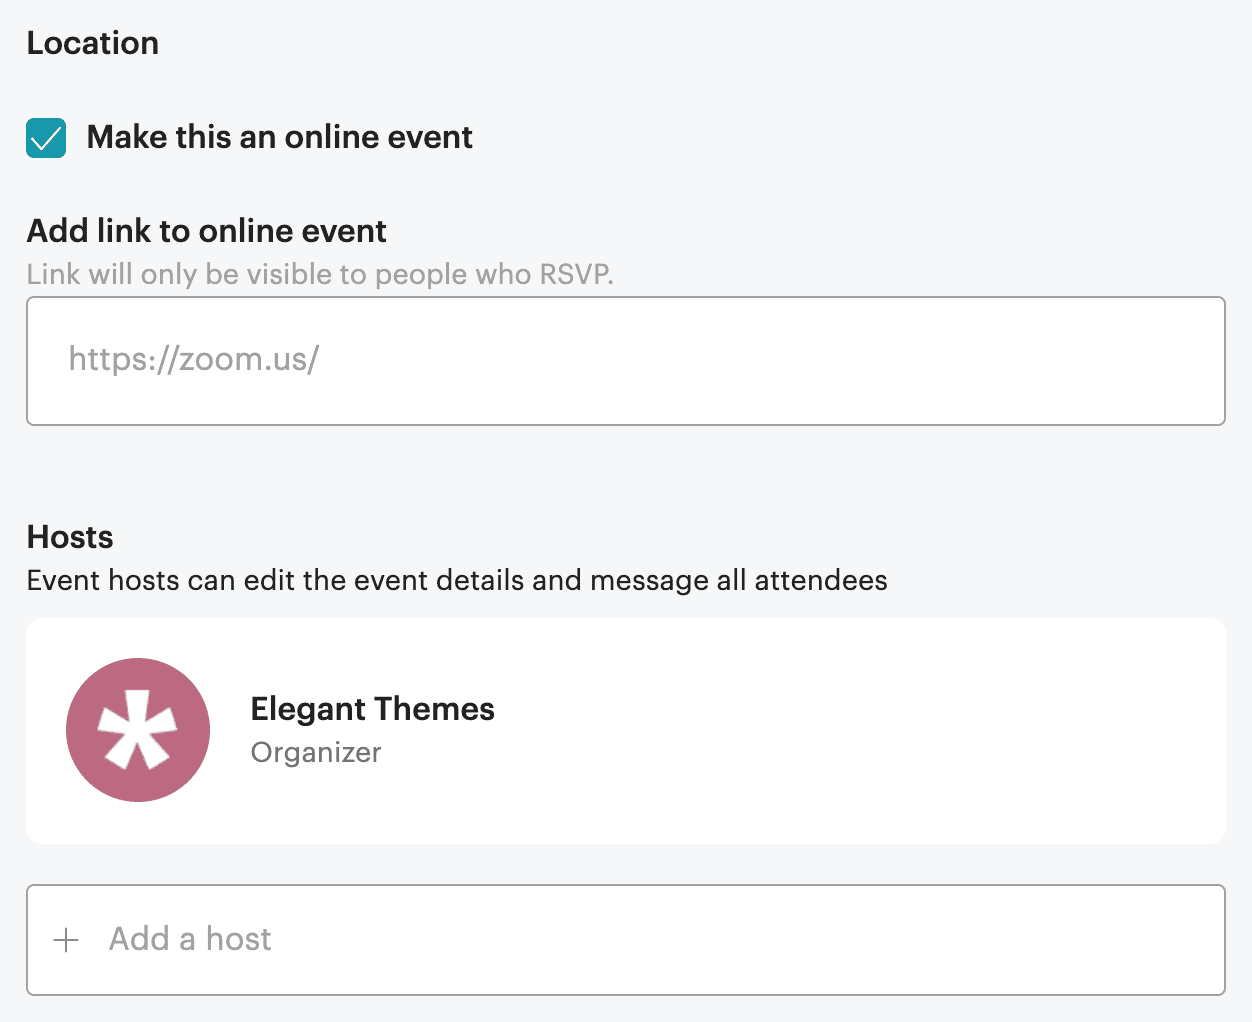
3. In the middle of the form, you will have the option to choose either a virtual location or a physical one.
Go ahead and input the physical address of your venue or the virtual link. You will notice that Meetup protects the virtual link visible to registered attendees only. A new feature, yet to come, is the ability to have both a physical and virtual event. We cannot wait for that feature rollout. Continuing, you can add all organizers involved. Meetup will assume that since you are creating the event, you are the organizer. But you can add more organizers once you grow your organizer team (highly recommended).
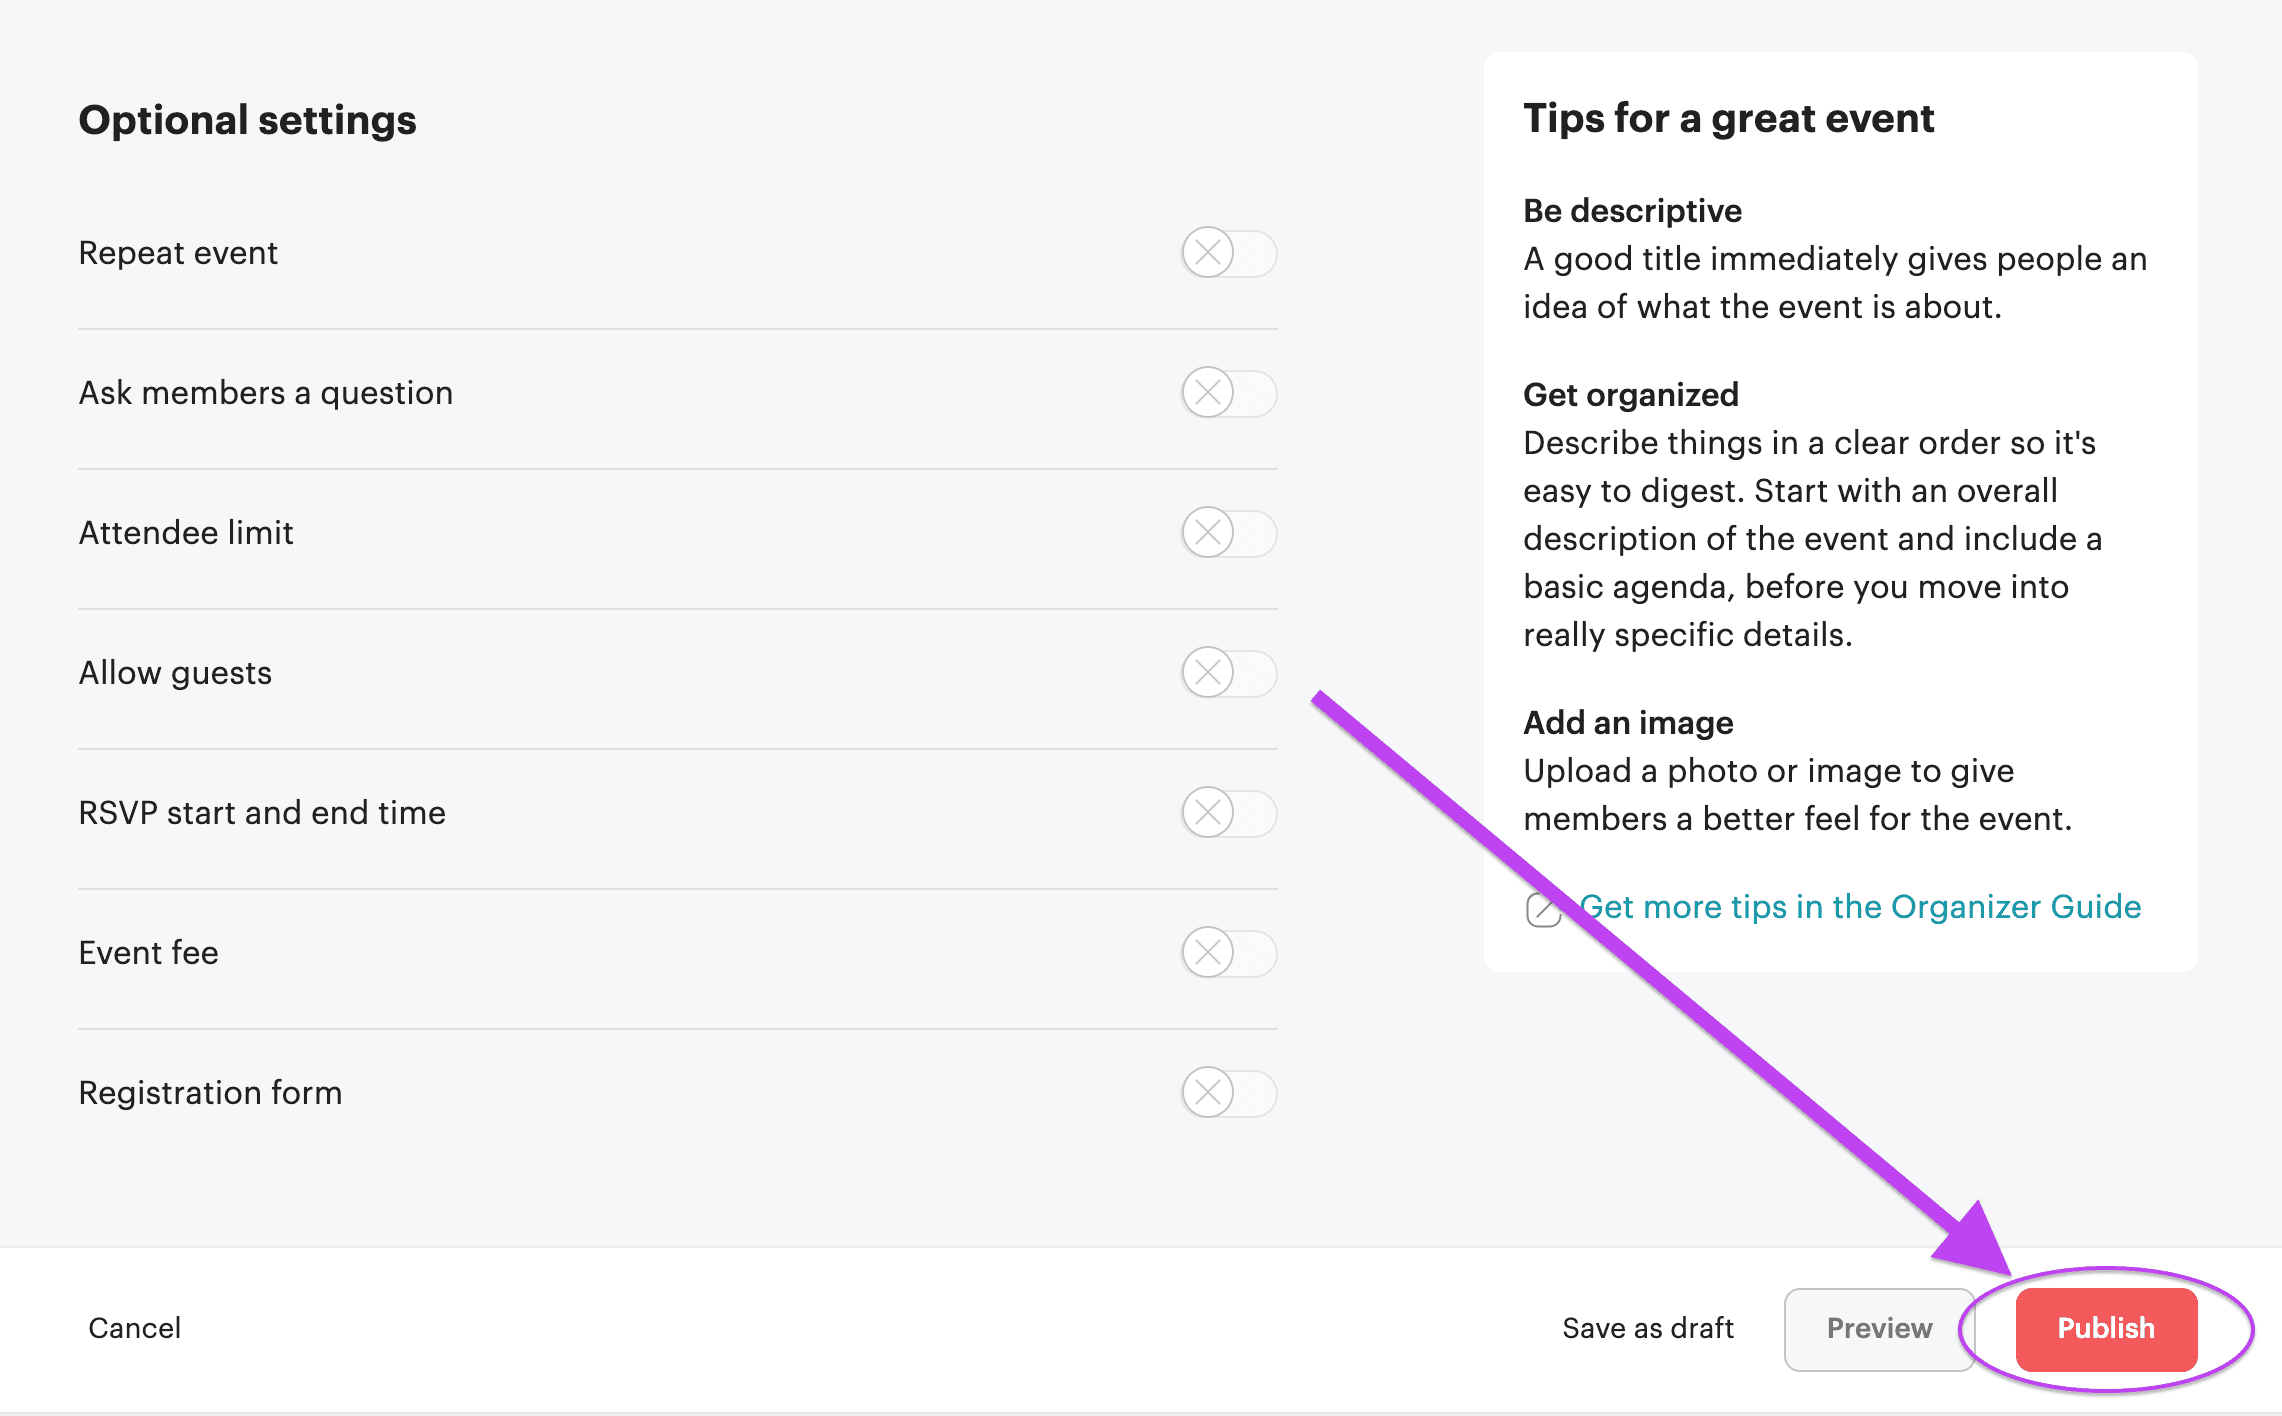
4. Finally, the bottom of the form provides some optional settings for you to decide on using or not.
The latest feature is a nifty registration form that allows you to gauge information from your attendees which is quite valuable. Once you appropriately choose your options, give the form a once-over and press publish.
Congratulations! You just created and published your first event! 😀
Next step: Email your members
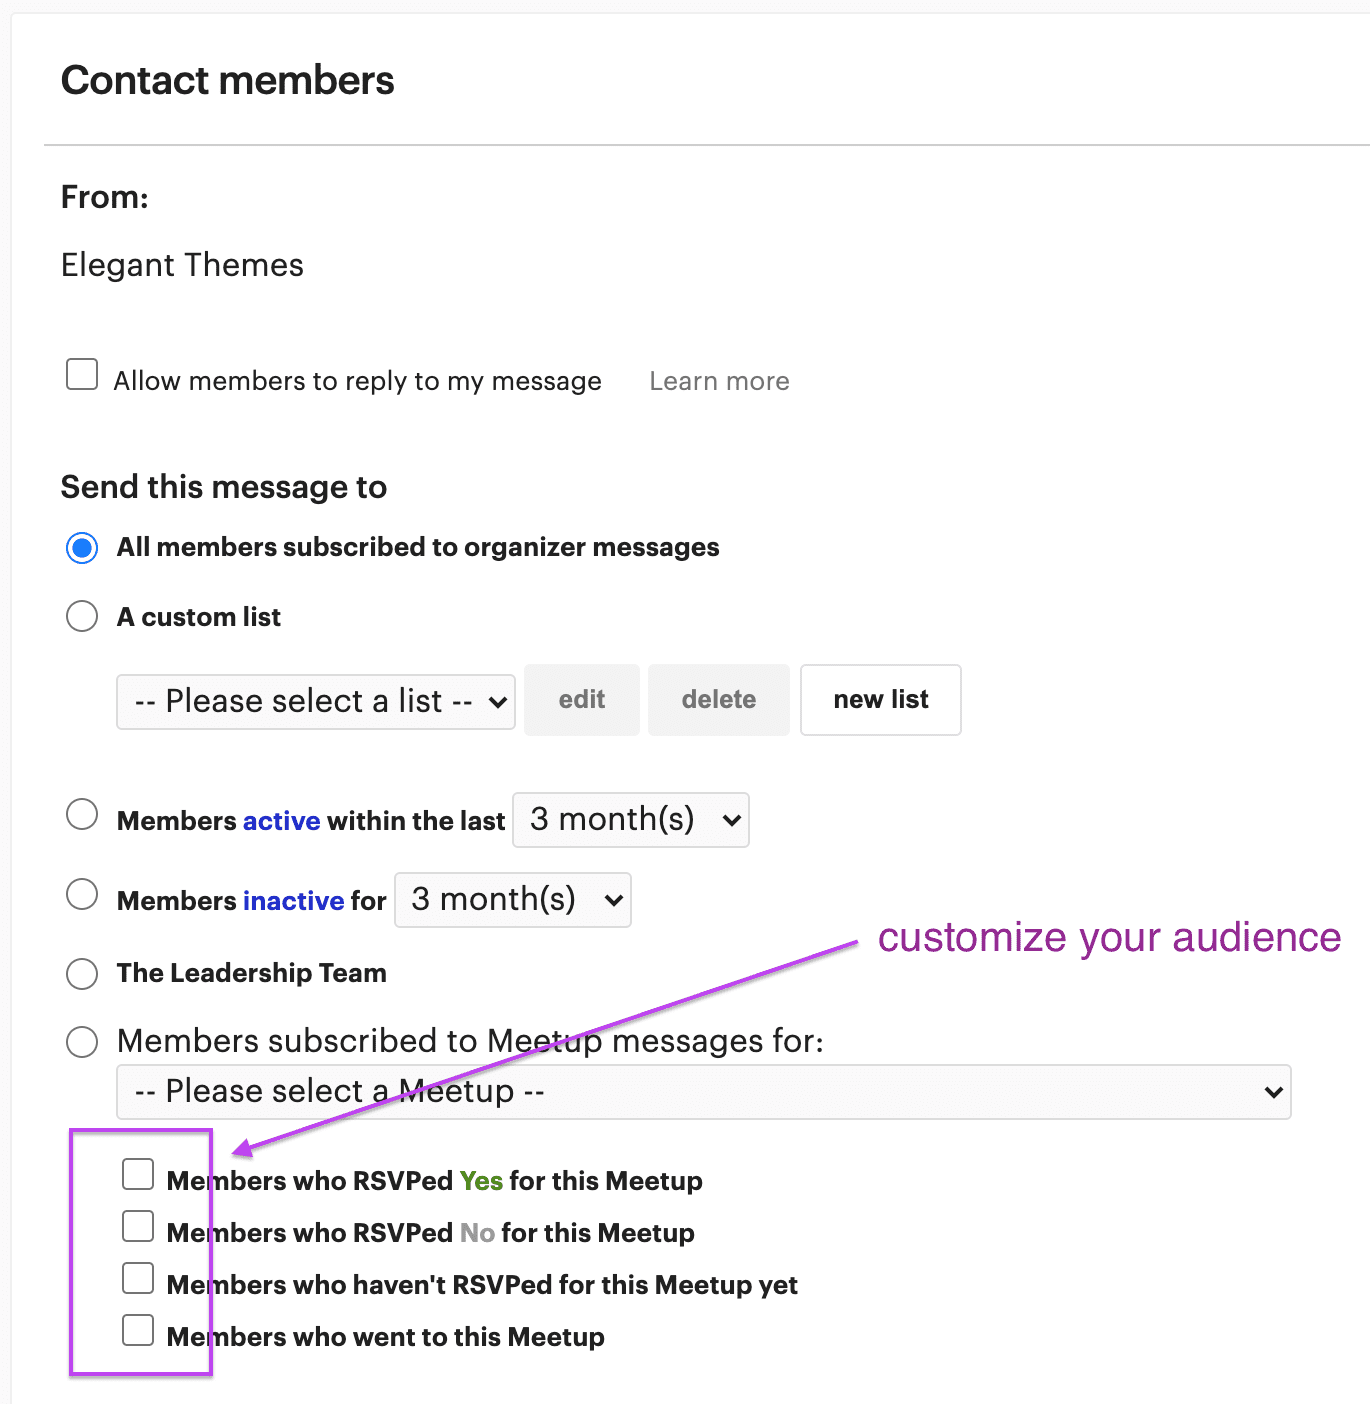
Almost as soon as you schedule your event, Meetup will automatically email all of your members announcing it. But you will want to send a more personable email to everyone a few days before your meetup commences. Meetup makes it easy to communicate with your community members with their email tools. This tool is quite capable of giving you mailing options.
Check this out:
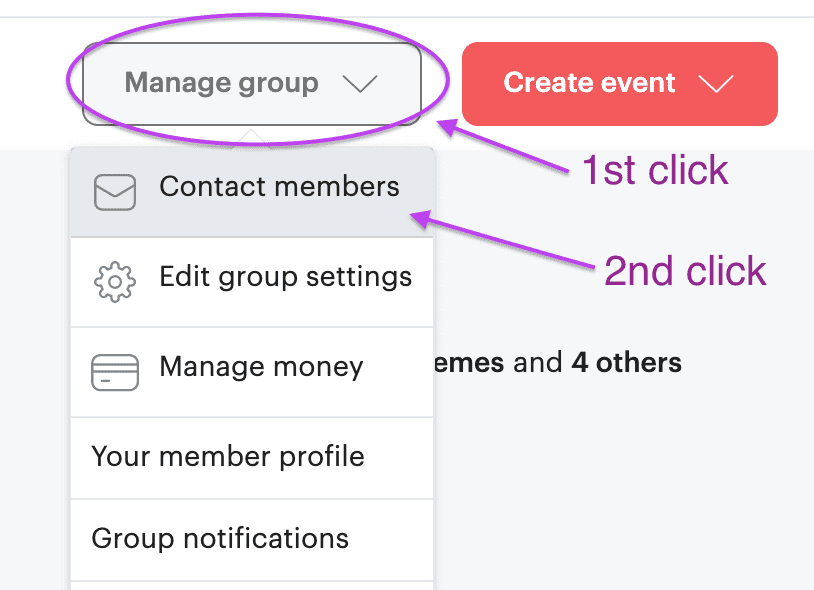
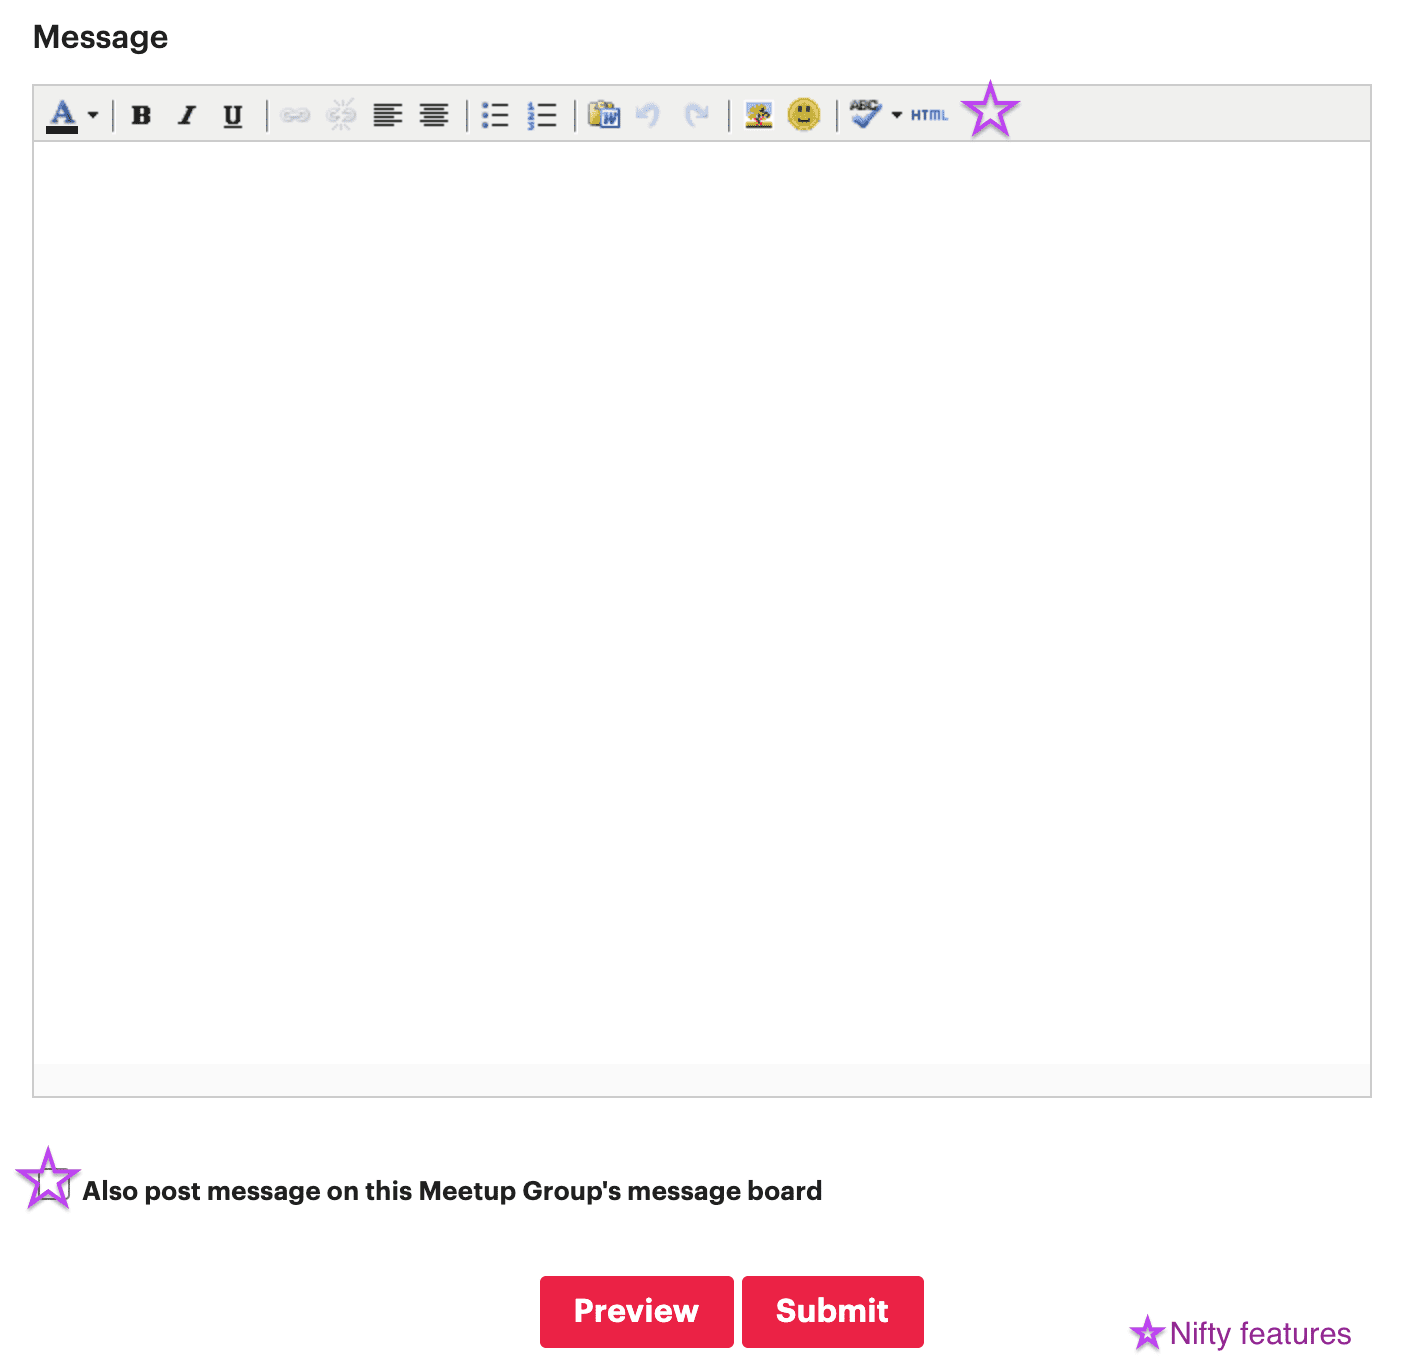
Meetup Email Editor
We recommend emailing all members and not just those who have RSVP’d. Invite them to come out and reiterate the event description. By the way, you should definitely have a way for people to RSVP for your event. To do that, you can use one of several RSVP plugins for WordPress.
Next step: Promote Your Meetup
Building a great community takes more than logistics. You can’t set it and forget it. You must actively promote it. Off the bat, Meetup will begin sharing your group with like-minded folks in your local area and they will email your current members announcing your event. However, you should do your own promotions. Follow these tips on promoting your group below:
1. Share All the Things!
Get the word out about your event by sharing it on social media outlets. Facebook, Twitter, Instagram, and even LinkedIn are great places to begin. If you’re unsure of how to start, simply copy your group’s or event’s URL and paste it into a Facebook, Twitter, or LinkedIn post (this will not work on Instagram). A thumbnail with auto-populate creates a visually appealing post to catch the eyes of potential members and attendees. Of course, adding a bit of copy will do your promotion well, so, don’t be afraid to write a line or two further explaining the event. Share on social when you publish an event and again a few days before the event begins.
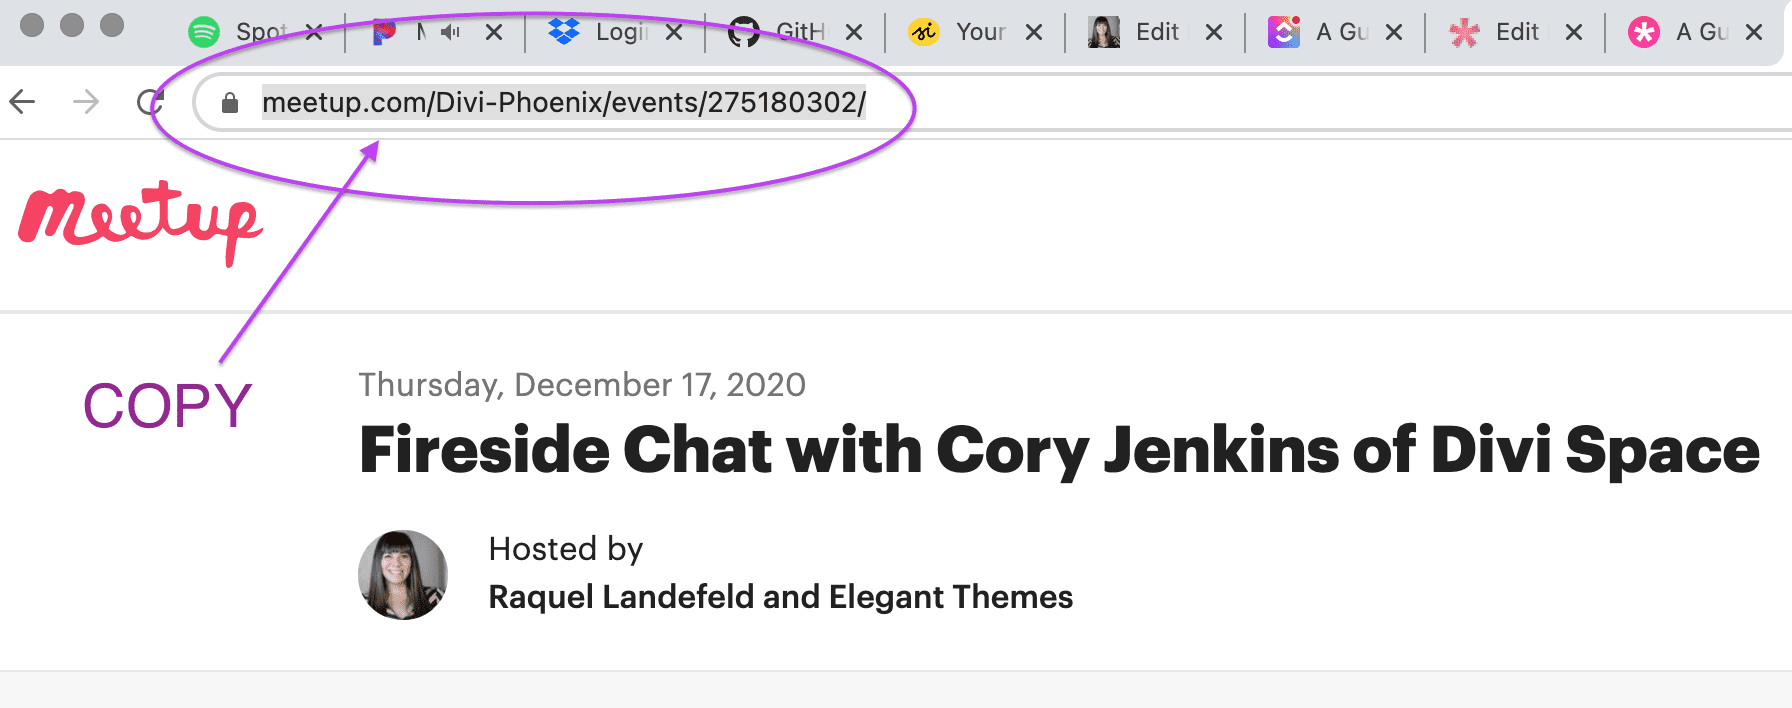
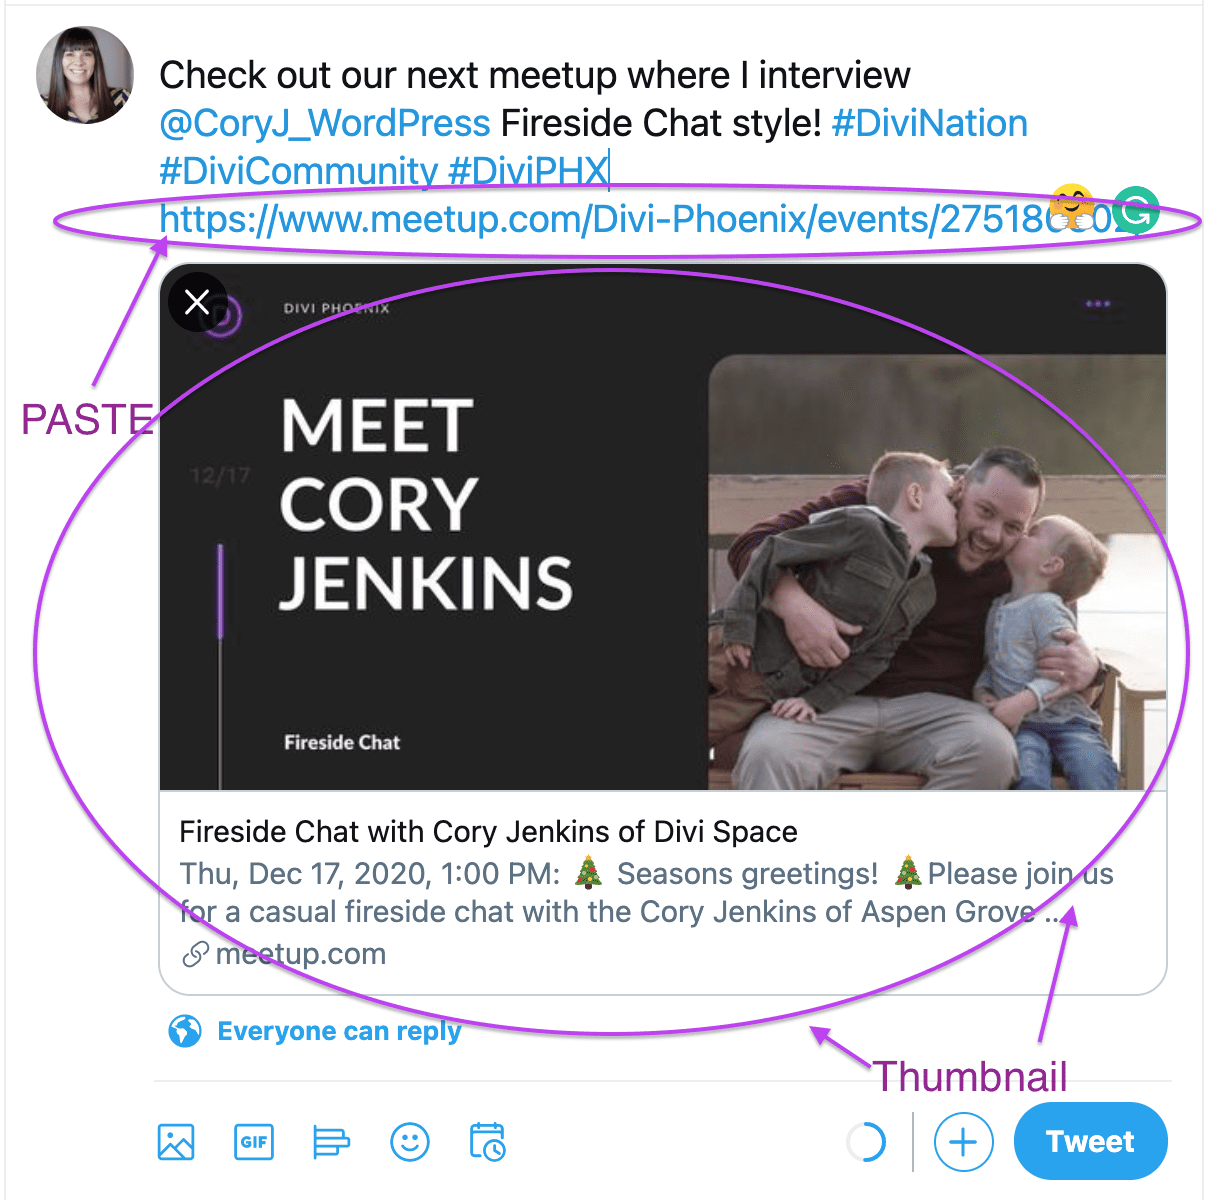
Are you ready to take it to the next level? Don’t be afraid to use more visually-based social media outlets like Instagram or TikTok as these can do wonders for your community. These outlets require more of an intermediate level of social media marketing but they should not be completely disregarded. Utilizing tools like Canva, Later, & Hootsuite are helpful when you’re ready to up your social media marketing game.
2. Paid Promotions
Take promotions to the next level by buying social media advertising. There are so many options and one doesn’t have to break the bank. Check out this article for more information.
Note: Elegant Themes takes out paid promotions on our official Divi meetups. Just one of the perks of joining our MeetupPro network.
3. Create a Promotional Website or Social Media Group
Building a marketing website or setting up a Facebook group are simple ways to get more eyes on your meetup community. Both provide multiple outlets for discussion which provides a bigger reach to your community members. Always be sure to link to your Meetup page and be sure to schedule and manage events exclusively with Meetup.com.
Final step: Setup your Meetup
Whether virtual or in-person, some setup is required. Virtual is pretty simple as you might only have to choose your featured virtual background and whatever top you find appropriate.
In-person requires a bit more. You will want to arrive early to make sure seats are arranged, screens and projectors are ready to go, and any sponsor swag is setup. Do you have a guest speaker? Make sure they arrive early so you can do a sound and slide check. With either virtual or in-person, be sure to leave plenty of time to put on your smiles and gather your breaths as this is go-time!
During your Meetup
Ah, we have arrived. The best part. As stated earlier, this is where the magic and community building happens. And here’s the biggest tip: Smile. Giving a huge, warm smile to all attendees goes the distance. Humans have an incredible response to an 💯 inclusive welcome. Yes, content is king and will bring folks to your meetup, but the warmth and true acceptance of all will keep people coming back. Of course, there are a few logistical steps to take care of so let’s address those now.
Meeting Logistics
1. Attendance
Taking attendance is a necessary step to track important data. We recommend recording during the meetup for best tracking. Follow these screenshots on how to do so:
Head on over to the scheduled event page and scroll down to the attendees.
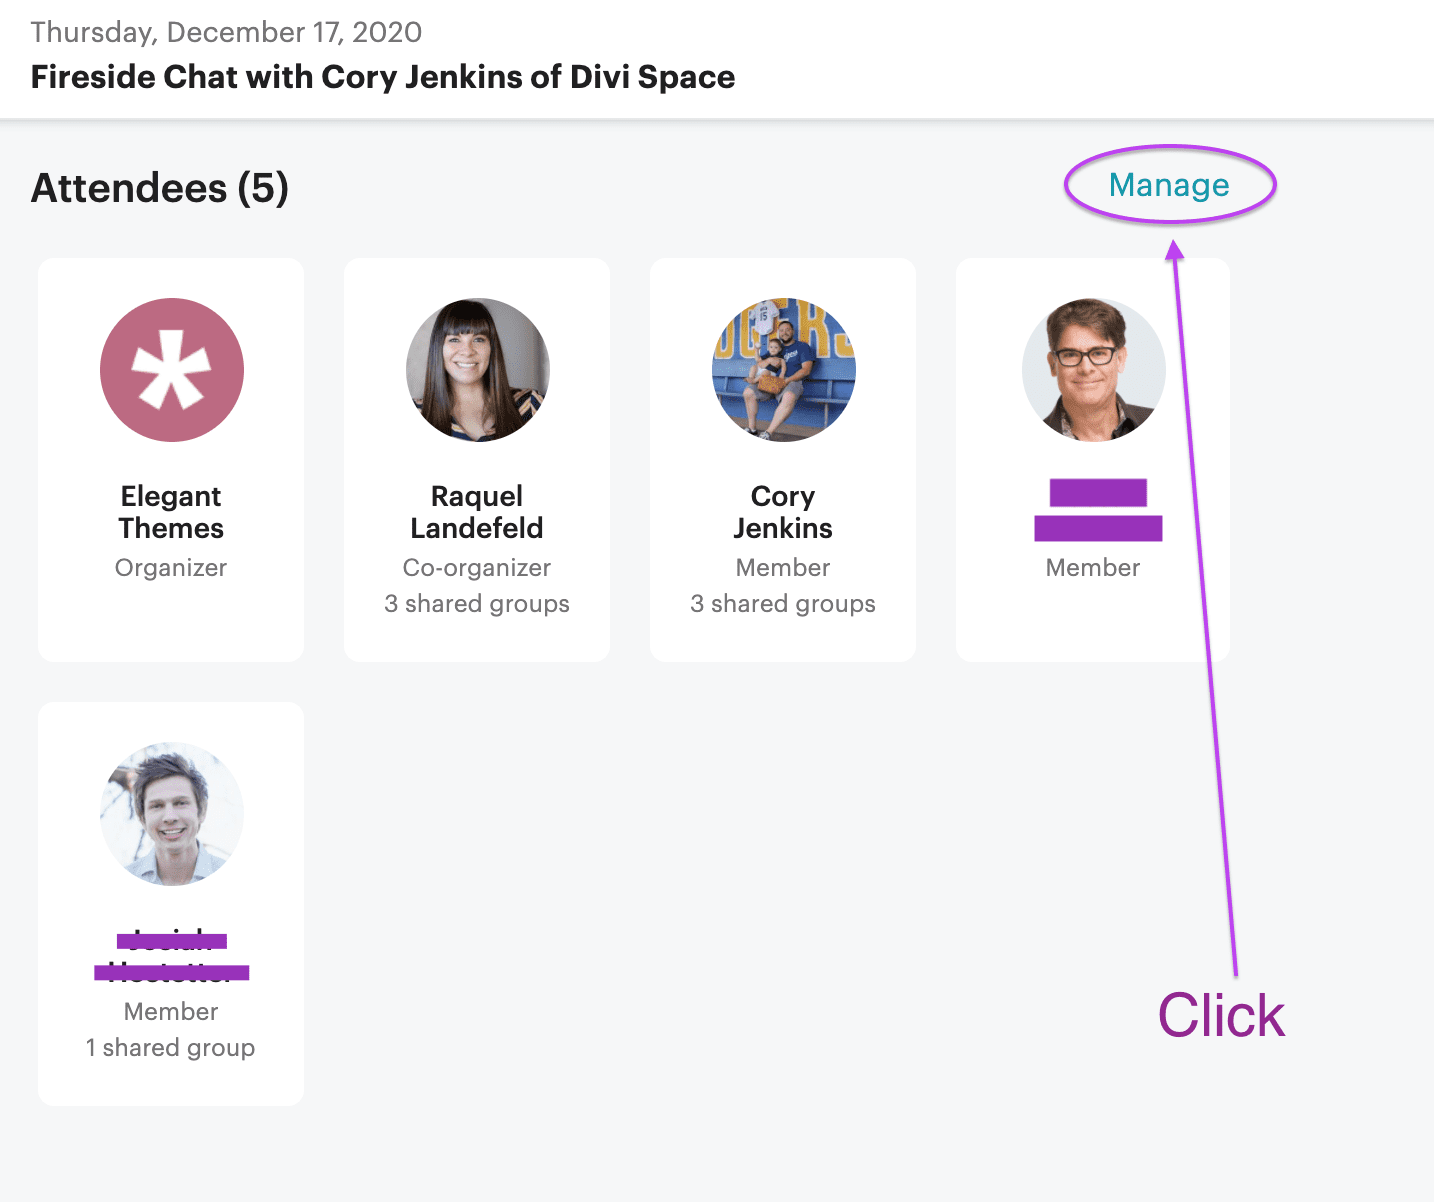
Meetup makes taking attendance easy
When an attendee RSVPs, “Going” (and they indeed go) or “Not Going” ahead of time, you don’t have to do anything. But if they RSVP, “Going” and don’t show up, you’ll need to click on the ellipsis next to their name and flag them as “No-Show.”
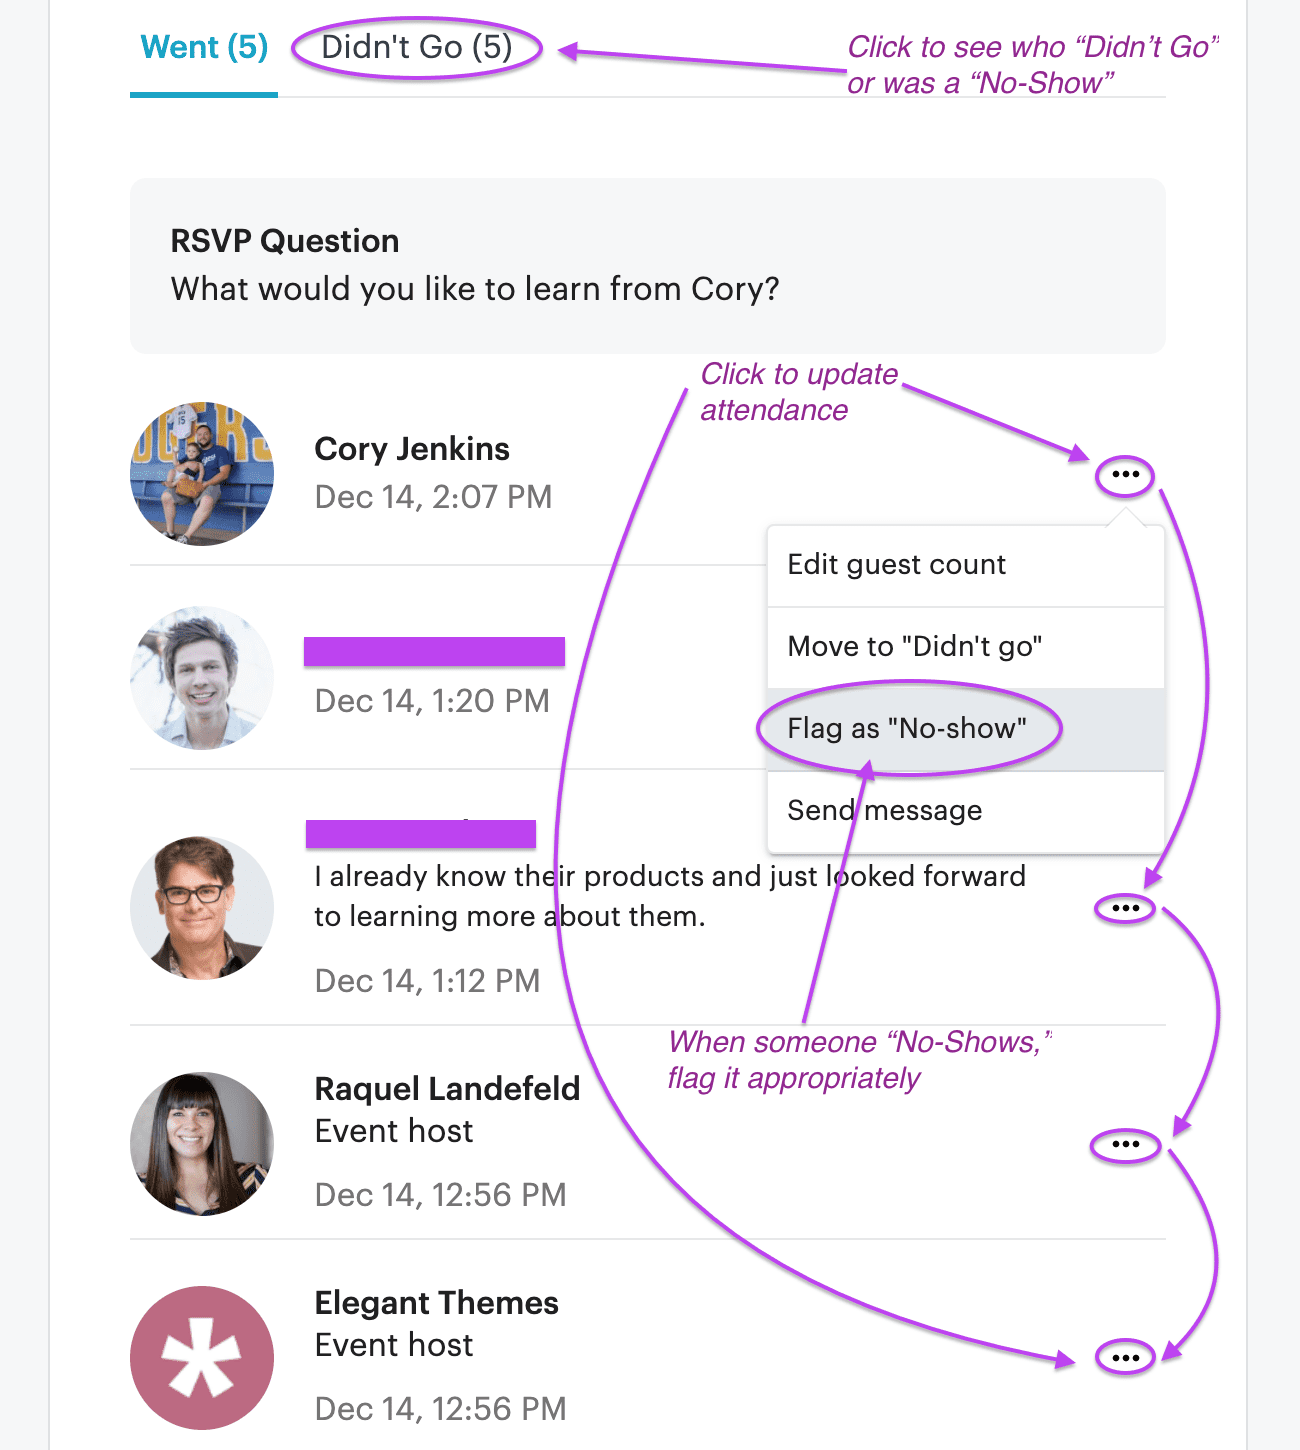
After marking attendance appropriately, you can click on the top “Didn’t Go” to see the attendance marks
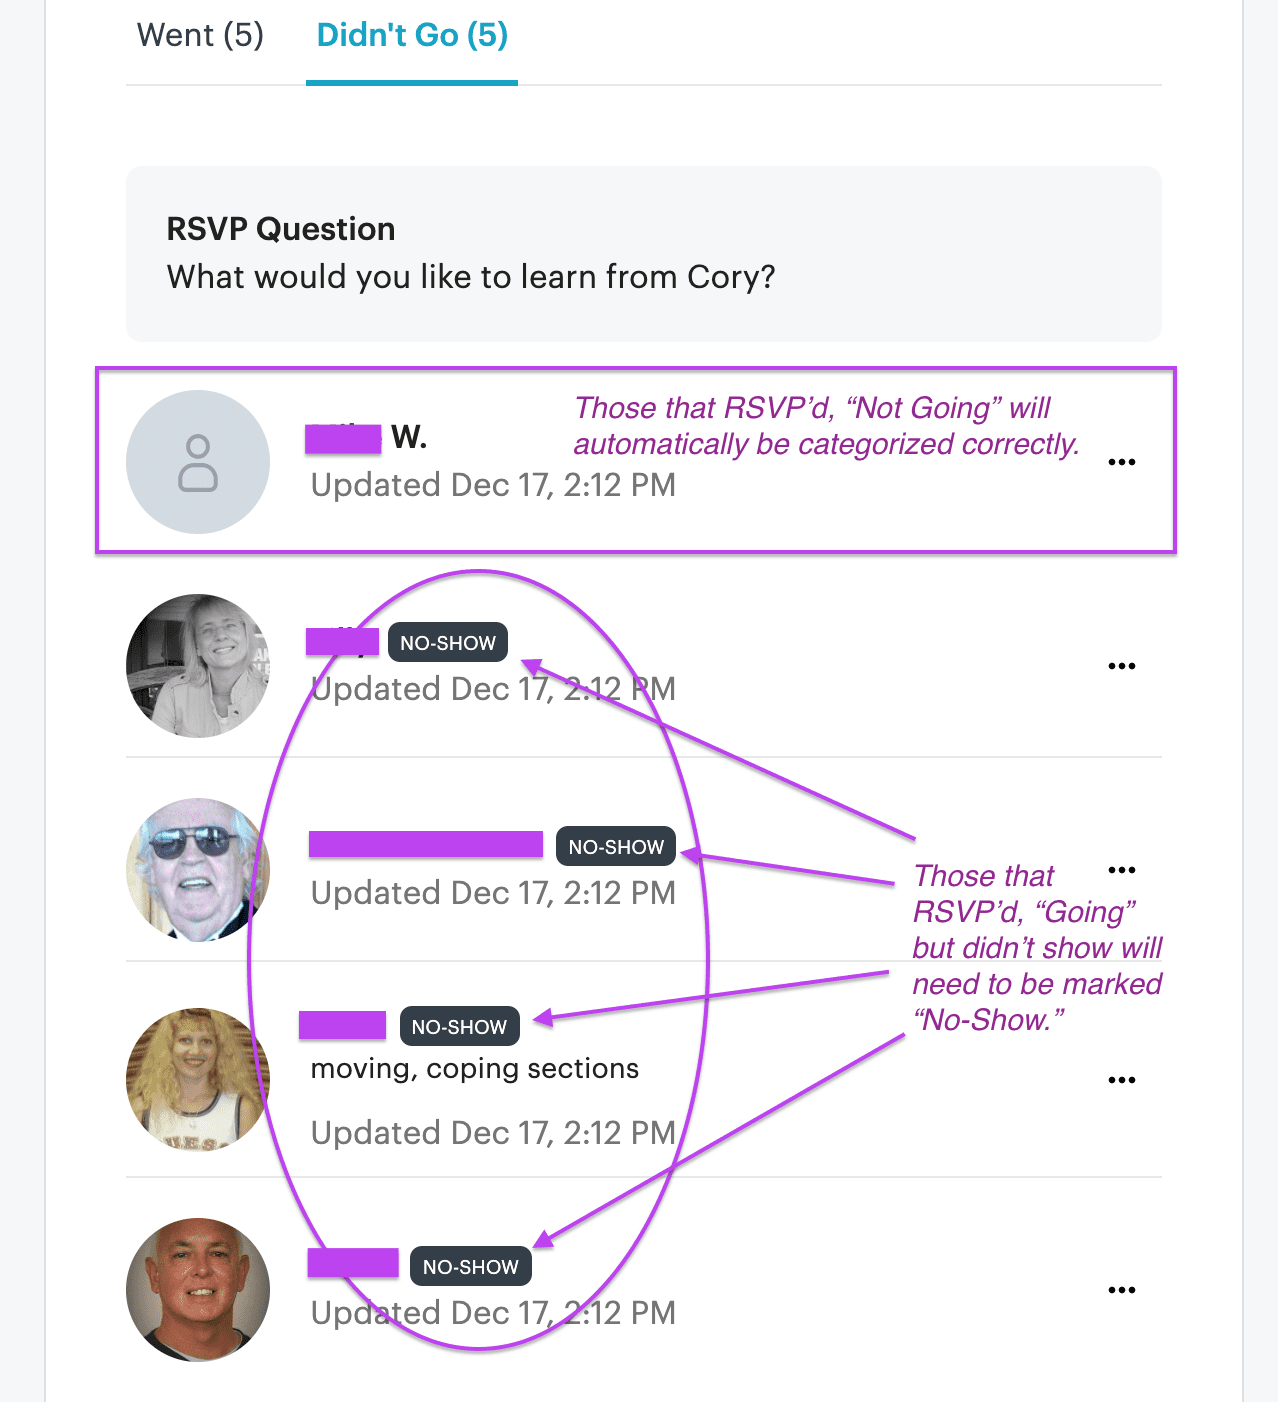
Don’t worry. Nobody’s in trouble if they’re flagged as a “No-Show.” It’s just for our ever-loving drive for data. No grudgies held.
2. Networking, Announcements, & Intros
It’s a great idea to pad some time at the beginning of your meetup just for chitchat. A half-hour if in person or 10 minutes if virtual. And when you start your event, give some community announcements. Let your community know about other upcoming events or relevant happenings. Give explicit thank-yous to all of your sponsors. Engage in an icebreaker. And last but not least, save time for introductions. If your group is small enough, allow one collective time for intros. If your group is upwards of 15 to 20-ish or more, break everyone up into small groups in order to save time and still learn about each other.
3. Take Pictures
A picture is worth a thousand words, right? Take pictures of your community during the event and post them. You can post on the meetup event page itself or even to the meetup group. Of course, live social sharing with hashtags is a great way to create buzz for your group. Here’s a tip: take photos of faces and not backs of heads. Show your community off. Be sure to post all event photos taken to the respective event on meetup for storage. And, certainly don’t force anyone to be in photos if they don’t feel comfortable consenting.
4. Post-Production
As soon as your meetup ends, don’t rush people out. Allow for some extended networking as folks leave. Are you meeting in-person? Invite all lingering to help clean the space back up. Also, having an open invitation to a nearby restaurant or coffee shop for a nightcap is a wonderful way to build your community.
Feelings we emote to our community will win loyalty. We don’t always remember what was said but we always remember how we felt. So as you run your meetups, practice unabashed kindness and acceptance to all that come and watch your community grow.
Post-Meetup
Community building does not stop when the meetup ends. It’s a perpetual intention. No later than a day after your event concludes, send a wrap-up email out to your members. Include pictures. This adds a nice bow to the whole event. Be sure the double-check attendance while it’s fresh in your mind and respond to any comments or discussions about your event on any/all mediums. And whether you have a team of organizers or it’s just you, be sure to have a post-mortem after each event to continue the growth of your community.
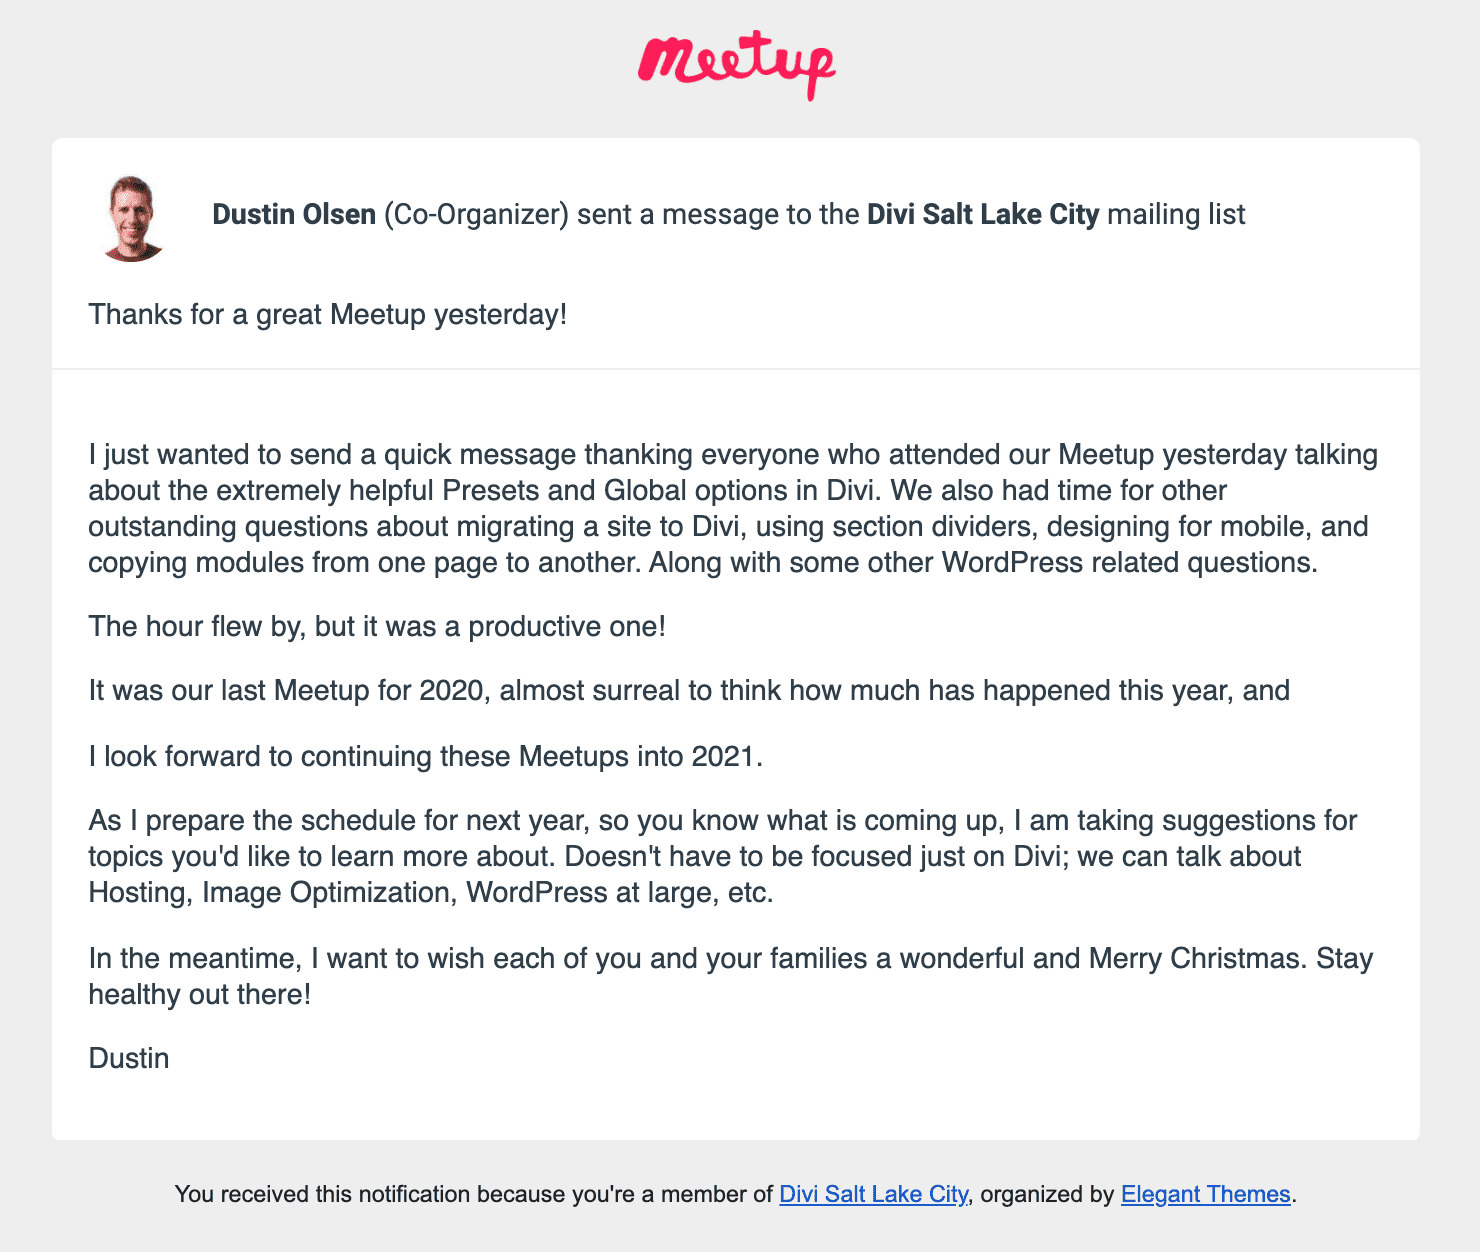
Check out this post-event email example
And that’s a Meetup wrap
We hope that this guide on how to organize and host a great meetup provides you with an excellent start. This is just the tip of the iceberg as you’ll discover the world of building a meetup community. Remember, a great community is grown from smiles and feelings. Content is extremely important. But content without conscientious care is dead. Provide excellent content but smile and make eye contact with each of your community members and watch what happens.
Have any questions? Ask away!
And finally: If you have a passion to build your local Divi community, locate a group near you here or use the button below to apply to become a local organizer.



Leave A Reply