Using images on your website is critical to attracting viewers or customers. As important as the visual is, the size of the image file matters too. For the images you choose to compliment your content and not distract from it, you should format them to work with your page and be consistent with size and resolution. You can change the size of each image one-by-one, but this process is hugely inefficient if you have a large number of pictures. Luckily, Photoshop has an Image Processing script that bulk resize images and resave all the files for you in one easy process. Follow the steps below to learn how!
- 1 Step 1 – Identify Your Image Files and Dimensions to Resize
- 2 Step 2 – Start the Image Processor Function in Photoshop
- 3 Step 3 – Select the Images You Want to Resize
- 4 Step 4 – Determine Where to Save Your Resized Files
- 5 Step 5 – Determine The File Type and Set Parameters to Resize Images
- 6 Step 6 – Set Preferences As Needed
- 7 Step 7 – Run the Script
- 8 Step 8 – Review Your Resized Files
- 9 Bulk Image Resizing Alternatives
- 10 Conclusion
Step 1 – Identify Your Image Files and Dimensions to Resize
Before you run the script, identify which image files you want to use, and either open them or save them to the same folder. This is the “batch” on which you will run the script. If you save the files to a folder, remember the name and location of the folder to use in the next step.
Also, research your website’s image sizing guidelines to determine what dimensions are best to use via this process. Find out at what size is best and resize your images to be at or a little above this intended display size.
Step 2 – Start the Image Processor Function in Photoshop
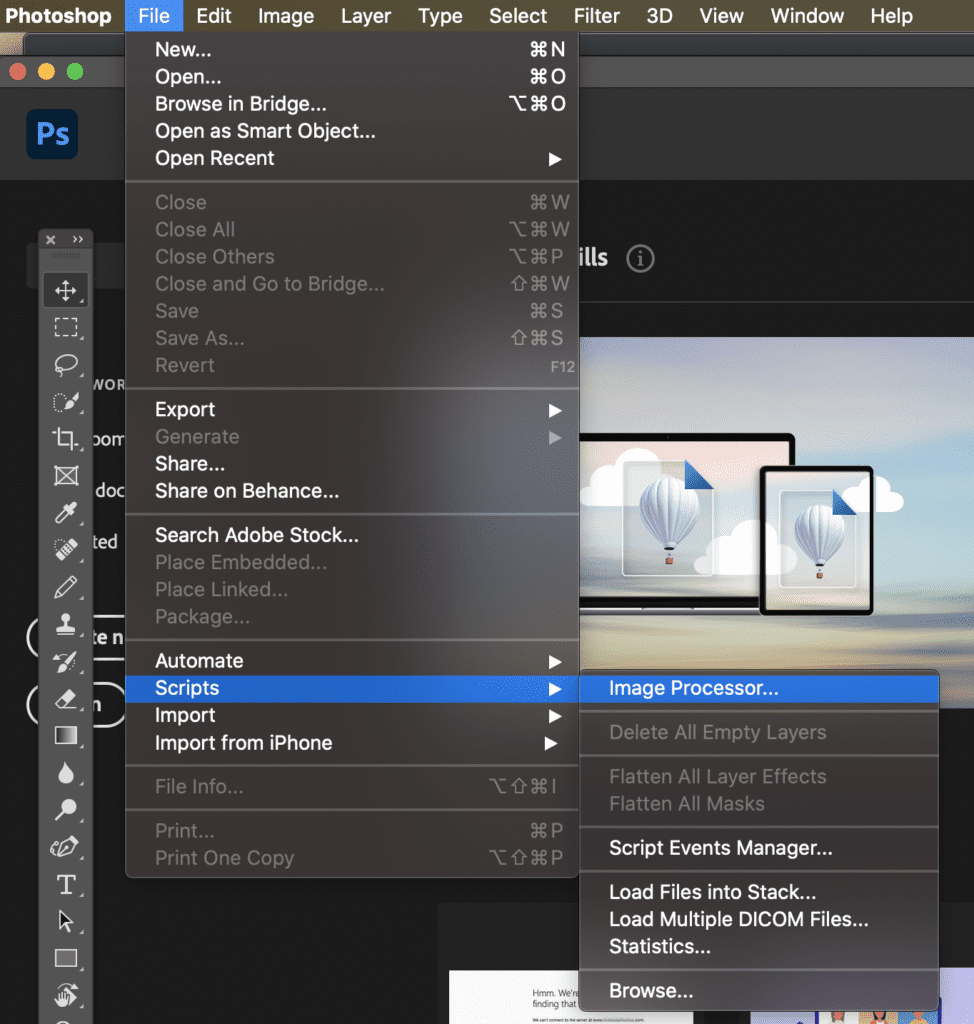
In Photoshop, navigate to File > Scripts > Image Processor.
Step 3 – Select the Images You Want to Resize
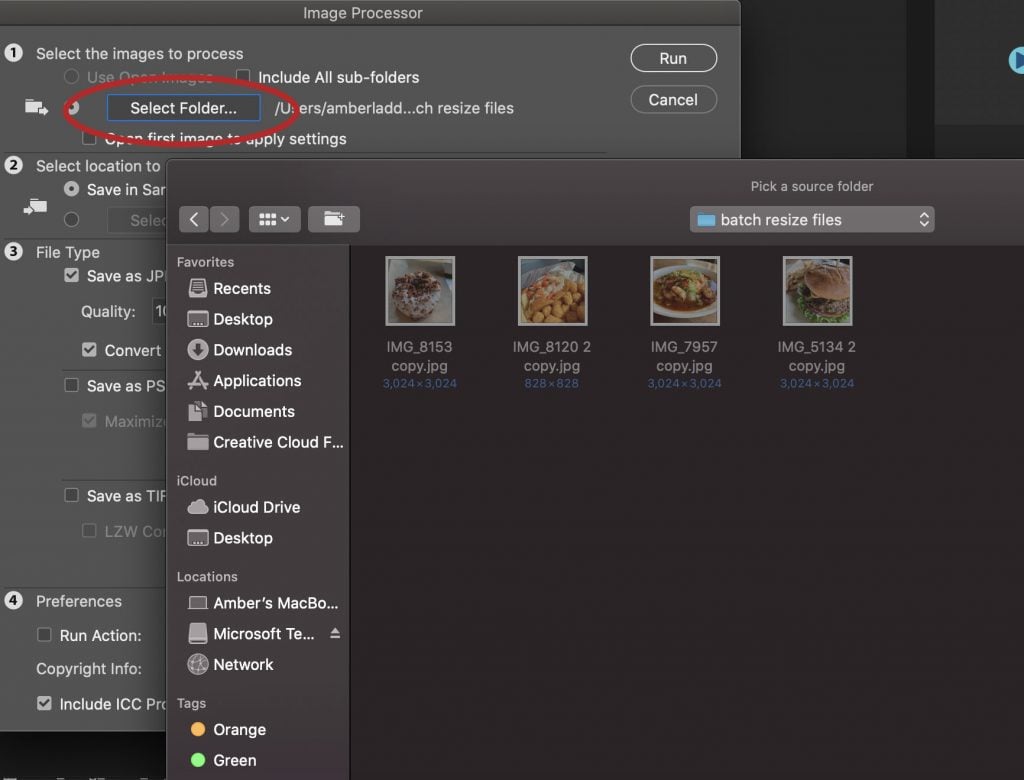
In the first section of the Image Processor screen, select either “Use Open Images” or “Select Folder” depending on how you organized your files in Step 1.
If you choose “Select Folder,” you can also check the box for “Include all subfolders” if you are working with multiple folders and you want all of the images in that folder hierarchy to be resized.
For this example, I chose “Select Folder and then navigated to my chosen folder shown in the pop-up window below. There is no subfolder so I did not check that box.
Step 4 – Determine Where to Save Your Resized Files
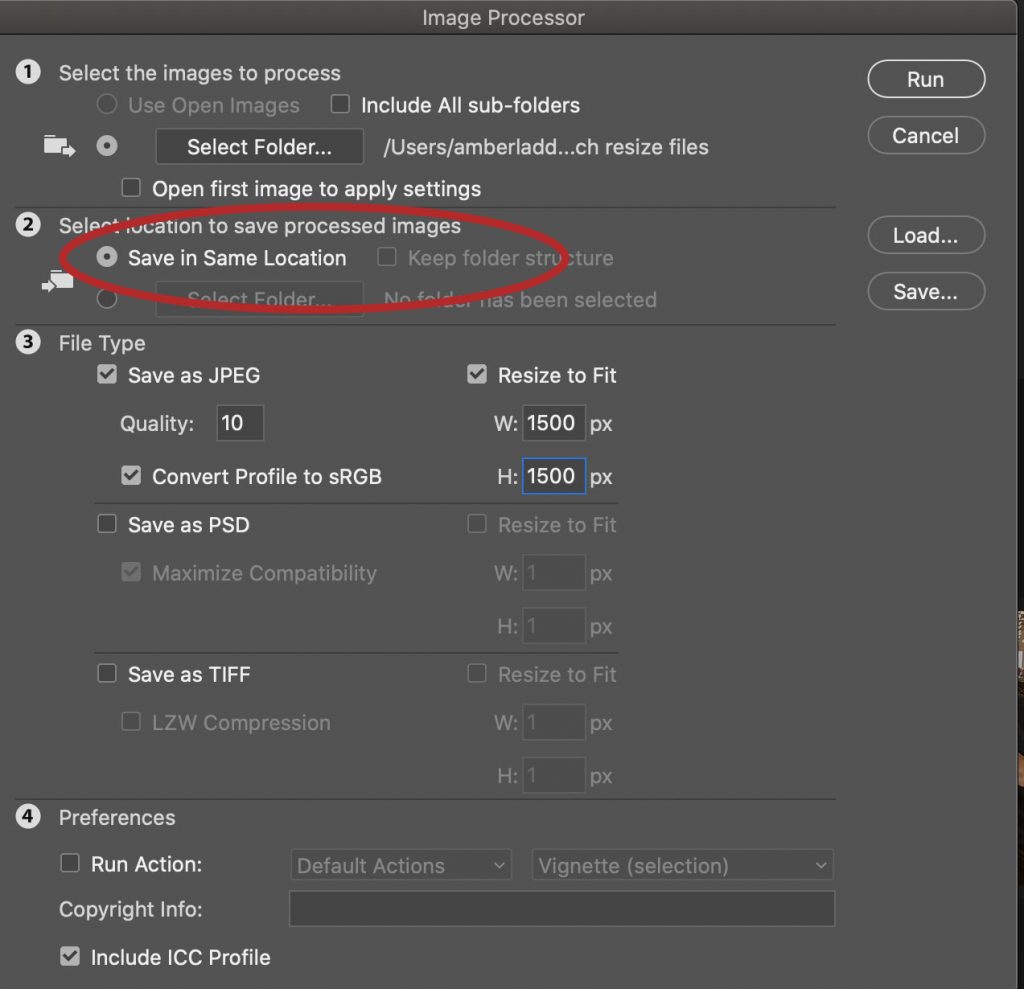
In section two, decide if you want to keep the new files in the original folder, or save them to a new one.
If you choose “Save in Same Location,” Photoshop will create a subfolder in that original location. If there is already a subfolder with the same name, Photoshop will add a number to the new subfolder to differentiate it from the original.
In this example, I chose “Save in Same Location.”
Step 5 – Determine The File Type and Set Parameters to Resize Images
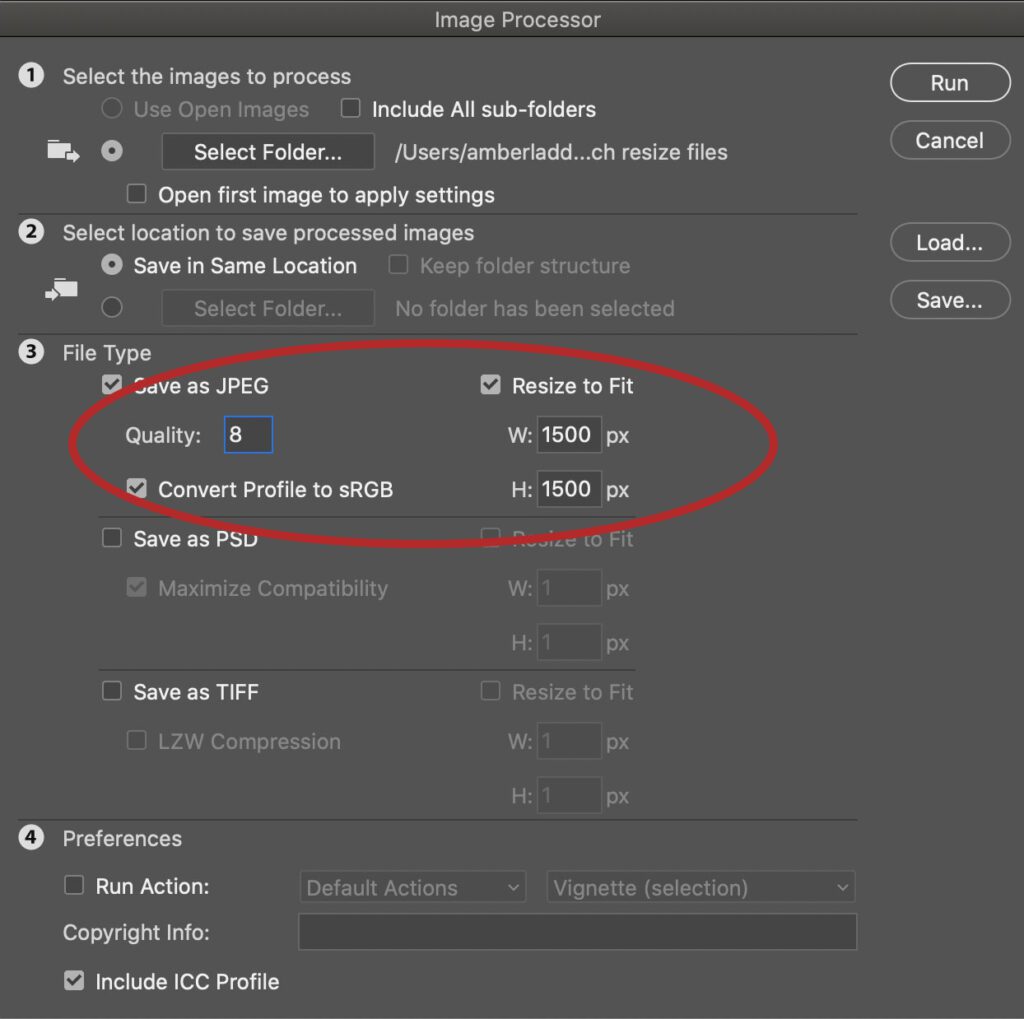
In section three of the Image Processing window, choose the file type for your new files. The options shown here are JPG, PSD, and TIFF. You can choose one, some, or all of these file types. Photoshop will create new files based on what you choose.
For this example, we will focus on the JPG option since it is the most common.
Set the Quality parameter to a number between 0 (lowest) and 12 (highest) based on your preference. This will determine how much data in the image you’re willing to sacrifice to get consistent sizing. A quality setting of 8 to 10 is typical for most JPEG files used on the web.
For the best color on the web, check “Convert profile to sRGB” here and “Include ICC Profile” at the bottom of the Image Processor window.
To resize all the images to the same pixel set, check the “Resize to fit” box, and then change the W (width) and H (height) settings respectively. These fields determine the size of all the files included in the script.
In this example, we’ve set the Quality parameter to 8 and set the resizing parameters to 1500 for both W and H.
Step 6 – Set Preferences As Needed
In the fourth section of the Image Processor window, you can select the “Include ICC Profile” option here, or use the drop-down lists to add formatting to your images. You do not have to select anything here if it doesn’t apply.
In our example, only the “Include ICC Profile” option is selected.
Step 7 – Run the Script
Click the “Run” button in the upper-right corner of the Image Processor window. Photoshop will open, resize, and save each image based on the parameters you set in the script.
Step 8 – Review Your Resized Files
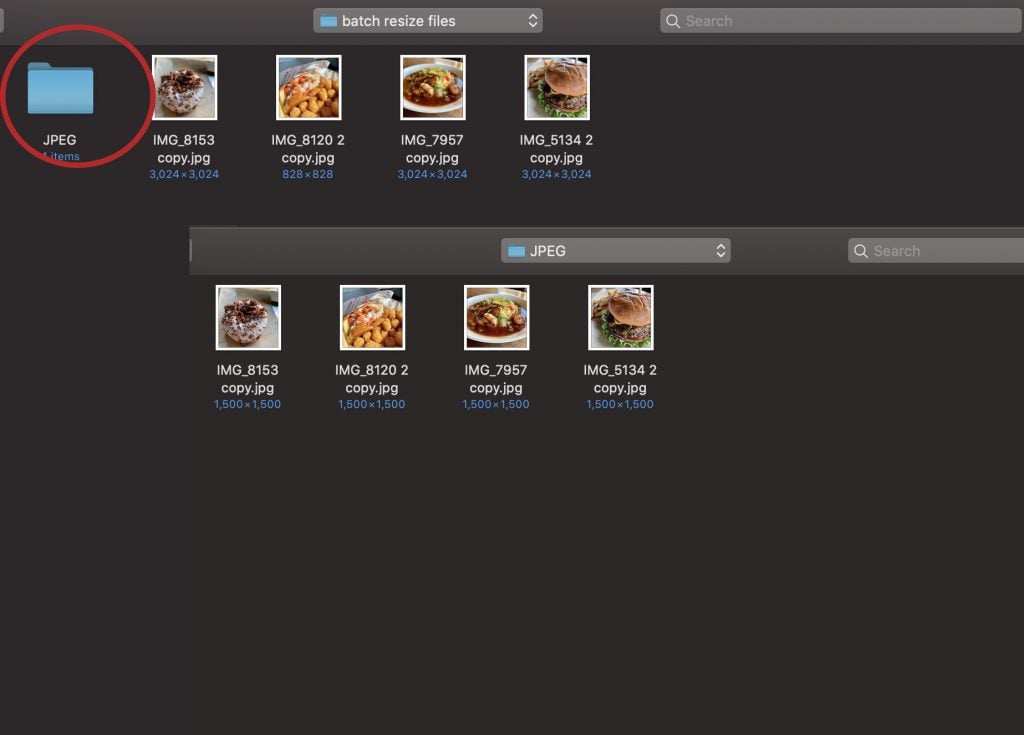
Navigate to the location or folder where you chose to save your new files. The new folder will be named with the file type you chose in the script (JPEG, PSD, or TIFF). You can verify that the files have changed by reviewing the sizes under each image.
Bulk Image Resizing Alternatives
If you’re more experienced in using Photoshop, you can also explore using a recorded Action and run an automated batch function to bulk resize images. This is a little more involved, but it allows you to save that action to refer back to later so you can resize other batches of images with just a couple of clicks.
If you don’t use Photoshop, have no fear! There are other options. If you prefer web-based applications, you can utilize resizing websites like this one from Shutterstock, or you can try picresize.com. These specific examples only allow one picture upload at a time but also allow you to edit the photos (crop, rotate, flip, etc.) in other ways at the same time. For bulk resizing, a good option is bulkresizephotos.com. This site allows you to quickly drag and drop multiple files into their interface and resize them all at once. The resulting images are automatically downloaded to your computer.
If you use Microsoft Windows, you can use this Outlook attachment hack to resize the files at once too.
Conclusion
The Image Processing script described here for Photoshop allows for quick bulk resizing images while also adjusting for the quality of the image. The other options are just as quick but don’t have that little extra quality tweak for uniformity. For any of the bulk resizing options mentioned here, the key is making the process fast and easy is to be sure you’ve organized your files ahead of time so that they are all in one place and easy to find.
Have you tried the Image Processing script yourself? How did it work for you? Or have you tried web-based applications and had better luck? Tell us about your experience in the comments!





Thanks, Amber, for the handy tips. I work as a graphical designer and resizing images is tricky. I came to know about the image processing script of Photoshop through my friend. The above post helped me to learn the bulk image resizing technique.
OMG! The lifestyle change! I’ve done a job. I’ve configured. I had to read the post a couple of times to get all the keystrokes and choices, but I eventually had and reduced about 60 photos successfully. A million thanks.
You’re very welcome. Small things like this can really make a big difference!
This is a must have!! When the customer gives you tons of photos for the website, all in HD… xDD
I don’t use Photoshop, but Gimp (GNU) and managed to find something similar. And it really saves a lot of time to be able to bulk resize.
Yay! So glad you found this helpful. 🙂