")
Your wedding is a once-in-a-lifetime event, so naturally, you’d want to store those precious memories as a keepsake. But what’s the best way? A wedding website.
If you’re unsure how to create your wedding website, this post is for you. It lists a step-by-step process using Divi and WordPress—a powerful combination and the only two tools you need to create a fully functioning wedding website.
Benefits of Having a Wedding Website
Your wedding is not just important for you. It’s also a valuable event for your family and friends. By having a wedding website, here’s how you make it easier for your loved ones:
- Centralized Information Hub: Your website can provide all the necessary details, such as event dates, venue location, dress code, and travel and stay accommodations, in one place to make sure everyone close to you is informed in advance.
- RSVP Management: Managing RSVPs through a wedding website simplifies the process for you and your guests. They can quickly confirm their attendance, and you can track responses, dietary restrictions, and guest lists in one place.
- Registry and Gift Information: Your website can include links to gift registries so your guests can easily find and purchase gifts. You can also offer integrated payment options for monetary gifts or contributions to a honeymoon fund.
- Forever Memory Hub: You’ll share your story, photos, and fun anecdotes on your wedding website, which becomes a go-to resource for your loved ones to refresh memories whenever they want.
What You’ll Need to Create a Wedding Website
You must start with a solid foundation to create an effective wedding website. Here are the only necessary tools you need:
- SiteGround: Reliable and secure web hosting to give your wedding website a living space. You’ll store all your website data in SiteGround hosting.
- WordPress: An all-in-one content management system where you’ll work on your wedding story. WordPress is secure, trustworthy, and free to use.
- Divi: A powerful WordPress theme with beautiful wedding templates that give you a complete wedding website without much effort.
Step-by-Step Guide to Creating Your Wedding Website
Creating a website might sound highly technical, and in some cases, it is. But it’s super easy with the right tools. The process we show you below is the easiest way to create a secure and stunning wedding website in less than an hour.
1. Get a Domain Name and WordPress Hosting
Your wedding website needs a digital home. To do this, you must choose a domain name, content management system, and web hosting.
Choose a Content Management System
WordPress is the most popular, secure, beginner-friendly content management system, powering nearly 40% of all websites. You’ll love working with WordPress because it provides two major benefits:
- A centralized dashboard to manage your website content.
- A library of plugins and themes to add functionality to your website.
The best part? WordPress is free to use. We also recommend using WordPress because it offers flexibility to scale—it has e-commerce and blogging capabilities if you want to grow your site further.
Choose a Domain Name
How to choose the perfect domain name for your wedding website? Unless you have already brainstormed, the best idea is to go with your couple’s name.
For example, if John is marrying Cera, a combination of first names is a perfect domain name for the couple’s wedding website. You can register for this domain name through NameCheap at affordable prices.
If you want to avoid technical setup and save money, get your domain with SiteGround.
Get WordPress Hosting
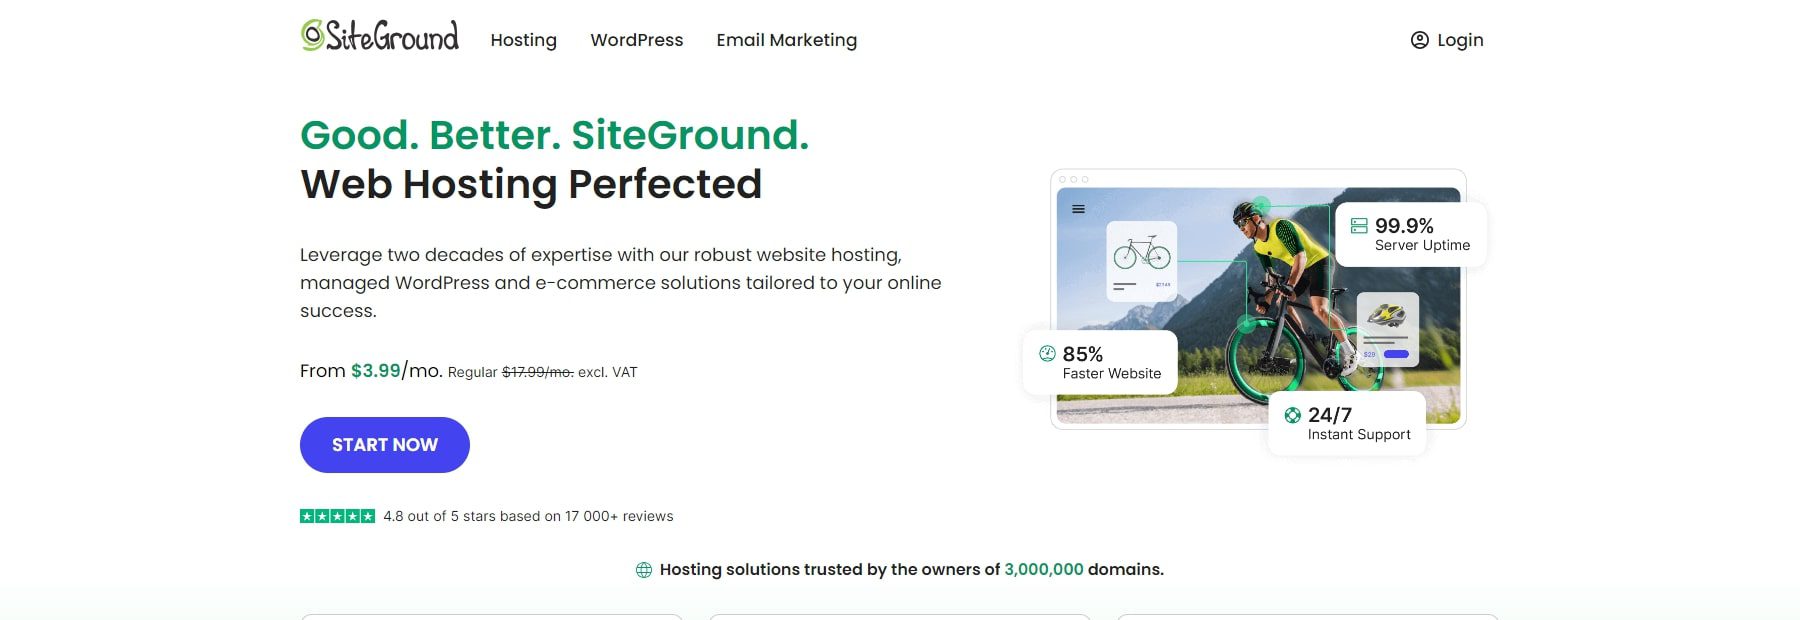
You’ll get your wedding website a digital space to live with web hosting. SiteGround is a secure, trustworthy, and reliable hosting perfect for a wedding website. Here’s why:
- You can get a free website domain (for the first year) with SiteGround. This also means centralized management in one dashboard without worrying about the technical setup, such as setting up DNS records.
- SiteGround offers WordPress-optimized web hosting, which means great performance and easy content management in one dashboard.
- With SiteGround, you get WordPress auto-installed in seconds, so there is no need to download and install it manually.
So, there’s no need to register your domain name and WordPress separately—they’re in one place with SiteGround.
2. Install the Divi Theme (Includes Wedding Starter Site)
Divi is a beginner-friendly WordPress theme with stunning wedding site templates and powerful tools, Divi Quick Sites and Divi AI, to help you create a fully functioning, modern website within an hour. It’s ideal for a wedding website because of these reasons:
- Full-site Wedding Templates: You get professionally designed complete Wedding site templates, including home, about, contact, and RSVP pages. All you need to do is adjust the content and make it yours. Also, check out our other free Wedding Engagement layout pack.
- Built-in Contact Forms: Divi has a built-in Contact Form module to create Contact and RSVP pages. You don’t need additional plugins to add this functionality.
- Built-in Countdown Timer: Want to display a countdown timer to build anticipation around your wedding date? Divi includes a built-in Countdown Timer for that.
- Map Integration: Add your venue location with Divi’s map integration to make it easy for guests to find the venue address.
- Gallery Layouts: Divi includes stunning Gallery layouts in grid, slider, and masonry to display your photos attractively.
- Built-in Conditions Option: Divi lets you set conditions on content elements and entire pages to show them to only a few people. For example, if you want to show the event date and location to only those who have RSVPed, you can set conditions on that page.
Basically everything you need to build your wedding website is in Divi. Are you worried about your website content because you don’t feel like a good storyteller? Leave that to Divi AI, your writing assistant, to help you generate captivating website copy in seconds. Just tell Divi AI what you want it to write (broken sentences are fine), and watch it tell your story perfectly.
Divi Pricing (Yearly and Lifetime)
Your Divi membership costs $89/year, which includes the Divi theme, Bloom and Monarch premium plugins, Extra theme, and premium support from Elegant Themes. If you’d like to get Divi for life, you can get it for a one-time payment of $250.
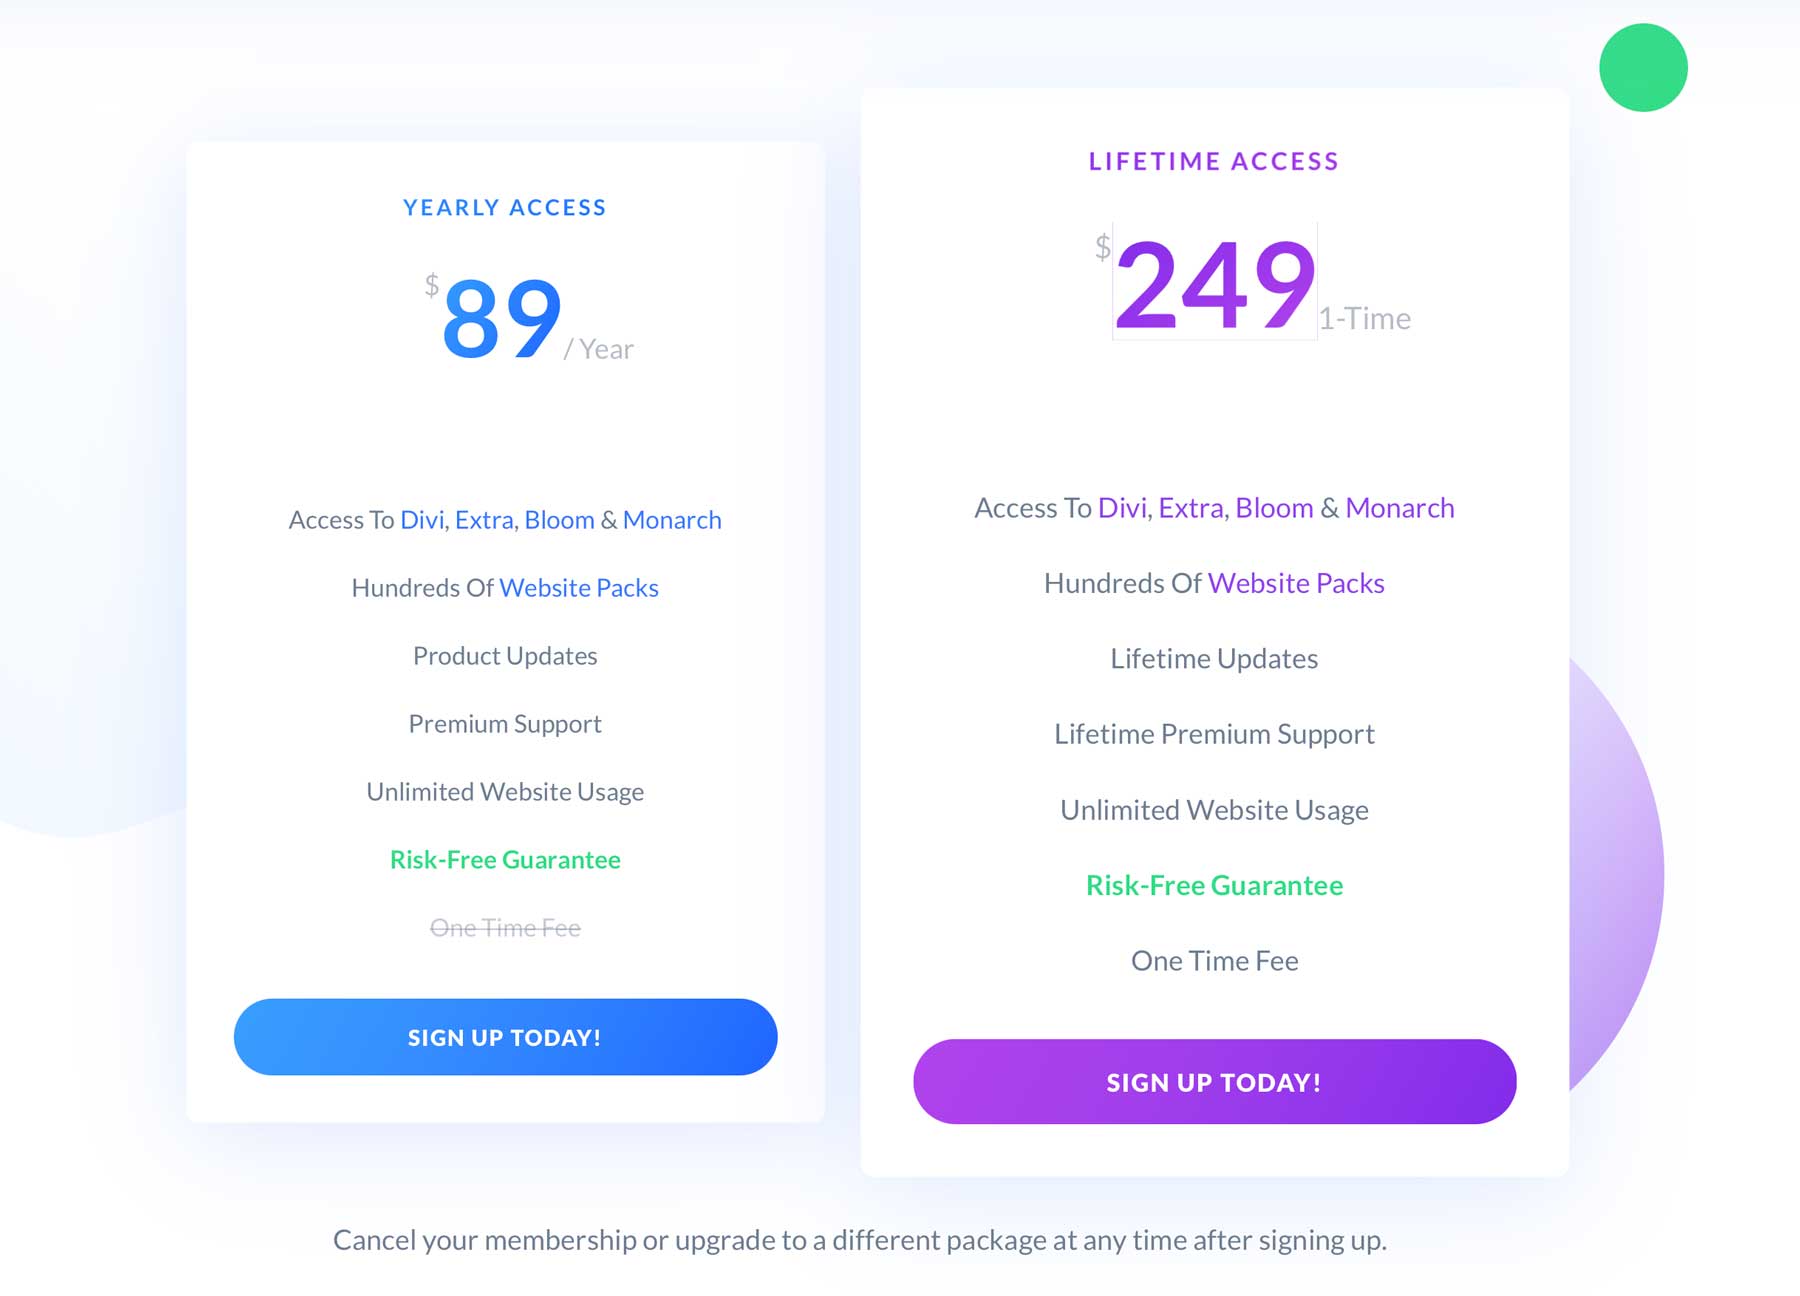
Great news—you can save even more by signing up for Divi today and getting a 10% discount.
Installing Divi on your WordPress dashboard is pretty straightforward. First, purchase Divi, download its zip folder, upload it on WordPress, install it, and activate the Divi license. Fret not. Here’s a step-by-step walkthrough of activating Divi completely:
3. Build Your Wedding Website
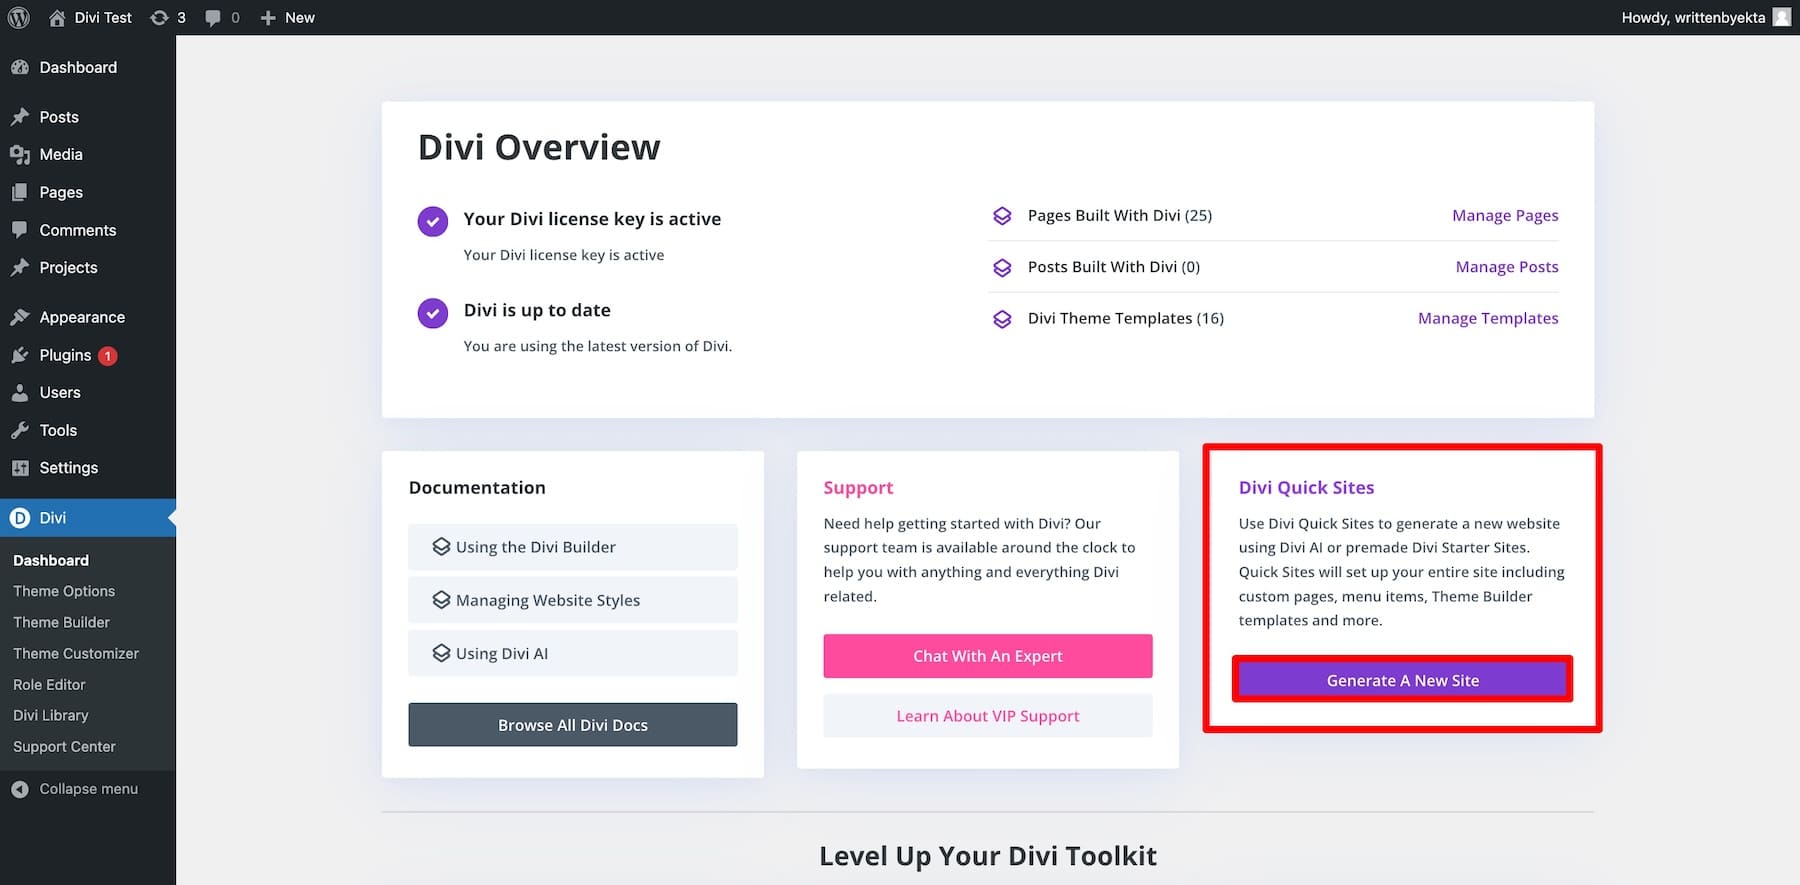
After you have Divi installed and activated on your WordPress dashboard, you can build a complete wedding website using Divi Quick Sites and Starter Sites in less than five minutes.
Divi Quick Sites designs stunning websites with all the necessary pages to match your needs in less than five minutes. Your site will include a pre-designed home, about, services, contact, gallery, Theme Builder templates, global styles, and presets with branding. Basically, everything is pre-done, so you just have to adjust the content and add your images.
Let’s generate your wedding website using Divi Quick Sites. From your Divi dashboard, choose Divi Quick Sites and click Generate a New Site.
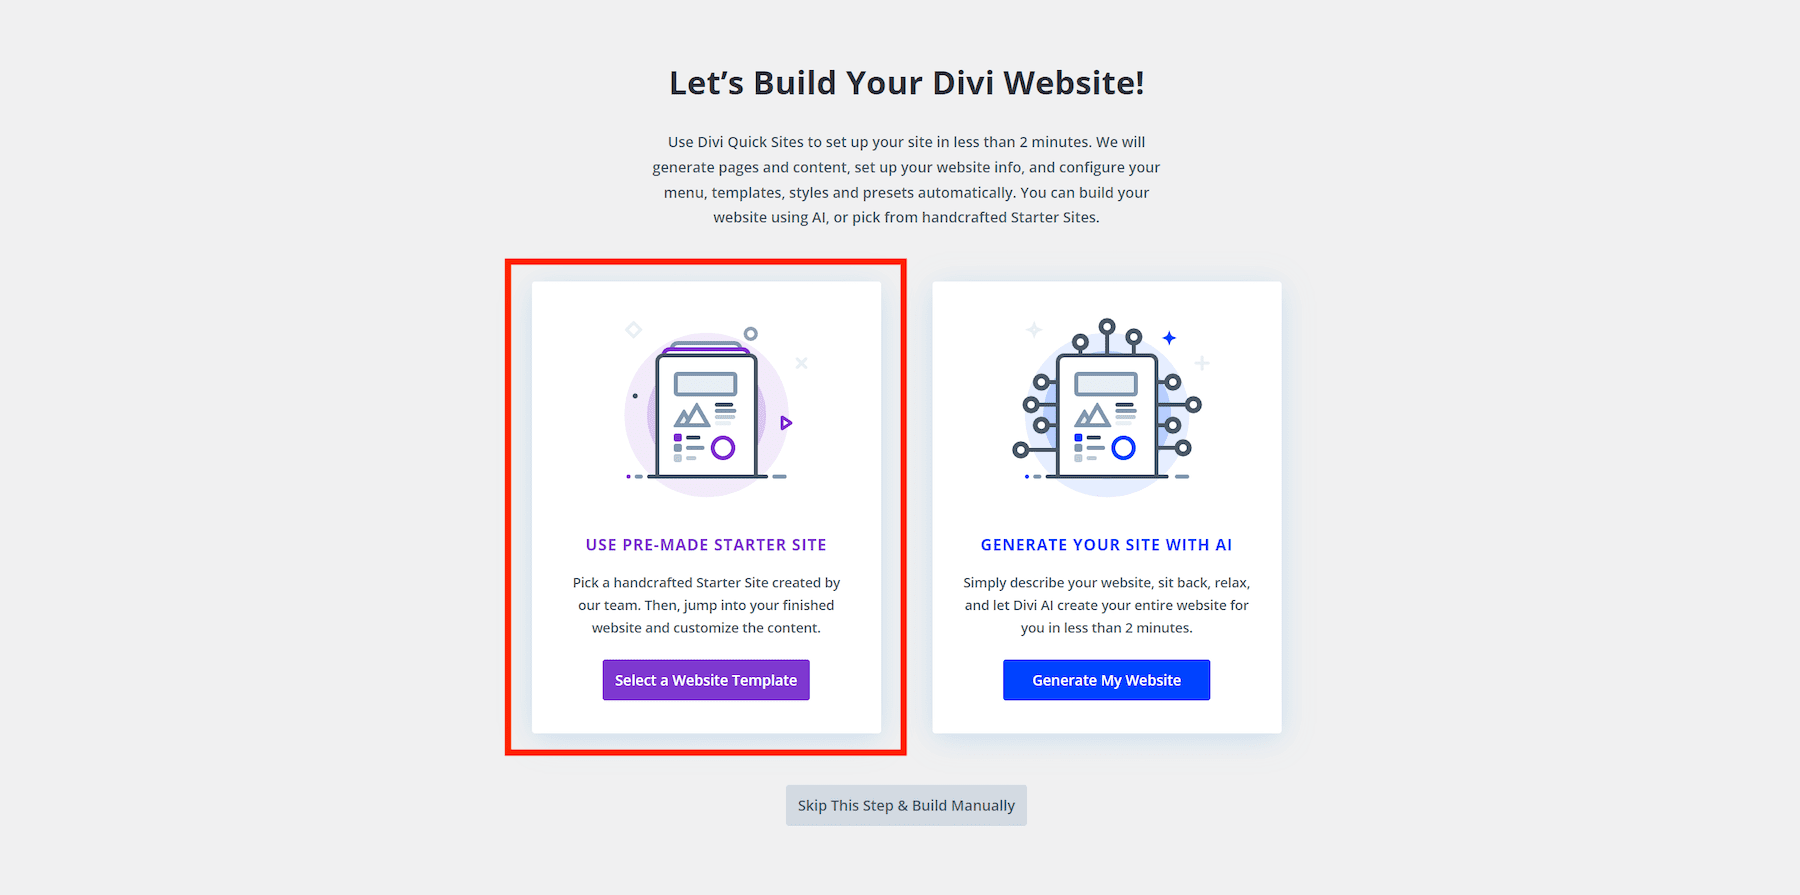
You’ll be asked to choose between two options:
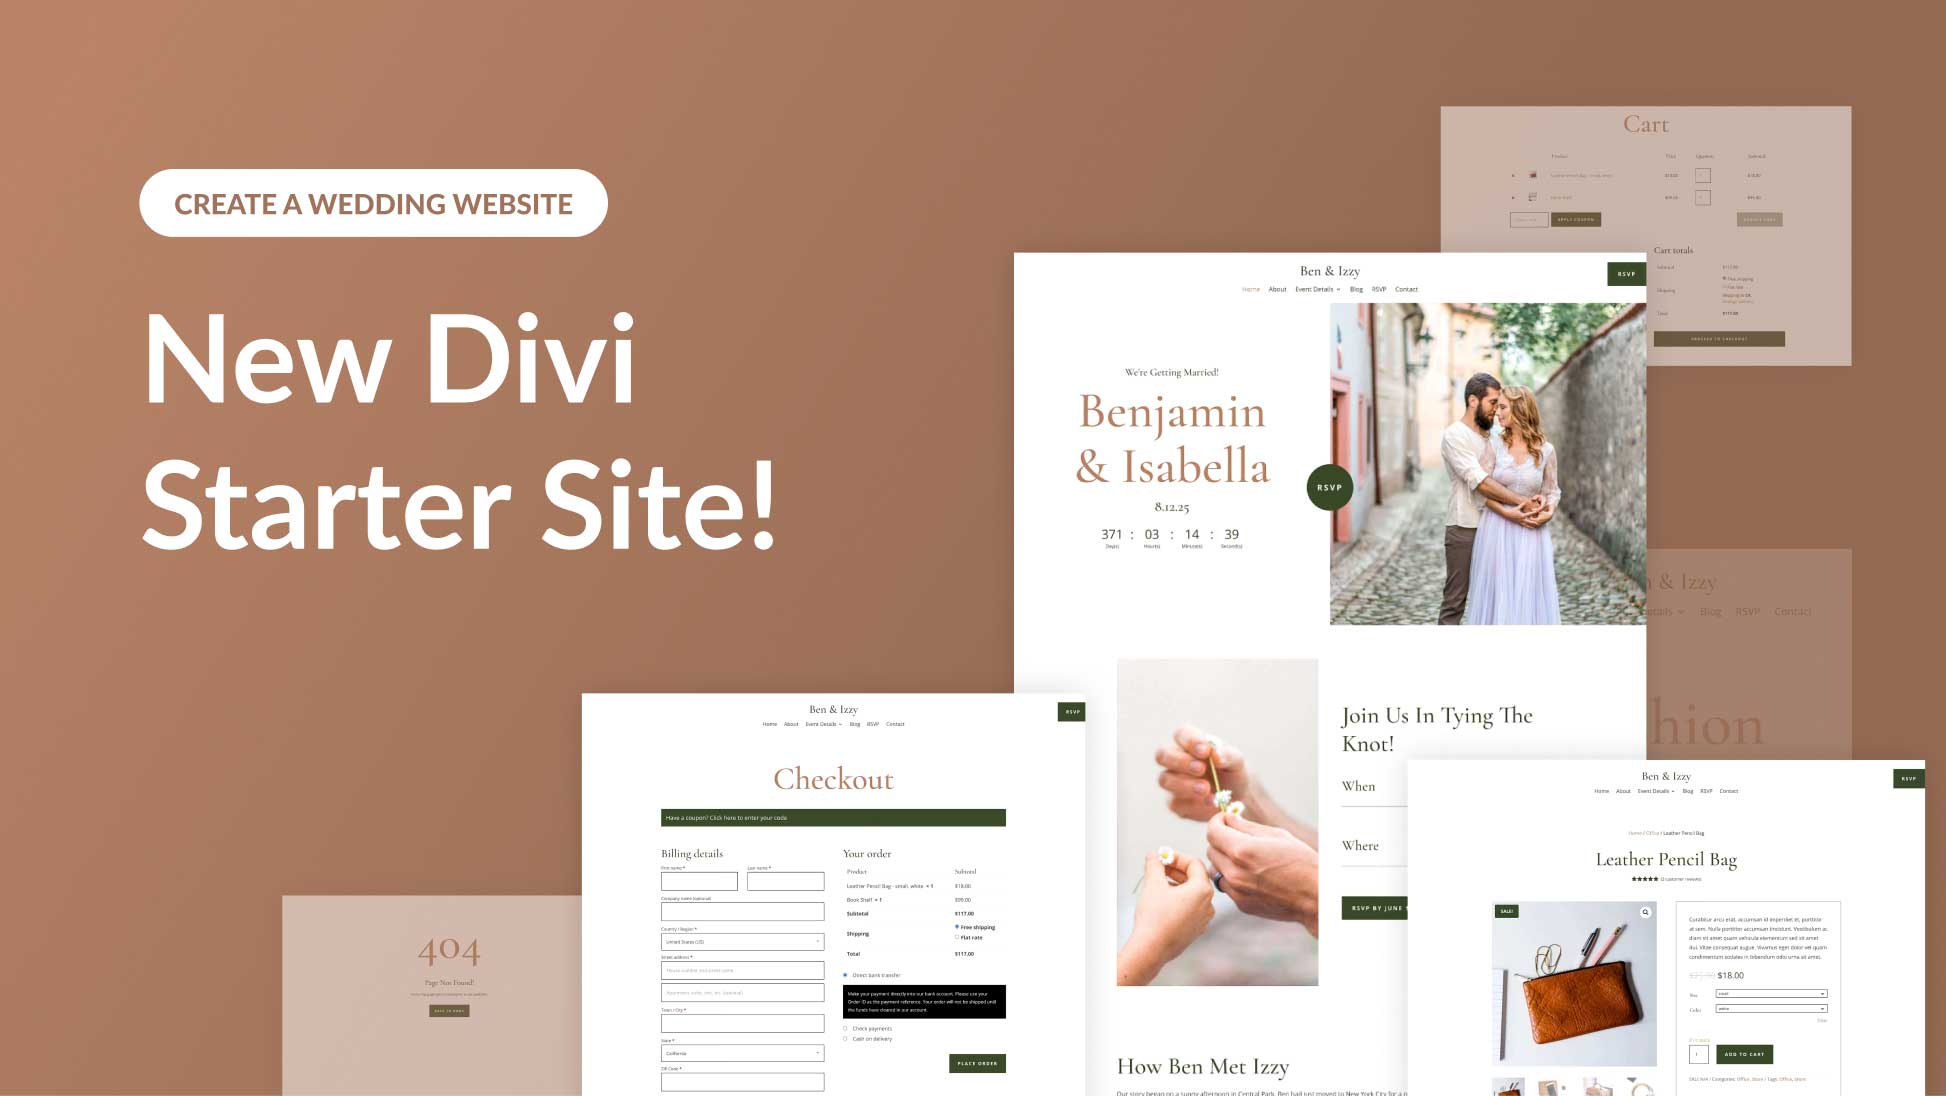
- Use a Pre-Made Starter Site: You select the pre-designed Wedding Starter Site, which includes everything from pages to branding, so your site is ready to launch with a few tweaks.
- Generate with Divi AI: You instruct Divi AI to generate a website based on your needs. It generates a wedding website that includes relevant pages and functionality.
Creating a Restaurant Site Using Starter Sites
We’ll choose the Starter Site method to generate your wedding site because it’ll give you a wedding site designed by Divi experts, who know the branding side of things much better. Your site will be ready to use immediately, but you can always tweak it to your liking.
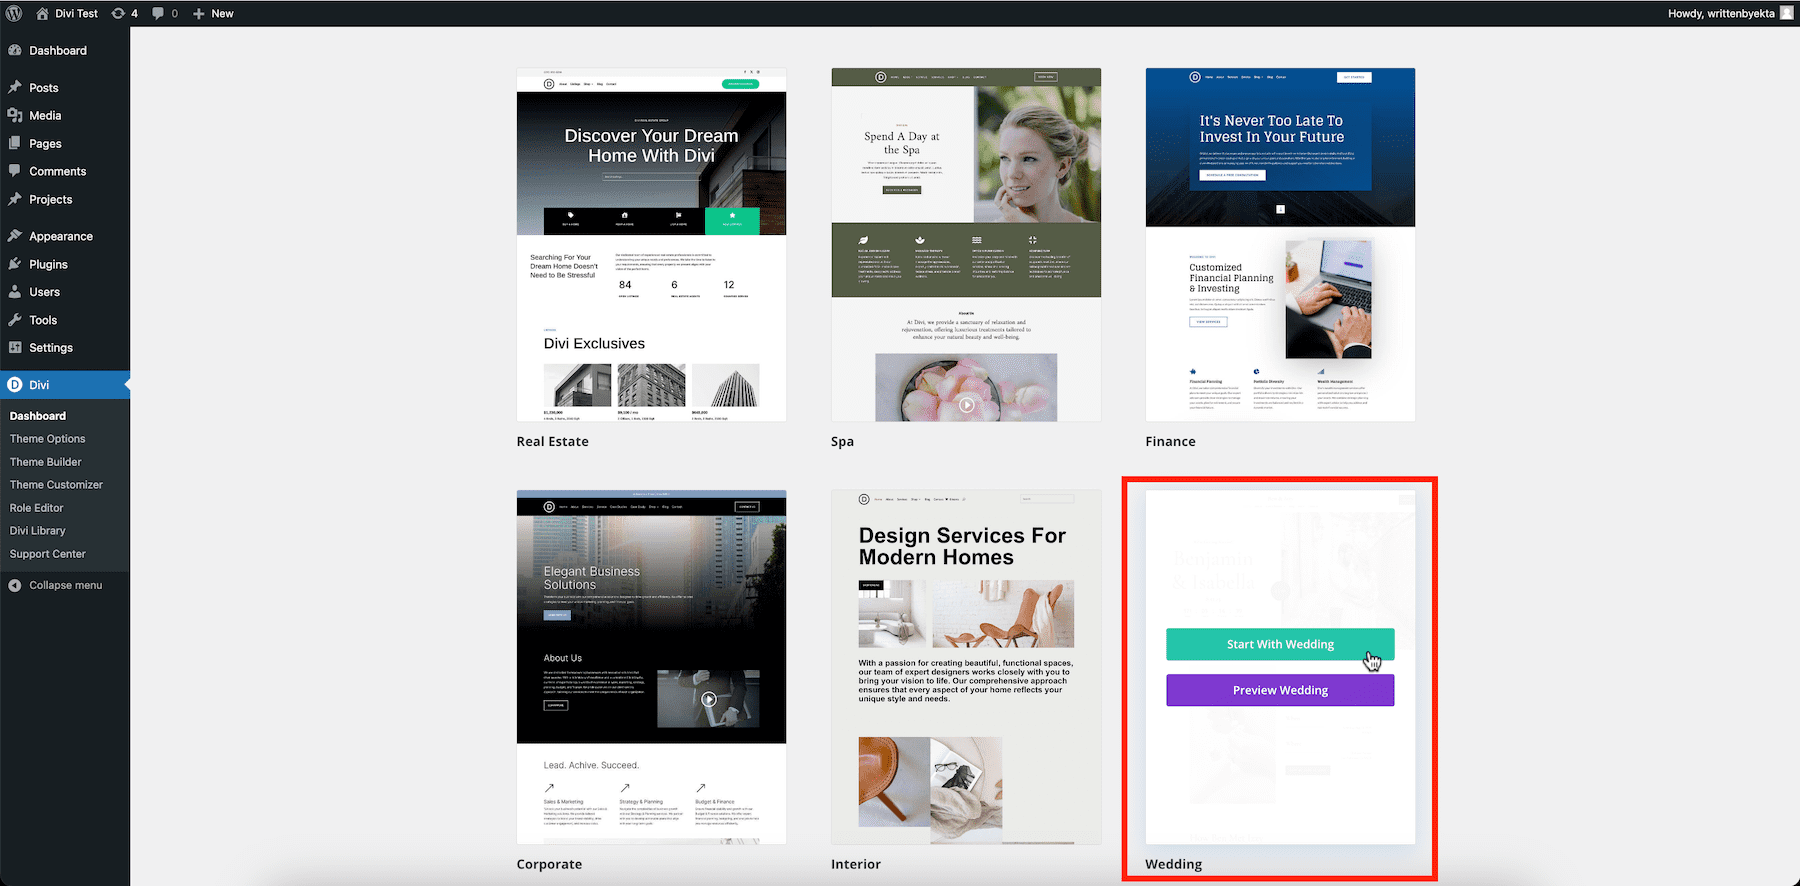
Choose Use a Pre-Made Starter Site and click on Select a Website Template.
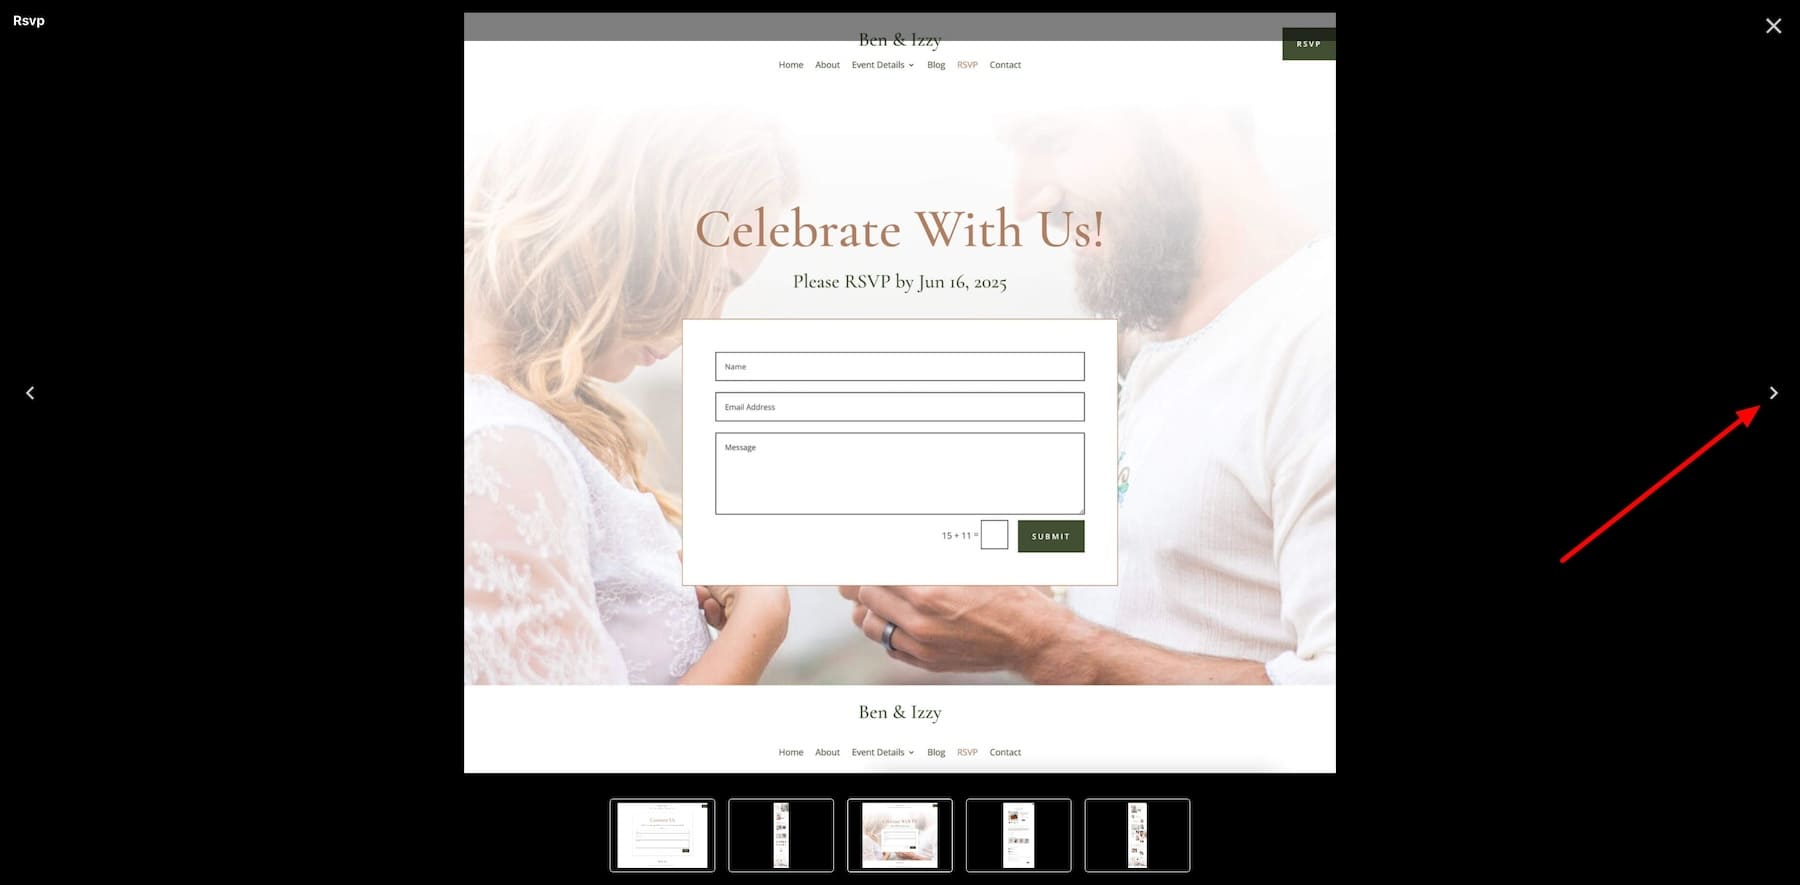
You’ll choose the Wedding Starter Site in the next window to model your site. Divi Quick Sites will replicate this site’s style. Preview each page if you’d like to see how your site will look. To preview, hover over the Wedding Starter Site and click Preview Wedding.
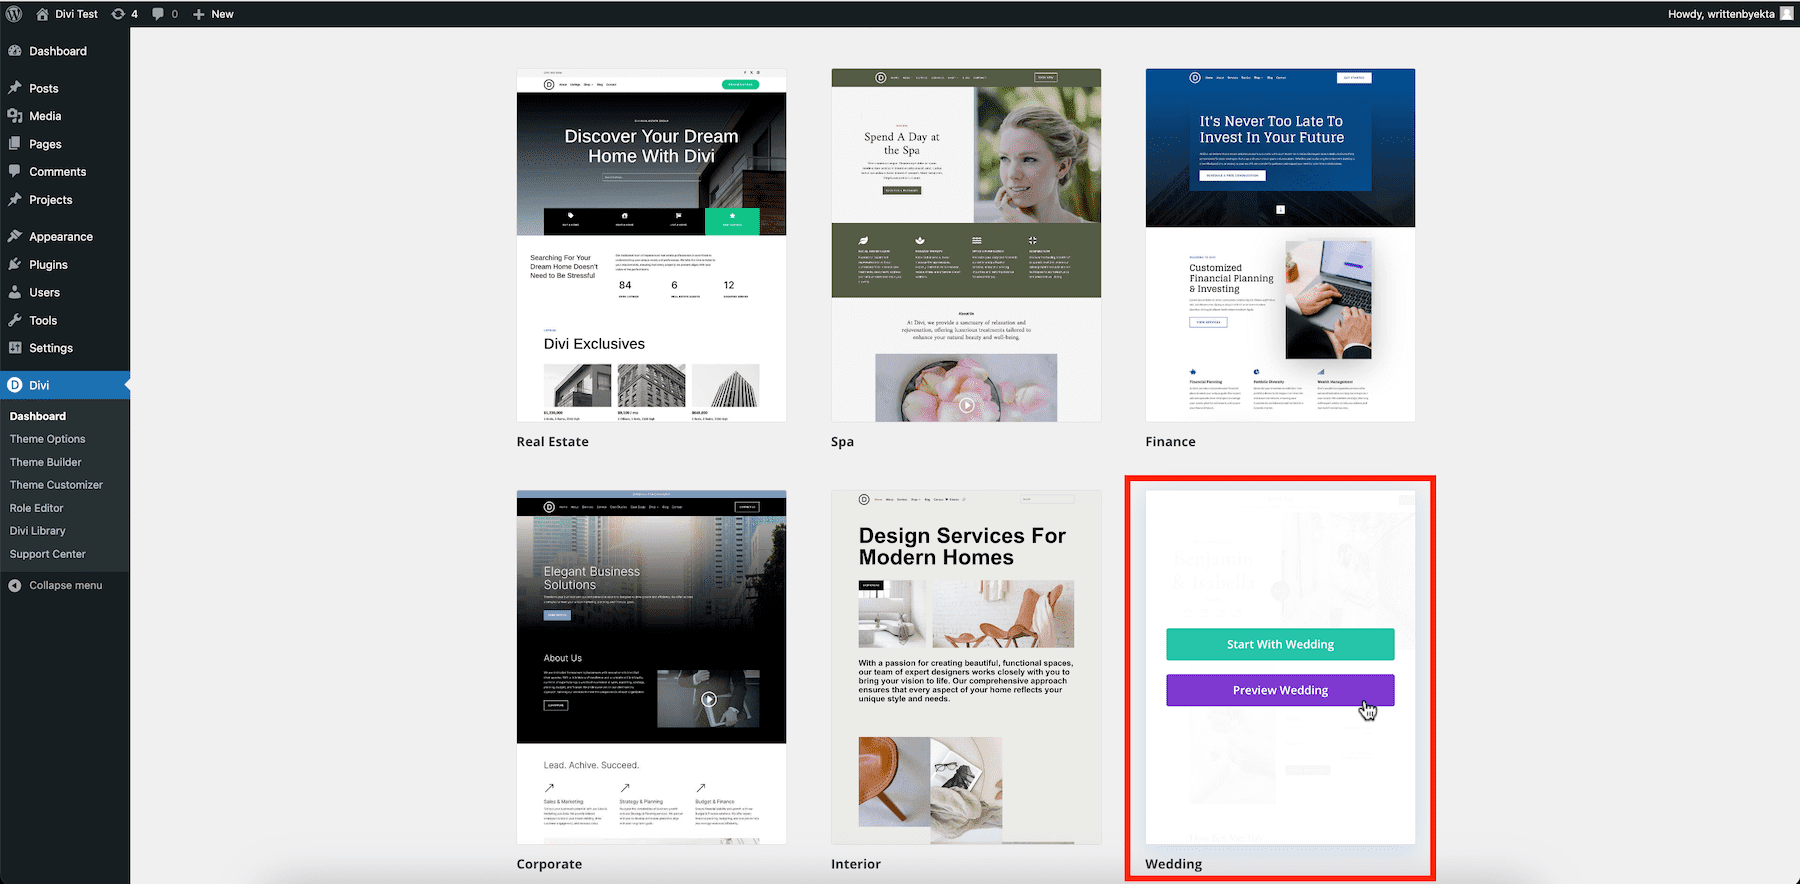
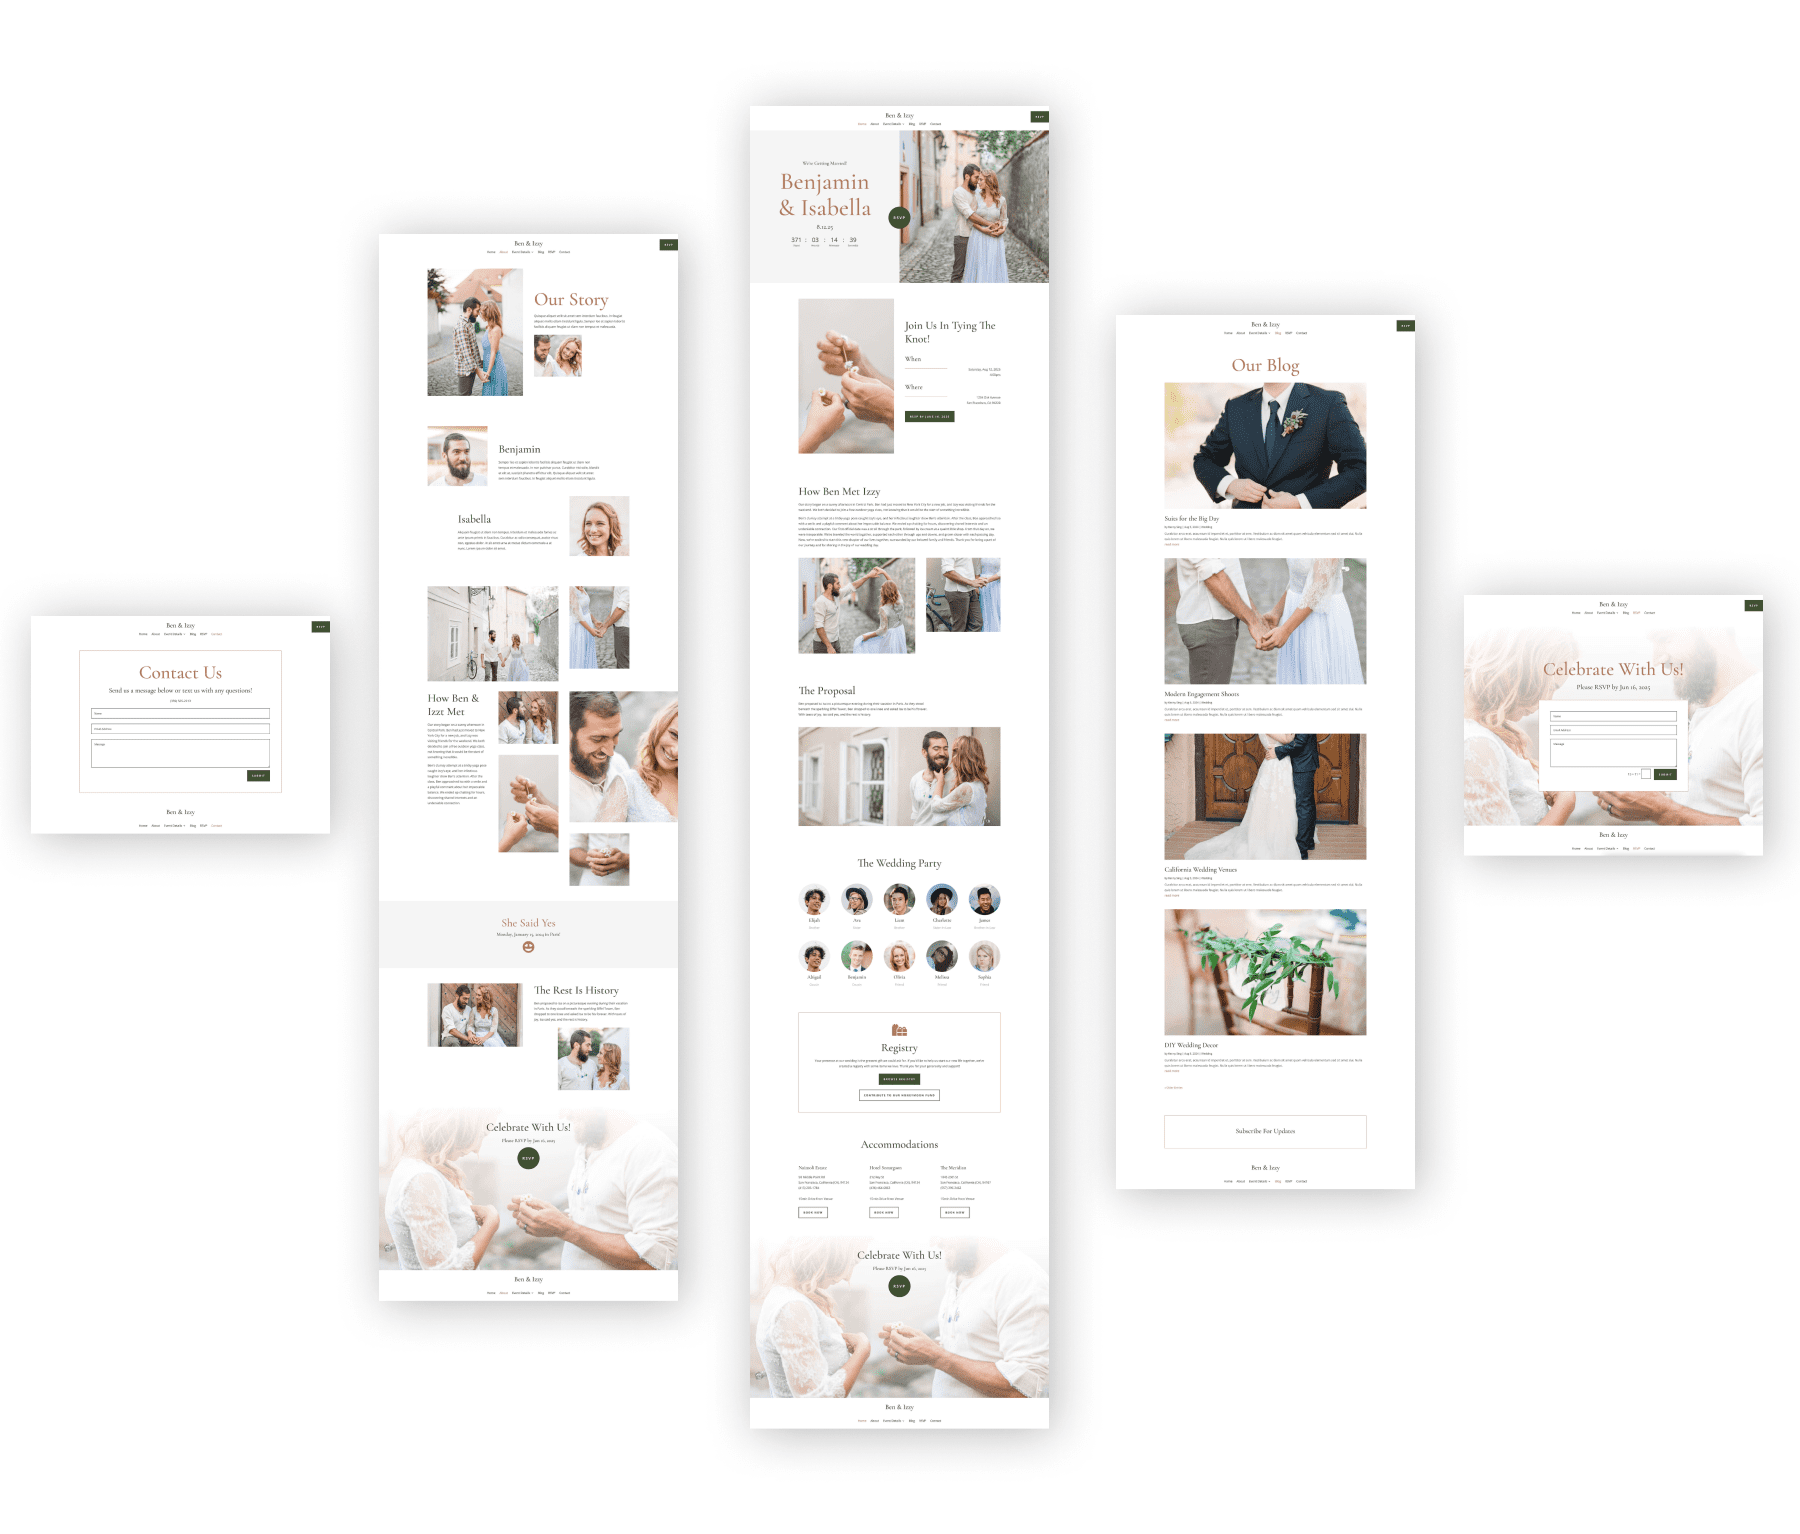
Use the slider button to see the different pages your site will have. The Wedding Starter Site includes home, about, contact, RSVP, blog, and shop pages.
To start building using the Wedding Starter Site, hover over Wedding again and click Start with Wedding.
Divi Quick Sites will ask you to enter the necessary details to build a wedding website that fits your needs.
- Enter your Site Name (your domain name) and Site Slogan.
- Upload your Site Logo to allow Divi Quick Sites to add it to your default header site-wide. (Use Adobe Express to design one for free.)
- Select the Pages you want to include in your site. Since you’re not planning to start an online store, uncheck Shop.
- Choose the Add A Custom Page button to add another page.

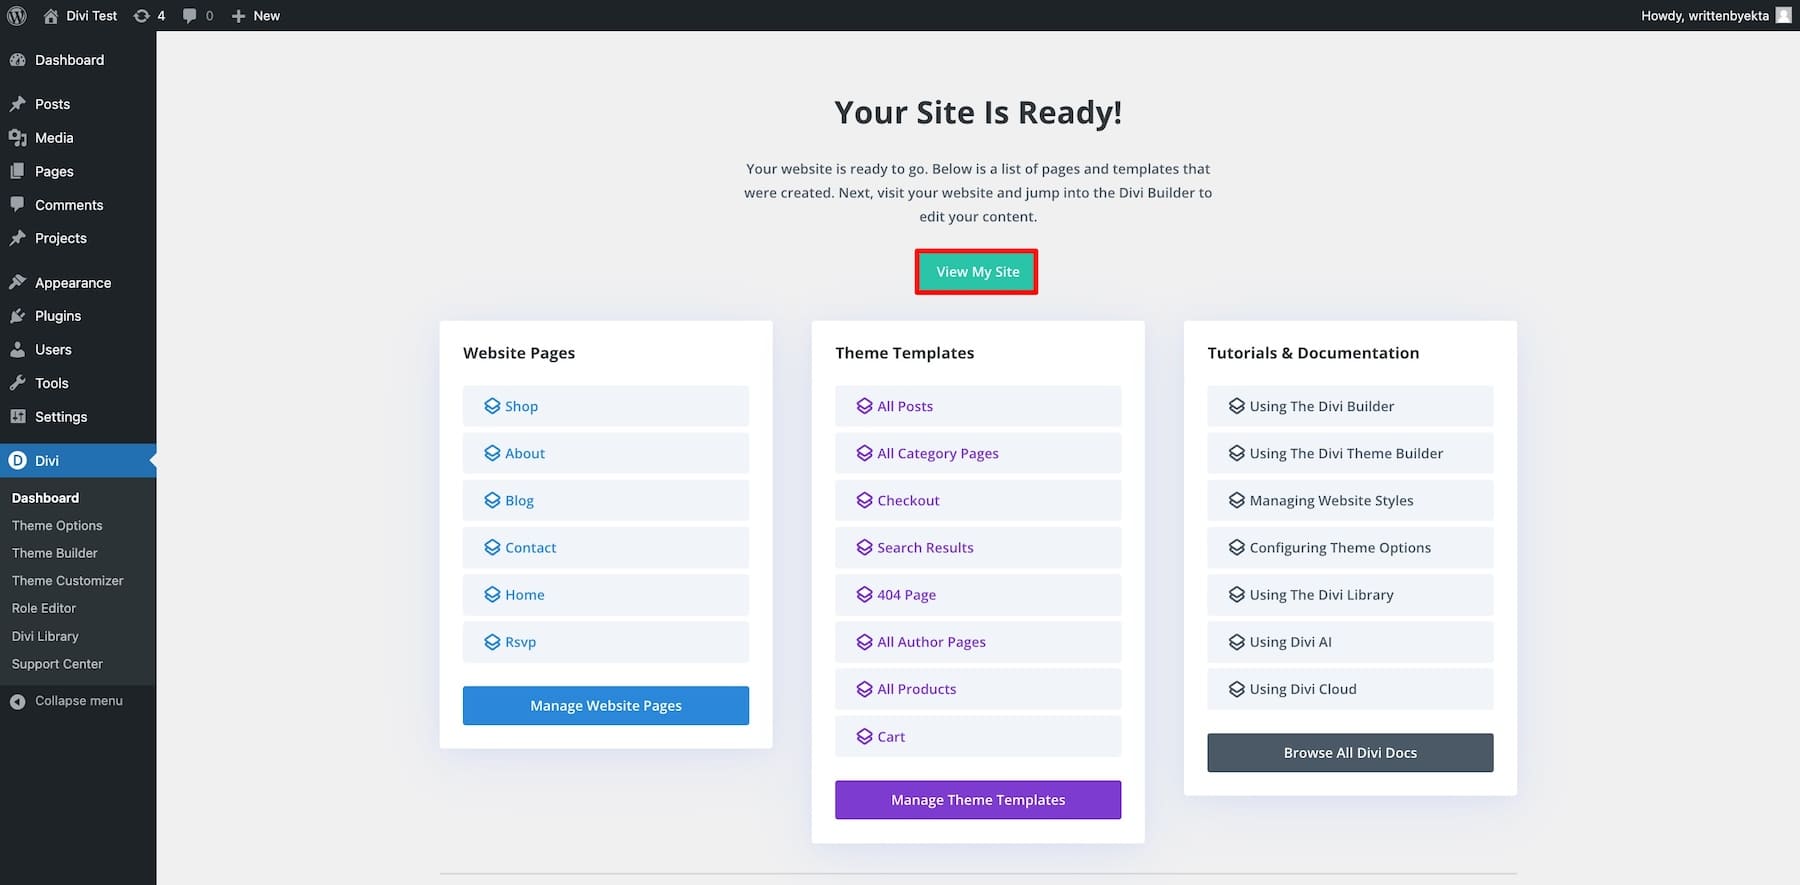
Once you’ve done this, click Generate & Publish My Website. Your site will be generated in 2-3 minutes.
And your site is ready! Here’s how your wedding site will look:
That’s it—your wedding site is ready. All you need to do is add your content and images, which can be done quickly and easily using Divi Builder.
Creating a Wedding Website in Minutes Using Divi AI
If you don’t want to use a Starter Site but want to create an entirely different website, choose the Generate Your Site with AI option.
Just like you added instructions for your Wedding Starter Site, fill in your website details to let Divi AI know how you’d like your site to look. Once done, click Generate & Publish My Website and watch Divi AI design your website in less than two minutes.
4. Customize Your Wedding Website
Your wedding site will need a personal touch. This includes adjusting website content, adding images, branding colors, and fonts, and modifying page and element styles.
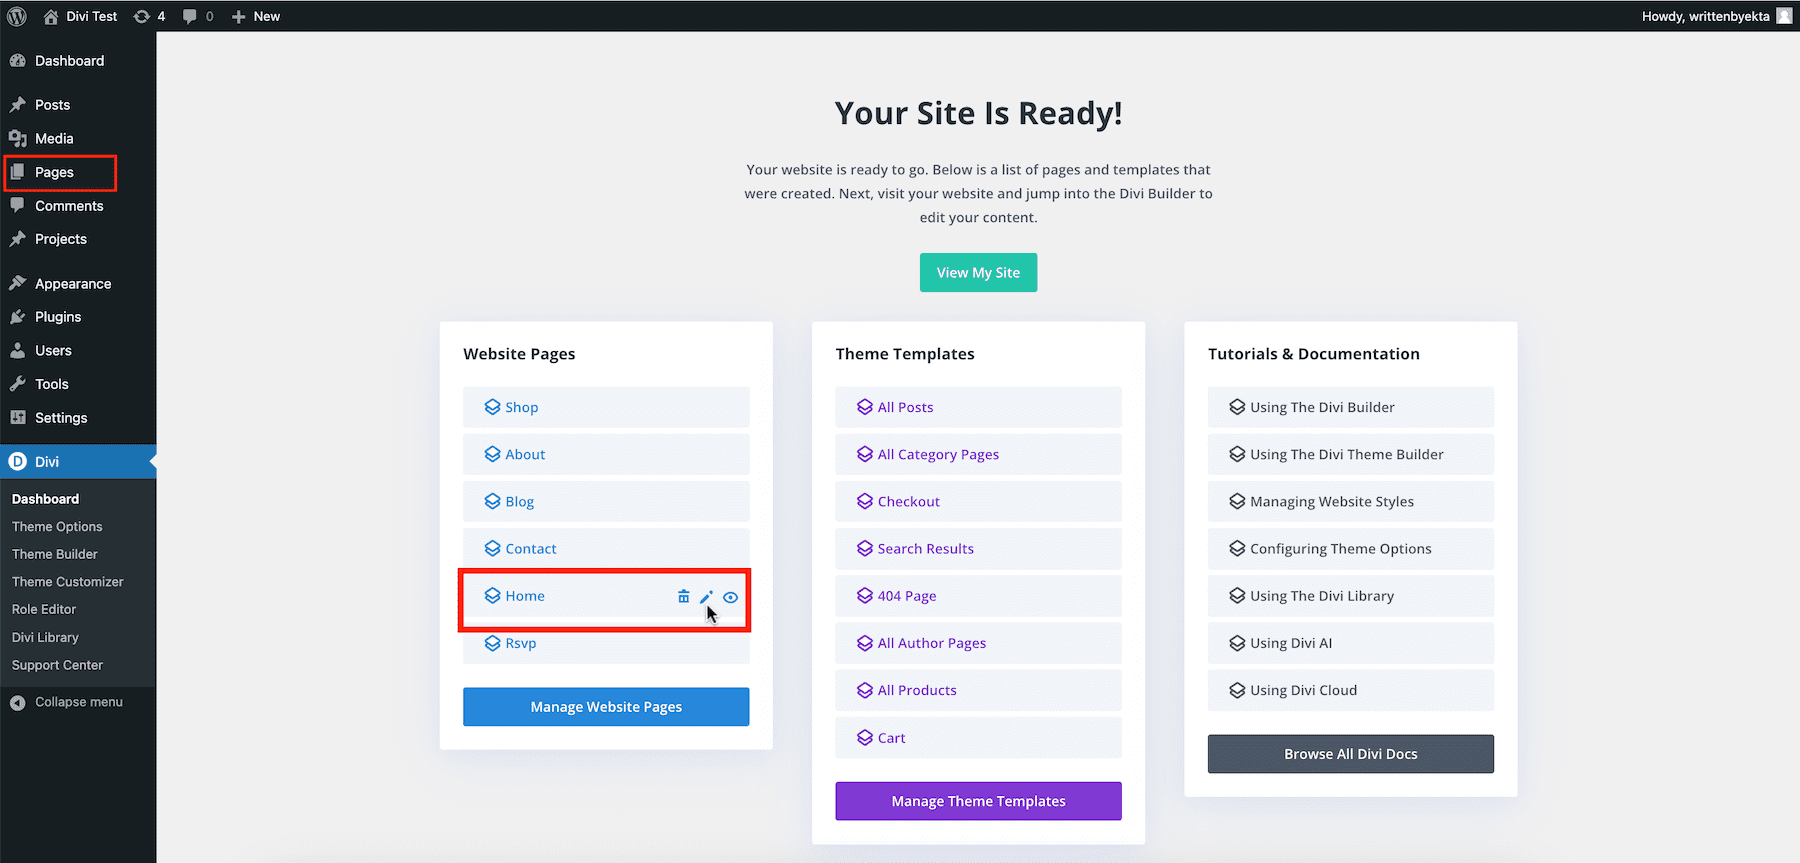
Here’s Your Site Is Ready page, where you can access all the pages and templates that the Divi Quick Sites generated. To view your site, click on View My Site.
Editing Wedding Site Pages
Let’s start with editing individual pages. To edit the Home page, hover over it and click the pencil icon. You can also go to Pages > Home from your WordPress sidebar.
You’re now editing your wedding site’s home page using Divi Builder—a drag-and-drop visual page editor that makes designing and editing web pages as easy as moving the cursor. To edit any element, hover over it and click the gear (settings) icon. This opens the editing window, where you’ll find all the settings in the Content, Design, and Advanced tabs.
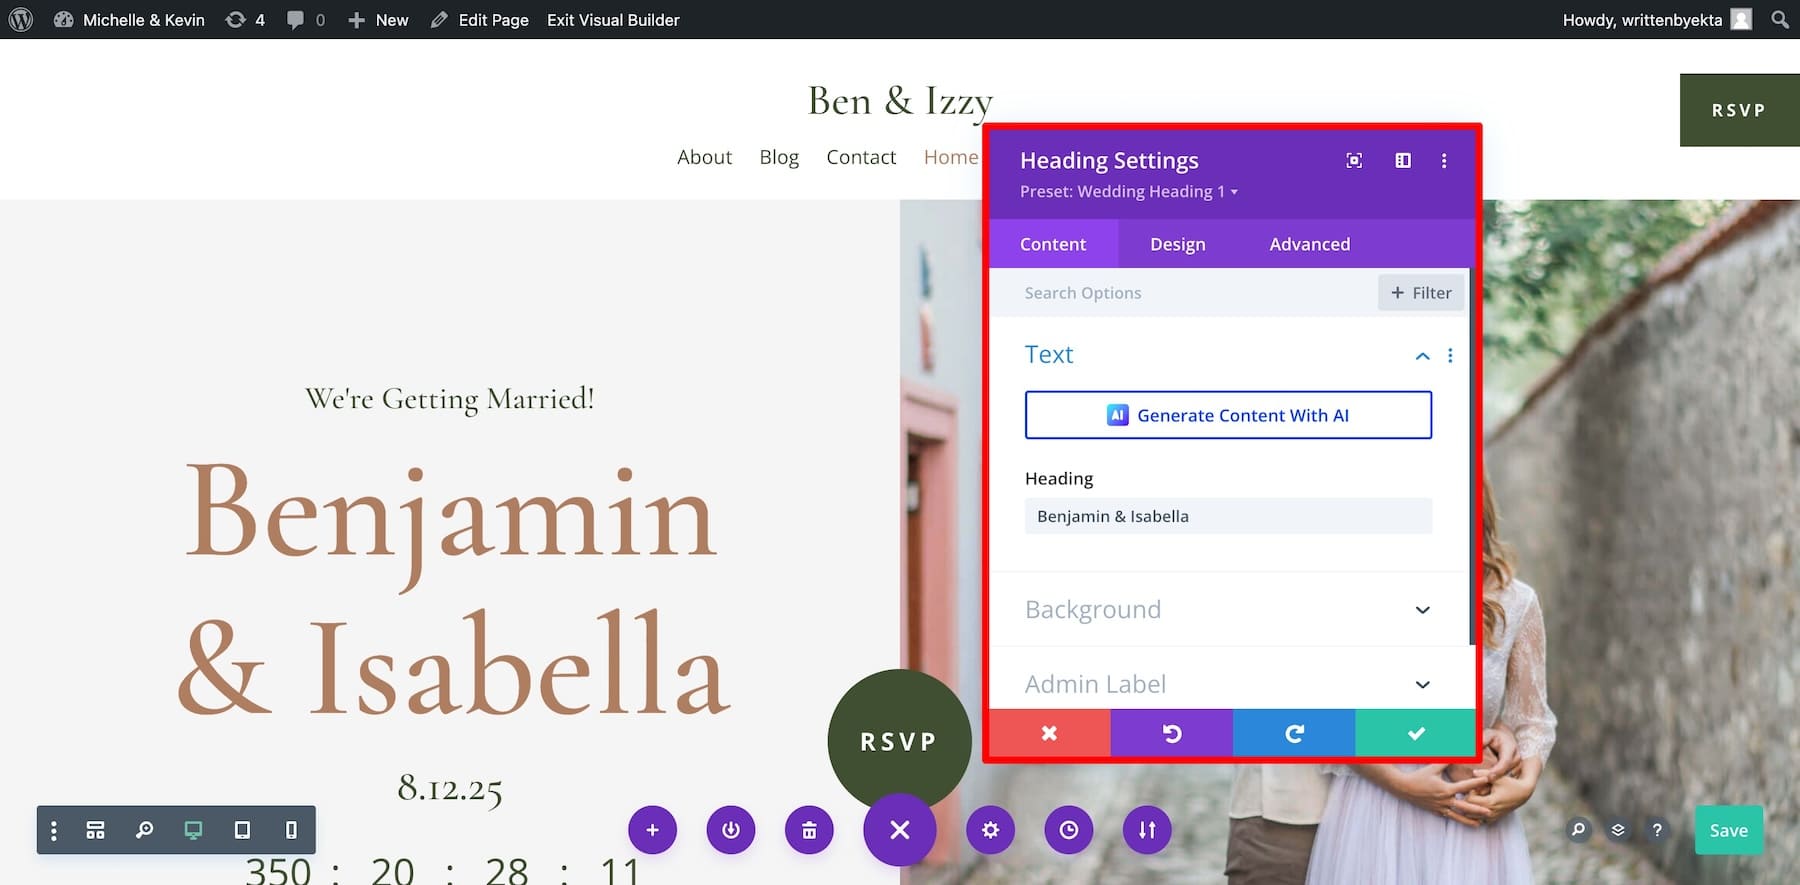
Your homepage includes a built-in countdown timer, so you don’t need to install another plugin. Just modify its settings, and your page will adjust. To edit, hover over the countdown timer and click on settings.
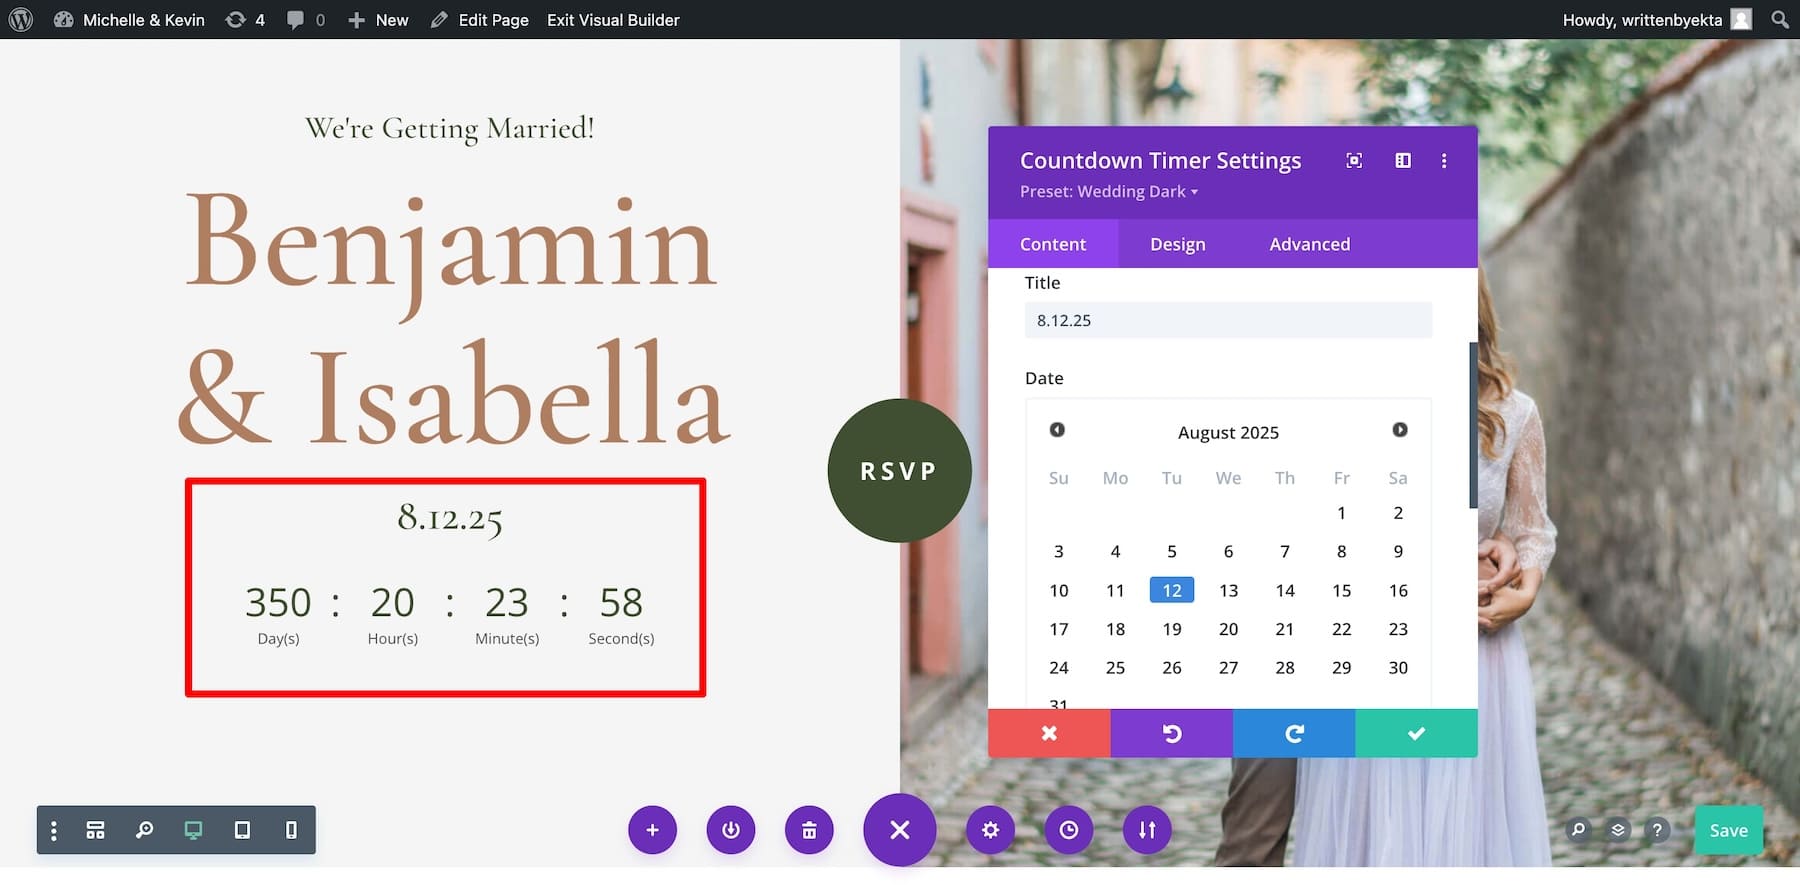
Give it a title, choose your wedding date and time, and click the green check button to save. Next, upload your images. To edit an image module, hover over it and click settings.
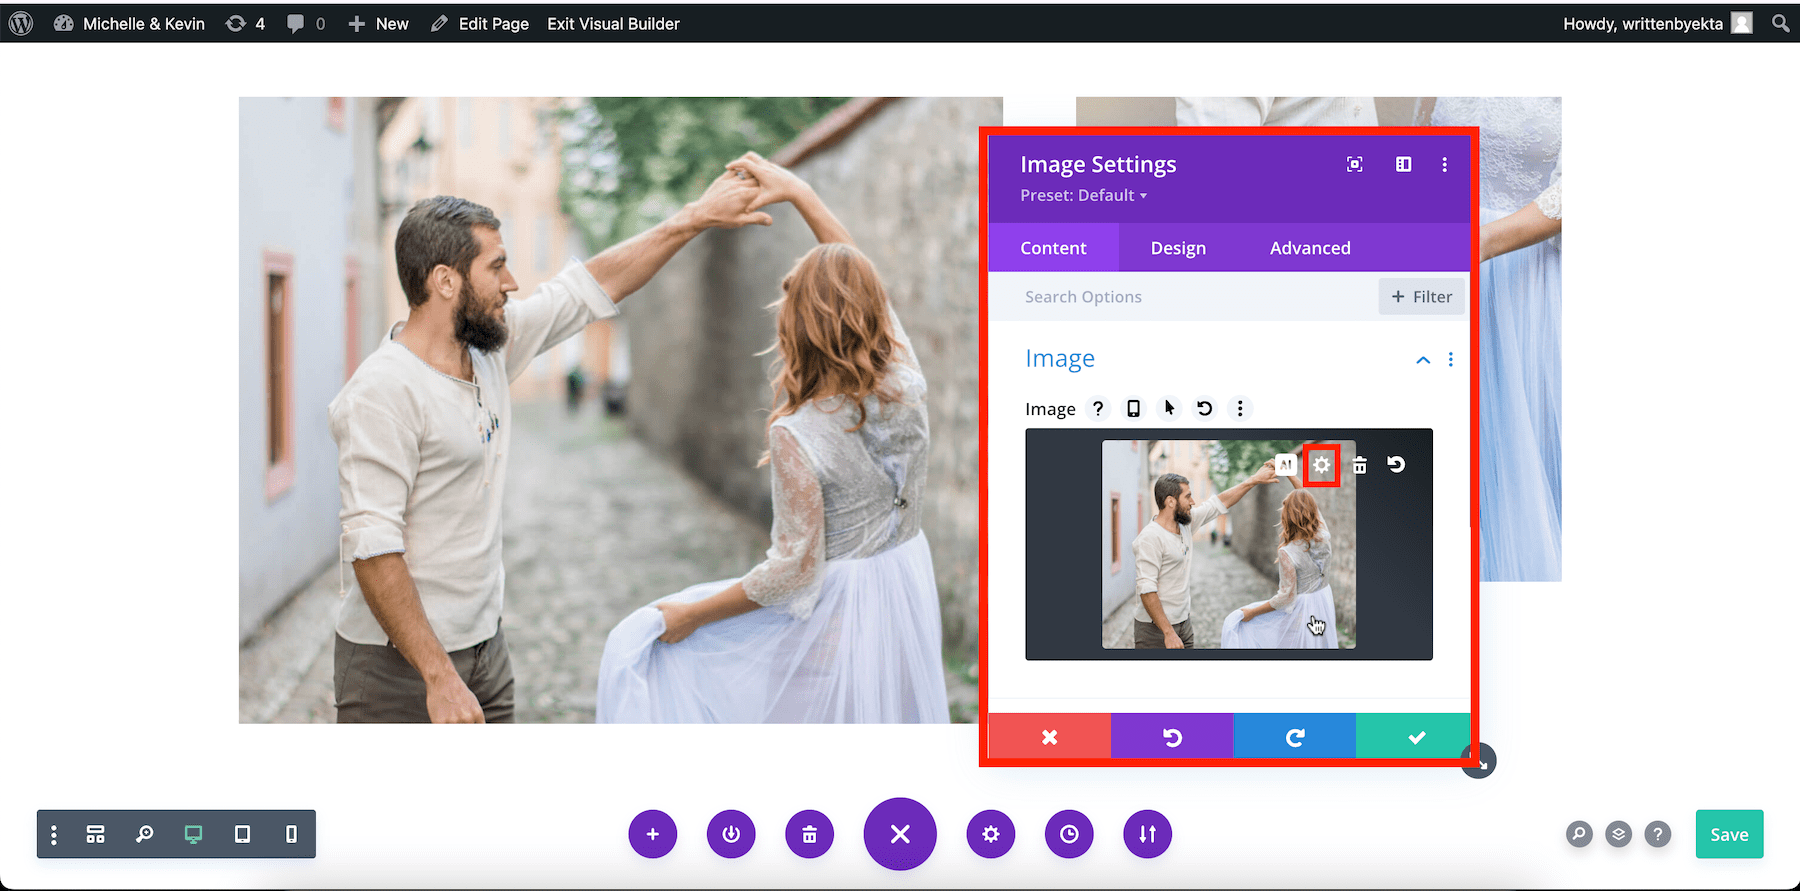
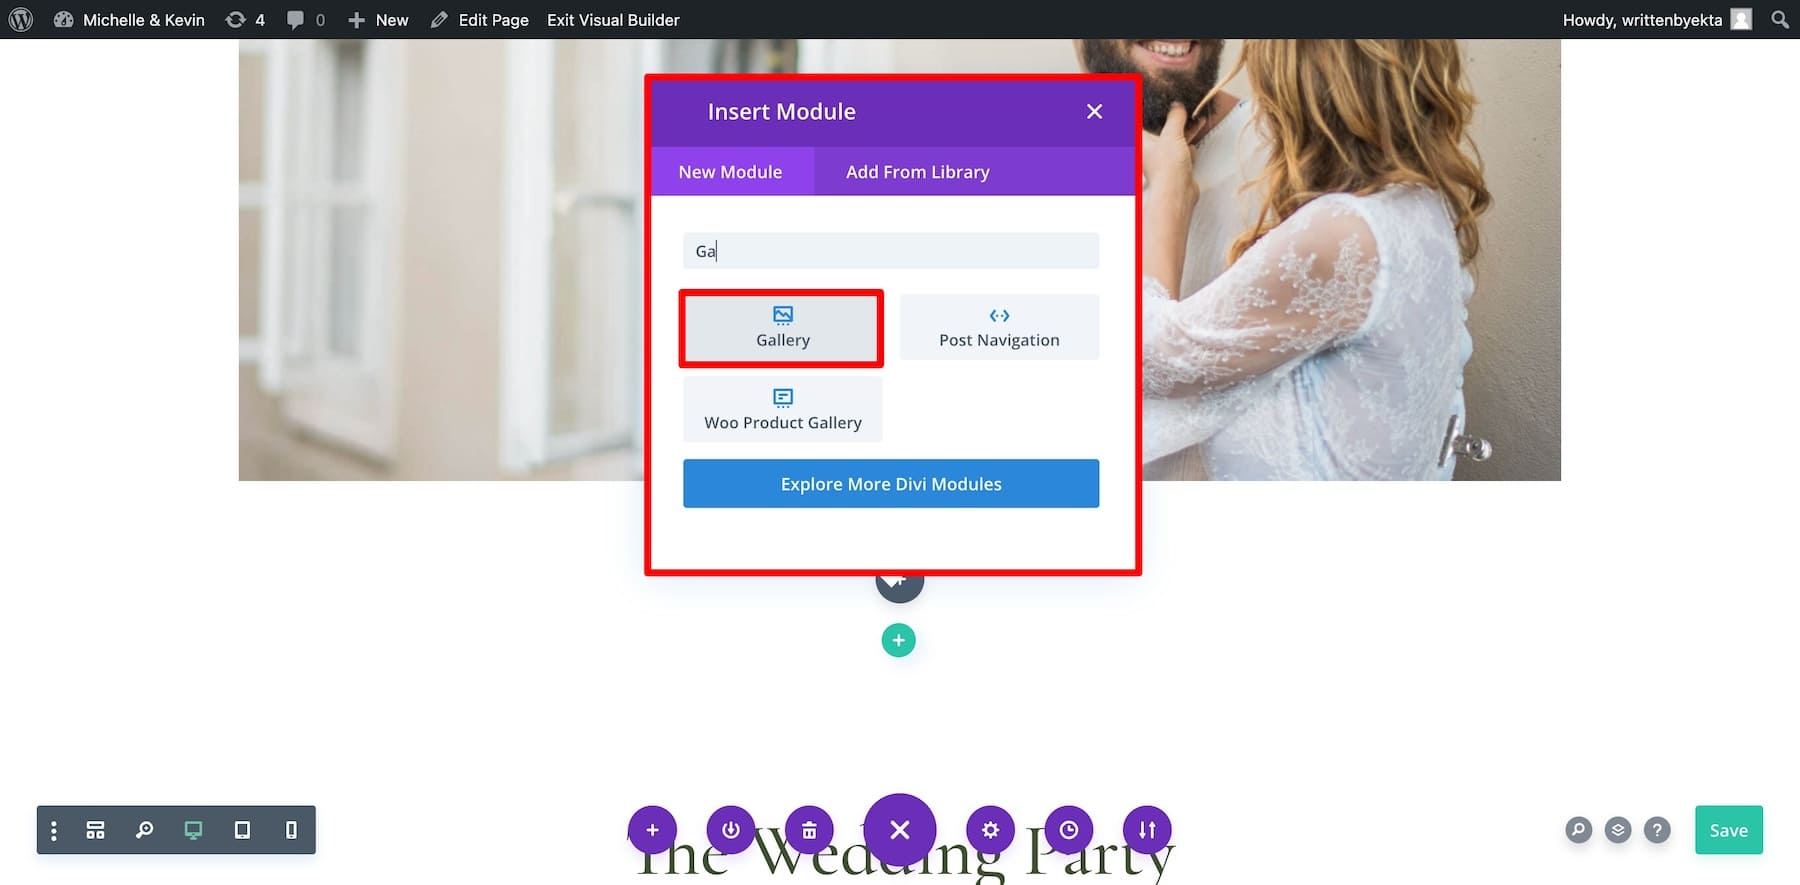
Click on the tiny settings icon inside the image. It’ll open up your WordPress library, where you can upload your own photos. Do the same for all site images. If you want to display more, add a Gallery content module to display images in a slider and grid layouts.
Next, let’s edit your site content. You don’t need to worry about storytelling—let Divi AI handle this for you. All you need to do is tell Divi AI your story and give it instructions, and it’ll generate your site content in seconds. Not just that, you can even ask Divi AI to refine the generated text, such as adding keywords, making it shorter, etc.
Follow the same process for each page. Update links, buttons, and other elements by reviewing each element’s settings option. Watch this video on Divi to learn how to edit pages with Divi Builder.
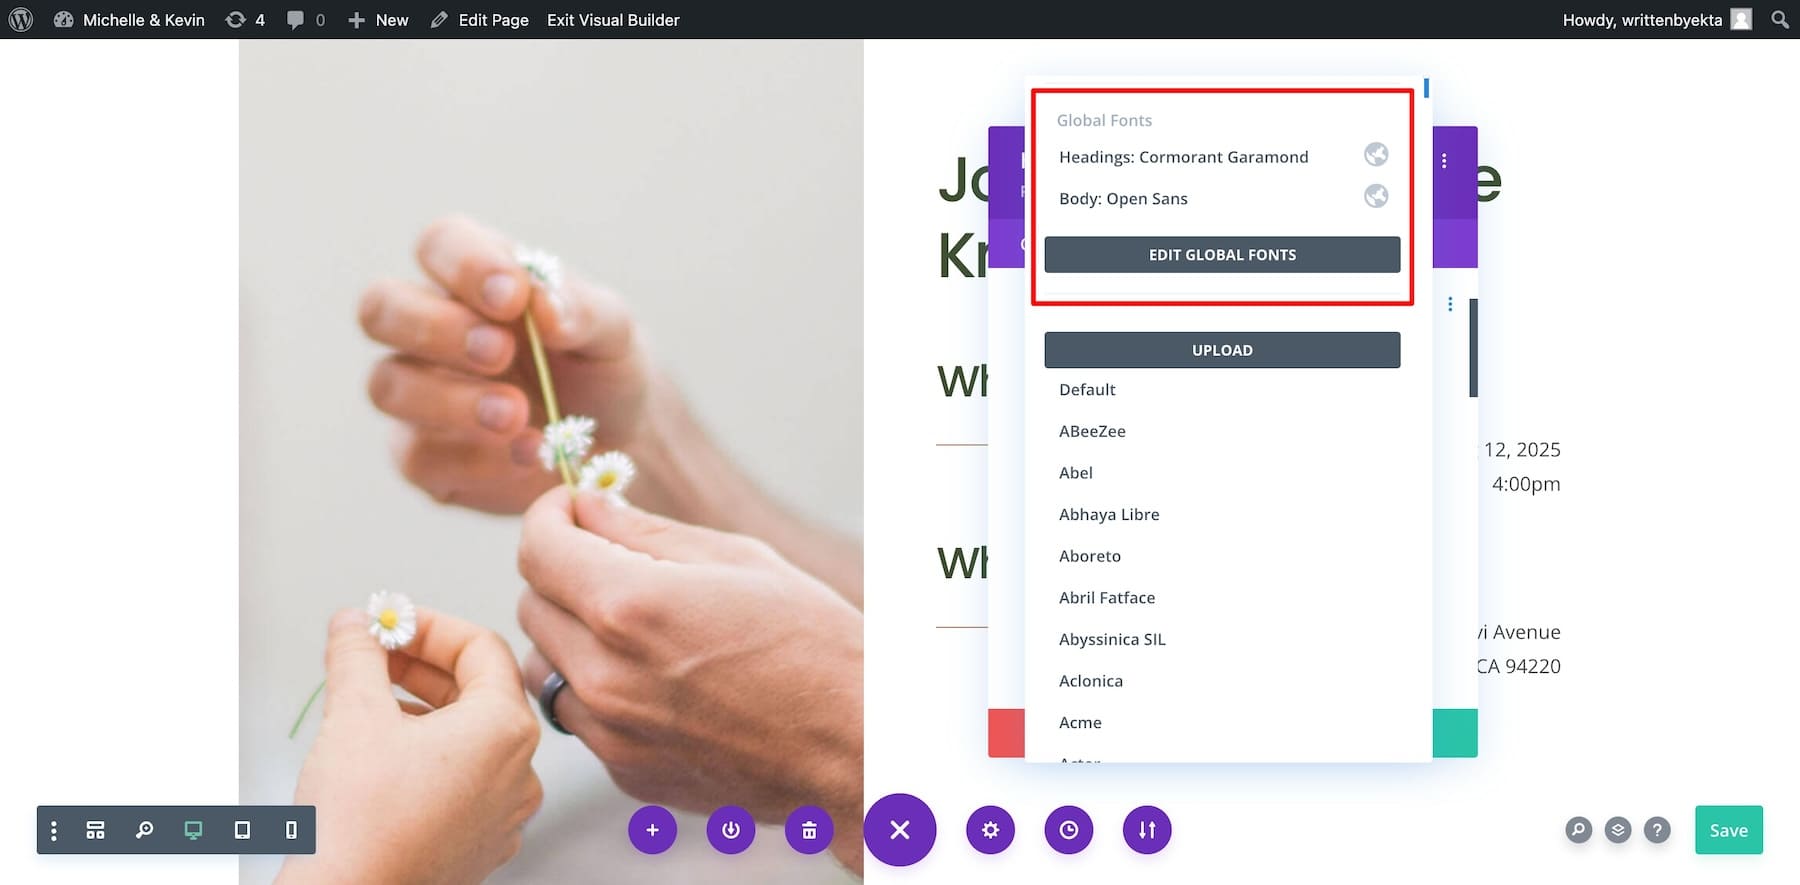
Adding Brand Fonts & Colors to Your Wedding Site
Next, update your Global Fonts & Colors on Divi to add your brand colors or fonts. Do this if you absolutely want to because this step is optional, as the Wedding Starter Site already includes professionally selected combinations.
To edit Global Fonts, click on any text element’s settings. Switch to Design, scroll down to Text, and click Font. You can choose from Divi fonts or upload your own.
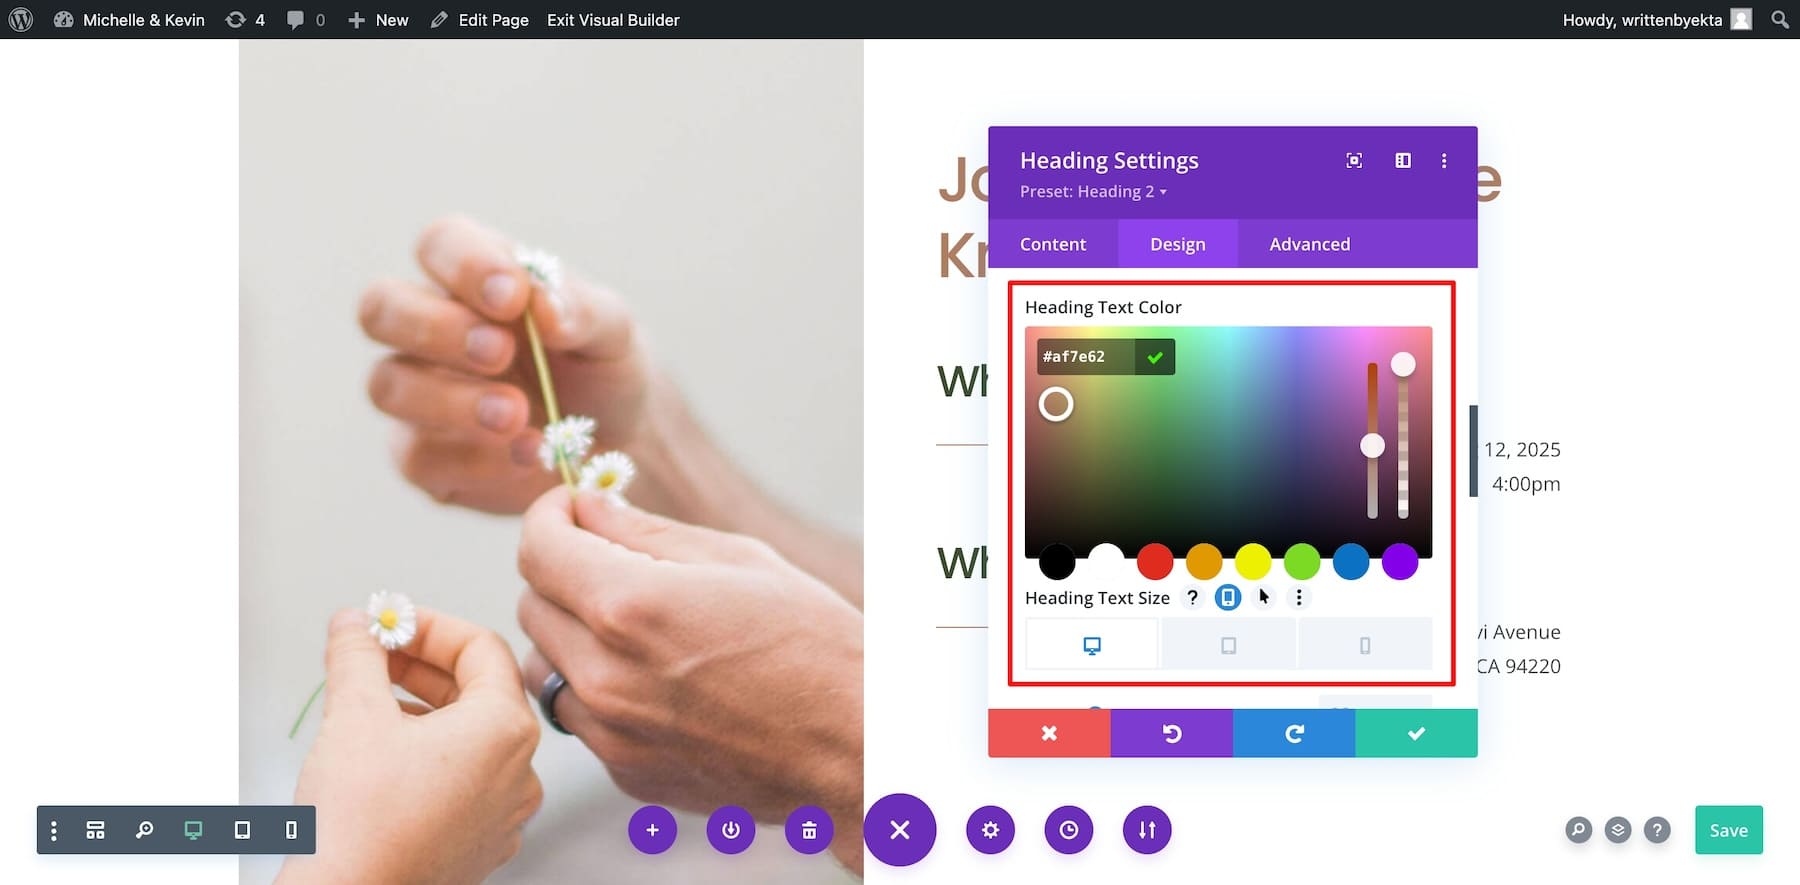
To edit Global Colors, scroll down to the Heading Text Color and switch to Global from Saved.
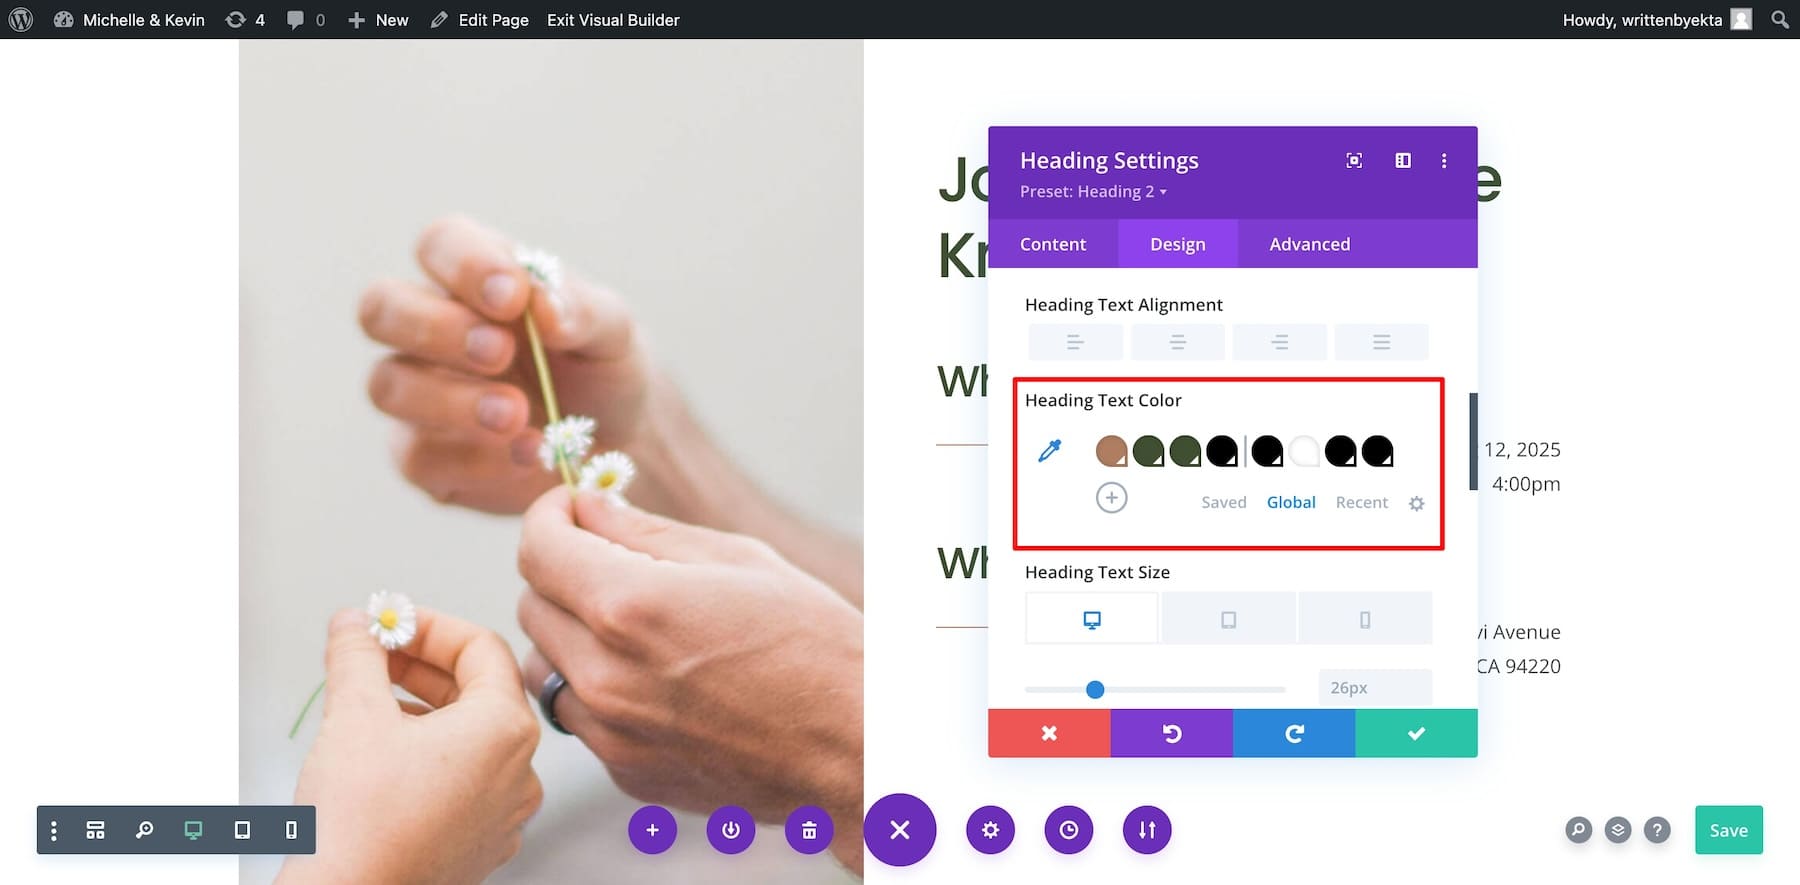
Click on the tiny dropdown arrow in each color and choose from the color panel. You can also write the hex code to get the exact color.
Similarly, adjust all colors. You can add more colors by clicking the plus icon next to the last Global Color.
Modifying Saved Element Settings
When you generate a branded site with Divi Quick Sites, each element (text, image, or other) has a pre-defined style. This pre-defined style is called Global Presets.
Modifying a Global Preset of an element means the changes are reflected everywhere that element is used. Simply put, you don’t have to manually edit a particular element on every page—just edit one, and the Divi Builder will take care of the rest.
For example, the RSVP button is universal throughout the site. When you hover over, it turns black. So, if you modify the RSVP button once, the other instances will also get updated.

Editing a preset is just like modifying any other element. First, select the element’s preset and then make changes. Here’s how to edit a preset of an element:
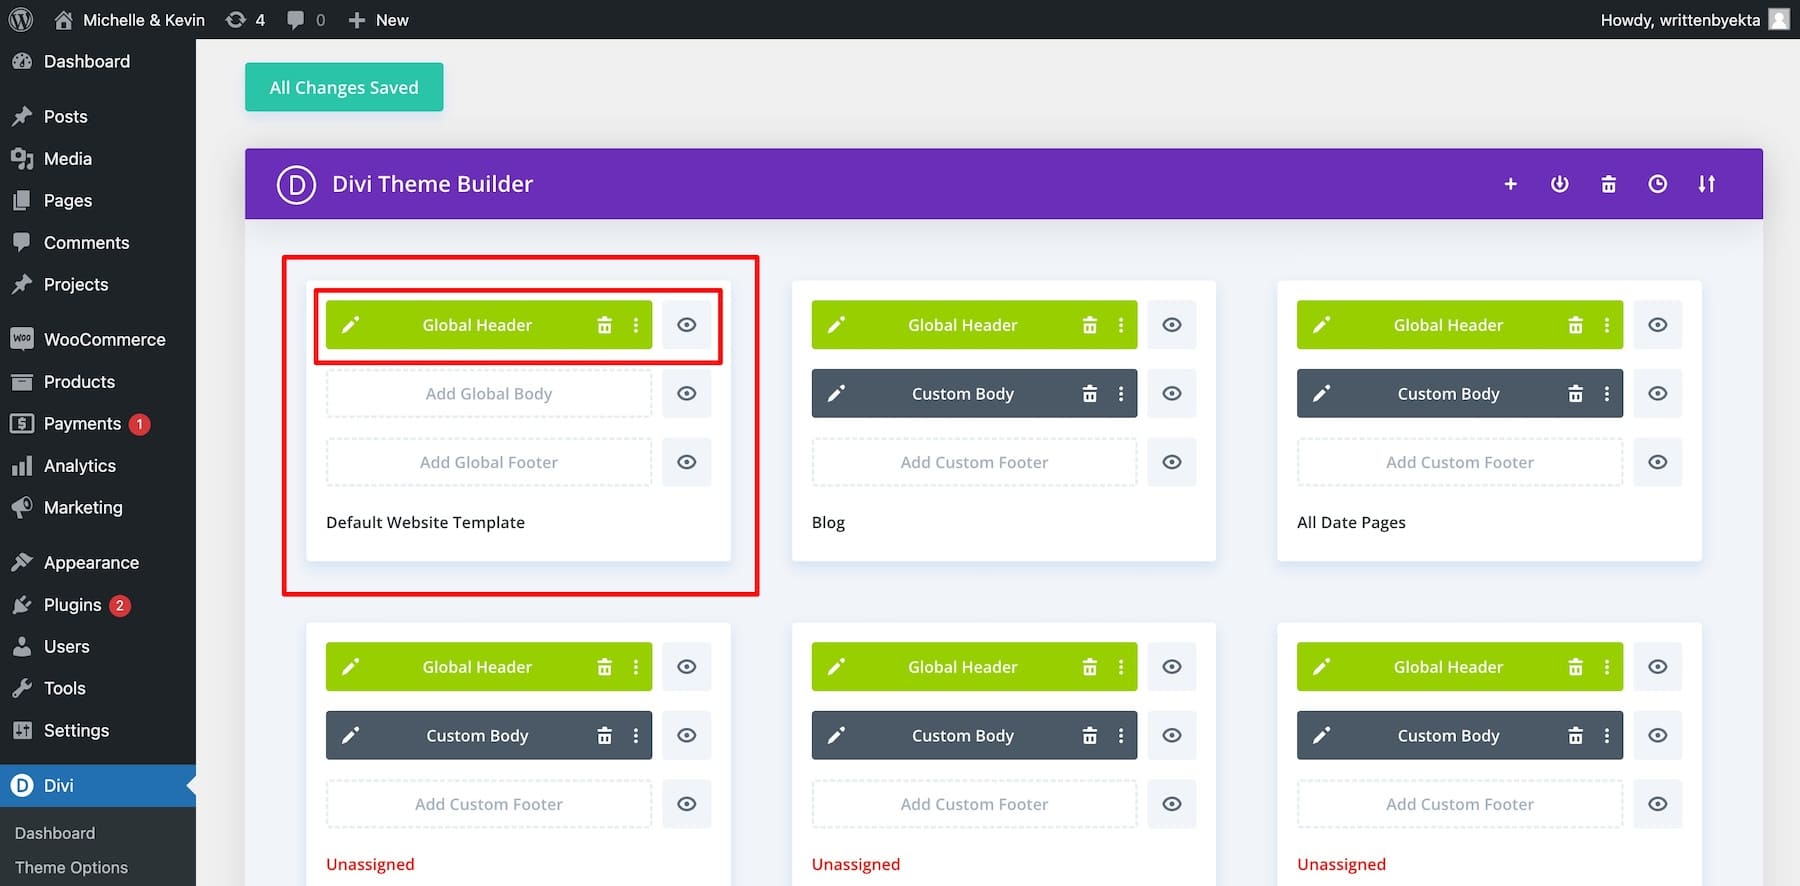
Editing Page Layouts
Similarly, each page of your wedding website (whether it’s a single blog post layout, blog page, default site layout, etc.) has a pre-defined style called the Theme Builder Templates. For example, the current header is the default on each page.
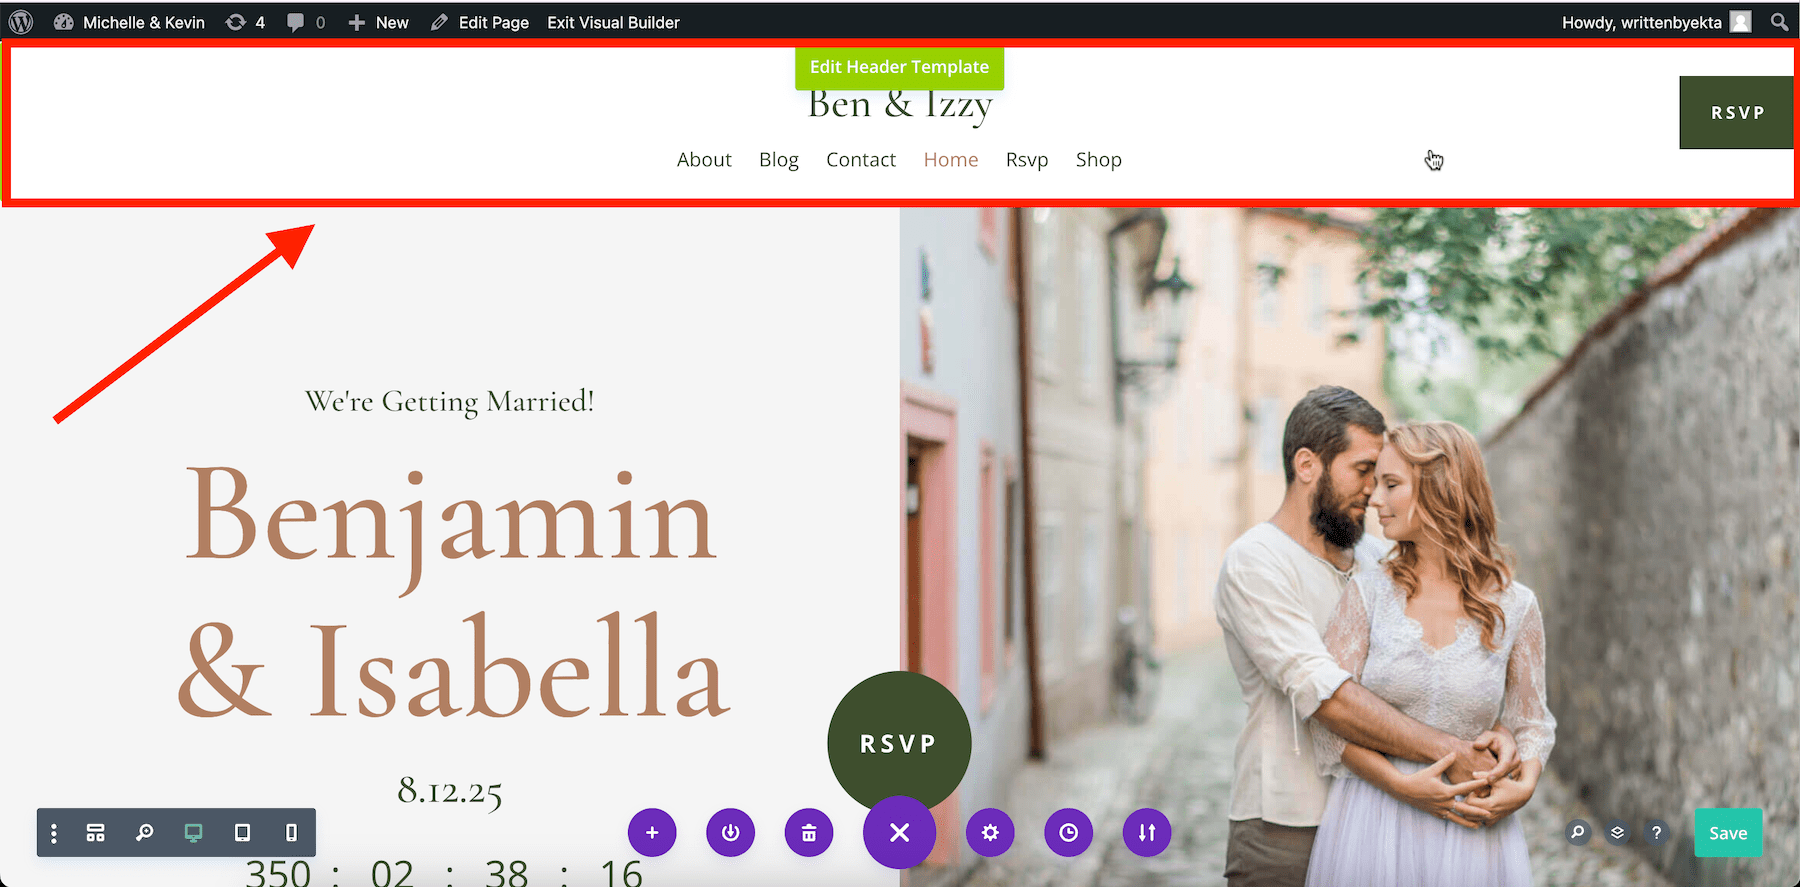
Suppose I want to add the RSVP page link to the RSVP button. To edit the Header Template, I can click on the Edit Header Template or modify the default Theme Builder Template.
Clicking on the pencil icon on the Global Header will take me to Divi Builder, where I can modify it just like any other element. The gear icon will open settings, and I can add the RSVP page link to the Link section.
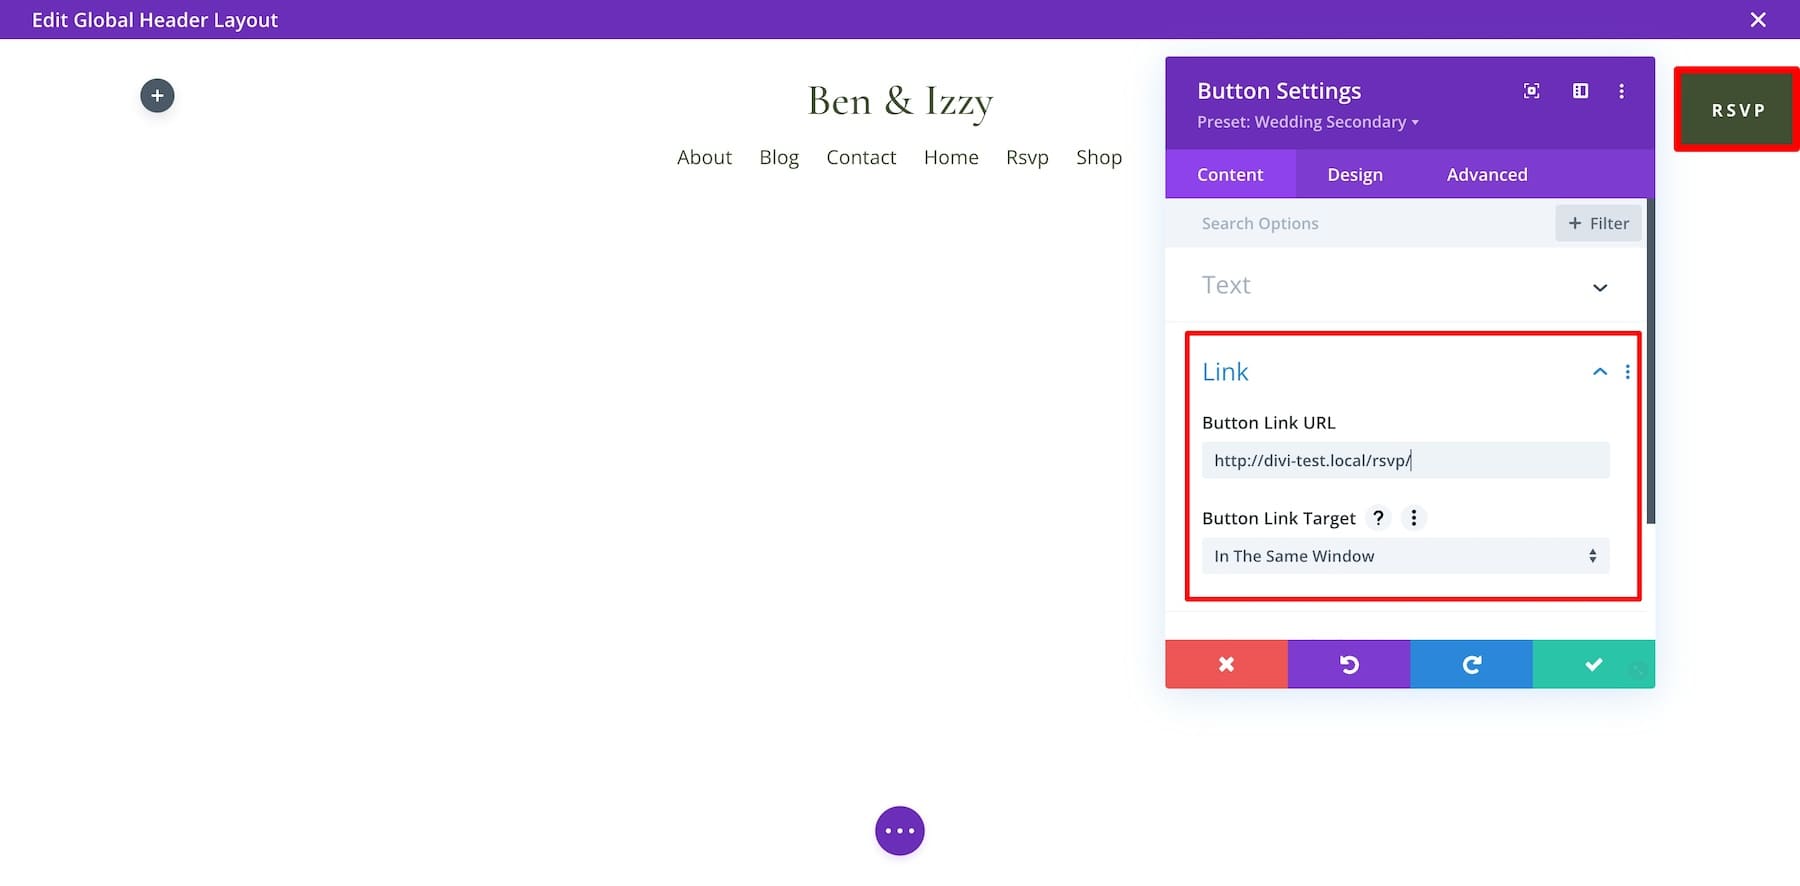
Like the Global Preset, Theme Builder Templates are site-wide, so manually updating each page isn’t required. Divi Builder makes it easy to customize your entire site by updating the Global elements, which saves a lot of time.
Once you’ve reviewed every element of your site and are sure it’s conveying your wedding story correctly, do a final check and launch it. Here’s a more in-depth tutorial on modifying your Starter Site-generated website.
5. Modify Your Wedding Site’s RSVP Form
Your RSVP page should be active to collect the confirmed guests on a list and have a headcount in advance. The Divi theme comes with a Divi Contact Form module, which is enough to make your RSVP page functional, but you can also check out advanced RSVP booking plugins like WPForms or Divi Events Calendar.
In this step, we’ll configure the Divi Contact Form to activate your RSVP page. From the Your Site is Ready page, click the pencil icon on the RSVP page.
The page already includes a Divi Contact Form, so you only need to configure the form settings. Hover over it and click on settings.
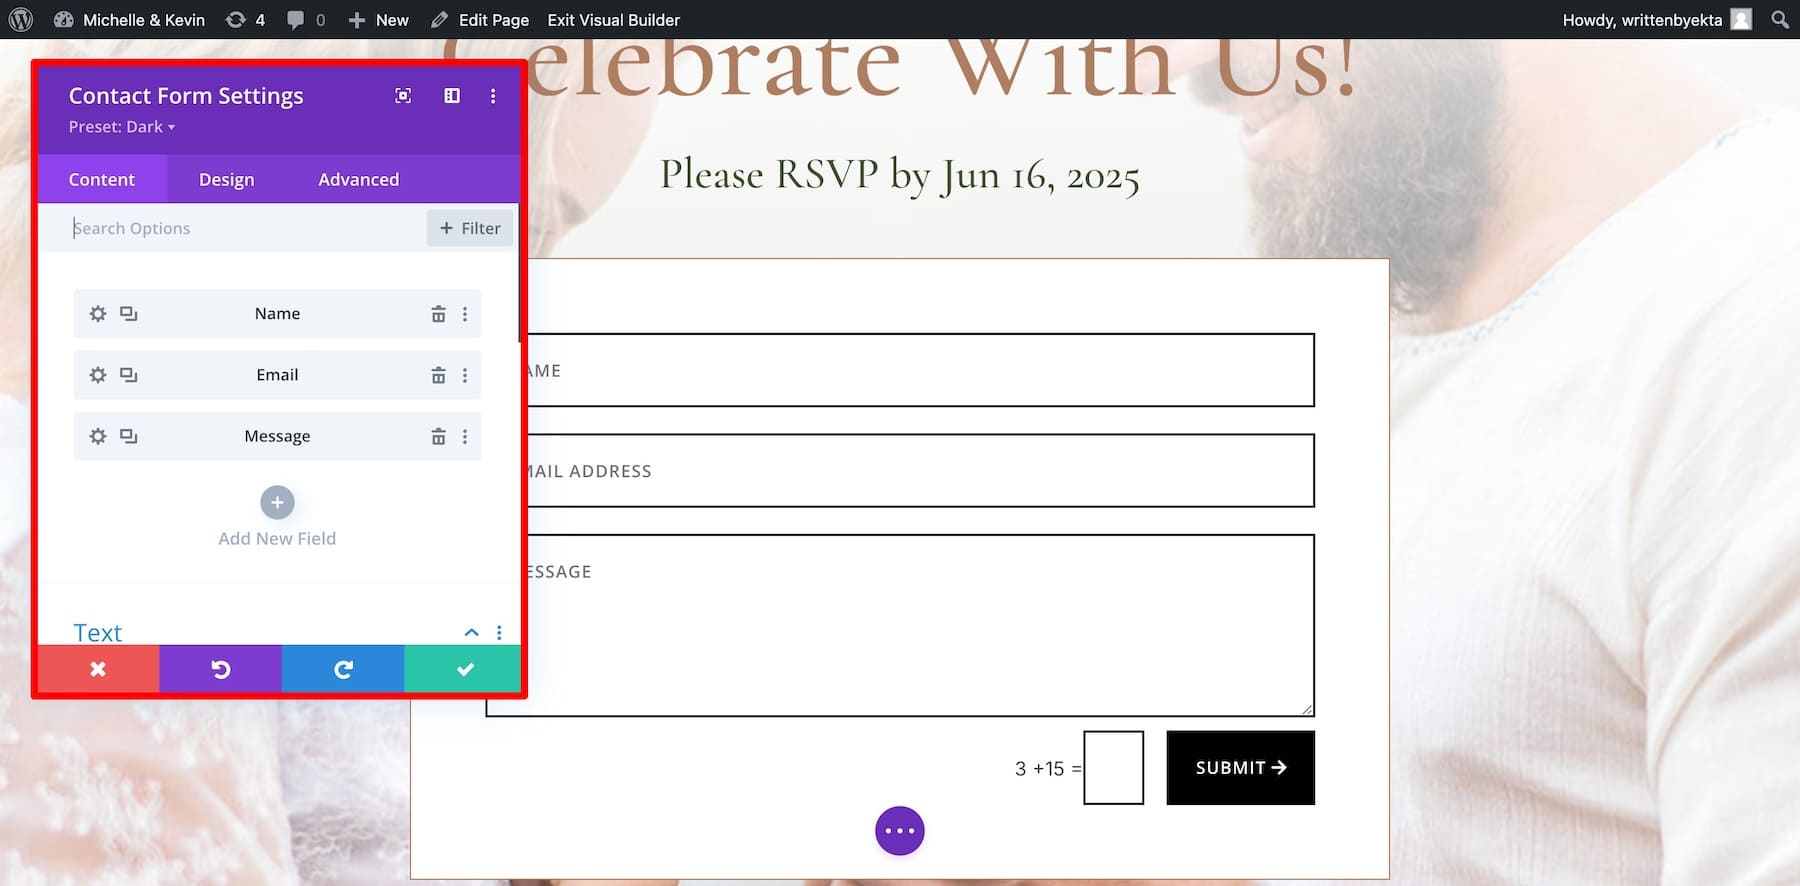
The form includes the Name, Email, and Message fields. If you want to add more fields, click on Add New Field. Scroll down to Text to edit the Success Message. Write a heartfelt success message—use Divi AI if you need help.
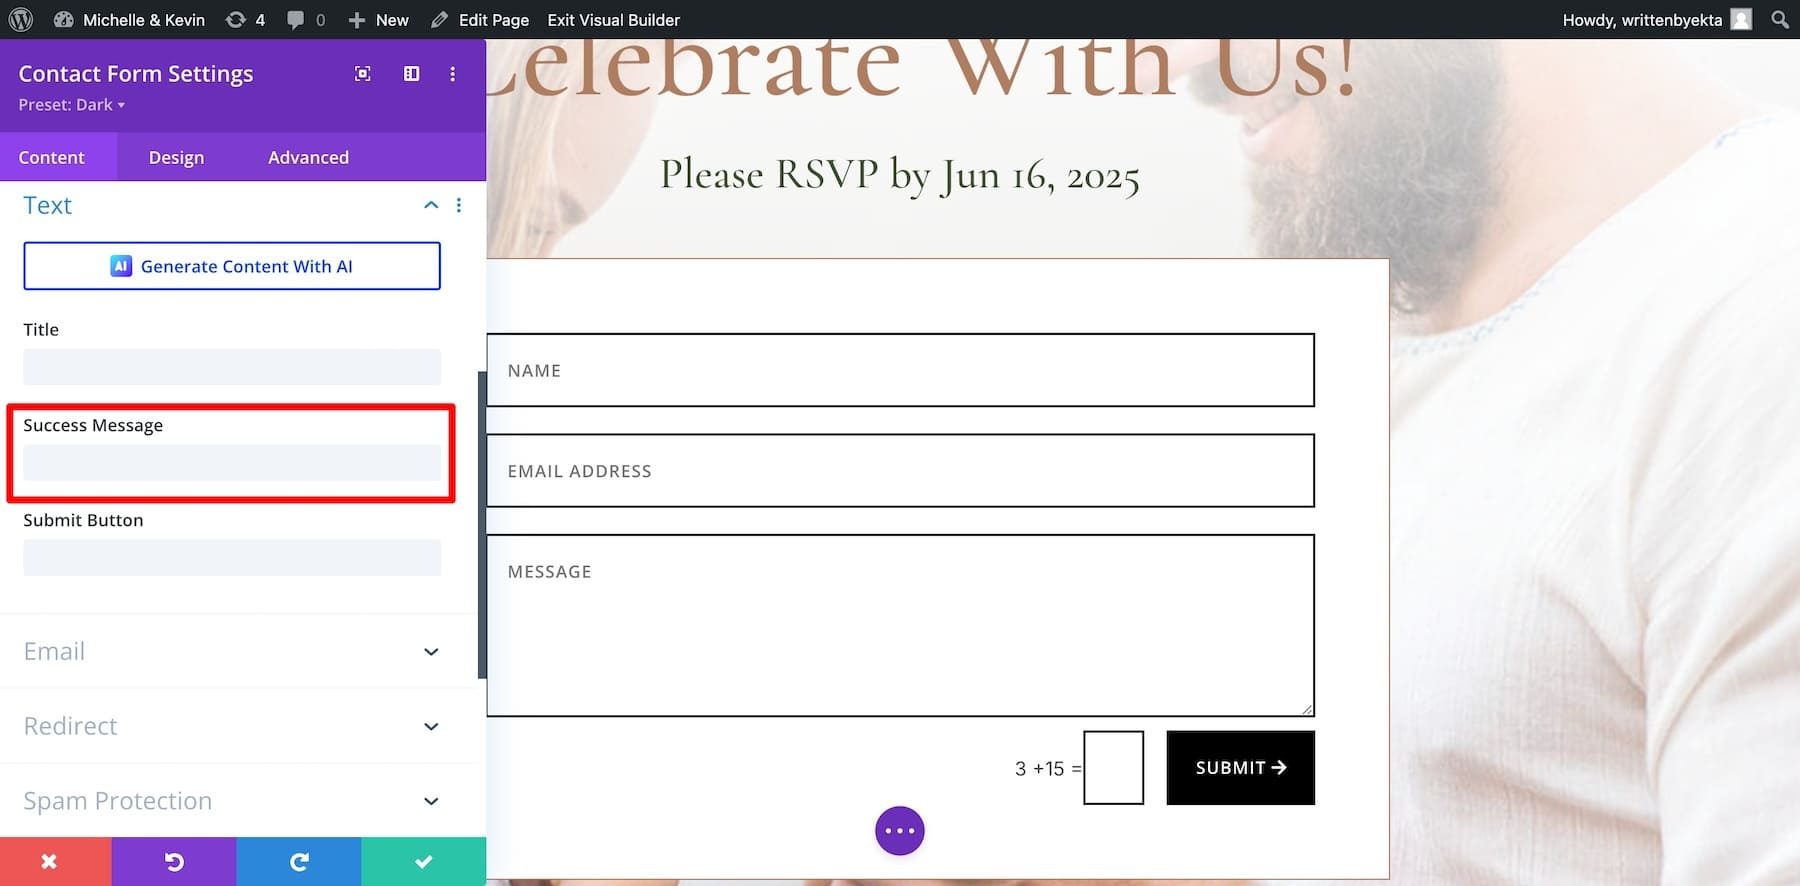
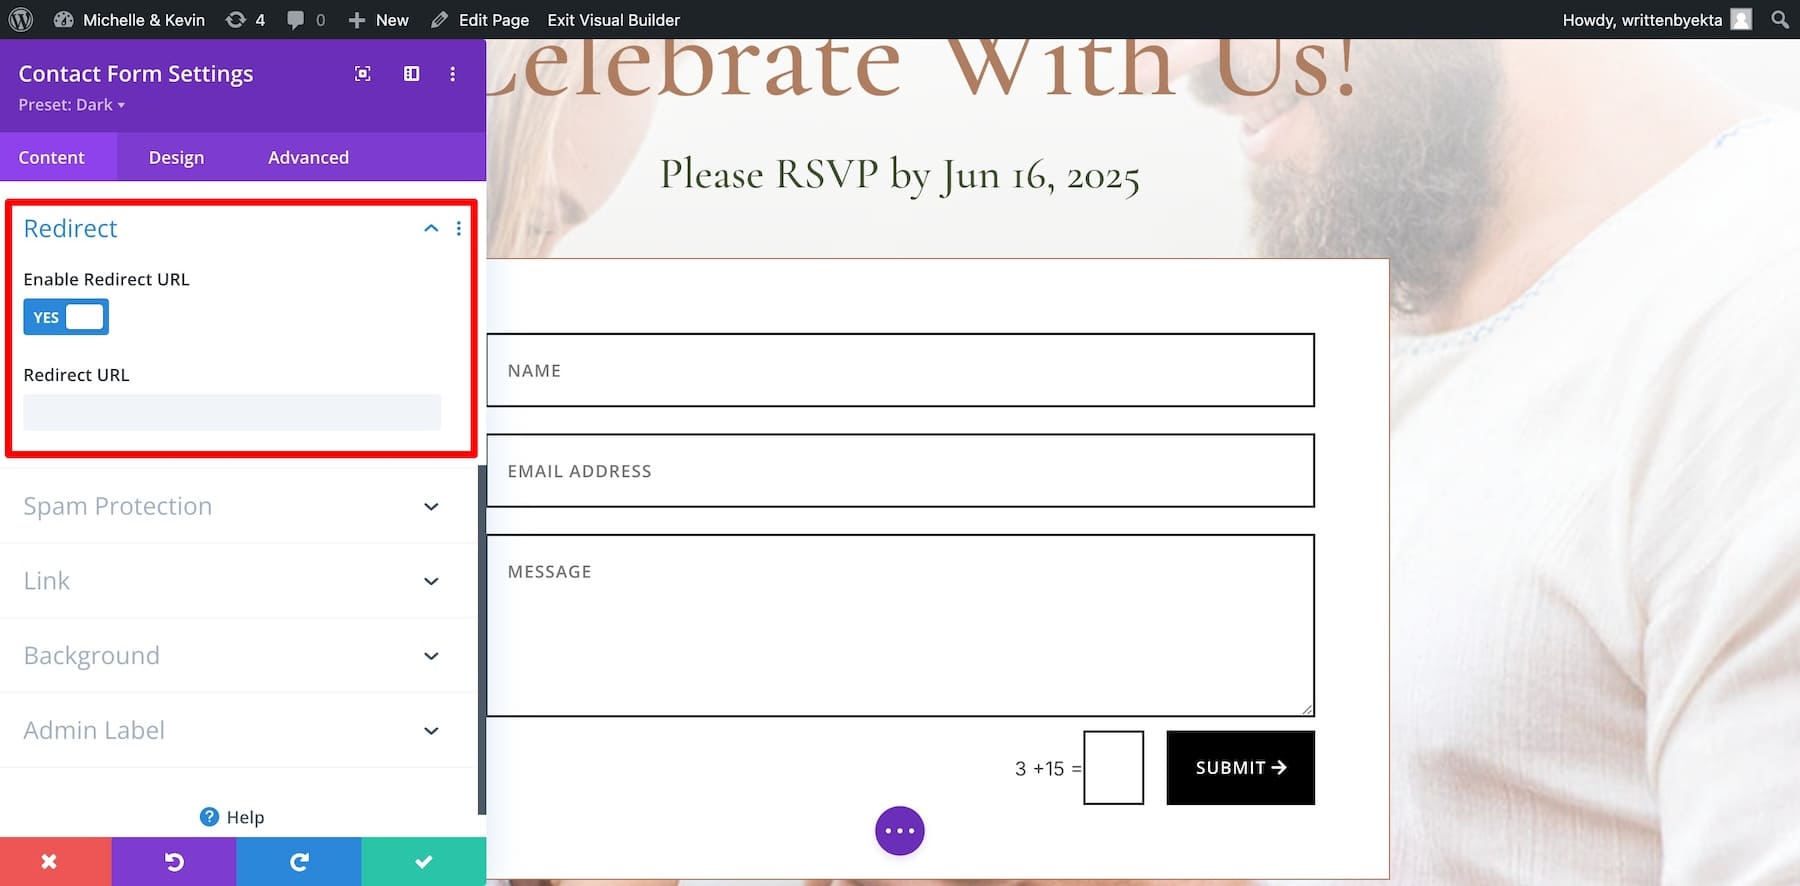
You can include event details in your Success Message only for confirmed attendees. This way, you can ensure a correct headcount. If you don’t want to use the Success Message, Redirect them to a separate Thank You page, where you can also include your PayPal or registry links to collect the Honeymoon donation fund.
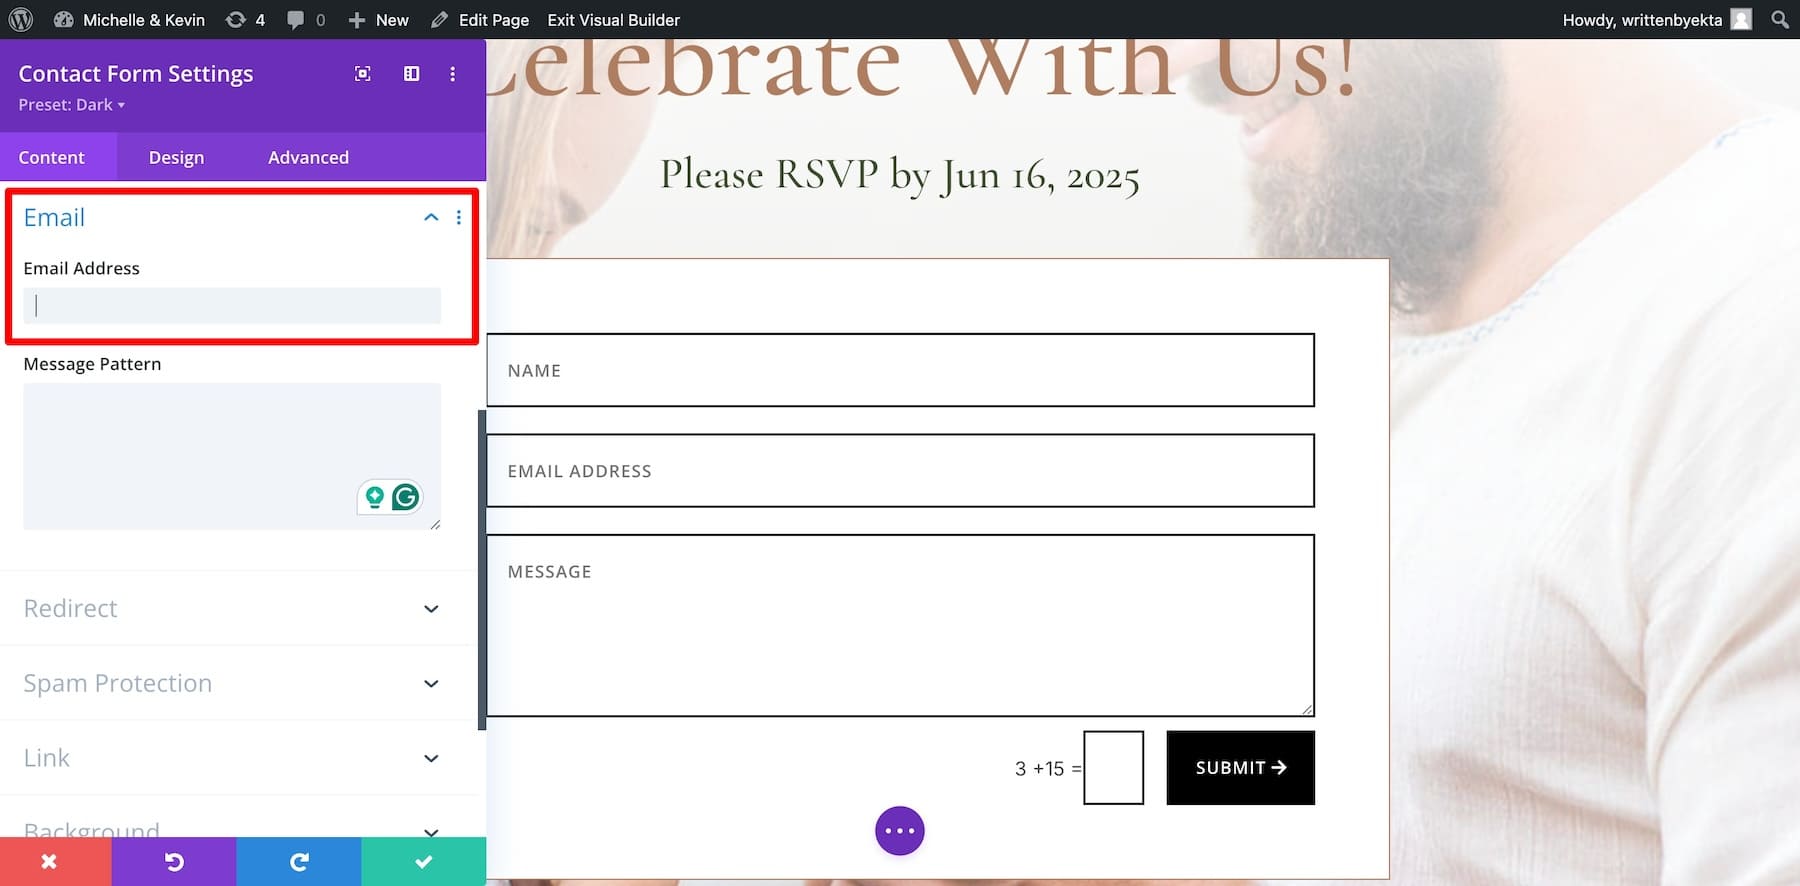
Next, let’s configure where you’ll receive the confirmed message requests. Go to the Email section. By default, Divi sends confirmed messages to your WordPress admin email, but if you want to receive them at a different address, enter your new email here.
Now, to adjust the look of your form, go to the Design tab. Here’s a more in-depth tutorial on customizing your Divi Contact Form:
With your RSVP form configured, your wedding website is ready. To view your final site, click on the View My Site from Your Site is Ready page.
Tools to Enhance the Functionality of Your Wedding Website (Optional)
Here are some additional tools that help enhance the functionality of your wedding website. These tools aren’t necessary—these just help get the most out of your website:
- Divi Marketplace: Offers themes and plugins that make a wedding website look great and work smoothly, giving you more options to customize your site.
- Monarch: Lets you add social media buttons to your wedding website so guests can easily share your wedding details with others. You get Monarch free with your Divi theme.
- Bloom: Helps you create email signup forms on your wedding website to collect RSVPs and send updates to your guests. You get Bloom free with your Divi theme.
- Divi AI: Assists in writing and designing your wedding website by giving you smart suggestions, making it easier to write a memorable wedding story.
- EWWW: Compresses images on your wedding website so that pages load faster, which is especially useful for photo galleries.
- Cloudflare: Keeps your site data (guest information) safe from spam attacks.
Start Your Wedding Website Journey Today
Creating a wedding website is the perfect way to celebrate and share your special day with loved ones. With Divi and its powerful features—like Divi Quick Sites—you can build a stunning, fully functional site in minutes without any technical expertise. Pair it with SiteGround for reliable hosting, and you’ll have everything you need to create an unforgettable online experience.
Building your dream wedding website is easy when you have the right tools. Below are the essential products mentioned in this guide that will help you create a memorable and fully functional site.
| Products Mentioned | Description | Starting Price | Link |
|---|---|---|---|
| Divi | WordPress Theme & Page Builder | $89/year | Get |
| Divi Quick Sites | Wedding Website Generator | Free with Divi | Get |
| Divi AI | AI Website Generator and Assistant | $16.08/month | Get |
| SiteGround | Hosting Provider | $2.99/month | Get |
| Bloom | Email Opt-in Plugin | Free with Divi | Get |
| Monarch | Social Sharing Plugin | Free with Divi | Get |
| WPForms | RSVP & Contact Forms | $49/year | Get |
| EWWW Image Optimizer | Image Optimization Plugin | $8/month | Get |
| OptinMonster | Lead Generation Plugin | $9/month | Get |
| Cloudflare | Website Security & CDN | Free | Get |


Leave A Reply