Adding delayed button animations to any CTA can be an effective way to draw attention to visitors and, in turn, increase the likelihood of getting a click. In this tutorial, we will show you how to use Divi to create 8 delayed button animation for a custom header CTA. To do this, we will be combining animation settings in ways you may have never considered. Plus, these animations can be applied to almost any CTA button throughout your site.
Let’s get started.
- 1 Sneak Peek
- 2 Download the 8 Delayed Header Button Animations Layout for FREE
- 3 Download For Free
- 4 You have successfully subscribed. Please check your email address to confirm your subscription and get access to free weekly Divi layout packs!
- 5 What You Need to Get Started
- 6 Importing the Template from the Second Theme Builder Pack
- 7 8 Delayed Button Animations for Your Custom Header CTA
- 8 Final Results
- 9 Final Thoughts
Sneak Peek
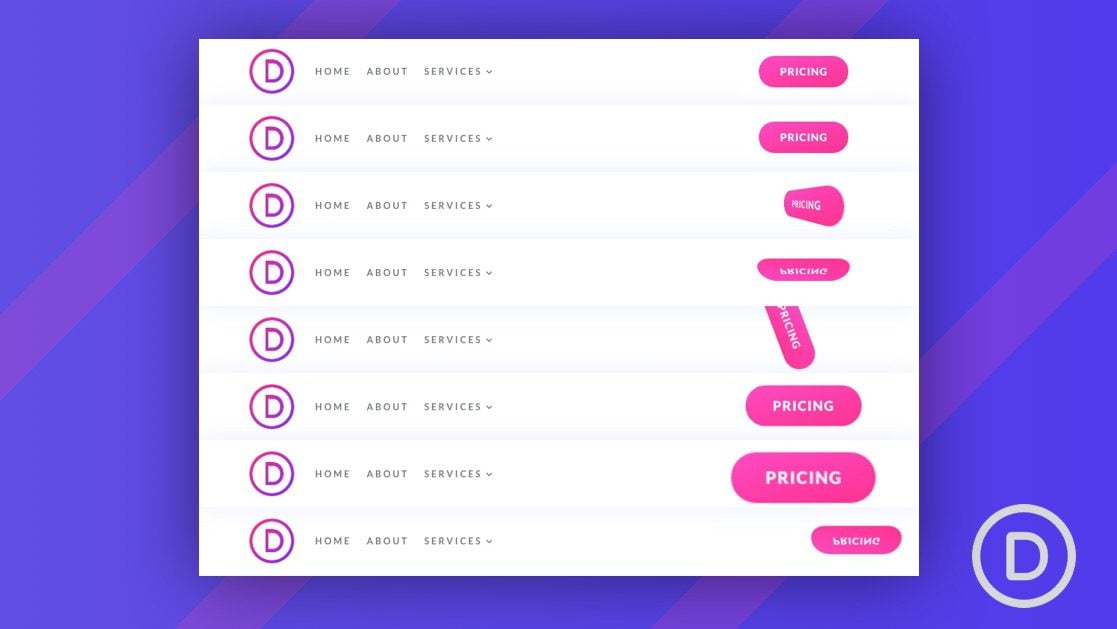
Here is a peek at the 8 delayed button animations we will be adding to the custom header CTA in Divi:
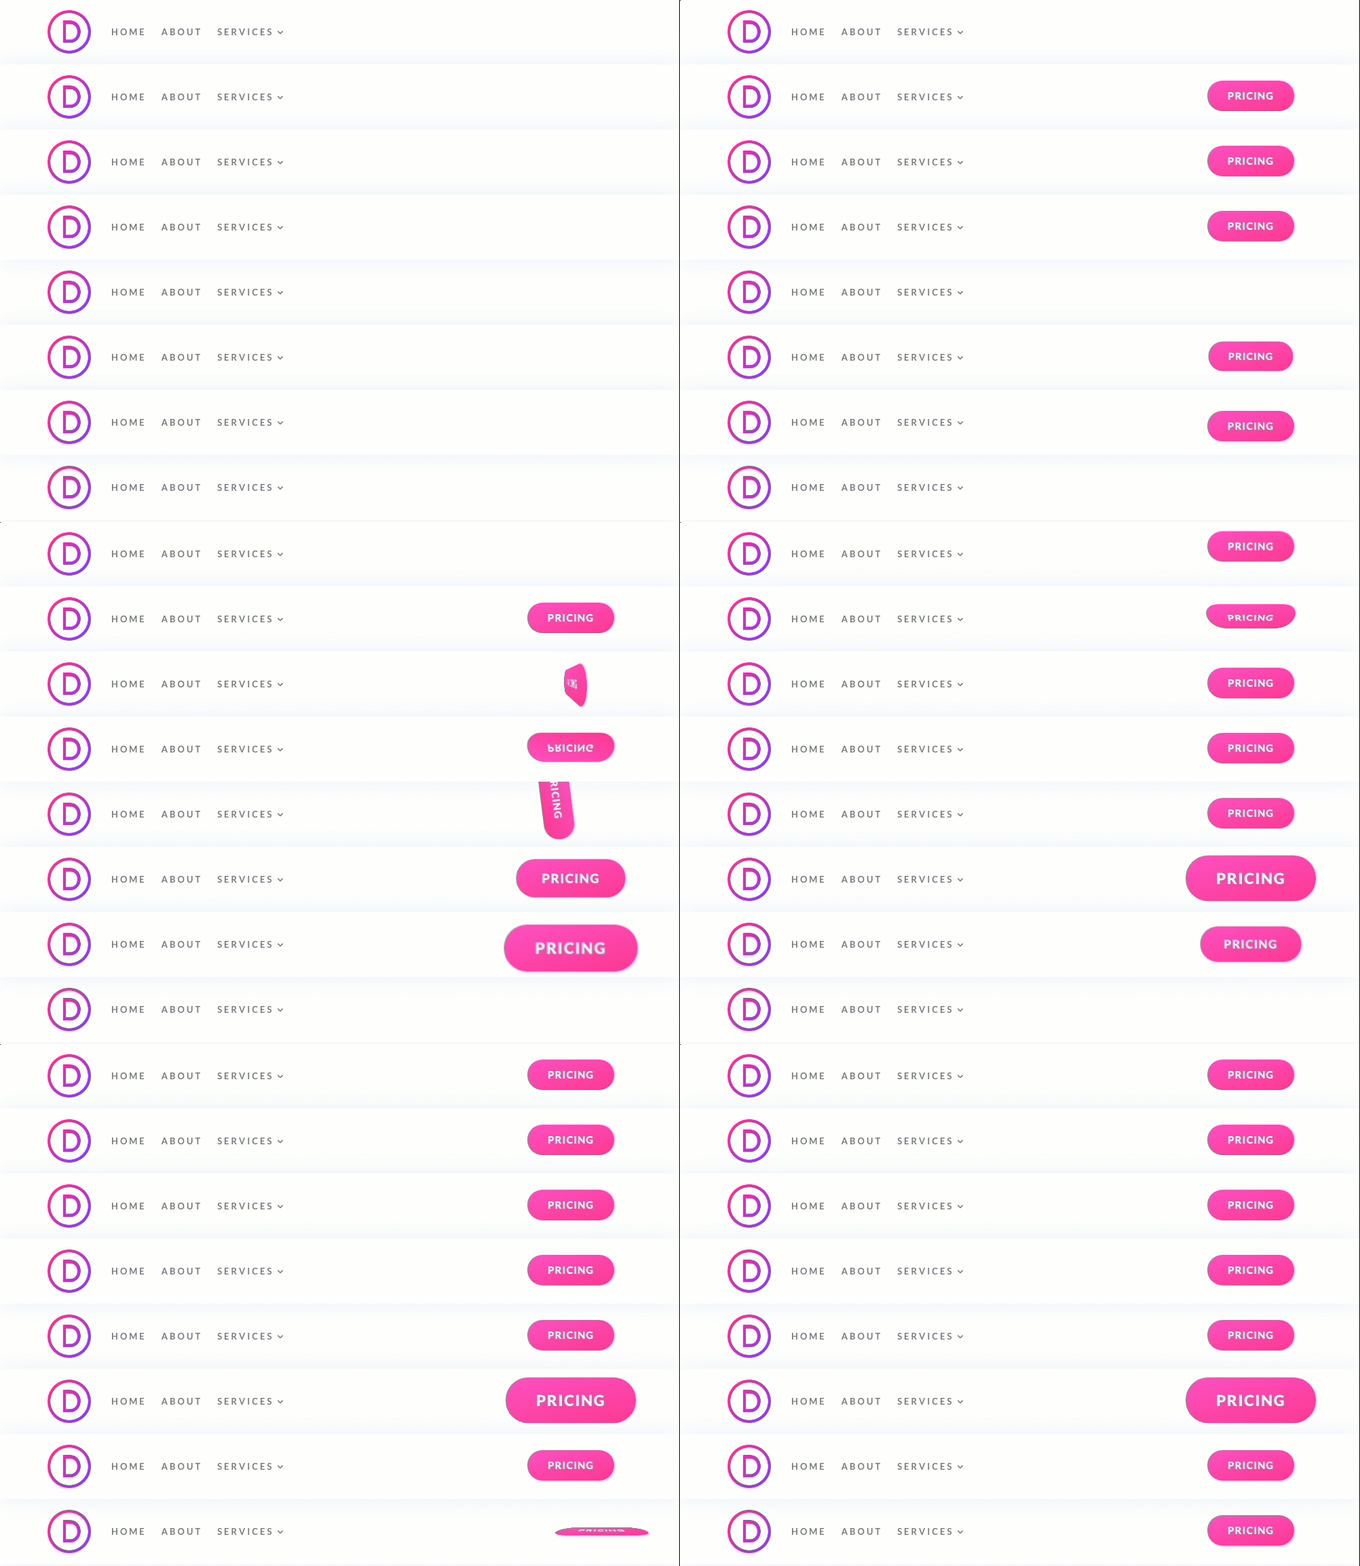
To lay your hands on the 8 delayed button animations from this tutorial, you will first need to download it using the button below. To gain access to the download you will need to subscribe to our newsletter by using the form below. As a new subscriber, you will receive even more Divi goodness and a free Divi Layout pack every Monday! If you’re already on the list, simply enter your email address below and click download. You will not be “resubscribed” or receive extra emails.
To import the layout to your page, simply extract the zip file and drag the json file into the Divi Builder.
Let’s get to the tutorial shall we?
What You Need to Get Started
To get started, you will need to install and activate the Divi Theme. Make sure you have the latest version of Divi.
You will need to download the Second Theme Builder Pack since we will be using the custom Header on the 404 page template from that pack for this tutorial.
After that, you are ready to go.
Importing the Template from the Second Theme Builder Pack
From the WordPress dashboard, navigate to Divi > Theme Builder. Within the theme builder, select the portability icon at the top right of the page. In the portability popup, select the import tab, choose the theme-builder-pack-2-404-page-template.json file and click the import button. (This import file will be inside the Second Theme Builder Pack folder)
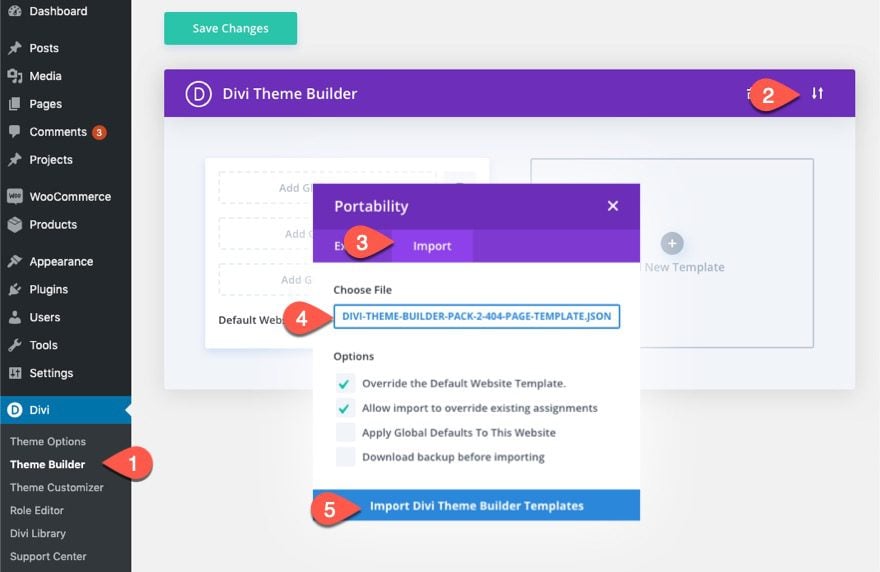
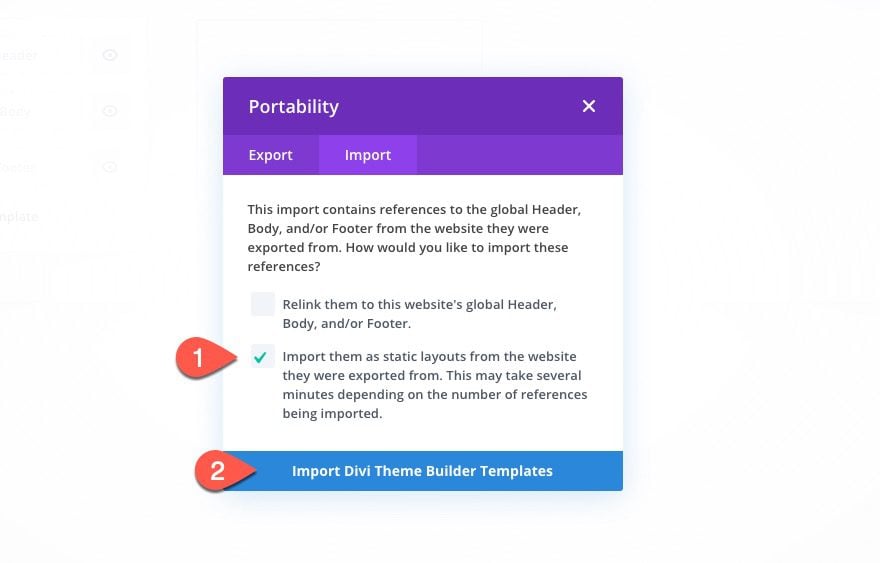
You can also select the option to import the global header and footer as static layouts.
After the template has been imported, click the icon to edit the custom header area.
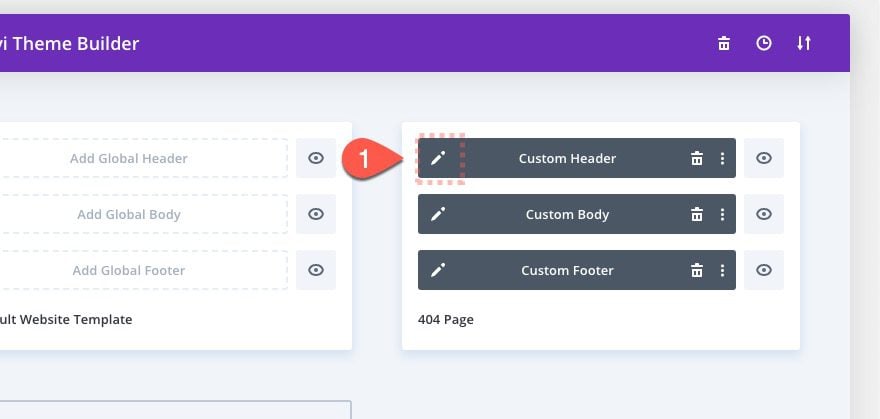
This will take you to the body template layout editor where we will add the delayed animations to the button on the premade header.
The 8 delayed button animations below include a unique combination of built-in Divi animation options and the perspective CSS property. The perspective property adds a 3D effect when the button animation includes a flip or fold effect. For most of these animations, we will add animation to both the button and its parent column in order to get more complex movement.
Here they are…
#1 Dropdown Bounce

Button Settings:
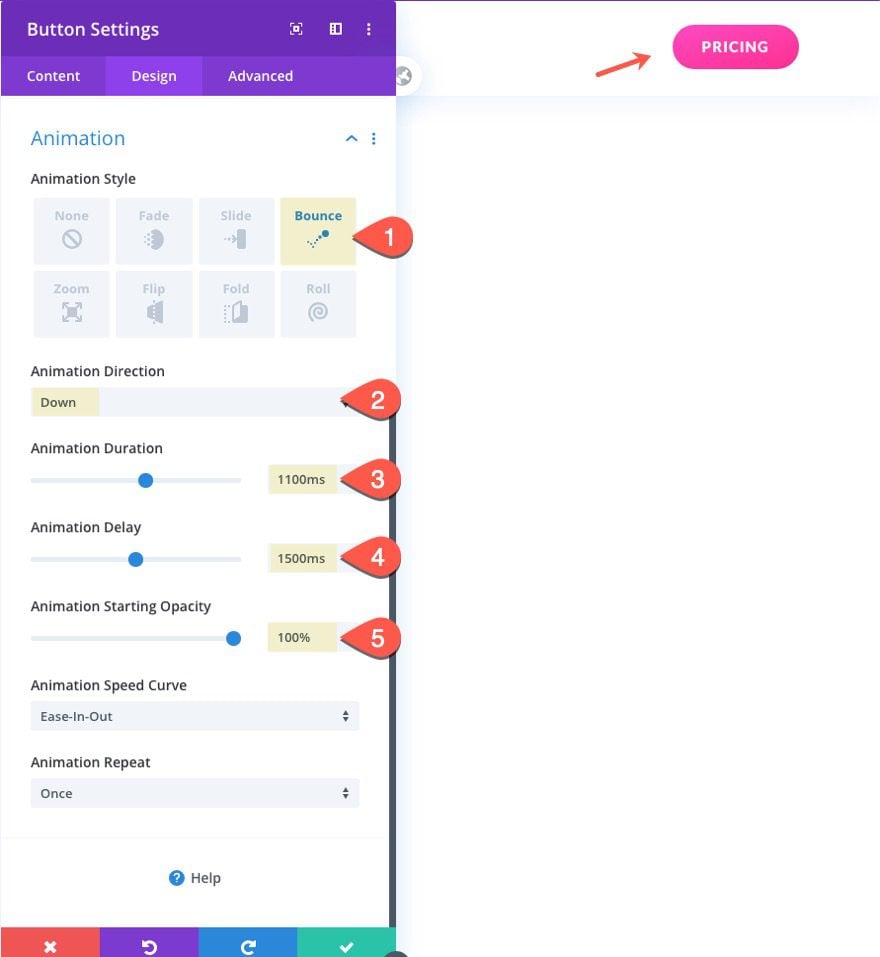
The dropdown bounce delayed button animation is simple and effective. To build it, open the settings of the button module and update the following:
- Animation Style: Bounce
- Animation Direction: Down
- Animation Duration: 1100ms
- Animation Delay: 1500ms
- Animation Starting Opacity: 100%
#2 3D Vertical Flip

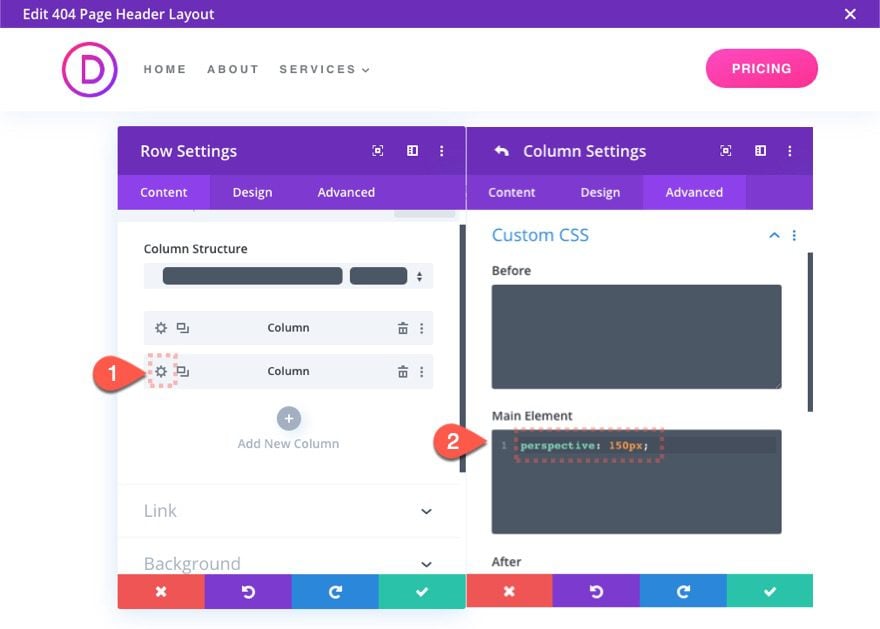
To build the 3D vertical flip delayed button animation, you must first add the perspective property to the button’s parent column (column 2).
Column Settings
To add perspective to the column, open the row settings and then click to edit column 2 settings. Under the advanced tab, add the following custom CSS to the main element:
perspective: 150px
Button Settings:
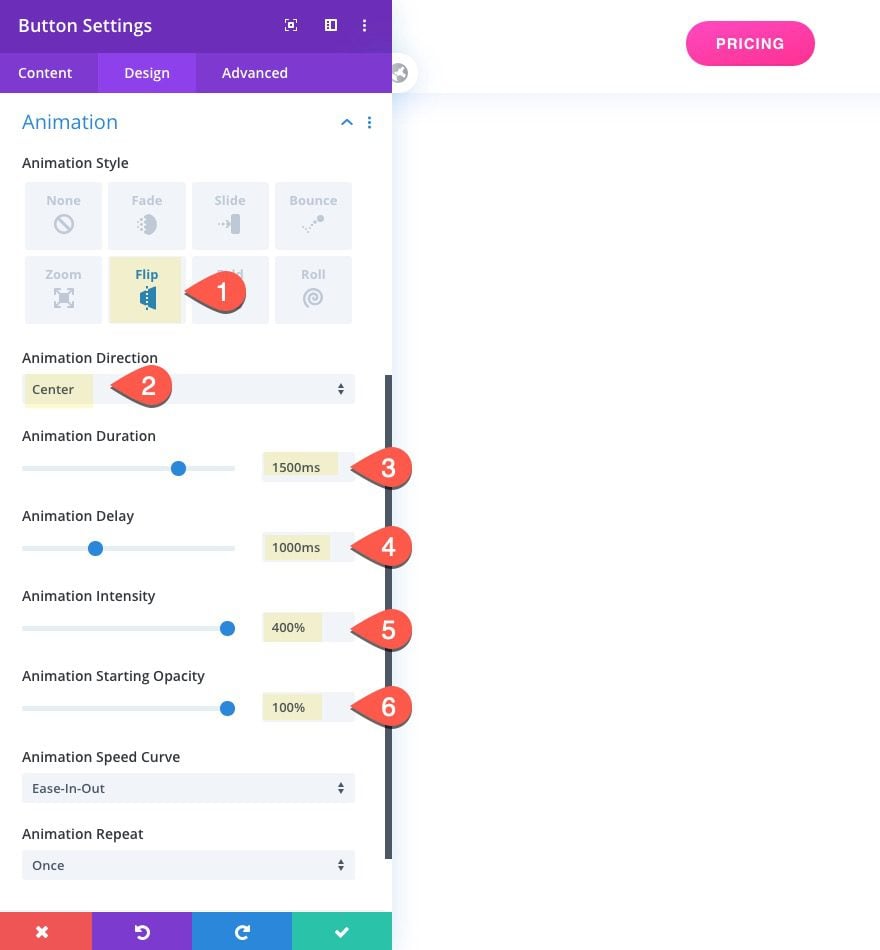
- Animation Style: Flip
- Animation Direction: Center
- Animation Duration: 1500ms
- Animation Delay: 1000ms
- Animation Intensity: 400%
- Animation Starting Opacity: 100%
#3 3D Horizontal Flip

The 3D Horizontal Flip delayed button animation is similar to the vertical flip. The only real difference is the animation direction.
Column Settings:
First, make sure you have added the perspective to column 2 by adding the following custom CSS to the main element:
perspective: 150px

Button Settings:
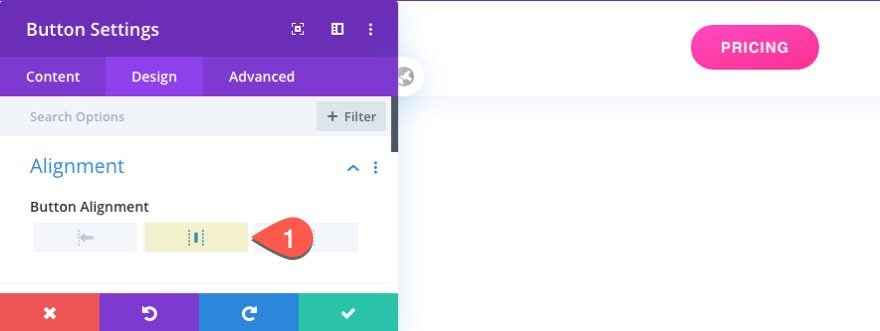
The open the button module settings and update the following:
- Button Alignment: Center
This makes sure the horizontal flip is centered with the parent perspective property.
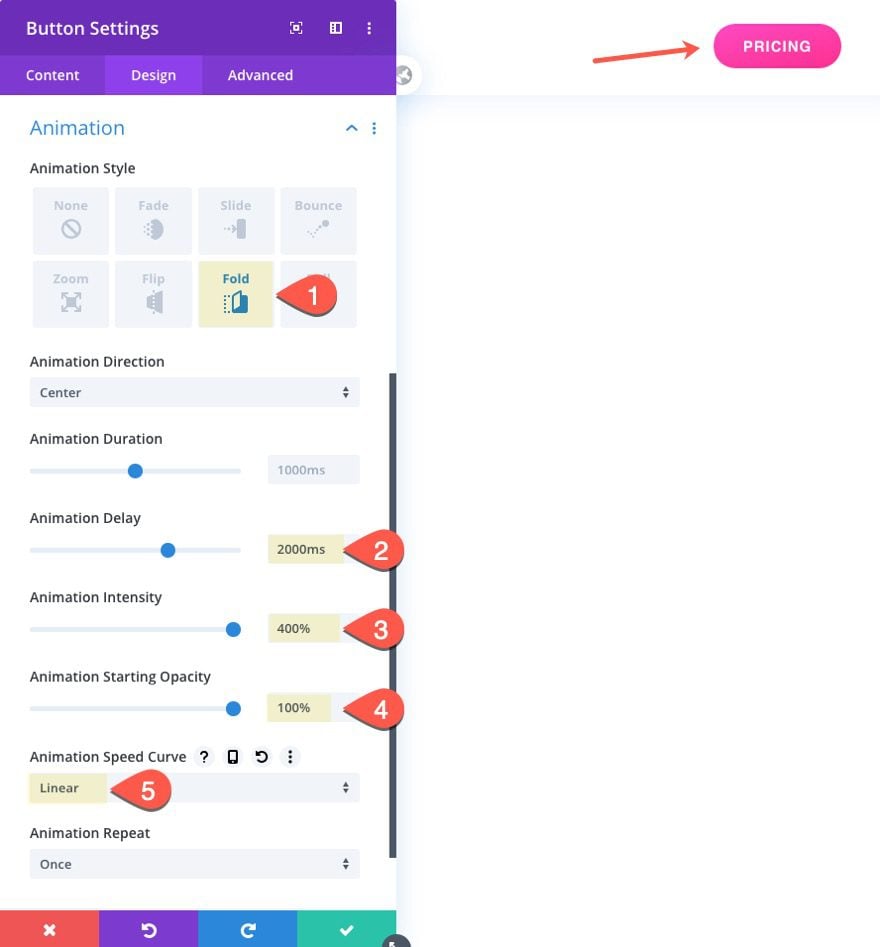
- Animation Style: Fold
- Animation Direction: Center
- Animation Duration: 1000ms
- Animation Delay: 2000ms
- Animation Intensity: 400%
- Animation Starting Opacity: 100%
- Animation Speed Curve: Linear
#4 Dropdown Bounce + 3D Vertical Flip

This delayed button animation is accomplished by combining a bounce animation (added to the column) and a flip animation (added to the button).
Here’s how to build it.
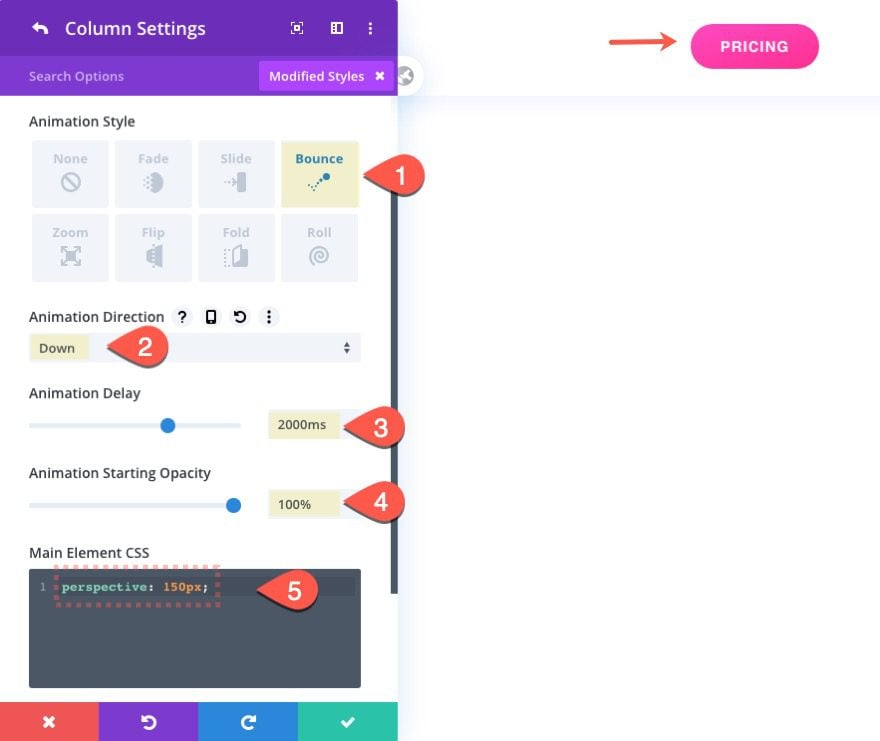
Column Settings:
Open the row settings, and update the column 2 settings with the following:
- Animation Style: Bounce
- Animation Direction: Down
- Animation Delay: 2000ms
- Animation Starting Opacity: 100%
Then add the perspective css to the main element as follows:
perspective: 150px;
Button Settings:
After the column settings are in place, update the button module settings as follows:
- Animation Style: Flip
- Animation Direction: Center
- Animation Duration: 1500ms
- Animation Delay: 1000ms
- Animation Intensity: 400%
- Animation Starting Opacity: 100%

The trick here is to make sure you delay the flip to start after the column animation is complete.
#5 Swoop down (slide down + Rotate)

To get the “swoop down” animation for this next one, we will need to combine a slide animation (added to the column) and a roll animation (added to the button).
Let’s do it.
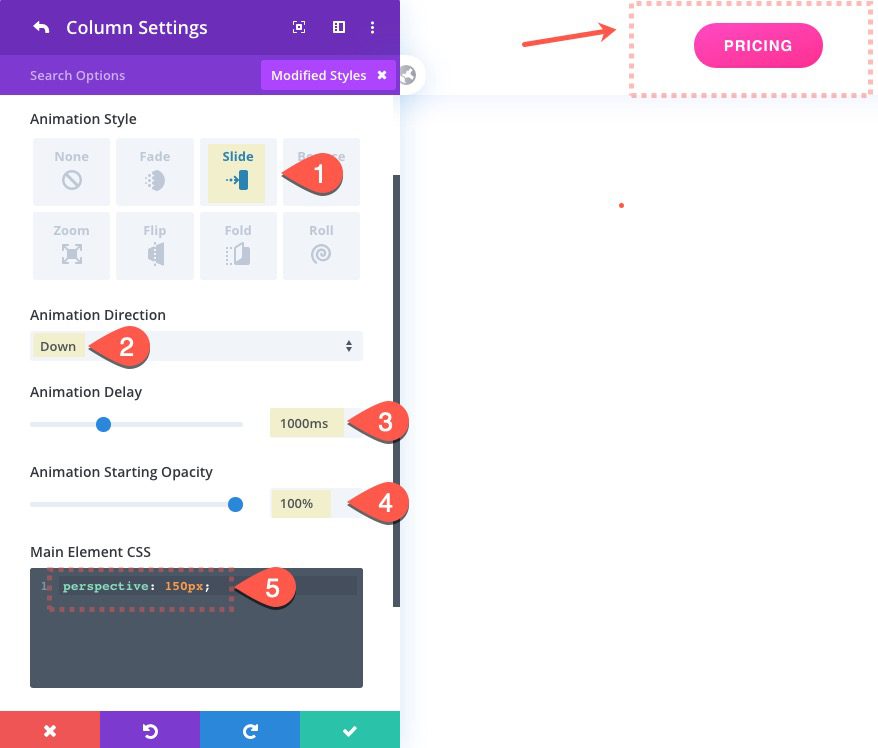
Column Settings:
Open the row settings and update the column 2 settings as follows:
- Animation Style: Slide
- Animation Direction: Down
- Animation Delay: 1000ms
- Animation Starting Opacity: 100%
Then add the following custom css to the main element:
perspective: 150px
Button Settings:
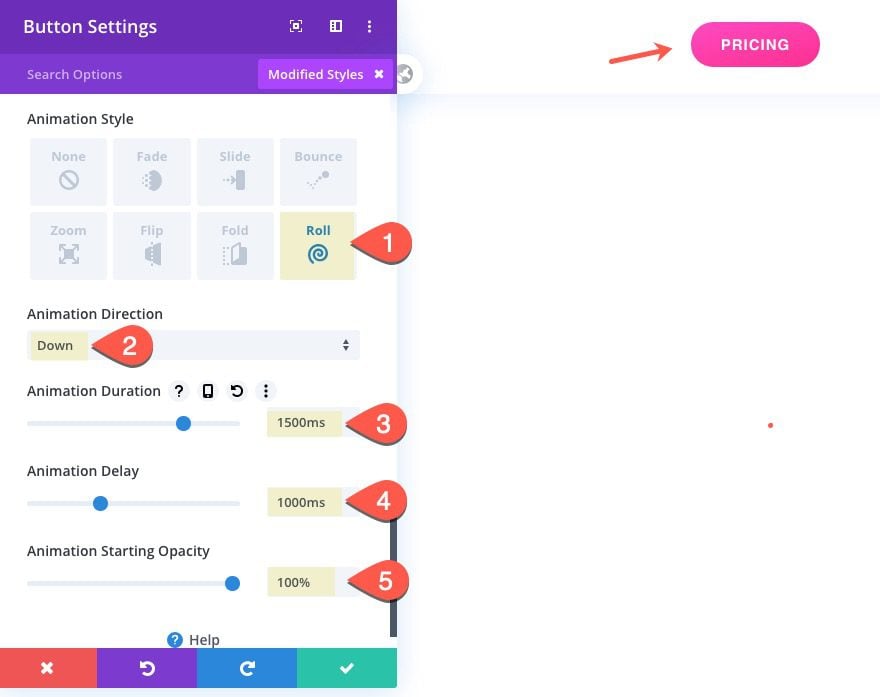
Then update the button settings as follows:
- Animation Style: Roll
- Animation Direction: Down
- Animation Duration: 1500ms
- Animation Delay: 1000ms
- Animation Starting Opacity: 100%
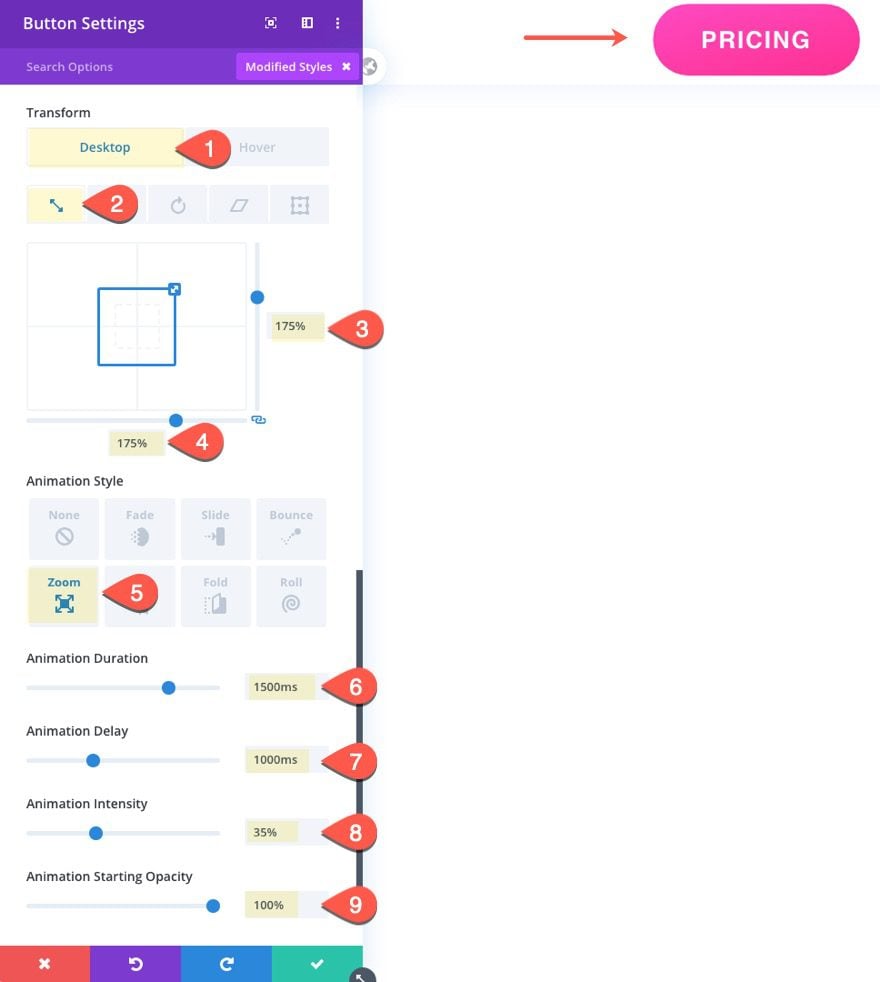
#6 Enlarge (zoom + transform scale)

This delayed button animation is unique in that it involves scaling the button using transform scale. Then we add the zoom animation to the button.
Here’s how to do it.
Button Settings:
Open the button module settings and update the following:
- Transform Scale: 175%
- Animation Style: Zoom
- Animation Direction: Center
- Animation Duration: 1500ms
- Animation Delay: 1000ms
- Animation Starting Opacity: 100%
#7 Pulse (zoom in + zoom out)

This delayed pulse animation is created by combining a zoom out animation (added to the column) and a zoom in animation (added to the button).
Let’s do it.
Column Settings:
Open the row settings and update the settings for column 2 as follows:
- Animation Style: Zoom
- Animation Direction: Center
- Animation Duration: 1000ms
- Animation Delay: 2000ms
- Animation Intensity: -100%
- Animation Starting Opacity: 100%
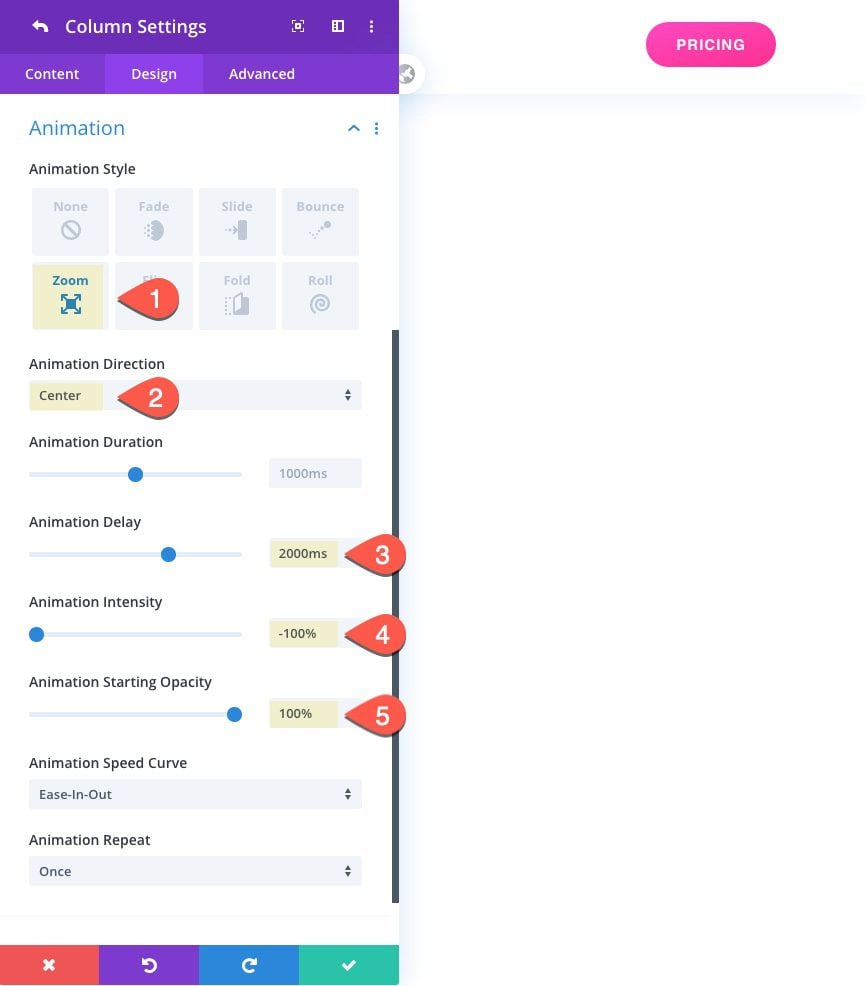
Notice that we added a negative value (-100%) for the animation intensity. This causes the column to have the opposite effect which will shrink the column/button (or zoom out).
Button Settings:
Then update the button settings as follows:
- Animation Style: Zoom
- Animation Direction: Center
- Animation Duration: 1500ms
- Animation Delay: 1000ms
- Animation Intensity: 50%
- Animation Starting Opacity: 100%
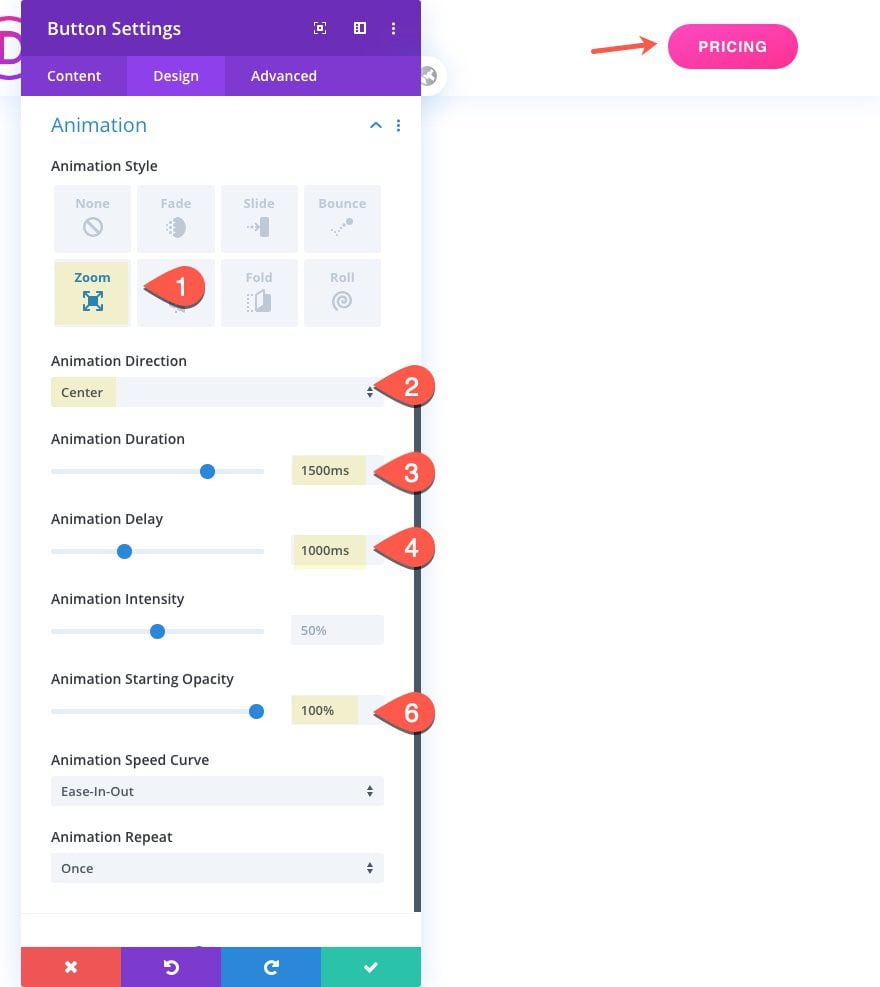
Notice that the animation delay is set to occur 1000ms before the column animation so that the button will zoom in before it zooms out.
#8 Spiral (slide left + spin)

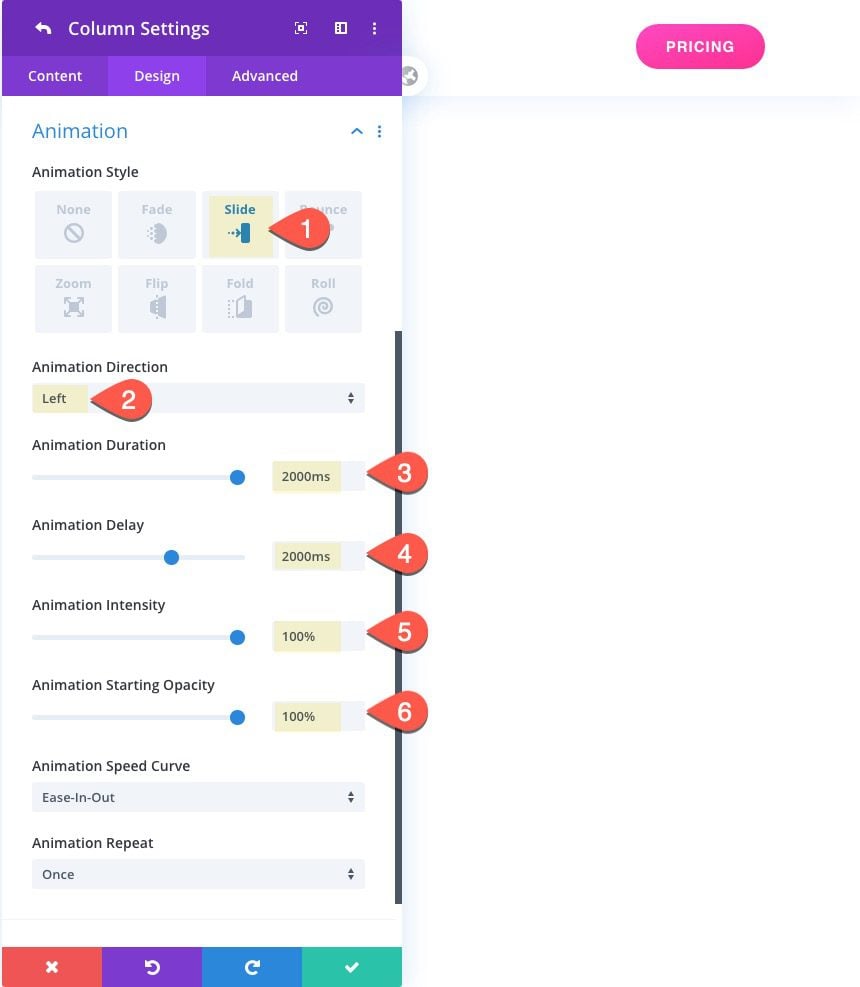
This final delayed button animation combines a slide animation (added to the column) and a 720 degree flip animation (added to the button).
Here’s how to do it.
Column Settings:
First, open the row settings and update the settings for column 2 as follows:
- Animation Style: Slide
- Animation Direction: Left
- Animation Duration: 2000ms
- Animation Delay: 2000ms
- Animation Intensity: 100%
- Animation Starting Opacity: 100%
Button Settings:
Then update the button module settings as follows:
- Animation Style: Flip
- Animation Direction: Center
- Animation Duration: 2000ms
- Animation Delay: 2000ms
- Animation Intensity: 800%
- Animation Starting Opacity: 100%
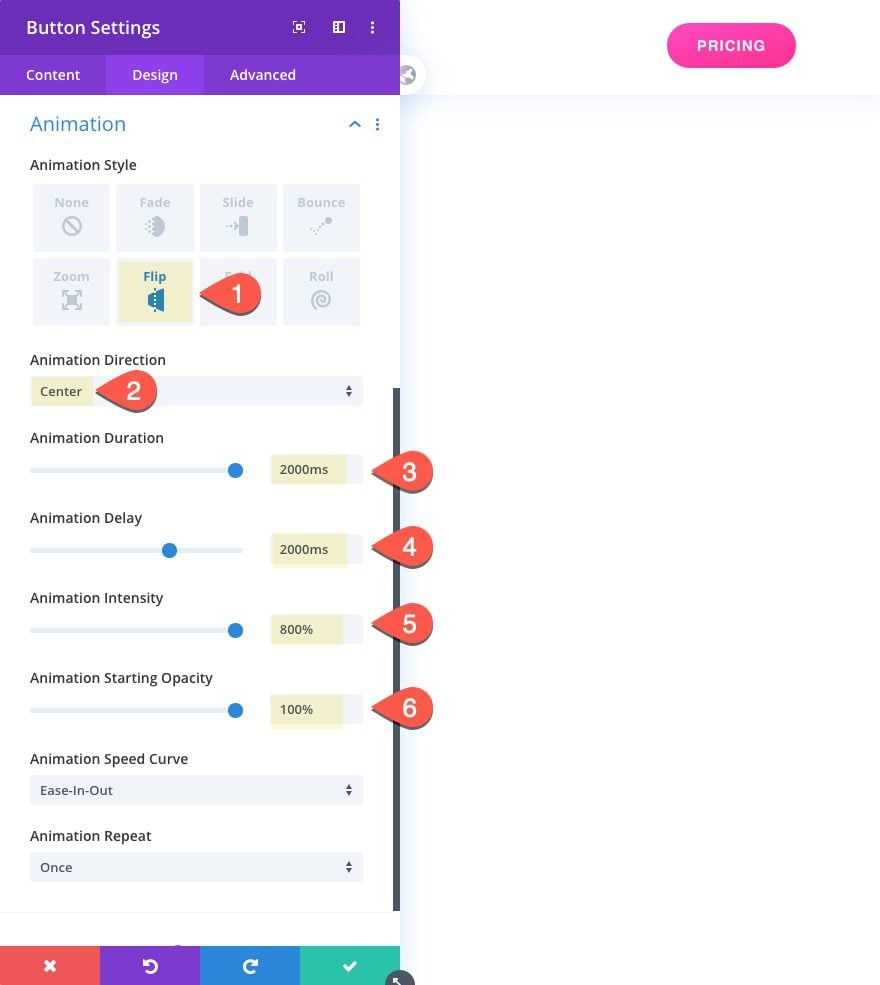
Notice here that the animation intensity is set to 800%. This will cause the button to flip three times to create the spin effect.
Final Results
Let’s take one final look at the 8 delayed button animations.

Final Thoughts
I hope these 8 delayed button animations will help boost conversions for your custom header CTAs. You can also use these examples for inspiration and explore additional designs and applications for your own website!
Have a favorite?
I look forward to hearing from you in the comments.
Cheers!



Thank you for the information, very useful. I will try delayed button animation on my Divi site.
Great! Glad it was helpful.