
")
The Divi Anniversary Sale is in full swing—and this year, we’re doing something we’ve never done before. We’re giving away the entire DonDivi suite of premium plugins for free to everyone who picks up a qualifying Divi product. That’s over $170 worth of tools added to your account, instantly.
To show you just how powerful this collection is, we’ve created three use cases using DonDivi and Divi. These aren’t just “cool ideas”—they’re practical solutions you can copy, customize, and use today. You’ll even get a free download of all the layouts used in this post so you can import and build instantly.
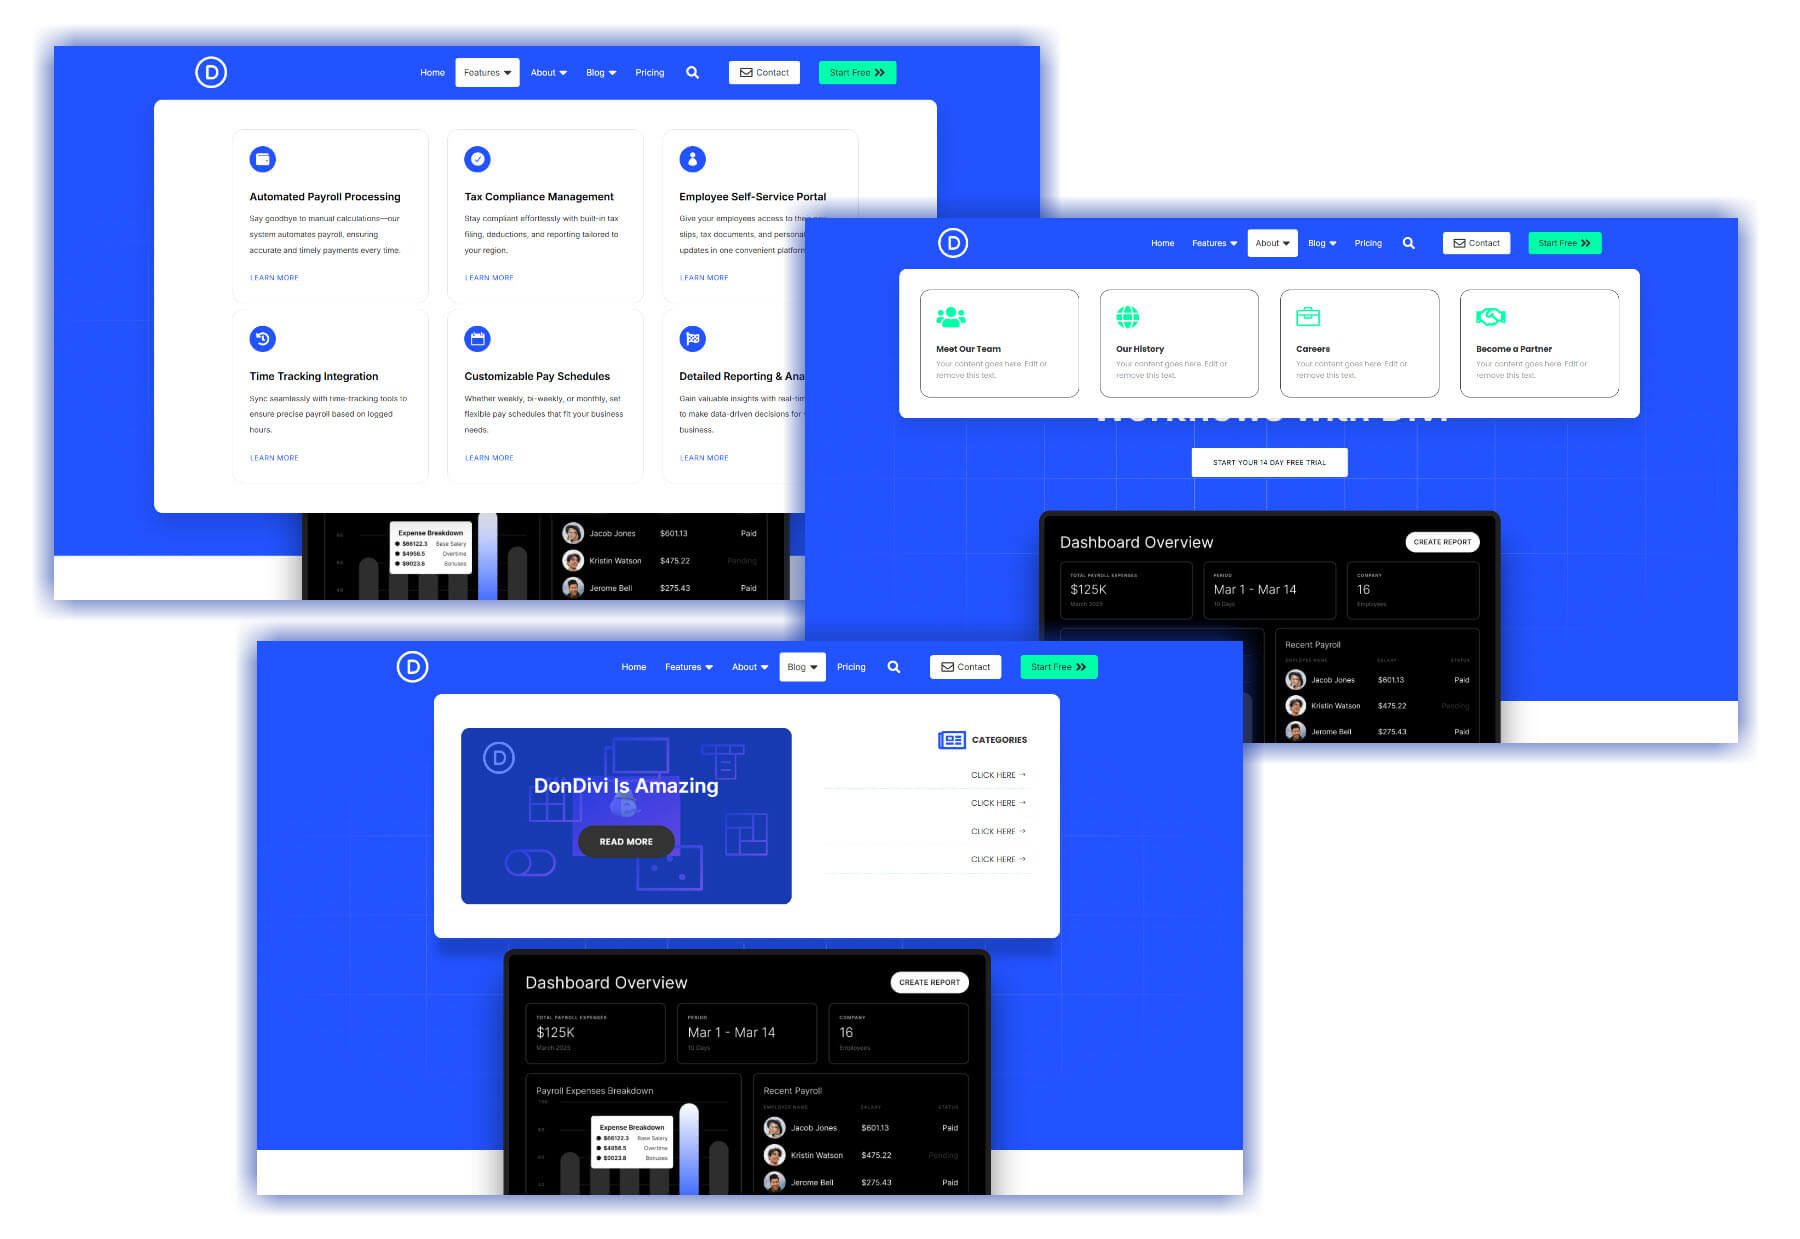
Here’s a sneak peek of what we have in store…
Let’s dive in and discover what you can do with DonDivi.
🎁 Get The Entire DonDivi Suite For Free
We recently acquired the entire DonDivi collection—and to celebrate, we’re giving it away for free to everyone who makes a qualifying purchase during the Anniversary Sale. That’s over $170 worth of premium plugins, added to your account automatically when you buy Divi Pro, Divi VIP, or any Divi bundle.
Subscribe To Our Youtube Channel
✅ What’s Included?
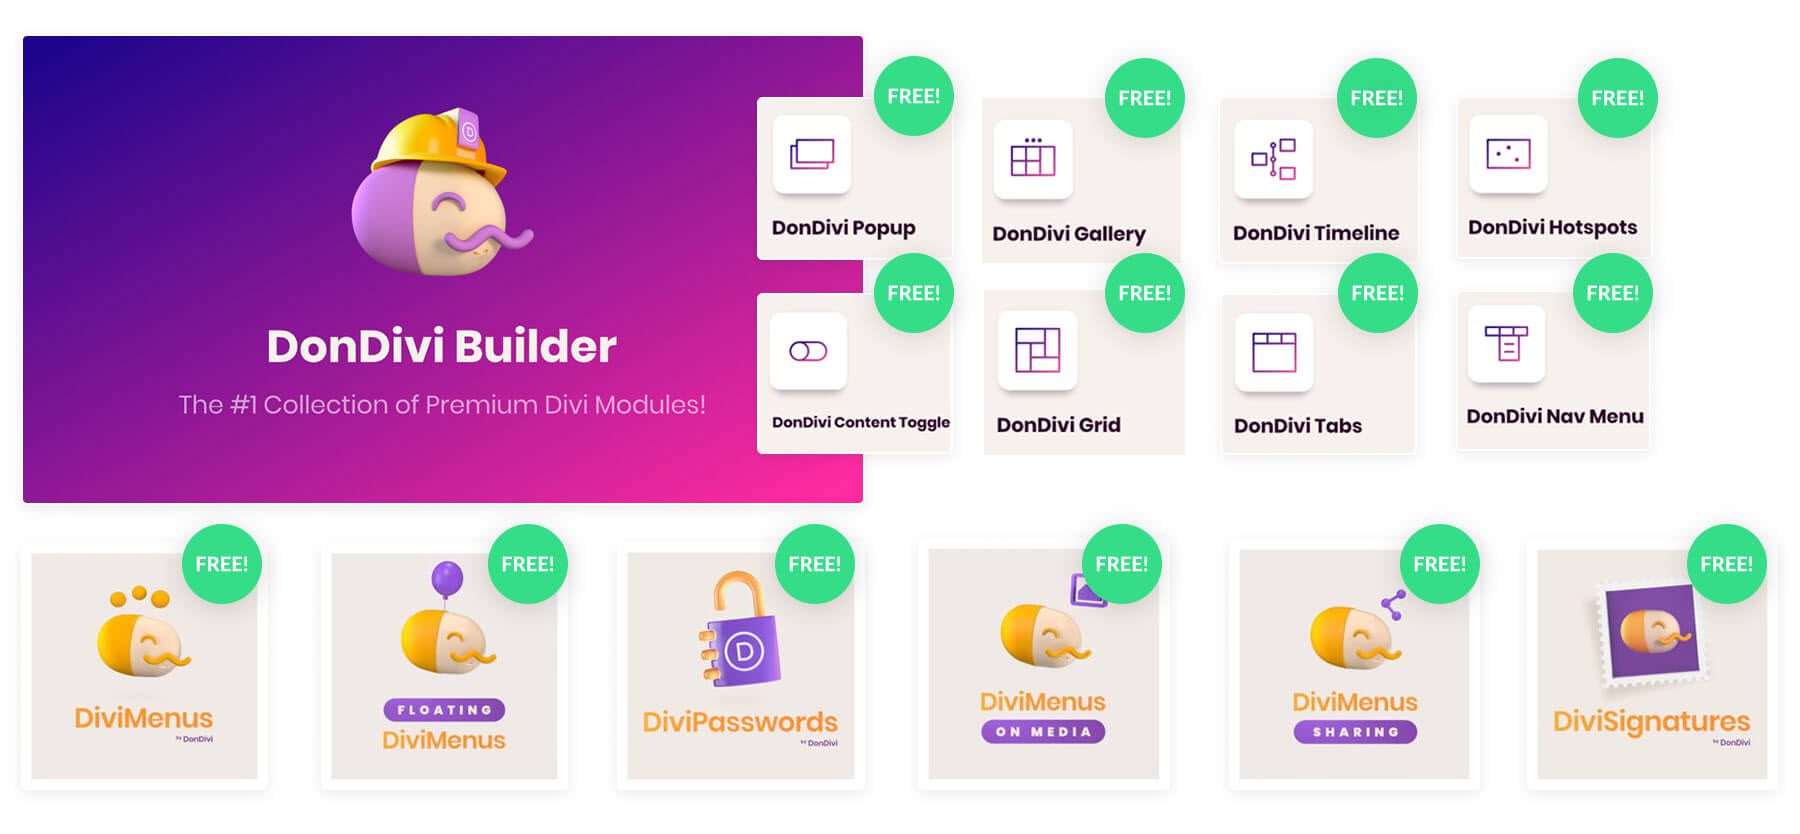
Every qualifying purchase unlocks the full collection of DonDivi products, including:
- DonDivi Builder — A premium set of 9 modules including Popups, Grids, Content Toggles, Tabs, Hotspots, Timelines, and more.
- DiviMenus — A flexible menu builder that lets you create mega menus, sticky headers, floating navs, popups, and interactive content.
- DiviPasswords — Password protect any section, row, or module with a simple password field.
- DiviSignatures — Build and manage custom email signatures using the Divi Builder. Includes a searchable directory!
- Floating DiviMenus — Float your menus anywhere on the screen with custom positioning and visibility controls.
- DiviMenus Sharing — Add beautiful social sharing buttons to any Divi layout using DiviMenus styles.
- DiviMenus On Media — Place interactive menus directly on images and videos to boost engagement.
And it’s all free—just for joining in during the sale.
Claim Your Free DonDivi Collection
3 Cool Things You Can Build With DonDivi
DonDivi isn’t just a bundle of plugins—it’s a full-blown creative toolkit for Divi. Whether you want to enhance your headers, create slick popups, or make your pricing tables more interactive, DonDivi makes it possible with drag-and-drop simplicity.
To show you what’s possible, we’ve built three real-world examples using:
- The Divi SaaS Starter Site with Divi Quick Sites
- The DiviMenus and DonDivi Builder plugins
- Pre-made DonDivi layouts imported into the Divi Library to jumpstart the process
Each example below includes a quick walkthrough—and we’ve even packaged up the layout files as a free download at the end of this post.
Tired of basic header menus? DiviMenus lets you create something far more dynamic—think mega menus, hover reveals, and modals—all styled your way right inside the Divi Theme Builder.
Here’s how we built it:
We replaced the global header template in the Theme Builder with a premade DonDivi header menu layout (built with the DiviMenus Flex module) to give us a working example.
Then, we used the DiviMenus Flex module to build a dynamic header with different styles and link types. Here’s what our example menu includes:
- Home — a simple URL link
- Features, About, Blog — each one reveals a custom Divi Layout from the library in a mega menu style.
- Pricing — another standard URL link
- Search — opens a styled search bar layout in a Popup
- Contact — also opens as a Popup with a contact form, styled as a call-to-action button
- Start Free — a bold button that links to the pricing page
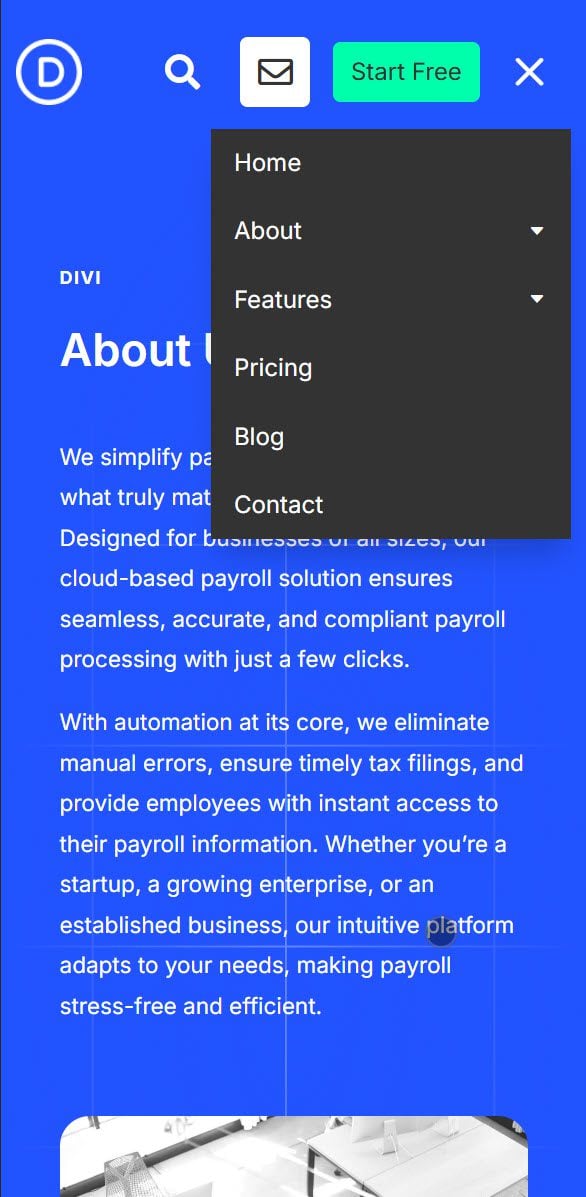
- Hamburger Menu – This hamburger menu displays a WordPress menu on mobile (with collapsible sub menus!)

Displaying Full Divi Layouts with Sub Link Type
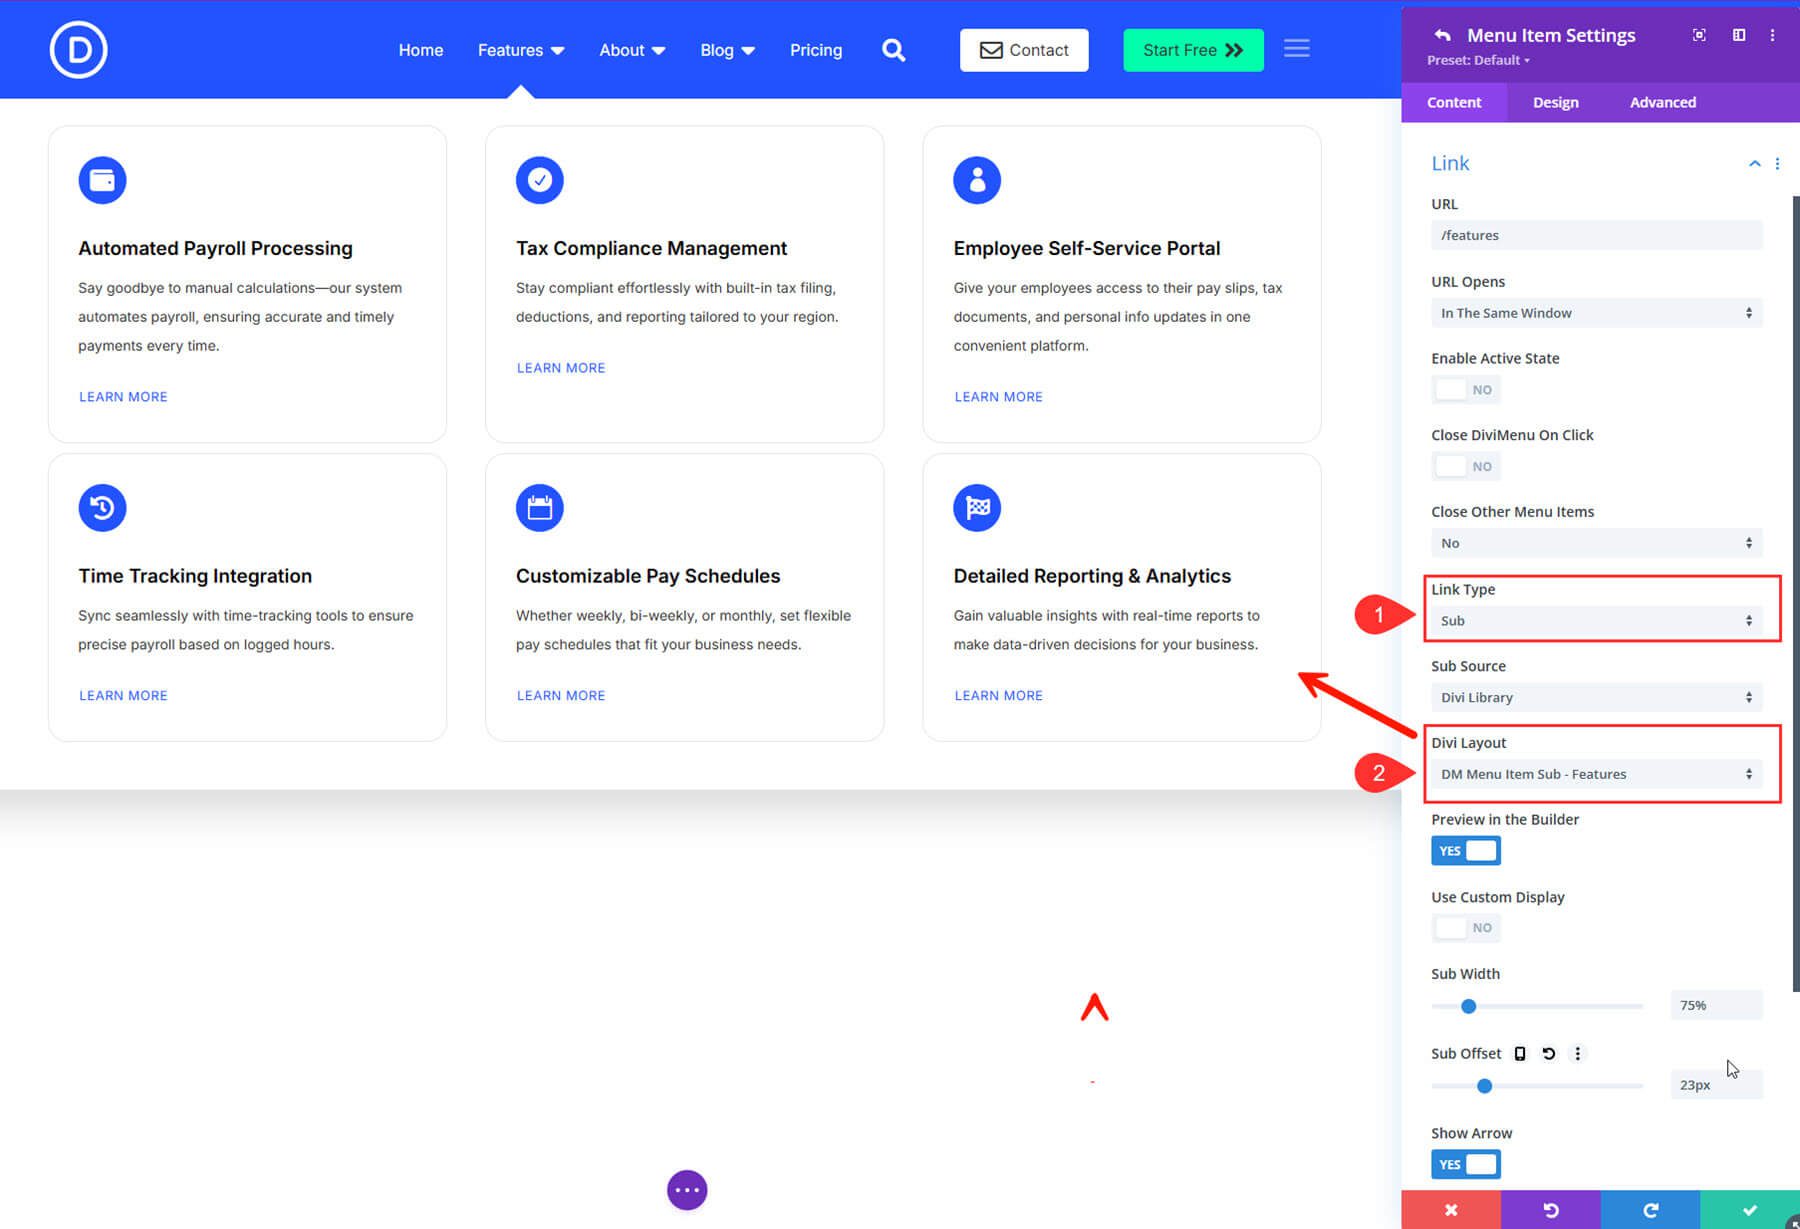
To display a custom “mega menu-like” layout when hovering (or clicking) on the menu item, you can use the Sub link type in the module item settings.
For example, to show the features layout when hovering over the “Features” menu item, we first had to save the features section from our website to the Divi Library.
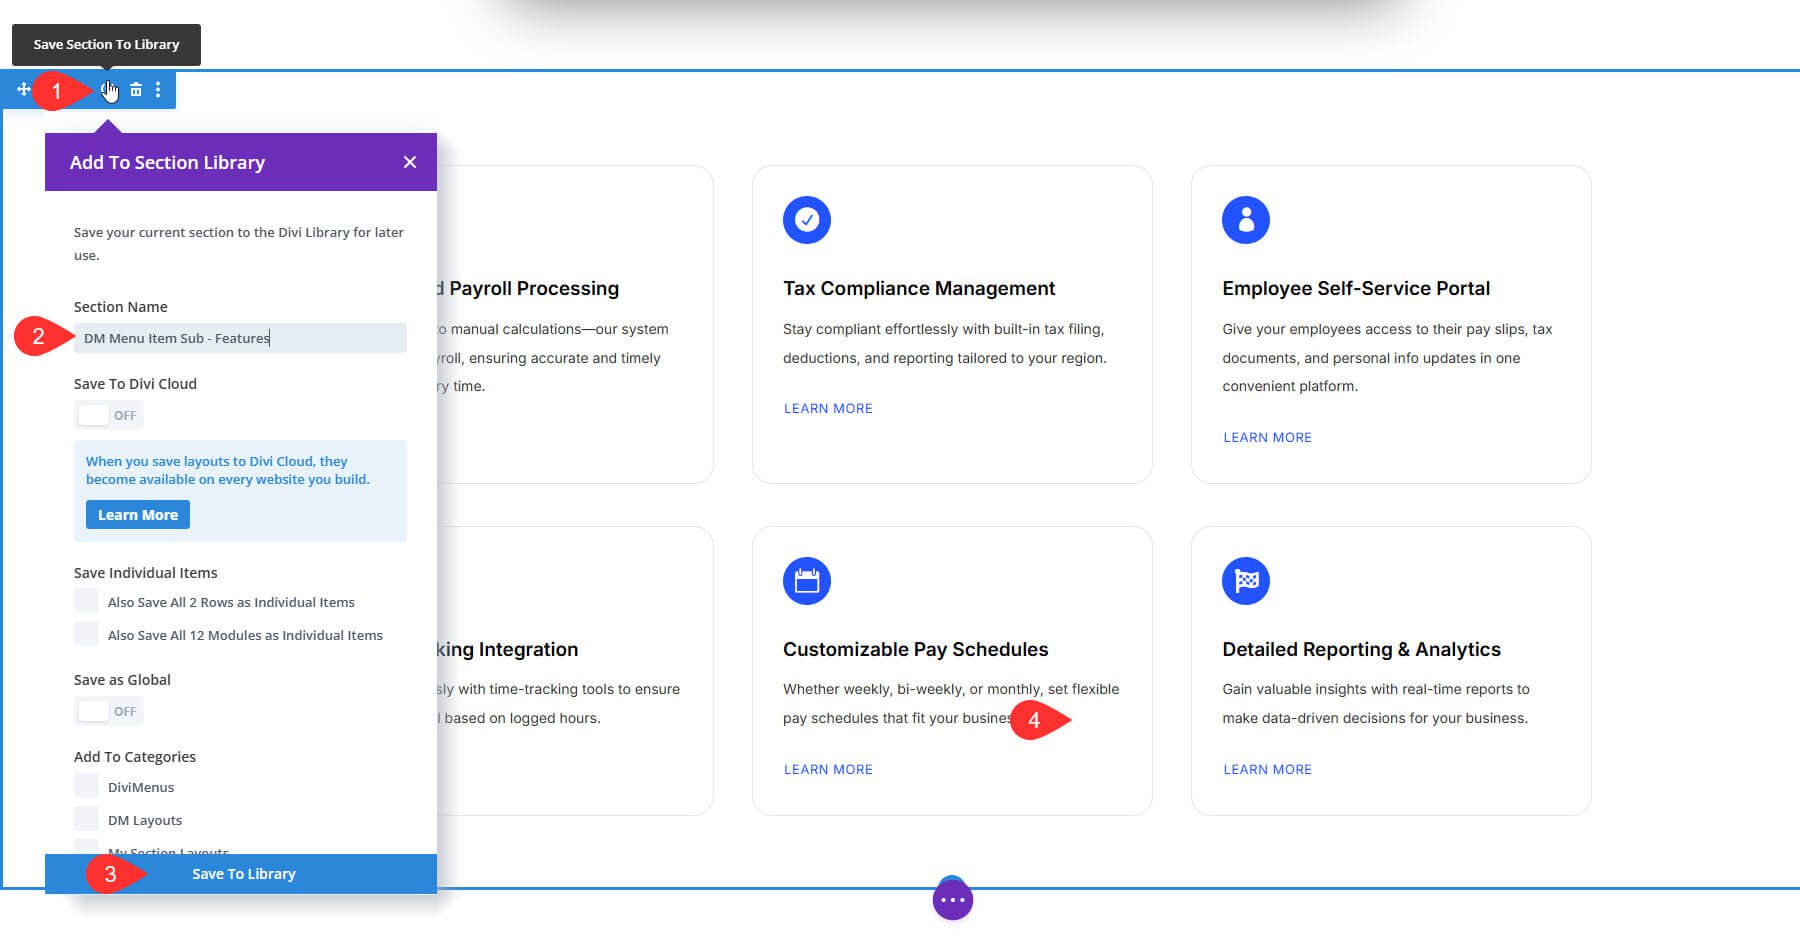
Then, we opened the DiviMenus Flex module and changed the “Feature” link type to “Sub.” We then selected the saved layout from the library as the content.
We did the same thing for the Blog and About menu items as well. We saved a custom layout to the library for each and displayed it by using the Sub link type in the menu item settings.
The About link displays a mock layout with clickable blurb modules and the Blog link displays a dynamic blog post slider with mock links to categories.
That’s pretty much it! Here is the result.
Turning Layouts Into Popups Using the Popup Link Type
For Search and Contact, we used the Popup link type to trigger custom layouts from the Divi Library.
To create the “Contact” popup link, we used the design options to style the link with an icon, background color, hover effect, etc., to look and function like a button. Then, we changed the link type to “Popup” and selected the contact form layout from the Divi Library (which we got from the contact page).

We put some final touches on the design to change the color of the overlay, the “close” icon, etc. That’s it!
The popup layout will show when clicking the contact link.
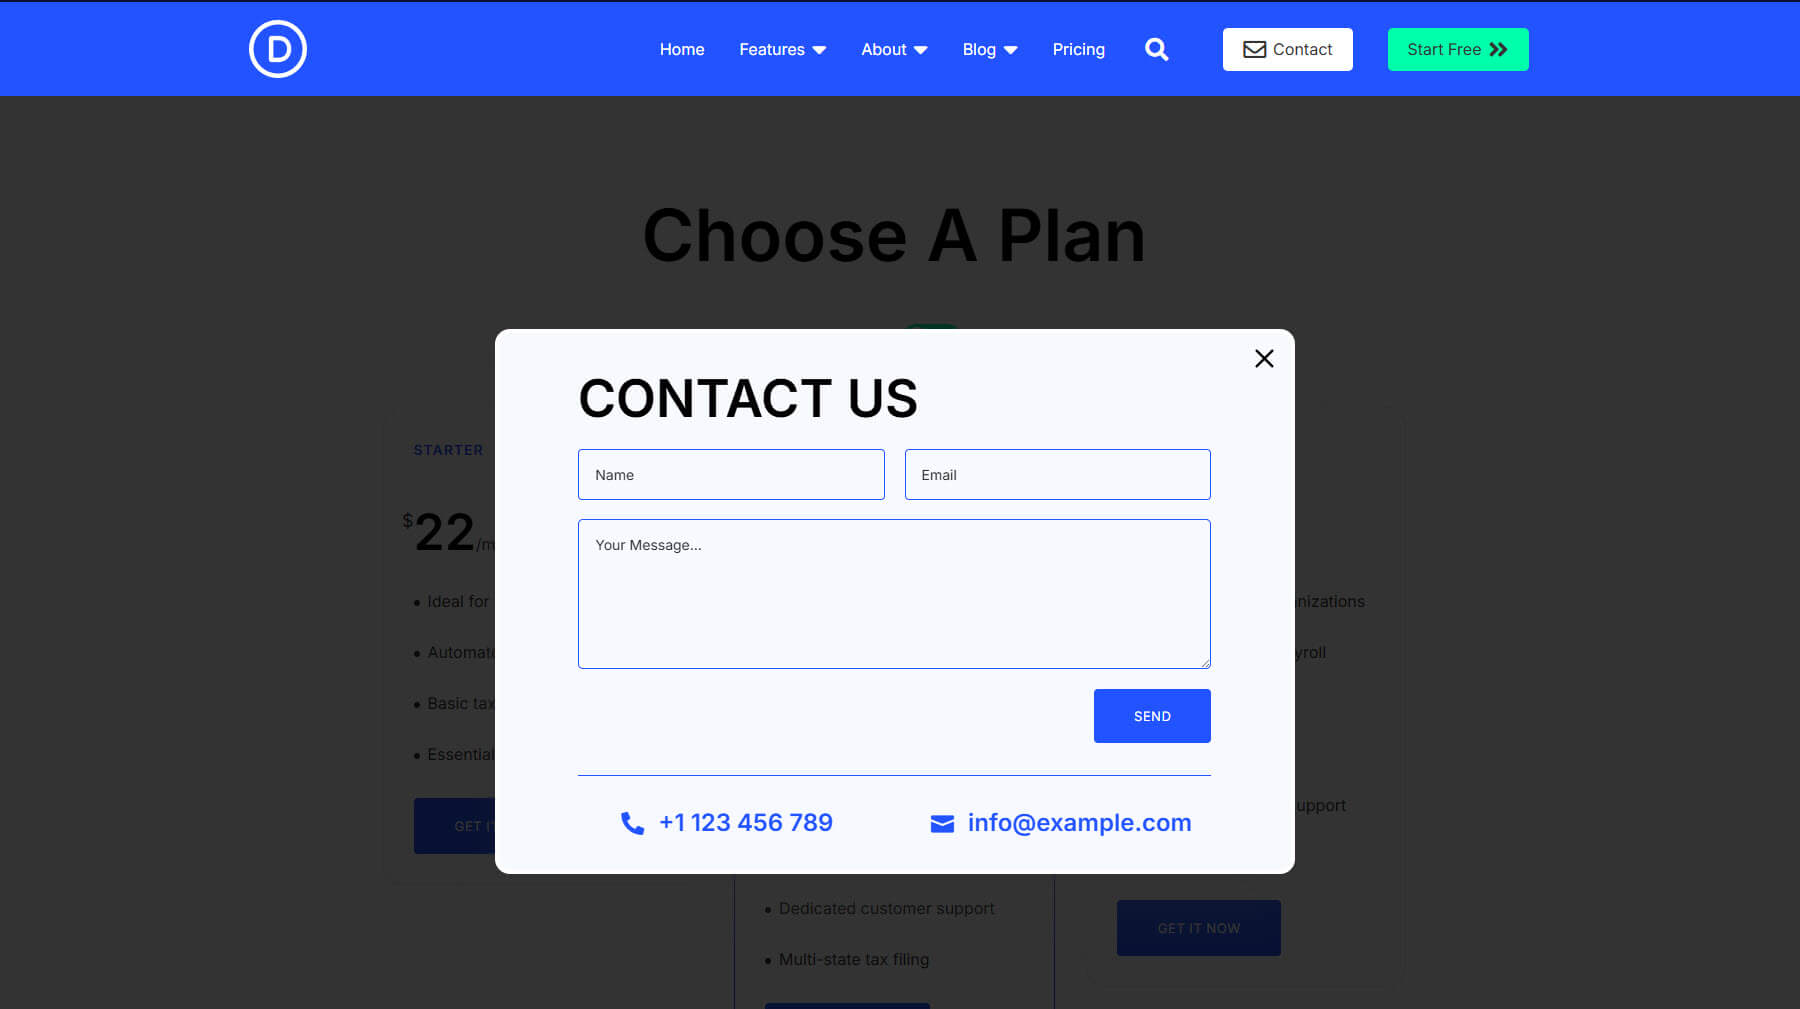
We did the same thing to create a search bar popup when clicking the search icon. All you need to do is pull a predesigned search bar layout from the library.
Here are the popup menu items in action.
Styling Tips:
- Use Icons or Custom Images for each item for extra polish
- Under Design > Menu Item, adjust padding and hover effects
- Turn on Sticky Settings so the menu stays on top during scroll
- Hide Link Text on Mobile so only the Icon displays, saving space
DonDivi’s DiviMenus lets you turn a simple header into an interactive experience tailored to your brand and the user. And that is just the tip of the iceberg. There is so much more you can do with this plugin, especially when you combine it with DonDivi’s Floating DiviMenus, DiviMenus Sharing, and On Media (also free during the sale).
2. Build Custom Popups With Click, Scroll, and Exit Triggers
Popups can be annoying—or awesome. With DonDivi’s Popup module, you’re in full control. You can show any Divi layout as a popup and trigger it however you want: on scroll, on click, or even on exit intent.
In this example, we took the CTA section from the SaaS Starter Site homepage and turned it into a smart exit-intent popup. Here’s how we did it:
Save the CTA Section from your homepage to the Divi Library.
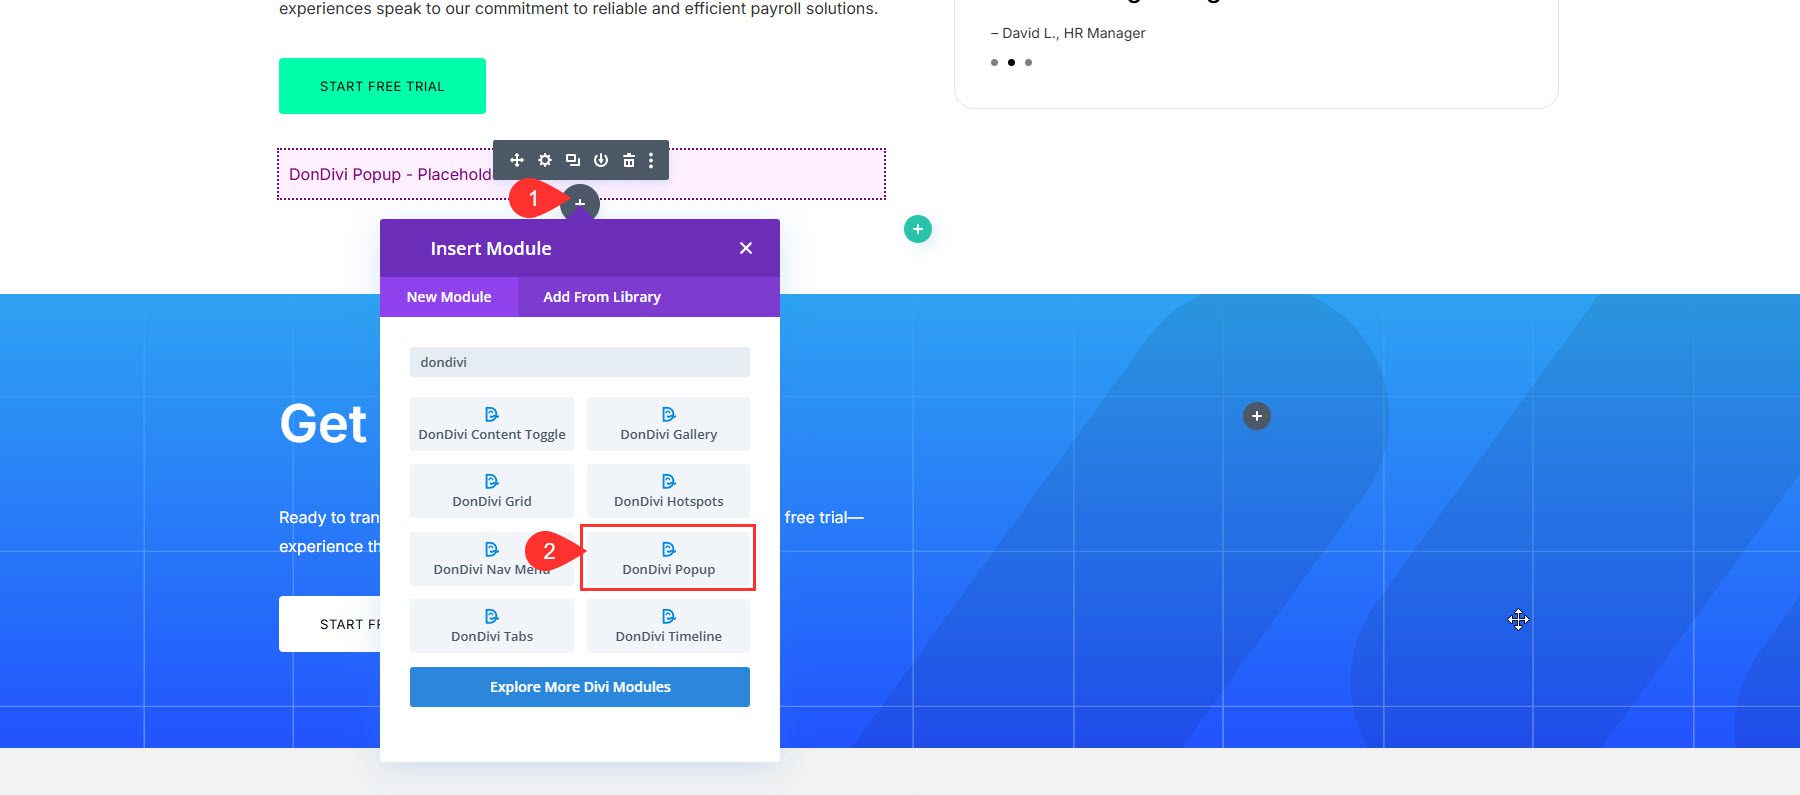
Create a new Section and add the DonDivi Popup module.
Under Content Settings, choose “Exit Intent” as the trigger type. Then choose “Divi Layout” as the content type and choose the corresponding Layout from the library in the dropdown menu.
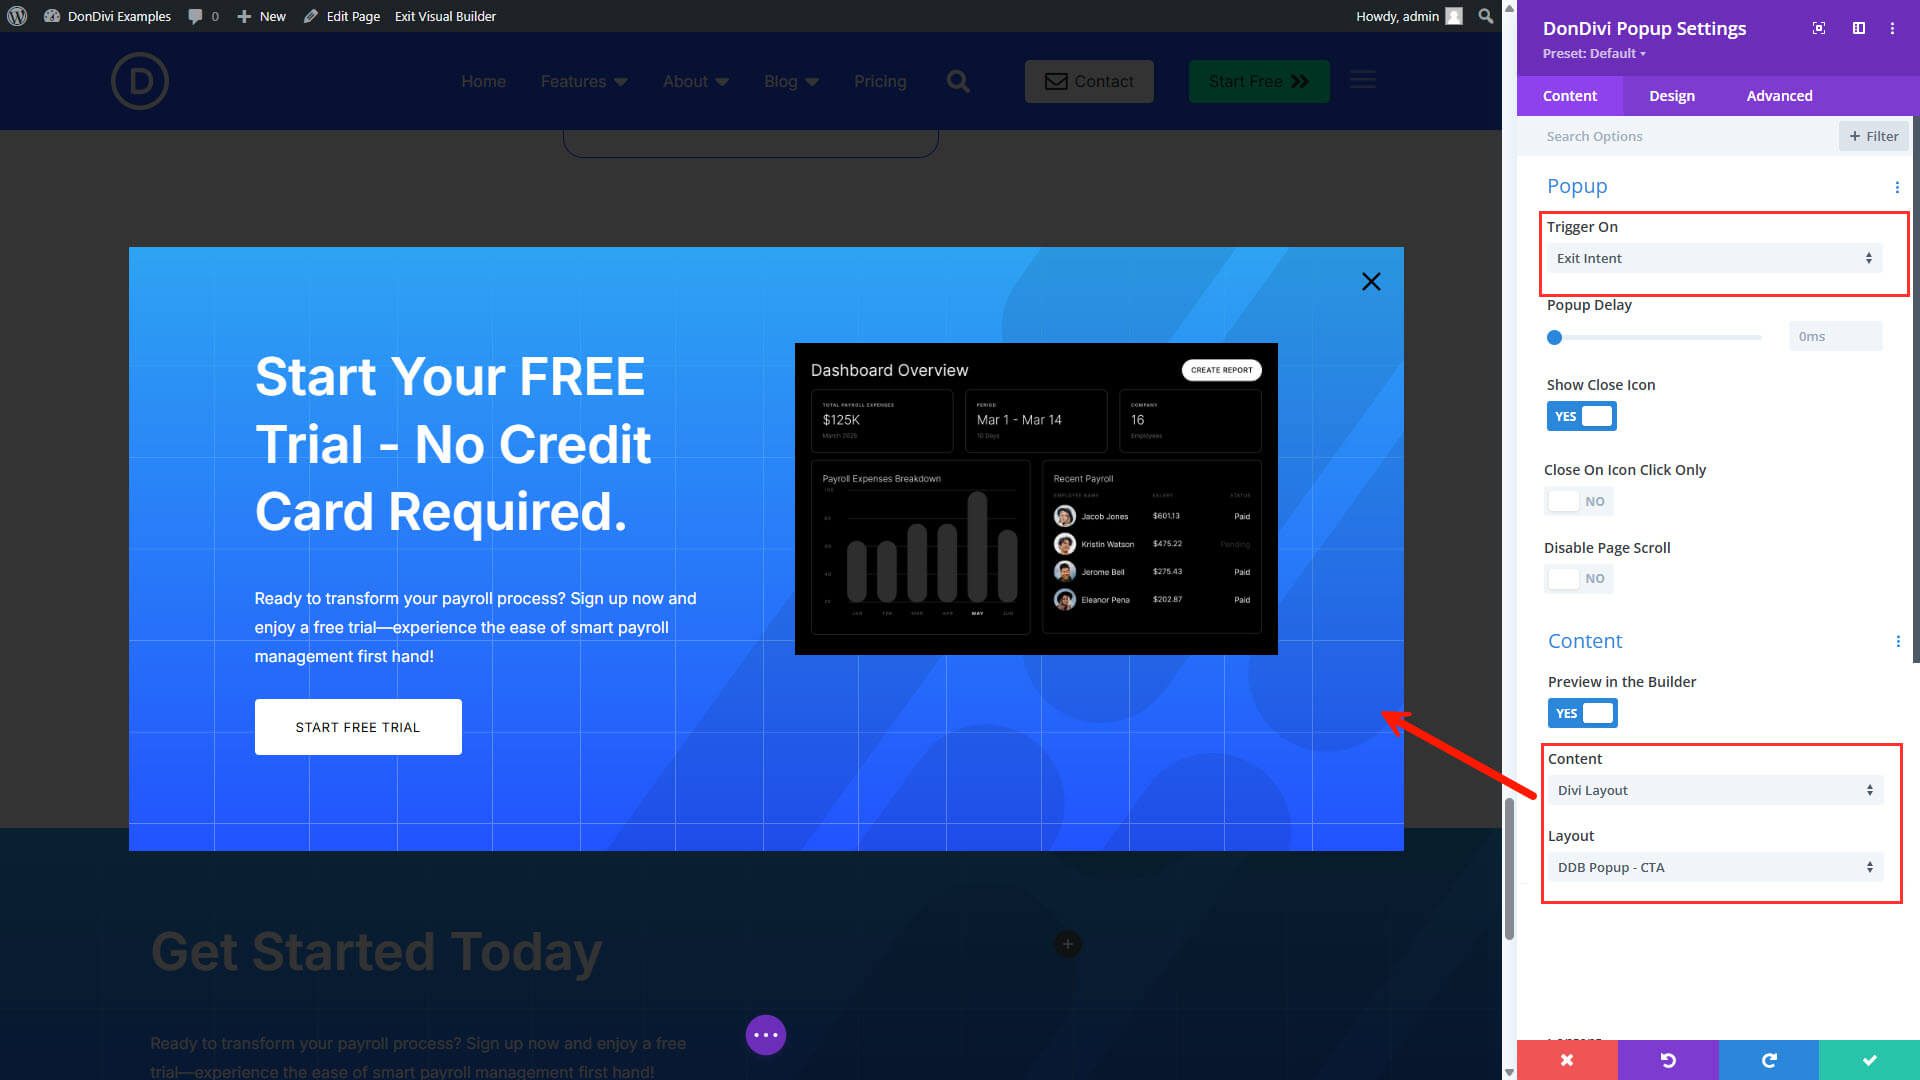
Here the popup in action.
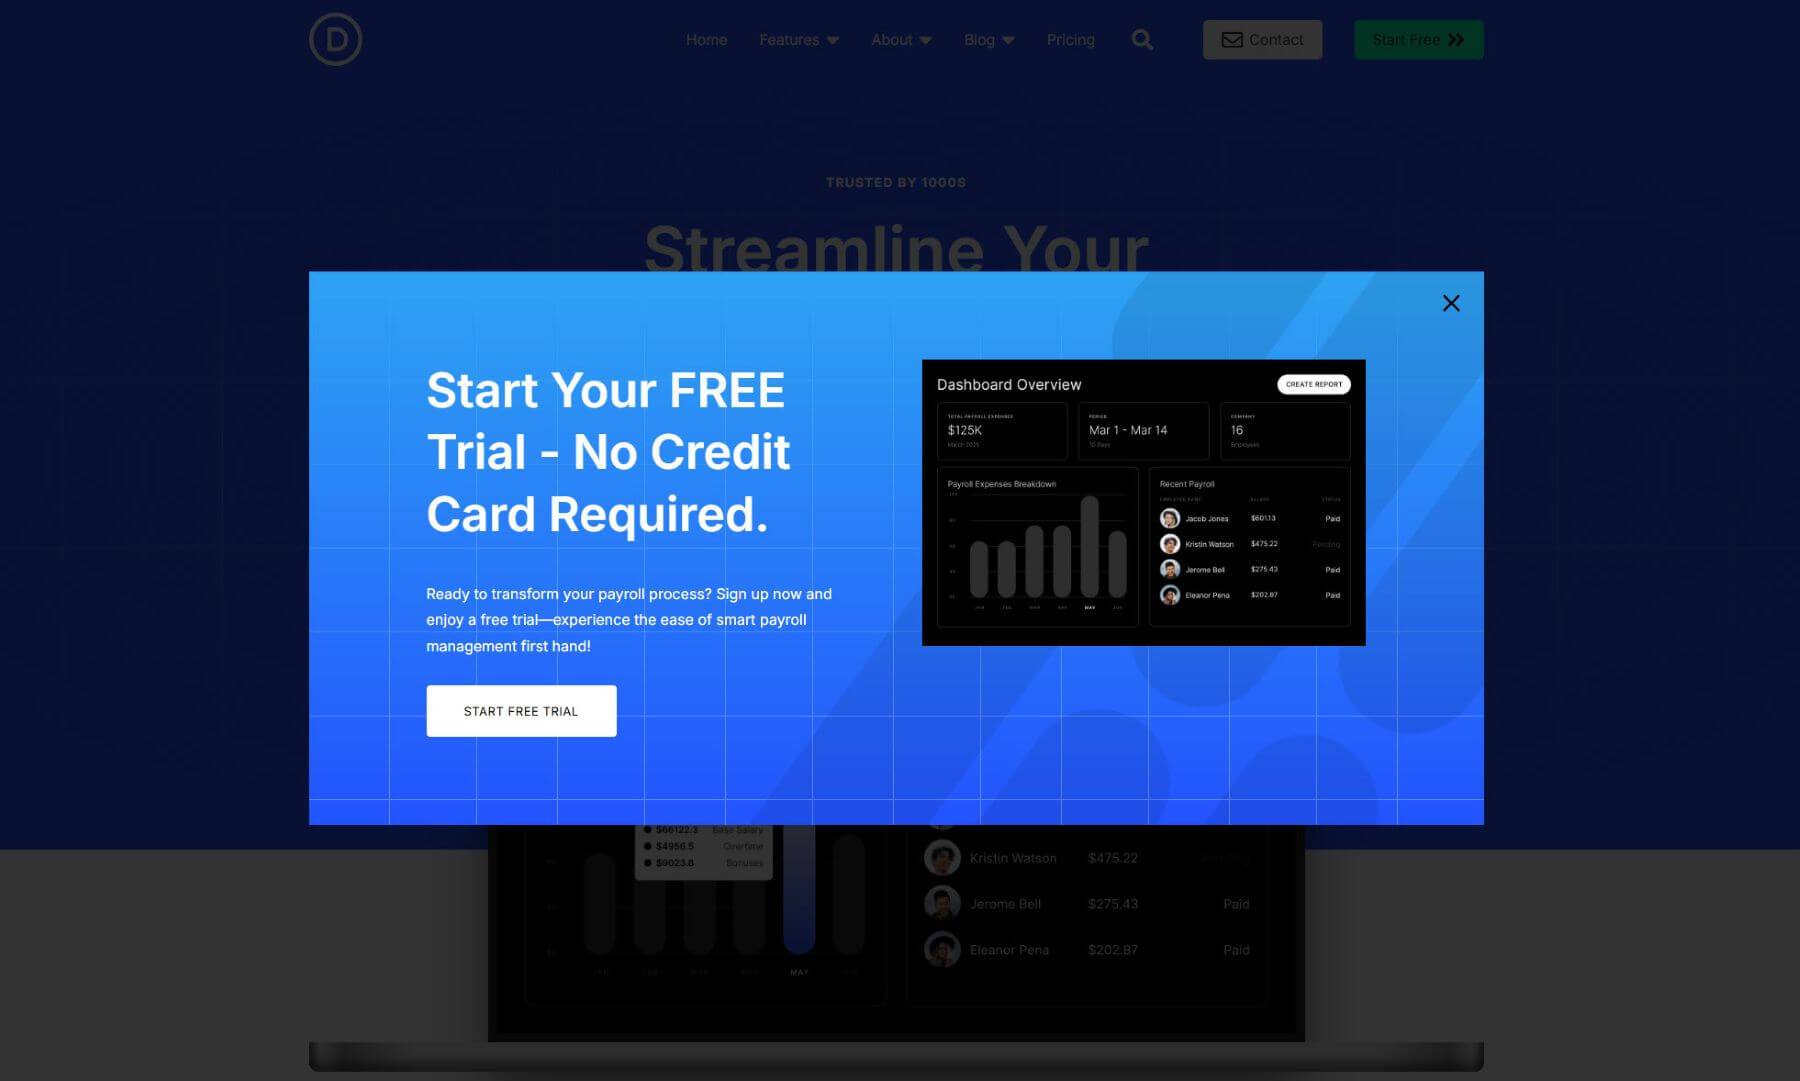
This is a perfect way to surface calls to action without interrupting your visitors. Because you’re using Divi layouts, the sky is the limit on customization.
✨ More Tips
- Use Animation Settings to add entry/exit effects like “Zoom In” or “Slide Up”
- Control popup width, background color, and close button position
- Want to trigger on button click instead? Switch to Click Trigger and assign a CSS class like
.cta-popupto any element - Use the scroll trigger to have the popup show at a certain point when the user scrolls down the page. This would be great for adding an email optin popup on your blog post template!
This Divi Popup module is a perfect FREE alternative to more robust popup solutions like Optinmonster and free WordPress plugins like Popup Maker.
Think about it: Divi is your popup builder. If you can design it in Divi, you can display it in a popup with any trigger you need.
3. Toggle Content with Switches or Tabs (Perfect for Pricing Tables)
Need to let visitors switch between two views—like monthly and yearly pricing—without leaving the page? The DonDivi Content Toggle module does exactly that. It creates smooth, interactive toggles between two layouts, perfect for pricing tables, feature comparisons, or product plans.
In our example, we used the pricing section from the Divi SaaS Starter Site. We duplicated the pricing section and adjusted the duplicate section pricing. Then we saved both sections—one for monthly pricing and one for yearly pricing—to the Divi Library.
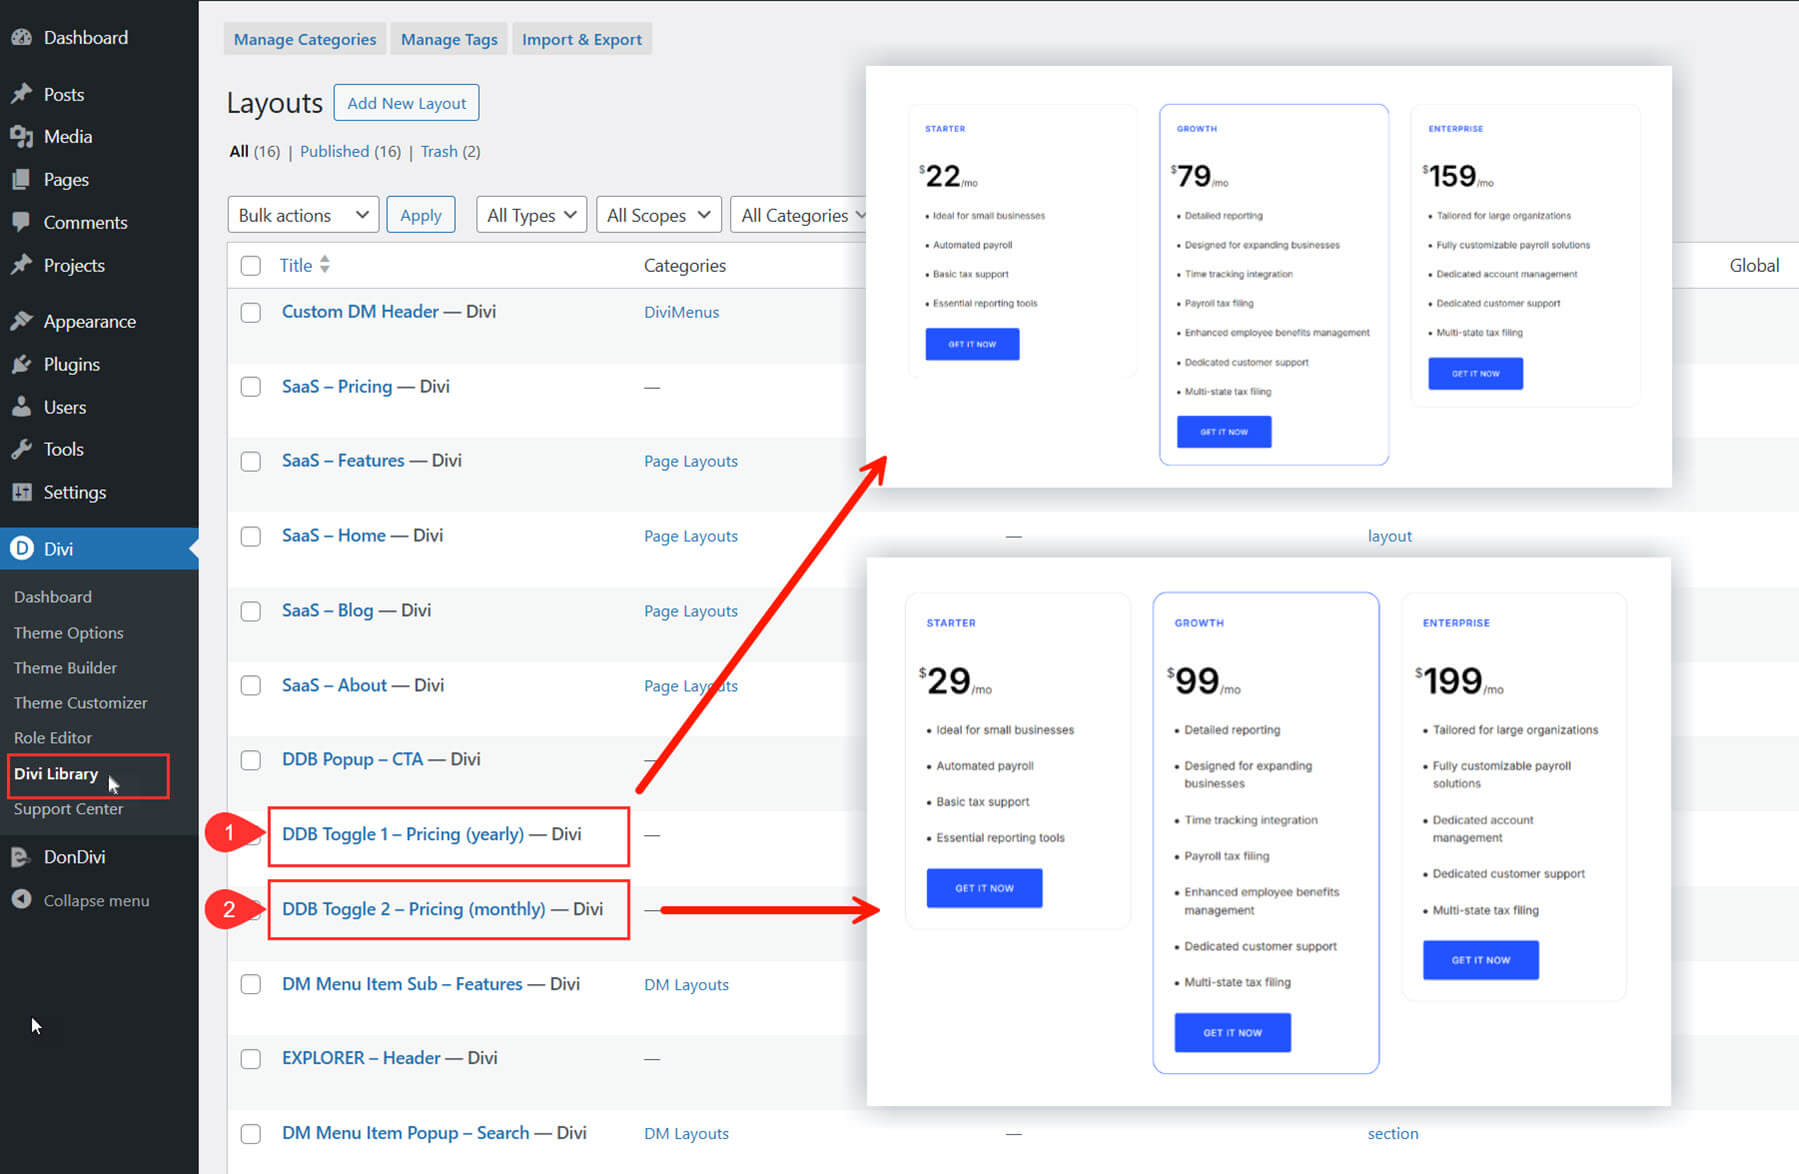
Once the layouts are saved, we went back to the pricing page and added the DonDivi Content Toggle module to replace the static pricing content.
Under Content > Layouts, assign each toggle state to one of your saved layouts. Name the toggle states Monthly and Yearly.
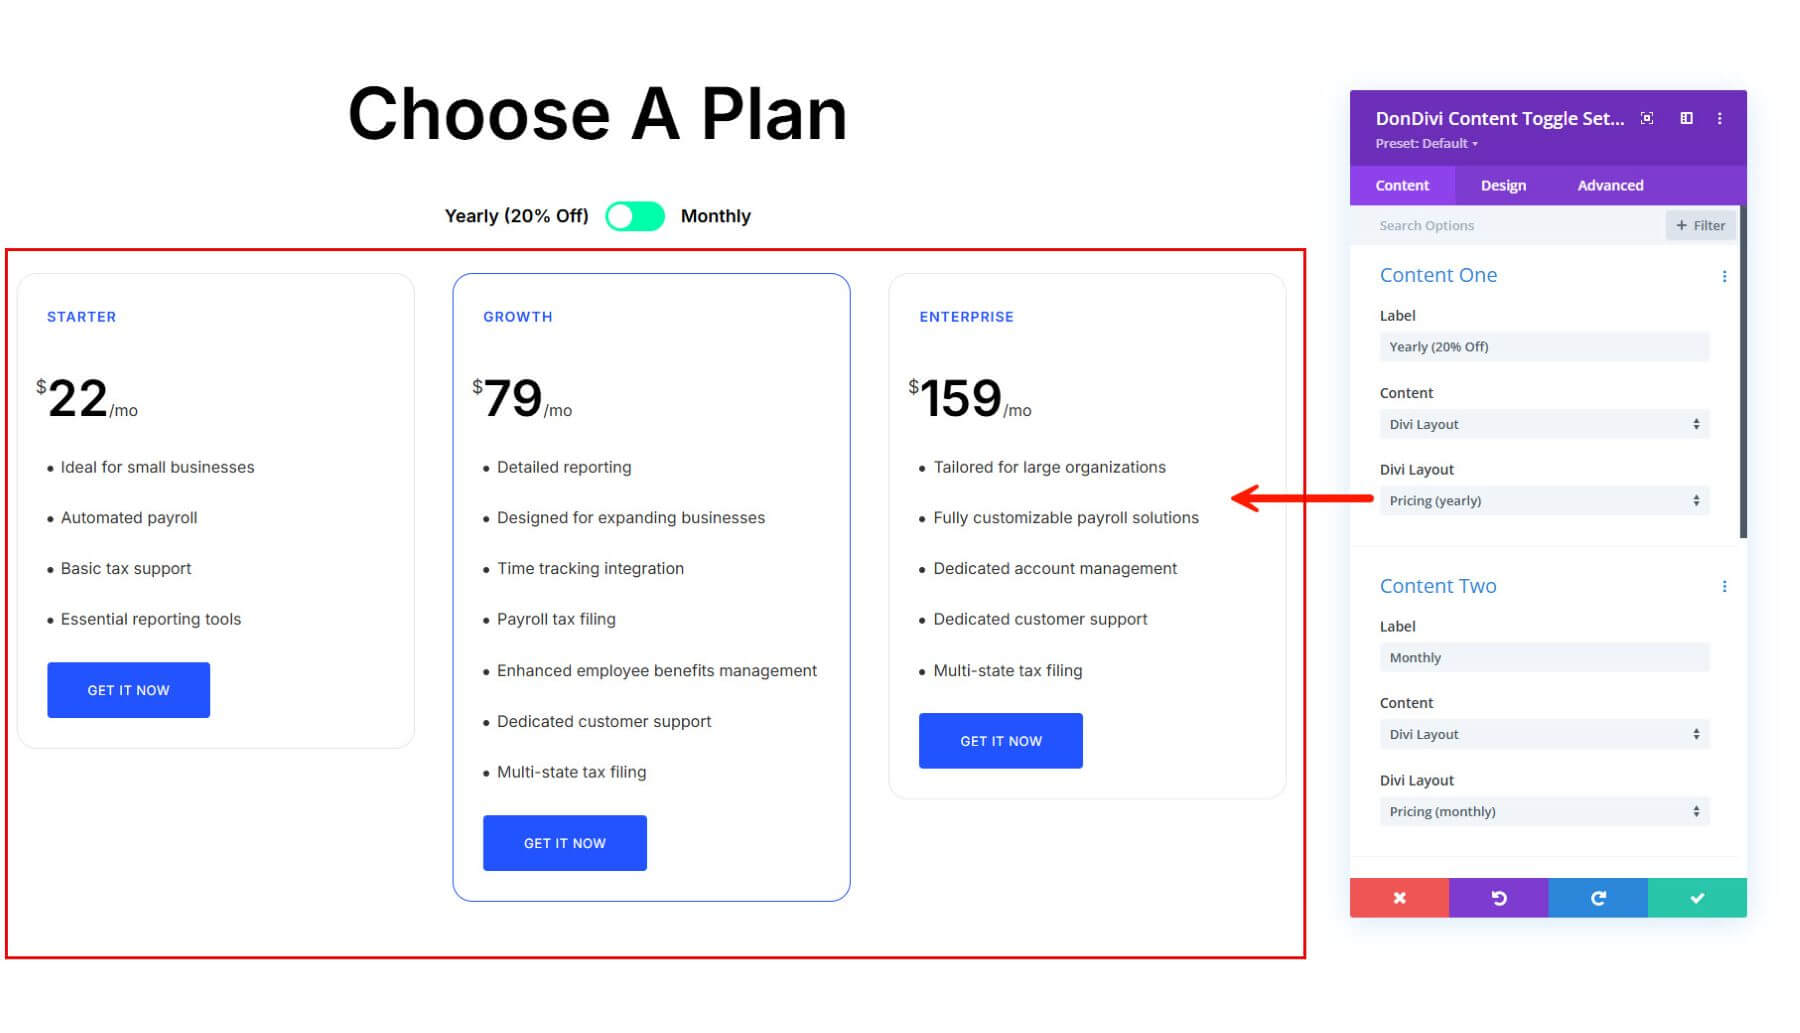
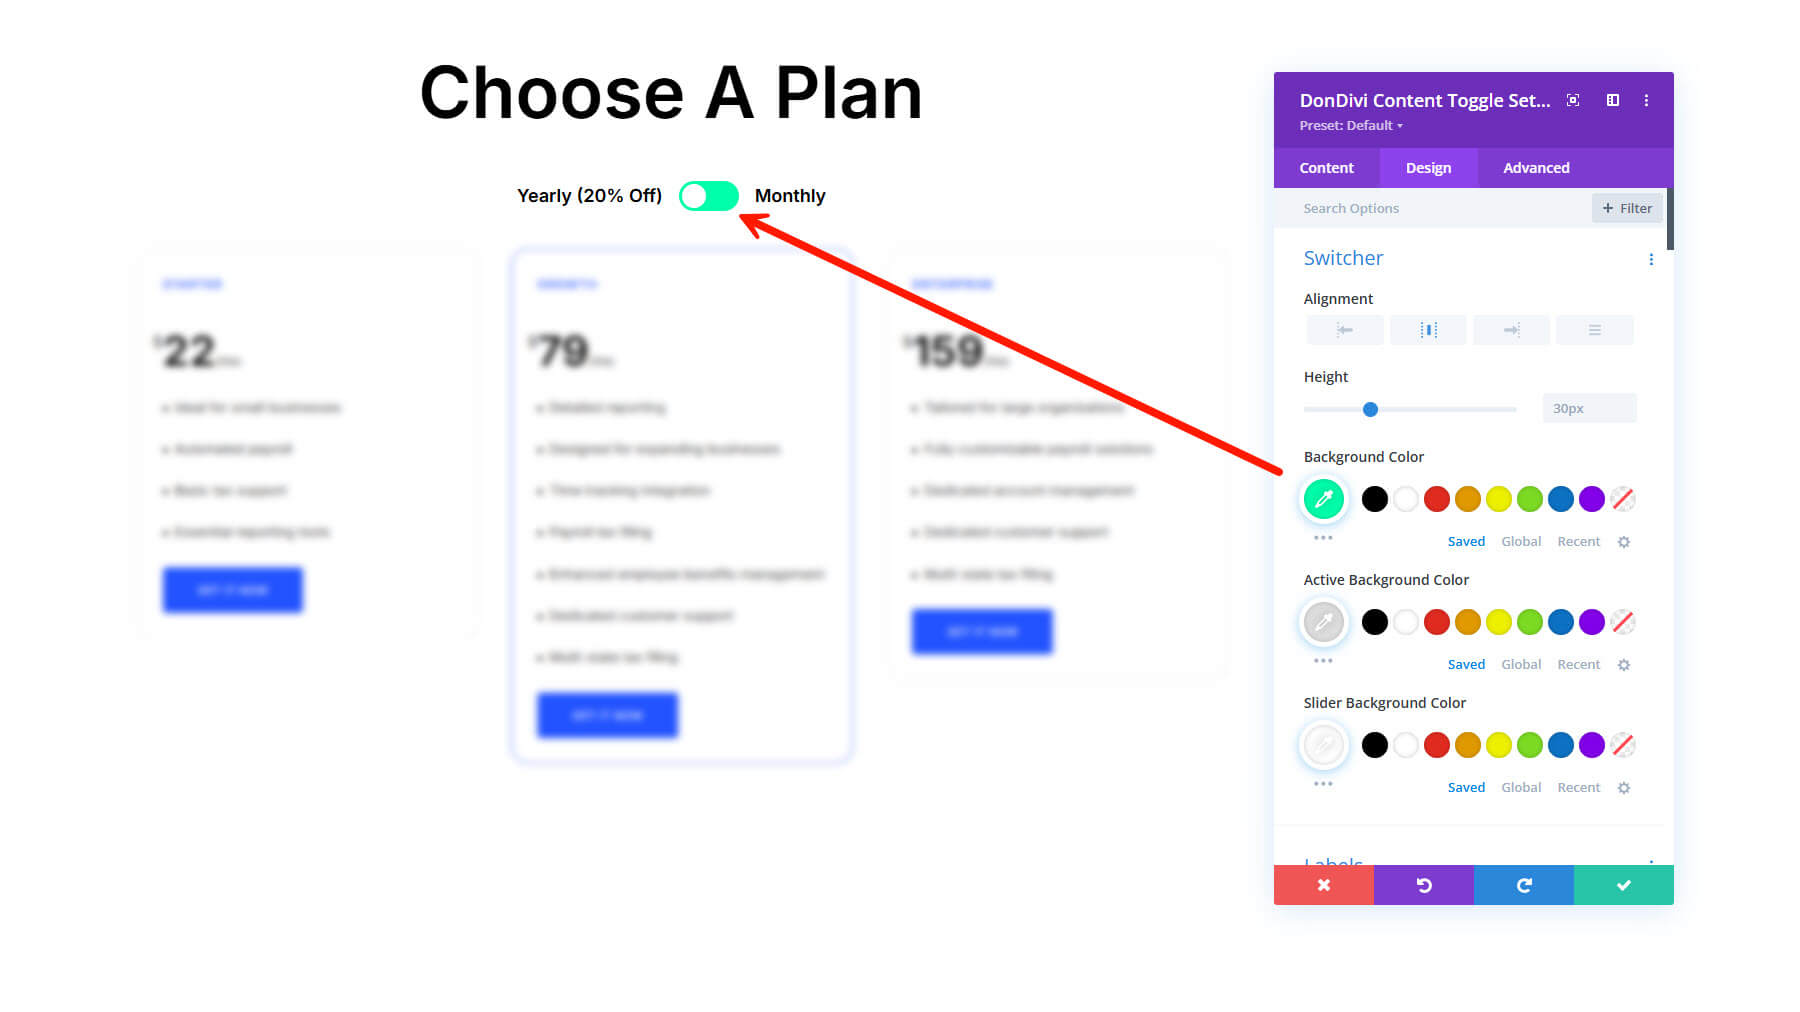
And you can design the toggle in the design tab to match your brand.
Here’s the result.
🛠 Module Styling Tips
- Use the Switch Mode setting for a clean, modern toggle switch design
- Apply Enter and Exit Effects for smooth transitions
- Style toggle labels and content independently using the Design settings
Want to go beyond two layouts or build advanced tabbed navigation? Check out the DonDivi Tabs module. It supports:
- Horizontal and vertical tab layouts
- Multiple content sections with unique styling per tab
- Icons, subtitles, and entry/exit animations
Both modules are included in the DonDivi Builder, and they work seamlessly with any layout you save to the Divi Library.
Final Result
Here is the final result.
And if you are wondering what happens to the menu on mobile, there is a collapsible WordPress Menu that is also completely customizable with DonDivi.
📦 Download All Layouts From This Post (For Free!)
Want to try these examples yourself? We’ve packaged all the custom Divi Library layouts used in this post into a free downloadable ZIP file. Just import them into your site, plug them into the appropriate modules, and you’re ready to go.
🎁 What’s Inside:
- Page Layouts — For setting up your website pages if needed
- Custom Header Menu — The header menu layout we built using Divimenus. You can add it to your main header template in the Theme Customizer
- Header Submenus Layouts — 3 Divi Library layouts for Features, About, and Blog sub-menu content
- Menu Popup Layouts — 2 layouts: one for the search popup and one for the contact form when clicking the menu items
- Pricing Section Layouts — Monthly and Yearly pricing section layouts, ready to use with the Content Toggle module
- Popup Layout — The layout for the DonDivi Builder Popup we built
How to use the layouts:
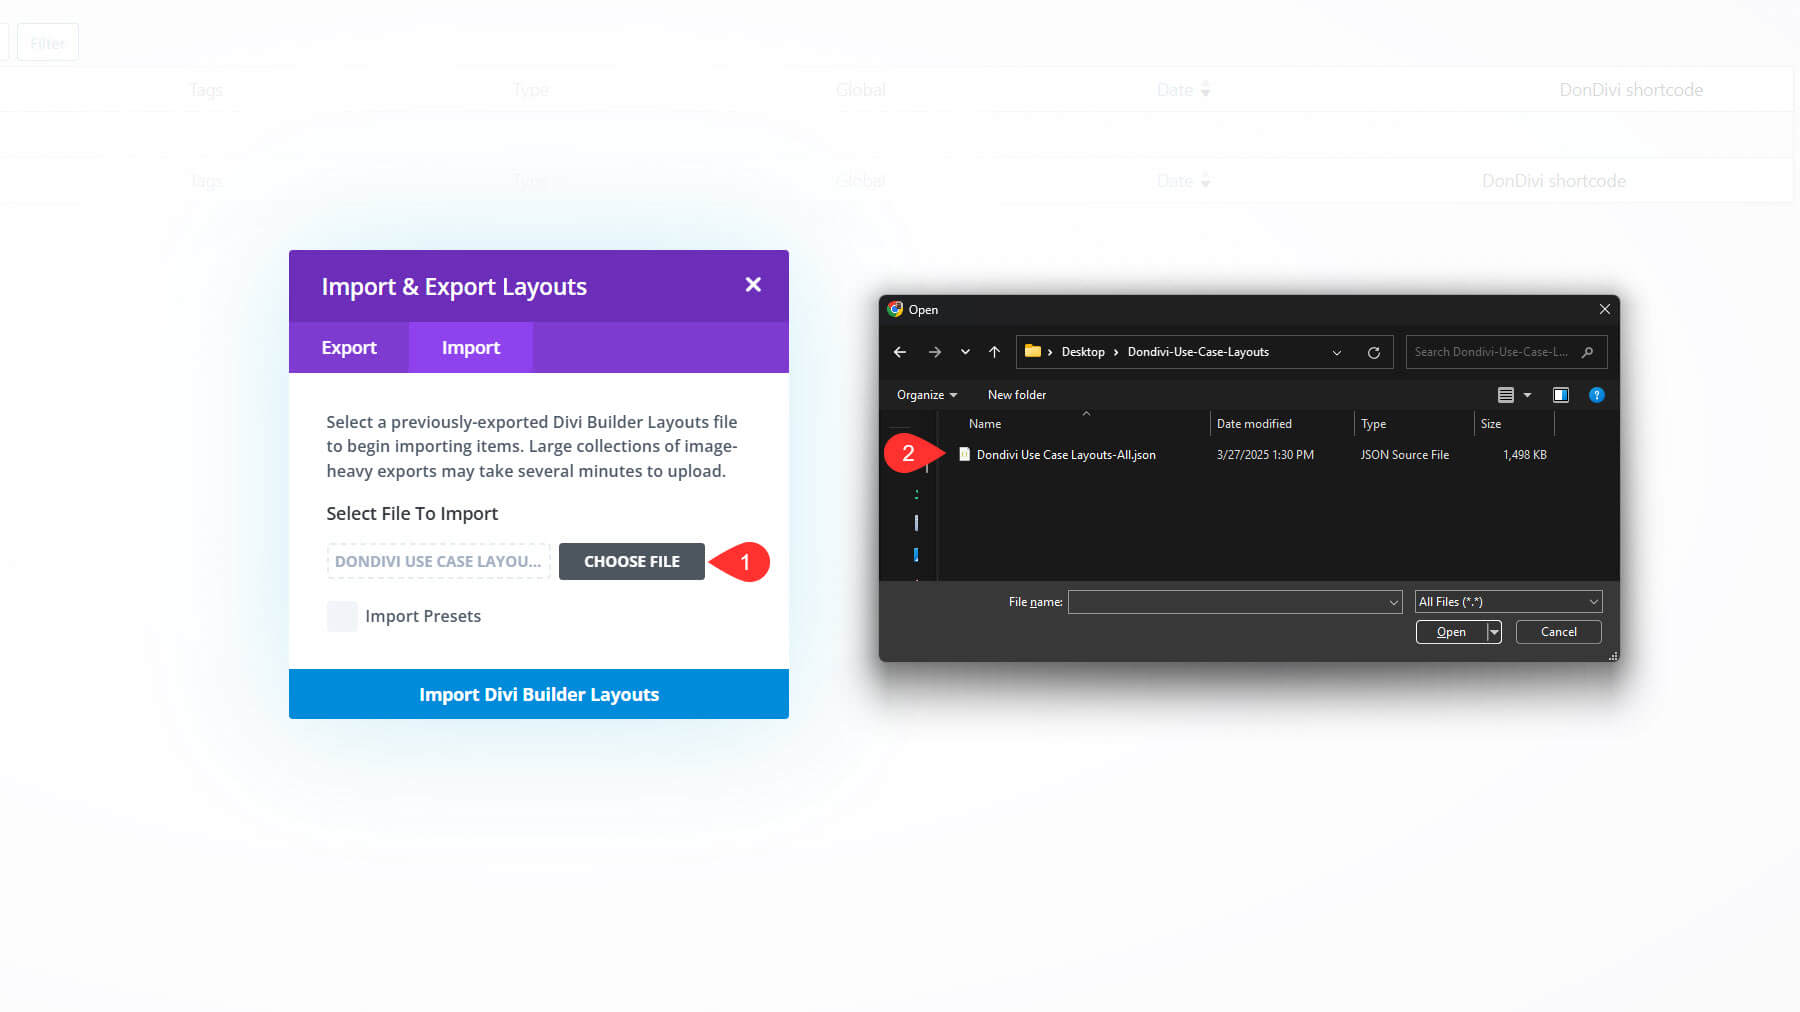
1. Download the zip file and unzip the files on your computer.
2. Import the “DonDivi Use Case Layouts-All.json” file into the Divi Library.
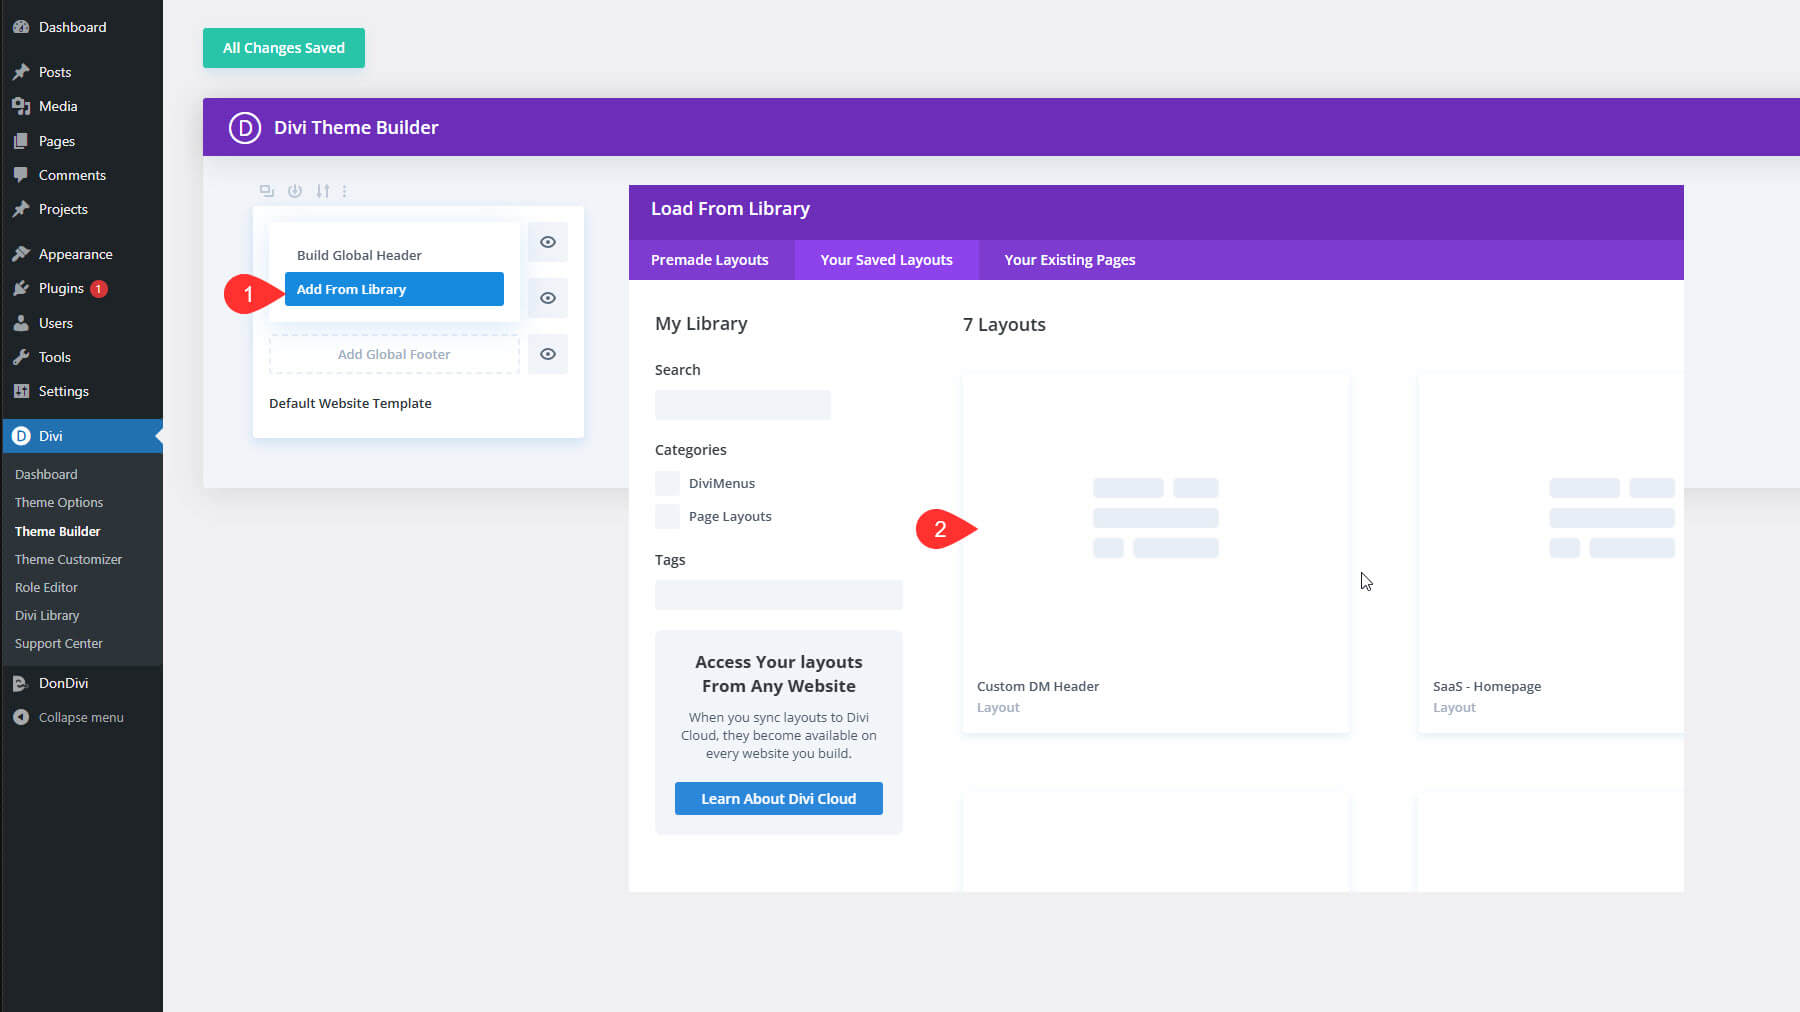
3. Then create a new homepage and pricing page. Use the Divi Builder to create the page using the SaaS Homepage and SaaS Pricing page layouts from your library. You should see the monthy/yearly pricing toggle on these pages.
4. To test out the DonDivi header menu, go to the Theme Customizer and create a new Header on your default template using the “Custom DM Header” layout from your library.
We’ve also included a bonus: a curated collection of free DonDivi layouts from their member portal. These templates are normally only accessible through the DonDivi website, but we’ve organized them for you by plugin so it’s easy to find the ones you need.
🔥 Bonus: Download DonDivi Layout Library
DonDivi offers many premade layouts for each product that you can download for free. Once you make a qualifying purchase during our sale, you can find all the DonDivi product downloads and the supplementary files under the Marketplace Tab in your Members Area.
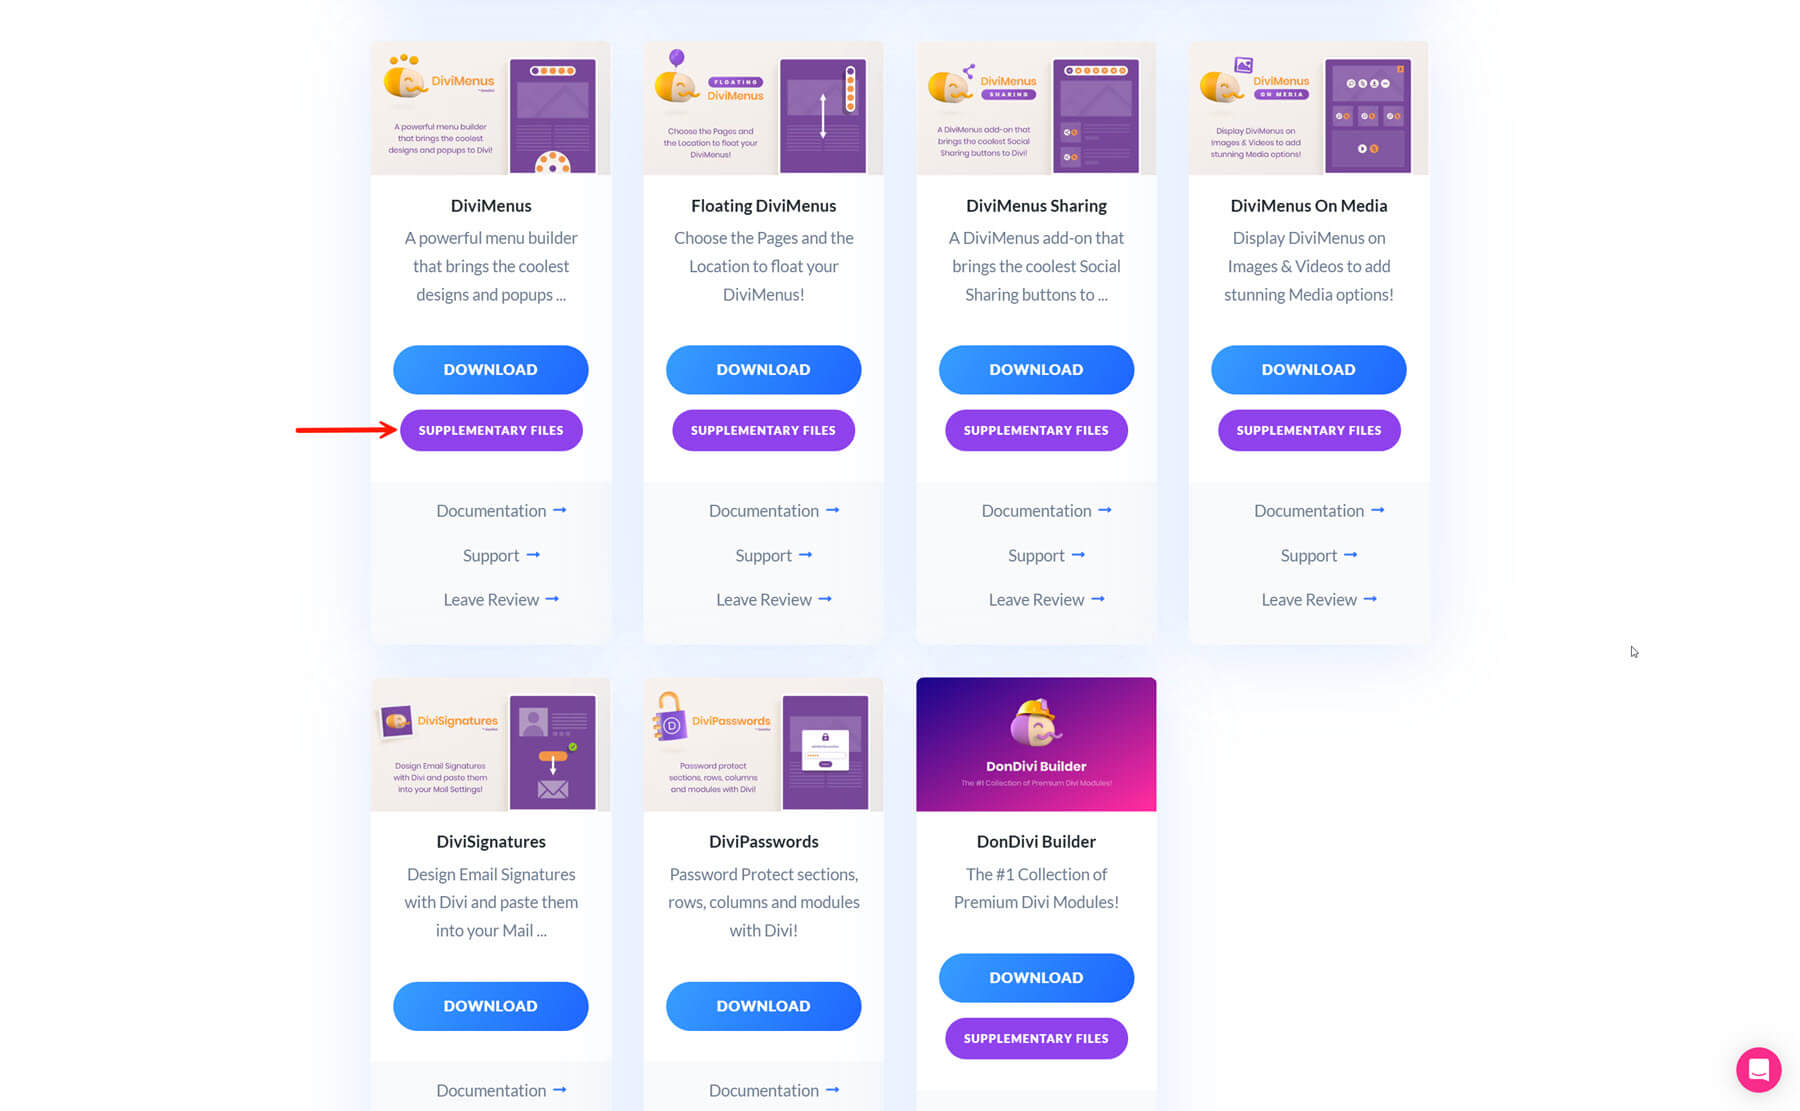
This is a great way to jumpstart your next project—or explore what’s possible with the tools you now have access to for free.
🚀 Start Building With DonDivi — For Free!
Whether you want to upgrade your menus, create beautiful popups, or add powerful UI features to your Divi website, DonDivi has a tool for the job. And for the first time ever, you can get the entire suite for free during our Anniversary Sale.
But don’t wait—this offer is only available for a limited time. Once the sale ends, so does the free download.
Join the Sale & Get DonDivi Free
This is your chance to supercharge your design toolkit with some of the most creative and flexible modules in the Divi ecosystem—at no extra cost.
We can’t wait to see what you build. 💜
🎉 The Divi Anniversary Sale is Ending Soon
Our Anniversary Sale only has a few days left—and it’s packed with ways to save across the entire Divi ecosystem. Whether you’re new to Divi or already a member, there’s something for everyone, including exclusive bundles, huge discounts, and the full DonDivi suite completely free with qualifying purchases.
- Divi Pro – 78% Off — Includes everything: Divi, Divi AI, Divi Cloud, Divi VIP, Divi Dash, and Divi Teams, plus a $50 Marketplace credit and the entire DonDivi collection.
- Divi AI – 60% Off — Generate copy, images, and layouts inside Divi with AI tools trained on your website.
- Divi Cloud – 40% Off — Store and sync your layouts, templates, and code across all your websites.
- Divi Teams – 40% Off — Give your team or clients shared access to Divi services with managed roles and permissions.
- Divi VIP – 40% Off — Get 24/7 premium support with sub-30-minute response times and 10% off all Marketplace purchases.
- Save 60% on Module Bundle, Feature Bundle, and Layout Bundle — Grab curated collections of best-selling modules, layouts, and extensions in the Divi Marketplace.
- Lifetime Upgrade — Make a one-time payment for lifetime access to Divi and every future update.
Don’t wait. Grab a deal and get DonDivi free today.


Hi everybody,
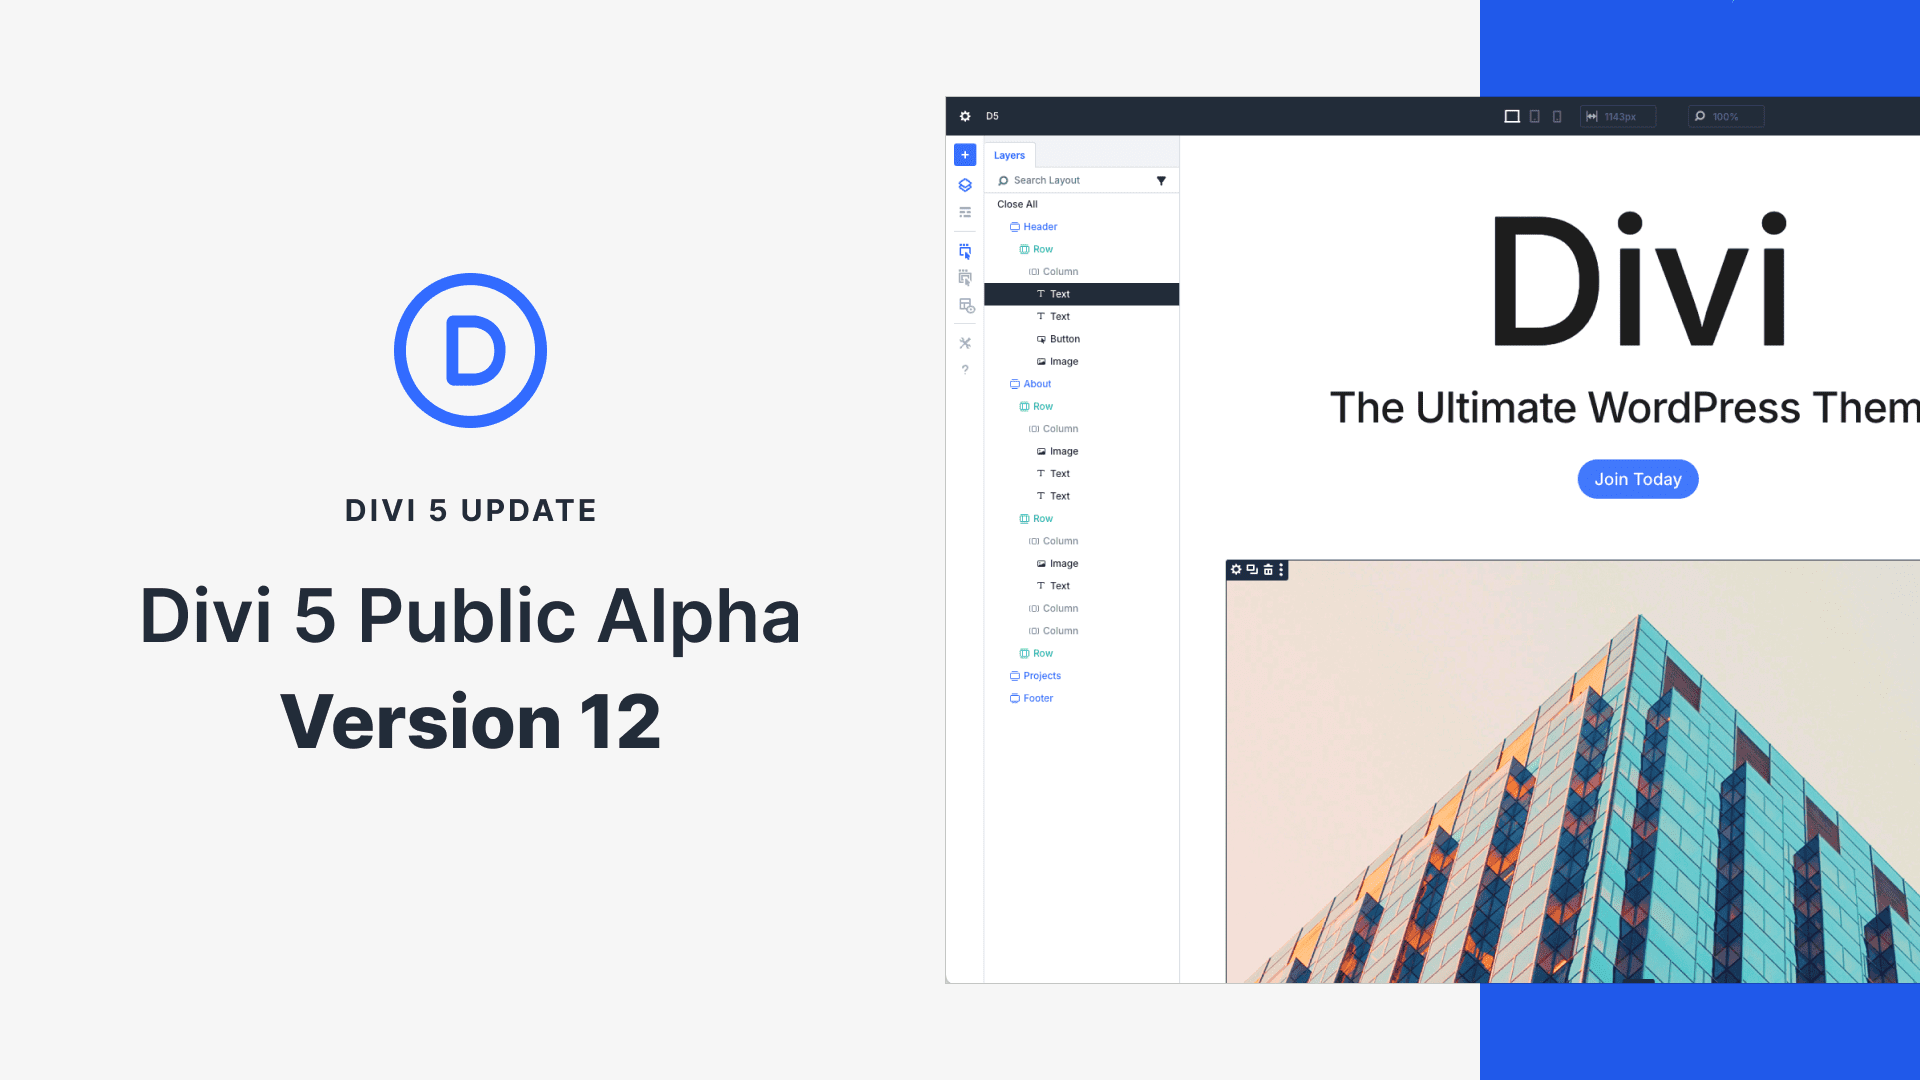
It’s important to note that this suite of plugin won’t work at all for now in Divi 5, not even in backward compatibility like the other plugins.
It works great in Divi 4.
But don’t worry, they are working on making this powerful suite very extraordinary, so don’t hesitate to get it!
Thanks, Mike. You are correct 👍. DonDivi was recently acquired, but don’t worry. We are working to ensure all DonDivi plugins are compatible with Divi 5.