Welcome to Day 1 of 3 in our series on How to Add Custom Styles to Divi’s Blog Post Formats. By default Divi comes with six blog post formats: Standard, Video, Audio, Quote, Gallery, and Link. In this series we teach you how to customize them with php and css.
Over the next 3 days, I will walk you through customizing all of Divi’s blog post formats: Standard, Quote, Link, Video, Audio and Gallery. Editing all of those (for the designs I have in mind) requires editing the single.php template file. To do this properly, we must create a Divi child theme that will contain our altered Single.php template file. And before we do that, we should also create a local install of WordPress using Desktopserver. This will provide a safe development space for us to play around without risking anything on a live website.
As the title of this post suggests, we’ll need three days to cover everything from beginning to end. Today, I’m going to show you how to create a local install of WordPress using Desktopserver and create the child theme we’ll use to house our altered Blog Post Formats.
I would consider this series to be more “advanced” than the majority of the tutorials published here. But, if you’re a beginner, this series is actually a great opportunity for you to improve your development skills and branch out into something new in a safe, free, guided post series.
Let’s get started!
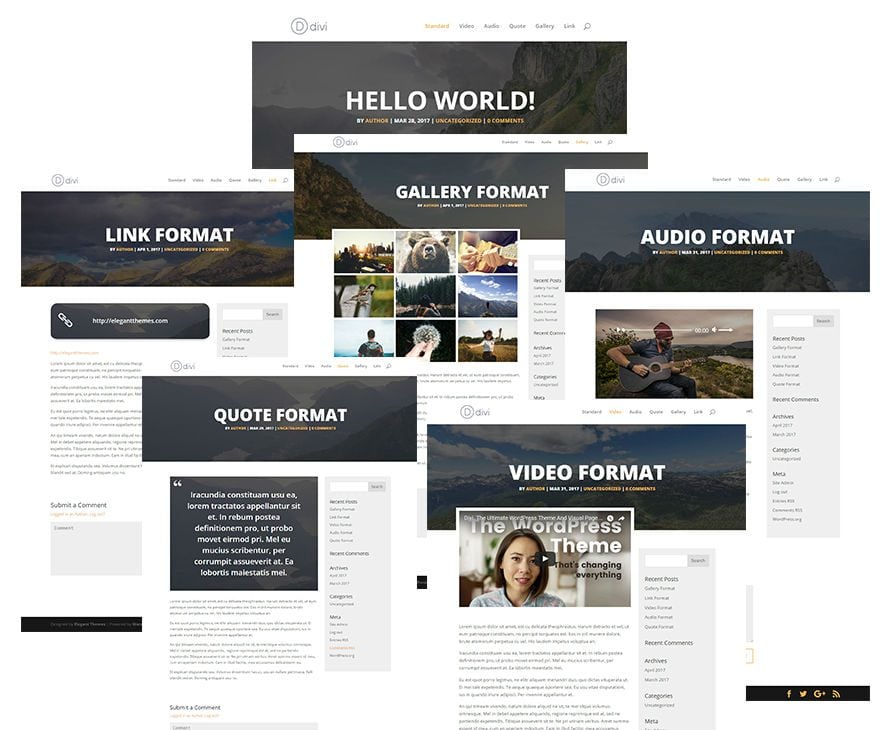
A Sneak Peek At What’s To Come
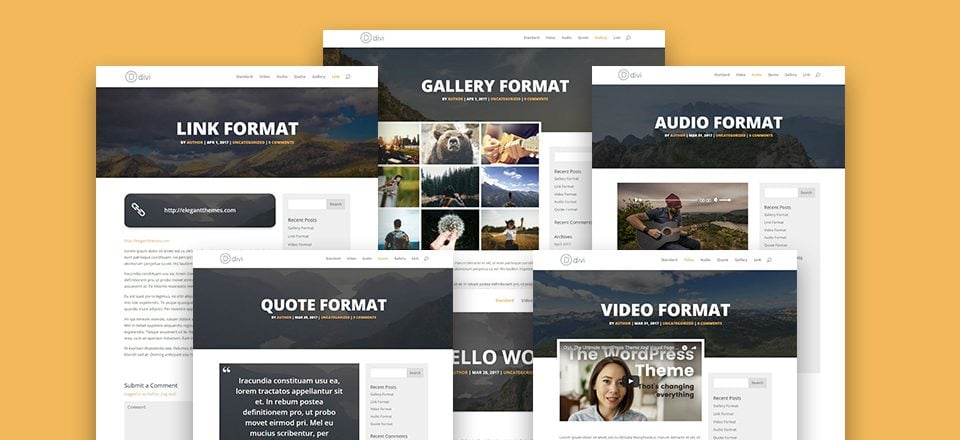
Here is a quick peek at the designs we’ll be achieving in this series. After we lay the groundwork for them in today’s post, I’ll show you how to edit the single.php file (the template for all of our blog post formats), and then how to further style that template for each format with CSS. It’ll be quite the journey!
Preparing Your Development Assets
Here is what you will need to follow along with today’s tutorial and the tutorials I’ve created for the next 2 days:
- A code editor such as Atom, Sublime, Brackets or Notepad + + (whatever you prefer)
- A Local WordPress Installation using DesktopServer (unless you already have one)
- A Divi Child Theme–which we’ll create!
I strongly recommend that if you are going to follow along with this series you do so on a WordPress install that is setup just for testing and development. The last thing I want is for people to experiment with their live website and mess something up.
If you’re not sure how to set up a local development installation of WordPress, I recommend using the free version of desktopserver. It should have you up and running with a local WordPress install in just a few minutes (no exaggeration).
Setting Up DesktopServer on Your Computer
Here are a few steps to get started with DesktopServer.
Visit their website and download the Free Version by clicking the “Free – Add to Cart” button on the right column.

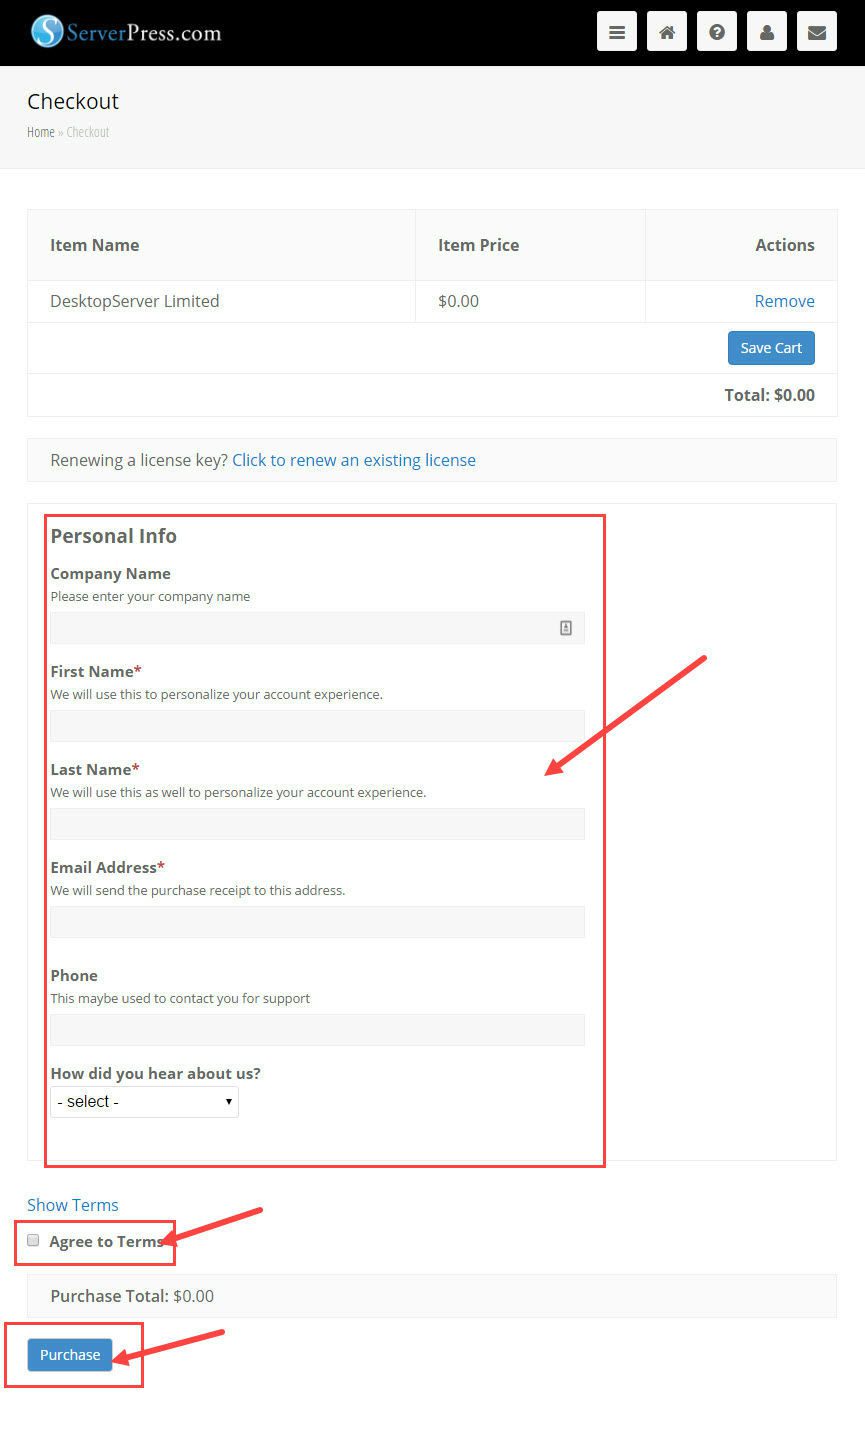
On the checkout page, fill out your personal info, agree to their terms, and click purchase.
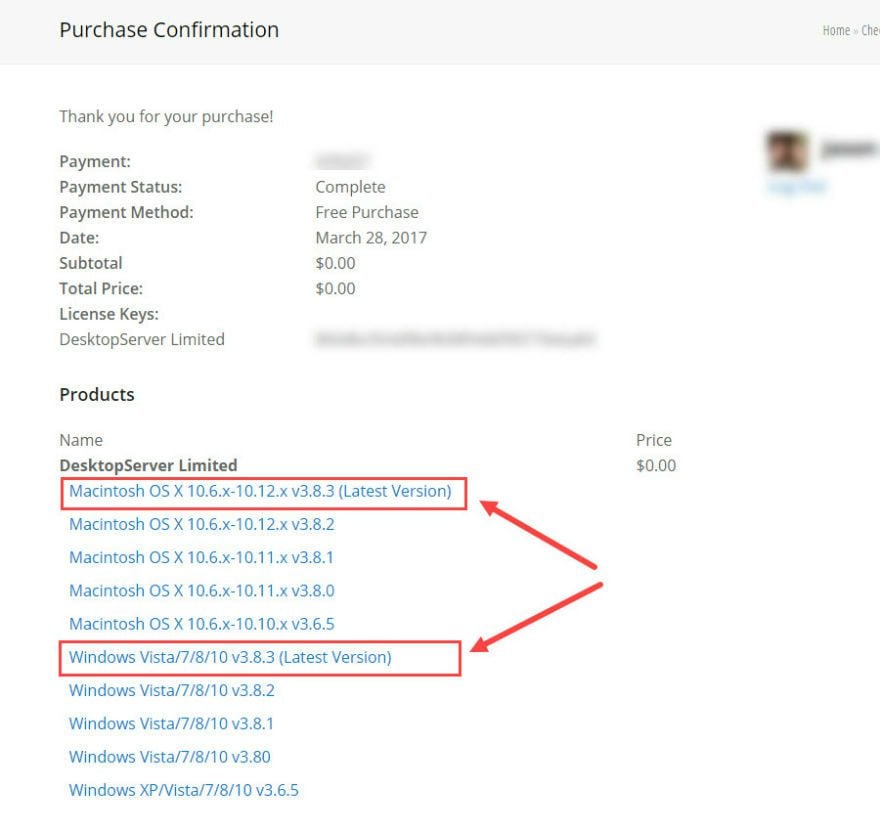
On the Purchase Confirmation page, select the right download for your operating system. I suggest installing the latest version of either Mac or Windows.
Unzip your download and run the Install of the application on your computer.

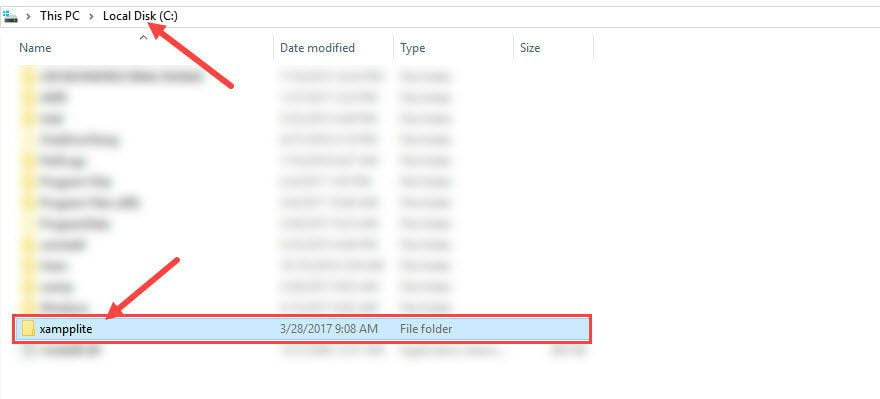
Now you can find the DesktopServer application in a folder called “xampplite”, in the root of your Local Disk (C:) Drive.
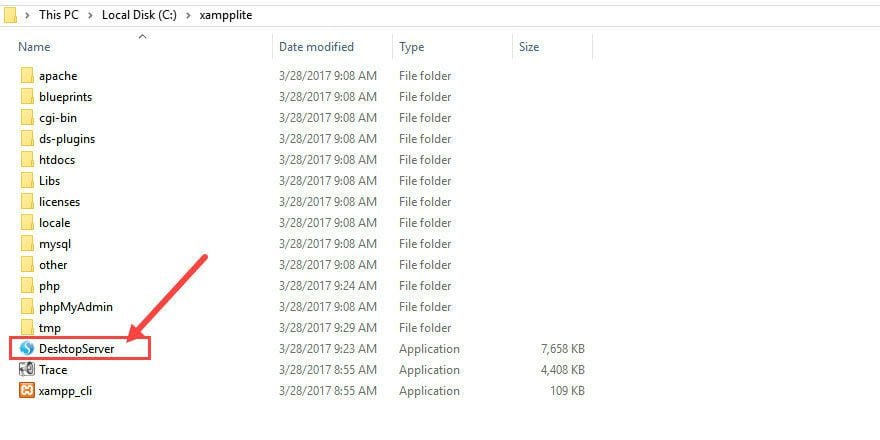
Once you have Desktopserver installed, read their instructions to help you get started with setting up your local wordpress installation.
Creating Your Divi Child Theme for This Series
To Create a Divi child theme, you need to access your WordPress theme files. If you followed the defaults when installing DesktopServer, your theme files should be located in your documents folder inside a folder labeled “Websites”.

Locate the themes folder, and add a new folder called “child”.

Now you are going to add your style.css file to your child theme folder. This is the first of 3 files that will make up your child theme.
Open your text editor and create a new file with the following CSS header at the very top of the document.
/*
 Theme Name:     Divi Child
 Theme URI:
 Description:	   Divi Child Theme
 Author:
 Author URI:
 Template:       Divi
 Version:        1.0.0
 License:
 License URI:
 Tags:
 Text Domain:
*/
You can add the rest of the information for the child theme CSS header to fit your site as needed.
Save your new file with the name and extension “style.css”. And add it to the child theme folder:

The next file you need to add to your child theme folder is the functions.php file.
Go back to your text editor and create another new file and add the following php code to the very top of the document:
<?php
function my_theme_enqueue_styles() {
    $parent_style = 'parent_style';
    wp_enqueue_style( $parent_style, get_template_directory_uri() . '/style.css' );
    wp_enqueue_style( 'child-style',
        get_stylesheet_directory_uri() . '/style.css',
        array( $parent_style ),
        wp_get_theme()->get('Version')
    );
}
add_action( 'wp_enqueue_scripts', 'my_theme_enqueue_styles' );
?>
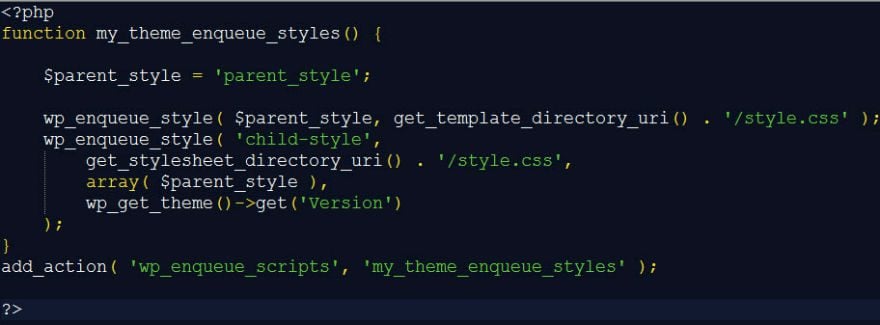
Save the file with the exact name and extension “functions.php” and add it to your child folder:

The final file you need for you child theme is Divi’s single.php file. Along with adding new CSS to your child theme style.css file, we will be using a copy of Divi’s single.php file to edit the layout for the different post types.
To find the single.php file, go to the Divi (parent) theme folder.

Copy the single.php file and paste it into your child theme folder:
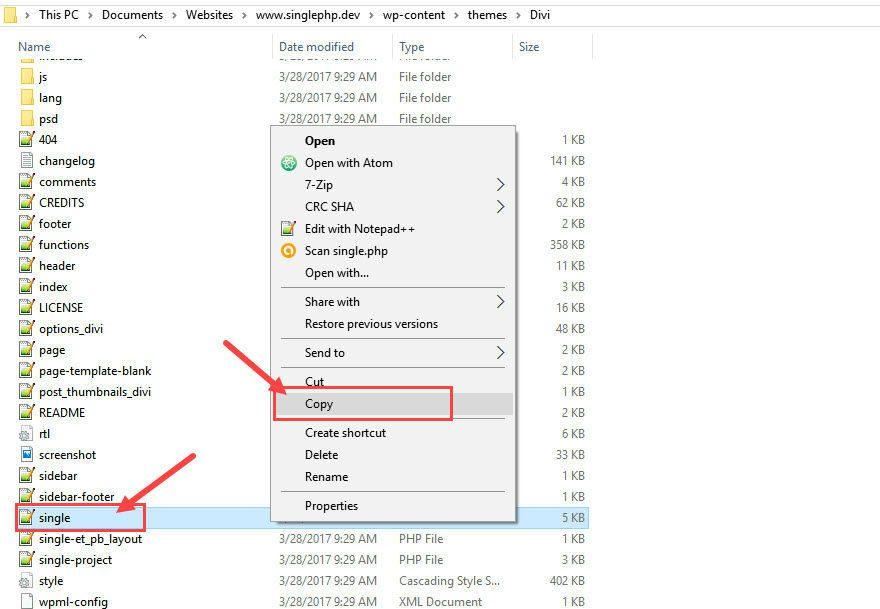
Now we are ready to make customizations to your child theme’s single.php file.
Activate Your New Child Theme
Before we start customizing the single.php template file, go ahead and activate your new child theme.
From the wordpress dashboard, go to Appearance → Themes and select the Activate button on your new child theme called Divi Child.
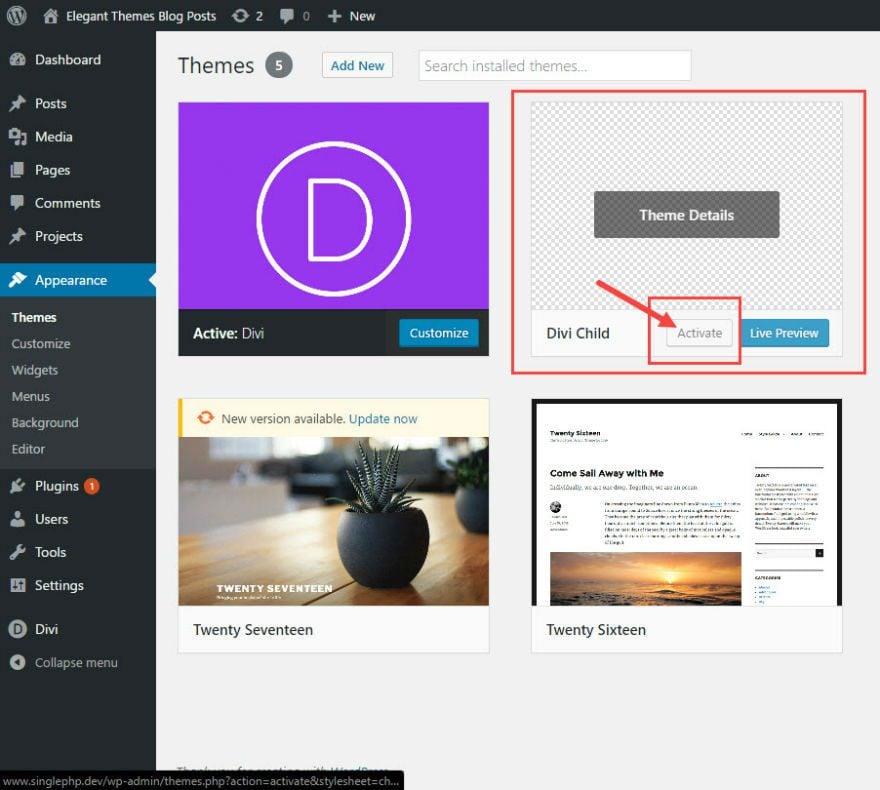
That’s it for now!
I know that this isn’t too exciting yet but I do hope you stay with me. It is important to lay the right foundation for your projects and this post is a great place to start.
What’s Coming Tomorrow?
Now with your local install of WordPress and child theme activated, you are ready for the next part in this series. Tomorrow I will show you how to edit Divi’s single.php file to create a completely unique layout for your blog post formats.
I’m looking forward to reading your feedback below. Setting up a child theme on a local server can lead to some problems for first timers, so I will try and answer any questions I can. However, if you have more technical issues, our support team is ready and willing to help you out as well. Not to mention the folks over at Desktop Server!
Cheers!





Did the correct code for the functions.php file ever get posted?
thanks for this blog post but we don’t need this, let’s be honest — who needs an outdated website developer tool? what’s happening with elegant themes’ research team? they’re outdated tsk tsk! tried and tested www(dot)(dot)local(dot)getflywheel(dot)com is far better than www(dot)serverpress(dot)com/get-desktopserver/
*www(dot)local(dot)getflywheel(dot)com is far better than www(dot)serverpress(dot)com/get-desktopserver/
I’m confused. I did this tutorial in a live subfolder install for testing. Everything works perfectly. Now I’m ready to add to actual live site but as I read (must have breezed through this before)all the discussion about the functions file I am hesitant to move forward until someone could explain what the final php file should contain. Has this tutorial been updated with revised (corrected) code? Please help.
Yikes a reply to me. Wellforgot to post my functions.php file as it is now and like I said everything works perfectly. Why is mine different and working?
<?php
add_action( 'wp_enqueue_scripts', 'my_enqueue_assets' );
function my_enqueue_assets() {
wp_enqueue_style( 'parent-style', get_template_directory_uri().'/style.css' );
}
That was the easiest install ever! Thanks!
I tried to follow the steps provided, but I don’t get the divi folder, and the child theme …where do I go wrong
@Eitan: Desktopserver actually is a wrapper around Xampp. The only big difference is that Desktopserver manages hosts settings for you and creates a new development site by creating host entries and a database. If you can do that in code, Desktopserver is of very little use.
So I don’t see why such large part of a tutorial is about installing a third party product.
Hi,
Looking forward to test this!
BTW, I’m using WAMPserver for local set-ups. How’s DESKTOPserver better, if at all?
I can install unlimited website with it…
Thanks for great articles. Keep them coming 🙂
Hi Tammy Grant , Thank you so much for this tutorial. I am enjoying reading. And Waiting for Part-2
I’ve been wanting to do something similar for a while.
Thank you!
youtube video please!!!!
I followed the instructions but have issues with seeing the created child theme in wordpress:
“Broken Themes
The following themes are installed but incomplete.
Name Description
Divi Child The parent theme is missing. Please install the “Divi” parent theme.”
What is missing? Divi is actived
Kind Regards
Okay found the issue. “Divi” was in second folder called “Divi” :P…sorry
I’ve not tested this yet, but looking at the code you have presented (in particular the functions.php coding) I don’t think this will work.
Where you’ve enqueued the parent and child theme stylesheets, your code uses the get_template_directory_uri() function concatenated to an external cdn url? Did you not mean to use the local file – ‘/style.css’
In addition, the cdn urls present a 404.
I would imagine it would work making the following replacement within the functions.php file:
get(‘Version’) );
}
add_action( ‘wp_enqueue_scripts’, ‘my_theme_enqueue_styles’ );
Sorry….above code rendered incorrectly in this comments section.
Should have read:
(opening php tag)
function my_theme_enqueue_styles() {
$parent_style = ‘Divi’;
wp_enqueue_style( $parent_style, get_template_directory_uri() . ‘/style.css’ );
wp_enqueue_style( ‘child-style’, get_stylesheet_directory_uri() . ‘/style.css’, array( $parent_style ), wp_get_theme()->get(‘Version’) );
}
add_action( ‘wp_enqueue_scripts’, ‘my_theme_enqueue_styles’ );
I have created at least 30 websites with Divi and I never used the post formats. In fact, I have started to clean out all the if clauses in the single.php and archive.php that sort out the look for the post formats and removed the theme support for them in the functions.php of my child themes altogether.
My clients are mostly small and medium sized businesses and none of them has ever considered using the post formats. I find them highly unnecessary and I would appreciate if there was a version of Divi without them as they only add overhead in the template files and Divi’s style.css in my opinion. ^^
Here is a child theme with 3 files (single,function,style.css)
https://www.dropbox.com/s/1lxelaznew4ojad/Divi-child.zip?dl=0
I’m heading to Part 2
Thank you Tammy!
Can somebody help me: I Installed the 3 files and I can activate the child theme in WordPress. The only thing is that I don’t see any Divi lay out. I already modified the Single.php file as mentioned in the second day tutorial.
I am having the same issue (I think). Divi template looks good but the child theme is just html, not finding any style sheet. I would think it would use the original divi one.
This was fun so far.
I’m actually looking forward to this tutorial! I’ve been waiting for something like this in a long while. I’ve already figured stuff out but a proper tutorial will be better.
When you make your enqueue/create your child theme you have two different blocks of code displaying. The first uses a cdn for the parent and child stylesheets, the second uses local. If people are going to be making CSS changes later in the tutorial, I would think they would have to use the local, at least for the child stylesheet. Would there be a speed bump to page load to use the cdn for the parent on a live site?
It appears DesktopServer Free edition is not available. There is no “Add To Cart” option.
Just click the download button and you will be given the choice between the free and pro versions.
hmm… I have the same problem as Brad, there is no option do download, only checkout(in the right column) and add to cart(the pay version)
Great tutorial 🙂
Can i do this steps with “Extra Theme” instead of “Divi”?
Love this series. This is going to take my knowledge to the next level. Thanks!
Great job but for me the index.php was missing.
Also something about the Header file.
Great job none the less I got it done.
Thank you,
Ken
How did you fix this, Ken?
I have the same problem with missing index and template headers.
I recently bought divi builder and I am very satisfied, great this tutorial.
Hi, this is an awesome subject.
I’d like to suggest LOCAL (https://local.getflywheel.com) as a local server, do you know?
Thank you,
Looks like it will be a great series. Can I ask ET theme if they can start to categorize blog into sections, e.g. Divi 3, tutorials, layouts etc.
There is a lot of good information, great if easier to navigate.
Categories are in the footer 🙂
Really good blog post and this is going to be something which we will put in practice – Goodwork Elegant Themes
Can you please explain the reasoning for the functions file content?
I use the following to enqueue the parent stylesheet, then the child is automatically enqueued using the following:
/**
* Setup theme styles.
*/
function my_prefix_theme_enqueue_styles() {
$parent_style = ‘parent-style’;
wp_enqueue_style( $parent_style, get_template_directory_uri() . ‘/style.css’ );
}
add_action( ‘wp_enqueue_scripts’, ‘my_prefix_theme_enqueue_styles’ );
It looks like there was an error. Sorry about that. Thanks for pointing it out. Your code is correct, Ben. Look for an updated version of this post soon.
Thanks
I had the same question ! some interesting script here I haven’t seen before. It would be good to know what the script is doing compared to the usual code we use to enqueue the style sheet
Was almost done but…When I look into the themes folder to find the Divi folder to get the 3rd required file, there is no Divi folder. I do see the other folders e.g. twentyfifteen (and I dont see index file either). Please advise
Did you install the Divi theme?
yes I did. The only thing is that now it doesn’t show the Divi lay out if I activate the child theme. Don’t know what I’m doing wrong.
You probably should change “https://cdn.elegantthemes.com/blog/style.css” to “/style.css” (twice) in functions.php
Hi, I had the some problem. I solved it by downloading the divi theme and installing it in WordPress.
Can it done without child theme?
This is very useful. Now we have an official source to point people when they asked how to build their own child theme for Divi in FB groups.
I’m loving the entire process and the tutorial series!!
hello, I´m using Content Views Plugin because I want to have a blog on a landing page and with this plugin I can do it because of categories.
Is it possible to do it without the plugin, only with your customization?
I want to have 2 blogs on the same website, how can I do it?
thanks a lot!
Thank you!!
Awesome timing, I was just toying with the idea of editing some of these. Now I don’t have to go searching, thanks!
Will you cover how to add an additional template style?
I have mounted a wampserver … it serves the same
It seems very interesting, I’ll follow it.
I hope you guys will talk about the archive pages in this serie
Thanks for sharing this idea
I am really looking forward to this series! I’ve been wanting to do something similar for a while.
Thank you!
Cool tutorial series! Thanks for putting this together.
Thanks Alicia,
I am not sure what this refers to.
“Open your text editor and create a new file with the following CSS header at the very top of the document.”
I don’t have a Divi folder in my PC Themes file. Am I supposed to transfer one?
Also I am already using a Divi Child Theme on Word Press site, does that make a difference?
Thanks for you patience.
Brian
Hello Brian,
You should have a Divi folder (parent theme) in your ‘themes’ folder. Otherwise the child theme won’t work.
“Also I am already using a Divi Child Theme on Word Press site”. That’s perfect.
Try out the tutorial on on your local dev environment.