When creating your website structure, chances are high that you’ll want to include the same CTAs on multiple pages, posts and projects. Of course, you can keep the URLs close by and copy-paste them as you go, but that isn’t necessarily the easiest way to go. Before you start creating your pages, posts and projects, you can set up a list of all the URLs you might need, set a default value for them and use the default values on new items you create.
If for any reason the URLs differ on a certain page, post or project, you can change that within the item itself without it applying to the entire field default value. The default values attached to URLs will help give you a headstart when creating a new page, post or project. In this tutorial, we’ll show you step-by-step how to get there!
Let’s get to it!
Tutorial Overview
- This approach works best if you add the custom fields group to a new website, right before you start adding pages, posts and projects
- Install the Advanced Custom Fields plugin on your WordPress website
- Inside the plugin, you’ll be able to set up a fields group that’ll appear on all your pages, posts and projects
- Create a separate URL field for all the possible URLs you might need throughout your website
- Assign a default value to each one of the fields; this default value will automatically appear on each new page, post or project
- On existing pages, posts and projects, the values will only appear once you enter the backend and save the default URLs
- Use the URL fields throughout your Divi design as dynamic link content (page, post, project, template)
- If you change the default URL in the field settings, the old default URL will still apply on pages, posts and projects that inherited the previous default value
1. Install & Activate the ACF Plugin
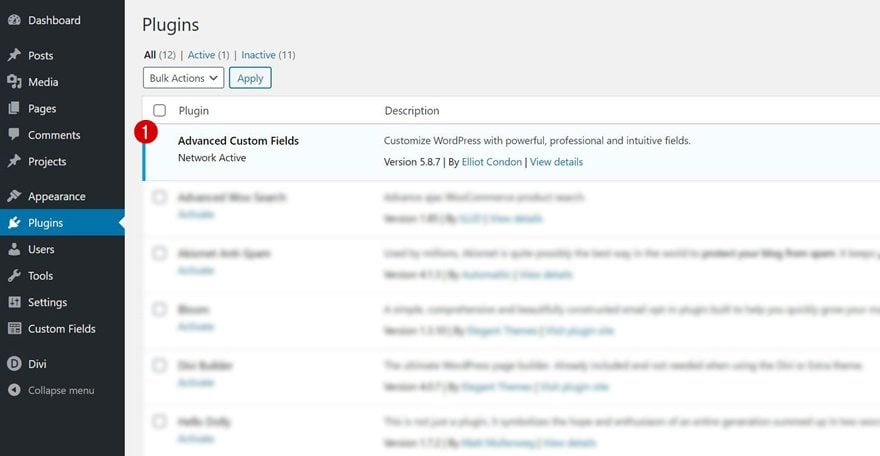
The first thing you’ll need to do is install the Advanced Custom Fields plugin on your website. You can download the plugin here, or just search for it inside your WordPress dashboard. After you’ve installed the plugin, make sure you activate it as well so you can get started right away.
2. Set up a Fields Group on All Posts, Pages & Projects
Now, once the ACF plugin has been installed, it’s time to create the URL fields group. This group will contain all the CTAs that you’ll use multiple times across your pages, posts and projects. Go to your WordPress Dashboard > Custom Fields > Add New.
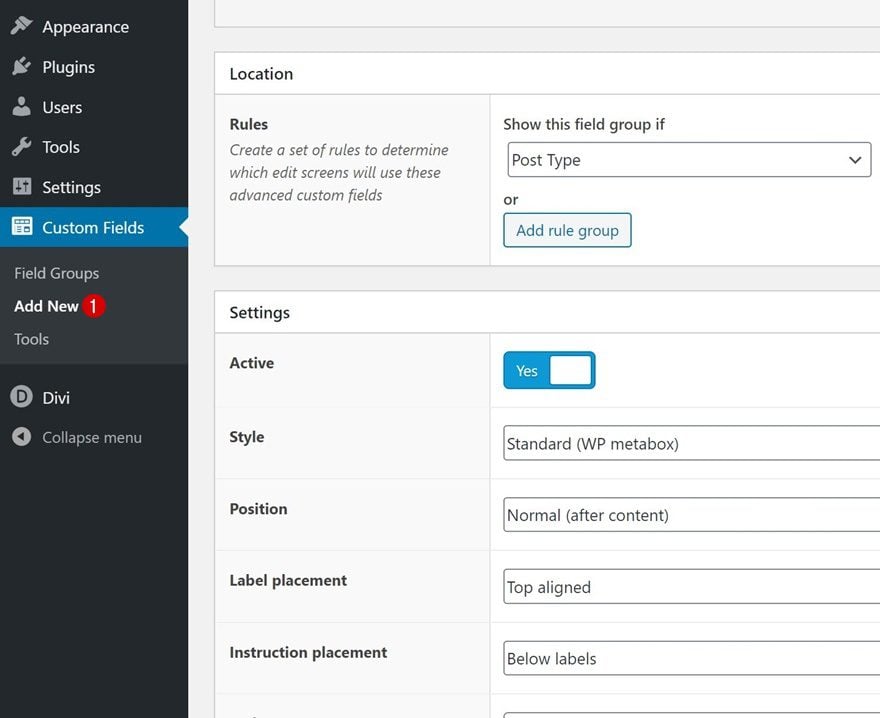
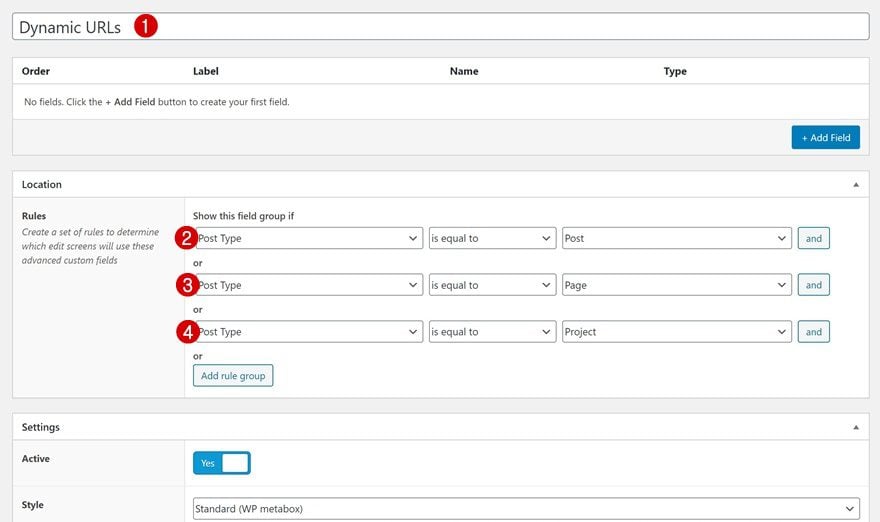
Give your group a title and continue by settings the rules. We’re making sure the fields group appears on each and every post type on our website. If you, however, want the links to show up on one specific post type only, you can adjust the rules to your needs.
Show this field group if:
- Post Type – is equal to – Post or
- Post Type – is equal to – Page or
- Post Type is equal to – Project
3. Add Different URL Fields with Default Value
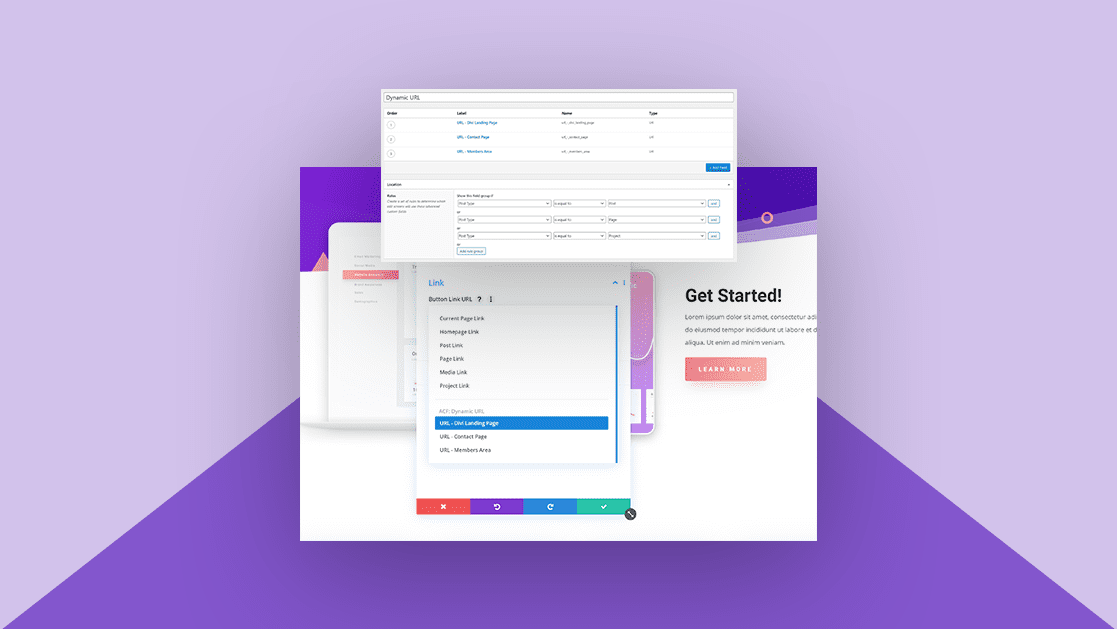
We’ll continue by adding the different URL fields. As mentioned before, you’ll need a separate URL field for each URL that you use multiple times across your post types. To illustrate how it works, we’re going to add three different URL fields. One of the fields will redirect visitors to the Divi gallery landing page, the second one will lead visitors to the contact page and the remaining one will redirect users to the members area.

So, let’s say we’re starting with the CTA that redirects people to the Divi gallery landing page. We’ll add a new field for it and give it a recognizable field name. That way, once we’re inside the Divi builder, there’s no confusion when it comes to selecting the right URL.
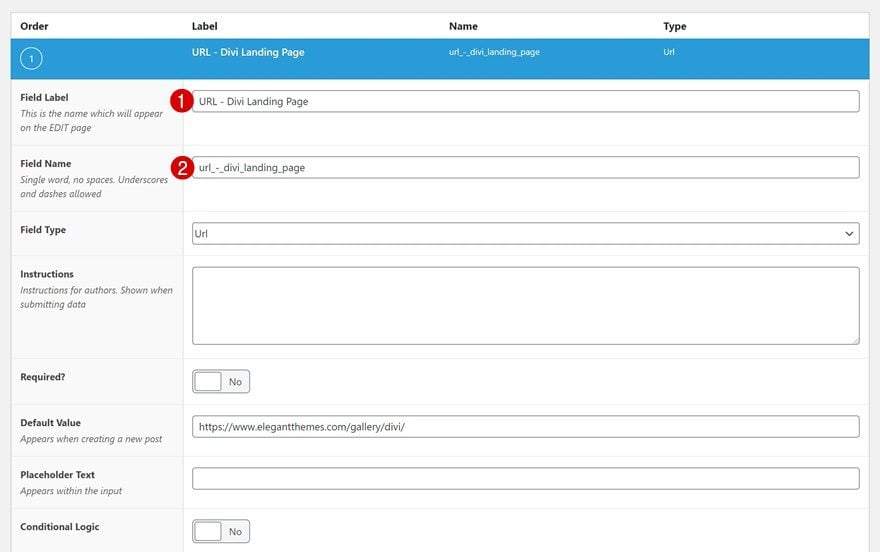
We’ll continue by scrolling down the fields settings and select ‘URL’ as the field type.
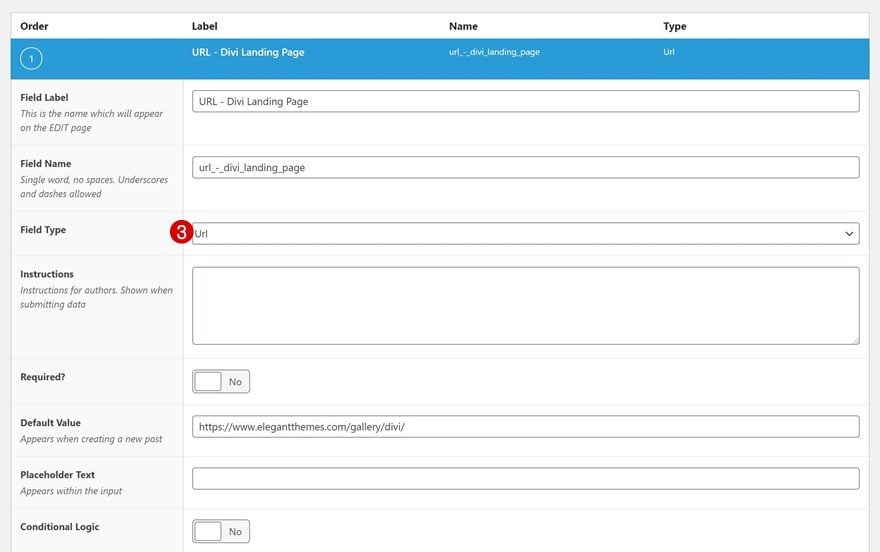
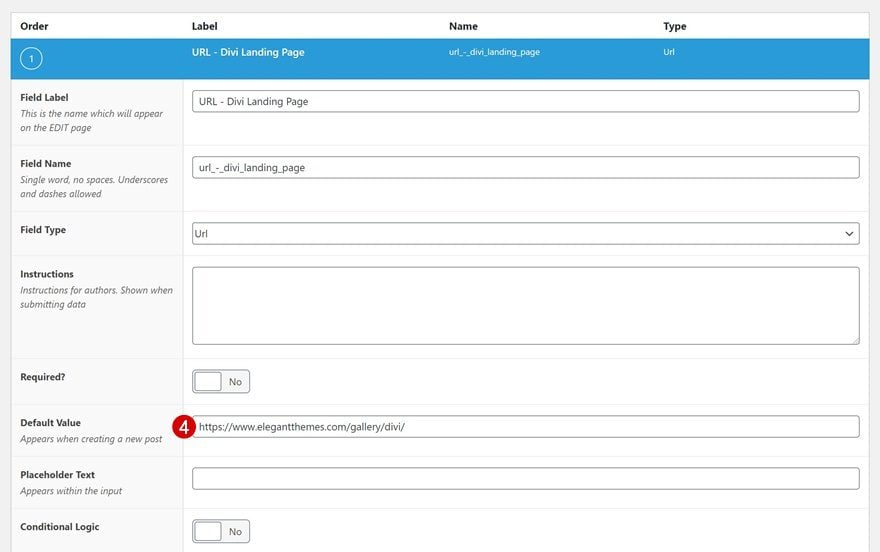
The next and last thing you’ll need to do is add a default value to the field. This is where you’ll place the URL you want your CTA to redirect to. As soon as you add this default value, it’ll apply automatically to each new page, post and project you add.
Repeat the steps above for each CTA field you need on your website. For this particular example, that means we’re creating two extra fields; once for the contact page and one for the members area.
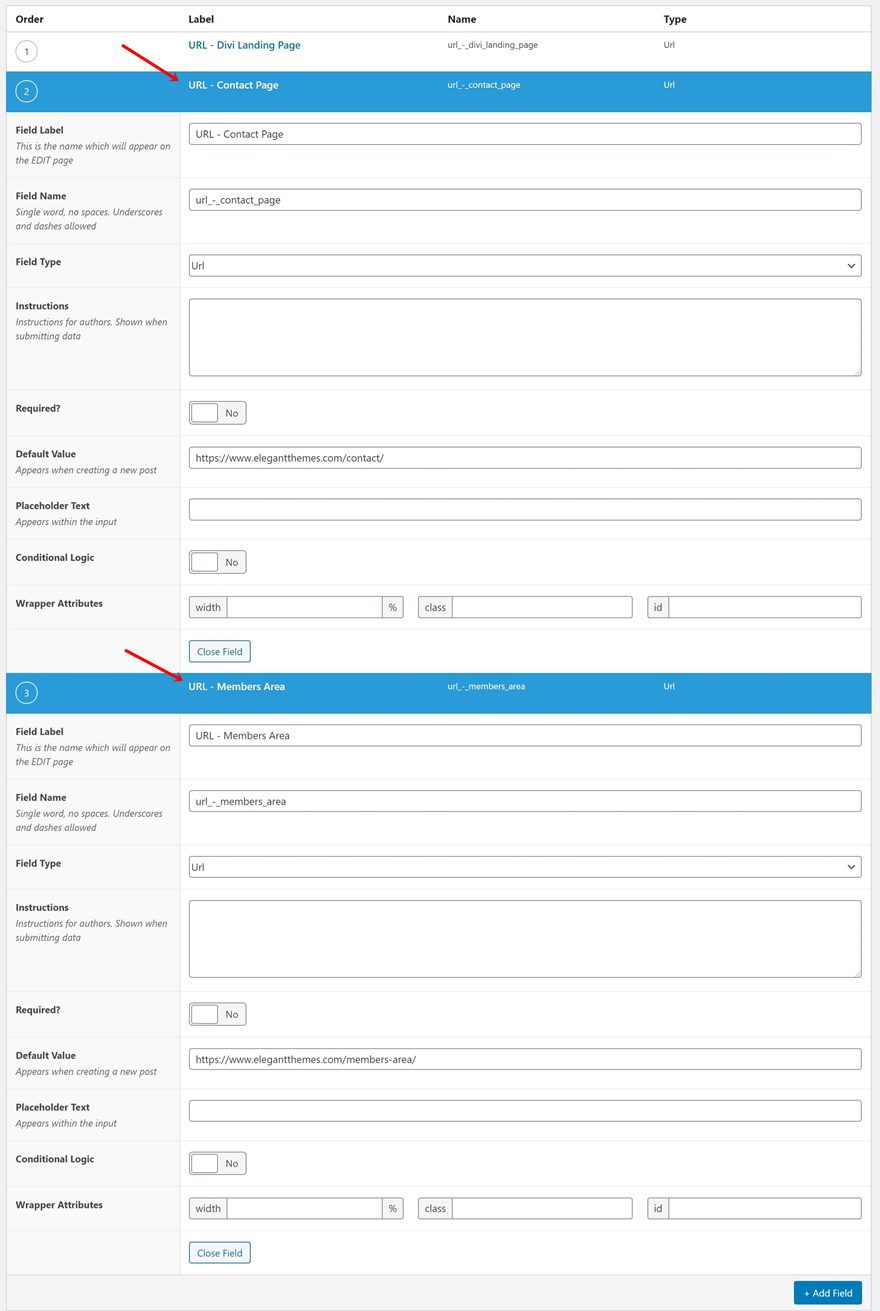
Once all your URL fields have been added, make sure you save all changes made to your fields group.
Now, when entering a post, page or project, you’ll notice the URL fields group at the bottom. If for any reason you want to use a different URL on that specific page, post or project, you can add another URL in the field. The URL you add will only apply to that specific page, post or project you’re working on. In the core of the fields group, the default URL will still be the same as the one you’ve added when creating the field.
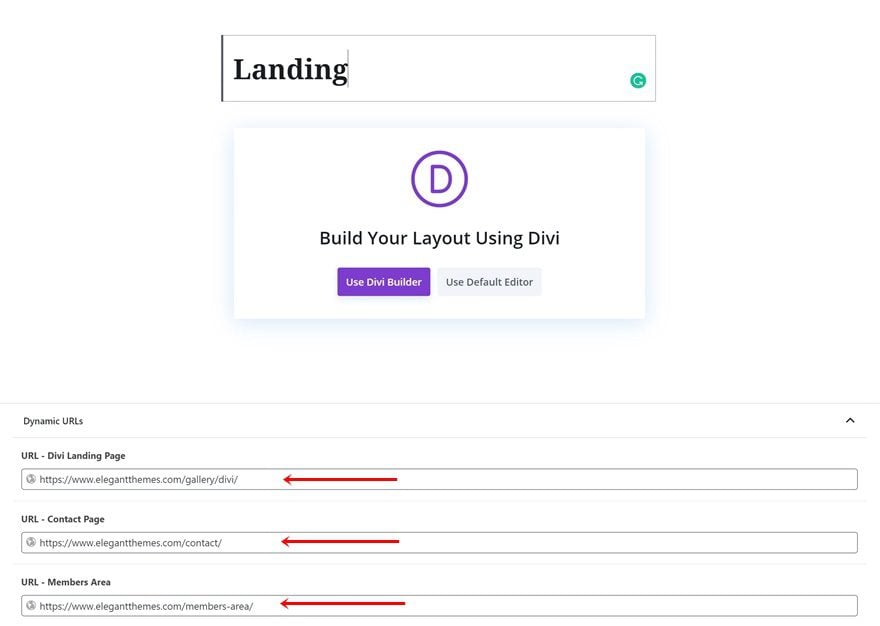
If you’re using the default URLs, switch over to Visual Builder to start linking the buttons in your design to the correct URL.
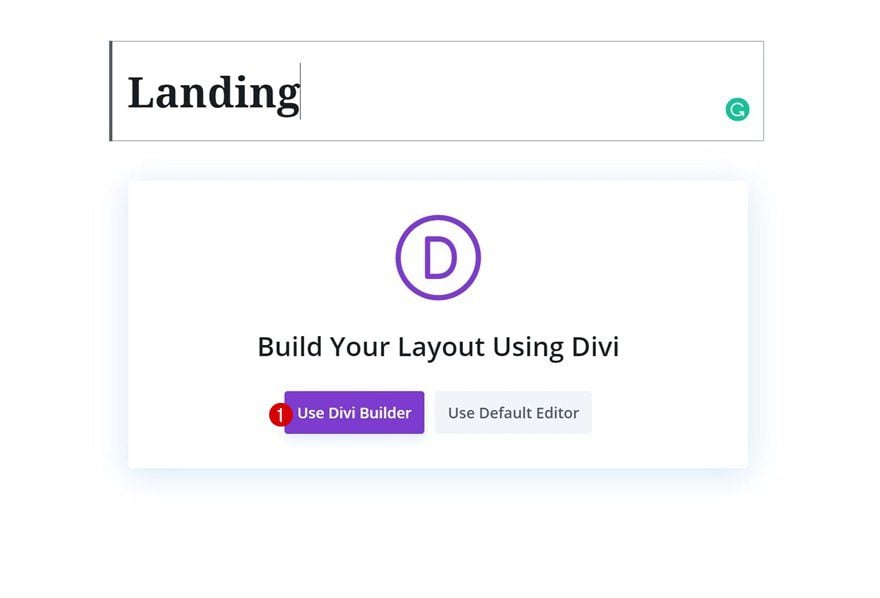
Adding a dynamic URL to your Divi buttons is really simple. Open whichever button you can find on your page, go to the link settings, and click on the dynamic content icon.
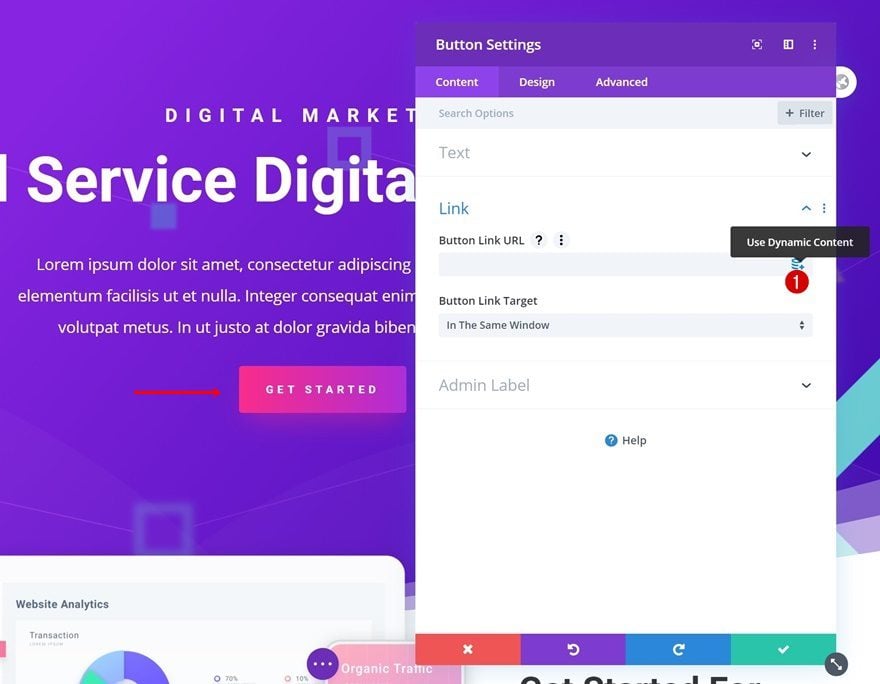
Once you’ve clicked the dynamic icon, you’ll find a list of dynamic content to choose from. In that list, you’ll see the different URL fields appear as well. Select the correct URL field you want to link to.
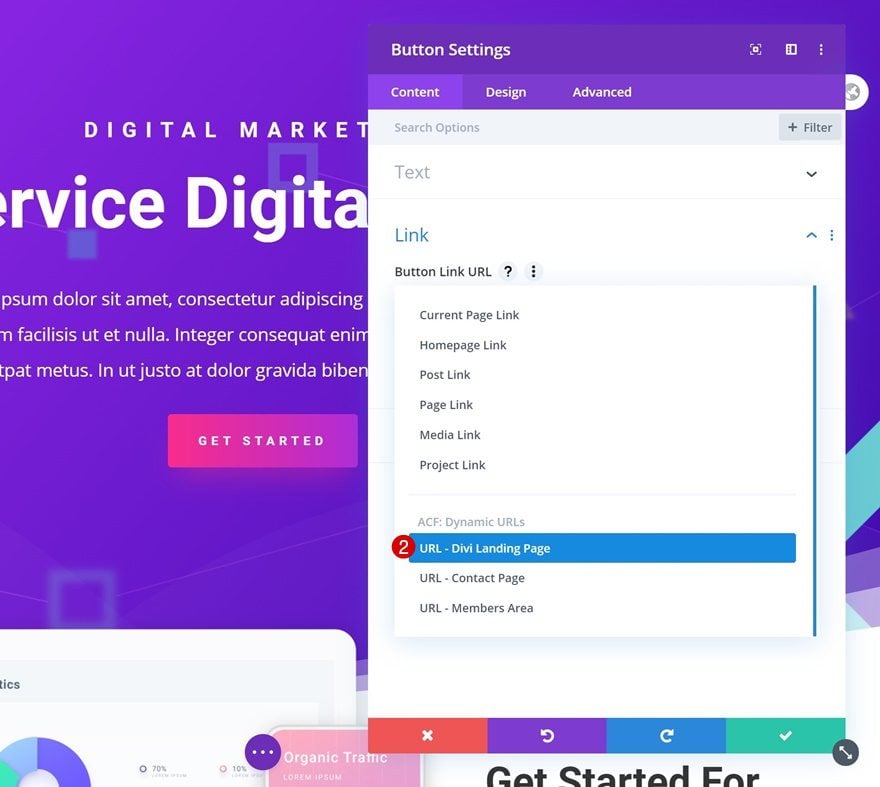
Repeat the steps for each button on your page. If the URLs on a page, post or project for any reason change, you can go back to that specific page, post or project and change the URL dynamic content in the backend.
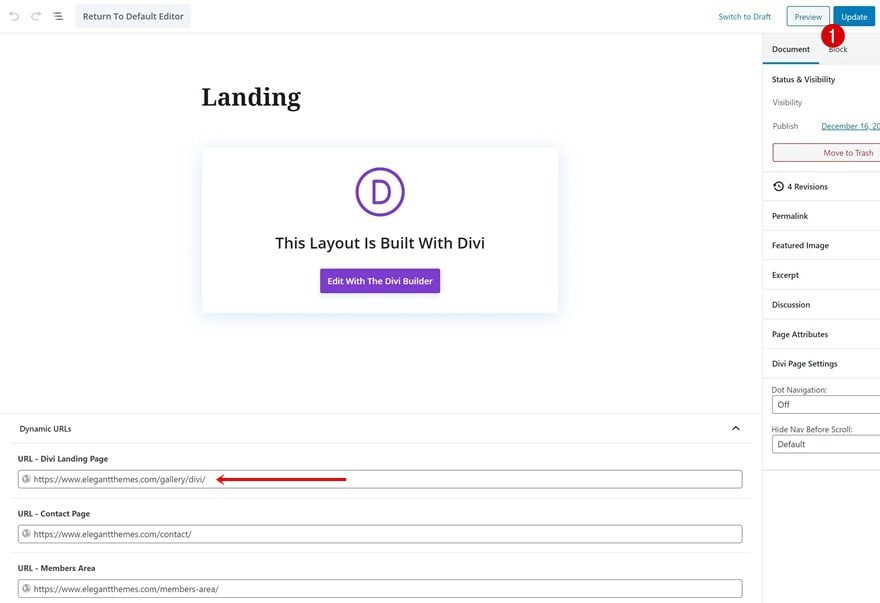
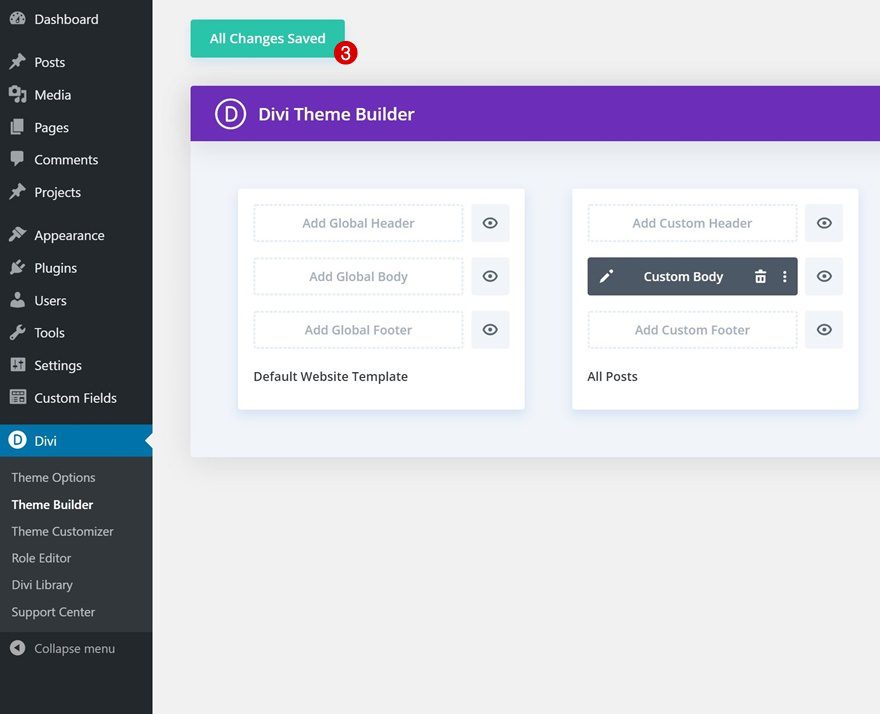
The same approach counts for adding dynamic URLs to your templates as well. If you want to add a dynamic URL to a button in your blog post template, for instance, you can go to your website’s theme builder and open the post body template editor.
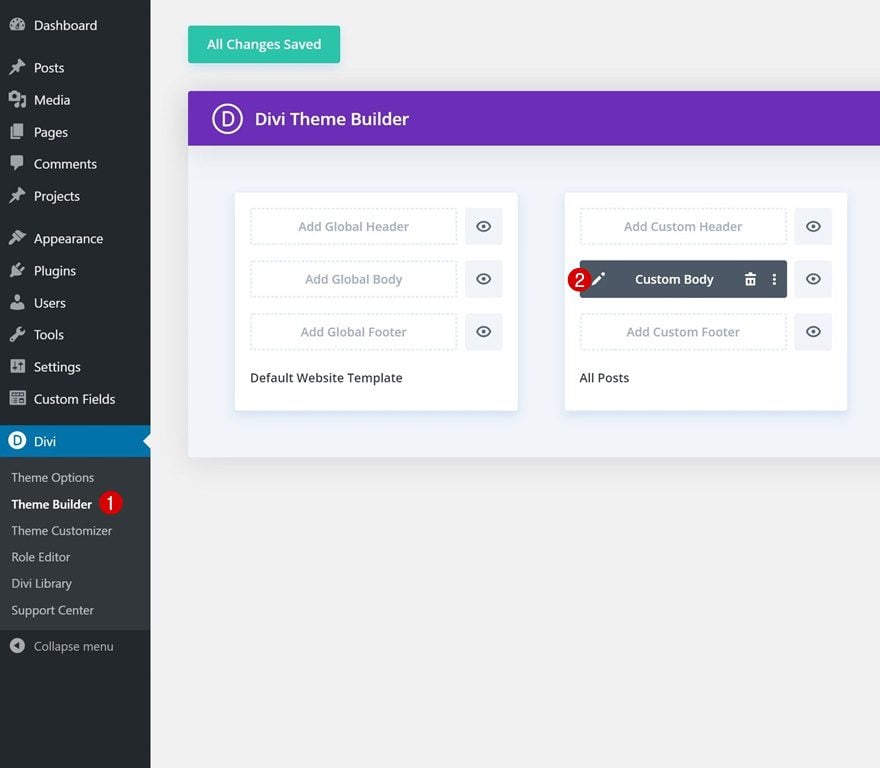
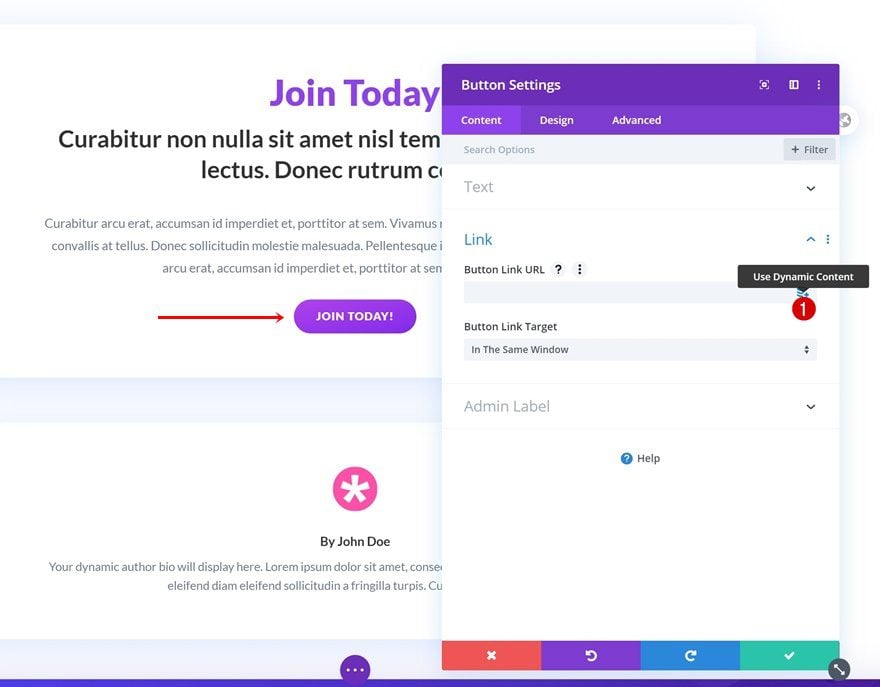
Continue by opening the button module settings, go to the link settings and click on the dynamic content icon.
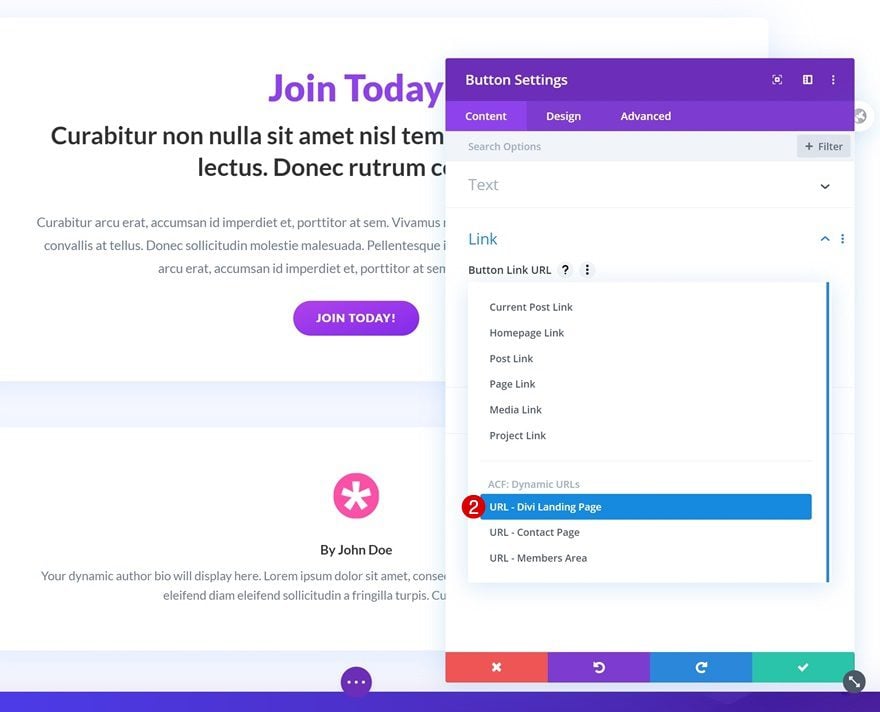
Again, a dropdown menu will show up where you can select the URL dynamic content that matches the CTA.
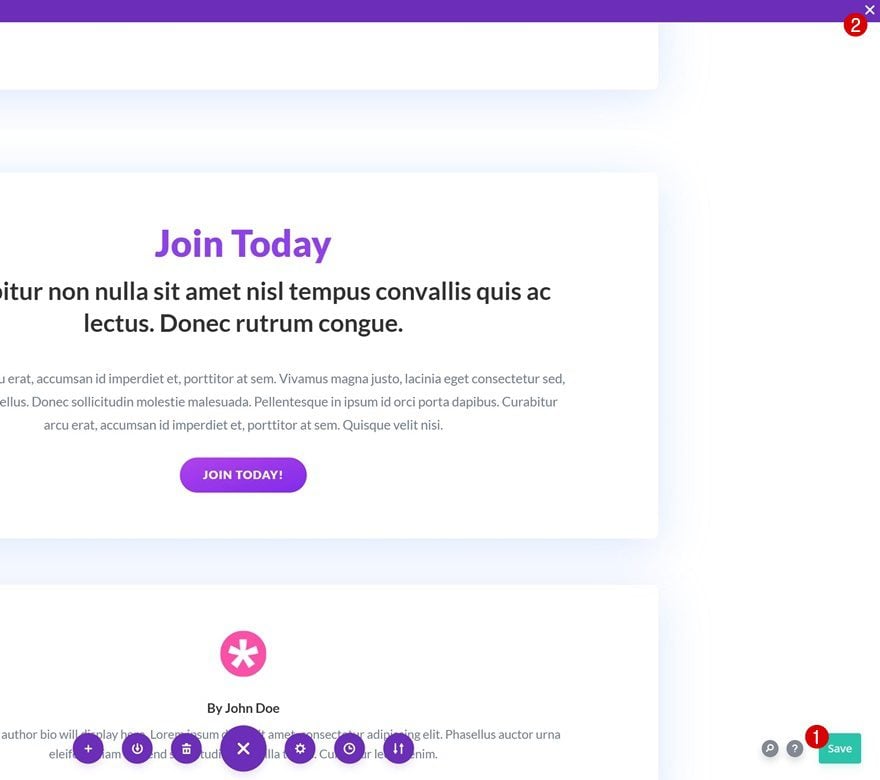
Make sure you change all theme builder changes after adding the dynamic URLs too!
Final Thoughts
In this post, we’ve shown you how to create dynamic URLs, and have them be available on each page, post or project on your website. We used Divi’s dynamic content in combination with the ACF plugin. We were able to set a default value and have that URL value apply to our CTAs. This tutorial is focused on allowing you to be as effective as possible when you’re creating websites with Divi! If you have any questions or suggestions, feel free to leave a comment in the comment section below.
If you’re eager to learn more about Divi and get more Divi freebies, make sure you subscribe to our email newsletter and YouTube channel so you’ll always be one of the first people to know and get benefits from this free content.



I set up three CTA URL codes in ACF then added them to three blurb modules in a site footer I’m working on.
After doing this I converted the section into a Global section in the Divi library because I wanted to apply the section across the entire site.
However, once I did this, none of the buttons containing ACF links worked any more. The field content was replaced with an error message: “Permission issue cannot access acf group field”. Anyone else had this problem? I can’t find a solution online.
Great post. Thanks!
Can you share a live page where this is applied? I may get a better idea of what a dynamic url looks like
Wow! Love this post. More than a tool is how and when to know them wisely and with purpose.
How about passing the current page URL via a global CTA?
This way we can have a single global CTA on many pages and posts and know where the lead is coming from.
Thank you.
Thanks Donjete for the detailed tutorial.
When I read dynamic, I was expecting that the URL works like a variable: where we can change the value in one place and it will be dynamically updated everywhere this custom field is linked, throughout the site. Can we access such a custom field from another place? A custom post type maybe?