Adding favorite button functionality to your Divi site can be a great boost to user experience. The basic functionality works as a bookmarking system for posts. Users can browse through posts and select the ones they want to favorite. Then users can view those favorited posts later at their convenience.
For this use case tutorial, I’m going to show you how to add favorite button functionality to Divi’s Animal Shelter Layout Pack. This will allow the user to select certain pets as their favorite and then view those pets on a separate “my favorites” page.
Let’s get started.
Sneak Peek
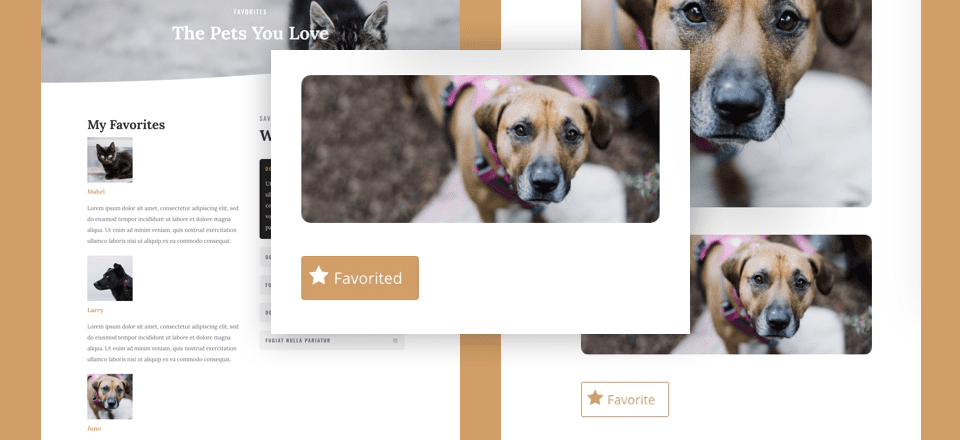
Here is a peek at the favorite button we’ll be adding to our project posts.
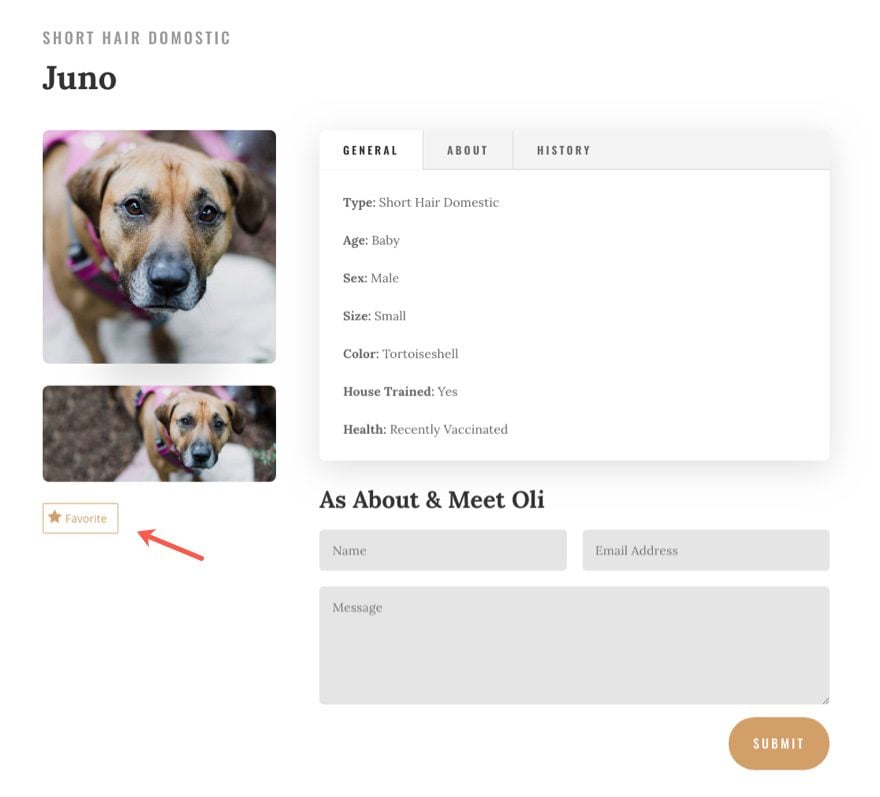
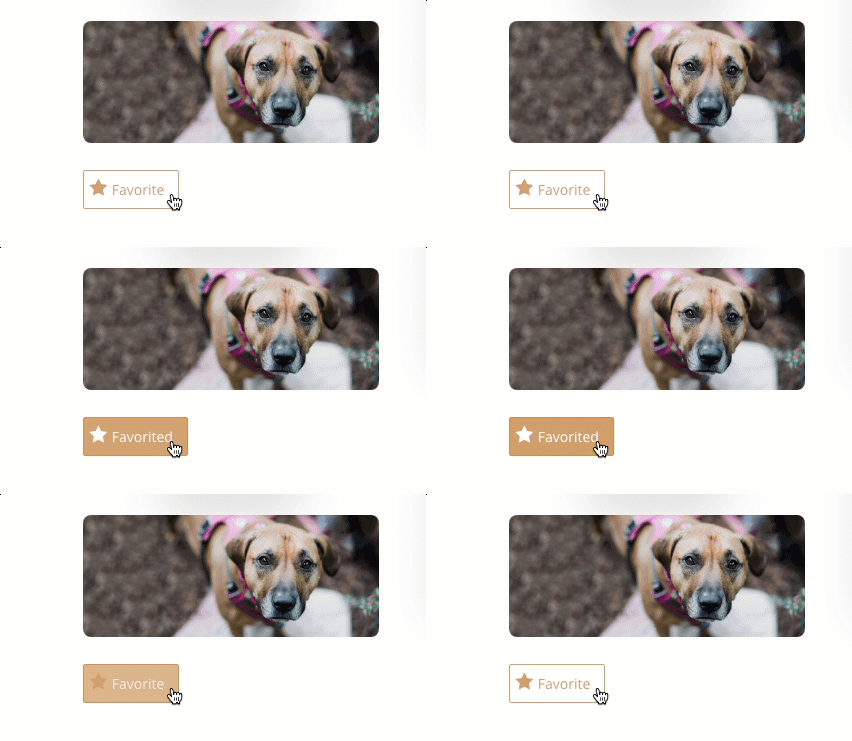
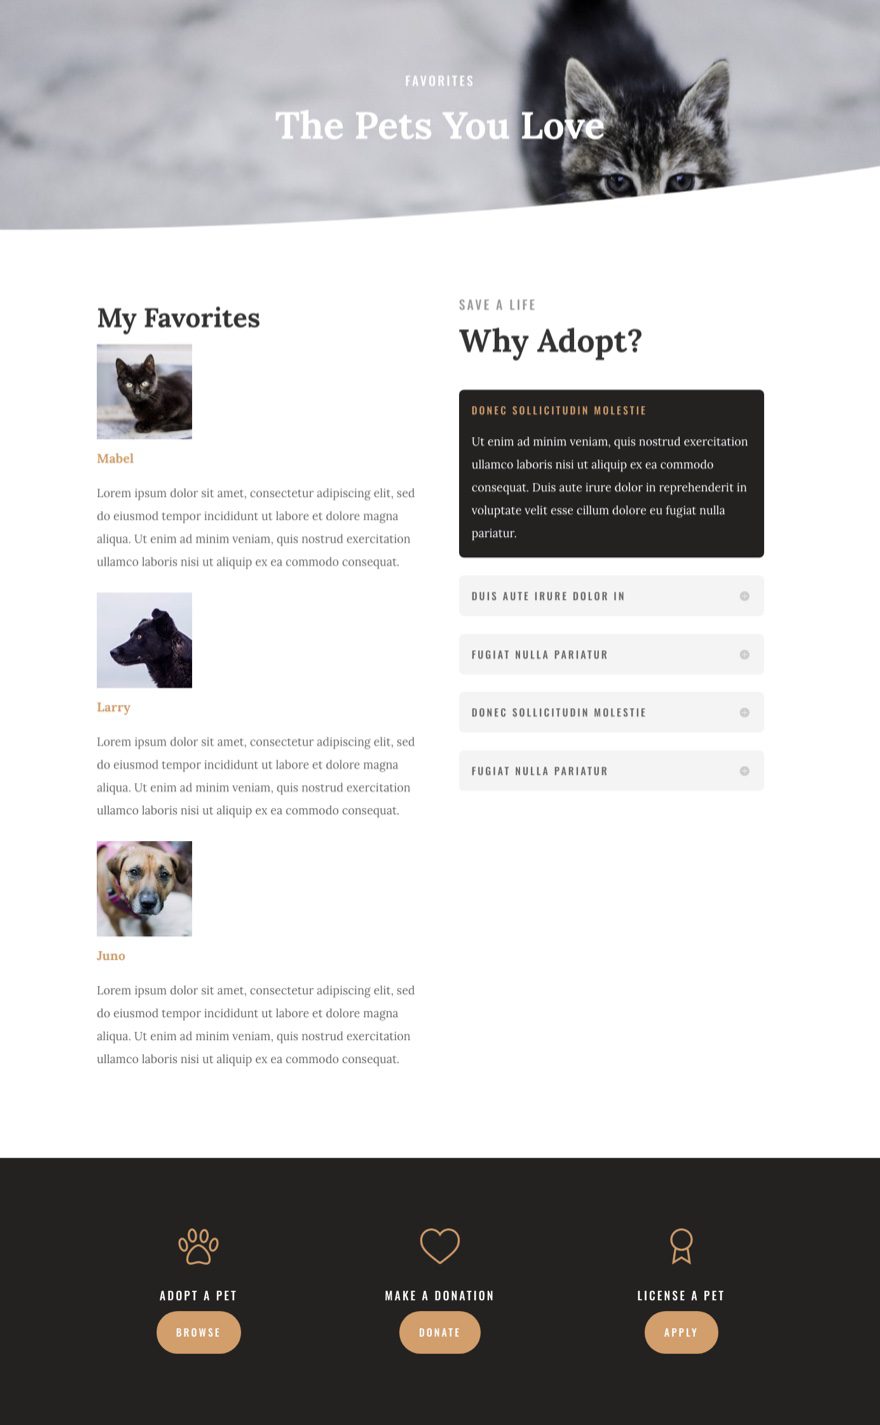
Here is an peek at the favorites page we’ll be building to show user favorites.
What You Need
For this use case tutorial, you will need the following:
- Divi Theme (installed and activated)
- Favorites Plugin (installed and activated)
- Animal Shelter Layout Pack
The Plugin Settings
Once the plugin is installed, you can access the settings from the WordPress dashboard by navigating to Settings > Favorites.
Enable Favorites for Projects
Click on the Display & Post Types tab on the Favorites Settings page. Then select to enable Projects as the designated post type you want to grant favorite button functionality.
Note: You don’t have to set them as projects. You can enable posts or pages if you like. I thought it would be nice to use projects just in case I wanted to use the portfolio module to display my listings down the road.
Once checked, click the Settings button that appears to the right and update the following:
Include before content: uncheck
Include after content: uncheck
Add meta box: check
Add admin column: check
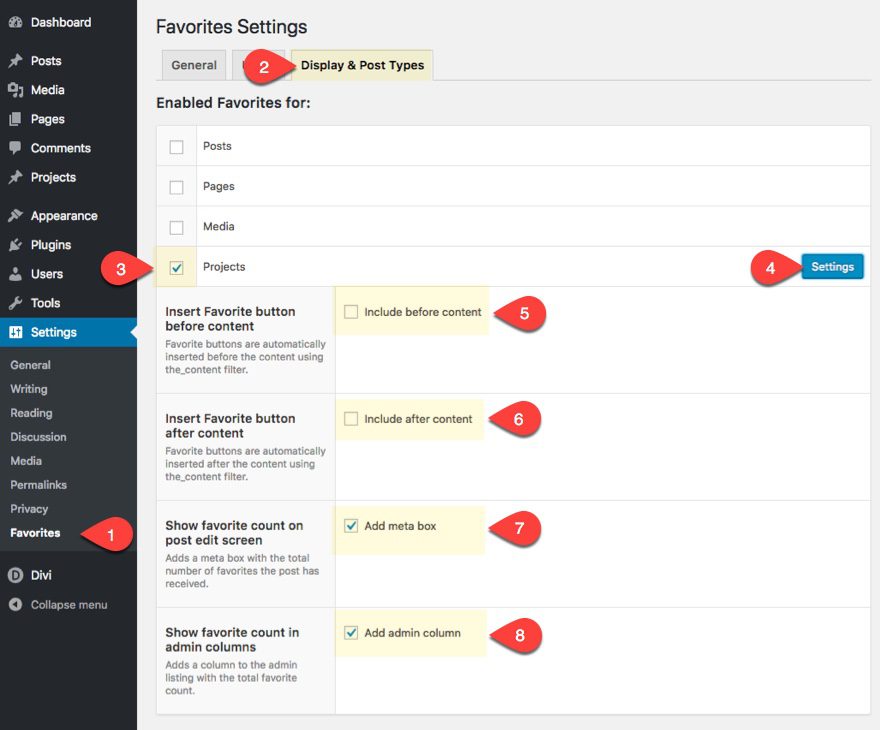
We are not checking the option to include the button before or after content because we are using the Divi Builder. We will use a shortcode to display the button within a text module.
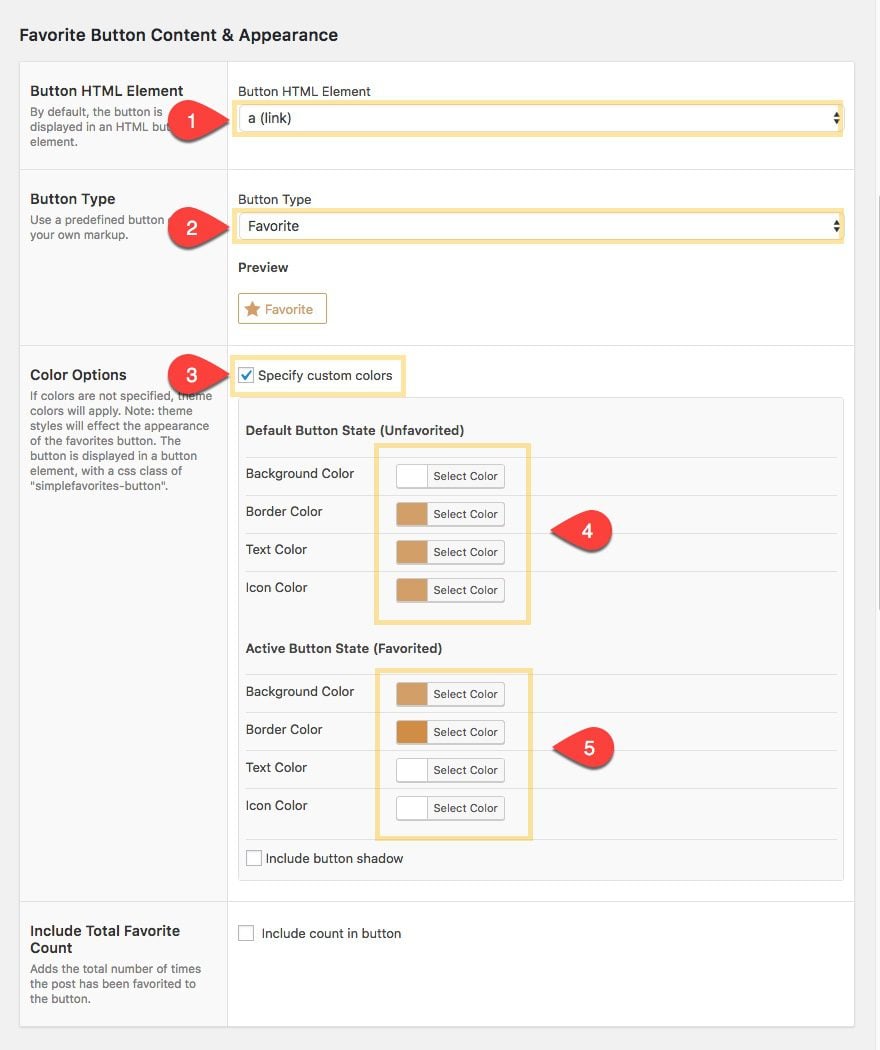
Next set the Button HTML Element to “a (link)”. This will allow us to design the link from within the text module later on.
Set the Button Type you want to use. I would suggest using the predefined buttons instead of a custom markup, unless you know what you are doing. I’m going to use the Favorite Button Type.
Specify the custom colors you want to use for the button. Update the following for the default button state:
Background Color: #ffffff
Border Color: #d29f68
Text color: #d29f68
Icon Color: #d29f68
For the active button state, update the following:
Background Color: #d29f68
Border Color: #d18d45
Text color: #ffffff
Icon Color: #ffffff
You can even preview what the button will look like in the Button Type section above (it’s clickable as well).
Customize the Favorites Listing Display
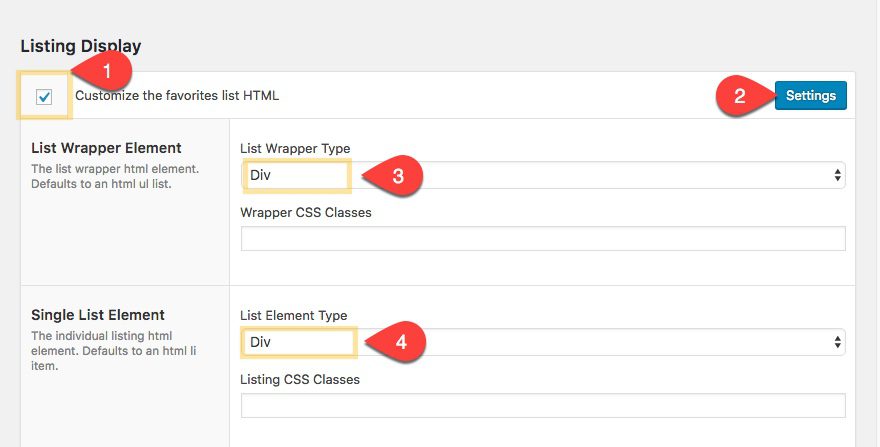
Under Listings Display, select to customize the favorites list HTML and click the settings button to the right. The primary reason I decided to do this was that I found it difficult to get thumbnails to display with the favorites listing shortcode, so I decided to create a customized output for my listings.
By default the favorites list will be displayed in an unordered list with “ul” as the list wrapper type and “li” as the list element type. However, I find it more difficult to style the default setup with Divi, so instead, set the List wrapper type to “Div” and the List Element Type to “Div”.
Next, select to Customize the single Listing Content Markup. You will see a wysiwyg editor to customize what listing content you want to show when using the favorites listing shortcode. You can add dynamic fields by choosing them from the dropdown list and they will be added to the content editor box. Make sure you have the visual tab selected when added the dynamic fields (it may not work with the text tab selected).
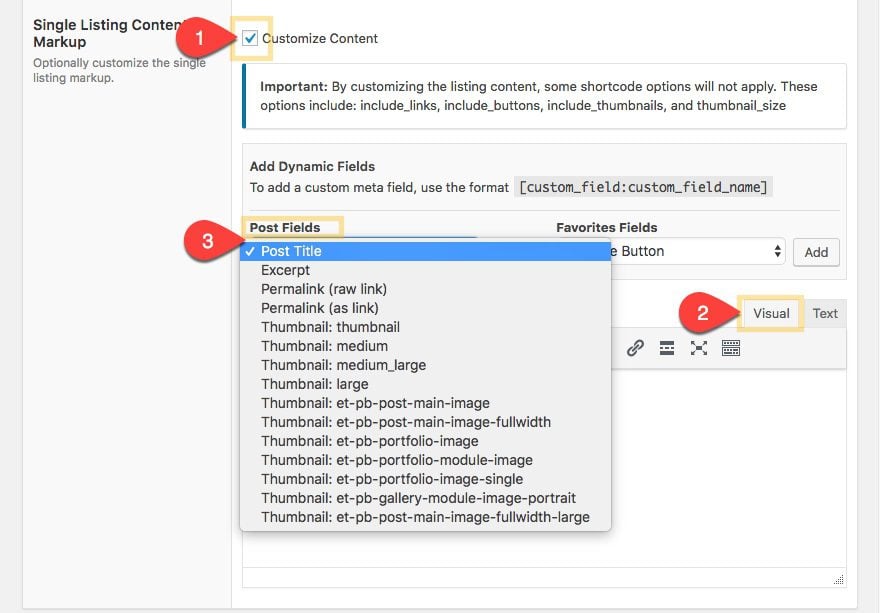
Under post fields, add the field “Thumbnail:thumbnail”. This generate the following code in the editor:
[post_thumbnail_thumbnail]
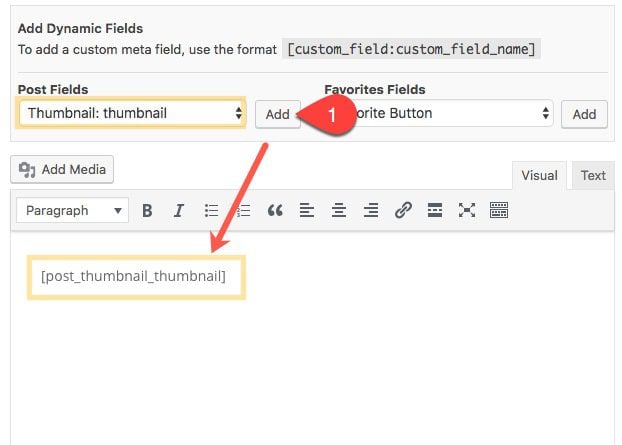
The will show the thumbnail (featured image) you have selected for the project post.
Next, add the field “Post Title” from the dropdown. This generates the following in the editor:
[post_title]
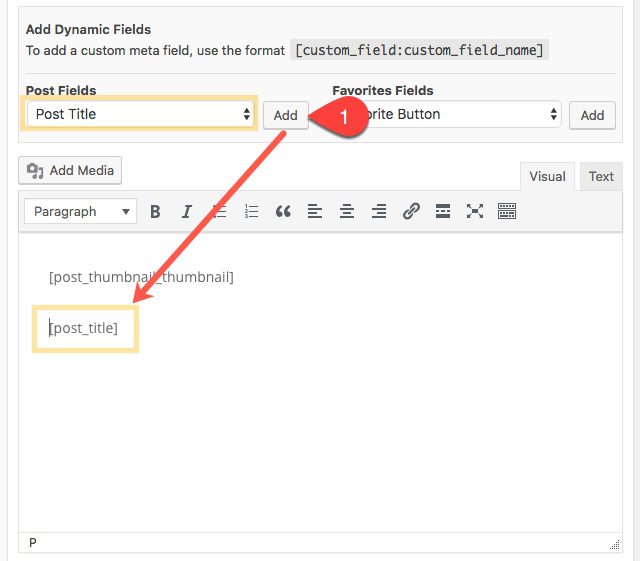
This will show the post title of project post.
If you plan on giving your posts a custom excerpt, you can add the “Post Excerpt” field as well. This is a great way to provide some info about the favorited listing/pet that users can see in their favorited list.
The post excerpt field will be the following:
[post_excerpt]
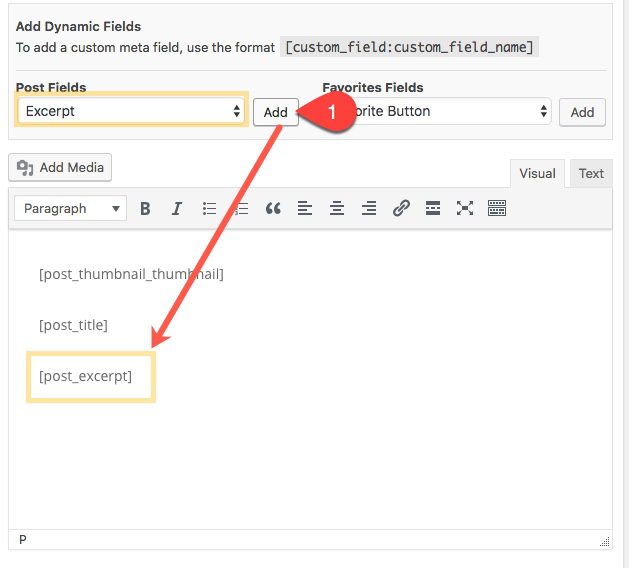
Now that we have our fields in place, we can wrap our thumbnail and post title in an “a” tag in order to turn it into a link that will redirect to the post permalink. Since we want the permalink to be pulled from the post, we need to add the custom field “Post Permalink” for the href value for each of our links. Here is what the final html should look like in the editor:
<a href="[post_permalink]">[post_thumbnail_thumbnail]</a>
<a href="post_permalink]">[post_title]</a>
<p style="margin-bottom: 30px;">[post_excerpt]</p>
Note: I wrapped the post excerpt field with a paragraph tag and added some bottom margin to create a little space between the listed items.
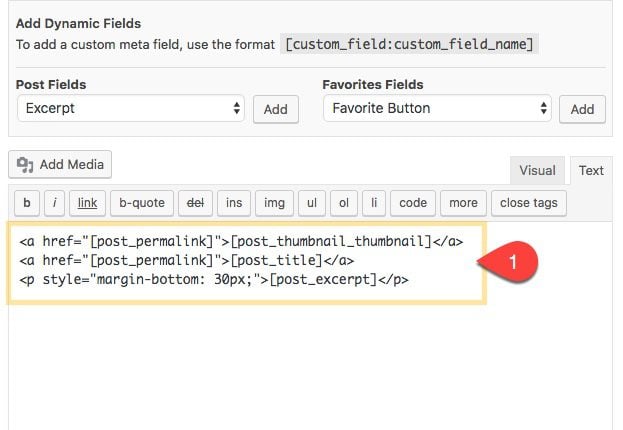
Once done, save your settings.
Here is a sneak peak of what this output will look like whenever we use the shortcode to show user favorites.
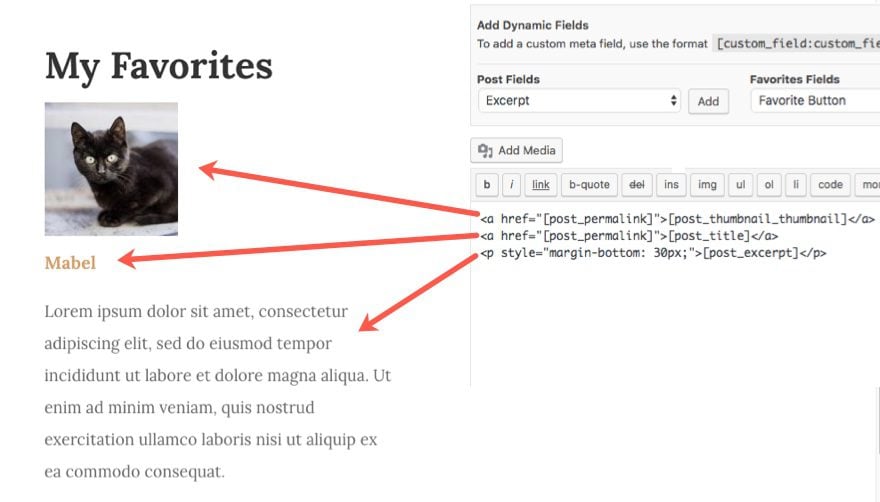
General and Users Settings
I’m keeping the default functionality of the favorites plugin under the General and Users tab. By default the plugin enables anonymous users (users not logged in) to have favoriting functionality by saving favorites as cookies. If you want to force users to login before favoriting, you can do this under the Users tab.
Adding Your Pet Listings as Projects
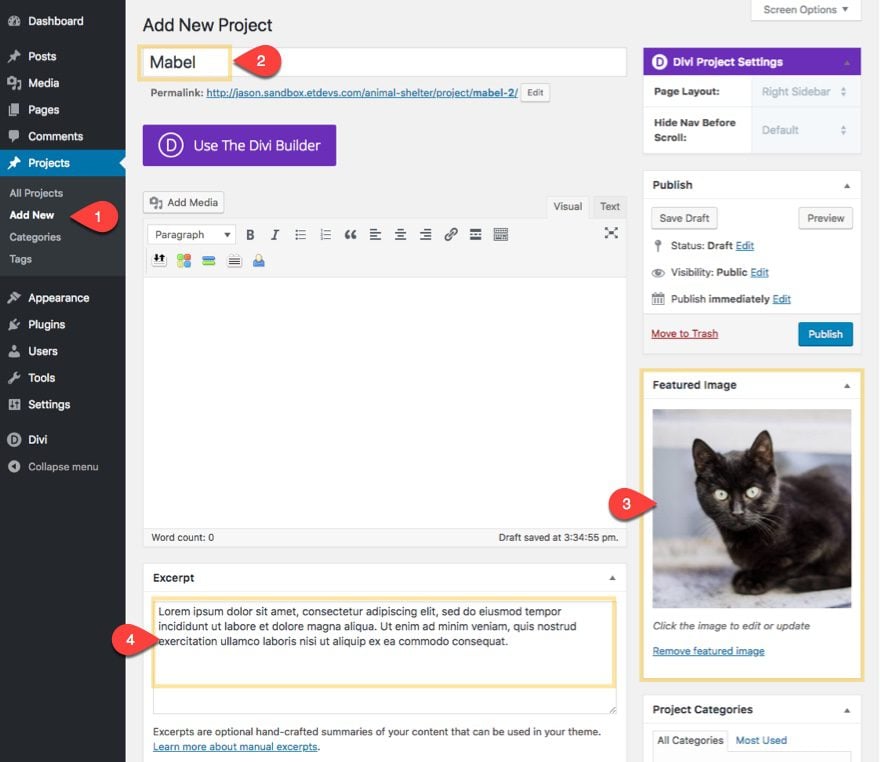
Now we are ready to start creating our project posts to serve as our individual pet listings. To add a new project, go to the WordPress dashboard and navigate to Projects > Add New.
Enter a title for your post (ie. the name of the pet), add a featured image, enter the content you want to display in the listing page in the excerpt box.
Import the Listing Page Layout
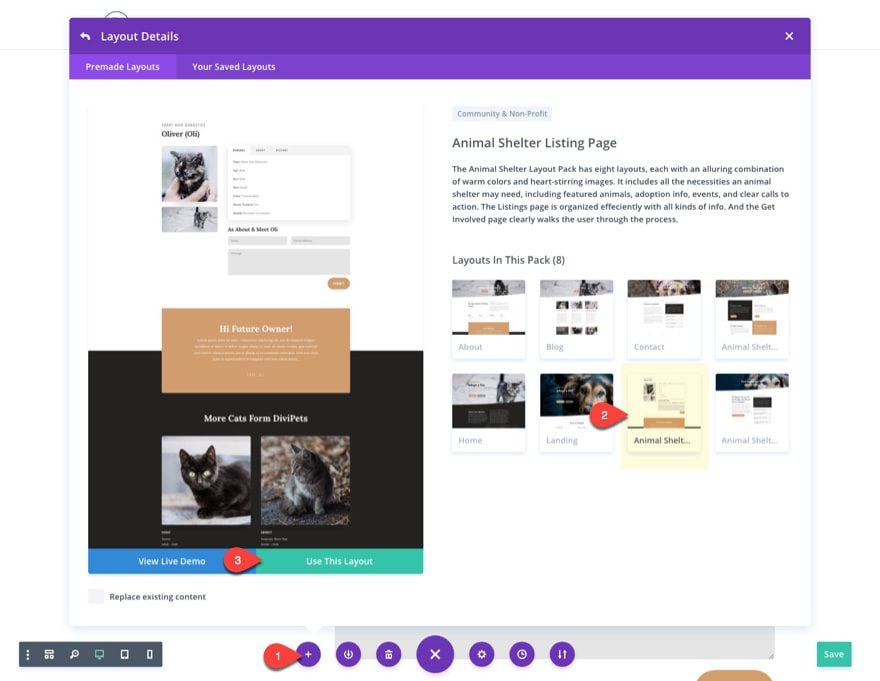
Next we need to add our premade listing page layout from the Animal Shelter Layout Pack. To do this, first deploy the visual builder.
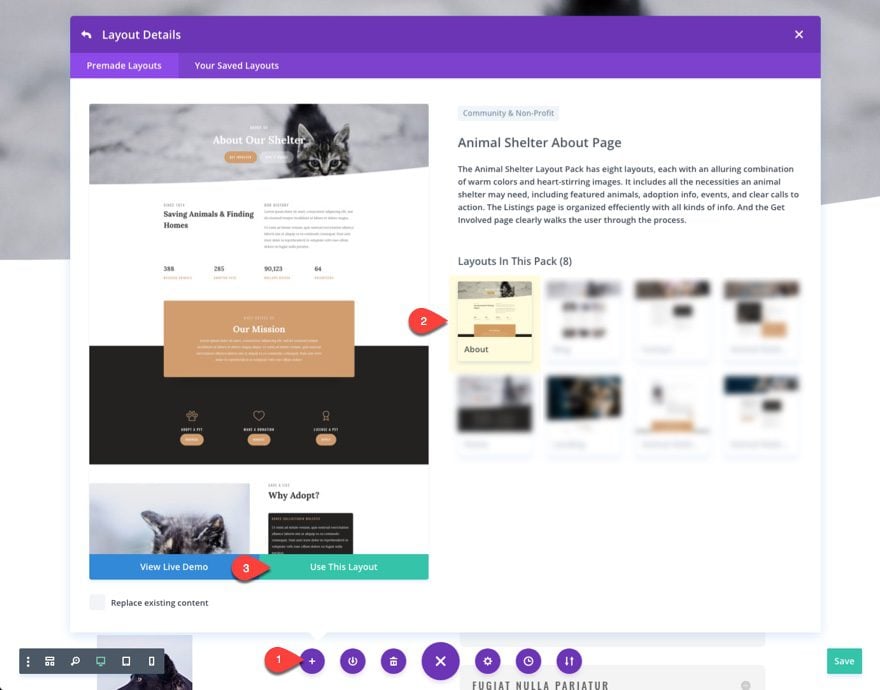
Open the settings menu and add the Animal Shelter Listing Page Layout to the post.
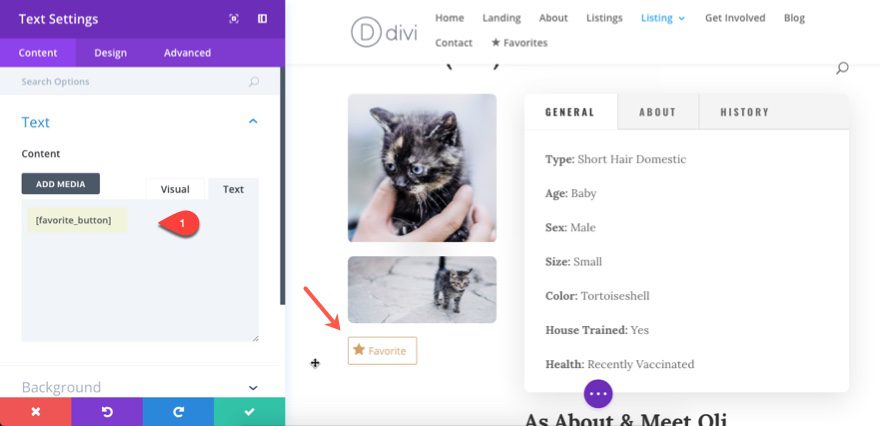
You can add the favorite button anywhere on the page by using a shortcode. For this use case, let’s add it right under the photos in the left column in the first section.
Add a text module and enter the following shortcode in the content box:
[favorite_button]
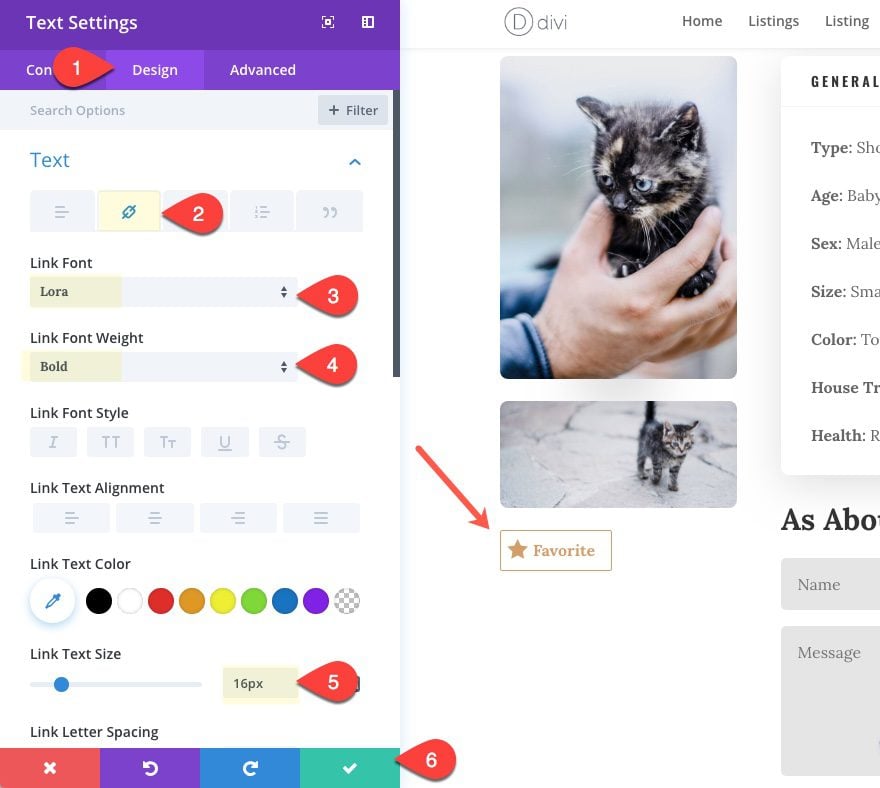
You can change the style of the button (it is technically a link) using the design settings if you want. Just be careful not to override the color you set in the plugin settings. For example, you can go to the design tab and click the link tab under the text category and update the following:
Link Font: Lora
Link Font Weight: Bold
Link Text Size: 16px
This is the most basic usage of the shortcode. There are a few additional parameters you can add to the shortcode to customize the functionality. You can check those out on the plugin page or their main website for more examples and shortcodes.
All that is left to do is update the content of the post as needed and you are done. Save settings.
Tip: You may want to save your text module with the favorite button shortcode as a global item in order to make it easier to add and edit the button on all listings.
Here is what the layout looks like with the favorite button:


Create a Page to List Favorites
Once a user clicks on a button to favorite a post, the post is saved (using cookies) and is able to be listed anywhere on your site using a shortcode. For this use case, I’m going to create a new page to list those posts that have been favorited.
Create a new page (Pages > Add New). Give the page a title (ie. “Favorites”). And deploy the visual builder.
Import the About page Layout
Next, add the Animal Shelter About Page layout to the page.
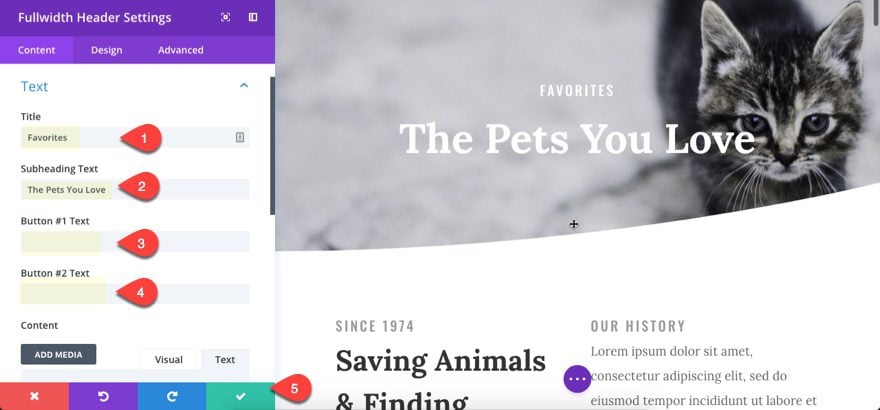
Update the Fullwidth Header Module settings at the top of the page to include a new title and subheading text. Then delete the button text for both buttons.
Add User Favorites Shortcode
At this point, all you have to do is decide where you want to add the shortcode and which elements of the layout you want to keep (or rearrange) to design your page.
In the second section, the first row has two columns. Delete the text module in the second column and update the content of the text module in the first column with the following title and shortcode:
<h3>My Favorites</h3>
[user_favorites]
This user favorites shortcode will display all of the user’s favorites they have selected.
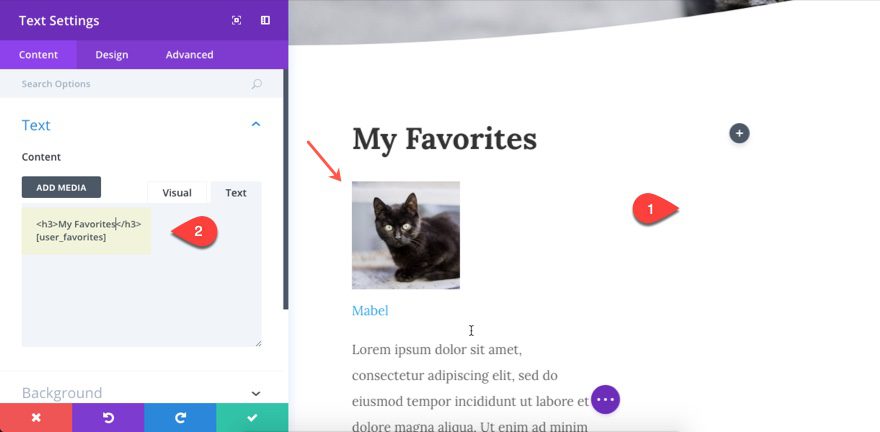
Then go to the design settings to customize the text deployed by the shortcode however you want. For this example, I’m simply going to change the link text design in order to target the post title link deployed in the shortcode as follows:
Link Font: Lora
Link Font Weight: Bold
Link text Color: #d29f68
Link Text Size: 20px

Now you can add additional elements to the right column if you want and delete the rest of the layout elements you don’t need.
Favorites will only show on this page if the user has favorited posts. Here is what the page looks like with three posts favorited by the user.

That’s it!
Final Thoughts
The good thing about the favorites plugin is that it is designed for developers, but this can also be challenging for those not comfortable with a little html/css. But for Divi, it seems to be a nice option to get the favorite button functionality up and running without too much customization. There are more options and shortcodes available if you want to add more functionality so feel free to check those out.
It goes without saying that this plugin will work for many different use cases, not just for favoriting animals for an animal shelter. This would also work well for traditional blog posts or products.
I look forward to hearing from you in the comments.
Cheers!



Hello! thank you for this tutorial, is there a way to make the favourite list as a grid and not a stacked list?
I just wanted to alert everyone that the plugin has been updated and also includes opt-in checkbox for GDPR compliance. I guess this blog must have generated downloads and gotten the author’s attention)
Nice plugin, but updates are a problem
Outdated plugin but interesting concept.
Very detailed tutorial!
Lot’s of work went into writing this post.
Only thing, as Commenter: Michael stated, I also noticed that Favorites plugin has not been updated for 12 months and only tested in WP 4.8.6.
Isn’t this normally a Red Flag as far installing this plugin?
That can easily be a red flag for me.
Same here.
Please don’t recommend outdated plugins.
It looks like the https://wordpress.org/plugins/favorites/ plugin has Not been supported in over a year and support request are saying it’s not working properly or at all on some sites.
It shows 1 out of 10 support tickets resolved in the past 2 months and that one request was resolved by the person requesting help on that issue.
Is there another up to date plugin that will work to do the same thing and work with Divi?
It has been updated.
Very cool. But when I read this:
“Once a user clicks on a button to favorite a post, the post is saved (using cookies) and is able to be listed anywhere on your site using a shortcode.”
All I could think was, “GDPR…GDPR…” Sigh
Nice one thanks 🙂 The same can be applied for the real estate layout I quess right?
This is really cool, but I wish more of these tutorials had less plugins and more code.