There is always a need for notification boxes on a website. They are helpful additions that supply important information to users where they can see it. Unfortunately, the growing COVID-19 epidemic has left many websites with the pressing need to keep their users updated. A notification box is a great way to do it.
Today, we are giving away a FREE Divi notification box section layout (complete with all the necessary code/functionality) for you to add to any of your Divi pages or templates.
Don’t worry, we’ll also show you how to build it from scratch and how to use it.
Let’s get started!
- 1 Sneak Peek
- 2 Download the Divi Notification Box Section Layout for FREE
- 3 Download For Free
- 4 Part 1: Adding a New Section Layout to the Divi Library
- 5 Part 2: Designing the Notification Box Section Layout
- 6 Adding the Notification Box (section layout) to a Page
- 7 Adding the Notification Box (section layout) to a Divi Theme Template
- 8 Final Result
- 9 Final Thoughts
Sneak Peek
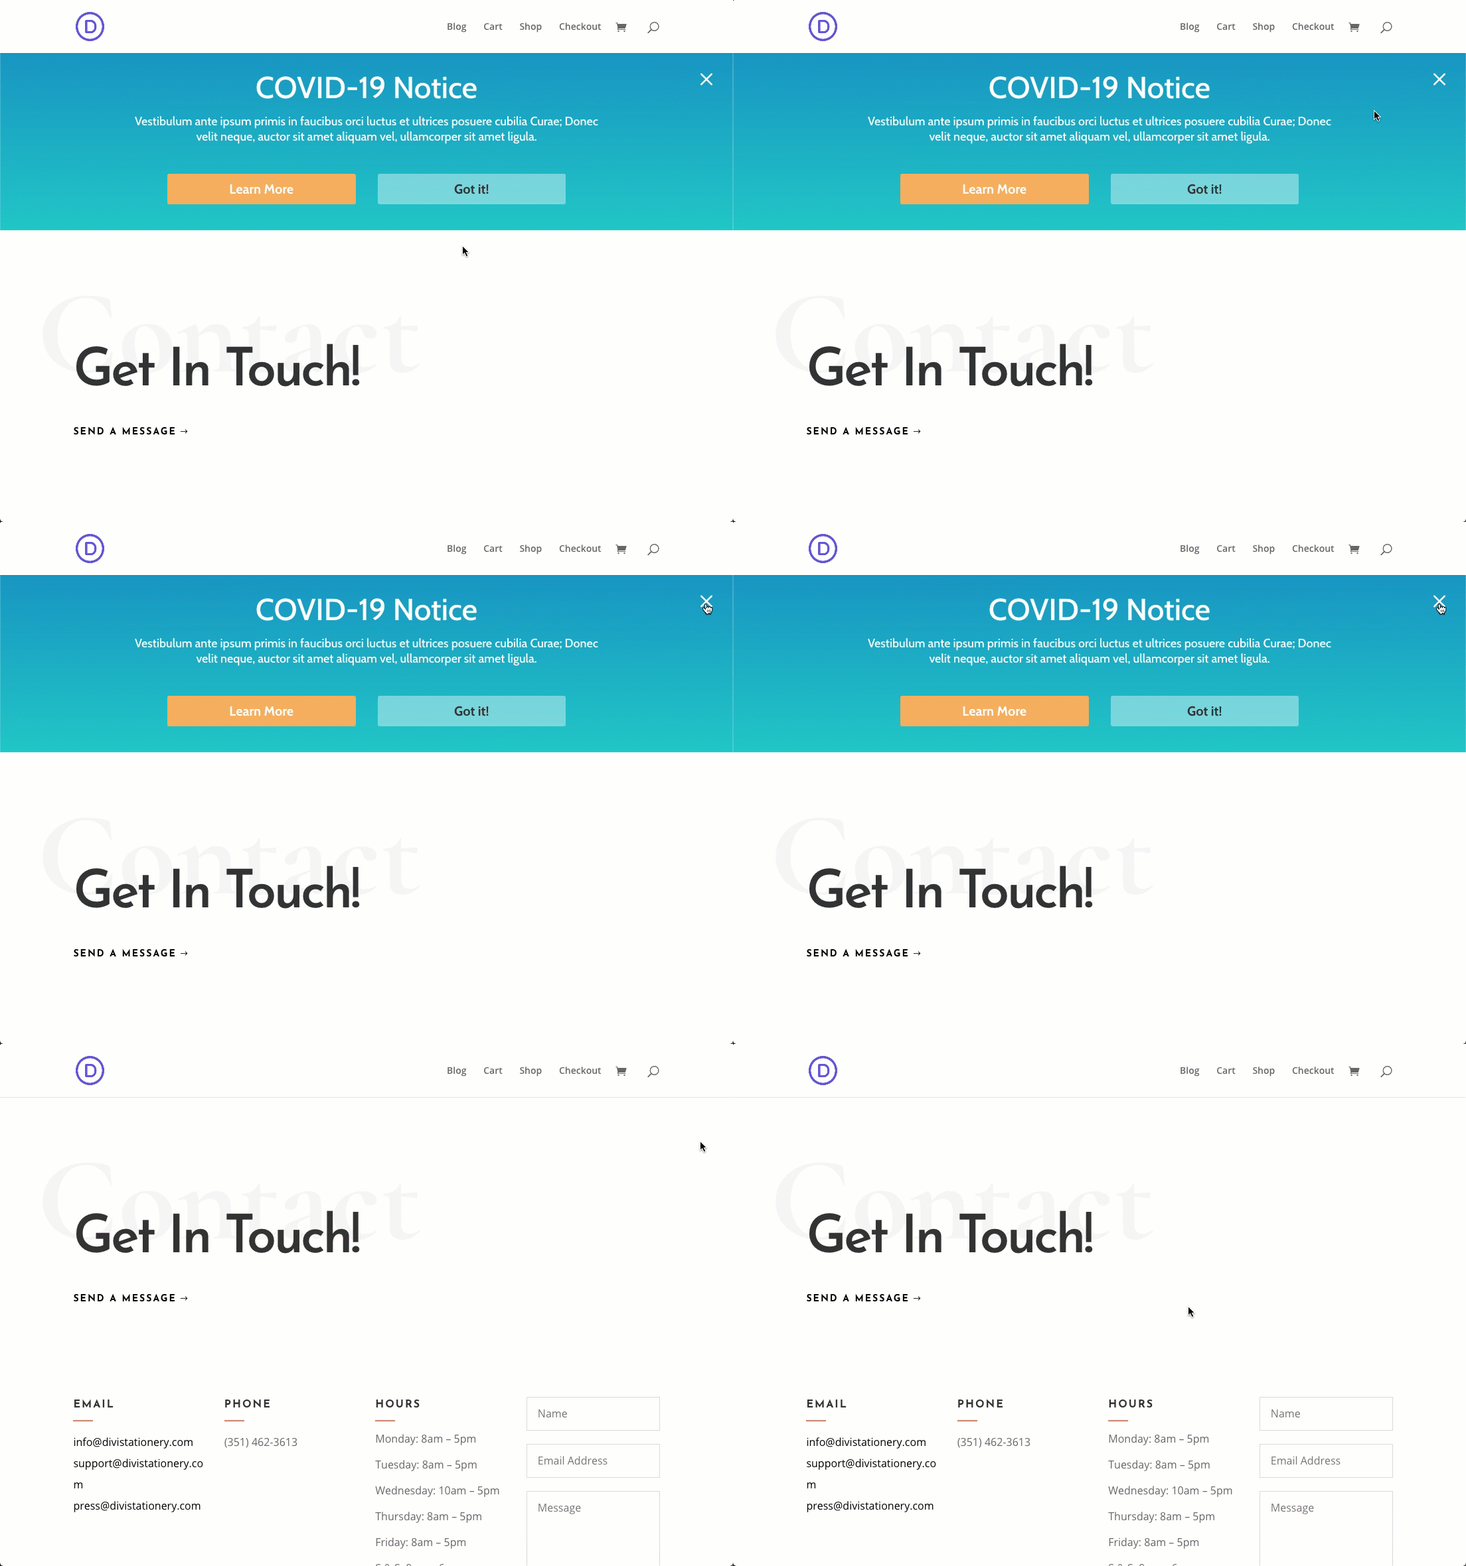
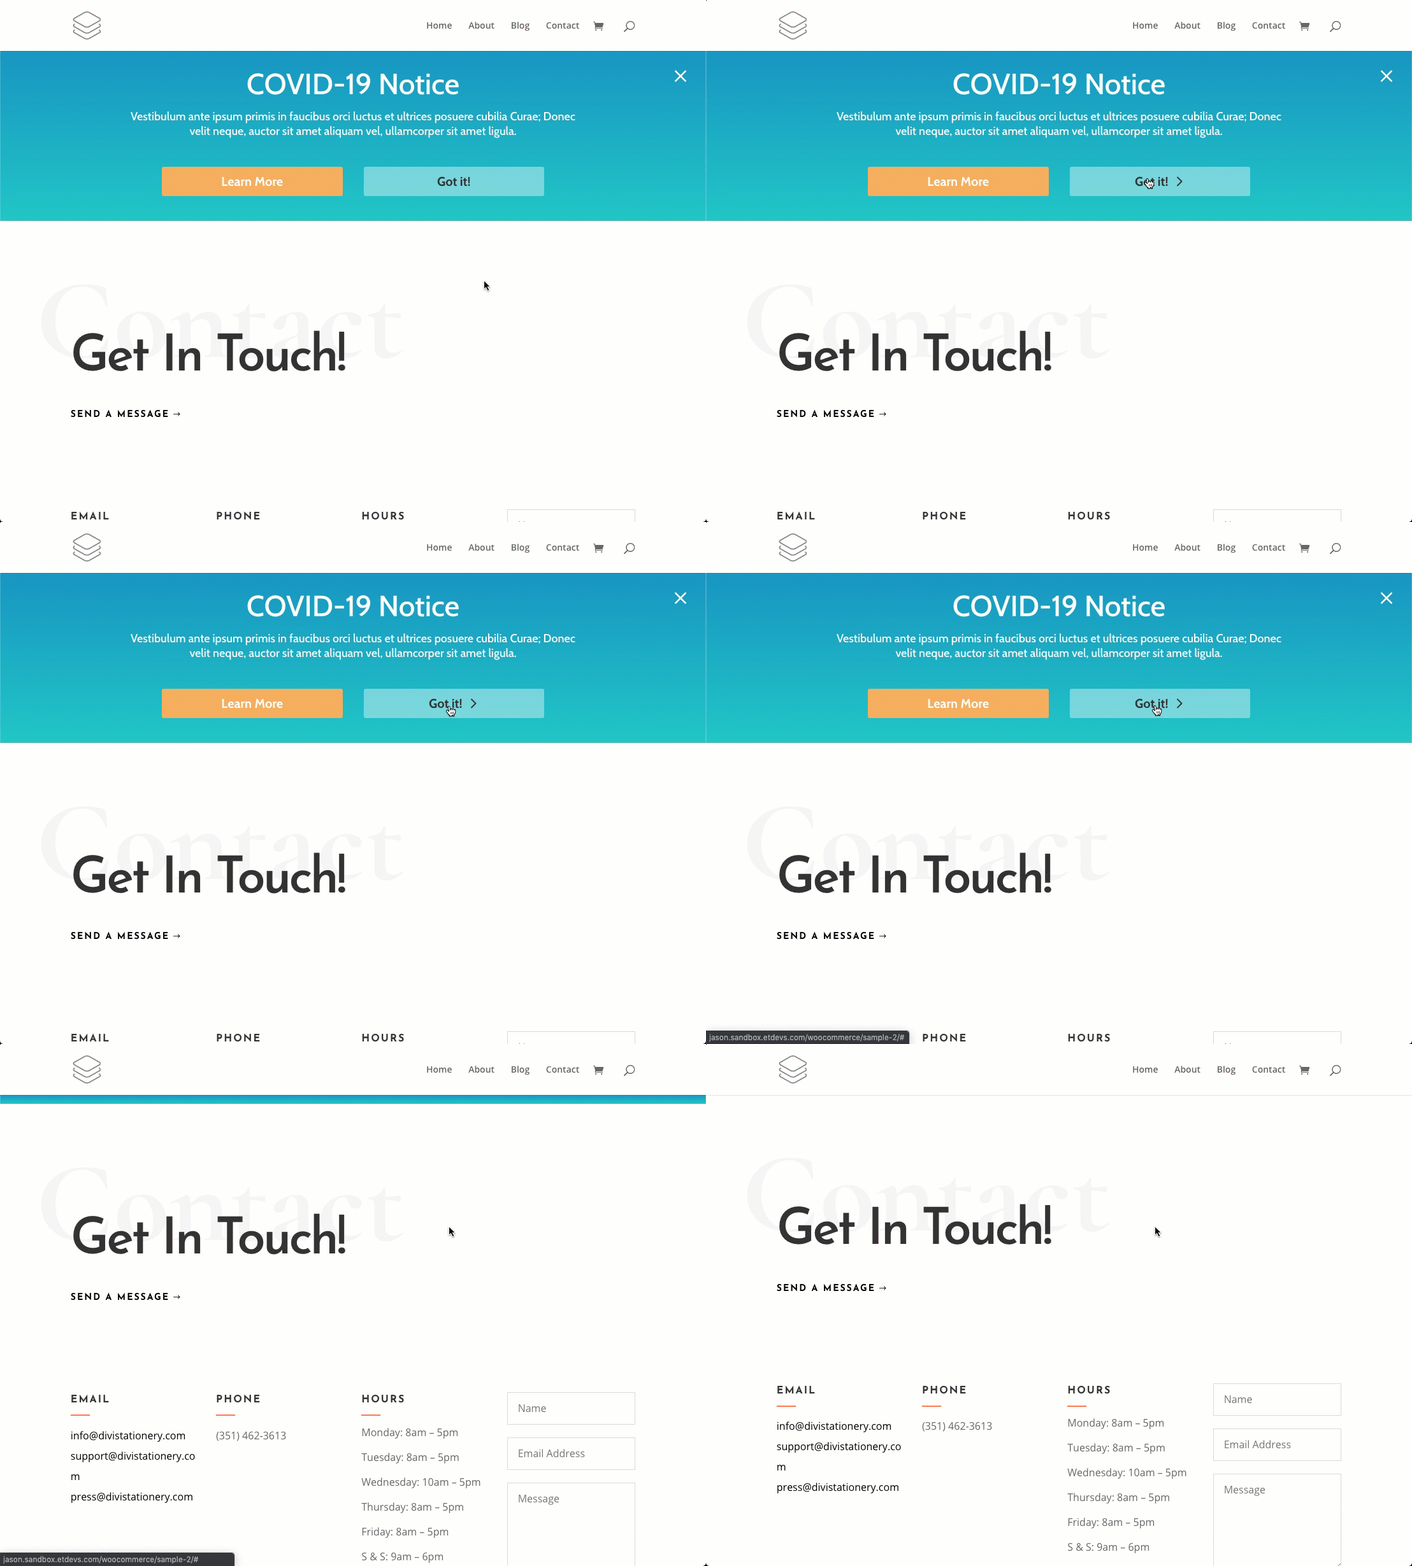
Here is a quick look at the Notification Box and how it functions.

Download the Divi Notification Box Section Layout for FREE
To lay your hands on the designs from this tutorial, you will first need to download it using the button below. To gain access to the download you will need to subscribe to our newsletter by using the form below. As a new subscriber, you will receive even more Divi goodness and a free Divi Layout pack every Monday! If you’re already on the list, simply enter your email address below and click download. You will not be “resubscribed” or receive extra emails.
To import the section layout to your Divi Library, navigate to the Divi Library.
Click the Import button.
In the portability popup, select the import tab and choose the download file from your computer.
Then click the import button.

Once done, the section layout will be available in the Divi Builder. Remember this is a section layout so you will need to add this layout to a page, post, or template when creating a new section in the builder.
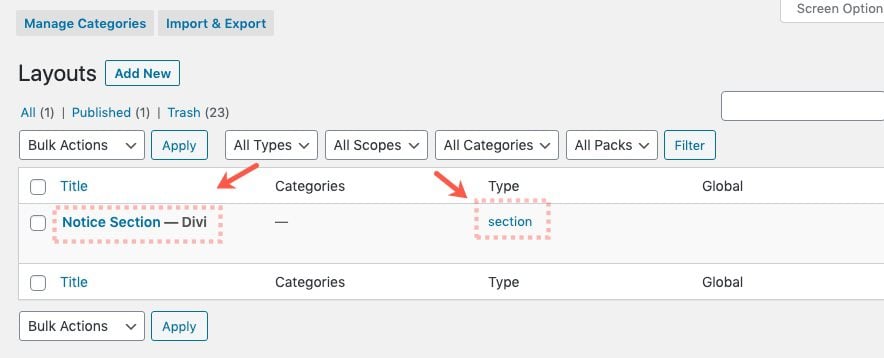
See the bottom of the post for how to add the Notification Box Section Layout to a page or template
Let’s get to the tutorial, shall we?
Part 1: Adding a New Section Layout to the Divi Library
For this design, we are going to build the notification box as a section layout in the Divi Library first. That way, once the section layout is complete and saved, we can conveniently add the section layout from the Divi Libary to any Divi Page, Post, or Template. The idea is to have it ready in the library for every instance we need a notification box/section for the site.
Add Layout
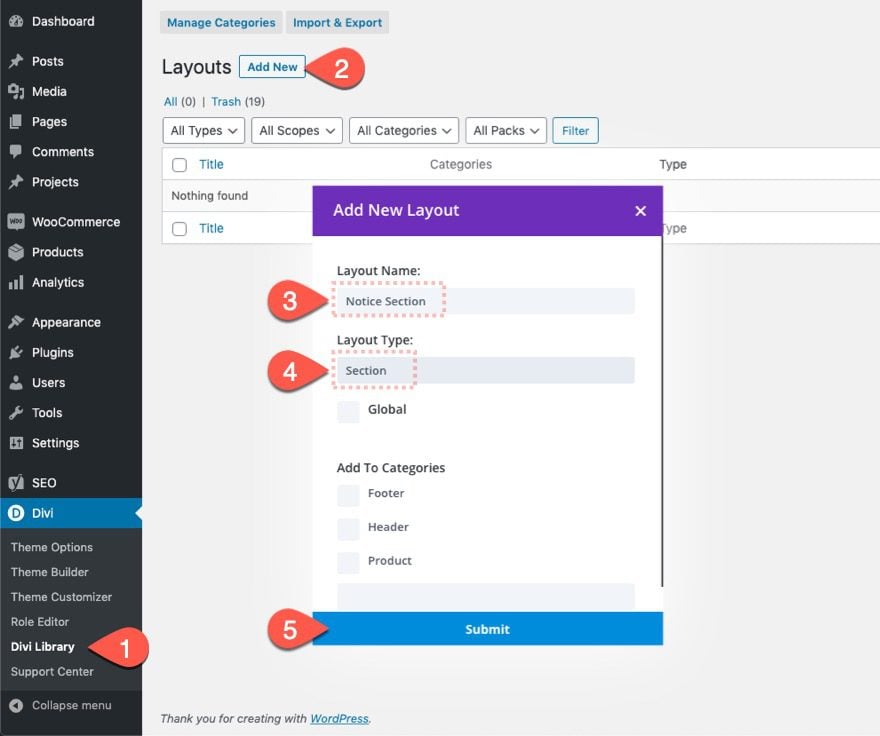
To start, navigate to Divi > Divi Library.
Click the “Add New” button to add a new layout to the library.
In the Add New Layout popup, give the layout a name (ie. “Notice Section”) and choose the “Section” layout type.
Then click Submit.
Part 2: Designing the Notification Box Section Layout
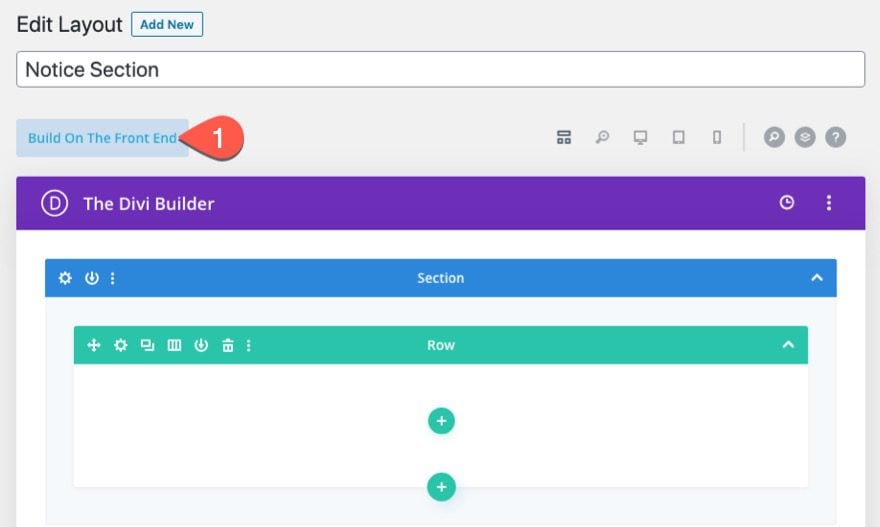
Build On the Front End
This will deploy the layout editor which functions much like a normal page using the Divi Builder. Since we want to build the layout visually, click “Build On The Front End”.
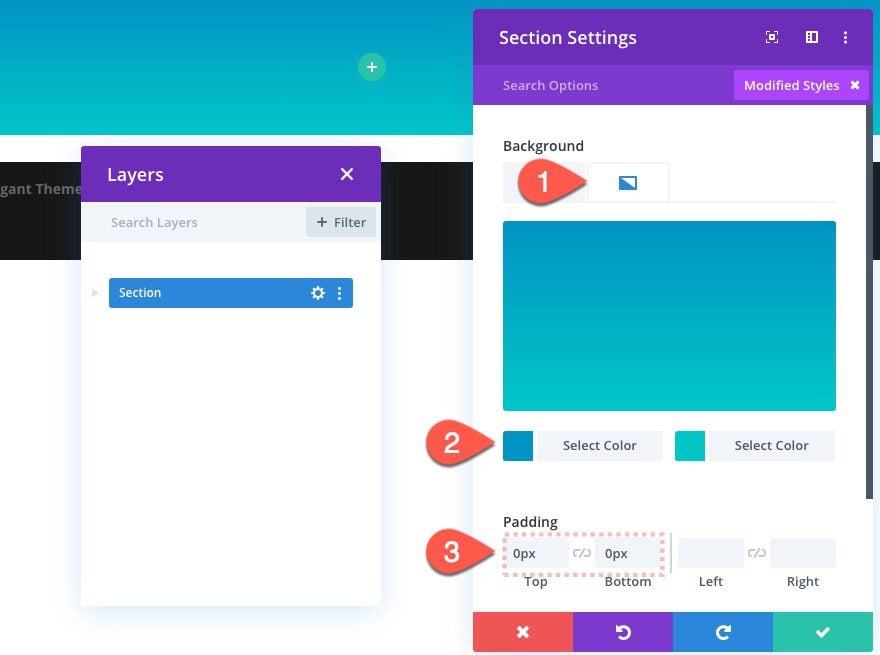
Section Background and Padding
Open the section settings, and update the background and padding as follows:
- Gradient Background Left Color:
- Gradient Background Right Color:
- Padding: 0px top, 0px bottom
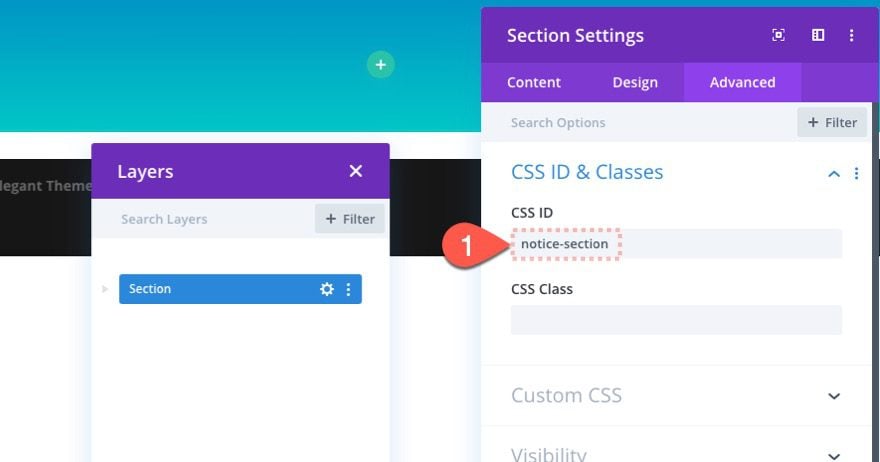
Section CSS ID
The notification box will need some custom CSS/JQuery to provide the clickable functionality to close the box/section. Add the following CSS ID to the section so that we can target it with code later.
- CSS ID: notice-section
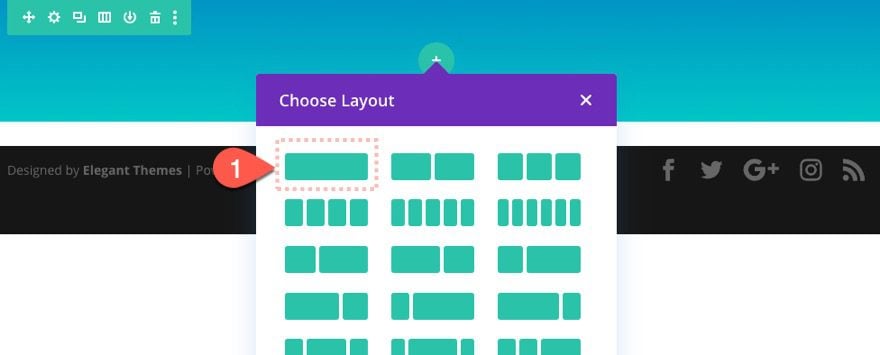
Add Row and Row Width
Add a one-column row to the section.
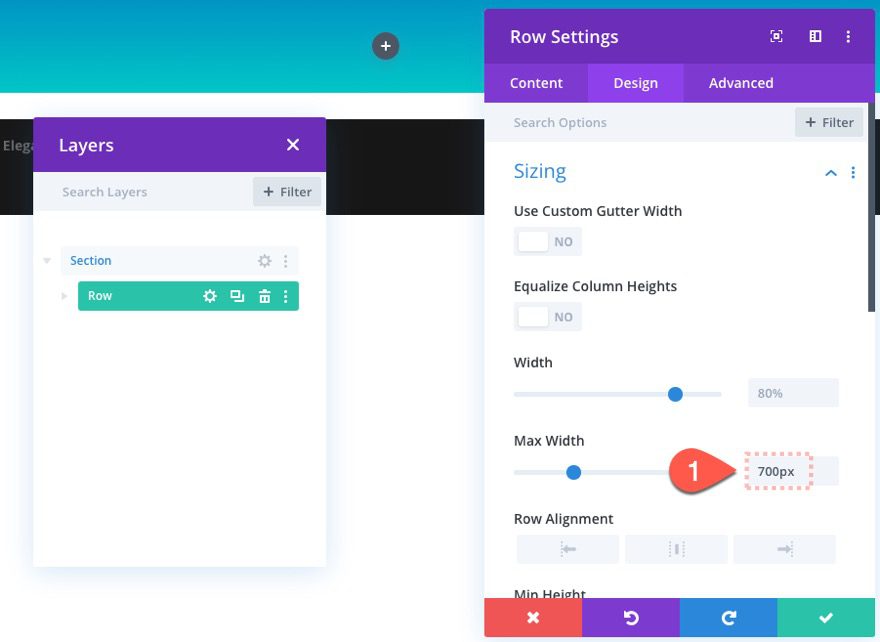
Then update the row settings with a max-width as follows:
- Max Width: 700px
Add Text Module for Notification Text
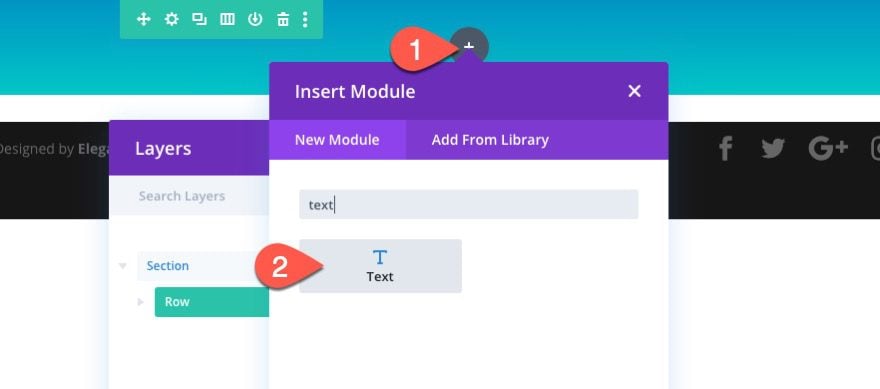
Inside the row, add a new text module. This will be where we add the text content for the notification box.
Text Content
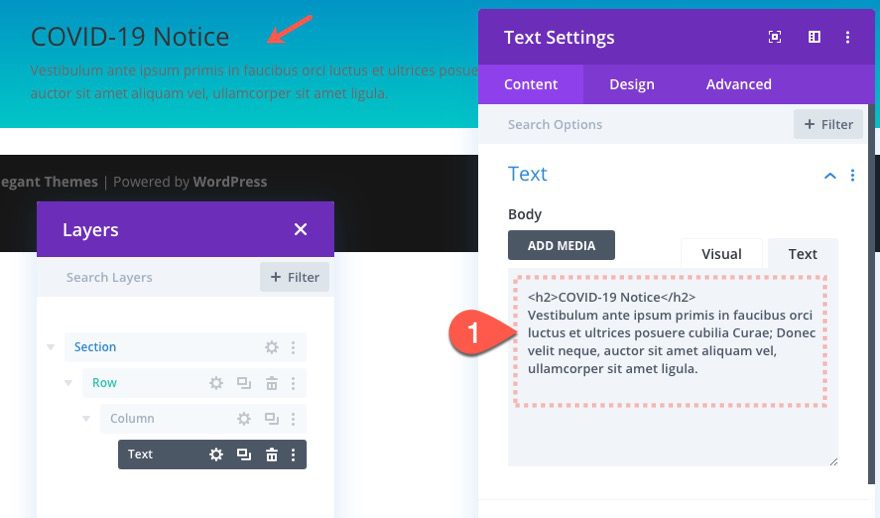
Update the body content with the text needed for the notification as follows:
<h2>COVID-19 Notice</h2>
Vestibulum ante ipsum primis in faucibus orci luctus et ultrices posuere cubilia Curae; Donec velit neque, auctor sit amet aliquam vel, ullamcorper sit amet ligula.
Text Design
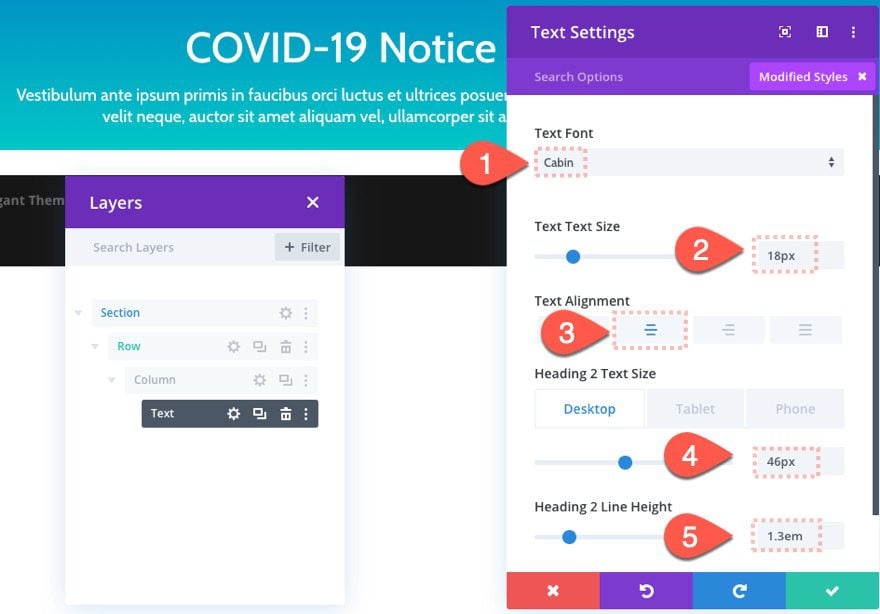
Under the design tab, update the text style as follows:
- Text Font: Cabin
- Text Text Size: 18px
- Text Alignment: center
- Heading 2 Text Size: 46px (desktop), 38px (tablet), 28px (phone)
- Heading 2 Line Height: 1.3em
Add Two Column Row
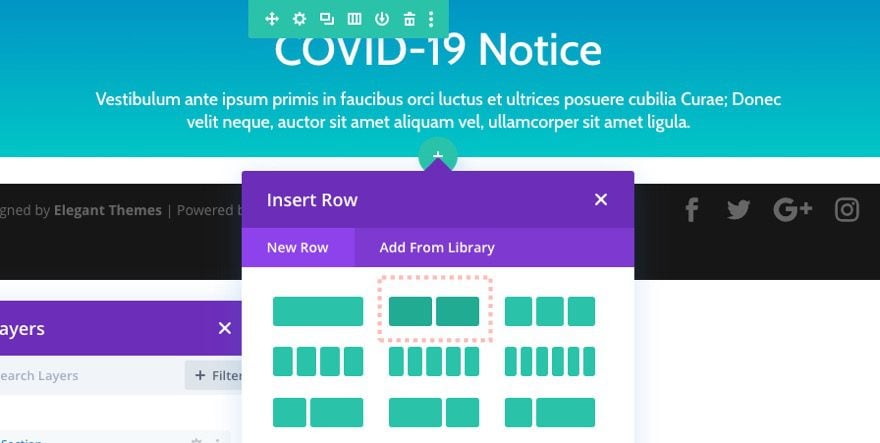
Under the row with the text module, add a new two-column (1/2 – 1/2) row.
Row Width
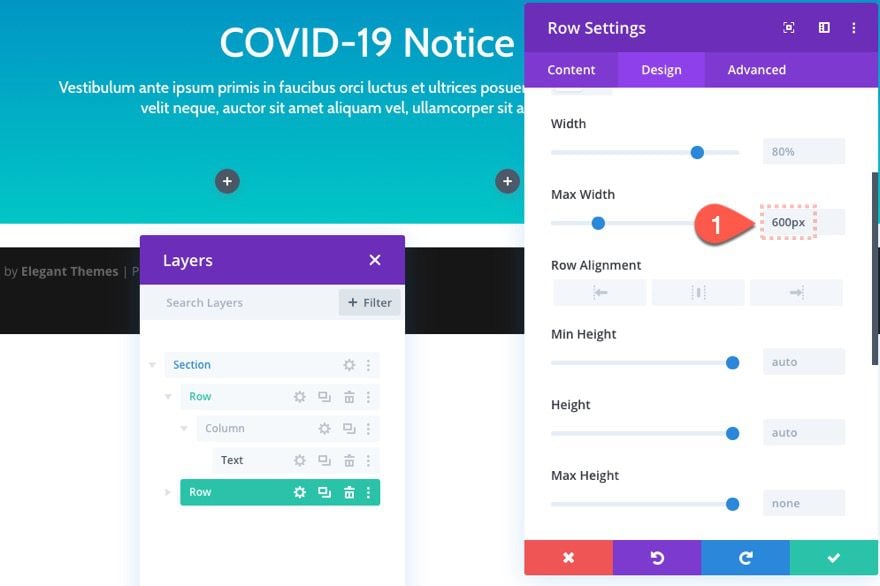
Update the row with the following max-width:
- Max Width: 600px
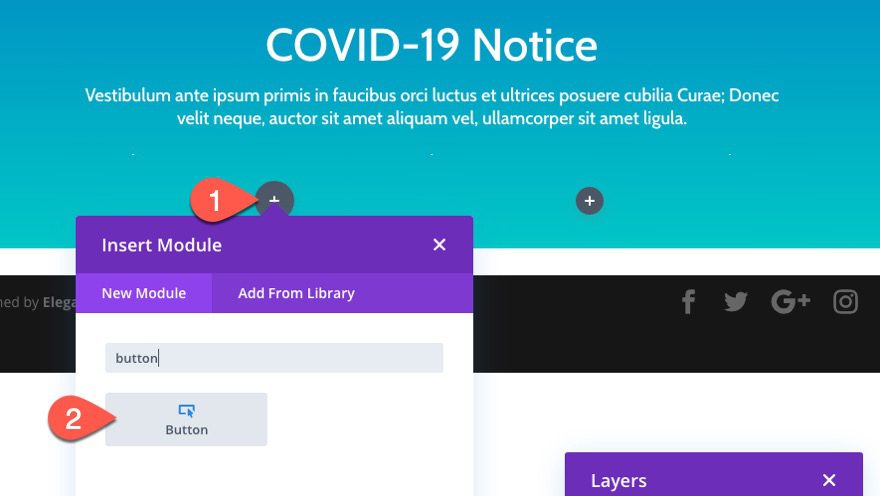
This notification box will have a “Learn More” CTA Button on the left that can be used to redirect a user to another page with more info.
To create the button, add a new button module to column 1.
Button Content
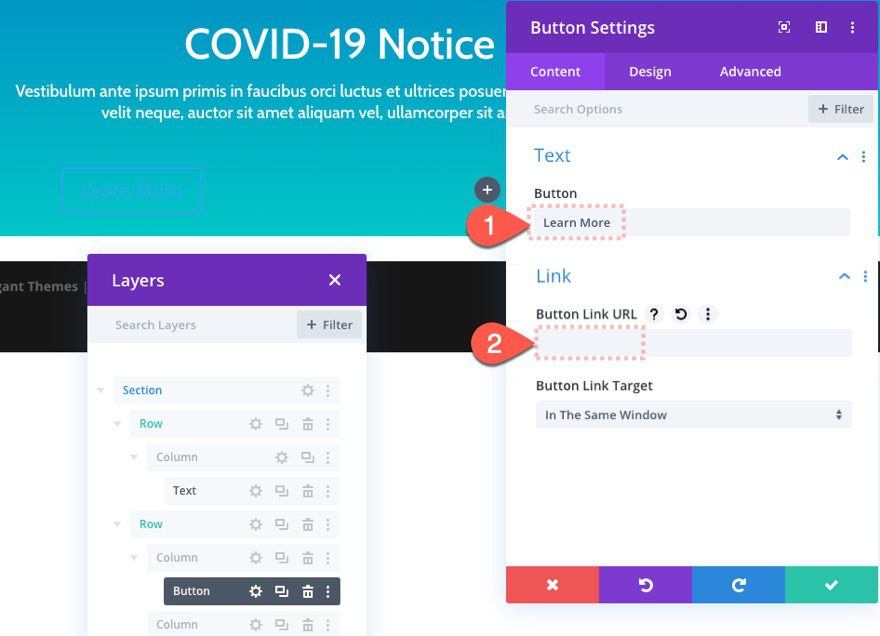
Update the button text with “Learn More” and add the button link URL to redirect users to another page for more info.
Button Design
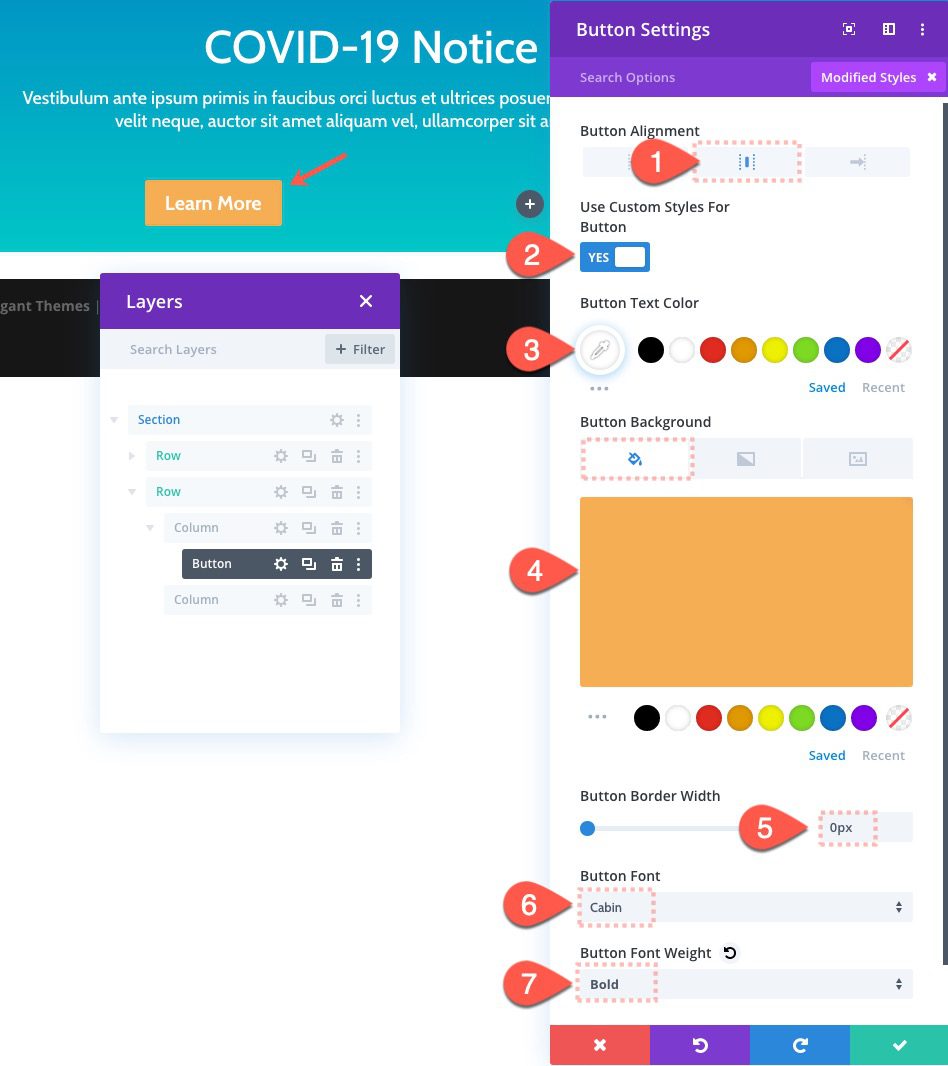
Update the following design options:
- Button Alignment: center
- Use Custom Styles For Button: YES
- Button Text Color: #ffffff
- Button Background Color: #f6ae55
- Button Border Width: 0px
- Button Font: Cabin
- Button Font Weight: Bold
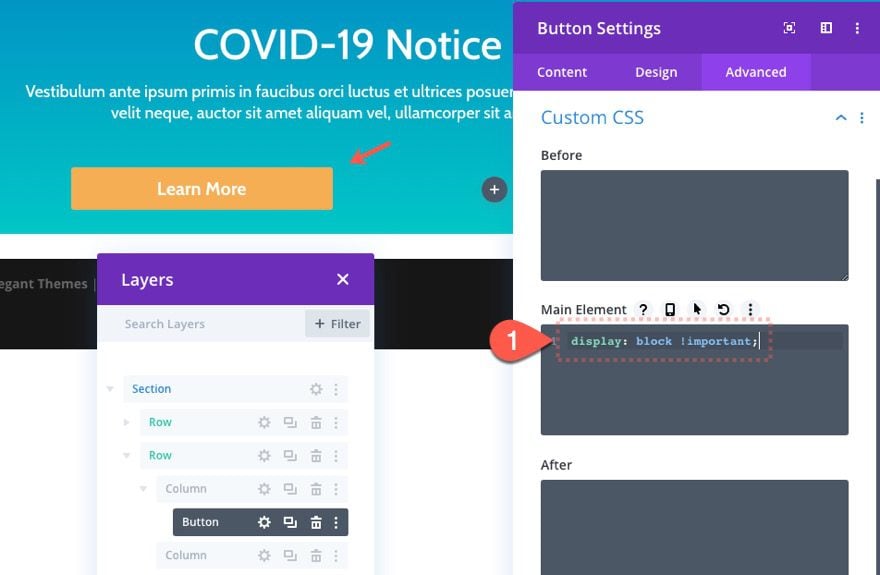
In order to have the button span the full width of the column, add the following custom CSS to the main element:
display: block !important;
In the right column of this notification box, we will have a “Got it!” button that collapses/closes the notification box out of view. For this button, we will keep most of the design of the previous button with the exception of the background and text color. We will also need to give this button a CSS ID to target it with code later.
Copy and Paste Button to Right Column
To jumpstart the design of the button, copy the button in column 1 and paste it into column 2.
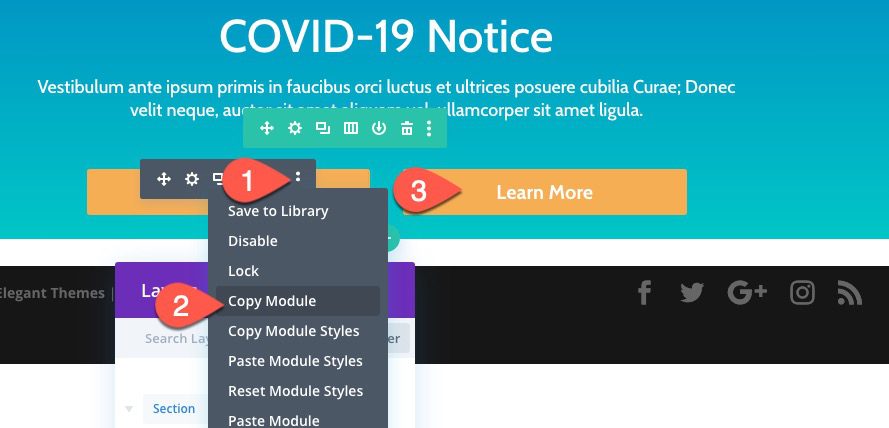
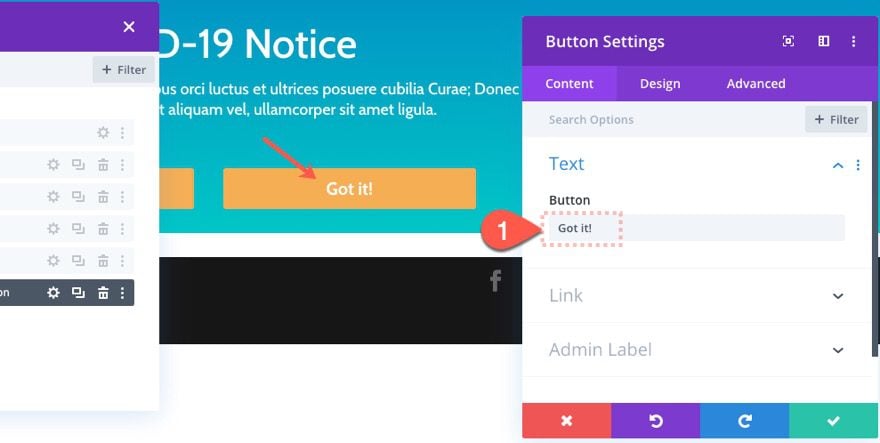
Content
Update the button text.
- Button Text: Got it!
Design
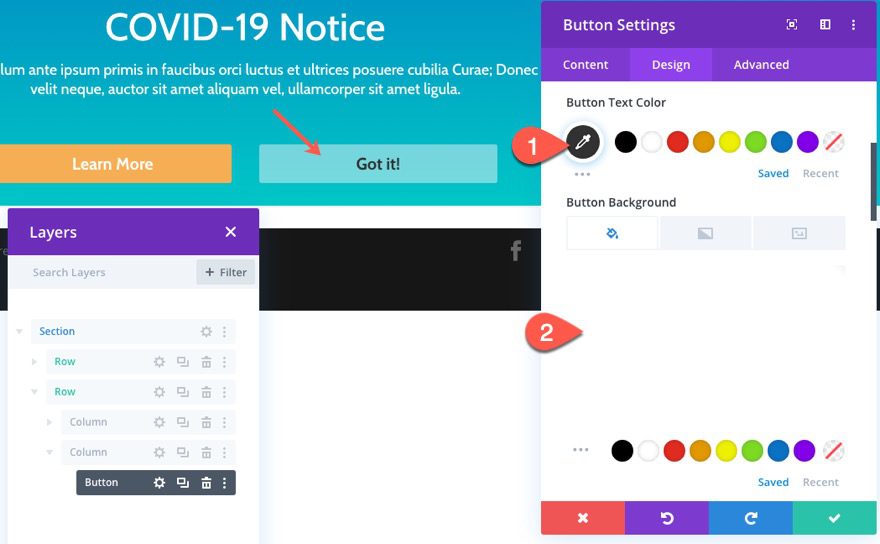
Then update the button text color and background color as follows:
- Button text Color: #121212
- Button Background Color: rgba(255,255,255,0.4)
Button CSS Class
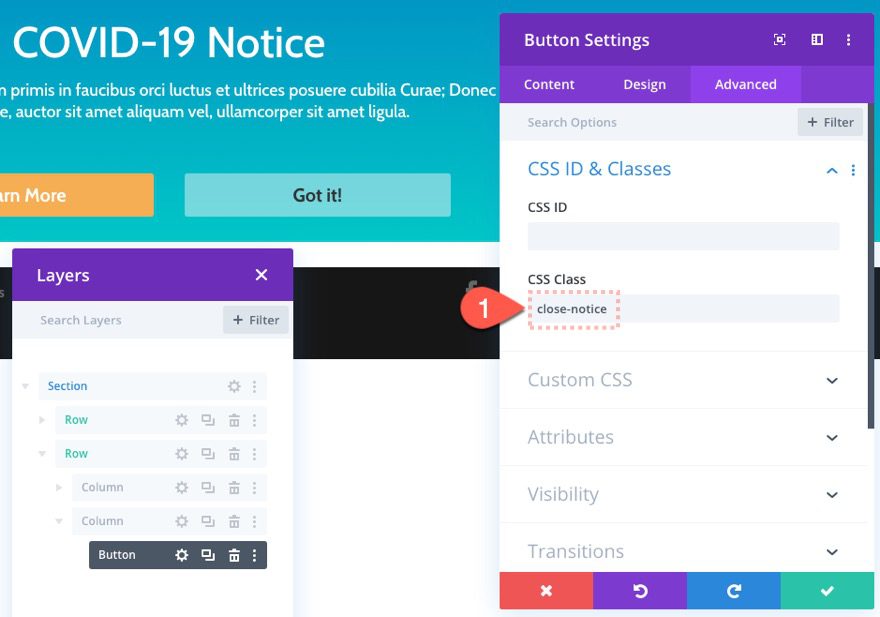
For this button, add the following CSS Class to target the button later with code needed to collapse/close the notification box.
- CSS Class: close-notice
Creating the Notification Box Close Icon (“x”).
Add Row
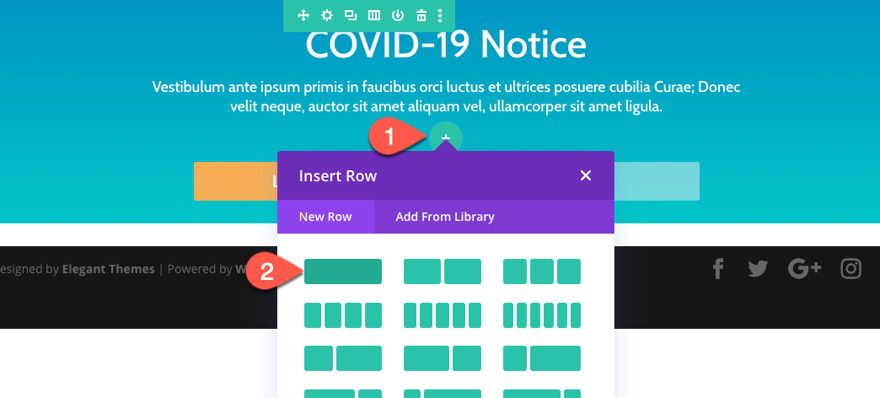
In order to create the close icon at the top right of the notification box, a new one-column row.
Row Settings
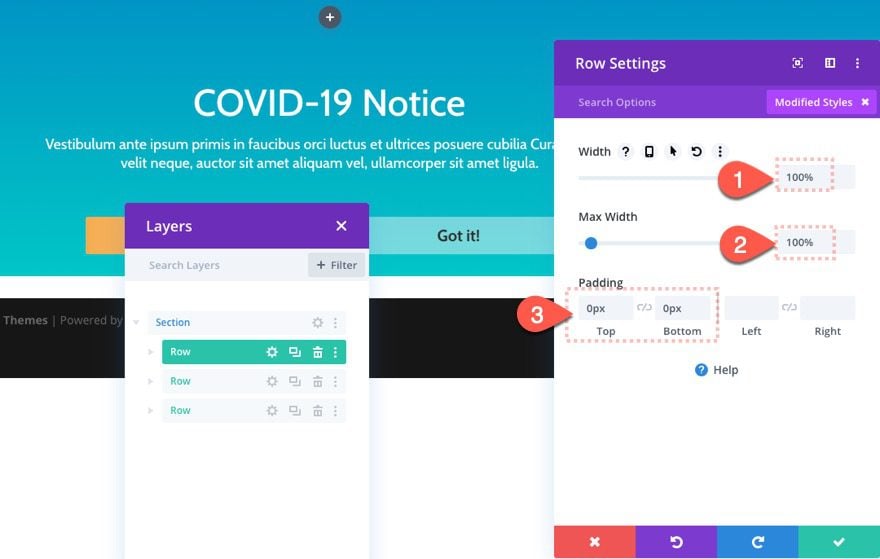
Then update the row width and padding as follows:
- Width: 100%
- Max Width: 100%
- Padding: 0px top, 0px bottom
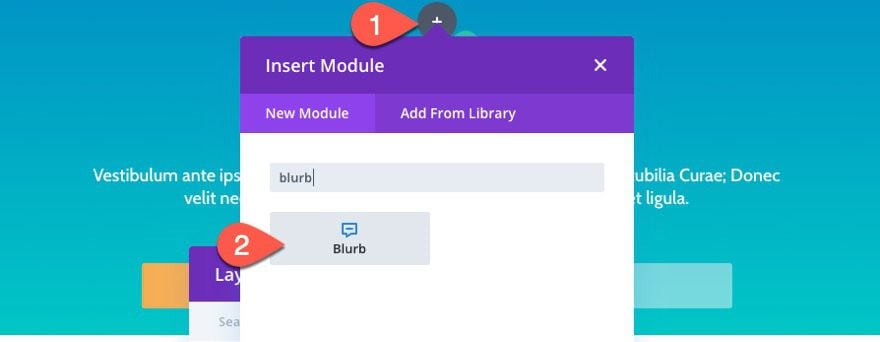
Add Blurb Module/Icon
Inside the row, add a new blurb module.
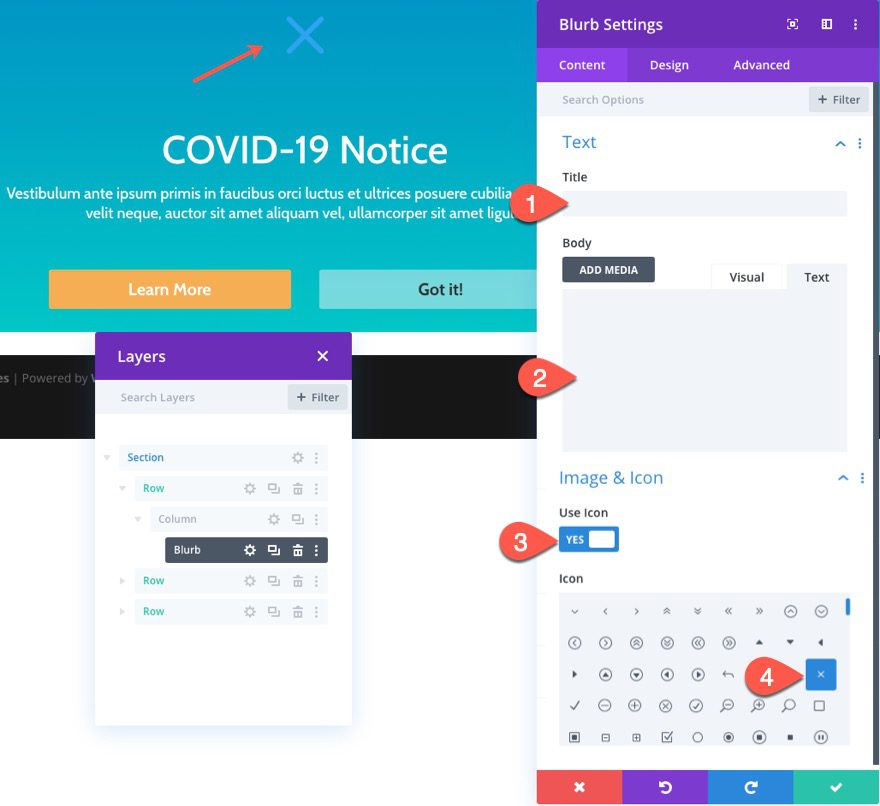
Content
Then delete the mock content in the Title and Body select to use the “x” icon for the blurb.
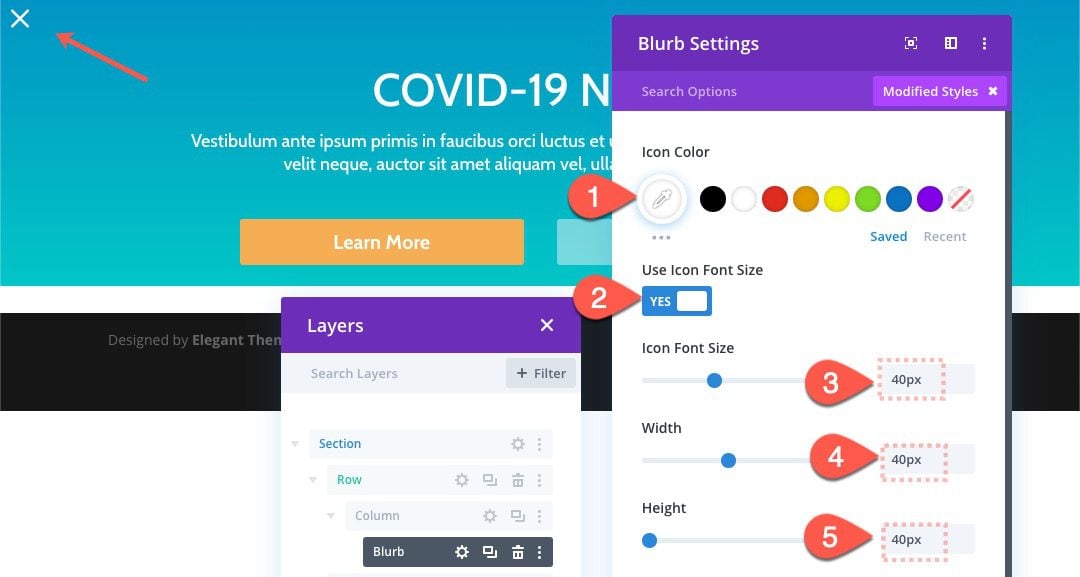
Blurb Settings for Close Icon
Under the design tab, update the following:
- Icon Color: #ffffff
- Use Icon Font Size: YES
- Icon Font Size: 40px
- Width: 40px
- Height: 40px
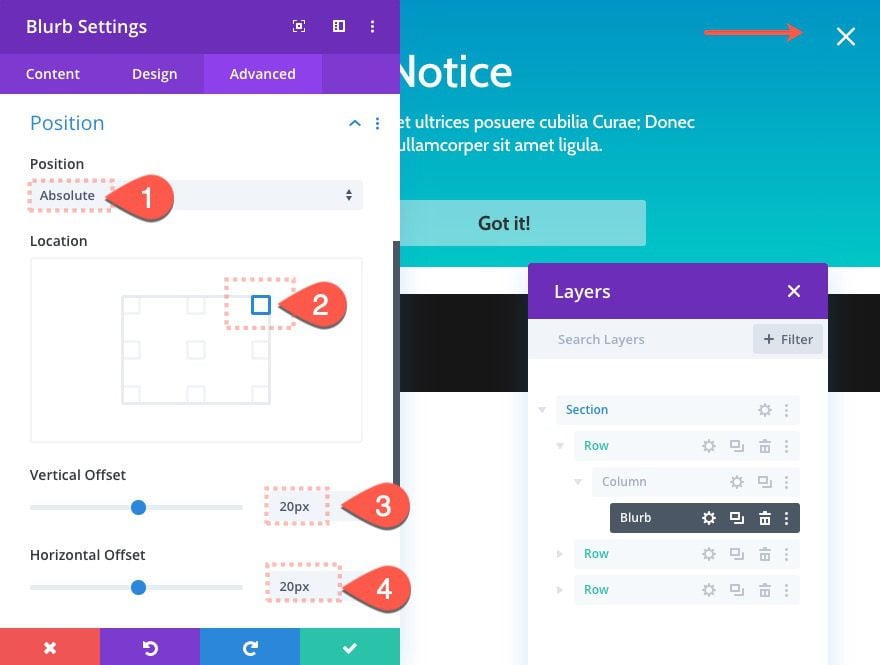
Icon Position
To position the icon at the top right of the box, open the Advanced tab, and update the following:
- Position: Absolute
- Location: top right
- Vertical Offset: 20px
- Horizontal Offset: 20px
Blurb/Icon CSS Class
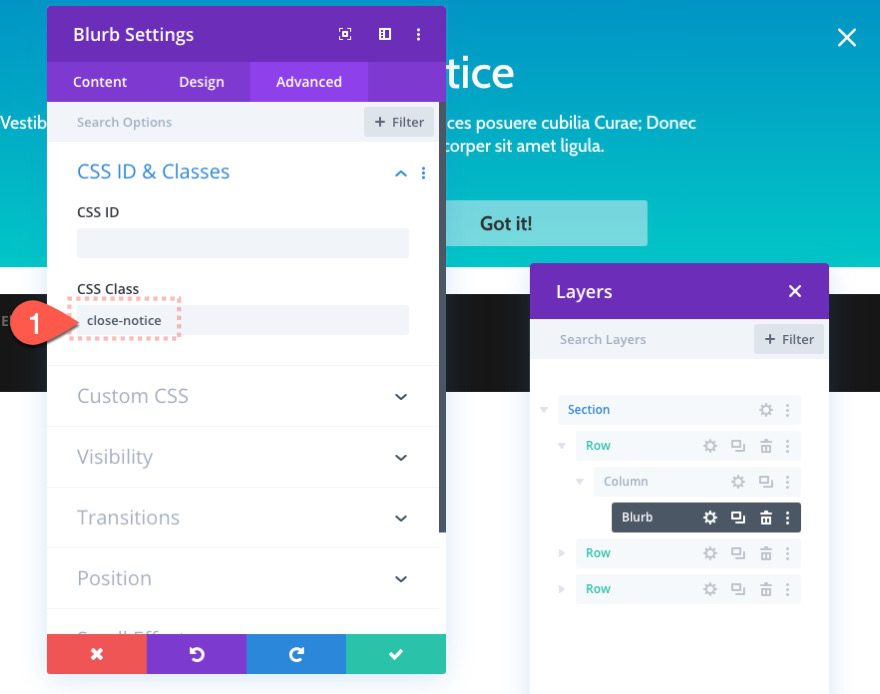
Now add the same CSS Class to the blurb that you did for the “Got it!” Close button (both will be used to close the notification box).
- CSS Class: close-notice
Add Custom Code
For this notification box, we are going to add custom CSS/Javascript to do the following:
- Close the notification box when clicking either the close button or close icon.
- Close the notification box by sliding the box (and page content below it) upward out of view (a common trend with these kinds of boxes).
- Record the event in the user’s browser so that the popup doesn’t keep showing during the session after closing it.
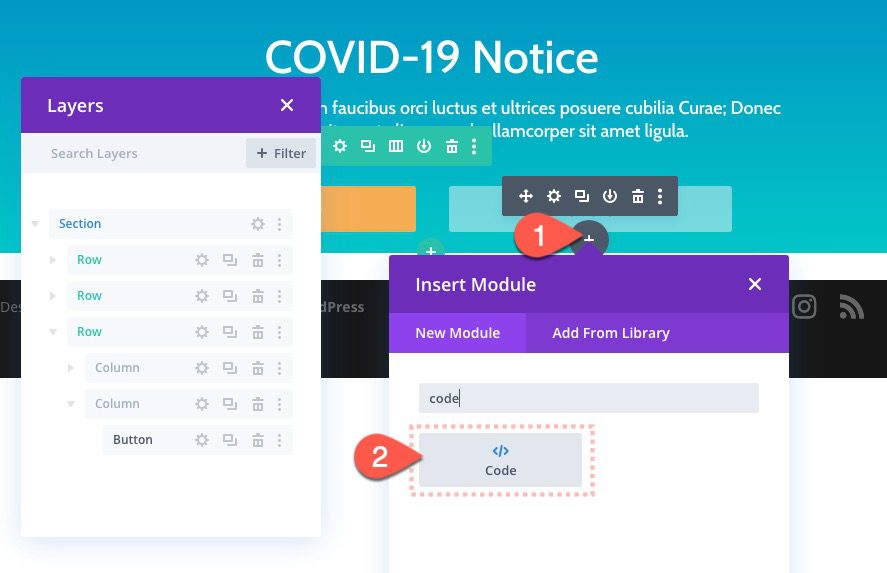
To add the functionality, we are going to add the code to a code module. Go ahead and add a new code module under the close button module (or anywhere on the page really).
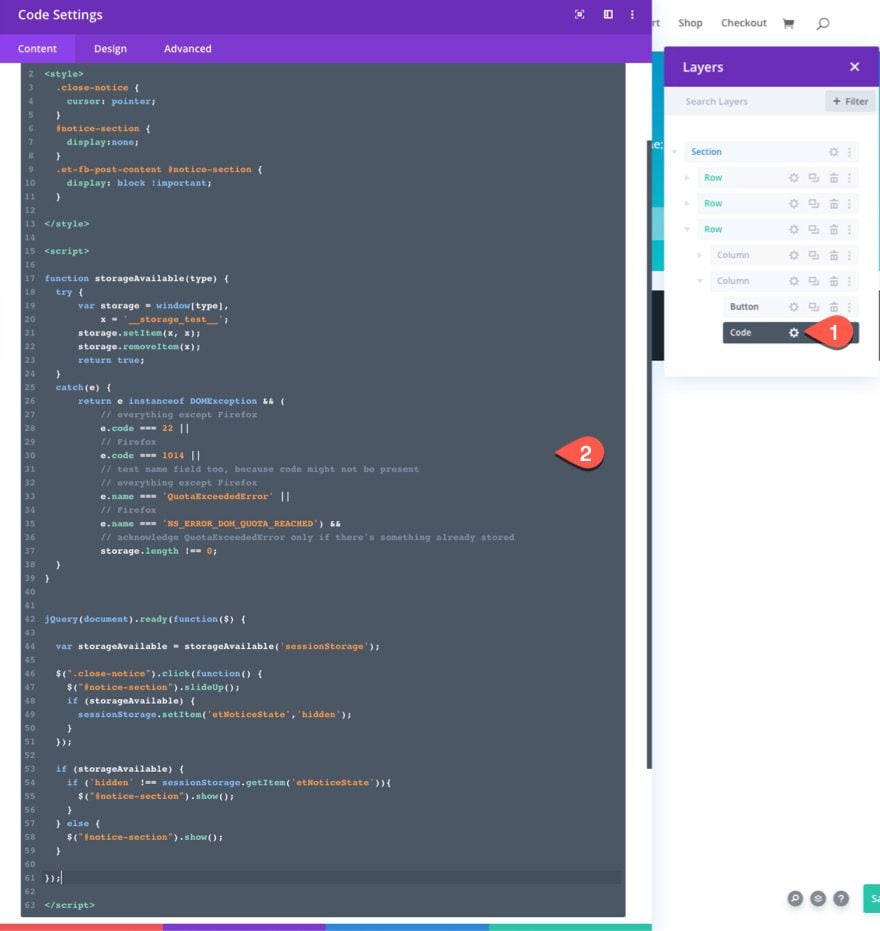
Then paste the following code into the code module content area:
<style>
  .close-notice {
    cursor: pointer;
  }
  #notice-section {
    display:none;
  }
  .et-fb-post-content #notice-section {
    display: block !important;
  }
</style>
<script>
function storageAvailable(type) {
  try {
      var storage = window[type],
          x = '__storage_test__';
      storage.setItem(x, x);
      storage.removeItem(x);
      return true;
  }
  catch(e) {
      return e instanceof DOMException && (
          // everything except Firefox
          e.code === 22 ||
          // Firefox
          e.code === 1014 ||
          // test name field too, because code might not be present
          // everything except Firefox
          e.name === 'QuotaExceededError' ||
          // Firefox
          e.name === 'NS_ERROR_DOM_QUOTA_REACHED') &&
          // acknowledge QuotaExceededError only if there's something already stored
          storage.length !== 0;
  }
}
jQuery(document).ready(function($) {
  var storageAvailable = window.storageAvailable('sessionStorage');
  $(".close-notice").click(function() {
    $("#notice-section").slideUp();
    if (storageAvailable) {
      sessionStorage.setItem('etNoticeState','hidden');
    }
  });
  if (storageAvailable) {
    if ('hidden' !== sessionStorage.getItem('etNoticeState')){
      $("#notice-section").show();
    }
  } else {
    $("#notice-section").show();
  }
});
</script>
About the Code
In the style tags, you will notice that we are actually hiding the notification box/section initially with this…
#notice-section {display:none;}
That way we can check to make sure the browser has the storage we need to record the item.
That same snippet will also hide the section in the Divi Builder (on the front end). To override that, we added another snippet to show the section in the Divi Builder so you can make edits visually.
.et-fb-post-content #notice-section {display:none;}
The JS function “storageAvailable(type)” checks the browser for storage.
The jQuery snippet does everything else needed…
- Closes the section (#notice-section) when clicking the button and icon with the class “close-notice”.
- If the browser has session storage available, clicking either button to close the box hides the box during the rest of the user’s browser session which lasts as long as the browser is open.
Once done, make sure to save the Section Layout.
Adding the Notification Box (section layout) to a Page
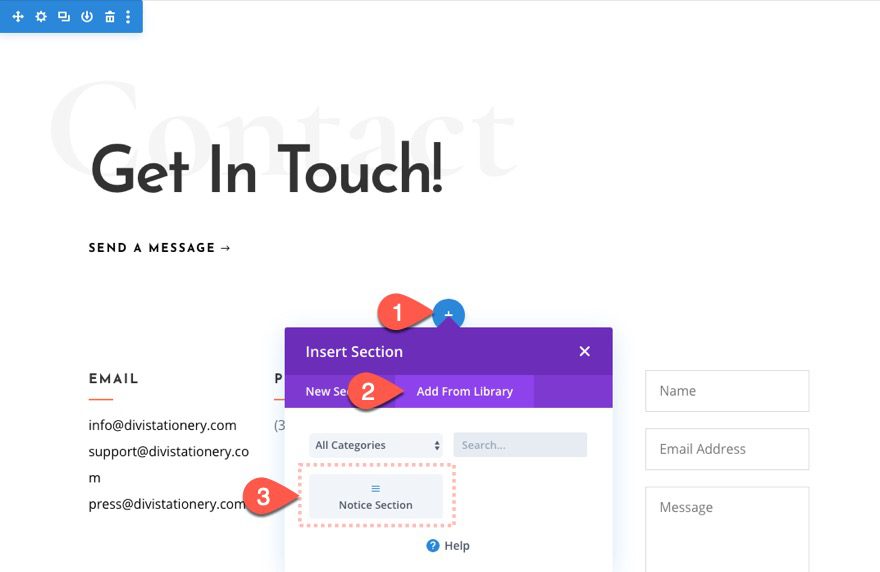
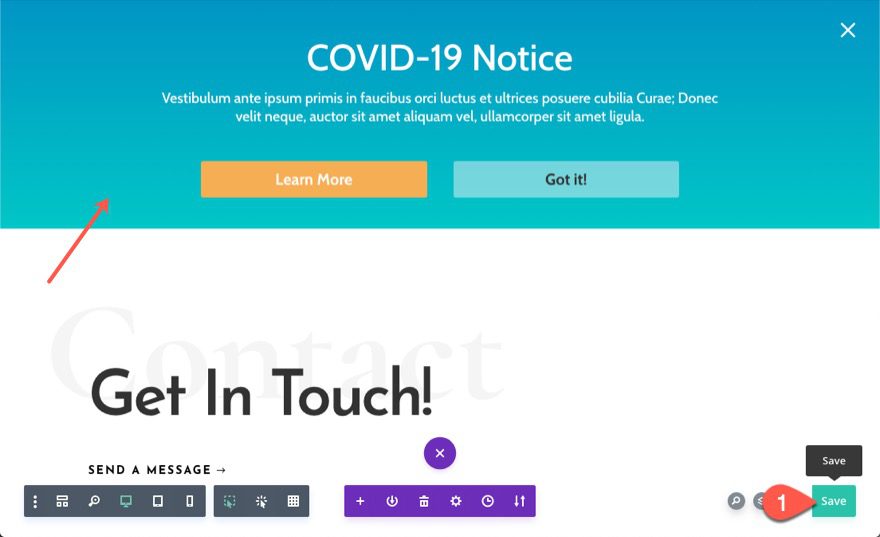
To add the notification box section layout to a page using the Divi Builder, open a page in the Divi Builder and click the blue icon to add a new section to the page.
Open the Add From Library tab and select the notification box section layout from the list. We named it “Notice Section” for this example.
Make sure to place the section a the top of the page (or anywhere else you might want) and save the page.
Adding the Notification Box (section layout) to a Divi Theme Template
We can also add the notification box section layout to any page/post template, global header, or global footer. The process is the same as adding it to a regular Divi page.
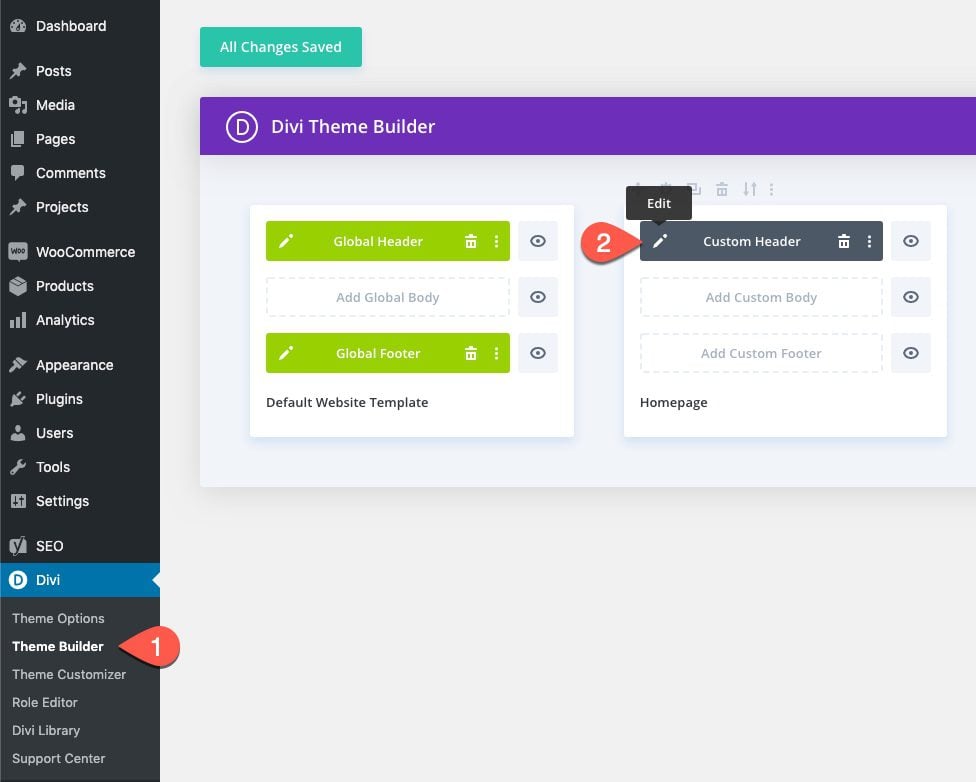
To add it to a template, open the Divi Theme Builder.
Then click to edit the template area where you want to add the notification box section layout.
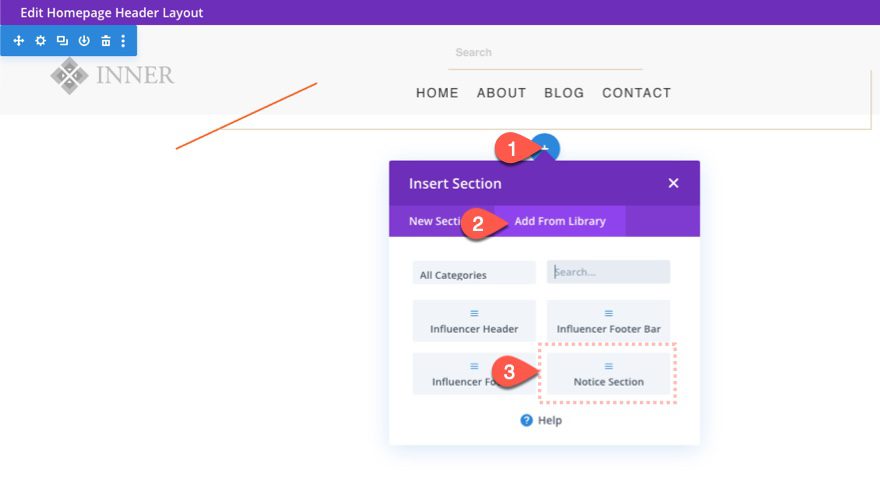
In the template layout editor, click to add a new section and select the saved section layout from the Divi library.
Save the template layout.
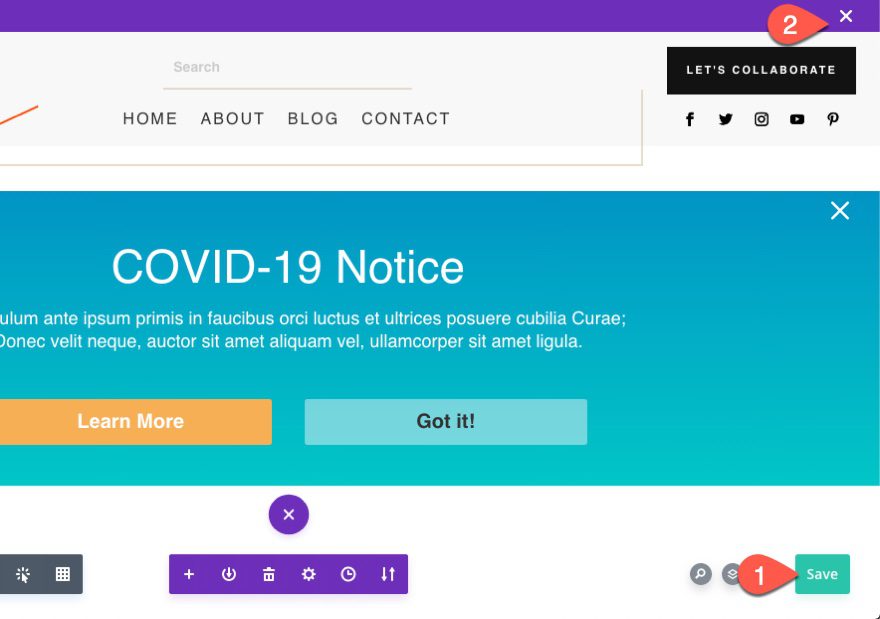
That’s it!
Final Result
Here is the final result of the notification box on a live page.


Final Thoughts
I hope this Divi Notification Box will come in handy. There really are so many wonderful uses for something like this. And even though the world is still coping with COVID-19, we look forward to many positive notifications in the near future.
I look forward to hearing from you in the comments.
Cheers!



Having issues getting the buttons to show. The text is visible on the live site, but it seems that the buttons are not. Buttons are in fact visible on the visual builder. Any insight?
Thanks! Is there a way to make the notice always appear (even after clicking “Got it”)?
Is there a way to add an action or button so the user can open this notice if accidentally closed before reading it? I’m looking to add something like this but for adding a big list of resource links.
Hi, thanks a mill for this – perhaps it’s just me but I would like this to appear everytime the page is refreshed, any ideas on making that happen would be much appreciated!
thank you , helpful article (;
You’re welcome. Glad it helped.
I have followed the step-by-step instructions of “Adding the Notification Box (section layout) to a Divi Theme Template” and I have applied to a specific page, but then the menu will disappear. What am I doing wrong?
Perhaps the answer is that it is necessary to have previously created a Global Header?
German Sanchez,
Try adding the notification box/section to the body area of a specific page template (right above a fullwidth post content section). If you have no custom header in the page template (the header space is left empty), it should show the default Divi menu like normal.
Great, this is awesome.
I can’t get this to show on my website. I can see it in the visual builder but it won’t show up otherwise.
Deep,
Try opening it in an incognito browser. You may have already clicked it so it will stay hidden during the browser session.
Unfortunately, that form is not GDPR compliant!
Could you please add to your post on how to get it GDPR compliant. Thanks!
I wasn’t aware that this would qualify as a form that needs to be GDPR compliant since there is no real personal information recorded. Only that the user clicked a button. Thanks for the heads up. I would have to look into it more. Maybe someone else can chime in on this one.
He aprendido muchas cosas con esta entrada. Gracias.
Just what i was looking for, needed to be updating my users on the pandemic
Great!
Nice! Is there a way to add it to the top of very page without editing all pages?
Logic would be to use the theme builder, but you can’t if a site doesn’t make use of the theme builder yet.
I am thinking about saving it in the library and then use the Divi options » integrations to insert it, but have no clue how to do that
Thanks
JP
+1 I can’t find a way to do this and I have a lot of pages
I don’t see why you couldn’t make use of the theme builder for a page template. You don’t have to add it to a global header. Create a new page template then edit the body area. Add a fullwidth section with a post content module to the layout (to show the page content). Then add the notification box/section to the top of the layout. Then you can assign the template to all pages. Hope that helps.
Ah good thinking. I didn’t want the builder because of the global header. Never thought about using the body with the page content module. Thanks!
Nice and clever! Thanks for the storageAvailable function example.
If Divi simply supported the default WordPress wp_body_open hook, all the the existing notification bar plugin options that are already available, but Divi does not support this WordPress core hook that was added nearly a year ago with 5.2
I really wish Divi would add wp_body_open() to the theme
great! It was all I needed … Thank you.
Hey thank you for this. You guys are just awesome. No wonder I’ve never recommended another theme to anyone in ages. /*One thing I would really appreciate is if you guys design a k-12 school layout */
Great to hear! And thanks for the suggestion on the layout. That would be a great addition.
I can’t get this to show on my website. I can see it in the visual builder but it won’t show up otherwise.
It may be that you have already clicked to close it out so it won’t show up again. Try opening it in an incognito browser.
Thanks for the help
Nice one, thanks. I just added this layout to my own website.
Awesome!