You’ve purchased Divi and are ready to build your website. The only problem is that you need to figure out where to start. Thankfully, Divi is one of the most intuitive WordPress themes available. It offers a user-friendly drag-and-drop Visual Builder that allows you to place design modules directly onto a web page on the front end to see your design emerge in real-time.
However, Divi is more than just a WordPress theme. It provides a complete website-building experience without writing a single line of code. In this post, we’ll show you how to build a Divi website and provide a step-by-step guide so you can easily follow along.
Let’s get started.
Getting Started with WordPress & Divi
Before we jump into the fun part of building your website with Divi, let’s ensure that you have the essentials. In this first section of our how to build a Divi website post, we’ll concentrate on purchasing a domain name, signing up for a WordPress hosting plan, and installing and configuring the Divi theme.
Purchasing a Domain Name
Consider your domain name as your website’s address on the internet. When choosing one, make sure it’s memorable. Your domain is often the first thing people see when they come across your website. A well-chosen domain name can create a positive first impression and make your website easier to remember. Use a good domain registrar that has a good search feature so you can find the one that works best for you.
A strong domain name acts as a building block for your brand identity. It’s one of the most important steps when building a Divi website. It should be relevant to your website’s niche and target audience. For example, elegantthemes.com instantly tells visitors they can expect to find beautiful themes on our website. The more closely your domain name reflects your brand, the easier it will be for people to recognize and remember you.
Another factor to consider is search engine ranking pages (SERPs). Including relevant keywords in your domain can give you a slight search engine optimization (SEO) boost, making it easier for people to find your website while searching. Some domain name extensions are better than others for SEO, so it’s a good idea to stick to extensions like .com, .net, or .org, to name a few.
Choose a Reputable Domain Registrar
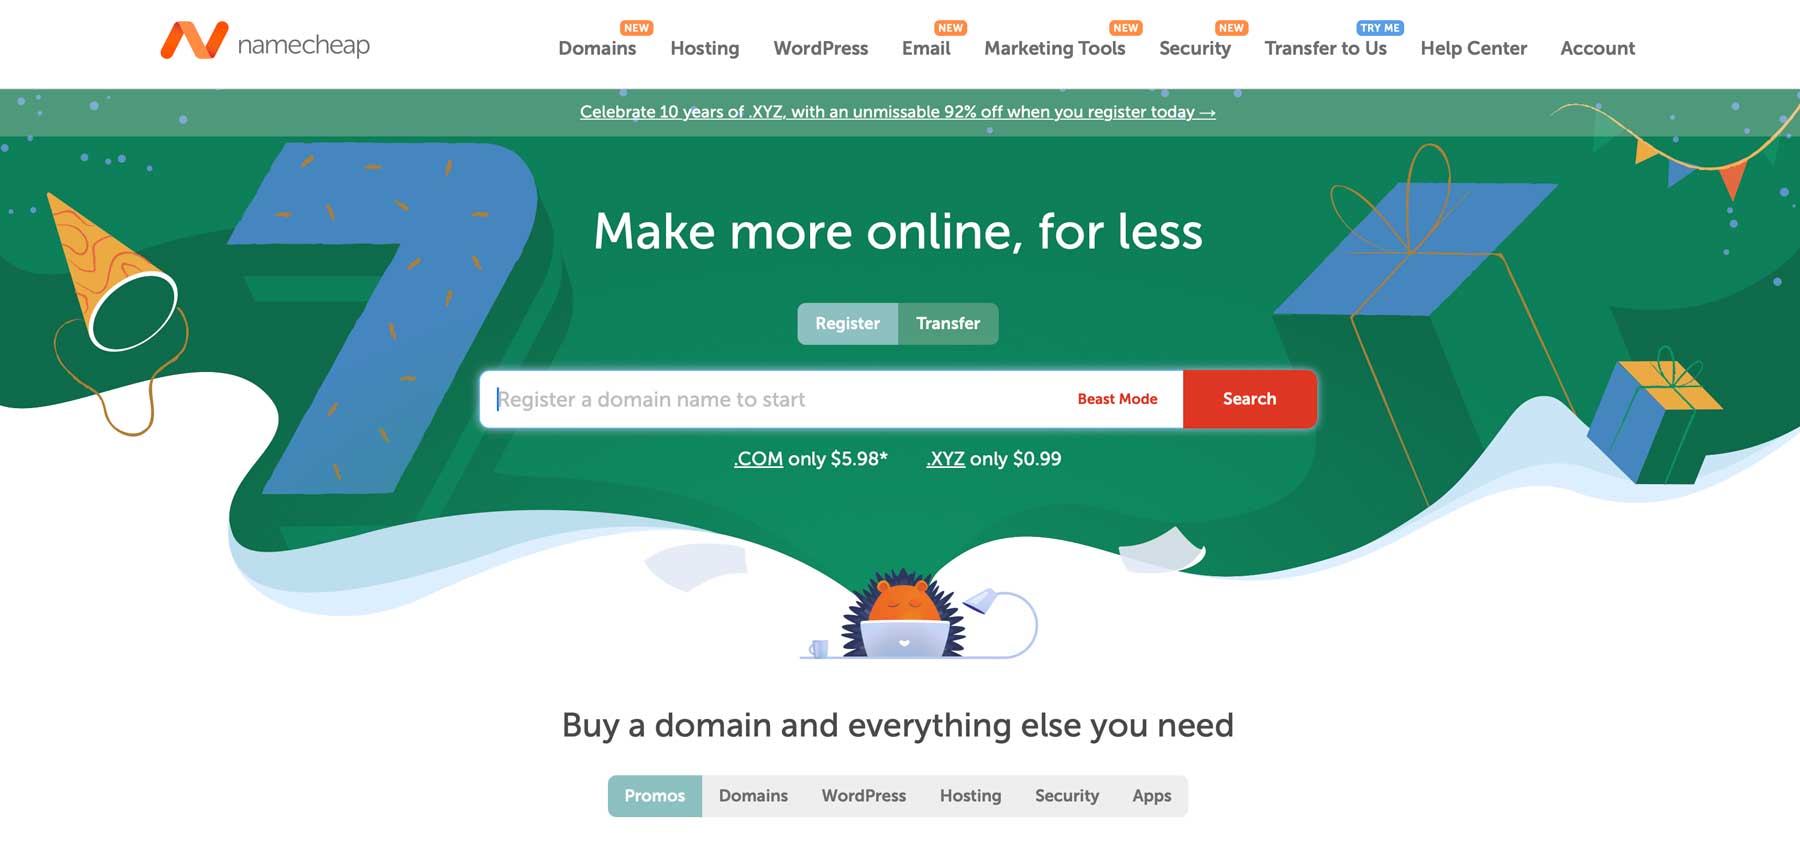
One of the best domain registrars is Namecheap. It offers a powerful domain search, so you can easily find the perfect domain for your business. It also offers very affordable pricing. For example, you can get a .com domain for the first year for $5.98. It provides a simple interface for registering your domain, FreeDNS hosting services, and PremiumDNS to ensure your website is always online. It accomplishes this by distributing DNS information across multiple edge servers, making it nearly impossible for you to be a victim of a distributed denial of service (DDoS) attack.
Signing up for a WordPress Hosting Plan
Another thing you’ll need to make a Divi website is a good hosting provider. Think of web hosting as your website’s home. It stores your website’s files and makes them accessible to visitors. There are many web hosting providers available, including Cloudways, Flywheel, Pressable, and SiteGround.
All of the hosting providers mentioned above offer hosting that’s designed for WordPress and Divi. When you opt for optimized WordPress hosting, you’re taking steps to ensure that your website is fast, secure, and well-equipped to run WordPress. These hosts are also designed to run Divi flawlessly. Of the four, SiteGround offers the most bang for your buck.
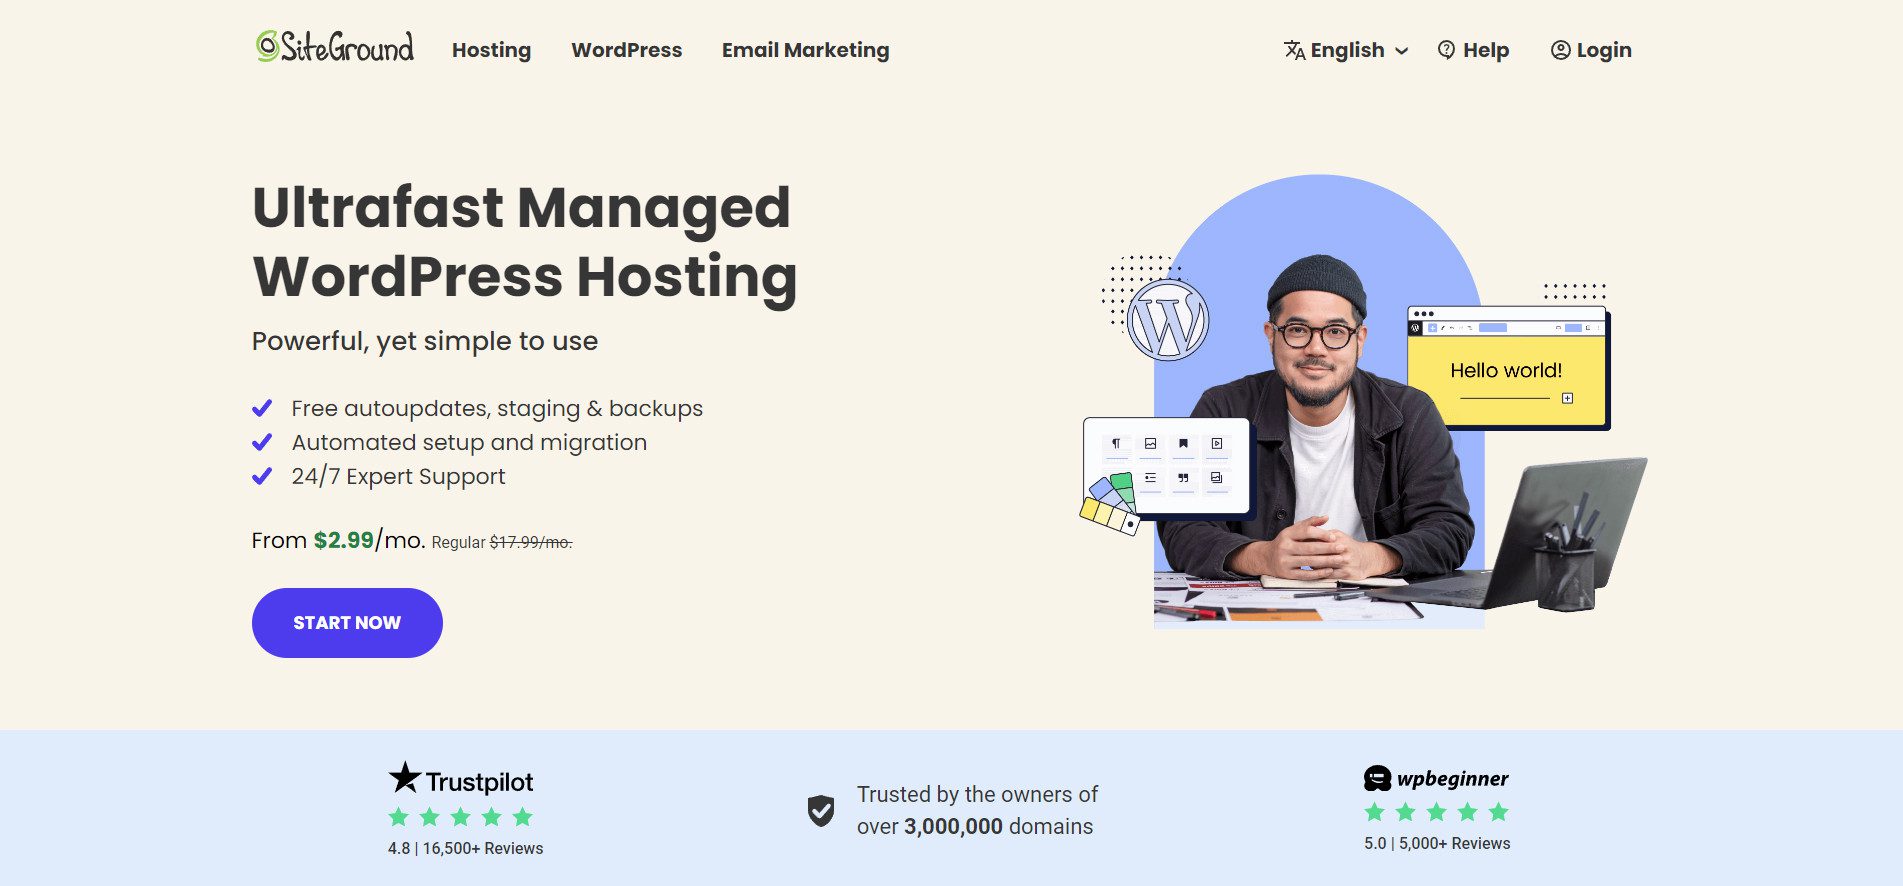
It offers a ton of freebies, including free email, site migration, an SSL certificate, one-click WordPress installs, a content delivery network (CDN), and more. Plus, their WordPress hosting plans are incredibly affordable, with prices starting at $2.99 per month. SiteGround takes website security seriously, too, with an AI-powered anti-bot system that flags and blocks millions of security threats daily. There’s also a powerful web application firewall (WAF) that ensures your site is protected against hackers, brute force attacks, and malware.
Installing WordPress
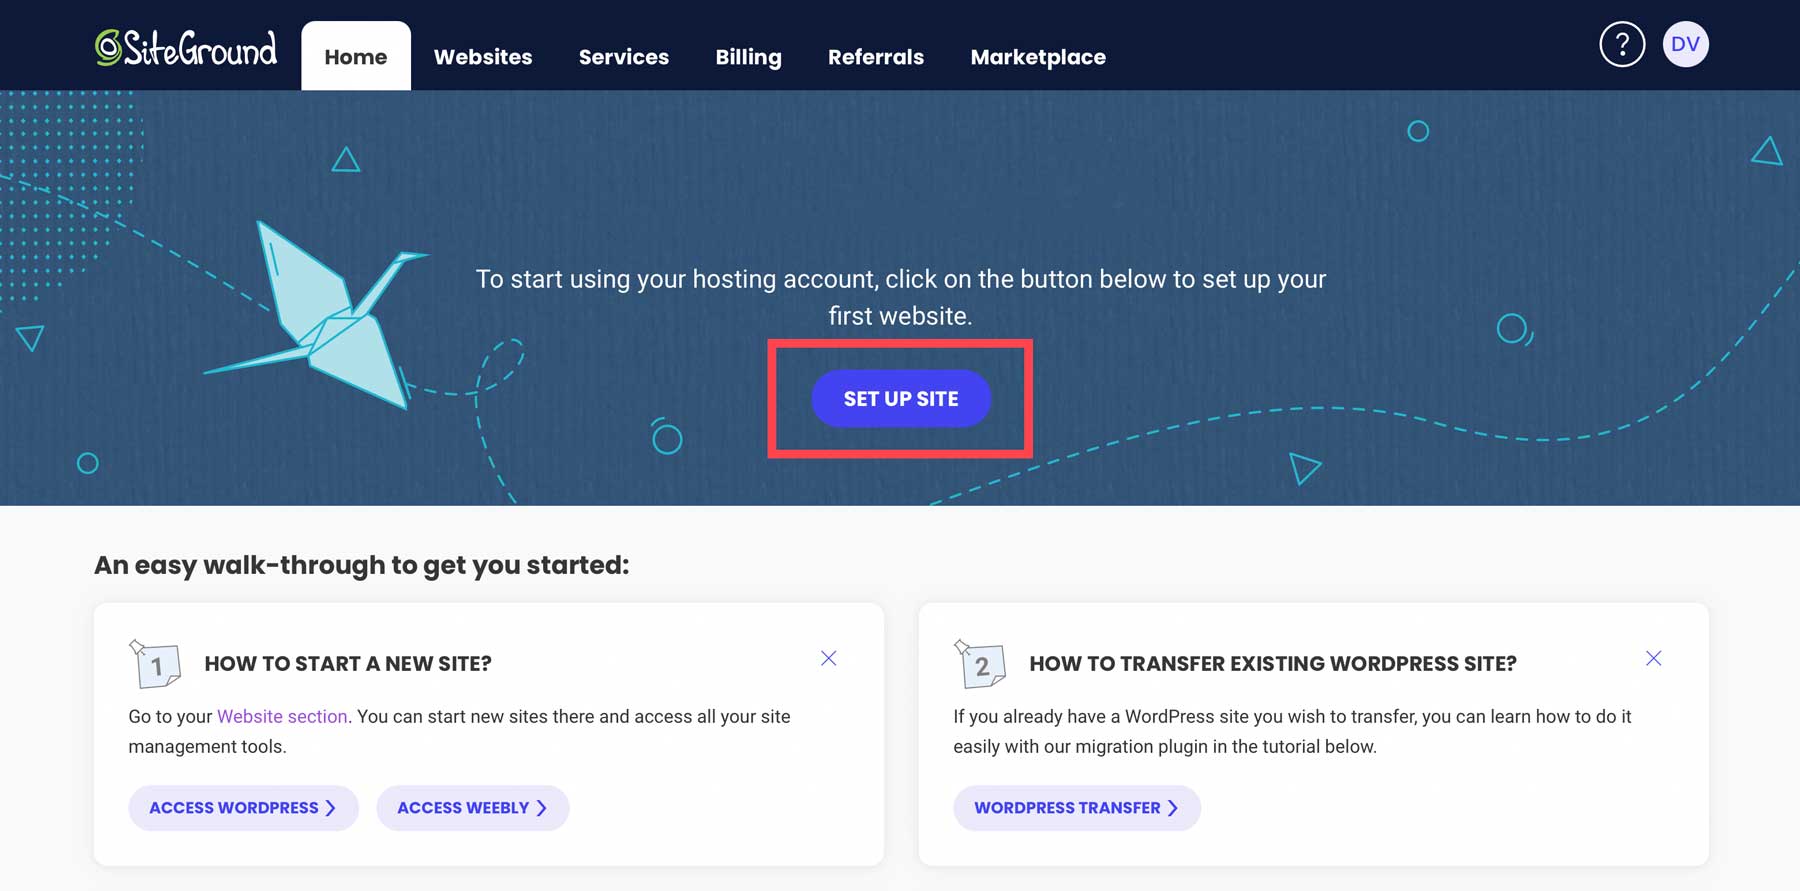
There are several ways to install WordPress, including manually. Thankfully, the process is incredibly easy with a hosting provider like SiteGround. After signing up for a SiteGround hosting plan, SiteGround walks you through the simple steps of installing WordPress. Start by logging in to your SiteGround account. Upon login, you’ll be redirected to the Site Tools dashboard. Click the Set Up Site button to begin.
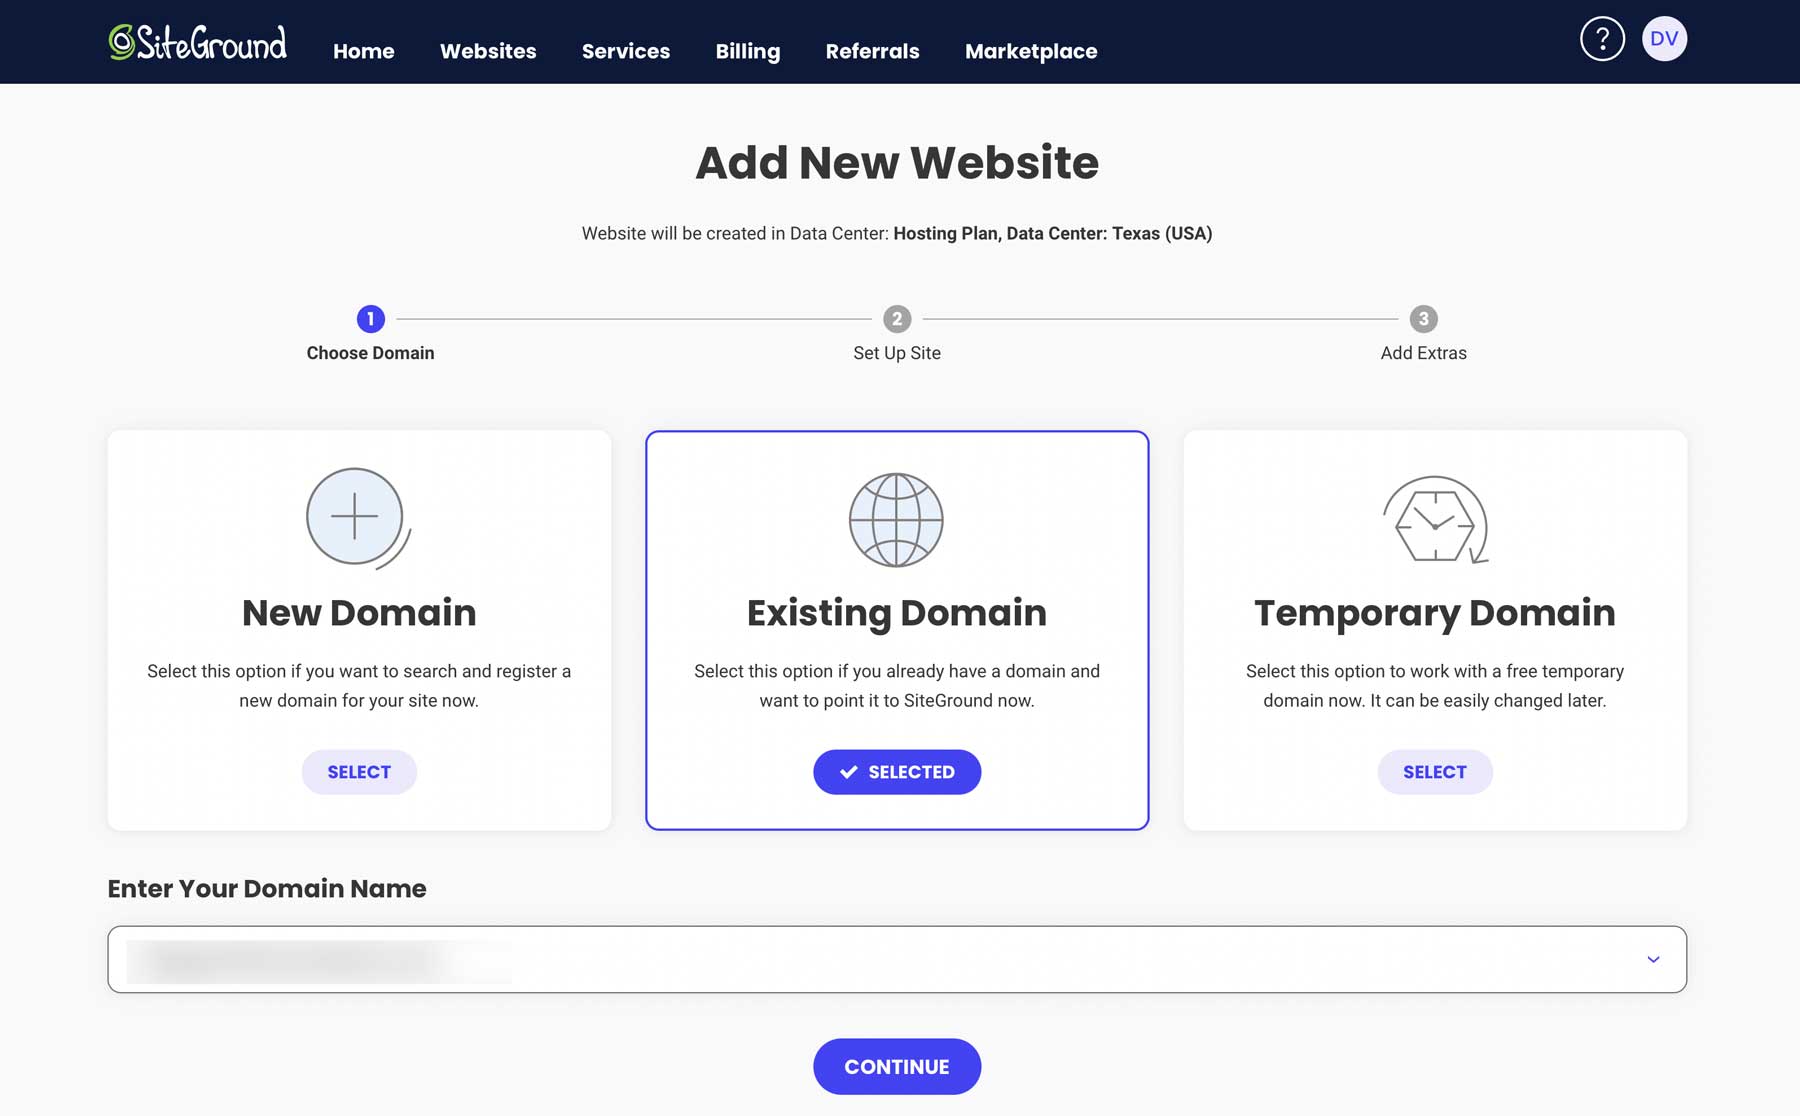
Choose from a new, existing, or temporary domain on the next screen. We’ll assume you purchased a domain from Namecheap in the previous step, so select existing domain. Enter your domain name in the field and click continue.
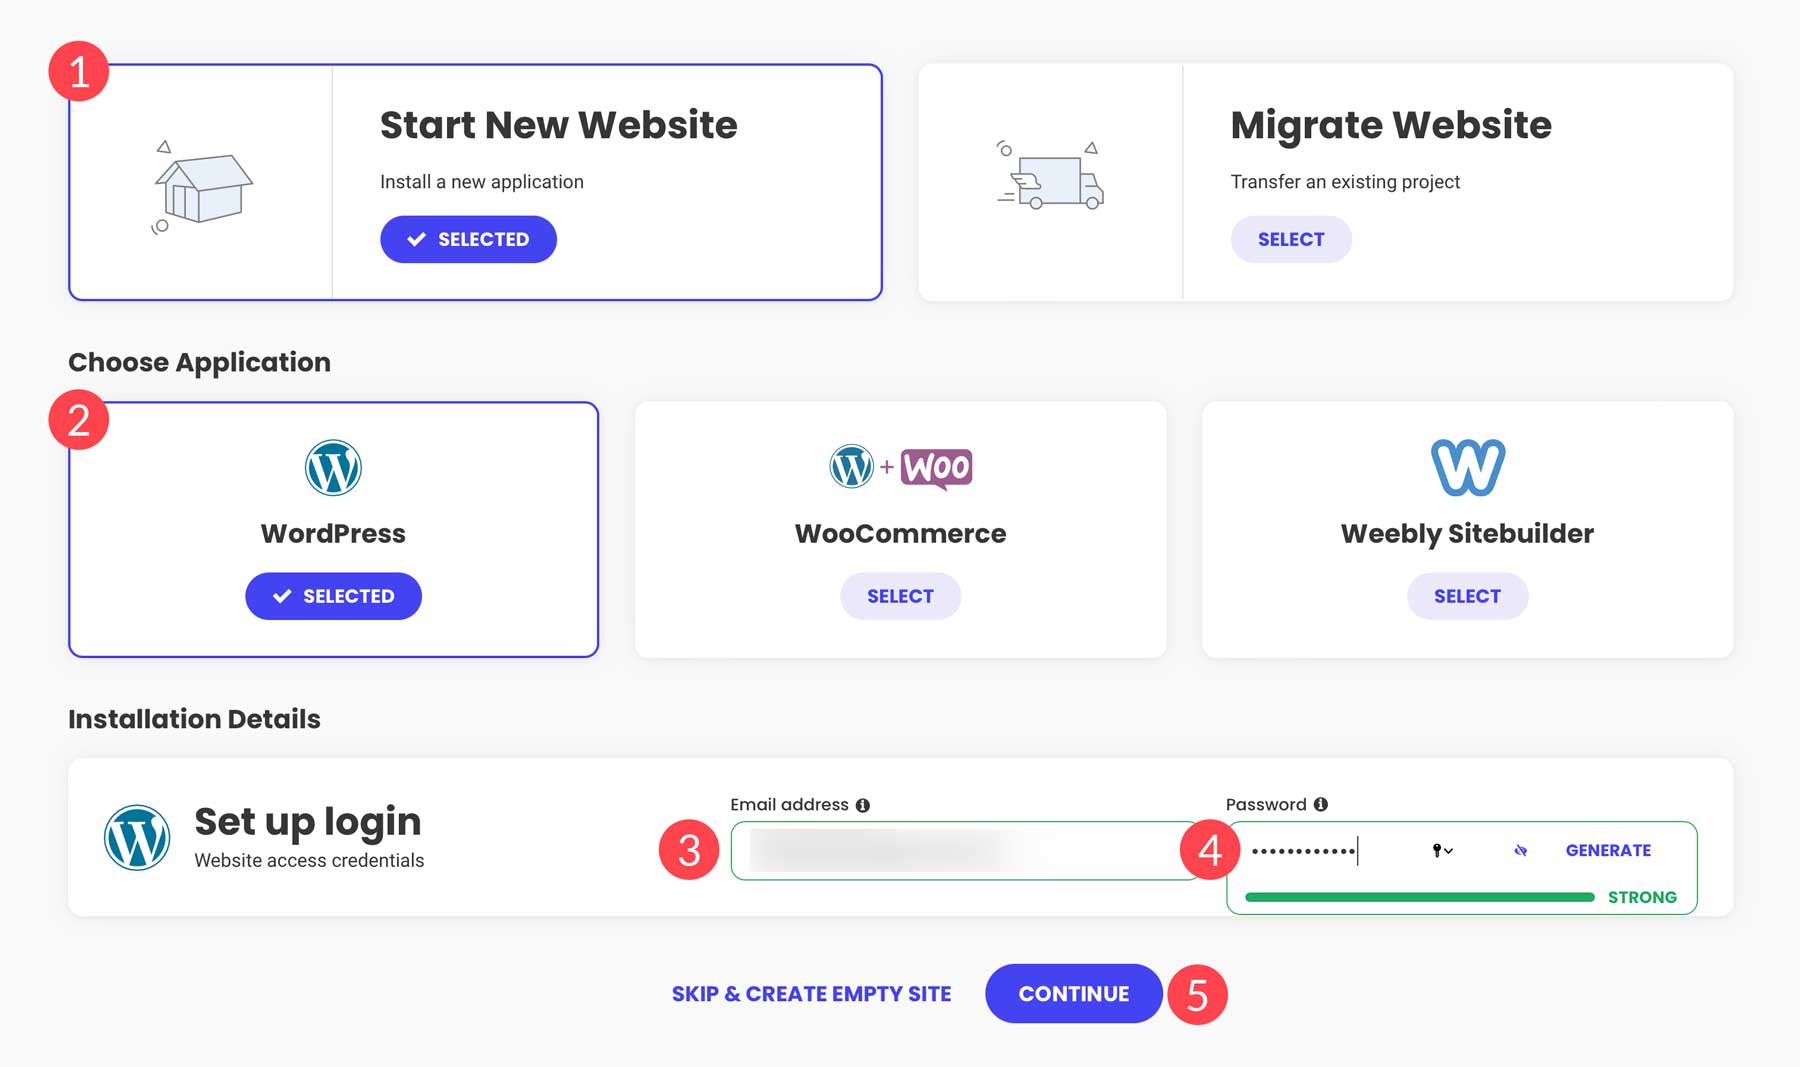
Next, select Start New Website, choose WordPress for the application, add an email address and password (this is what you’ll use to log in to WordPress), and click Continue.
Over the next few minutes, SiteGround will set up your server space, install WordPress, and configure it for speed and performance. SiteGround uses a proprietary speed optimization plugin, Speed Optimizer, which controls caching, image optimization, and more.
Installing the Divi WordPress Theme
With WordPress installed, it’s time to install Divi. For this post, we’ll assume you’ve taken the steps to purchase an Elegant Themes subscription. So, for this section, we’ll concentrate on installing Divi and generating and installing an API Key.
Start by navigating to your WordPress dashboard. There are two ways to access your WordPress dashboard: through SiteGround’s Site Tools dashboard or directly in your browser by typing in www.yoursitename.com/wp-admin (replace yoursitename with your domain).
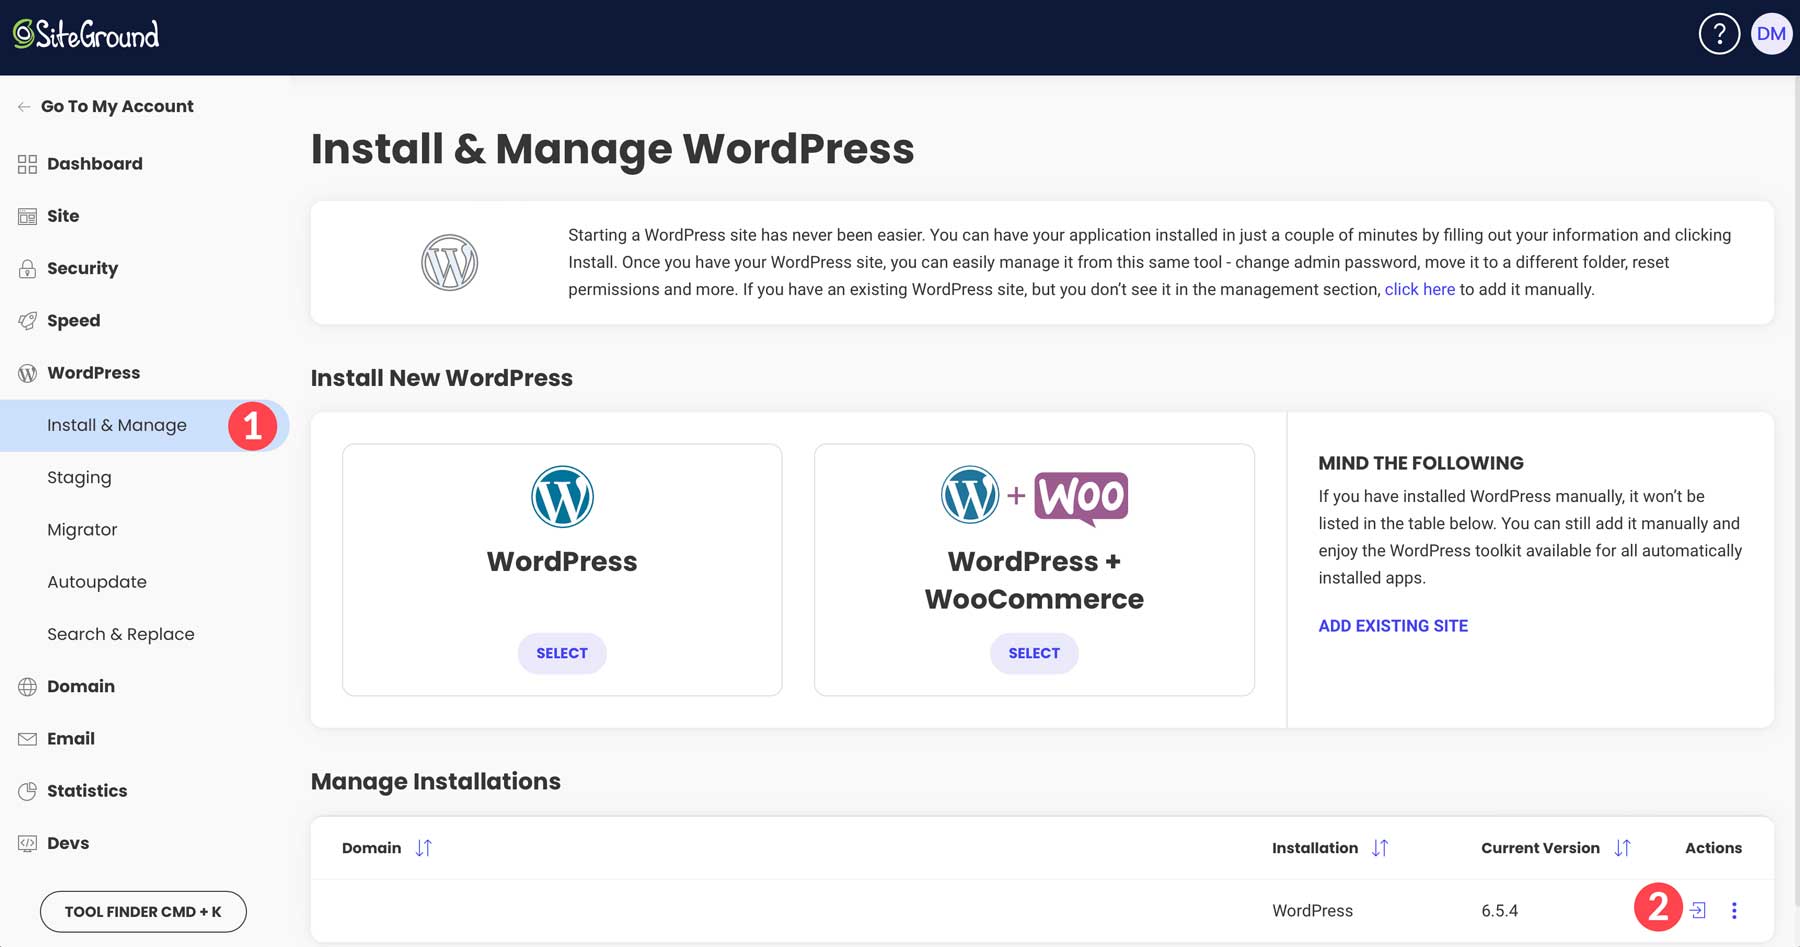
Once logged in, navigate to Appearance & Themes. Click Add New Theme.

Next, click the Upload Theme tab.
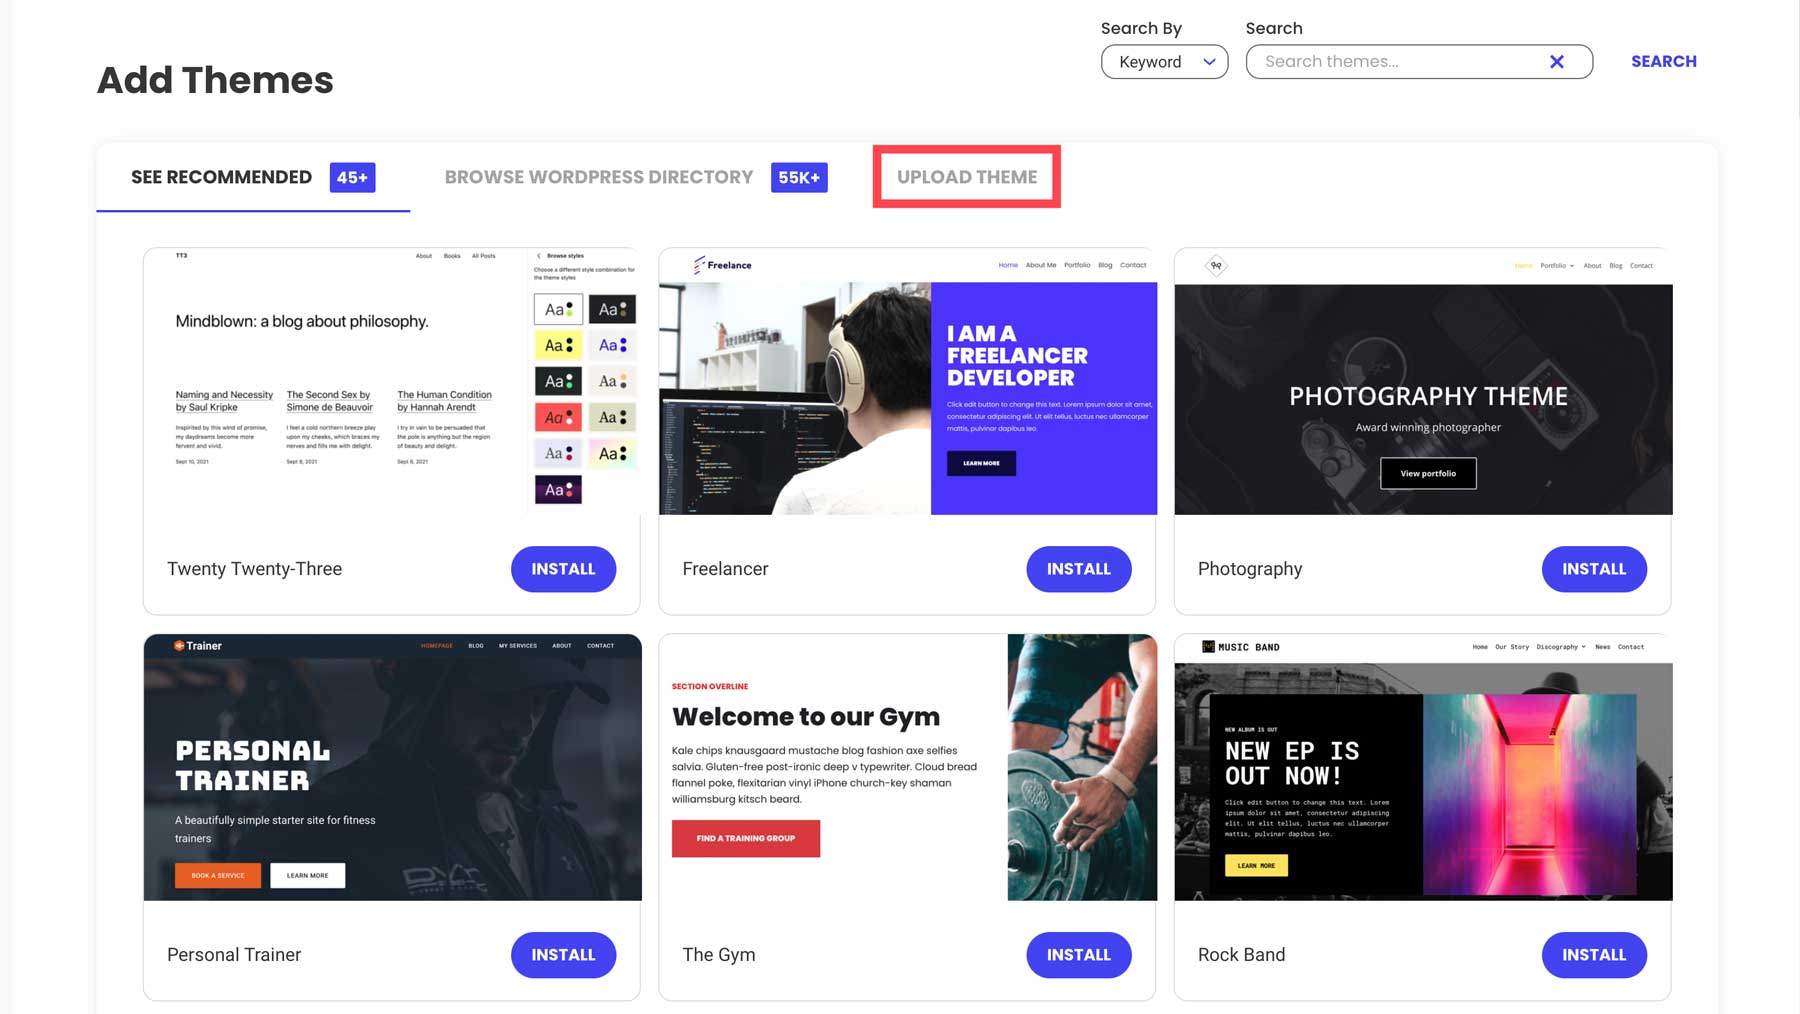
Click the choose file link to load the zipped Divi theme file into WordPress.

Once the file is uploaded, click the Install Now button to install Divi on WordPress.

Finally, click the Activate button to activate the theme.
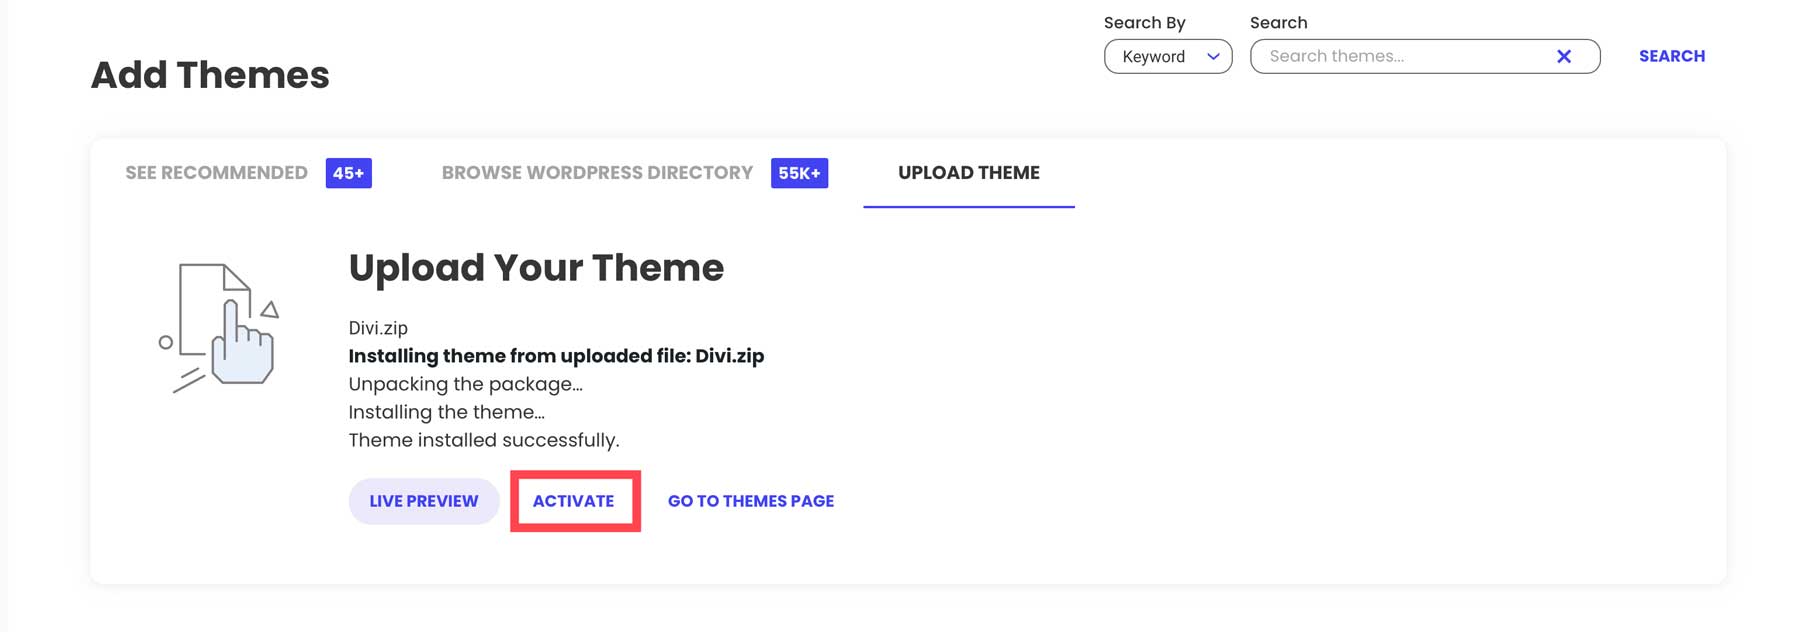
Generate and Install a Divi API Key
The last step in installing Divi is to generate and install an API Key. Using an API Key ensures that Divi’s core framework is up-to-date. Updates are crucial for ensuring Divi runs smoothly, is secure, and grants access to future features. Another benefit of an API Key is that it grants you access to any additional products you purchase and gives you access to Divi’s more than 2000 premade layouts.
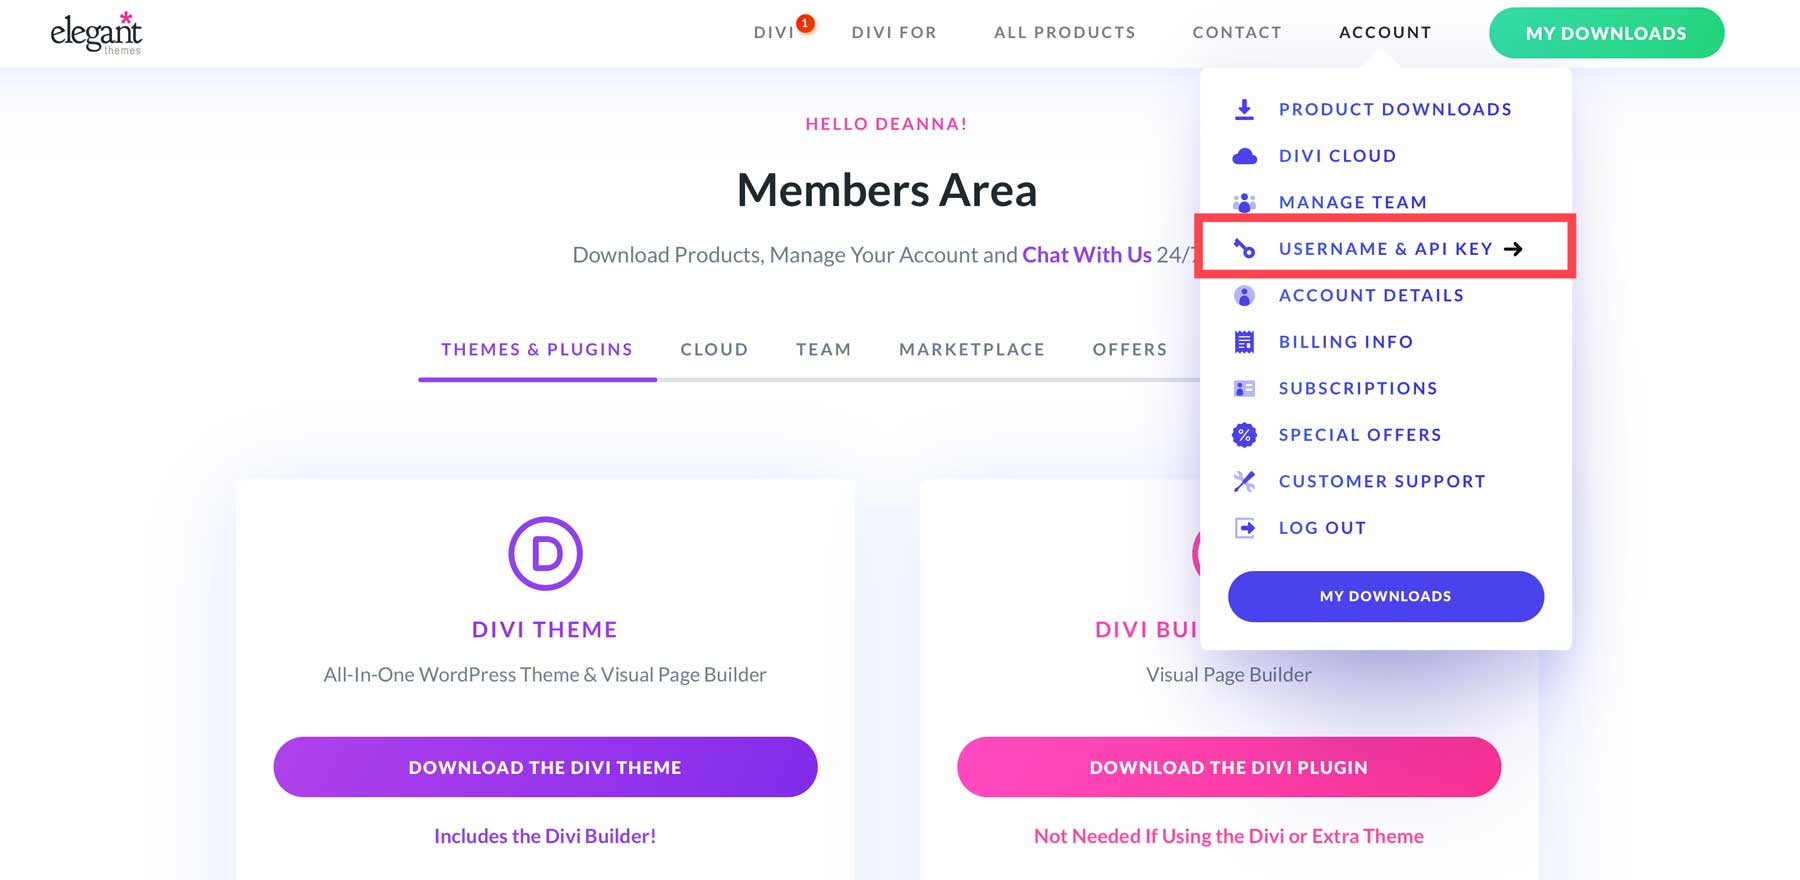
To generate a key, log in to your Elegant Themes account, navigate to the Account tab, and click Username & API Key.
Scroll down until you see the Generate New API Key button.
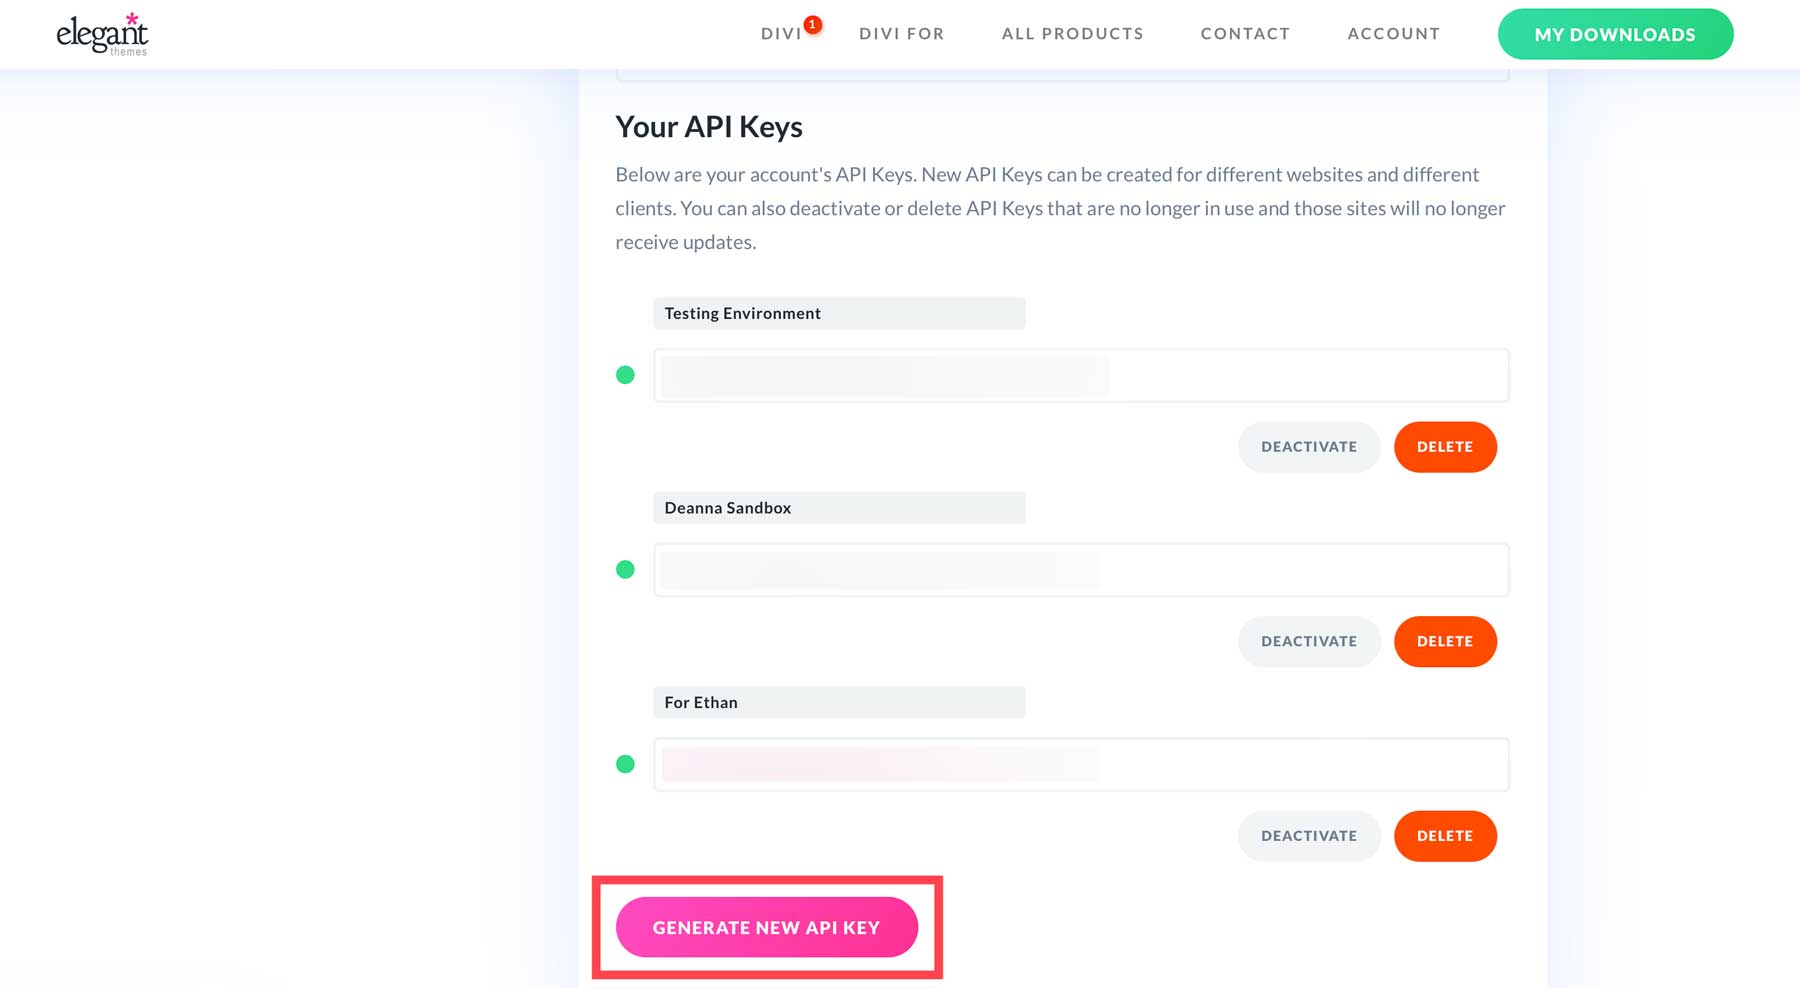
Name the key and copy both the label and API Key for safekeeping. Next, return to the WordPress dashboard and navigate to Divi > Theme Options > Updates.
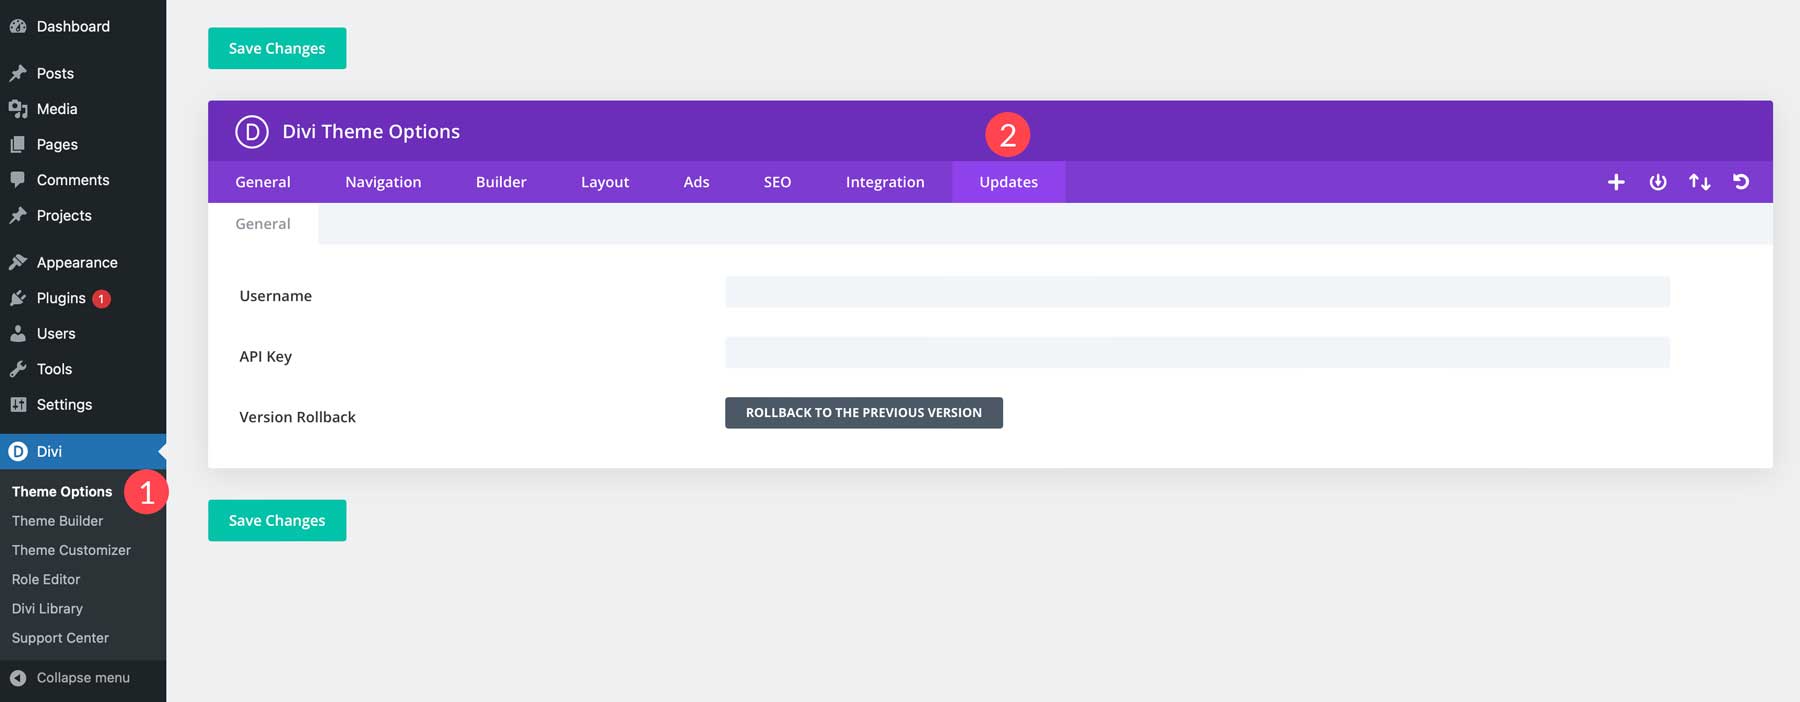
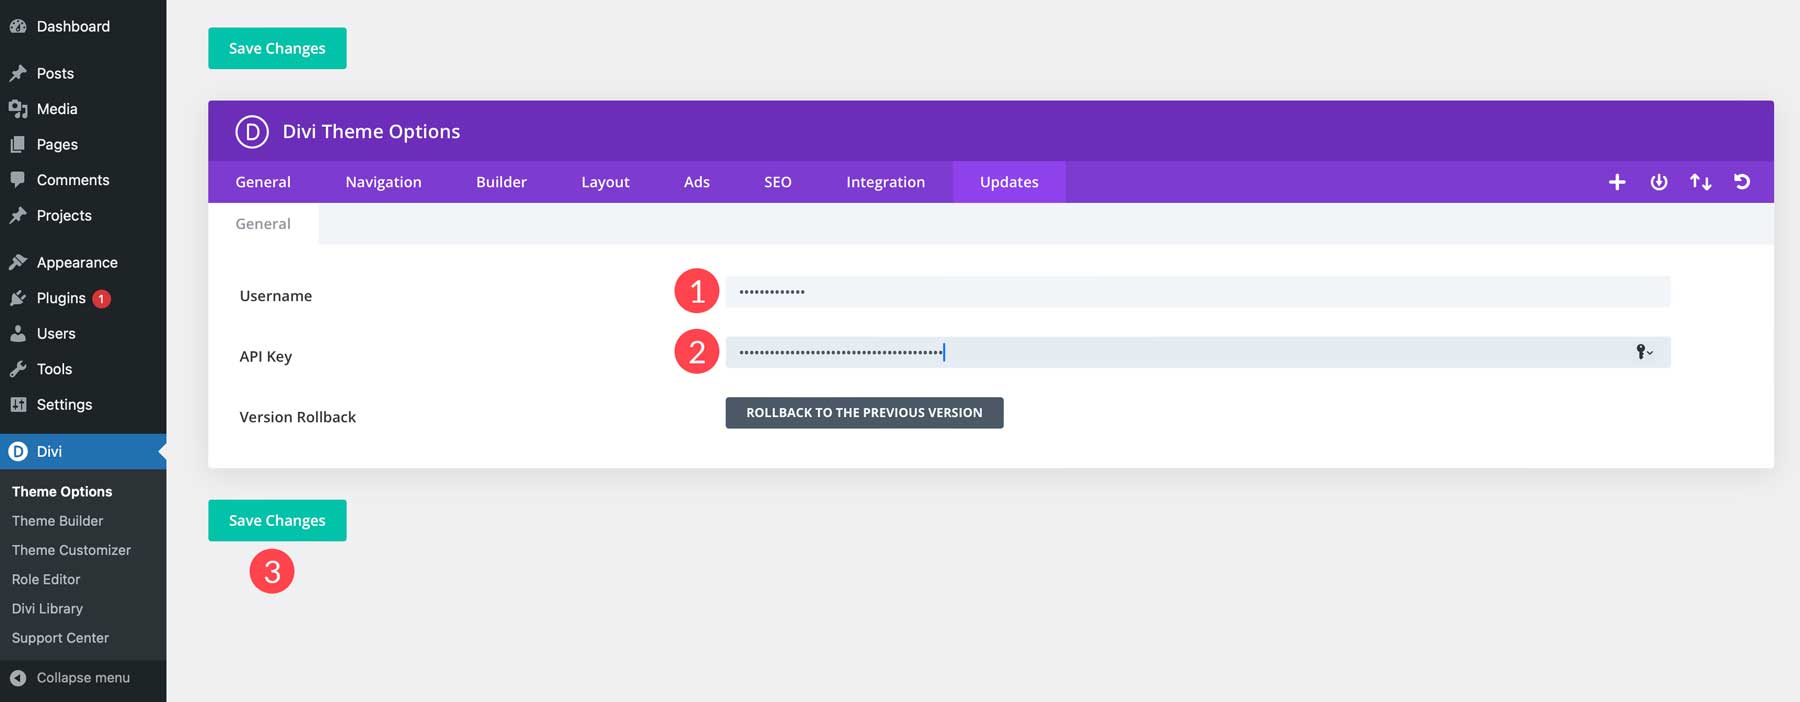
Enter the username and API Key in the associated fields and click the Save Changes button.
Divi is More Than Just a WordPress Theme
As mentioned, Divi is a powerful WordPress theme that offers an intuitive drag-and-drop page builder, the Visual Builder. It comes equipped with over 200 design modules, so you can build any type of website you want. Divi also includes a powerful full-site editing experience, thanks to the Theme Builder. Using it, you can create a header and footer, blog post templates, archive pages, and more – all with the same drag-and-drop interface. Divi is affordable, with yearly licenses starting at $89.
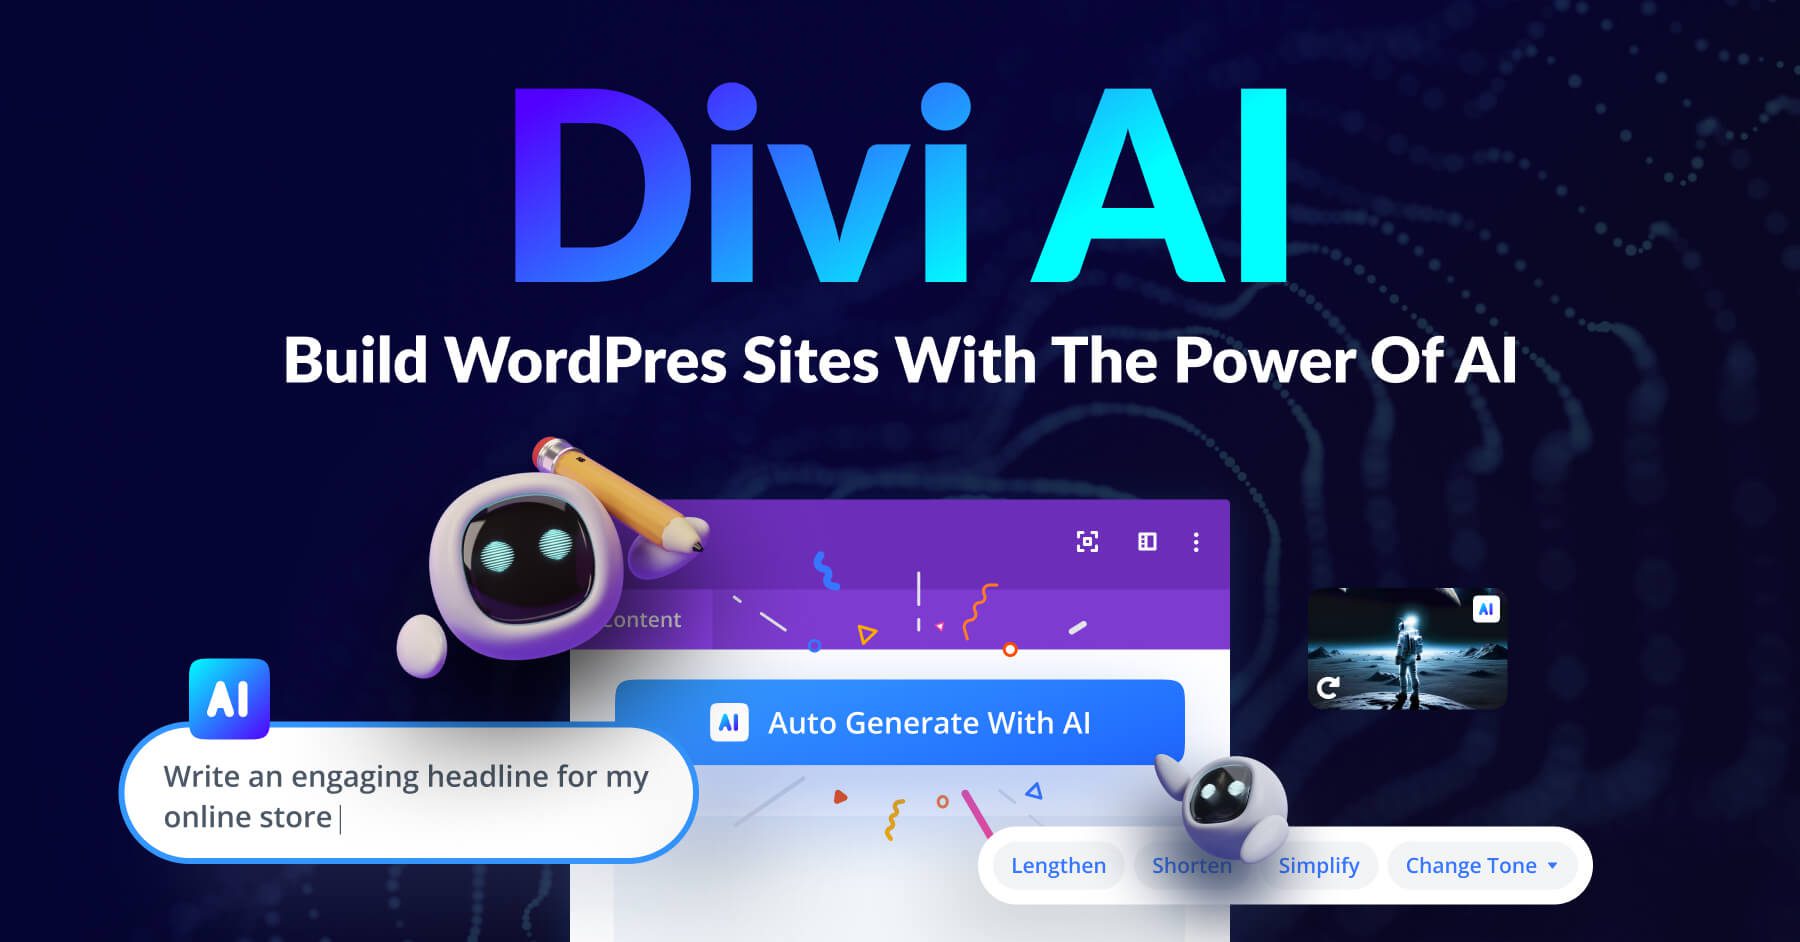
As an added bonus, Divi has an incredible suite of products to enhance your experience. There’s Divi AI, an AI-powered design assistant that’s capable of writing on-brand text, generating life-like images, writing code and developing modules, and creating full web pages – all with a simple text prompt. You can generate unlimited photos, text, code, and pages for as little as $16.08 per month.
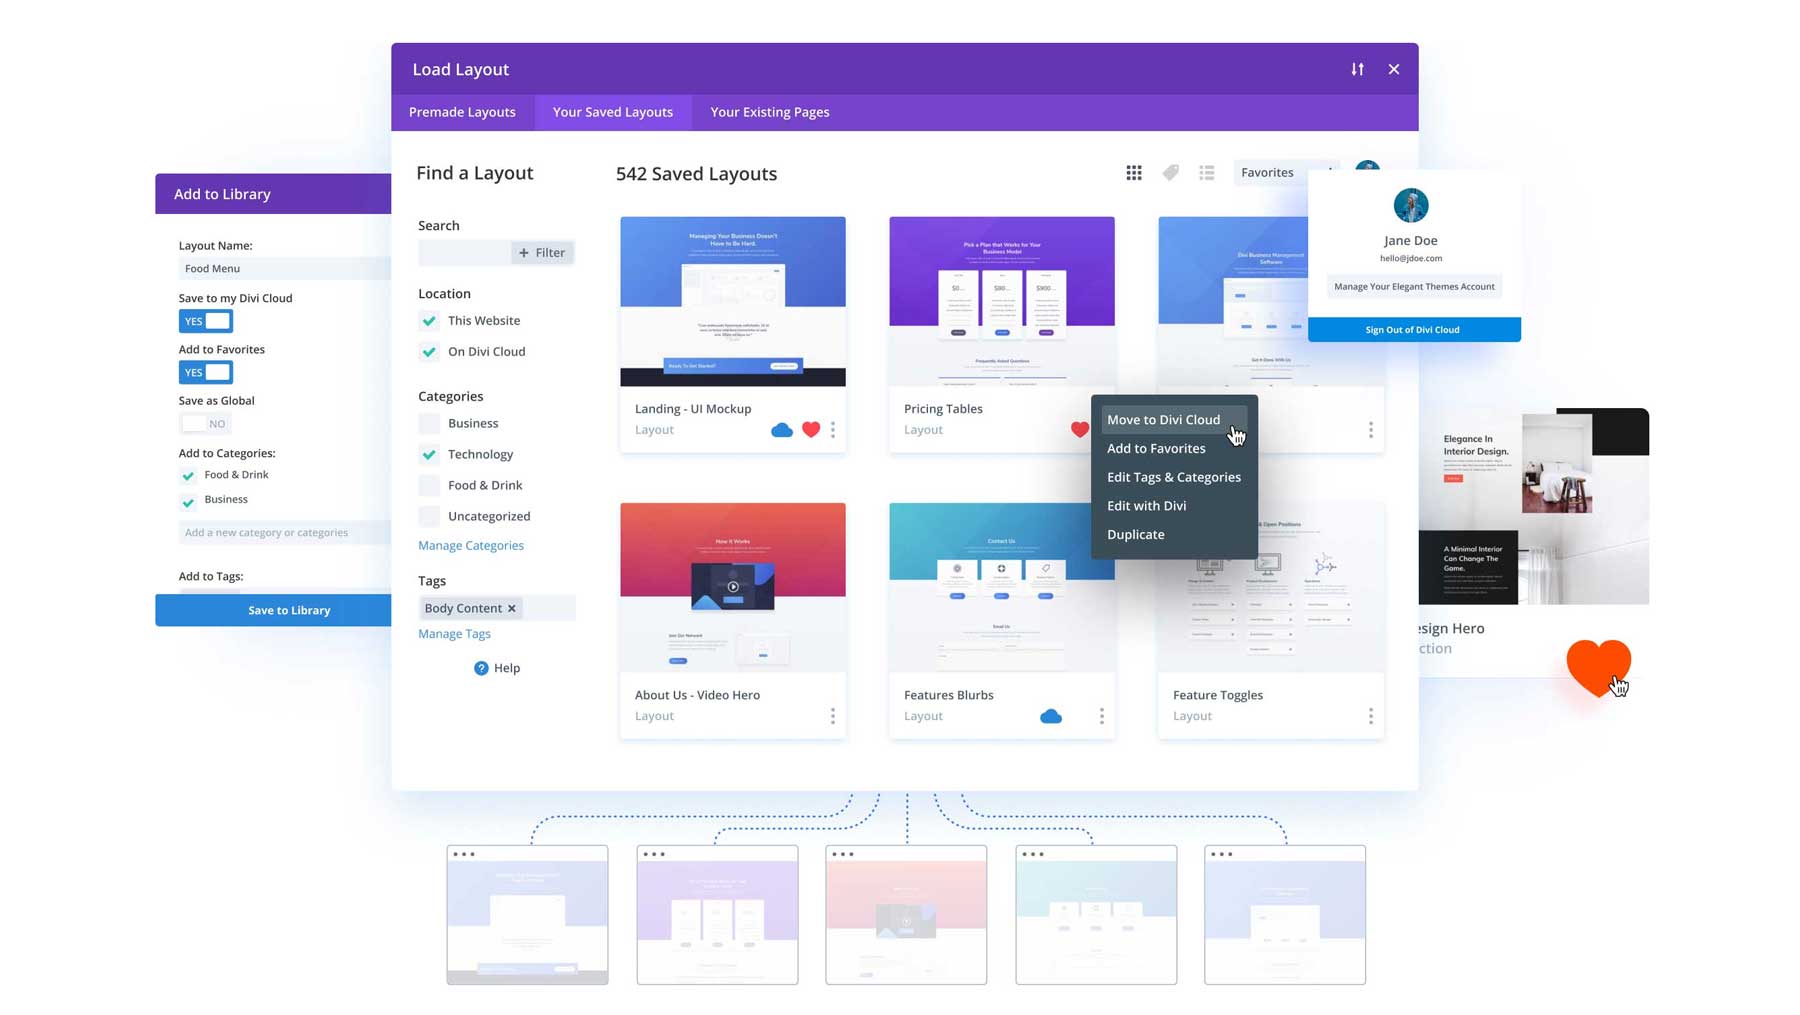
Other products, like Divi Cloud, allow you to store all of your Divi modules, sections, and full layouts in the Cloud. This eliminates the need to export JSON or XML files to reuse your favorite layouts. With Divi Cloud, you can save layouts from every website you own, easily importing and exporting your favorite layouts. Divi Cloud is available for $6 per month.
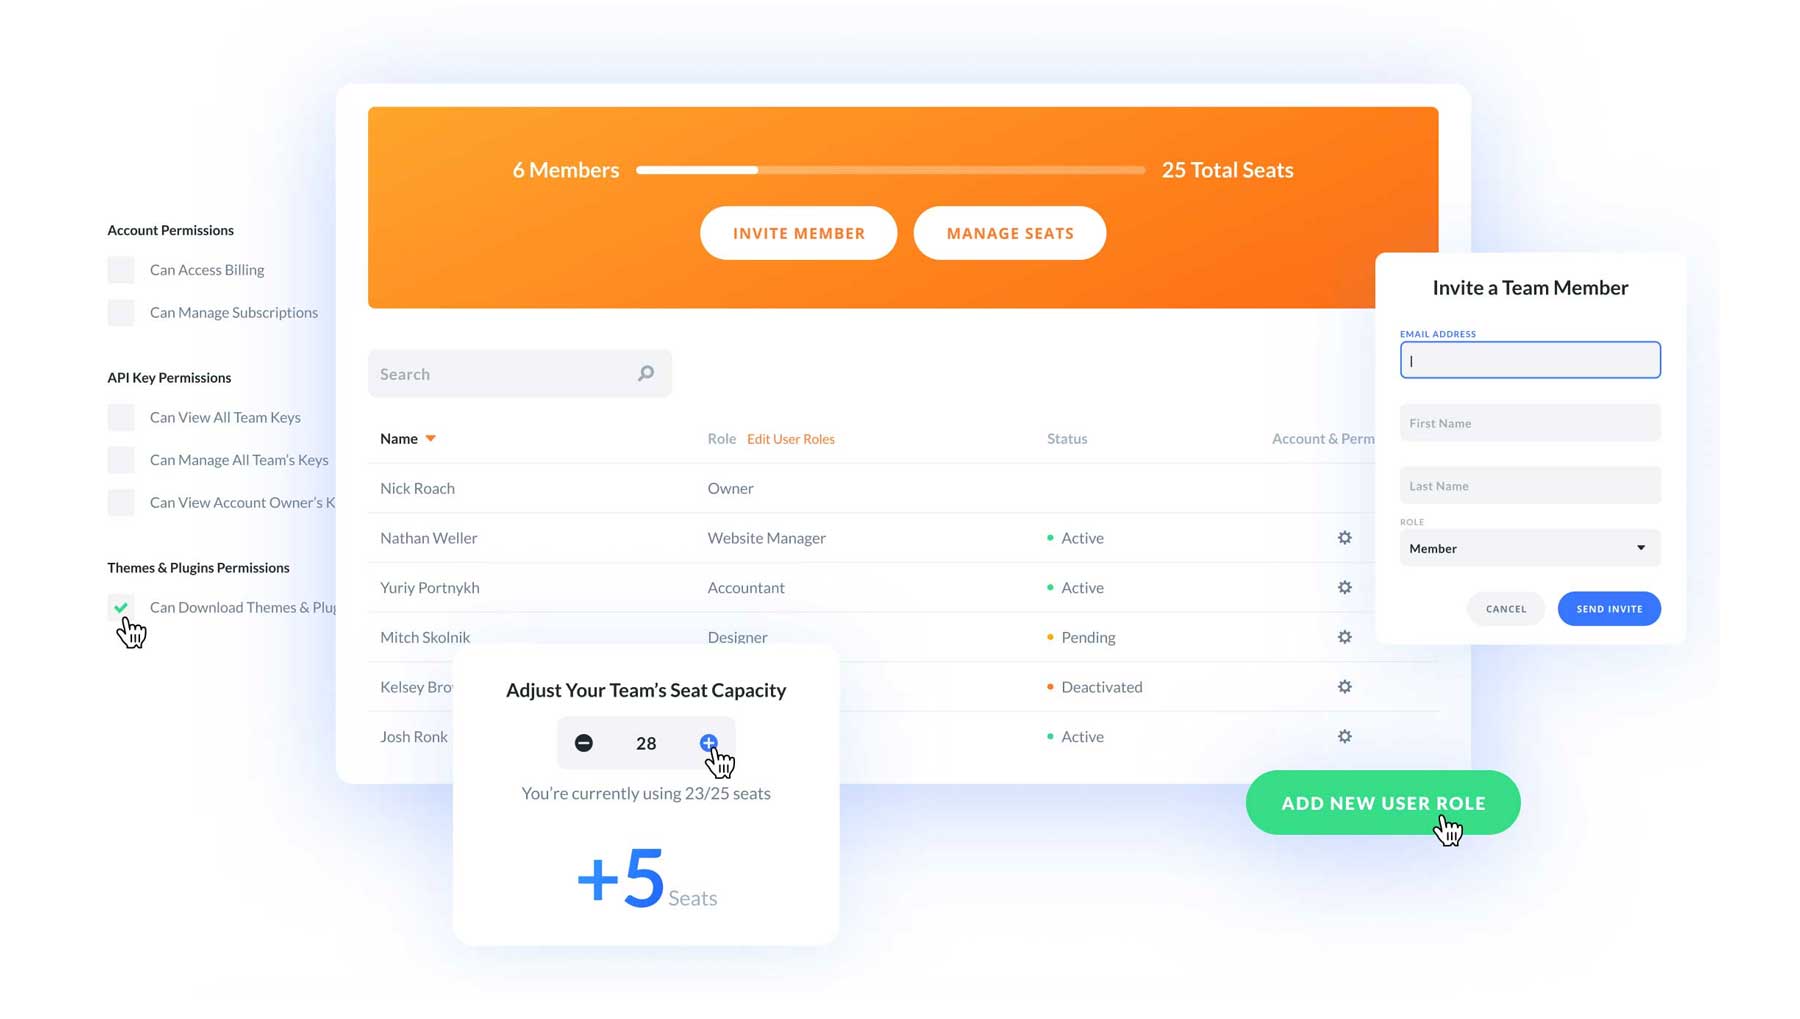
Looking for a way to foster collaboration between team members and make life easier? That’s where Divi Teams can help. For as little as $1.50 per month per seat, you can grant access to Divi and every product you purchase via your Elegant Themes member’s area. Share access to client billing and Divi products, assign user roles, and easily access support tickets.
Configuring Divi Theme Settings
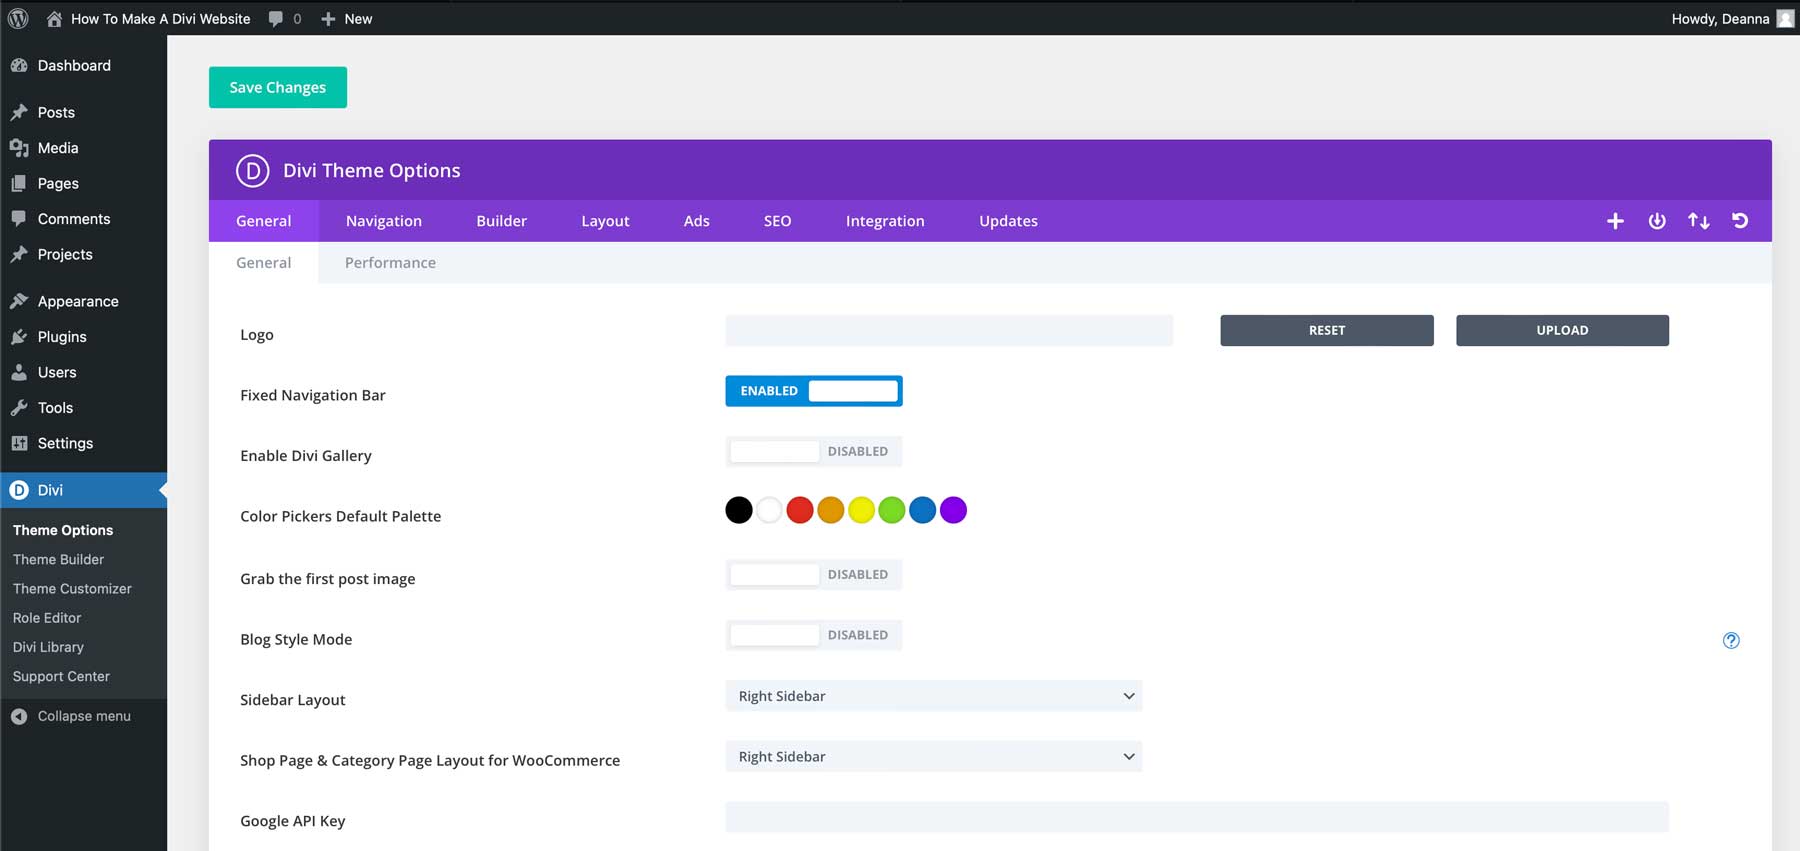
With Divi installed, there are a few key areas you’ll need to know about. The first is the Divi Theme Options. Here, you can add a logo, configure global colors, add social media links, tweak performance settings, and more. You can also configure site navigation settings, allow the Divi Builder on custom post types, configure SEO settings, and add scripts for extra functionality.
There’s also a Divi Theme Customizer, which enables you to adjust global settings for fonts, site width, site title and tagline, and more. You can also assign global fonts and colors, adjust colors and fonts for headers and footers, style buttons, configure mobile styles, and more.
How to Build a Divi Website
With all the setup work completed, we can focus on the second part of our how to build a Divi website tutorial. This section will walk you through planning your website’s structure, from page creation to making a navigation menu. We’ll also explore creating pages with a premade layout and generating one with Divi AI. Finally, we’ll suggest some essential plugins to improve your site.
Planning Your Divi Website Structure
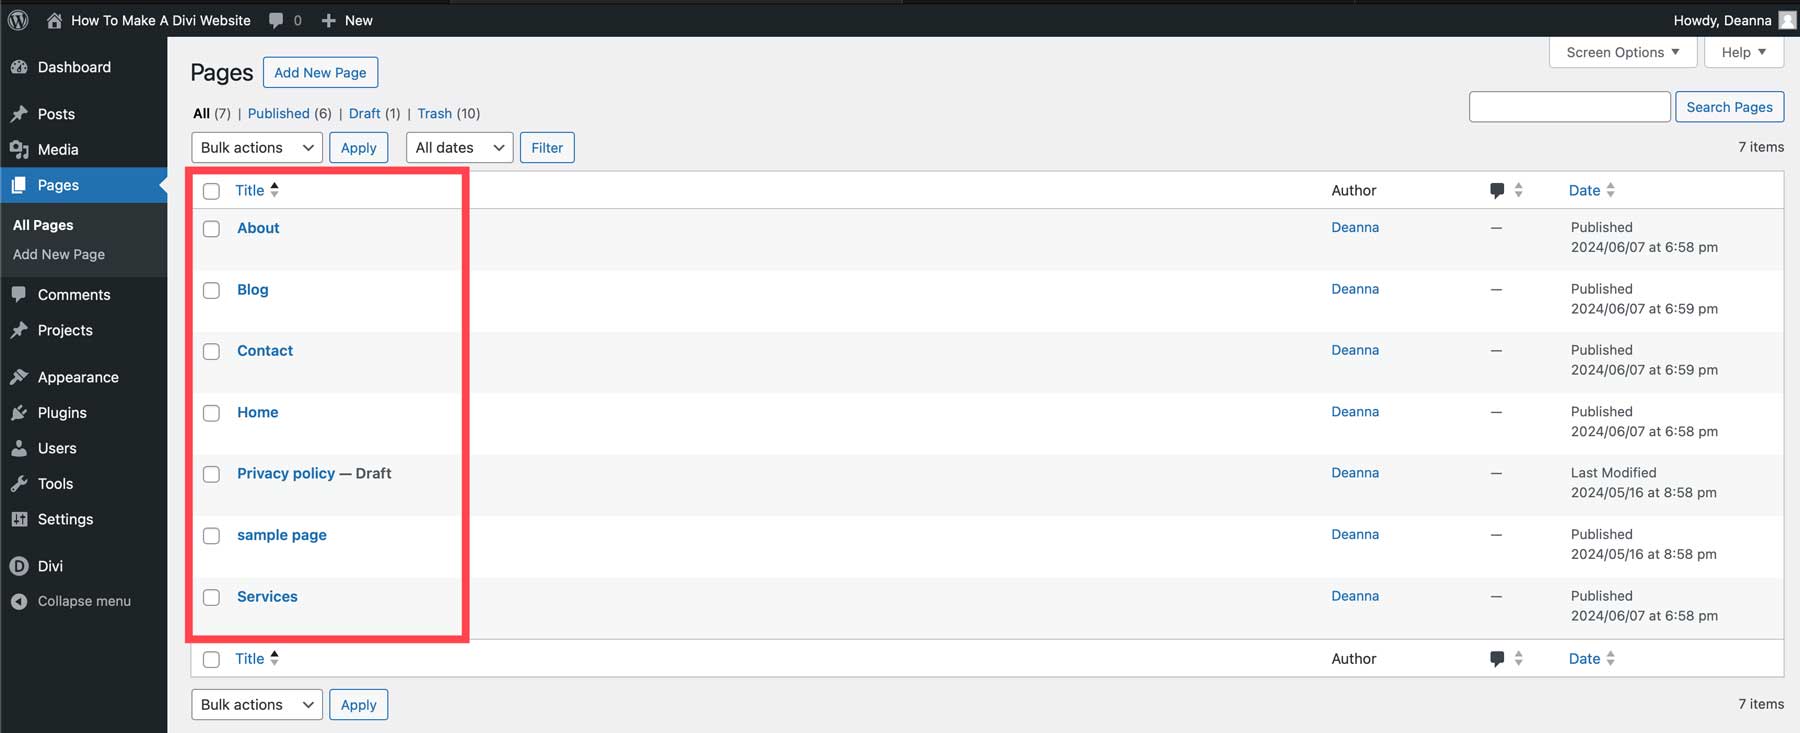
Before designing pages for your WordPress website, you have to create them. Most basic WordPress websites have a few pages, including home, about, services, blog, , and contact, so that’s what we will start with. While you may need additional pages depending on the type of site you’re building, these serve as a good starting point.
WordPress pages page creation is simple. Navigate to Pages & Add New Page.

Give your page a title and click the Publish button to create the page.

Repeat the process above to create the remaining pages. When finished, your site’s page structure should look like this.
Creating a Navigation Menu
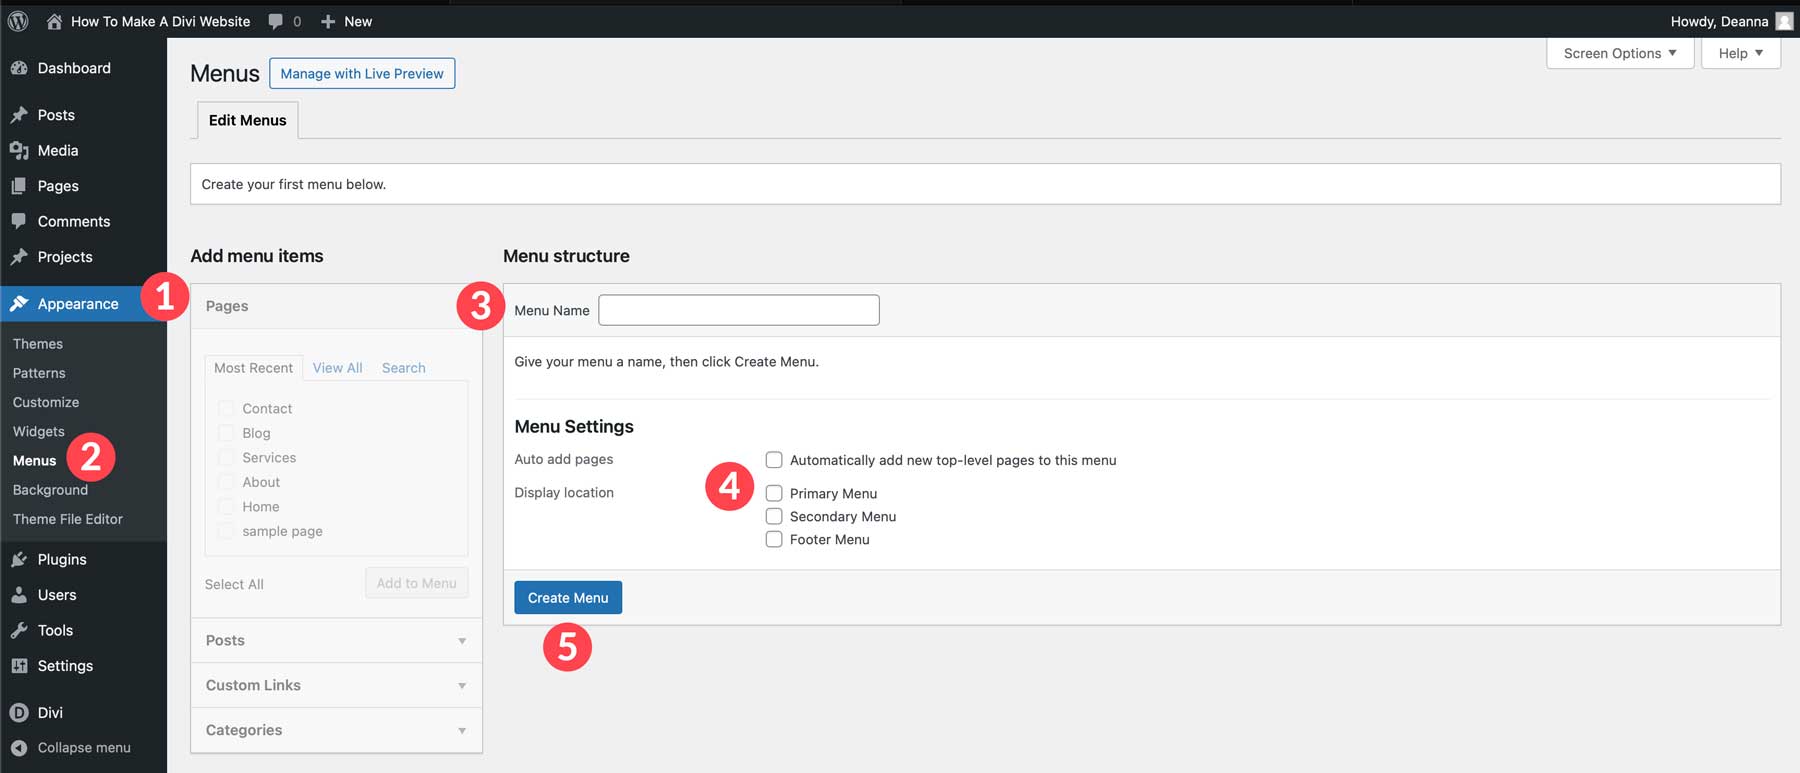
Before diving into the Visual Builder, laying the groundwork for your website’s structure is crucial. This ensures a clear and logical flow of information, making it easy for visitors to navigate and find what they want. To create a menu in WordPress, navigate to Appearance & Menus. Give your menu a name, such as main navigation, set the location to primary, and click the create menu button.
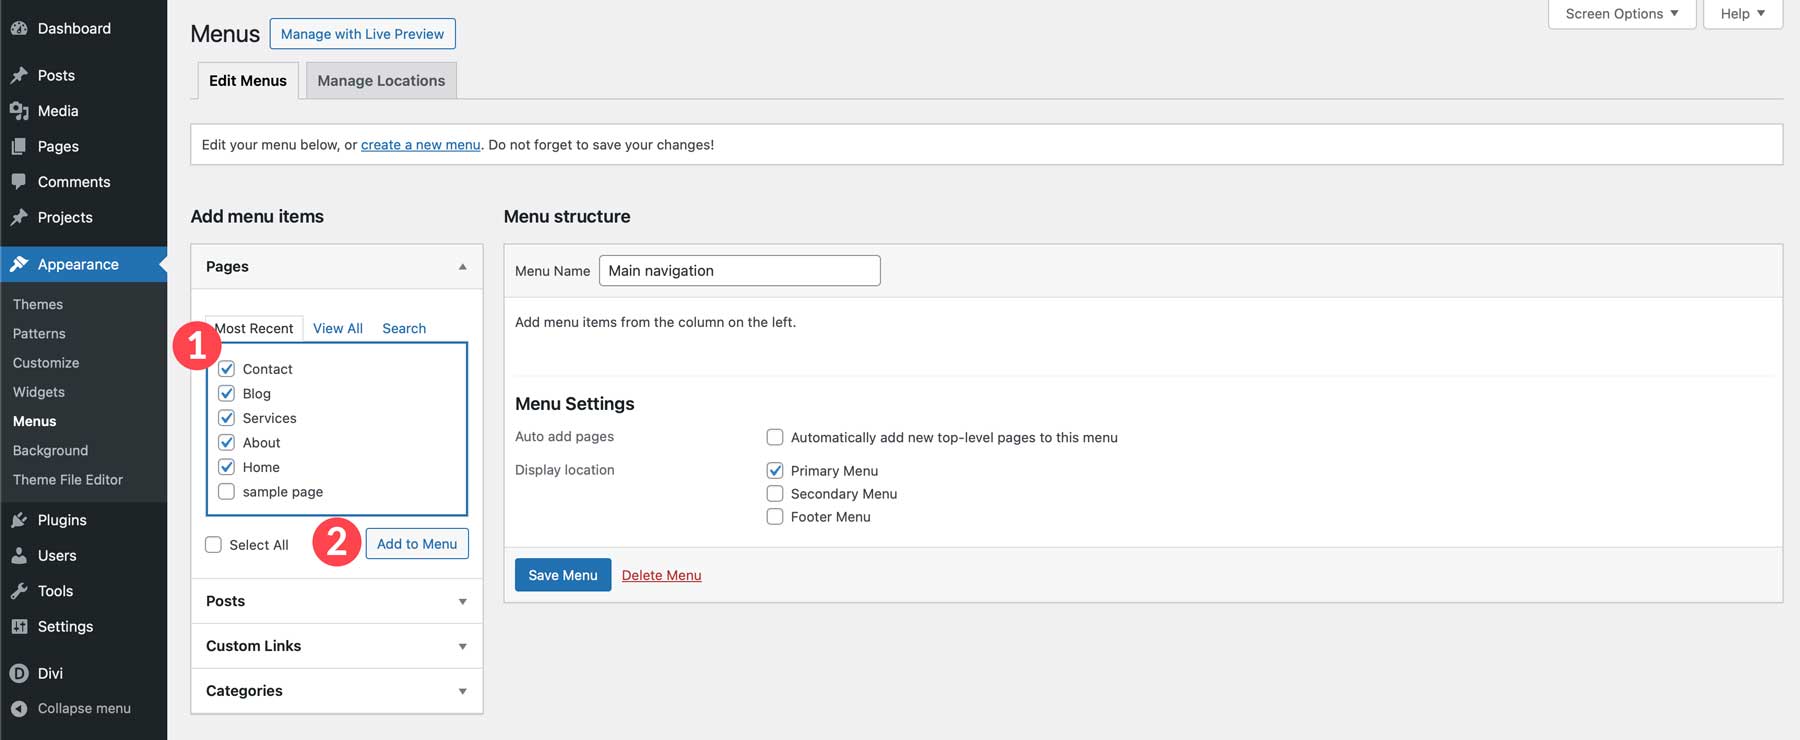
Next, select the pages you’d like to add and click the Add to Menu button.
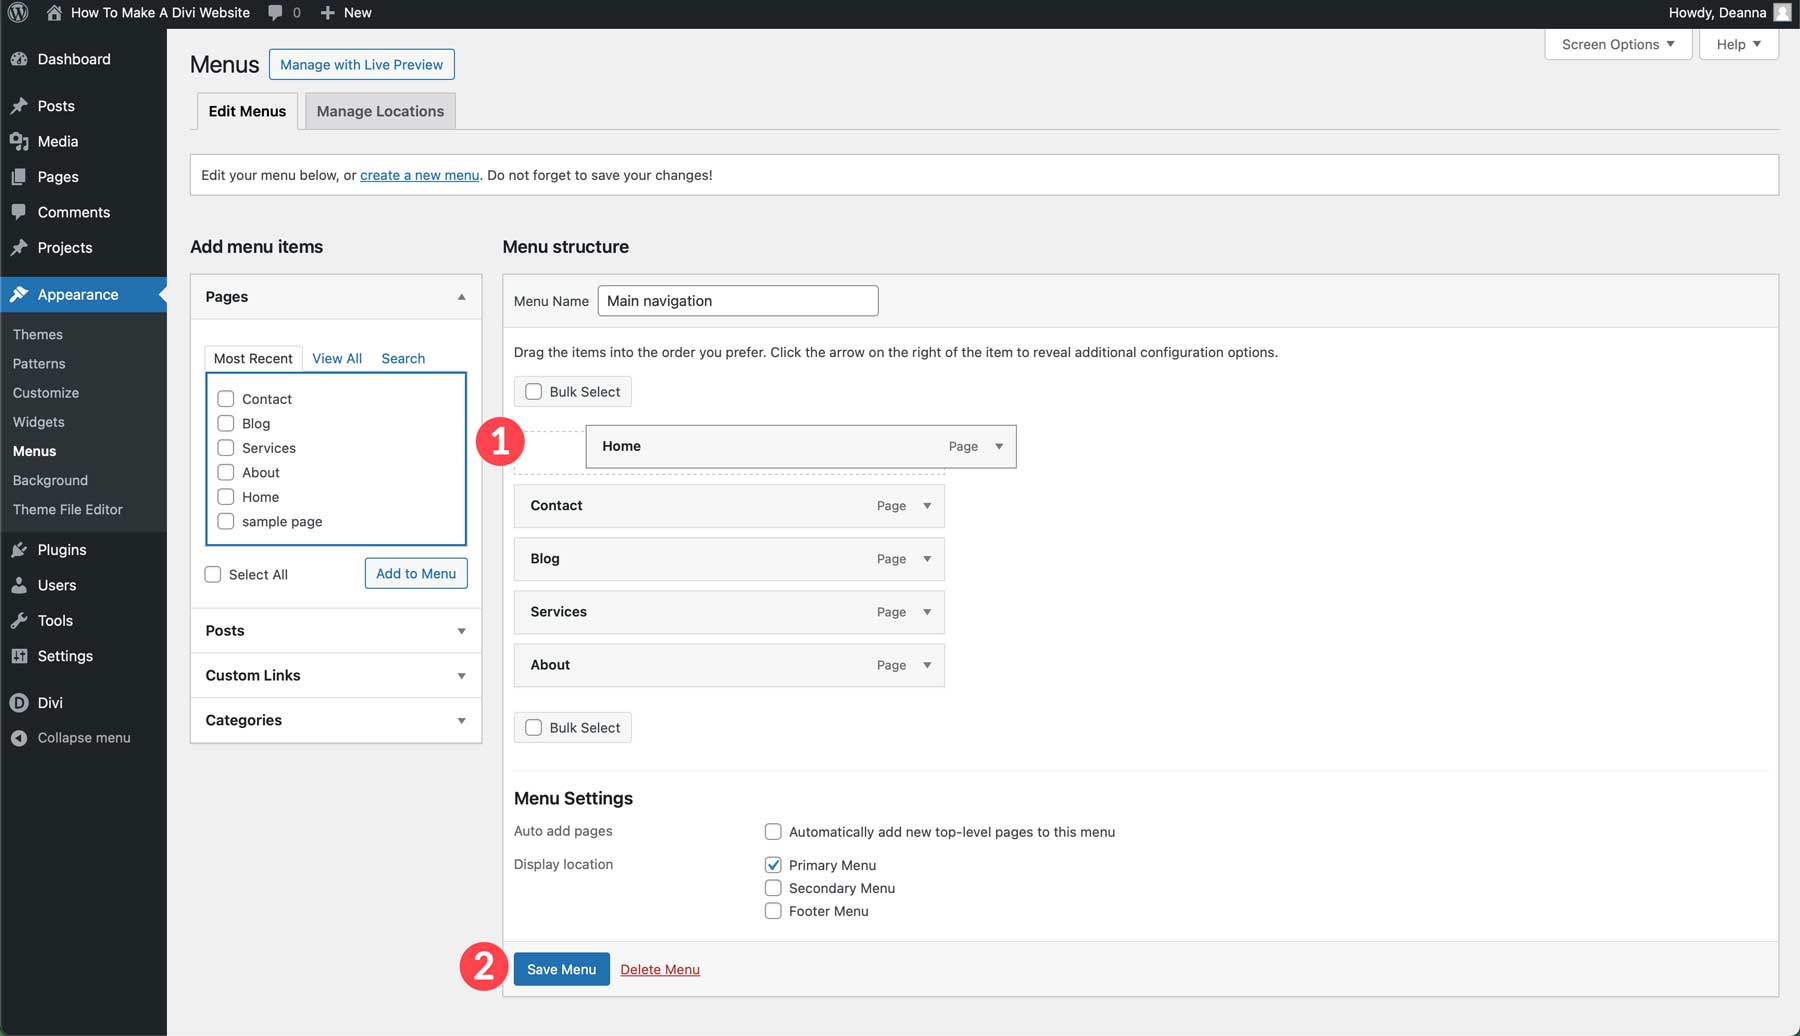
Finally, click and drag the pages within the menu to arrange them to your liking, and then click the Save Menu button.
Setting a Home Page in WordPress
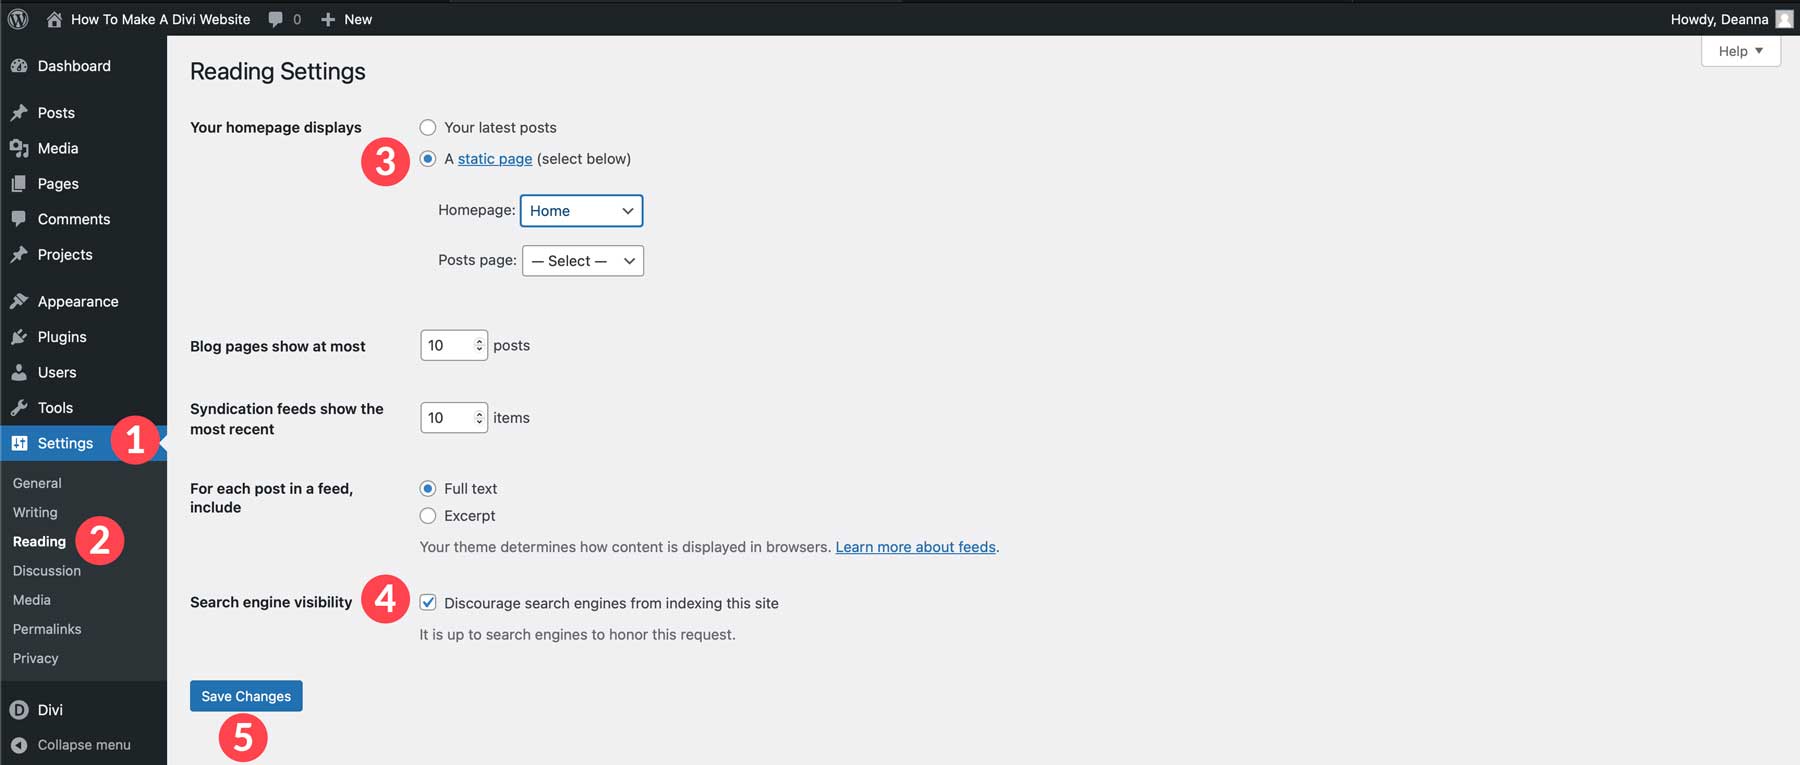
Next, we’ll set up the home page for our Divi website. Navigate to Settings & Reading to do this. Select the static page radio button option and choose the home page. While your site is in development, checking the search engine visibility checkbox is a good idea. This will keep your site hidden from search engines until you’re ready for the world to see it. Finally, click the Save Changes button to lock in your home page.
Creating Web Pages With Divi
With our website’s structure in place, a home page set, and a header and footer created, we can start building our web pages with Divi. There are a few ways to do this, including using a premade layout, using Divi AI, or from scratch using the Visual Builder. For this tutorial, we’ll give you the basics for all three options to ensure you know how to create pages in a way that suits you best.
Loading a Premade Layout
Creating a page with a premade layout is one of the easiest ways to start with Divi. More than 2000 layouts are available, covering every major category you can imagine. There are layouts for restaurants, various business types, services, events, technology, and more. Each Layout Pack for Divi has at least 6 page layouts, enough to create most websites.
To load a pre-made layout, navigate Pages > All Pages. Next, click the home page to edit it.
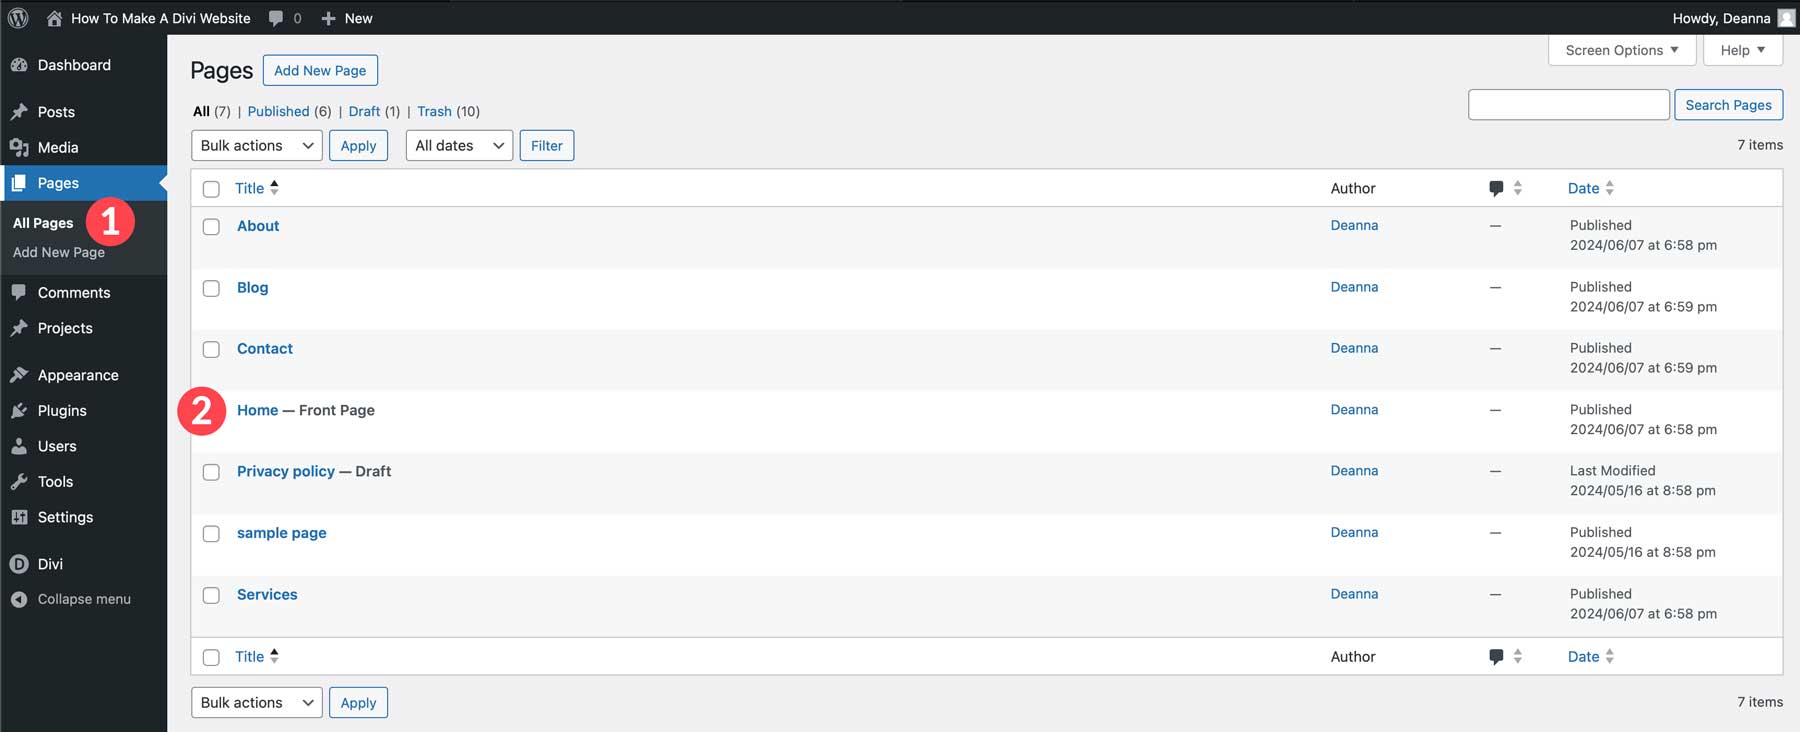
Click the Edit with the Divi Builder button.
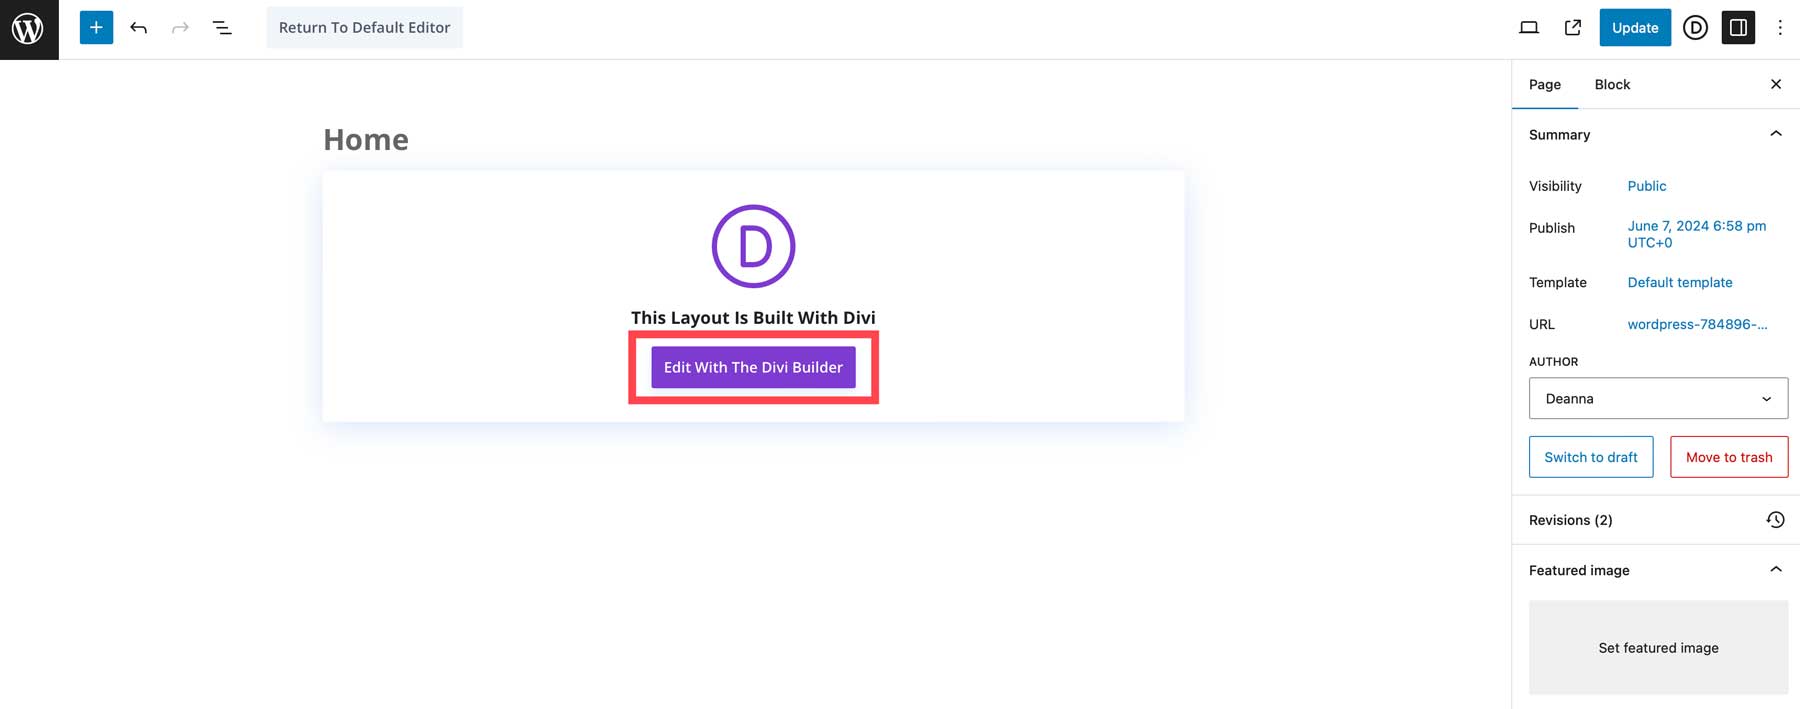
Next, select Choose a Premade Layout.
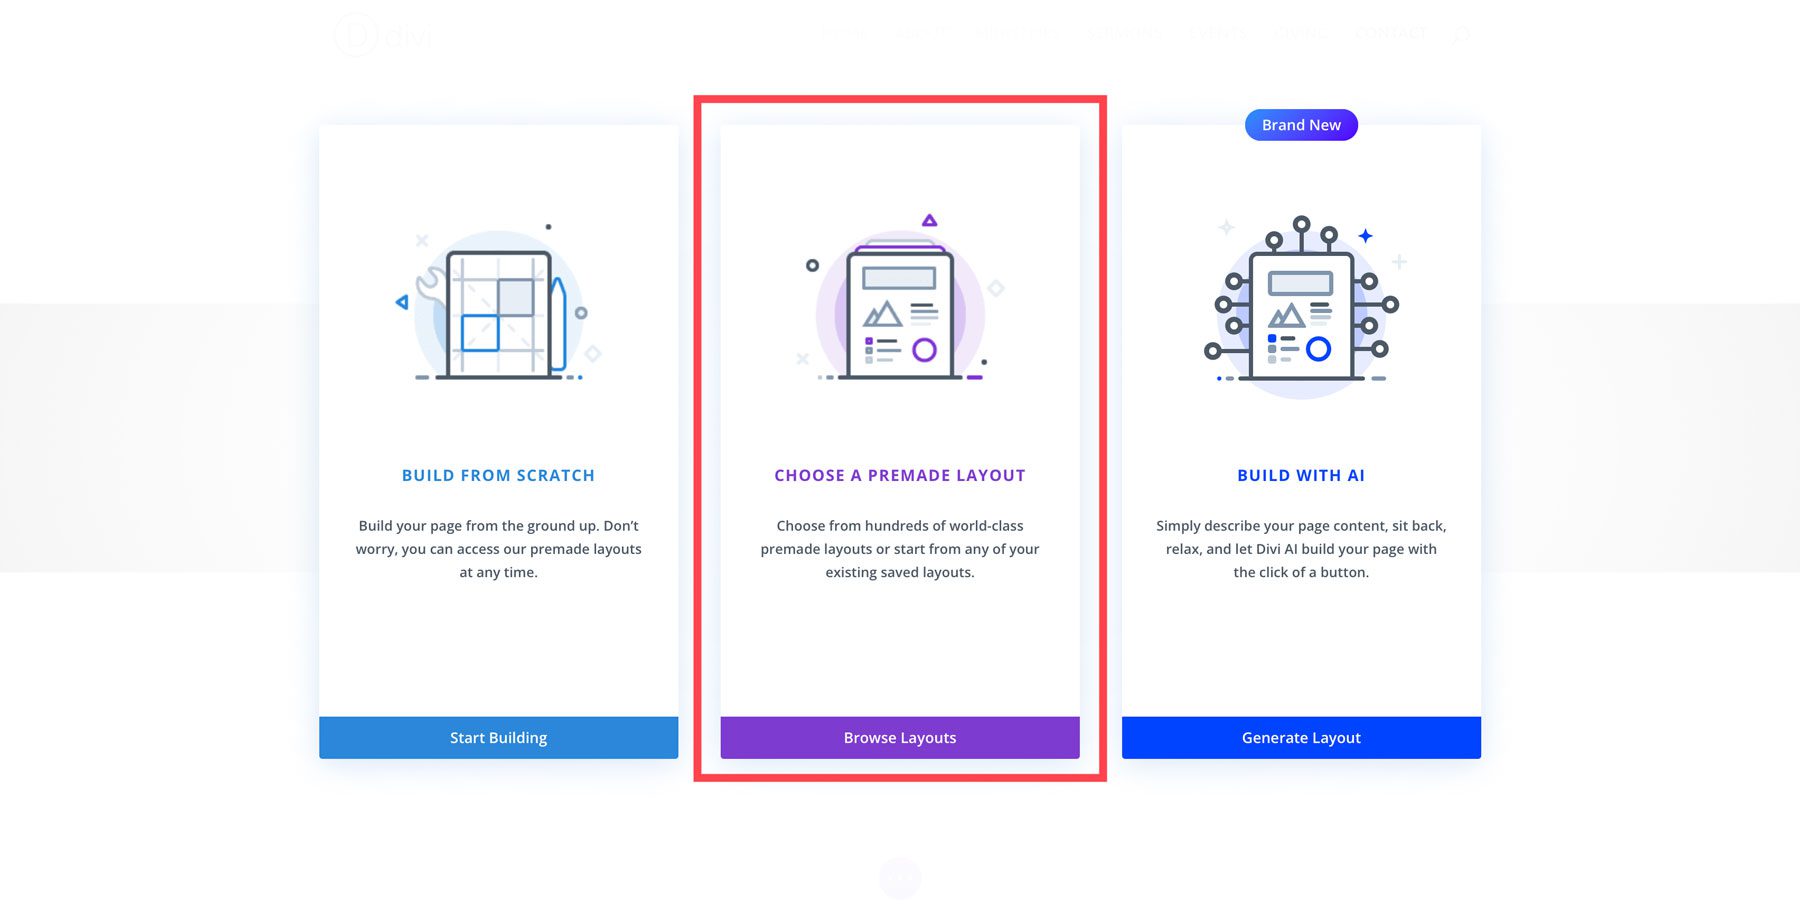
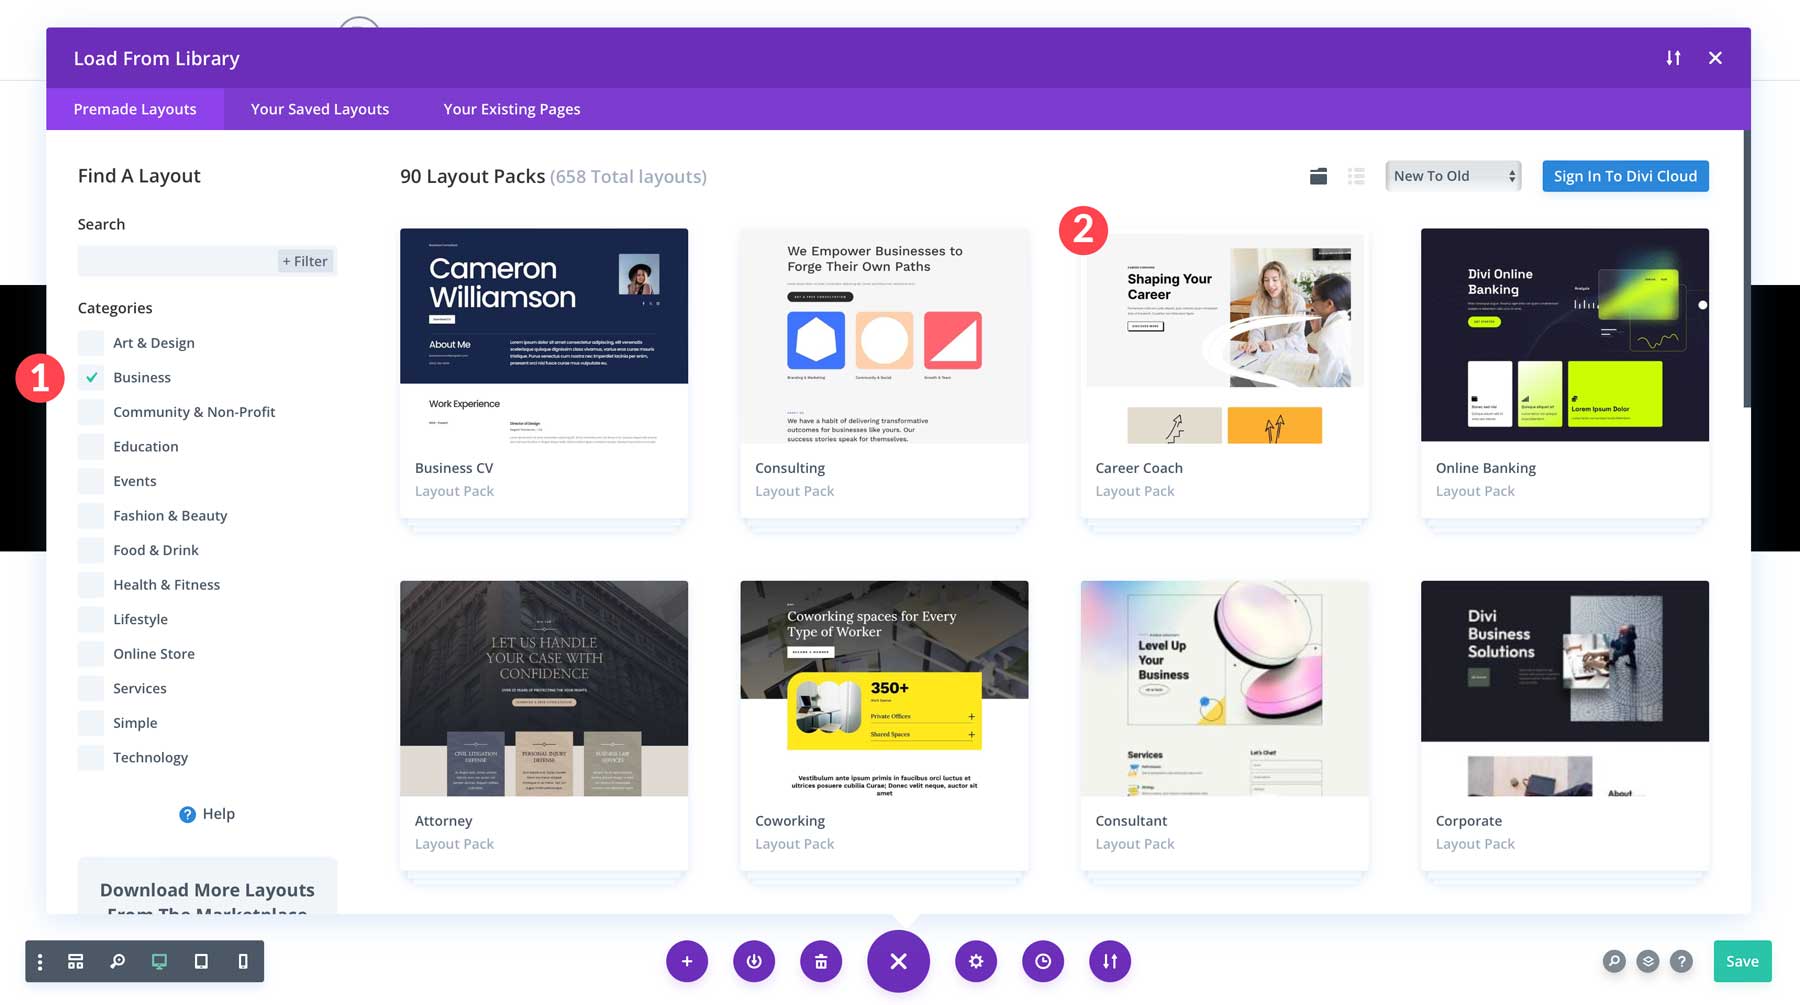
You can use the search bar to search for a particular layout or browse by category.
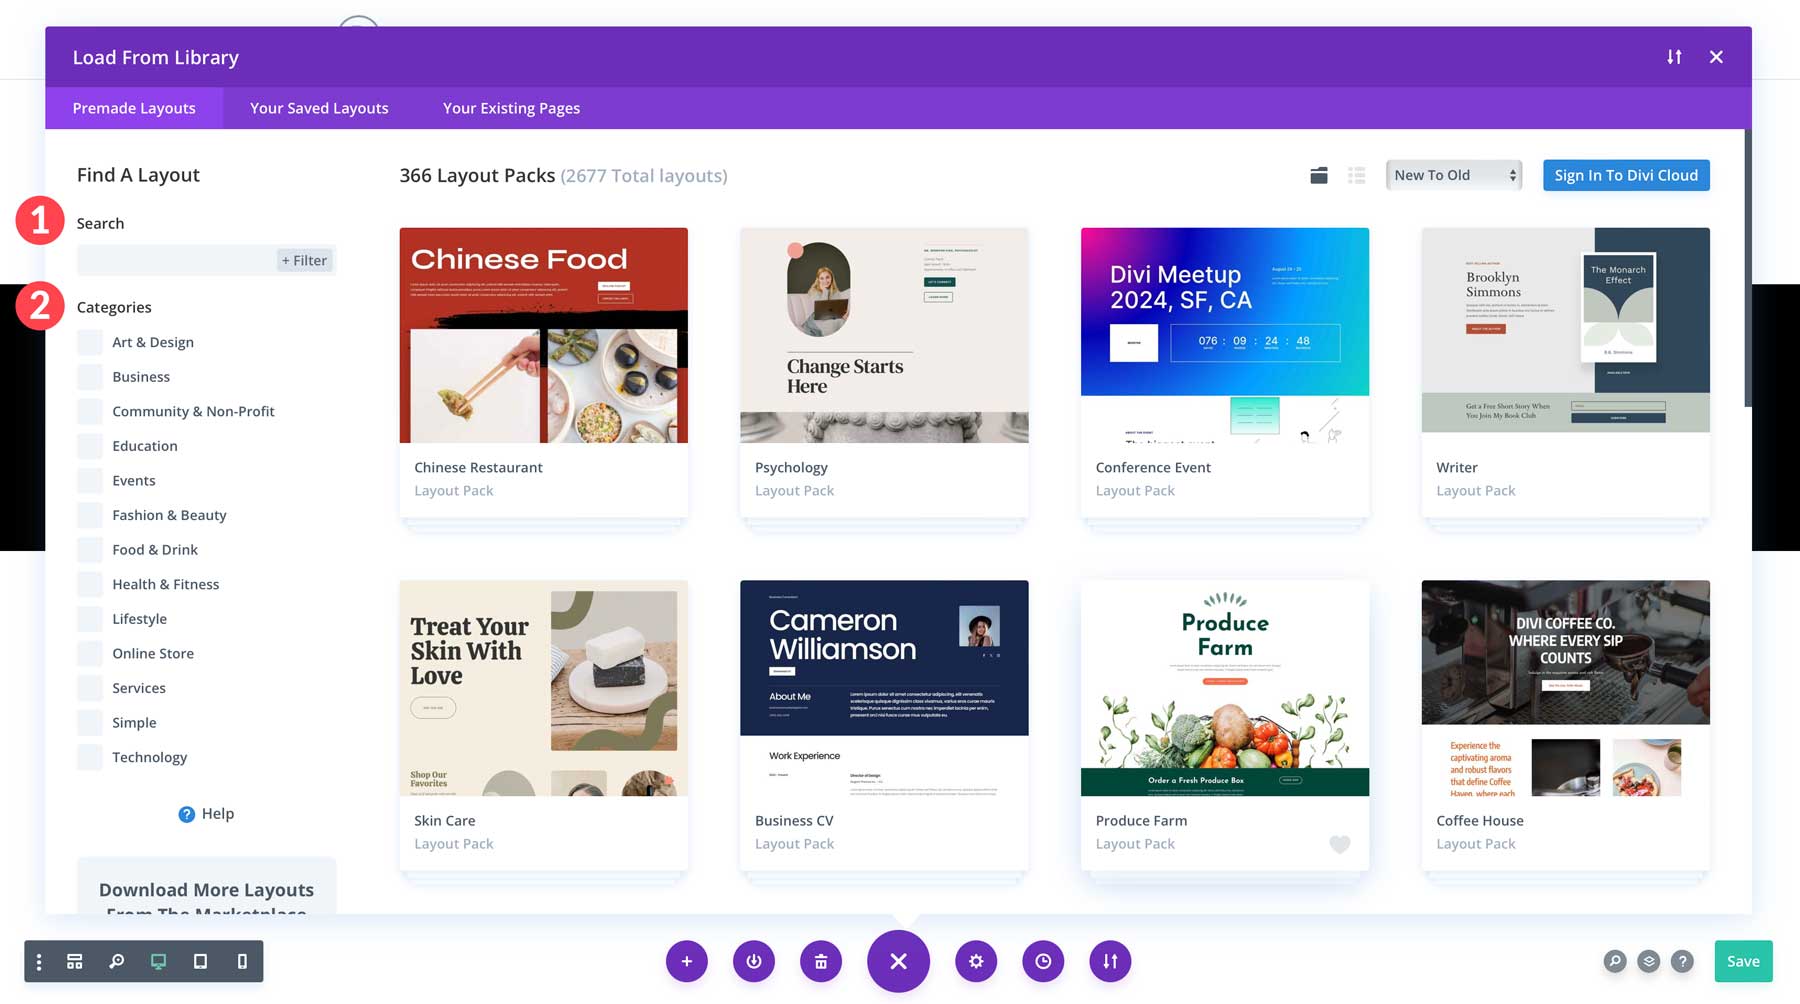
Click the business category and select the Career Coach Layout Pack for Divi.
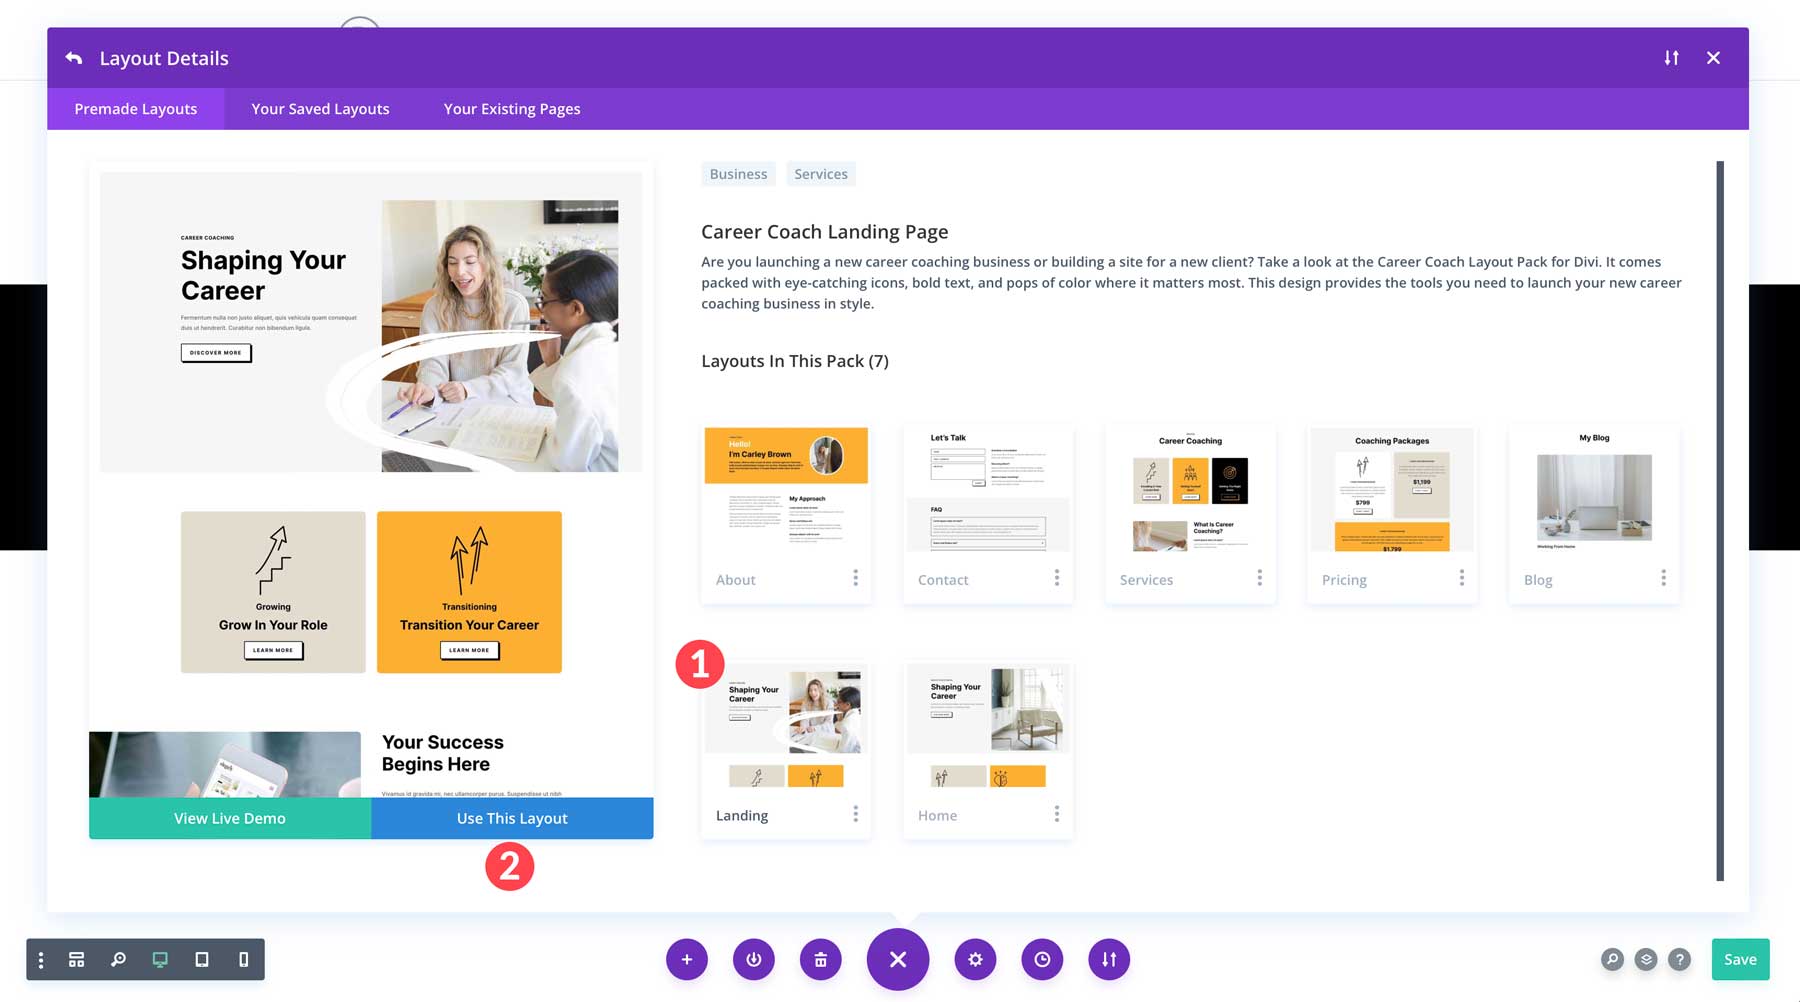
Select the Landing Page layout and then click the Use This Layout button to load the layout into the home page.
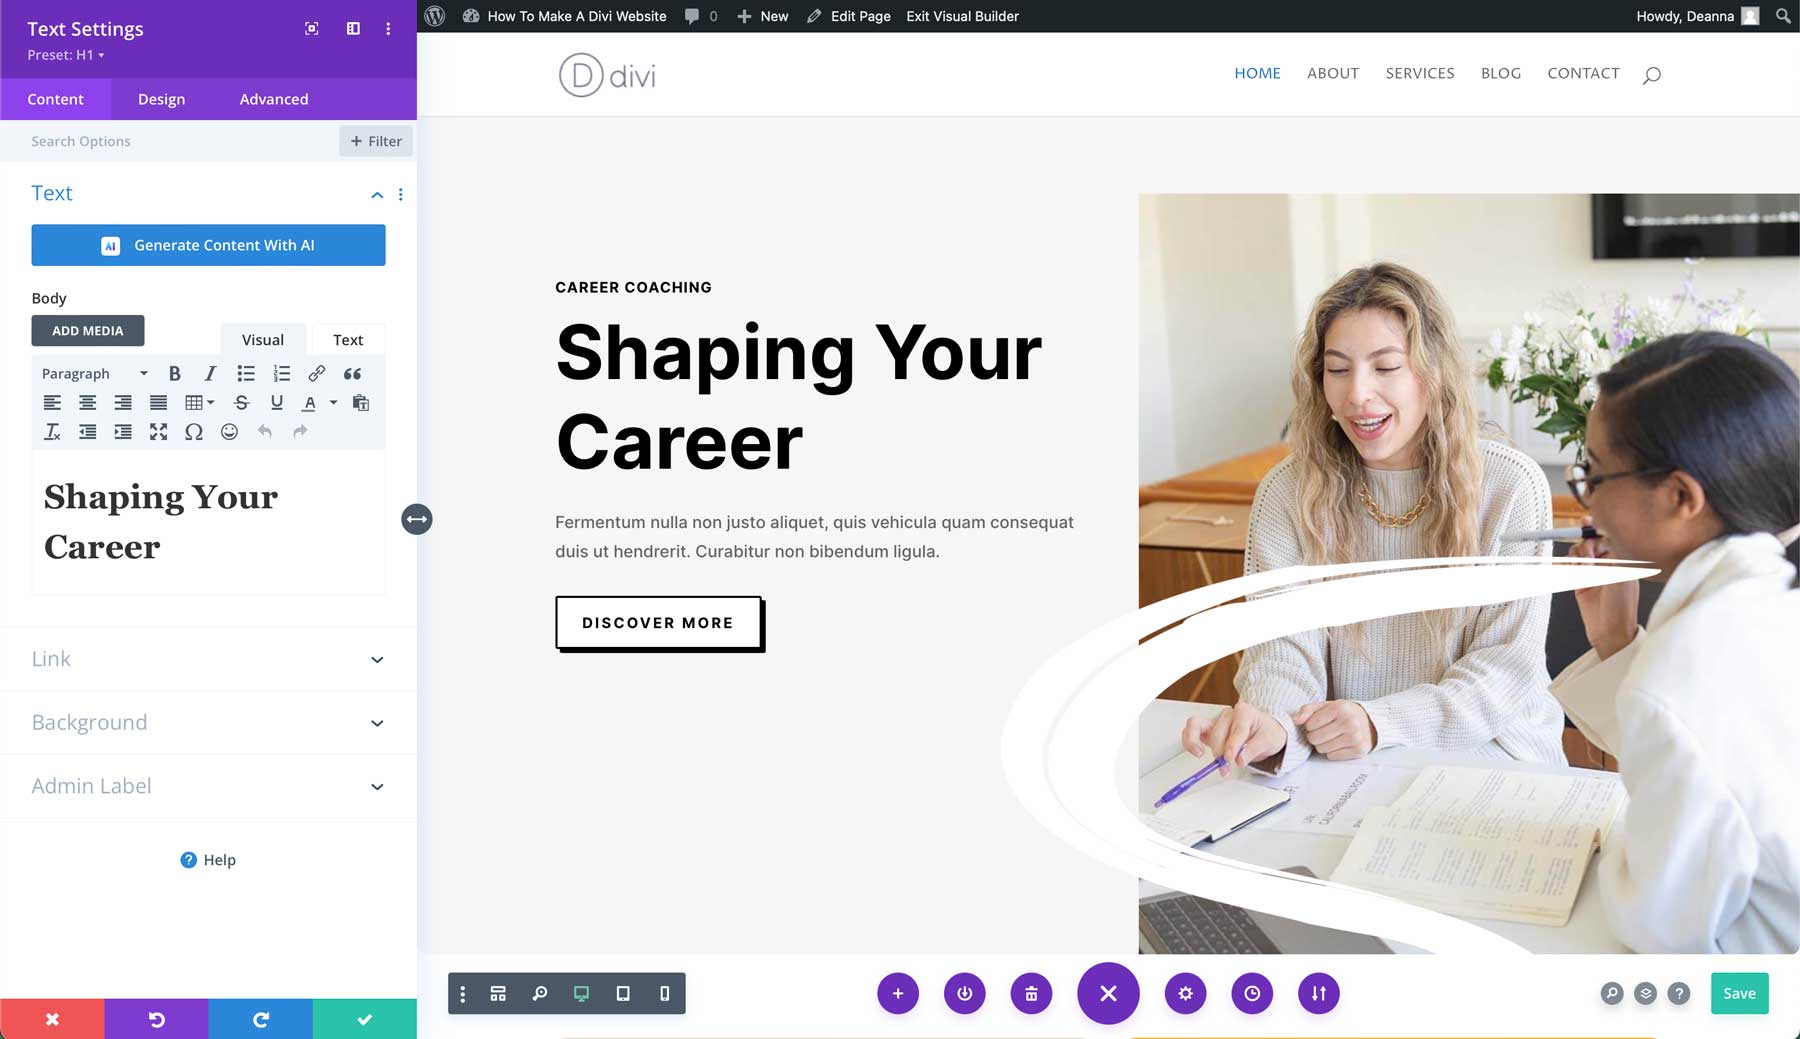
Once the page refreshes, you can change the text and images, add new design modules, and customize your page.
Using Divi AI to Create a Web Page
In addition to using a premade layout, Divi users have another awesome way to design web pages. Divi AI is Elegant Theme’s powerful new AI-powered design assistant that allows you to generate full web pages with a text prompt. Simply describe the type of page you want to create, provide the AI with supporting information, choose fonts and colors, and watch as Divi AI generates a full web page, complete with a wireframe, text, and images.
To generate a page with Divi AI, select the About page in Pages > All Pages. Enable the Divi Builder like in the previous step. Instead of choosing premade layouts this time, we’ll build the page with AI.
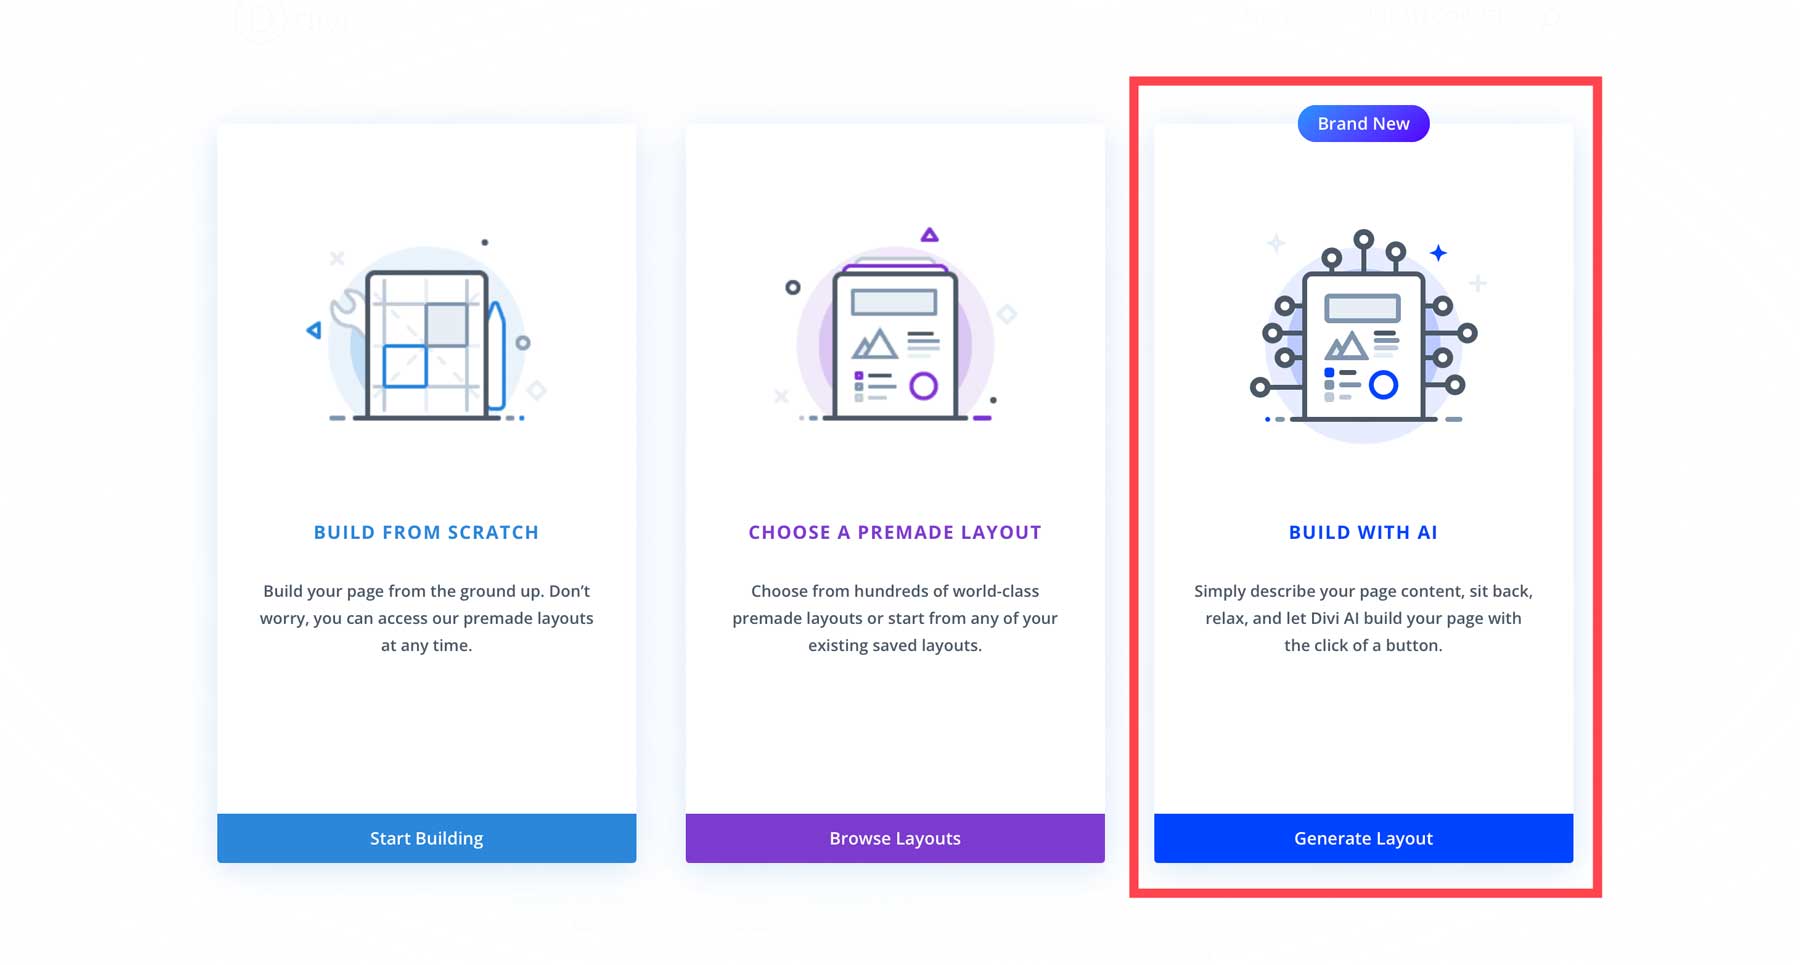
When the Divi AI dialog box appears, describe the page you want Divi AI to create, provide additional details, such as a mission statement or brief description of your business, and customize your fonts and colors. You can let AI choose them, use the website’s default fonts and colors, or select them manually. To make things interesting, we’ll select Let AI Choose For Me across the board. Once all fields are filled, click the Generate Layout button.
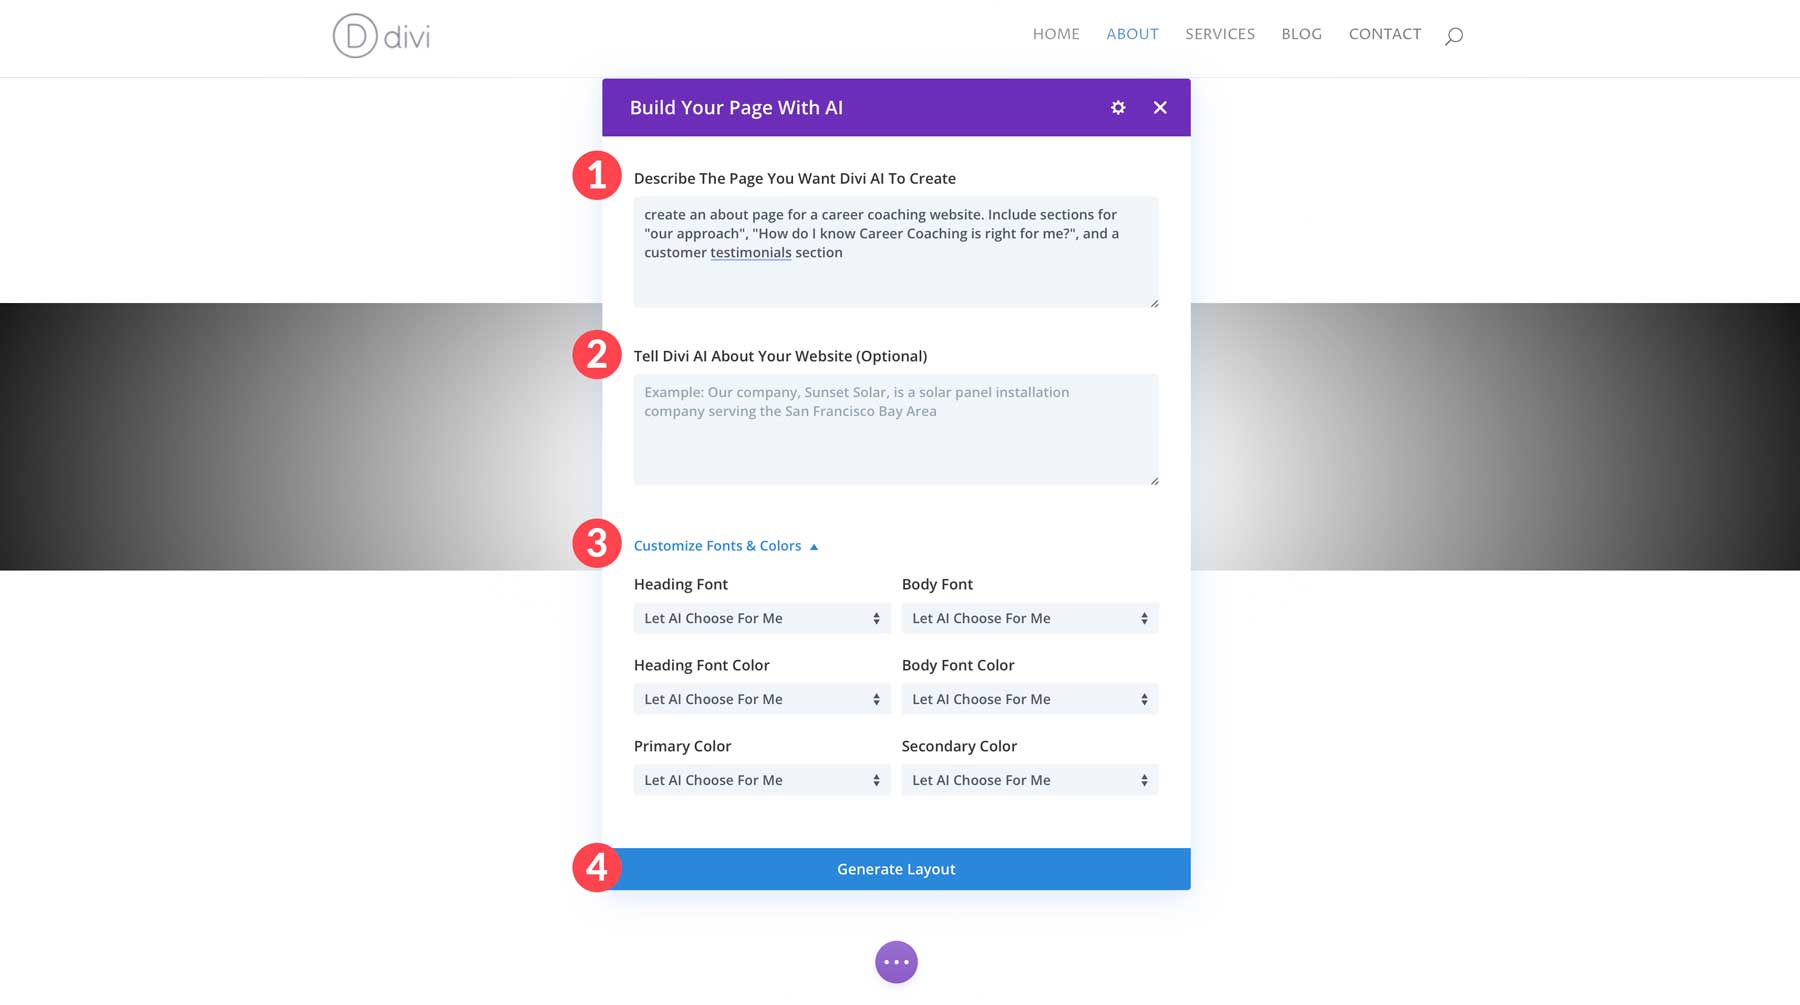
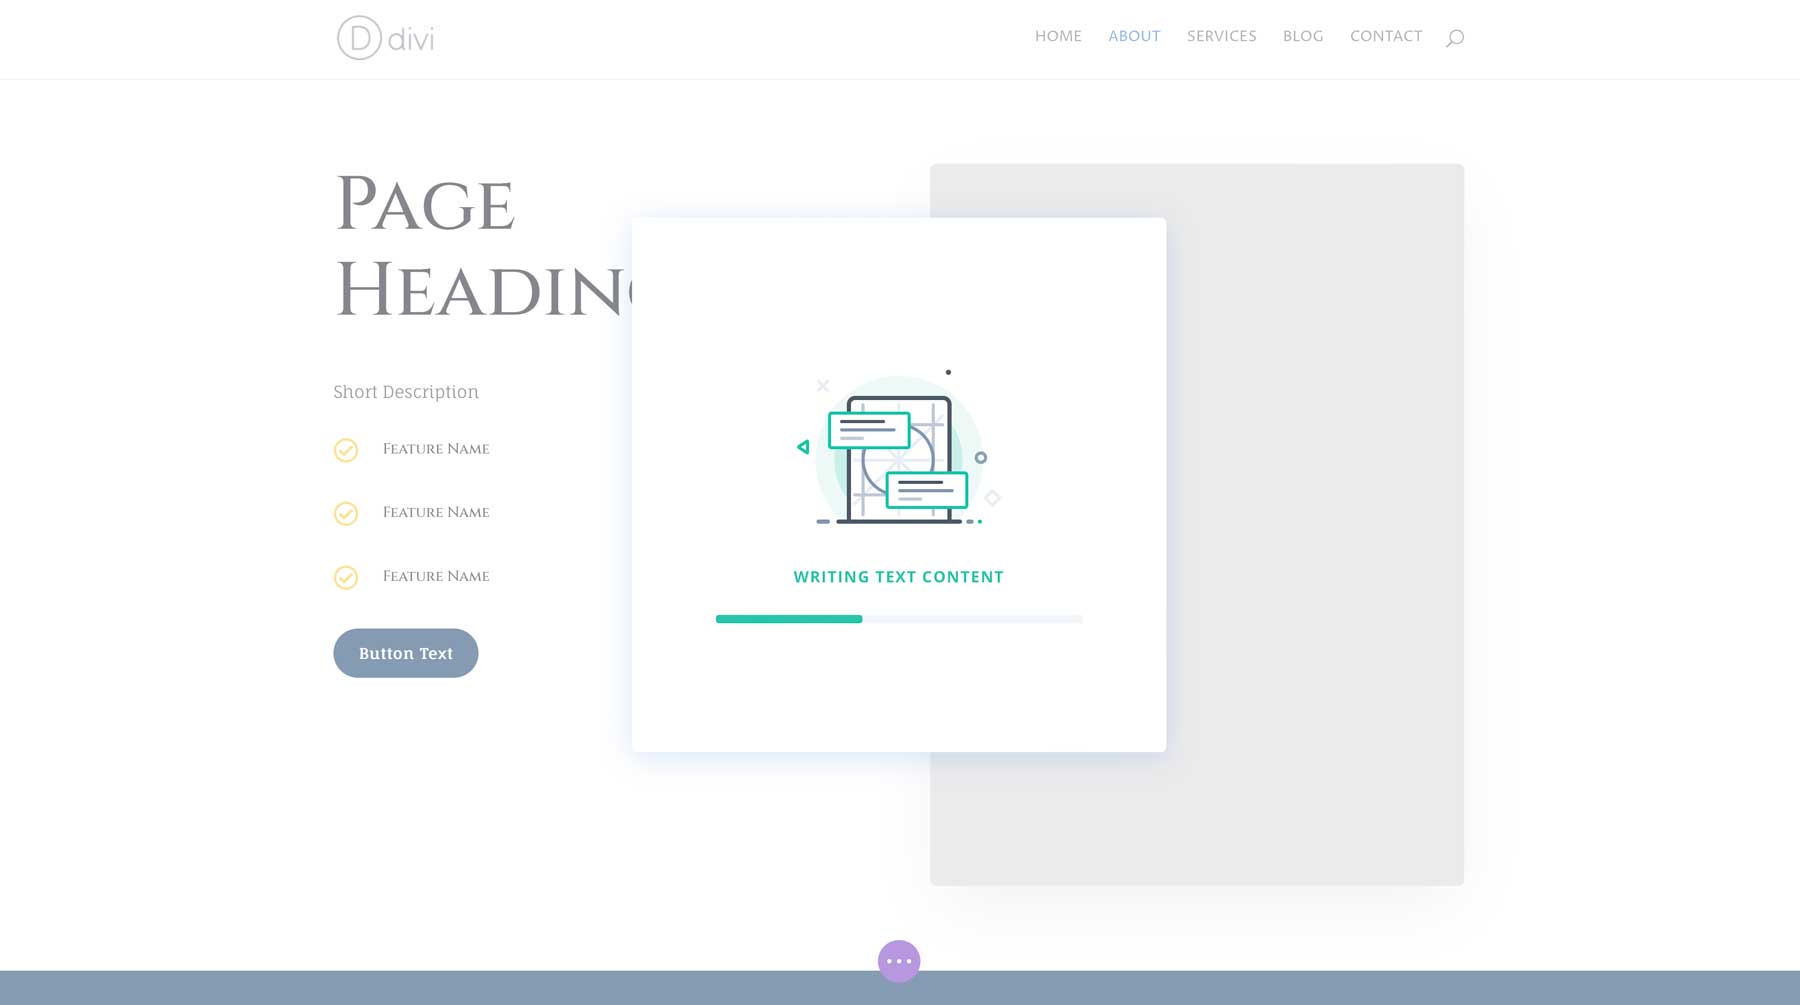
Over the next few minutes, Divi AI will create the page’s wireframe and add text and images within Divi design modules.
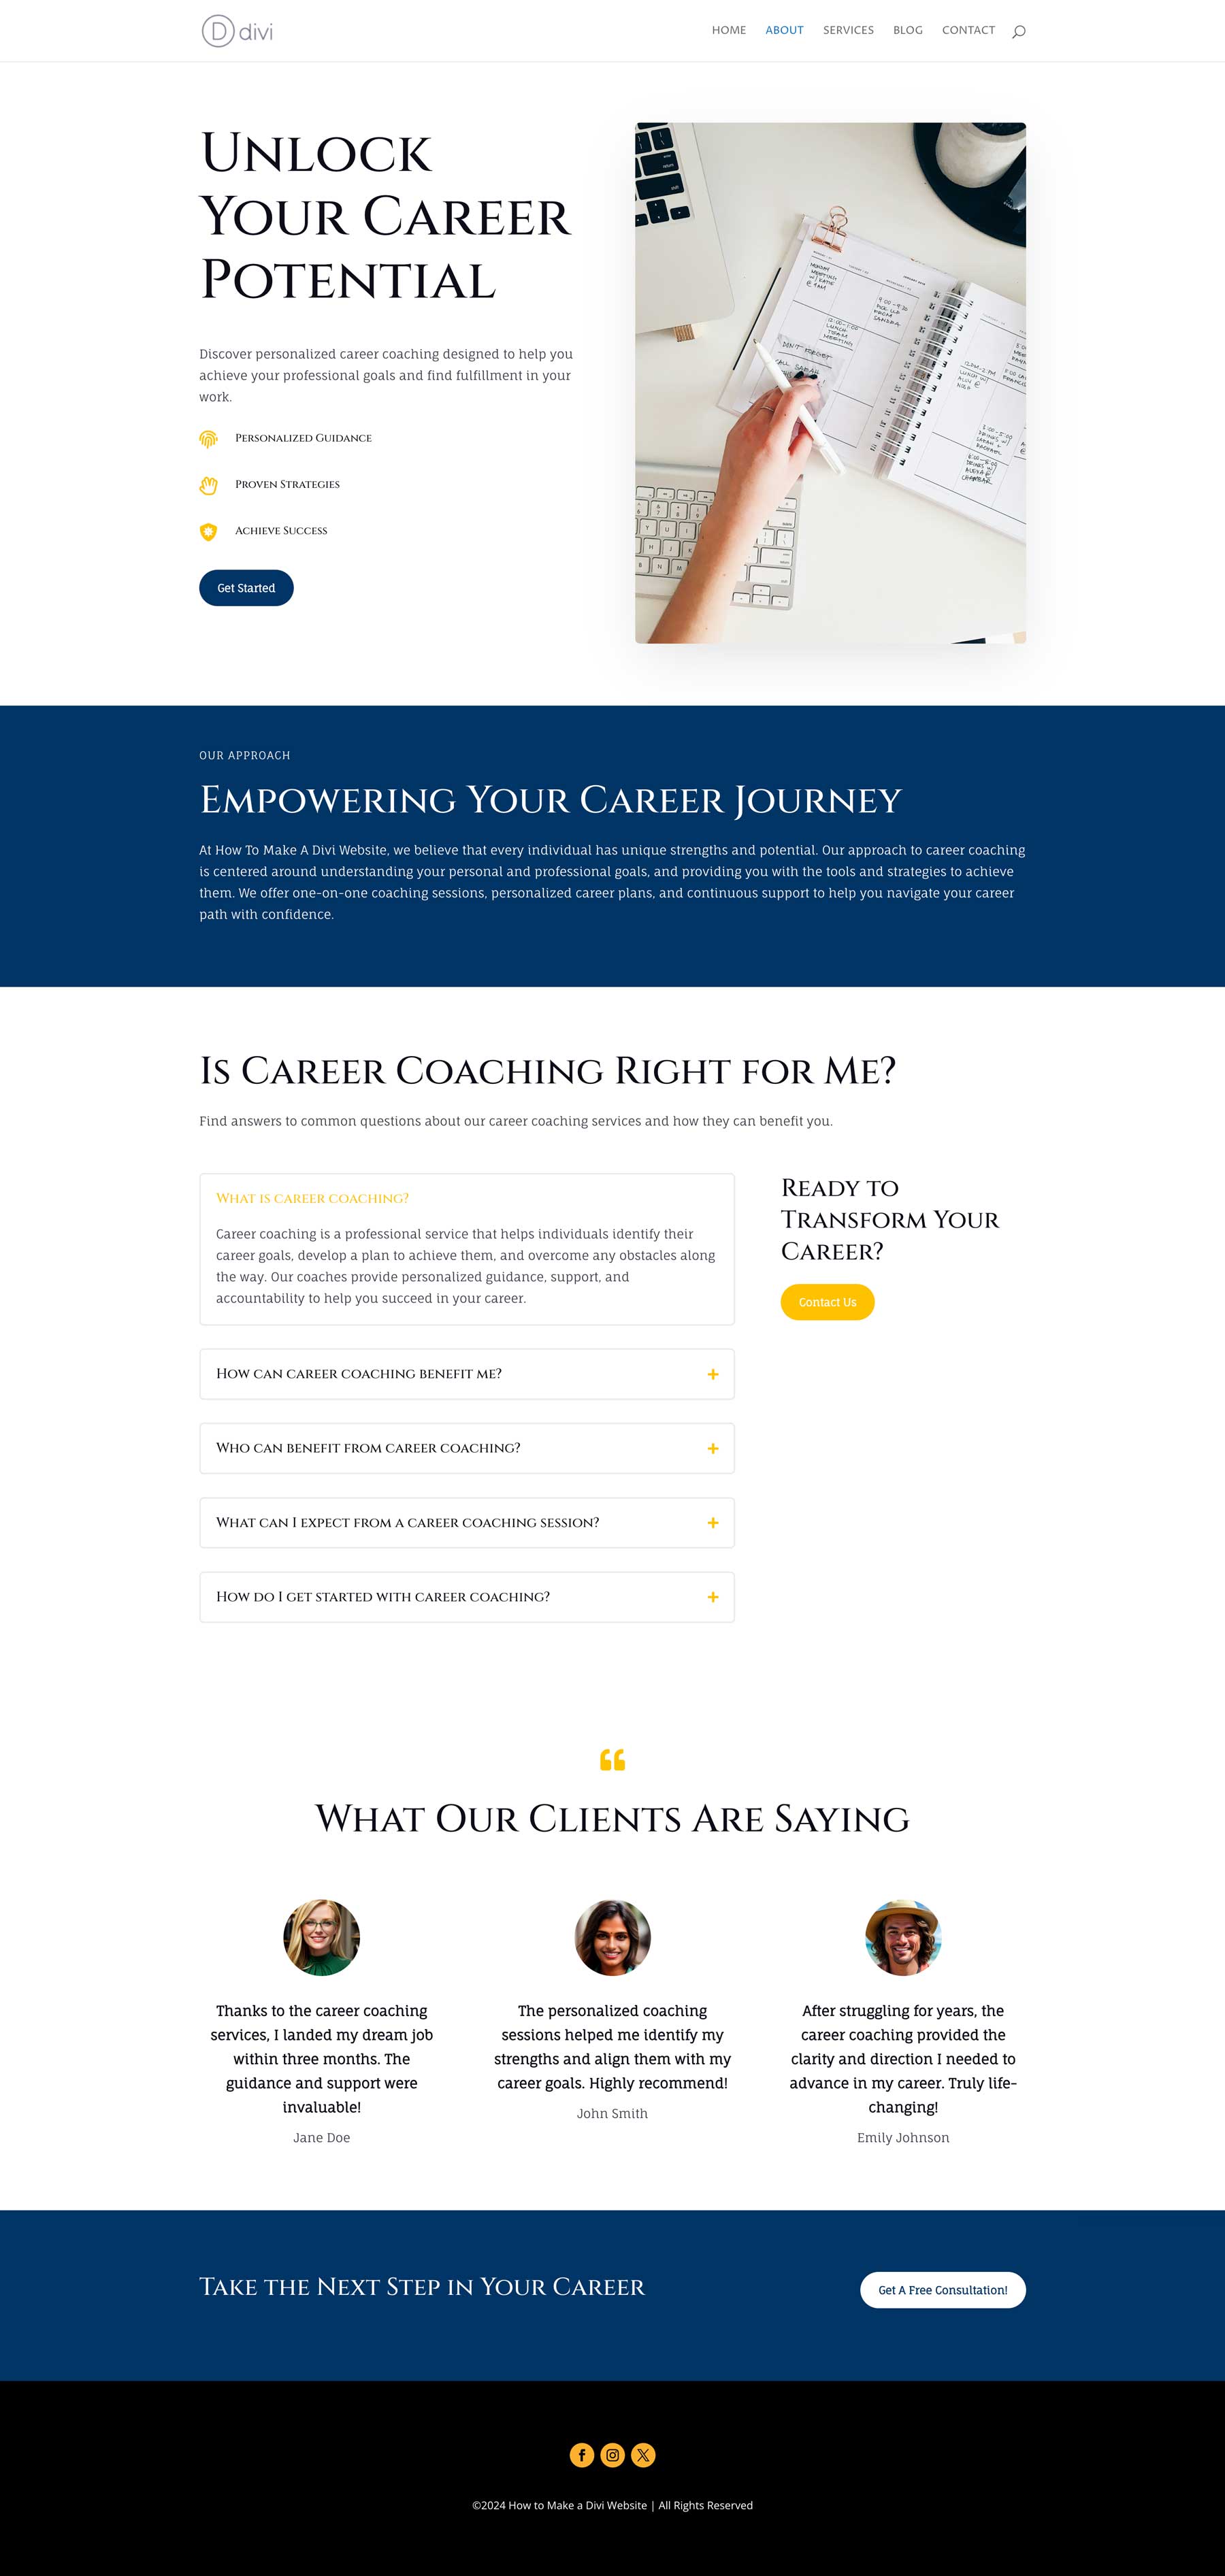
Once complete, you’ll have a fully functional web page you can edit with the Visual Builder.
Making Design Edits With Divi
Divi empowers you to create visually stunning pages using a vast library of design modules and customization options. These modules act like building blocks, allowing you to easily add various elements to your website. Even after creating pages with a premade template or Divi AI, you can edit designs by adding additional text content, images, and other elements.
In this section of our how to build a Divi website tutorial, we’ll showcase different ways to edit your pages with the Visual Builder and Divi AI.
Understanding the Visual Builder
Divi uses sections and rows to define the structure of a web page. Sections are larger containers with rows, which further organize your content into columns. You can customize the number of columns and spacing within each row.
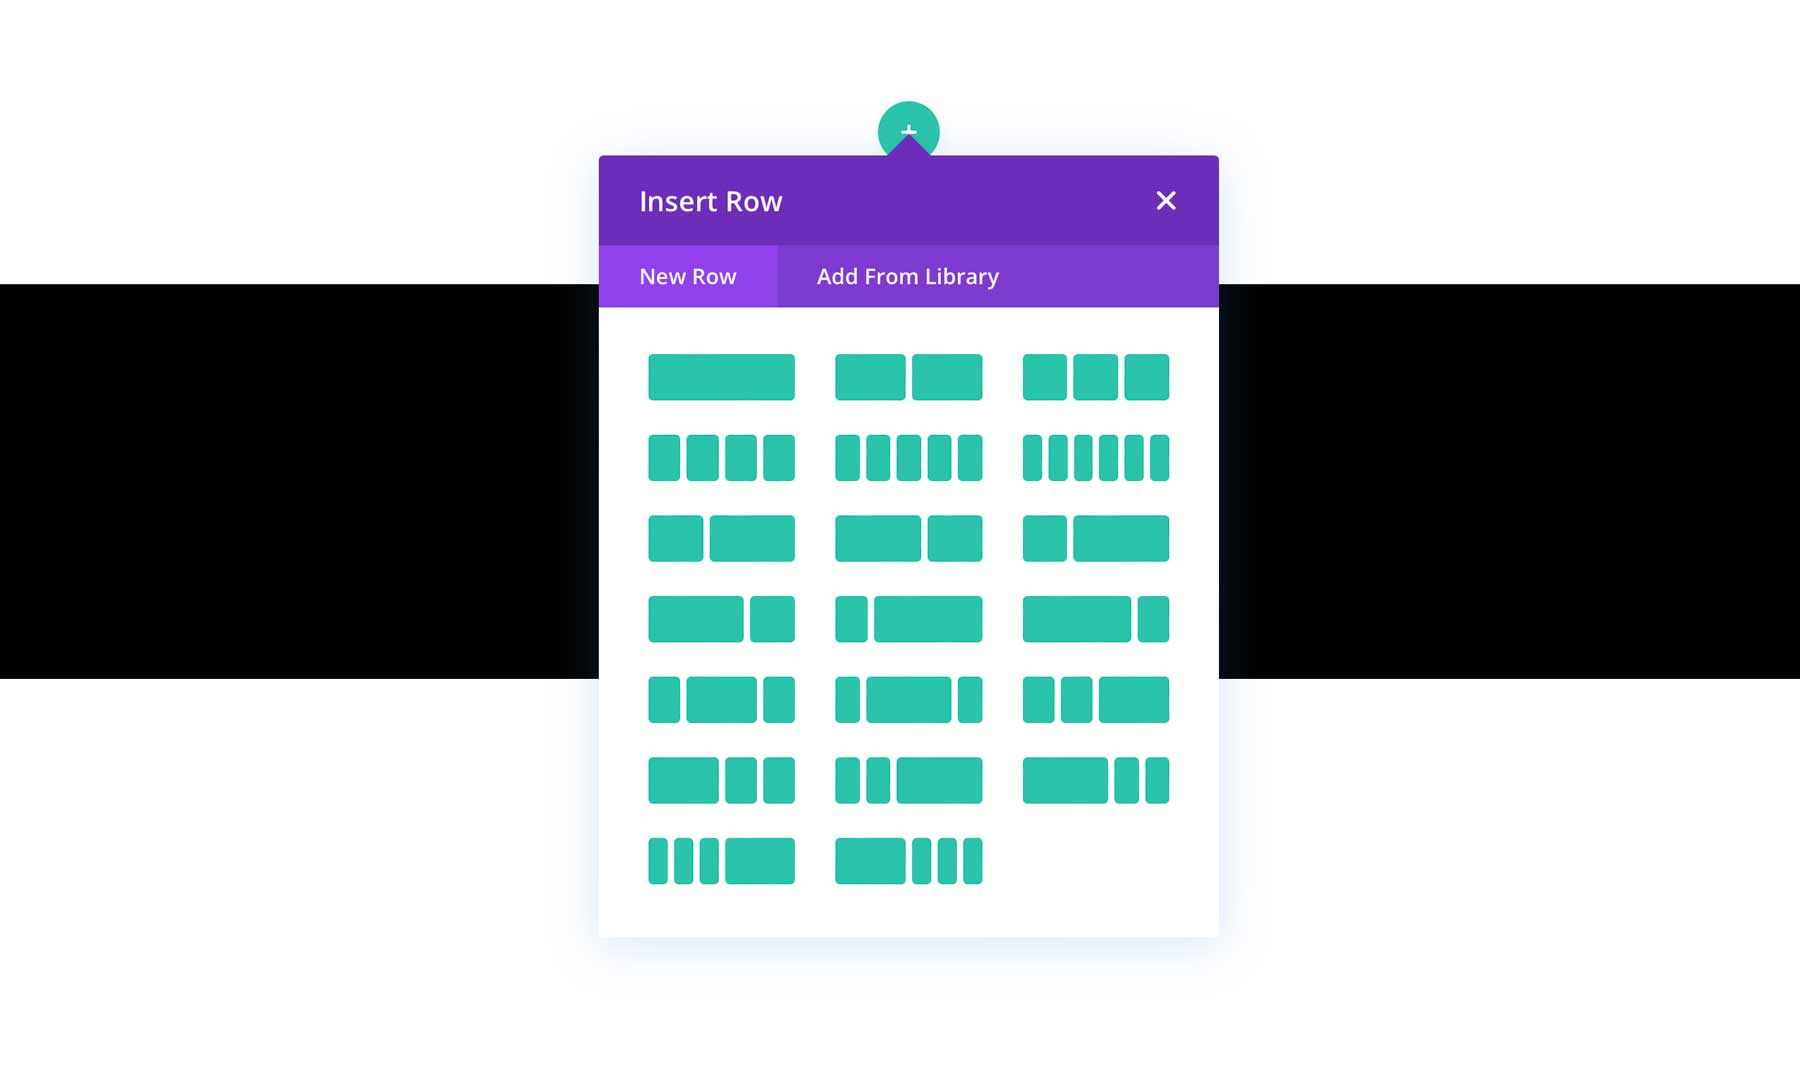
As previously mentioned, Divi has over 200 design modules with various functionalities. You can create image galleries, tabs, accordions, countdown timers, and more.
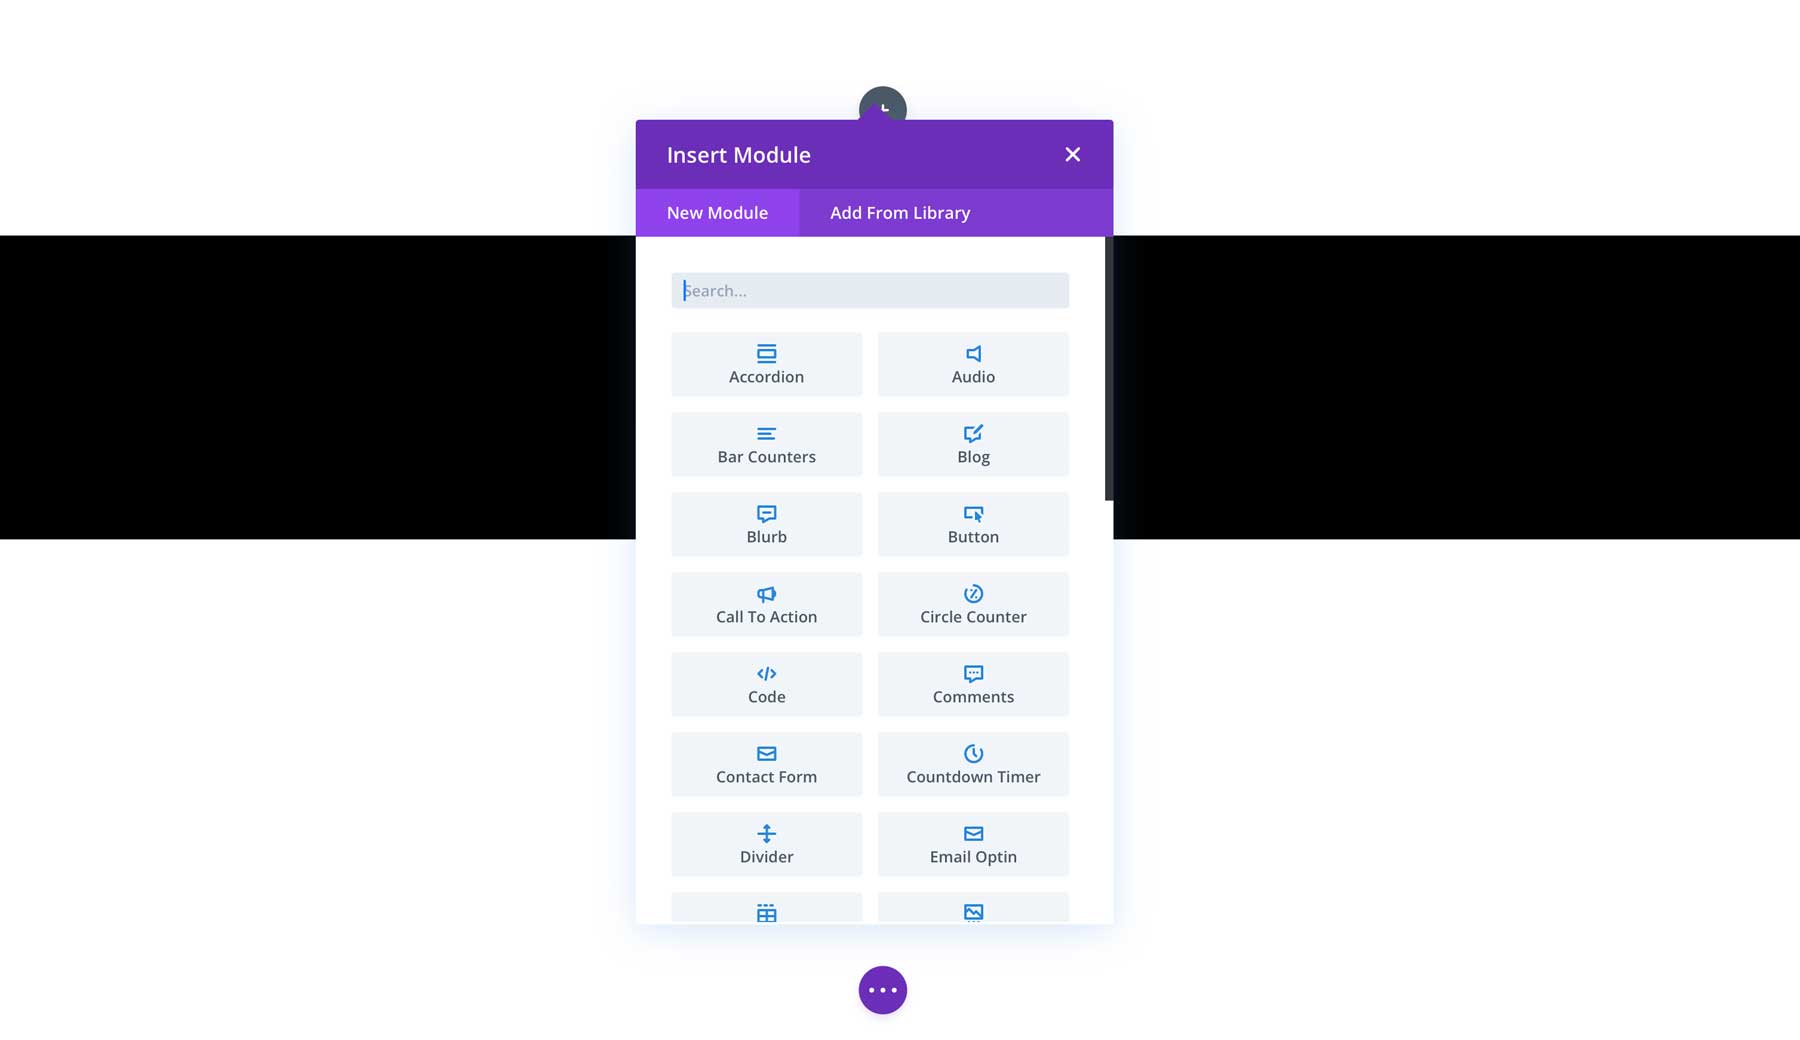
As you drag and drop elements, you see the changes reflected live on the screen. This eliminates the need for complex code and ensures your website looks exactly how you envision it. It’s like having a real-time preview of your website as you build it.
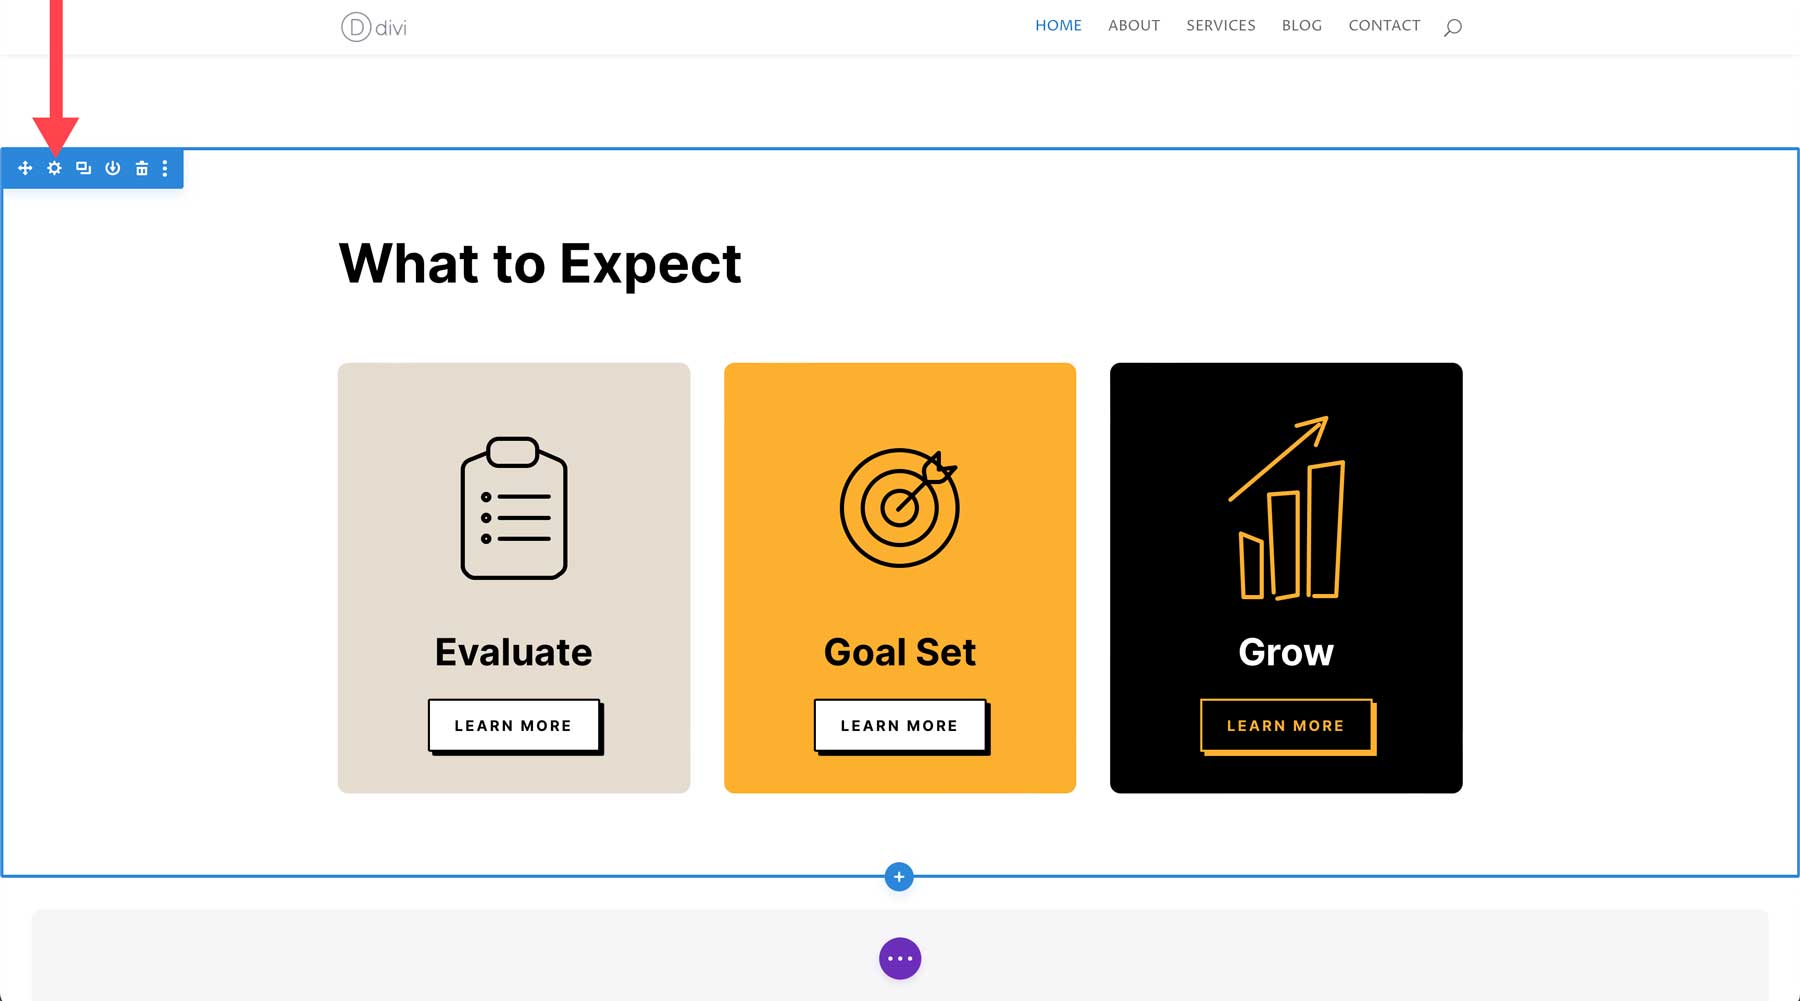
To edit a section, hover your mouse over the page content until a blue box appears. Click the gear icon to edit a section.
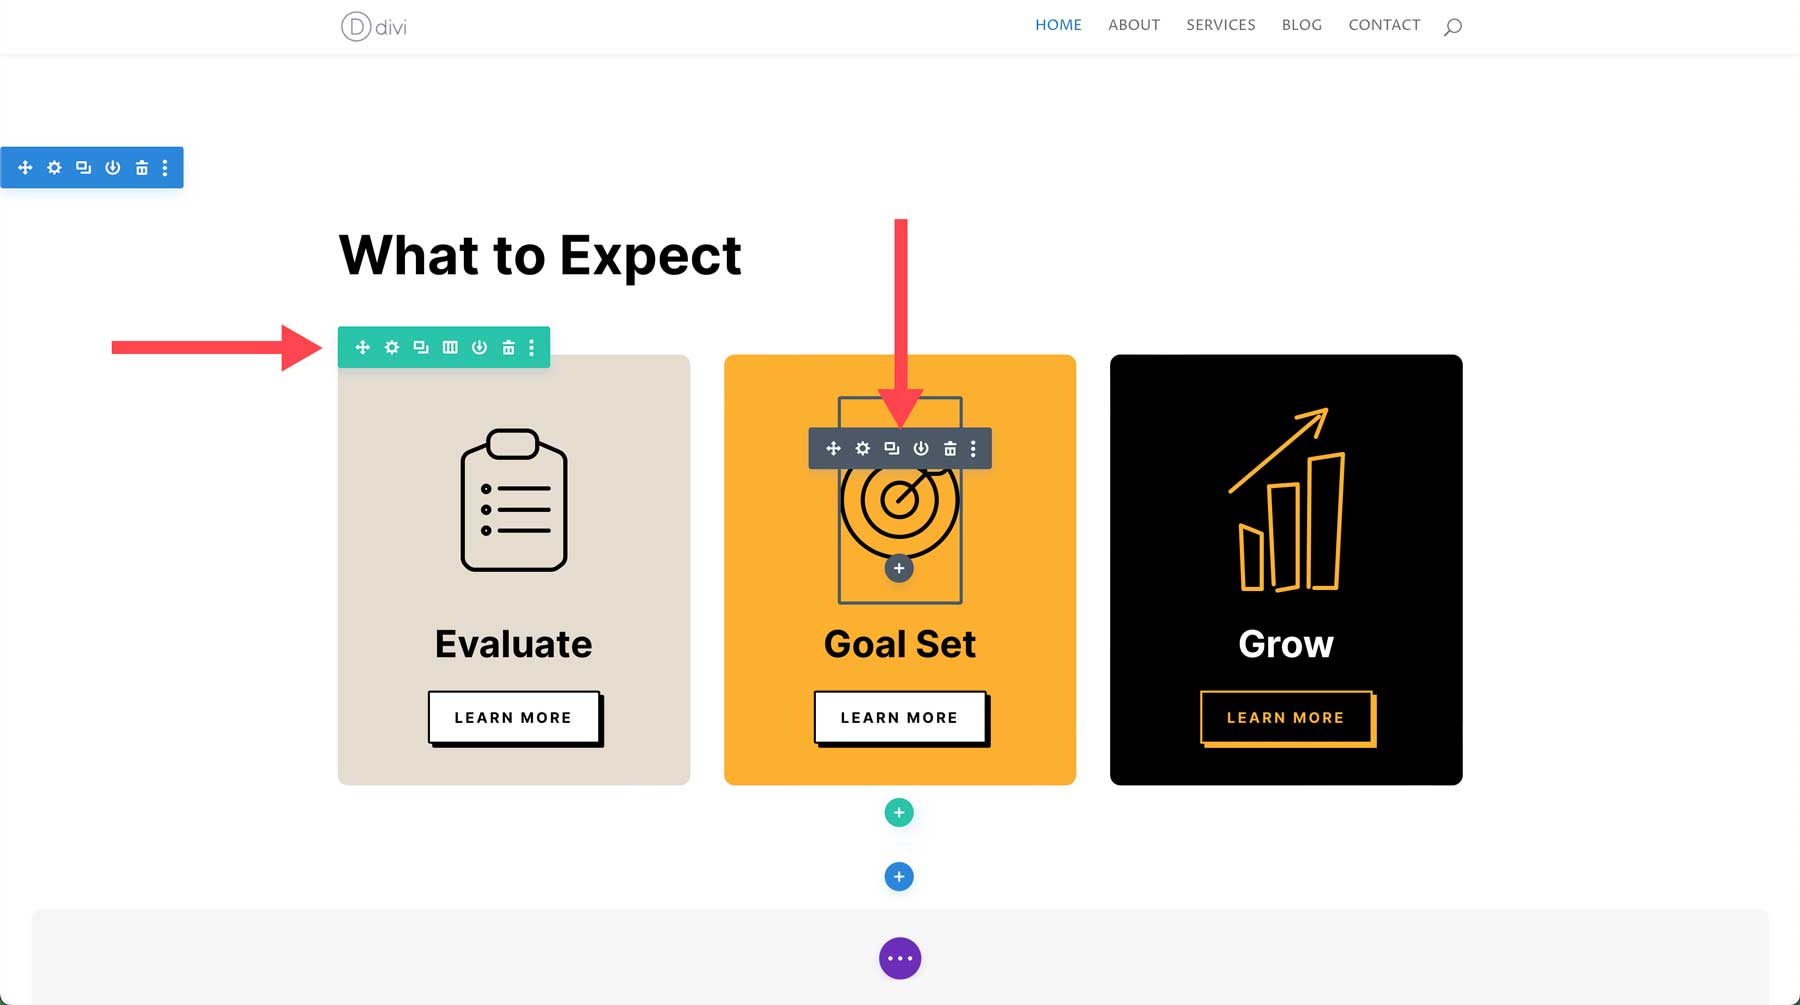
Similarly, you can edit rows and modules too. Rows are highlighted in green, and modules are grey.
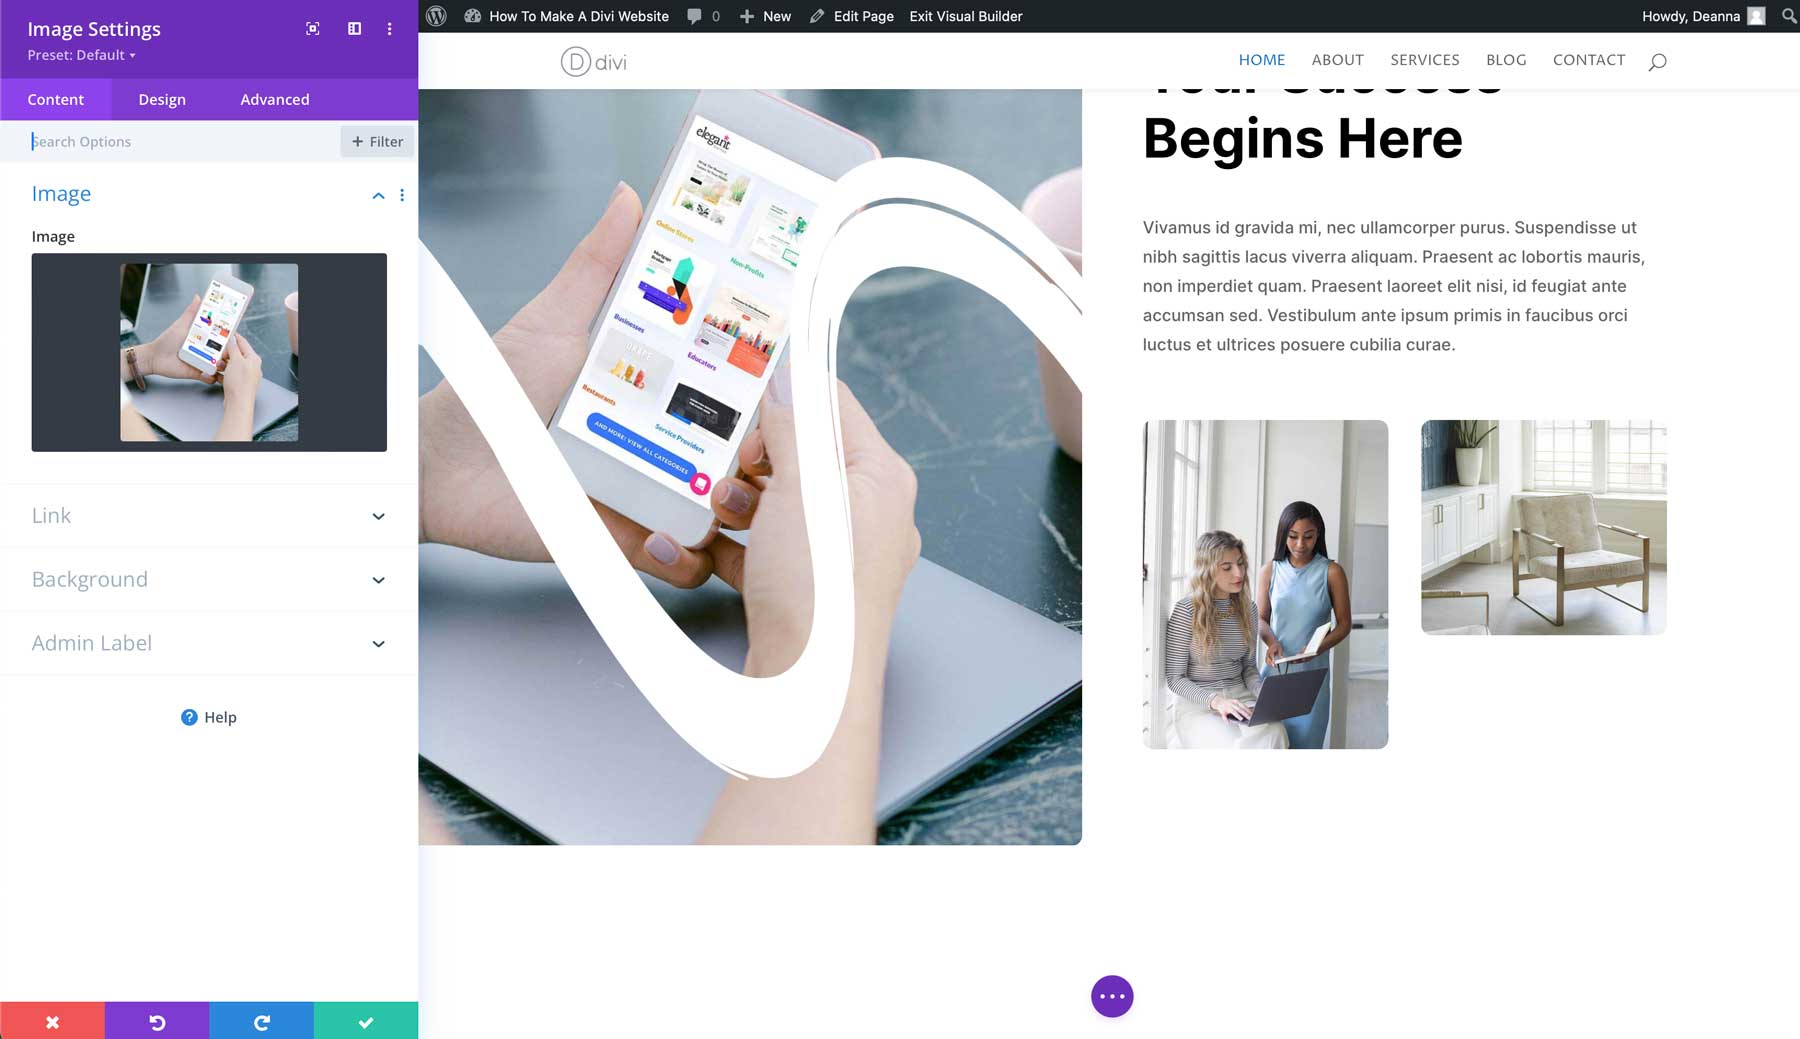
Every Divi section, row, and module has its own settings. There are three tabs, including content, design, and advanced.
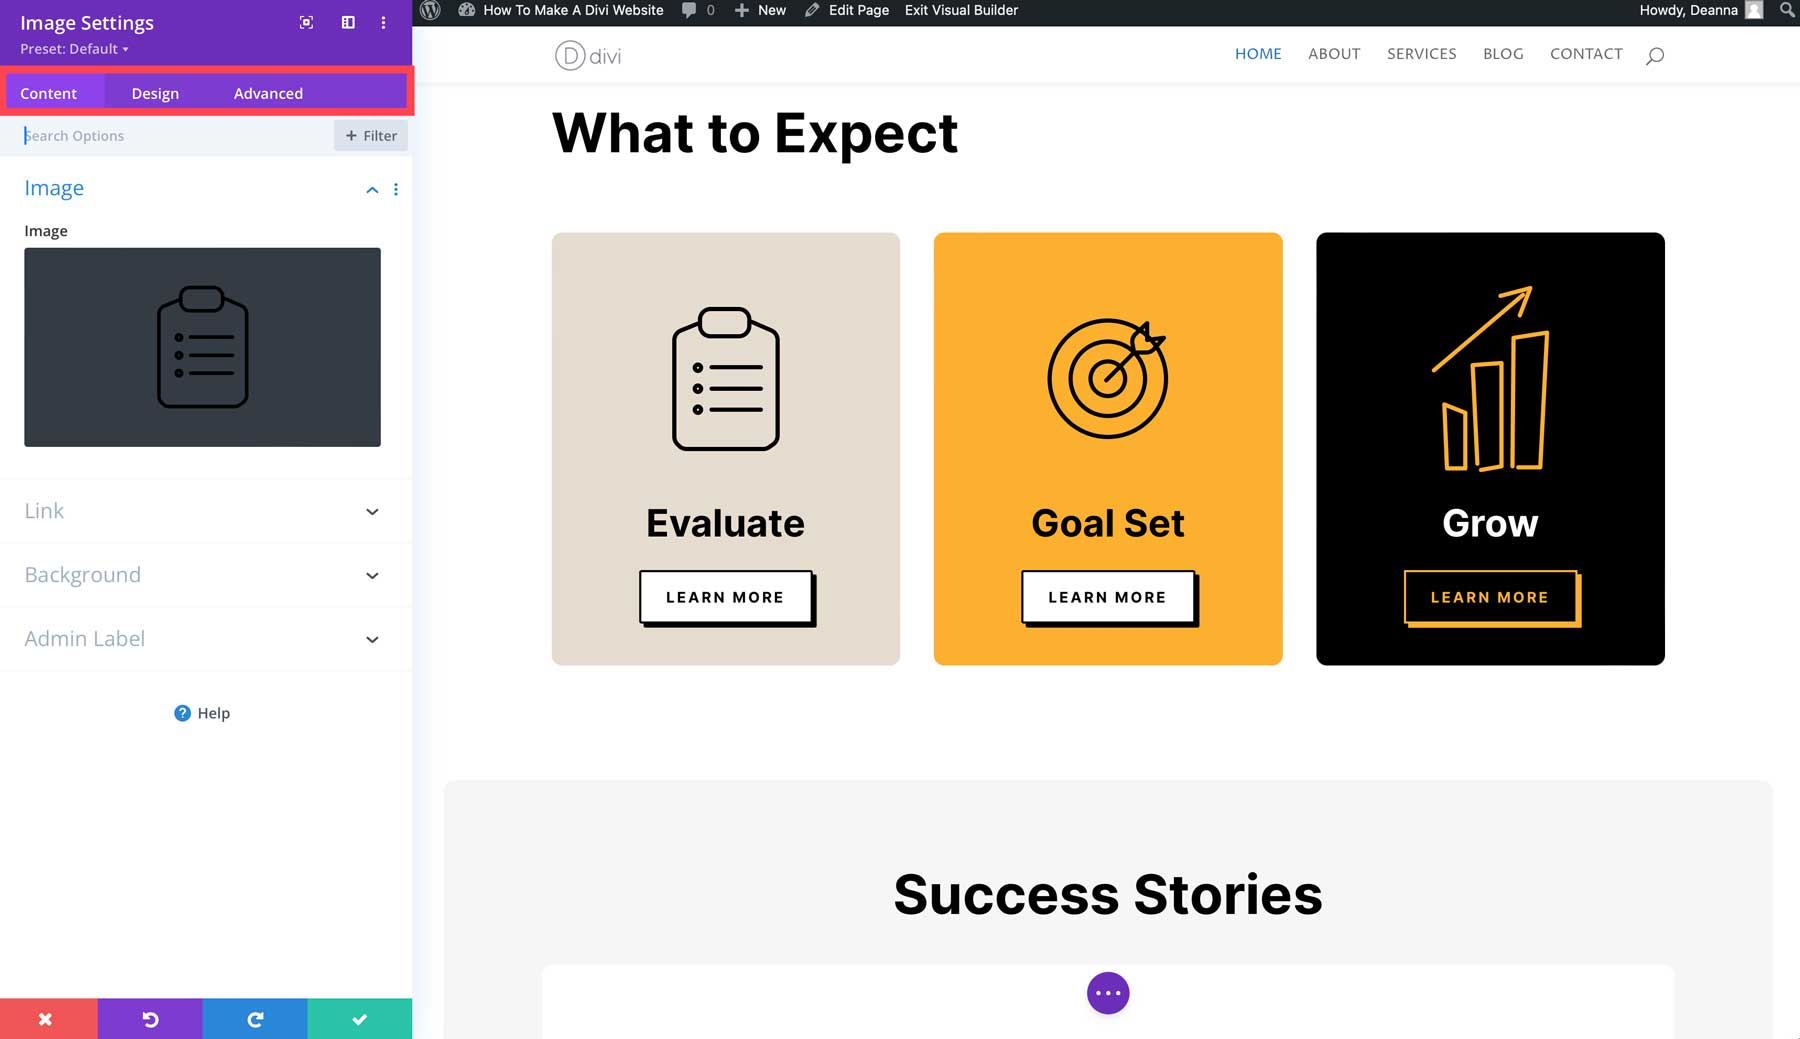
Combining modules, rows, and sections allows you to create complex layouts with complete control over the visual hierarchy and arrangement of elements on your pages. For example, you might use a section with a full-width background image, then add a row with three columns to display your services side-by-side within that section.

Divi’s powerful modules and layout options make the possibilities for creating beautiful and engaging websites endless.
Generating Text with Divi AI
Whether you make a Divi website with premade layouts, Divi AI, or from scratch, you can easily generate on-brand copy for your pages. Divi AI can generate all types of content, from blog post titles to product descriptions to blog posts and everything in between. Divi AI uses that knowledge and understanding of your website to create unique and relevant text content.
Let’s refer back to the home page we created with a premade layout to demonstrate how easy it is to use Divi AI’s text generator. Divi’s Layout Packs come with headlines, but placeholder copy is inserted in text modules. Let’s edit the text module in the hero section and add some new copy with Divi AI. Hover over the text module and click the grey icon to access its settings.
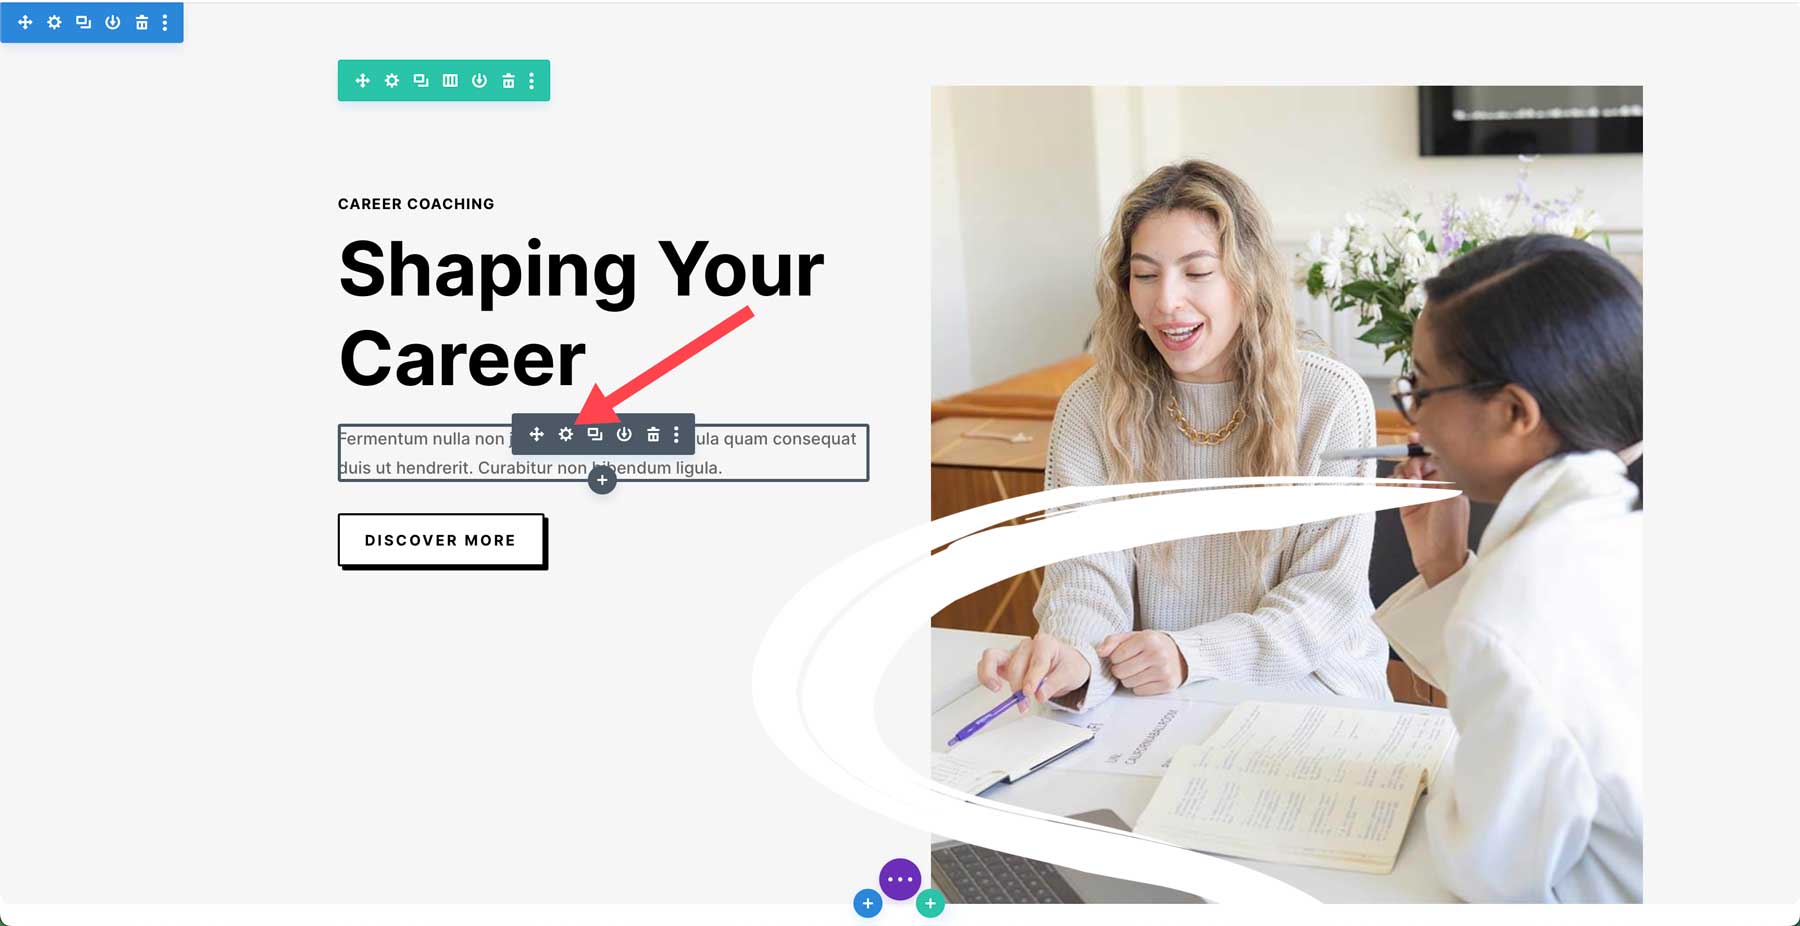
Next, click the Divi AI icon to access the AI dialog box.
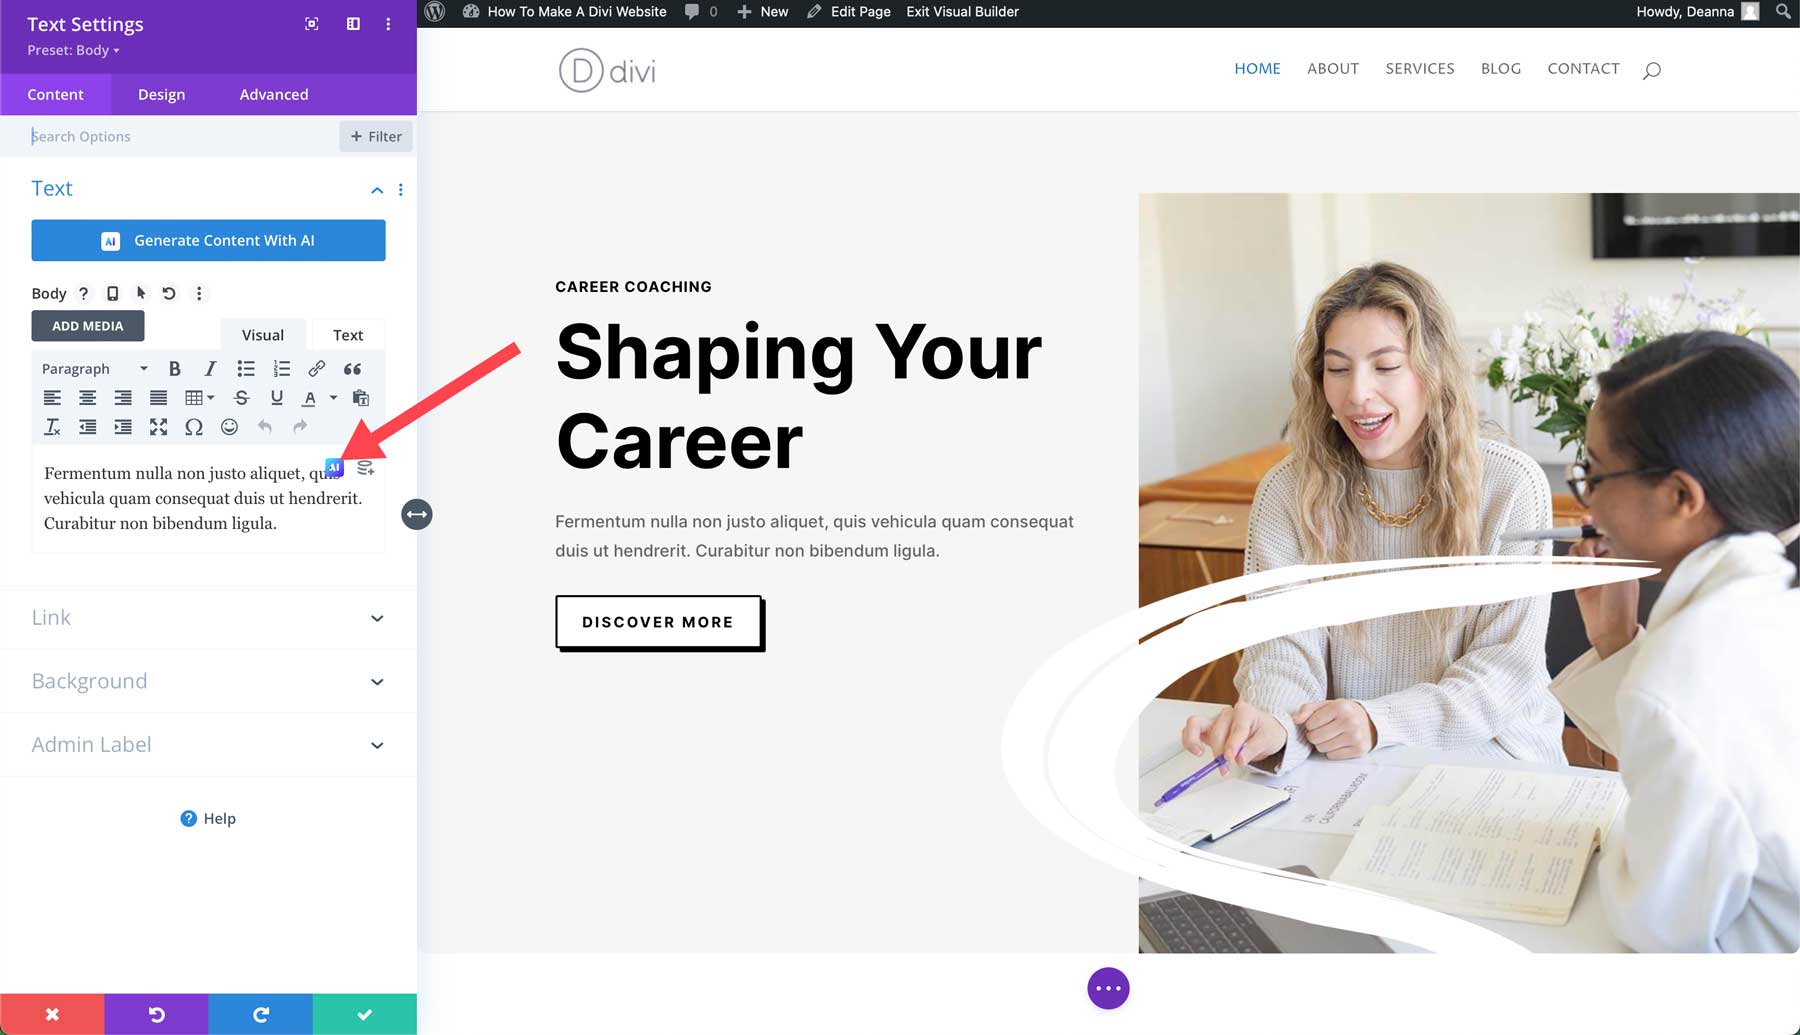
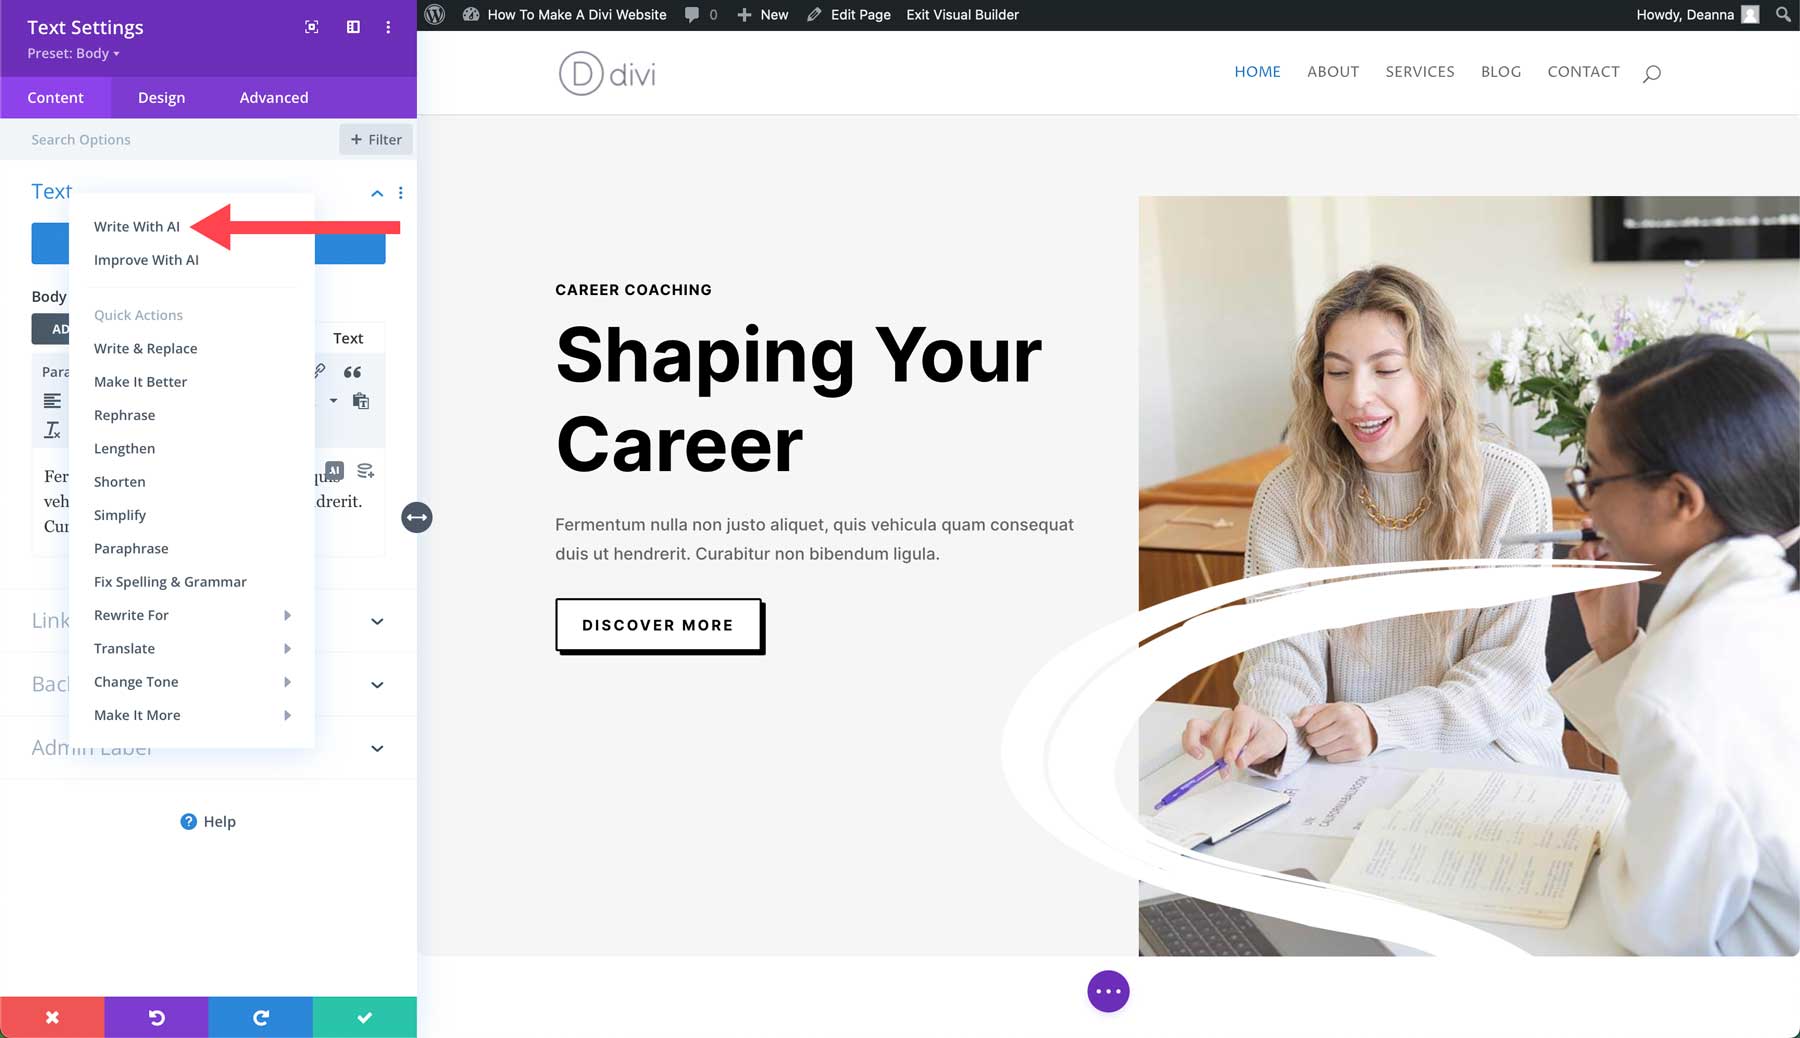
Select Write with AI when the popup appears.
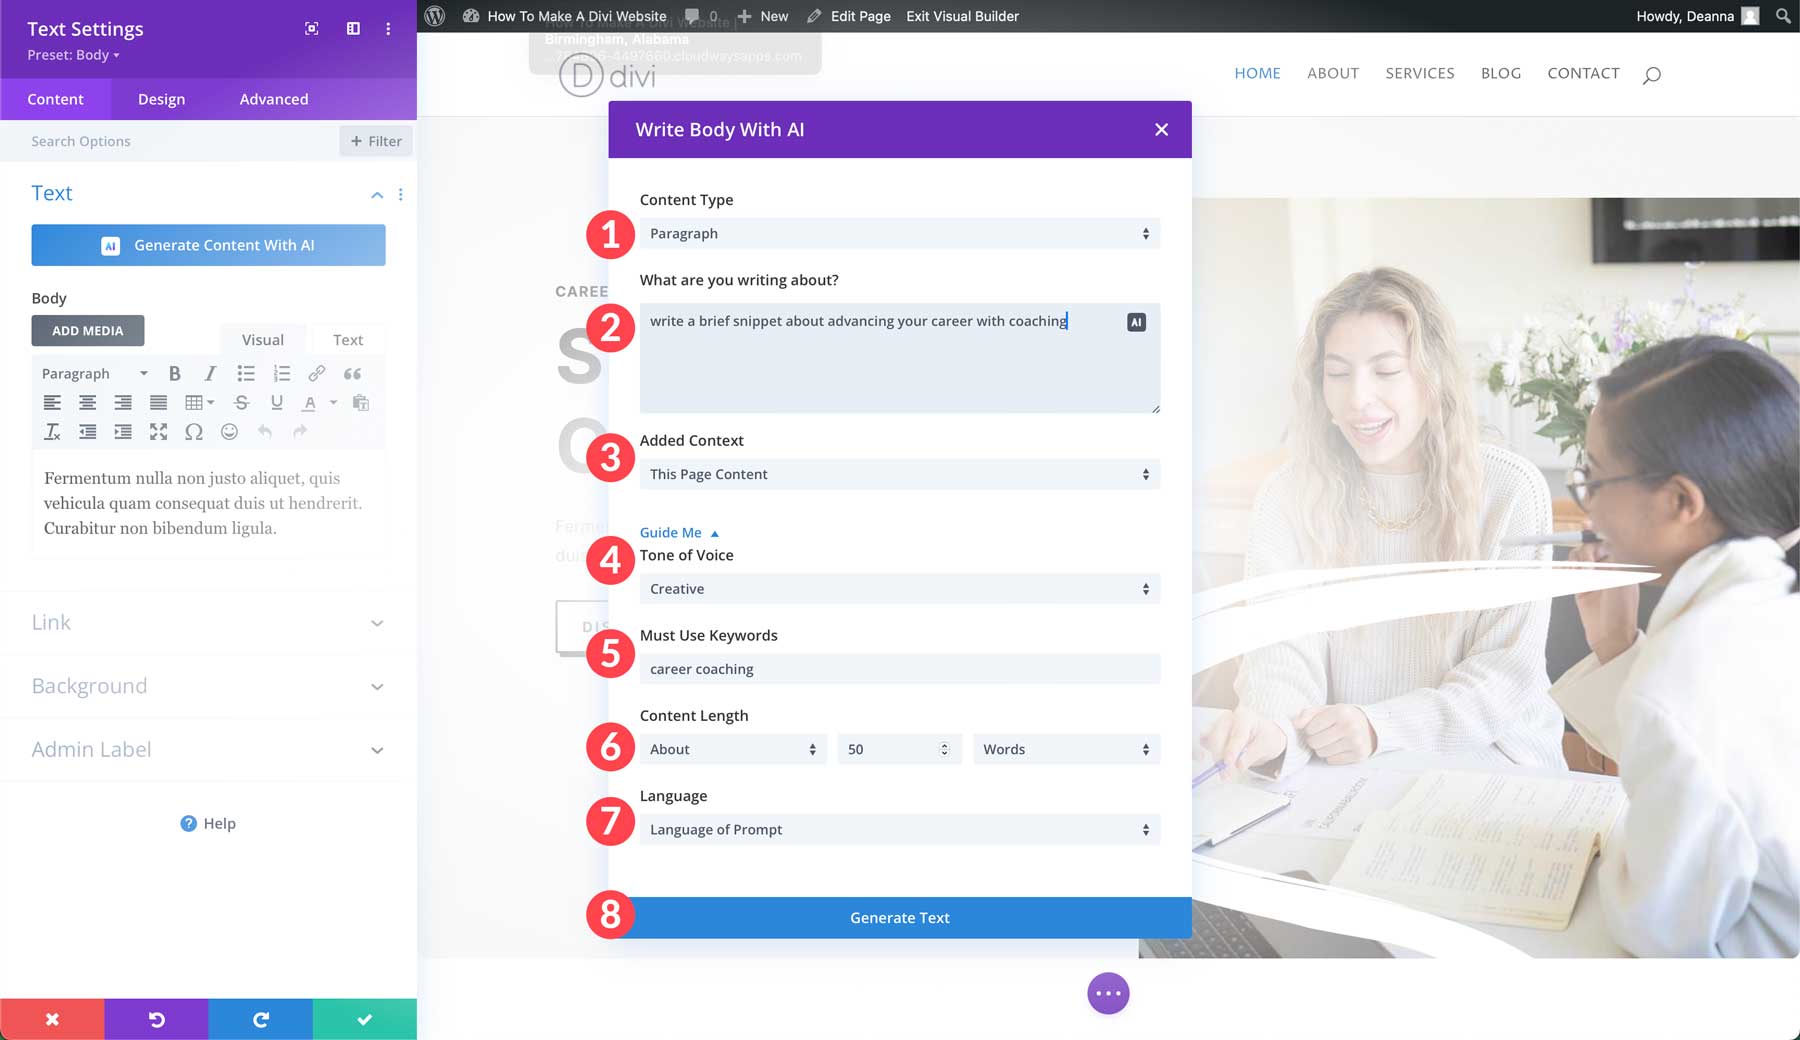
For the content type, select paragraph. Next, provide Divi AI with a brief summary of the text you want to generate. Specify the added context (this page, this section, etc), choose a tone of voice, and any must-use keywords you’d like to include. Finally, make the content about 50 words, leave the language at the default setting, and click the Generate Text button.
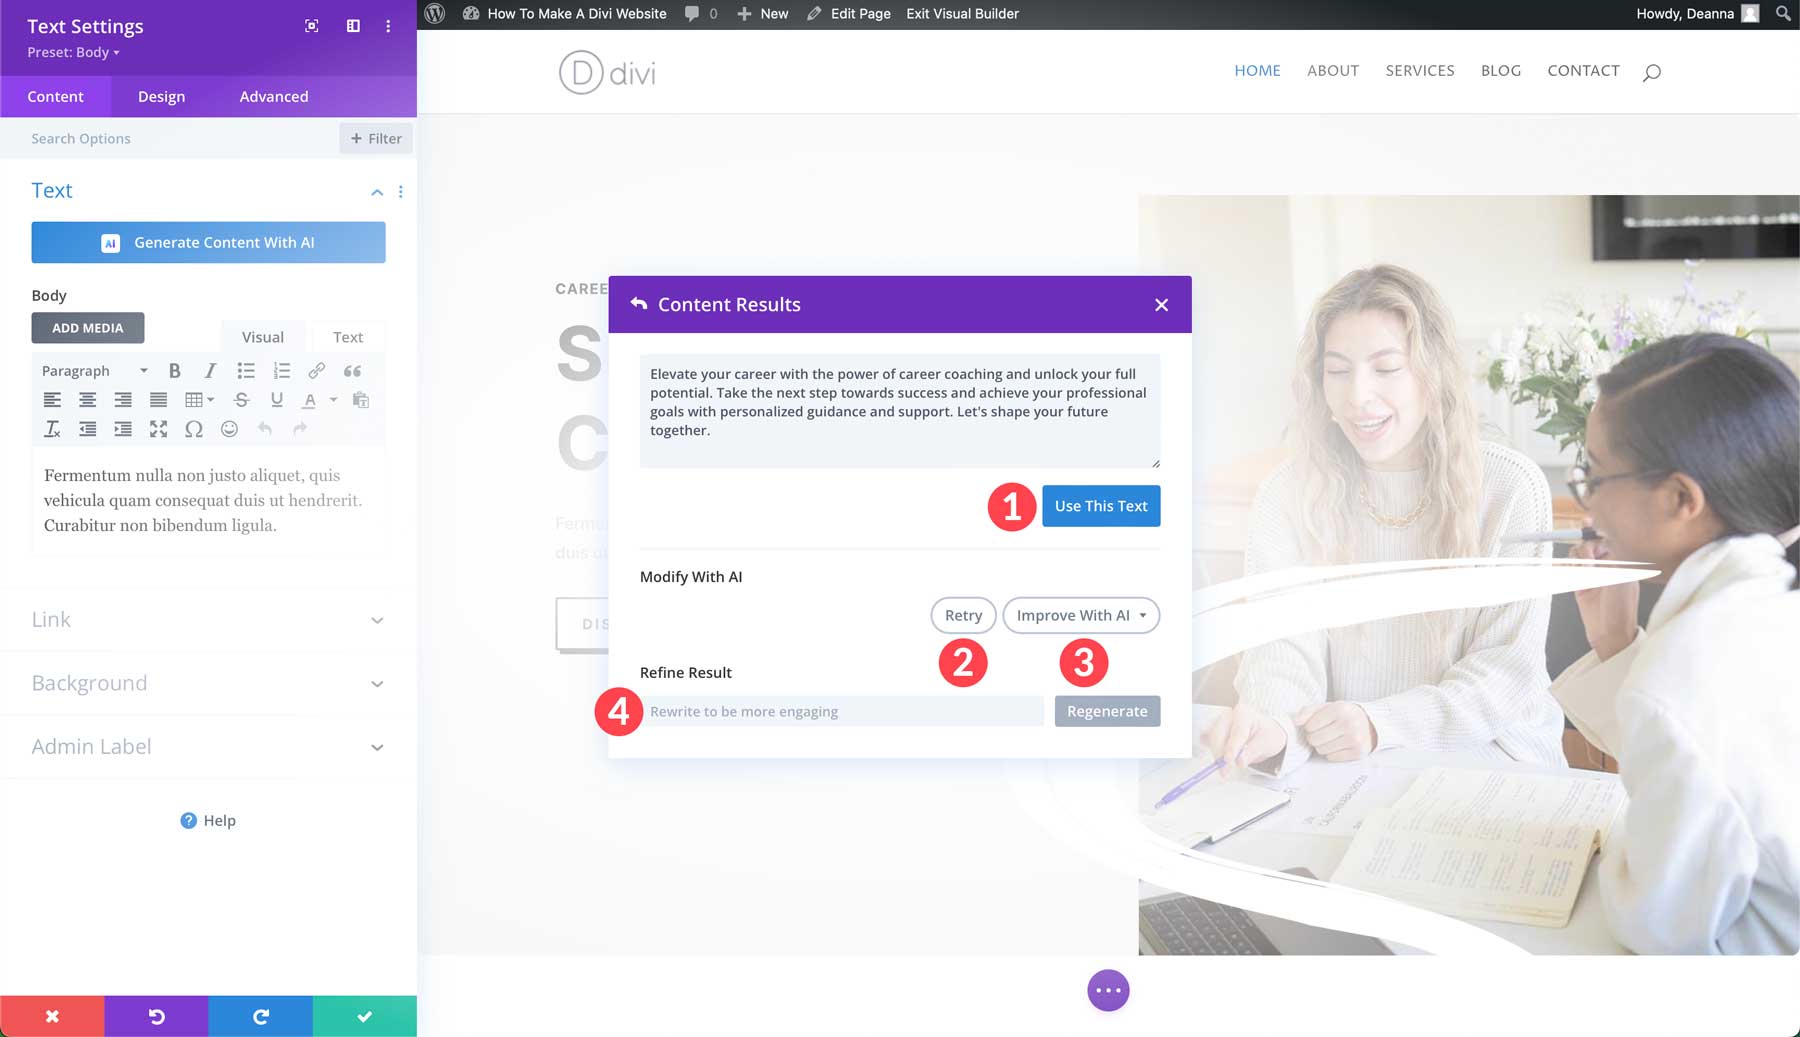
Divi AI will generate the content based on your settings. Once generated, you can place the text into the module by clicking the Use This Text button. Alternatively, you can retry your prompt, improve it further, or refine the result by adding an additional prompt.
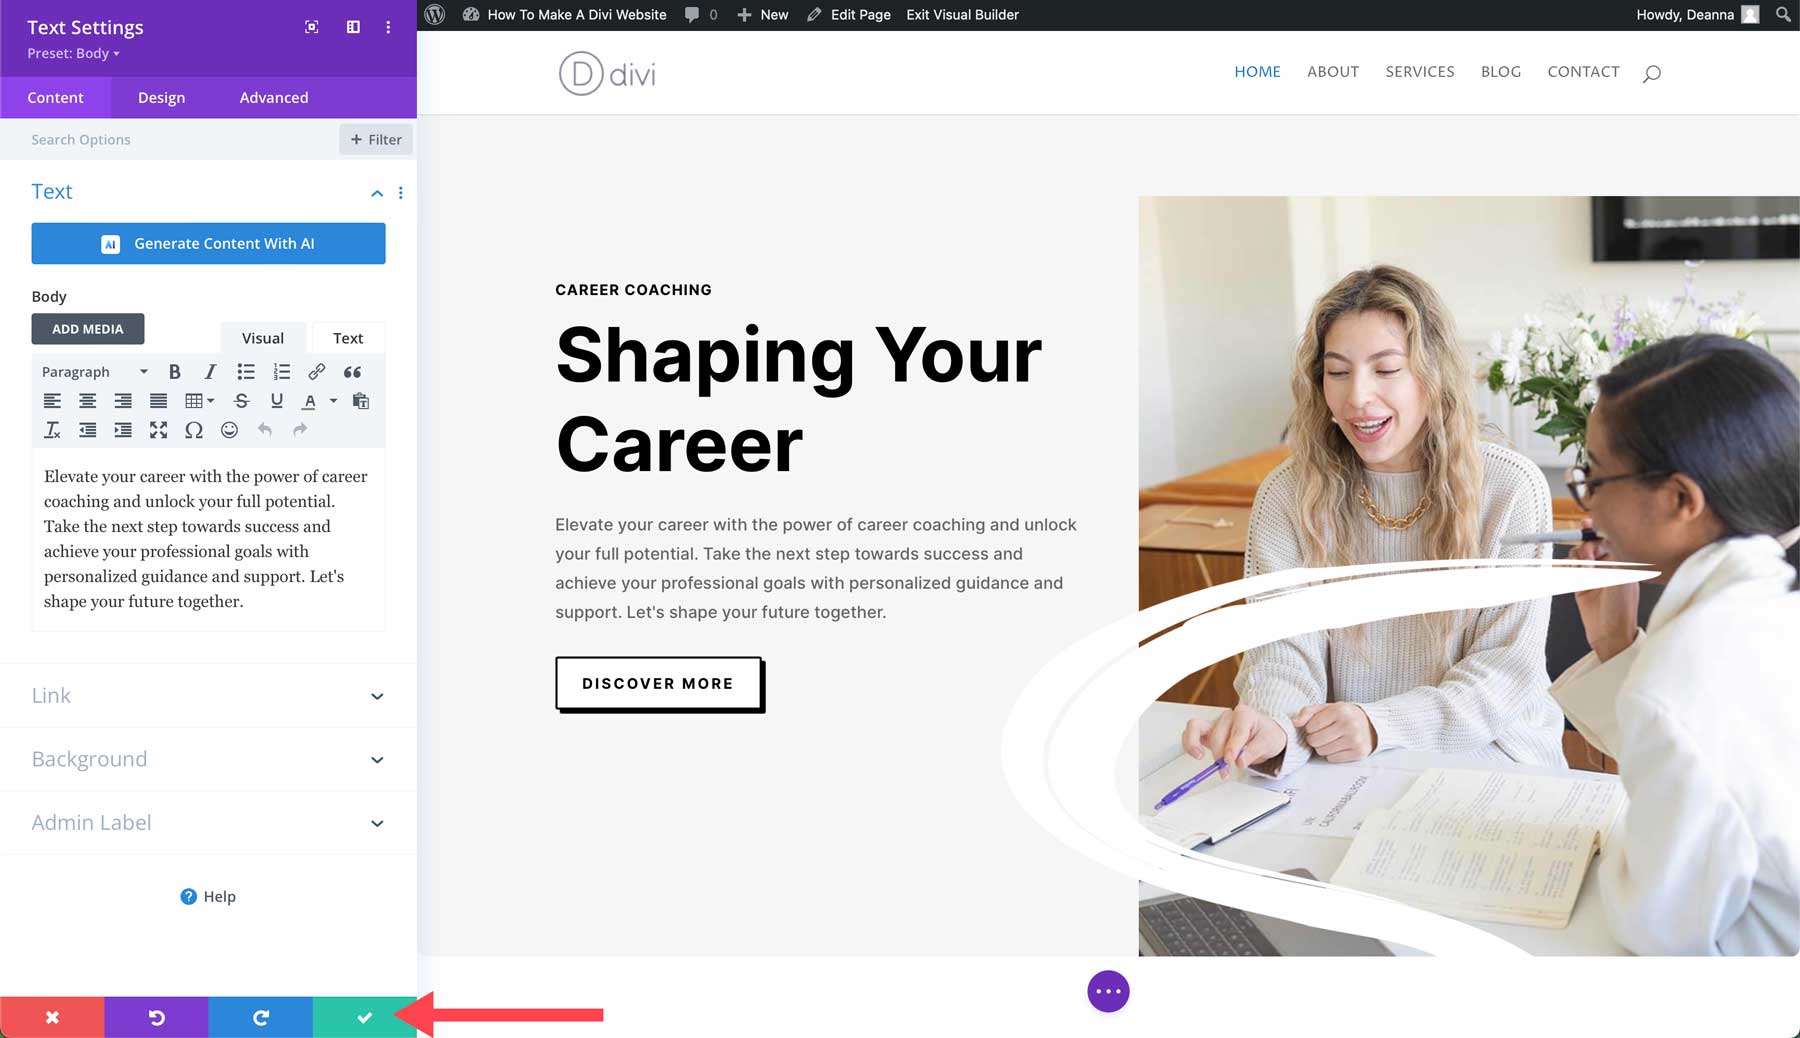
After adding the text to the module, click the green check button to save the changes.
Generating Images with Divi AI
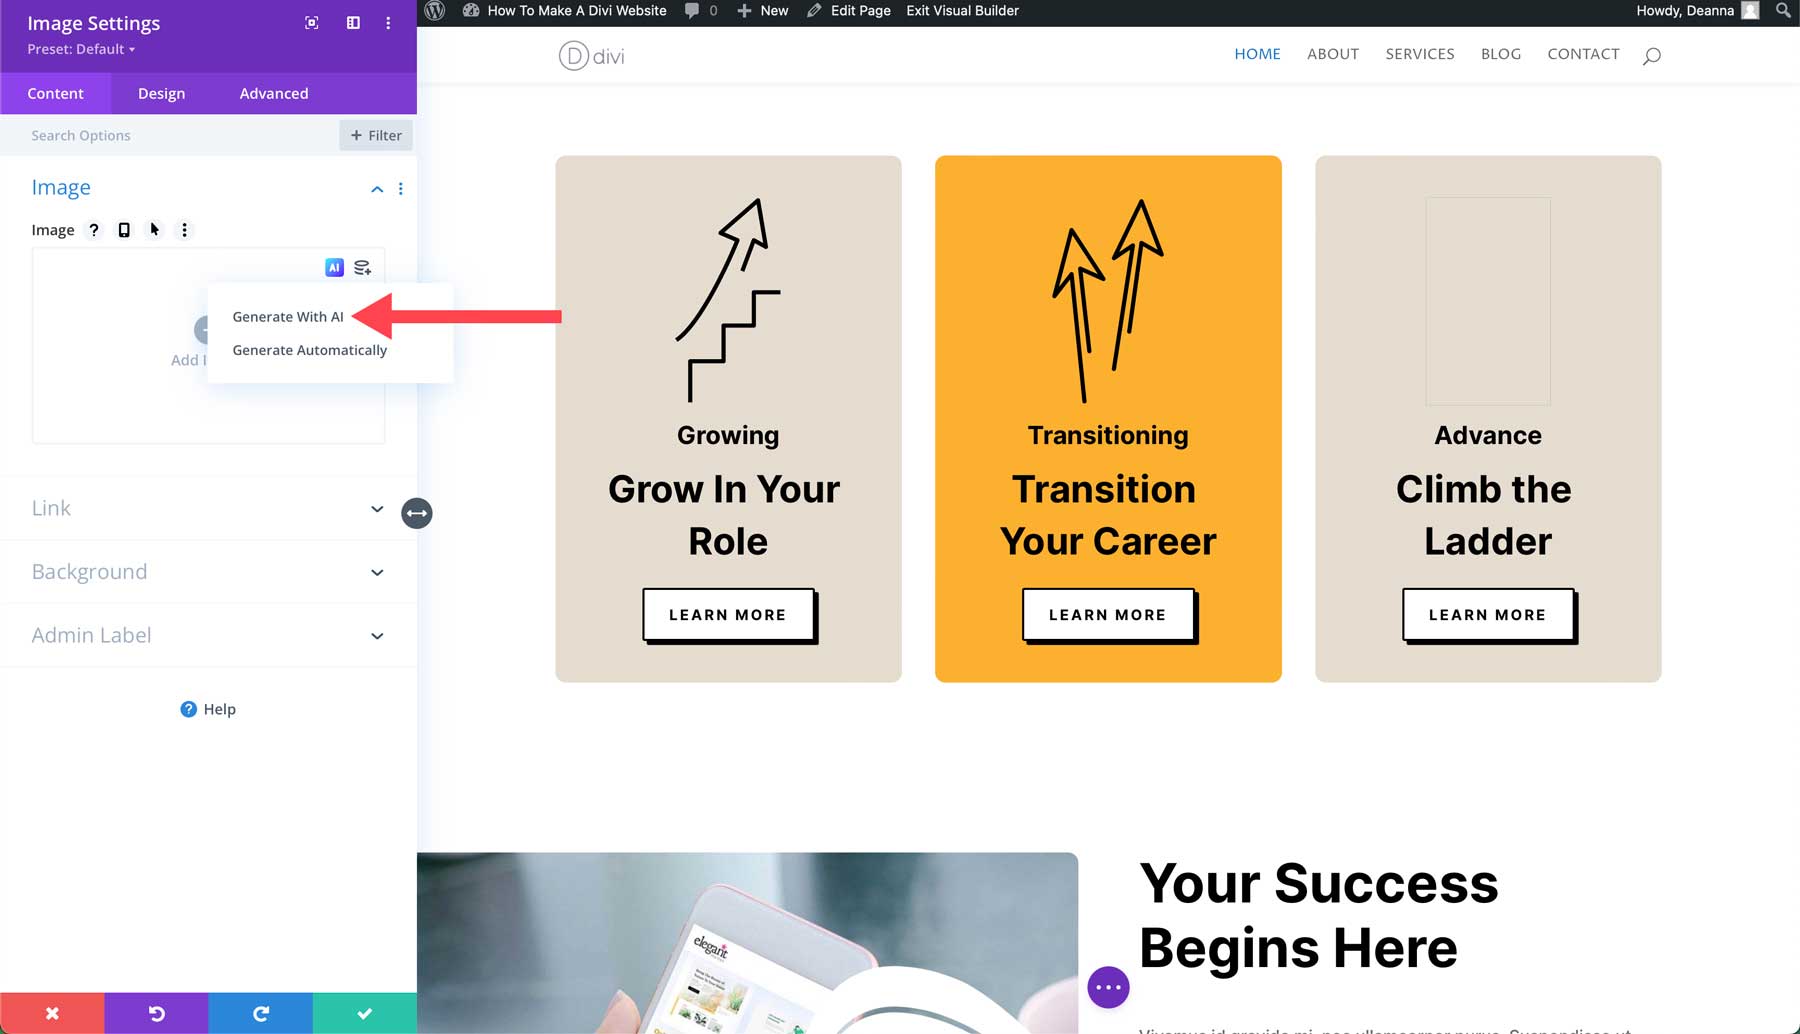
In addition to text, Divi AI can generate images. Divi AI offers twelve image styles: photo, vector, anime, and more. Generating images works much the same way generating text does, by entering a prompt describing the type of image you want to create. Start by either adding or editing an existing image module. With the image module’s settings active, click the Divi AI icon to bring up the AI interface.
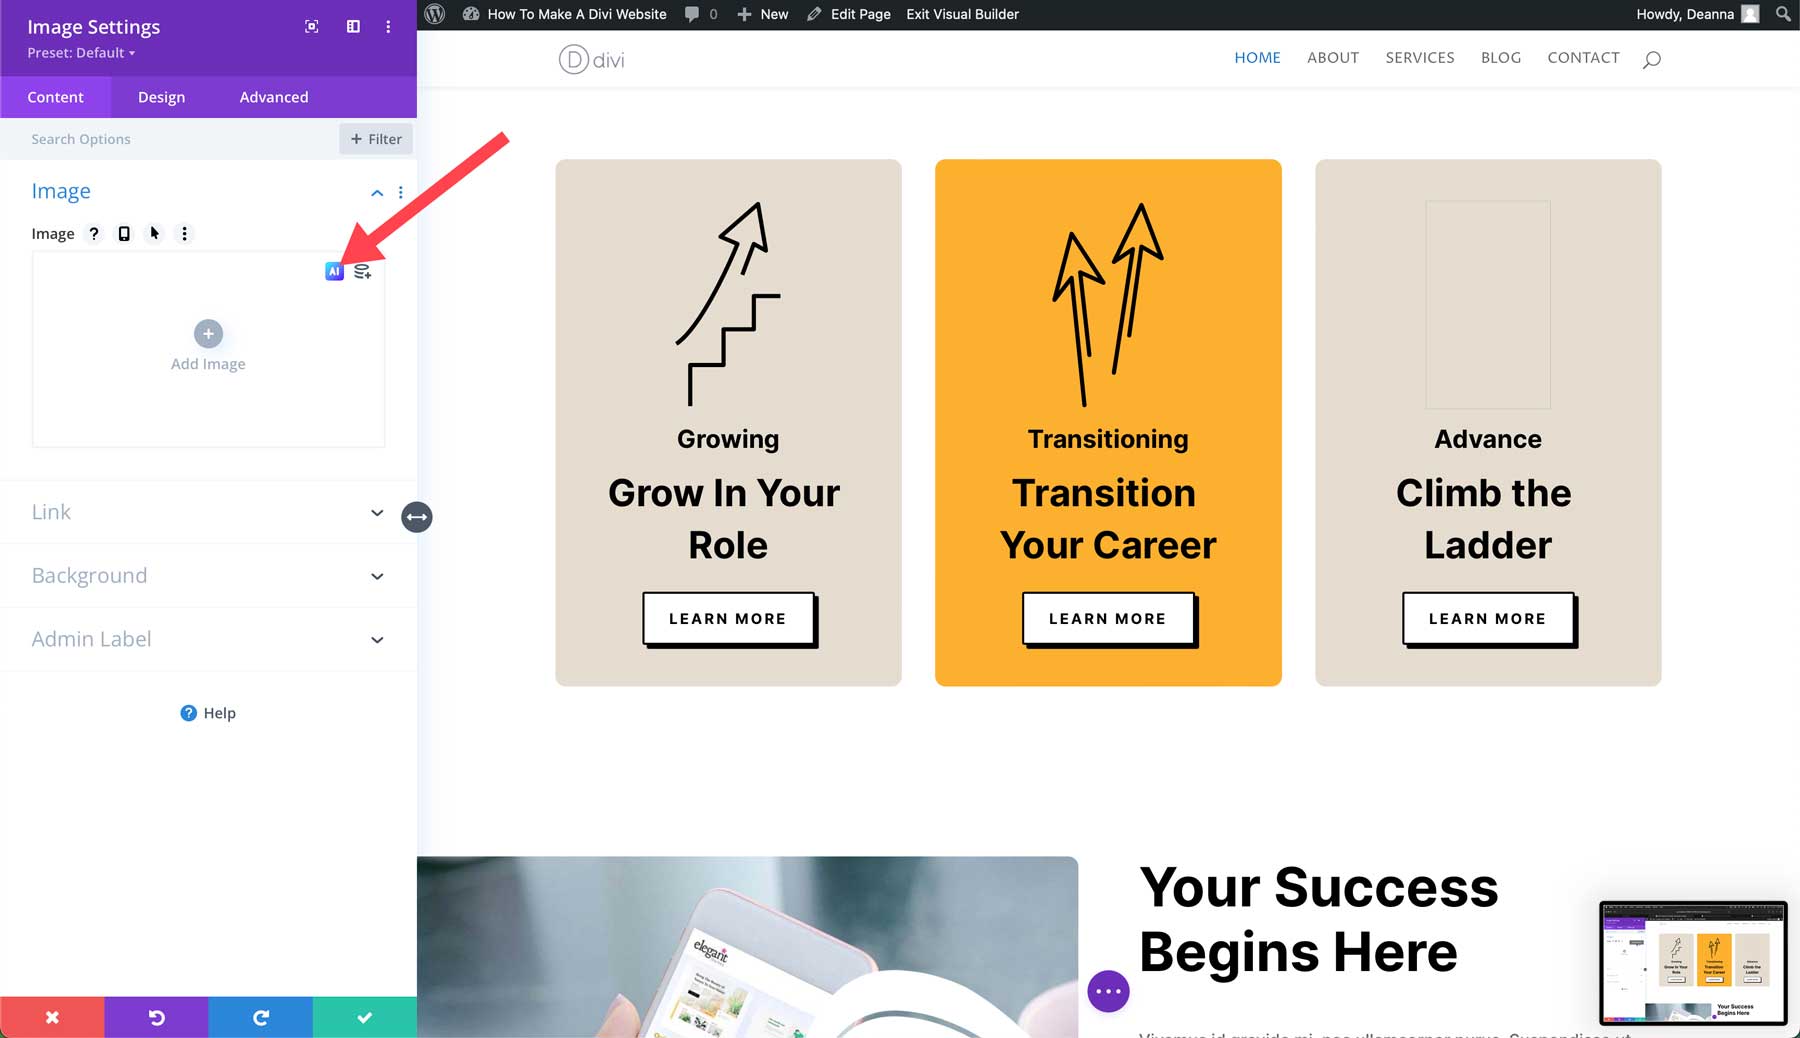
Click Generate With AI when the popup appears.
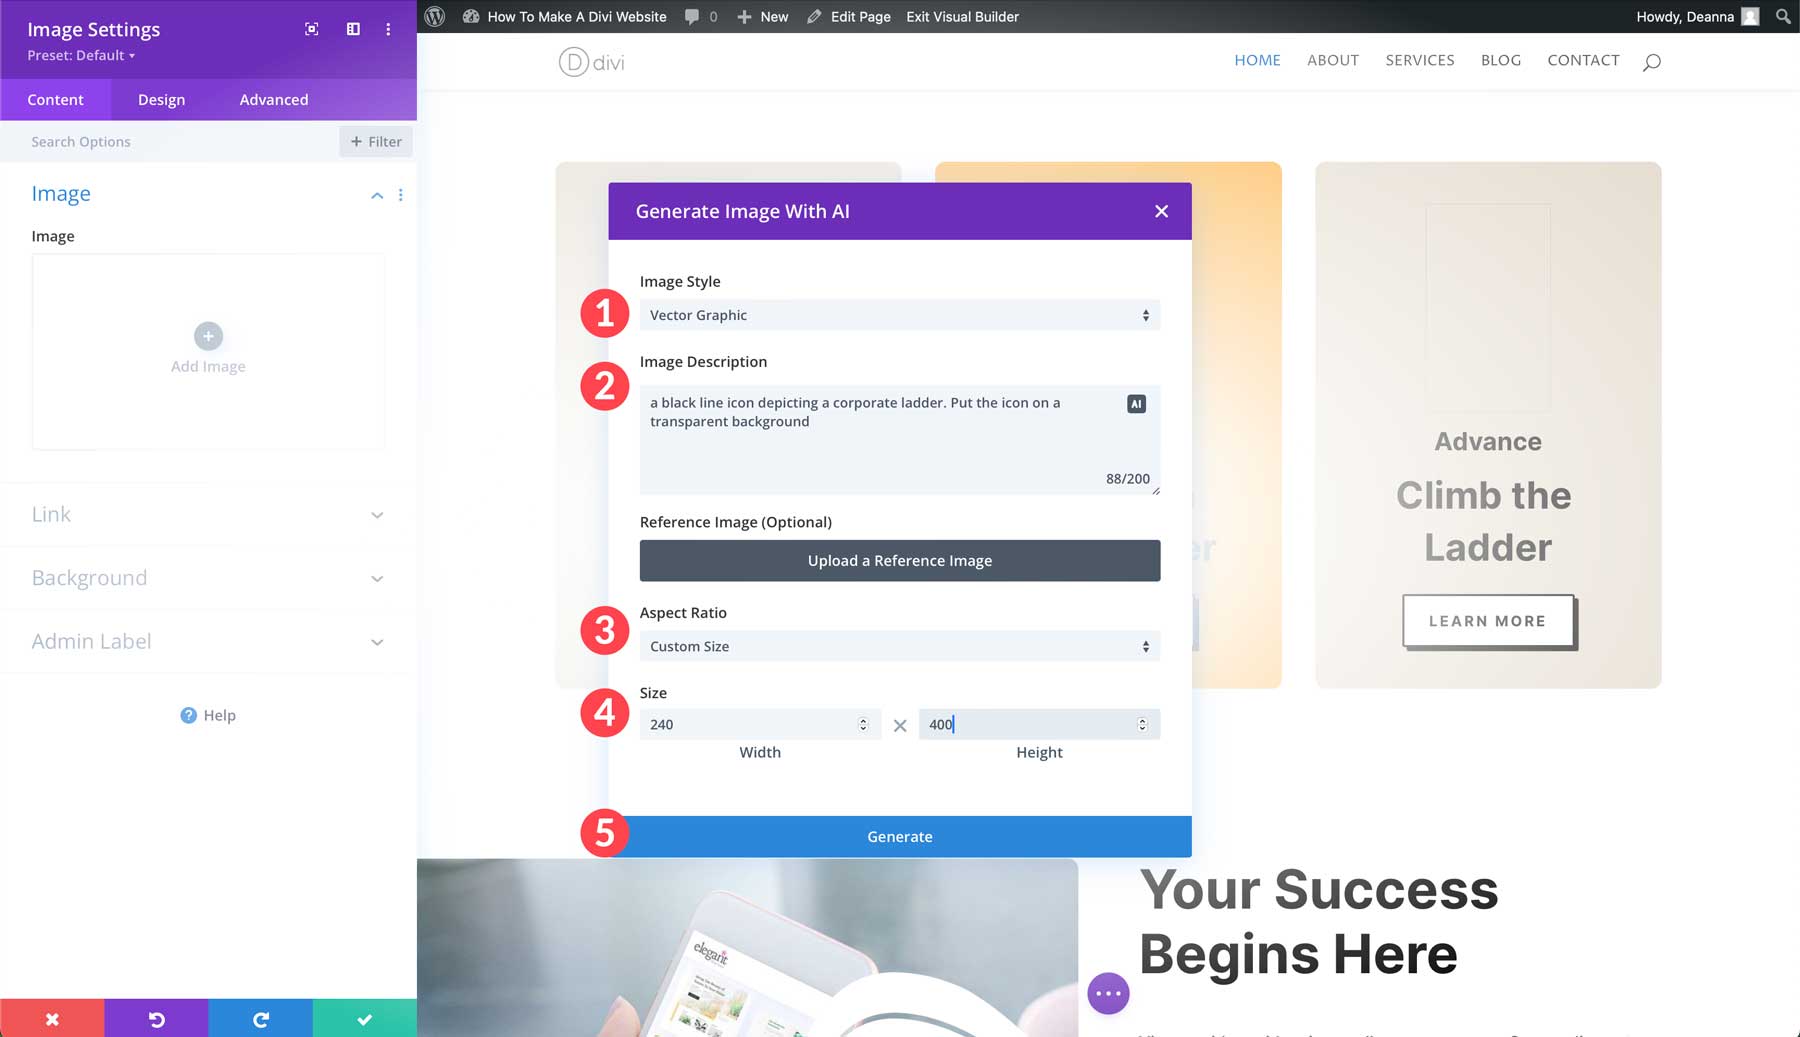
When the AI dialog box appears, choose vector graphic for the style, describe the image you want to create, set the aspect ratio to a custom size (240px wide by 400 pixels high), and click the Generate button.
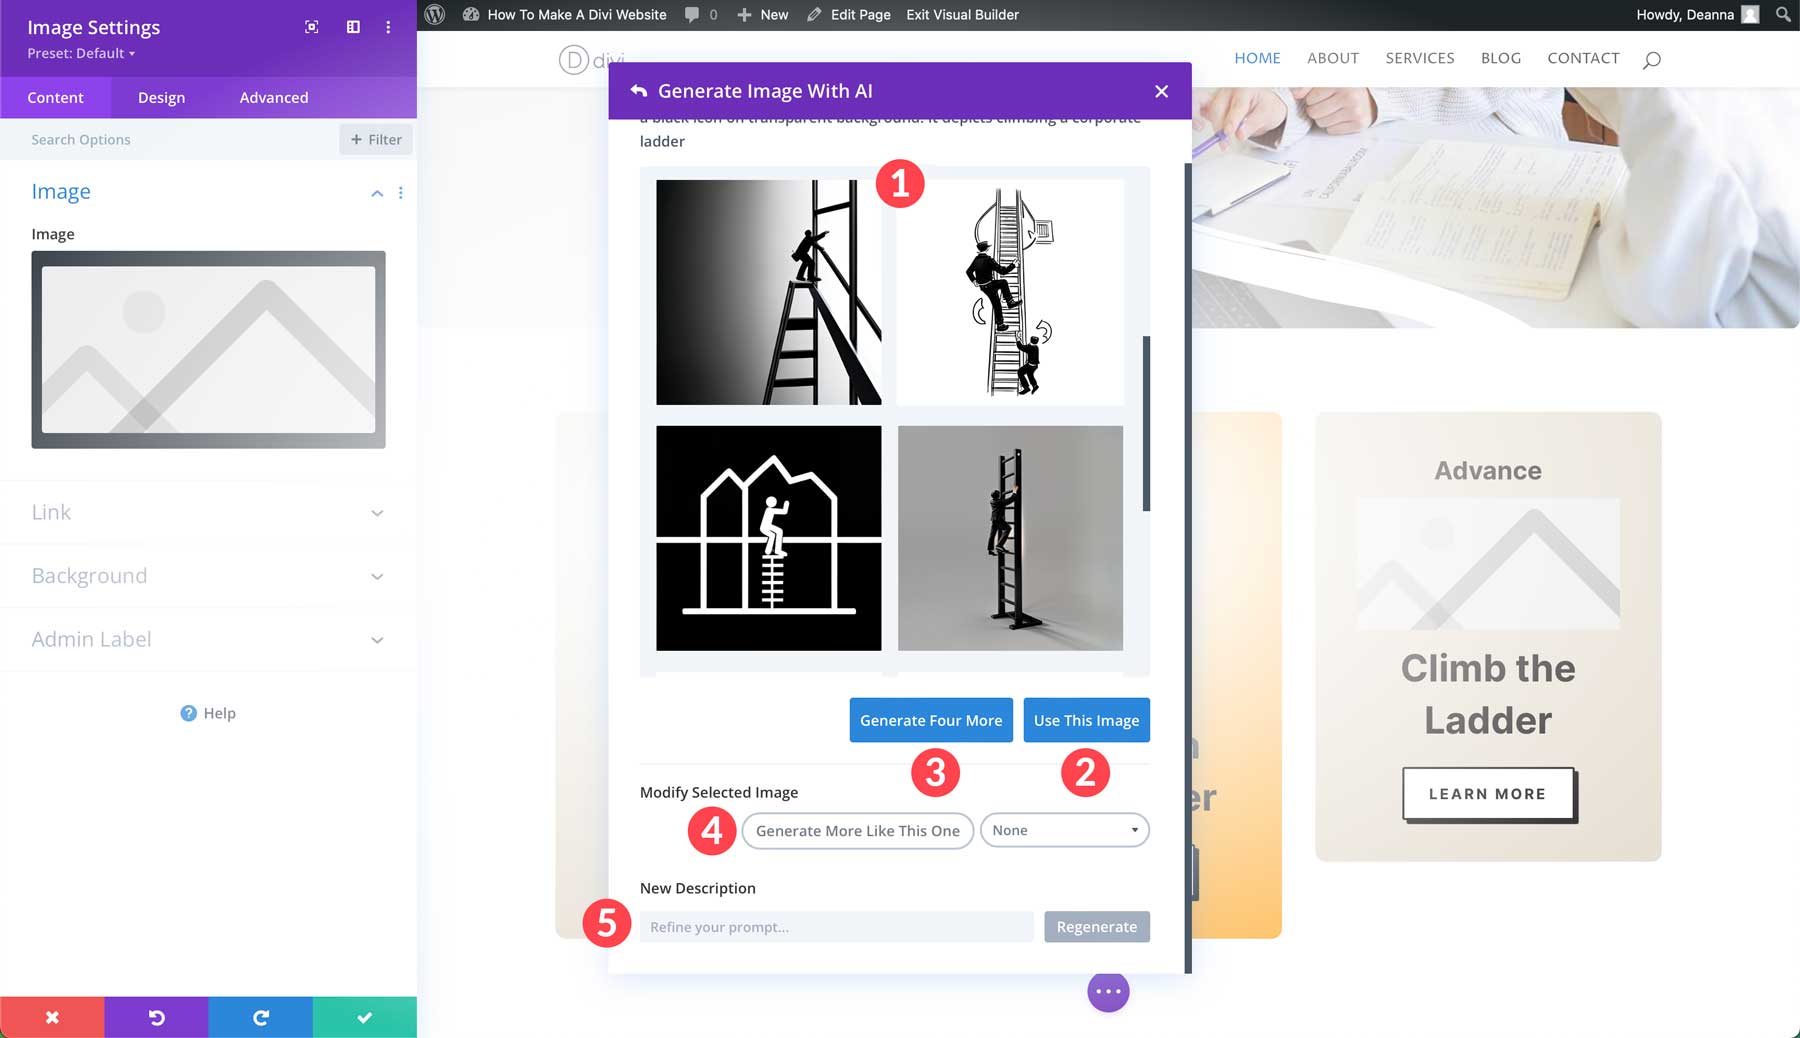
Divi AI will generate 4 images for you to choose from. You can select your favorite and click Use This Image or Generate Four More. You can also modify your selected image by generating more like it, choosing an alternate style, or adding a new description.
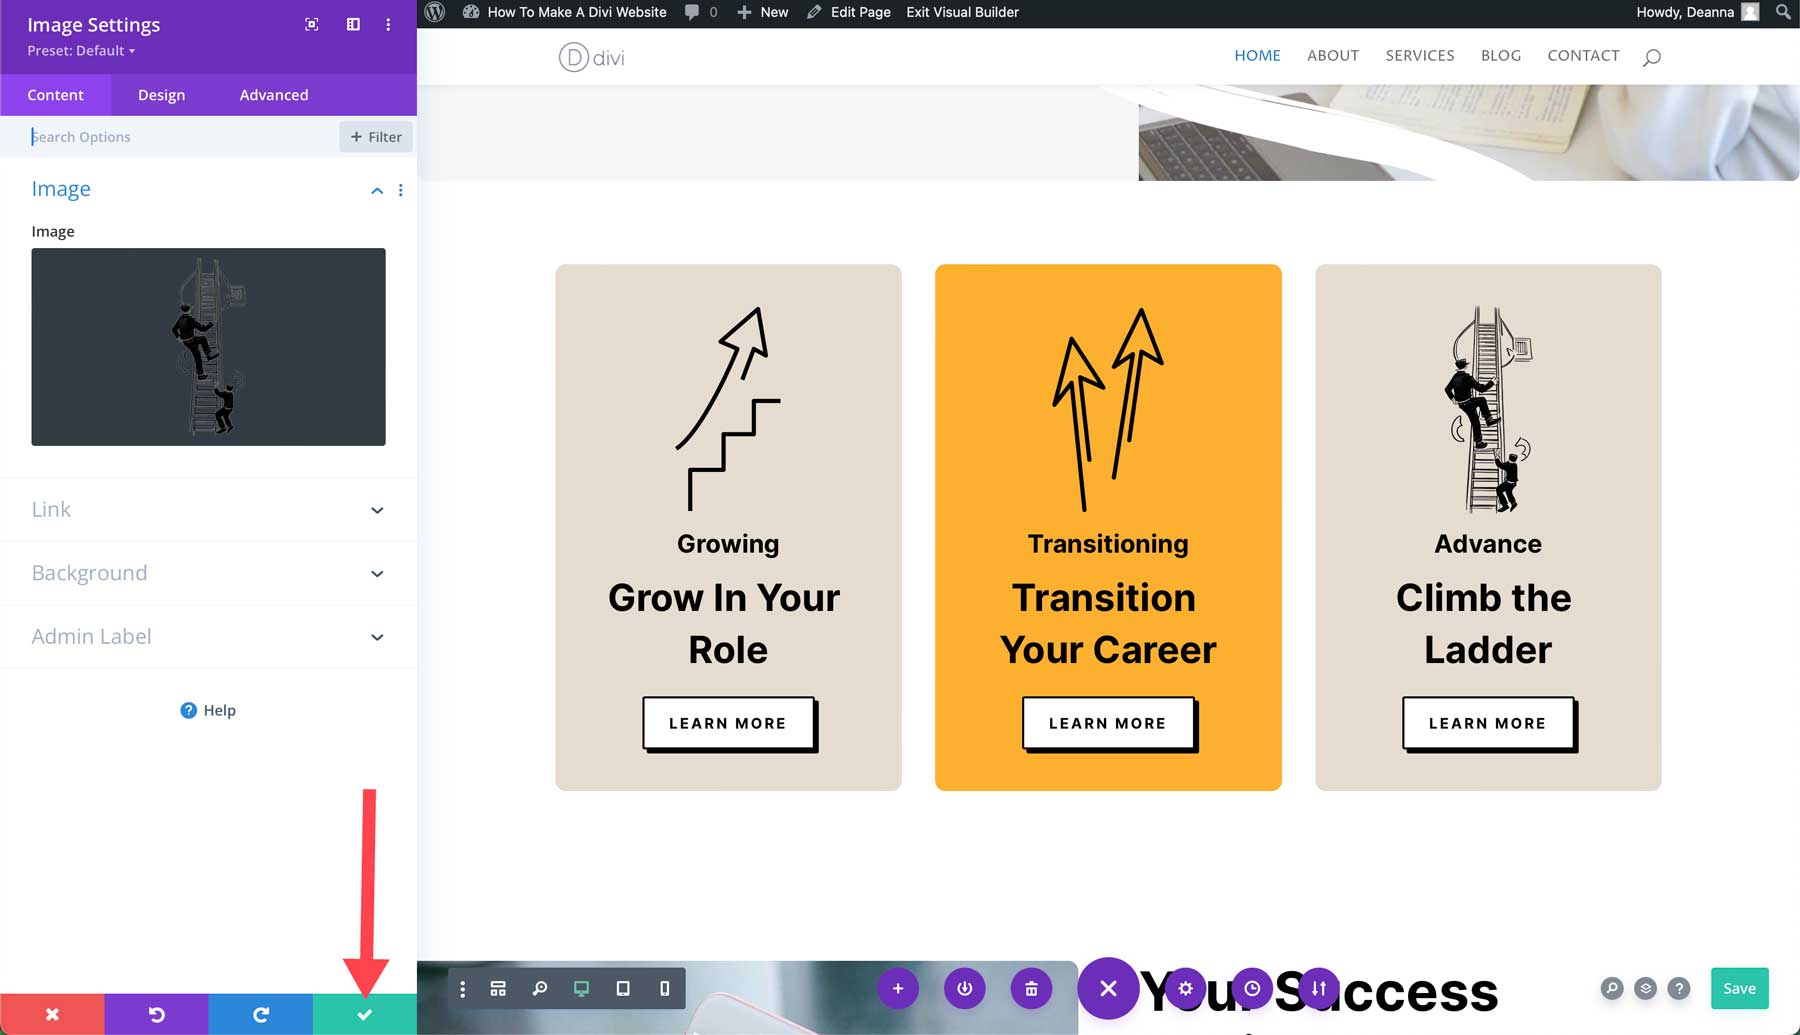
After inserting the generated image into the image module, click the green check button to save it.
We’ve briefly touched on Divi’s Theme Builder, a powerful component of the Divi theme that allows you to create headers, footers, and various other areas of your site. The Theme Builder utilizes the Visual Builder, making it easy to design templates for displaying blog posts, search results, archive pages, and more, just as you would create a regular web page.
Getting started with the Theme Builder is simple. Navigate to Divi > Theme Builder.
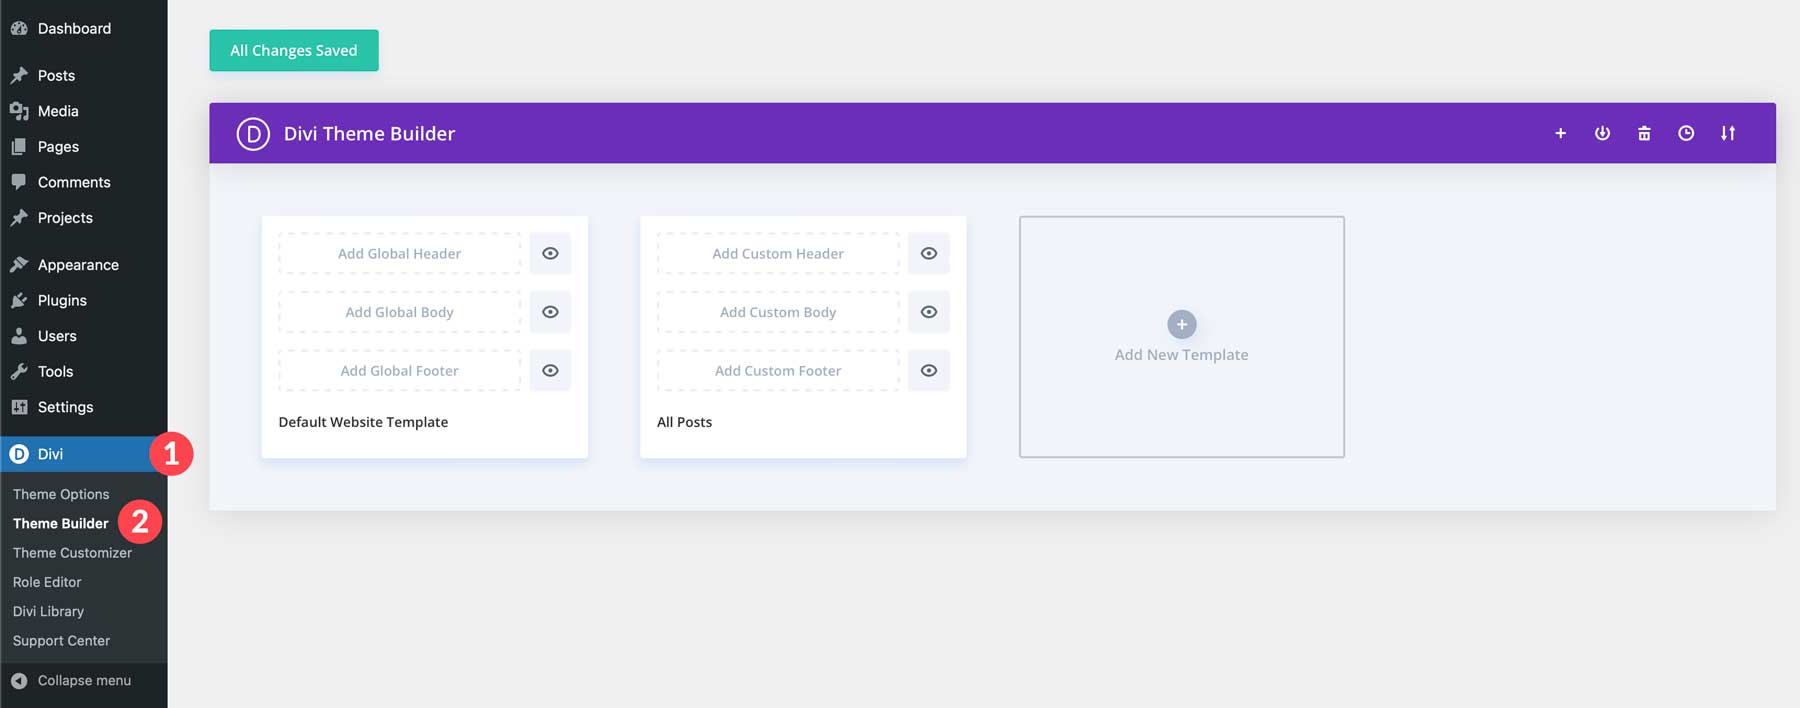
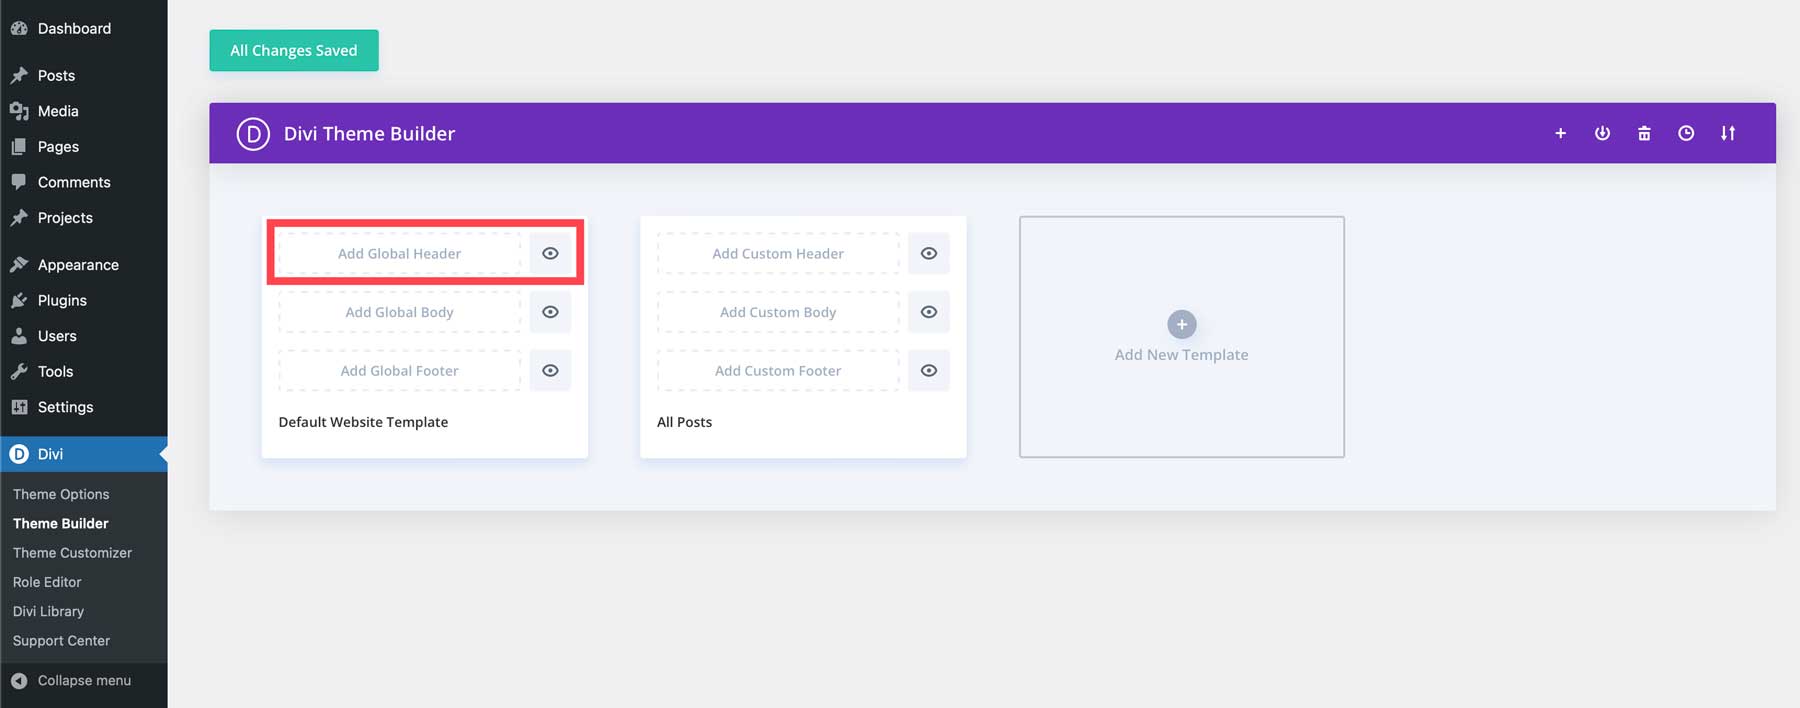
To create a header, you’ll first need to create a template. Headers and footers are assigned to the Default Website Template by default. Click Add Global Header to launch the Theme Builder.
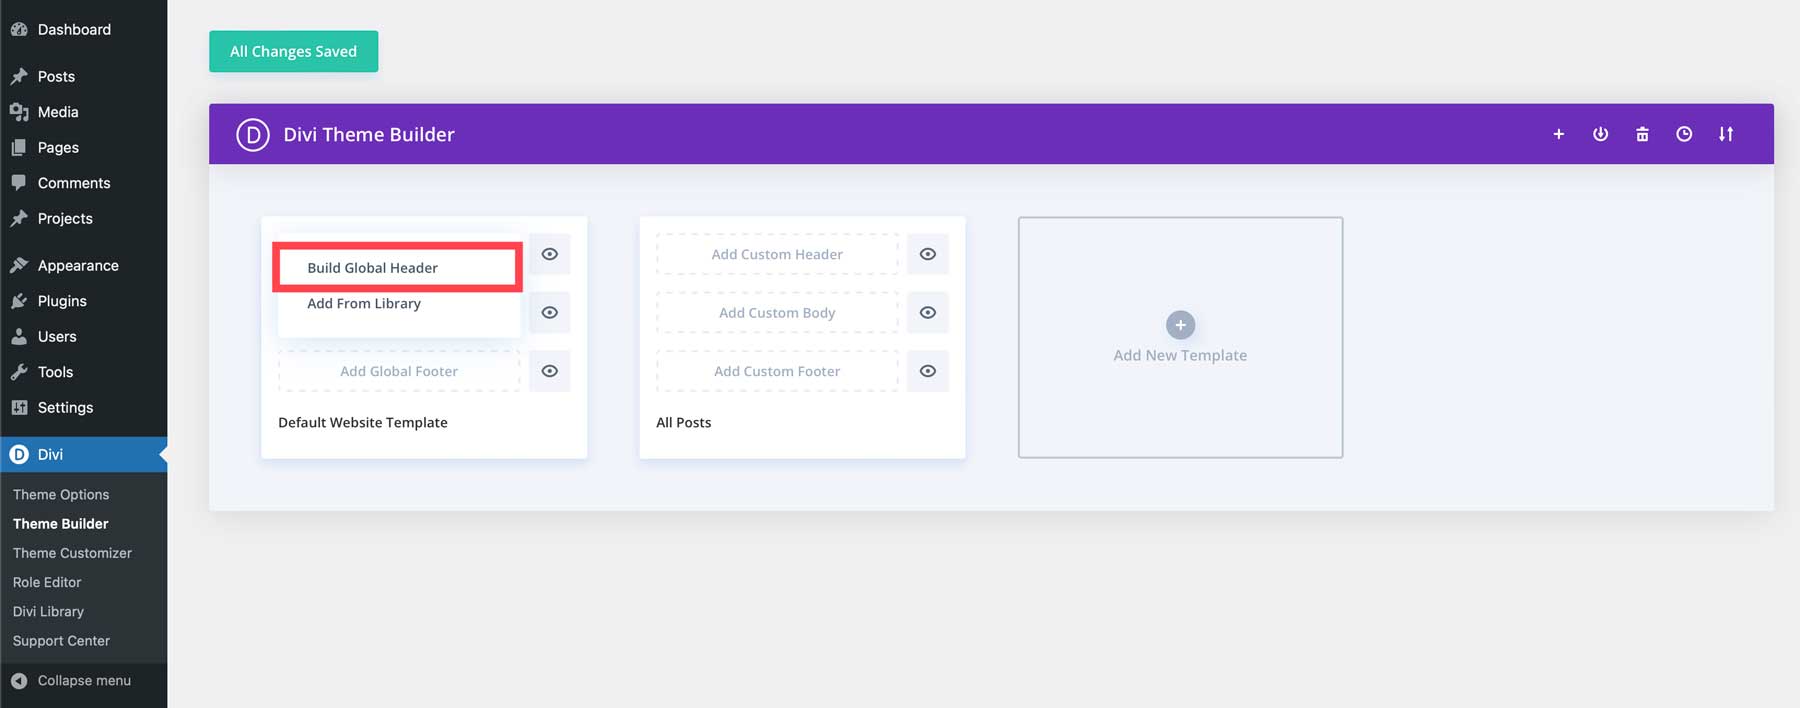
Next, click the Build Global Header button.
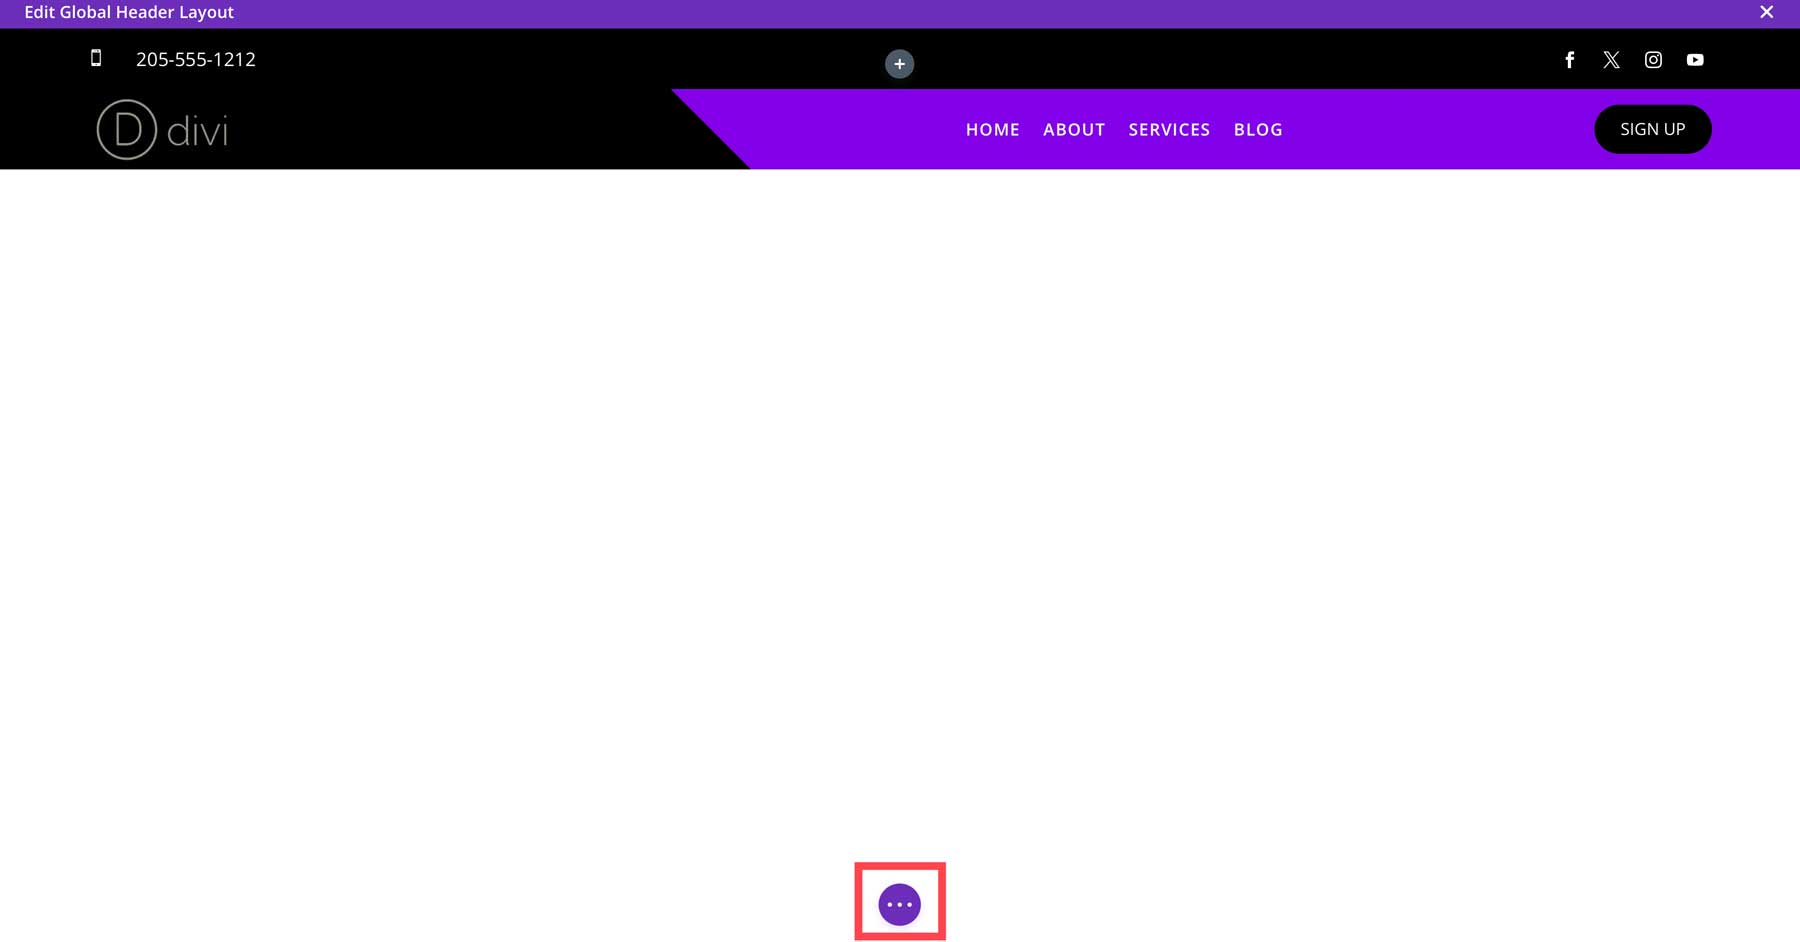
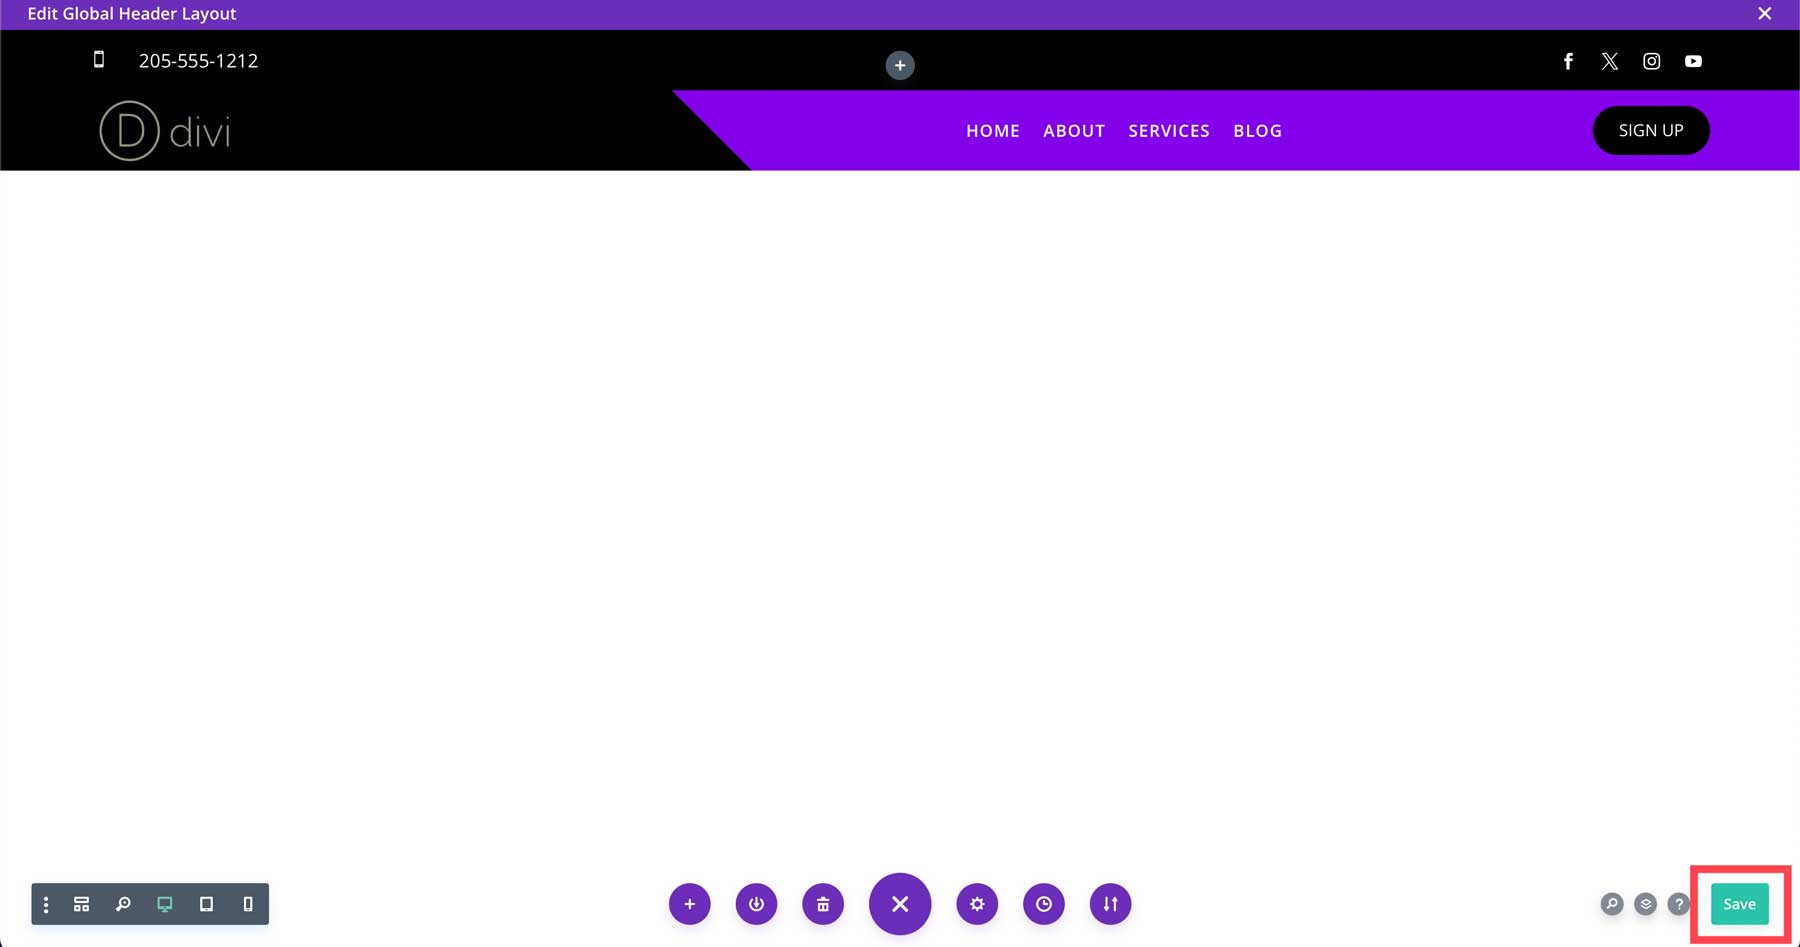
The Visual Builder will launch, allowing you to create a custom header for your Divi website. You can use any combination of modules to create an eye-catching header. Add social media links, a call-to-action button, and more easily. Once your header is made, simply click the purple ellipsis menu at the bottom center of the page.
To save your header, click the green save button to save the layout.
Using A Divi Theme Builder Pack
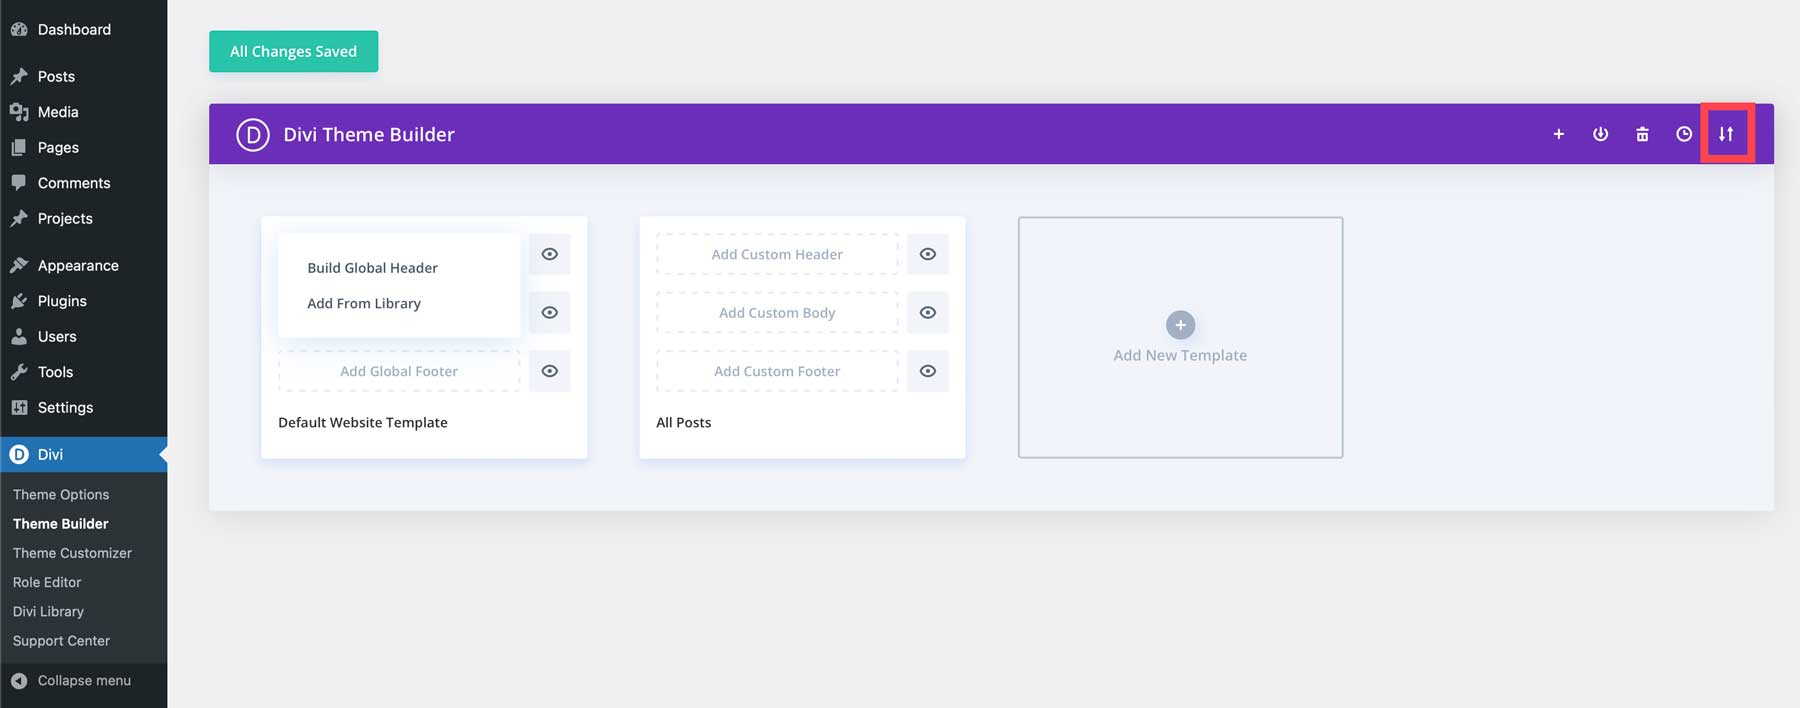
In addition to designing your header from scratch, you can use one of our Theme Builder Packs. Each Pack comes with 10 premade templates for every area of your site, including headers, footers, post templates, an author template, and more. It’s a great way to get a jump start on the design when building a Divi website. For example, searching the Divi Resources category on our blog, freebies for pages, templates, and other resources to keep you up to date on all things Divi. To demonstrate how easy it is to load a Theme Builder Pack, we’ll use the Spa Theme Builder Pack as an example. Sign up for our newsletter to gain access to the free layouts. Once the Pack is downloaded to your computer, head to the Theme Builder. This time, we’ll click the import/export button in the Theme Builder.
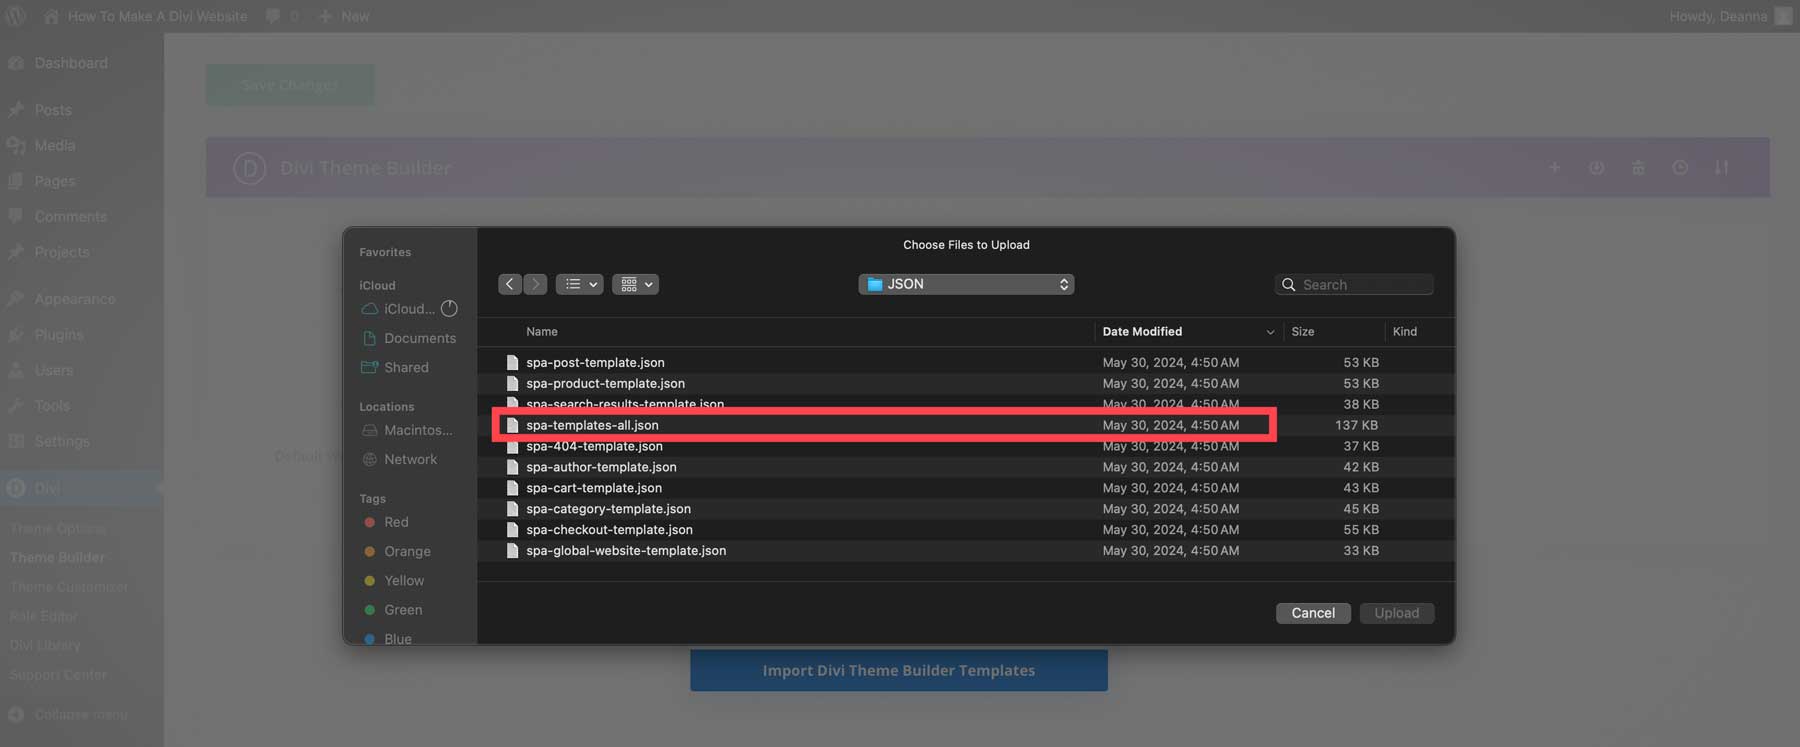
Navigate to the saved files on your computer, and select the spa-templates-all.json file. This will install all templates in the Pack.
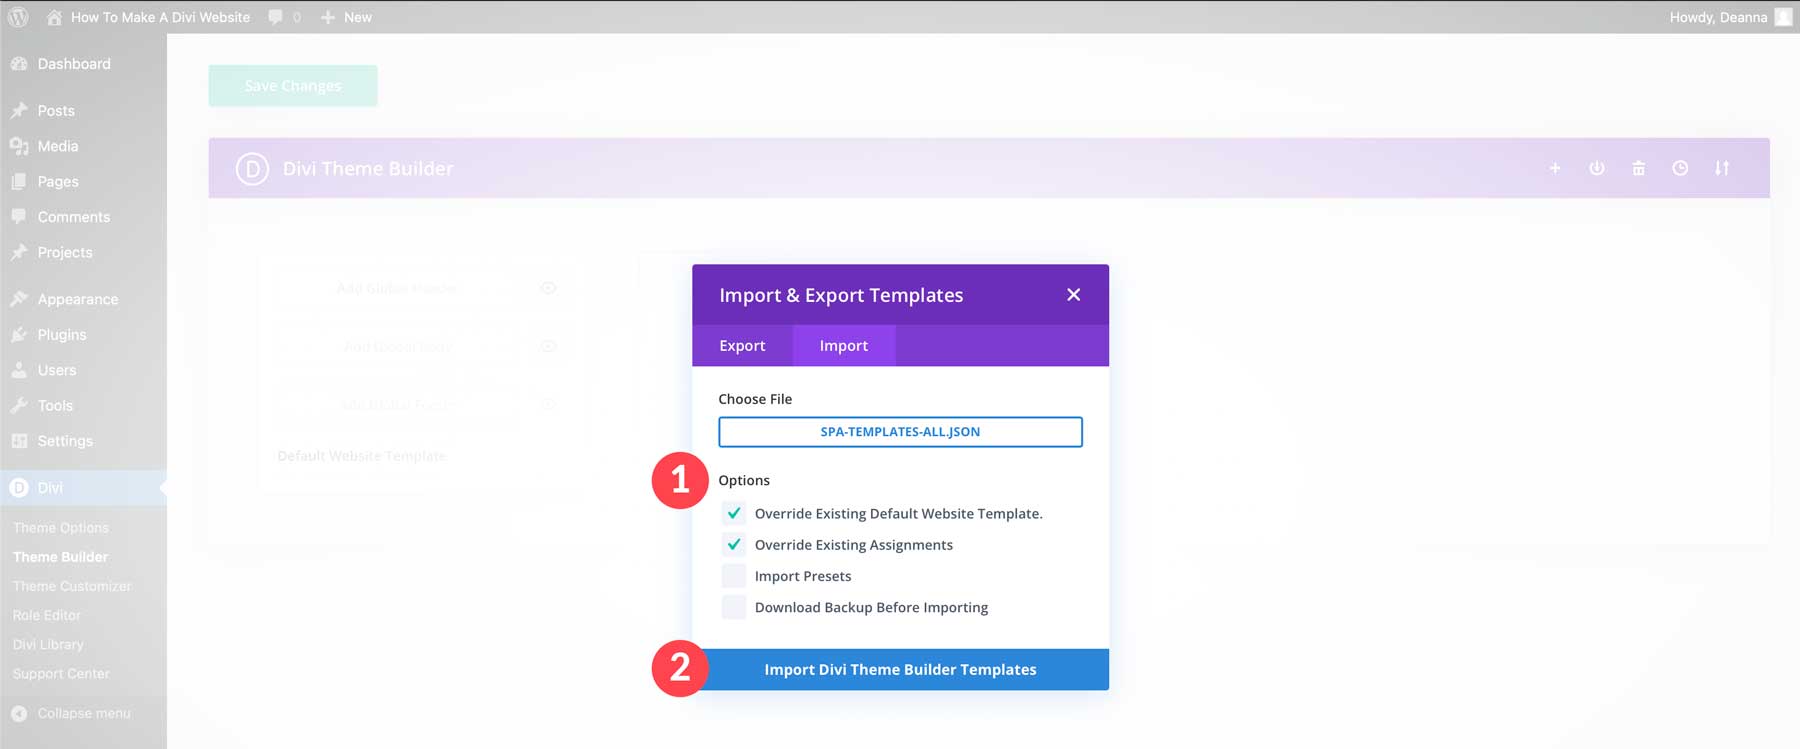
To overwrite existing templates, keep the first two checkboxes checked. Check the tick box if you’d like to import the presets associated with the Theme Builder Pack. Once your selections have been made, click the Import Divi Theme Builder Templates button.
Create a Design System Using Divi Presets and Global Colors
One of Divi’s best features is the ability to create a complete design system with global presets and colors. With global settings, users can create a consistent brand identity when building a Divi website, streamline their workflow, and speed up the design process. Global Presets is similar to CSS classes. Simply create a design preset, save it, and apply it to similar modules throughout your website.
For example, you can easily create a global preset for a button module based on its existing styles. To do it, open the button module’s settings. With the module active, click the preset dropdown menu to reveal the options.
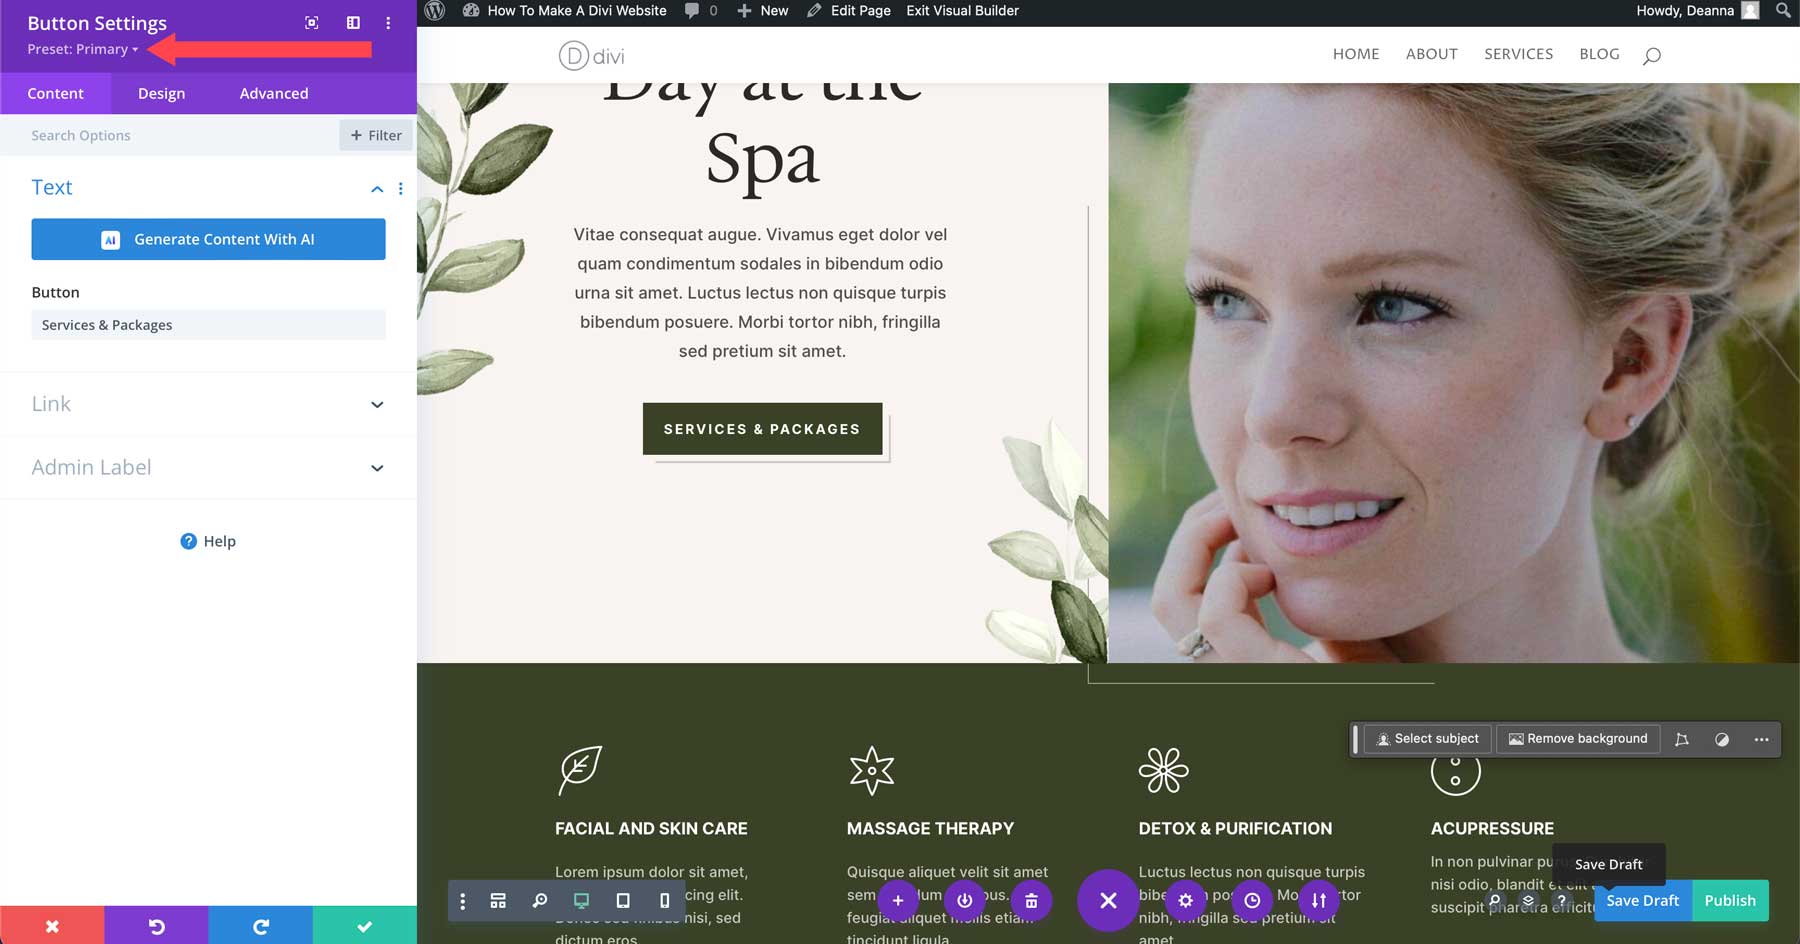
Click the Create New Preset From Current Styles button.
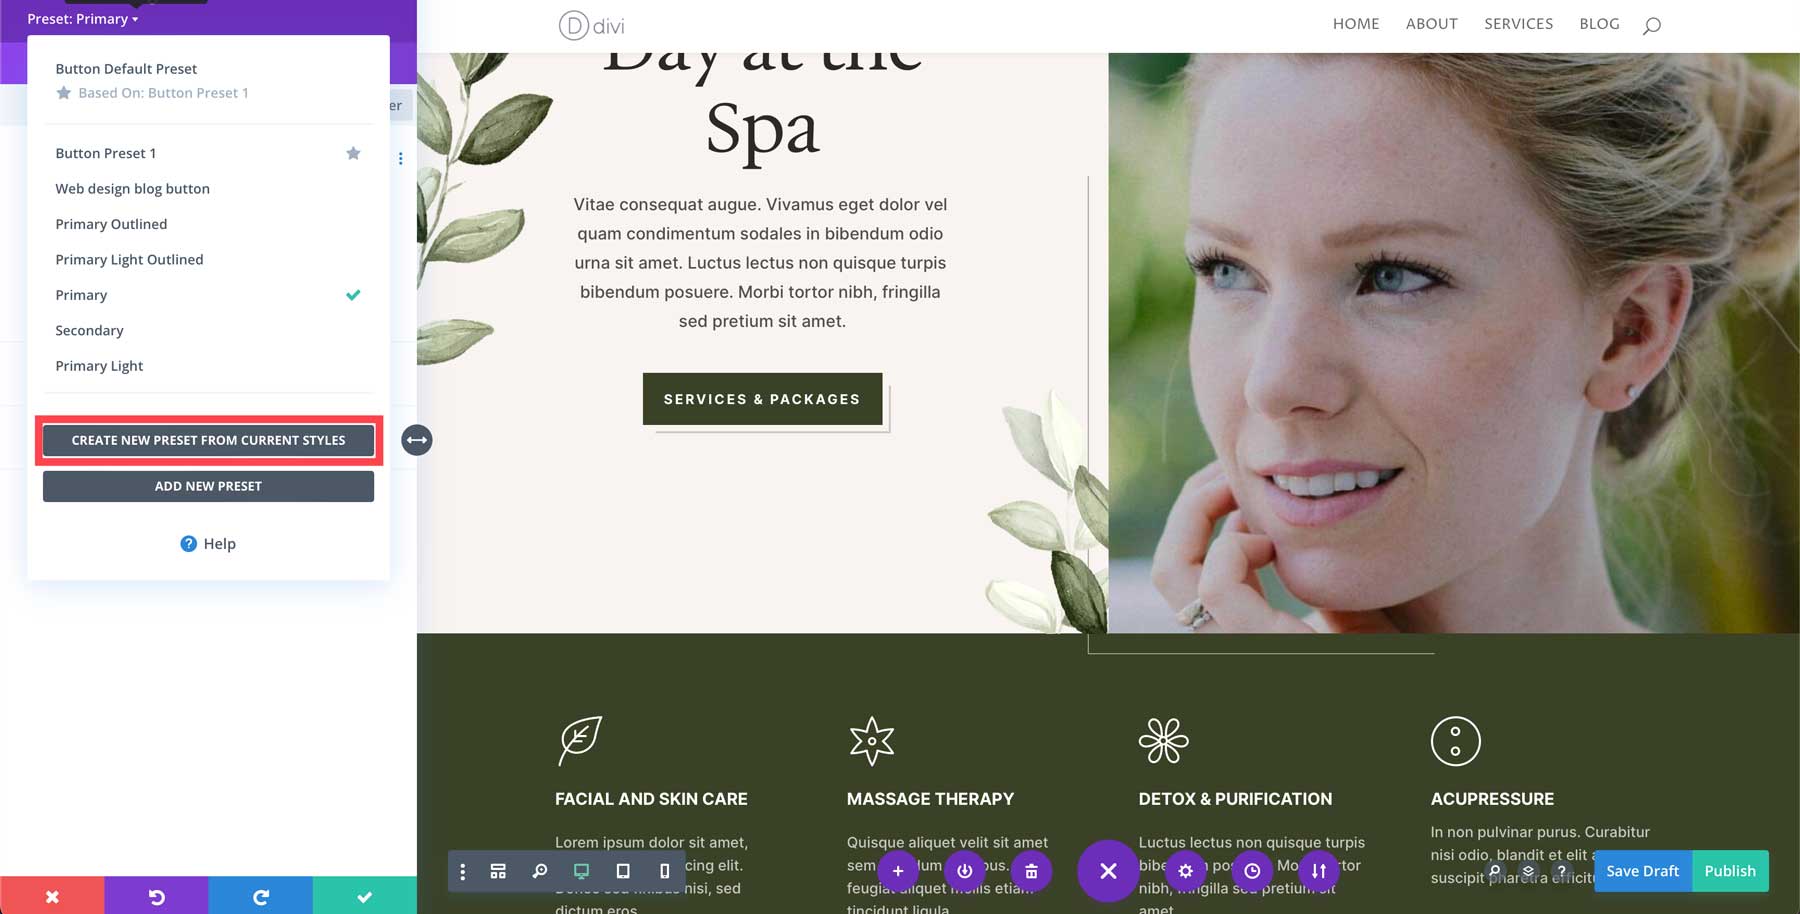
A dialog box requesting a name for your preset will appear. You can also choose whether to assign this preset to the default button module. After selecting, click the green check button to save your button preset.
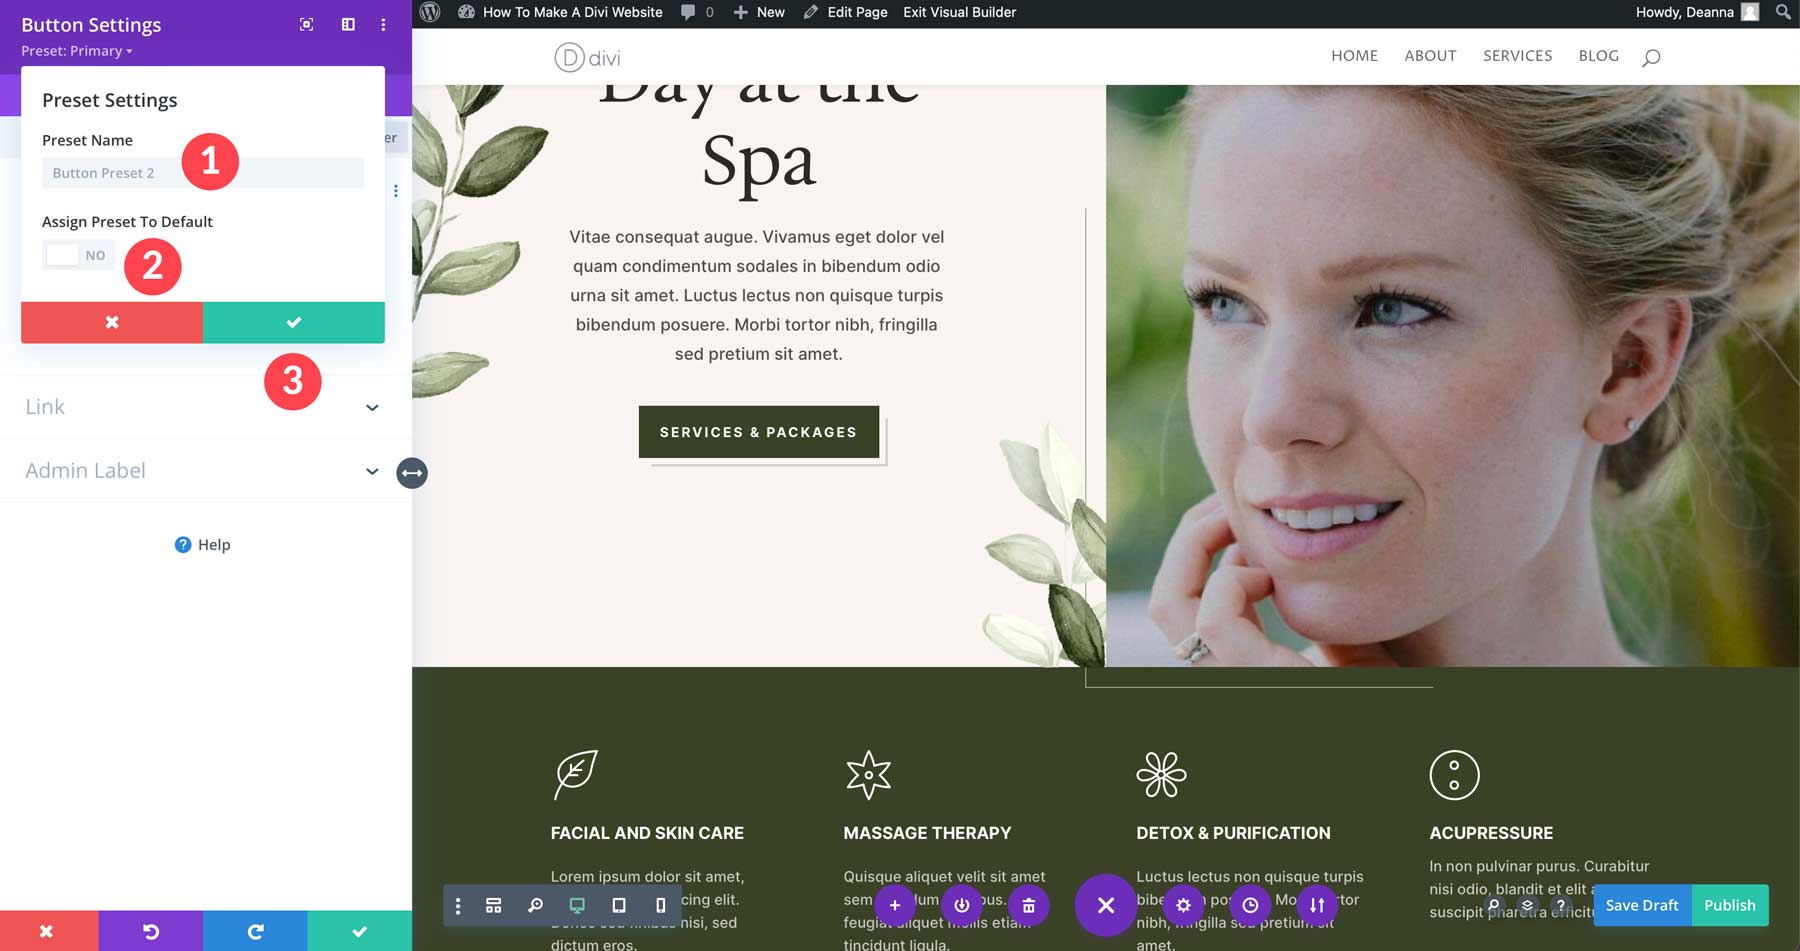
Create a Global Color Palette With Divi
You can also create a Global Color Palette when building a Divi website. You can change colors throughout your website with one click when you set colors globally. For example, after loading a premade layout into a Divi web page, you can easily change colors on the fly, altering colors across an entire page at the module level. For example, when we modify the dark green global color in this landing page layout, the color will update automatically across the page. Simply click the edit symbol within the global color.
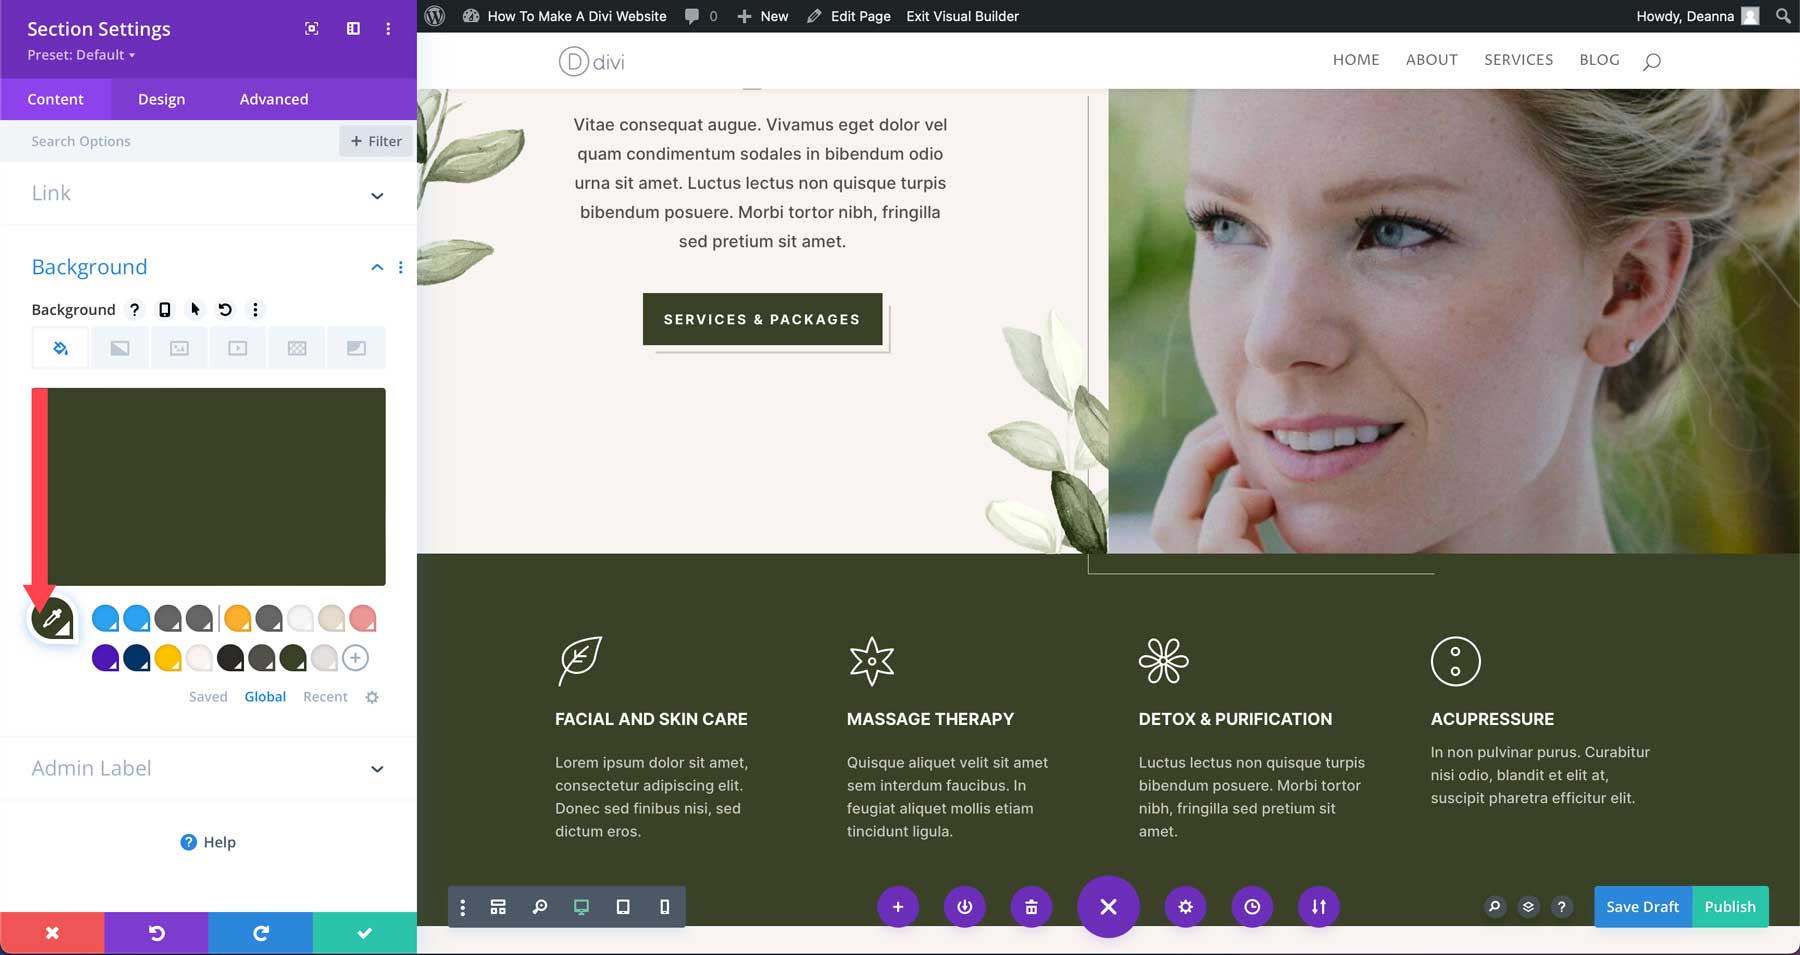
You can enter a hex code manually or use the color slider to change it. Once you alter the color to your liking, click the check icon next to the hex code to lock it in. Click the green check button to save your changes. Once saved, you’ll notice that the dark green on the landing page has been replaced with a new color.
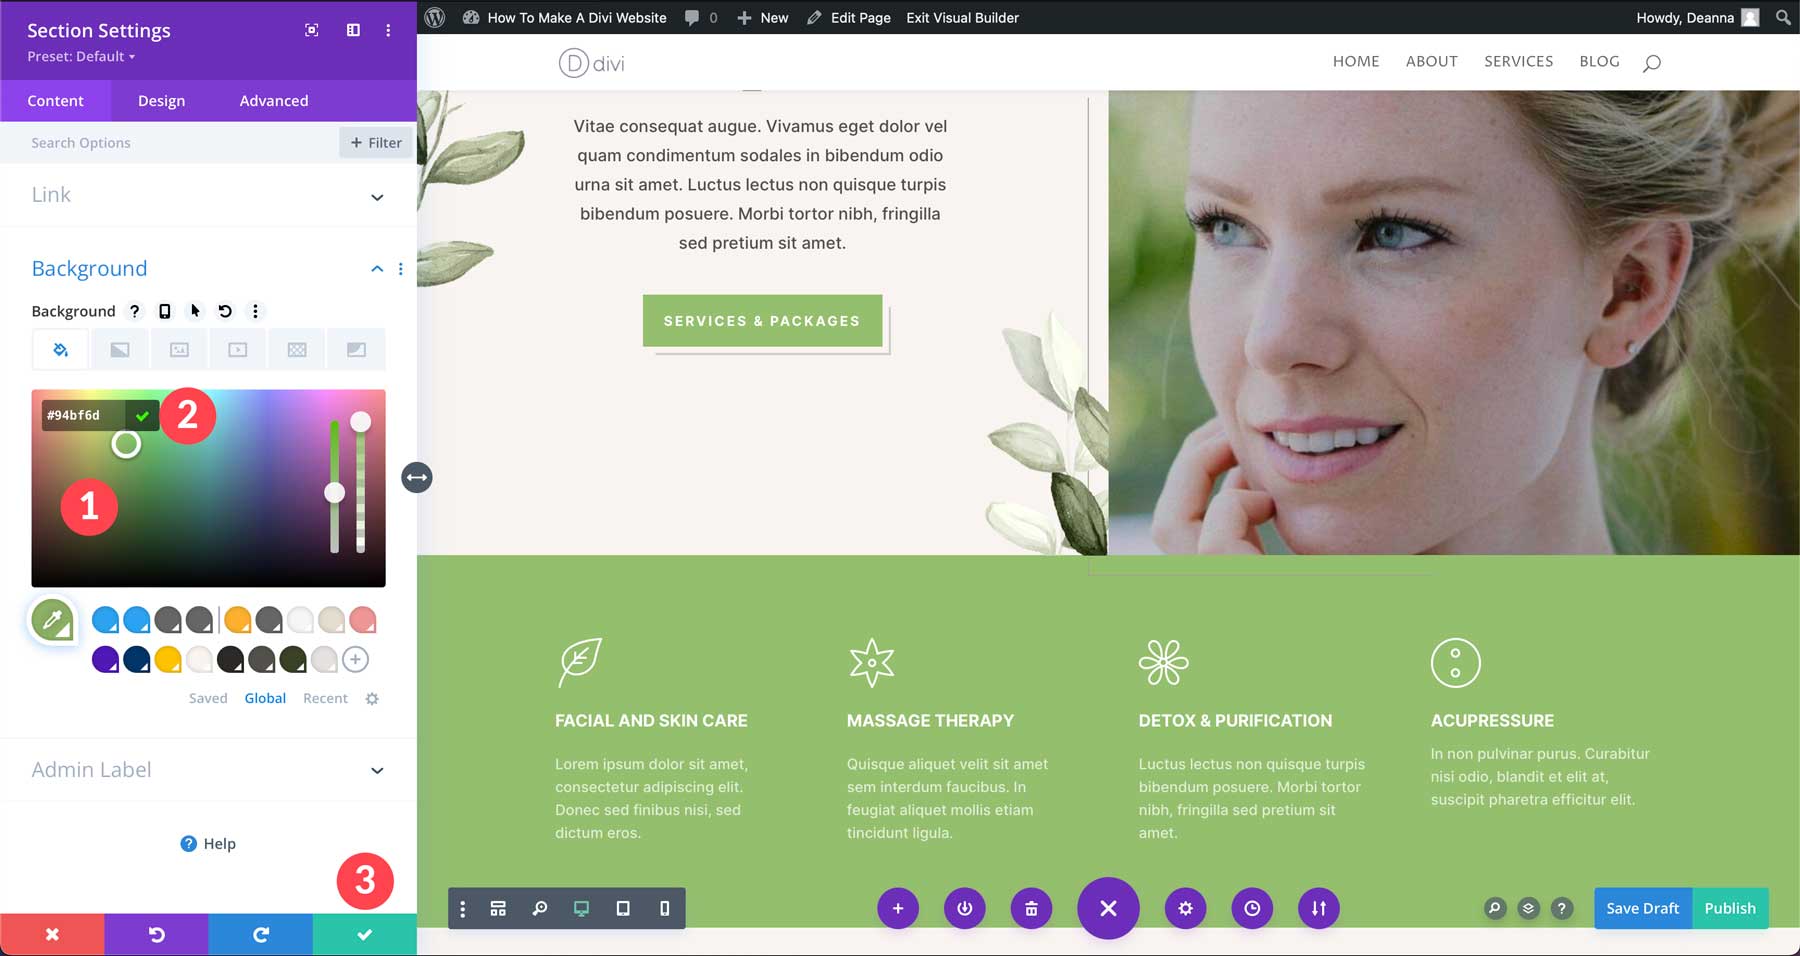
In addition to altering existing global colors, you can easily create new ones. To create a new global color, click the + button to the right of the existing global colors.
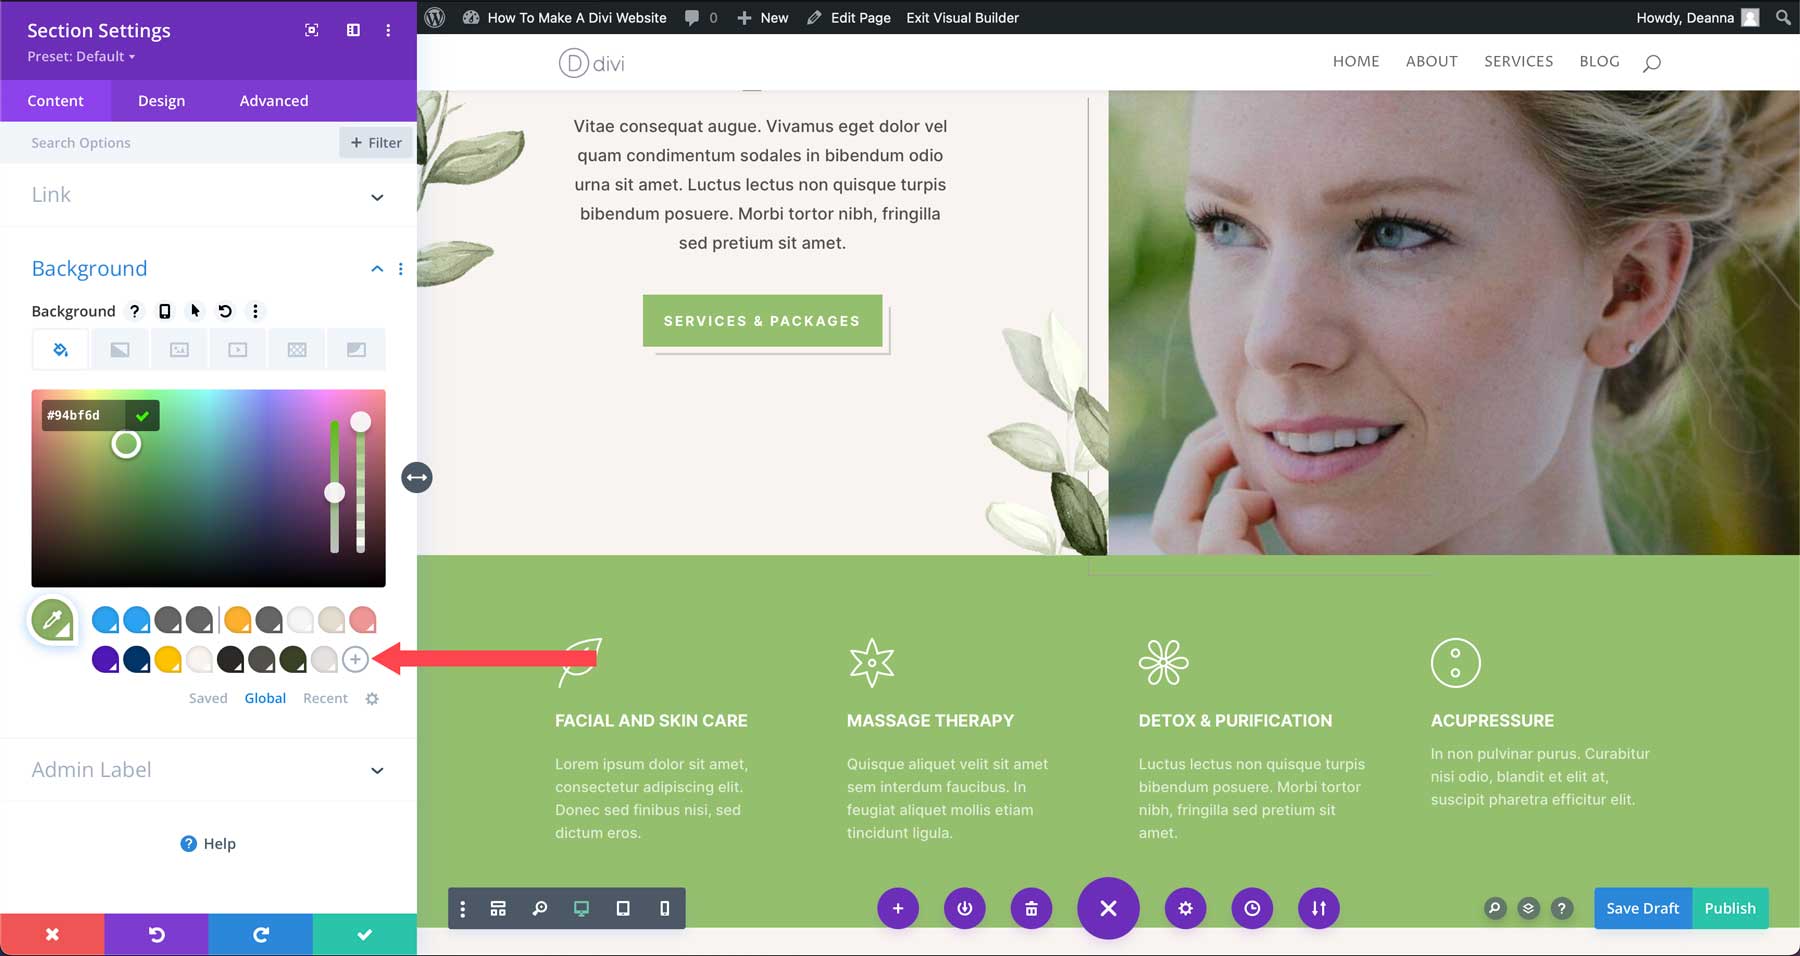
Repeat the steps above to save it (click the check, save the module).
Enhancing Your Website with Plugins
Divi is a powerful website builder, but plugins can take your website to the next level. Plugins add extra functionality and can extend Divi’s already amazing capabilities. It’s true that Divi offers a wide range of features, but there might be specific functionalities you require that Divi may not have already built in.
Here are a few examples of plugins you could add (or should) to keep your website secure, running fast, or boost SEO:
- Contact Form Plugins: Simplify how visitors contact you by adding a user-friendly contact form plugin like WP Forms
- Ecommerce Plugins: Transform your WordPress website into an online store with an ecommerce plugin like WooCommerce or Easy Digital Downloads
- SEO Plugins: Optimize your site for search engines to improve organic traffic. An SEO plugin like Rank Math can help you with keyword research, on-page SEO, and sitemap generation
- Social Media Plugins: Make it easy for visitors to share your content with a social media plugin like Monarch or Blog2Social
- Security Plugins: Most managed WordPress hosts cover this for you, but when choosing another type of hosting, it may be necessary to install a security plugin. Choose a good option, such as Solid Security or WP Activity Log
Integrating Third-Party Services
Many plugins and tools connect your Divi website with popular third-party services. Divi offers dozens of integrations with popular email marketing software, analytics tools, and payment gateway plugins. Here are a few to consider:
- Marketing Plugins: Integrate WordPress with marketing plugins like Active Campaign, display popups with Bloom, create a podcasting website with Seriously Simple Podcasting, and more
- Analytics Plugins: Gain valuable insights into your website traffic with analytics plugins like MonsterInsights
- Membership Plugins: Create a powerful membership website with a plugin such as MemberPress
- Learning Management System (LMS) Plugins: Create an online course website with integrations with popular LMS plugins like LifterLMS or LearnDash
Explore the Divi Marketplace
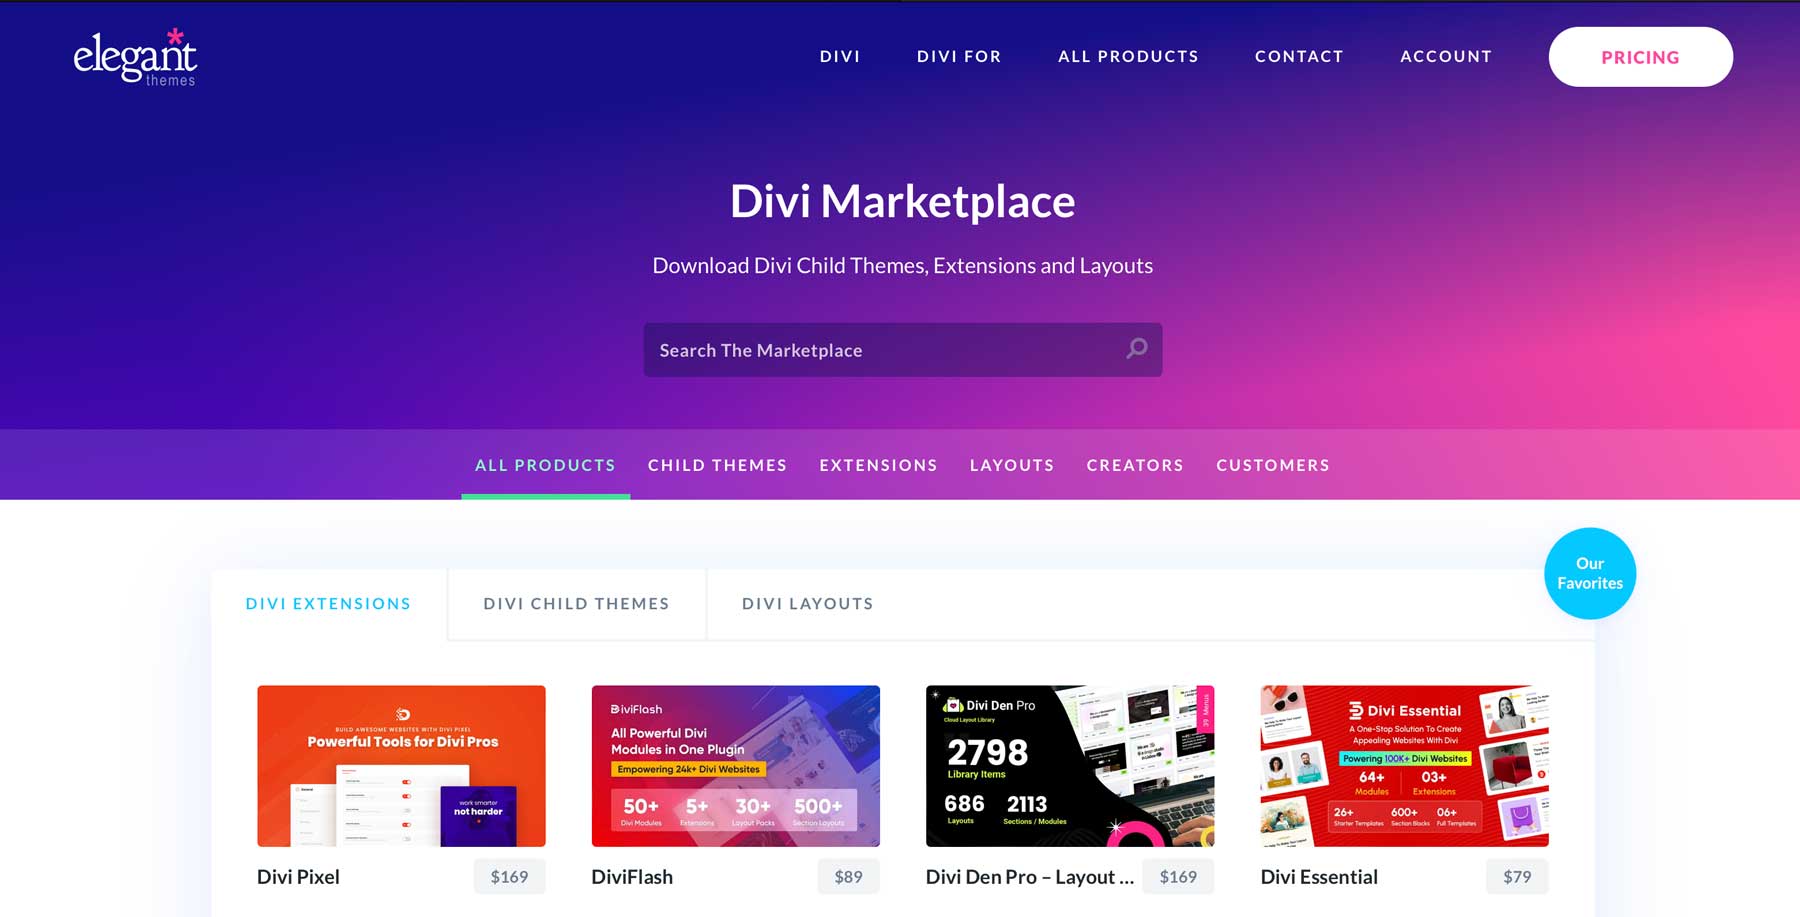
Hundreds of extensions, child themes, and layout packs are specifically designed to work with Divi, extending its core functionality and offering even more design flexibility. In addition to Divi Layout Packs, Divi users can find a wealth of products in the Divi Marketplace. There are incredible products by major developers like Divi Life, Divi Pixel, and Divi Engine.
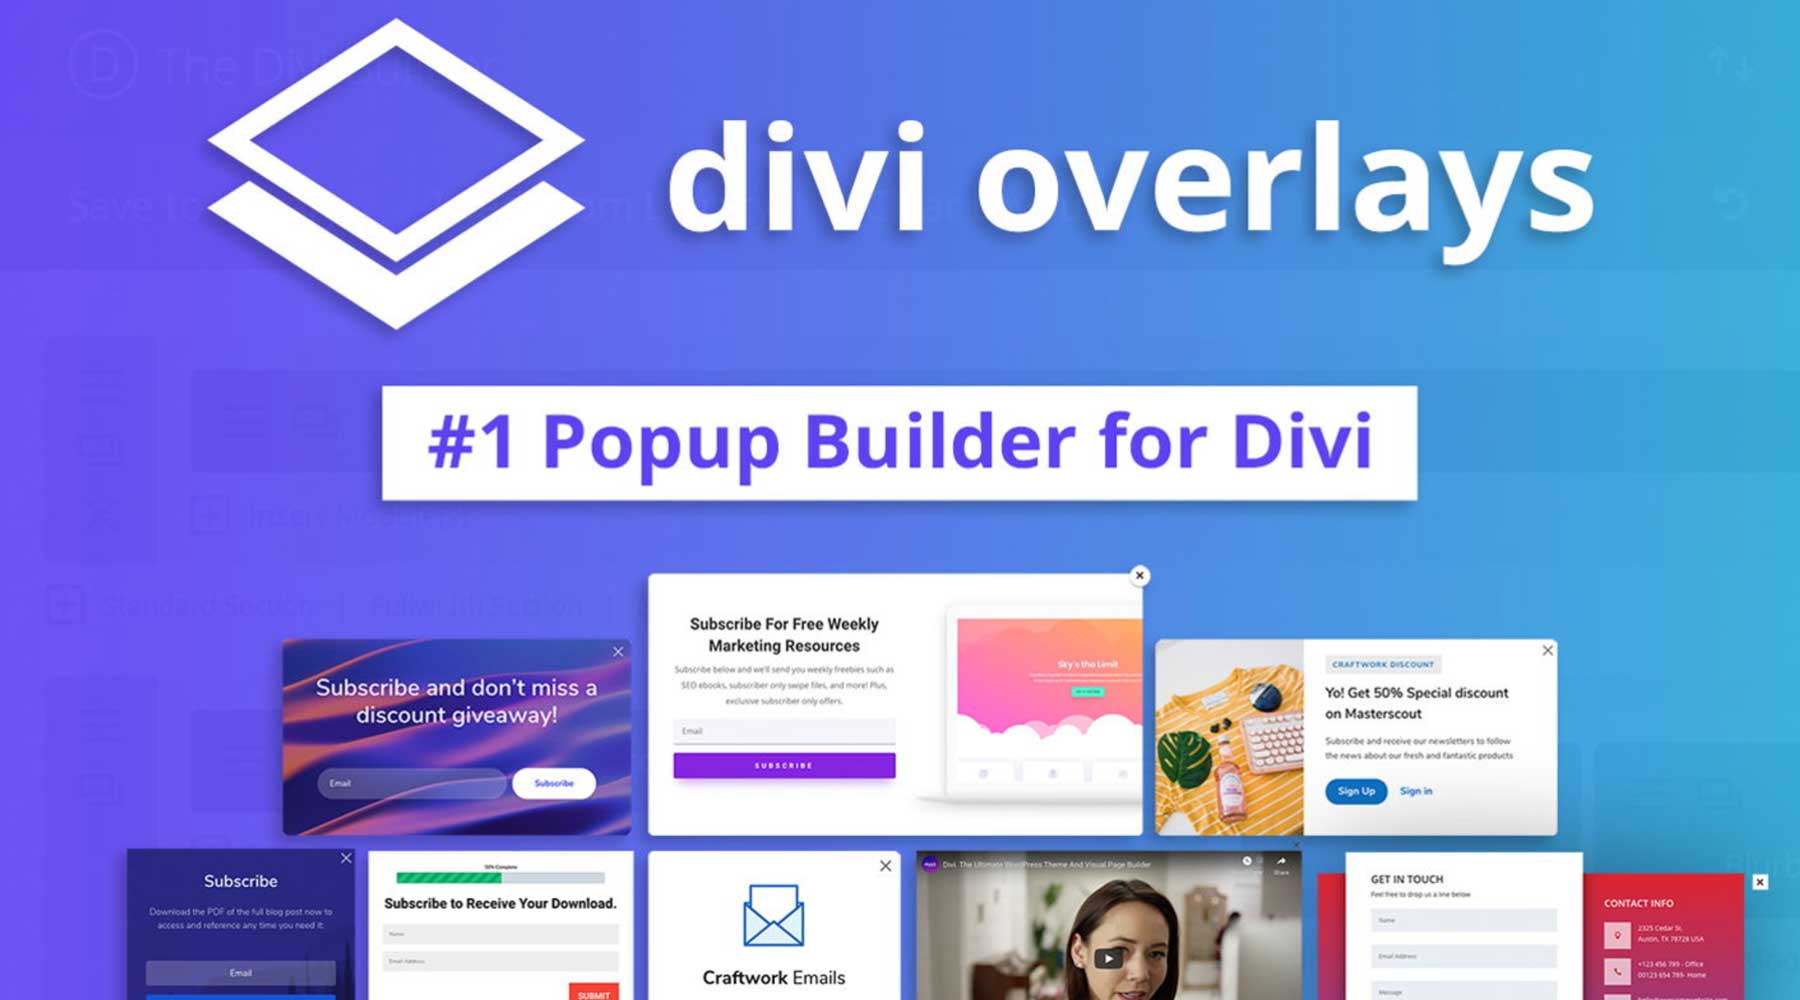
Divi Overlays is the ultimate popup builder for Divi. It utilizes the Visual Builder to create amazing popups and modals. Popups can be timed, triggered on certain pages, or set up as exit intent to entice visitors to act. The best part? Divi Overlays has pre-designed templates you can easily import and customize to match your site’s branding. The plugin is available for $79 and comes with unlimited website usage for one year.
Divi Pixel is a collection of Divi modules that will add incredible functionality when it’s time to build a divi website. You can edit every aspect of your site with them, including headers, footers, login pages, and more. In addition to modules, Divi Pixel comes packed with 40 unique website templates, so swapping up the look of your site is a breeze. Divi Pixel is available for $169 per year with unlimited website usage.
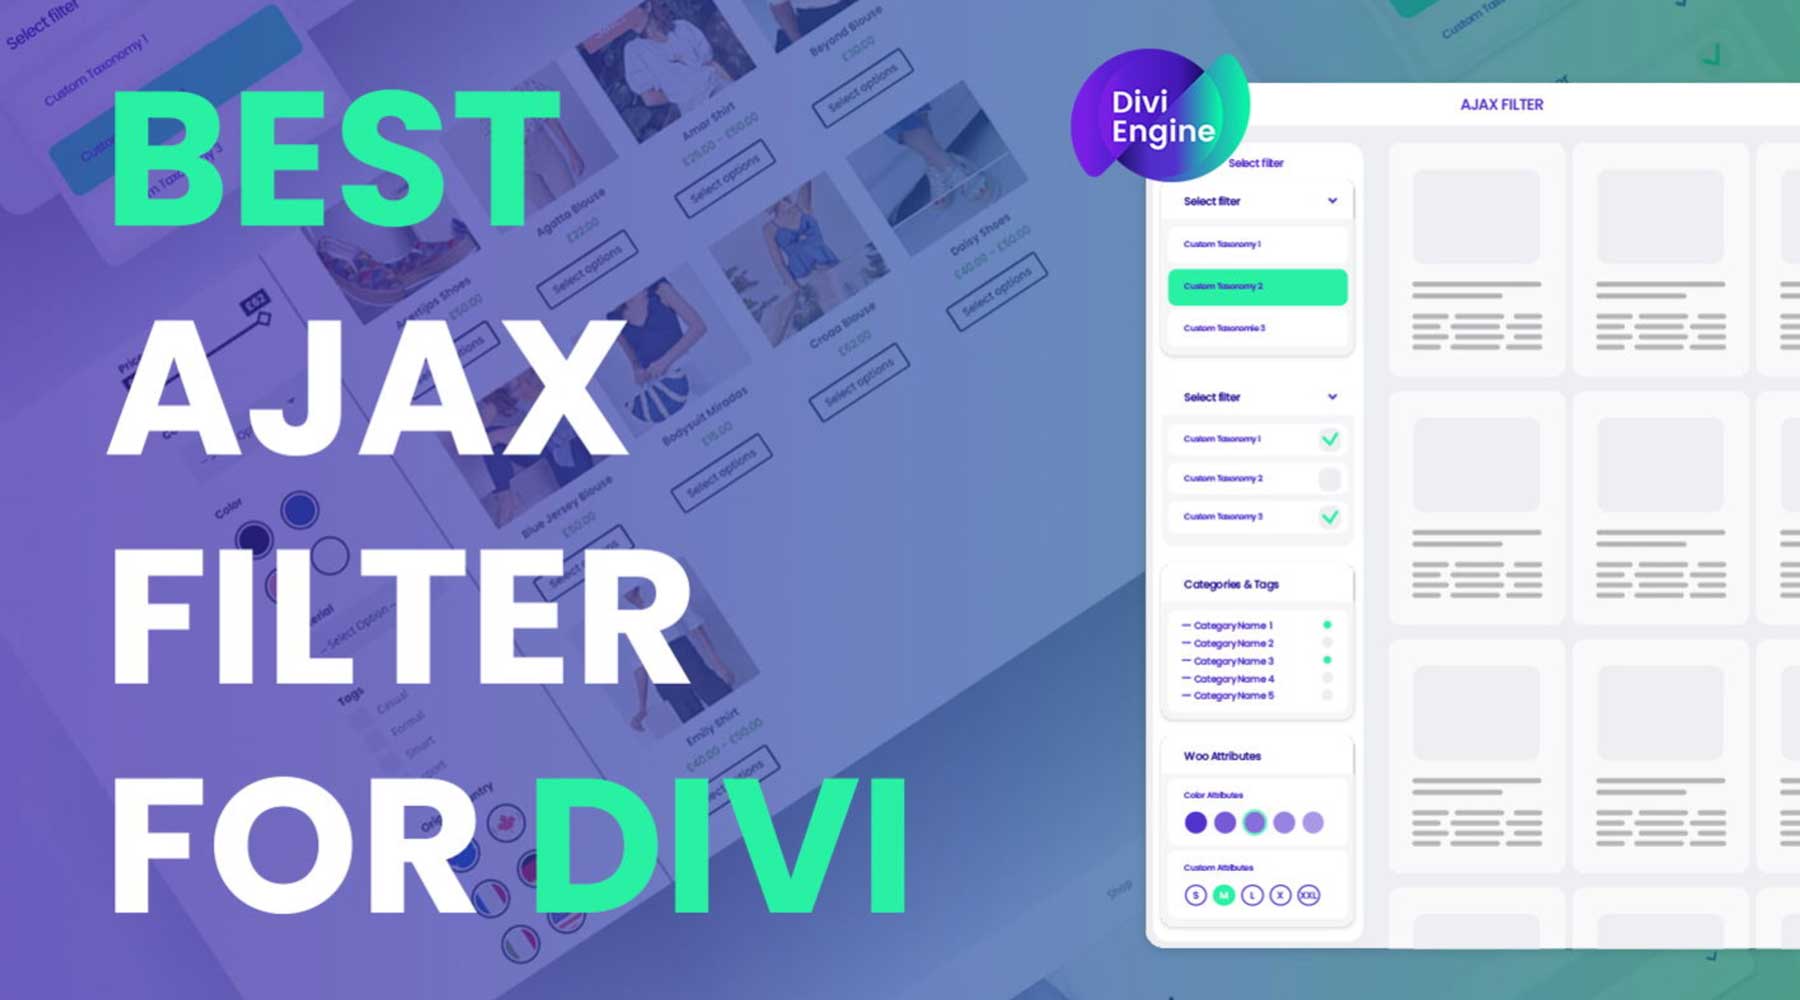
Divi Ajax Filter is a Divi extension designed to create filters for your content, such as blog posts, portfolios, or WooCommerce products, directly within the Visual Builder. It allows various filter options, including categories, tags, custom fields, and product attributes. Divi Ajax Filter utilizes Ajax technology, enabling content updates without reloading the entire page. It works seamlessly with Divi, WooCommerce, and Advanced Custom Fields (ACF). Divi Ajax Filter is available for $97 per year with unlimited website usage.
Divi Excels at Making Professional Websites
Divi makes it possible for anyone, regardless of experience, to create a beautiful, professional website. With its intuitive drag-and-drop Visual Builder, extensive premade layout library, and powerful Theme Builder, Divi is capable of bringing your vision to life. In this post, we’ve provided all the information you need to make a Divi website. From purchasing a hosting plan with SiteGround to planning your website’s structure and designing captivating pages with Divi AI, you now have the knowledge to embark on your website-building journey.
Remember, Divi offers a wide range of design chops to explore. Don’t be afraid to experiment, customize, and unleash your creativity. There are plenty of online resources available, from the Elegant Themes blog to the Divi documentation website. With Divi by your side, the possibilities are endless.
Want to know more about the products mentioned in this post? Check out the table below for pricing and links to each.
| Products Mentioned | Starting Price | Description | Action | |
|---|---|---|---|---|
| 1 | Namecheap | $5.98/year | Domain Registrar | Get |
| 2 | SiteGround | $2.99/month | Hosting Provider | Get |
| 3 | Flywheel | $13/month | Managed Hosting Provider | Get |
| 4 | Cloudways | $12/month | Managed Hosting Provider | Get |
| 5 | Pressable | $37.50/month (billed annually) | Managed Hosting Provider | Get |
| 6 | Divi | $89/year | WordPress Theme | Get |
| 13 | Visual Builder | Included with Divi | Page Builder Plugin | Get |
| 14 | Design Elements | Included with Divi | Page Builder Plugin | Get |
| 16 | Theme Builder | Included with Divi | Full Site Editing | Get |
| 15 | Divi AI | $16.08/month (billed annually) | AI Website Builder | Get |
| 17 | Divi Cloud | $6/month | Cloud Storage | Get |
| 18 | Divi Teams | $1.50/month per user | Team Collaboration | Get |
| 19 | Divi VIP | $6/month | VIP Support | Get |
| 20 | WP Forms | $49.50/year | Contact Form Plugin | Get |
| 21 | WooCommerce | Free, Add-ons Available | Ecommerce Plugin | Get |
| 22 | Easy Digital Downloads | Free, $89.55/year | Ecommerce Plugin | Get |
| 23 | Rank Math | Free, $6.99/month | SEO Plugin | Get |
| 24 | Monarch | Included with Divi | Social Media Plugin | Get |
| 25 | Blog2Social | $7/month | Social Media Plugin | Get |
| 26 | Solid Security | $99/year | Security Plugin | Get |
| 27 | Active Campaign | $8/month | Email Marketing Service | Get |
| 28 | Bloom | Included with Divi | Marketing Plugin | Get |
| 29 | MonsterInsights | Free, $99.60/year | Analytics Plugin | Get |
| 30 | MemberPress | $179.50/year | Membership Plugin | Get |
| 31 | LifterLMS | $149.50/year | LMS Plugin | Get |
| 32 | LearnDash | $199/year | LMS Plugin | Get |
| 32 | Divi Marketplace | Prices Vary | Extensions, Child Themes, and Layouts for Divi | Get |
| 33 | Divi Pixel | $169/year | Divi Modules | Get |
| 34 | Divi Overlays | $79/year | Divi Layouts, Sections, and Modules | Get |
| 35 | Divi Ajax Filter | $97/year | Divi Extensions | Get |
Frequently Asked Questions
Although our Divi website post is extensive, you may still have a few questions that need to be answered. Check out the FAQ section below to get the answers.



Muchas gracias, siempre es aconsejable ponerse al día. salu2
¡De nada! Nos alegra que te guste el artículo.