An HTML sitemap page can be useful for users looking to navigate your Divi site from a panoramic view. Basically, an HTML sitemap (like the name suggests) is a map of your site in HTML. The sitemap page usually contains an organized list of links to all the relevant content throughout your site. An HTML Sitemap page can be created manually, but it helps if you can generate the sitemap page content dynamically so that you don’t have to worry about constant updates.
In this tutorial, we are going to show you how to create a dynamic HTML sitemap page layout in Divi using a combination of Divi Design and the plugin WP Sitemap Page. The setup is extremely easy and the result is surprisingly effective.
Let’s get started.
Sneak Peek
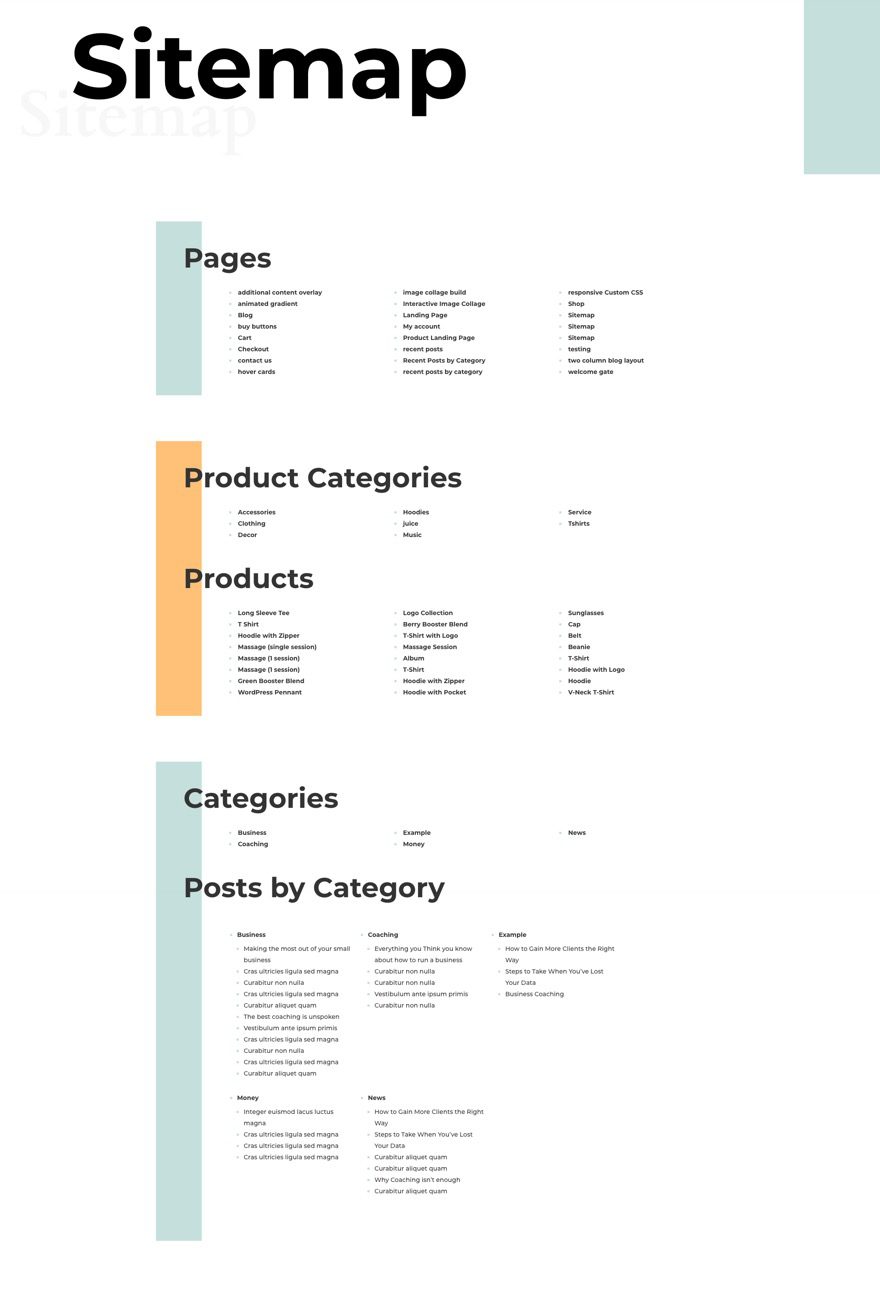
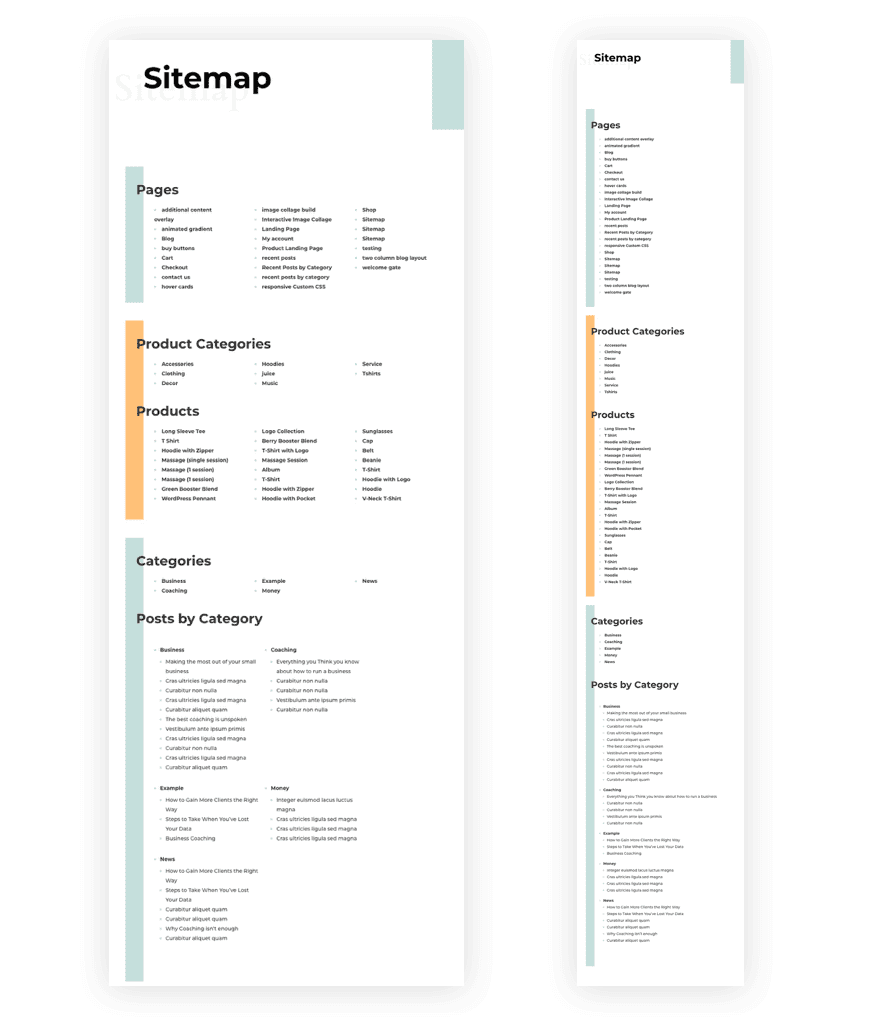
Download the HTML Sitemap Page Layout for FREE
To lay your hands on the sitemap page layout from this tutorial, you will first need to download it using the button below. To gain access to the download you will need to subscribe to our newsletter by using the form below. As a new subscriber, you will receive even more Divi goodness and a free Divi Layout pack every Monday! If you’re already on the list, simply enter your email address below and click download. You will not be “resubscribed” or receive extra emails.
Subscribe To Our Youtube Channel
To import the layout to your page, simply extract the zip file and drag the JSON file into the Divi Builder.
NOTE: This layout relies on the shortcodes used with the WP Sitemap Page plugin. If you don’t have the plugin active on your site, you will not see the content within the modules.
What You Need for this Tutorial
For this tutorial, you will need the following:
- The Divi Theme.
- WordPress Content. In order to generate HTML sitemap page content, you will need to have actualy pages, posts, categories, products, etc. on your site.
- The WP Sitemap Page plugin. This can be accessed from the WordPress dashboard which we’ll show you how to do below.
Let’s get to the tutorial, shall we?
Difference Between XML and HTML Sitemaps
If you are new to sitemaps, there are basically two kinds – XML and HTML. The XML sitemaps are specifically generated to give search engines a detailed map of your site. For the most part, XML sitemaps exist strictly for search engines like Google to make it easy for them to crawl your site which will help boost your rankings. As such, XML sites are not for the user. This is where HTML sitemaps come in. HTML sitemaps are built-in actual HTML (and PHP since we are using Divi and WordPress) on an actual sitemap page on your website. The idea is to generate an organized listing of all the relevant website content (posts, pages, products, categories, etc.) for the user in one convenient place. Basically, an HTML sitemap page is like a mega menu for your entire site.
For more info on sitemaps (like how to create an XML sitemap in WordPress), check out our post on how to create a sitemap for your WordPress site.
Setting up the Plugin
For this tutorial, we are going to use a FREE but effective WordPress plugin called WP Sitemap Page that will allow us to display sitemap content dynamically within a Divi module through the use of shortcodes.
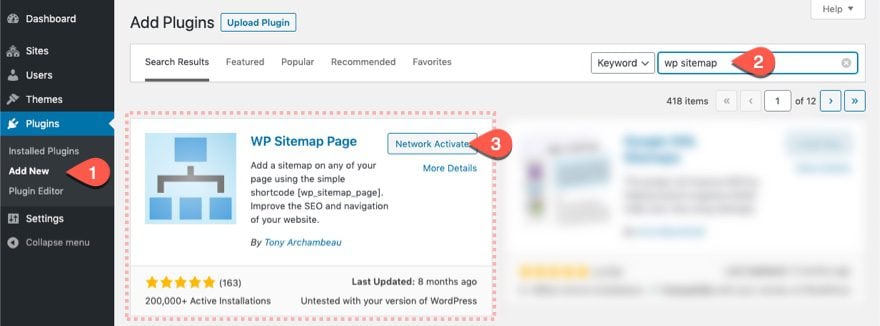
To download the plugin, go to your WordPress Dashboard and navigate to plugins > Add New. Then search for the wp sitemap page plugin using the search bar and then install and activate the plugin.
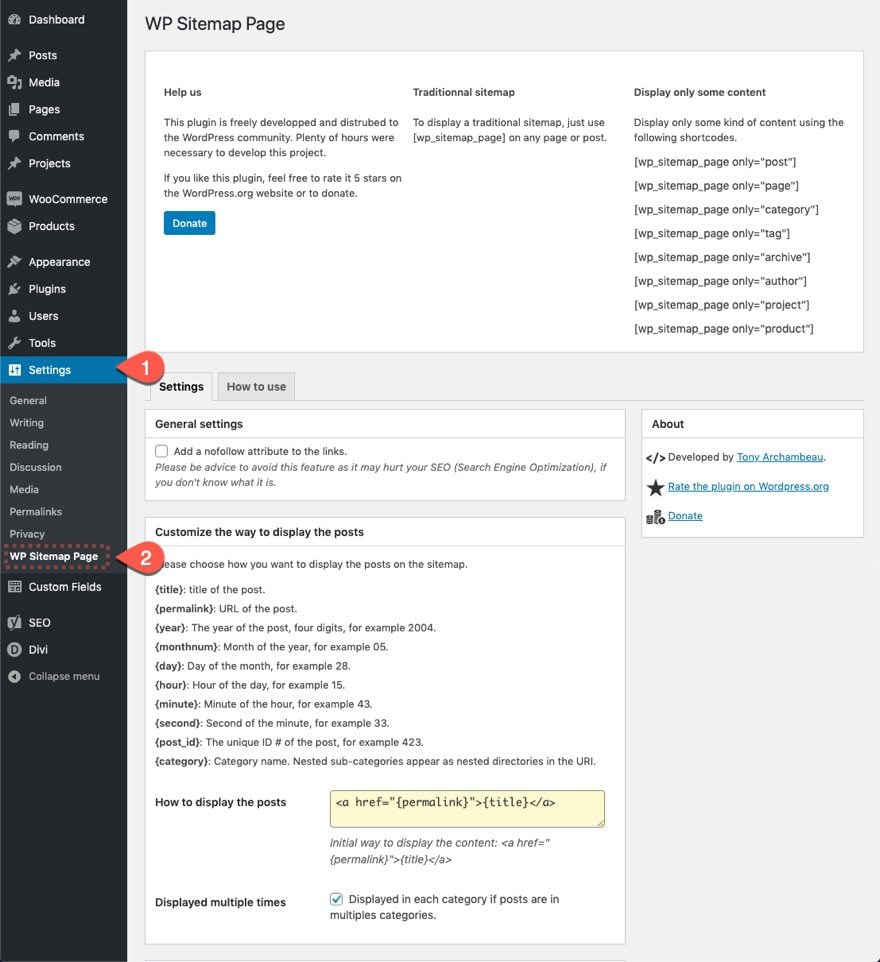
To open the WP Sitemap Page Plugin Settings, navigate to Settings > WP Sitemap Page. There you will see the settings available. For this tutorial, we are going to leave the options under the settings tab alone, but feel free to view them later on.
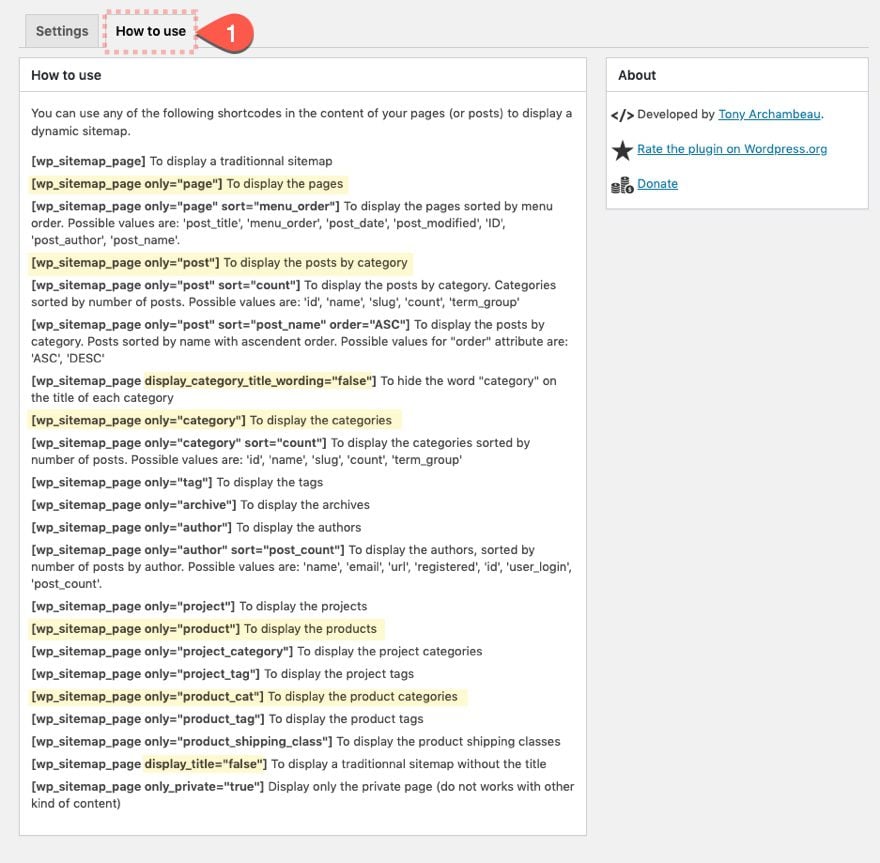
Click the How To Use tab to see all the available shortcode examples we can use to display our sitemap page content. The highlighted ones are those that we will be using.
Creating the HTML Sitemap Page in Divi
Once the plugins have been set up, we are ready to start designing the Sitemap page layout in Divi.
Creating a New Page
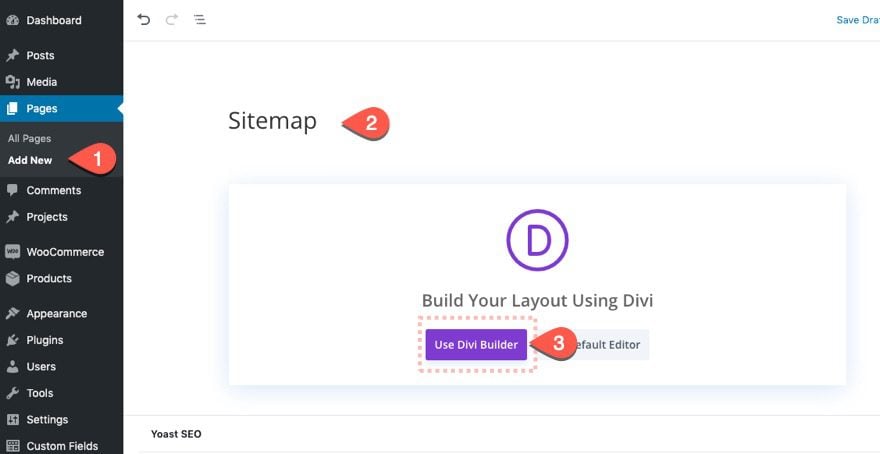
To start, create a new page, give it the title “Sitemap”, then click “Use Divi Builder”.
Adding the Premade Layout to the Page
You will be greeted with three options for how you want to build your page. Select “Choose a Premade Layout”.

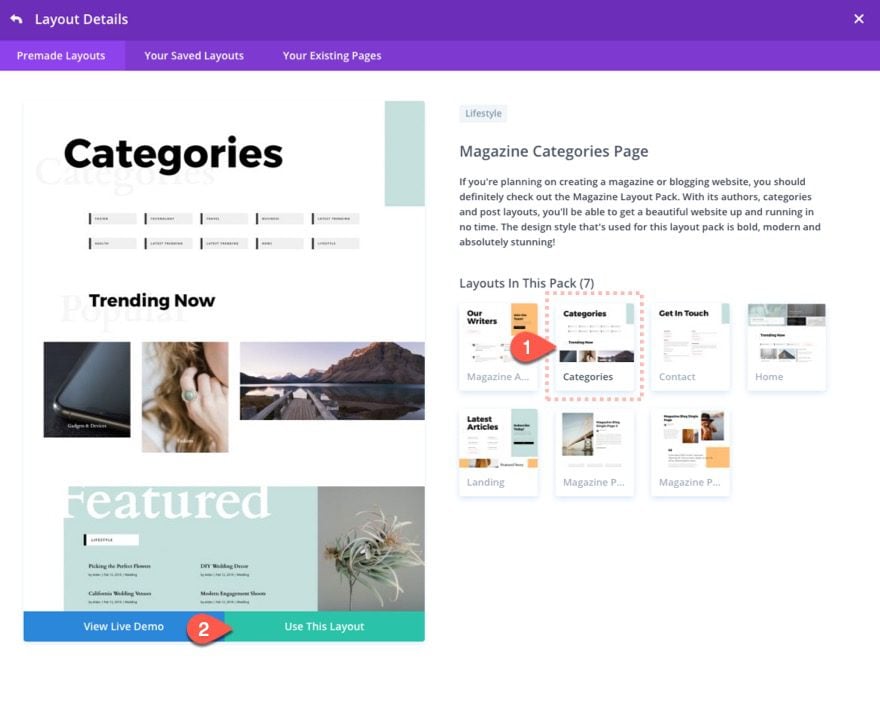
Then search and find the Magazine Layout Pack and click to use the Categories Page Layout.
Deleting Unneccessary Elements
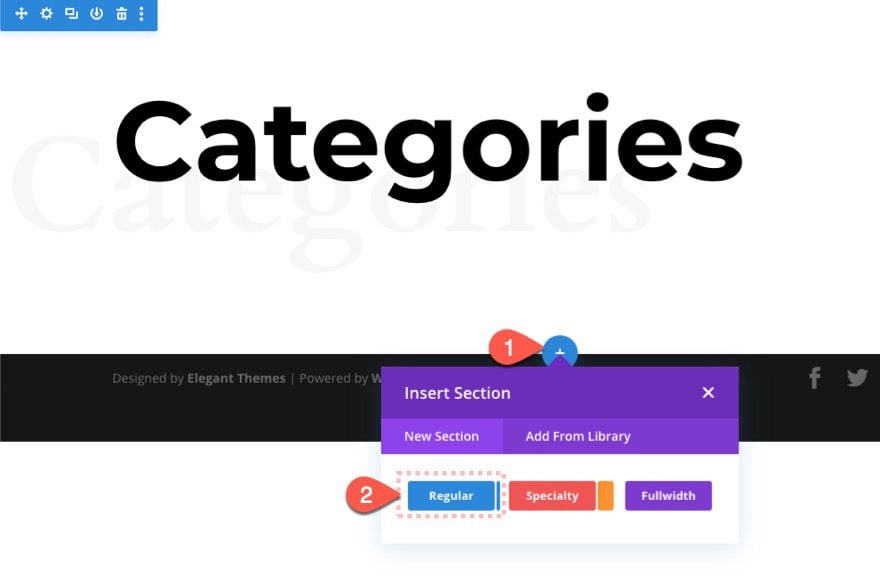
Since we are only going to be using the top section of this premade layout, once the layout is loaded into the page, delete all the sections below the first section.
Then add a new regular section below the top section.
Adding Row #1 for Displaying Pages
For our first row, we are going to add HTML sitemap page content that will display all pages on the site. Let’s start by adding a one-column row.
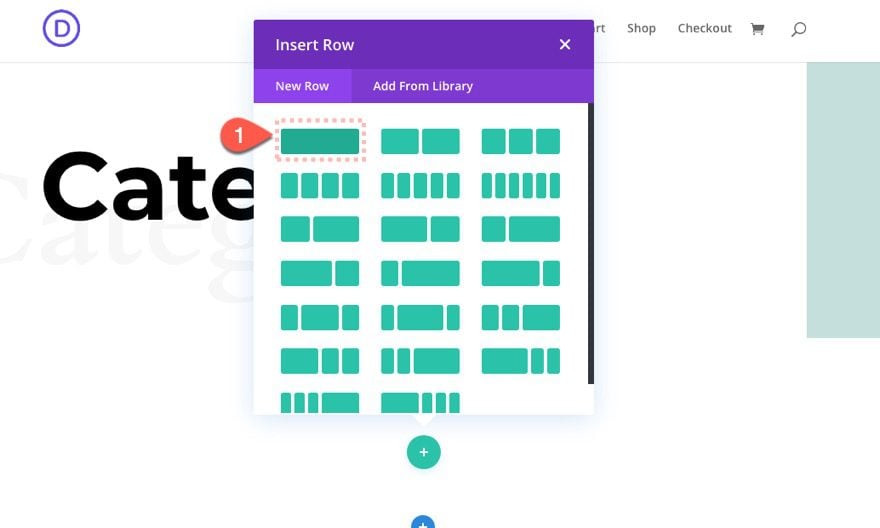
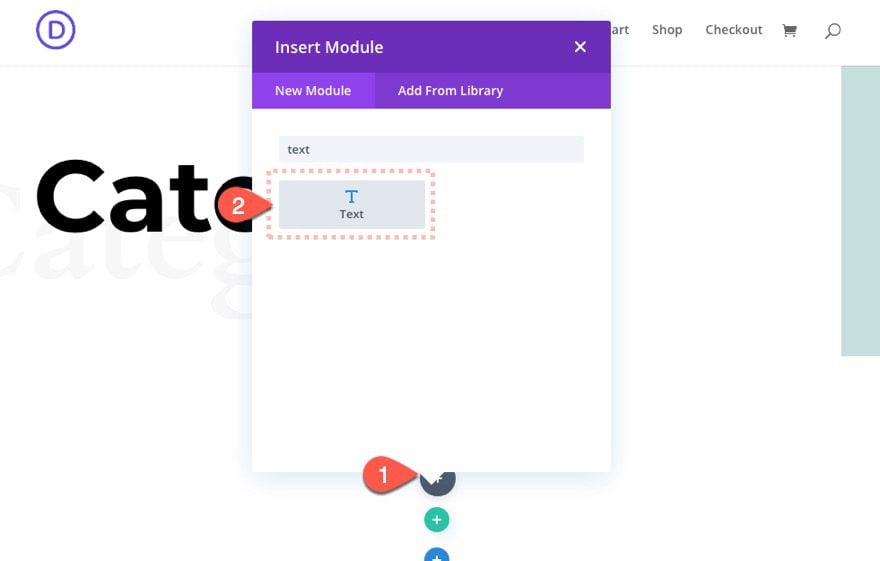
Adding Text Module to Display Pages
Inside the row, add a new text module.
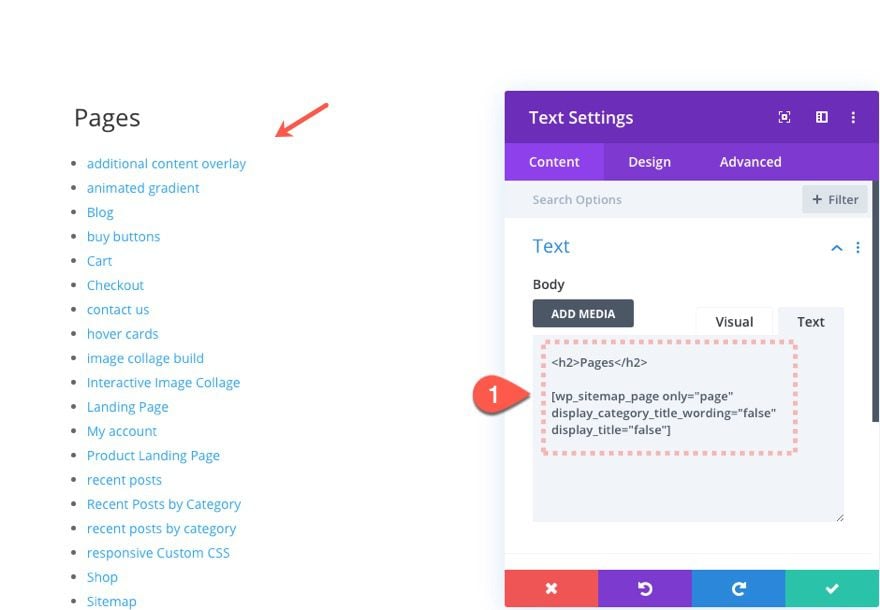
Then paste the following inside the content box under the text tab:
<h2>Pages</h2>

[wp_sitemap_page only="page" display_title="false"]
Text Design Settings
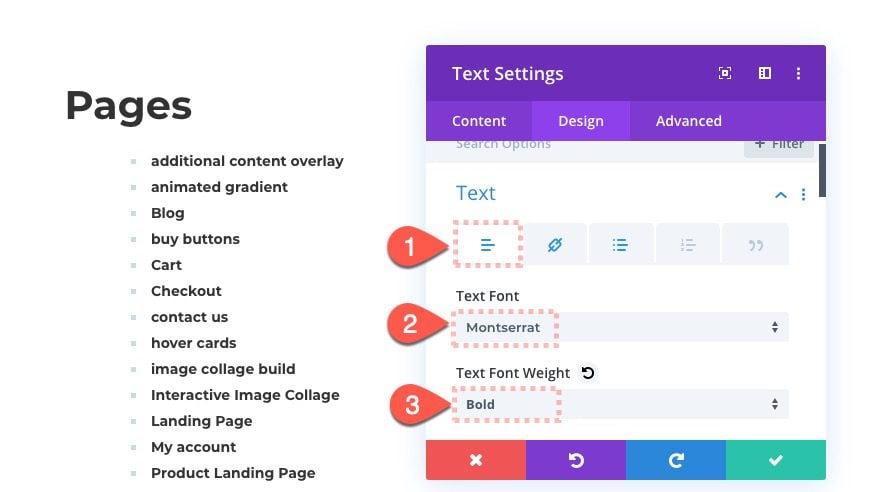
Even though most of the text content is generated by a shortcode, we can still design those elements using built-in Divi design settings. Jump over to the design tab and update the following:
- Text Font: Montserrat
- Text Font Weight: Bold
Then select the link settings tab and update the following:
- Link Text Color: #333333
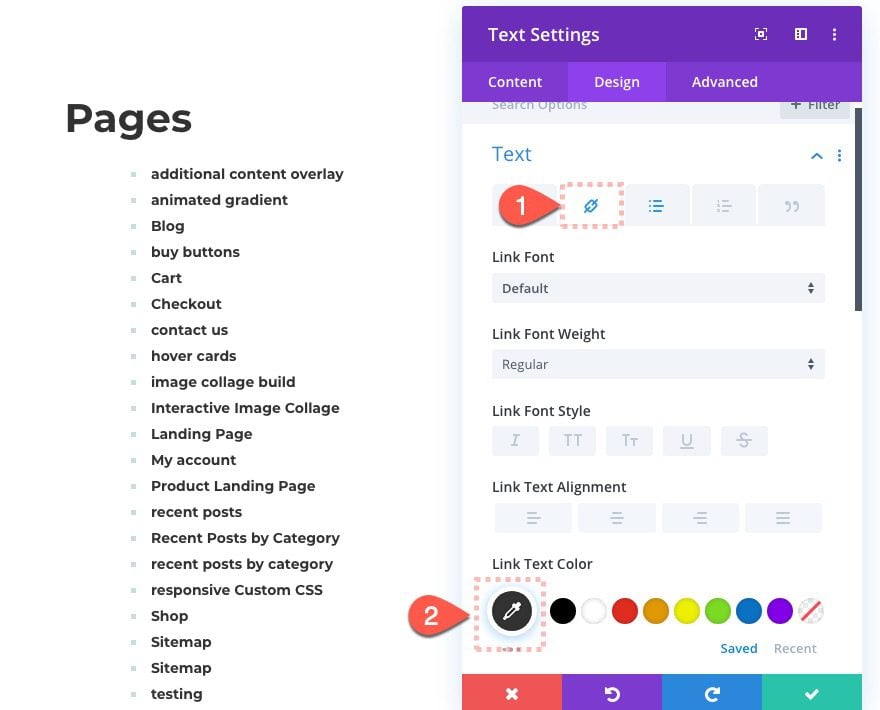
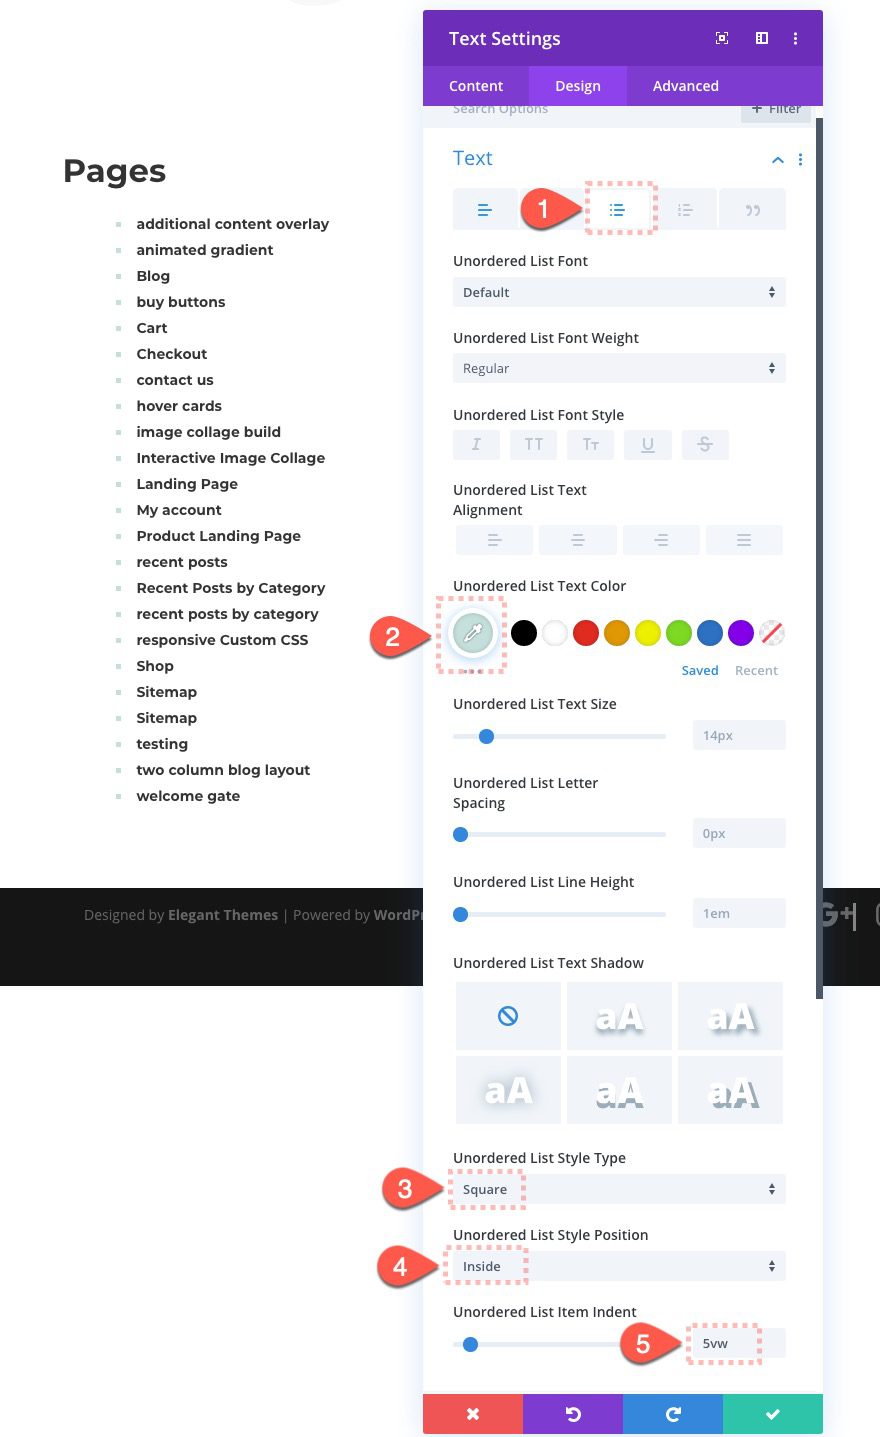
Next, select the unordered list settings tab and update the following:
- Unordered List Text Color: #c5e0dc
- Unordered List Style Type: Square
- Unordered List Style Position: Inside
- Unordered List Item Indent: 5vw
NOTE: Any links styles will override the unordered list styles. That’s why we can add this unordered list text color and it will only apply to the little square bullets.
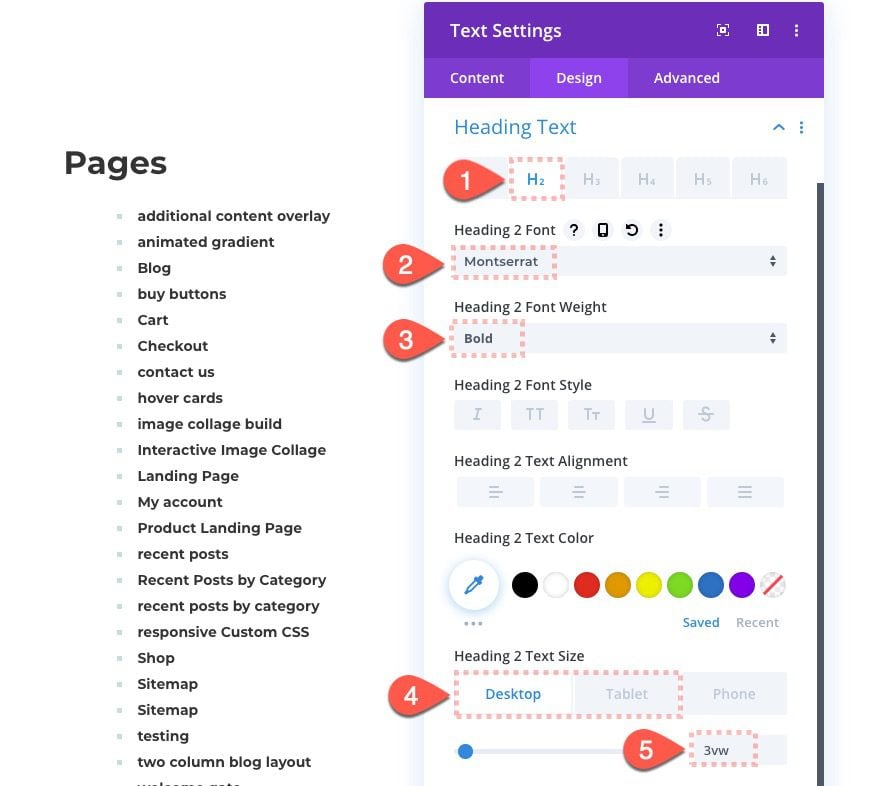
Update the Heading 2 style as follows:
- Heading 2 Font: Montserrat
- Heading 2 Font Weight: Bold
- Heading 2 Text Size: 3vw (desktop), 38px (tablet)
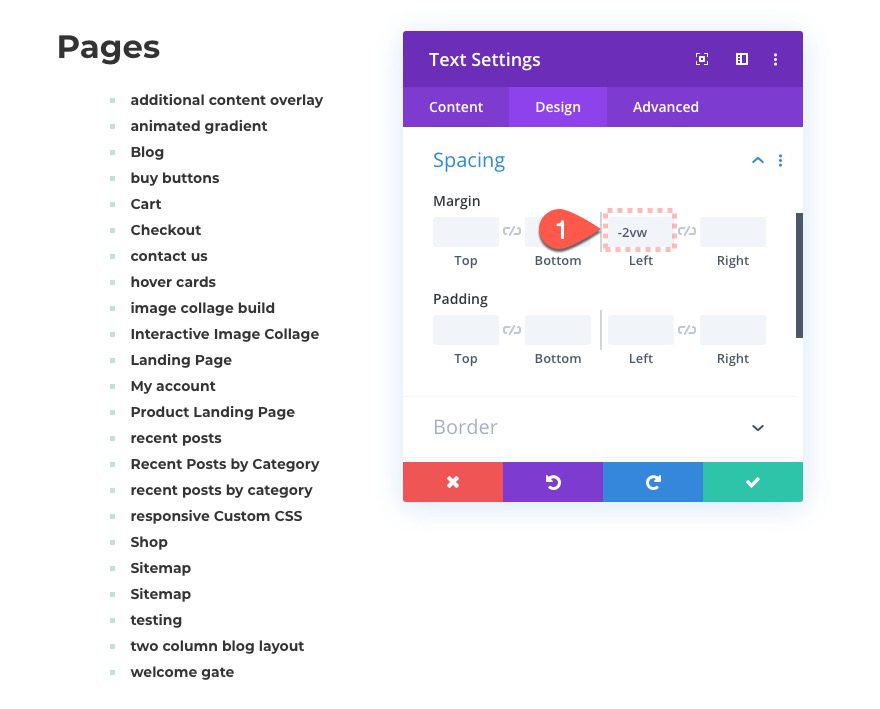
Then update the spacing with some left negative margin to pull the module to the left a bit. This will add a nice overlapping design with our heading and our box-shadow.
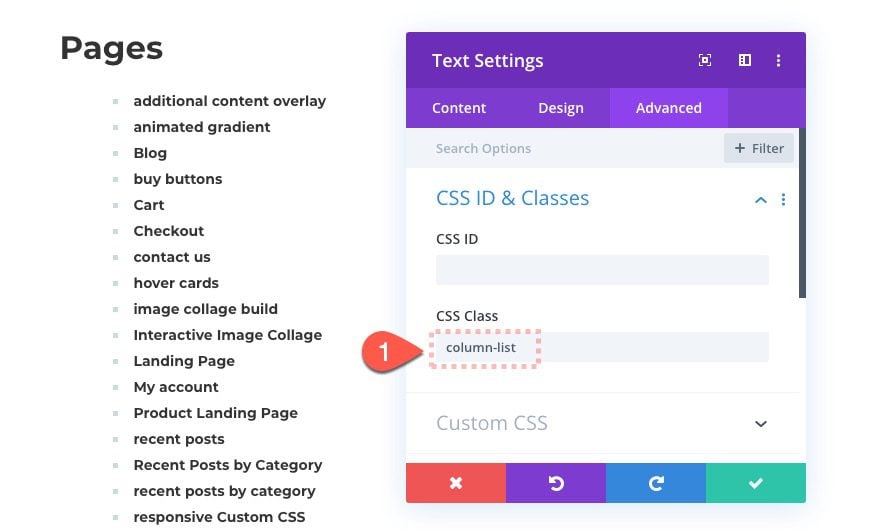
Finally, add a custom CSS Class to the module in order that we may target it later on with some custom CSS for breaking up the content into columns.
- CSS Class: column-list
Row Settings
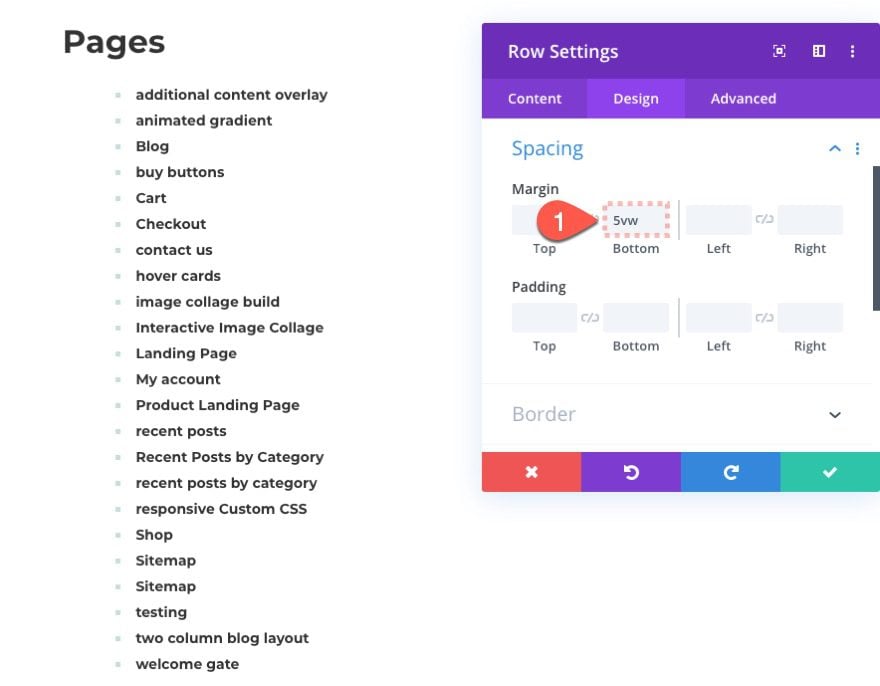
Now update the row settings as follows:
- Margin: 5vw bottom
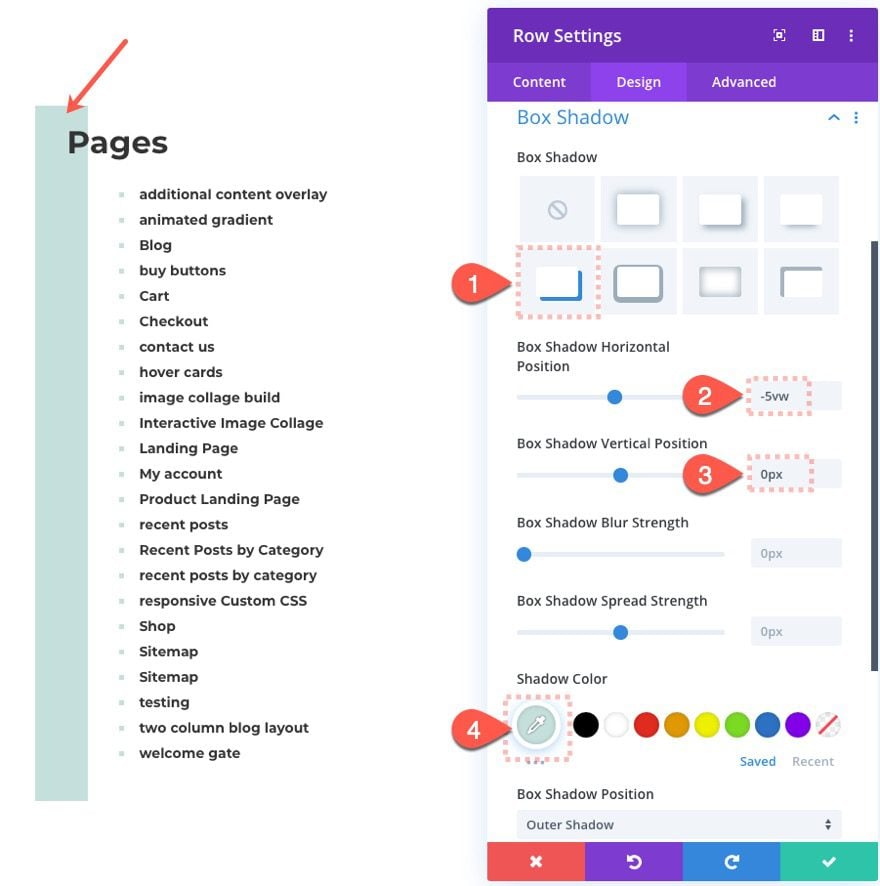
- Box Shadow: see screenshot
- Box Shadow Horizontal Position: -5vw
- Box Shadow Vertical Position: 0px
- Shadow Color: #c5e0dc
Adding Row #2 for Displaying Posts and Categories
Duplicate Row to Create a New One
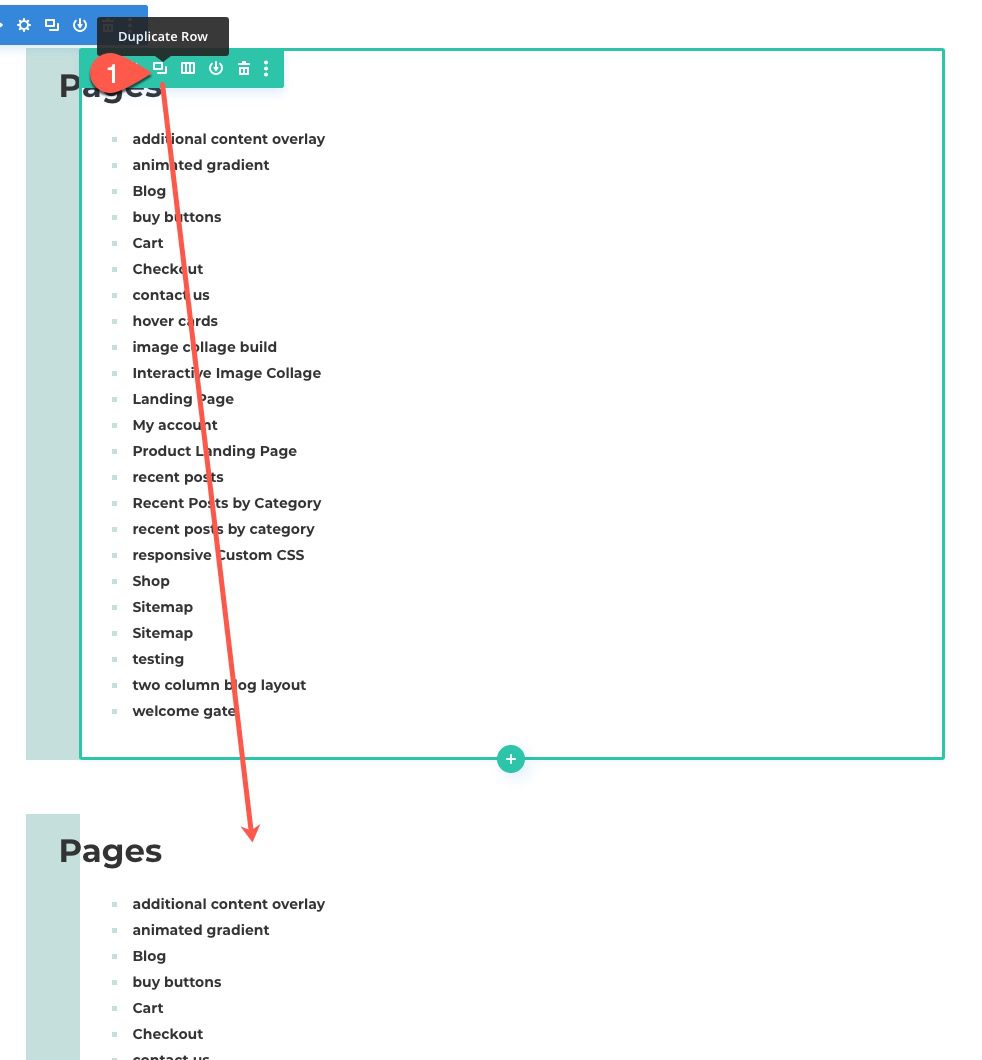
In our second row, we are going to display HTML sitemap page content for our blog posts. To create the second row, duplicate the row we just created containing our pages.
Update Text Module with Shortcode to Display Categories
Then open the settings for the text module in the duplicate row and replace the content with the following:
<h2>Categories</h2>

[wp_sitemap_page only="category" display_title="false"]
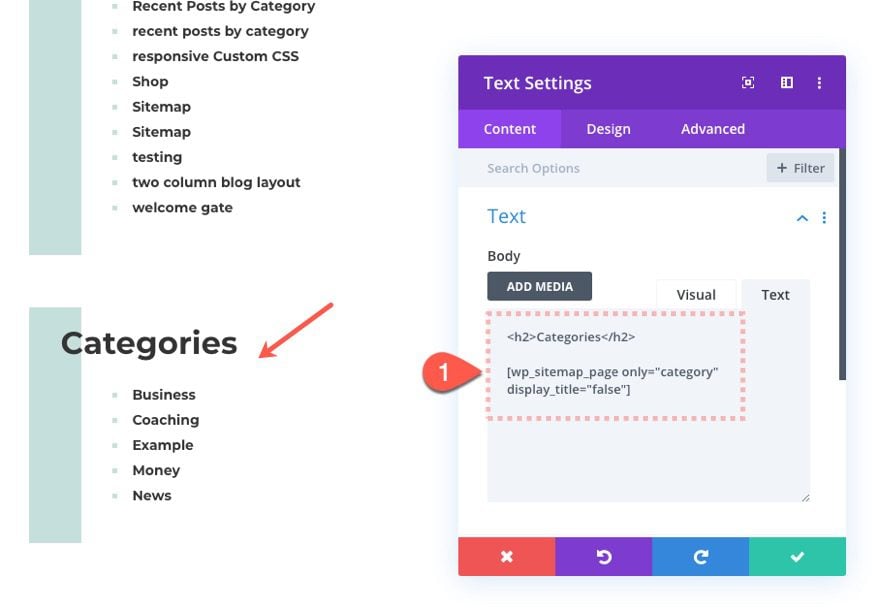
This shortcode will dynamically display the post categories.
Duplicate Text Module to Display Separate Title for Posts by Category
In order to display the posts by category, duplicate the text module containing the post categories and update the content with the following:
<h2>Posts by Category</h2>
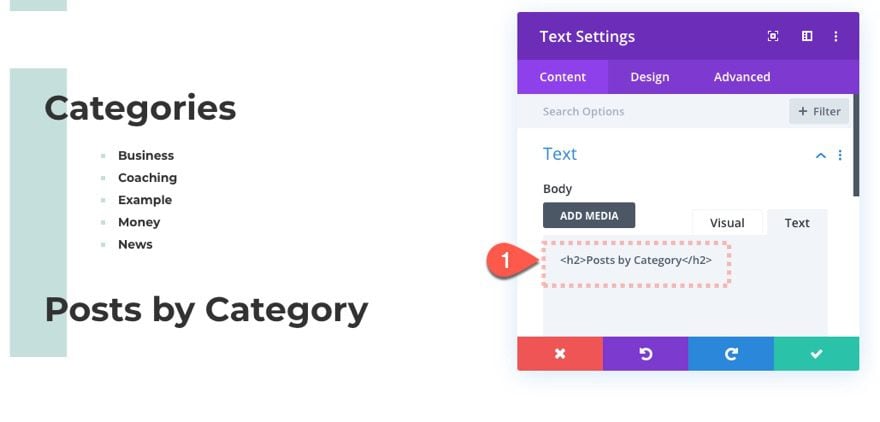
Duplicate Text Module and Update Content with Shortcode to List Posts by Category
We are going to put the title in a separate text module than the shortcode for design reasons.
Duplicate the text module you just duplicated one more time.

Then update the content of the new duplicate text module with a new shortcode as follows:
[wp_sitemap_page only="post" display_category_title_wording="false" display_title="false"]
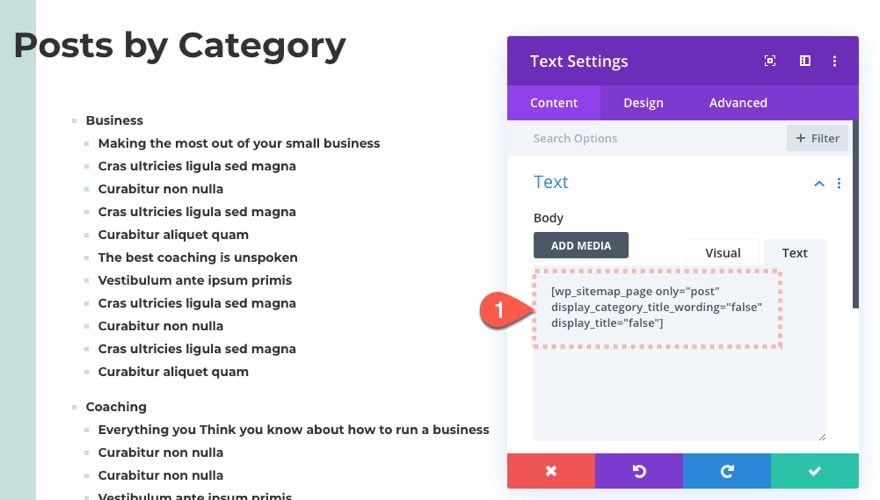
Update Shortcode Content Design with Divi
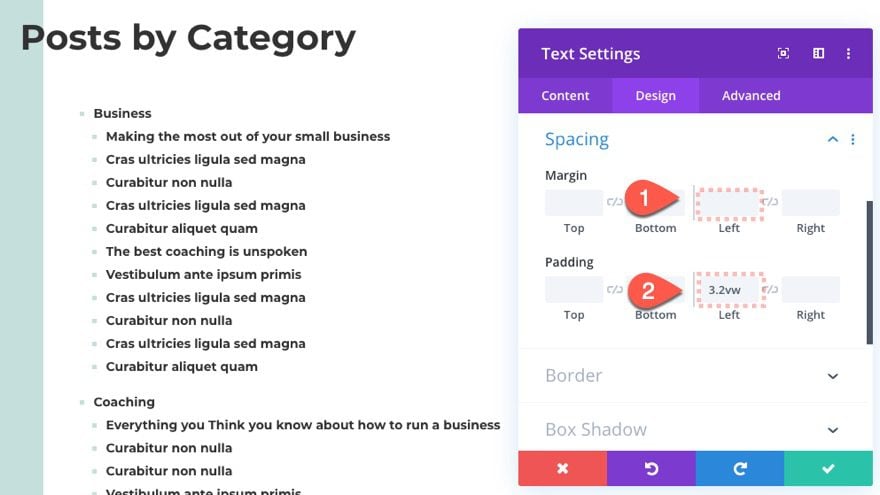
Because this shortcode has a nested list, we will need to optimize it a bit differently. Click the design tab and update the following:
- Unordered List Style Position: Outside
- Unordered List Item Indent: 0px
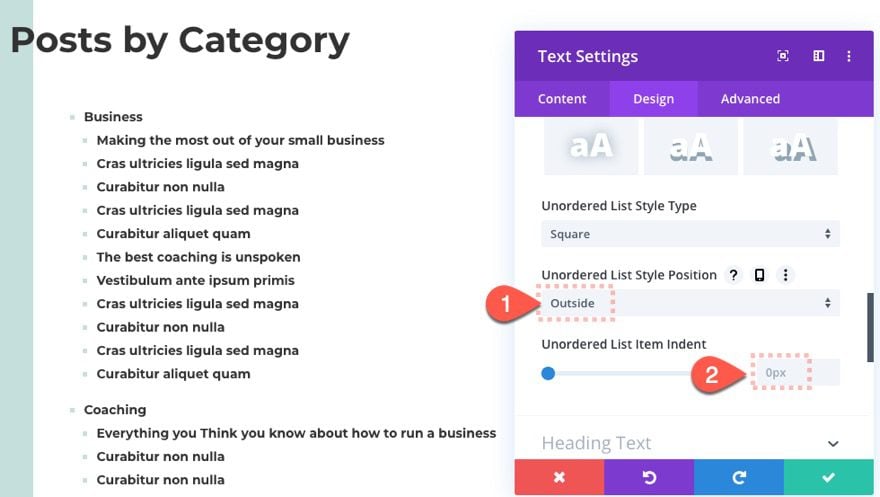
- Margin: 0px left
- Padding: 3.2vw left
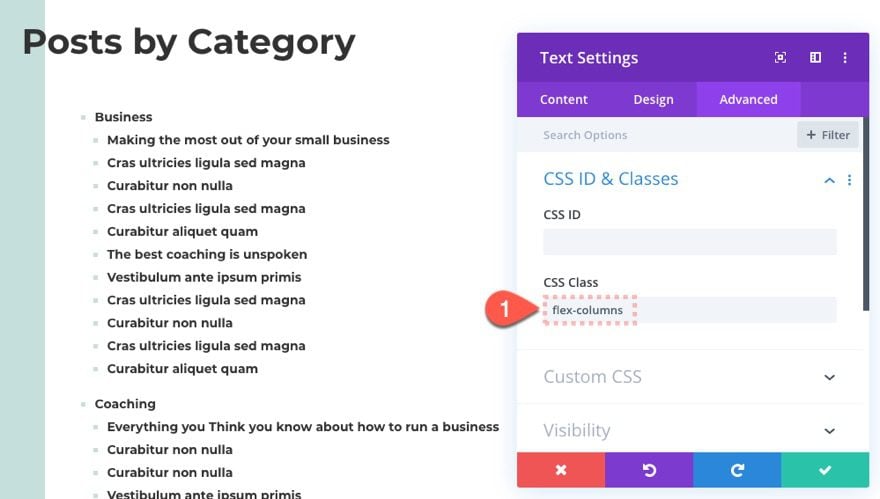
Then replace the CSS Class with the following:
- CSS Class: flex-columns
Adding Row #3 for Products
In this third and final row, we are going to add HTML sitemap page content that displays product categories and all products.
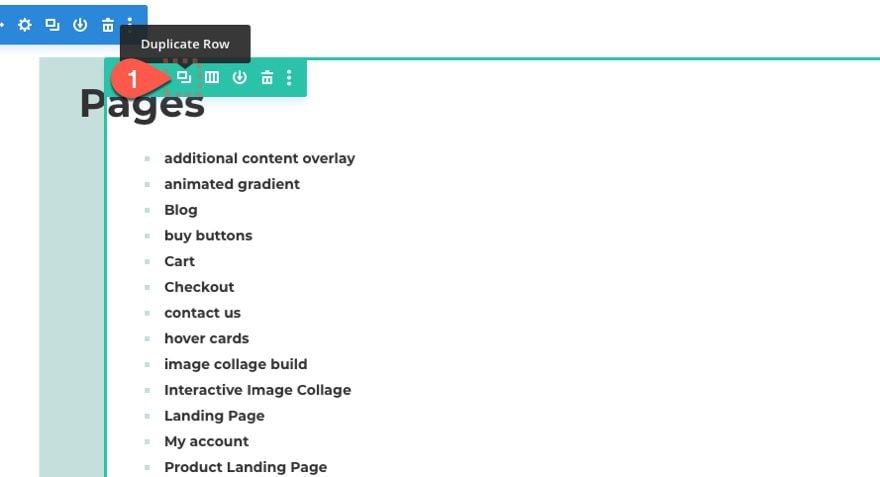
Duplicate Row #1
To start, let’s duplicate the top row (the one displaying pages).
Update Text Module Settings to Display Product Categories
Then update the duplicate’s text settings with the following content:
<h2>Product Categories</h2>

[wp_sitemap_page only="product_cat" display_title="false"]
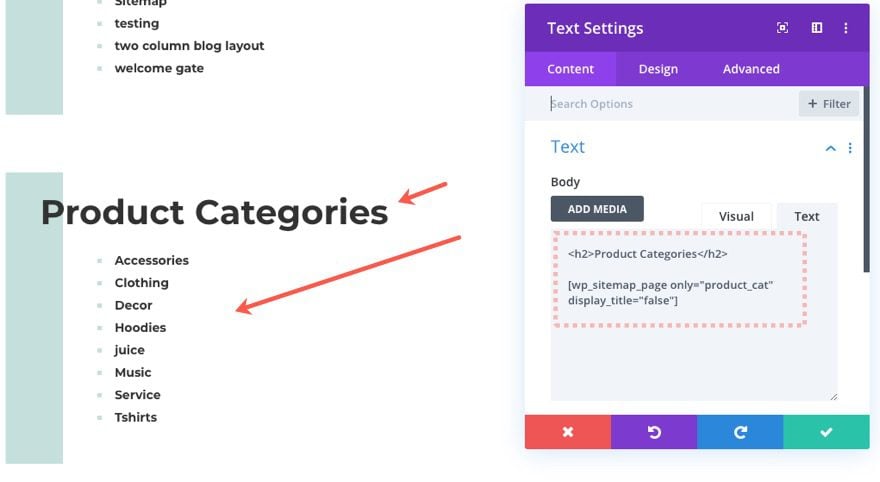
This shortcode will display the product categories.
Duplicate Text Module to Display Products
Next, duplicate the text module just created.
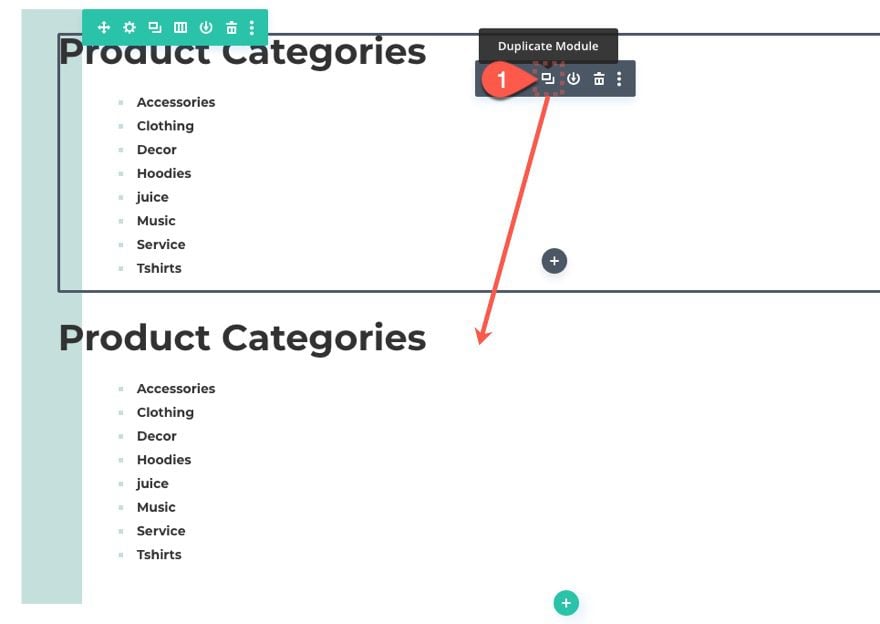
Then update the duplicate text settings with the following content:
<h2>Products</h2>

[wp_sitemap_page only="product" display_title="false"]
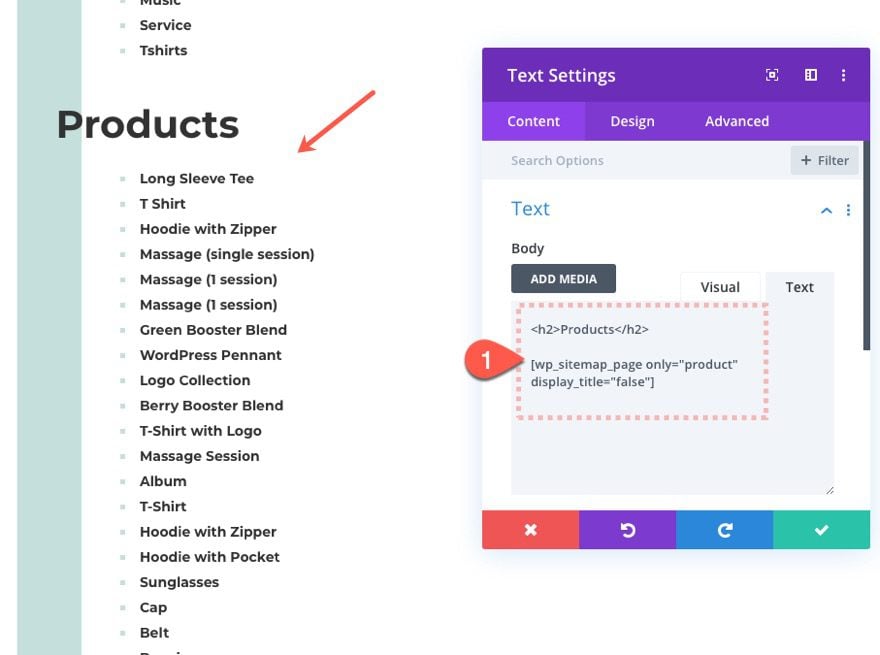
This shortcode will display all the products sitewide.
Update Row Box Shadow Color
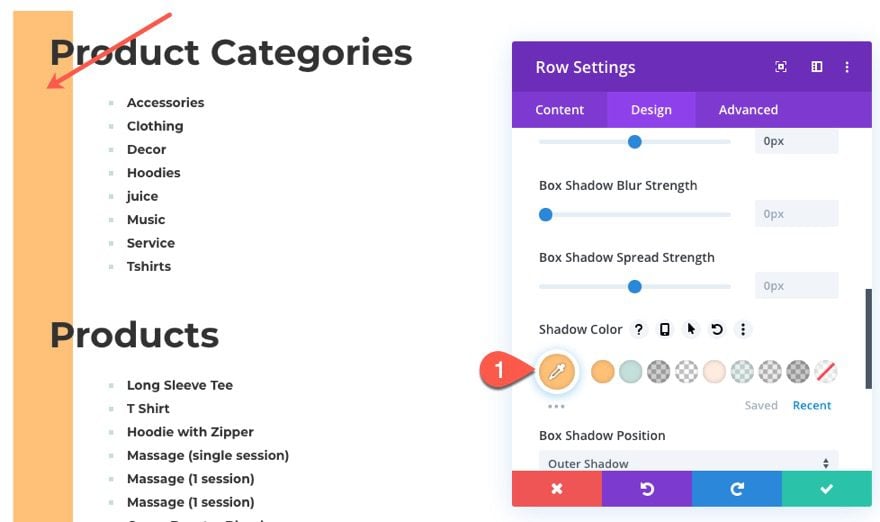
To give a little separation between sections, we can change the box shadow for the row containing our product categories and products. To do this, update the row settings as follows:
- Shadow Color: #ffc077
Update Page Heading
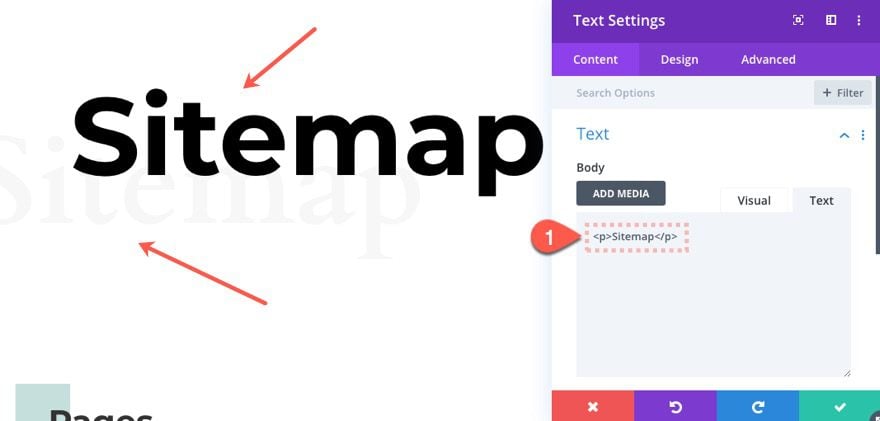
Before we forget, jump up to the top section and update the two text modules with the text, “Sitemap”. This will give an accurate title for our sitemap page.
Result So Far
Here is the result so far.

This one-column design looks really great as is, so feel free to call it a day and roll with it. But if you want to boost the layout with multiple columns, see below.
Adding Multiple Columns to Sitemap Page Content with Custom CSS
Right now, the default layout will display the sitemap page content in a single column. If you want to break this up into multiple columns on desktop and tablet, you can add custom CSS to a code module in Divi.
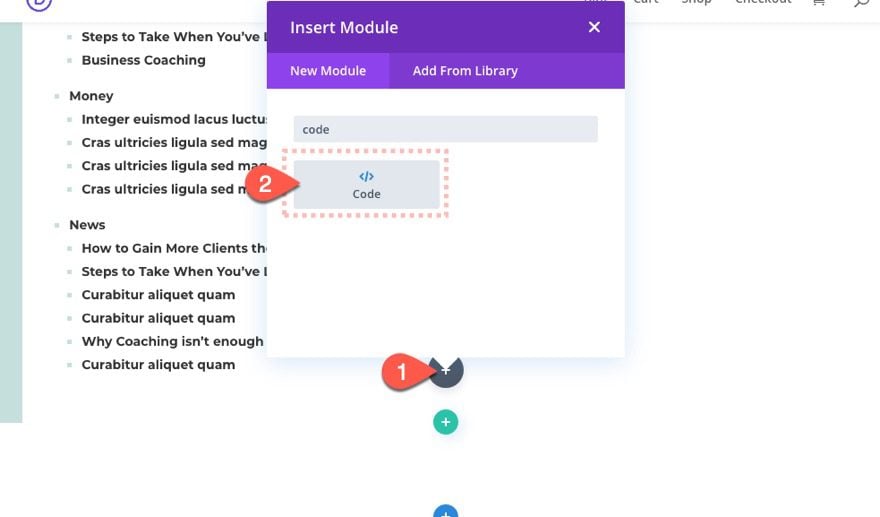
First, add the code module at the bottom of the page (doesn’t matter where).
Then paste the following CSS code into the code box:
<style>
@media all and (min-width: 767px) {

  .flex-columns .wsp-posts-list {
    display:flex;
    flex-wrap: wrap;
  }
  .flex-columns .wsp-posts-list>li>ul {
    width: 300px;
    padding: 2% 10% 10% 5%;
  }
  .column-list .wsp-container {
    column-count: 3;
  }

}
</style>
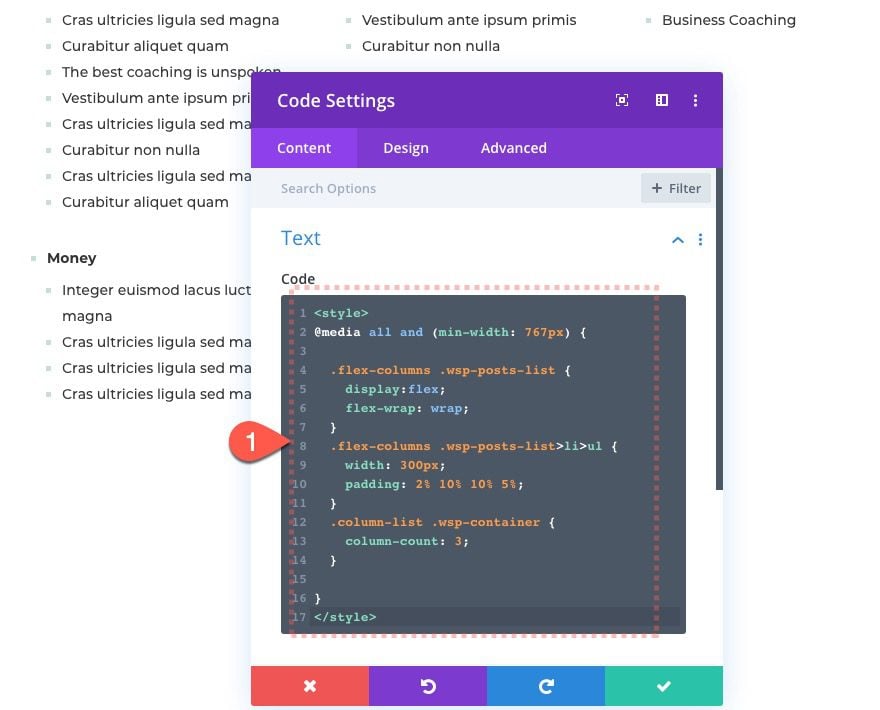
This CSS snippet only applies to a large tablet and above. The code targets the text modules with the CSS classes we added to them earlier. For the text module with the class “flex-columns”, the shortcode that generates the posts by category is divided into columns that are 300px wide. The text modules with the class “column-list” will divide the shortcode sitemap page content into three columns.
Final Result
Check out the final result!

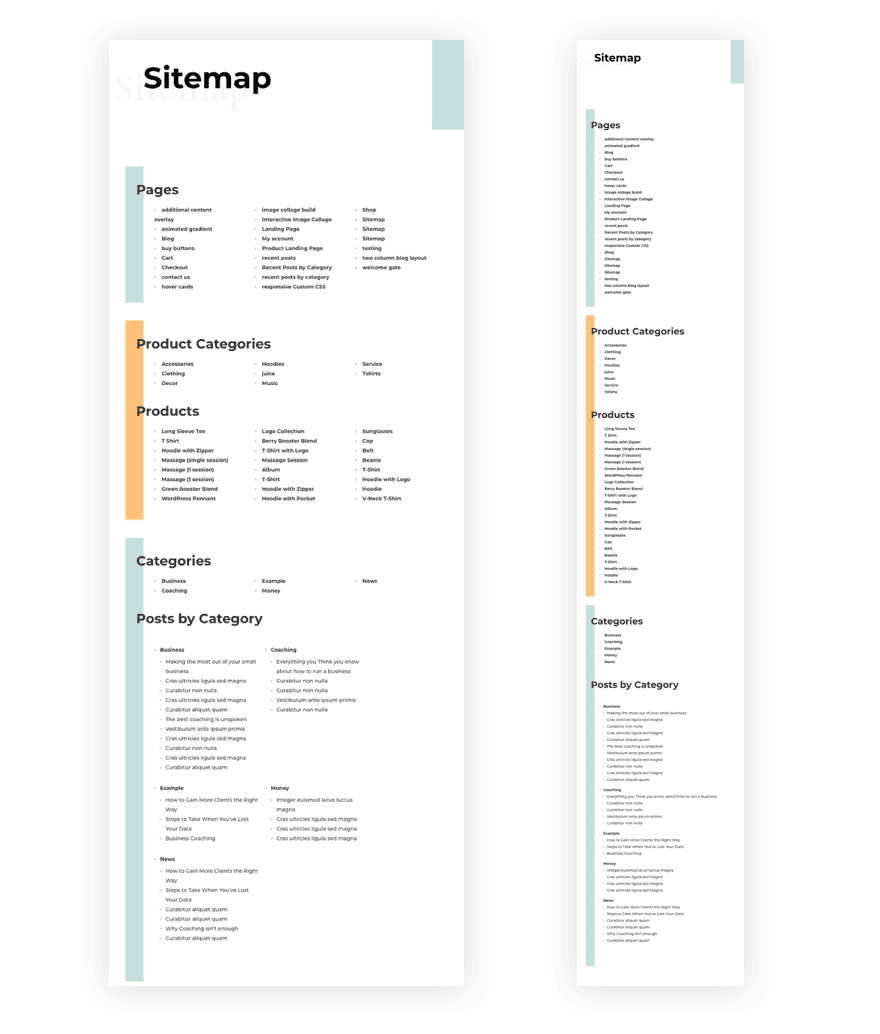
Others ways to Add Sitemap Content
We can also add sitemap content to the sitemap page using WordPress Widgets, Divi modules, and WooCommerce shortcodes.
Use WordPress Widgets
WordPress has some standard widgets that will display things like pages, categories, and products. They can be found in the WordPress dashboard under Appearance > Widgets. Feel free to take advantage of those using Divi’s sidebar module if you need to add something to the sitemap page.
Use Divi Blog Module
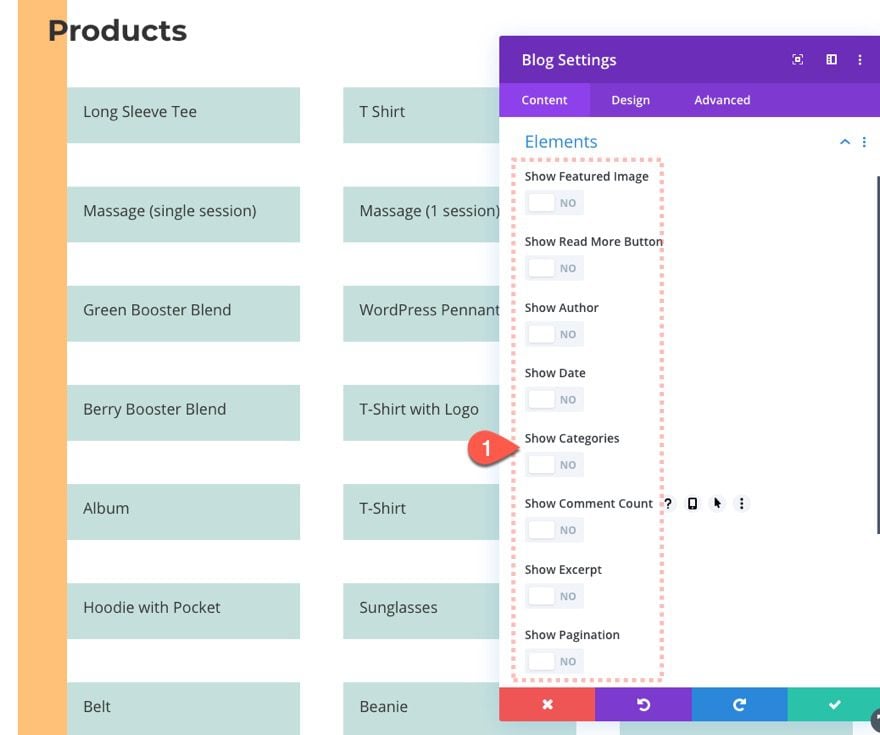
Divi’s blog module comes with built-in settings for displaying posts, pages, projects, and products. And if you take a minimalist approach to the design, you can get a pretty cool customizable list for sitemap pages.
For example, we can add a new blog module and select products as the post type and give it a post count large enough that we now it will display all products on our site.
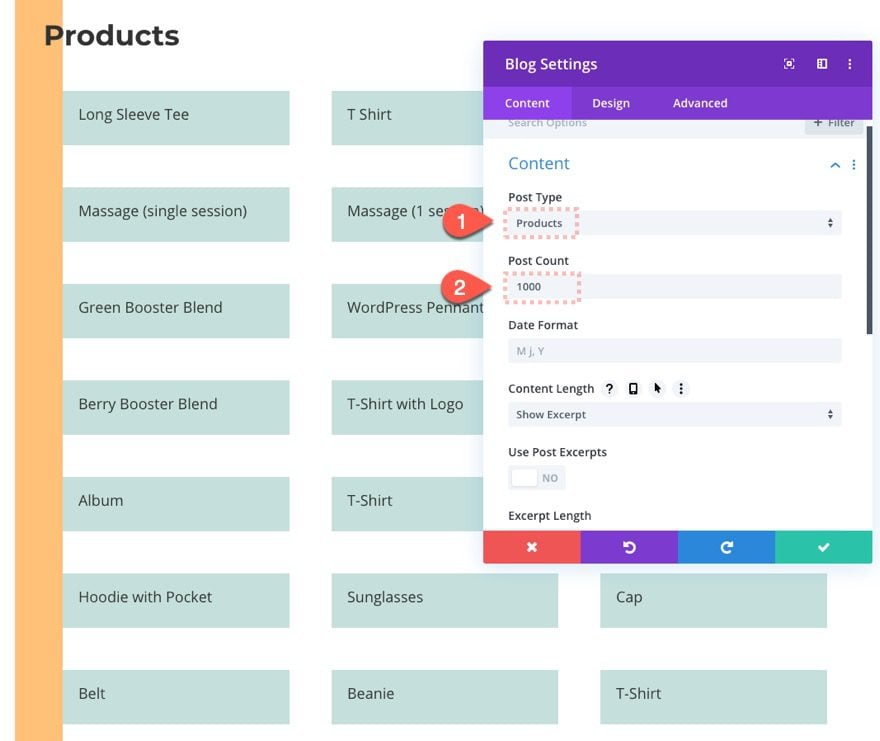
Then we can hide all the elements except the product link/title.
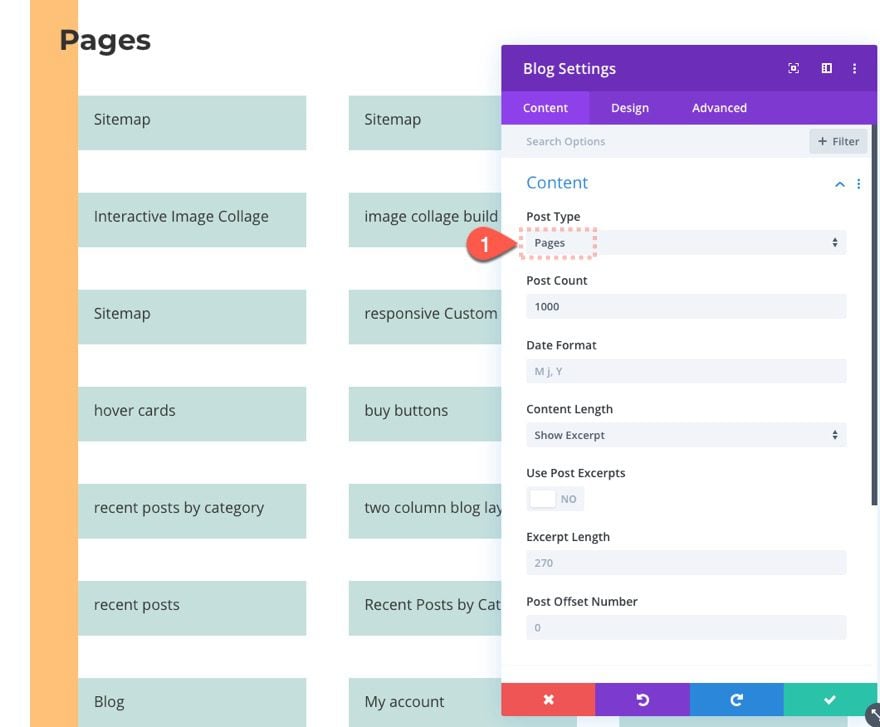
We can do the same for pages as well. Just select pages for the post type.
Product Shortcode
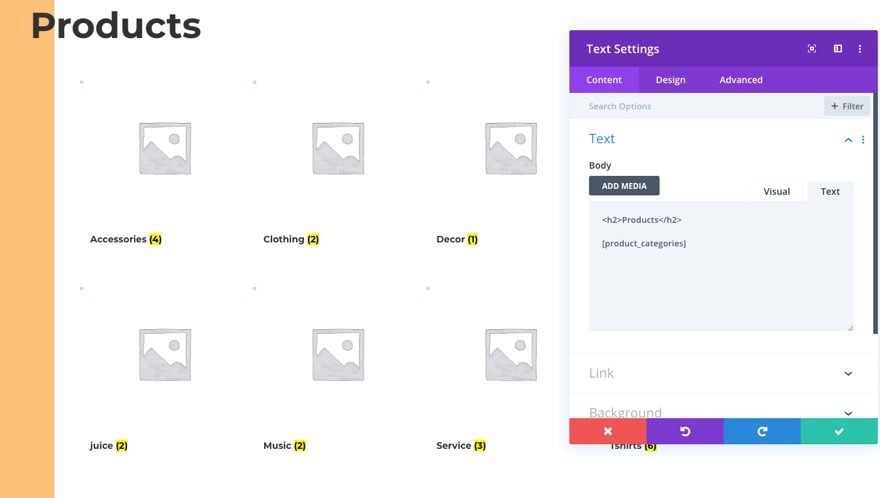
For WooCommerce products, we can use the WooCommerce Product Shortcode to generate product lists or product category lists. The product shortcode is very robust and versatile to display products however you want. You can even use the shortcode within a Divi Module to take advantage of built in settings.
Final Thoughts
Using the WP Sitemap Page plugin combined with the power of Divi is a nice simplified solution to generating a dynamic HTML Sitemap page for your website. And you can easily add more dynamic content to your sitemap page using any combination of Divi modules and WooCommerce shortcodes as well. Feel free to experiment and find the right design that fits your needs.
I look forward to hearing from you in the comments.
Cheers!


Thanks for Sharing this
Glad you liked it. You’re welcome!
Very Useful Post, thanks for sharing
Awesome!