
In case you haven’t heard, we’re getting ready to start off a massive Black Friday and Cyber Monday campaign here at Elegant Themes. But there’s another cool thing happening around this time of year. It’s called Giving Tuesday (this year it falls on November 28) and it’s an effort by the non-profits of the world to remind everyone that while they’ve got their wallets out for personal shopping, they may want to consider donating to those in need too. What a cool idea! And since we’re in the business of empowering our community, we thought it would be a good idea to help those who are using Divi (or Extra) and working for non-profits to make the best Giving Tuesday donation landing page they’re capable of.
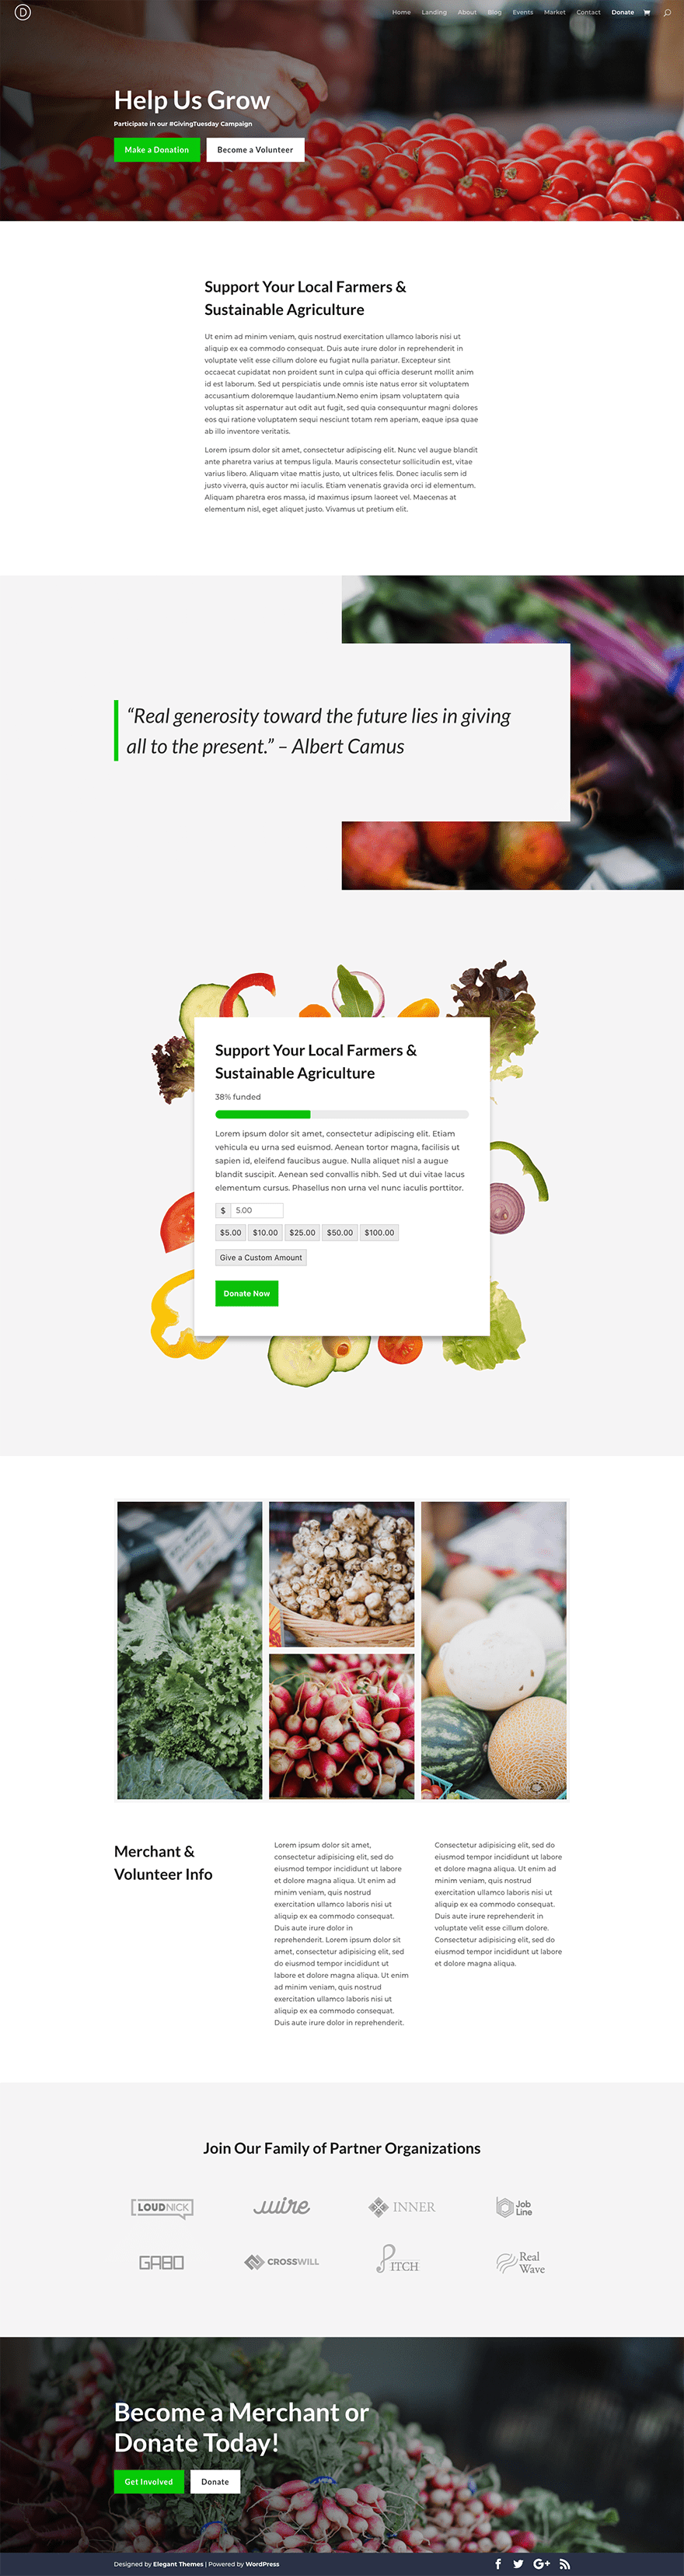
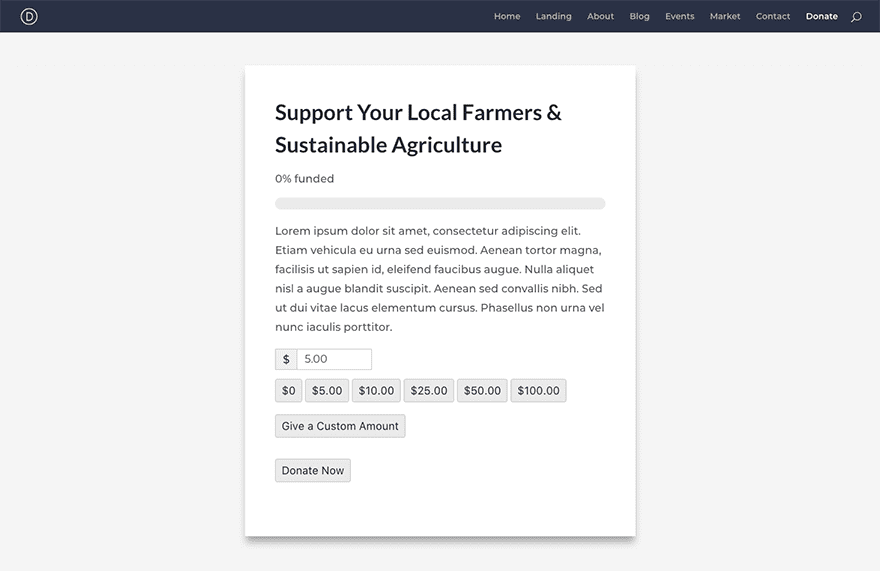
Here’s a quick peek at what we’ll be creating today.
End Result Preview
In today’s post we’ll be creating a beautiful Giving Tuesday landing page complete with a visually stunning (and functional, of course) donation form.
Install the GiveWP Plugin & Create a New Form
We’ll be using GiveWP – a popular donation plugin – to create the donation form we’ll be using in this tutorial. To install it, navigate in your WordPress Admin to Plugins > Add New. There, use the search feature to find the Give plugin. Click the “Install Now” button and and then activate it.
Next, go to Donations > Add Form. Enter a form title. I chose “Support Your Local Farmers & Sustainable Agriculture”.
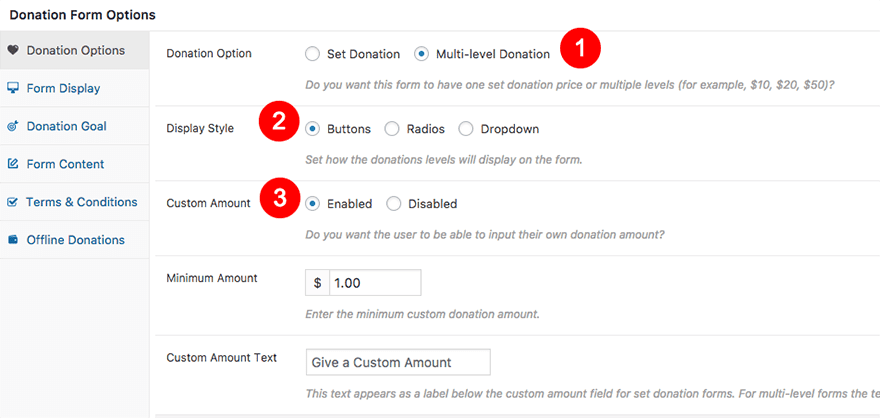
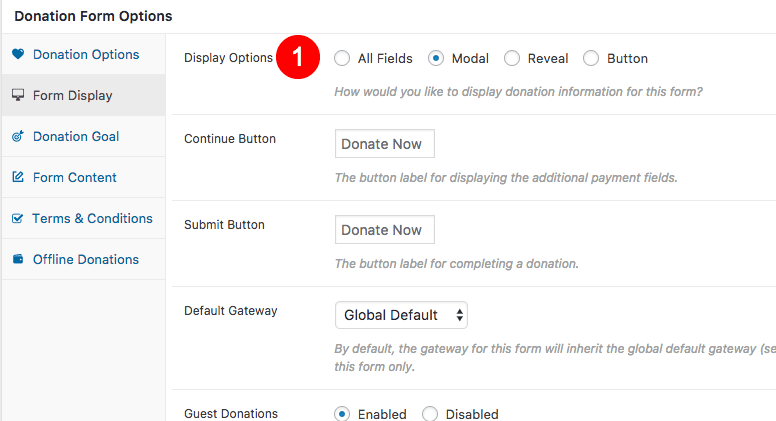
Next, you’ll notice the Donation Form Options. Let’s run through them tab by tab.
In the first tab, called Donation Options, configure the following settings in the top section.
Donation option: Multi-level Donation
Donation Display: Buttons
Custom Amount: Enabled
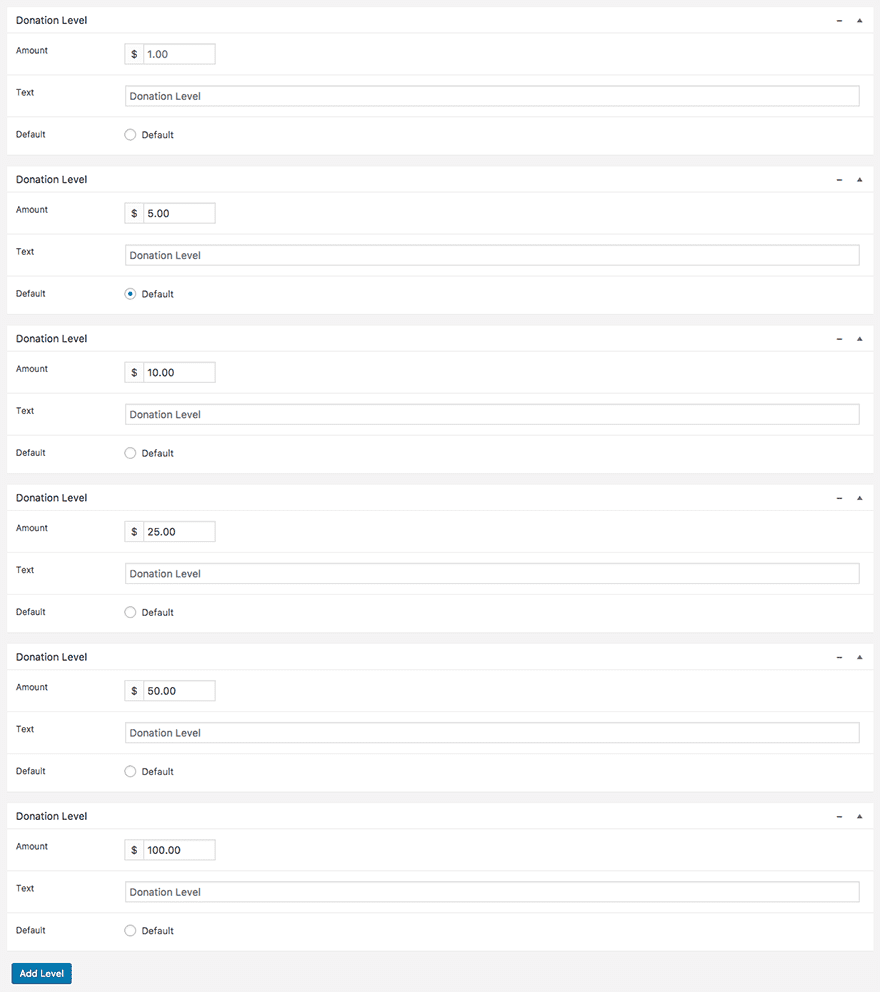
In the Donation Level section, set up the following donation levels: $1, $5, $10, $25, $50, $100. Be sure to set the $5.00 donation level as your new default.
Now move on to the Form Display tab. The only thing you need to do here is change the Display Options setting to Modal.
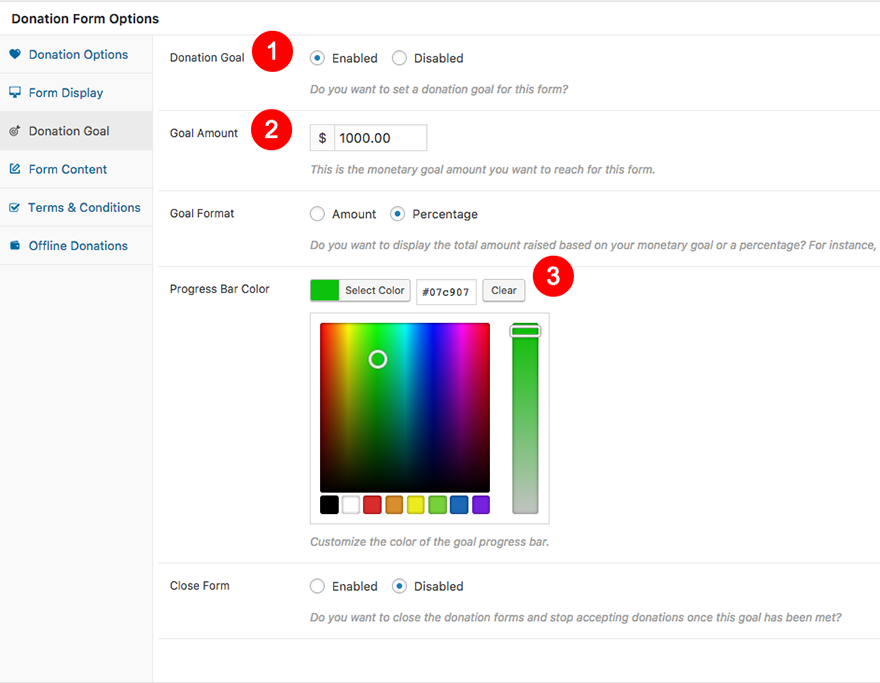
In the Donation Goal tab, first enable the Donation Goal option. Once you’ve done that, set your goal amount. I’ve set mine to $1,000. I’ve also set the Goal Format to percentage. This will let form viewers know the percentage of our goal that we’ve met, not the actual amount of money we’ve raised. And finally, I’ve changed the progress bar color slightly to match the same green used throughout the rest of my website (#07c907).
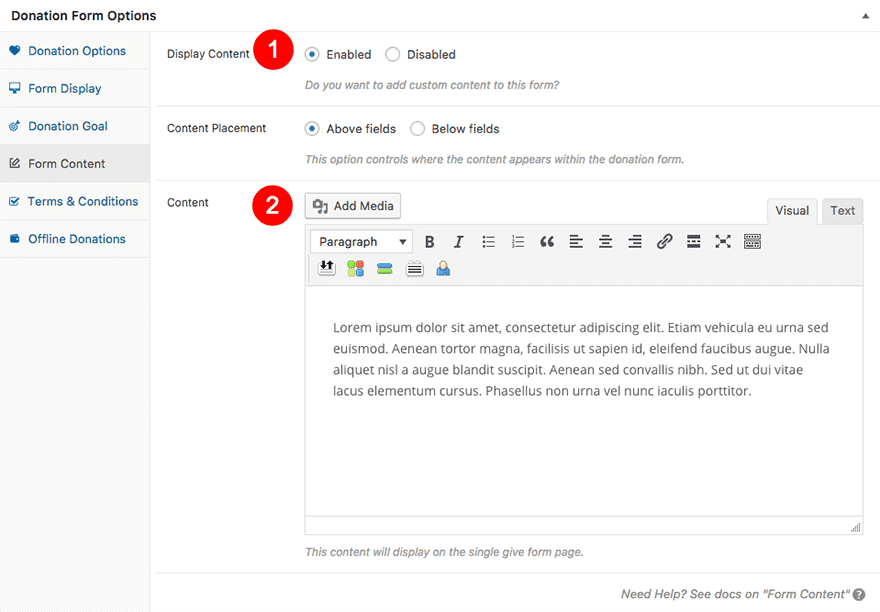
Lastly, we need to add some form content. In the Form Content tab, enable Display Content. Then, add some text to the content area.
For the purposes of this tutorial, those are all the Give form settings we need to configure. Click the Publish button and take note of the fact that you’ll need this donation form’s shortcode later.
When setting this form up for real, you will also need to go to Donations > Settings and configure things such as your Payment Gateways, Emails, etc.
Prep Your Image Assets
We’ll also be needing a custom background image for our form section. This is of course optional, it doesn’t affect how the form works. But it looks cool and adds a nice design tie-in to our farmers market example.
To create this image I used Photoshop but you can probably also use a free software called Gimp. It’s an open source tool that has a lot of the same features.
Here’s how to create it.
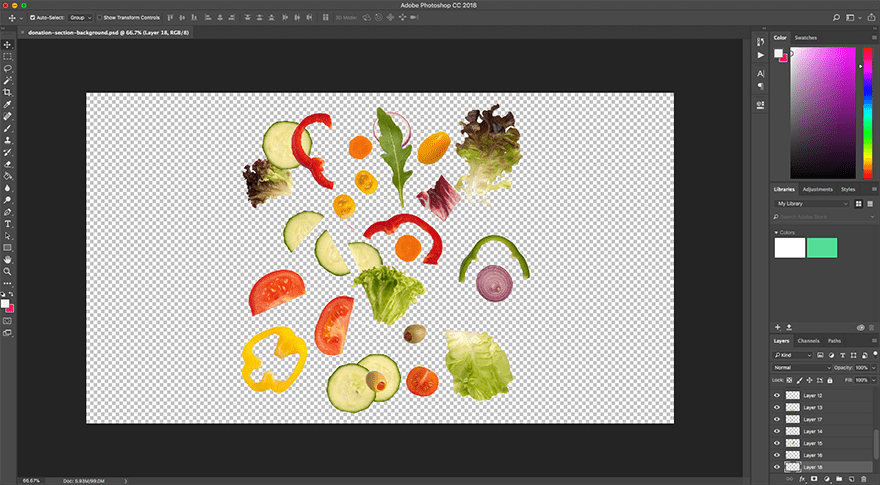
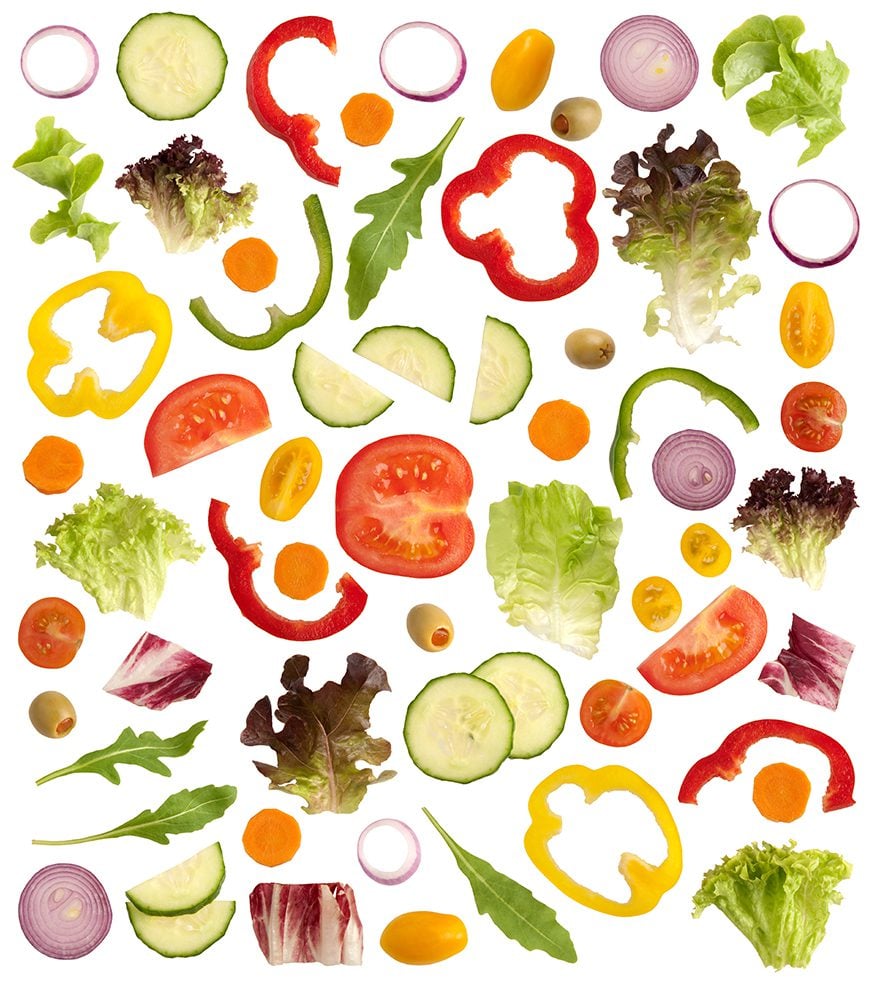
First, find yourself an image with elements related to your non-profit. Since the example I’m using is for a farmers market, I decided to use vegetables. I searched on a stock image website for “isolated vegetables”. Typically, the term “isolated” on a stock image website refers to items on a white background. This makes them easy to isolate by deleting the background. Which is exactly what I did.
Here is the image I found.
I then opened that image in photoshop.
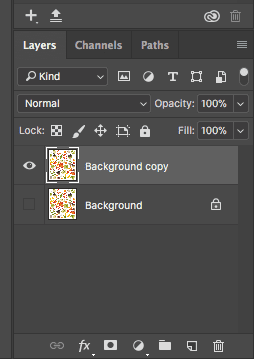
Because the initial layer is locked by default, duplicate it by right-clicking on it and selecting “Duplicate Layer”. Then, hide the first layer by clicking the eye icon next to it.

Next, use the magic wand tool to select all of the white space around and inside the vegetable elements. Hit the backspace key to delete it.
Next, navigate in your top menu to Image > Canvas Size and resize your canvas to 1920×1080. When you do this, your elements will likely be very big in comparison to your new, smaller, canvas.
On your keyboard hit command+T or go to Edit > Transform > Scale. Resize your isolated elements layer to fit within the new canvas size.
This is as far as we’ll go on this image for now. Simply make sure you’ve saved this new photoshop file. We’ll continue down below once we have our new donation form as a size reference.
Creating the Design in Divi
If you haven’t already done so, you’ll want to download and install our brand new (free) Farmers Market Layout Pack. Follow the instructions in that post for installing the layout pack. After it’s installed, follow the instructions in this blog post to get your site set up for the next stage of customization, which we’ll cover here.
When you’re ready, navigate to your Donate page and use the botton at the top of the page to enable the visual builder. I’ll take you section by section down the page, making customizations as we go.
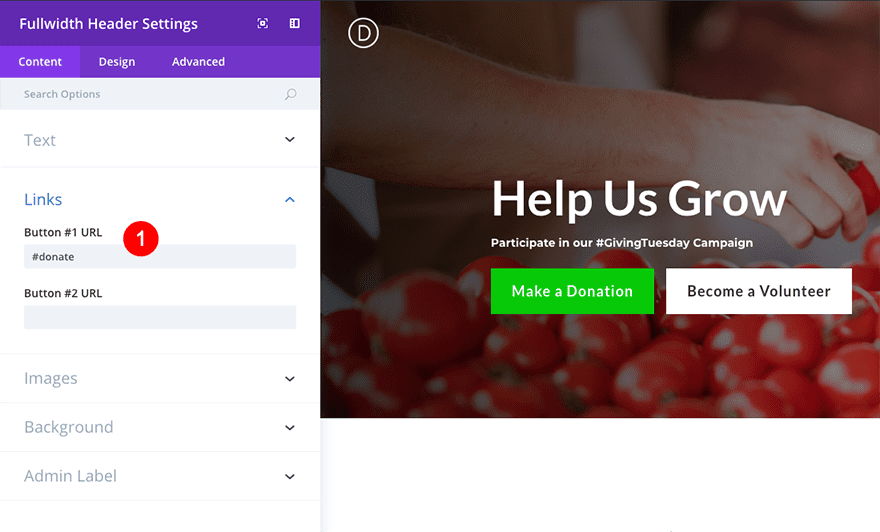
Since we’re getting this page ready for a Giving Tuesday campaign, we should probably make mention of that right at the top. So hover over your hero section and open up the module settings by clicking on the gear icon in the grey module controls.
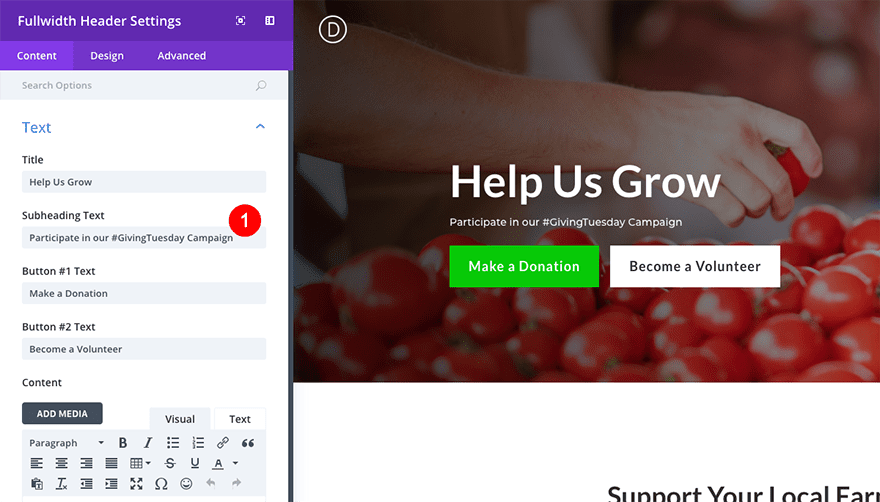
Then, while still in the Content tab, scroll down and open up the link settings. In the field title Button #1 URL place the text “#donate”. This will function as an anchor link to the form we’ll create below.
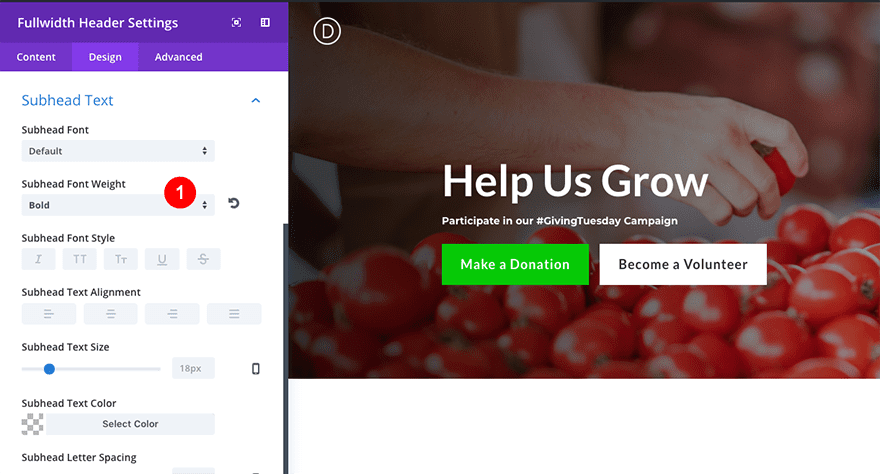
Lastly, navigate to the Design tab and open up the SubHead Text settings. Set the Subhead Font Weight to bold.
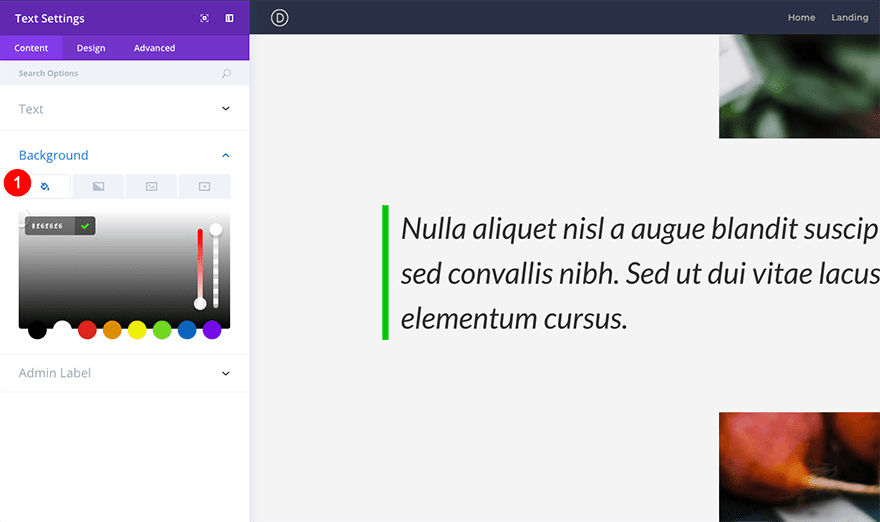
The first section is now complete. Scroll down to the third section (the one featuring a large quote) and click on the gear icon in the blue section controls. Set the background color to #F6F6F6.

Next, open the module settings for the quote text module. Change the background of that to #F6F6F6 as well.
This section is now complete as well. Move on to the fourth section immediately below it. This is our donation form section.
As this section exists in the layout pack, it’s more of a “pledge” section where people can use the contact form to send you a pledge for how much they intend to give. But we’re going to turn it into an actual donation form where we can accept money directly.
Let’s start with the section settings and work in. First, we need to change the background color. Set it to the same #F6F6F6 as the section above.
Then, in the section Design tab, open up the Spacing options. Add the following custom padding:
Top: 250px
Right: 40px
Bottom: 250px
Left: 40px
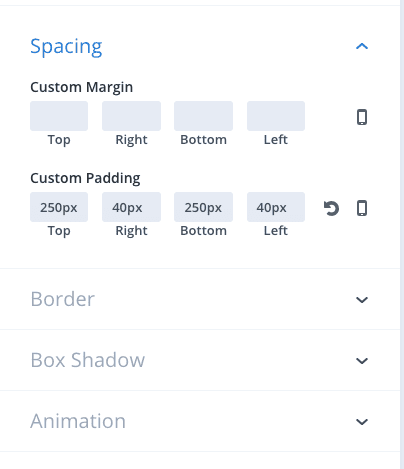
Lastly, while still in the section settings, navigate to the Advanced tab and open up the CSS ID & Classes controls. Under CSS ID write the word “donate”.

Save your new settings.
We now need to get rid of our pledge form. It’s made up of two text modules and a contact form module. Go ahead and delete them. In their place, add a text module.
Within the new test module, place the shortcode for the Give donation form we created earlier. Set the background to solid white (#ffffff).
Now, navigate to the Design tab. A little known secret is that elements generated by third party shortcodes can be customized to some extent using the text module’s design settings.
Under the text options, configure the following settings:
Text Text Size: 18px
Text Line Height: 1.8em
Under the Heading text options for H2, configure the following settings:
Heading 2 Text Size: 36px
Heading 2 Line Height: 1.5em
Under the Spacing options, configure the following settings:
Custom Padding: 50xp (for all fields)
Under the Box Shadow options, choose the last option in the top row (on the far right). Then configure this option:
Box Shadow Spread Strength: -2px
Finally, under the Animation options, configure these settings:
Animation Style: Bounce
Animation Direction: Up
Animation Duration: 800ms
Animation Delay: 400ms
Animation Starting Opacity: 100%
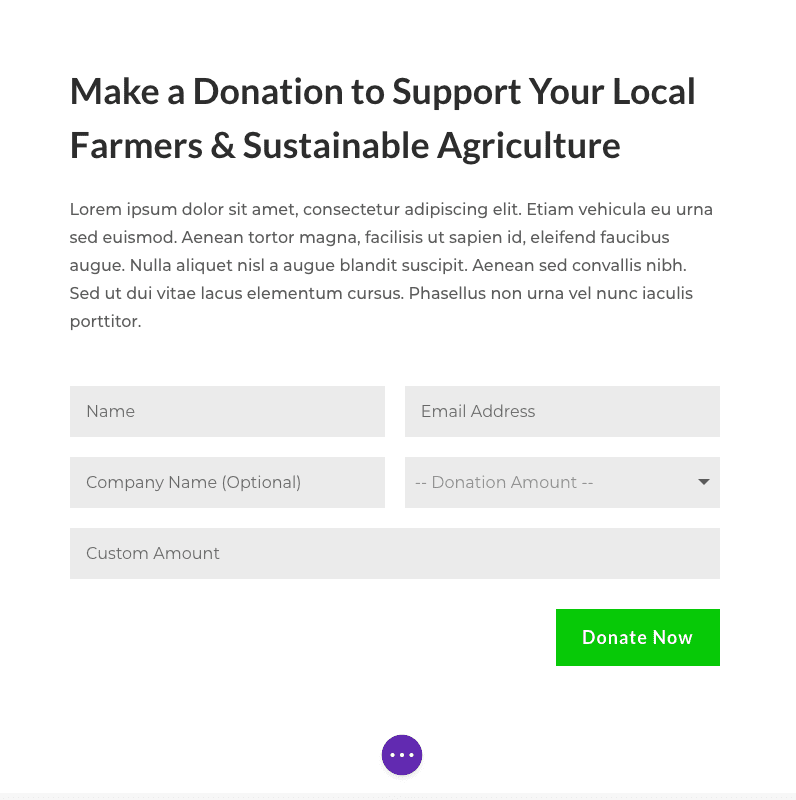
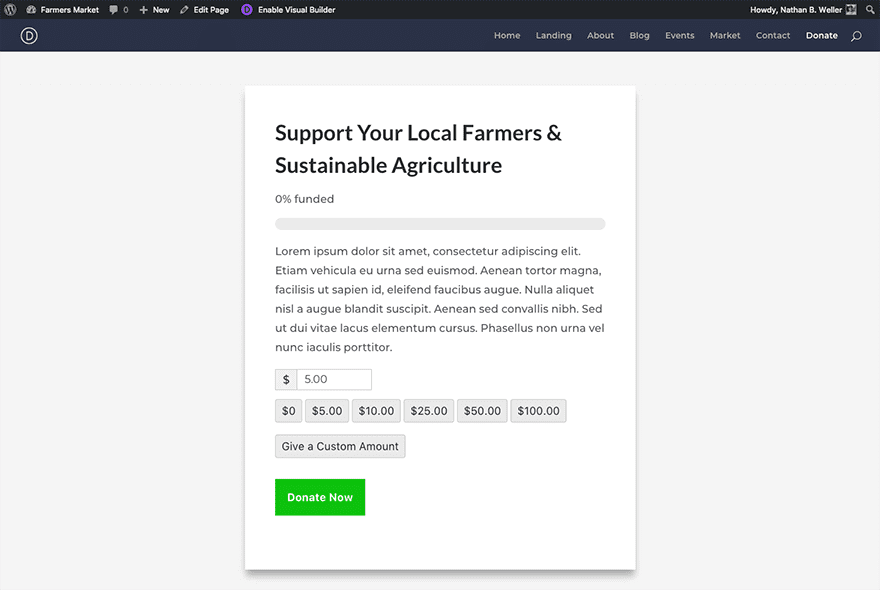
When you’ve configured all these design settings, save them. Your donation form should now look like this.
Of course this is a perfectly acceptable form. But in my opinion it’s a little boring. There are two things I’d like to do to spice it up. First, we’re going to match the Donate Now button style to match other Donate buttons throughout the website.
Navigate to your theme options by going to Divi > Theme Options > General Scroll down to the Custom CSS box and paste the follow button styles there:
/*Give Plugin Styles*/

.give-btn.give-btn-modal {
    background: #07C907;
    border: none;
    border-radius: 0px;
    color: #fff;
    padding: 20px;
    cursor: pointer;
    line-height: 1.2em;
    font-size: 18px;
    font-weight: bold;
}

#give-purchase-button.give-submit.give-btn {
    background: #07C907;
    border: none;
    border-radius: 0px;
    color: #fff;
    padding: 20px;
    cursor: pointer;
    line-height: 1.2em;
    font-size: 18px;
    font-weight: bold;
}
Save your changes and go back to your donation page. Refresh it and take a look at your form. It should now look like this.
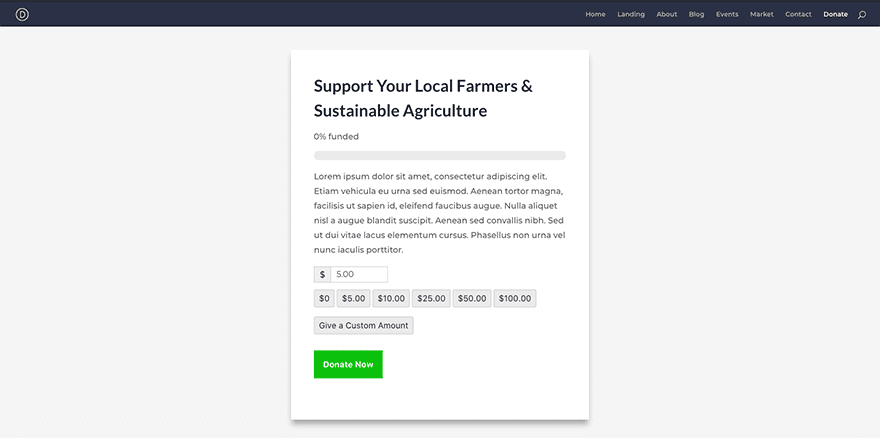
Now we’re getting somewhere! Let’s add the final touch. The section background image we began to create earlier.
To complete it, resize your browser window to 1920×1120. You can use a website like whatsmybrowsersize.com.
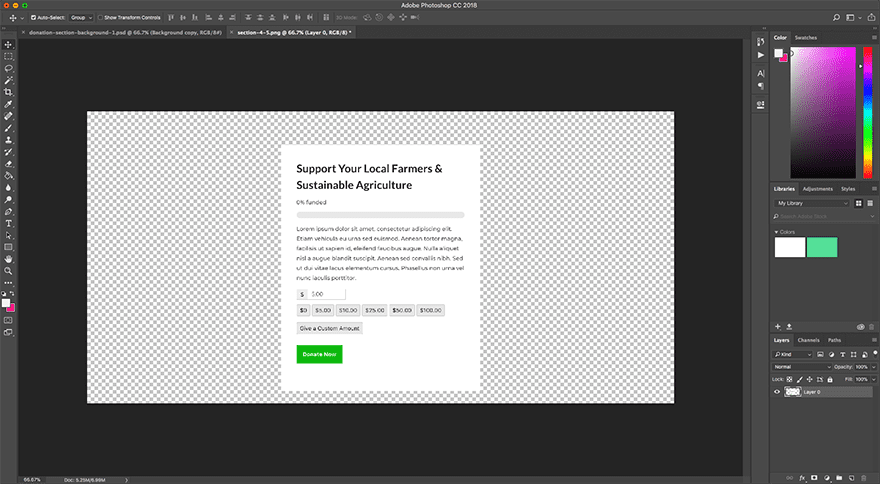
Then, take a screenshot of your donation page with our new form centered on it. It should look like this.
Open this new screenshot up in Photoshop along with the photoshop file we created earlier.
Use the Rectangle Marquee tool to select your form. Then, go to Select > Inverse to select everything but your form. Delete your new selection. You should now have a canvas that looks like this.
You now have a correctly sized “form mockup” that you can use as a reference for your background image. With both photoshop files open, drag the photoshop layer containing your isolated form into your background image file.
In your layers panel, adjust the opacity of your form layer to 50%. Then, with the form later still selected, click the lock icon and lock it. It should now look like this.
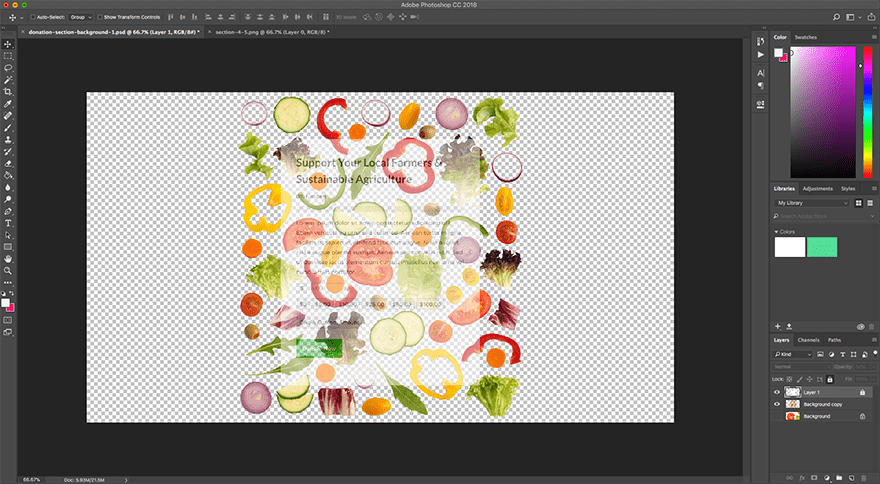
You can now select your vegetables layer in the layers panel. Use the lasso tool to select individual elements and either delete them or re-arrange them until you get a configuration you like. My final configuration looked like this.
Once you have your own final configuration you’ll go to File > Export > Export As and choose PNG to maintain the transparent background.
Now we can add that image to the Donation Form section of our Donation page, back on our Divi website.
Open up the section settings. Under Background leave the color we set earlier alone and choose the image option. Add your new background image here. Then configure the following settings:
Background Image Size: Actual Size
Background Image Position: Center
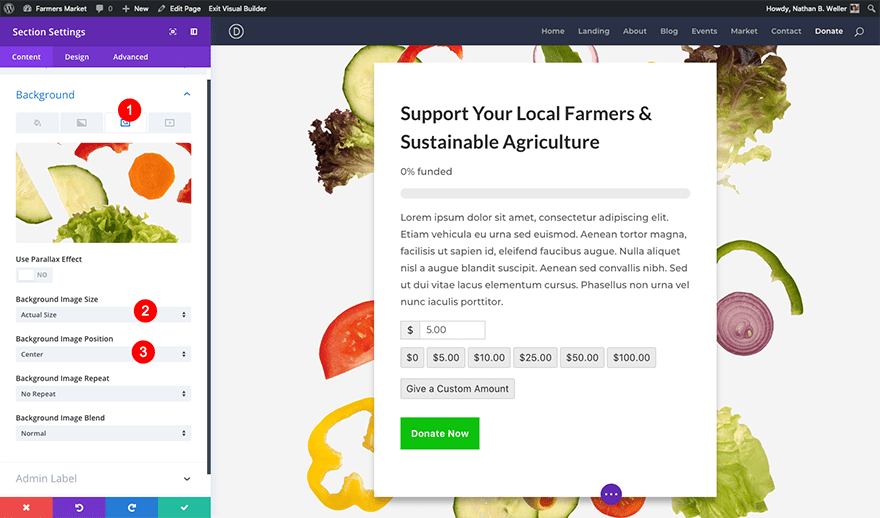
Save these settings. Your form section should now be complete.
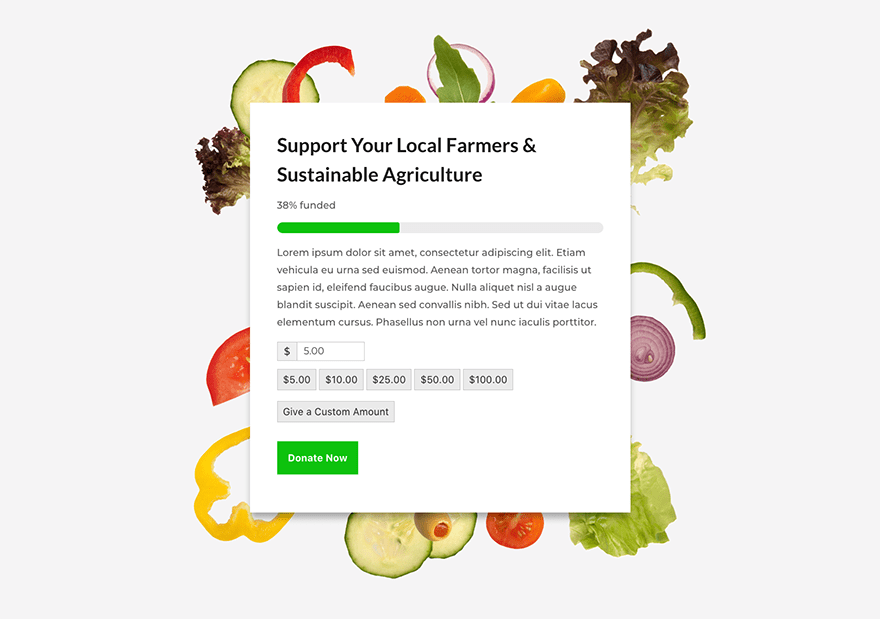
To completely finalize your design (to match our full page preview from the beginning of the post) simply change the background colors of the remaining page sections to match those in the screenshot. You will either use grey (#F6F6F6) or white (#ffffff).
Happy Fundraising!
With Divi and a plugin as powerful as Give, we’re sure that your Giving Tuesday efforts are sure to be a big hit. Thanks for following along. If you’d still like some assistance with anything covered in this tutorial, I’ll be conducting a livestream today at 3pm on our Facebook page and YouTube Channel where I’ll be showing this entire process in a single take. I’ll also be fielding questions as we go along. Hope to see you there!


Absolutely great step-by-step tutorial. Posts like these make you stand out from your competition. Not only that, you are making us (developers and final users) better at what we love doing. Thank You!
Interesting
Nice article, keep up the good work
What a great tutorial! Thanks so much for mentioning Give. If folks have questions at all, we’re happy to answer them here, or reach out to us via our website: https://givewp.com/contact-us
Great post! We are using Divi and GiveWP for a nonprofit, called DollarFund, that we just launched last month.