Divi and its built-in condition options make it really easy to hide or show any element based on a number of conditions, including the user’s logged-in status. A really useful application of this conditional functionality is to create member-exclusive blog posts. The idea is to show non-members (or logged-out users) a brief excerpt of the post content along with a call to action to sign up or log in to see the full article. Then, for members (or logged-in users), you show the full post with all the content.
In this tutorial, we are going to show you how to create member-exclusive blog posts by using Divi’s theme builder and Divi’s new condition options. Once done, you will have a dynamic blog post template that will incentivize users to become a member of your site to view the full content of each post.
Let’s get started!
- 1 Sneak Peek
- 2 Download The Member-Exclusive Blog Post Template For FREE
- 3 Download For Free
- 4 How to Upload The Template
-
5
How to Create Member-Exclusive Blog Posts with Divi’s Condition Options
- 5.1 Part 1: Uploading the Blog Post Template
- 5.2 Part 2: Creating Post Excerpt Content for Logged Out Users
- 5.3 Part 3: Building the CTA Overlay Section for Logged Out Users
- 5.4 Part 4: Adding Display Conditions to Elements According to User’s Logged In Status
- 5.5 Part 5: Customizing the Post Excerpt Content
- 6 Final Result
- 7 Final Thoughts
Sneak Peek
Here is a quick look at the design we’ll build in this tutorial.
Here is a blog post showing only the post excerpt and a CTA overlay inviting users to become a member or log in to view the full article.
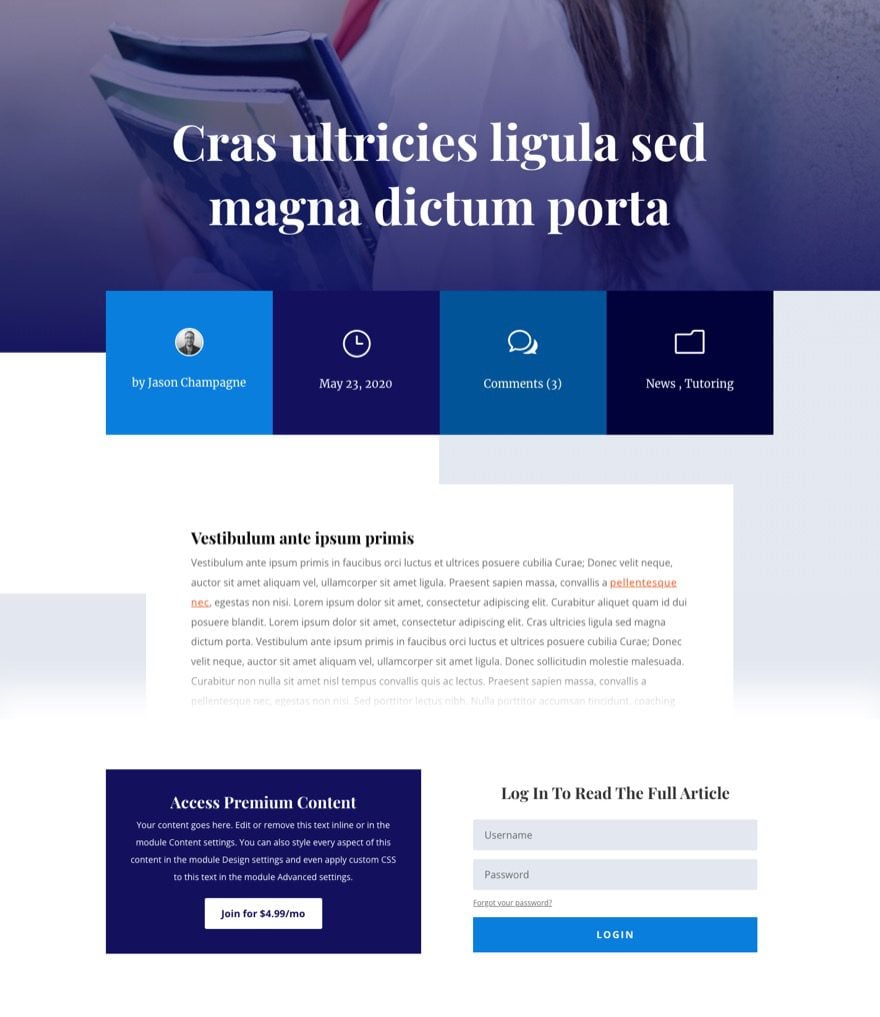
Once you log in using the login form, you will be redirected to the same post showing all of the post content.
Download The Member-Exclusive Blog Post Template For FREE
To lay your hands on the free Member-Exclusive Blog Post Template from this tutorial, you will first need to download it using the button below. To gain access to the download you will need to subscribe to our newsletter by using the form below. As a new subscriber, you will receive even more Divi goodness and a free Divi Layout pack every Monday! If you’re already on the list, simply enter your email address below and click download. You will not be “resubscribed” or receive extra emails.
How to Upload The Template
Go to Divi Theme Builder
To upload the template, do the following:
- Navigate to the Divi Theme Builder in the backend of your WordPress website.
- Then, in the top right corner, you’ll see an icon with two arrows. Click on the icon.
- In the portability popup, select the import tab
- Upload the JSON file that you could download in this post
- Click on ‘Import Divi Theme Builder Templates‘.
- Save Changes

How to Create Member-Exclusive Blog Posts with Divi’s Condition Options
Part 1: Uploading the Blog Post Template
For this tutorial, we are going to create member-exclusive blog posts by adding condition options on a blog post template. You can use any custom blog post template you want, but for now, we are going to use the Marina Blog Post Template which is already premade and ready to download on our blog.
To download the Marina Blog Post Template, navigate to the post on our blog. Under the Download section, enter your email address to access the download. Then click the download button to download the zip file.
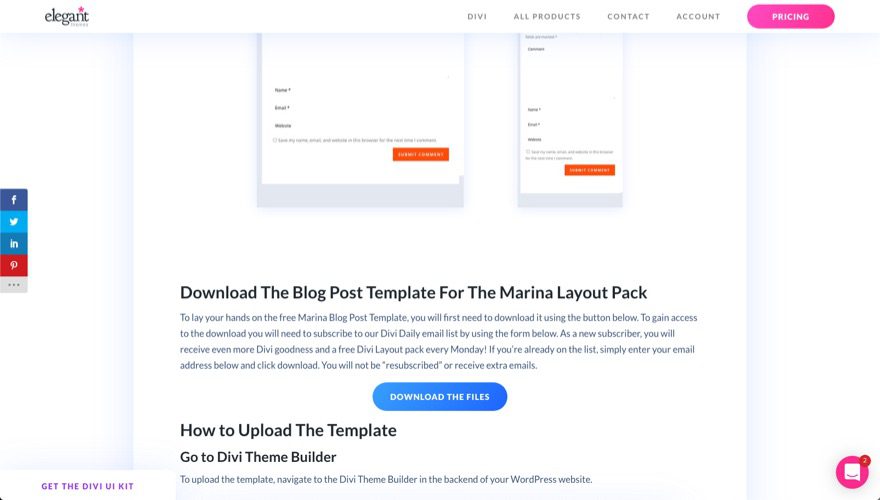
Once downloaded, unzip the file so that the JSON file is ready for upload.
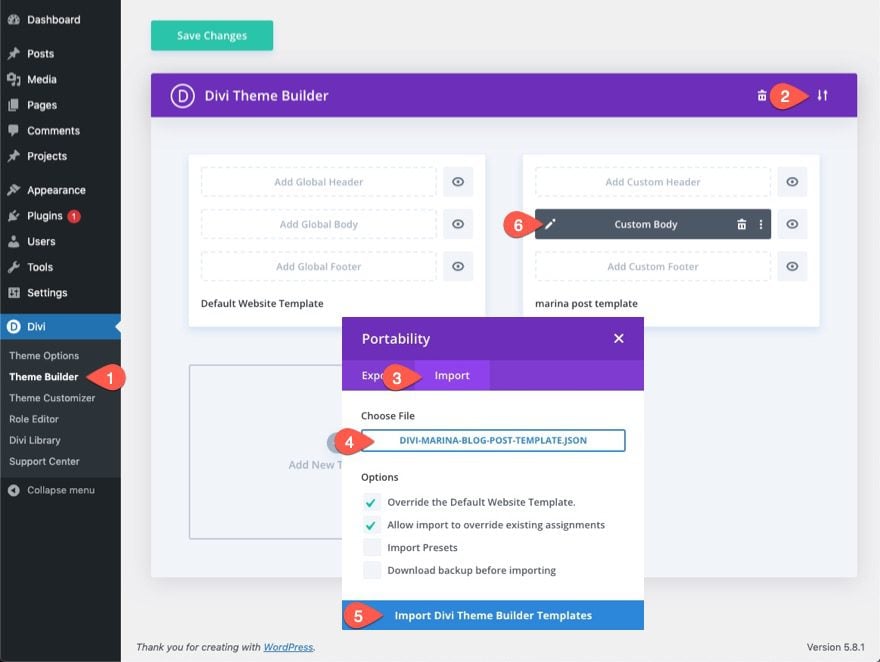
To upload the blog post template to your site, do the following:
- Navigate to the Divi Theme Builder in the backend of your WordPress website.
- Then, in the top right corner, you’ll see an icon with two arrows. Click on the icon.
- In the portability popup, select the import tab
- Upload the JSON file that you could download in this post
- Click on ‘Import Divi Theme Builder Templates’.
- Click the edit icon on the custom body area of the template to begin editing the layout.
Part 2: Creating Post Excerpt Content for Logged Out Users
Once the blog post template has been imported and you have clicked to edit the custom body area of the template, you are ready to add the post excerpt content for logged-out users. Post excerpt content is available as dynamic content in Divi and is a perfect way to show a preview of the post content without showing all of the post content.
Add New Row for Post Excerpt
Before adding the post excerpt content, first, add a new row directly under the existing row containing the post content and post navigation modules.
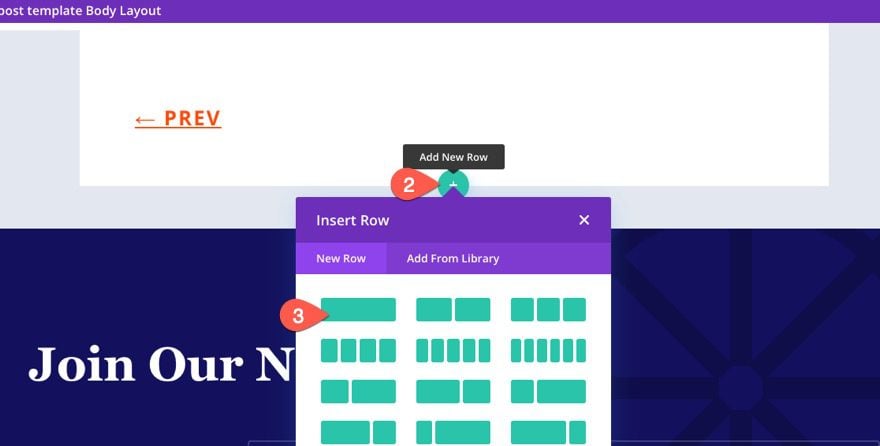
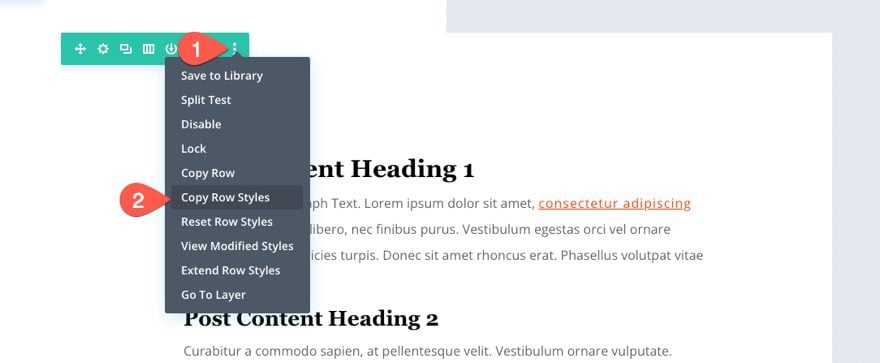
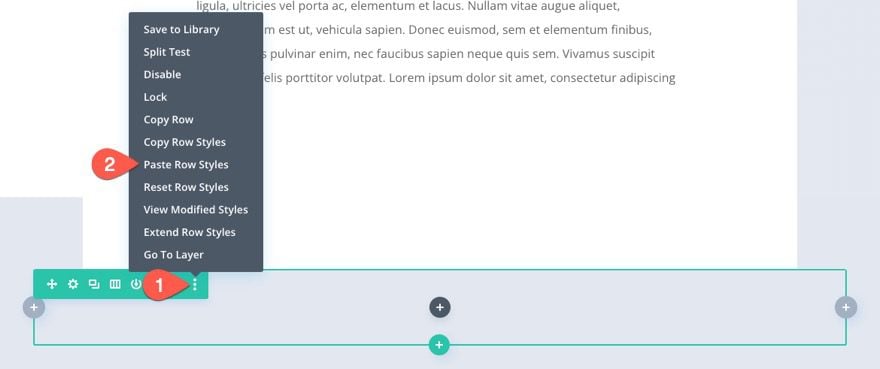
Then copy the row styles of the row directly above the new row and paste the styles to the new row.
Open the settings of the new row and update the padding as follows:
- Padding Bottom: 20px
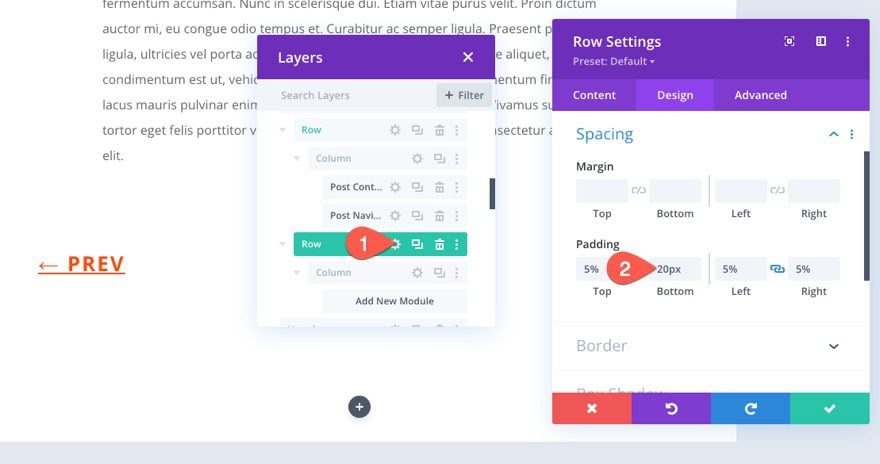
This will give us a static spacing that we can overlap with our overlapping section later on.
Add New Text Module with Post Excerpt as Dynamic Content
Inside the row, add a new text module.
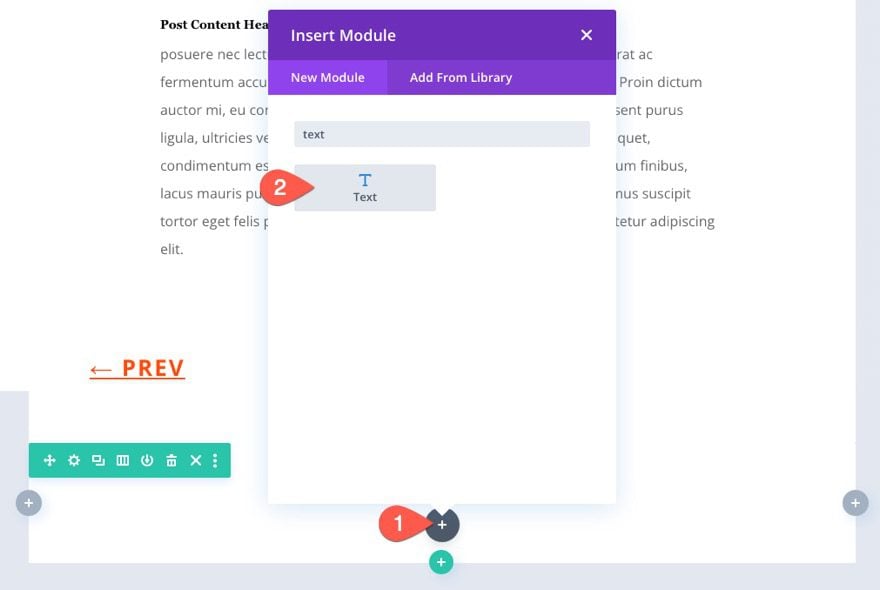
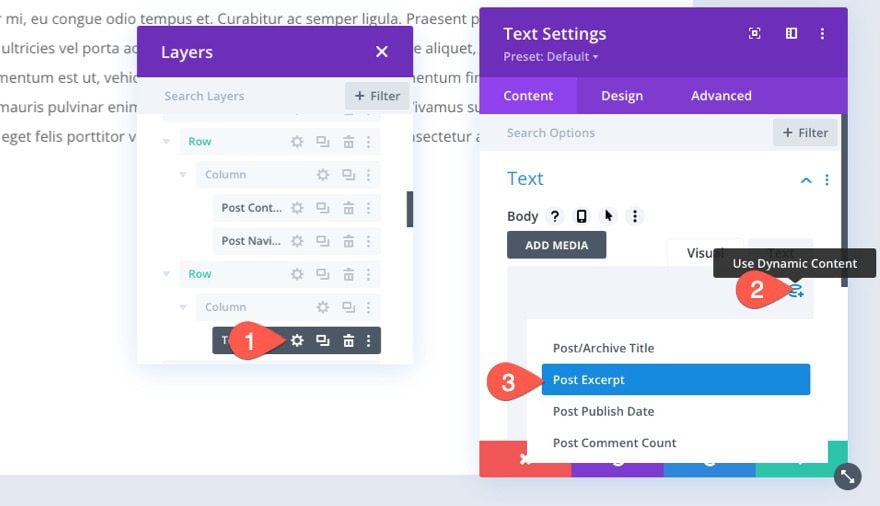
Under the content tab of the text settings, click dynamic content icon when hovering over the body area and select to use the Post Excerpt as dynamic content.
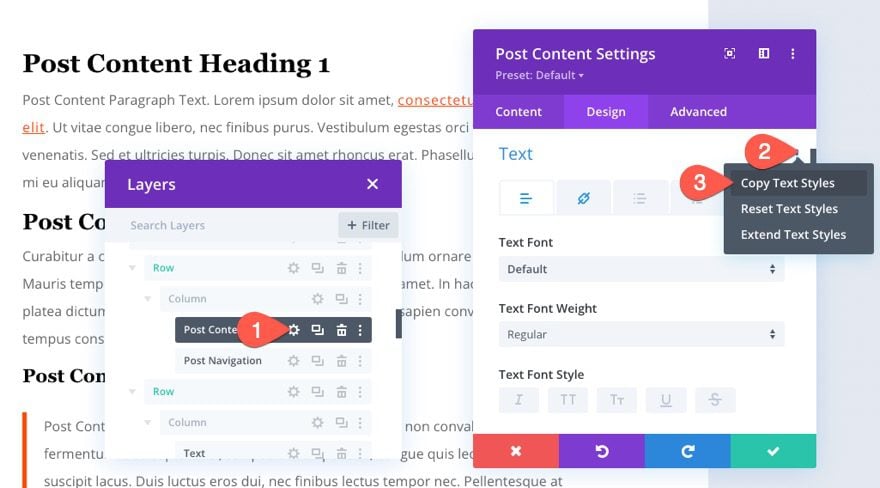
To match the text styles with the current layout, open the settings for the post content module and copy the text styles.
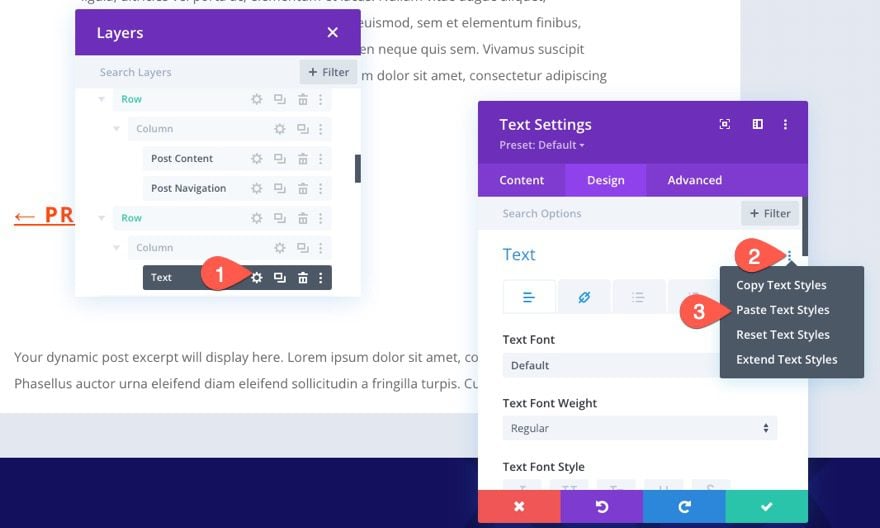
Then past the text styles to the new text module containing the post excerpt dynamic content.
Next, do the same for the heading styles. Copy the heading styles from the post content module.
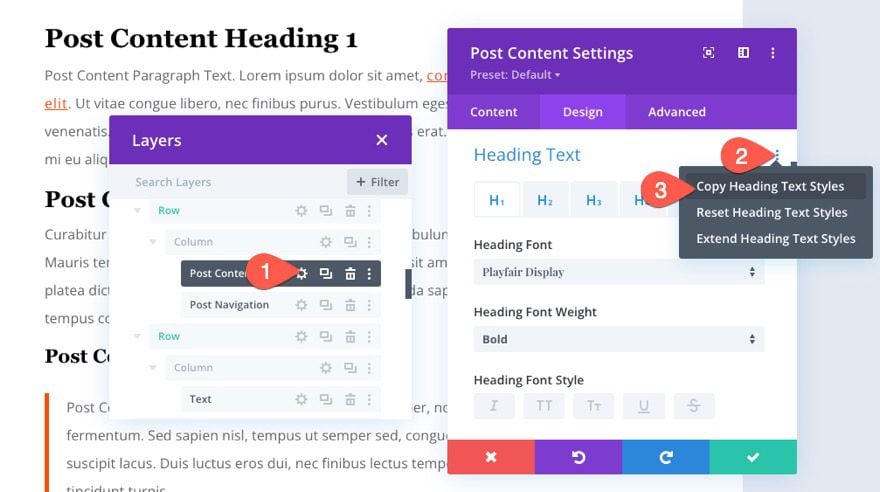
Then paste the heading text styles to the new text module.
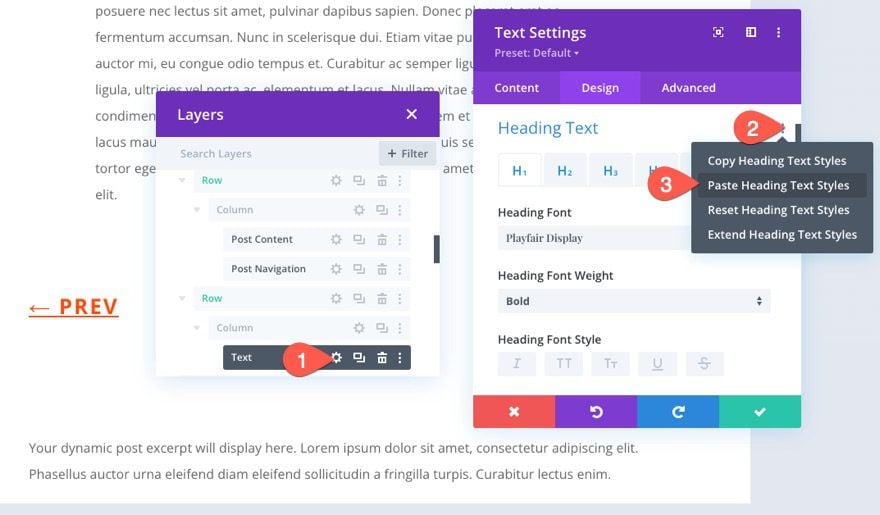
Now any post excerpt content will inherit the matching styles set in the text module.
Part 3: Building the CTA Overlay Section for Logged Out Users
Now that the post excerpt content is done, we are ready to build the CTA overlay section that we want to appear for logged-out users.
Add New Section and Row
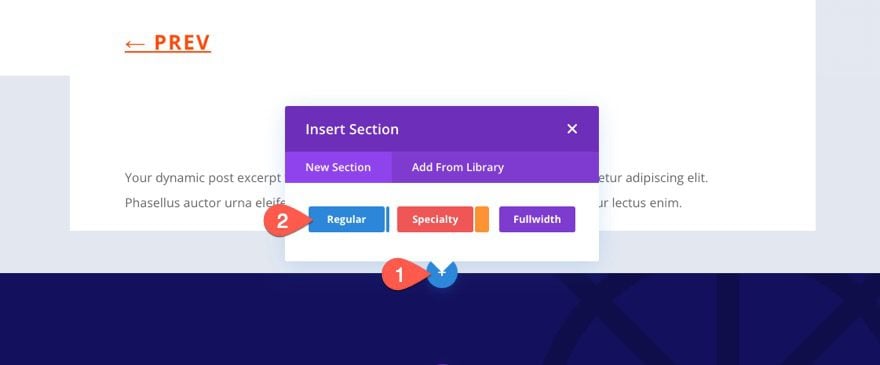
To do this, add a new regular section below the section containing the post content and post excerpts.
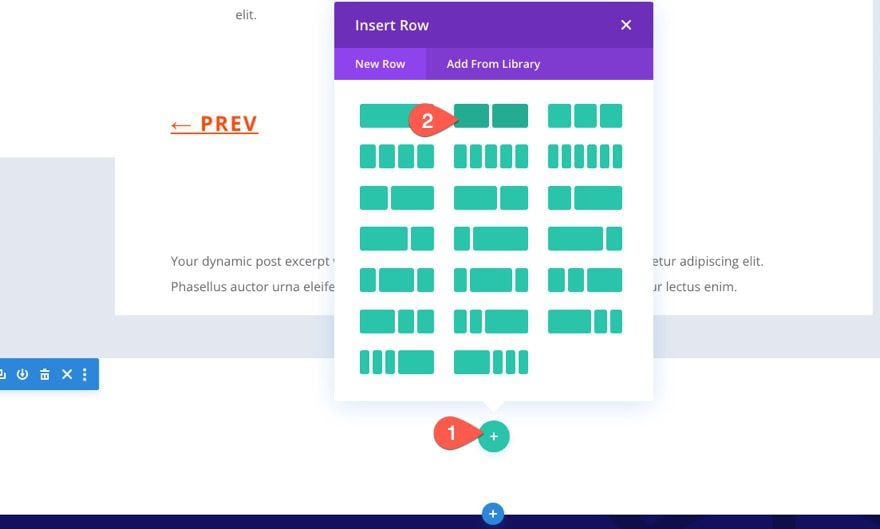
Add a two-column row to the section.
Add Call to Action for Non-Members
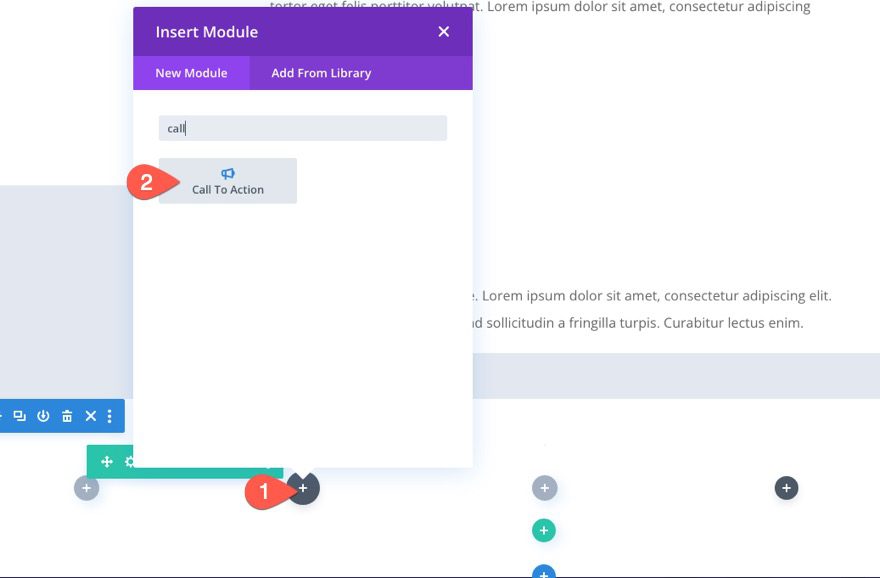
In the left column, add a call to action module. This will serve as a call to action that encourages the user to click a button to sign-up for a membership. So you will want to make sure you have a membership sign-up page that you can redirect users to with the button URL.
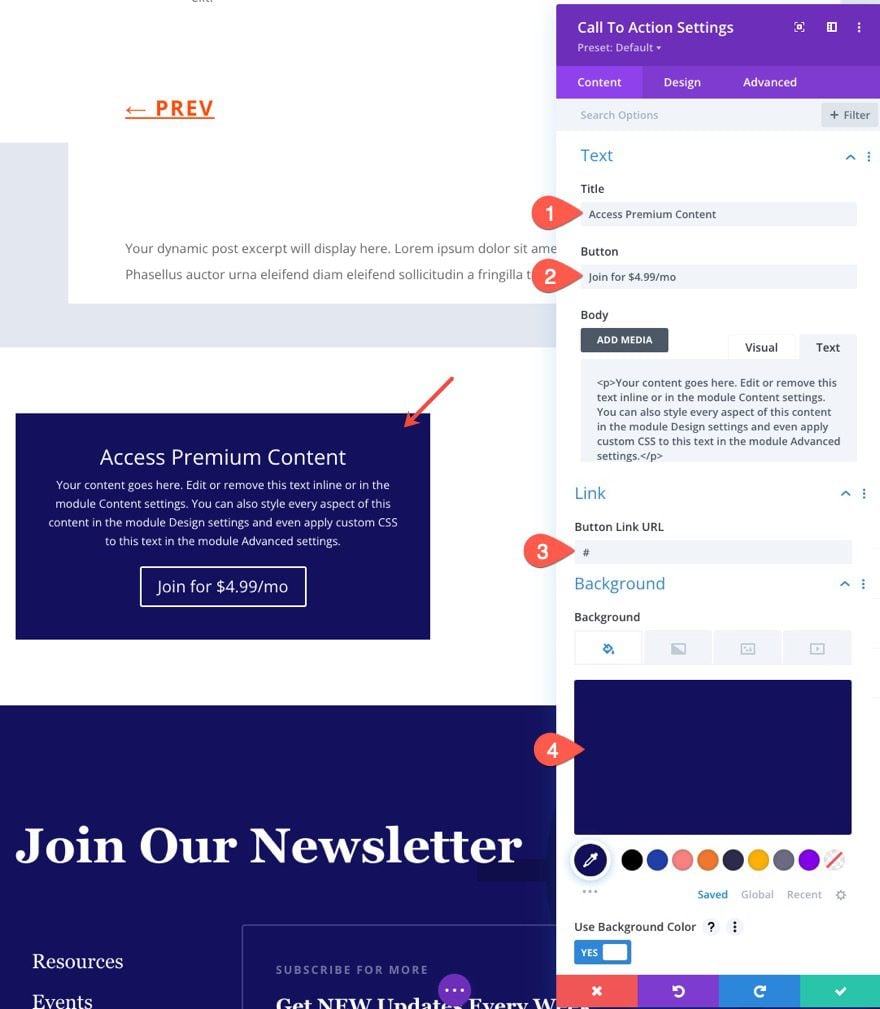
Under the content tab of the Call to Action Settings, update the following:
- Title: Access Premium Content
- Button: Join for $4.99/mo
- Button Link URL: #
- Background Color: #12115d
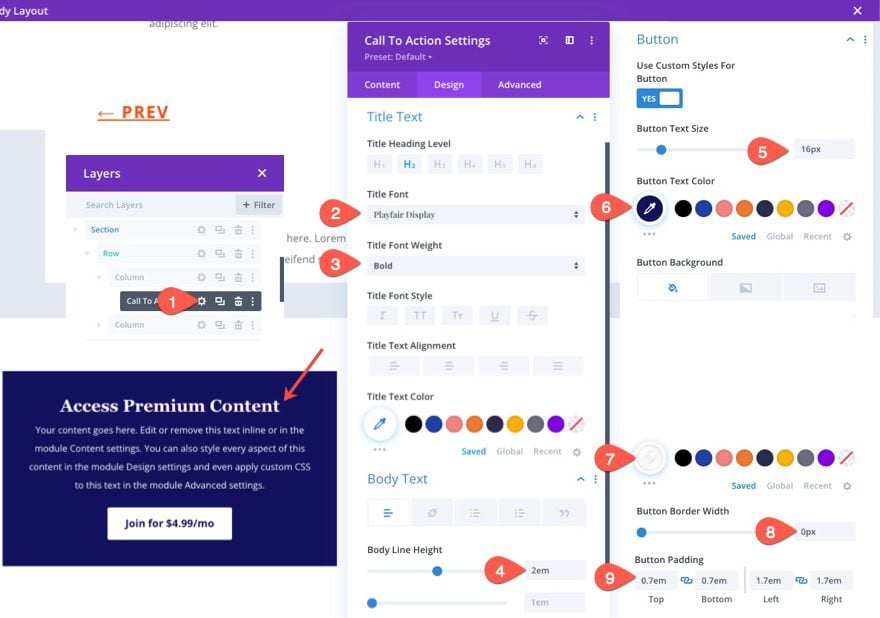
Under the design tab, update the text and button styles as follows:
- Title Font: Playfair Display
- Title Font Weight: Bold
- Body Line Height: 2em
- Button Text Size: 16px
- Button Text Color: #12115d
- Button Background Color: #fff
- Button Padding: 0.7em top, 0.7em bottom, 1.7em left, 1.7em right
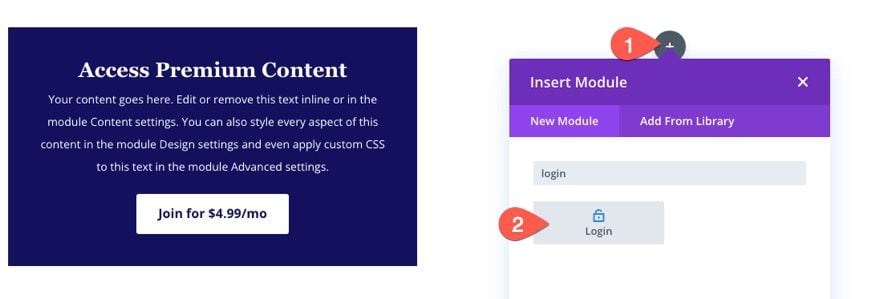
Add Login Form for Existing Members
In the right column, add a login module. This will allow existing users to log in to see the full article if they aren’t already logged in.
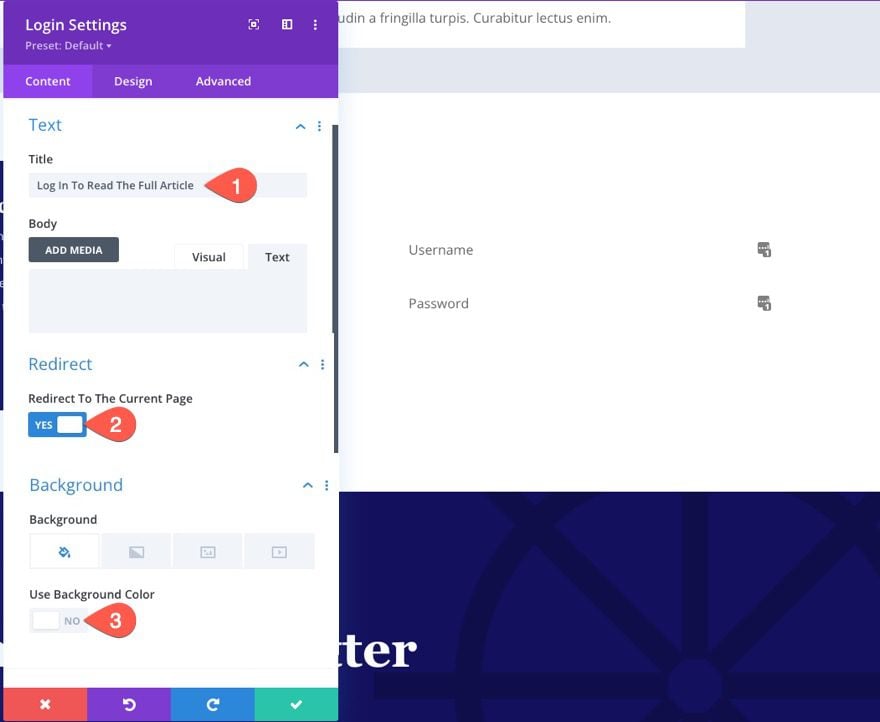
Under the content tab of the Login settings, update the following:
- Title: Log In To Read The Full Article
- Redirect to the Current Page: YES
- Use Background Color: NO
NOTE: Make sure to redirect users to the current page for a better user experience. Also, you won’t be able to see the white text without a background color yet, but we’ll fix that.
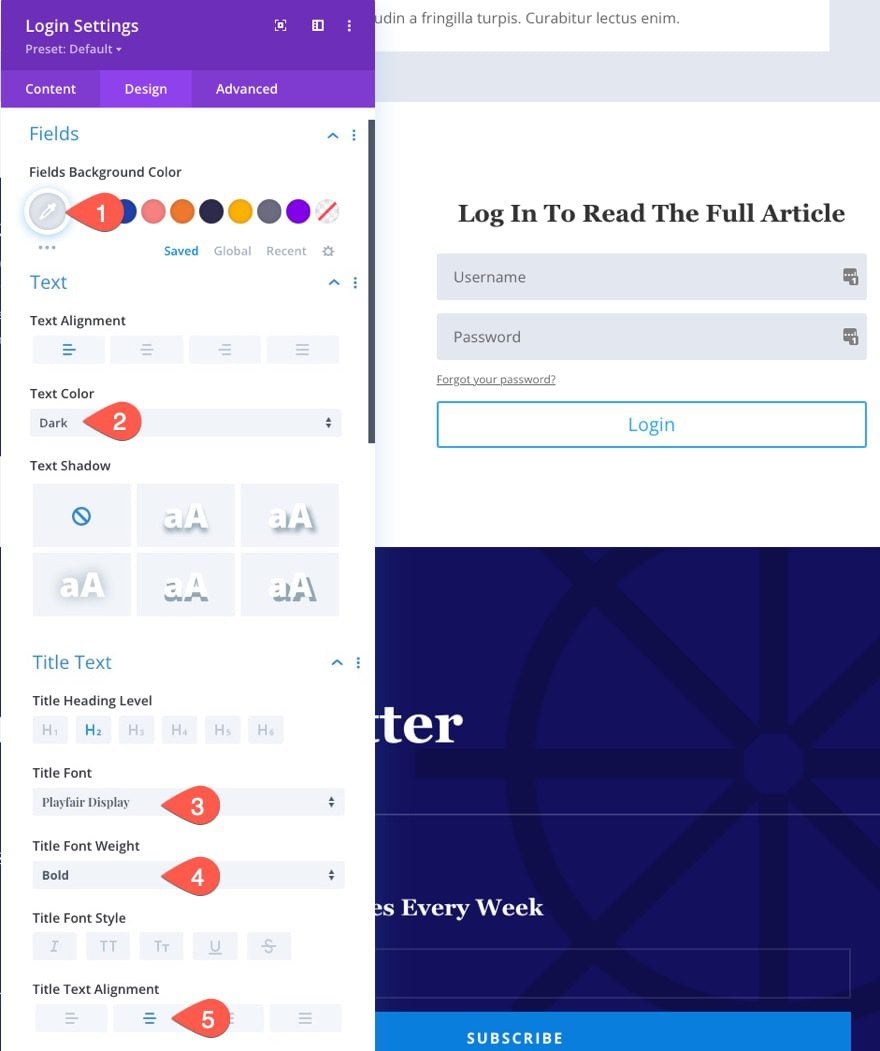
Under the design tab, update the following:
- Fields Background Color: #e3e8f0
- Text Color: Dark
- Title Font: Playfair Display
- Title Font Weight: Bold
- Title Text Alignment: center
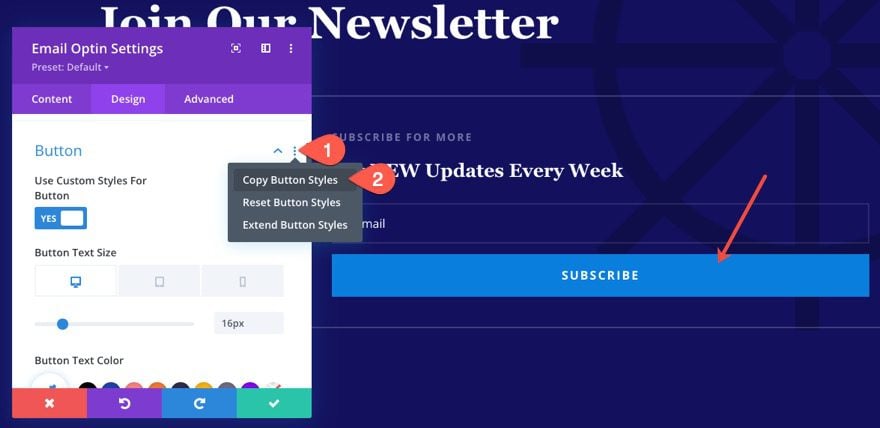
To speed up the process of getting a matching button style, copy the button styles in the Email Optin Module in the right column of the row inside the section with the title “Join Our Newsletter”.
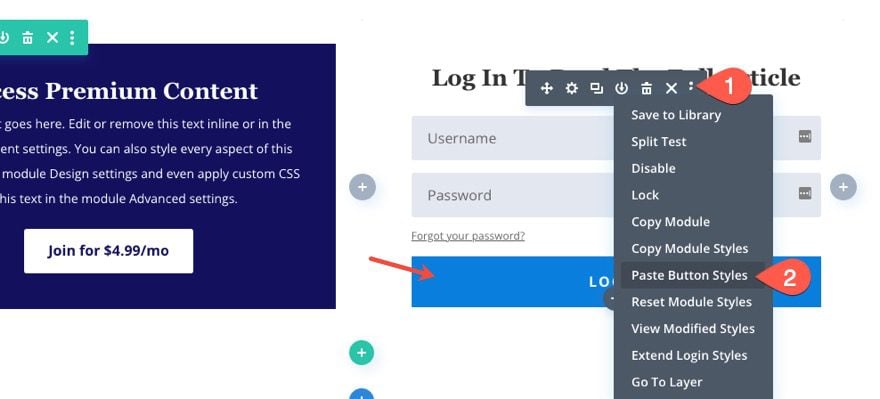
Then paste the button styles to the new login module we just created.
Add Section Overlap Styles
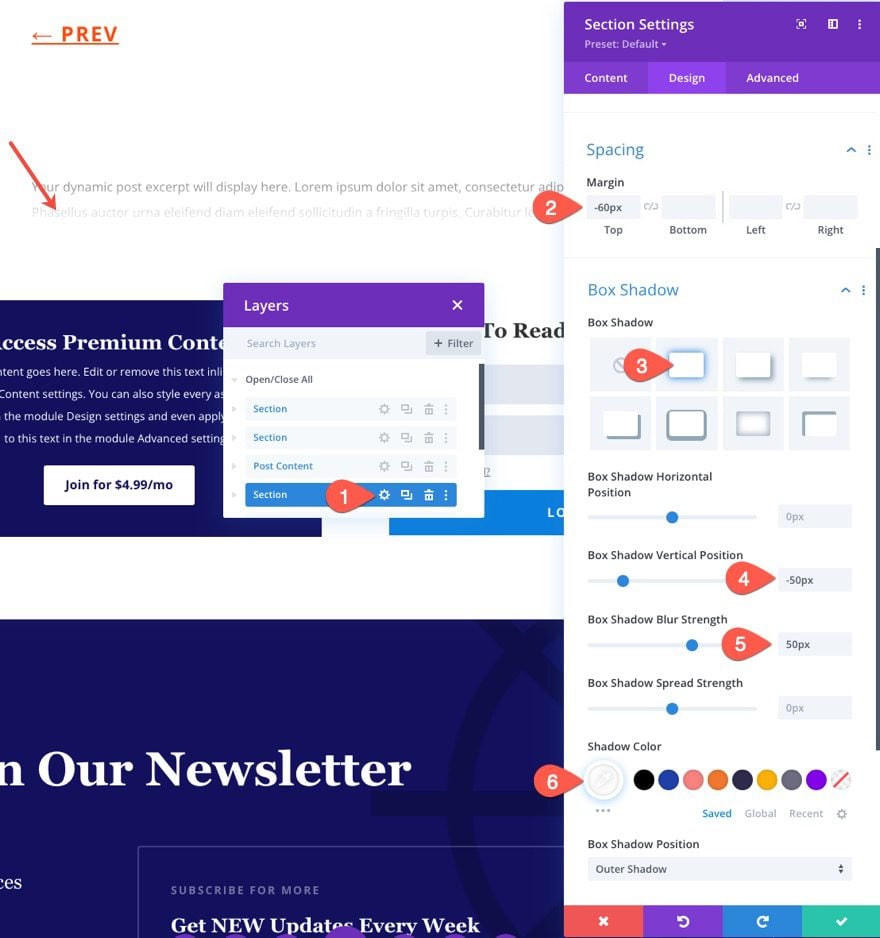
In order to complete the design of the overlapping section, we need add a few style elements to the section containing our CTA and Login form. Open the section settings and update the design settings as follows:
- Margin: -60px top
- Box Shadow: see screenshot
- Box Shadow Vertical Position: -50px
- Box Shadow Blur Position: 50px
- Shadow Color: #fff
This will bring the section upward by 60px so that the box-shadow overlaps the bottom portion of the post excerpt text in the section above.
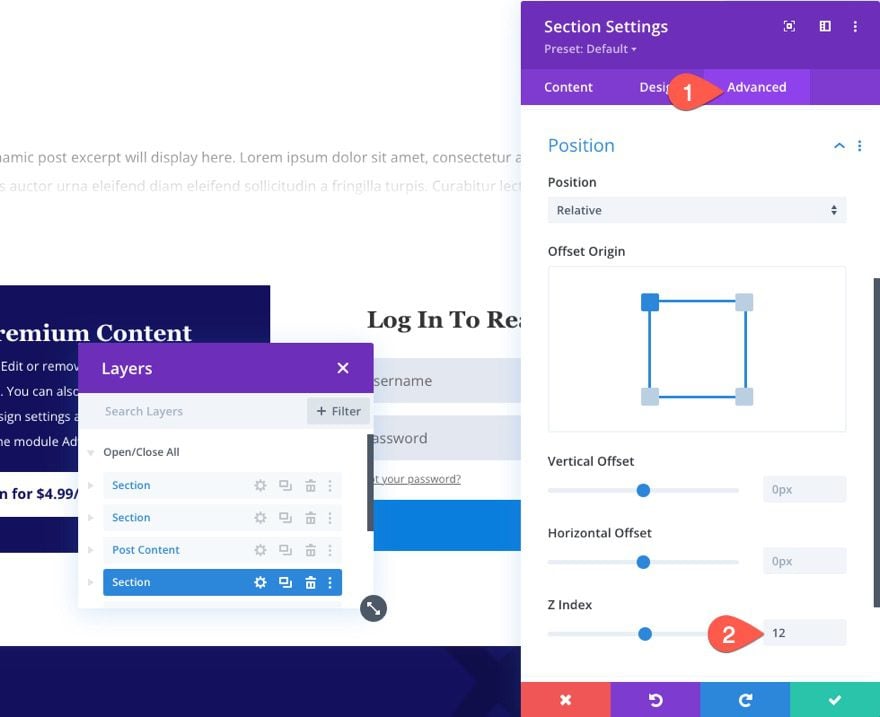
Under the Advanced tab, make sure the overlay section stays above the other elements on the page by updating the Z Index of the section to 12.
- Z Index: 12
Part 4: Adding Display Conditions to Elements According to User’s Logged In Status
Now that the post excerpt row and the overlay section (with the CTA and Login form) are complete, we are ready to use Divi’s built-in condition options to hide and show elements based on the user’s logged-in status.
Show Full Post Content for Logged-In Users
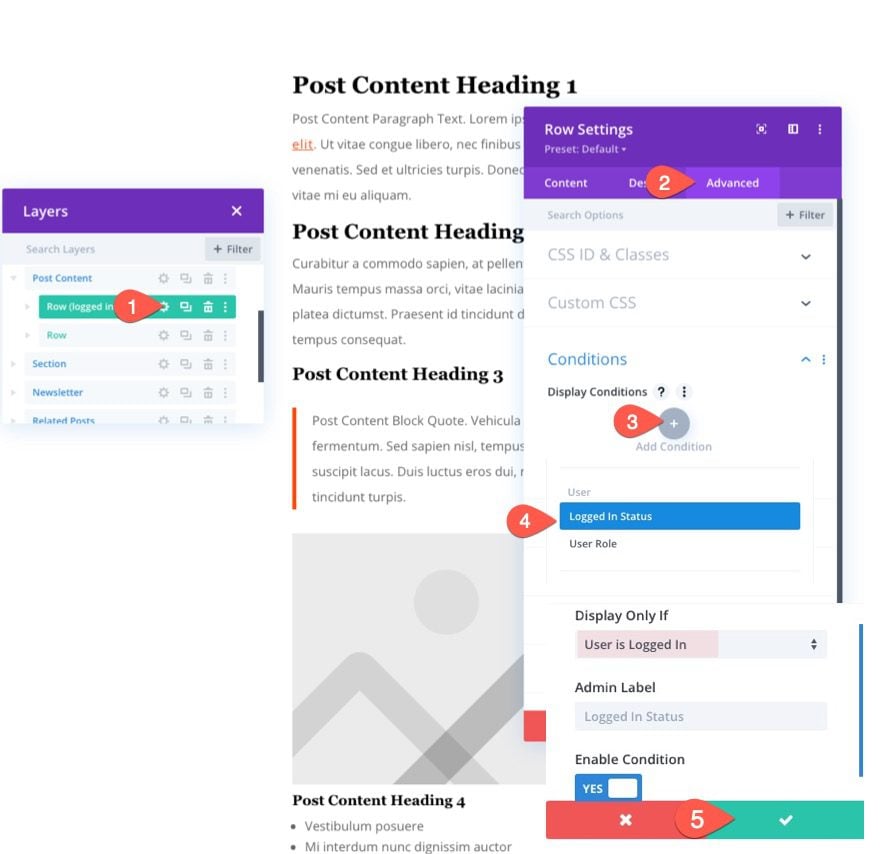
First, we are going to add a display condition to show the row containing the post content module only to logged-in users.
To do this, open the row settings and, under the Advanced tab, click to add a new display condition.
Under the drop-down menu, select the option “Logged In Status”.
In the Logged In Status settings popup, make sure the option is set to Display Only If User Is Logged In. Then save changes.
Show Post Excerpt Row for Logged-Out Users
With the post content currently hidden to logged-out users, we need to show the row containing the post excerpt content to those logged-out users instead.
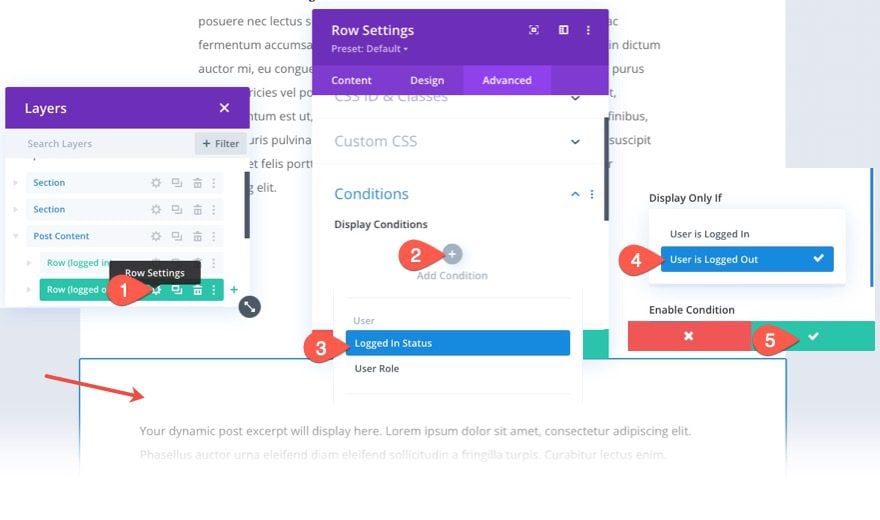
To do this, open the settings for the row containing the post excerpt and, under the Advanced tab, click to add a new display condition.
Under the drop-down menu, select the option “Logged In Status”.
In the Logged In Status settings popup, make sure and select the option to Display Only If User Is Logged Out.
Then save changes.
Show Overlay CTA Section for Logged-Out Users
In addition to the post excerpt content, we also want to show the overlay CTA section to logged-out users. This will give them the opportunity to sign-up for a membership and/or log in to view the full article.
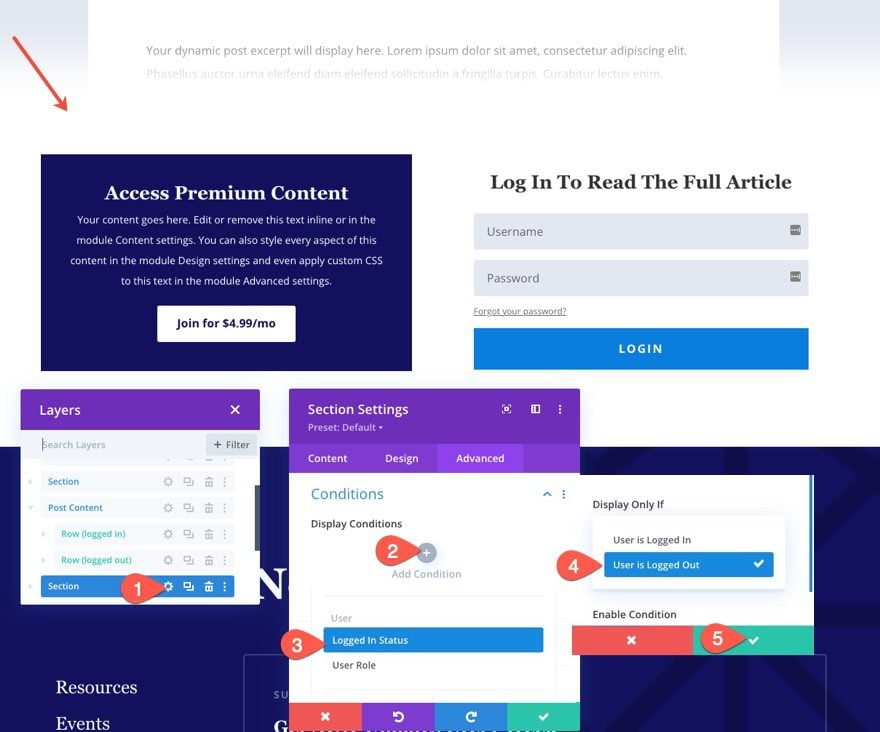
To do this, open the settings for the section containing the CTA and Login form.
Under the Advanced tab, click to add a new display condition.
Under the drop-down menu, select the option “Logged In Status”.
In the Logged In Status settings popup, make sure and select the option to Display Only If User Is Logged Out.
Then save changes.
Hiding Additional Elements for Logged-Out Users
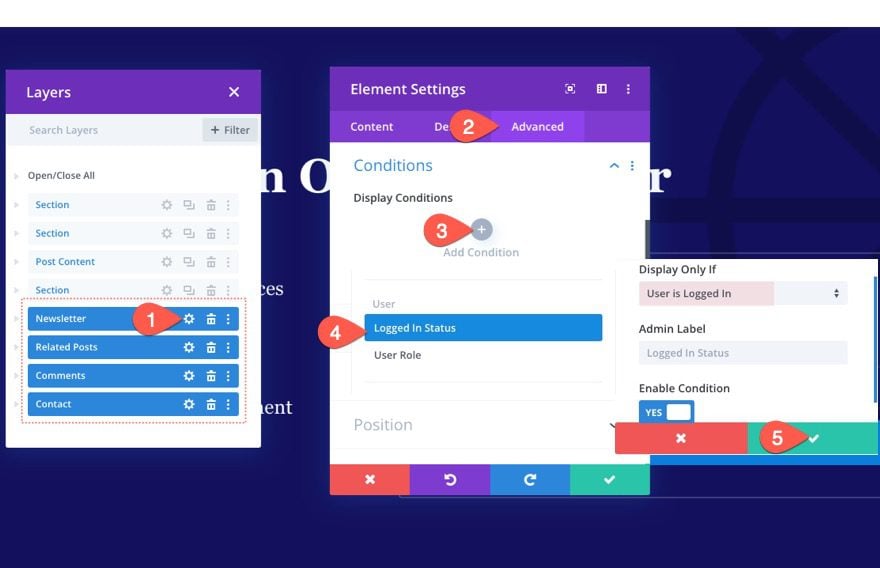
In addition to the post content, you may also want to hide additional sections or elements that content post content (like related posts, comments, etc.). To hide the additional post elements, use Divi’s multi-select feature to select all the sections you want to hide, then open the settings for one of the elements and add a new display condition. Select the Logged In Status condition and make sure it is set to Display Only If User is Logged In. And save changes.
Part 5: Customizing the Post Excerpt Content
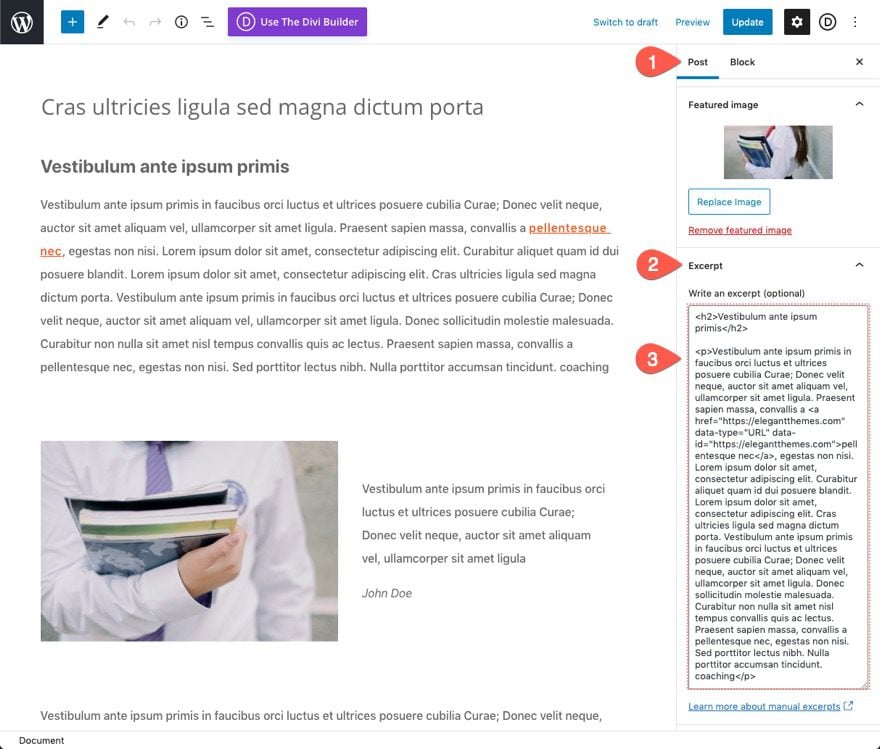
By default, the post excerpt dynamic content will display a small snippet of the post content. However, you can customize the post excerpt content to display whatever content you want. To do this, edit any of your posts and add the HTML content under the Excerpt toggle in the sidebar with the post editor options.
Final Result
To view the final result, open a live version of a blog post while you are logged out. You should see the post excerpt and CTA section overlay.

Once you log in using the login form, you will be redirected to the same post showing all of the post content and any of the additional sections you selected to hide.
Final Thoughts
Hopefully, this tutorial will help you get the functionality you need to get member-exclusive blog posts on your Divi site with ease. Don’t forget, you can always use Divi’s theme builder options to assign this member-exclusive blog post template to specific posts, posts with certain categories, or to all posts site-wide.
I look forward to hearing from you in the comments.
Cheers!


way too difficult and don’t have a ‘layer tab’ – sorry jason give me something easier!
Divi is a good theme I used it on some of my websites and it’s easy to understand 😊
Divi is a great theme for people who want to create beautiful and professional looking websites. I used it on my own blog, and it’s so easy.
Awesome, Shahid! Thanks for sharing.