Divi Cloud is a great way to store layouts to reuse. Users can organize them with custom categories, tags, and more. Once you have a lot of Divi Cloud items, they can become more difficult to search and sort if they’re not organized well. In this post, we’ll see how to reorganize a Divi Cloud item to help you keep your Divi Cloud simple and easy to use.
Let’s get started!
Finding Your Divi Cloud Items
First, let’s see how to find your Divi Cloud Items. Reorganizing a Divi Cloud item makes them easier to find.
- First, enable the Visual Builder by navigating to any page on the front end of your Divi website and clicking “Enable Visual Builder” in your toolbar at the top of the screen.
- Second, click the purple plus icon on the Divi toolbar at the bottom of the page to open the Divi Library.
- Third, click the tab at the top labeled “Your Saved Layouts”.
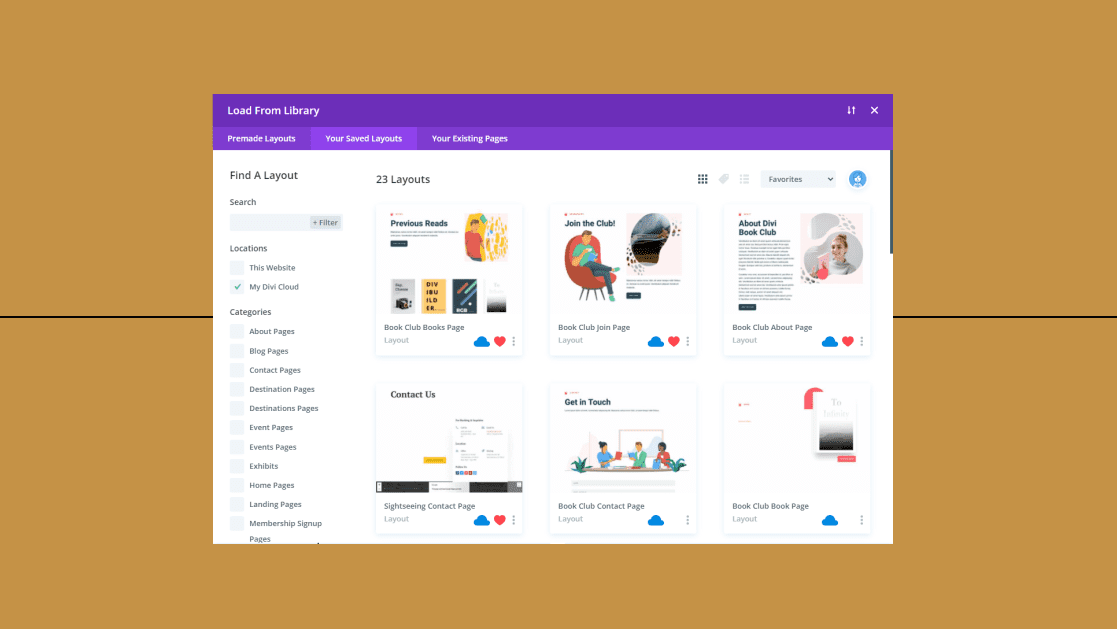
- View your Divi Cloud items. Click the checkbox labeled “My Divi Cloud” under Locations in the left sidebar.
- Next, choose Grid View, the grid icon above the layout thumbnails on the right, to see the thumbnails. Alternatively, you can choose List View, the List icon is above the layout thumbnails on the right, to see the names and meta information.
- Finally, locate your layout by searching, sorting, or filtering the Divi Cloud items. Search by keywords or favorites, select categories and/or tags to filter them, or sort them based on time, name, or favorites.
Rename Your Divi Cloud Layouts
Next, reorganize a Divi Cloud item by renaming the layouts so they’re easy to understand. Use consistent naming practices.
- Enable the Visual Builder by navigating to any page on the front end of your Divi website and clicking “Enable Visual Builder” in your toolbar at the top of the screen.
- Click the purple plus icon on the Divi toolbar at the bottom of the page to open the Divi Library.
- Click the tab at the top labeled “Your Saved Layouts”.
- Next, view your Divi Cloud items. Click the checkbox labeled “My Divi Cloud” under Locations in the left sidebar.
- Find the layout you want to rename in the Grid View or List View.
- Next, right-click on the layout you want to rename and select “Rename” from the popup that appears.
- Finally, select the name in the field of the modal that opens, edit the name, and click the green check icon when you’re finished.
- Alternatively, you can right-click on the layout in the Layout Details view and select the Rename option from the popup.
- Changes to your Divi Cloud are saved automatically, so you won’t need to save this page. Click the X in the upper right corner of the “Load from Library” modal to close it.
Edit Your Divi Cloud Categories
Next, reorganize a Divi Cloud item by editing your categories. You can add new categories, rename them, and delete them. Keep them simple and consistent and use as few as possible. Think of them as major topics.
- Enable the Visual Builder by navigating to any page on the front end of your Divi website and clicking “Enable Visual Builder” in your toolbar at the top of the screen.
- Click the purple plus icon on the Divi toolbar at the bottom of the page to open the Divi Library.
- Click the tab at the top labeled “Your Saved Layouts”.
- Next, view your Divi Cloud items. Click the checkbox labeled “My Divi Cloud” under Locations in the left sidebar.
- Select “Manage Categories” in the left sidebar at the bottom of the Categories list.
- Next, scroll down to the section labeled “Divi Cloud Categories”.
- Select the category you want to edit and enter the new name or delete it. Continue selecting and renaming your categories until you’re finished renaming them.
- Click “Add New Cloud Category” and enter its name if you need more categories.
- Finally, click “Save Changes” under the category list.
- Changes to your Divi Cloud are saved automatically, so you won’t need to save this page. Click the X in the upper right corner of the “Load from Library” modal to close it.
Next, reorganize a Divi Cloud item by editing your tags. You can add new tags, rename them, and delete them. Think of them as sub-topics. Use as many as you need.
- Enable the Visual Builder by navigating to any page on the front end of your Divi website and clicking “Enable Visual Builder” in your toolbar at the top of the screen.
- Click the purple plus icon on the Divi toolbar at the bottom of the page to open the Divi Library.
- Click the tab at the top labeled “Your Saved Layouts”.
- Next, view your Divi Cloud items. Click the checkbox labeled “My Divi Cloud” under Locations in the left sidebar.
- Scroll down to Tags.
- Select “Manage Tags” in the left sidebar under the tags search box.
- Next, select the tag you want to edit and enter the new name or delete it. Continue renaming your tags until you’re finished.
- Select “Add new Cloud Tag” and enter its name if you need new tags.
- Finally, click “Save Changes” under the list of tags.
- Changes to your Divi Cloud are saved automatically, so you won’t need to save this page. Click the X in the upper right corner of the “Load from Library” modal to close it.
Next, reorganize a Divi Cloud item by editing the tags and categories if they’re not placed in the proper categories or don’t include the correct tags.
- Enable the Visual Builder by navigating to any page on the front end of your Divi website and clicking “Enable Visual Builder” in your toolbar at the top of the screen.
- Click the purple plus icon on the Divi toolbar at the bottom of the page to open the Divi Library.
- Click the tab at the top labeled “Your Saved Layouts”.
- Next, view your Divi Cloud items. Click the checkbox labeled “My Divi Cloud” under Locations in the left sidebar.
- Find the layout you want to edit in the Grid View, Tag View, or List View.
- Next, right-click on the layout and select “Edit Tags and Categories” from the popup that appears.
- Finally, check or uncheck the categories and select or remove the tags for this layout. Click the green check icon when you’re finished.
- Alternatively, you can right-click on the layout in the Layout Details view and select “Edit Tags and Categories” from the popup.
- Changes to your Divi Cloud are saved automatically, so you won’t need to save this page. Click the X in the upper right corner of the “Load from Library” modal to close it.
Favorite Your Divi Cloud Layouts
Next, favorite your most-used layouts. This helps you find them faster.
- First, enable the Visual Builder by navigating to any page on the front end of your Divi website and clicking “Enable Visual Builder” in your toolbar at the top of the screen.
- Click the purple plus icon on the Divi toolbar at the bottom of the page to open the Divi Library.
- Click the tab at the top labeled “Your Saved Layouts”.
- Next, view your Divi Cloud items. Click the checkbox labeled “My Divi Cloud” under Locations in the left sidebar.
- Make sure Grid View is selected. This is a grid icon above the layout thumbnails on the right.
- Finally, navigate to the cloud item you want to favorite and hover over the space between the cloud and three dots in the bottom right corner of the layout’s card. A grayed-out heart will appear. Click the heart to Favorite the layout. Click the heart again to remove it from your favorites list.
- Alternatively, you can click the layout to view it in more detail. A grayed-out heart icon appears to the left of the cloud icon under the layout’s title. Click the heart icon to add it to your favorites.
- Changes to your Divi Cloud are saved automatically, so you won’t need to save this page. Click the X in the upper right corner of the “Load from Library” modal to close it.
Remove Unneeded Divi Cloud Items
Finally, remove any layouts you don’t need. Leave them in the Trash folder until you’re sure you don’t need them. When you’re sure, permanently delete them from your Divi Cloud.
- Firstly, enable the Visual Builder by navigating to any page on the front end of your Divi website and clicking “Enable Visual Builder” in your toolbar at the top of the screen.
- Secondly, click the purple plus icon on the Divi toolbar at the bottom of the page to open the Divi Library.
- Thirdly, click the tab at the top labeled “Your Saved Layouts”.
- Fourthly, view your Divi Cloud items. Click the checkbox labeled “My Divi Cloud” under Locations in the left sidebar. Make sure “This Website” is not checked or you’ll delete the layouts from the website’s library.
- Make sure Grid View or List View are selected.
- Next, locate the layout you want to delete.
- In Grid View, click on the three dots in the bottom right corner of the layout’s thumbnail.
- Next, click “Remove from Cloud” or “Delete” in the popup menu to delete the layout from your Divi Cloud. Both options perform the same task. Also, both keep the layout in your website’s library.
- Alternatively, you can right-click on the thumbnail in Grid View, the layout in the List View, or the preview in the Layout Details screen to open the menu items and click “Remove from Cloud” or “Delete” in the popup menu.
- Click the links labeled “Trash” above the first layout.
- Locate the layout you want to permanently delete.
- Hover over the layout and click “Delete Permanently”. Once the layout is permanently deleted it cannot be restored.
- Finally, select “All” to return to the layouts.
Ending Thoughts
That’s our look at how to reorganize a Divi Cloud item. Reorganizing them makes them easier to find and use, and it keeps your Divi Cloud clean and structured. Divi Cloud gives you several ways to organize your items with just a few simple clicks.
We want to hear from you. Have you reorganized your Divi Cloud items? Let us know in the comments.


Divi is probably the best WordPress theme I ever use.
Lot of updates and real update that add very useful features.
It helps me a lot to create website for my clients.
Hurry to see what is coming 😉
DIVI Cloud is a fantastic service, but in my opinion it will always be not very functional until the possibility of selecting multiple elements on which to perform a single operation is introduced: delete, assign category or tags, etc.
Hi, Do your themes have masonry grid layout.