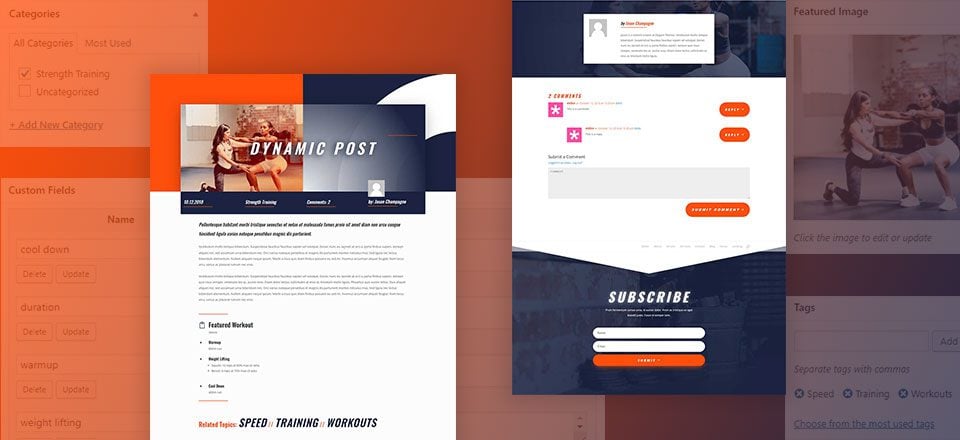
Divi’s new Dynamic Content feature gives us the ability to build dynamic layouts for blog posts (and a lot more). And there are good reasons you may consider doing this. One reason is design. You can design some amazing post layouts with Divi using the visual builder, especially when you use the premade layouts available as a starting point. Another reason is convenience. Once the post layout is designed with all the dynamic content elements in place (like categories, featured images, post tags, custom fields, etc.), the process of creating and updating blog posts is greatly simplified. Other than the actual post content, all of the other post data can be updated without ever having to deploy the visual builder.
In this tutorial, I’m going to show you how to build a dynamic post layout in Divi. By starting with a premade layout, I’ll walk you through the process of adding dynamic content throughout the layout and then designing that content to match. I’ll even introduce a simple way to use custom fields as dynamic content.
Let’s get started.
- 1 Sneak Peek
- 2 What You Need to Get Started
- 3 Part 1: Adding the Premade Layout to the Post
- 4 Part 2: Updating Divi Page Settings, Post Meta Data, and Featured Image
- 5 Part 3: Adding Custom Fields for the Dynamic Workout Content
- 6 Part 4: Adding Dynamic Content to the Post Layout Using the Visual Builder
- 7 Part 5: Adding the Custom Fields as Dynamic Content to Add a Featured Workout to the Post
- 8 Part 6: Designing a “Related Topics” Section Using Post Tags Dynamic Content
- 9 Part 7: Adding an Author Bio and a Comment Section
- 10 The Final Design
- 11 Updating Post Content and Saving the Layout for Future Posts
- 12 Final Thoughts
Sneak Peek
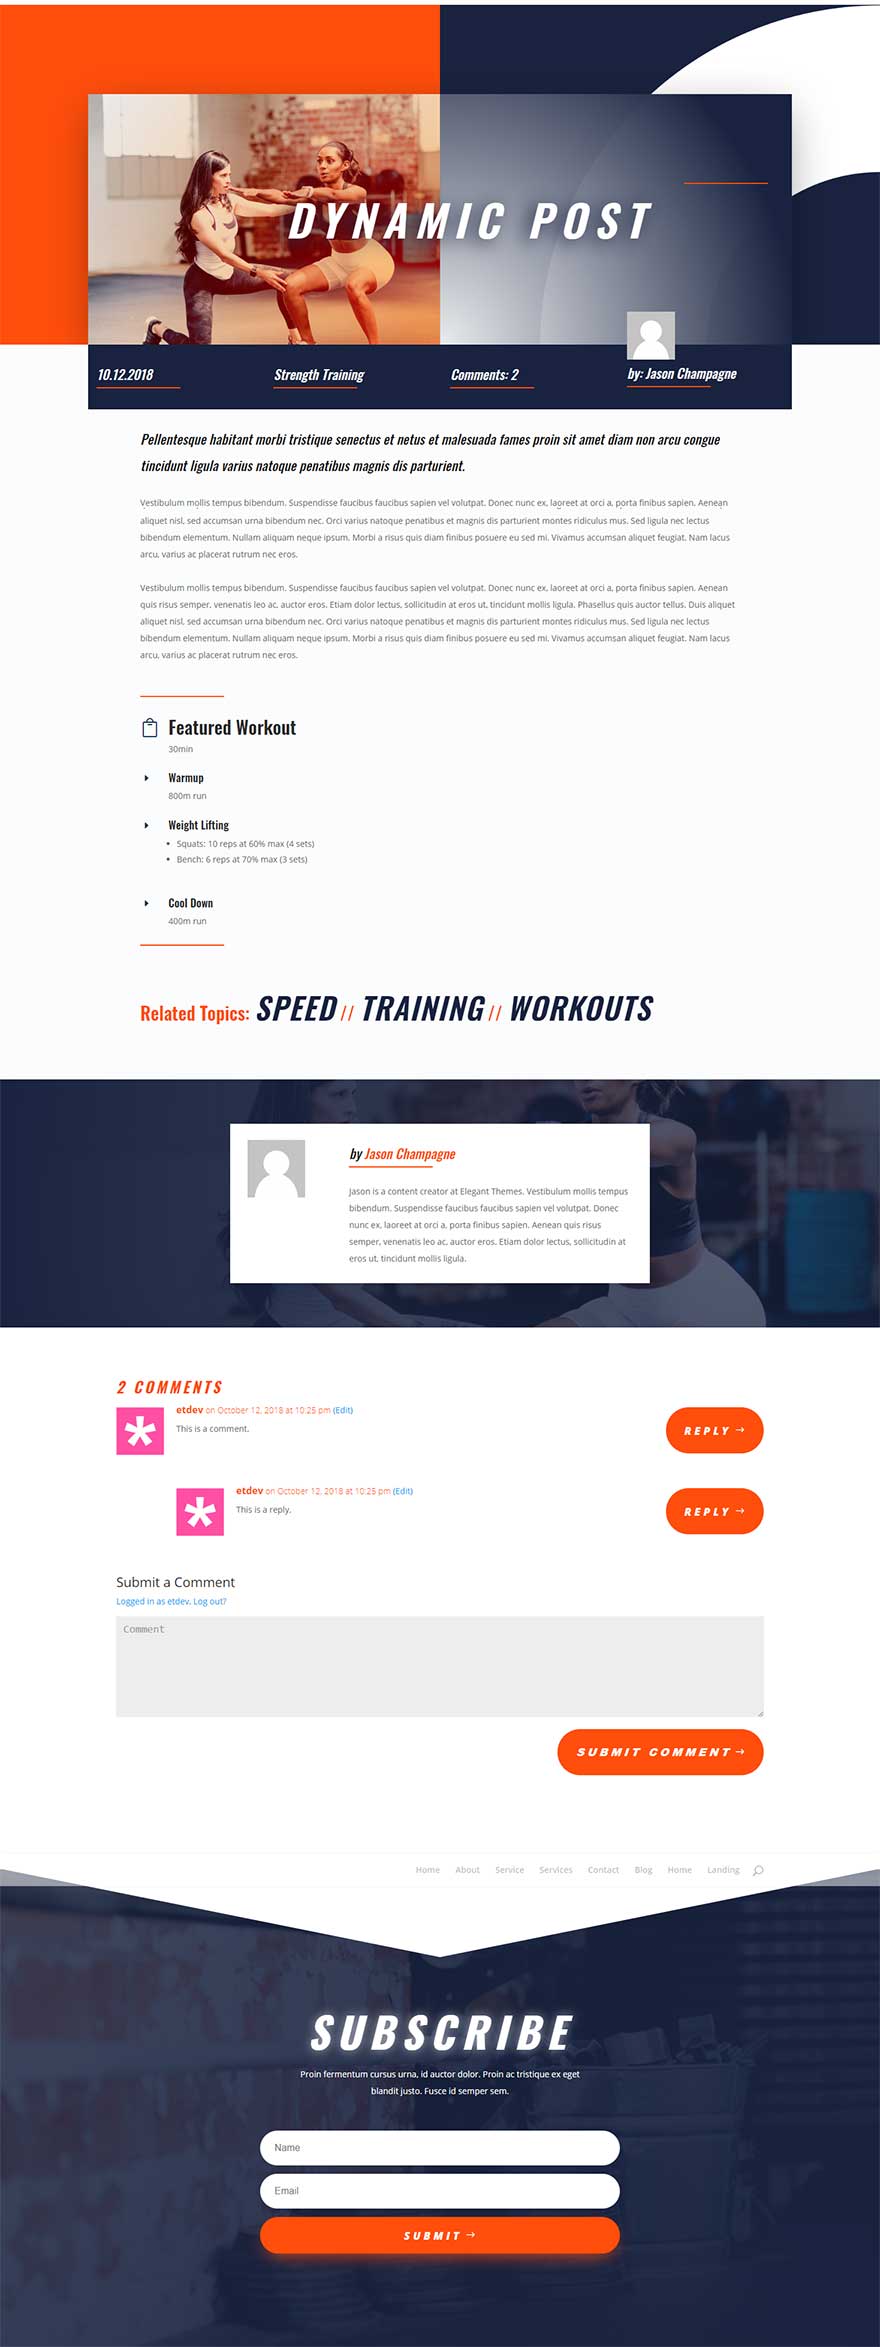
What You Need to Get Started
For this tutorial, you will need the following:
- Divi Theme
- Personal Trainer Layout Pack. This layout pack is accessible from the Divi Builder. We will be using the Personal Trainer Service Page Layout to kickstart the design of our post layout.
I will also be showing you how to take advantage of custom fields to build a featured workout section using custom post type functionality. Custom fields are built in to WordPress and do not require additional plugins or anything. So you already have what you need.
Part 1: Adding the Premade Layout to the Post
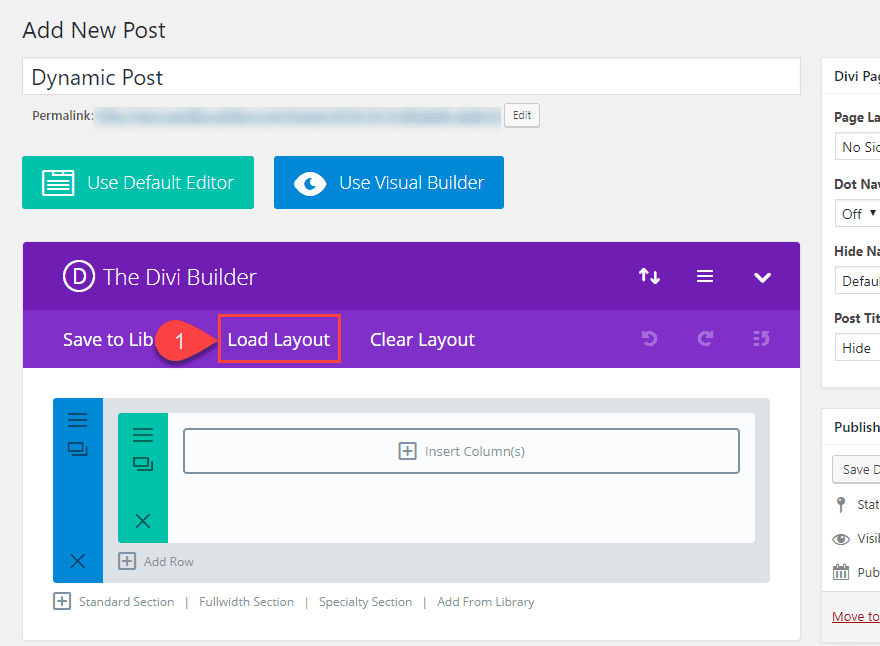
To kick things off, go ahead and create a new post (not page), give your post a title, and then click the Use Divi Builder button. Don’t deploy the visual builder yet because we first need to customize our post settings from the default WordPress editor screen.
Since we do want to add the our premade layout in order to pull in our images from the layout (we need it for our featured image). Click the Load Layout button located in the Divi Builder menu.
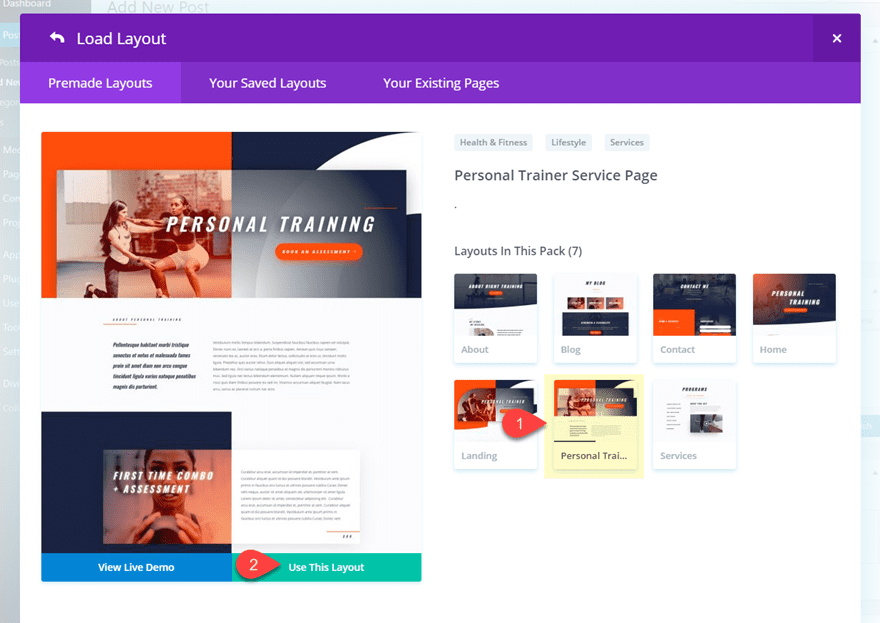
From the Load From Library popup, select the Personal Trainer Service Page Layout and deploy it to your post by clicking the “Use This Layout” button.
Then publish your post to save your settings.
Part 2: Updating Divi Page Settings, Post Meta Data, and Featured Image
Divi Page Settings
It’s important that we update the Divi page settings so that our new layout will fit the design. We also need to hide the default post title display since we will be using the post title module instead.
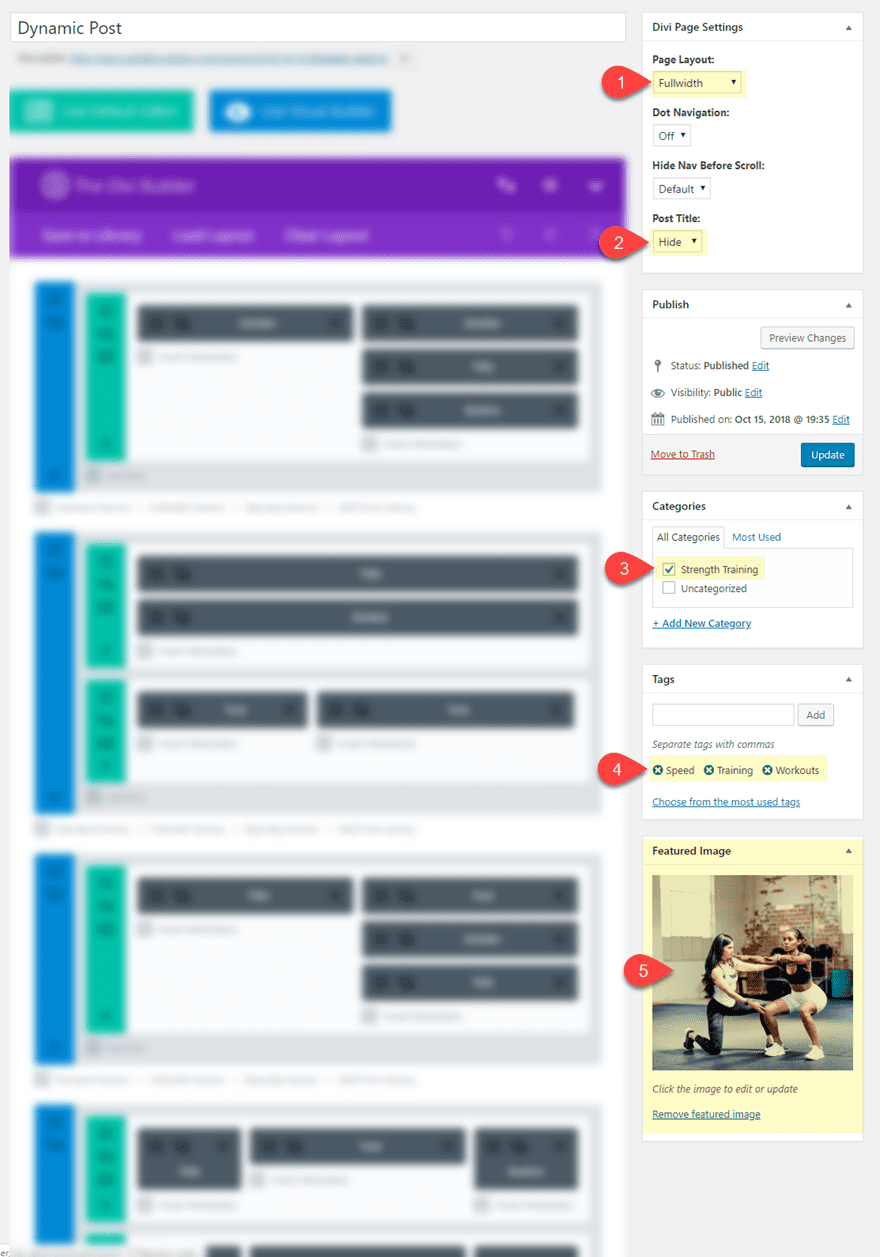
At the top right of the page, locate the Divi Page Settings box and update the following:
Page Layout: Fullwidth
Show Post Title: Hide
If you don’t see the Divi Page Settings, you probably don’t have the Divi Builder activated so make sure you do that first.
Add Categories
Under the categories box, add a new category called “Strength Training” and make sure it is the only category selected.
In the tags box, add the following three tags: Speed, Training, and Workouts.
Featured Image
Next, add a featured image that matches the background image used in the header of the the layout as shown in the screenshot below.
Part 3: Adding Custom Fields for the Dynamic Workout Content
Custom Fields are built in to WordPress. They allow post authors to add extra information (called meta-data) to a post in addition to the default meta-data like categories, post author, post date, etc. At a basic level, custom fields can be used to display the weather or the author’s mood when writing a post. But there are many different ways to use custom fields to create dynamic content for your website. Feel free to read more on how to add custom fields to your website. But for this use case, I think you will grasp the basic concept of custom fields by building a few for yourself.
For this example, I’m going to show you how to add a few custom fields that can be used to add dynamic content to your post. The dynamic content for this example is a featured workout. Once the custom fields are in place, all the post author would need to do is fill in the custom field values and the content will be updated (dynamically) to the post without ever having to load the Visual Builder.
To do this, scroll down to the bottom of the post and and find the Custom Fields box. If for some reason it isn’t displayed, make sure you select it from screen options at the top of the page.
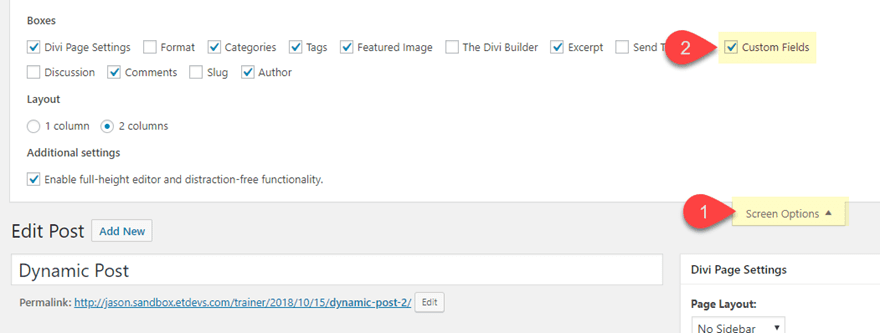
Then click the Custom Fields box dropdown (if collapsed) to add a new custom field and enter the following:
Name: workout title
Value: Featured Workout
Then click the Add Custom Field Button.
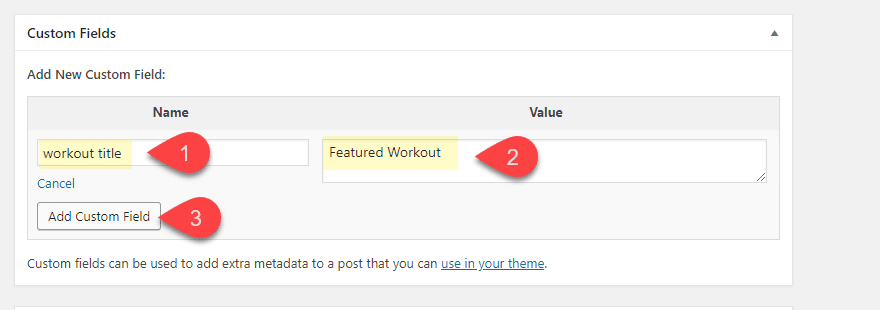
The Name is how you identify the custom field in Divi. The Value is the content that will be dynamically added to the page using Divi’s dynamic content feature (more on this later).
Continue this process to add the following custom fields to your website.
Name: warmup
Value: 800m run
Name: duration
Value: 30min
Name: weight lifting
Value:
<ul>
<li>Squats: 10 reps at 60% max (4 sets)</li>
<li>Bench: 6 reps at 70% max (3 sets)</li>
</ul>
Name: cool down
Value: 400m run
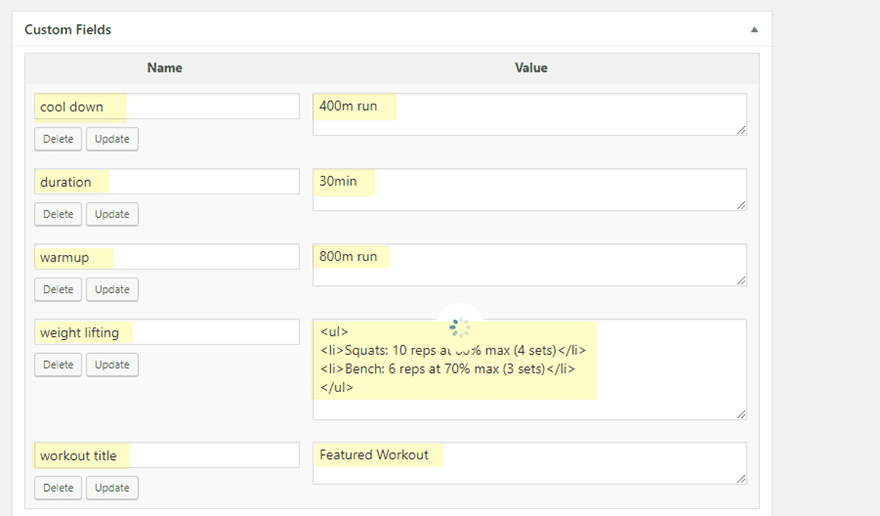
Note: These custom fields will be added to the Divi Theme and will be available on any new post you create in the future. In other words, it is not limited to this single post.
Don’t forget to update your post!
Part 4: Adding Dynamic Content to the Post Layout Using the Visual Builder
Now that we have our post settings and meta data in place, it’s time to start adding dynamic content to our post. To do this, deploy the Visual Builder.
To make things a bit easier to locate and edit for this advanced layout design, open the settings menu and set the Builder Default Interaction Mode to Click Mode.
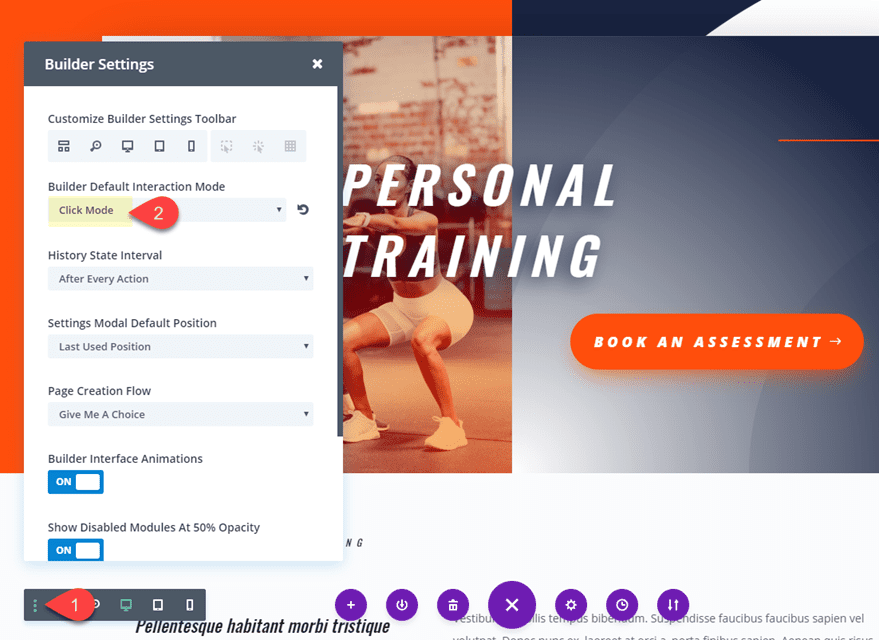
In the header section, delete the button module (we don’t need it).
Replacing the Background Image with the Featured Image Dynamic Content
For our first piece of dynamic content, we are going to replace the background image used in the column 1 of our top header section row with the featured image used for the post. To do this, open the row settings and find the background settings for column 1 and click the background image tab. Then delete the image that is currently there and then hover over the background image preview box. You will see the dynamic content icon in the top right of the box. Click on it to open the dynamic content options. Then select the Featured Image dynamic content option from the list.
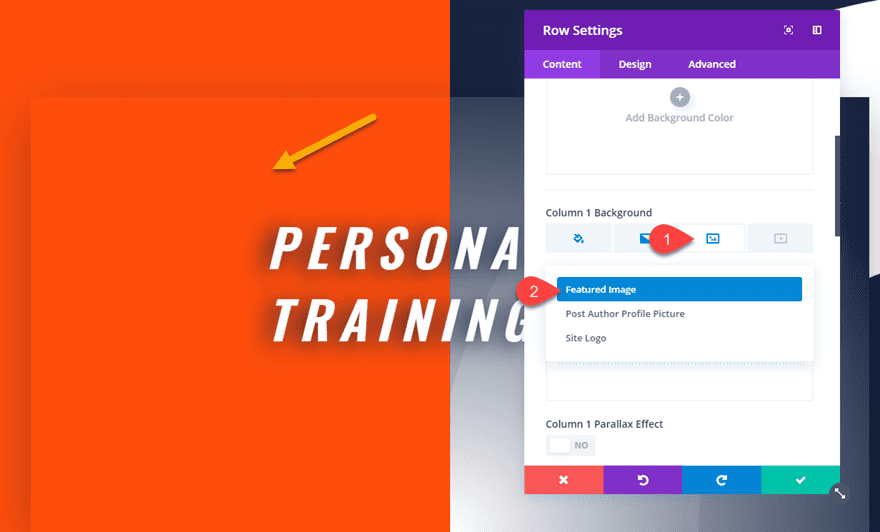
Your layout will look exactly the same since we are using the same image. The only difference is now that background image is being pulled from whatever image is set as your featured image of the post. This is the beauty of dynamic content!
Let’s continue.
Adding the Post Title with a Post Title Module
Under the text module that currently holds the title of the page, add a Post Title module. There is also an option to use add the post title to a module using dynamic content, but since the Post Title Module works like dynamic content already and preserves the h1 heading tag for SEO, it makes perfect since to use it for your custom post layout.
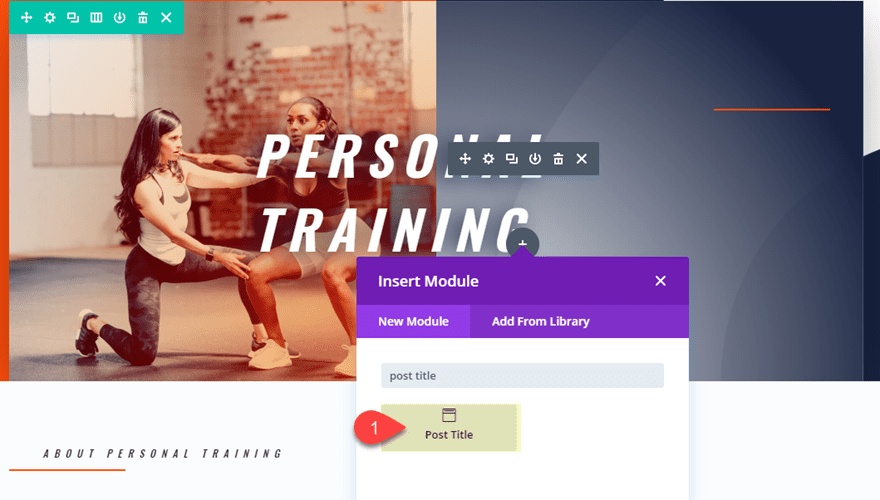
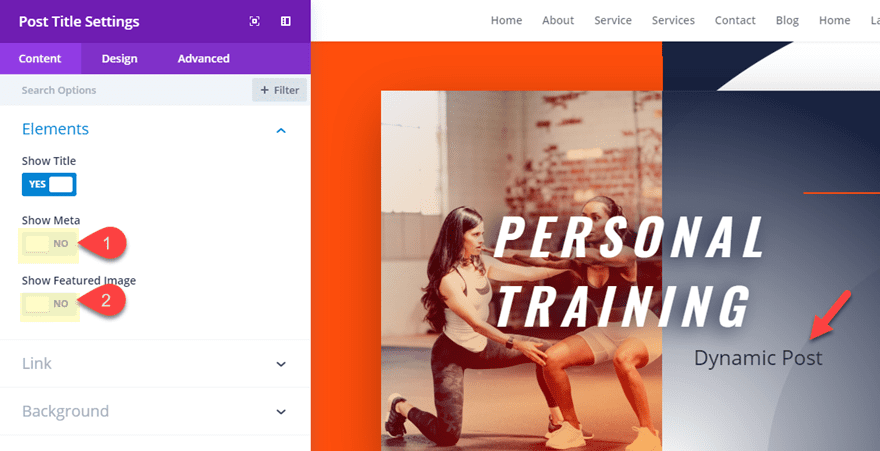
Then update the post title module settings as follows:
Show Meta: NO
Show Featured Image: NO
Now go to the text module above and copy the h2 heading styles by right clicking on the h2 tab and selecting the option from this list.
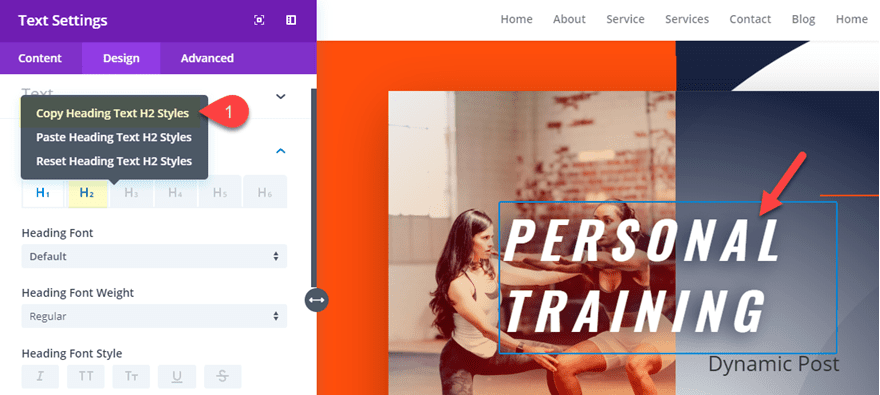
Then paste the h2 heading styles to the post title module by right clicking on the module and selecting the option from the list.
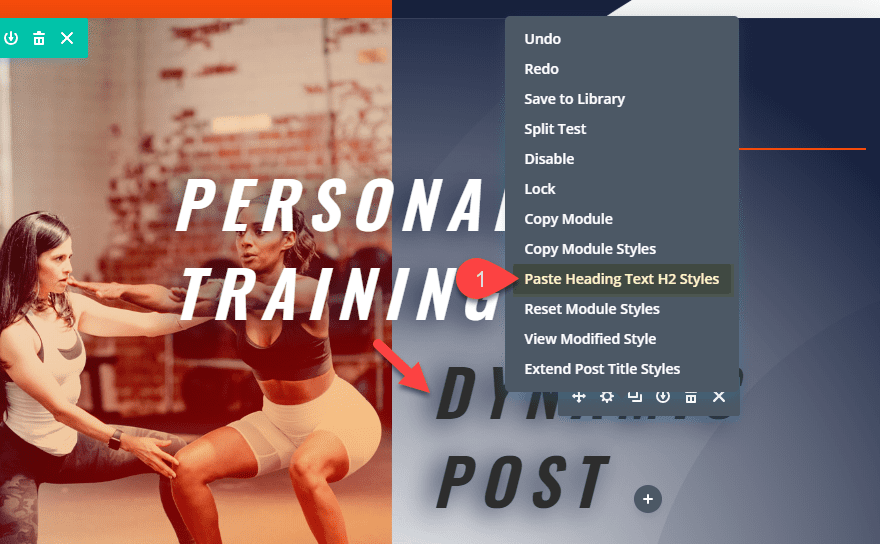
After that, go back again to the text module above and copy the spacing styles and paste them to the post title module. Then change the post title text color to light to get the white color.
Now your post title should match the design of the original layout title.
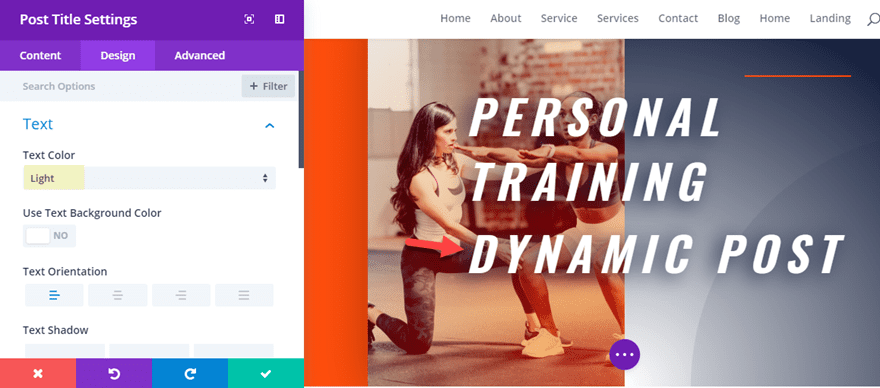
Now you can delete the text module containing the original heading.
Using Dynamic Content to Create a Row of Meta-Data
Move on to the second section of the layout. Then take out the top padding of the section by dragging it away in the visual builder or setting it to 0px in the section settings.
In the first row of the second section of the layout, you will notice a text module (it has the content “About Personal Training”) with a divider under it. This is where we are going to build our custom row of meta-data using dynamic content.
We want the size of this row to match the size of the row in the top section. To do this, open the row settings of the row in the top section and copy the sizing styles. Then paste them to the first row of the second section. Then update the row gutter with to 2. The new sizing should look like the following screenshot.
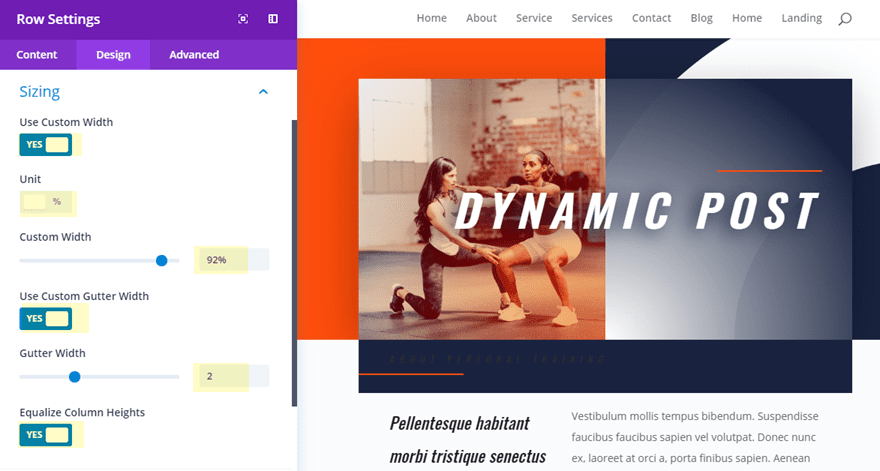
You will also need to add custom spacing as follows:
Custom Padding: 1% left, 1% Right
Then save the row settings.
Now update the row column structure to a four column layout.
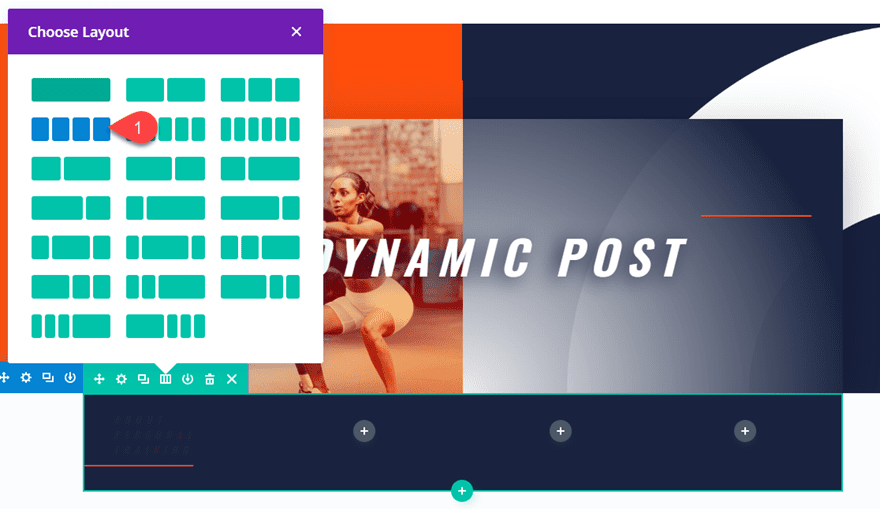
Now we are ready to add our dynamic content. To do this, open the settings of the text module now in the far left column and hover over the content box. You will see the dynamic content icon in the top right of the box. Click on it to open the dynamic content options.
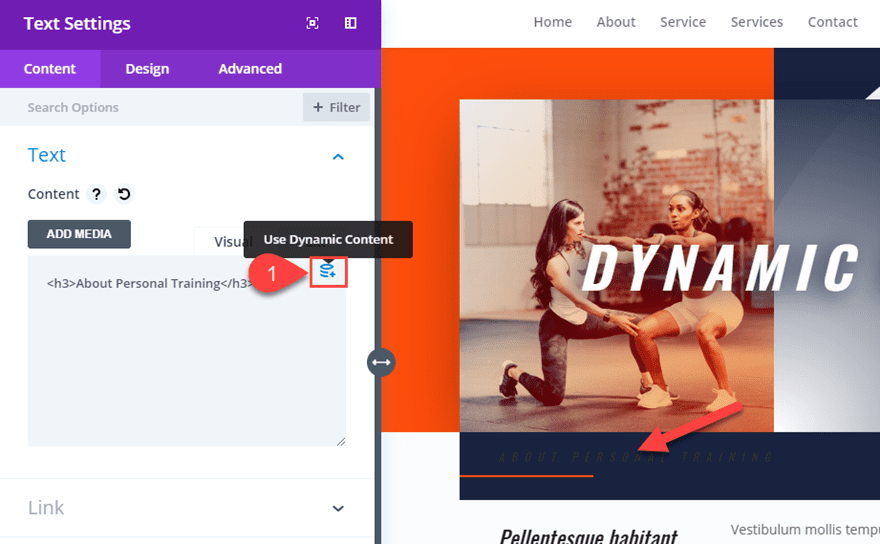
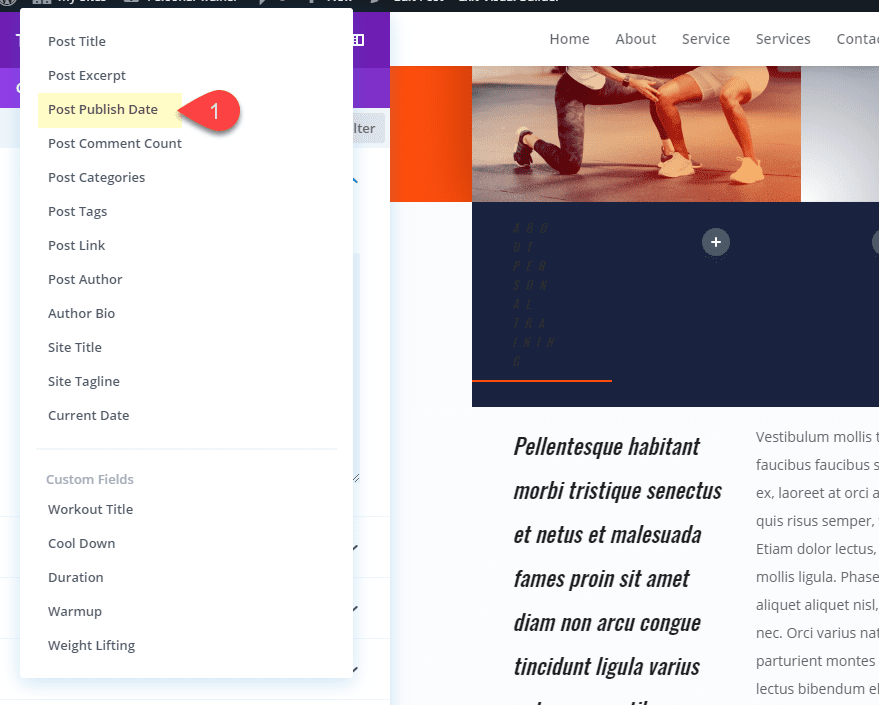
Then select the option: Post Publish Date.
Then change the date format accordingly.
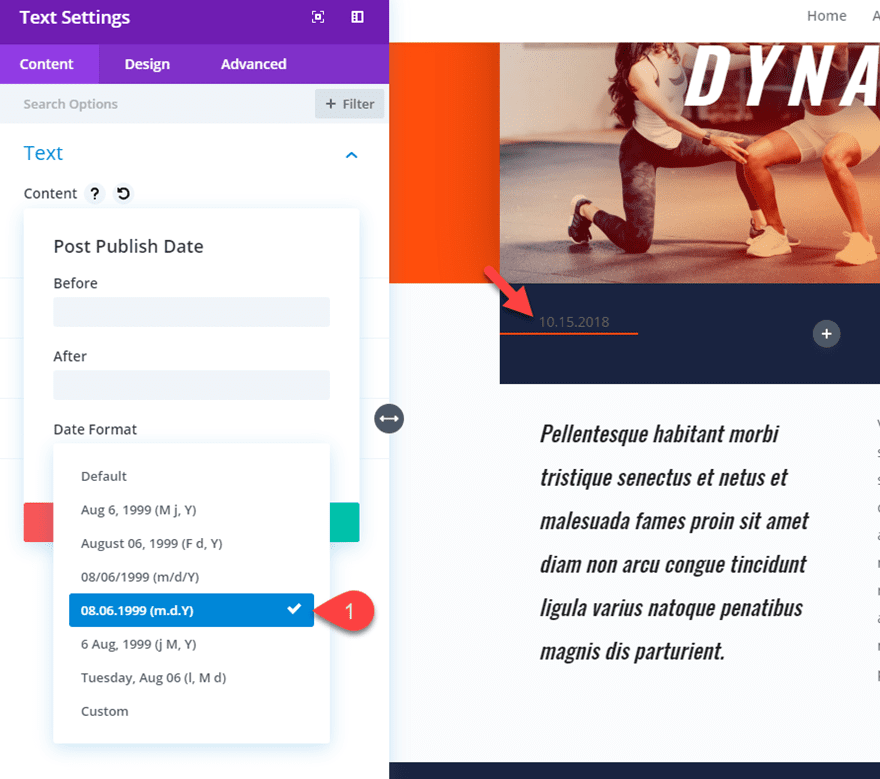
This will add the publish date of the post as dynamic content.
To style the text module with the dynamic date content, copy the module styles of the text module in the left column of the row directly below.
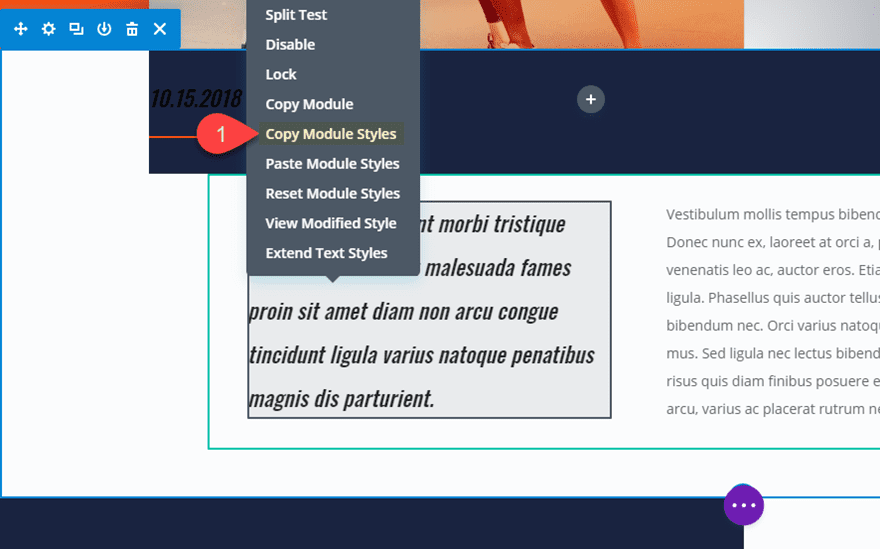
Then paste the module styles to the text module with the dynamic date content and change the text text color to white.
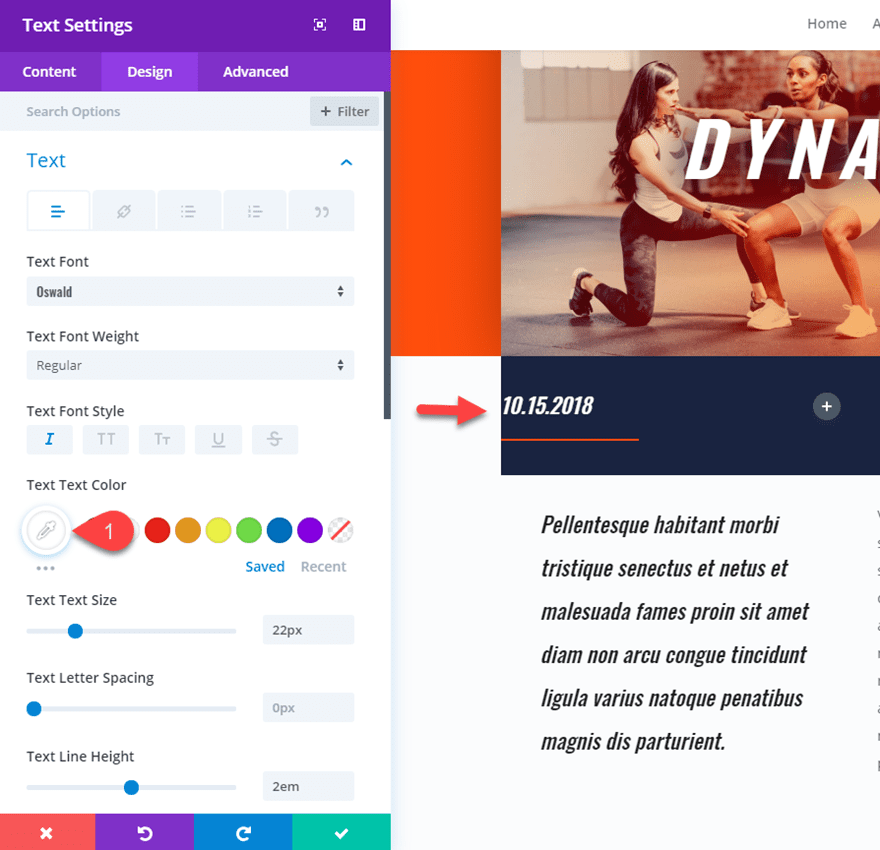
Next, copy the text module and the divider below it and paste it into column 2. Then change the dynamic content to Post Categories.
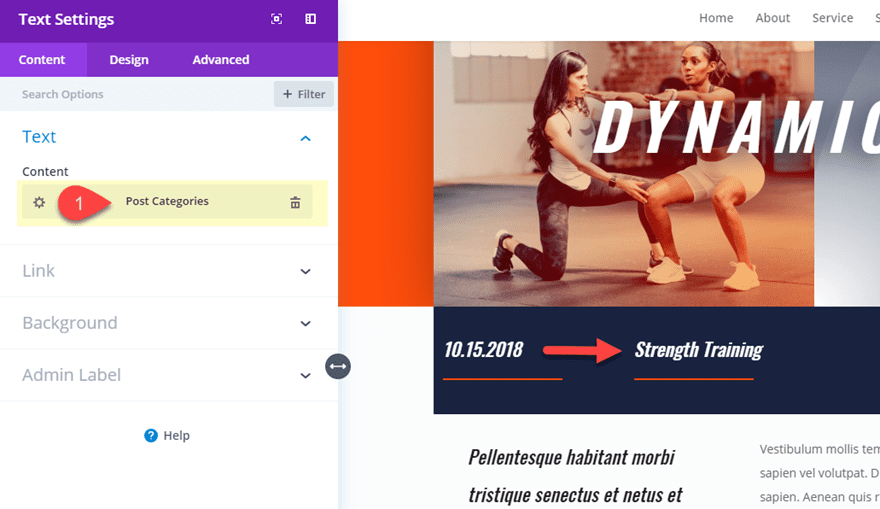
You will need to update the link text color to white to match the design of the layout.
Now copy the post categories text module with the divider over to column 3. Then change the dynamic content to Post Comment Count. In the Post Comment Count popup, enter the the following in the Before input box:
Before: Comments:
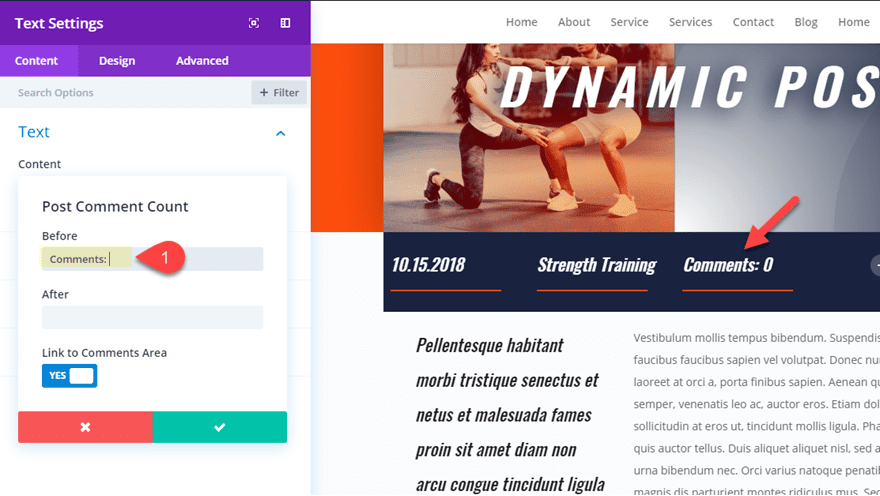
The before and after input boxes available in the dynamic content popups are a convenient option for add text before and/or after the dynamic content. This is helpful for adding labels, price symbols, and other elements when needed.
Now let’s continue adding our dynamic content. Copy the text module and divider in column 3 and paste in over to column 4. This last column is going to hold our post author thumbnail and author name. So, change the dynamic content of the text module to Post Author. In the Post Author popup, update the following:
Before: by:
Name Format: First & Last Name
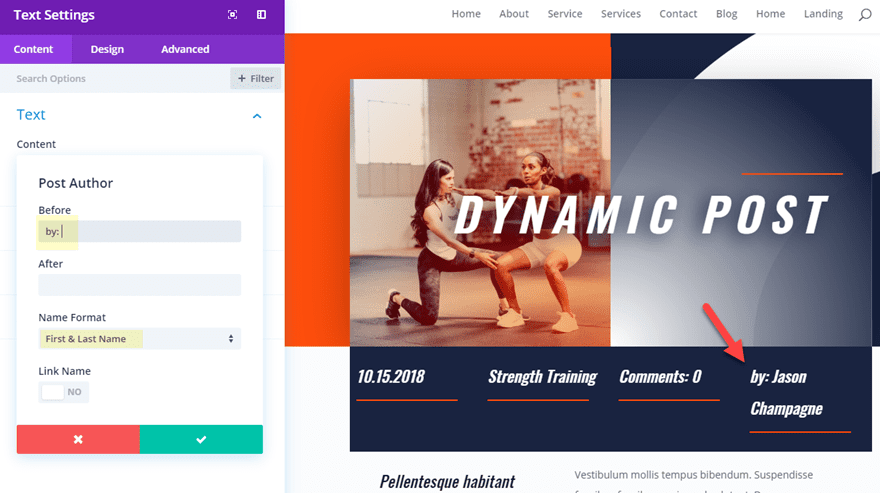
Above the text module with the post author content, add a new image module. Open the image module settings and delete the default image. Just like we have been doing, click the dynamic content icon in the image preview box and add the Post Author Profile Picture as the dynamic content.
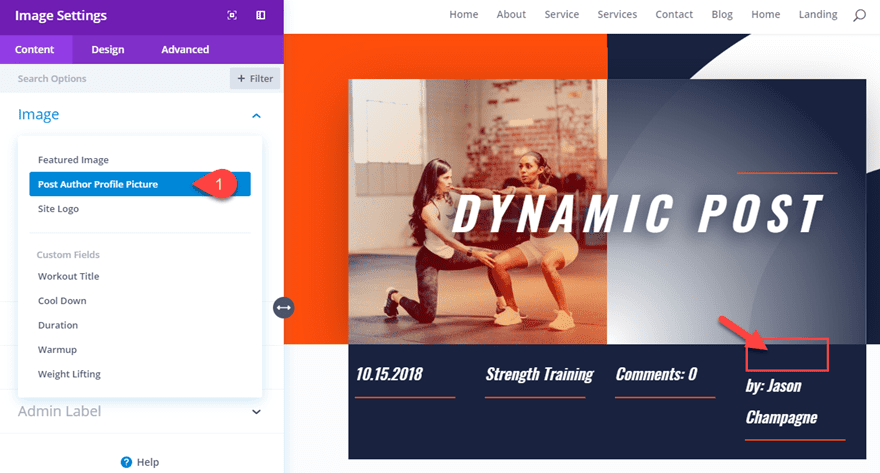
Then adjust the design settings to pull the image up and give it a custom width as follows:
Width: 80px
Custom Margin (desktop): -82px Top
Custom Margin (tablet): 0px Top
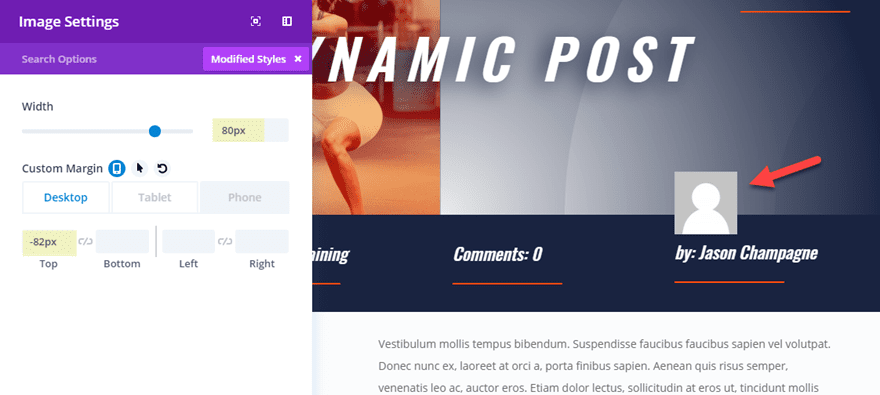
Note: The post author name is going to show the author that has been assigned to the current post. And the post author profile picture is whatever has been set for the user profile in the WordPress Dashboard under Users > Your Profile.
Part 5: Adding the Custom Fields as Dynamic Content to Add a Featured Workout to the Post
Remember how we added those custom fields earlier in the tutorial? Now we are going to use those custom fields as content for a featured workout on our post.
To add our featured workout dynamic content, first duplicate the two-column row directly below the four-column row with all of our dynamic meta-data. Then delete the modules in both columns and add a blurb module to the left column.
We are going to use blurb modules to add the dynamic content for the workout section. To start, add a new blurb module to the left column.
For the Title, add the custom field named “Workout Title” as dynamic content. Then for the blurb content, add the custom field named “Duration” as the dynamic content.
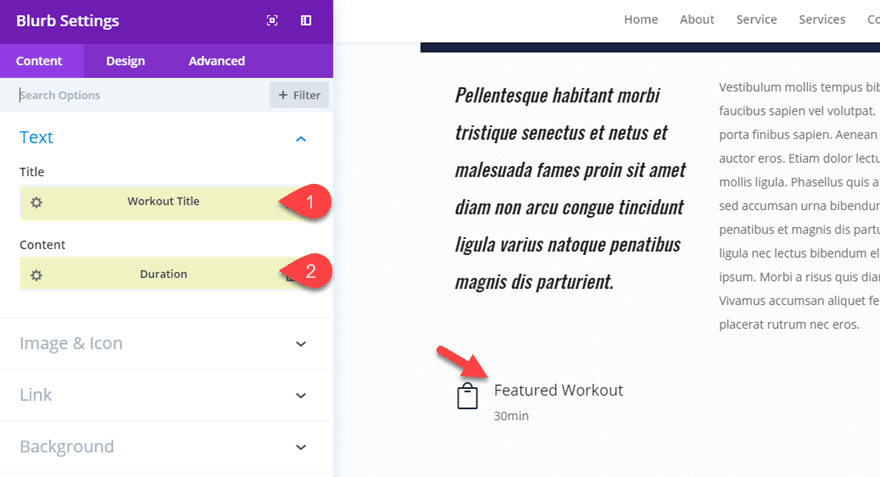
To keep things rolling, I’m not going to go over the styling for these modules in detail. But, you will need to add a blurb icon placed to the left of the title and update the design to match the layout.
Next, add a second blurb module below. Enter the text “Warmup” as the title. And then add the custom field named “Warmup” as the dynamic content.
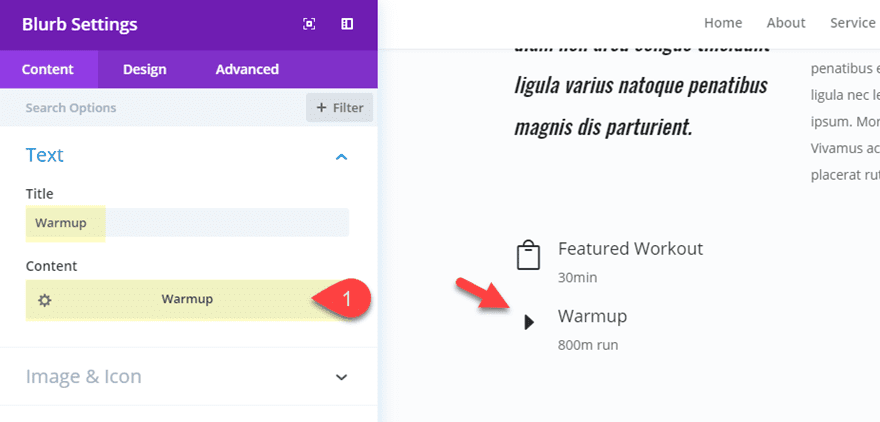
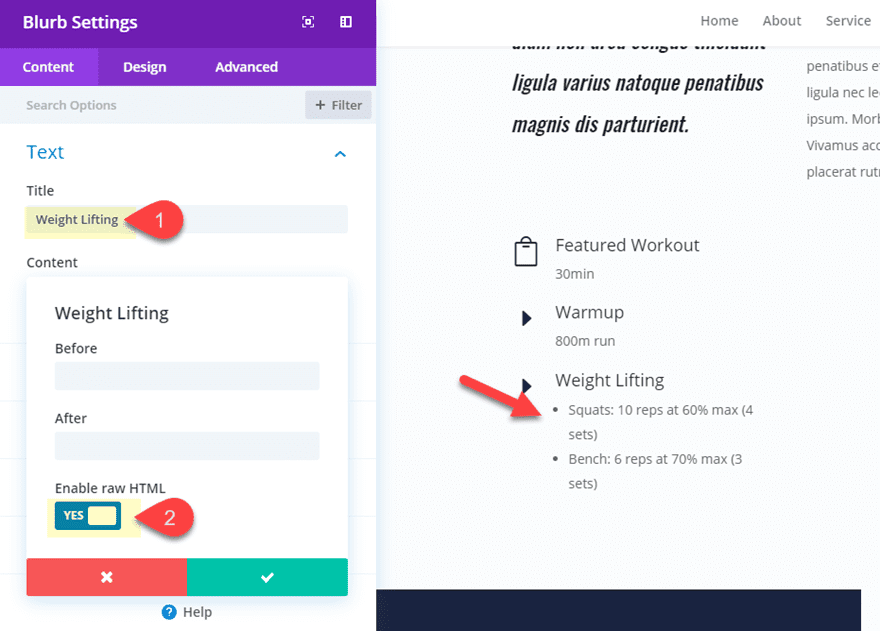
Add a third blurb module below that one, with “Weight Lifting” as the title and the custom field “Weight Lifting” as the dynamic content. Since we are using html for this custom field value, you will need to enable raw html in the weight lifting popup.
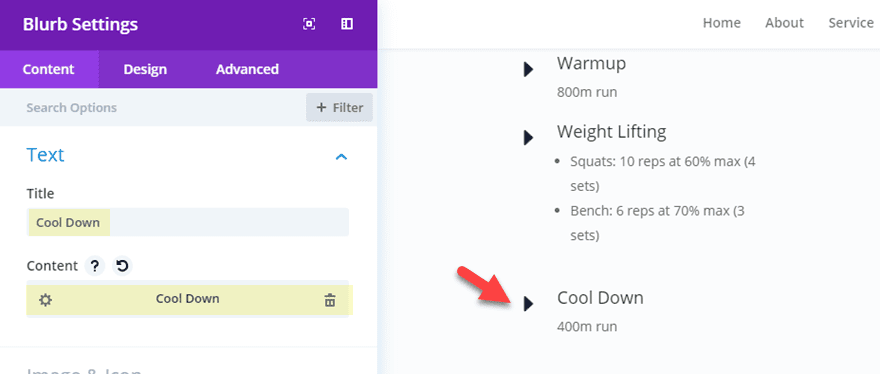
Add a final blurb module with “Cool Down” as the title and the custom field “Cool Down” as the dynamic content.
Now you have a dynamic section for adding workouts to your post!
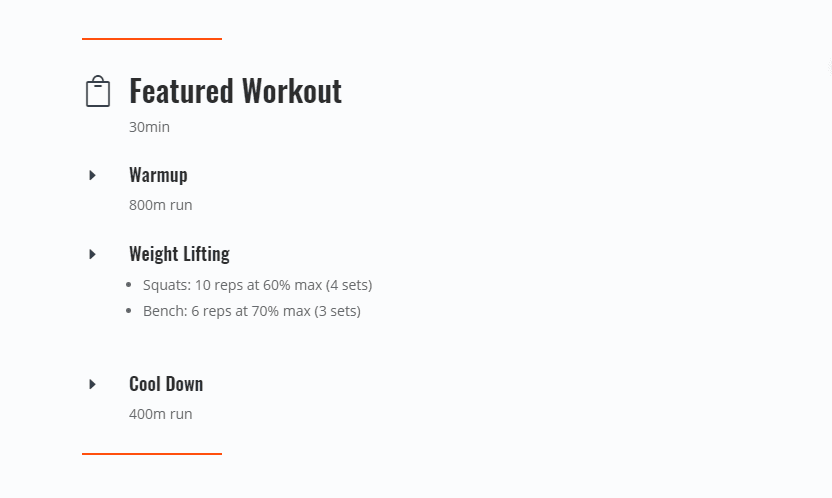
All you need to do is update the custom field values from the default page editor in WordPress and that content will be added to your post layout automatically without having to go into the Divi builder.
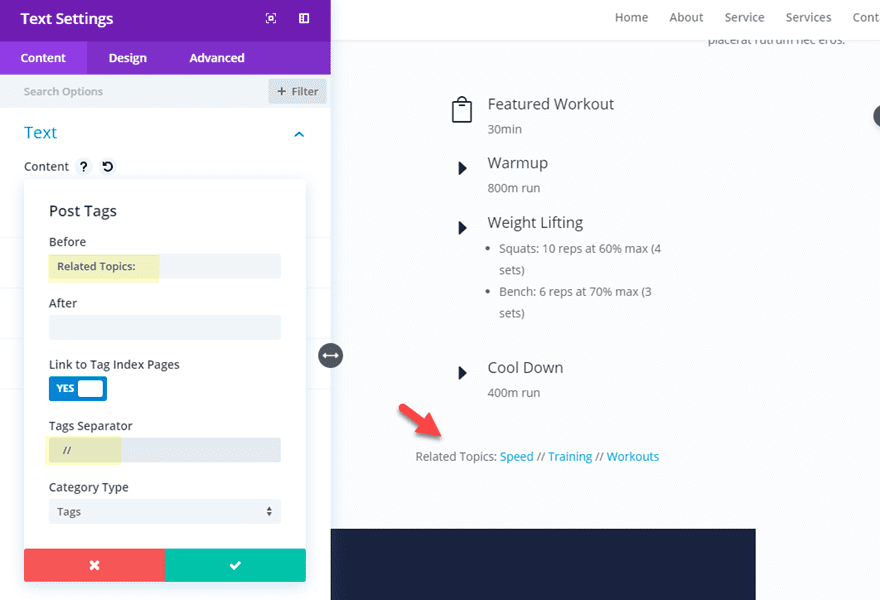
You can use dynamic content to display the post tags and create a cool looking “related topics” section for your post. To do this, create a new one column row and add a text module to the row.
Then for the content box, add Post Tags as the dynamic content. Then update the following Post Tags options:
Before: Related Topics:
Tags Separator: //
Note: You can use just about any set of characters you want for the tags separator so feel free to experiment with different ones for creative designs.
To style the content, update the following design settings:
Text Font: Oswald
Text Font Weight: Semi bold
Text Text Color: #ff4c00
Text Text Size: 30px
Link Font: Oswald
Link Font Weight: Semi bold
Link Text Color: #262d3f
Link Text Size: 50px
Link Letter Spacing: 2px
Link Line Height: 1.6em
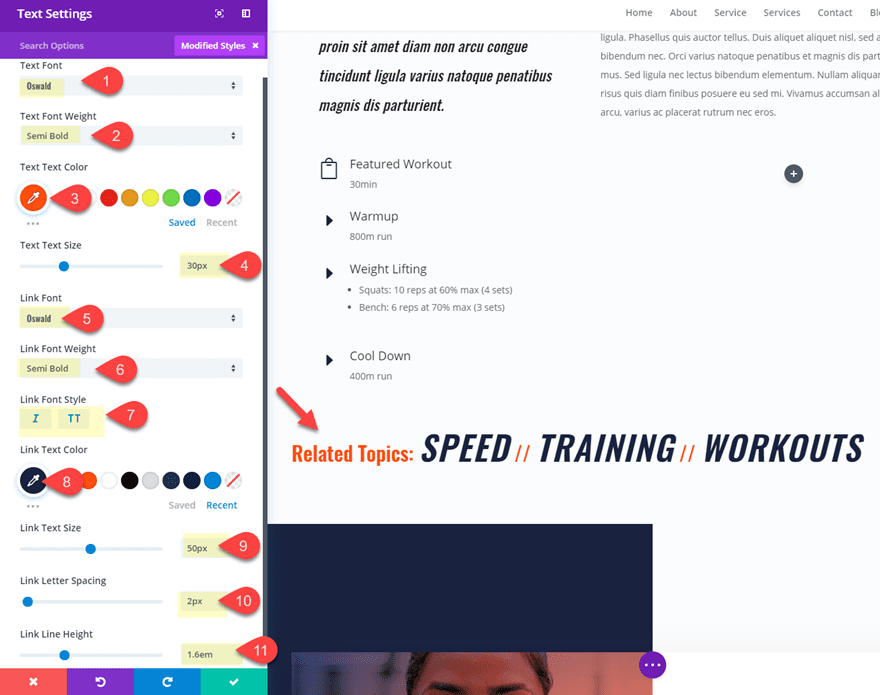
Here is the final design.

At this point you be well equipped to add dynamic content and adjust the design of your post layout with a fair amount of ease so I won’t go into much detail on these last two elements.
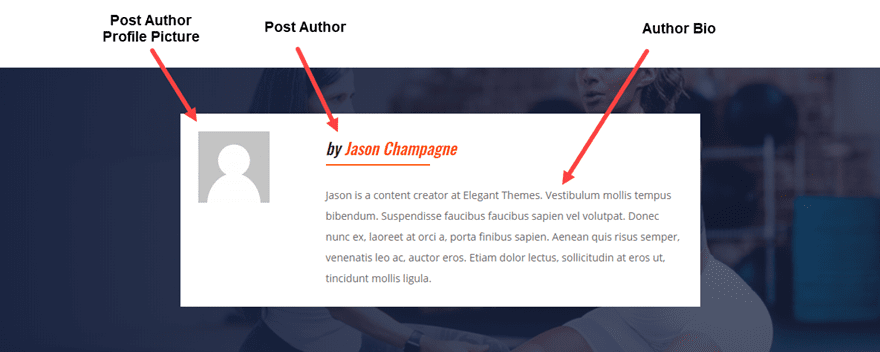
To add a author bio section at the bottom of your post content, you can use the Post Author, Post Author Profile Picture and Author Bio dynamic content. As you can see in the screenshot below, I created a 1/4 3/4 column row. Then I added the post author profile picture to the left column. In the right column, I added the post author with the author bio underneath. I also added the featured image dynamic content as the background image for the section (and a gradient overlay). Here is an example of what that would look like.
Adding a Comment Section Using the Comments Module
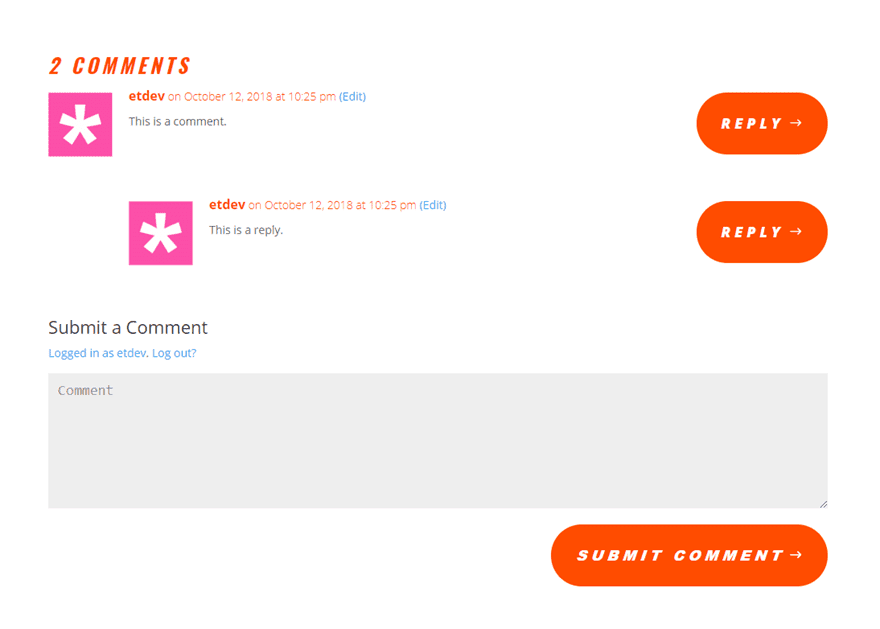
Since we are using a custom post layout, it makes since to use a comments module so that we can match the design of the comment section with the layout. Simply add the comments module to a new section row match the button styles and fonts with the current layout. Here is an example of what that would look like.
The Final Design
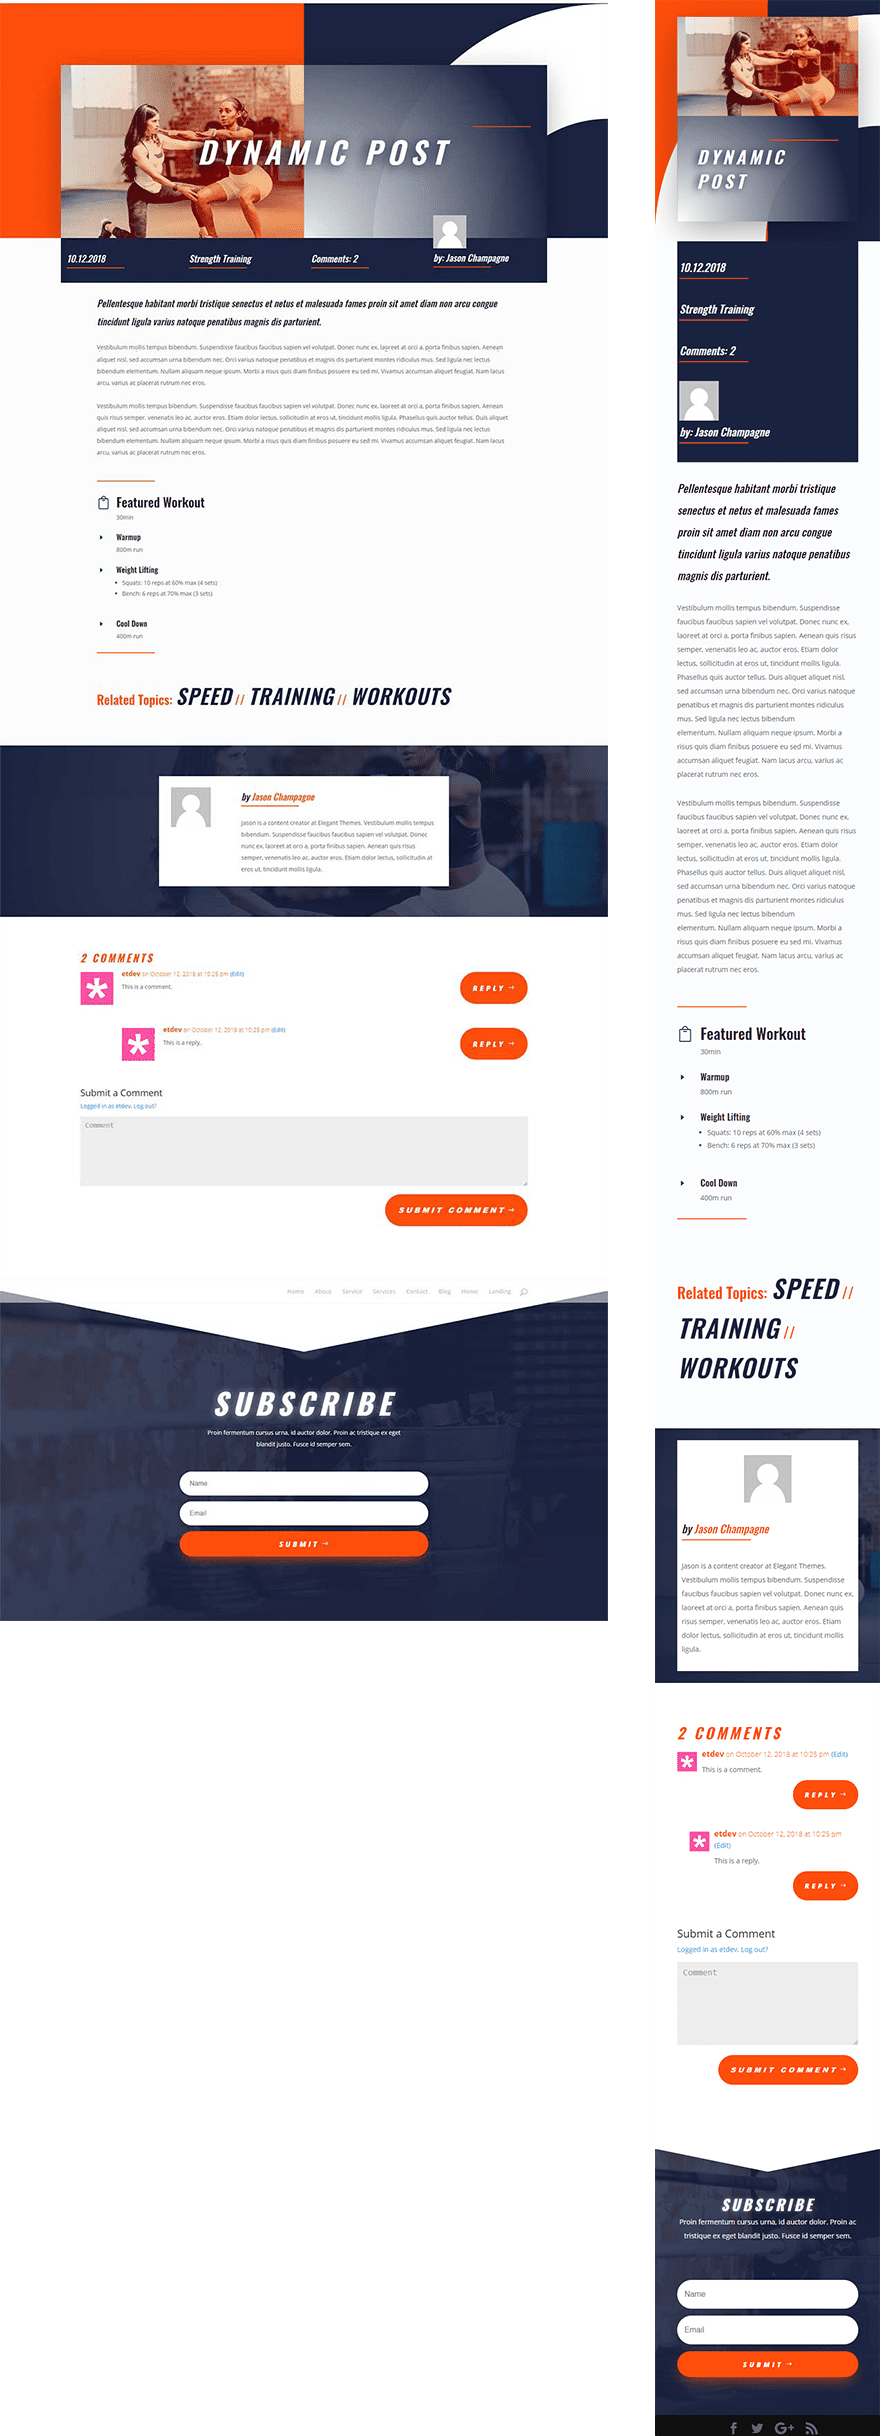
Here is the final design of the entire post once all of the design has been adjusted.
Updating Post Content and Saving the Layout for Future Posts
Since we are using the Divi Builder to create the post layout, you will still need to update the actual post content for your post using Divi modules. But with everything else now dynamic, this makes the process a whole lot easier going forward. You will need to save the post layout to your library so that when creating a new post, all you will need to do is add the saved layout to your post and update the post content.
Final Thoughts
Divi’s Dynamic Content is a powerful feature that makes adding and updating post data a whole lot easier. So if you are looking to design a custom layout for your blog posts (or other custom post types like Projects) using the Divi Builder, dynamic content is the way to go. Of course, dynamic content is not limited to posts. You can take advantage of dynamic content and custom fields throughout your entire website. I hope this post helps you understand some of the possibilities and inspires you to use dynamic content in awesome new ways.
I look forward to hearing from you in the comments.
Cheers!





Disregard my previous comment about Comments. I just reread the docs for the Comments module. When you add the module it overrides the default comments location in the post. Oops! Always read the docs!
Thanks for the post. My question has to do with comments. Don’t Posts automatically have a comments section? Even if I create a new post with no Divi modules at all, and I save and view the post, there is a Comments section at the bottom of the post. I don’t know of a way to hide it like you can hide the Post Title with the Divi setting.
While not ideal, it would be great to outline a custom function for a dev’s child theme of Divi to auto assign the layout/template of choice (with the dynamic field values) to all posts of a given post type automatically.
Types Toolkit has a similar administration interface for this inferior layouts themeing model. That I’m researching making a custom plugin so I can embed Divi layouts into the layout builder.
Still, a raw function that devs could use in their child themes would be great.
Ok well, we’ll see if I can figure something out on my own.
Hi, thanks for your work 🙂
I’ve missed something: in the Visual Builder everything is displayed correctly. but online dynamic fields no longer work!
what have I missed? Thx !
more details: I’m French and French is the language of my website (WP Dashboard > Setting).
In the Virtual Builder, all the dynamic fields are displayed.
When I leave the Virtual Builder only the dynamic field of the title of the Blurb module is displayed. all the others show a error: {« dynamic »:true, »content »: »post_date », »settings »:{« before »: » », »after »: » », »date_format »: »m.d.Y », »custom_date_format »: » »}}
If I choose “english” for the language of the site, everything are ok! all the dynamic fields are displayed.
is there a problem with the quote in the scripts of PHP?
why is the title field displayed and not the others?
thanks you!
Does this work with all Divi modules? Or just basic text-data ones. If I wanted to use a custom content field for a Vimeo URL, would that work for setting the video URL for Divi’s Video Module?
I am trying to enter YouTube and Google iframe sharing code in custom fields, but they do not show up in my dev site. Is this a limitation of the Divi custom fields?
I’m not sure, but I do know what you are talking about. I’ll have to look into it more.
Forget my previous issue.
Solved 😉
Sorry for my delayed response on that. Glad you got it sorted!
Great tutorial and very nice results of the post !
But how to fix the issue on the blog homepage (several posts)which let appears the entire post or a part of frame when you added a “Read more” code…?
See the screen captures with my test :
https://screenshot.net/7y7vqsq
https://screenshot.net/ngdywbd
Great article, great new content. But what I can’t see is the dynamic content for the entry’s text. Am I missing something?
Patrizio,
Sorry for the delayed response. Can you clarify what you mean by “entry’s text”? If you are referring to the actual content of the post, then, with the setup built in this tutorial, you would update that in a text module. Everything else is dynamic.
Woocommerce?
Dynamic Content: is this function only available in the Visual Builder? I can see the Dynamic Content icon using that, but, not if I am using the Divi Builder (the backend builder).
This is a good first step — but I will hope to see a templating system… I think this will be too overwhelming for the user I had in mind.
Beth,
Yes. Currently this is available only in the Visual Builder.
Thanks for your clear tutorial I have a question:
do you think that is there a possibility to put into the divi’s gallery module images that comes from dynamic content? in example I have created with advanced custom fields a custom gallery field were I can put some images( woocommerce have a similar custom field)but there is no way to load this set of images into any divi module. do you think if there is a workaround to this? many thanks
Vassilis,
I understand the issue, but unfortunately, I don’t have a solution at the moment.
Waiting for support for custom field plugins such as ACF/Pods/Metabox.
(i.e. special field type such as Gallery or Maps are very useful)
If these are supported, would be awesome.
They mentioned at the update release that ACF will be supported.
This is very usefull but, without the capability of creating a new single and archive for custom post types, I think that is easier to use “duplicate post” plugin and make changes in front end.
Dear Sir
Many thanks for this but how about an example to show dynamic content from a product in woocommerce?????
+1
Thanks for the suggestion!
I think, this is really great! Thanks.
But the first Problem is, that i can´t see the dynamic content. Do i need an additional Plugin or something else?
Best wishes from good old Germany
Ulli
Ulrike,
Thanks for the comment. First, I would try updating Divi to the latest version. If that doesn’t work, try reaching out to our support team.
I have to say that my understanding of the Dynamic Content principles that you just released and your meaning of it are two totally different things. I have coded custom modules since the beginning of my use of Divi that can do this so much quicker and easier than your process. The sudden realization of what you built versus my understanding has left me a little disenchanted with it. I thought this update was going to be something a bit more along the lines of the power that Toolset provides. I was vastly mistaken to have thought that. I’ll stick to using my modules because this would be a total P.I.T.A. to try and teach and convey to clients. :/
+100
Please guys stop trying to make this update look more than it is. I used to build complete PHP sites populated by dynamic data. This update is simply a window/link on some dynamic fields. Yes its useful, and a start (thanks), but as said above – this update urgently needs tools (select, filter, group, repeat, relate) to make it worthwhile. At a push, even a simple select and repeat region for goodness sake.
From this side of the fence it feels like Dynamic Content been turned into some sort of feature release while the templating system is being developed to keep the user base quiet. Yes, it is going to be the thing to use once a templating system is in place, but on its own its pretty poor – there is really no point in duplicating your page content in custom field box on the same page (back end).
Conversely there is a huge point in selecting data from multiple posts and being able to display that (with DIVI) – so please ET just add a couple of vital tools to DIVI to make this update shine. If it is just going to be for templates and no further tools are in the offing – then, for sure, DIVI users will be missing out on a whole bunch of hugely useful and valuable site building options.
Hey Paul – not sure if you offer services, or could provide direction, but I’m looking to do some more complex stuff with dynamic data within WordPress, as you mentioned. If interested, my email is joe at greenflagdigital dot com.
Thanks!
My thoughts exactly. I mean don’t get me wrong I love the concept, but it doesn’t seem to be complete just yet. It lacks the ability to create a custom post-type so you don’t have to remake these custom fields every time you want a new post and not just update an old one. The way it is right now you would still have to use ACF or toolset to create these. Although it does make the frontend part a little bit easier to implement.
Failed on first step of dynamic content delete image then nothing, no icon , so i gave up
Sorry to hear, Nick. Maybe try updating Divi again?
Yes, updating worked for me! Great tutorial!
Good on you for explaining everything. It seemed as though many people needed it.
This is a great update for making more complex websites. Good on the Divi team for this!
PS.
This is why I will not ever give up the backend. (and also why I only build in the backend)
Thanks for this tutorial
Dynamic content is really good to use.
Is there a way to embed shortcode in the contents?
Bruno,
Not sure what you mean. Where exactly do you want to embed the shortcode? Glad to help if I can.
Will this work with Advance Custom Fields plugin?
Sure it will. Have not done much testing at all with ACF and DIVI.
I personally haven’t tested it out yet.
Thank you! Great tutorial! Here is some thought: One thing I always miss on a tutorial is the Live Demo + Json Download.
Still trying to figure this out. I understood everything in this post, yet really don’t get the benefit. Sure, data from somewhere else can be used to fill these custom fields.
But if I have to update those field values every time I need a change, how have I really saved any time?
What is the mechanism for feeding changing data into these fields? Table, array, etc.
It’d be great for RE agents to have a featured property, but no time savings at all if I (or the client) have to update all the fields somewhere.
I simply MUST be missing something.
What we do not have yet is the Theme Builder update. When you get that update you will be able to do so much more with this Dynamic content update.
Right now you could make some modules global and when you make a change to one module you make a change to them all
Just imagine, that you have saved this layout to divi library and when create new post, use it from there. All you need is to fill custom fields and all info will be inside layout filled for you. I guess, it will be very good for some custom info, like recipes, pricing, tech specs etc.
Hi all,
@Patrick Finney,
The major benefit is that you design once. There is the time saver. It took me some time to figure it out too.
One thing to recall is that the Divi builder is also available not only for WordPress pages and Divi projects but also for WordPress posts, and any custom post type.
Let say that you are designing for a Cook Lessons Website, and that they publish a recipe course post each day. But… they don’t want the classic WordPress post appearance.
Let’s say that the post will be made of:
– A top featured image
– A big title
– Some meta
– The recipe course (post content)
– But also the ingredients list (as a custom field(s)) at the bottom of the post.
So what you would have to normally do would be first, to design the post template and save it. Then each day, you would have to write that new post by loading the saved template first, then populate :
– the module for the top featured image
– the module for the for the big title
– the module for the meta
– the module for the course itself
– the module for the ingredients list
by opening each of them.
But now, with that feature, when designing your post template with the Divi Builder, instead of populating with temporary data (lorem and random image) that you will have to replace when writing a new post, you will tell your template to retrieve those data directly from the post you will be writing.
So you may tell the template to retrieve :
– The featured image from the WordPress featured image field
– The Big title from the WordPress post title field
– The meta from the WordPress post meta fields
– The ingredients list from your custom field(s)
from the WordPress post you are actually writing.
So each day, you will have to load your template for a new post and the only module you would have to open would be the one for the actual recipe course text. The other modules will be populated by the fields from the WordPress post you are writing automatically since you have already assigned the source.
I hope I made it clearer, unless I did not get it myself ^_^
Cheers
(Sorry for bad English, French inside)
Thank you SupraTiti!
Great explanation.
Yep, I get all that. But where is the time savings? What’s the benefit? Seems like it takes information I enter in one place and is able to display it elsewhere in one or more places.
Good question. I think it will save time for your customers/clients when they will load layout to use with their posts without touching the design part with no need to look inside modules where to change some content.
And for someone who wants to transfer websites to WordPress or WP sites to Divi.
Hi I have a question
If I use dynamic content with use advanced custom field plugin and I logout from backend I have
javascript notation and nothing happend it’s like only generate code but when I login to admin backend wordpress and click view page It’s everything ok
Can You show me congifuration Advanced custom field plugin
I created group but on the bottom is must choice simplepage layout draft?
THank You very much
Robert,
I haven’t tested the ACF plugin yet. Sorry. Maybe reach out to support?
Thanks.
Of course this will really be useful when, some day, Divi finally gets post type single and archive theme builder capability.
+1
+1
+1
+1
+1
+1