Video is a powerful tool. If an image is worth a thousand words then a minute of video is worth 1.8 million words (At least that is what researcher Dr. James McQuivey suggests). Video is an effective marketing tool and, when done right, an instrument for beautiful design.
Adding a video to your website is easy with Divi. The video and video slider modules allow you to add third party hosted videos like youtube and vimeo by simply entering the video url. You can even add your own custom videos in both mp4 and webm formats for maximum browser compatibility. To top it off, Divi gives you the option of styling your videos with image overlays and play buttons to help match the design of your site.
In addition to embedding videos on your page, Divi also provides a simple solution for adding background videos. Currently, when you build a site with the Divi builder, each section, row, column, and 20 out of 37 modules have background video capability.
For most people, using Video within Divi is as easy as inserting the link to the YouTube or Vimeo video that you want and seeing it appear on your post or page. But in this post we’re going to talk about how and why Divi does what it does with video so that you are fully equipped for any special use cases, unique styles, or creative experiments you might want to run.
In this guide we’re going to discuss…
- behind the scenes workings of the Video Module and Video Slider Module so you can use it more effectively.
- the difference between self-hosting your videos and using a third party host.
- some tips about optimizing your videos for the web.
- best practices for Video Backgrounds.
- a general guide for choosing video dimensions.
- and a few helpful hacks for background videos.
Let’s get started.
- 1 Exploring the Video Module
- 2 Exploring the Video Slider Module
- 3 4 Important Tips for Self-Hosting Your Videos
- 4 Hosting with Third Party Platforms (Youtube and Vimeo)
- 5 Using Video Backgrounds with Divi
- 6 Best Practices for Video Backgrounds
- 7 Divi Video Hacks
- 8 Video Dimensions for Divi
- 9 Final Thoughts
Exploring the Video Module
The video module allows you to embed videos to your page from just about any source. Divi’s documentation on the video module explains all the features and how to add a video to your page. But for this post, I’m going to dig a little deeper.
Adding a Self Hosted Video to the Video Module
To add a self-hosted video with the video module you must upload a video or add a url to the video file within the Video settings. And, you must add your video in two file formats.
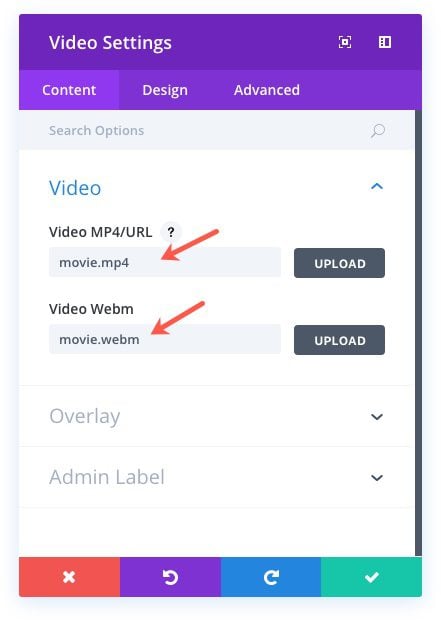
And that is all you really need to do. Simple enough.
However, behind the scenes, Divi is using the HTML5 video element to display the video. When you choose to add a self-hosted video or upload your own video using the mp4 and webm formats, the structure of the code Divi deploys looks something like the following:
<video controls>
  <source src="movie.mp4" type="video/mp4">
  <source src="movie.webm" type="video/webm">
Error loading this resource
</video>
Here are a few things I want to point out about what this code is doing:
- Notice the controls attribute within the <video> tag. This tells the video to display the controls. Simple enough.
- Notice the two <source> tags within the opening and closing <video> tags. The sources consist of video files. The first is an mp4 and the second is a webm file format. Both are necessary for maximum browser support. The order is important as well. You want the browser to see the mp4 first since it is the most universally supported. I’ll discuss more on these formats later.
- The line that reads “Error loading this resource” will be displayed if the first two formats don’t get recognized.
- What you can’t see is that Divi has styled this <video> tag and given it a width of 100% to make it responsive so your video will adjust to the width of the column it sits in.
This HTML5 video element is growing as the new standard way to show video on the web. Thankfully, Divi takes care of this for us.
Self-Hosted Video Image Overlay
Aside from the option to add your videos to the Video Module, Divi also allows you to add a custom overlay image for your video.
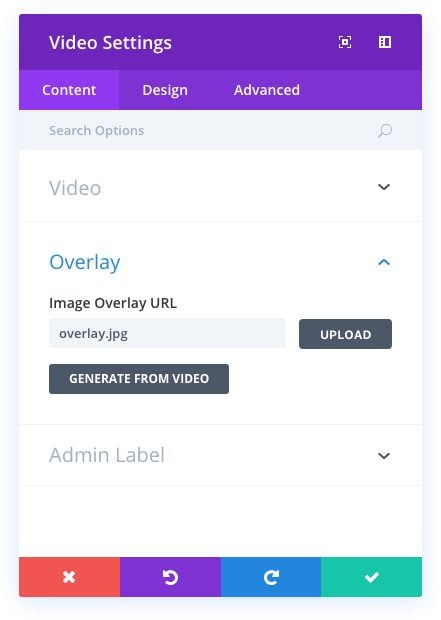
If you choose to add an overlay image to your self-hosted video, you must upload your own. The option to generate the image from video only applies to third party hosted video URLs like Youtube and Vimeo.
Because the image will become the size of the video and because the video will adjust to the size of the column in which it sits, it is important to choose the right size image. Videos from Youtube, Vimeo, and most other formats usually have an aspect ratio of 16:9. So if you have your max content width set to Divi’s default of 1080px, then following the 16:9 aspect ratio your video will have the dimensions of 1080×608. Therefore your overlay image should be 1080×608 pixels.
Once your image has been set, Divi will automatically apply a custom play button. You can even change the color of the button if you want in the Video Setting under the Design tab.
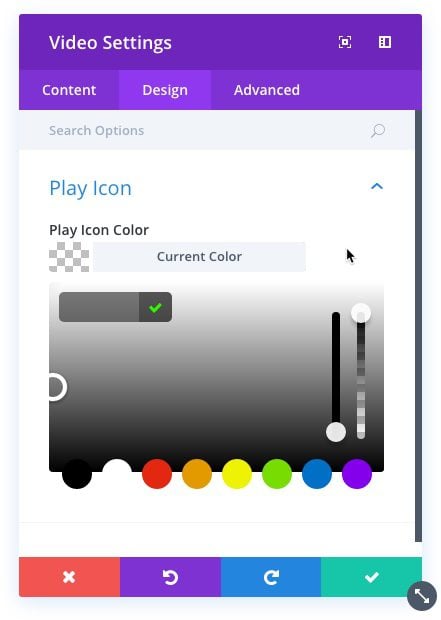
Once the user clicks on the overlay with the custom play button, the overlay and button will disappear and the video underneath the overlay will start to play automatically.
Adding a Third Party Hosted Video URL
The most common method for adding a video to the Video Module is to simply add the URL of a video hosted by a third party like Youtube or Vimeo. So instead of adding the two video formats like you would do for self-hosted videos, you would simply add a URL in the top background input bar.
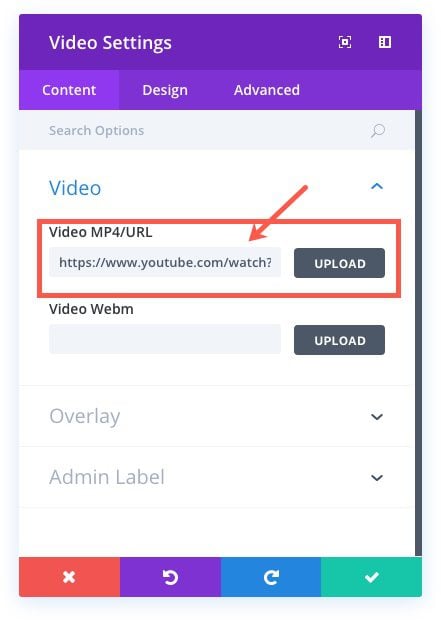
Behind the scenes, Divi adds a fluid width wrapper div and embeds an iframe displaying the video. This iframe is the same as you would get from youtube directly. Here is an example of what the code looks like when adding a youtube video with the video module:
<div class="fluid-width-video-wrapper" style="padding-top: 56.2963%;">
<iframe src="https://www.youtube.com/embed/Nimdf3Zeayk?autoplay=1&feature=oembed&wmode=opaque" frameborder="0" allowfullscreen="" id="fitvid0">
</iframe>
</div>
The div with the class “fluid-width-video-wrapper” wraps around the iframe and gives it a width of 100% so that it will adjust to the width of its container making it responsive.
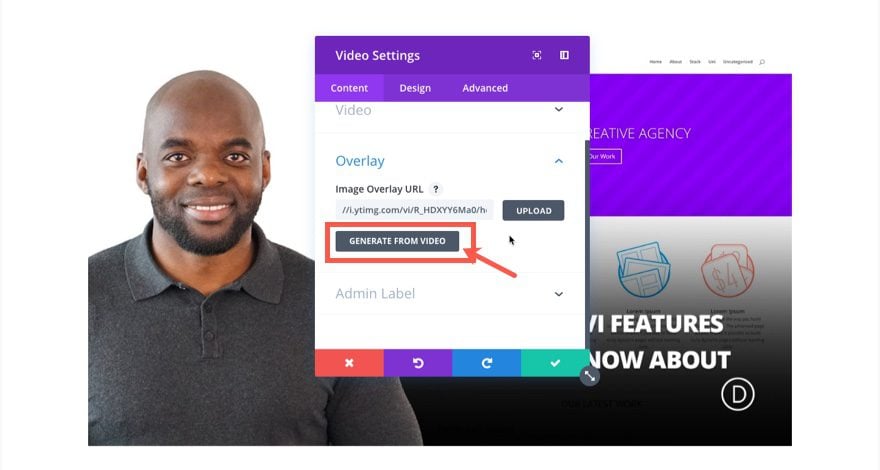
If you choose to add an overlay image, you can choose to upload your own or, to save a little headache, you can simply click “generate from video” and Divi will automatically apply an overlay image taken from the video. You can also choose to customize the play button.
Exploring the Video Slider Module
The video slider works very similar to the video module in the way that videos are deployed on a webpage, except now the videos are in a slider. This is a convenient way to display videos in one place so your users can simply scroll through a group of videos one at a time. For more details on the Video Slider Module options, you can visit the documentation page.
One of my favorite elements of the video slider is the thumbnail track you can use to control the slides. It is both convenient and engaging.

You can even customize colors of the slider controls from the module settings including the Thumbnail Overlay Color.
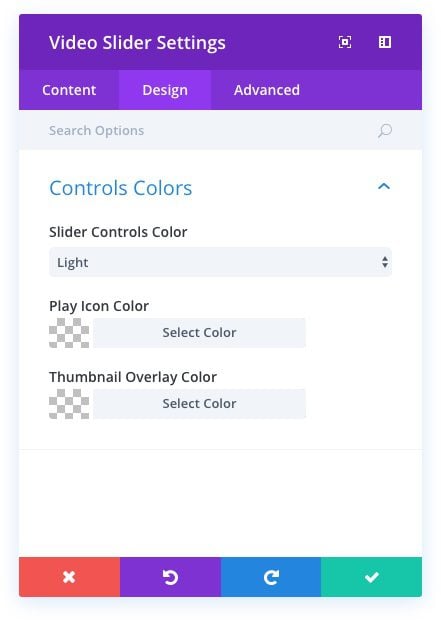
The thumbnail images will remain the size of the original image you upload so be careful not to upload a bunch of large images in your slider as this could slow down your site. Also, the thumbnails cannot be generated automatically from the video. You must upload those yourself.
The thumbnails follow an aspect ratio of 4:3 so in order to adjust your 16:9 slider images, it will blow up and cut off the right and left of the image in order to cover the entire space.
Design Tip: One trick you could do to cut down on file size and keep your thumbnails from cutting off part of the image is to customize your thumbnails to be 253×190 pixels (a 4:3 aspect ratio) and select the option to hide display image overlays on main video. That way your overlay images will only be used for thumbnails and therefore won’t need to be any bigger to adjust for the main video size.
4 Important Tips for Self-Hosting Your Videos
- Use a CDN. If you are thinking about adding your videos via the WordPress Media Library, think again. Although it is possible to host videos on your own WordPress install on your own server, you will probably run into some limitations on bandwidth, file size, storage space, etc… which may cause your site’s load time to suffer and result in lagging video streaming. I would consider hosting your videos on an external service like Amazons3. This will help with page load times. Plus, some of these providers offer a level of security to keep people from downloading your videos (or at least make it more difficult to download).
- Optimize File for the Web. Videos take up a lot of bandwidth, especially when you are using a large video background. You will need to be careful not to overload your page. There are a number of factors to consider if you want to properly optimize your video for the web. Here is a helpful equation to consider:
file size = bitrate(kilobits per second) x duration (length of video in seconds)
So, if want to get a smaller file size, you will need to cut down on duration (the video length) and/or bitrate (the number of kilobits per second that is transmitted). The bitrate should always be lower than the the user’s connection speed. Considering the worldwide internet speed is around 7 Mbps (US is around 18 Mbps), you will want to keep the bitrate well below that to avoid a disruption in streaming.
You don’t have to do this all by yourself. There are some great free tools out there to help you with video compression like Handbrake.
I suggest reading “5 Best Ways to Reduce Video Size for Faster Loading” if you want to learn more about optimizing your videos for the web. There are some great resources listed and a great explanation on how to use Handbrake.
- Add Correct File Formats.
As I mentioned before, if you are self-hosting your videos (not relying on a third party to host it for you like Youtube), you will need to add your video in both mp4 and webm formats.Mp4 is currently the most widely supported format because it still plays some of the old browsers using flash and it is the standard for mobile browser support. Divi lists mp4 first in the code so iOS devices can recognize the file immediately.
Webm is the second most supported format. It was built for the web and it seems to be here to stay. It produces high quality streaming with excellent compression. And it is open source.
Combined, these two offer support for most web browsers including mobile.
A great free conversion tool would be the VLC media player.
- Define MIME Types: In order for the WEBM video format to work in all browsers, your server must have the correct MIME types designated. You can learn more about using .htaccess to define MIME types here. If you notice your videos are not playing in certain browsers, then this is likely the reason.To add MIME types to your .htaccess file, use a FTP client (like FileZilla) to access your WordPress root files. There you should find your .htaccess file. Open the file in a text editor. Below the line that says “#END WordPress” add the following:
AddType video/mp4 .mp4 .m4v
AddType video/ogg .ogv
AddType video/webm .webm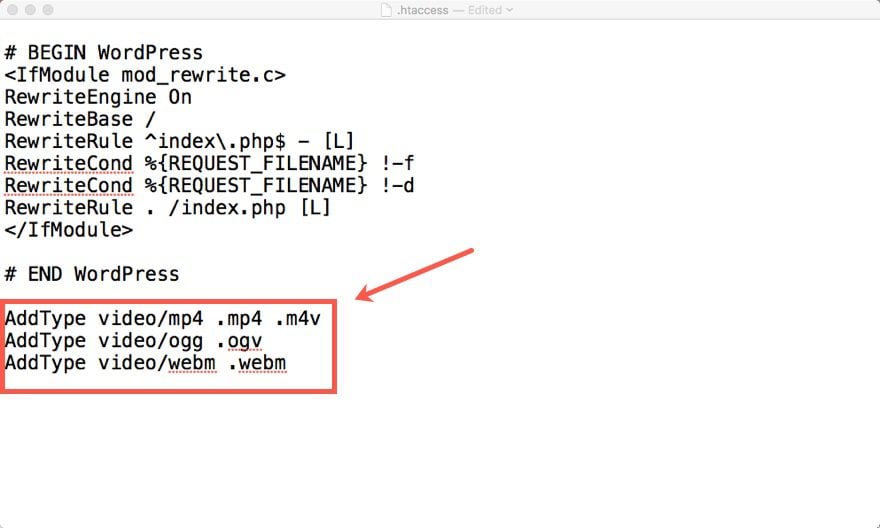
Then save the file. Now your video formats will be recognized on all browsers.
Hosting with Third Party Platforms (Youtube and Vimeo)
If you find that converting and compressing your own videos is just too much work, you can always let a third party do the work for you.
If you don’t know anything about video, I suggest taking this route. If you aren’t crazy about the limitations of youtube or vimeo free, you can bite the bullet for Vimeo Pro. It may be worth the headache in the long run. What you don’t want is to put a video on your site that slows it down or looks poorly. It’s simply not worth it.
Third Party Video Platforms supported by the Video and Video Slider Modules
If you want to use the Video and Video Slider Modules to add your third party videos, you can use the following popular platforms:
- Youtube
- Vimeo
- Dailymotion
How to Add Third Party Videos Using Divi
To add a video from any of these platforms, you will need to go the their site to get the share link.
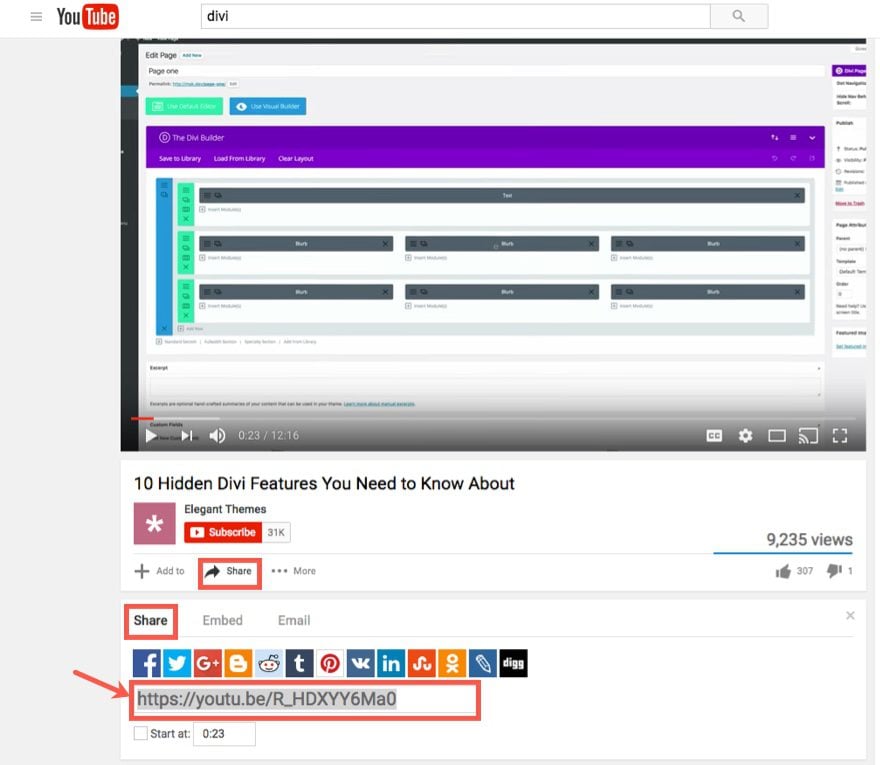
Then you can paste that into the Video or Video Slider Module.
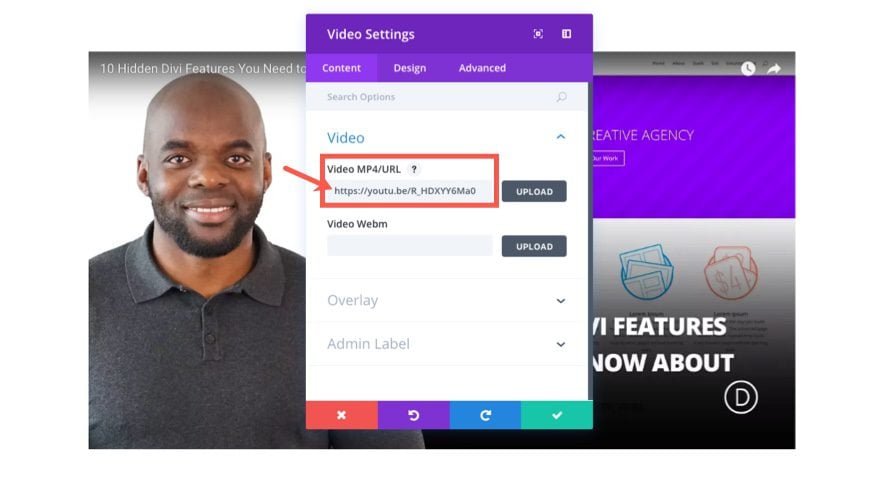
Click the “Generate from Video” button to add an imag overlay. Or upload one of your own.
Save Settings. And that’s it.
Keep in mind that Divi is built on WordPress so you can always embed videos from third party platforms using their suggested embed codes without using the Video Module. Simply add a text module and input the embed code inside the content box.
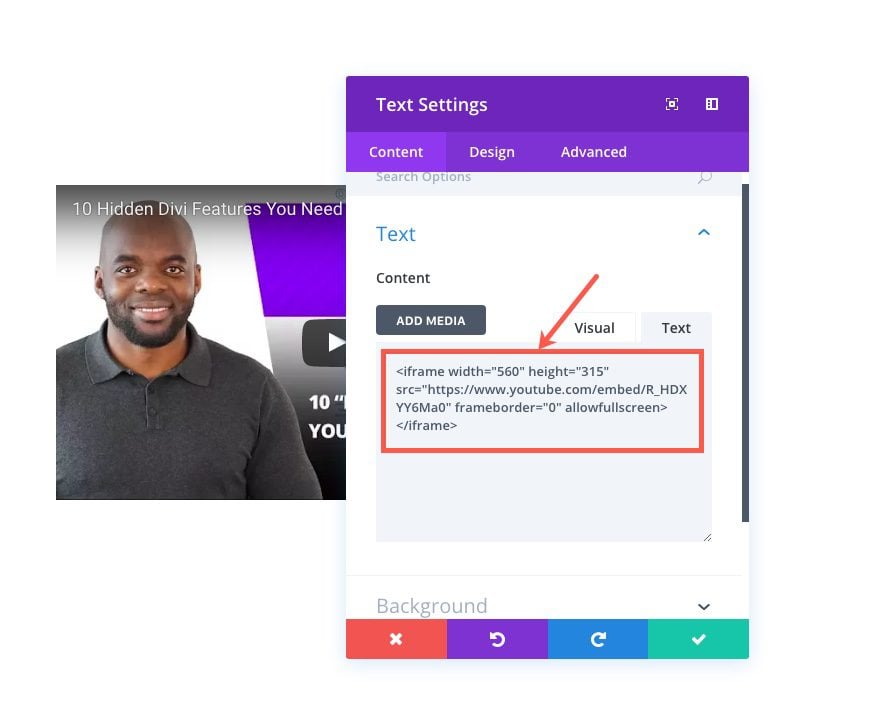
You may need to customize the width and height for your embed to adjust for a responsive layout.
What about Wistia?
Wistia is a powerful platform that a lot of people use but unfortunately it does not play well with Divi modules currently. You can, however, embed Wistia using the embed code they provide.
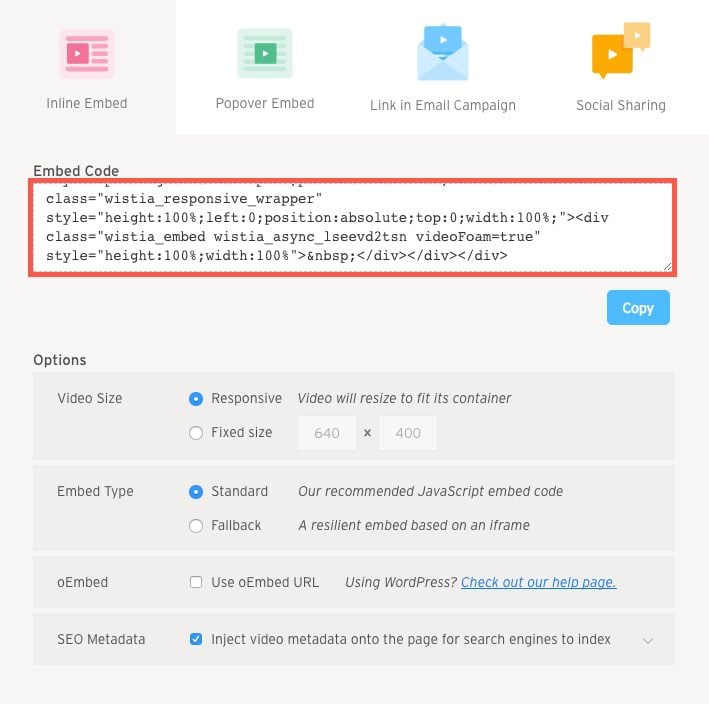
Pasting that code in a content section on your Divi site will show the video.
You can even paste the code into the content section of the slider module to add a wistia video as one of your slides. However, you will need to adjust some CSS to get it looking the way you want.
Using Video Backgrounds with Divi
Should You Even Use a Video Background?
Before we get into the details of video backgrounds, it is important that you honestly ask yourself whether or not you should use one at all. Don’t get me wrong, I love a good video background. But sometimes it just doesn’t make sense. Make no mistake about it, videos will slow your site down and can be distracting to your content. So never choose a video background over a more effective image. You site may be better without one.
But, there are times when video is a better solution than an image. When done right, a video background can bring your content to life. So, make your video purposeful and make it count.
Video Background Capabilities within Divi
You can add a video background almost anywhere you want using the Divi Builder. You can add a video background to each Section, Row, and Column. You can even add video backgrounds to most modules.
Here are the modules that support video backgrounds.
- Fullwidth Header (works on fullscreen option as well)
- Fullwidth Menu
- Fullwidth Portfolio
- Fullwidth Post Slider (When not using the featured image, you can use a video background to serve as the background for all slides)
- Fullwidth Post Title
- Fullwidth Slider (works with individual slides)
- Audio module
- Bar Counters
- Blurb Module – just make sure to give the module some padding.
- Call to action module
- Countdown Timer
- Email Optin
- Filterable portfolio
- Login Module
- Number Counter Module
- Person Module
- Portfolio Settings
- Post Slider (When not using the featured image, you can use a video background to serve as the background for all slides)
- Post Title
- Pricing table (You can set a video background for the module and for different tables individually)
- Slider (for backgrounds of individual slides only)
- Tabs (for both module background and individual tabs)
- Testimonial
- Text
- Toggle
Stock Video Libraries
The hard part about adding a video background to your site is finding the right image and making sure it is the right size. Thankfully, you don’t have to create your own custom video backgrounds. There are royalty free stock video libraries available that may work well for your website. If you are looking for some free video footage, some good places to start would be videvo, coverr, or videezy. If you are looking for better quaility paid versions, you can check out videohive, videoblocks, or pond5. Some of these sites use video backgrounds really well if you are looking for some inspiration.
How to Add a Video Background to Your Page
After you find (or create) the right video, things get really easy. To add a video background to your Divi webpage, simply deploy the visual builder and find the section where you want to add the video and click on Section Settings icon.

Under the content tab, click the background image icon/tab under the Background options. If you have a self-hosted video, enter both mp4 and webm formats. Then enter the dimensions of the video so Divi knows how to size it properly.
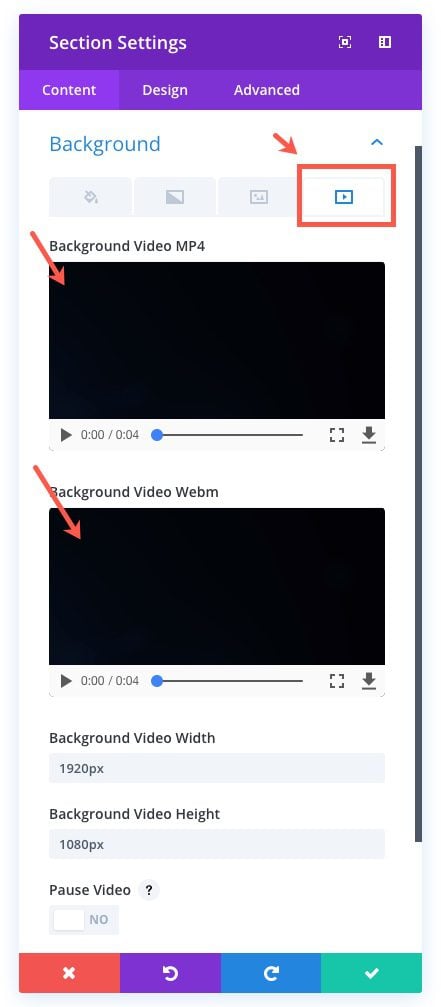
Now go to the background image tab and add a background image that would serve as a good fallback for mobile devices.
Then save settings. It’s that simple.
If you were planning on using one of your videos that you now host on youtube (or vimeo) as a background, this is not currently possible within the Divi builder. Remember that you need these videos in the correct formats to show on all browsers. However, you can download that Youtube video (if it belongs to you) and convert it to mp4 and webm formats to use on your background.
Background Design Tip: Using a Video Background for Your Fullwidth Post Slider
If you are looking for a creative way to showcase your featured posts on your blog page, you can add a video background to your post slider. Let me show you what I mean.
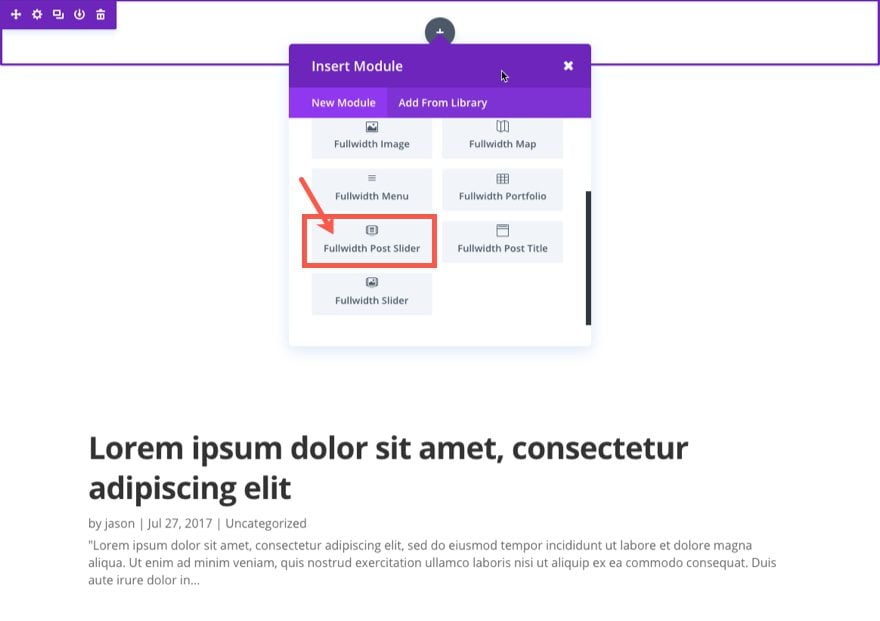
Go to your page using the Visual Builder and add a Fullwidth Section to the top of the page with a fullwidth post slider module.
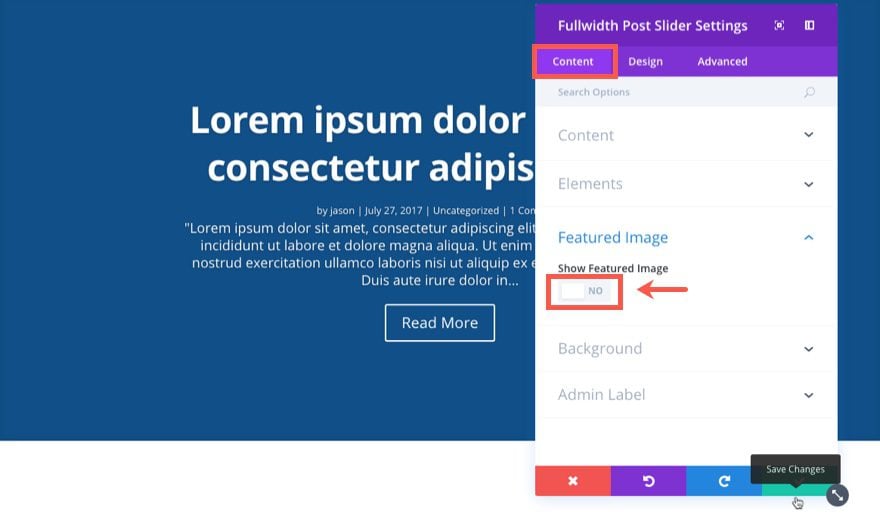
Under the Content tab, under Show Featured Image, select “NO”.
Then under the Background section, select the video background tab and add both formats of your video, along with the dimensions.
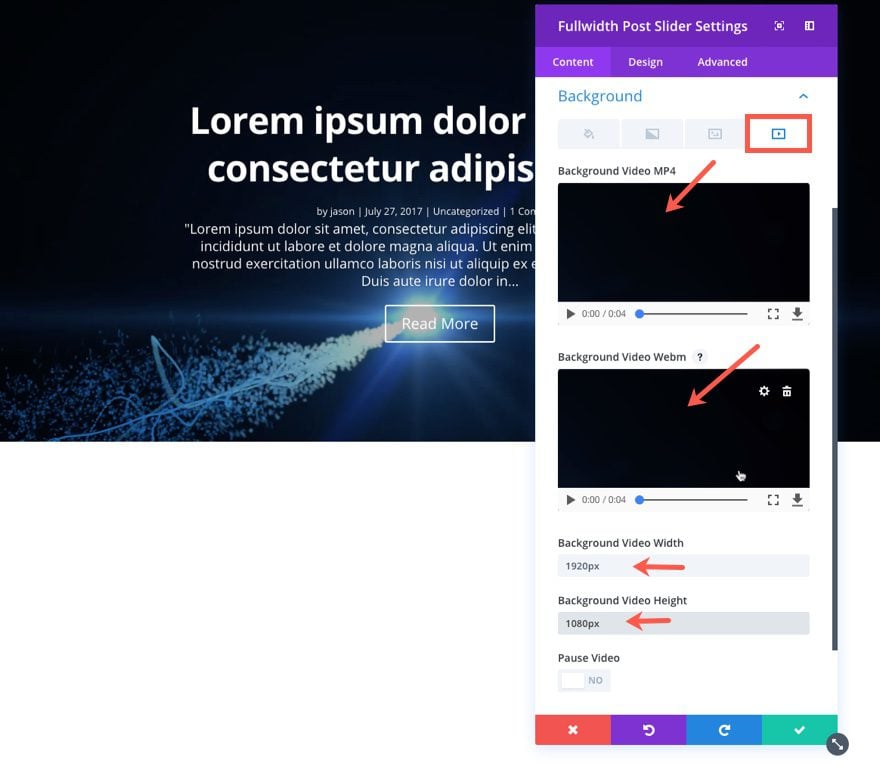
It is also a good idea to add a background image as a fallback for mobile devices that can’t display video backgrounds.
That’s it.
Now the user can scroll through your featured post slider with a cool background video. Just make sure the video background is subtle enough not to distract from the content.
Best Practices for Video Backgrounds
With all the possibilities afforded by video backgrounds, I thought it best to include some general best practices.
- Always include a background image as a fallback for mobile. Mobile devices won’t autoplay large videos. This is why Divi shows the fallback image by default on mobile devices.
- Use a small video. For background videos, you can get away with 720p resolution since the background is a second thought to the content/text overlaying the video. The quality won’t suffer so much that you would notice.
- Consider an overlay. Adding a semi-transparent color overlay on top of the video will help you get away with a smaller file size because it will hide the messy details of a video with less quality. Plus it will make your text stand out more.
- Don’t use audio. You don’t need sound for video backgrounds so take it out. This will cut down on filesize.
- Use both mp4 and webm formats for cross browser support.
Pause Video?
You may have seen this option listed in the settings under background options.
In some cases, the video may conflict with another video background playing sound. This option helps to keep only one video sound playing at a time.
Divi Video Hacks
There are a few more advanced video and video background customizations that you may find helpful. Here are a few.
If you would like to change the size of your play button, go to the Video Module settings, under the Advanced tab, and enter the following custom CSS in the box labeled “Video Icon”:
Font-size: 10rem;
Line-height: 10rem;
Margin-top: -5rem;
Margin-left: -5rem;
You can adjust the values to the size you want. Just make sure that the font-size and line-height always stay the same and the margin-top and margin-bottom always remain a negative value that is half of the font-size. For example, if you wanted to make it smaller, the values would be.
Font-size: 4rem;
Line-height: 4rem;
Margin-top: -2rem;
Margin-left: -2rem;
How to Stop the Video Background from Pausing on Click
In some cases, you may find that clicking on your video background will pause the video. You can disable this feature by add the following Custom CSS to your style.css file in your child theme (or in theme customizer > Additional CSS):
.et_pb_section_video_bg video {
pointer-events: none;
}
How to Stop Video Background from Looping
You may have remembered this tip from one of our older posts. By default, the video background will continue to loop. This is on purpose because that is normally what you want a video background to do. But if you just want to show your background video once and then quit, you can disable the loop action by going to Divi > Theme Options > Integration and enter the following in the:
<script>
(function($) {
    $(document).ready(function() {
        $('.no-loop .et_pb_section_video_bg').each(function() {
            $(this).find('video').removeAttr('loop');
        });
    });
})(jQuery);
</script>
Video Dimensions for Divi
I didn’t want to end the post without mentioning video dimensions. There is no firm rule on what dimensions to use considering all videos and websites are different. A 720p (1280×720) video may look great stretched on a 1920×1080 screen while another will look horrible. When deciding on the dimensions or resolution of a video for your site, you can follow the image dimensions for Divi’s column layouts and modules as a general guideline. Simply put, your video should be closest to the width of the column it sits in without going under. So if you have a fullwidth column that has a max width of 1080px, then you shouldn’t need a video with a resolution greater than 720p (1280×720). However, if you are using a video background that spans the full width of your browser, you may need to go up to 1080p (1920×1080) so that when it spans the full width of the browser on larger monitors, it doesn’t look grainy.
If you are going to rely on a third party video professional to prepare your videos for the web, here is a list of recommended video resolutions for youtube.
2160p: 3840×2160
1440p: 2560×1440
1080p: 1920×1080
720p: 1280×720
480p: 854×480
360p: 640×360
240p: 426×240
These follow the 16:9 aspect ratio so that you won’t see the black bars on the sides of the video.
Vimeo also gives guidelines for videos. I especially like Vimeo’s post on video compression basics.
Final Thoughts
Videos will continue to be an integral part of our online experience for a long time. So it is important that you know what you are doing when adding videos to your website. If you do decide to use video in your website, Divi makes the process extremely simple, providing a cross browser solution for self-hosted videos and a convenient solution for third party embeds. But Divi can’t do everything for you. Hopefully this post will help you in the process of selecting the right video and preparing it for the web.
I look forward to hearing from you in the comments.


Great article! I have a question, how can I hide the download button in the internal divi’s video player?
thanks
I have added the code the to stop the loop But the video loop is working. I have cleared my cached and even tried on different browser as well.
Any idea how can I stop the video after first loop ?
I am trying to add a video from Vimeo and I keep getting errors. Either the screen is totally blank when I paste the URL or it shows the video box when I embed but the video won’t load/play and I get “not supported mme” error message. Please help. It seems to only work if I add a video from Youtube.
This is for a regular video added through the video module. Not background video
Thanks for the post. Can you tell me how can I stop looping the video and have it stopped at the last frame? I have the video as background for a fullwidth header and I want the video to stop at the last frame and have it like a poster.
Thanks
Just adding another comment to note how Divi staff avoid answering questions they don’t like. I’ll keep asking it and tally how many times it’s avoided (or not even allowed to post here) before writing a full review of this company.
Why was video background capability removed and what do you expect us to do with full background video since you say NOT to upload it and we CANNOT use third party software.
And what message do you think you give paying customers AND potential costumers when you categorically, and habitually REFUSE to answer the questions? I’ve been cataloging this behavior across this blog and it’s as bad as any company I’ve seen. I’m sure this comment won’t make it live but I screenshot all of your lies.
Hey Bill,
I can assure you, we aren’t intentionally dodging or refusing to answer questions. We simply get a high volume of comments (sometimes thousands a month) and it can be hard to respond to each question that deserves an answer.
I’m not sure what you mean by the background video feature being removed. It’s still there and if you’d like to use a third party, we encourage that in the form of a CDN.
Great article! I have a question, How can I resize the video depending on the desktop screen size? Of course if you have big screen it looks great but on small laptop screens, the video background covers the entire page at one glance.
Thanks!
Emjhay,
Make sure you are entering the height and width of your background video in the settings. This may be your problem.
How can i create a lightbox effect with video
Antony,
Might want to bring this up to support. I’m not sure of an easy solution at the moment. Sorry.
will we have the old options for adding videos from a third party host with URL?
What was the issue for removing those? would you please explain more? it costs us lots of bandwidth my friend.
Hi Logan, I use this:
1) Assign a css class to video module (say = nosuggestion)
2) Go to Divi > Theme Option > Integration
3) Paste the given code in Head section:
jQuery(document).ready(function($ ) {
// add ‘&rel=0’ to end of all YouTube video URL’s
// to prevent displaying related videos
$(‘.nosuggestion iframe’).attr( “src”, function( i, val ) {
return val + ‘&rel=0’;
});
});
This doesn’t seem to work at all.
Just tried it and it worked for me. Had to replace the single and double quotes though as they come out wrong when pasting it in.
Thanks for sharing Enrique.
Is there a workaround for Divi video module that would allow me to use the ?rel=0 option to disable the display of related YouTube videos?
Hi Logan, I use this:
1) Assign a css class to video module (say = nosuggestion)
2) Go to Divi > Theme Option > Integration
3) Paste the given code in Head section:
jQuery(document).ready(function($ ) {
// add ‘&rel=0’ to end of all YouTube video URL’s
// to prevent displaying related videos
$(‘.nosuggestion iframe’).attr( “src”, function( i, val ) {
return val + ‘&rel=0’;
});
});
Hi
Thank you for a good article!
When using YouTube with an IFRAME I can adjust if I would like
1: show controlls or not
2: show suggested vidoes at the end or not
is there a way to do the same when using Divi video module
The option to autoplay a Youtube video in the video module would be handy.
I second this…
No, the option to autoplay your own hosted video from the video module would be handy. You can already choose to add ?autoplay=1 to your YT video URL OR make sure the correct boxes are ticked when you get your embed code on YT to make it autoplay.
Can videos backgrounds be done on mobile using divi?
It is difficult bc of the lack of support on mobile browsers. This isn’t just a Divi issue. Normally you will have a image fallback for mobile.
Great article, thanks Jason. I’ve got a couple of sites I’m currently working on with multiple videos so this has given me some great tips and ideas.
Thanks for this information. One advantage of using YouTube’s “Embed” code rather than the “URL” is that you can turn off “Show Suggested Videos When Video Finishes”. Is there a way to use the embed code rather than simply paste the URL in the Divi video modul?
Removing the ability to use Youtube or Vimeo video as a background has been an issue as websites started displaying the ” Error loading this resource…” when the Divi update removed the functionality.
You advised against uploading videos directly to WordPress above, so will you be re-introducing the ability to use YouTube/Vimeo for background again???
If you have multiple videos on one page (eg. woocommerce products archive) can you make it so that if a video is playing when another is clicked, the first one stops?
Did you say you can using a self hosted like amazon to host the video files and use the video as a video background? Confused on that part.
If you are paying for a service like AWS, I would recommend Vimeo Pro. They will provide the raw vid files via CDN. I’ve gone both routes and Vimeo is magnitudes easier.
Hi Vincent,
How does that work?
I use Rackspace files but its much the same. You can do this.
I have over 20 video embeds from YouTube on various pages in my divi site. My site loads slower than other sites I have created with comparable content minus the videos. Would this many videos be what is causing my site to load slower than normal?
I took a look at your site on http://pingdom.com. It looks like you have some connection issues. Let me know if I can help in any way.
Unfortunately, we don’t have an option for background video from youtube. Can we hope to see that one in future?
I would recommend you use vimeo pro. It gives you the source file and serves it with their CDN. If you want to try it out, let me know. I will upload and host it for you to play around with (twitter profile in link)
Youtube is a free service…they want you to view (and click) on their videos (and adverts). Background video functionality is against their TOS as it modifies the viewer.
Some themes/plugins get away with it but any of them could get shut down or broken whenever Youtube updates.
It looks like no one is willing to give any details about this missing feature.