Every chef knows their unique touch makes their dishes memorable. However, only experienced restaurant owners understand how crucial a website is for showcasing their culinary identity and attracting new customers.
Are you preserving your uniqueness online?
If not, don’t worry! This guide will show you exactly how to create a feature-rich, modern restaurant website in under an hour—without any coding. With the right tools, you’ll showcase your dishes, attract loyal fans, and turn your restaurant into a brand people can’t resist.
Ready to transform your restaurant into an online brand?
Here’s what you’ll learn:
- Why WordPress is the best platform for creating your restaurant website.
- The six easy steps to build and launch your unique site in less than an hour.
- Pro tips on how to optimize your restaurant website for maximum impact.
- 1 Essential Tools to Create Your Restaurant Website
-
2
How to Create a Restaurant Website in 6 Steps
- 2.1 1. Get a Domain Name and WordPress Hosting
- 2.2 2. Install Divi (Includes Restaurant Starter Site)
- 2.3 3. Build Your Restaurant Website
- 2.4 4. Customize Your Restaurant Website
- 2.5 5. Install Divi Bookings & Reservations to Take Table Bookings
- 2.6 6. Install Essential Plugins to Optimize Your Site Performance
- 3 How to Make the Most Out of Your Restaurant Website in 4 Steps
- 4 Launch Your Restaurant Website Quickly and Effortlessly with Divi
- 5 FAQs on Creating a Restaurant Website
Essential Tools to Create Your Restaurant Website
To build a stunning restaurant website, you’ll only need a few key tools that make the process smooth and hassle-free. Here’s what you need to get started:
- Divi: A flexible, drag-and-drop WordPress theme perfect for restaurant websites. It comes with beautiful pre-made templates and features like Divi Quick Sites, which allows you to generate a fully-functioning website in minutes without any coding.
- WordPress: The most popular content management system (CMS) trusted by millions. Easily manage your website’s content and updates.
- SiteGround: A top-rated WordPress hosting provider that ensures your restaurant website runs smoothly with excellent speed and security.
- Simply Schedule Appointments: Enable visitors to book tables directly from your website using a custom Divi Booking Module. A must-have for restaurants offering online reservations.
How to Create a Restaurant Website in 6 Steps
Building a professional restaurant website doesn’t have to be complicated. With the right tools, you can have a fully functional, beautifully designed site up and running in no time. Follow these six simple steps:
1. Get a Domain Name and WordPress Hosting
The first step in building your restaurant website is choosing a domain name and reliable WordPress hosting. You need these things to have a virtual space to store your website.
Get a Domain Name
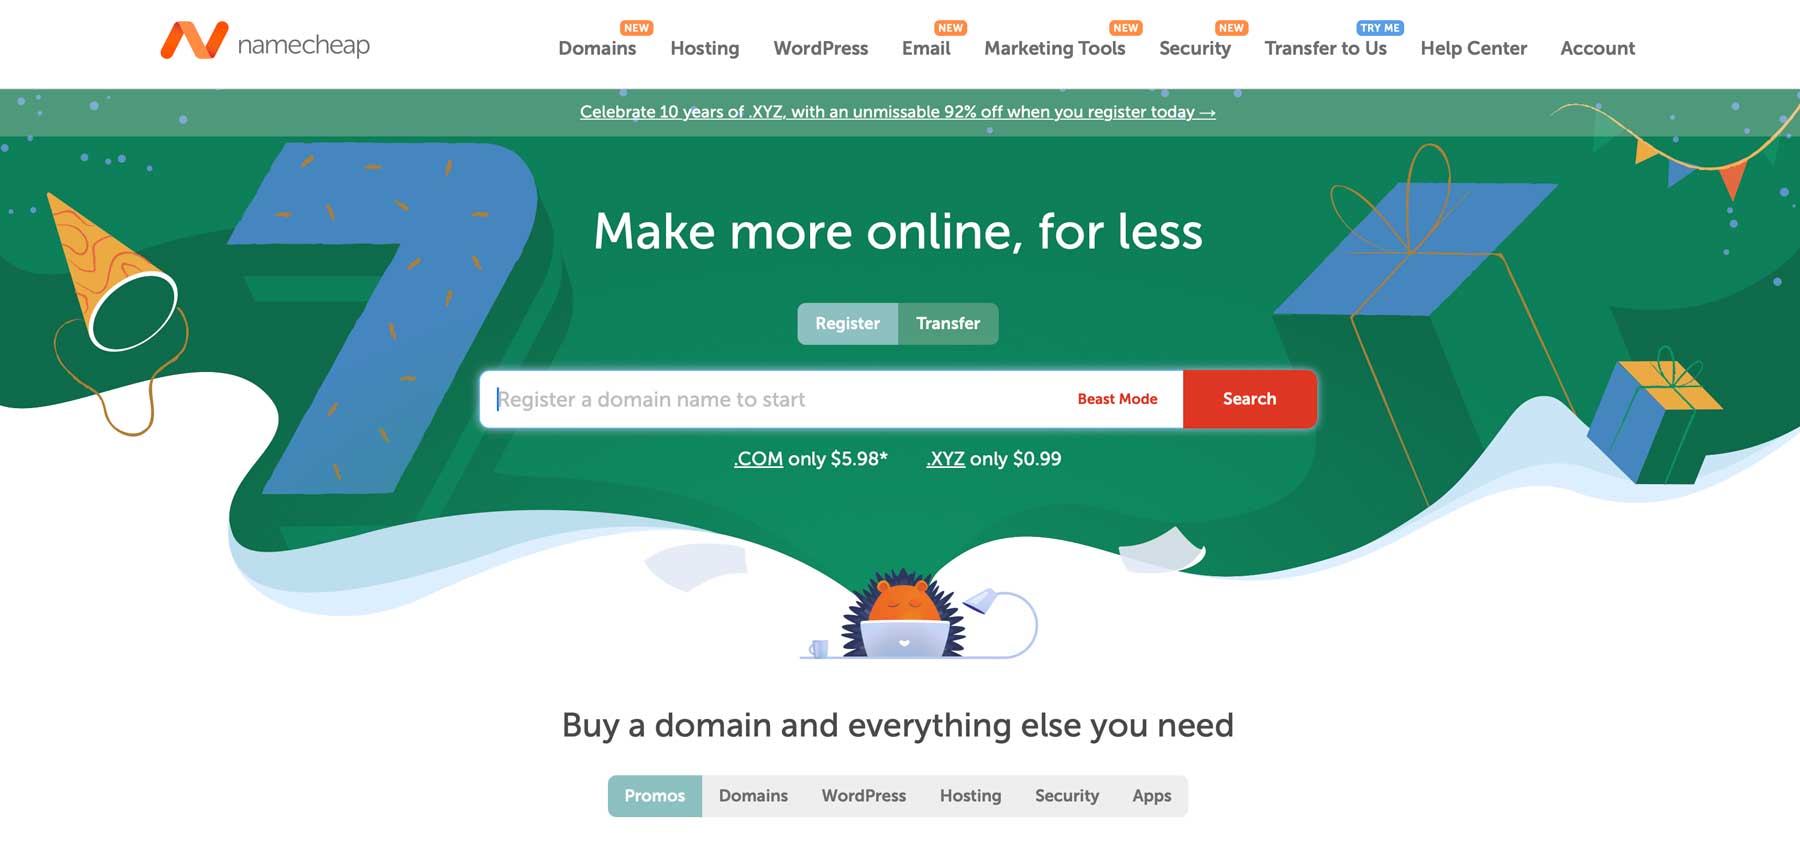
NameCheap is one of the best domain registrars for securely registering a domain name at an affordable price (wait a little bit if you want more convenience). But what should be the domain name of your restaurant website?
Your restaurant already has a name—use that. Your restaurant name as the domain name is the best way to turn it into a brand and claim it so no one else can use it.
Get WordPress
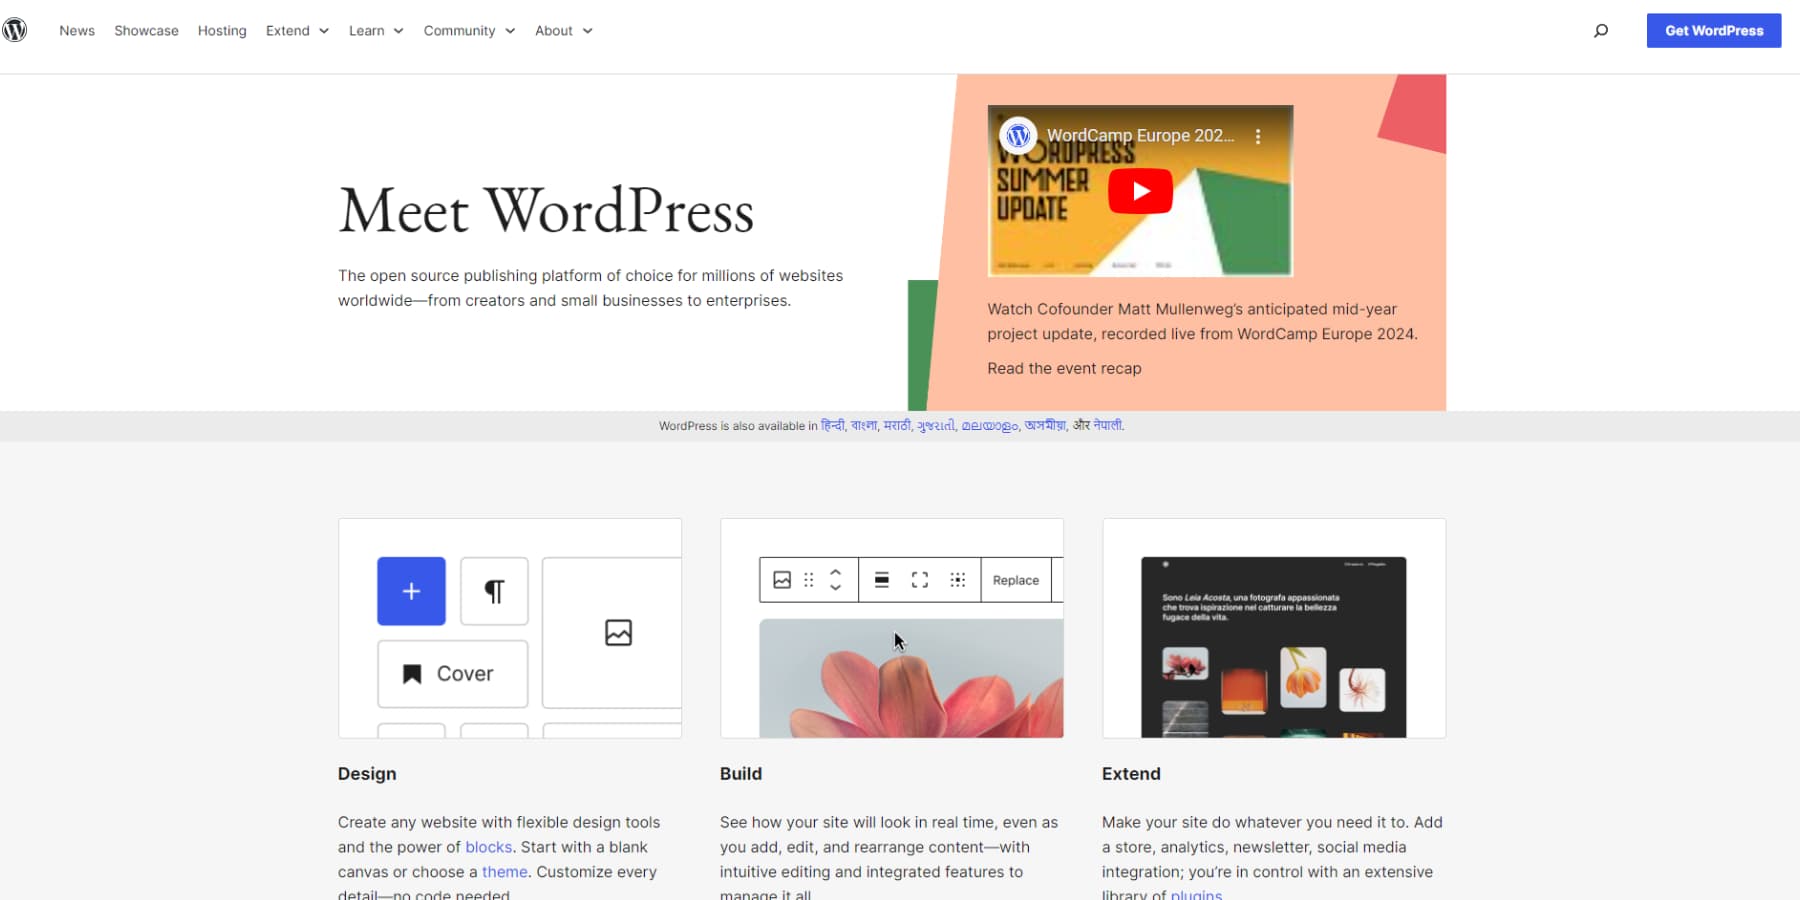
WordPress is the ideal content management system (CMS) for building a restaurant website. With over 40% of websites powered by WordPress, it’s secure, flexible, and perfect for restaurant owners looking to manage their own content with ease. To unlock the true power of WordPress for your restaurant website, we are going to use Divi, the best theme and website builder for WordPress.
Set Up WordPress Hosting
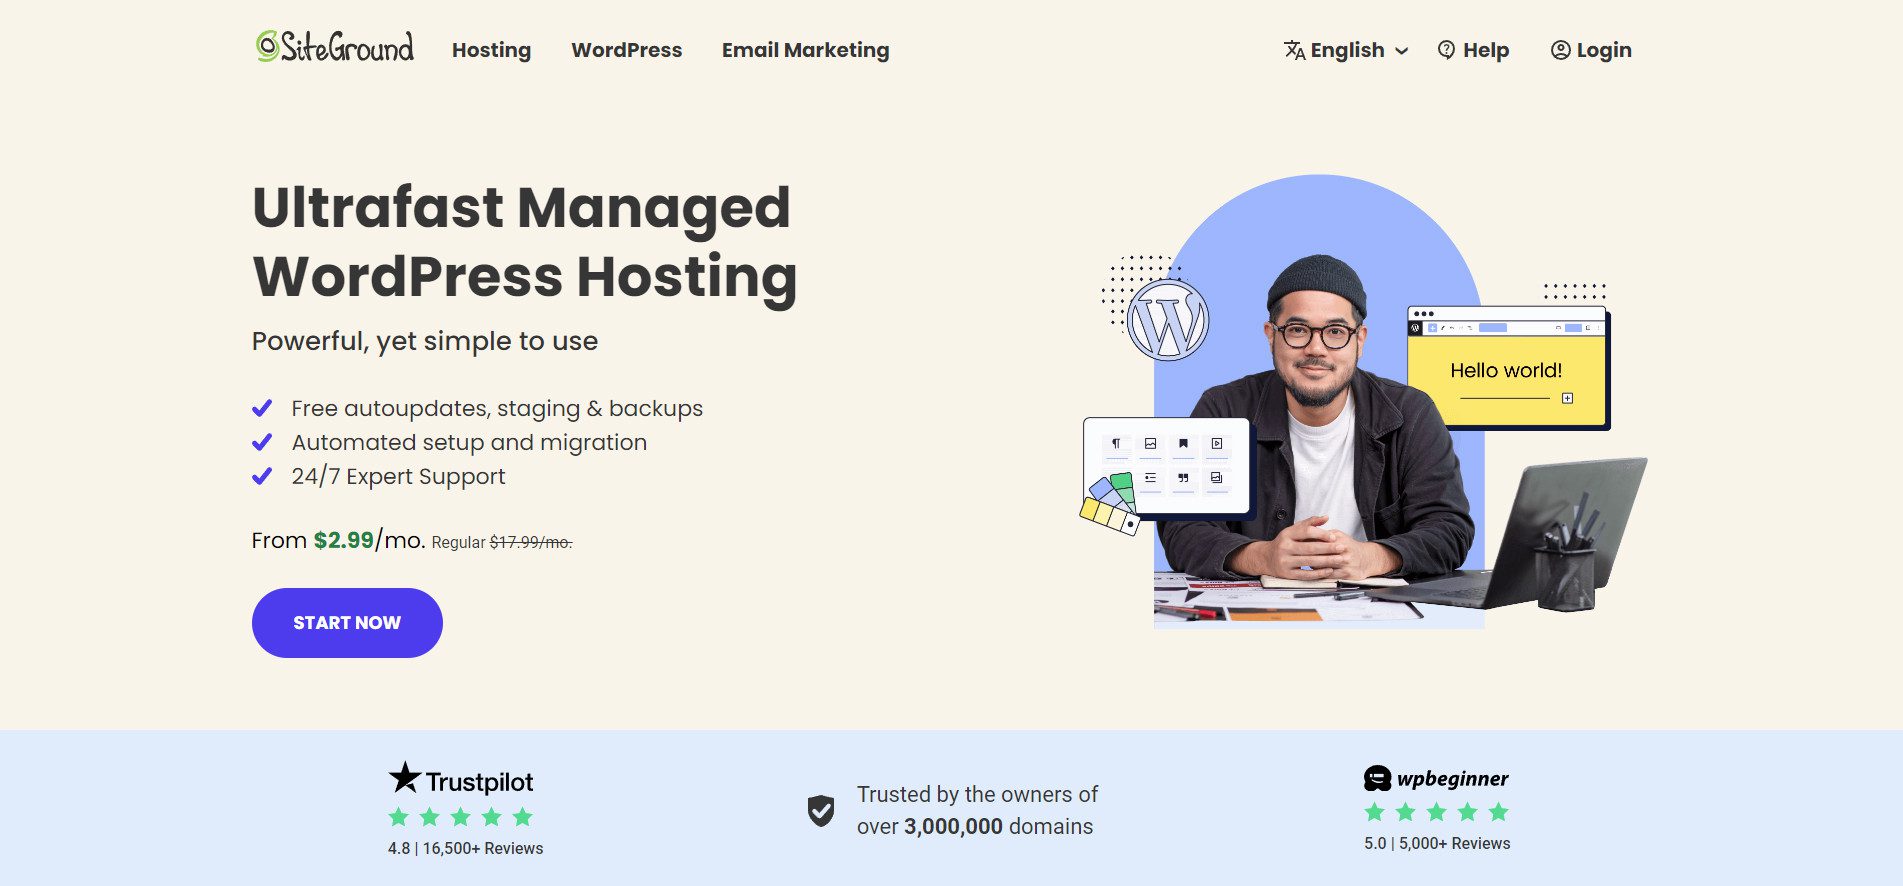
SiteGround is a secure, reliable, and trustworthy web hosting. It also streamlines the whole process. Here’s the best part: When you host your website on SiteGround, you don’t need to install WordPress or get a domain name separately.
Once you set up your SiteGround dashboard, you can claim your one-year free domain name and choose its WordPress hosting, which is more than enough to host a restaurant website. You won’t have to get into the technical side, such as connecting DNS records or WordPress. SiteGround makes managing all your website assets in one dashboard extremely easy.
Creating your account on SiteGround is simple. Enter your domain name, fill in your details, and sign up.
Here’s a more detailed video on setting up WordPress hosting:
2. Install Divi (Includes Restaurant Starter Site)
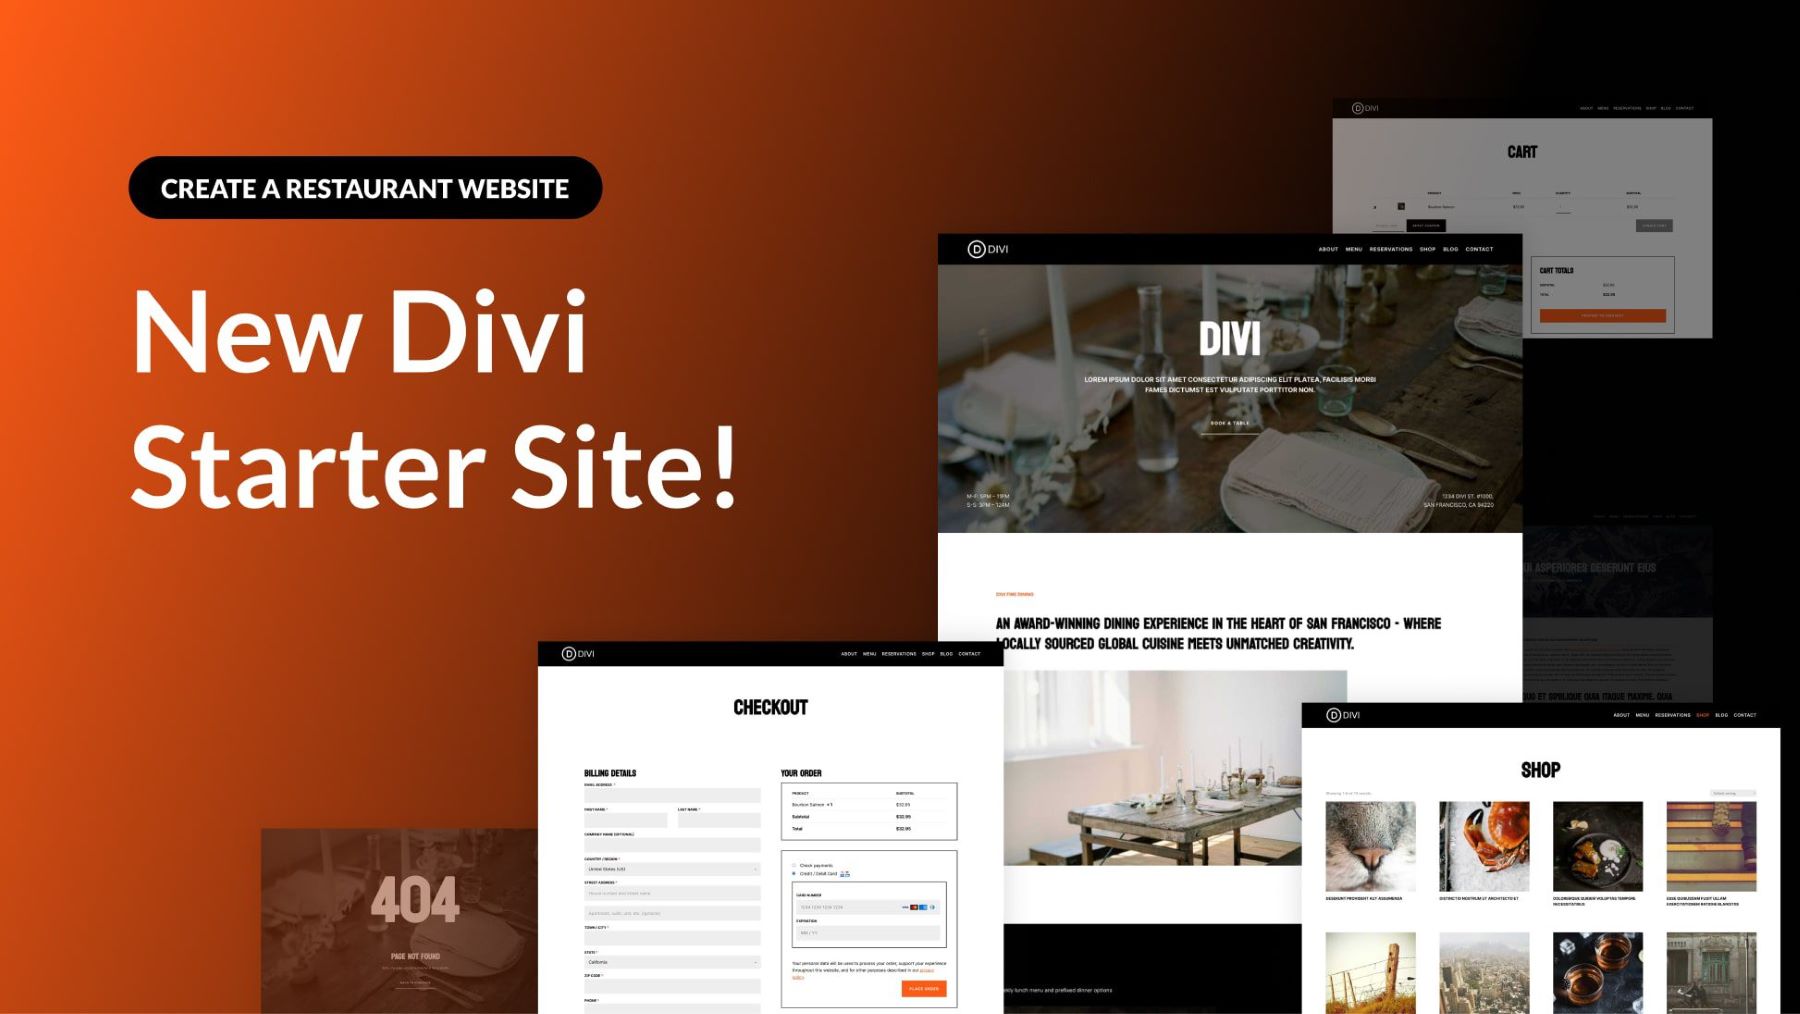
Once your WordPress dashboard is set up, the next step is to install the Divi Theme — a website-building framework for WordPress that comes with pre-made layout packs designed specifically for restaurants, cafes, and food businesses. With Divi’s new Restaurant Starter Site, you can easily build a professional restaurant website in minutes, all without needing to code.
You’ll love working with Divi because of its no-code drag-and-drop page builder capabilities, which let you customize your site visually. It offers more than 200 content elements, such as Gallery to display your dishes in stunning images, Contact Forms to give users options to book orders, and Map Integration to display restaurant locations.
Divi Quick Sites and Divi AI simplify your work even more. Need a website designed in 2 minutes? Ask Divi Quick Sites to do it for you. Want to create a section to showcase the amazing things people say about your dishes? Divi Section AI will generate a stunning section in seconds.
Why is Divi Perfect for Restaurant Websites?
Divi offers excellent features to simplify building a functioning restaurant website. Here’s why:
- Restaurant Website Templates: Divi provides full site templates for restaurants, cafes, and food businesses. You can also mix and match templates to design a custom website.
- Gallery Layouts to Showcase Food Images: Divi includes a Gallery element to showcase food images in grid and slider layouts. Want more options? Check out Divi Gallery Layout Pack and more in Divi Marketplace.
- Mega Menu to Showcase Food Items: You can create mega menus to list all your dishes. Install the Divi Restro Menu extension to add images, price listings, and more elements.
- Online Bookings & Reservations: Take table bookings from your website by installing the Simply Schedule Appointments plugin. You can also get Divi Booking Reservation from Divi Marketplace.
- WooCommerce Compatibility: Allow your customers to order food online directly from your site by configuring WooCommerce. Divi Quick Sites automatically installs and configures WooCommerce, so you don’t have to worry about the setup. You also get pre-designed Divi WooCommerce Modules to set up pages quickly.
The best part is that Divi offers a suite of time-saving tools, such as Divi AI (which takes care of your website content,) Bloom and Monarch premium plugins for email marketing and social media sharing, Divi Theme Builder, which makes site-wide changes to website branding, and many more.
Divi Pricing (Yearly and Lifetime)
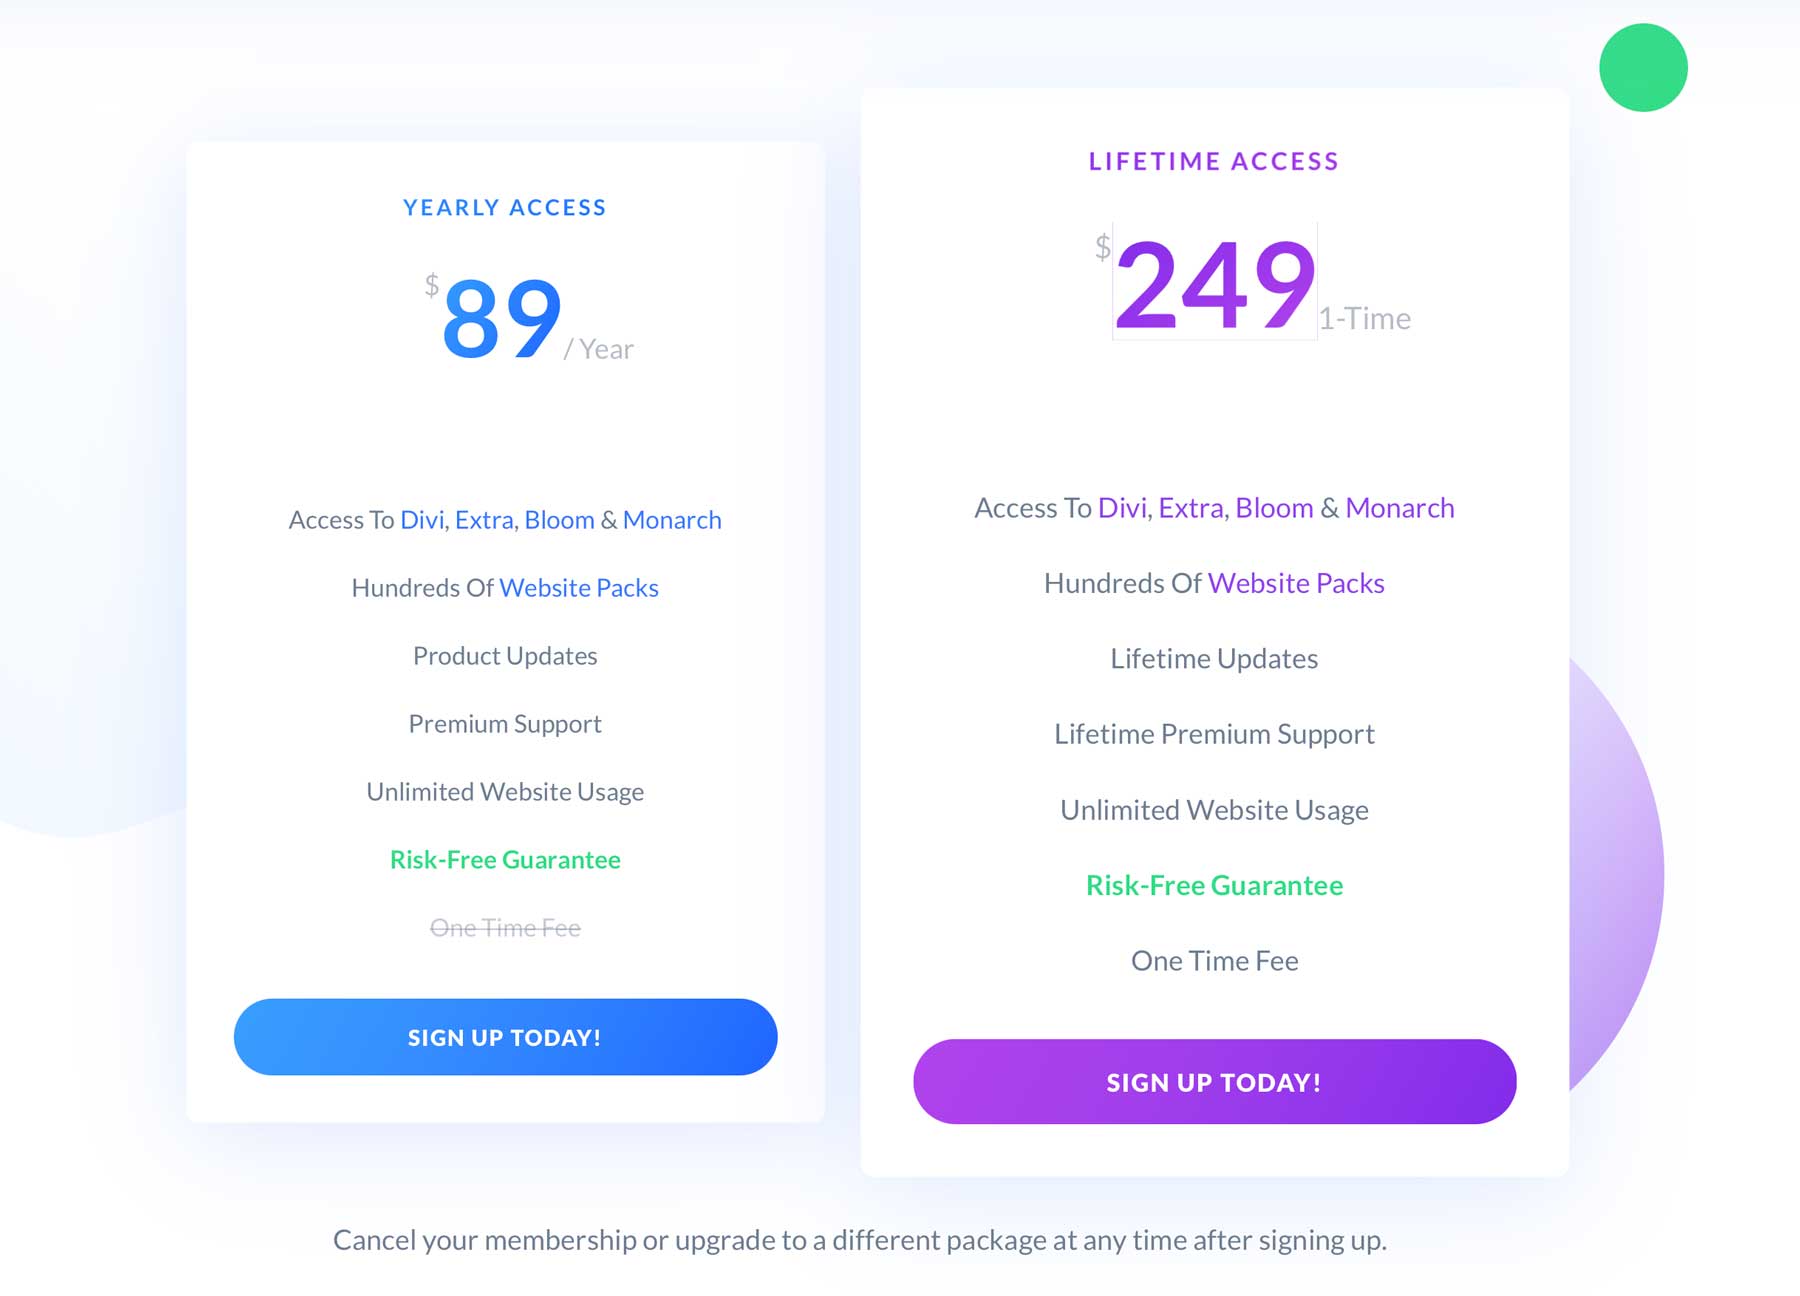
You need the Divi theme membership to build a restaurant website, which costs $89/year. If you’d like more upfront pricing, pay $250 once to get the Divi theme for life.
Once you purchase Divi, installing it is easy. Here’s a walkthrough of purchasing, installing, and activating the Divi theme on your WordPress dashboard.
3. Build Your Restaurant Website
With Divi Quick Sites, you can build a fully functioning restaurant website in under an hour. You’ll have a structured website ready in less than five minutes, leaving you with plenty of time to customize it to your exact needs.
Divi Quick Sites comes with pre-designed pages like Home, About, Services, Menu, Contact, and Gallery. It also includes Theme Builder templates, global styles, and branding presets to give your site a professional finish.
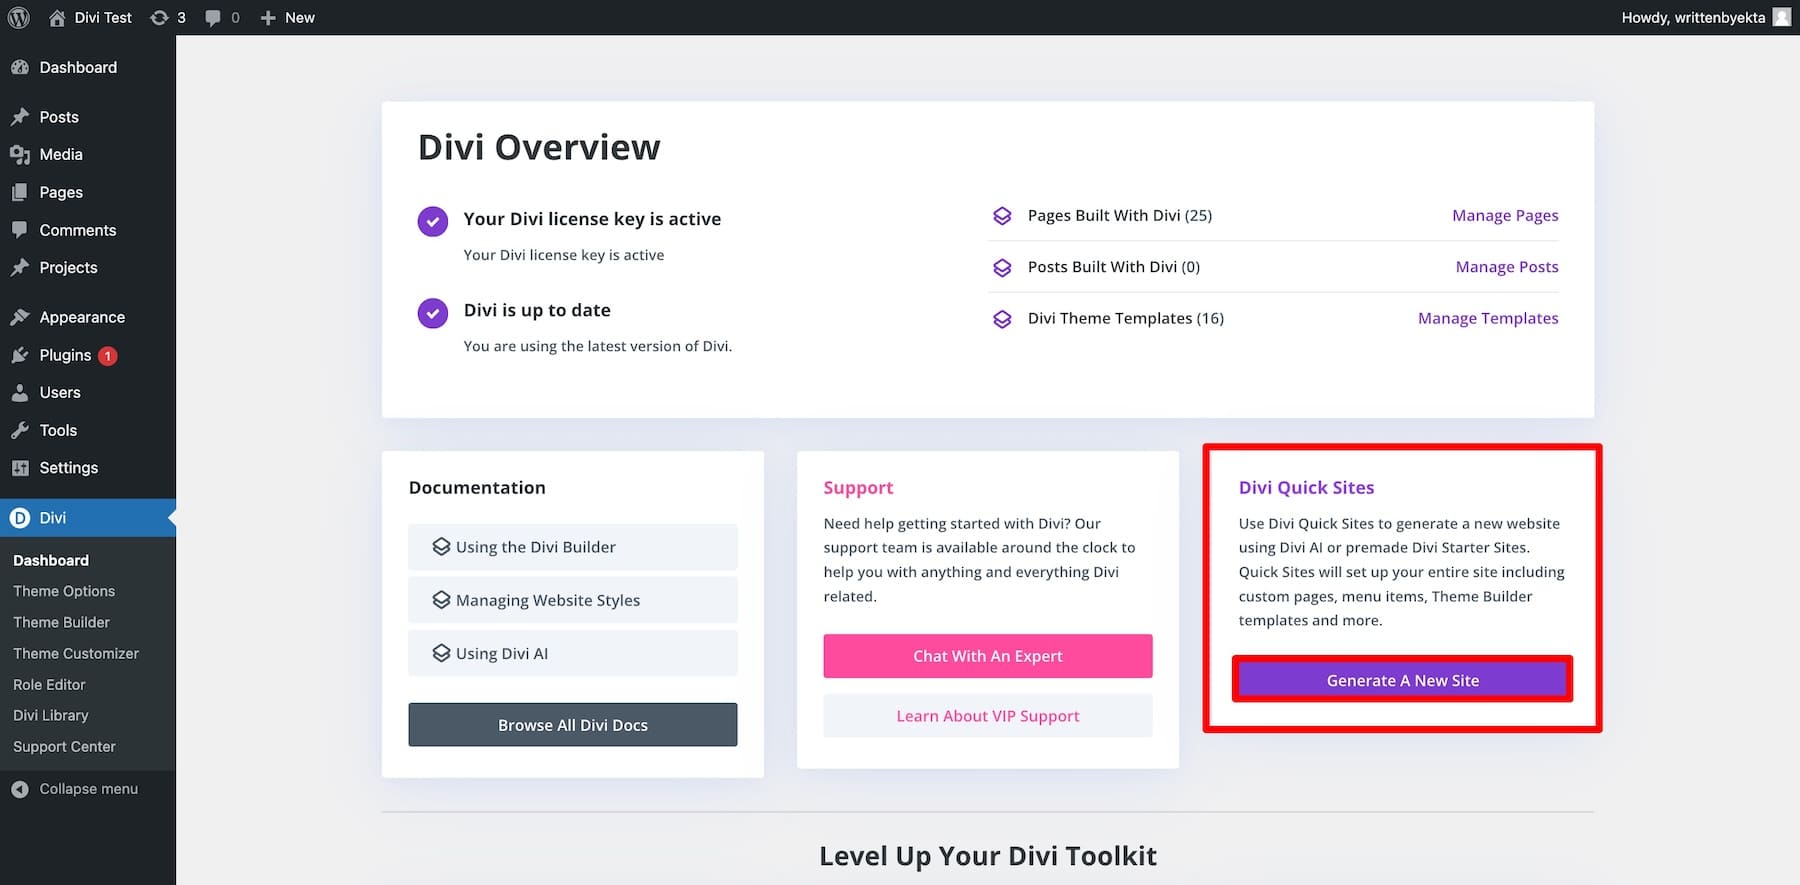
Here’s how to create your restaurant website using Divi Quick Sites. From your Divi dashboard, click Generate a New Site in the Divi Quick Sites section.
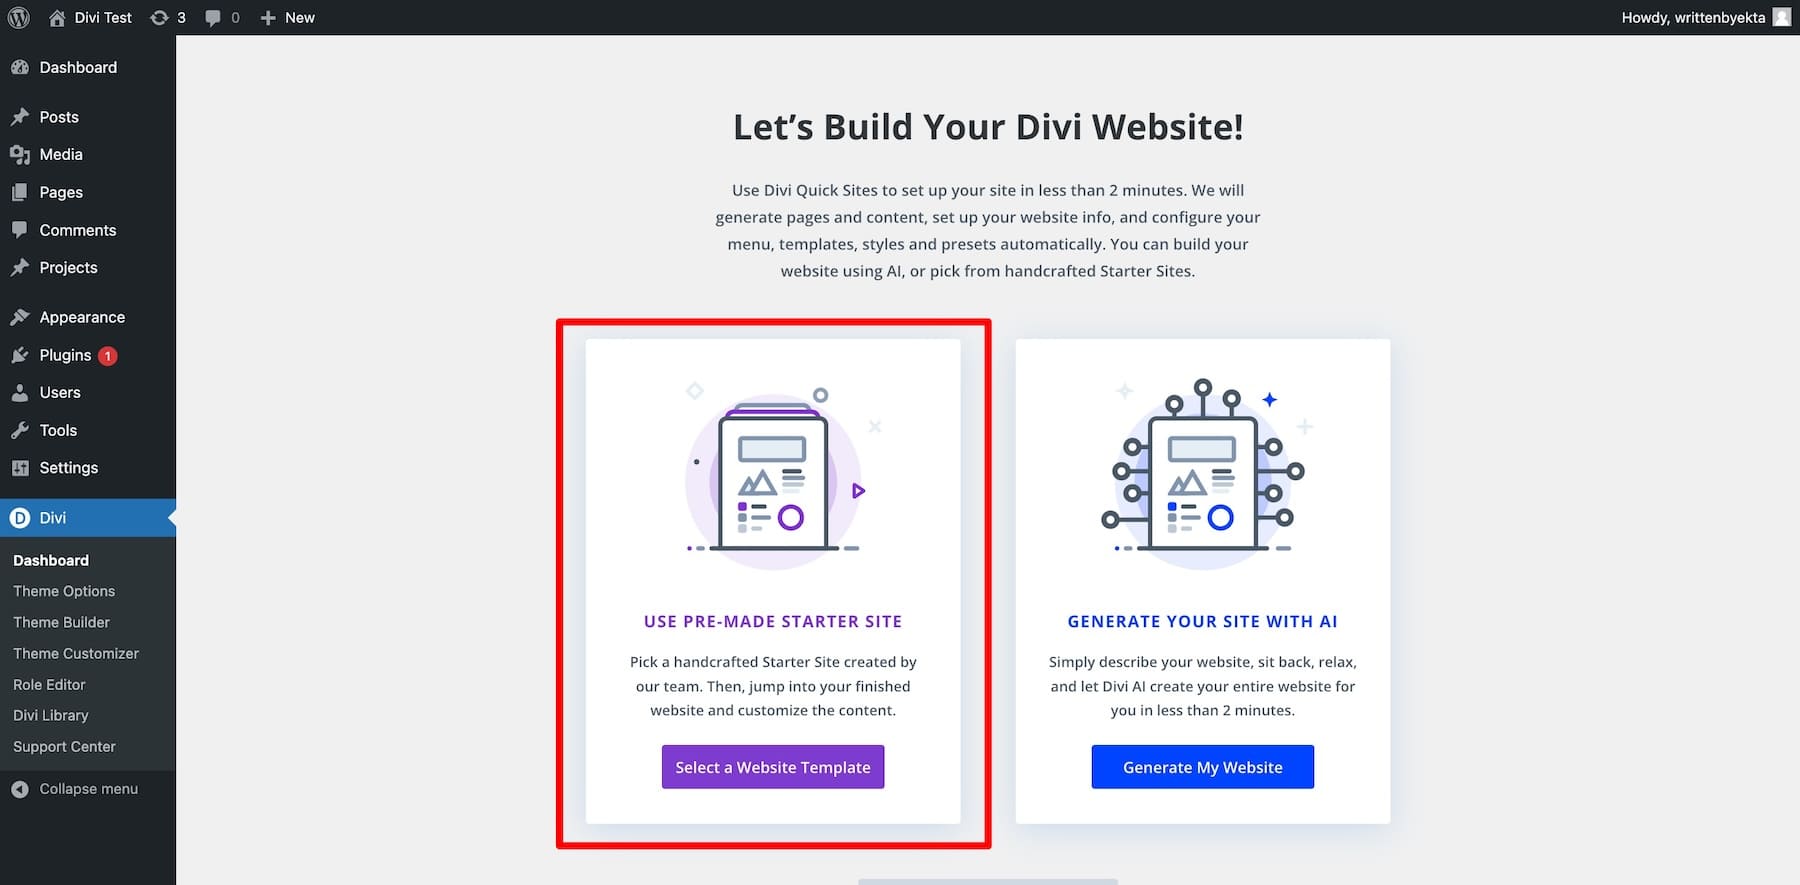
You’ll be prompted to choose between two options:
- Use a Pre-Made Starter Site: Select from a pre-designed Starter Site that includes branding, pages, and layout. Your website will be ready to launch immediately.
- Generate with Divi AI: Provide Divi AI with your preferences, and it will generate a custom website complete with relevant pages and functionality.
Creating a Restaurant Site Using Starter Sites
Let’s go with the Starter Site option. It offers a professionally designed, ready-to-launch website that can be easily customized to your liking.
Click Select a Website Template.
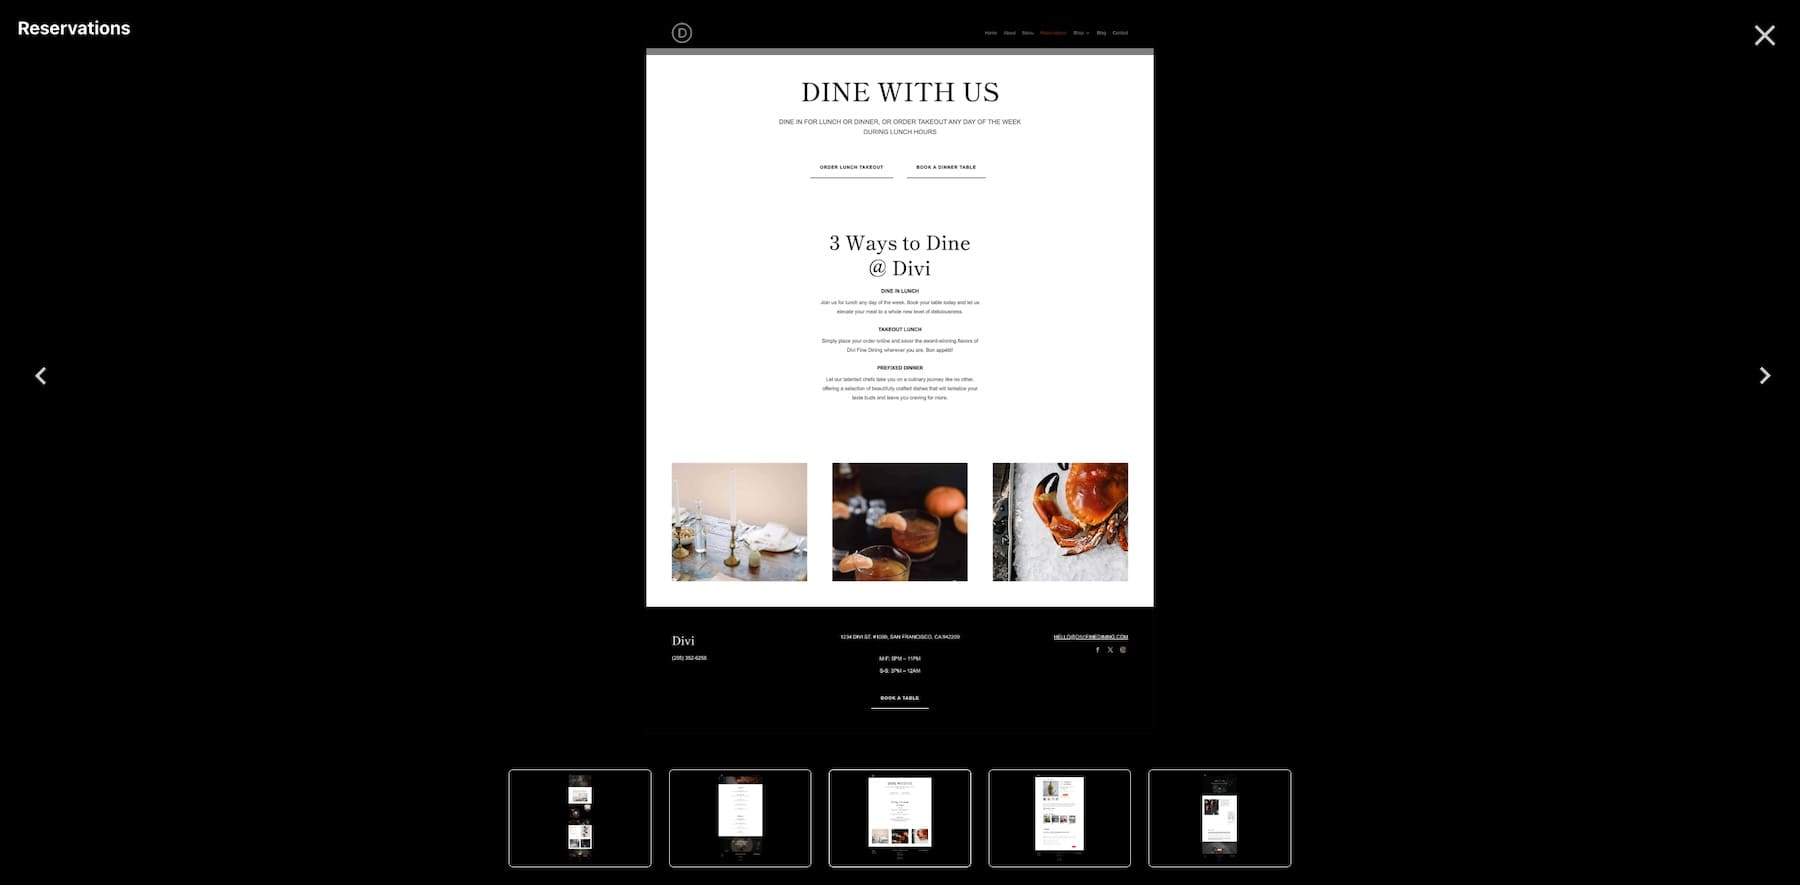
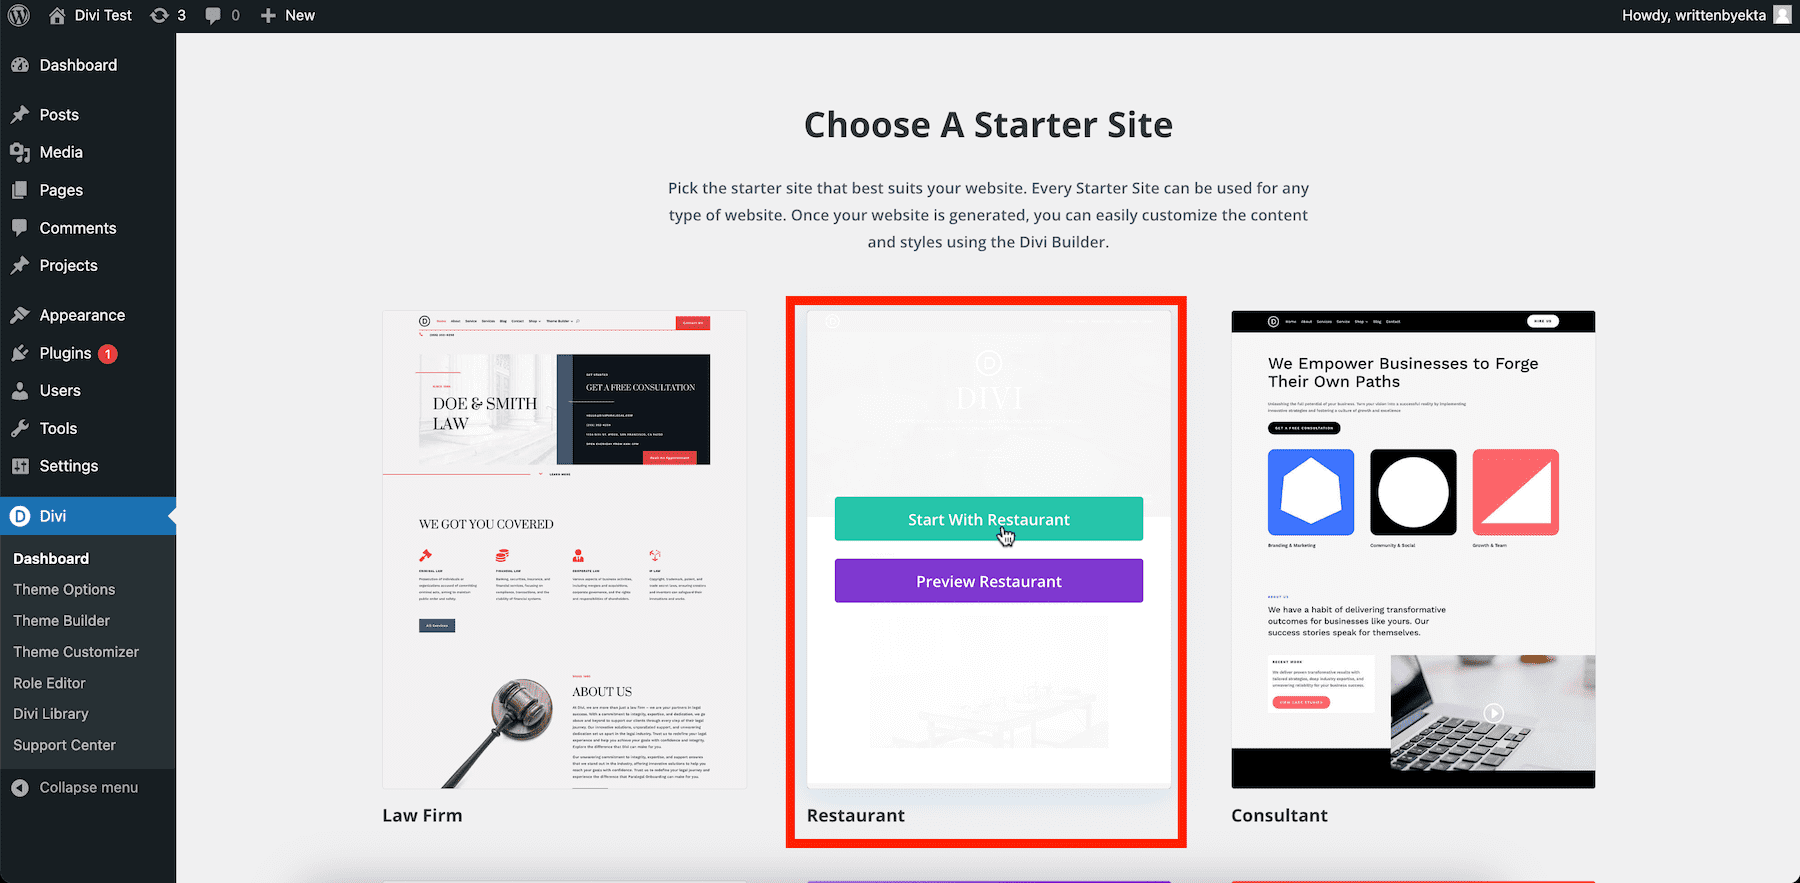
Now, choose the Restaurant template. You can preview the template to see how your restaurant site will look. To preview, hover over and click Preview Restaurant.
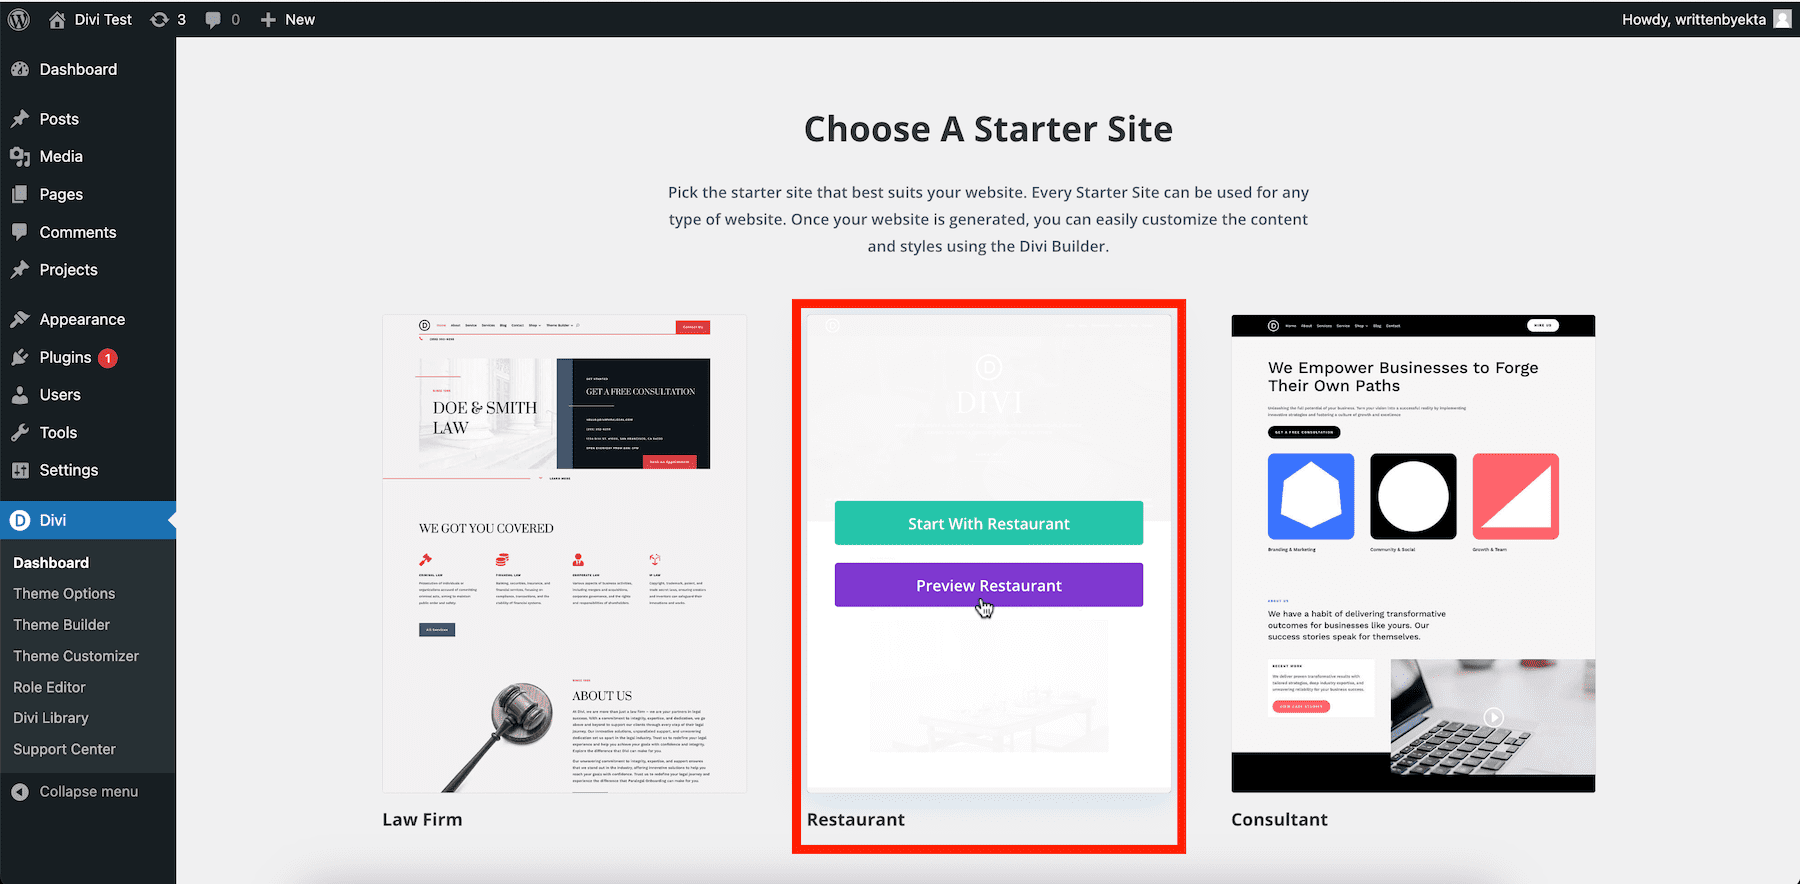
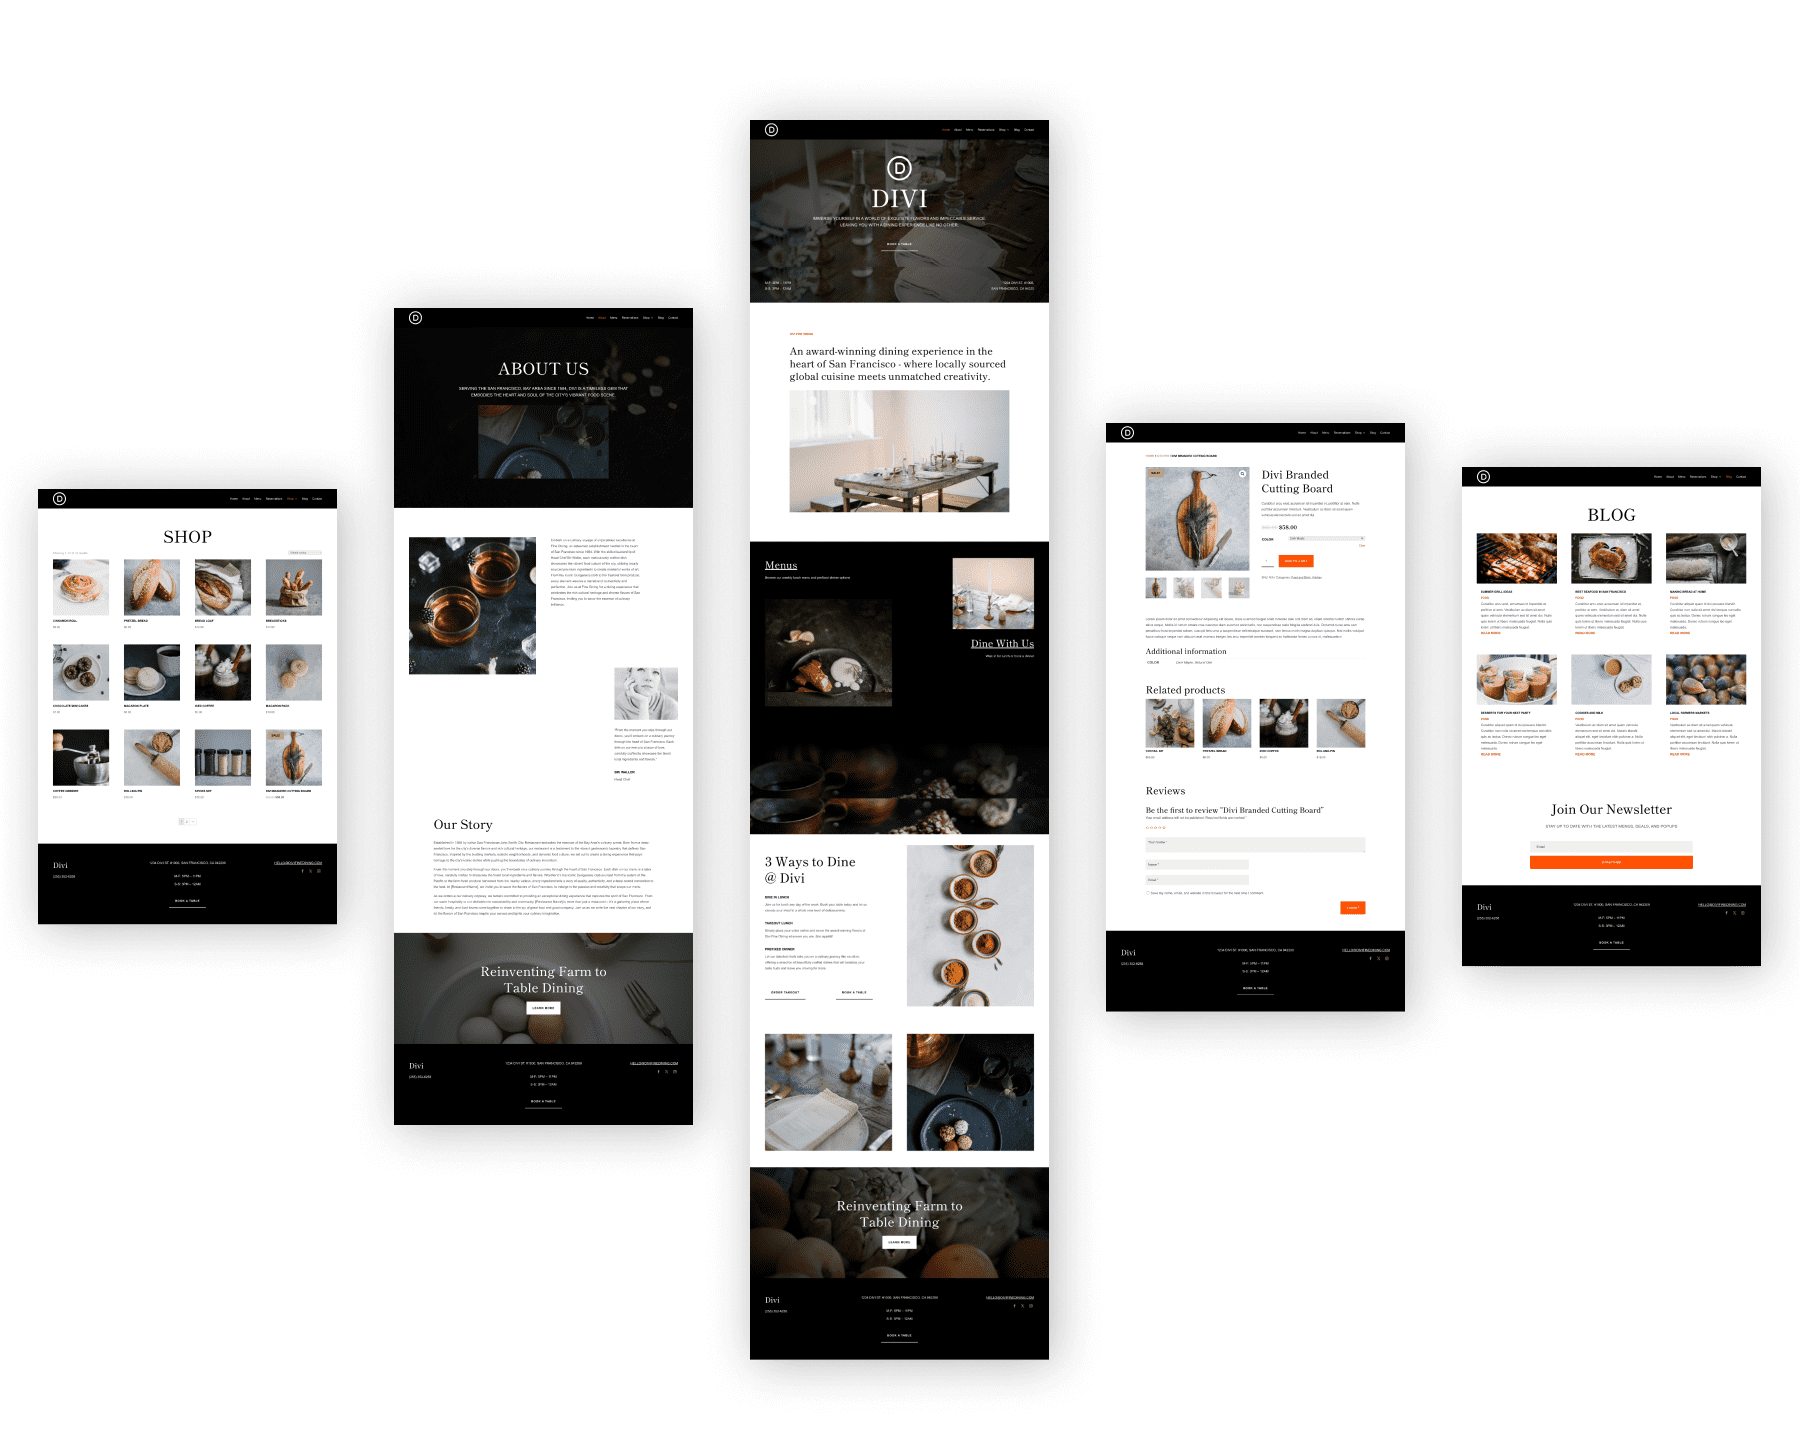
The Restaurant Starter Site includes essential pages like Home, About, Contact, Menu, Reservations, Blog, and Shop.
To start building, hover over the template and click Start with Restaurant.
Divi Quick Sites will prompt you to fill in a few details to personalize your site:
- Enter your Site Name and Site Slogan.
- Upload your Site Logo to add it to the header across all pages.
- Select the Pages you want to include. If you check the Shop option, Divi Quick Sites will install WooCommerce and configure it for online food ordering.
- Use the Add A Custom Page button to add any additional pages.
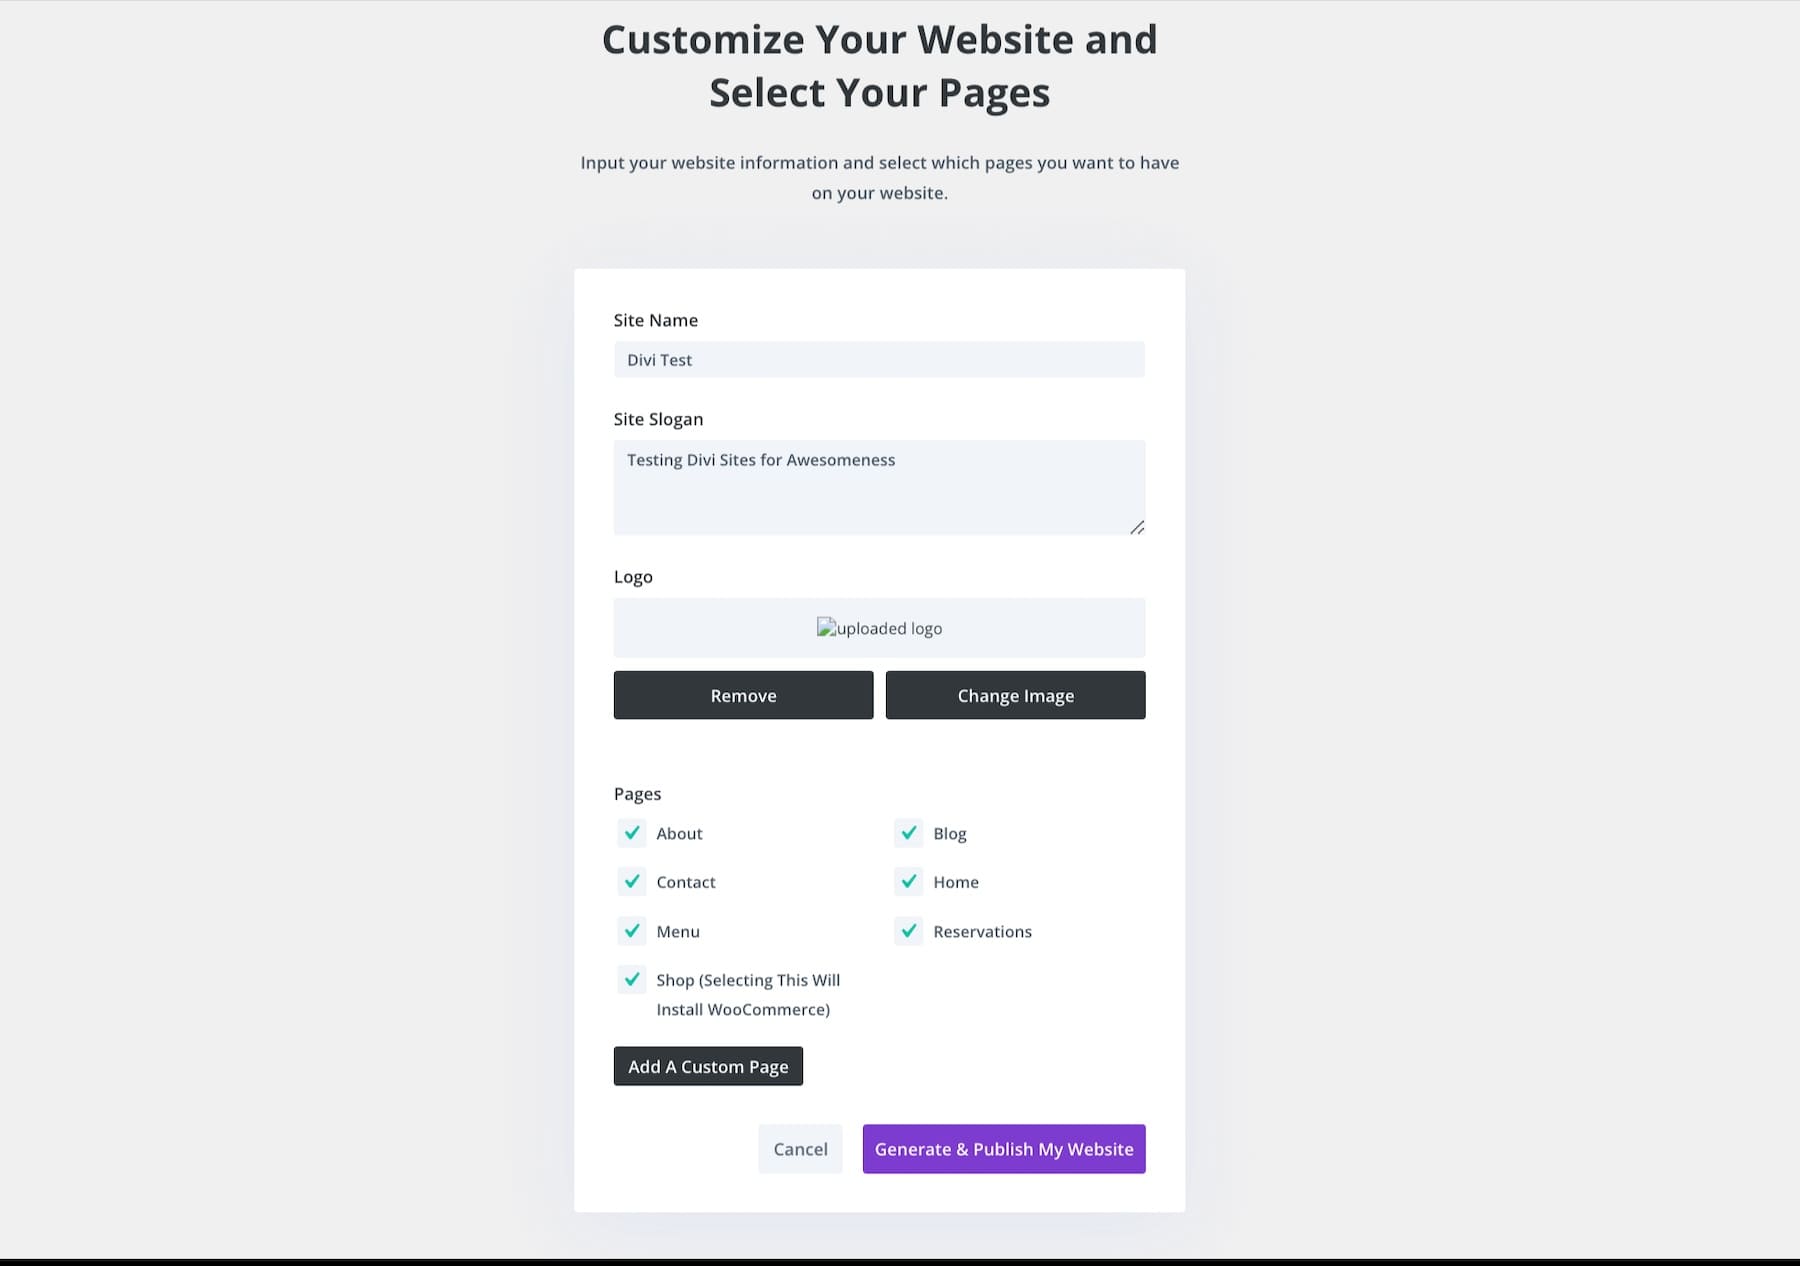
Once you’ve filled in the details, click Generate & Publish My Website. Your restaurant site will be live in just 2-3 minutes.
And that’s it! Your restaurant website is ready, and you can start customizing it right away.
Creating a Restaurant Site Using Divi AI
If you prefer to create a custom website from scratch, choose the Generate Your Site with AI option.
Just fill in the site details and let Divi AI create the perfect website for you. Once it’s ready, click Generate & Publish My Website and watch your site come to life.
4. Customize Your Restaurant Website
The website generated is a replica of Divi’s Restaurant Starter Site, meaning it needs to be customized with your content and branding to reflect your restaurant online. Let’s start with customizing your site’s pages.
Adding Content to Your Restaurant Site Pages
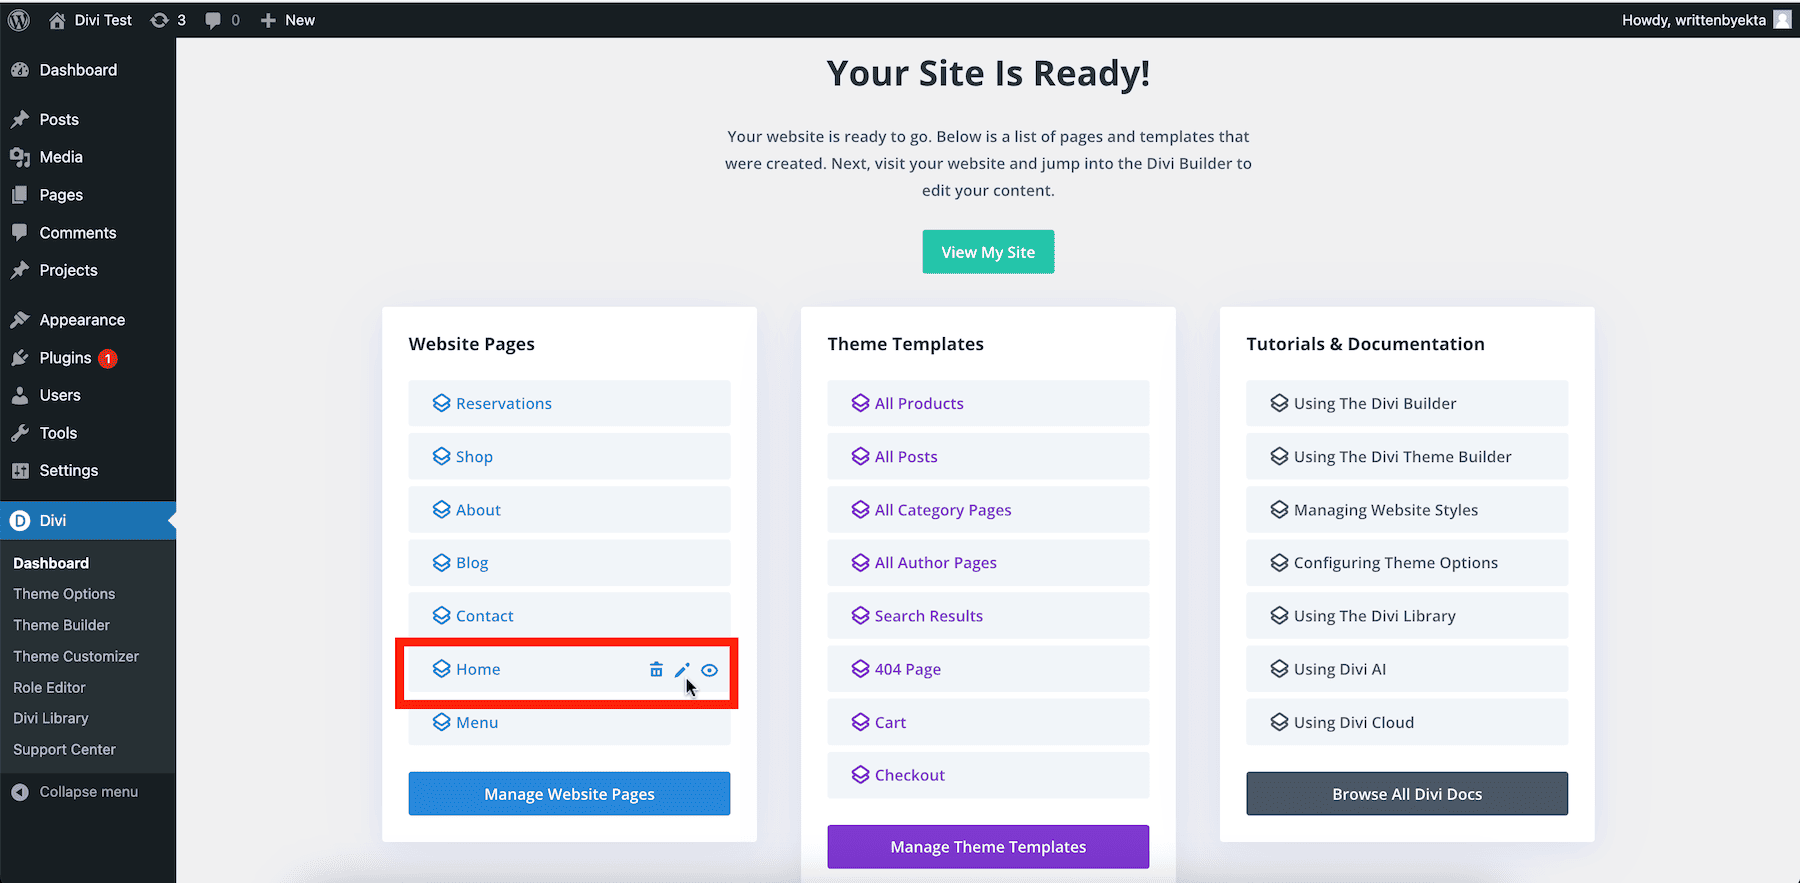
From Your Site is Ready screen, hover over Home and click the pencil icon to modify it.
You’re now customizing your site’s home page using Divi Builder, which lets you make changes visually by dragging and dropping elements. To modify any Divi module, hover over it and click the gear (settings) icon. This opens a pop-up window with all the settings.
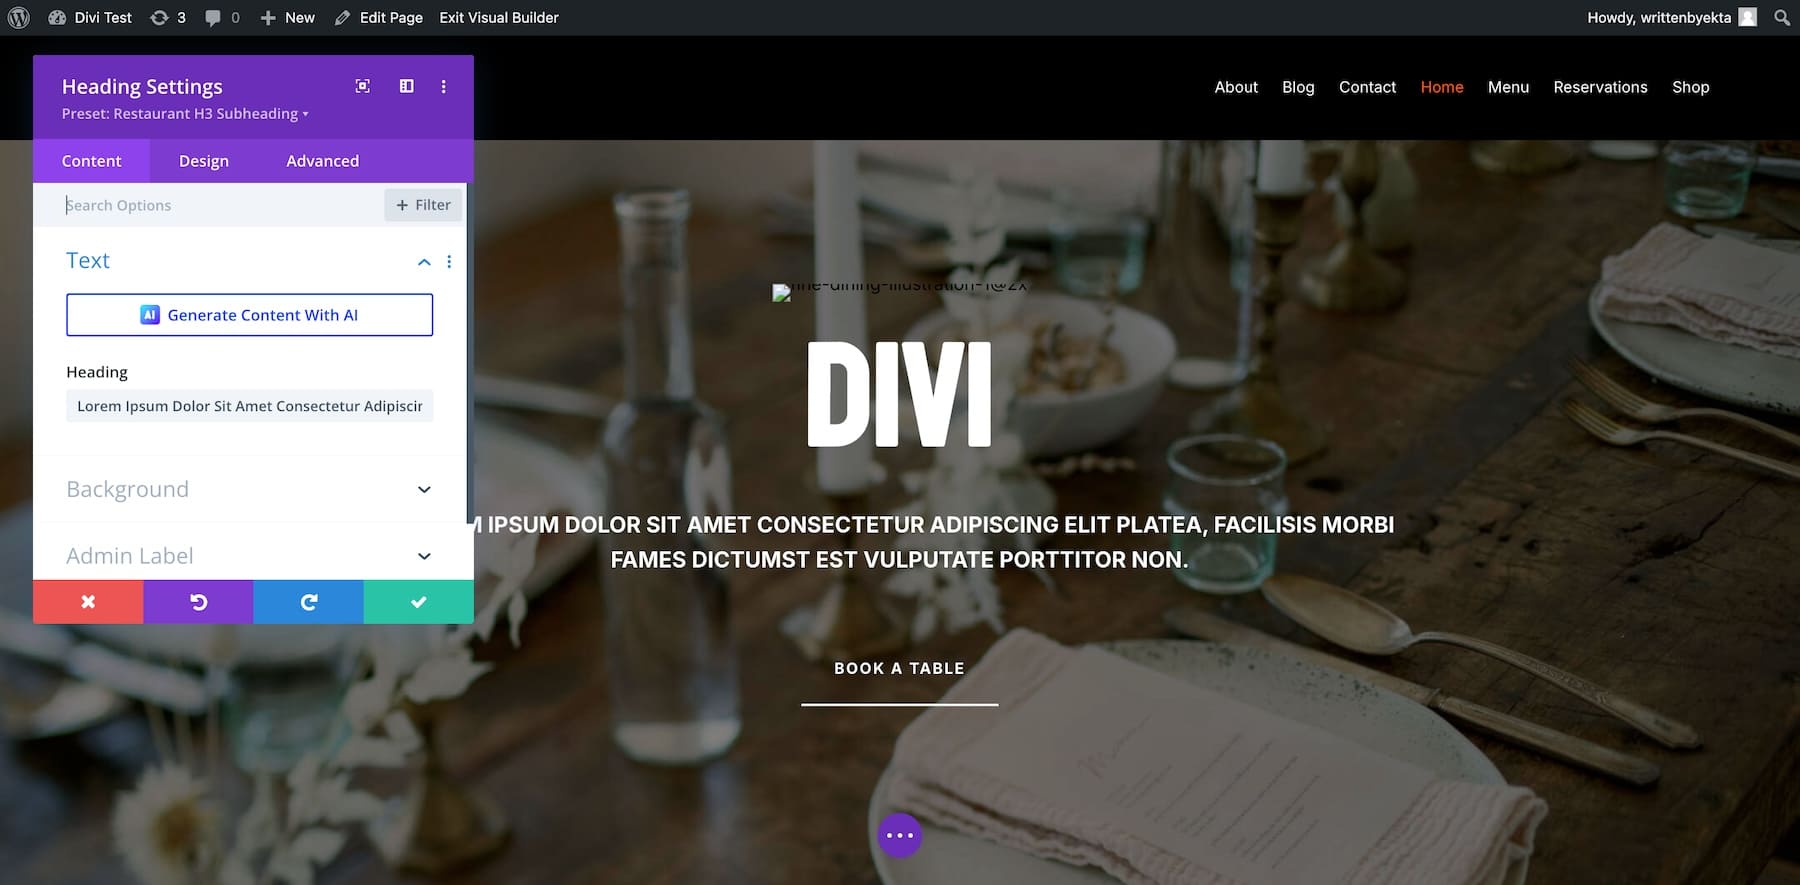
Divi supports inline editing, so you don’t have to open the settings window to edit text. You can do it on-screen using the keyboard keys. Similarly, to upload images, hover over the image and click the settings option.
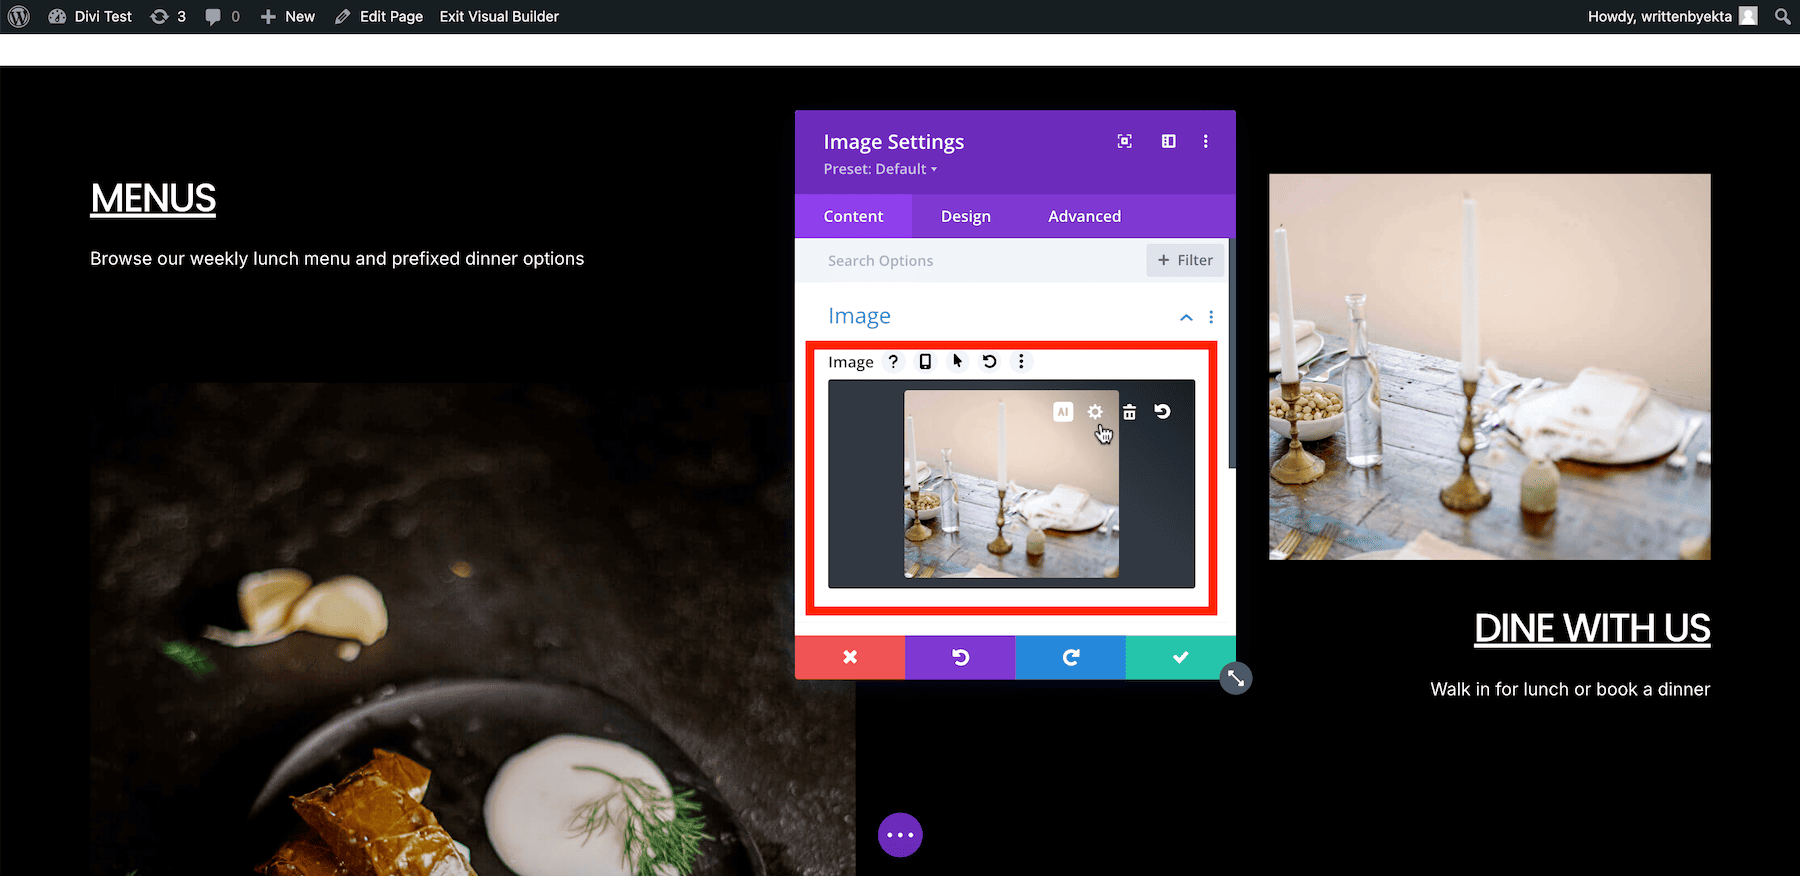
Now click on the settings icon inside the Image section. This will take you to the WordPress media library, from where you can upload your images.
Similarly, update links, buttons, and other elements by going through the settings option for each element. Watch this video on Divi to learn how to edit pages with Divi Builder.
Adding Brand Fonts to Your Restaurant Site
The Restaurant site you generated has pre-defined Global Fonts (picked from the Starter Site) that apply to your site. You can use the current ones or add your brand fonts. You can easily modify Global Fonts using Divi Builder.
Click any text element and go to settings. Switch to the Design tab, scroll to Text, and click Font.
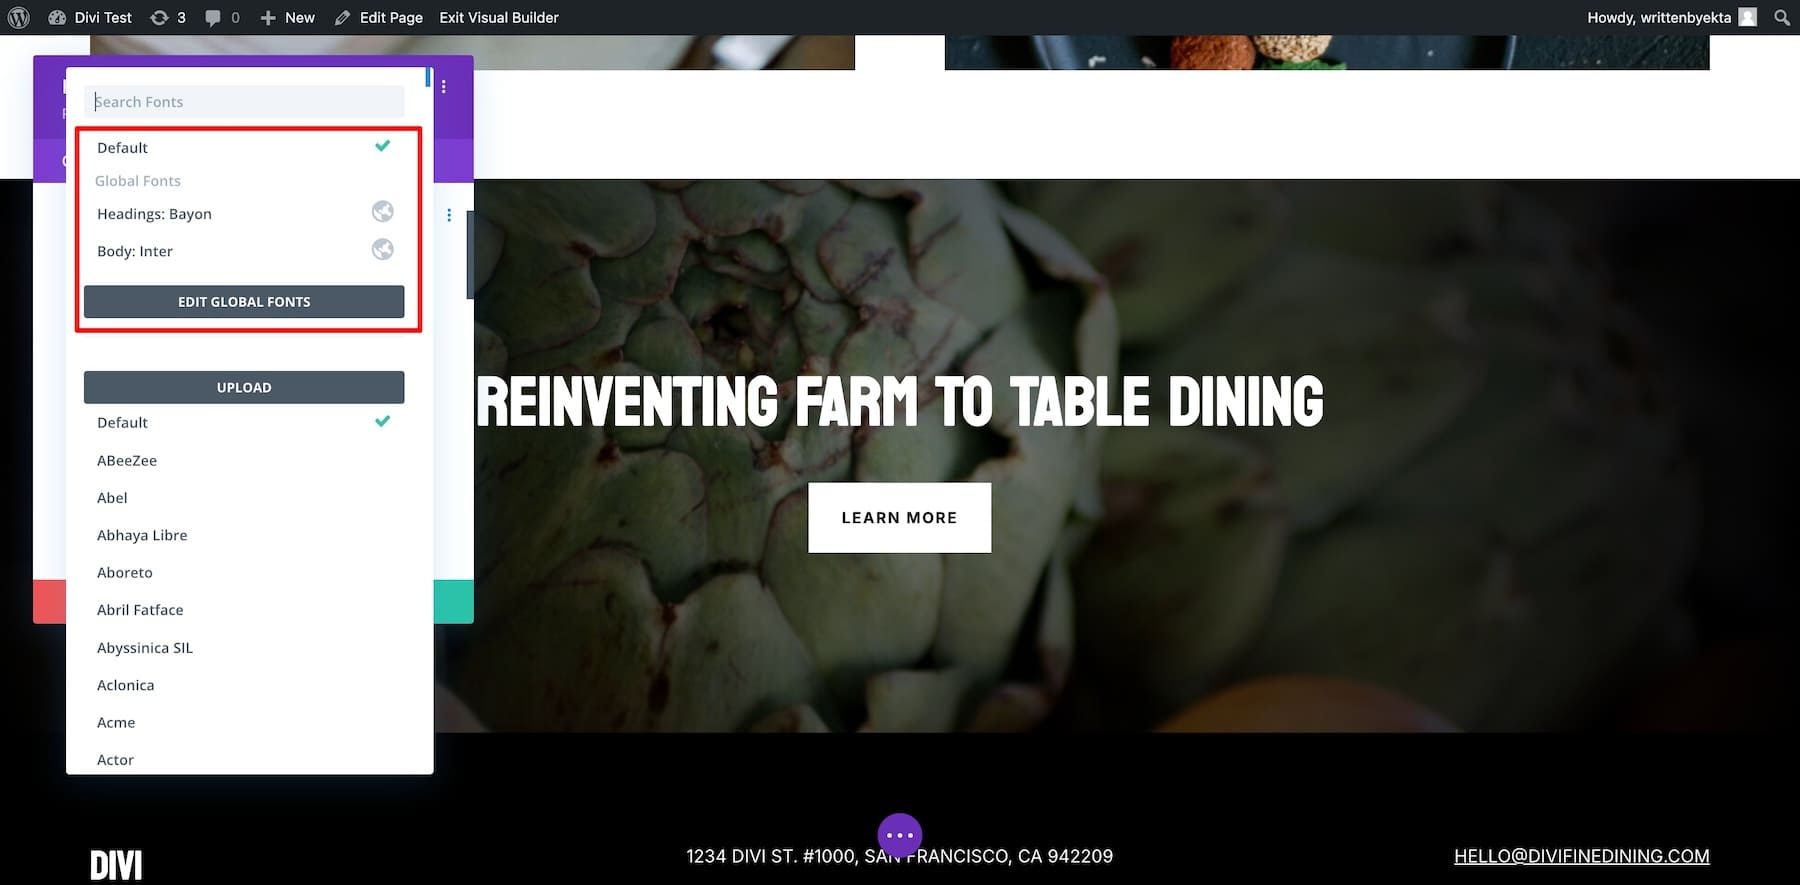
You can also upload your fonts or choose from our library, including Google fonts.
Adding Brand Colors to Your Restaurant Site
To add your brand colors, you need to edit Global Colors. Like Global Fonts, the current global colors are picked up from the Restaurant Starter Site.
Click on the settings of any text element and switch to Design. Scroll down to Text and go to Heading Text Color.
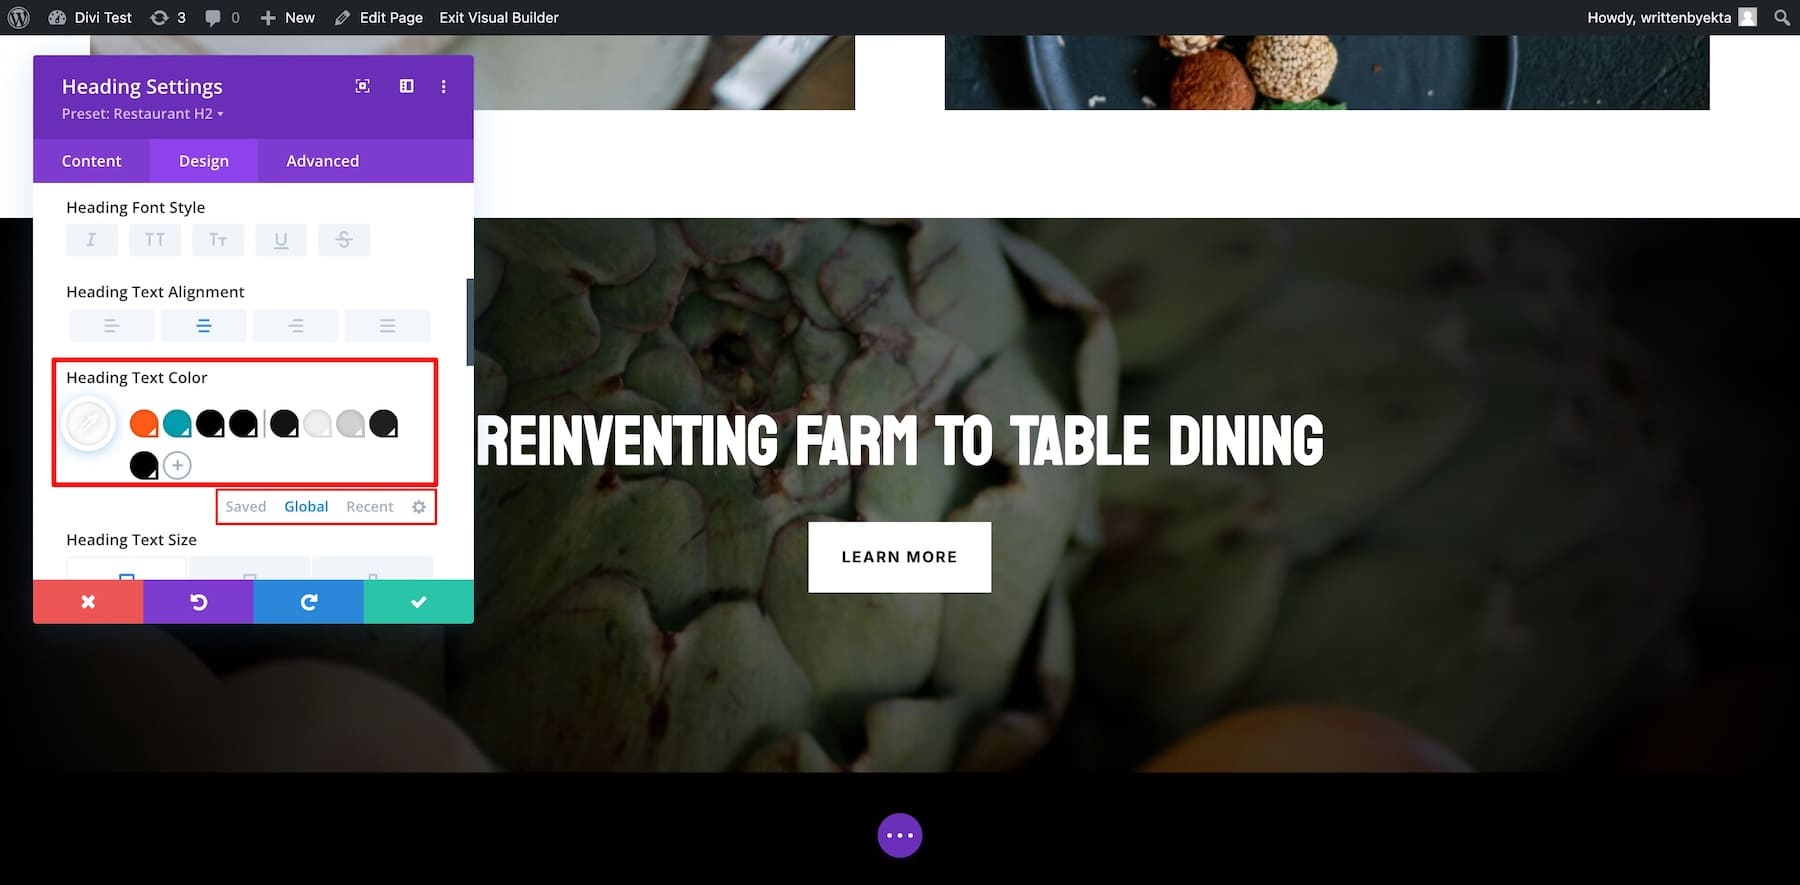
Now switch to Global from Saved. These are the current Global Colors. To modify them, click on each color and choose. You can also add your color hex codes.
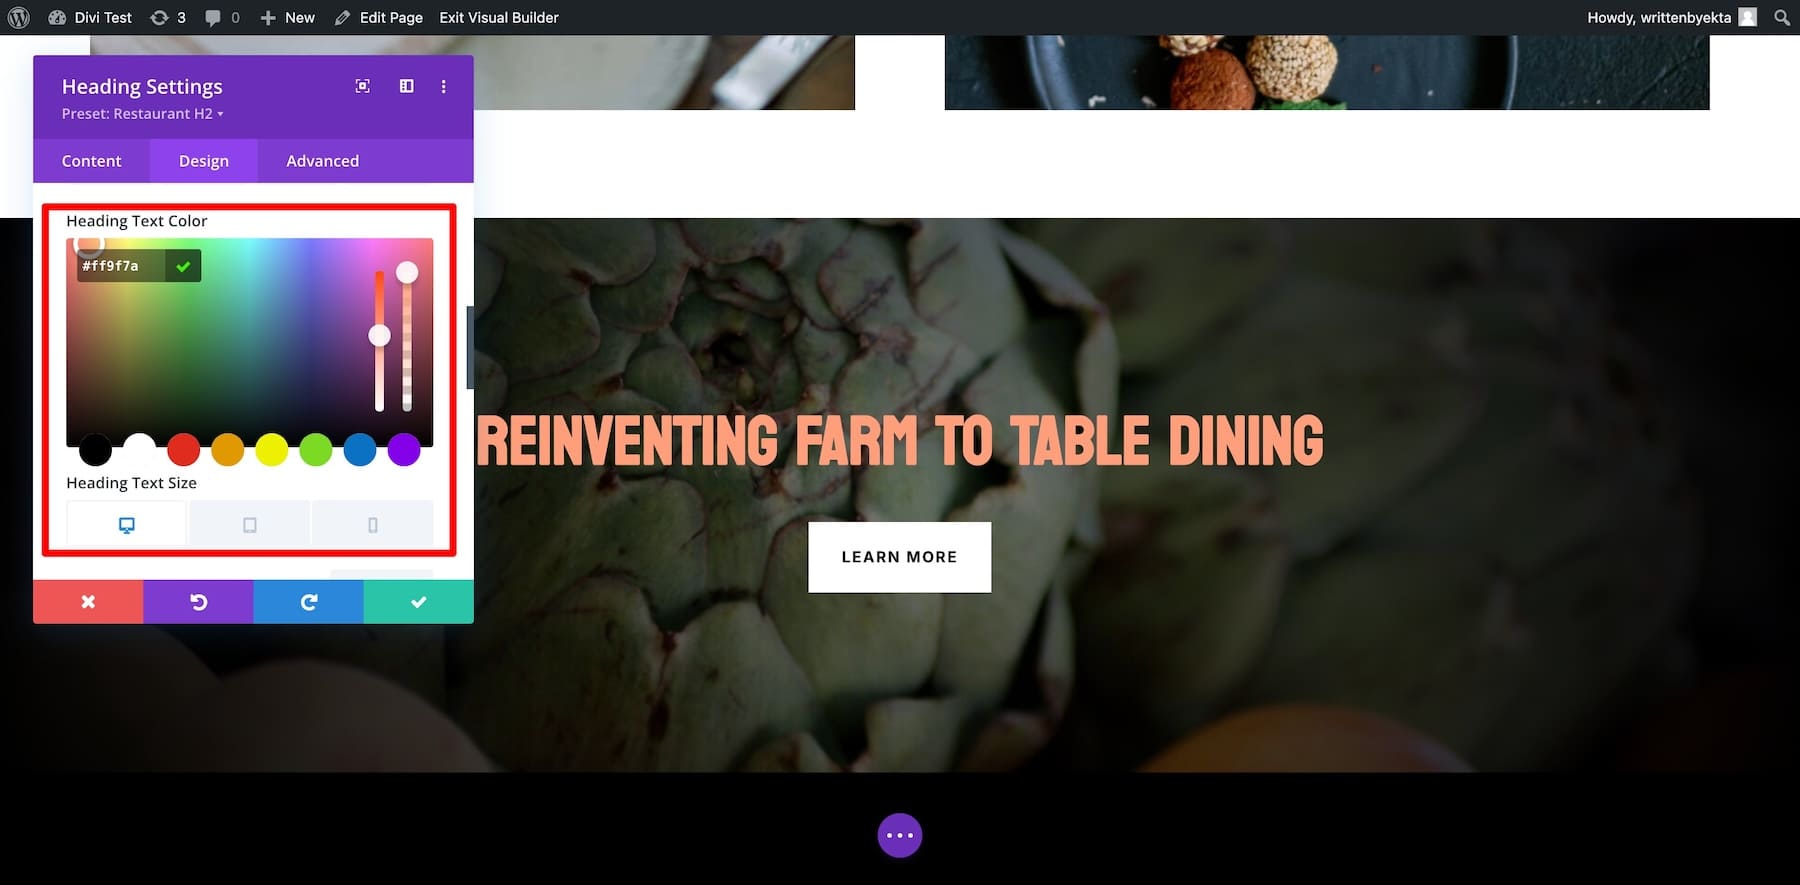
Similarly, adjust all colors. You can add more colors by clicking the plus icon next to the last Global Color.
Editing Page Layout Templates
Divi Quick Sites automatically creates Theme Builder templates (replicated from the Starter Site.) The benefit of using Theme Builder templates is that your pages look the same, and if you want to make adjustments, the changes are reflected site-wide.
For example, the custom footer you see on your site is taken from the Restaurant Starter Site. It will appear on all pages. If you modify its Theme Builder template, the changes will appear everywhere.
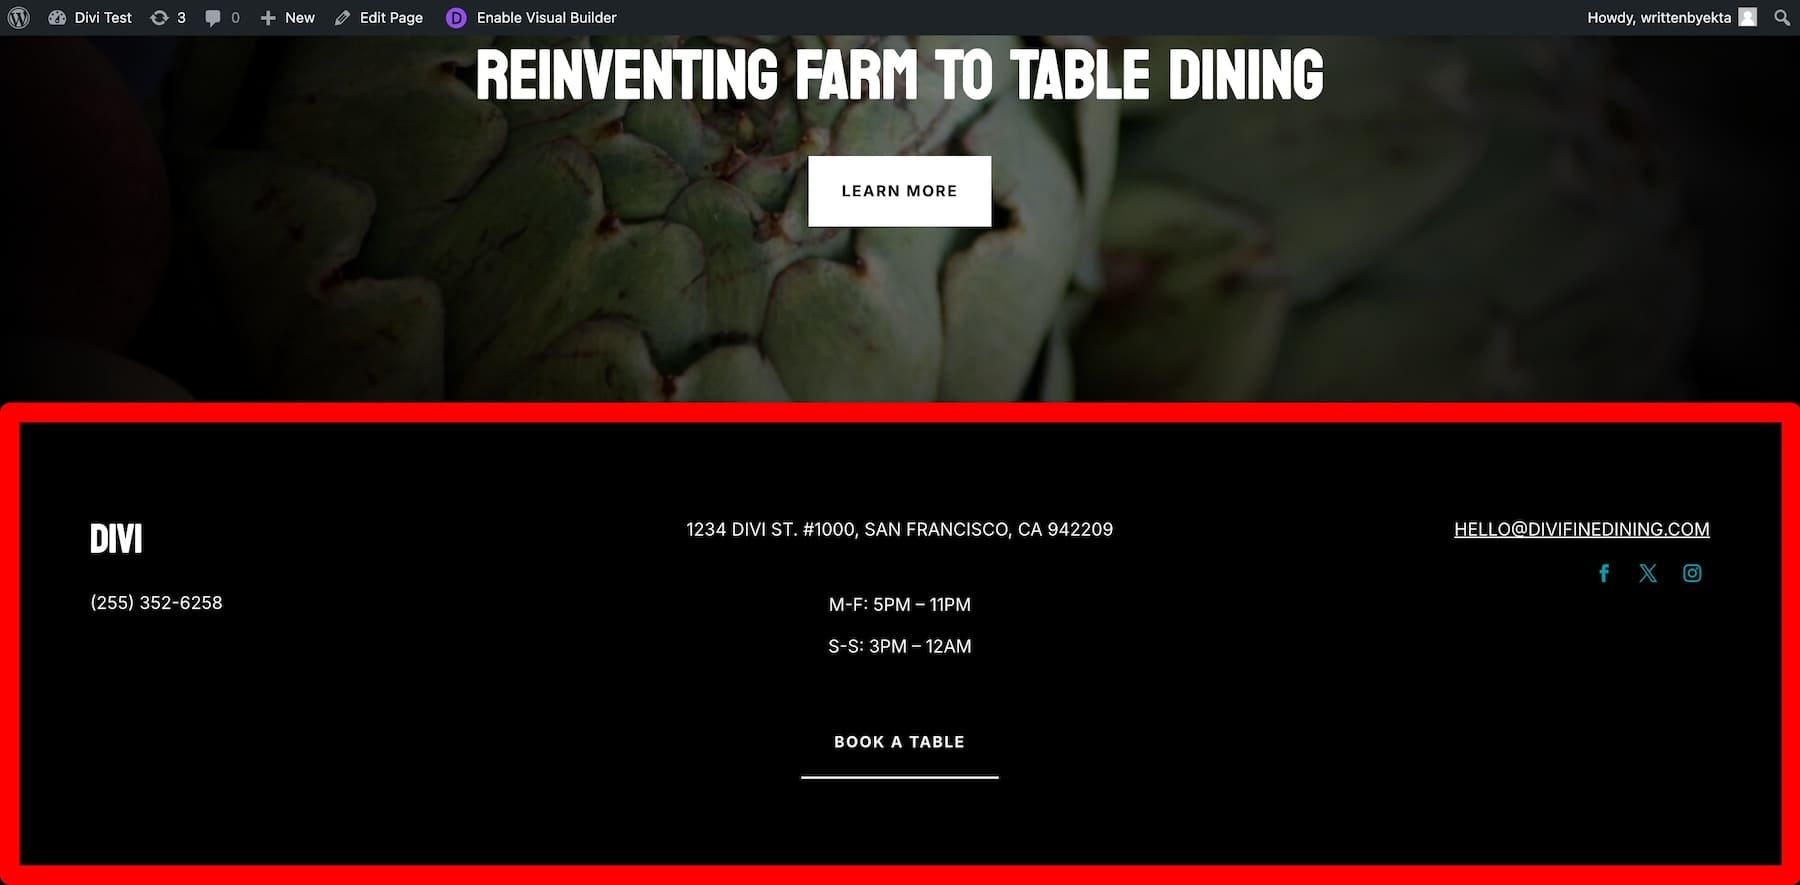
To modify this footer, you must change the default Theme Builder template from the Your Site is Ready page. Or go to Divi > Theme Builder and click on Default Website Template.
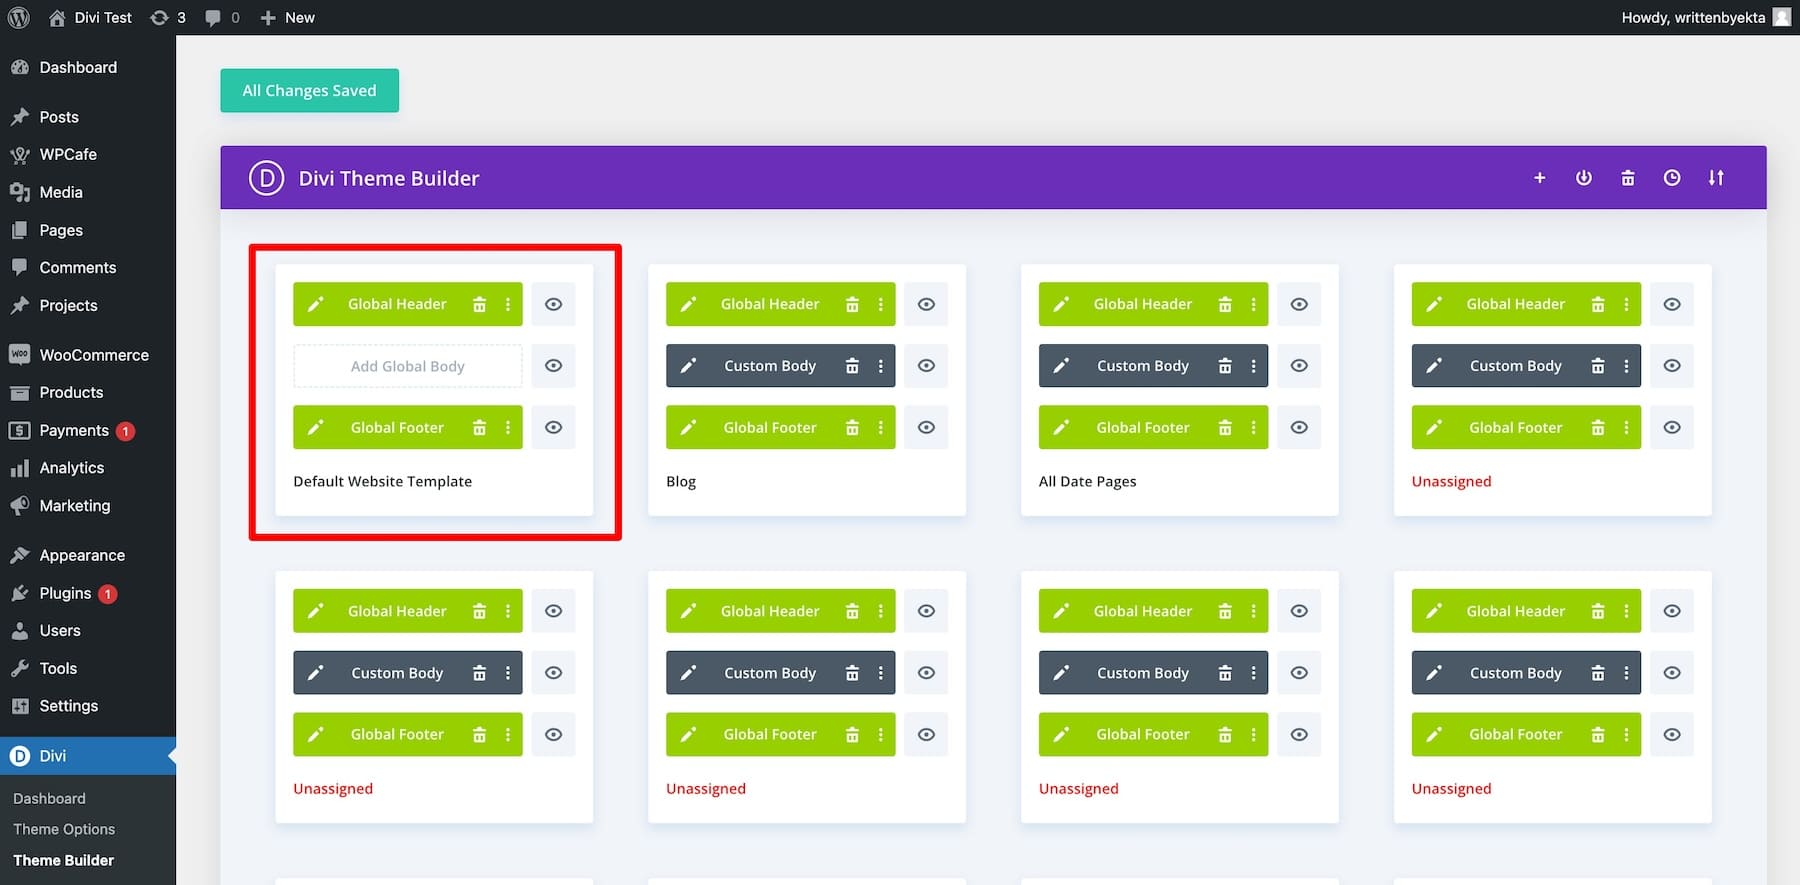
Click on the pencil icon next to the Global Footer to modify it. You’ll be taken to the Divi Builder page, where you can change the Global Footer using its drag-and-drop functionality.
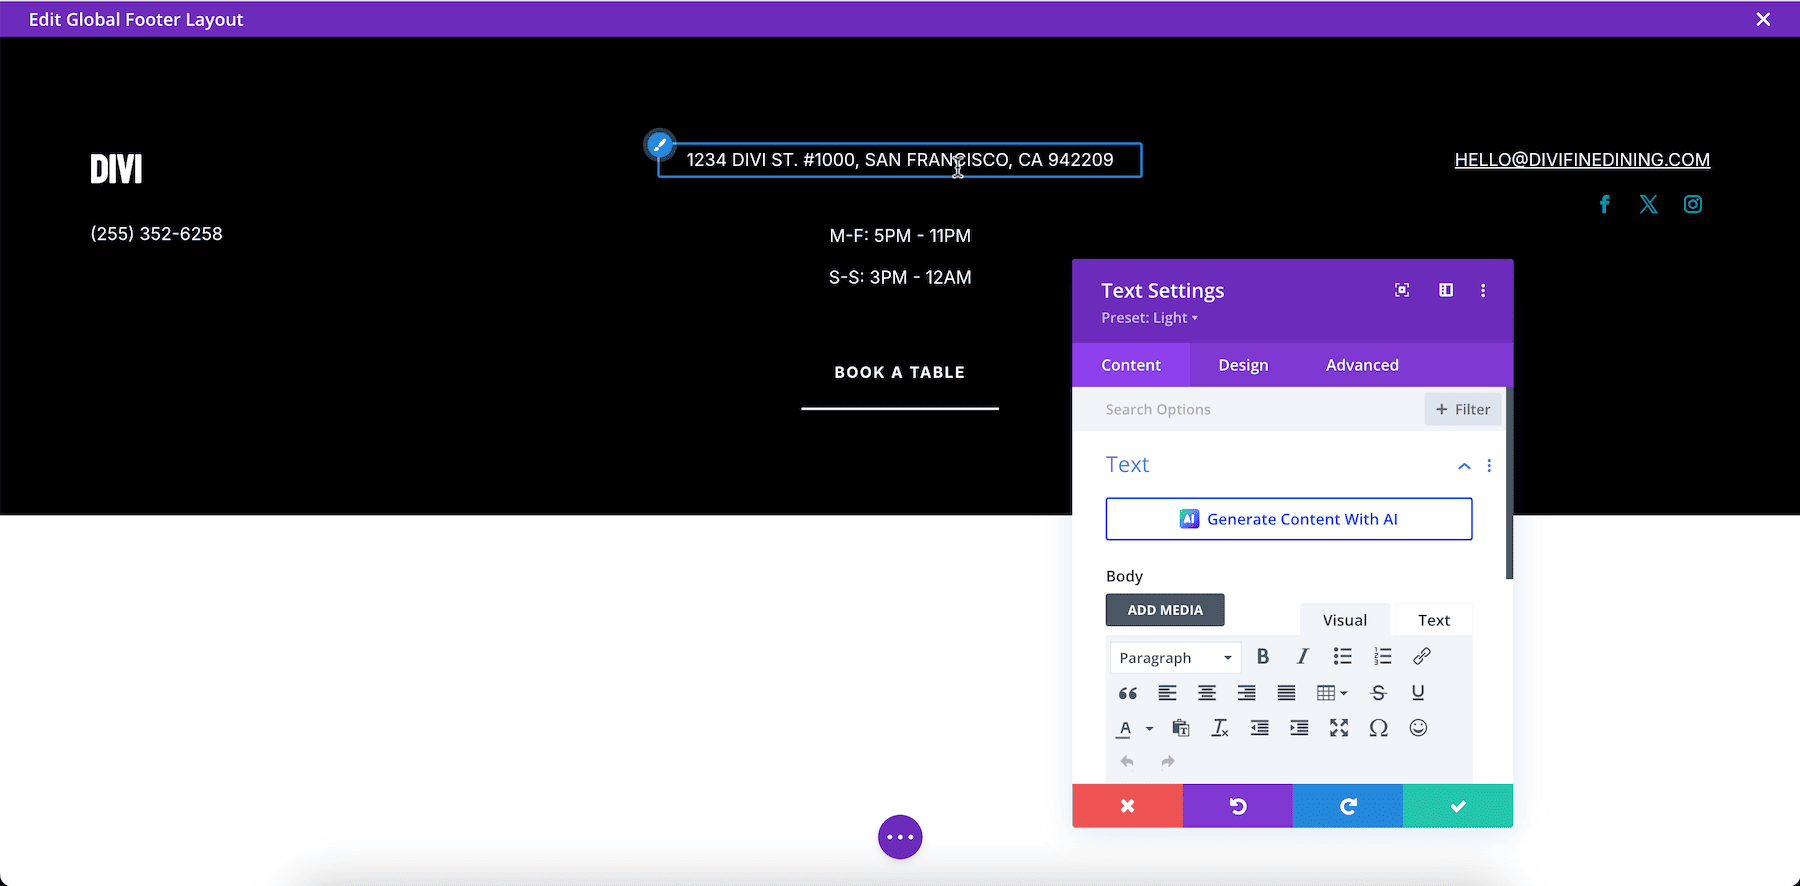
Similarly, you can modify other Divi Theme Builder templates for blogs, product pages, author pages, and categories. Check out more powerful features of Divi Theme Builder.
Editing Saved Element Settings
Like Theme Builder templates, Divi Quick Sites replicates Global Presets from the Starter Site. Global Presets are pre-configured element settings that are imported from your Starter Site.
For example, you might notice that each button element has a square border and white background, so if you add another button, it’ll have the same settings—this is perfect as you won’t have to configure each new element you add.
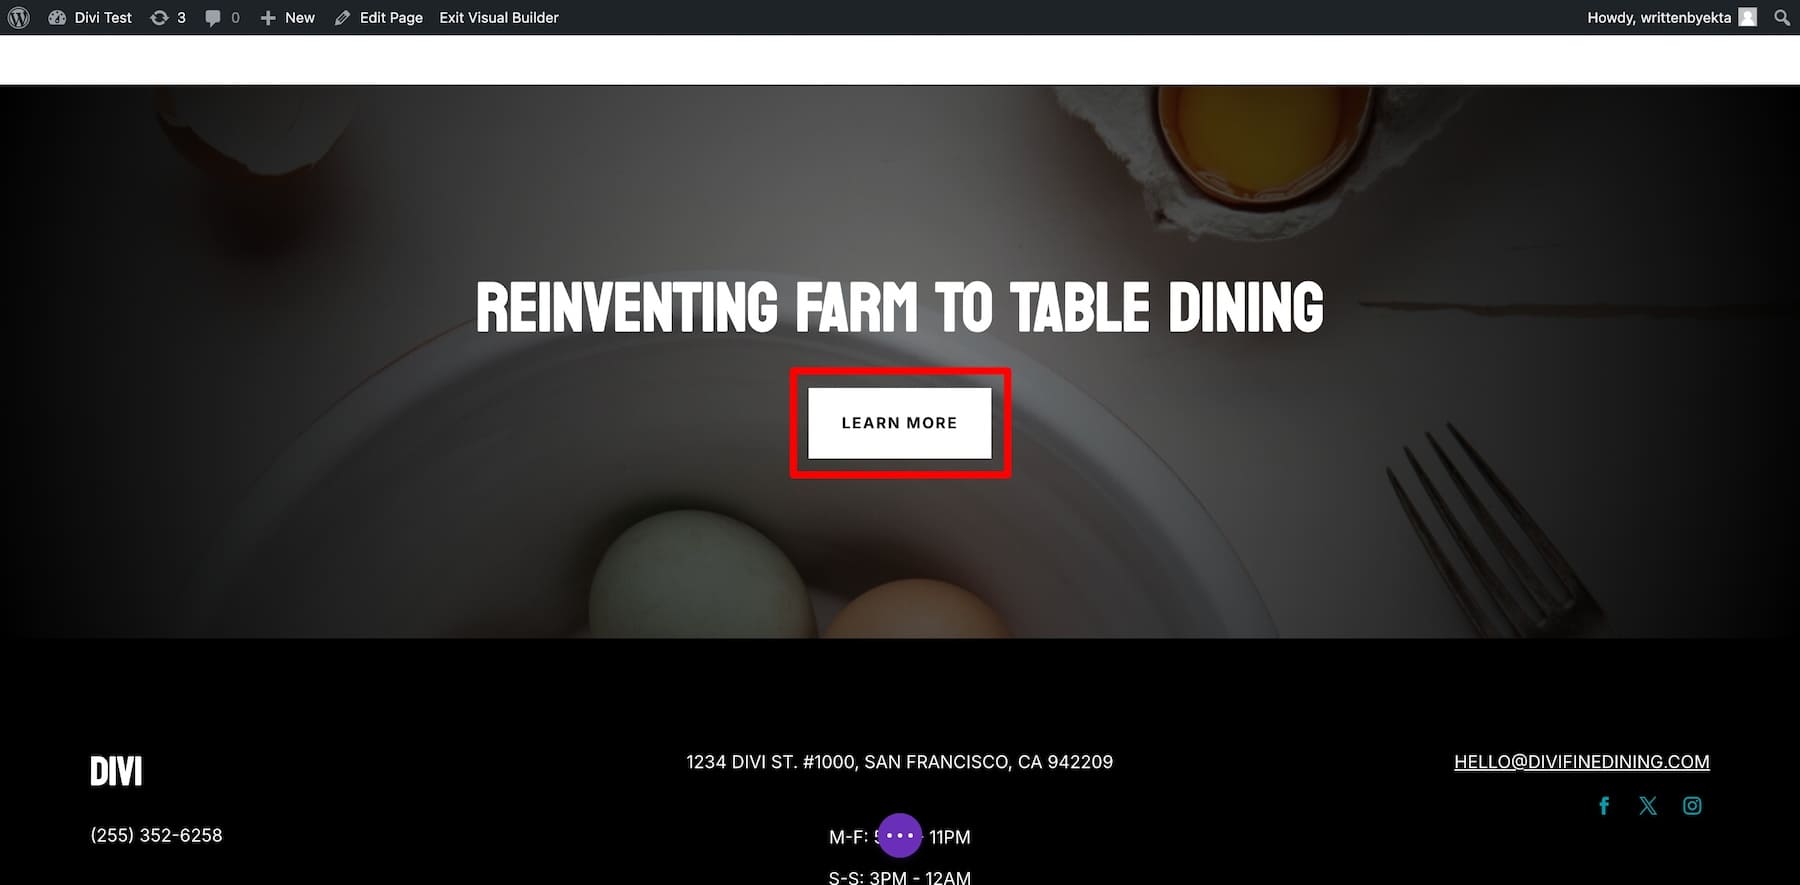
Presets are also site-wide applicable. So, if you modify one button, the changes will be reflected on all the buttons wherever they’re on your site. Here’s how you can modify a Divi Global Preset of an element:
Once you’ve reviewed every element of your site and are sure it’s reflecting your restaurant correctly, do a final check and launch it. Here’s a more in-depth tutorial on modifying your Starter Site-generated website.
5. Install Divi Bookings & Reservations to Take Table Bookings
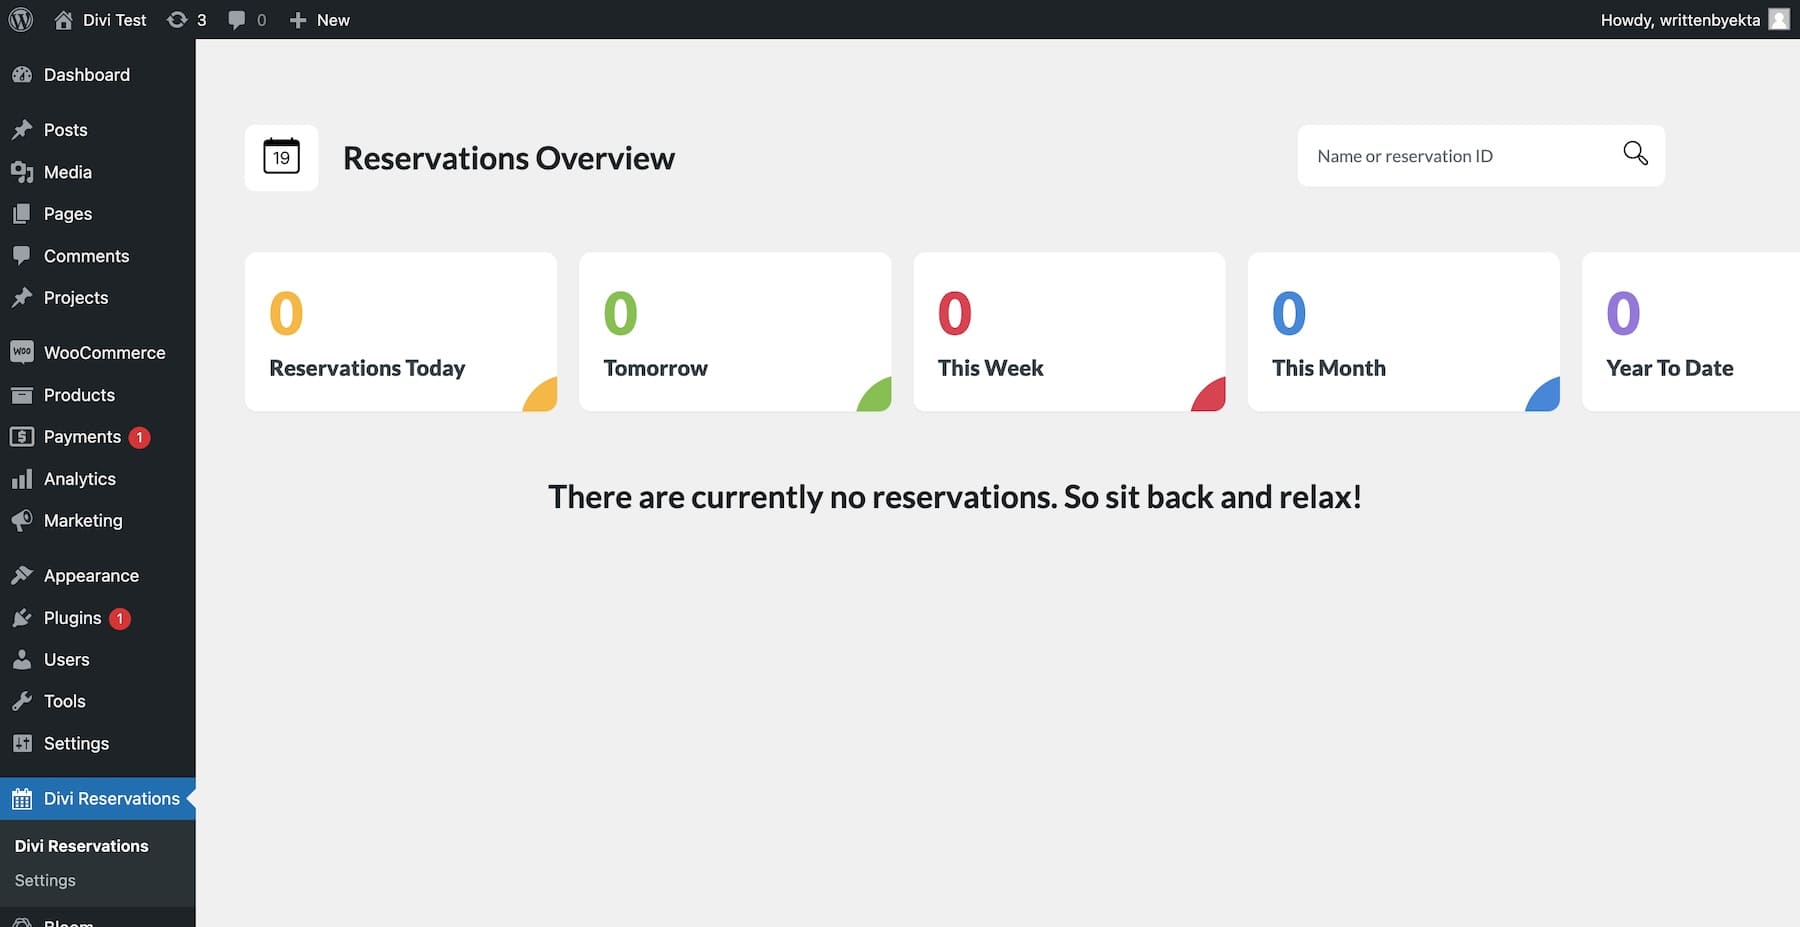
To allow visitors to book tables from your website, install the Divi Bookings & Reservations extension. Once installed and activated the plugin, go to Divi Reservations from your WordPress dashboard.
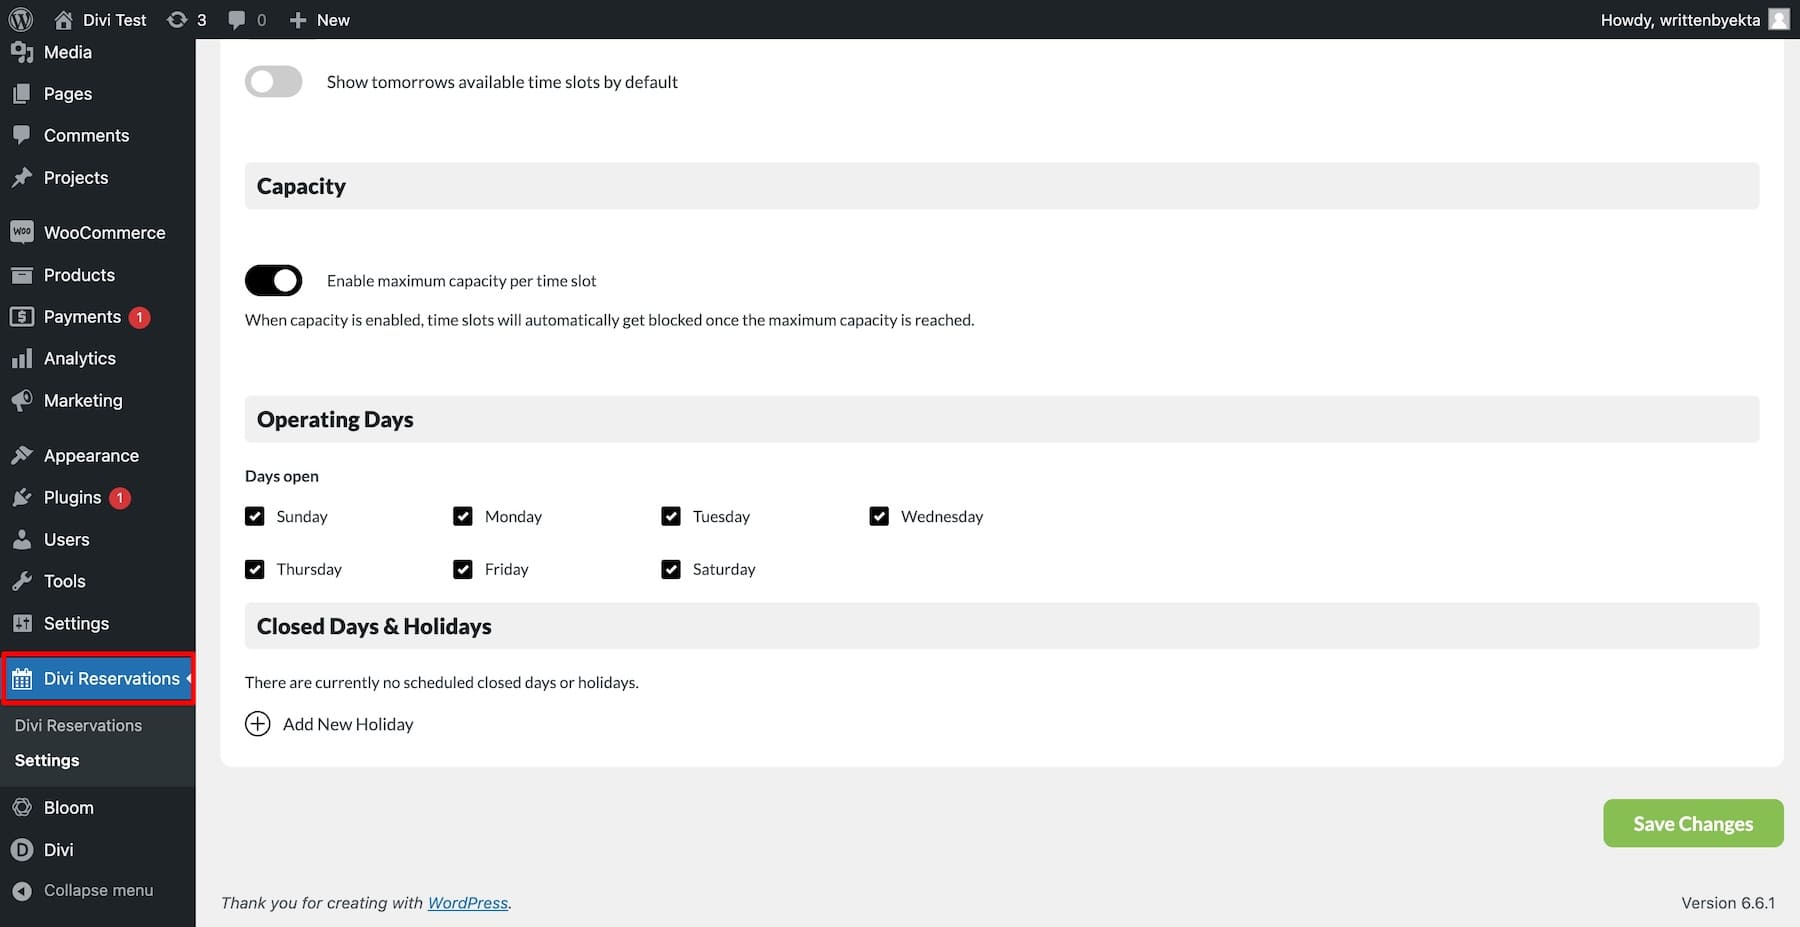
To activate the plugin, configure settings such as branding, time slots, operating days, menu, availability, date format, etc. Once done, go to the Reservations page and add a new module, Reservations Form.
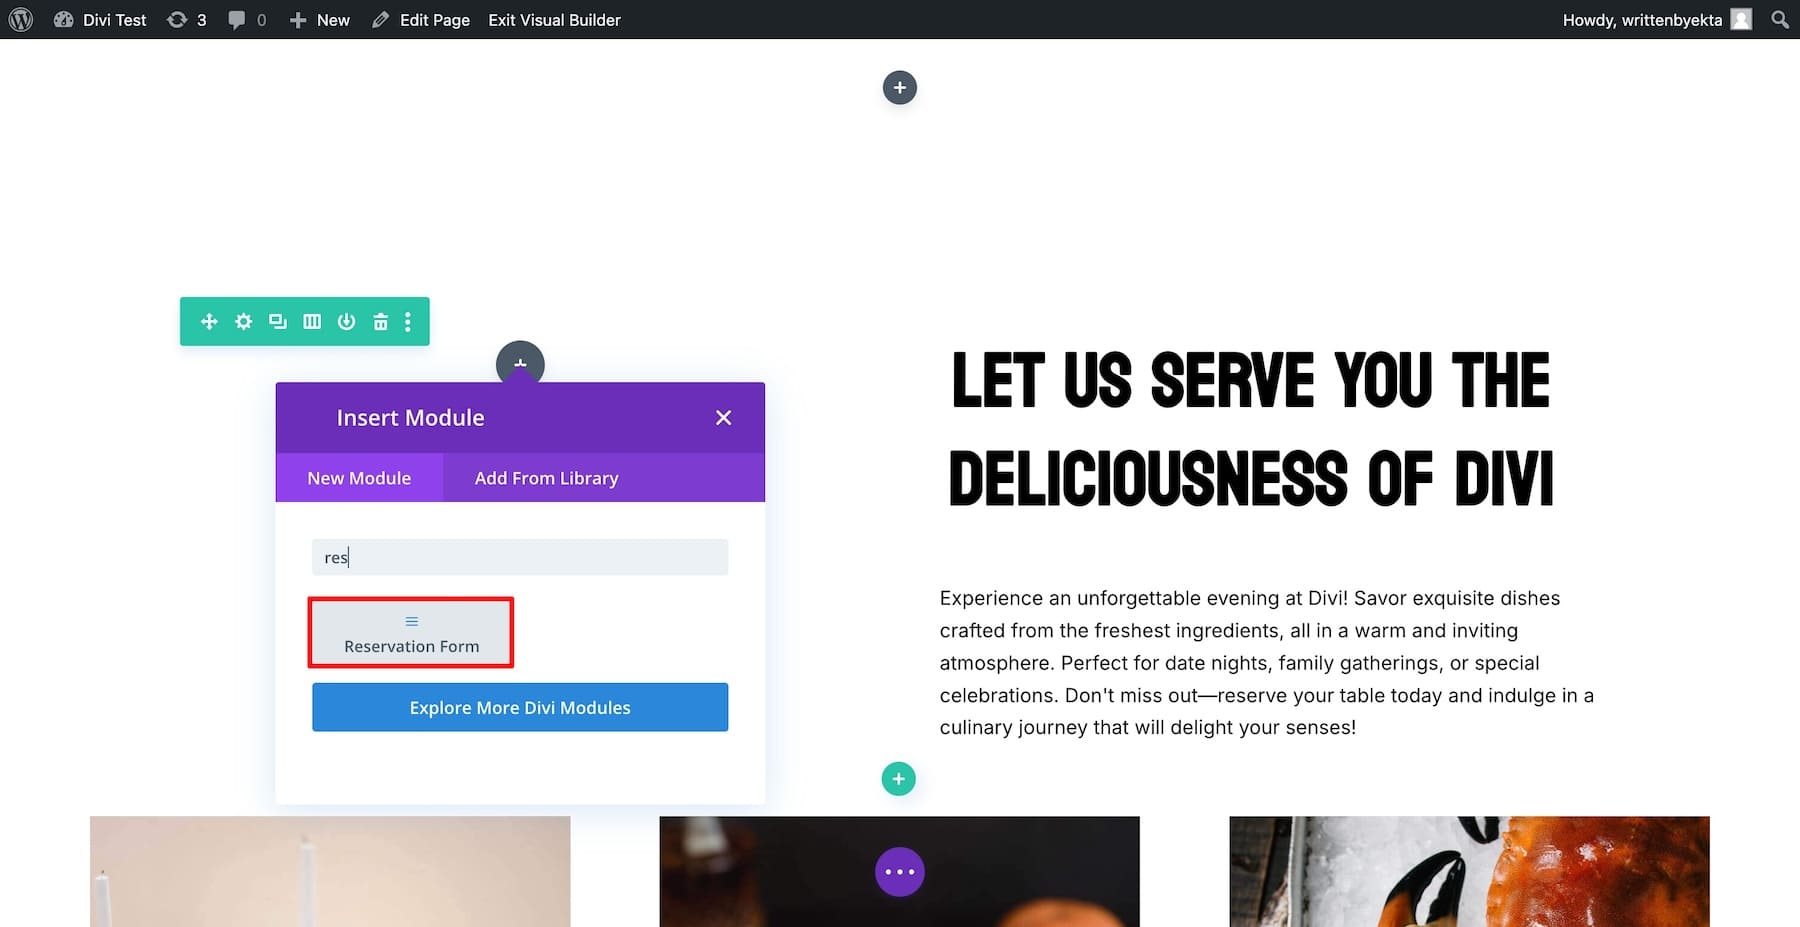
Using Divi Builder, optimize the form’s branding. Modify the color, add title text, change the background, and match it to your site branding.
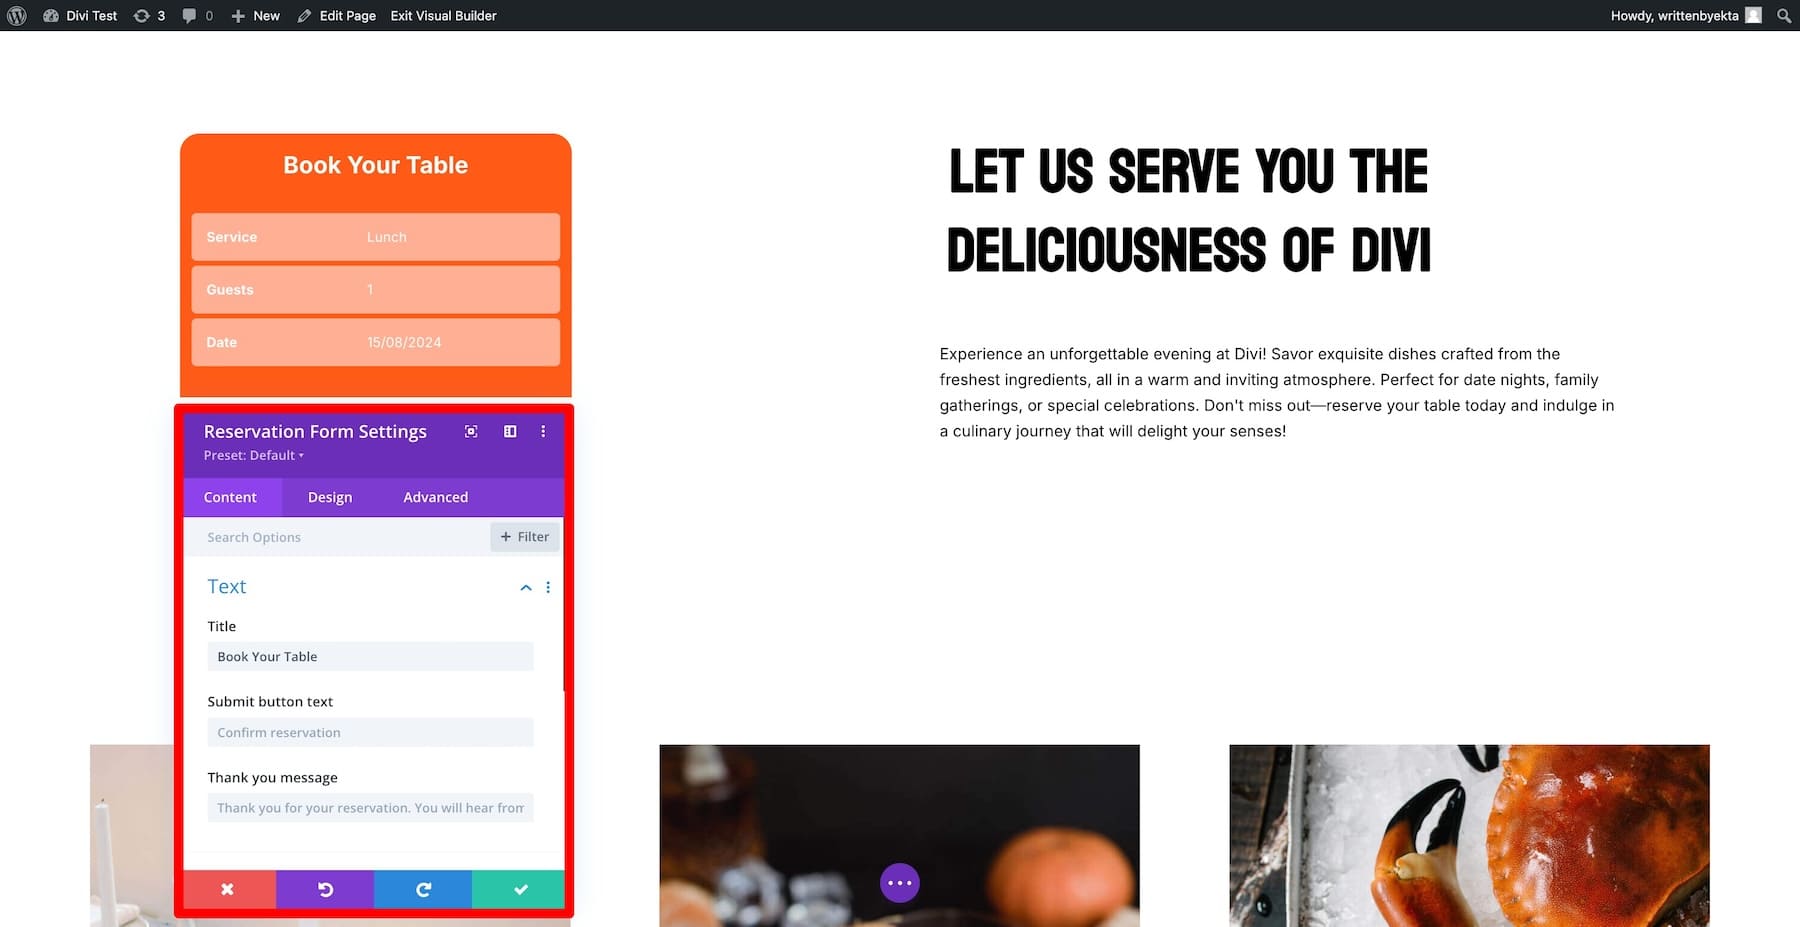
Once done, save the changes. Now, you’ll receive notifications on your WordPress dashboard whenever someone books a table.
Divi Marketplace has more extensions to add more functionality to your restaurant site. For example, if you want to add a toggle button Menu, check out Restaurant Menu with Toggle Button. Want to display food and restaurant images in different layouts? Use Gallery Layout Pack and many more.
6. Install Essential Plugins to Optimize Your Site Performance
Other than adding functionality to your restaurant site, here are some essential plugins and services that’ll help you optimize your site’s performance:
- WP Rocket: If you want your website to load quickly, WP Rocket is a caching plugin that can help. It’s effective, but there are other options worth considering.
- Rankmath: Great for boosting your website’s SEO. Rankmath is straightforward and one of the best SEO plugins for WordPress sites.
- EWWW: EWWW helps your images load faster without sacrificing quality. Considering you’ll upload food and restaurant images, EWWW is perfect for ensuring they’re fast to load and good quality.
- Updraft Plus: It is essential to keep backups of your website, and Updraft Plus does this automatically. This helps you in situations when something unexpected happens, and you don’t know how to fix it, so you restore the backup.
- Cloudflare: A CDN ensures your site loads fast and is safe from spam attacks. Cloudflare enhances your website’s speed and security with CDN and DNS services.
- Solid Security: Solid Security offers comprehensive protection to safeguard your website from threats. It’s great, though other security plugins might be better, depending on your needs.
- Bloom: Add beautiful email embed forms to your website pages and collect more email subscribers. Bloom is a premium email option plugin that is free with your Divi membership.
- Monarch: Display branded social media sharing icons on your website pages to encourage visitors to share them with others. Monarch is another Divi plugin that you get for free with your membership.
How to Make the Most Out of Your Restaurant Website in 4 Steps
After your restaurant site is published, there are some things you can do to improve its reach and get more visitors.
1. Optimize for Local SEO to Attract Local Customers
Since your main goal is to attract local customers to your restaurant, you should optimize your site to show up on local searches. Optimizing for local SEO helps nearby people find your restaurant when they search online, bringing more local customers through your doors. Here are some things you could do:
- Create a Google Business Profile: By optimizing your Google My Business profile, you give Google extra data about your business, such as location, address, and phone number, which will appear when someone searches for your restaurant online.
- Use Local Keywords: Write your website content using location-specific keywords to show up on local searches. For example, if your restaurant is in Brooklyn and your title dish is Italian pasta, optimize your site for “Italian pasta in Brooklyn.”
- Add Your Restaurant Address and Location: Make sure you add your restaurant’s address and embedded map in multiple places on your site so that search bots can easily access them and add them to Google’s Knowledge Graph.
- Optimize Footer with Contact Number: For the same reason, add your contact number along with your email address and other contact options in multiple places, ideally in the header, menu, contact, about, and footer sections.
2. Start a Blog to Attract Organic Customers
To show up for more keywords and improve your organic visibility, start a blog and publish engaging content on food, recipes, and tips to attract food lovers. Starting a blog with Divi is easy. Your Restaurant Starter Site already includes a blog page, so you only need to create new content from your WordPress dashboard.
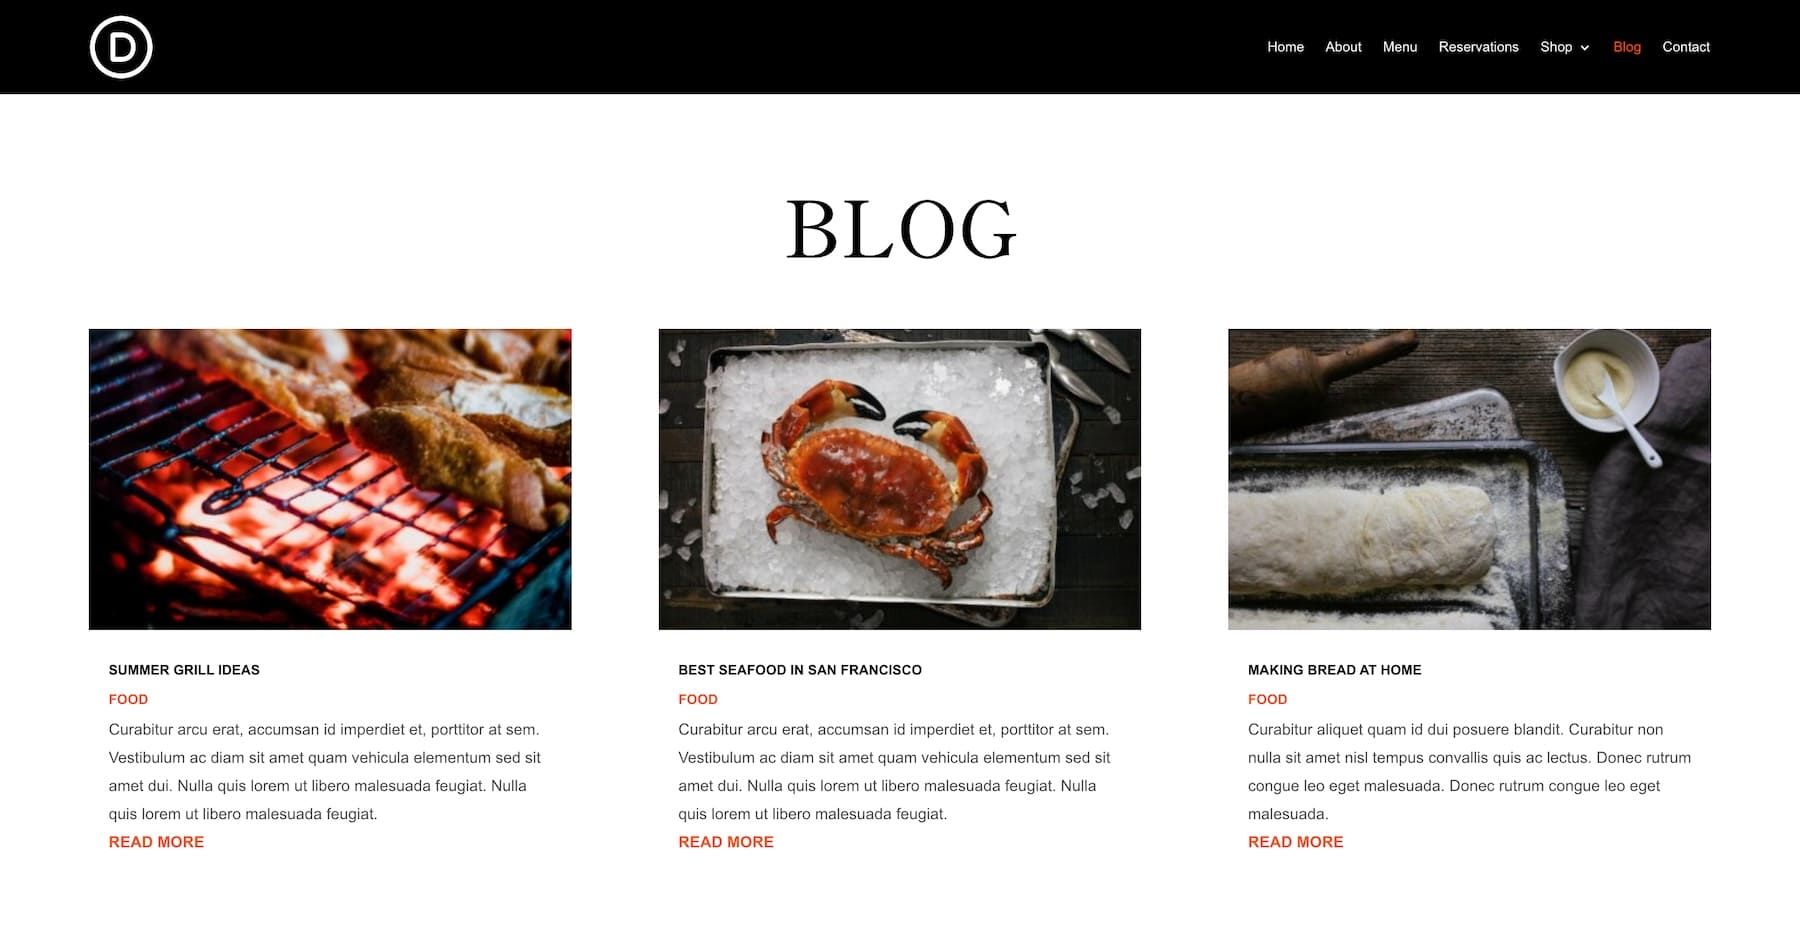
You can also use your blog to share news about your business. For example, if your business is doing great and you plan to open another outlet in Boston. So to attract Boston people, you can share the news with your blog readers. Since you’ve been actively publishing new content, people have become regular readers so many of them show up, giving you a grand opening night.
You can also use social media to build awareness about your restaurant and recipes and attract tourists visiting you, mainly because they read great reviews about your dishes on Instagram and want to try them themselves.
![]()
Using Divi’s Monarch plugin, sharing blog recipes and other content is as easy as one click. Your page shows beautiful social sharing icons readers can click on and share with their network. The best part? You can customize social media icons to match your branding.
4. Start an Email List to Convert Customers into Brand Advocates
You should also build an email list to keep in touch with your customers. Send them updates, special offers, and event invitations. Regular emails can turn occasional visitors into loyal customers who often return and tell others about your restaurant.
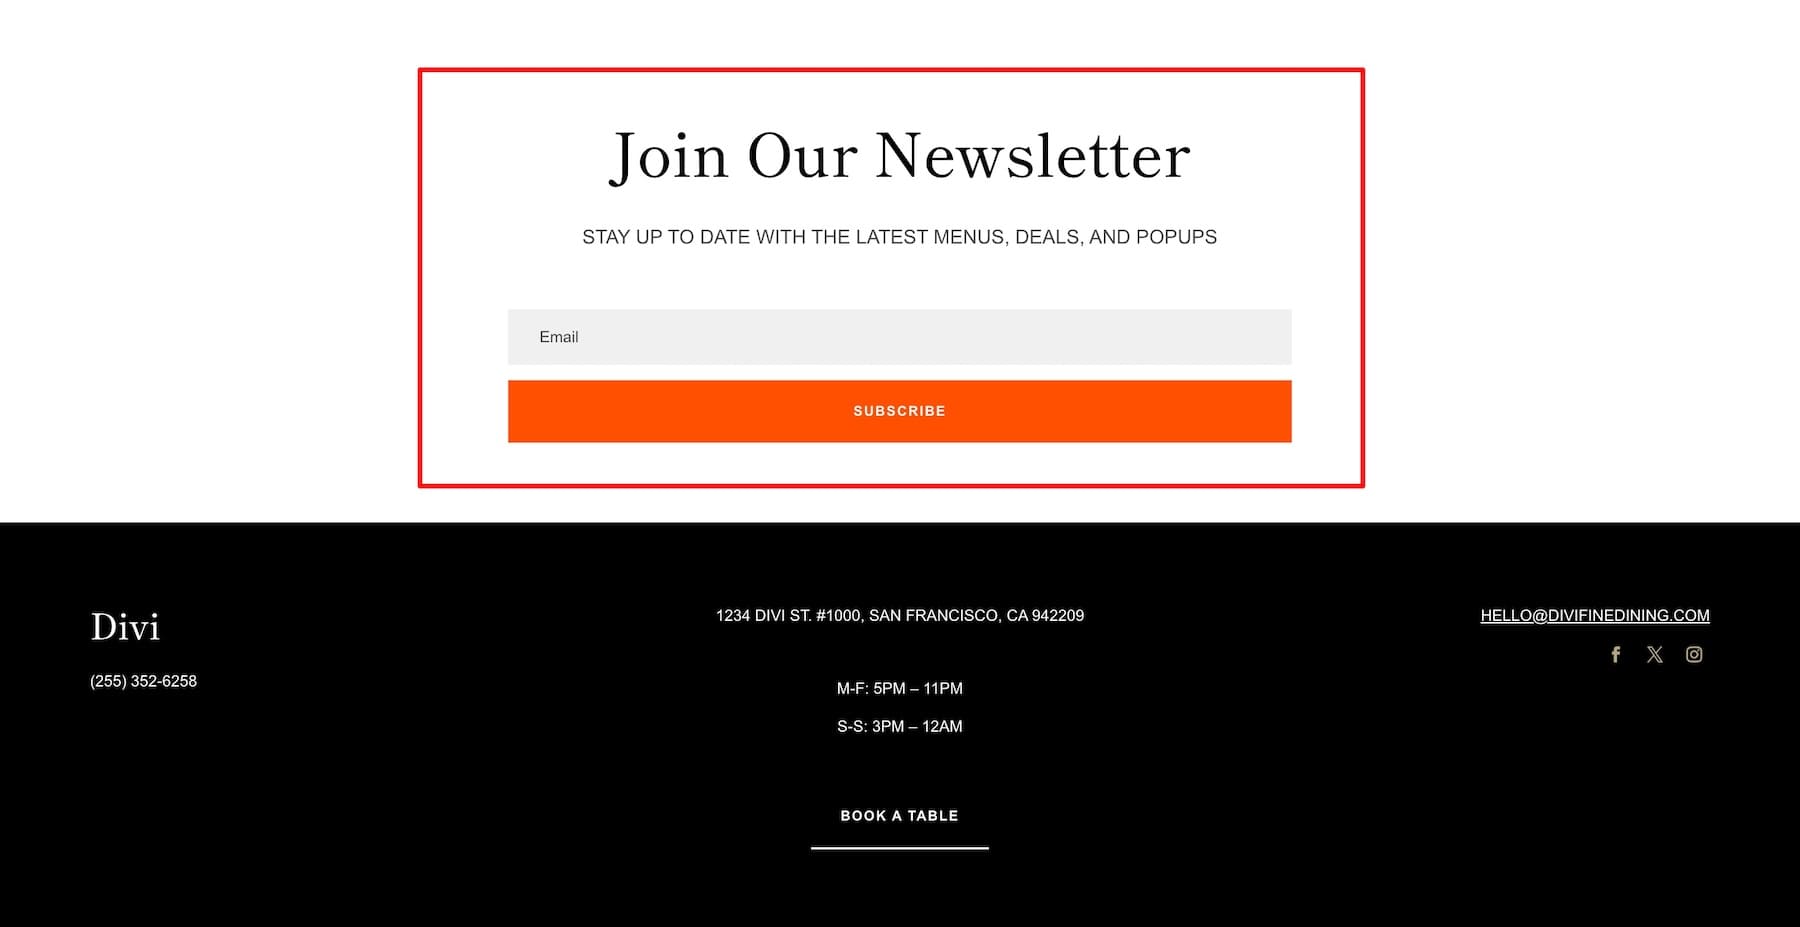
Divi’s Bloom plugin makes your email automation workflow super manageable. It not only makes connecting your email marketing service easy but also makes embedding email opt-in forms effortless. For example, you can integrate Mailchimp with Bloom to streamline email marketing.
Launch Your Restaurant Website Quickly and Effortlessly with Divi
Creating a professional restaurant website has never been easier. With Divi, WordPress, and SiteGround, you can get your site up and running in no time—no coding required. Showcase your menu, take reservations, and connect with your customers effortlessly.
With Divi’s intuitive design tools and ready-made templates, you’ll have everything you need to create a stunning, functional website that attracts food lovers and grows your business.
Why wait? Start building your restaurant website today and make your online presence as memorable as your dishes.
To bring your restaurant’s online presence to life, you’ll need the right set of tools. Below is a breakdown of the products mentioned in this guide that will help you create a stunning, high-performing website with ease.
| Products Mentioned | Description | Starting Price | Link |
|---|---|---|---|
| Divi | WordPress Theme & Website Builder | $89/year | Get |
| Divi Quick Sites | Restaurant Website Generator | Free with Divi | Get |
| Divi AI | AI Website Generator and Assistant | $16.08/month | Get |
| SiteGround | WordPress Hosting Provider | $2.99/month | Get |
| WordPress | Content Management System | Free | Get |
| Simply Schedule Appointments | Online Booking Plugin | $99/year | Get |
| Bloom | Email Opt-in Plugin | Free with Divi | Get |
| Monarch | Social Sharing Plugin | Free with Divi | Get |
| Rank Math SEO | SEO Optimization Plugin | Free, Pro is $6.99/month | Get |
| EWWW | Image Optimization Plugin | Free, Standard is $8/month | Get |
| UpdraftPlus | Website Backup Plugin | Free, Premium starts at $70/year | Get |
| Cloudflare | Website Security & CDN | Free | Get |
| Solid Security | WordPress Security Plugin | Free, Pro is $99/year | Get |





Leave A Reply