Live video is being prioritized more and more often by nearly all social networks. But specifically Facebook. The social giant makes going live incredibly simple, especially if you’re using one of its many mobile apps (including Instagram). However, just pressing the red Go Live button doesn’t mean that you’re actually doing it the best way — the way that will net you the most viewers, quality engagement, and an overall increase in conversions and impact for your brand or company. That’s why we’re gonna break down what it means to go live on Facebook the right way, so that you’re always one step ahead of the algorithms.
Subscribe To Our Youtube Channel
What Do You Need to Go Live?
Outside of the obvious Facebook account, there’s a little bit of stuff you need to pick up to make sure you’re doing live video the right way. While simply pressing Go Live is by far the lowest barrier to entry, if you take the time to prep and invest in yourself and your broadcast, the end results will pay dividends. Here’s a quick rundown of what you need:
- Studio space
- High-speed internet
- Computer
- Streaming software
- Lighting
- Video camera
- Microphone
While that might seem like a lot to put together, it really isn’t that bad, all things considered. While you can absolutely spend a fortune on these things before ever going live, that’s completely unnecessary. We have a few options put together that will get you online and looking professional without breaking the bank.
The Non-Negotiable Essentials
When you’re looking to start livestreaming, three things are totally non-negotiable: studio space, high-speed internet, and a computer powerful enough to handle it.
A Decent Computer/Laptop
We’re going to assume that you have a computer that doesn’t bog down too easily because livestreaming can really hog CPU cycles. You don’t need a top-end gaming rig or anything, but you probably won’t want to do hours-long livestreams on Facebook from your 15-year-old HP laptop, either. If you’re able to watch Netflix at the same time you’ve got a half-dozen tabs open in Chrome, you’re probably going to be fine.
And in general, it doesn’t matter if you’re on a PC or a Mac. If you’re going to be streaming games to Facebook, then a PC might be a better choice because many games aren’t available for Mac, nor are some gamer-centric streaming suites. But if you’re doing a more general, talking-head livestream, then there’s good software on both that can get you live. You can even find some Mac-exclusive streaming software that may be better than PC equivalents (but we’ll get to that in a later section).
High-Speed Internet Access
You also don’t need to have ultra-fast gigabit fiber internet access, either (but it’s great if you do). As long as you have an upload speed of 5-10 mbps, you’re going to be fine. Download speed is important for most things, but given that you’re streaming from your computer, upload is where you want to focus. If your upload speeds are disproportionately slow compared to your downloads, contact your ISP to see if they can help troubleshoot any issues. We generally use speedtest.net to get an idea of where our speeds are.
Studio Space
Then we have your studio space. If you’re looking to go live on Facebook, we strongly suggest that you have a dedicated space for doing so. It doesn’t have to be fancy, nor does it need to be expensive. But if you look at any professional livestreamer, there’s consistency in their background. You don’t want it to be distracting, either. You’re the focus, but no one wants to see your dirty laundry in the background, either.
Mak’s background looks like this:
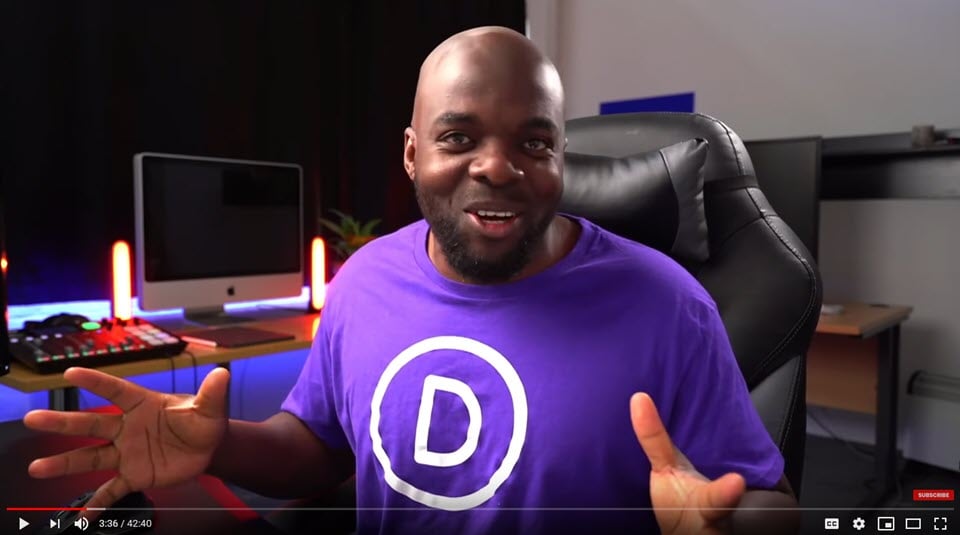
While Matt’s is here:

As long as it’s neat, clean, and not distracting, have fun with setting up your space. But consistency in location can help keep viewers from focusing on that instead of you and your topic. Unless changing location is your thing, which is a whole different story.
Also consider acoustics. Being in a smaller, more intimate area that has some soft surfaces makes a big difference in stream quality over setting up at the table in your high-ceilinged kitchen.
The Rest of Your Livestream Setup
Once you have your basics lined up, it’s time to dig in on the elements of going live that can make or break a stream: the equipment. Don’t be scared, though. Getting quality audio-visual equipment is easier and more accessible than ever, and you might be surprised at how well entry-level gear performs.
Microphone
We’ve recommended a couple of microphones for podcasters in the past, and we stand by those for livestreamers, too. The Blue Yeti mic is one of the most affordable options around, and you can generally find a used one around $79-99 or a brand new one for $129. The RØDE Procaster comes in generally around $229, which puts it out of some people’s budgets, but it does provide a little higher quality audio and less background noise than the Blue Yeti. However, it also needs a USB hub and boom arm. It’s the mic setup that we use for our ET livestreams, too.
Camera
It may seem obvious, but you do need a camera to livestream. There are so many options when it comes to looking at video cameras that it’s pretty intimidating to even figure out where to start. So let us help you. We suggest the Logitech C922 webcam as a place to start. Really, any of the Logitech C9XX series would work as an entry-level camera that streams in HD and requires little-to-no setup.
If you’re looking to get into the full-on professional-grade camera at this stage, you should take a gander at the Sony Alpha 6600. Recommended by our very own video guru Matt Phillie, if you’re looking to put together video content and have the budget for it, the α6600 is a solid choice.
We do want to caution against using any built-in webcams, though. Facetime HD cameras and other onboard technology like that are perfectly adequate for communicating with family and friends, but if you want to go live on Facebook, we recommend getting something more dedicated to the cause.
Lighting
As much as a high quality microphone and camera are worth, you can negate all their benefits by having poor lighting. It doesn’t take a huge investment to see huge results. In fact, we think that Wistia’s down-and-dirty lighting kit is pretty fantastic. They “went to Home Depot and built a lighting kit with clothespins, clip lights, and LED bulbs.” Because you want soft light, coming from in front of you, that’s consistent and powerful.
That said, if you don’t want to go the DIY route, head over to Amazon or other online retailer of choice and search for ring lights.
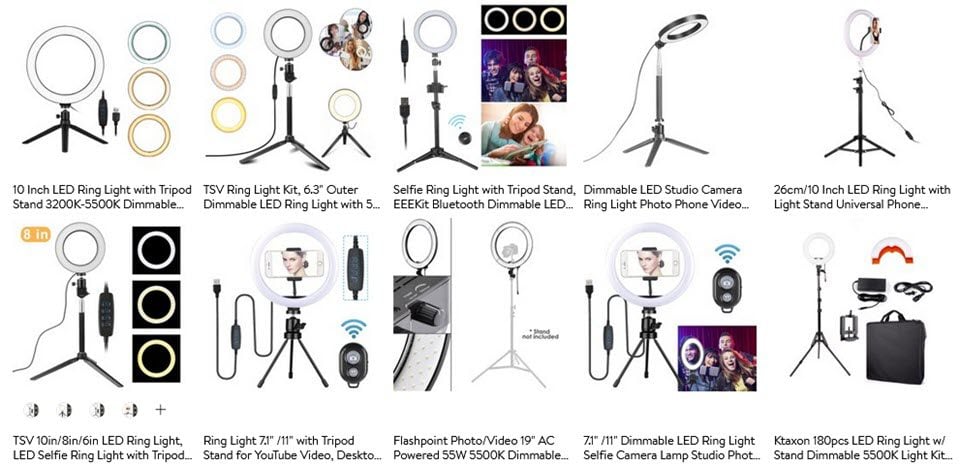
You’ve probably seen these before, either in videos or the hardware aisle — or even the makeup and cosmetics section. They’re all pretty similar. If you’re doing “talking head” style livestreaming, a ring light may be all you need. It provides strong, stable, even light so that you’re always going to be illuminated in focus.
If you are doing a shot that’s more spread out, showing more of the background or moving around a space, consider a larger lighting set up like the one that Wistia recommends.
Streaming Software
Depending on the type of stream that you’re planning to produce, there are a number of options of streaming software for you to choose from. Almost an overwhelming amount, to be honest. Here at Elegant Themes, when we go live on Facebook (and others), we use a combination of OBS Studio, Restream.io, and/or Ecamm Live. Primarily, though, it’s Restream and OBS.

OBS Studio is the encoder software, or the streaming software itself. This is the app in which you set up how you want the screen to look to your viewers and where you actually press the Start Streaming button. We highly suggest that you read our guide on getting it set up. OBS Studio is a free, open-source streaming app that has been wonderful for us in a number of ways.
Restream.io is another great piece of software that lets you broadcast to more than one channel at a time. For instance, by default, most software only lets you choose a single platform to stream to. So that might be Facebook or Twitch or YouTube. With Restream, you set this platform as that single channel, and then they distribute your feed to multiple platforms — YouTube, Facebook, Twitch, etc. — simultaneously.
Additionally, if you’re using a Mac, you have the option of Ecamm Live, a Mac-only streaming app that originally specialized in Facebook livestreaming. Now it fully integrates with Restream and Switchboard Live to get you across any number of platforms. In our experience, using Ecamm Live has been the simplest, easiest, and most hassle-free app to start livestreaming. The downside and reason we can’t suggest it 100% is that it’s Mac-exclusive and has a monthly license fee, where OBS is a free option.
How to Go Live on Facebook
For this particular article, we are going to show you how to go through the steps of going live on Facebook using OBS Studio. In order to set that particular software up and running, please see our guide on that topic.
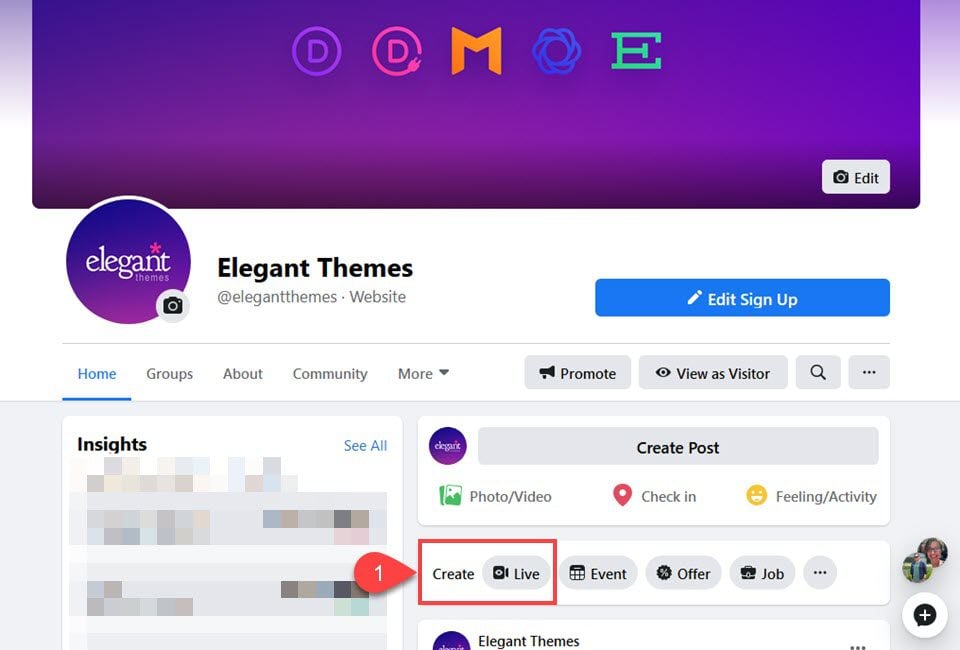
For Facebook specifically, you’re going to want to head to the Page you want to stream to and find the Create – Live button.
Pressing it will take you to the Stream Setup tab of the Facebook Live interface. You will be most interested in the Live Stream Setup box. Here, you will need to copy the Stream Key (and potentially the Server URL) to paste into OBS settings.
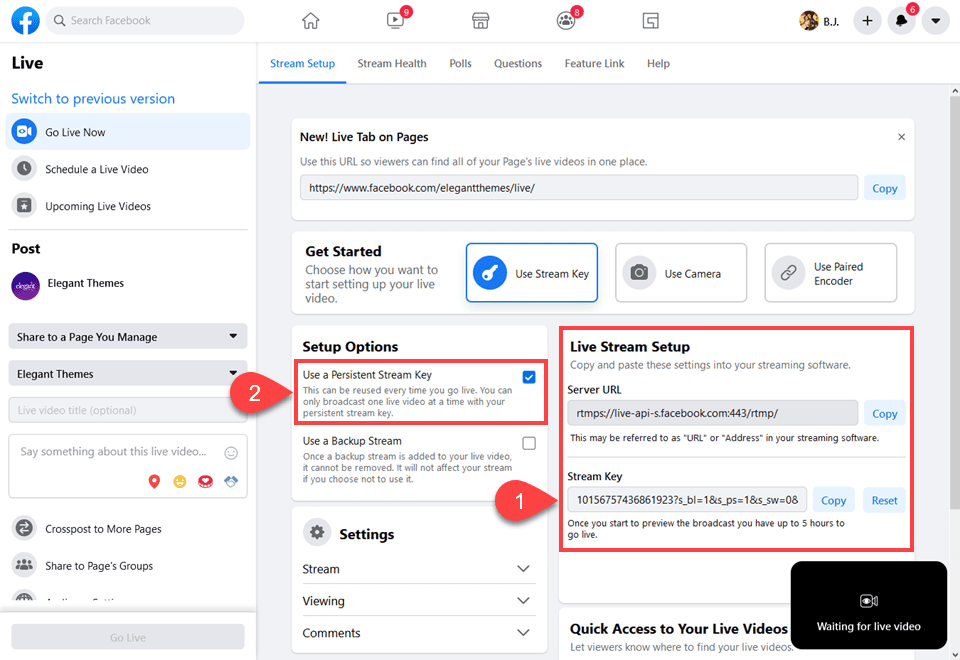
Additionally, it’s not a bad idea to check the Use a Persistent Stream Key option, which means that you won’t have to go through the OBS set up each and every time you do a new livestream.
With the key copied, head into the OBS settings. Under File – Settings, you will go into the Stream tab.
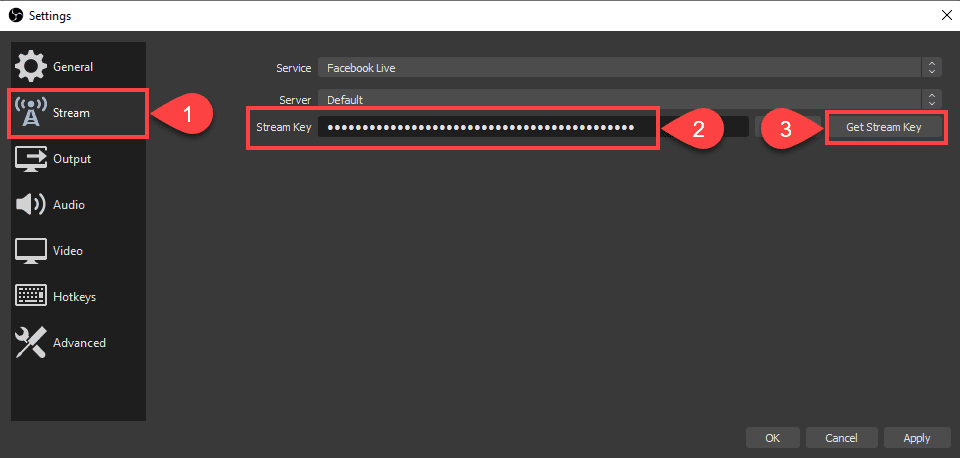 Paste the stream key into the appropriate field (and the server URL if you want to — otherwise the default tends to be safe) and click Apply. You can also press the Get Stream Key button to be taken to the Stream Setup tab we showed above.
With that saved and applied, you’re just able to go live on Facebook.
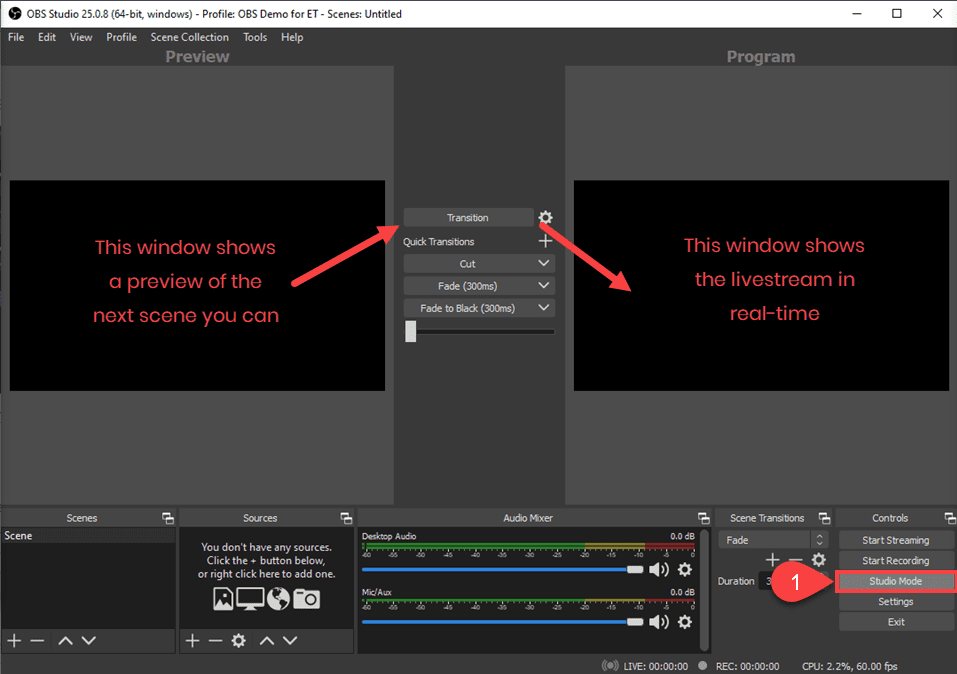
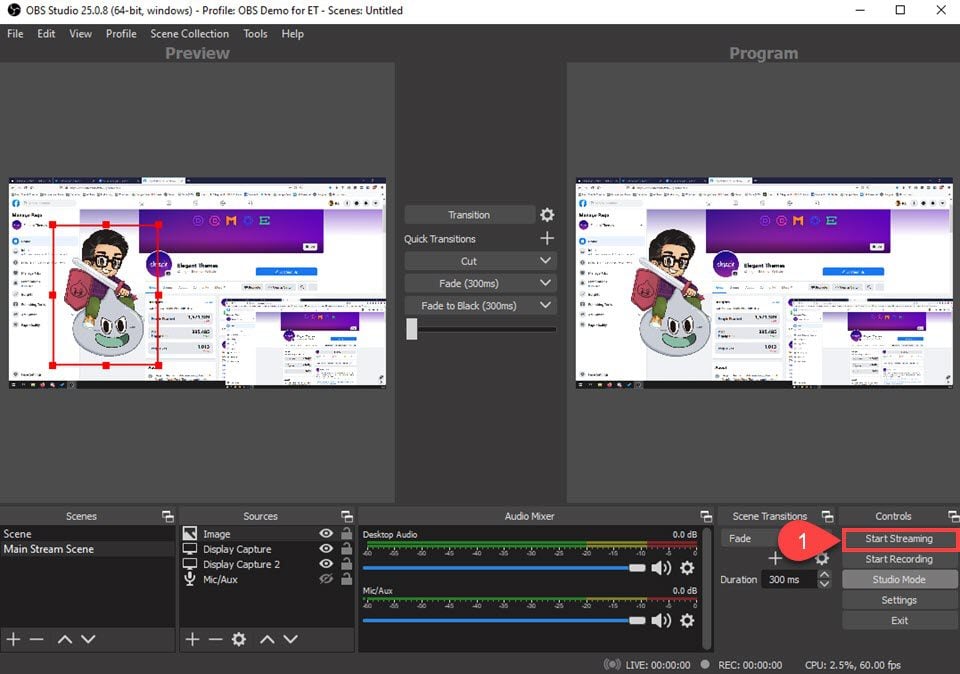
If you followed our OBS guide on setting up the software scenes and elements, you’re (almost) ready to press the Start Streaming button!
Choosing Facebook Stream Destinations
The only other choices that you have to make before you go live on Facebook are where you want to broadcast your stream and who you want to broadcast to. To the left of your screen in the FB livestream manager are a number of dropdown menus and selection buttons.
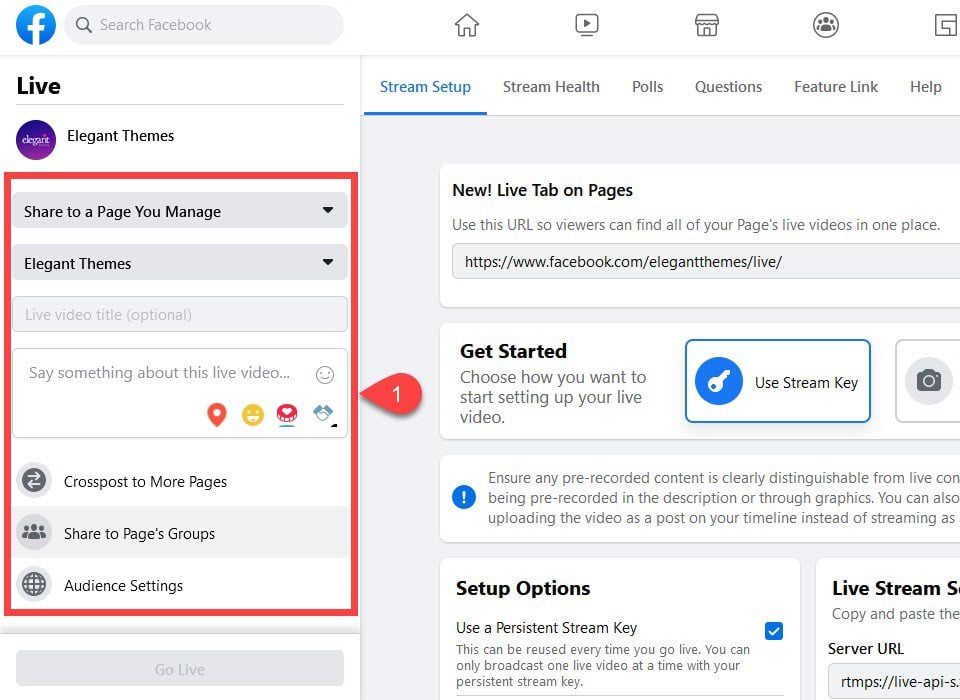
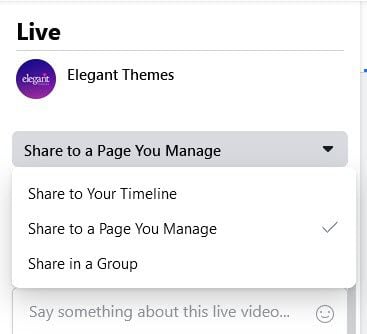
The top dropdown lets you choose between Pages and Groups (and your own timeline) on which to stream.
Depending on what you choose, you will get another dropdown for you to pick the primary destination for your stream. They all work the same way in terms of streaming, but make sure that you have permission from any group or any page that you choose to actually broadcast your stream.
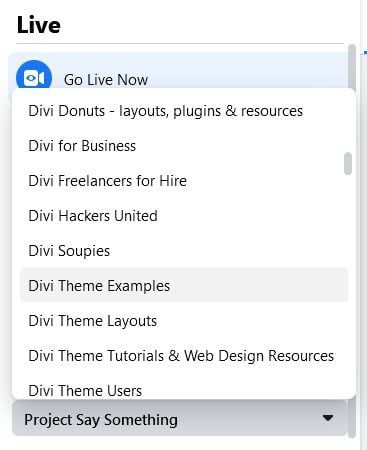
In addition to your primary destination, you can also crosspost to multiple pages and groups at the same time. Those are chosen below the dropdowns, and when you pick one of these, you can choose multiple options from a multi-select modal in the middle of your screen.
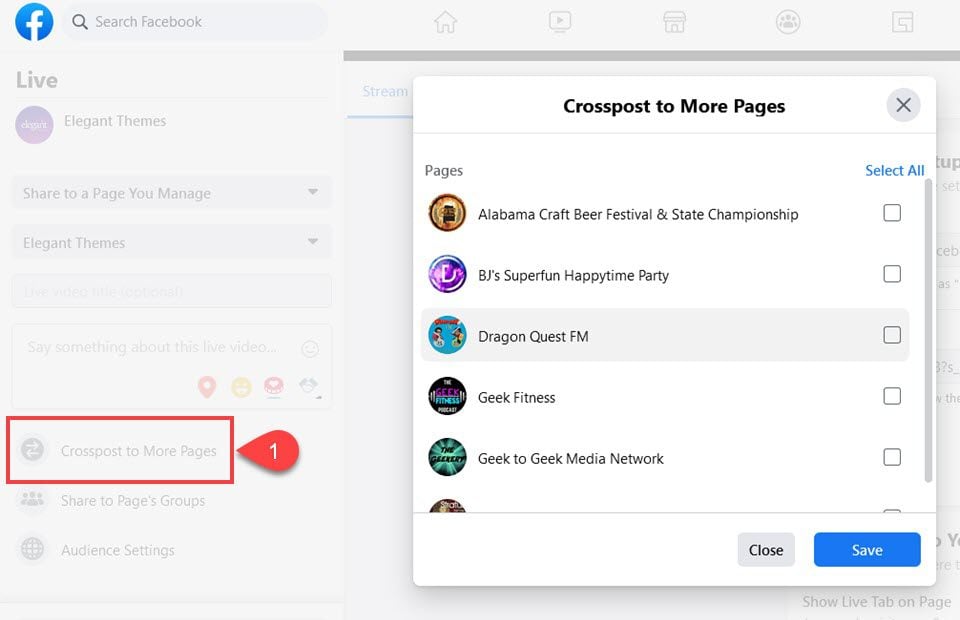
For crossposting to groups, however, you can only choose from groups that the page you’re set to stream to oversees. If your primary location is a group or your own timeline, these extra options won’t appear.
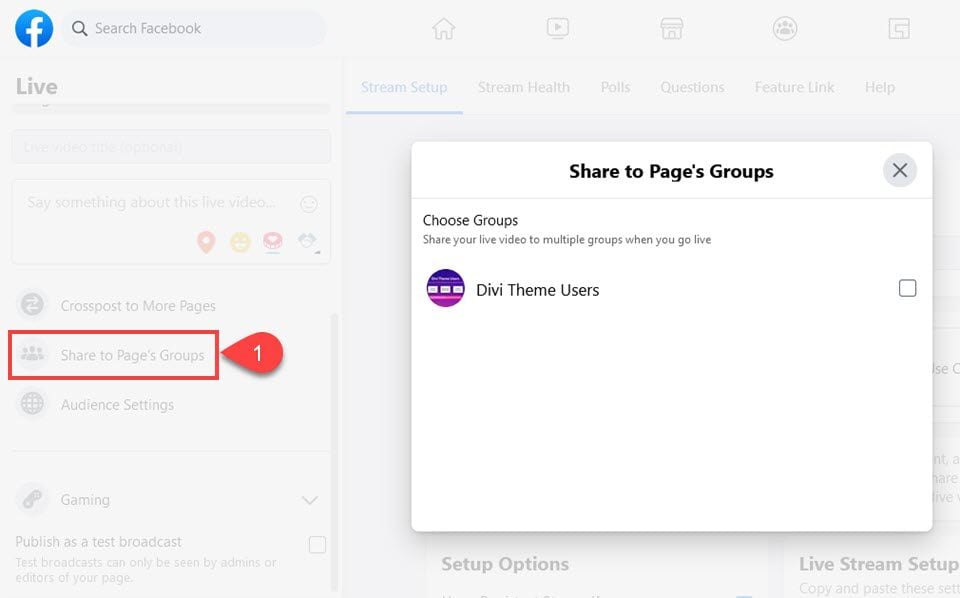
With that done, it’s time to choose audiences.
Choosing Facebook Live Audiences
For most people, this is a non-issue. Most of your streams are going to be unrestricted, and you won’t have to either allow or disallow anyone in them. However, that’s not the case for everyone. Depending on the kind of content you stream or the places you’re streaming to or from, permissions may need to be adjusted.
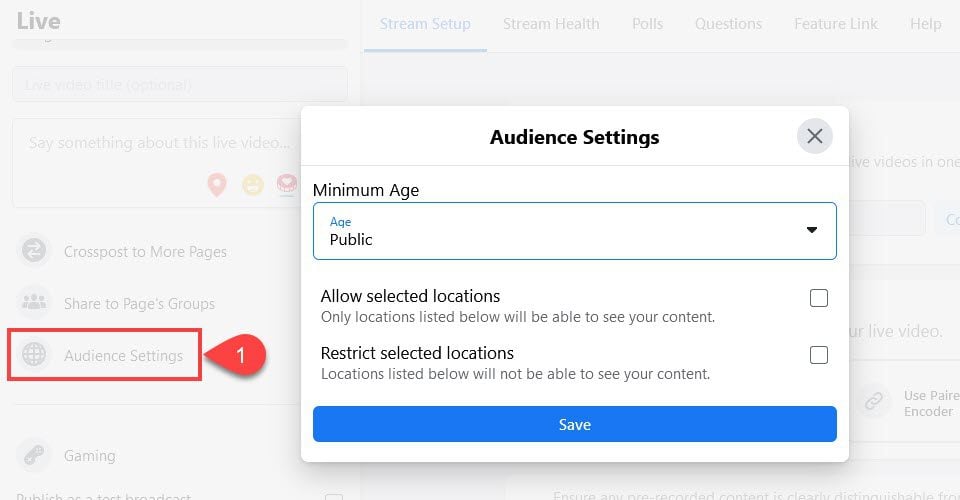
In addition to the locations you can allow/restrict, you also have an Age dropdown. If Public is selected, then it’s an all-ages, open stream anyone can attend. You can, however, choose from a number of options:
- 15+
- 18+
- 21+
- 25+
We’re pretty impressed by the number of options here, actually. It’s not often that you have options other than simply 18+, so heartily being able to more specifically control who your content is intended to reach.
Now You’re Ready To Go Live!
If you’ve made it through all of that, from getting your studio set up with lights, your laptop and internet connection in tip-top shape, set your scenes and elements in OBS, and adjusted the pages and audiences, you’re absolutely going live on Facebook the right way. Again, while it is entirely possible to go live to Facebook with a single button press from their mobile app, it’s by far not the best way to do it. With minimal investment and a little time, you can get yourself a livestreaming set up that anyone watching would be jealous of.
What tips do you have for how to go live on Facebook?



I would suggest adding Streamyard to your list of possible services.
I spent some time evaluating streaming platforms before starting our weekly live show (The State of Kentucky), and chose Streamyard primarily for the ease-of-use for interviewees. All they need is a way to access the link I send, be it desktop, tablet, or phone. They click the link, allow acess to their camera and mic, and they’re in.
Also, Streamyard streams simultaneously to FB and YT out of the box. And, you can download both the full video and audio-only of the session, so we post the audio as a podcast as well.
There’s more to Streamyard, but this isn’t intended to be a full review. 🙂 I just wanted to throw it into the mix, as we have been pretty pleased with it.
Thanks for the recommend, Bruce! I haven’t toyed around with Streamyard, myself, but I intend to try it out now. 🙂