Canva Teams has been around for a while. It allows you to have a team of up to 5 people at the lowest price, which makes it a great choice for small businesses that can’t afford to hire a designer. In this article, we’ll look at several features for the lowest subscription including the Branding Kit and collaboration tools, to help you decide if Canva Teams is a good choice for your business.
Canva Teams Features
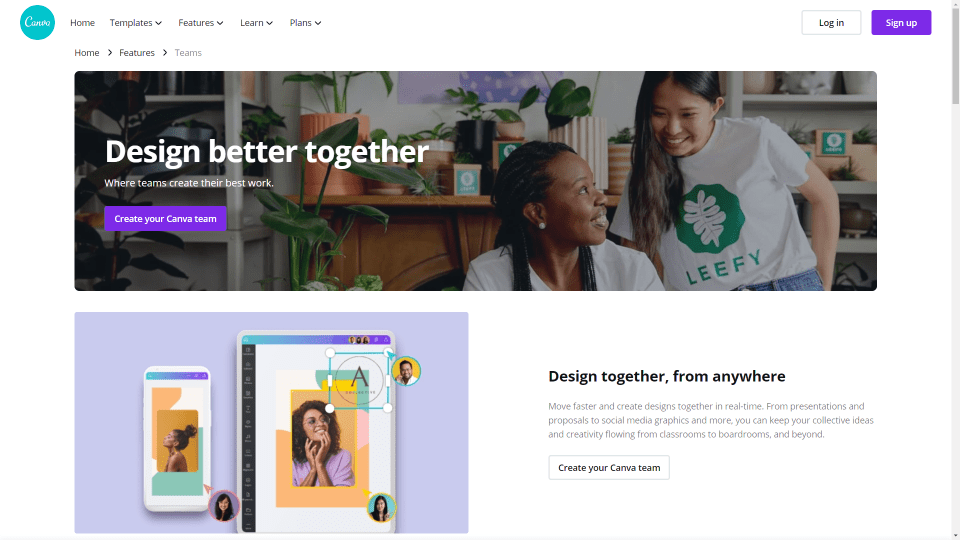
Canva is a simple and powerful online design tool. The Pro version takes this to the next level by allowing you to collaborate with a team. You can share design elements and templates while collaborating on projects. Canva Teams lets your team work on designs together in real-time.
Canva Teams makes it easy to stay on-brand with logos, sharable color palettes, and font. With Canva Folders, all the reusable assets, files, and projects can be organized and stored in the same location. Your team members can access this folder on any device.
Communication is simplified. Create groups, post comments, tag the team members, make suggestions, resolve suggestions, and share designs. Invite team members and choose their access level. You can work on any device.
Main features include:
- Brand Kit
- Magic resize, background remover, animations
- Folders with 100GB of storage helps you organize your content.
- Free premium content – over 75 million photos, videos, and graphical elements, 3000 fonts, and over 420,000 templates.
- Collaboration tools
Canva Pro is ideal for teams. It’s easy to learn and has lots of simple, yet powerful, features to create visual content, and includes short videos to train them. This makes it easy to train team members without having to have extensive and difficult courses. They won’t need to learn expensive and complex design tools.
Brand Kit Features
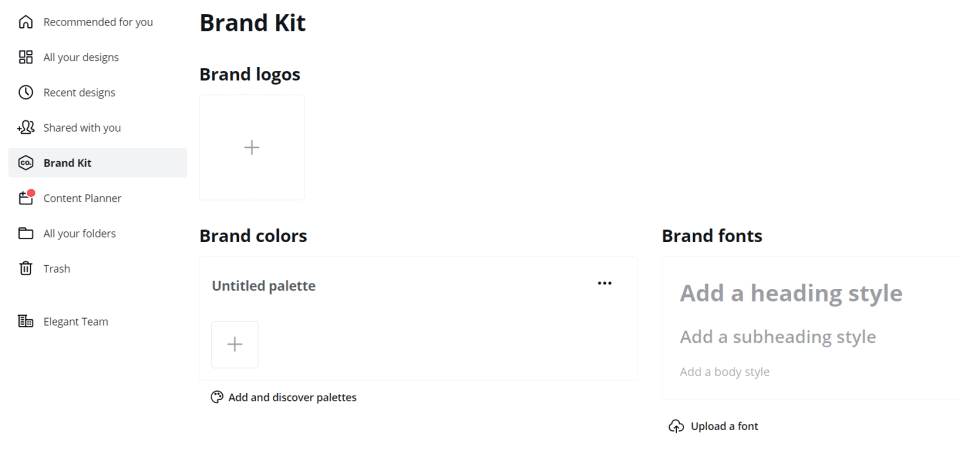
The Canva Pro platform has a universal Brand Kit where you’ll keep your branded logos, colors, and fonts. Your team members have access to this Brand Kit, so your company’s designs will remain consistent. This gives you more control over the branding and makes your graphics look professional.
Features include:
- Set up your branded colors.
- Select your font families.
- Choose and upload your images.
- Upload your logo.
- Create templates for social media, email, blog posts, etc.
Reuse graphics
It allows you to save your branded colors, images, fonts, and logo and then apply them to your templates with just a few clicks. This saves time and keeps your branding consistent. Team members have access to the graphics, so everyone can use the same colors, fonts, etc.
Resize based on the platform
It’s not a good idea to share the same sized images on all your social platforms. Images will be incorrectly cropped and look unprofessional. This usually means creating a new image for each platform individually.
Instead, use the Magic Resize feature to automatically create images in the correct sizes for all your social platforms. To change the dimensions of your images, use the Resize tool. This makes it easy to create custom dimensions for your website, newsletters, social platforms, etc.
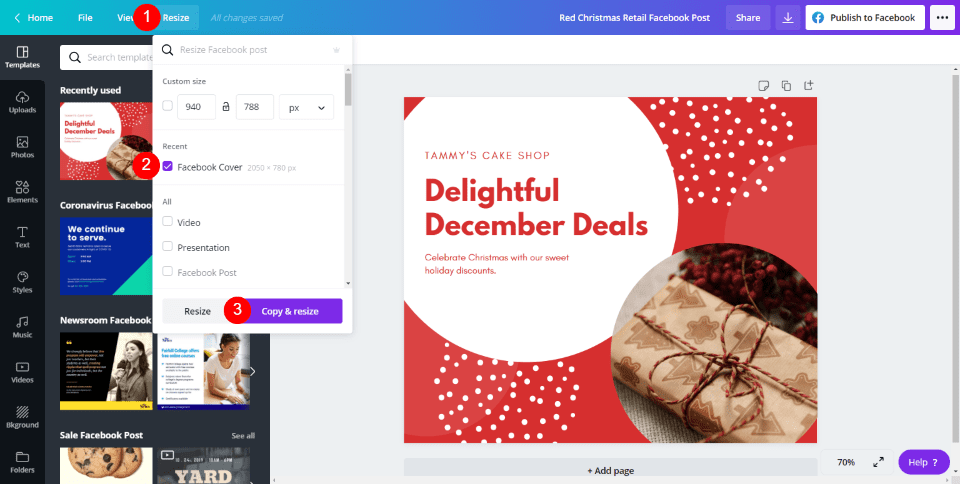
Select the Resize option in the menu and then choose the size or the platforms to resize the image to. Click Copy and resize.
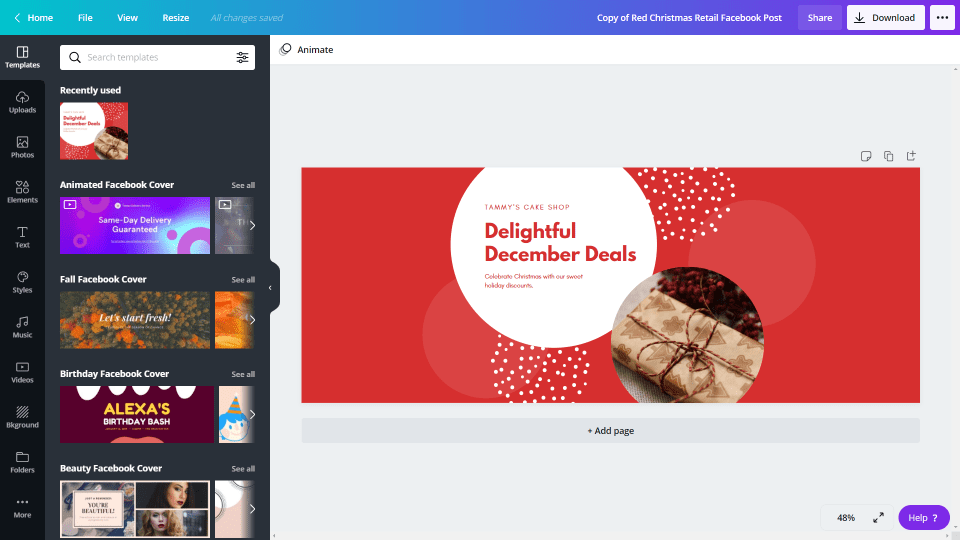
The image is automatically resized. The graphics and background are adjusted to fit the new size.
Save templates
Templates keep you from having to redesign or recreate the same design for your featured images, social media images, newsletters, presentations, etc. All team members can use the templates, so everyone starts with a consistent design. Templates give your team members a head start and help you keep your design elements standardized.
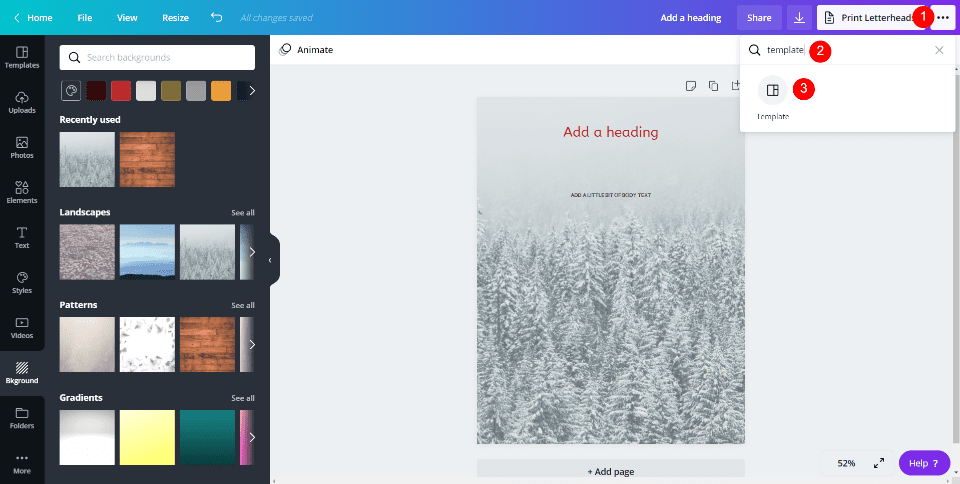
To create a template, simply create a design and then select Save as Template. This takes a few steps in the editor. Click the three dots in the upper right corner, search for Template in the field labeled How would you like to publish?, and then select Template. In the image viewer, just click Save as Template.
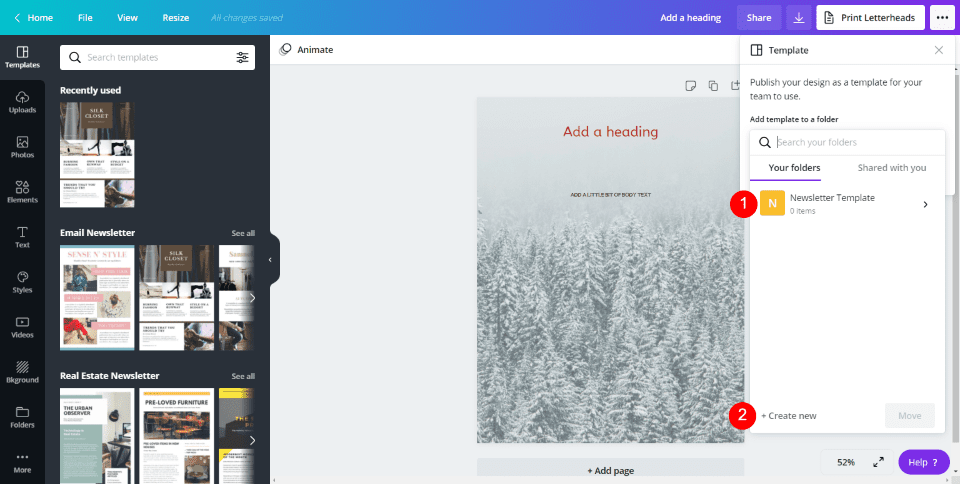
Choose the folder you want to save it in or create a new folder and click Move Here.
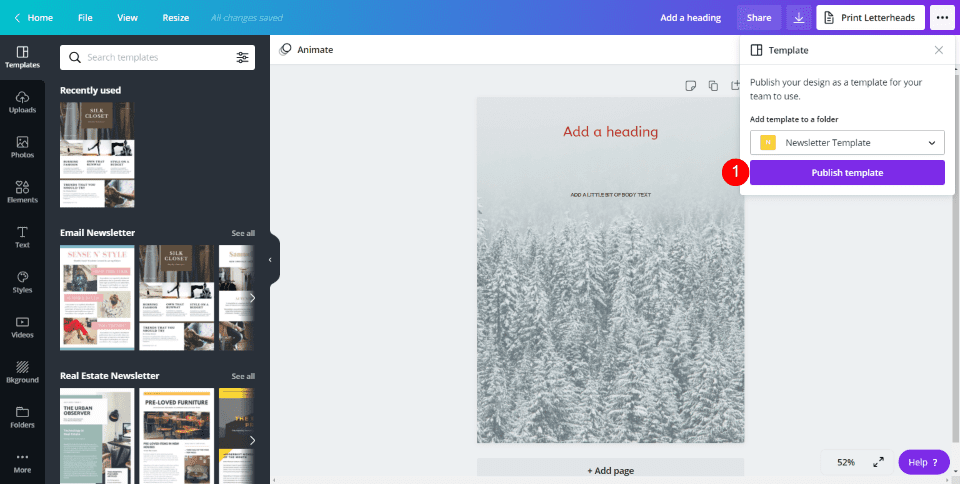
Next, click Publish template.
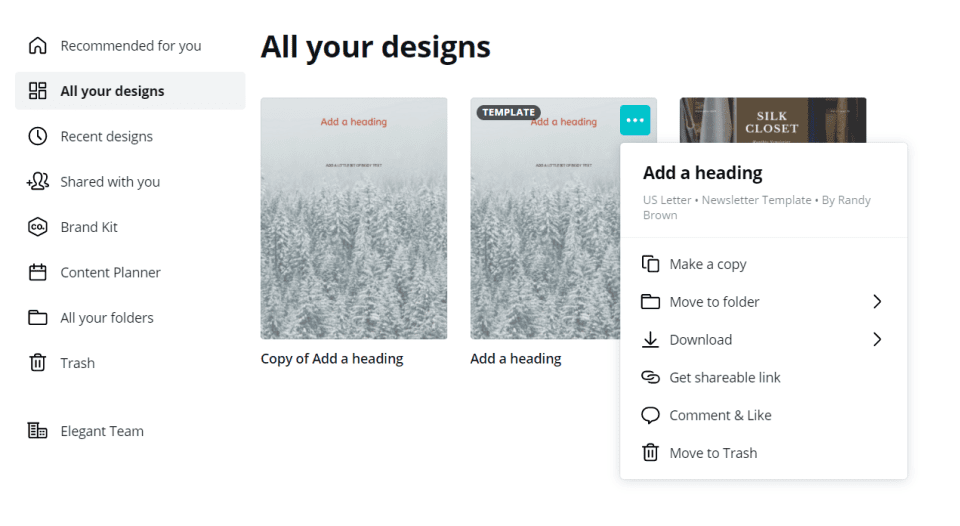
It will automatically appear in the All your designs tab for the team to use.
Keep images organized
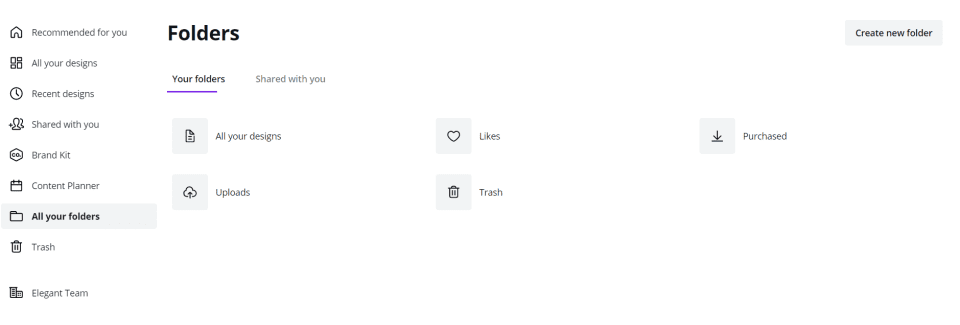
Create folders for images to keep content for specific projects separate. This makes it easier to find for both you and your team. This also keeps team members from accidentally using the wrong assets if there are multiple versions of files to choose from. The collaboration tool lets you share the folders with your team members. To create a new folder, click the button on the right.
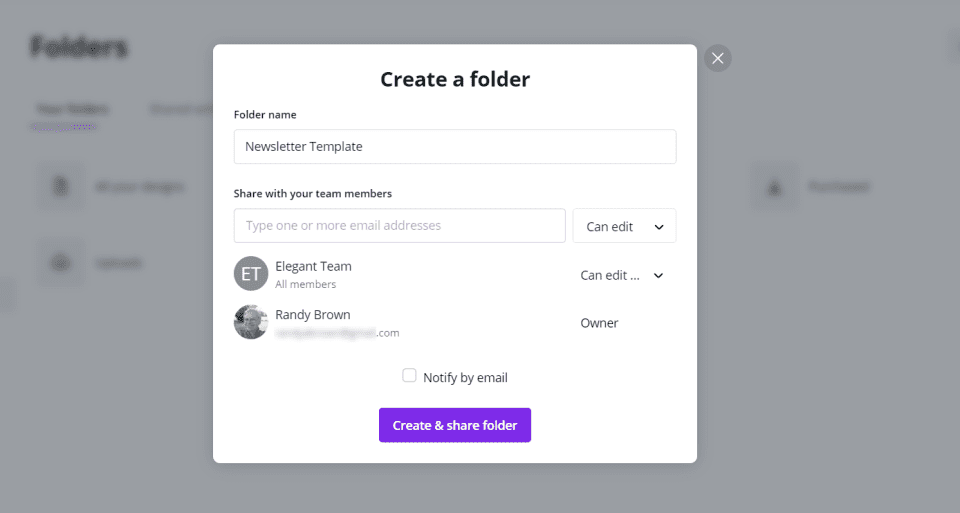
Name the folder and select the team or members you want to share it with. You can specify if they can edit.
Creating a Brand Kit
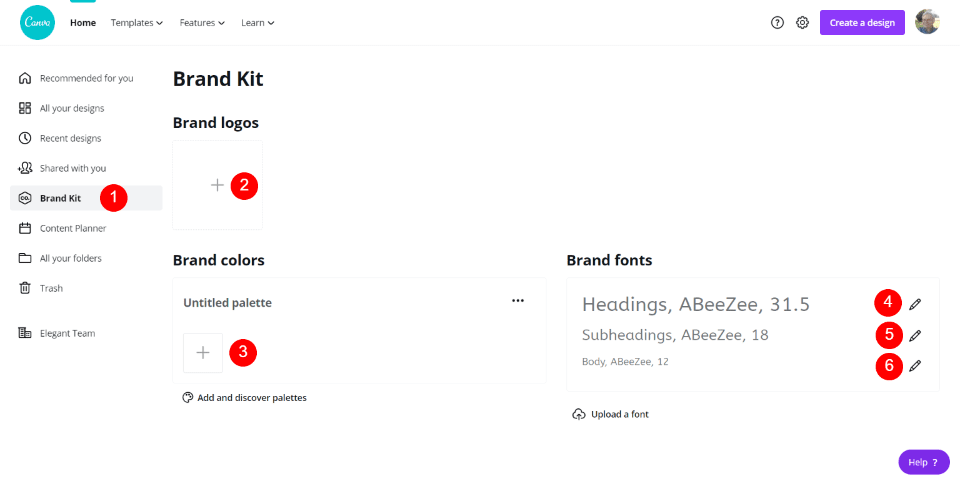
Creating a Brand Kit is simple. Select Brand Kit in the menu and you’ll see areas for your logo, colors, and fonts.
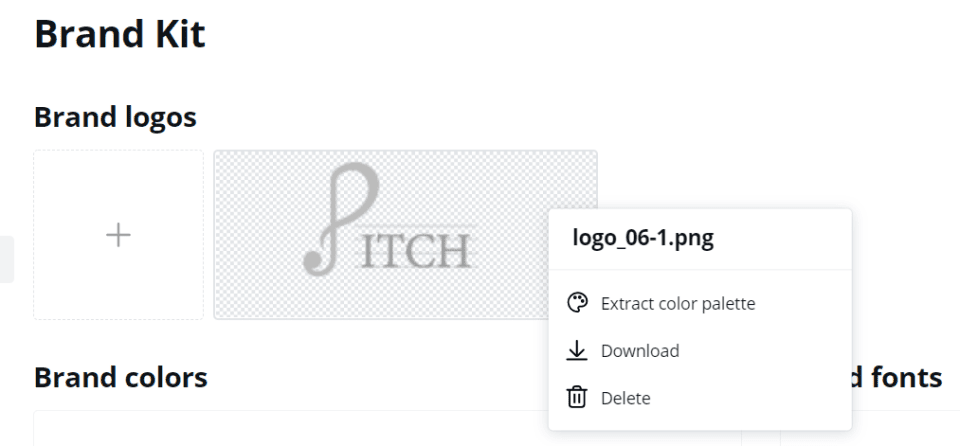
Upload your logo. Then, you’ll see a set of dots to the right that allows you to extract the color palette, download the file, or delete it.
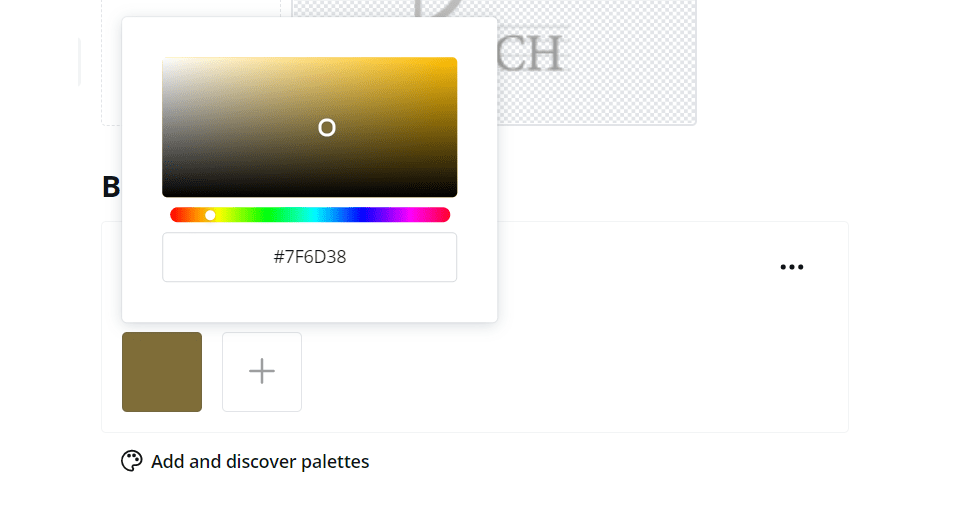
Branded Colors opens a color picker. Use the picker or enter the hex code for your colors. Add as many colors as you want and give the palette a name. You can also edit or delete the colors or palette.
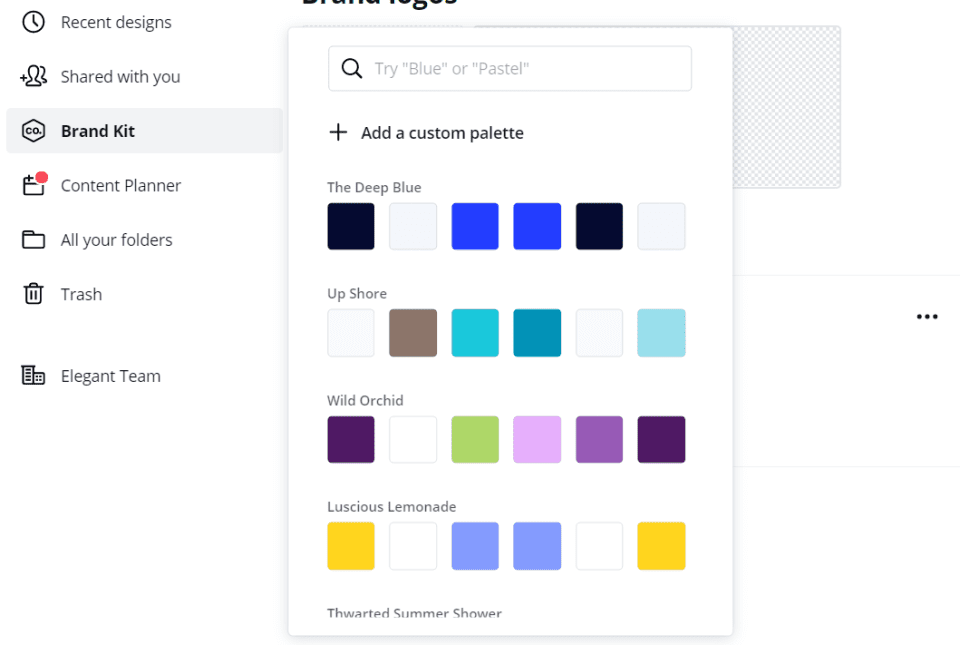
It also has a tool to add and discover color palettes. Search by name, select premade palettes, or add a custom palette.
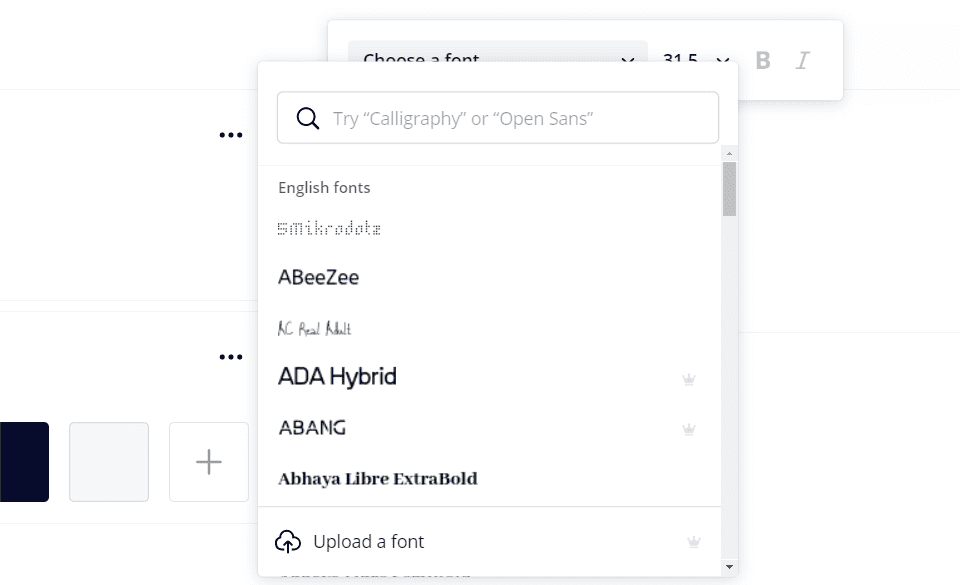
For branded fonts, select the type of font you want to specify between Heading, Subheading, and Body. This opens a box where you can search for fonts, choose the size, and choose bold and italics. You can also upload fonts.
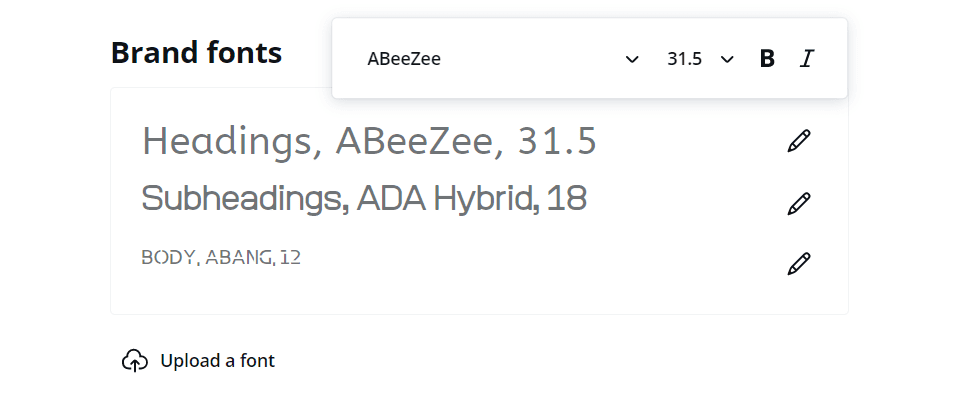
It shows the name of the fonts and lets you edit them. I’ve clicked on the editing icon for the first font.
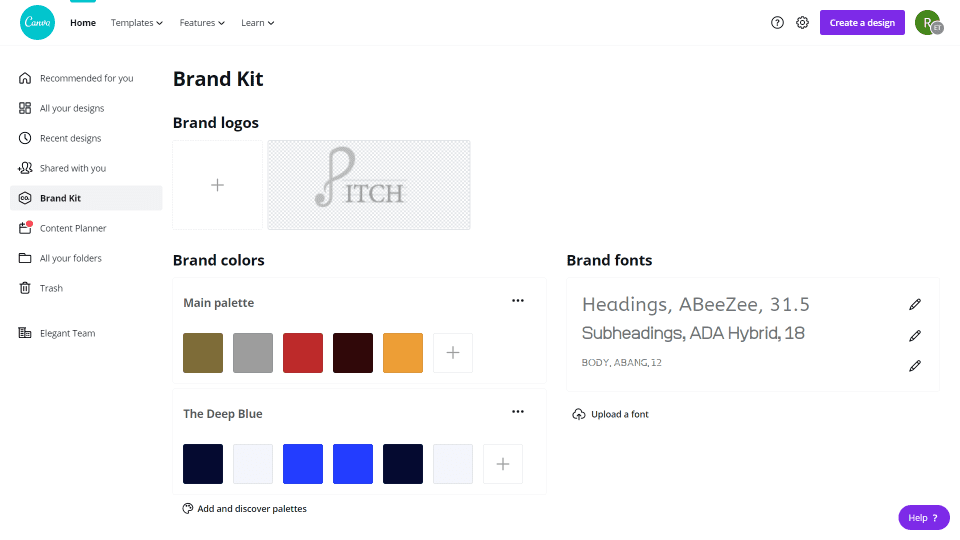
Team members will now have access to the logos, color palettes, and fonts in the Brand Kit. Whether or not they can edit them will depend on the access you gave them.
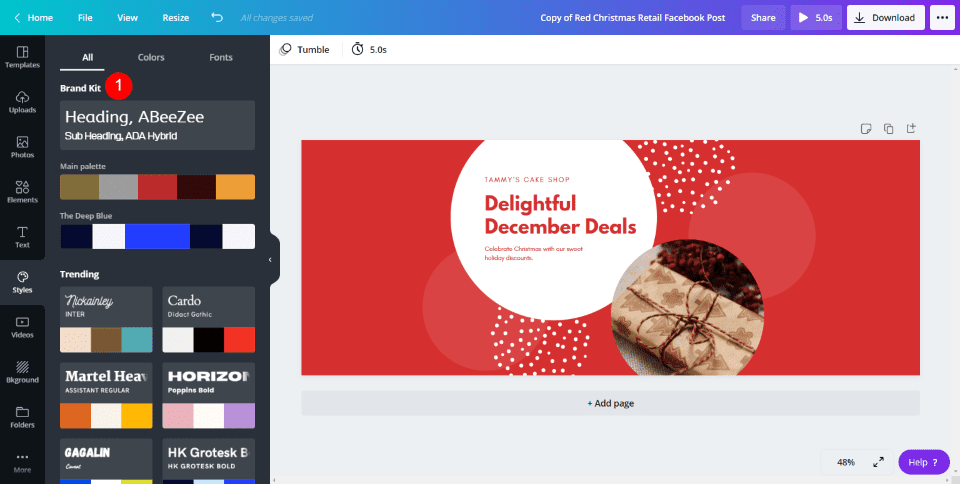
Now, colors and other elements from your Brand Kit will appear where they can be used. This example shows my Main palette and the Deep Blue palette that I added to my Brand Kit.
Collaboration Tools
Canva Pro makes it easy to collaborate with a team. Collaboration tools help synchronize the team so they can work together and see the changes in real-time. This keeps you from sending files back and forth for edits, which is ideal for remote workers.
Main features include:
- Create user levels for different team members.
- Collaborators can easily switch between teams. This is helpful if someone is on multiple teams.
- Add comments to designs. This allows team members to leave feedback.
- The Notifications Center makes communication more effective. Team members are notified when they’ve been tagged, when approval is requested, or when new files are shared.
Inviting Team Members
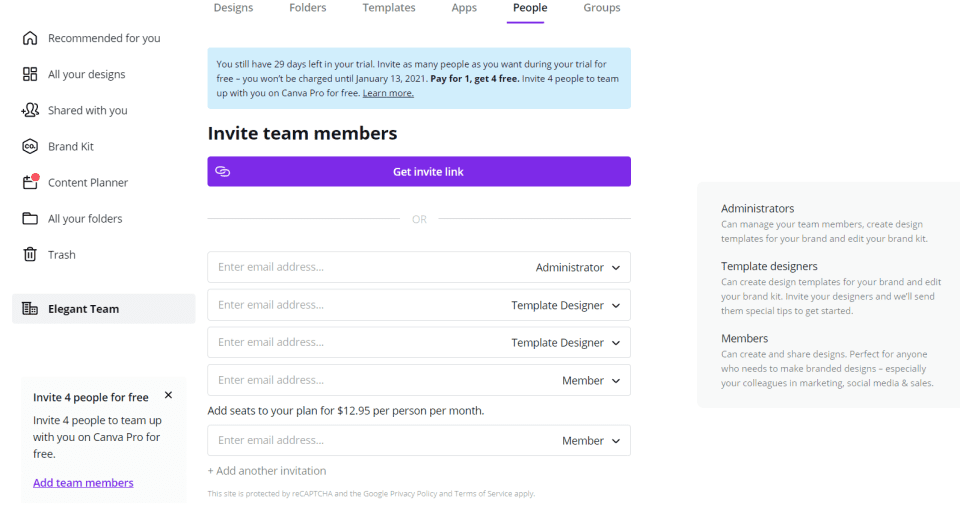
It’s easy to invite team members. Just click on your team’s name and select People. This will provide you with a link to send them, or you can enter their email to invite them from this screen. You can choose their permission level as you send the invitation. Choose between Admin, Template Designer, and Member. A description is given for each one, so you’ll know what they have access to. You can change their permission level at any time. Members still have their personal accounts and they can change between their account or the team account.
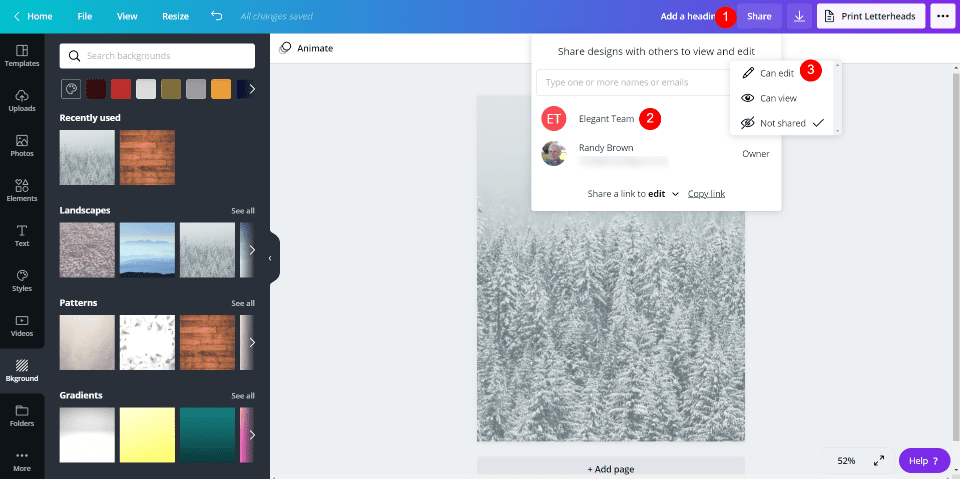
When you create a file, you can share it with the team and give them permission to edit or just view the file. Select Share at the top of the screen, choose the team you want to share with and then choose what they can do.
Groups

You can create groups with your team members to help keep projects separate. Select your team in the menu, click Groups, and select Create a Group.
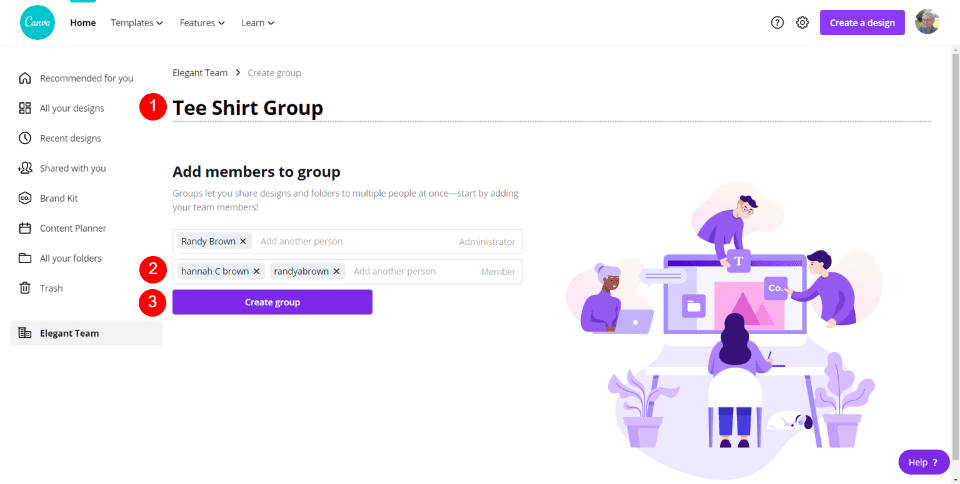
Give the group a name and add your members. You can add them to the admin field or the member field.
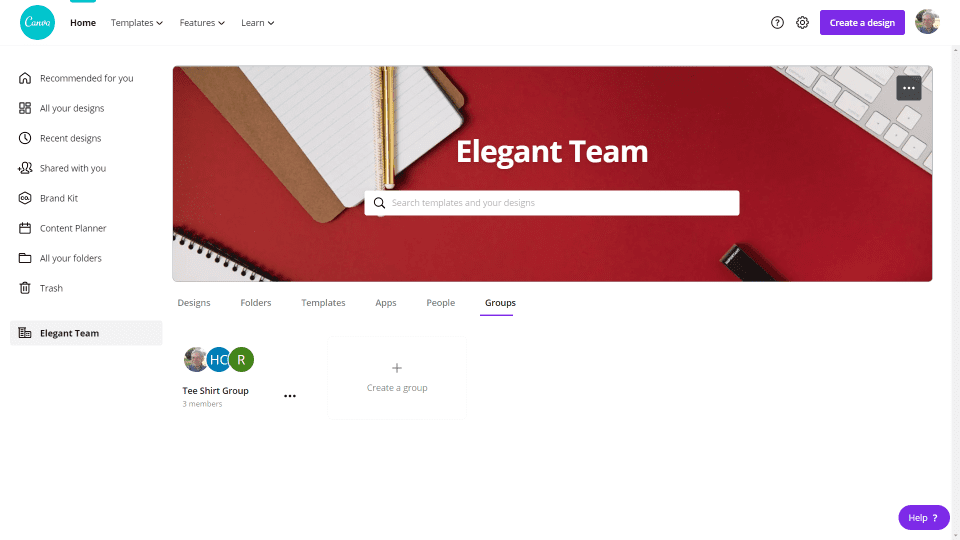
This group can now collaborate on projects as a separate group within the team.
Commenting
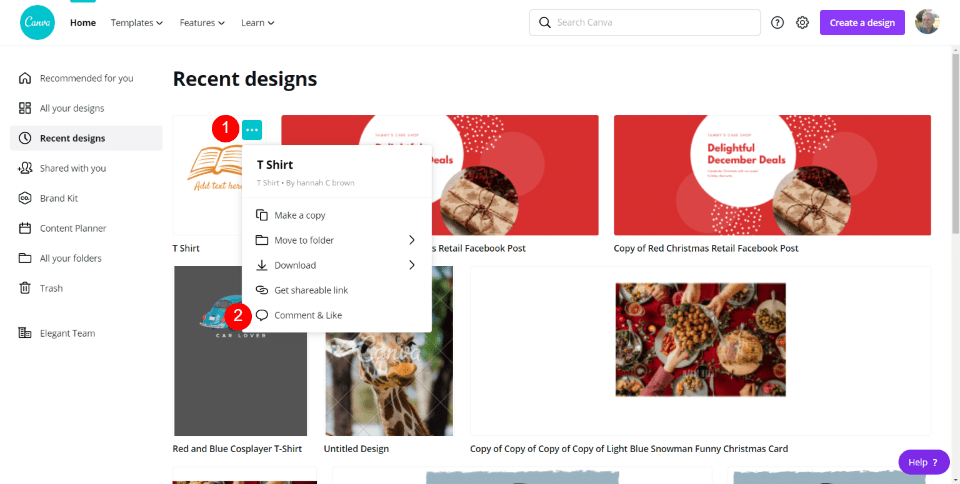
Commenting is simple. Select the three dots on an image or element and then click Comment & Like.
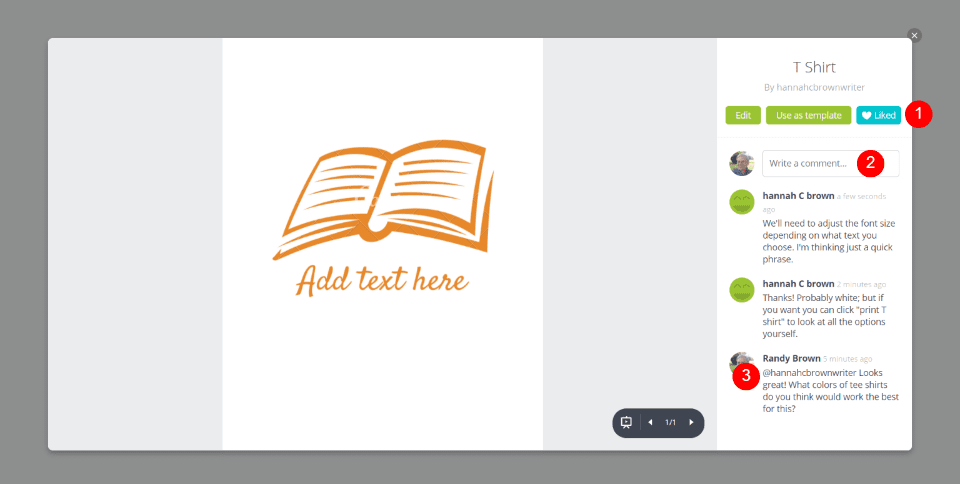
Enter your comments into the field like any social platform. You can also tag the team members, like the content, edit the content, and use it as a template.
Learning

Canva has lots of training available such as courses, tutorials, and blog posts. 17 of the courses are devoted to Canva Pro. They’re YouTube videos that take less than a minute to watch. There’s plenty of help.
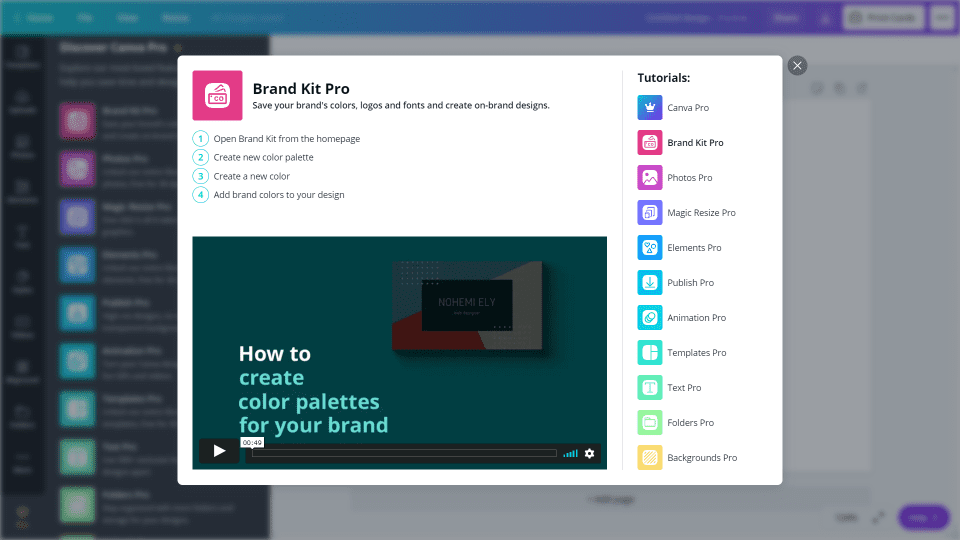
You’ll also see the videos in the Pro tab of the editor. Selecting a video opens it in a modal and includes short instructions and links to other tutorials.
Canva Teams Pricing
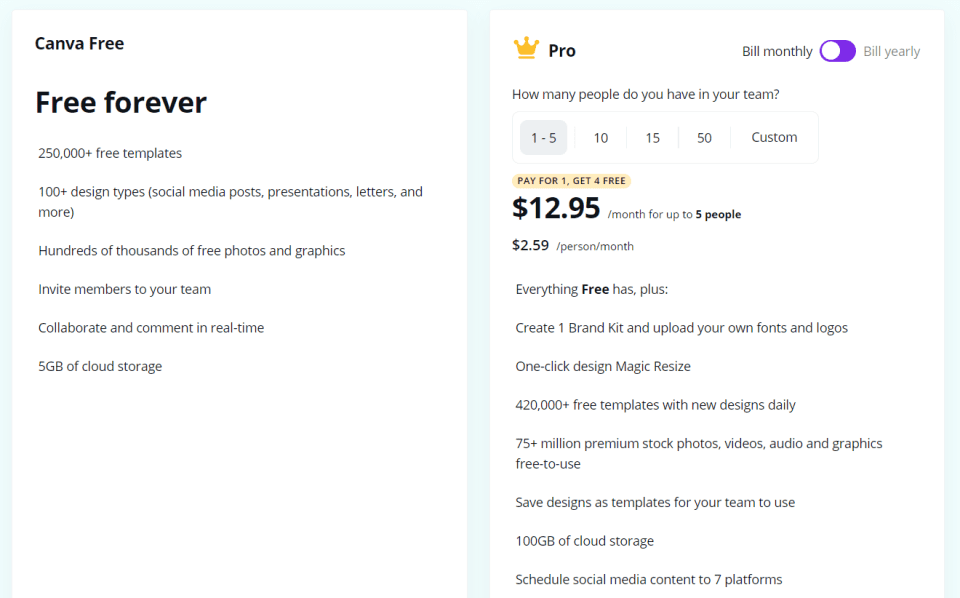
Canva Pro for 5 team members is $12.95 per month if billed monthly and $119.40 if billed yearly. It includes the Brand Kit, Magic Resize, 420,000 templates, 75 million photos, videos, audio, and graphics that are free to use, and 100GB of storage. You can schedule your social media content to 7 platforms.
Ending Thoughts
That’s our look at Canva Teams. There are a lot of tools to help make communication and design more productive. It’s easy to use, but there are times when it seems to have more steps than is needed. There are plenty of videos to show users how to do the main tasks, so it doesn’t require extensive training. It includes lots of premium resources to use with your projects. There is a lot here for the money. Canva Teams is an excellent tool for creatives to collaborate and produce high-quality visuals for websites, social networks, and more.
We want to hear from you. Have you tried Canva Teams? Let us know about your experience in the comments.
Featured Image via Art Alex / shutterstock.com



thanks for updating the blog with this info. I have been making use of canva. now i see reasons to recommend to my friends. 🙂
Hi Randy,
I absolutely love “regular” Canva and am largely a one-person shop. I currently do designs in Canva and share files with clients through a project management system. My question is, in your opinion, what’s the advantage in upgrading to Canva For Work over the above scenario? I don’t mind the price at all so it’s not about that, just wanted to get your take on benefits for 1-person operations before I dive in.
Thanks!
Rooney Reeves
thanks for sharing these infos. I often have been using canva. now i can use it more effective. 🙂
Great article, I have been using Canva for several years and the platform just keeps getting better. Our team uses it for everything from social media posts to website graphics and photo editing. Excellent tool and you can’t beat the price!