All but the simplest of websites use databases. Everything that happens on your WordPress site – regardless of its complexity – is recorded to one. However, you may sometimes need to access and interact with your database content – and that’s often difficult without the right knowledge and tools.
That’s where phpMyAdmin (and other tools like it) come in. This user-friendly software enables you to interact with your databases easily. In this article, we’ll talk about what the software does, how to configure it, and some of the tasks it can help you tackle.
Let’s jump in!
An Introduction to phpMyAdmin

phpMyAdmin is an open-source tool built on PHP that enables you to administer MySQL and MariaDB databases online. To use it, you’ll need to install the software on a server running either Windows or one of the several Linux distros it supports.
The software enables you to manage as many databases as you want. You can edit tables and values, create and delete databases, or even import and export them. The application itself is easy for beginners to pick up, but it offers enough depth that it can take a while for you to master everything it offers.
Key Features:
- Administer your databases using an open-source web application.
- Set up phpMyAdmin on both Windows and Linux-based servers.
- Modify any value within your databases.
- Execute Structured Query Language (SQL) queries to interact with your databases more efficiently.
- Create and remove databases at will.
- Export and import databases with a few clicks.
Most WordPress hosts come with phpMyAdmin bundled into their cPanel software. However, some managed hosting services such as Flywheel use different tools, so your mileage may vary. If you’re running your own server, you can set up phpMyAdmin on your own, which we’ll discuss in the next section.
How to Set Up phpMyAdmin (And Configure Its Settings)
First off, if you want to set up phpMyAdmin on your own server, the process isn’t that complicated for those with the expertise. If you’re using Linux, you can do so using a simple apt-get command, whereas Windows Server users can use the Composer tool for an easy setup.
However, you’ll usually find access to the latest version of phpMyAdmin within your hosting account. To access it, navigate to your management dashboard (usually cPanel or Plesk), log in using your credentials, then look for the Databases section – there should be a phpMyAdmin icon inside:

Clicking on it will launch the application. While you can start working on your databases right away, you should configuring some settings first. For example, you can change the default language and font size from the main screen, under Appearance settings:

You can also change phpMyAdmin’s theme if you want to. Depending on your host, you should only have access to a couple of themes by default, although others are available. Changing themes won’t affect the software’s functionality, of course, but it can make for a better experience if you start using it often.
4 Tasks phpMyAdmin Can Help You Accomplish
Before we jump into the tutorials, keep in mind that we’re going to be focusing on WordPress-related tasks. We won’t be talking about SQL queries, for example, which are sophisticated enough to require more thorough documentation.
There’s far more you can accomplish with phpMyAdmin than we can cover in one article. If you’re interested in learning further, you’ll want to check out the official documentation, which includes everything you might want to know.
Finally, if you are going to poke around under WordPress’ hood, remember to carry out a full site backup in case something goes wrong.
1. Checking the Status of Your WordPress Database
First off, phpMyAdmin enables you to check the status of your MySQL or MariaDB server. To do this, jump to the Status tab in phpMyAdmin without selecting a specific database:

Inside, you’ll find a summary of all the traffic your server has sent and received while it’s been running. There’s also a running tally of concurrent connections, and even failed attempts. If you’re using a shared hosting plan, chances are your numbers won’t make much sense. This is because you’re not the only person using the MySQL server. However, if you’re running a private server, these figures should be much more accurate, and they can help you determine how much bandwidth you’re consuming.
In most cases, if your database is inaccessible, you won’t be able to use phpMyAdmin at all since the tool won’t be able to establish a connection. This may also lead to WordPress displaying an error saying it can’t connect to your database, which you can fix following this tutorial.
2. Accessing and Editing Your WordPress Databases
Accessing your WordPress databases is simple – phpMyAdmin displays all of your existing databases on its sidebar, and if you’re only running one site, there should be a single option. In our example, we have several of them, but you can identify the WordPress databases as they often include wp in their name:

By default, WordPress uses the wp prefix for all its databases. However, you can change the setting (as we did) to make it more difficult for attackers to try and access yours. Either way, once you’ve identified the database you want to edit, click on it. You’ll see a list of tables including easy-to-recognize names, such as comments, users, and posts:

For example, if you wanted to edit one of your posts within phpMyAdmin, you’d just need to click on the wpca_posts table name (not the Browse button). Once you’re in, your posts should show up in order using their IDs:

If you want to delete a particular post, you just need to identify it either through its ID or the post_title field, then click on the Delete button for that row. Alternatively, if you want to edit a post, click the Edit button on its corresponding row:

Inside, you can edit every value associated with that post, including its title, content, the date it was last modified, and more. The names for each value are simple to understand, so you should have no problems identifying each of them:

Once you’ve made your changes, scroll down to the bottom of the screen and click the Go button to save them. This will also return you to the wpca_posts table, where you can start anew with a different post. The process for editing values is the same regardless of which table you’re working with – the only things that change are their corresponding values. Given this, you should be extremely careful about any changes you make at a database level and while editing fields you’re not familiar with.
3. Adding (And Removing) WordPress Databases
Deleting databases is the more straightforward process of these two, so it’s a good starting point. To delete a database, go to the phpMyAdmin main screen and look for the Databases tab at the top:

Inside, you’ll find a list of all the databases you have access to. If you have the right permissions, you’ll also see the option to select those databases and ‘drop’ them (which is database speak for deletion):

Moving on, any phpMyAdmin user can create new databases. If you’re installing WordPress manually, you’ll need to create a blank database for the process to work. To do so, return to the Databases tab and look for the Create Databases option at the top of the screen:

You can choose any name you want for your database – just make sure it’s one you can identify later on. Click the Create button when you’re ready, and phpMyAdmin will automatically send you to a screen where you can add tables to your database. Leave it empty for now – instead, go to Privileges > Add user account, and click on it:

Now, choose a secure username and password for your WordPress admin account, then type localhost within the Host name field:

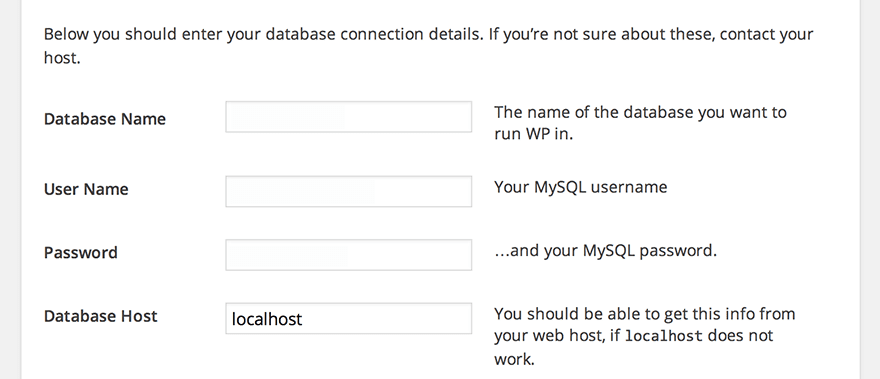
Then scroll down to the Database for user account section and tick the Grant all privileges on X database option. “X” in this case should be the name of your database. Click on Go when finished, and your admin user will be ready. Now you can execute the WordPress installer on your server. The installer will ask you for the name of your database, its host, and your account info:

At this point, you can go through the rest of the WordPress installation, and your website will be ready to go!
4. Importing and Exporting WordPress Databases
phpMyAdmin also enables you to import and export existing databases. This can come in handy if you want to migrate a WordPress website manually, since you have to copy both your files (using an FTP client, for example) and its database. To export a database, access it from the sidebar on phpMyAdmin’s main screen, then look for the Export tab in the main menu:

Inside, you’ll see the option to do either a Quick or a Custom export. The Quick setting automatically includes all of your database’s tables. Choose this option, and the SQL format from the drop-down underneath, then click on Go:

This will automatically download an SQL file containing your database’s info to your computer. If you want to import it onto a different server, just access phpMyAdmin there and look for the Import tab:

There, you’ll find the option to upload an SQL file to your server. Simply locate the downloaded file and click on the Go button at the bottom of the screen. phpMyAdmin will upload the file and create an exact copy of that database on your server.
Conclusion
In a nutshell, most WordPress users don’t interact with their databases directly. While the platform enables you to tackle most of your day-to-day tasks using the dashboard, it doesn’t hurt to know how to tweak your database manually. For example, if you get locked out of your site, and you can’t reset your password, that’s something you can fix through a tool such as phpMyAdmin in a few minutes.
In this post, we’ve presented four different tasks you can carry out with phpMyAdmin. Let’s recap them quickly:
- Check the status of your WordPress database.
- Access and edit your databases.
- Add and remove WordPress databases (depending on your permissions).
- Import and export databases to a different server.
Do you have any questions about how to use phpMyAdmin? Let’s talk about them in the comments section below!
Article thumbnail image by apatpoh / shutterstock.com.


Very informative blog post. Thanks for sharing. I think it is crucial for a WordPress developer to be able to access the database and phpMyAdmin makes it easy. I just used it the other evening to solve an issue on a development site. Definitely a time saver.
No problem Monique. Happy to help 🙂
I highly suggest learning PHP MyAdmin if you develop in WordPress. I would compare it to getting a flat tire in the middle of nowhere.
Learn at least the basics and you’ll save a lot of trouble.
It’s a valuable skill!
So very true. Thanks for the comment 🙂
Thanks John, for information about using Phpmyadmin. We always fear touching database that we will break something. Very handy if we forget the password.
No problem Rahul. 🙂
I often use phpMyAdmin to change my password if I forget. This is very helpful to maximize the features contained in cPanel Hosting.
Thanks for sharing
No problem. Glad you found it useful 🙂
Thanks John, Very informative and useful post.
Also a great reminder of what we can do. 🙂
Thanks Liz. Very true.