Every website should have a favicon. Although small in stature, favicons (or site icons) are used by web browsers to represent your site (or brand) in a powerful way. Favicons aren’t only used for displaying a small image in your browser’s tab, they can also be used for bookmarks, and windows tiles. WordPress makes it easy to add a favicon to your site right from the customizer. And this is now the recommeded way to do it. But there are a few other ways that may suite your needs as well.
Understanding Favicons in WordPress
What is a Favicon
A Favicon (term for “favorite icon”) is a small icon used by web browsers to add an additional branding element for users to recognize your website/company. If a favicon is installed on your site correctly, browsers will use it on different locations as needed. These locations include browers tabs (next to the page title), address bars (next to the URL), bookmarks, and others.

![]()
In WordPress, favicons are called “Site Icons” which is a useful description that informs users that this icon will be used to represent your site in various instances.
Importance of Favicons
Favicons (or Site Icons) are similiar to a company logo in that it can play a small, but crucial, role in branding your website. A website that lacks a favicon could seem less credible to users (since we are all accustomed to seeing them). On the other hand, a website that has a favicon will give the user the strong visual they need and boost the user’s experience. Think about it. It is much easier to find a bookmark with an icon next to it than it is to read the text.
File Format(s)
There are a few acceptable image formats available for favicons, but the two most popular are ico and png. These formats have the most browser support and support transparent backgrounds for your favicon (unlike jpg).
ICO Format
Traditionally, favicons are created as an ICO file (favicon.ico). An ICO file allows you to store multiple images with different sizes in one file, allowing the browser (desktop and mobile) to choose the size needed from the images available. The problem with the ico format is that not many people know what it is or how to create one. You can create ICO files in a photo editor like Gimp, but it seems most gravitate to using an onliine favicon generator which makes the process really easy, especially for generating favicons with transparent backgrounds.
Thankfully, with the release of WordPress 4.3, we don’t have to worry about creating a favicon in ico format to add one to your site. The customizer has a Site Icon option that accepts more popular formats like png, gif, and jpeg. More on this later.
Note: It is worth mentioning that some older browsers only support the ico format and nothing else and may be a necessary fallback for old versions of browsers. So if you are looking to have the best of both worlds (ie. PNG and ICO), you may need look into a plugin or add it manually.
PNG Format
Since HTML5, the PNG format is an acceptible format for your favicons and all major browsers are supporting them now. Arguably, this is the better option going forward since the png is more consistent due to its widespread use throughout the web. However, since all browsers (even the old ones) support ICO, it may be best to use both png and ico versions to avoid unwanted 404 errors.
Size
Your site needs multiple favicon image sizes available in order to display them optimally in all use cases (this is why favicons began in ico format). I won’t get into all the different sizes here, but the 4 most common sizes needed are generated automatically whenever you add a site icon from the WordPress customizer, so no need to stress.
However, you will need to make sure the image you upload to the customizer is at least 512 x 512. WordPress will create the other sizes from that original file as follows:
32x32px favicon.
180x180px app icon for iOS up to the iPhone 6+.
192x192px Android/Chrome app icon.
270x270px medium-sized tile for Windows.
Naming and Placement
You may remember the days when the favicon had to have the exact file name “favicon.ico”. Then you would add it to your root directory and that was basically it. Times have changed and thankfully, WordPress has as well. Now you can name your file anything, save it in other formats, and store it anywhere on your site. If you are using the WordPress Customizer to add your Site Icon (favicon), WordPress will create multiple images and store them in your media folder.
Note: Placing a Favicon.ico in the root directory is still a good idea as a fallback but be careful to use the right method or get some help from a plugin.
Creating Your Favicon
A favicon is an image, so designing your own favicon will be no different than designing your own logo. You can use a photo editor like Gimp or Photoshop. Just remember to design your favicon as a perfect square (ie. 512×512 for your WordPress Site Icon). If you want a transparent background, save your file as a png (or gif). After that you can upload your image to WordPress as our site icon (more on this later). If you want to convert your png to ico format, I suggest using an online file converter like Convertico.
Tip: Sometimes you can create your favicon by cropping a square portion of your logo. This might be a good idea if you are looking to simplify the process. Just remember that this icon will represent your brand so don’t get to careless.
How to Add a Favicon to Your WordPress Website in 3 Ways
Subscribe To Our Youtube Channel
#1 Adding a Favicon with the WordPress Customizer
For most, this is the only method you need to consider for WordPress. All you need is an image file (png, gif, jpeg) and WordPress will do the rest.
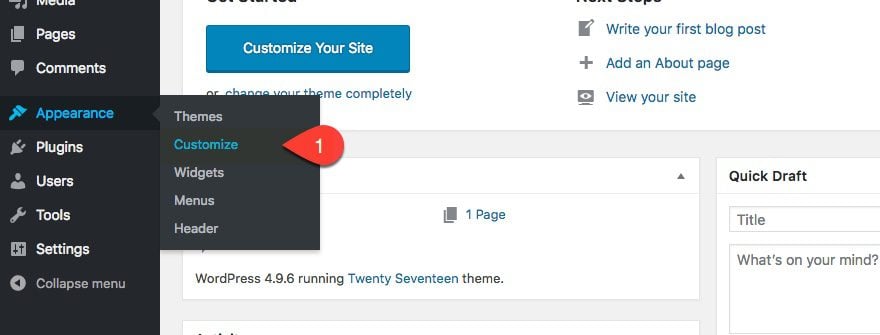
Since Wordrpess 4.3, you can add a favicon (or Site Icon) to your WordPress site easily within the Customizer. From the WordPress dashboard, navigation to Appearance > Customize.
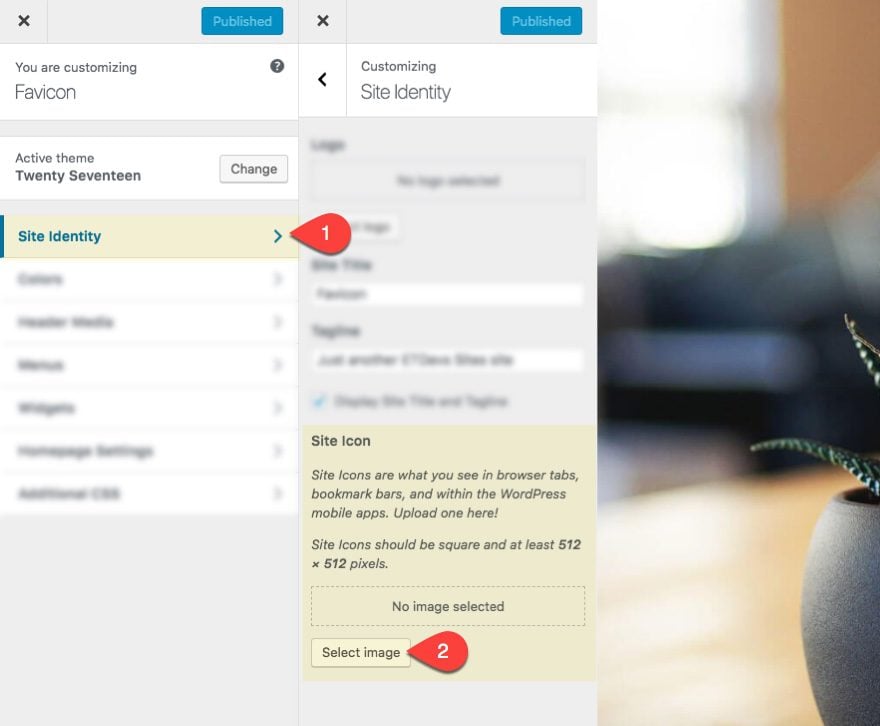
Then select Site Identity and you will find an option to set your Site Icon (Site Icon is just another term for Favicon). Then you can select your image from the media library or upload a new one. Make sure you file is at least 512 x 512 to ensure the best quality rendering of your image for all use cases.
Once you select the image you want, you will be prompted to crop your image so that it will render correctly on your browser. This is helpful if you are uploading an image that isn’t already perfectly square.
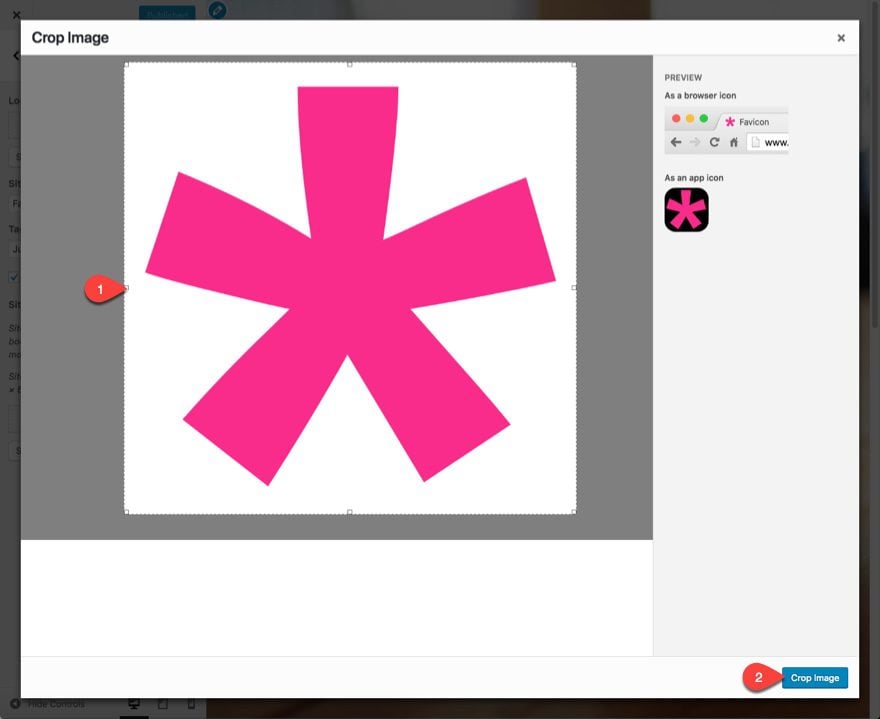
That’s it! WordPress will do the rest. Once the image has been cropped, WordPress will generate the necessary image sizes needed for all the favicon use cases:
32px for browser favicon
180px for IOS app icon
192px for Chrome App Icon
270px for Windows tile
It even generates a helpful preview of what the icon will look like.
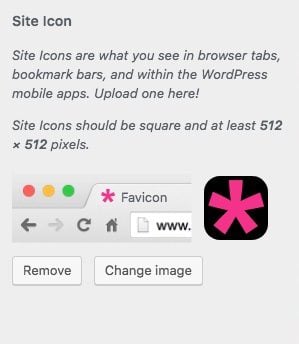
Publish your changes and refresh your page to see your favicon magically appear in your browser. If you can’t see it right away, you may need to clear the site cache or open your site in an incognito/private browser window to see it.
#2 Adding a Favicon Using a Plugin
![]()
If you want the help of a plugin to add a favicon to your WordPress site, your in luck. A simple search of the WordPress repository will give you some great free plugins to choose from. Personally, I would look no further than Favicon by RealFaviconGenerator. This plugin will make sure your favicon is compatible with all browsers by placing multiple images in all the right places. It even allows you to customize the design of each image, which is not easy to do on your own.
To use add a favicon using the plugin, install the plugin and navigate to Appearance > Favicon. Then upload your image. Make sure it is perfectly square and at least 260 x 260.
![]()
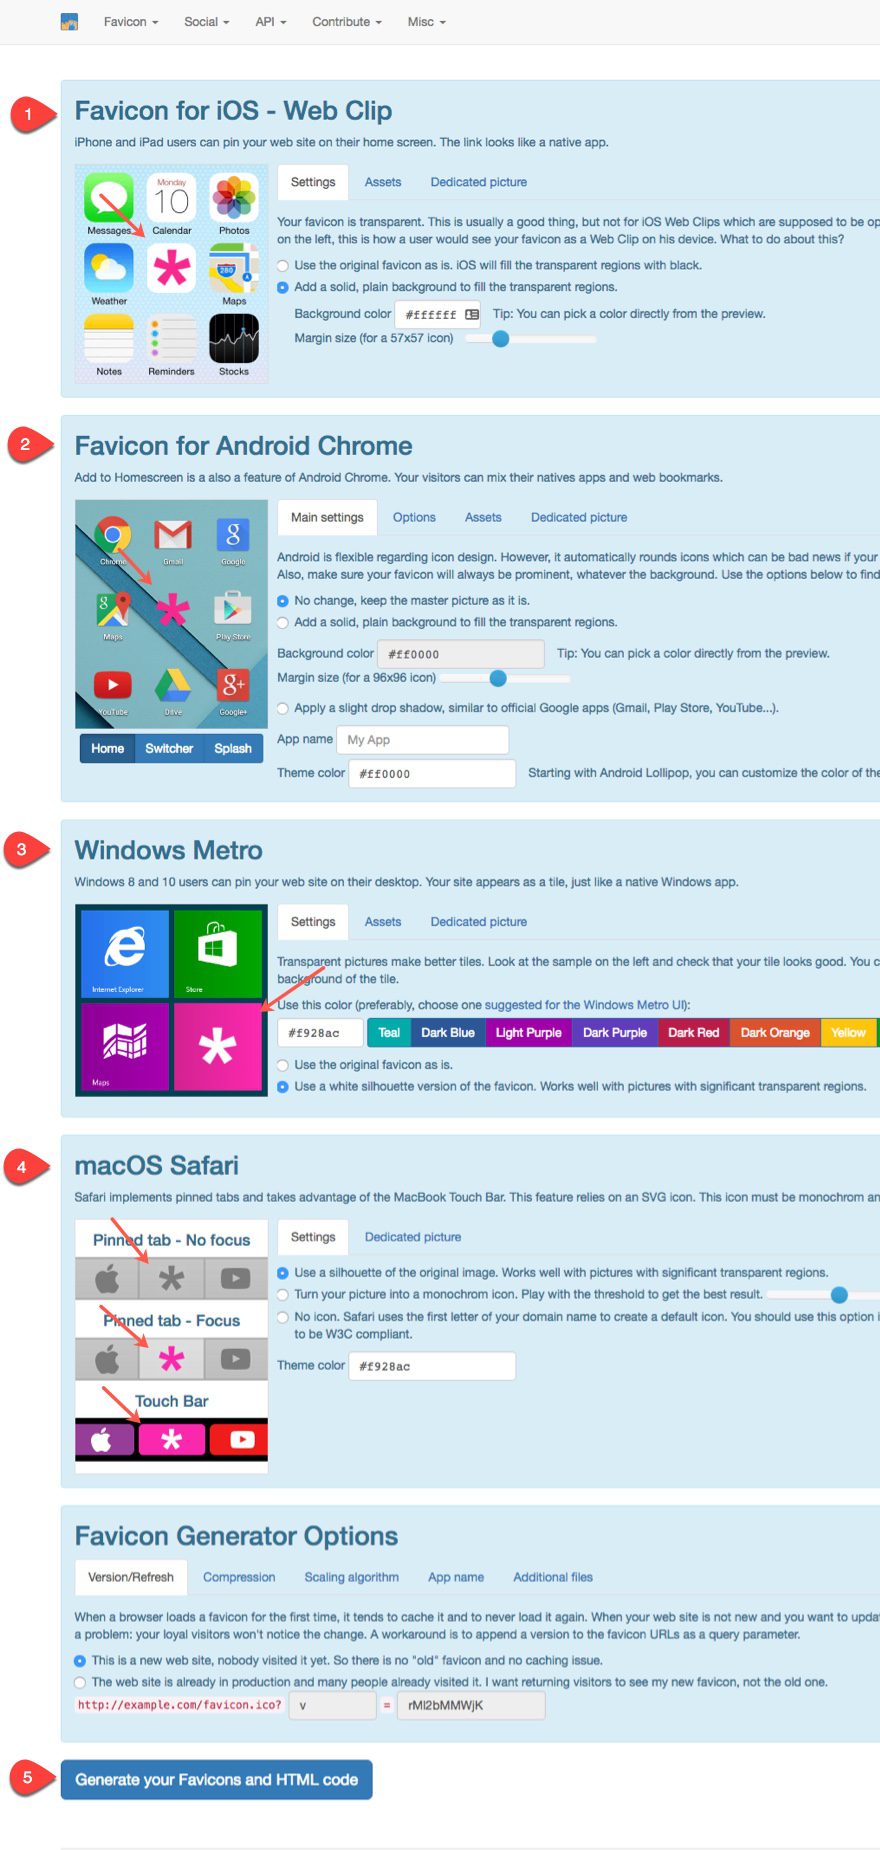
The plugin will redirect you to the online generator to complete customization of your favicon for IOS, Android(Chrome), Windows, and macOS (Safari). In just a few minutes, you can add your brand colors to get those icons looking great for all instances. When you are done, click the Generate Your Favicons and HTML Code button at the bottom of the page.
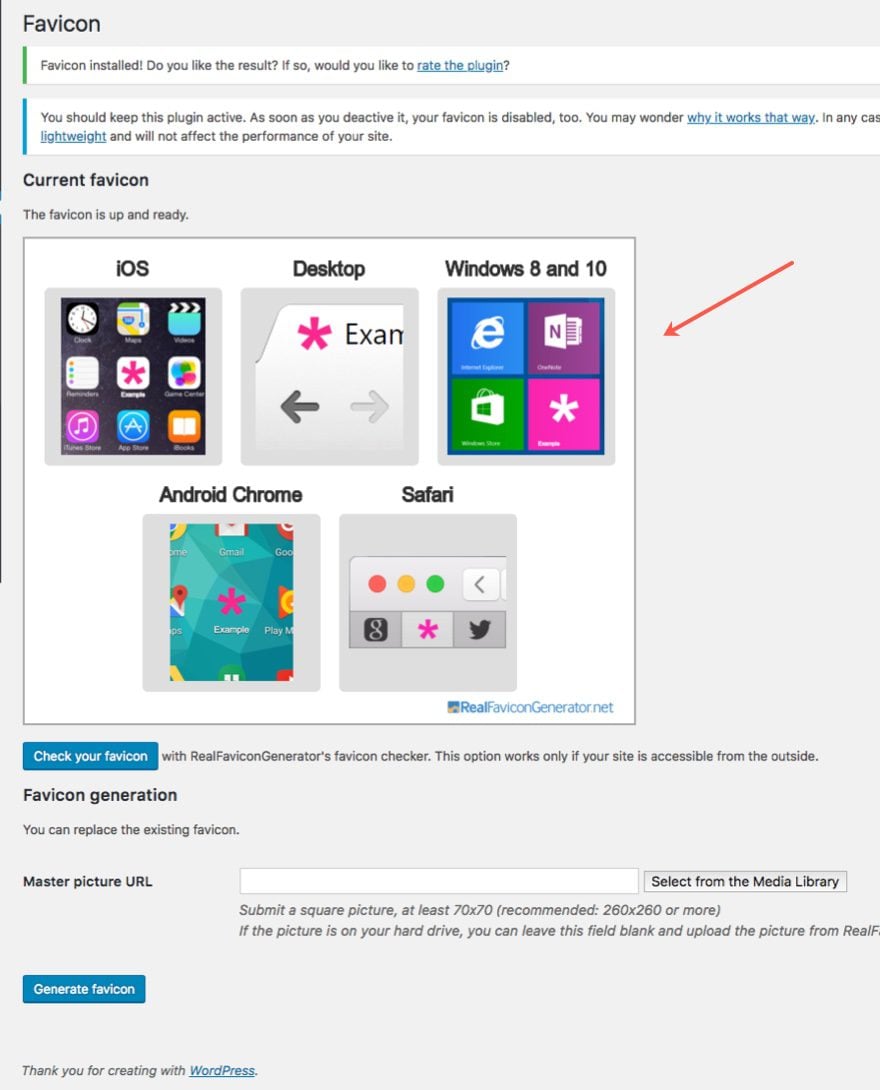
Since you are using a plugin, you wont have to worry about any code. You will be redirected to your site and greeted with a nice preview of your icon displays.
That’s it!
#3 Adding a Favicon Manually (WordPress 4.2 and Older)
In older versions of WordPress (before the Customizer upgrades), you can add a favicon to your site in two steps. Make sure you are using a child theme to modify your site files.
First, you need to upload your favicon.ico file to your website (you will need to use an FTP client like FileZilla if not a local install). Once you access your site files, upload the favicon to your root directory . You may also choose to add the favicon to your child theme folder as well.
![]()
There are different opinions on whether you should add the favicon to the root directory, the theme folder, or both. For example, some suggest keeping a favicon in the root directory to be displayed in feedreaders. So to be safe, always keep one in the root directory. Wherever you choose to put it, make sure you link to the file location in your header. Don’t just drop it in your folder trust that all browsers will automatically find it. Some old browsers may not.
Linking to your favicon requires the use of an html link tag in your theme (or child theme) header file (header.php) inside the head tag. Here are two examples.
To link to the favicon (in ICO format) within the root of your theme (or child theme) folder you can add the following code inside the head tag.
<link rel="icon" type="image/x-icon" href="<?php echo get_stylesheet_directory_uri(); ?>/favicon.ico">
To place the favicon.ico file in the root of your theme folder (e.g. www.yourwebsite.com/wp-content/themes/twentyfourteen/favicon.ico), you would use:
To place the favicon.ico in your main root directory, use the following:
<link rel="icon" type="image/x-icon" href="http://www.yourdomain.com/favicon.ico">
I don’t know about you, but I’m really thankful for WordPress 4.3.
Adding a Favicon Using Theme Options
In general, it is still best practice to use the Site Icon feature in the WordPress Customizer if available since it was built specifically for WordPress. But, some WordPress themes (especially older ones) include an option to upload a favicon directly from the theme settings. Be careful when using this custom theme option because it may use an outdated method and only generate one image to use for multiple instances.
Main Takeaways
If you need a little recap, here are some main takeaways about adding favicons to your WordPress site:
- You should add your favicon with the WordPress customizer if available.
- If you want to ensure your favicon placement is everywhere it needs to be and have a bit more control over what your favicon will look like on a case by case basis, use a plugin like the realfavicongenerator plugin.
- If you for some reason you find your self caught in the dark ages of WordPress or need to take a manual approach, make sure you use the right methods
- Avoid using built-in theme options (other than the WordPress customizer) to add your favicon unless you have a good reason to do so.
I hope this helps clear up a few things about favicons (site icons) and eases your mind about how your favicon is handled by WordPress. And I look forward to hearing any questions or insights you may have on the matter in the comments below.
Cheers!



Great article that well covers all major ways to add a favicon. We normally use the realfavicongenerator plugin method mentioned above. Many thanks to Elegant Themes | Divi team
Great tutorial, thank you 🙂
Thanks for this tutorial. I think it is very important to use favicon because it gives a good impression to your viewers and projects your website as a reputed brand.
I agree, Akshat. It is a small but crucial part of branding.
That helped me much for better understanding – and successfull trial. Thanks!
As we are using Divi mainly … does Divi upload the fav-icon correctly as stated above, if we use the Divi general options (the one straight below the logo-upload)? Or is it recommended to use the wordpress theme options instead?
Herbert,
Loading a favicon in Divi theme options will still work fine for most instances as it has in the past. However, at this point, I would say the WordPress Customizer method is still recommended over any custom theme option (including Divi) for uploading favicons.
I would like to know this, too. Also, what dimensions should the favicon have that we will upload in Divi theme options?
+1 … good question.