Displaying a date and time widget is something that started with newspaper websites. Getting today’s date from their newspaper just something that had always been part of people’s lives. When print journalism moved to the web, that wasn’t about to change.
However displaying the current date and time is not only for news websites. There are plenty of reasons other sites should think about doing the same:
- You can display the current time in your time zone to let customers know when they can reach customer support
- It makes your site look alive and relevant, even if your content is a little older. This is important since most of us on the lookout for the latest, up-to-date info.
- If have upcoming events on your page, the current time and date helps visitors understand how much longer they need to wait for them (alternatively, use a countdown timer module such as the one included in the Divi theme)
In short, displaying a date and time widget helps bind your audience, makes your site more attractive and positions you as a provider of up-to-date news and information. Reason enough to learn how to implement one on your WordPress site.
In the following article, we will show you several ways you can create a date and time widget for your website. First, we will go over how to do it manually, then will talk about some plugin solutions that let you do the same thing without any coding.
Sounds good? Then let’s not dillydally but get right to it.
How to Create a Date and Time Widget Manually in WordPress
One way to include the current time and date on your site is to code a solution yourself. This is what we will do first. We will create a simple shortcode that, if input anywhere on your site, will display this the time and date to your visitors.
Create the Shortcode
Our first step is to set up the actual shortcode. For that, we will first open functions.php of our current theme. We highly recommend you use a child theme for that so as not to lose any changes when your parent theme is updated.
Once we have opened the file, paste this piece of code at the end of it:
function current_time_date(){
return date('F jS, Y, H:i:s');
}

add_shortcode( 'time_date', 'current_time_date' );
Some information on that: The code above is a function that spits out the current date and time and then assigns it to a shortcode called [time_date]. If you input the shortcode on your site, it will then call the function into action.
In the format we have used above, the time and date is output in this format: July 6th, 2017, 12:35:41. However, you can use different formats that you can learn about here.
Now, to test the code, simply copy the shortcode somewhere on your site. Be aware, however, that by default shortcodes don’t work inside widgets. In order to use them, you either need to install the Shortcode Widget plugin or add this line to functions.php.
add_filter('widget_text','do_shortcode');
After that, here is the result:

Switch to JavaScript
Looks good so far, doesn’t it? However, if you follow the steps above, you will quickly notice that the clock isn’t updating itself. Instead, it only spits out the current time once — when the page is loaded. After that it remains static, which kind of defeats the purpose somewhat, don’t you agree?
That’s because PHP is a server side language, meaning you need to do additional calls to the server to update the information. For that reason, we are better off working with a client-side language like JavaScript.
Luckily, there are loads JavaScript clock available on the net. A short Google search will show up loads of examples. I used this service to generate the JavaScript code for my desired format. After that, I input the code into a file called clock.js which I copied to my theme folder.
The script calls for a div of the name clockbox. For that reason, I changed my prior function to the following:
function current_time_date(){

echo '<div id="clockbox"></div>';

}

add_shortcode( 'time_date', 'current_time_date' );
Now, all that’s left is to call on my new JavaScript file:
wp_enqueue_script( 'clock', get_theme_file_uri('/clock.js'));
And voilá:

Add Styling
Finally, you probably want to be able to style your time and date widget so that it fits your overall branding. Luckily, since the function we used created CSS id, we can add our own styling to the date and time widget like so:
#clockbox {
font-size: 22px;
font-style: italic;
color: #999;
}
Here is the result:

That wasn’t so hard now, was it? Told you it would be easy. However, this is just one way of creating your own date and time widget. With additional coding chops, you can make a lot more happen.
However, if you are not one for the manual route, you can also achieve similar results with the help of WordPress plugins.
Plugins to Create Time and Date Widgets for Your Website
While the number of available plugins in the WordPress directory is not overwhelming, there are a few specimen out there that do a good enough job.
Live Clock Date

Our first contender is this plugin. As the name suggests, it allows you to add a clock and the date to your WordPress website.
Their time and date widget offers lots of customization options. You can choose between a 12 or 24-hour cycle, whether to update the clock every minute or second, show or hide the date and determine their order. The widget even has a section for custom CSS so you can use the same font as your website and more.
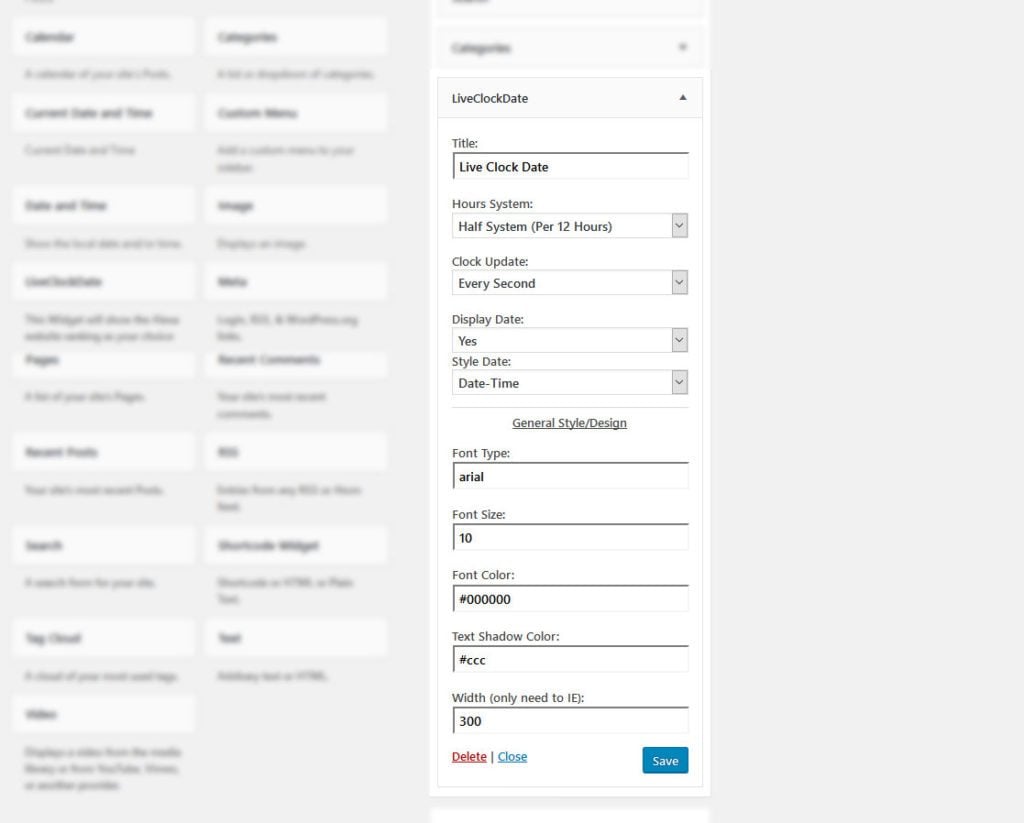
Unfortunately, the formatting options are otherwise somewhat limited. For example, it’s not possible to remove the weekday from the date. However, apart from that the plugin does what it’s supposed to.
Date and Time Widget
First off, a little warning. This plugin is a bit old and has last been updated two years ago. As a consequence, there is no guarantee it will work with all the modern themes and latest version of WordPress. However, since it worked fine in my test with WordPress 4.8 and offers a nice set of options, I thought it worth including.
After the installation, the plugin adds a new Date and Time widget to the widget menu. When you add it to a widgetized area, it gives you many ways to customize.
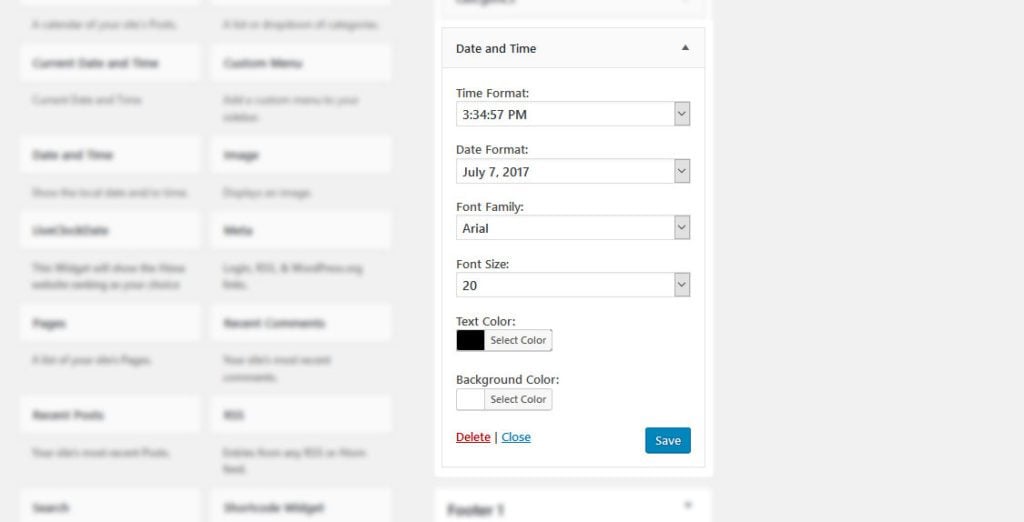
As you can see, you can configure the time and date format (or disable it completely), change the font family and size as well as text color and background color (including hex codes). That way, it’s easy to make the widget fit your theme. If that is not enough, the widget has enough HTML classes so you can implement your own custom CSS rules with ease.
Current Date and Time

The final plugin on this list is simple enough. Install, activate and you get a new widget called Current Date and Time that you can drag to any widget area. Done.
The result looks decent and automatically adjusts to the style of your theme. It’s also mobile responsive, which is a must have these days. On the other hand, it doesn’t offer any options to adjust anything. Only one time format is available, for more you need to buy the pro version.
Conclusion
There are many reasons to display a time and date widget on your WordPress site. It’s a good way to let your clients know when they can reach you, how current your content is and more.
As you have seen from the above, there are several ways to implement this in WordPress. One is to set up your own shortcode to implement the widget anywhere you want. Of course, there are also plugins that can do the same for you. While not overwhelming, there are some solid contenders out there.
Now over to you. Have you used a time and date widget on your site before? If so, what did you need it for and how did you implement it? Let us know in the comments section below.
Article thumbnail image by Jane Kelly / shutterstock.com


Thanks but javascript didn’t work on my web site…
Thanks so much for sharing these pretty cool tips! Putting on a date and time widget, for me, simply means you value time and how you use it (and also it adds flare to your website). For events, on the other hand, a calendar widget would be a better option.
Thanks for all the tips and plugins. I am not very good at coding and learning basic programming language from the Internet, That’s why I prefer to use Plugins.
What I would like to do instead of the current time running, is show a certain time and date in the visitor’s local time (say for webinars or events).
Do you have a working suggestion for that?
I don’t have a plugin suggestion for this but to show the client time, JavaScript is the way to go. Maybe this here will put you on the right path: https://stackoverflow.com/questions/2705067/how-can-i-get-the-users-local-time-instead-of-the-servers-time