Out of all the top blogging platforms, WordPress takes the trophy as the most popular. Since 2003, WordPress has allowed users to blog on top of beautiful websites with no upfront costs. Today WordPress has held onto it’s roots as well as evolved into a fully functional CMS offering users the ability to build nearly any type of website.
Whether you want a custom install (www.wordpress.org) or a place to just write your thoughts and ideas,(wordpress.com) there’s no easier way to go about creating your own blog.
Our very own Kevin Muldoon recently wrote a post about Installing WordPress on a Windows Machine. This post will be about doing the same thing only on a Mac.
Why Install Locally?
Before we dive in, I wanted to explain the benefits to installing a local version of your WordPress site or any website for that matter.
Working with WordPress locally allows you to make changes and revisions to your website’s design, functionality, or even theme options on the fly. Since the installation is a local one it will not disrupt what your users see on your existing live website.
On top of all of these things the concept of testing plays an even more important role. Say you have installed a new theme or a new plugin and want to give it a try before anyone else can see it. There’s no better way to do this than to try it locally to work out any kinks or conflicts that may arise.
Always keep updates in mind with WordPress, your themes, plugins, etc.. when logged into your live site. While most developers make their code play nicely with others, there’s always a chance that it can break your site causing a moment of panic and possibly even some down time before a you figure out a solution to the problem.
How To Create A Local WordPress Installation On A Mac
WordPress requires an enhanced environment to run correctly on your Mac. This environment uses a local PHP server and MySQL server that when working together provide the necessary code to run WordPress properly. For this tutorial we will be using an application called MAMP. MAMP stands for Macintosh, Apache, MySQL, and PHP.
Downloading MAMP
Before you can install MAMP on your Mac, you’ll need to download it from the MAMP website. MAMP requires that your Mac be running Mac OSX 10.6.6 or later so be sure your system is up to date.
At the time of this writing, MAMP currently offers a beta version for Windows users so if you are following along and are on a PC feel free to give it a try. If MAMP isn’t for your be sure to check out Kevin’s post about Installing WordPress on A Windows Computer.
After you have downloaded the software (which might take a little while to download due to it’s size) double click the .pkg file and install.
Unless you plan on buying MAMP Pro, which I have to say has some great features, be sure to pay attention to the Installer prompt. Once it you make it to Installation Type you will see a Customize button on the bottom left.
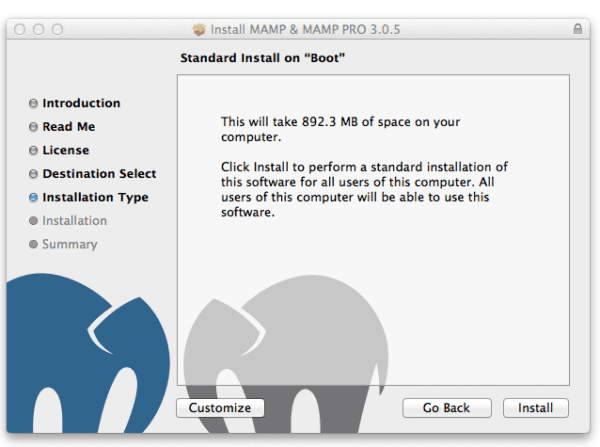
Customize your MAMP installation
Click “Customize” and uncheck MAMP Pro from the packages to install. This will save a bit of space on your hard drive. Ok now go ahead and click Install.
Configuring MAMP
Now that you have MAMP installed, head to your Applications folder on your Mac. You should find a new folder for MAMP that looks like the image below.
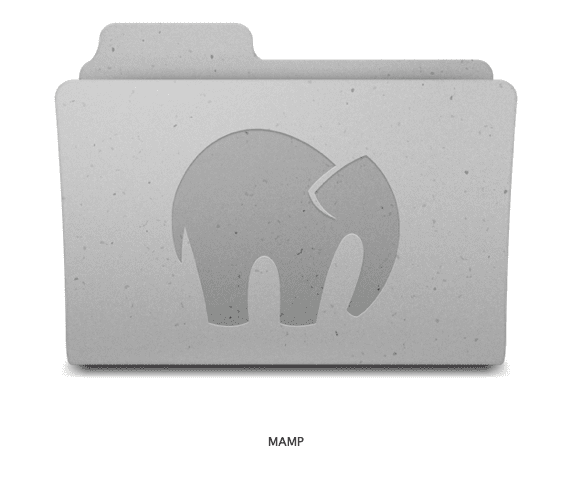
Our newly installed MAMP folder
Inside this folder you’ll find some more folders and some applications. For now the main one we are concerned with is, you guessed it, MAMP. If you plan to work locally a lot, drag the MAMP application icon to your dock and assign it to stay there.
Fire up the application and you’ll see the screen below. It’s extremely simple and offers only a few options from the start. This is a good thing as it makes setup a breeze.
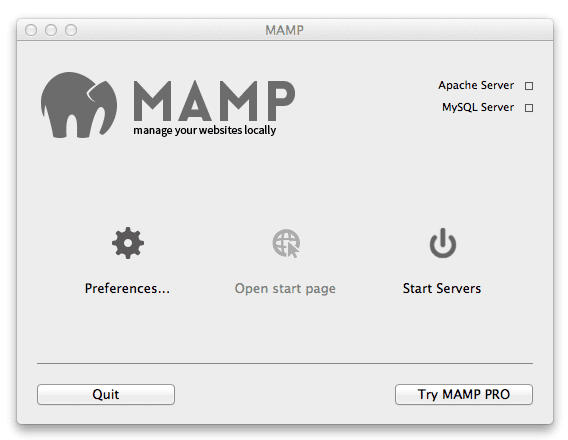
MAMP’s simple interface
In order to get our local WordPress installation off the ground we need a place to keep the files that make up the software. By default, MAMP assigns a folder named “htdocs” to be the home for our local sites. For this tutorial we will use the default provided by MAMP but I want to point out that you can assign any folder on your system to be your workspace for all of your locally installed websites. Some people will often use a folder that is version controlled with Git or even a folder on their dropbox to have access to backups at all times.
To change your root folder simply click “Preferences” on the MAMP Main screen and click the tab titled “Apache”. Here you will see the path to your htdocs folder which like I said before is assigned by MAMP by default.
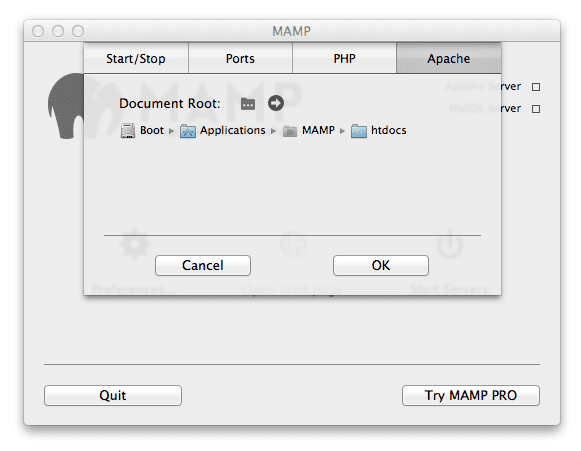
MAMP’s preferences at a glance
Look for the folder icon above the folder path. Click to to assign a new folder as your local site directory.
![]()
Start MAMP Servers
With our local site directories all setup (our’s is the MAMP default), we are ready to start up the MAMP servers.
Click the big Start servers button.
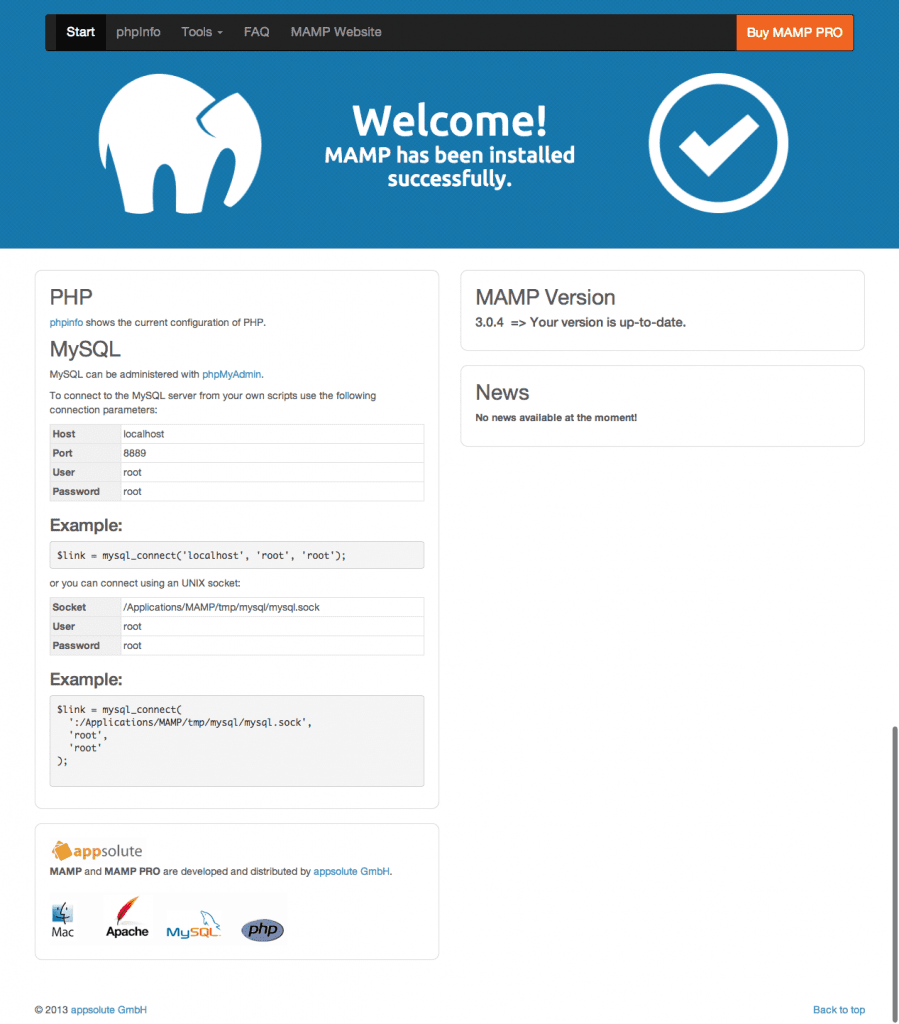
If your servers started successfully your default browser should open to a webpage at http://localhost:8888/MAMP/ which looks like below.
The MAMP Start Page tells us a little bit about our setup as well as provides us with some important tools we will need to use coming up. Now that MAMP is running it’s time to download WordPress.
Installing WordPress Locally
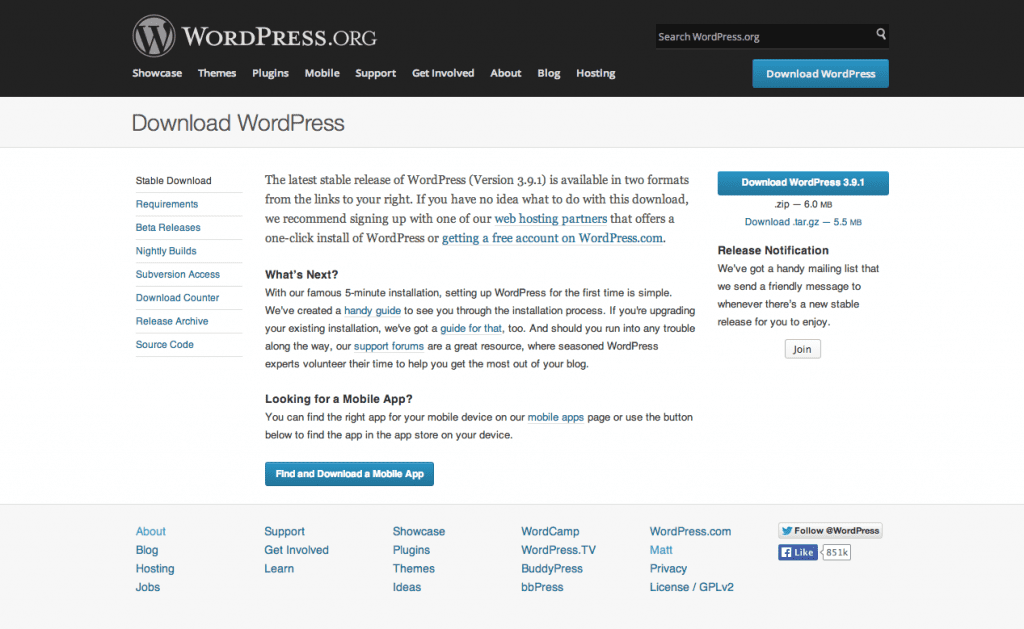
To download a local installation of WordPress we need to visit the WordPress Website to get the latest version.
Upon visiting the site you’ll likely see a download button instantly. Click it and download to your Mac. At the time of this writing we will be installing WordPress 3.9.1. The download comes as a .zip file which you can unarchive with your Mac’s built in utility. Within the archive is a single folder called wordpress.
This folder contains everything required to run a new copy of WordPress locally. We will move this folder to our htdocs directory which was explained when installing MAMP earlier.
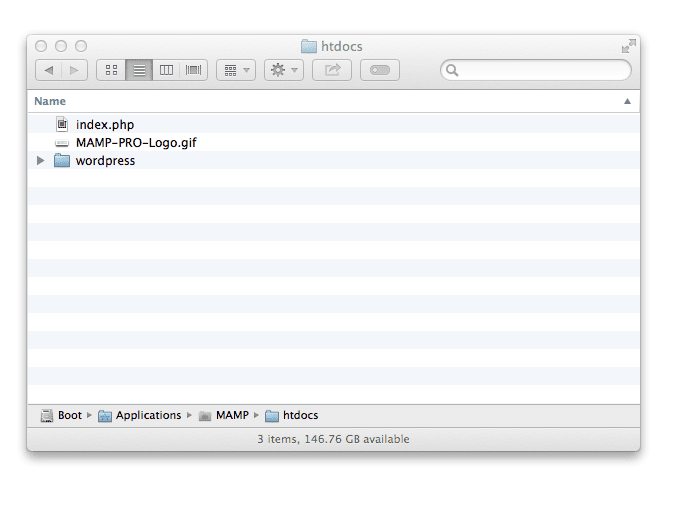
We move our wordpress download into our htdocs folder.
Configuring WordPress To Run Locally
Out of the box WordPress requires a bit of information to operate.
WordPress requires:
- a database
- an optimized
wp-config.phpfile - a php/mysql server (we have taken care of this one!)
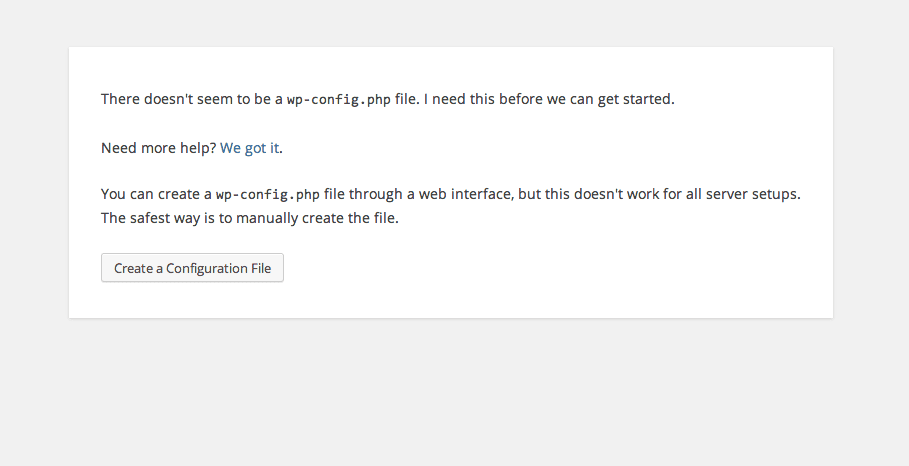
If you open the MAMP start page and navigate to http://localhost:8888/wordpress/ you’ll likely see an error about a wp-config file not being present. We will take care of that in a bit but before we do, let’s create a database.
Databases
Databases are organized collections of data. Think of it as a home for each and every blog post you create or image you upload. It’s a place to store content we create through WordPress.
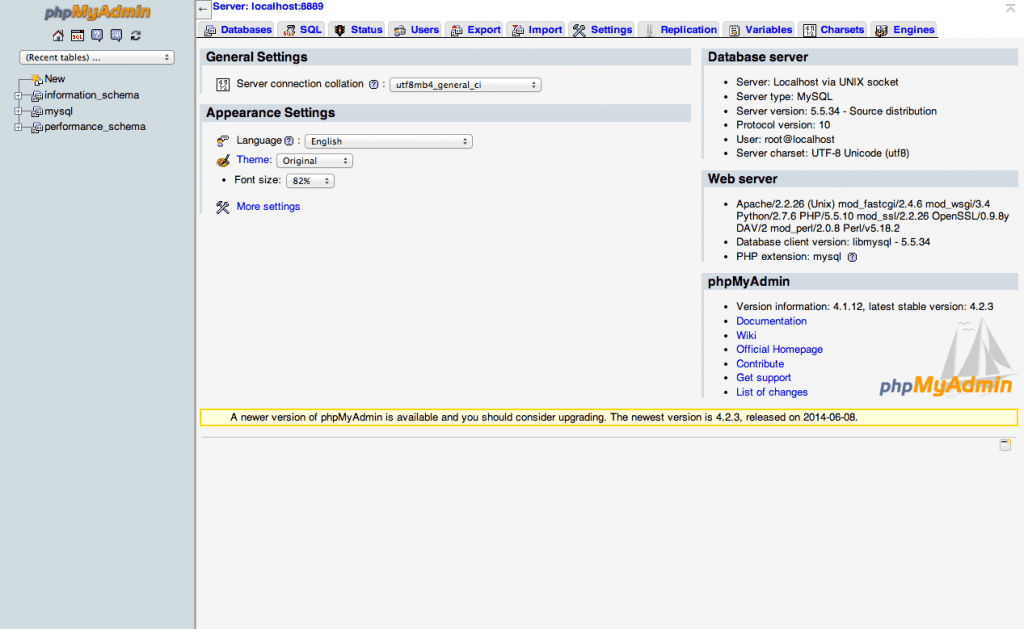
Earlier, I mentioned some tools that came bundled with our MAMP application. One of these tools is called phpMyAdmin. You can find this tool by visiting the start page on MAMP. Under the Tools menu item there should be a link for phpMyAdmin. We will head there now.
At first glance phpMyAdmin might look a little overwhelming to you if this is your first look at it. We will be doing on critical but simple task to get our installation in place. Most of the time you likely won’t be inside phpMyAdmin a lot but it is a necessary step when installing any website that requires a database.
Creating a database
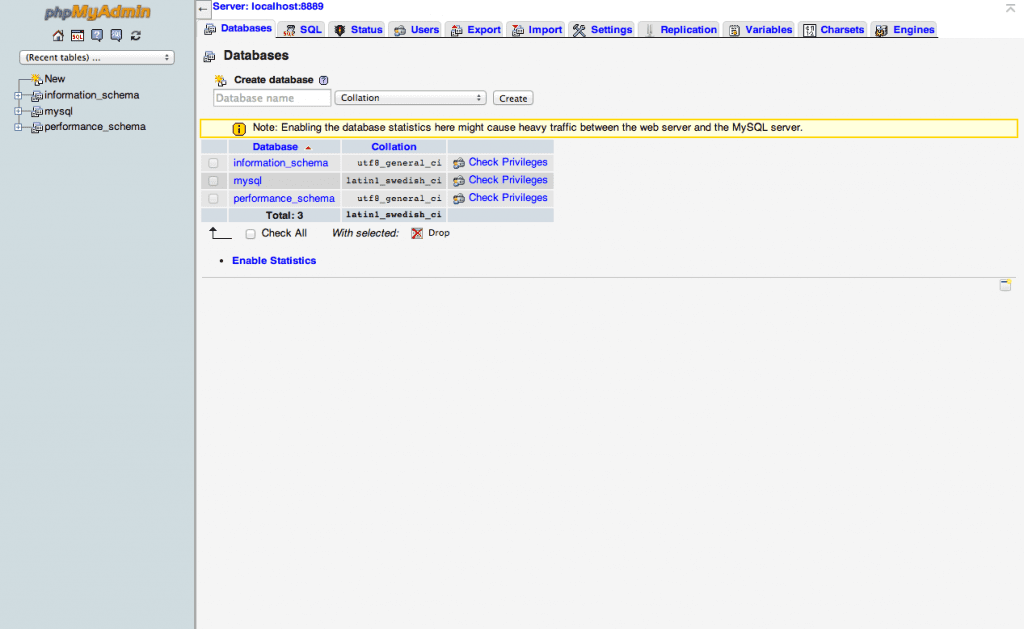
Let’s create a database for our WordPress installation. Look for the tab labeled “Databases” inside of phpMyAdmin. Click it and you will see and input field with a create button alongside it.
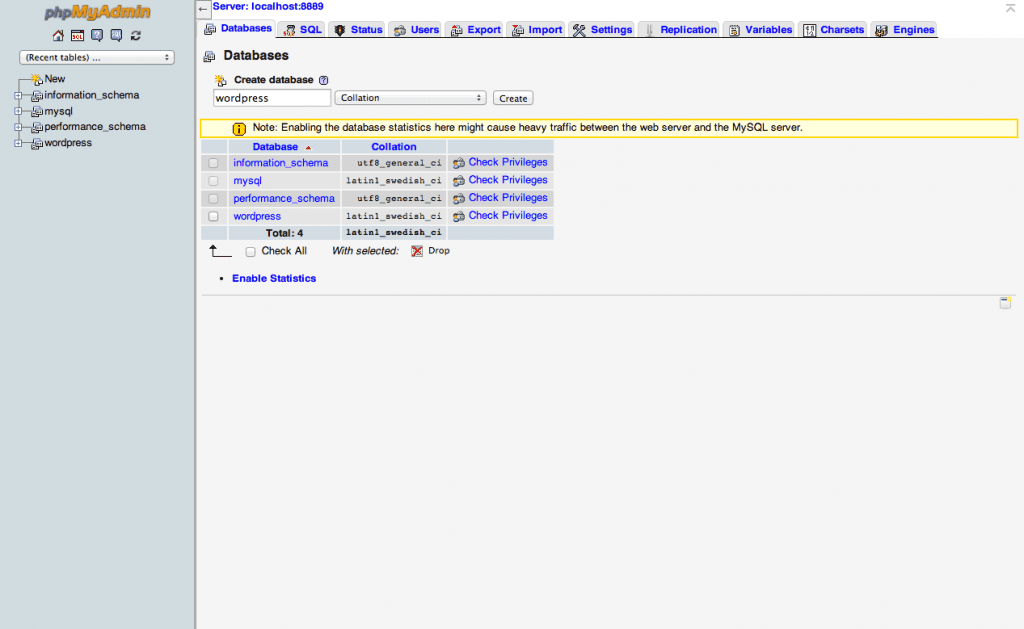
Lets enter a name for our database in the input field. We will call our database wordpress. Be sure that it is in all lowercase characters and click create.
You should see now that we have added a new database titled wordpress.
With that complete we are now finished using phpMyAdmin.
The wp-config.php file
Think of the wp-config.php file as a settings area for your WordPress installation. Here WordPress uses values you supply to connect successfully to a database. In our case we will be configuring the file to connect to our local database we created earlier.
Let’s configure the file. Open up the folder within our htdocs folder called wordpress at
/Applications/MAMP/htdocs/wordpress
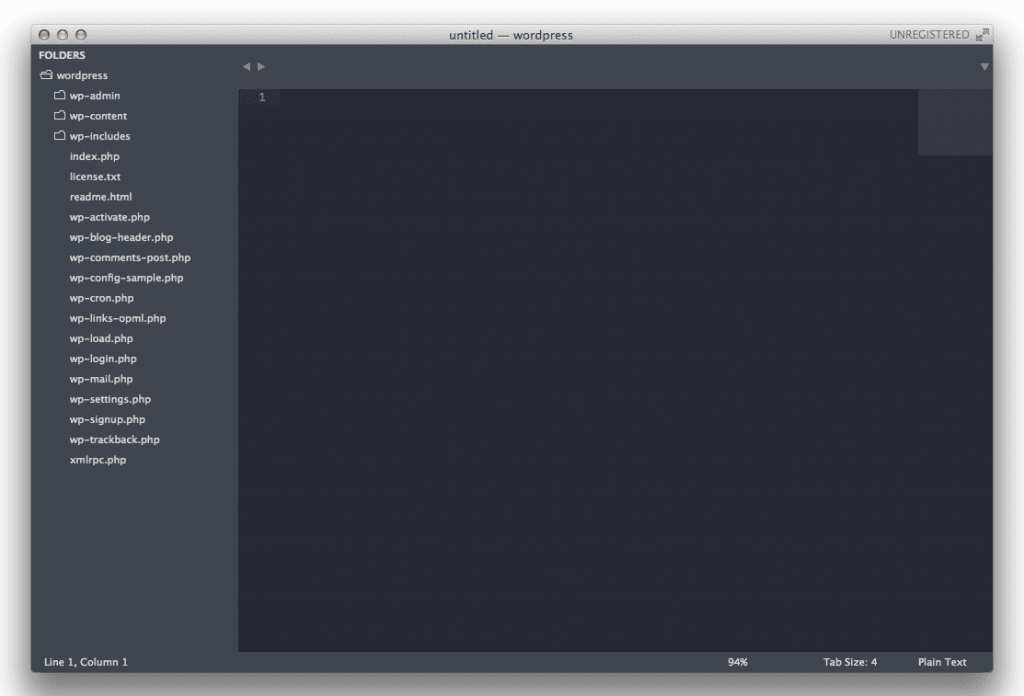
Inside the folder you will see our wordpress installation. In order to edit the config file you will need a text editor of some type. I would recommend a code editor such as Sublime Text or Coda 2 to edit these files. I could go into why but I’ll save that for another time.
Here’s is our project open in Sublime Text
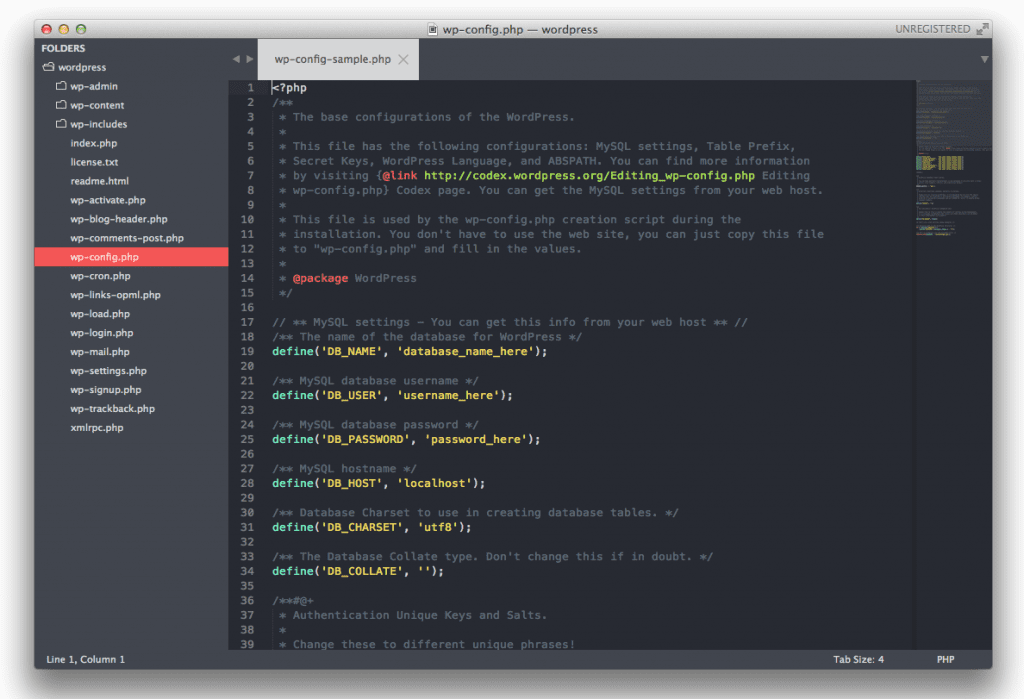
With our folder open we need to modify the existing file called wp-config-sample.php. Lets rename this file to wp-config.php. WordPress will automatically recognize the file once we finish. Once you have renamed the file open it up in your code editor.
Inside the file you’ll find some text that has been commented out, explaining what the file does and why it’s important to the functionality of WordPress.
The lines of code we will be editing are below:
/** The name of the database for WordPress */
define('DB_NAME', 'database_name_here');

/** MySQL database username */
define('DB_USER', 'username_here');

/** MySQL database password */
define('DB_PASSWORD', 'password_here');

/** MySQL hostname */
define('DB_HOST', 'localhost');
If you recall we named our database wordpress so we will update the first line to replace the “database_name_here” text
define('DB_NAME', 'wordpress');
The next two lines coincide with our database username and password. By default MAMP sets both of these values to root. If you ever forget you can find the same information on the MAMP start page at http://localhost:8888/MAMP. The lines update to the following:
define('DB_USER', 'root');

define('DB_PASSWORD', 'root');
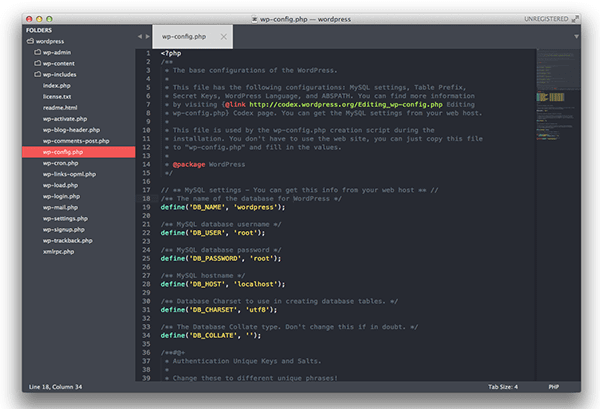
The very last line of code we needn’t worry about. Because we are running our site locally the value of “localhost” already works. So combined we get our wp-config.php file to look like this:
/** The name of the database for WordPress */
define('DB_NAME', 'wordpress');

/** MySQL database username */
define('DB_USER', 'root');

/** MySQL database password */
define('DB_PASSWORD', 'root');

/** MySQL hostname */
define('DB_HOST', 'localhost');
Here it is again inside Sublime Text with the updated values:
Keep in mind that once you decide your local website is ready to launch you will need to edit this file again when uploading the site to a web server. We won’t cover this today but I just wanted to note that this file plays an important role no matter the situation.
Testing Our Local Installation
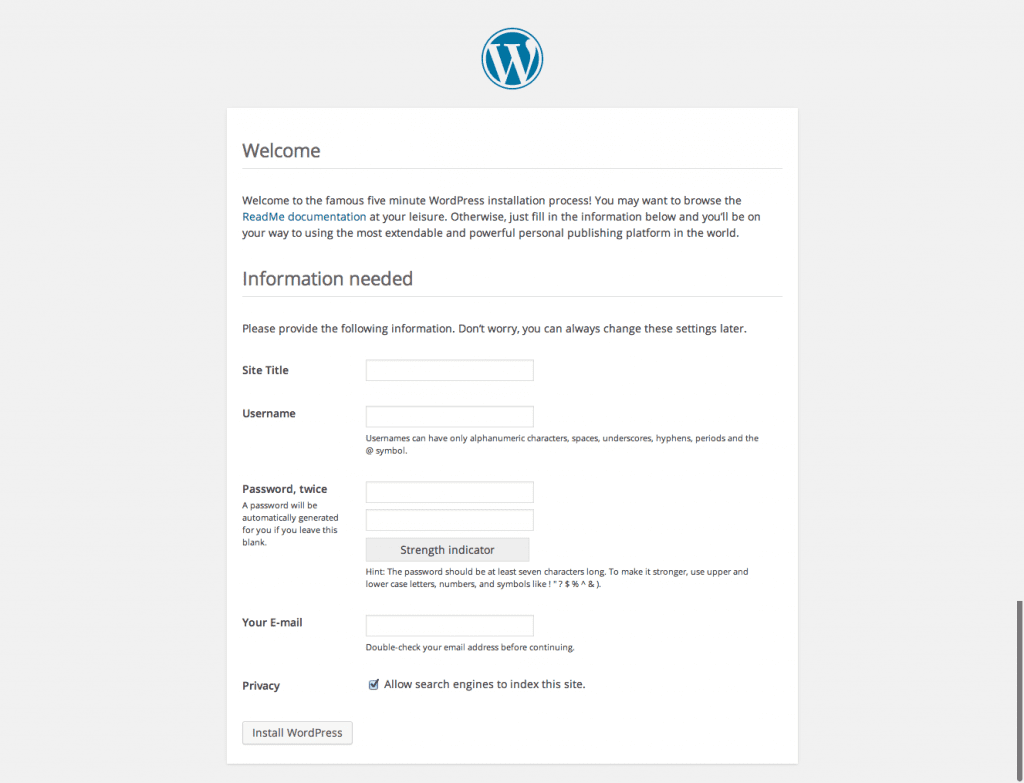
Now that our configurations are all setup we can test our work. Head to your site at http://localhost:8888/wordpress/. You should now see the popular screen below:
Known for it’s quick installation. WordPress has coined the phrase “The Five Minute Install”. This page essentially sets up your installation to declare a name for your blog as well as setup your username and password.
Success
Once complete you will be redirected to your flashy new WordPress Installation. Congratulations on making it this far. You now have a fully functional WordPress installation on your Mac. From here you can use one of our themes to customize your site any way you please.
After reading this tutorial do you think working locally is a smart way to develop a website? Let us know in the comments below!




An update is needed. The screens have changed. The installation process no longer appears as the tutorial currently shows (Aug 31, 2024).
great tutorial, thanks
I’m totally new to this and didn’t think I can do it. Your step by step approach did it for me. I’m wrapped.
Thank-you,
Had followed an alternative step-by-step guide previously which completely failed me at the wordpress/Mamp integration phase. So pleased to have found your site.
A very helpful tutorial. I did encounter some problems with editing the wpconfig.php file, but after researching this a bit, I discovered that leaving these files alone took me through the (very quick) WP installation process, and this worked just fine.
Thank you for these helpful notes.
Thank you!
This was very helpful and informative, also painless.
I tried a couple of times before and just messed up with php and mySQL and could not get anything done without confusing myself to death, but this is perfect.
Thank you for the tutorial. It does address some of my questions.
I exported my original content and DB. With some trial and error, I now have my site working in MAMP PRO. My desire is to have a dev/production on my local and then push to live host when changes are ready.
What discovered is that my local is not altering my live. YIKE! I have found many tutorials on how to set up MAMP PRO with WP. I have not found a good tutorial on how to import a live site in to MAMP PRO for dev/production purposes. Suggestions?
Thanks much…fred
I have downloaded my WordPress files from a live website. How do get it to open in my local WAMP?
So I followed the instructions and still didn’t work. Finally I changed the name of the file back to “sample” and then it worked 🙂
+1 works for me 🙂
Did all of this, and login to the dashboard just fine. However, when I go to visit the site, it’s not there…..Either a blank page or just the name of the theme.
Install the latest version of wordpress from your browser using localhost. This web app will guide you to get your local dev site up and running in matter of seconds.
https://github.com/michelve/WordPress-MAMP-Wordpress-Install-Web-Interface-
Features
1. Get Latest version of wordpress
2. Setup WordPress
3. Create Database
4. Create wp-config.php file
5. Install WordPress
* Create and Point Virtual Host ex: example.dev/
* Point your install to the virtual host
6. Site Manager – Manage all your sites in one place
8. App requirement check
9. That is it for now
10. WordPress Structure rewrite (Better security)
* Change wp-content folder name
* Change wp-uploads dir name
* Change plugins dir name
* More secure .htaccess (coming soon)
followed all steps exactly to load MAMP and WordPress on my Mac. did everything that was instructed up to the url entry >>>
http://localhost:8888/wordpress
i did NOT get what you stated that i should get (WP start page).
I got a blank page that says : Error establishing a database connection
Any idea what I may or may not have done?
after several attempts to retrace my steps – following your steps explicitly – i still get this Error page. I am starting to get really frustrated and upset because it is not working as the steps say it should. Please reply quickly with any help. I am ready to take a hammer to this computer. thanx
@bex Me too! Gone over it many many times and just get the error establishing a database connection :(((
BTW I have years of wp development experience and i can usually figure out all kinds of technical stuff. this tutorial is great and so simple however the result is not ideal for me. there must be something else going on. i have tried many other solutions but can’t establish a local server connection. I’m thinking it would involve some terminal code tampering to resolve but IDK what to do.
Here’s how I fixed the Ammps “Error establishing a database connection”problem, I’m on Mac OSX
Go to you ampps consol (this 1st screen you see when starting ammps)
Then click on MYSQL, then click “restore default configuration”.
then click on PHP, then click on”restore default configuration”.
Then click back on control centre and restart apache and MYSQL.
You should be back up and running again 🙂
Make sure you have the Apache Server and MySQL server started up?
Wow, wow, wow – one of the best tutorials I ever read online. You explained everything in awesome plain English and I had absolutely no questions. Great tutorial – please keep writing. Do you have a tutorial on how to push the local version of the wordpress theme to production and host it on your domain name by any chance?
Clear, concise tutorial. Thank you for taking the time to do this!
Dude, this was a really good tutorial. Very clear and easy to follow. Thanks so much
This is the best installation tutorial i have found for installing MAMP on a Mac however you might want to look at using Desktop Server by ServerPress for Mac as its fully automatic and far easier for the technically challenged beginner.
Thanks for the great article! Appreciated the steps by step instructions for us newbs
I did it it all and got to the “test our work” part and got “ERROR establishing a database connection”.
So now what do I do?
This really helped. I was looking for a tutorial like this since long, and nowhere has it been as well written as this one. Thanks again!
You are a life saver! I has having a database error connection that was driving me nuts! By reading your tuto I decided to try use “root” as password and user and it worked!!!! yeeeyy
Superb article. Straight forward, easy to follow steps. Thanks for the help.
Same here, it never is able to connect to the db.
Hi, I used your instructions to set up initially. I have several local sites, however, I’ve recently been unable to setup a new local site. I get an error with establishing a database connection. I can’t seem to get to the WP welcome page! Any advice please?
Thank you
awesome tutorial, one problem though. when i go to the webbrowser and puts in my site http//:localhost:8889/wordpress/ – my browser says it can’t find it, because it is not a secure connections to the server. What can I do about that?
Dear Andy,
thank you for the post. One of the issues with localhost development is the offline problem. Many themes (and that is the case with the wonderful ET) require resources which are online, javascript libraries, google fonts and so on…
It is possible to download these resources and install them locally too, however not practical to change all the theme loading parameters (script and font enqueues) form online to offline mode, especially when one works on child themes.
Is there a ‘development’ switch in ET themes that allows one to configure a local installation to be totally local, thereby being able to work offline with no Internet connection?
This switch would then be deactivated when migrating to a live server.
any ideas?
This is such a rocking tutorial and it is a real lifesaver for me – Great job Andy.
I cant find the “wordpress”folder. I already downloaded MAMP and WordPress but I can move forward because of this.
Help?
I am not computer savvy at all. I was really excited about this blog post because of the detailed step by step instructions, but they aren’t working for me and I don’t know how to fix them.
I downloaded MAMP and WordPress and moved the WordPress file into the htdocs folder as instructed, but when I went to the phpmyadmin.com tool I got an access denied page that said no servers were set up. I tried hitting the start servers button again (a few times) and still nothing. =( So I’m stuck there.
I’ve been using MAMP, but really like this simple tutorial, and appreciate the comments with alternative to MAMP.
For migration, Backup Buddy from iThemes makes it very simple to migrate the site to the host server. Just install WP and their migration plugin, visit a webpage, and import the site. Delete the migration plug-in afterwards.
great tutorial… working ‘local’ has come in handy many times!
Hello
Can I run local my WP already installed on my server?
Cos I want finish the css edit and other thing on Coda 2. So I want install it again from 0.
Thanks
Hi Andy, great article!
Unfortunately, I can’t get past the launch screen where the “open start page” icon is greyed out.
I’ve clicked on “start servers”, but nothing happens. The page never opens, icon remains grey and MySQL and Apache boxes remain unchecked. Also, the rest of the settings in preferences are set to default.
Do you know what could be causing this or how to correct it?
Any help would be greatly appreciated.
Thank you for making this easy! =)
Great tut.
Awesome tutorial. I was getting a little confused about MAMP and MAMP Pro so I did some research and stumbled upon AMPPS which is cross platform, and apparently you can set it up so your server is in Dropbox and you can work from wherever you happen to be. Plus it comes with Softaculous to make easy install of WordPress even easier.
I love having a local host set up to test wordpress. I am always messing and modifying stuff, so when I break things I’m only effected lol. Then I can learn what I can and cannot do.
Thanks for this posting!
Andy, thanks so much for taking the time to walk us through. I tried MAMP before and was just too complicated but following your instructions can’t get any easier… it took less then 10 minutes! I travel 70% of the time so being able to work offline for 15 hours on a website is a dream come true.
I just have one question: can I have multiple sites? I am trying to do it with no success.
For multiple sites you have to buy the PRO version.
thanks for these informations, as i am a total beginner on mac and it’s going to prove very useful ! i am working since 20 years with windows, so apart from using an iphone… the mac environment is unknown to me.
Lovely post. One thing that used to get to me was the installation and update of plugins and themes. I now use a simple method by updating the wp-config.php with the snippet:
/** Install and update plugins and themes automatically on local **/
define(‘FS_METHOD’, ‘direct’);
Then you can search and install directly from wordpress.org.
Enjoy
Thank you Andy for this easy step-by-step tutorial. I am using ElegantThemes.com for all my clients’ projects now. Specially now that Divi 2.0 is out. Installing a local WordPress on my Mac will definitely help. As others mentioned above, can’t wait for the follow-up tutorial to migrate the local install.
i like this tutorial! I’ve already purchased the Pro and can’t wait to try it out. I too, would love to see a follow-up tutorial on migrating the local install. This post was worth the entire price of my lifetime subscription! I agree with others this can sound like a lot of work when you can just edit in a subdomain or use a testing plugin. The benefits of using a home test server are speed and for serious alterations like changing functions and code!
What a great tutorial Andy! You saved me from so much headache! Thx! 🙂
Thanks Mia, I’m glad you like it
The timing of this post is perfect – I was just wondering how to work “offline” on a new site. I have an existing WP.com blog that I have recently set up a domainname.com for on Bluehost. I have a landing page up for now, because I wasn’t sure what I wanted to do theme-wise. I would like to import the existing WP.com blog to this new one I want to work on – is that possible working locally…? I have a nice number of followers I don’t want to lose. Sorry, I am not the most tech-savvy. Know enough to be dangerous 🙂
Hi BJ,
I believe the import you speak of is possible. I believe there’s a setting inside the WordPress software (from wordpress.org) that you can opt to use for an import from your existing wordpress.com site.
Thanks, Andy. I think so too, and will look into it next week when I start working on this. I am just wondering how that works in regards to not losing followers when importing to a local working environment. I’ll let you know how it goes!
People asking questions about migration and staging. There is a useful discussion here from Aug 2013
https://www.youtube.com/watch?v=ENAuP4UU5I0
Most important point. BEFORE you set up your local development environment, find out which version of Apache, PHP, and MYSQL your hosting service provider is running, then try to mirror that in your local setup.
That might complicate things a bit, but it’s better than still breaking your production site because things that worked locally didn’t work remotely.
One thing you can do is host a staging site on the same server as your production site but just at a different domain or something. Test everything there before moving it across to production. You can also use that staging server to get sign-off from your clients. You don’t need dedicated staging services.
I run wordpress multi-site, so this is easily done without actually needing another instance of wordpress installed at my hosting provider. Multisite requires a little effort up front but it pays big dividends. I found a really nice course at Lynda.com on how to set that up.
I Love You WordPress 🙂
🙂
Great article Andy, very nice step by step guideline, Thanks for share.
Thanks!
Great article Andy, very nice step by step guideline, Thanks for share. MAMP is look similar like WAMP.
Hi, Yes they are very similar. Both work perfectly for something like this.
I have no words to write how much I am grateful with ElegantThemes.
And don’t forget Linux users please, there are a lot of us creating websites with ET and Linux (Ubuntu mainly).
Thanks Jonatan!
Great walkthough, but a bit complicated. Bitnami has a much simpler and opensource self-installer for those looking to run a local instance of WordPress on Mac/PC/Linux: https://bitnami.com/stack/wordpress
Yes, lots of options are out there. The process in this tutorial is simply the way I prefer to go about setting up my sites.
I have used DesktopServer for several years now after using MAMP Pro before that. Once I used DesktopServer Premium, there is simply no other tool that is as functional, powerful and intuitive to use in building and then deploying WordPress sites.
If a client already has a WordPress site, I can install Duplicator, create an archive of the site, download it and then import it into DesktopServer Premium and then modify anything I need to or want to and then deploy it back to the site when it is ready. Check it out at DesktopServer
We are developing an online directory for reentry services using divi as our CMS system and having an onboard wordpress to run template creation is awesome Quick question how do I get the work from the host (Over 100 pages) we use to wordpress on the computer?
Thanks in advance
Install the Duplicator plugin on the hosted site. Then download the created archive and, for me, I import it into DesktopServer Premium. Don’t recall if you can do that with MAMP Pro or not, quit using them years ago when I discovered DS. If you have DesktopServer Premium, you can import the archive and it will recreate the hosted site on your local machine.
How hard is it to “push it to the development environment” after working on a wordpress site locally? I like the idea of a local install but want all of the work to then be pushed to the hosting server. Can you provide some easy steps on doing this?
I’ll likely cover this in a future tutorial Charlie. Working locally is a great starting point for the sake of speed and efficiency. Once your site is where you like it you can push it to a live server.
Thanks Andy…I will look for that at a future date.
I searched for MAMP in the Mac app store and found the Bitnami app which is MAMP bundled with WordPress. Literally just had to install the app, start it up, start the servers (two clicks) then launch WordPress and I was up in going in 5 minutes (aside from download time)
I agree with others this can sound like a lot of work when you can just edit in a subdomain or use a testing plugin. The benefits of using a home test server are speed and for serious alterations like changing functions and code, not just design and CSS.
Speed comes into play when you are making many code changes and want to quickly refresh the page and see the results. A few extra seconds doesn’t seem like much but it is when you do it several hundred times a day. And I travel a lot so I never know how reliable the internet will be at each location. Here lately, it has been closer to 56kbps speed than 50 Mbps. A few seconds becomes 10-15 seconds, enough to drive a person to madness.
Great mental image Brad, I feel for you. 😉
Great article, and one actually providing some tidbits for use in our local environs.
We too used to rely on MAMP, and even the paid version for awhile.
Then we discovered an app called DesktopServer. (You can find it easy enough via web-search, don’t want to be accused of spamming this post 🙂 )
But based on what we’ve found, and the responses above, it might be something worth inspecting, and/or maybe doing a follow-up article.
To wit, it slices, it dices, it chops, it minces.
Or more succinctly, it starts everything up for you on command, and gives you the opportunity to have any number of local .dev sites at your fingertips.
And, it can handle a live migration to your domain likkity-split with all links handled without stress. We’ve owned it for several years now and I recommend it to anyone wanting to work WordPress locally.
— Michael
I too have switched from MAMP and another one, but the DesktopServer. It is by far the easiest to setup and start working immediately. They do offer a free lite version, but to really get the fully benefits, it does cost a $100 a year, but the time that I have saved already makes that a non-issue.
The other thing that I like about this new solution, is that it let’s me link my Dreamweaver into the mix to really speed the process of customizing and getting the sites up a lot faster.
Also, with the paid version, they have built-in utility that will upload the site live and you have the opportunity to change the directories, domains and other aspects that are normally a pain.
I just like easy and this is it!
You have my attention. Downloading now. If the transfer is as easy as you say, it would be worth $99/year for the premium version for more than 3 websites. One of the worst parts of transferring a dev site are dealing with backlinks and image links. It handles these flawlessly?
Completely. I’ve never, ever, had any issues. And yes, the premium version is worth its weight.
As to links, I typically keep it the same format as what will be the live site, ie thiscoolsite.dev migrated to thiscoolsite.com
But theoretically, anythingorsomethingelse.dev would work in migration to reallythisisthesite.com
Thanks for sharing Michael!
Love this tutorial! I’ve already purchased the Pro and can’t wait to try it out. I too, would love to see a follow-up tutorial on migrating the local install. This post was worth the entire price of my lifetime subscription! 🙂
Thanks Julieanna!
Way too complicated. 🙂
It gets easier, http://youtu.be/3sCtCw8kXQ8
Enjoy,
Jim
If you do the way I do it (like above) once, it becomes a no brainer to get setup for any future installs. There are many more ways to go about it I agree, but I think there is no real wrong way to get your environment setup as long as it’s working correctly. Thanks
Hi Andy, I followed your instructions, but when I run my local installation: http://localhost:3306/wordpress/
I got this messy screen…
I had changed my Mamp ports in 80 (Apache) and 3306 (mysql) following a previous tutorial, could it be this the issue? Thanks
Good article! As an alternative to Mamp, check out wp starter.io.
Thanks Magnus!
Although I love the idea of designing locally, it seems to me it would be better to design in a subdirectory. With MAMP, there is no way to share site progress with a client except through screenshots whereas with a subdirectory your clients can see what you’re working on. Am I wrong?
It’s quite simple to share your dev mamp server with anyone. It’s too long to explain in a reply so I’d recommend searching for “Sharing a Local Dev Server with Your Clients Using MAMP”
Marcia,
There is actually a way to share your local installation but it involves setting up a DNS service and messing with your router; rather advanced and complicated stuff.
I recommend starting locally then pushing to a development environment on your web host like
http://dev.yourwebsite.comor something. A lot of reasons people work locally deals with the code they use. Styling your theme for instance can be done with Sass or Less and there’s no real support for those languages on a live server. In the end use whatever method works for you. Thanks for your comment!Good point. Also, a perk to working locally with MAMP is that you don’t need an internet connection. Go to the park, the mall, Uncle Bobs house, wherever, and do your work.
This is often said as one of the major advantages of working locally. However, there are plenty of themes nowadays that use Google fonts and FontAwesome icon fonts and add a Google Map. Once that is all in, you either need to temporarily disable calls to these scripts or add everything locally, because all these scripts are actually trying to connect to the internet and therefore will make your local setup incredibly slow.
Great easy to follow tutorial, but it does seem like a lot of work. Would like your opinion please on the WP Clone plugin as a means of creating a dev version of a site instead. I have used this, and it is incredible easy.
Hi Maura,
The plugin is certainly an option you can take. Some people prefer to be in complete control of the installation while others just want automation like a plugin offers. Use what ever works best for you. Thanks!
I was searching for a way to create a “development environment” for testing purposes to then move it to production. This article perfectly answered my questions. I’d also love to see a follow-up on migrating the local install from MAMP to your online host.
Great to hear Mariane! Thanks for the comment
Great tutorial. I would love to see a follow-up post about migrating the local install from MAMP to your online host.
+1 on this as well – with a versioning step too if possible (e.g. migrating to a code repository like beanstalk and deploying to production from there). Great tutorial by the way – thanks!
Thanks Dan, I’ll try to make this happen!
1+ – Thank you, this is by far the top, best post I have seen on MAMP installation.
Please write the step-by-step part 2 really fast, it is much needed.
Thank you heaps.
Brigitte.
Agreed! To me that is the most daunting part of working with WordPress. I’m prepping for a freelance project (using Divi 2.0 yay!!) which I’m creating on a dev subdomain of the live client site (dev.[sitename].com), and I’m a little nervous about getting it to the live environment when we’re all ready. Through a lot of research, it seems like this tool is the best free way to go: http://wordpress.org/plugins/duplicator/
Fingers crossed.
PS – Not really sure how you share a development site with a client to go over progress if it’s all done locally? Fine for personal projects, but seems counter-intuitive with external clients. Let me know if there’s a good way or if that was stated in the post and I missed!
+1 Dan. I would love to have a tutorial on elegant themes for migrating a local website to a host!
+1 on this as well.
+1 from me as well!
Guys, I found a very EASY article about migrating from local to host. I tested it and it works like a charm. Enjoy 🙂
http://www.wpbeginner.com/wp-tutorials/how-to-move-wordpress-from-local-server-to-live-site/
+1 from me as well!