Ever found yourself creating a series of posts or pages that follow a similar format? Wouldn’t it be great if, instead of manually recreating the same format over and over, you could just create blog templates to automate the whole process?
In this post, I’m going to show you exactly how to do that using a free plugin called Simple Content Templates. I’ll start with a brief discussion of what the plugin does and, most importantly, when you should use the plugin over other options. Then, I’ll give you a step-by-step tutorial on how to use the plugin to create your very own blog templates.
What Does Simple Content Templates Do?
In the free version, Simple Content Templates allows you to quickly pre-fill your posts with pre-defined:
- Title
- Post body content
- Excerpt
It’s definitely simple (hence the name). But it’s also quite helpful.
Can’t You Use Custom Post Types or Custom Fields For That?
If you’re familiar with WordPress, this is something that you could also do with a custom post type and/or custom fields. But Simple Content Templates isn’t really trying to replace those options.
Instead, it’s the perfect option for when you need to work within regular posts or pages, don’t want the template to apply to every single post or page, and don’t need to change the actual formatting of your post or page.
Remember: Simple Content Templates only affects content inside the normal WordPress Editor fields. It’s not creating a new post format or anything.
What’s cool is that the plugin lets you create unlimited blog templates. So you can create a few different templates that you use as needed.
How to Create Blog Templates With Simple Content Templates
For this tutorial, I’m going to use a test site running Divi. But it’s important to note that Simple Content Templates only works when you’re creating posts in the regular WordPress Editor. That means you can’t use your templates inside the Divi Builder.
Don’t worry, though. If you need to create reusable blog templates inside the Divi Builder, you already have access to the Divi Library. Just save your templates to your library and reuse them as much as needed!
Alright, let’s get started…
Step 1: Install and Activate Simple Content Templates
Simple Content Templates is free and listed at WordPress.org, so you can get started by installing it directly from your WordPress dashboard:
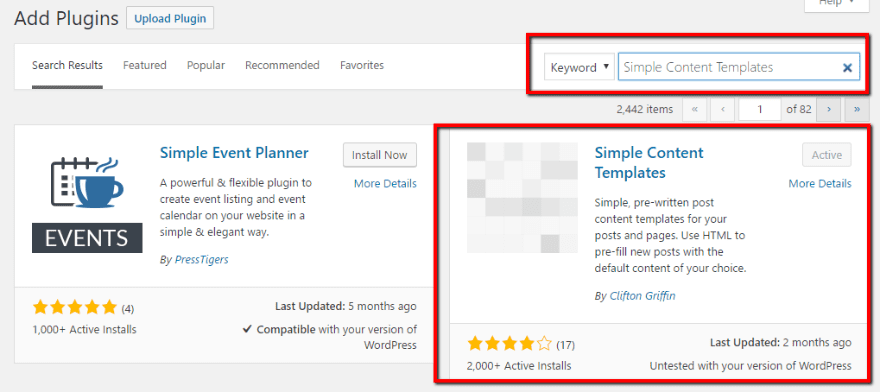
Once you activate the plugin, you’ll get a new Content Templates option in your sidebar where you can manage the plugin.
Step 2: Choose Which Post Types to Use Simple Content Templates For
The plugin only has one thing to configure – but it is an important one.
By default, Simple Content Templates is only enabled for regular WordPress posts, but you can go to Content Templates > Settings to enable it for pages as well:
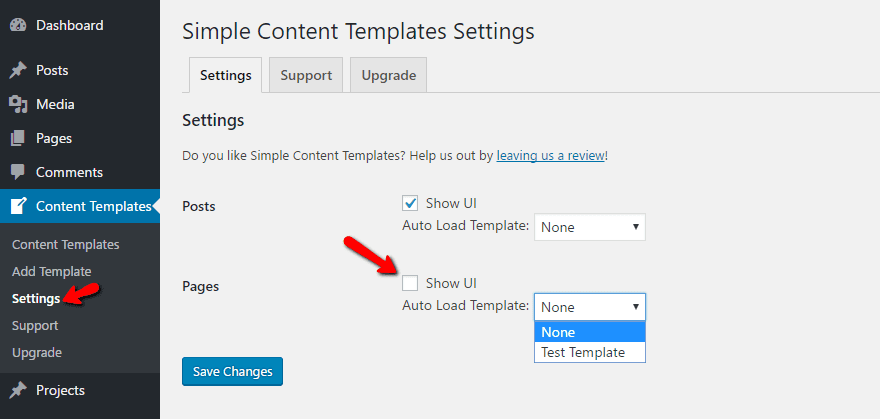
And once you create some templates, you can also have the plugin automatically load a template whenever you create a new post or page, instead of needing to manually select a template (more on that later).
Once you configure that, you’re ready to create your first template.
Step 3: Create a Template
To create some blog templates, head to Content Templates > Add Template. You’ll see pretty much the standard WordPress Editor:
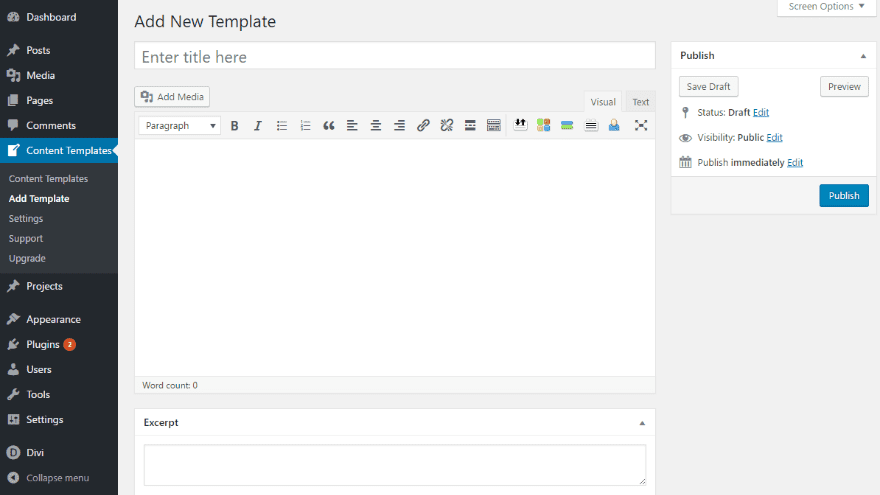
All you need to do is enter content like normal. The template can consist of anything that you’d normally enter in the:
- Title
- Text Editor
- Excerpt Box
When you import a template to your post, Simple Content Template just brings it in word-for-word.
What’s neat is that you can use all your normal shortcodes in the template.
Let’s look at an example. Say you wanted to set up a simple template for a book review, complete with a “Buy it Now” button using the ET Button shortcodes.
To do that, you could set up your template something like this:
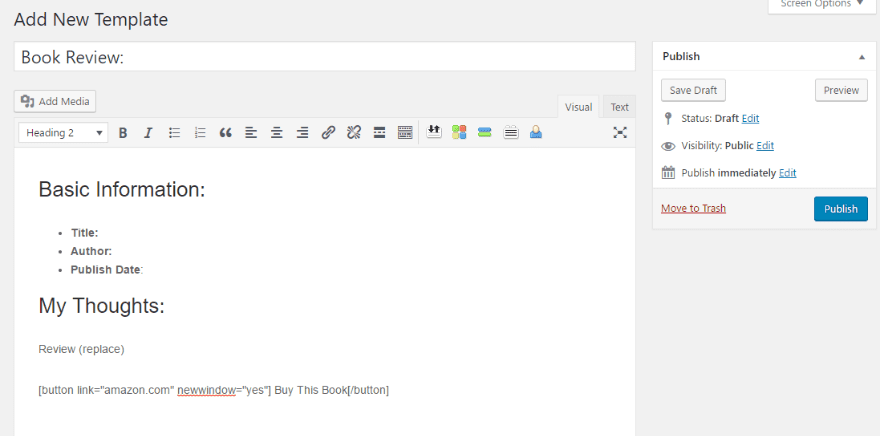
Make sure to Publish it, then you’re ready to start using your template.
Step 4: Insert Your Template When Creating New Content
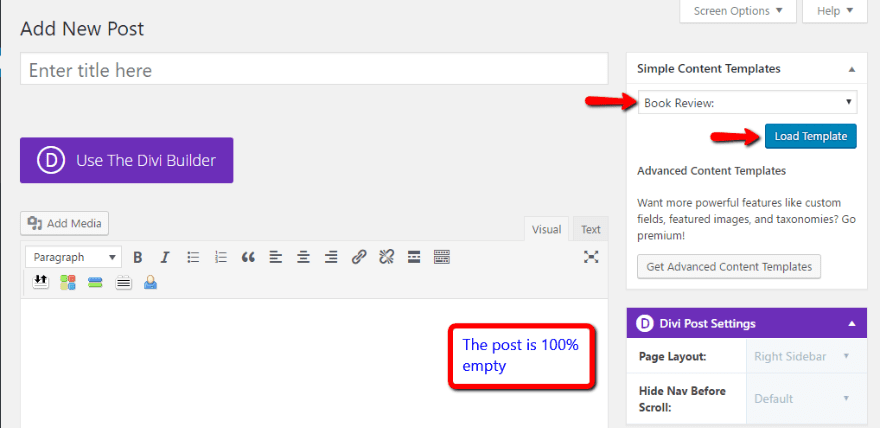
Once you finish your template, all you need to do is create a new post or page like normal. When you do, you’ll notice a new Simple Content Templates meta box. To load a template, all you need to do is select your desired template from the drop-down and click Load Template:
After you click the button, the plugin will automatically insert your template:
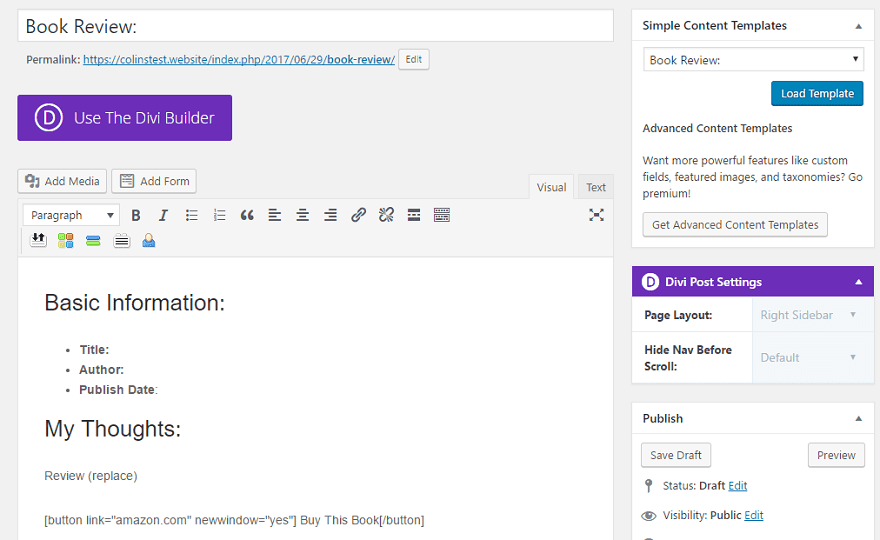
Then, you can just go in and add the relevant unique information before publishing.
Be careful, though. The plugin completely overwrites any existing content. So you can’t go back and retroactively add a template without completely wiping out your existing content.
And that’s it! A simple way to create some basic blog templates to save yourself some time.
Need to Edit Your Templates?
To edit your blog templates, you can always go to Content Templates > Content Templates and click on the Edit button under your desired template.
This got me wondering – if you go back and edit a template after you’ve already used it, will that have any effect on posts that already used the template?
Just to be sure, I ran a quick test. Editing a template has NO effect on posts that previously used the template. It only affects new posts that you create.
So feel free to edit away without risking breaking your old posts.
If you need more flexible blog templates, the developer also offers a premium version called Advanced Content Templates.
First off, the advanced version adds some more basic options like the ability to automatically set:
- Featured images
- Categories and tags
- Custom fields
- Post format
And it also adds support for custom post types in addition to posts and pages.
Beyond that, Advanced Content Templates starts to get into real templating with the ability to use inline PHP in your templates to dynamically generate content.
Wrapping Things Up
Simple Content Templates is an easy-to-use way to create some basic blog templates and save yourself some time. While it’s limited in the complexity of the templates that it can create, it’s also something that anyone, even a total beginner, can use.
If you’re creating a site for a client, you can use it to give them some pre-built templates without needing to do anything complex. And if you’re using it on your own site, you can save some time instead of trying to duplicate formatting across multiple posts.
Have you added blog templates to your site? What’s your preferred method to accomplish this?
Article thumbnail image by Legend_art / shutterstock.com


Cloning, plugins… have you ever heard of the DIVI library?
I just don’t get it: why `don’t you write and explain / document the DIVI features instead of promoting additional tools?
The screenshots are done with DIVI but without DIVI’s tools, and on the top of this blog page I see the announcement of “DIVI 3.0 and ALL NEW VISUAL BUILDER” .. I think you missed the topic ;=)
Wow. That’s a really handy plugin. For people with a lot of tasks, it’s nice to keep the that sort of thing in one place.
As much as I love Divi Builder, I think this is a simpler/leaner solution for blog post templates.
C.
don’t use the DIVI Builder but think of the layouts in the DIVI library… much better than installing the next of many plugins…
Me too Barbra,
I usually do one post, format it, then switch to text tab, copy the text including html, and paste it into notepad and save it.
Each time I want to have a very basic blog post with the same format, I simply open a notepad template and paste it back into the text editor, swap to the View tab, and paste in the new content in place of the old. no plugin required.
I guess it depends entirely on ones content and work flow though, and yes you can make a template with Divi builder and save it to your library for re use.
Thank You for sharing such a great information.
I have other solution. Cloning!
Free plugin – Duplicate Post
https://cs.wordpress.org/plugins/duplicate-post/
This plugin allows users to clone posts of any type, or copy them to new drafts for further editing.
How it works:
In ‚Edit Posts’/’Edit Pages‘, you can click on ‚Clone‘ link below the post/page title: this will immediately create a copy and return to the list.
NEW! In ‚Edit Posts’/’Edit Pages‘, you can select one or more items, then choose ‚Clone‘ in the ‚Bulk Actions‘ dropdown to copy them all at once.
In ‚Edit Posts’/’Edit Pages‘, you can click on ‚New Draft‘ link below the post/page title.
On the post edit screen, you can click on ‚Copy to a new draft‘ above „Cancel“/“Move to trash“.
While viewing a post as a logged in user, you can click on ‚Copy to a new draft‘ as a dropdown link under „Edit Post“ in the admin bar.
3, 4 and 5 will lead to the edit page for the new draft: change what you want, click on ‚Publish‘ and you’re done.
There is also a template tag, so you can put it in your templates and clone your posts/pages from the front-end. Clicking on the link will lead you to the edit page for the new draft, just like the admin bar link.
I use this plugin on every site. It works perfectly.
I was wondering the same as Catrina – is there a way to accomplish the same thing using Divi?
That’s what the DIVI library is for!
It’s called “layout” in the library ;=) but I get the impression that the blog here ignores DIVI’s features instead of promoting it ;=)
Maybe I’m missing something, but couldn’t you do the same thing by creating and saving a template in the divi builder? Then you wouldn’t have to download an additional plugin.
This looks like a great idea! I was actually just thinking about how to do something similar (even for book reviews as in the example), so this is really good timing for me! 🙂 Thanks again 🙂 🙂