Has this ever happened to you? You install a plugin. It has the exact functionality you’re looking for. But…it just doesn’t look right. Even after you change all the settings, it still won’t fit your theme’s style. So, despite how well it works, you’re either slightly unhappy, or you throw it to the side and use something else.
If it has, you may have been able to get the best of both worlds by using custom CSS to style your plugin. Custom CSS styles allow you to change the appearance of your plugins, even if the developer hasn’t built styling options into the plugin settings.
This post is all about showing you how to properly add such styles, so that you’ll always keep them safe even if you update or change your theme.
Custom CSS Styles = More Control Over Plugins’ Appearance
Custom CSS styles allow you to manipulate the appearance of your plugins in ways beyond what the developer adds into the plugin options. Nowadays, many premium plugins include detailed styling options, but free plugins aren’t always comprehensive in this regard (if they include them at all).
Take one of the most popular plugins out there: Contact Form 7. It offers very little in the way of styling. But, through using custom CSS, you can completely change every aspect of how the forms display.
Plus, even plugins with detailed options don’t always give you the ability to change every style element you need to modify.
So, by learning a little CSS, and how to safely add that CSS to your theme, you gain a whole new level of power over how your plugins display to your readers.
Why It’s Important to Add Custom CSS the Right Way
You don’t want to go adding plugin CSS styles willy-nilly. As Nick hit on in his post about child themes, there’s a right way and a wrong way to go about adding CSS to WordPress.
When you add CSS styles the right way, they’ll always be safe, even if you update your theme, and you’ll be able to easily copy and paste them to a new theme if you ever decide to change your design.
Conversely, adding them improperly will put you at risk for losing your styles to a theme update or theme switch.
Now, I’ll go through how to properly add CSS plugin styles for both Divi and other WordPress themes.
Where to Add Plugin CSS Styles in Divi
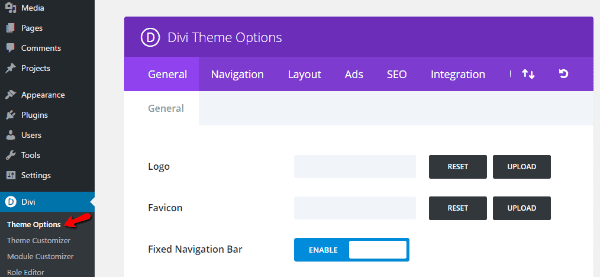
To safely add plugin CSS styles to Divi, you’ll want to first go the “Theme Options” tab in your Divi menu:
Then, in the “General” tab (which will be the default tab loaded), you need to scroll all the way down to the bottom of the page. There, you’ll find a box called “Custom CSS”:
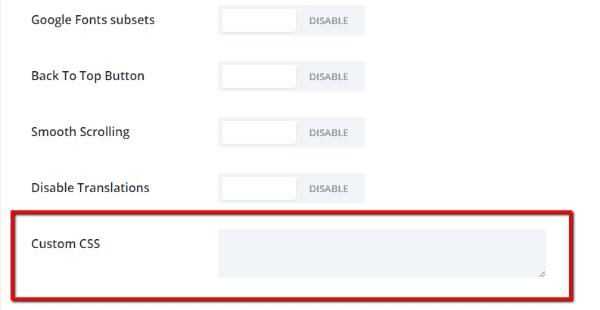
Technically, all you need to do is enter your custom plugin CSS here and click “Save Changes.” But, because we want to make it really easy to move or copy all our plugin styles, let’s take it a step further.
Because you might have already added some custom Divi CSS snippets, it helps to organize the custom CSS in this box. To do that, you can add a comment saying something like “Plugin CSS Styles Start Here”. Then, you would only add your plugin CSS styles below that line.
To add such a comment, all you need to do is copy and paste this code:
/* Plugin CSS Styles Start Here */

The comment won’t affect anything, but will help organize your various custom CSS styles. Divi will also keep your custom CSS styles safe during updates, so you don’t need to worry about losing them.
Where to Add Plugin CSS Styles for Other Themes
If you’re using a different theme, you’ll generally want to add your plugin custom styles to your child theme’s stylesheet. If you’re not using a child theme, or don’t know what one is, I definitely recommend you create one and start using it (here’s how you can do that!).
Assuming you have your child theme set up, you can modify it from inside your WordPress dashboard by going to Appearance > Editor:
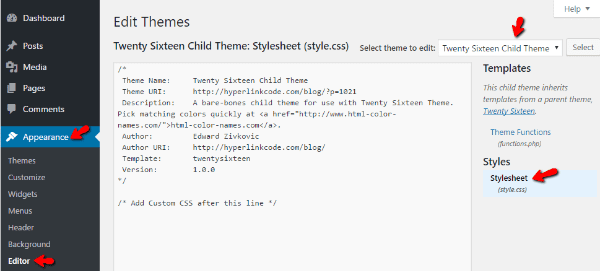
Make sure you’re editing the correct child theme. It should go to style.css by default. If it doesn’t, all you need to do is click on that option.
Then, you just need to add your custom plugin CSS exactly like I discussed in the Divi guide above. First, create a code comment along the lines of:
/* Plugin CSS Styles Start Here */
Then, add all your custom CSS styles below that line:
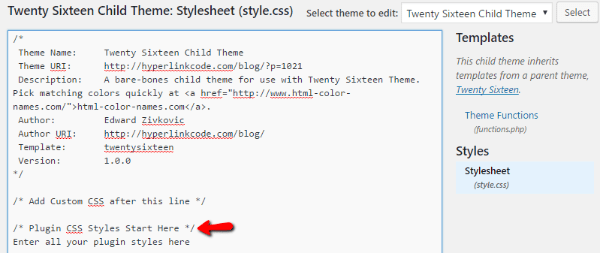
Because you’re working in a child theme, your styles will always be safe even if you update your theme. And because you’ve clearly commented them out, you can easily copy them to a new theme or a different WordPress install.
Real World Example: Contact Form 7
To really drive things home, let’s take a look at a real world example. Say you want to style a form for the aforementioned Contact Form 7. You installed the plugin and got a barebones looking form like this:
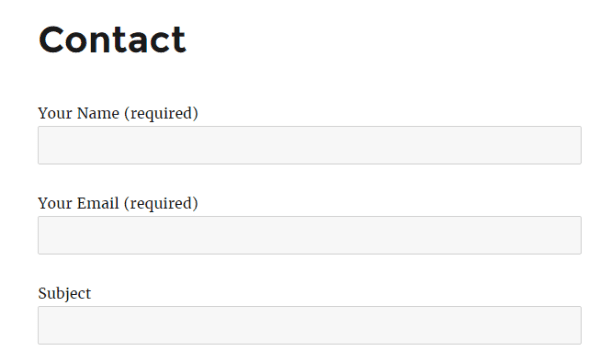
Now, you want to spice things up a bit by adding a black border to the form fields. You can go to your child theme’s stylesheet and add this code below the code comment you made (hint – this post is a great resource for styling Contact Form 7):
.wpcf7 input[type="text"],
.wpcf7 input[type="email"],
.wpcf7 textarea
{
    border: 1px solid #000000;
}
Your CSS should look like this:
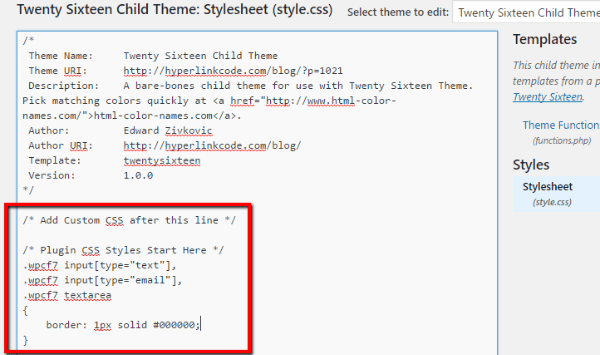
After you save the stylesheet and refresh your contact form page, you should see this:
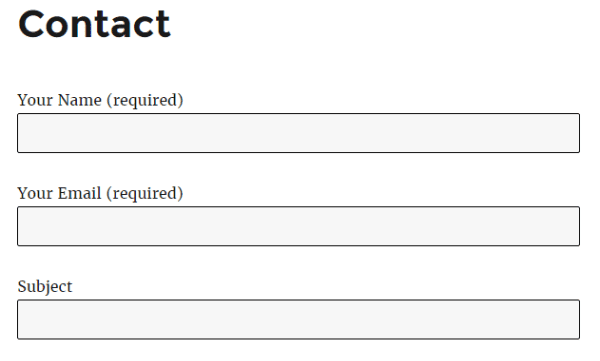
Notice the new black border? That’s all there is to it!
If you’re using Divi, your code would look the same, just in a different location:

Of course, this is a bit of a thought experiment because you don’t really need a contact form plugin with Divi. But, the same idea will work with any plugin you need to add custom CSS styles to!
Wrapping Up
Adding custom plugin CSS styles to WordPress is a pretty simple process. The hardest part is knowing what CSS code you need to add. You won’t become a CSS expert overnight, but a good place to get started learning basic CSS is w3schools. And a good way to find which plugin element you need to target is the Google inspect element tool.
Just remember – always keep your custom plugin CSS in a separate area marked by a comment. That way, you can always find it. And if you’re using a non-Divi theme, be sure to keep all your custom styles in a child theme.
Do you have any plugin custom CSS style tips to share? I’d love to hear about them in the comments below!
Article thumbnail image by DreamUP / shutterstock.com


Wonderful Tutorial… The given information and images are extremely powerful to understand the whole concept about how to add Custom CSS Styles to Plugins. I am also WordPress Developer and I am really happy with the provided information. Truly helpful and informative. Thanks for sharing.
I just bookmarked this source..
Now i can add CSS to my Plugins to make them appear like website’s theme. Thanks Really great post, Thank you for sharing This knowledge.Excellently written article, if only all bloggers offered the same level of content as you, the internet would be a much better place.
This is why I LOVE Elegant themes – you keep me coming back for more…and more…and more. Thanks so much! Do you guys EVER rest?
Nice information. I didn’t know I could even do this with Divi 🙂
From my personal experience I recommend CodeCademy to learn some CSS basics. They have really good interactive courses.
I hate to say it, but I really don’t like the Divi custom css box. I wish you would give it its own tab in the Divi Theme Options, with plenty of space. That small box at the very bottom of the Theme Options general settings tab is way too small for me to view all my styles properly. Even if I grab the corner of the box and drag it down, expanding the height of the box, I just don’t like it in that small width of space and that I have to do that (expand the box) in order to see all my custom css. It just looks and seems like an afterthought, placed there at the end. That’s why I think it needs its own tab in the Theme Options.
Instead, I usually create a child theme of Divi, and then add custom css to the child theme custom stylesheet viewable in Appearance > Editor. I far prefer the space allotted there.
If you could give your Theme Options custom css field more prominence, I would really love it!
Just my 2 cents. 🙂
yes, I’ve hated that small box for as long as I’ve used divi. In fact, on more complex sites, I’ll just copy and paste into a text editor, edit the code and paste back into the divi box. editpad.ord is an easy in-browser text editor without any wysiwyg options. A new tab with sections similar to the divi builder custom css would really help keep code organized.
I do as Sherry. I edit my child theme Css in DreamWeaver and upload it after each editing.
So I think yhat Sherry’s proposal is a good idea.
+1
+1
Rather than creating child themes, I add the CSS to the theme option page. Divi and other themes handle this without a problem. I just save a copy of the custom CSS in a local file “just in case!”
Note: You may find yourself adding !important to your declarations to override the plugins css. ie:
color: red!important;
And actually if you have to add !important to the declaration, you might want to make the selector more specific than the plugin css by using additional selectors and combinators. Using !important can cause problems down the road.
Actually, color: red !important
The space is important.
I’m having trouble adding styles to a Ninja Form within the Divi Theme. It appears that the default styles are from a .scss file (SASS). Any recommendation on how to target these styles in the child theme effectively?
Might want to make a mental note to update this article when WP4.7 comes out, as this has just been committed to WordPress Core: https://make.wordpress.org/core/2016/10/11/feature-proposal-better-theme-customizations-via-custom-css-with-live-previews/
This will make Divi’s custom CSS option redundant a custom CSS with live preview in the WordPress customizer!
Having used Contact Form 7 religiously on sites I always add my saved styling to each child theme I create which saves time.
I guess you could always add it to the Divi custom css and export the settings for each divi site if you use it like us.
Thanks for the Article! Nice… Now I’m still wondering why the Custom CSS Editor is still that bad in Divi/Extra 🙂
Dear Divi-Product-Owner: Please add a cool editor to the Custom CSS textarea that supports syntax highlight and tabulator (when pressed on keyboard). And appear much bigger (according to css content) – I have to increase the size of the textarea very often. Really annoying. 🙂
You would help us developers a lot if you just add these three improvements. You already started doing that for modules CSS section but not for the much more important custom CSS section.
Thanks!
I find the “custom css” sections of most of the themes rather too “minimal” and also prefer a real css editor. (https://wordpress.org/plugins/advanced-code-editor/)
Also recommended : use a child theme !
@Bart, and anyone else considering in using a CSS Plugin. This plugin hasn’t been updated in over 2 years. It may no longer be maintained or supported and may have compatibility issues when used with more recent versions of WordPress.
Instead give SiteOrigin CSS a try, it’s purely awesome!
I like my code colour formatted, so I’ve found that Jetpack’s Custom CSS feature works best for me 🙂 Would you say it’s a good option?
It is. Especially if your brain works better when you’re working in a workspace that has some sort of visual organization or legend.