Search engine spiders will crawl your whole website to cache your website’s pages for their index. In general, most website owners are happy for search engines to crawl and index any page they want; however there are situations where you would not want pages to be indexed.
For example, if you are developing a new website, it is usually best if you block search engines from indexing your website so that your incomplete website is not listed on search engines. This can be done easily through the reading settings page at http://www.yourwebsite.com/wp-admin/options-reading.php.
All you have to do is scroll down the search engine visibility section and enable the option entitled “Discourage search engines from indexing this site”.
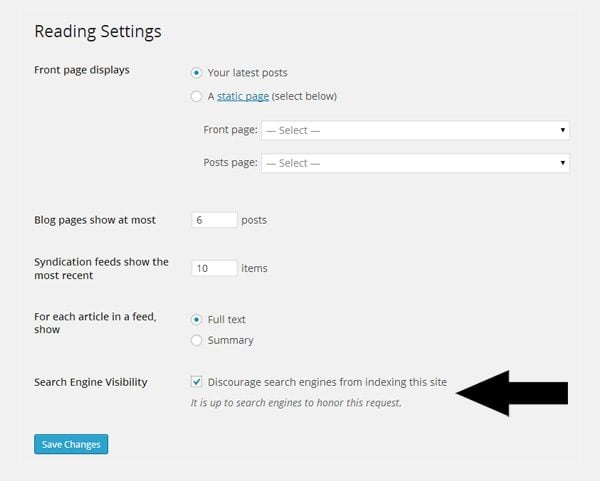
WordPress lets you block all search engines from indexing your content.
Unfortunately, WordPress does not let you stop pages being indexed on a page by page basis. The only option you have is allow search engines to index everything or to index nothing at all.
Stopping search engines from indexing specific pages is necessary from time to time. For example, on my personal blog I block search engines from indexing my newsletter email confirmation page. I also stop them from indexing the page where my free eBook can be downloaded. Most blogs do not take the step to block search engines from indexing their download pages. This means that people can download eBooks and other digital files from private pages by simply doing a quick search online.
There are a number of different ways in which you can stop search engines from indexing posts and pages on your website. In this article, I would like to show a few solutions that are available to you.
* All methods detailed in this article have been tested on a test WordPress installation and have been verified to work correctly 🙂
- 1 A Brief Overview of the Robots Meta Tag
- 2 Add the Robots Meta Tag to Your Theme Header: Method 1
- 3 Add the Robots Meta Tag to Your Theme Header: Method 2
- 4 Add the Robots Meta Tag to Your Theme Header: Method 3
- 5 Block Search Engines Using a WordPress Plugin
- 6 Stop Search Engines Crawling a Post or Page Using Robots.txt
- 7 How to Remove Content From Public View
- 8 How to Remove Page From Search Engine Results
- 9 Final Thoughts
A Brief Overview of the Robots Meta Tag
Google advises websites owner to block URL’s using the robots meta tag. The robots meta tag follows this format:
<meta name="value" content="value">
The robots meta tag should be placed within the <head> section of your WordPress theme header i.e. between <head> and </head>. There are a few different values available for the name and content attributes. The values that Google advise using to block access to a page are robots and noindex:
<meta name="robots" content="noindex">
Robots refers to all search engines while noindex disallows the search engine from displaying the page in their index.
If you want to block content from a specific search engine, you need to need to replace the value of robots with the name of the search engine spider. Some common search engine spiders are:
- googlebot – Google
- googlebot-news – Google News
- googlebot-image – Google Images
- bingbot – Bing
- teoma – Ask
Two well known spiders that are missing from the above list are MSNBot and Slurp. MSNBot was the name of the spider that used to index pages for Live Search, Windows Live Search, and MSN Search. These search engines were rebranded as Bing in 2009 and in October 2010 the MSNBot spider was replaced by Bingbot. MSNBot is still used by Microsoft to crawl web pages, however it will soon be be phased out completely. Slurp was the name of the spider that used to crawl pages for Yahoo!. It was discontinued in 2009 as Yahoo! started using Bing to power their search results.
All you have to do to block a specific crawler is replace robots with the name of the spider.
<meta name="googlebot-news" content="noindex">
Multiple search engines can be blocked by specifying more spiders and separating them by commas.
<meta name="googlebot-news,bingbot" content="noindex">
So far, you have only seen the noindex meta tag being used, however there are many values that can be used with the content attribute. These values are normally referred to as directives.
For reference, here is a list of the most common directives that are available to you:
- all – No restrictions on indexing or linking
- index – Show the page in search results and show a cached link in search results
- noindex – Do not show the page in search results and do not show a cached link in search results
- follow – Follow links on the page
- nofollow – Do not follow links on the page
- none – The same as using “noindex, nofollow”
- noarchive – Do not show a cached link in search results
- nocache – Do not show a cached link in search results
- nosnippet – Do not show a snippet for the page in search results
- noodp – Do not use the meta data from the Open Directory Project for titles or snippets for this page
- noydir – Do not use the meta data from the Yahoo! Directory for titles or snippets for this page
- notranslate – Do not offer translation for the page in search results
- noimageindex – Do not index images from this page
- unavailable_after: [RFC-850 date/time] – Do not show the page in search results after a date and time specified in the RFC 850 format
Some of these directives are only applicable to certain search engines. For example, unavailable_after, nosnippet, and notranslate, are only supported by Google. Noydir is only supported by Yahoo! and nocache is only supported by Bing. Other lesser known search engines support other directives that are not supported by major search engines.
A few of these directives are redundant too. <meta name=”robots” content=”all”>, for example, will give the same result as <meta name=”robots” content=”index, follow”>. And there is no point using either of those meta tags since search engines will index content and follow links by default anyway.
If you are trying to block search engines from indexing a page, then the nofollow directive cannot be used on its own. The nofollow directive advises search engines not to follow the links on a page. You can use this to stop search engines from crawling a page. The result is the same as applying the nofollow link attribute to every link on the page.
Consider a blog that only links to a download area from a thank you page. You could add a nofollow meta tag to the header of the thank you page so that search engine spiders will never visit the download page. This will stop search engine spiders from crawling the page and subsequently indexing it. All you would have to do would be ensure that the thank you page was the only area that the download page was linked from.
Unquestionably, someone else will link to that download page, whether you like it or not. This means that the nofollow directive is ineffective on its own. I have checked the incoming traffic to my own blog and found direct links to my download page from black hat forums. It is near impossible to stop others linking to a page that is known to people other than yourself.
That is why you also need to use the noindex directive. The directive ensures that a page is not shown in search results. It also ensures that a cached link for the page is not displayed; therefore you do not need to use the noarchive directive if you are using noindex.
So to stop all search engines from indexing a page and stop them from following links, we should use add this to the header of our page:
<meta name="robots" content="noindex,nofollow">
The above statement could also be written as <meta name=”robots” content=”none”>, however, not all search engines support the none directive. It is therefore better to use “noindex,nofollow” instead.
If you wanted to remove a page from the index, but still wanted search engines to crawl the pages that were linked on the page, you can use:
<meta name="robots" content="noindex">
There are thousands of articles online that incorrectly state the above line should be written as <meta name=”robots” content=”noindex,follow”>. Google themselves state that there is need to use the index or follow directives in a meta tag. In 2007, they clarified this issue by saying:
By default, Googlebot will index a page and follow links to it. So there’s no need to tag pages with content values of INDEX or FOLLOW.
When using the robots meta tag on your website, please note that:
- Meta tags are not case sensitive. Therefore, <meta name=”ROBOTS” content=”NOINDEX”> is interpreted in the exact same way as <meta name=”robots” content=”noindex”> and <meta name=”RoBoTS” content=”nOinDeX”>.
- If the robots.txt and meta tag instructions conflict, Google follows the most restrictive rule (I’m 99% sure other search engines follow this same rule, however I could not find any clarification about this issue from other search engines).
You now know how to stop search engines from indexing a page in their search results. However, it is not just an issue of adding the meta tag code to your theme’s header.php template. Doing that would block search engines from indexing all WordPress powered pages (pages published outwith WordPress would be unaffected).
To ensure that only specific posts and pages are blocked, we need to use an if statement that only applies the noindex directive to specified pages. Let’s take a closer look at how we can do that 🙂
Add the Robots Meta Tag to Your Theme Header: Method 1
I will show you three methods of adding a meta tag to your website by modifying your header.php template. The end result is the same for all three, however you may prefer using one method over another 🙂
In order to block a specific post or page, you need to know its post ID. The easiest way to find the ID of a page is to edit it. When you edit any type of page on WordPress, you will see a URL such as https://www.yourwebsite.com/wp-admin/post.php?post=15&action=edit in your browser address bar. The number denoted in the URL is the post ID. It refers to the row in the wp_posts database table.

The post ID can be viewed from the address bar.
Once you know the ID of the post or page you want to block, you can block search engines from indexing it by adding the code below to the head section of your theme’s header.php template. That is, between <head> and </head>. You can place code anywhere within the head section; however I recommend placing it underneath, or above, your other meta tags, as it makes it easier to reference later.
<?php if ($post->ID == X) { echo '<meta name="robots" content="noindex,nofollow">'; } ?>
In the code above, X denotes the ID of the post you want to block. Therefore, if your page had an ID of 15, the code would be:
<?php if ($post->ID == 15) { echo '<meta name="robots" content="noindex,nofollow">'; } ?>
As all post types are stored in the wp_posts database table, the above code will work with any type of page; be it a post, page, attachment, or custom types such as galleries and portfolios.
You can block additional pages on your website by using the OR operator.
<?php if ($post->ID == X || $post->ID == Y) { echo '<meta name="robots" content="noindex,nofollow">'; } ?>
You simply need to specify the ID of the pages that you want to block. For example, say you want to block search engines from indexing posts and pages with ID 15, 137, and 4008. You can do this easily using:
<?php if ($post->ID == 15 || $post->ID == 137 || $post->ID == 4008) { echo '<meta name="robots" content="noindex,nofollow">'; } ?>
To confirm that you have configured everything correctly, it is important to verify that you have blocked the correct pages from search engines. The simplest way to do this is to view the source of the page you are hoping to block. If you have added the code correctly, you will see <meta name=”robots” content=”noindex,nofollow”> listed in the head section of the page. If not, the code has not been added correctly.
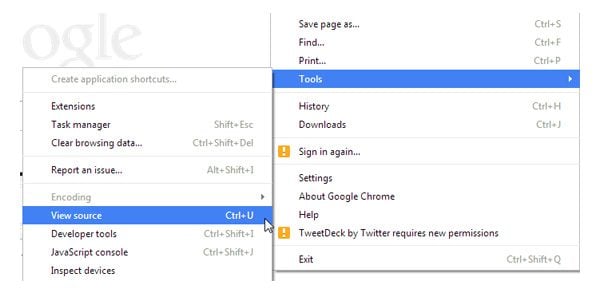
View the source code of your page to verify you have blocked the page.
You also need to check the source code of a page that you are not trying to block from search engines. This will verify that you have not blocked all pages on your website in error.
Add the Robots Meta Tag to Your Theme Header: Method 2
You can also block pages from search engines by utilizing WordPress conditional tags. In order to use this technique correctly, you need to use the appropriate conditional tag. For example, you would use is_single for a blog post and is_page for a WordPress page.
Once again, we need to add the code to the head section of our theme’s header.php template. In the example below, X denotes the ID of a blog post that has to be blocked from searched engines.
<?php if(is_single(X)): ?>
<meta name="robots" content="noindex,nofollow">
<?php endif; ?>
Conditional tags are quite flexible with how you specify a post or page. You can use the post ID, the post title, or the post slug.
Consider the first blog post that is added to WordPress. It has a post ID of 1, post title of “Hello World”, and a post slug of “hello-world”. We can therefore define the post in our code by using:
<?php if(is_single(1)): ?>
Or:
<?php if(is_single('1')): ?>
Or:
<?php if(is_single('Hello World')): ?>
Or:
<?php if(is_single('hello-world')): ?>
An OR operator can be used if you want to block more than one page. For example:
<?php if ( is_single('big-announcement') || is_single('new-update-coming-soon') ) ) : ?>
Conditional tags also support arrays. They are a better way of handling multiple posts or pages. In the example below, the if statement would be true if either of the pages are displayed. You can see that the pages are denoted by the page slug, the page title, and the page ID.
<?php if(is_page( array( 'about-page', 'Testimonials', '658' ) )): ?>
Remember that with conditional tags, you need to use the correct tag for each page. Therefore, you cannot use one array for both posts and pages. If you want to block search engines from one post and one page on your website, you could use something like this:
<?php if ( is_single('big-announcement') || is_page('About') ) ) : ?>
If you have a huge number of posts and pages, you could use an OR operator between an is_single array and an is_page array.
<?php if(is_single( array( '45', '68', '159', '543') ) || is_page( array( 'about-page', 'Contact Us', '1287') ) ): ?>
To keep things simple above, I have only reproduced the if statement to explain each technique. Don’t forget to include the meta tag itself and the closing endif statement when you are adding the code to your website header 🙂
<?php if(is_single( array( '45', '68', '159', '543') ) || is_page( array( 'about-page', 'Contact Us', '1287') ) ): ?>
<meta name="robots" content="noindex,nofollow">
<?php endif; ?>
You may prefer to use conditional tags so that you can specify post and page titles and slugs. This will make it easier for you to look back at your code and see which articles are being blocked. However, in my opinion, it is risky to do this. A post title can be changed. As can a post slug. However, a post ID never changes.
If you referenced the post or page title and slug in your code, then the code would cease to work if someone modified the title or slug. Every time you modified the post or page title and slug, you would need to update the meta tag code in the header.php template. This is why I recommend using post ID. In the long term, it is a more practical solution if you are hiding many posts and pages.
Add the Robots Meta Tag to Your Theme Header: Method 3
Another technique you can use is to utilize the WordPress custom field feature. Hardeep Asrani explained this technique earlier this year in a tutorial entitled “How To Disable Search Engine Indexing On A Specific WordPress Post“.
The first thing you need to do is add the following code to the head section of your theme’s header.php template.
<?php
    $noindex = get_post_meta($post->ID, 'noindex-post', true);

    if ($noindex) {
        echo '<meta name="robots" content="noindex,nofollow" />';
    }
?>
You do not need to modify the code above and insert your post ID or post title. Instead of specifying the post or page to block in the code itself, you do it using a custom field. All you need to do is specify a custom field entitled noindex-post and assign a value to it. It doesn’t matter what you enter. All you need to do is ensure that something is entered in the field so that the custom field noindex-post returns as true in the code you specified in your header.
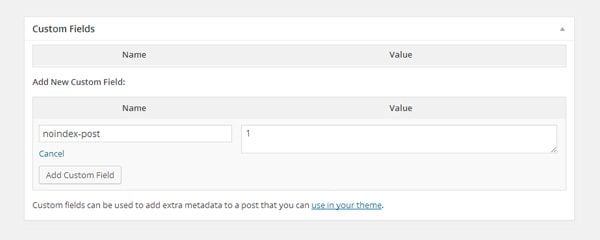
You can give your custom field any value.
Simply repeat the above step for any post type you want to block from search engines.
I believe this is one of the most user friendly techniques that a developer can configure for a client, as it so simple to block additional posts and pages. However, it does not give you a quick way of seeing which posts and pages are blocked from search engines, and which are not. Therefore, if you use this technique and are blocking a lot of pages, it may be prudent to take a note of every page that you have blocked.
Block Search Engines Using a WordPress Plugin
If you need to block search engines from more than a few posts and pages, you might find using a WordPress plugin a more practical solution. The plugin that I have used to do this in the past is PC Hide Pages.
To remove a page from a search engine using the plugin, all you have to do is select the page from a list of your pages. When you do this, the plugin applies the appropriate meta tag to the page in question. For me, it is one of the best solutions for removing pages from search engines as you can see at a glance what pages you have hidden, and do it directly through the WordPress admin area (which is not something you can natively do with the robots.txt method).
The only downside to the plugin is that it only supports WordPress pages. It does not support blog posts or other custom post types. This is unlikely to be a problem for many of you as content that needs to be hidden from search engines is generally published as a WordPress page e.g. a thank you page, a download page etc.
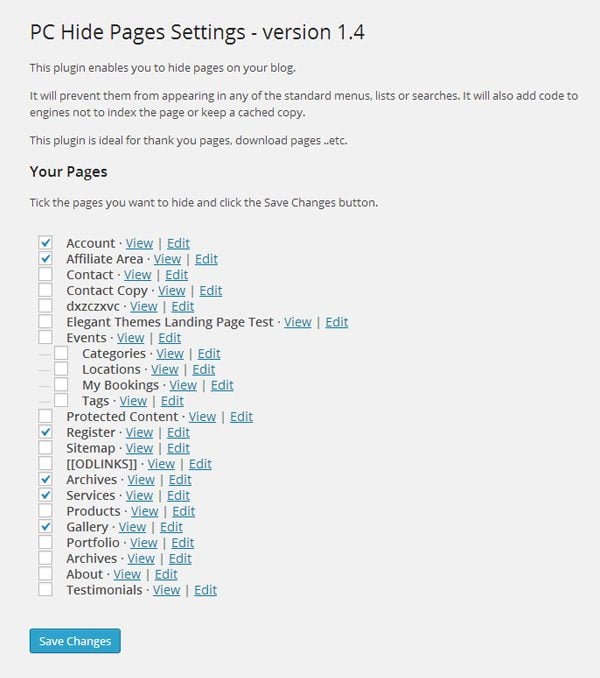
All you have to do is select the pages you want to block from search engines.
If your website uses a popular search engine WordPress plugin, such as WordPress SEO or All in One SEO Pack, then you already have the functionality to remove content from search engines.
Yoast was one of the first developers to create a plugin that helped website owners block search engines. He later integrated his Robots Meta plugin into WordPress SEO.
The Titles & Metas settings area in WordPress SEO has a section entitled Sitewide meta settings. This section lets you apply the noindex directive to subpages of archives and prevent titles and snippets from Open Directory Project and Yahoo! Directory being used.
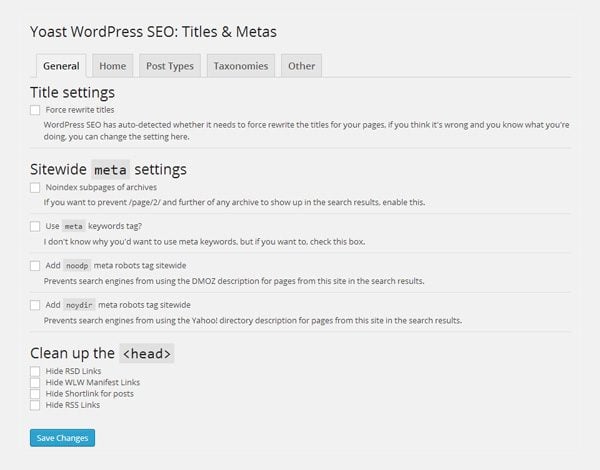
WordPress SEO offers four global settings.
WordPress SEO gives you a huge amount of control over how search engines treat a page on your website. The first option controls whether a page is indexed on a search engine. Six additional robots meta tag directives can be applied, including follow, nofollow, none, and noarchive. You can also exclude a page from your website sitemap and set its sitemap priority. A 301 URL redirect can also be configured if you need to redirect traffic from that page to another location.
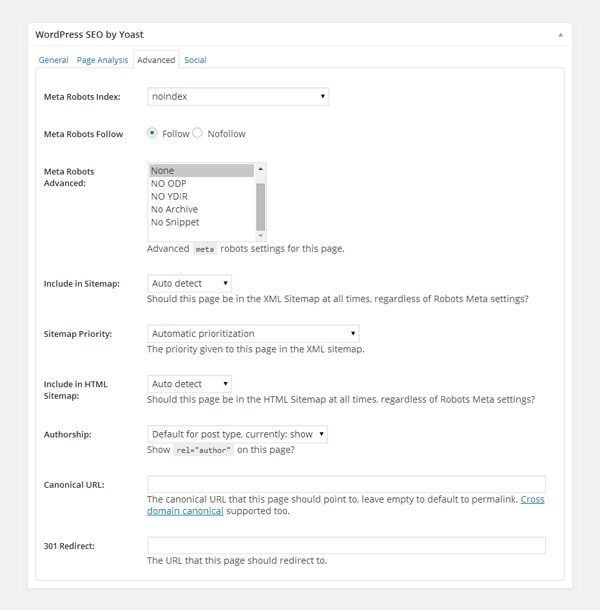
WordPress SEO offers many great options in the post editor.
The general settings page of All in One SEO Pack has a section called Noindex Settings. You can apply the nofollow meta tag to many different areas of your website in this section. For example, categories, author archives, and tag archives. You can also stop titles and snippets from Open Directory Project and Yahoo! Directory being used. As you can see, it offers a few more global options than WordPress SEO.
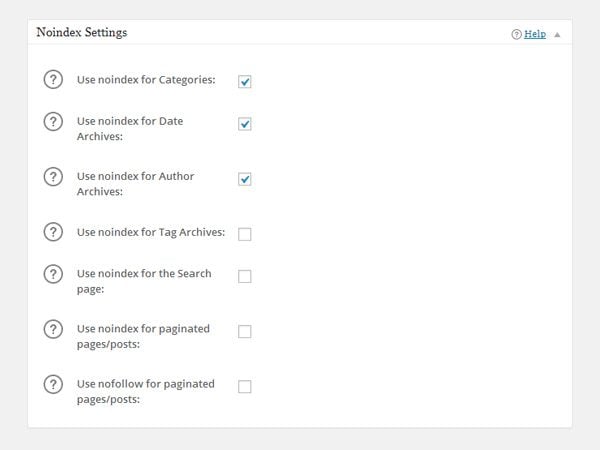
All in One SEO Pack lets you block search engines from certain areas of your website.
Just like WordPress SEO, All in One SEO Pack adds a settings area to the post editor page. In addition to applying noindex and nofollow, you can exclude the page from your sitemap and disable Google Analytics. On a post level, All in One SEO Pack offers less control than WordPress SEO.
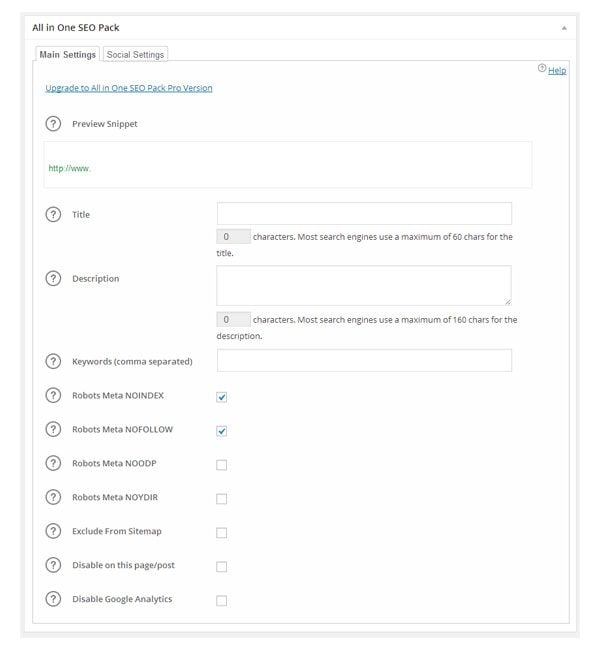
All in One SEO Pack adds a settings box to your post editor.
Both WordPress SEO and All in One SEO Pack work in the same way as the custom field method I explained earlier i.e. by selecting “noindex,nofollow” via the post editor. If you are already using one of these plugins, you may want to use them to select which posts and pages should be hidden from search engines.
Stop Search Engines Crawling a Post or Page Using Robots.txt
The Robot Exclusion Standard determines what search engine spiders should index and what they should not index. To do this, you need to create a new text file and save the file as robots.txt.
The concept behind the Robots.txt protocol is the same as the robots meta tag that I have discussed in length in this article. There are only a few basic rules.
- User-agent – The search engine spider that the rule should be applied to
- Disallow – The URL or directory that you want to block
The same search engine spider names that I referred to earlier in this article can be denoted as the user agent. For example, User-agent: googlebot would be used to apply a rule to Google, and User-agent: bingbot would apply a rule to Bing. Most website owners use a wildcard (*) to block all search engines.
With the Disallow rule, the URL or directory you block is defined using a relative path from your domain. Therefore, / would block search engines from indexing your whole website and /wp-admin/ would block search engines from your WordPress admin area.
Here are a few examples to help you understand how easy it is to use a robots.txt file to block search engines.
The code below will block search engines from indexing your whole website. Only add this to your robots.txt file if you do not want any pages on your website indexed.
User-agent: *
Disallow: /
To stop search engines from indexing your recent announcement post, you could use something like this:
User-agent: *
Disallow: /2014/06/big-announcement/
To hide your newsletter confirmation page, you could use something like this:
User-agent: *
Disallow: /email-subscription-confirmed/
The rules defined in the robots.txt file are case sensitive. Be conscious of this when defining rules; particularly when blocking files that use capital letters. For example, blocking /downloads/my_great_ebook.pdf in your robots.txt file would not work correctly if the correct file name of the book is My_Great_eBook.pdf.
Another rule that is available to you is Allow. This rules allows you to specify user agents that are permitted. The example below shows you how this works in practice. The code will block all search engines, but it will allow Google Images to index the content inside your images folder.
User-agent: *
Disallow: /

User-agent: Googlebot-Image
Allow: /images/
Robots.txt also supports pattern matching, which is useful for blocking files that have similar names or extensions. It is, however, not something you will need to learn if you just need to block a few pages.
Once you have created and saved your robots.txt file, you should upload it to the root of your domain i.e. www.yourwebsite.com/robots.txt.
Robots.txt is a relatively straight forward standard to understand. If you are looking for more help on creating a robots.txt file, you may want to check out the help pages from Bing and Google. However, I believe the best way to learn how to build a robots.txt page is to look at the robots.txt page of other websites. This can be done easily as robots.txt files can be seen by anyone. All you have to do is visit www.nameofwebsite.com/robots.txt for any website you want to check. Note that some websites do not use Robots.txt, so you may get a 404 error..
Here are some examples of Robots.txt files to illustrate how you can use it to control what search engines do:
- Amazon’s Robots.txt File
- Facebook’s Robots.txt File
- Google’s Robots.txt File
- YouTube’s Robots.txt File
Robots.txt is one of the most practical ways of stopping search engines from indexing posts and pages on your website as you can reference it at any time by visiting www.yourwebsite.com/robots.txt and checking what rules you have applied to your website.
How to Remove Content From Public View
Stopping search engines from indexing a page is not always the best solution. If you want to hide a page from the world, it may be more practical to restrict access to it. I spoke about this in great detail last month in my review of the best WordPress membership plugins.
A membership plugin such as Paid Memberships Pro, for example, will allow you to restrict access to content to those who are eligible. This is particularly useful for protecting downloads and premium content.
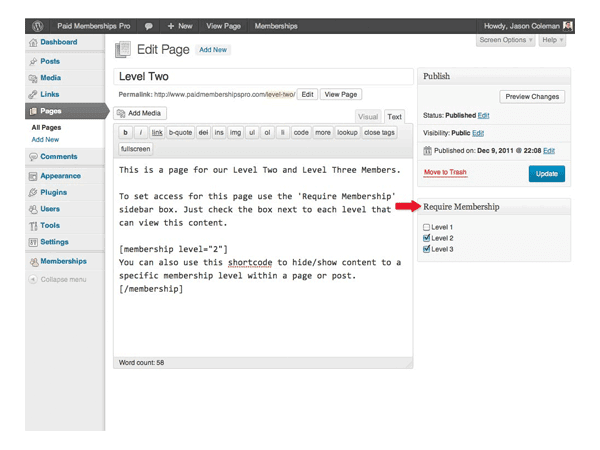
A membership plugin can help you restrict access to your content.
For a complete list of membership plugins, please check out my recent article “Using WordPress Membership Plugins To Create Your Own Website Membership“.
How to Remove Page From Search Engine Results
Search engine crawlers occasionally do not see the noindex directive denoted on a page. Therefore, your pages may be incorrectly indexed, even though you advised them not to. You may also have pages that have been correctly indexed, but now you want them removed from search engines.
“Note that because we have to crawl your page in order to see the noindex meta tag, there’s a small chance that Googlebot won’t see and respect the noindex meta tag. If your page is still appearing in results, it’s probably because we haven’t crawled your site since you added the tag.” – Google
The most efficient way of removing a page from a search engine’s index is by using a search engine URL removal tool. In Google Webmaster Tools, you will see an option to remove URLS in the Google Index section.
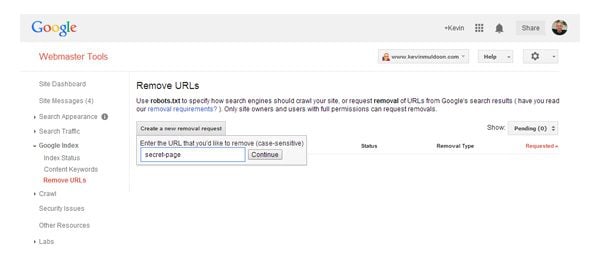
Simply click on the “Create a new removal request” button and enter your URL. Be aware that you need to enter the page slug that comes after your domain. For example, if you want to remove a page located at www.yourwebsite.com/news/big-announcement, you would enter news/big-announcement.
You can choose to remove a page from search results and cache or remove a page from cache. There is also an option to remove a complete directory. This can be used to completely remove a website from their search results.

Confirm what you want removed from Google’s index.
Google will then display a message that states that the page or directory has been added for removal. Take this opportunity to double check that the URL you submitted is correct.
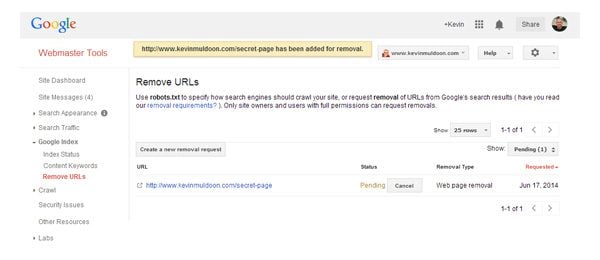
Google’s URL removal tool is fast and efficient.
Removing a URL from Bing is even easier. Within their Bing Webmaster Tools service is the Bing Content Removal Tool.
To remove a page from Bing’s index, all you have to do is enter the page URL. Then select whether you want to remove the page from the index or remove an outdated cached version of the page.
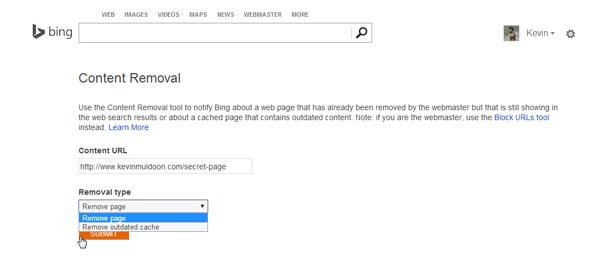
Bing’s URL removal tool is quick and easy to use.
Once you have submitted the URL, you will see a history of the pages you have submitted for removal.

Bing shows a history of your removal requests.
Unfortunately, neither Google or Bing offer an option to upload a CSV list of files that you want removed from the index. Therefore, you need to submit requests one by one.
Final Thoughts
Unfortunately, all search engines don’t play nice. It is up to a search engine as to whether they honor your request to not index a page. The most popular search engines do follow the rules set out by website owners; whereas poor search engines and nasty software from hackers and spammers, tend to do whatever they want.
I hope you have found this tutorial on stopping search engines indexing your content useful. If you know of any other good techniques to stop search engines from indexing content on a WordPress powered website, please leave a comment below 🙂
Article thumbnail image by venimo / shutterstock.com




The plug in referenced here, PC Hide Pages, is no longer active or available.
really useful.
How to stop single image in post to stop index any clue
Very helpful, thanks a lot for sharing. How can I stop search engines from indexing posts with a specific tag
Thanks Kevin, just the thing I was searching for.
Hello,
I’m currently having a WordPress.com Blog (Free Plan) & desire to sell my Digital Stuff online without setting-up a website and relying wholly on the Blog, at first (have been short of funds). Thus, going through with this thought I have made changes to my Blog, under this after making the payment, the customer is redirected to my blog page haivng a link to download the digital content. So, I just want the payment gateway to be able to redirect the traffic to the Download page on my blog and not have it searchable via search engines, etc. & neither be it listed under the WordPress.com Posts list/Pages, etc. because if the download page is searchable by the Search Engines & listed under my Blog’s post, I wouldn’t earn anything because then the customer would directly download the content without making the payment.
Regards,
Joojo.
Finally an easy guide. Thank you so much for explaining.
Thank you! Finally, step by step instructions on how to hide a page from search engines. You are a lifesaver. Thanks again.
Just stumbled across this post Kevin, lots of useful info. One quick question for you though: if I use noindex stop Google from finding a given page, would that stop said page being found by the website’s built-in search as well?
Thanks alot for explaining in detail …
Hello Kevin,
I’m trying to add a nofollow tag into a call to action link in a Divi themed site. It would be very convenient to have a standard option to make the call to action link nofollow or not. In the meantime, how can I do this?
I thought this would be included. Divi is pretty advanced in customizing options but what about an important SEO option like the nofollow tag…
Thanks and regards,
Jim
Hi Jim – I’m trying to do the same thing. Did you end up figuring this out? Any help is appreciated!
I’m super novice, but I have a blog that was hacked, so I’m rebuilding on a new domain and want to completely get rid of the old blog, old content, even eventually, the domain. I also want to prevent further indexing and caching because I don’t want it competing with my new blog.
In the start of your article, you mentioned the “discourage search engines from indexing this site” option in wordpress, which I turned on. My question is how and what does this communicate to the search engines? Does it create a meta tag of some sort?
My other question is what do with the site. Is it better to just go to my host and delete the database, files (home directory) altogether and let Google deal with the aftermath? Or, should I prevent indexing with a robots.txt “noindex” first for a month or two, then delete files and content after the removal? The domain will expire in August, so I’m not sure what to do in the meantime. Any help is greatly appreciated.
To prevent public access, I could “park” the domain too, I guess.
I was wondering to figure out, how to avoid indexing specific page, In my case my draft pages are being indexed by google bots, that is bothering, because webmaster says page not found, (as the post is still in draft) .
A nice post though , a long one but explaining many components.
Thank you so much for great post.. I really find what I needed to do now..
Thank you so much for this thorough explanation!
All very helpful – or it would be, if I could FIND the theme header!
You don’t explain how to locate the part on a WordPress site. Where is it?
I went to Appearances > Editor > Then on the right under “templates” selected Header which jumped me to the section.
Thanks for these great info!
Nice Post. I want to know if there is a way through which we can prevent a specific section on a page from being indexed?
On one of my websites, I have a section (contains approx 150 words) which is common on many services pages of the website, which is I believe is treated as duplicate content on internal pages. So, how we can handle this?
Hi Nick,
Great and useful post. I was searching around and this post has definitely helped me out to understand better how to no index specific URLs.
Following your below example:
Would if be possible to specify ALL URLs which start with the same post slug or title for example, as in the example below?
http://www.test.com/REF-123-mytest.html
http://www.test.com/REF-123-yourtest.html
http://www.test.com/REF-123-histest.html
Could I leave out ALL URLs which start by REF-123?
Thanks a lot
JM
after searching more then 2 hour i found useful article, thank you so much author for sharing your knowledge with us.
really happy after reading this. 🙂
First of all, great guide.
But I have one question. Is it possible to noindex a specific URL, for example http://www.test.com/blog/page2 or http://www.test.com/wp-content/ and son on?
Looking forward to hearing from you.
Hi,
I like to keep “noindex, follow” for all post, please tell me the code.
Not for specific posts, need to keep noindex for all posts…i have all in one seo plugin but the tag is not having. I dont like to shift to yoast SEO.
Is this a a mistake? Description says 137 but code says 175…
You simply need to specify the ID of the pages that you want to block. For example, say you want to block search engines from indexing posts and pages with ID 15, 137, and 4008. You can do this easily using:
ID == 15 || $post->ID == 175 || $post->ID == 4008) { echo ”; } ?>
Good catch, I updated the post 🙂
Thanks for another comprehensive article, Kevin. I use WordPress SEO to control indexing but I will be using your Custom Field option for some posts.
I had a massive clean up of my Categories earlier in the year and had a lot of 404 not found errors. By removing Categories from indexing the problem has gradually been solved. I’m considering re indexing categories again now.
Nice post…This Article showing all the things which related to Index or No Indexe. I’ve got all the idea about Indexing. Thanks for sharing such a good article here 🙂
as marc stated above, Seo plugin by yoast have everything you need for this matter. i never found a better plugin.
I use WordPress SEO by Yoast to block search engines from indexing certain pages, much easier than doing it manually.
good article!
thank you
superb article Kevin once again.. really learnt a lot about noindexing.. I believe using robots.txt is a much better option. it’s easier also.
Morevoer, I have seen (also followed accordingly) webmasters place their xml sitemap in the robots.txt file. Do we really need to follow this so that search engines can easily see our xml file?
I prefer robots.txt as well; much simpler to use and update.
Very good article for beginners and developers
Wow! I don’t know just to stop Search engines we can have many method as above…
thanks very much kevin
This article is awesome not only explains one important issue but you explain all the method possible to acomplish.
And of course well done.
Thanks very much kevin.
Because of articles like this is why i wanted to join riseforum.
Good article… Lately, I have been trying to figure out various ways to control how my pages are indexed.
I use WordPress seo by yoast, works great… But according to Google Webmaster Tools, I have been getting ‘Duplicate Titles’ for gallery pages that paginate.
Example page title: Glass Collections | Bernard Katz Glass
urls: http://bernardkatz.com/glass-collections/
http://bernardkatz.com/glass-collections/page/2/
http://bernardkatz.com/glass-collections/page/3/
http://bernardkatz.com/glass-collections/page/4/
None of the settings or variables in wordpress seo will add a page number to the ‘Page Title’ for the paginated pages
Is there a recommended way have these ‘sub-pages’ or ‘paginated pages’ removed or hidden?
Hi Bernard,
truly great art! Looks fantastic.
Kind regards,
Florian
You have to “No index subpages of archives”.
Titles and metas -> General -> Sitewide meta settings.
(using YOAST)
Great post! I learned a lot.
I agree with Clay!