")
Those who know CSS know that CSS classes are a massive timesaver when styling an entire site. But if you don’t code, you may have never realized how powerful they can be. Today, we change that.
In this post, I’ll show you 3 easy ways to add CSS classes to WordPress—even if you’ve never written a single line of code. You’ll also learn how to do it the no-code way using the powerful WordPress website builder, Divi.
What are CSS Classes, and How do They Help?
CSS (Cascading Style Sheets) is the code that controls the design and appearance of elements, such as colors, spacing, and fonts, on a website. A CSS class is a reusable label you assign to multiple elements so you can style them all at once instead of repeating the same process for each element.
Without CSS classes, you’d have to manually style each element, which becomes time-consuming—especially when working on larger WordPress sites with multiple pages. But as is often the case, most websites include repeating elements and motifs, such as the buttons on a pricing page or feature boxes across different sections.
These elements look similar because, in the backend, they share the same class group. So when you apply CSS to one element of a common class group, every element in it automatically inherits the same style settings. On the front end, this gives them a visually similar appearance. CSS classes save time, keep the design consistent, and make future edits easier—since you only need to update the class instead of changing each element one by one.
Ways to Add CSS Classes to WordPress
You can add CSS classes to a WordPress website in multiple ways, depending on your proficiency in using CSS. I’ll show you how to do it using WordPress Customizer and a plugin like Simple Custom CSS but both these methods require you to write CSS.
Skip to the third method if you’re more interested in the no-code method.
1. Using WordPress Customizer
Let’s say your WordPress page has multiple buttons. They currently look plain, and you want them to stand out, so you plan to add a navy blue border and sky blue background.
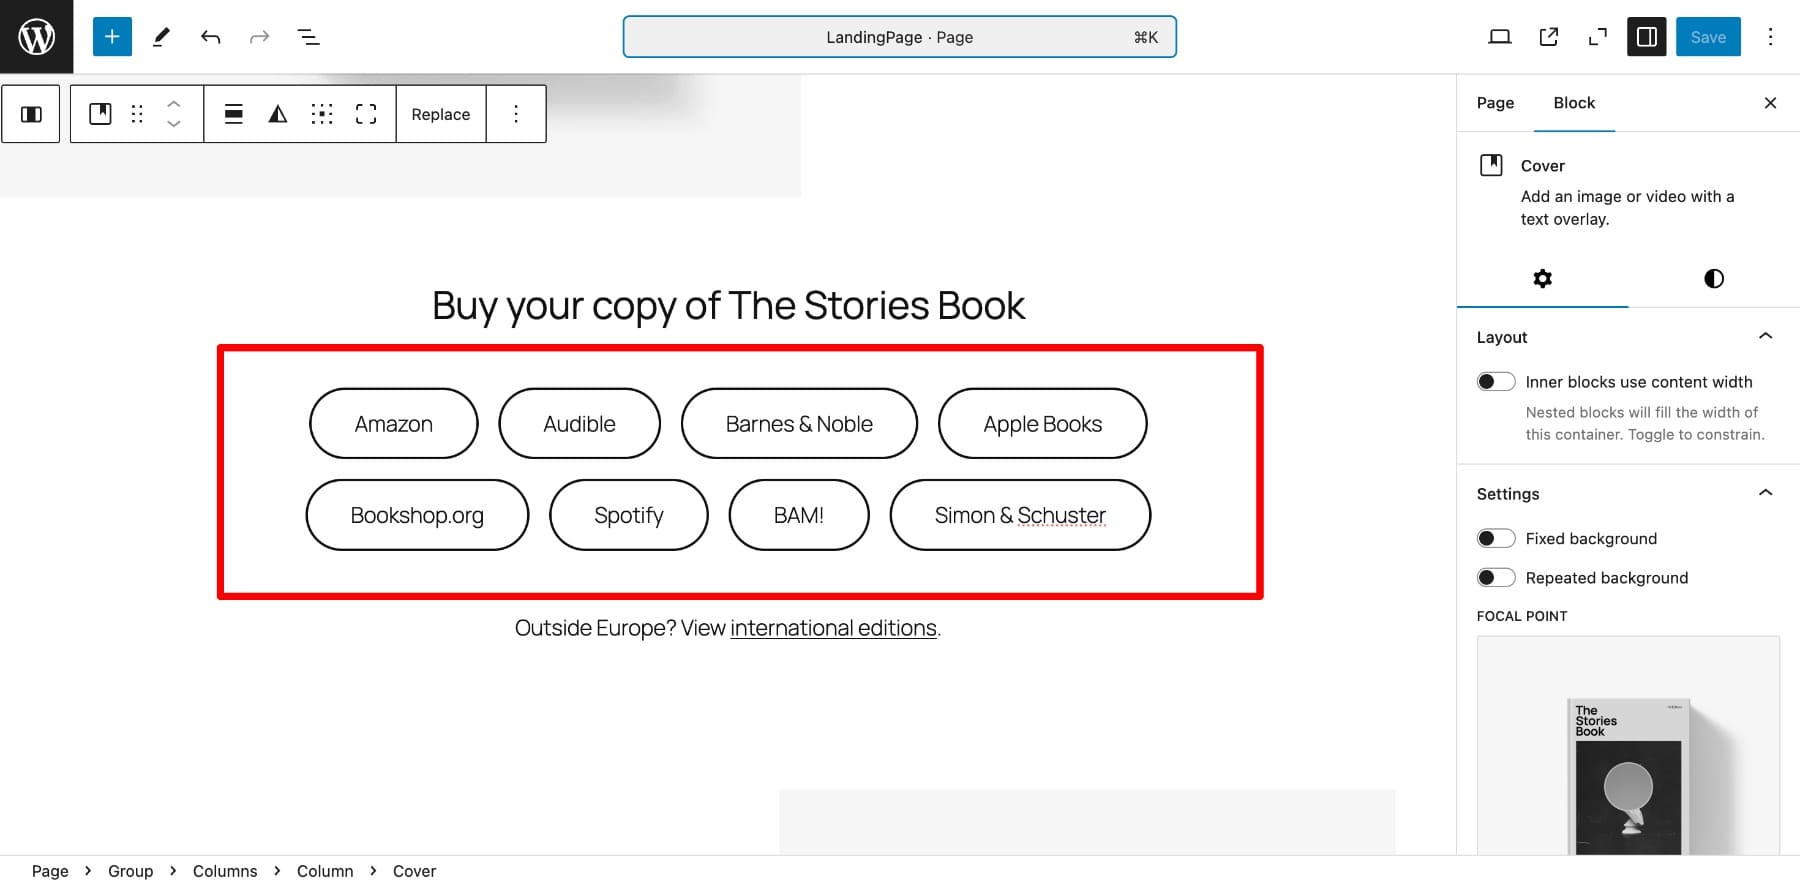
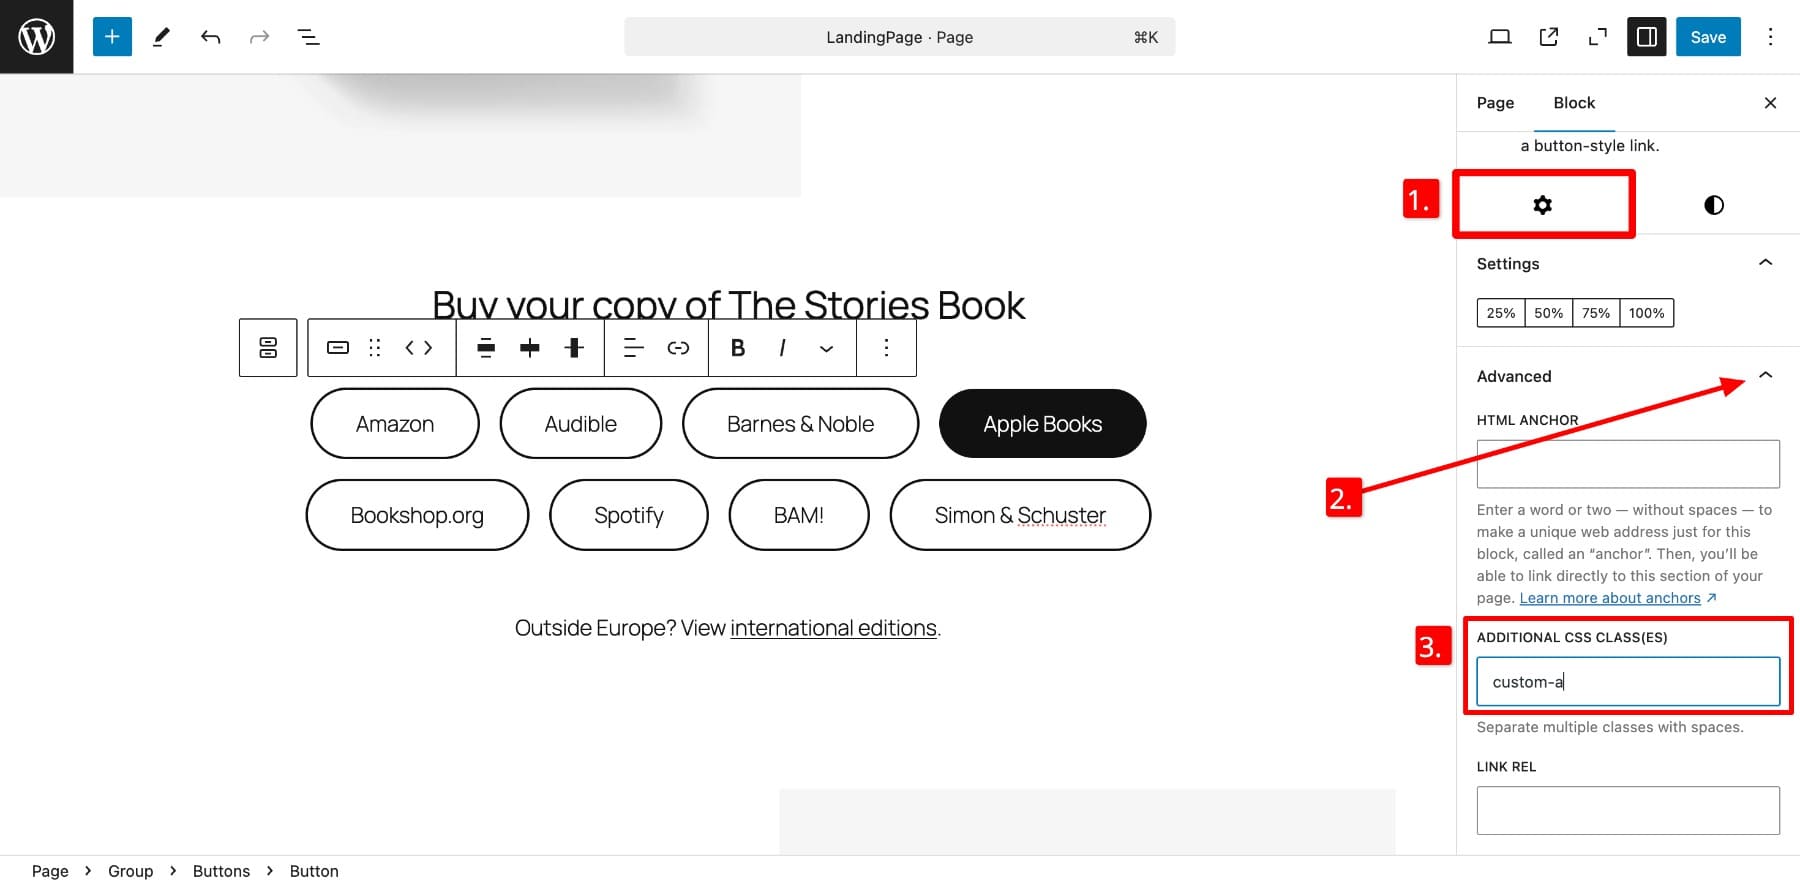
Adding CSS to each button will take you considerable time as you’ll have to repeat the process eight times. But with CSS classes, you can simply assign the same CSS class to each button and write the CSS only once. Let’s name our CSS class ‘custom-a’. On your WordPress page editor window, click on any button > Settings (gear icon) > toggle down the Advanced option. Now, write the class name in Additional CSS Classes.
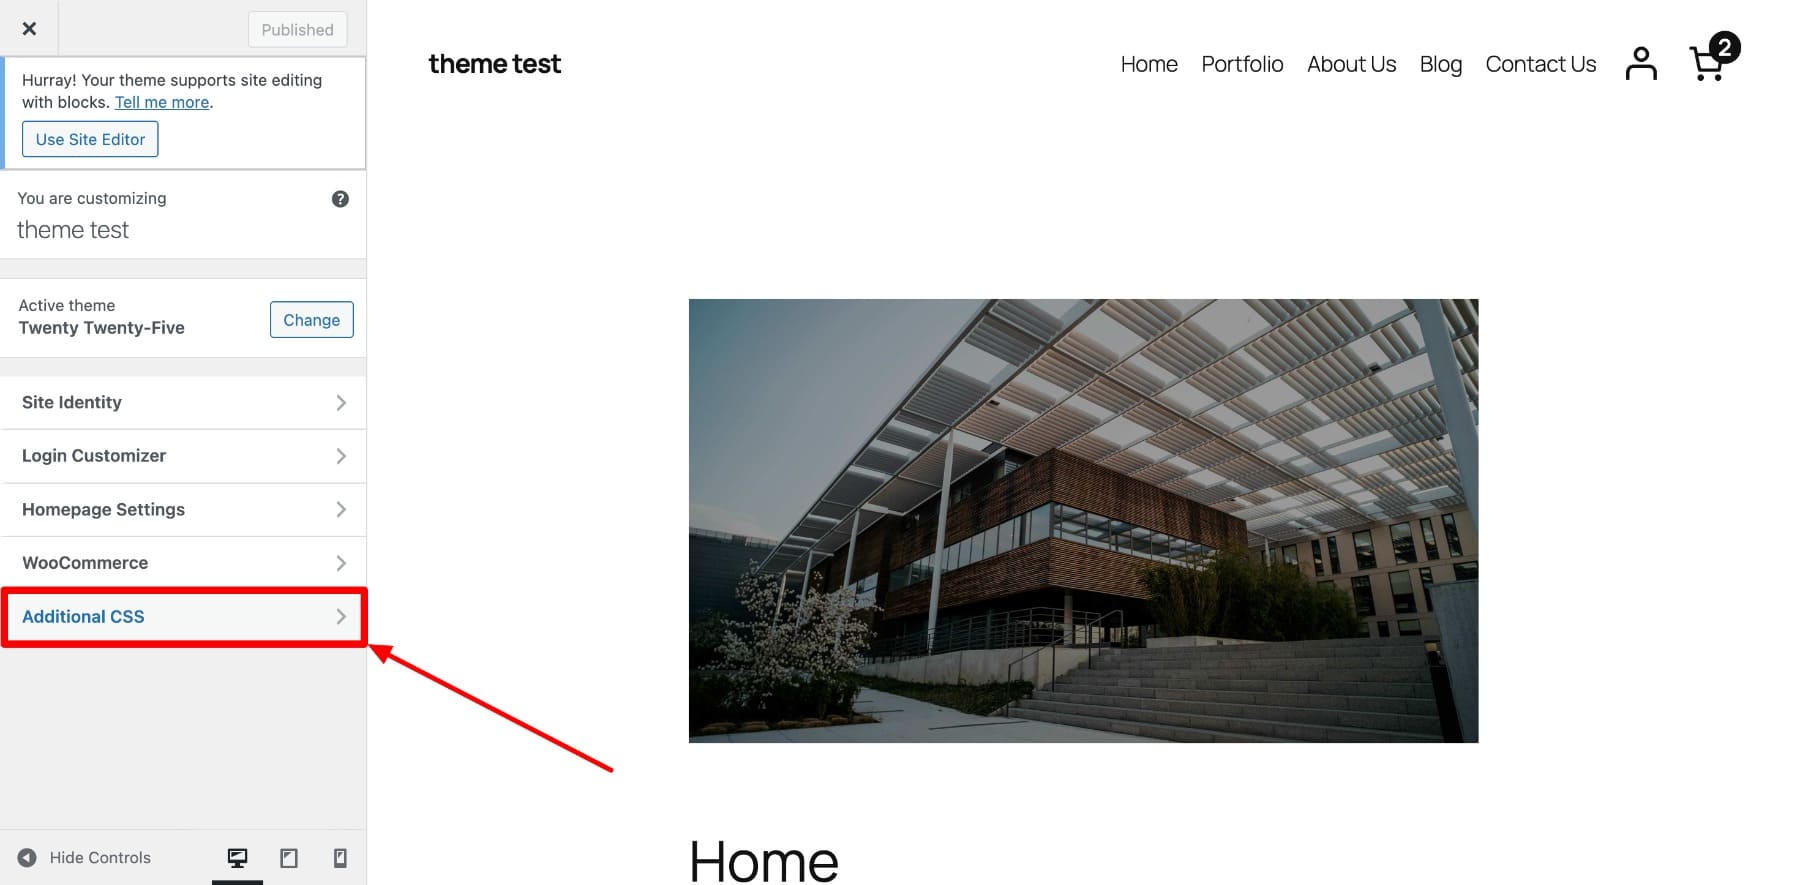
Repeat the process for each button and Save. To add the styling code to these buttons, you’ll have to navigate to WordPress Customizer > Additional CSS.
To make the border navy blue and the background sky blue, you’ll paste your CSS here.

Notice that the CSS class name we chose comes before the styling rules in the code. This makes sure that the code is applied to every element that has this class name assigned.
After you hit Publish and preview your page, the styled buttons will look like this:
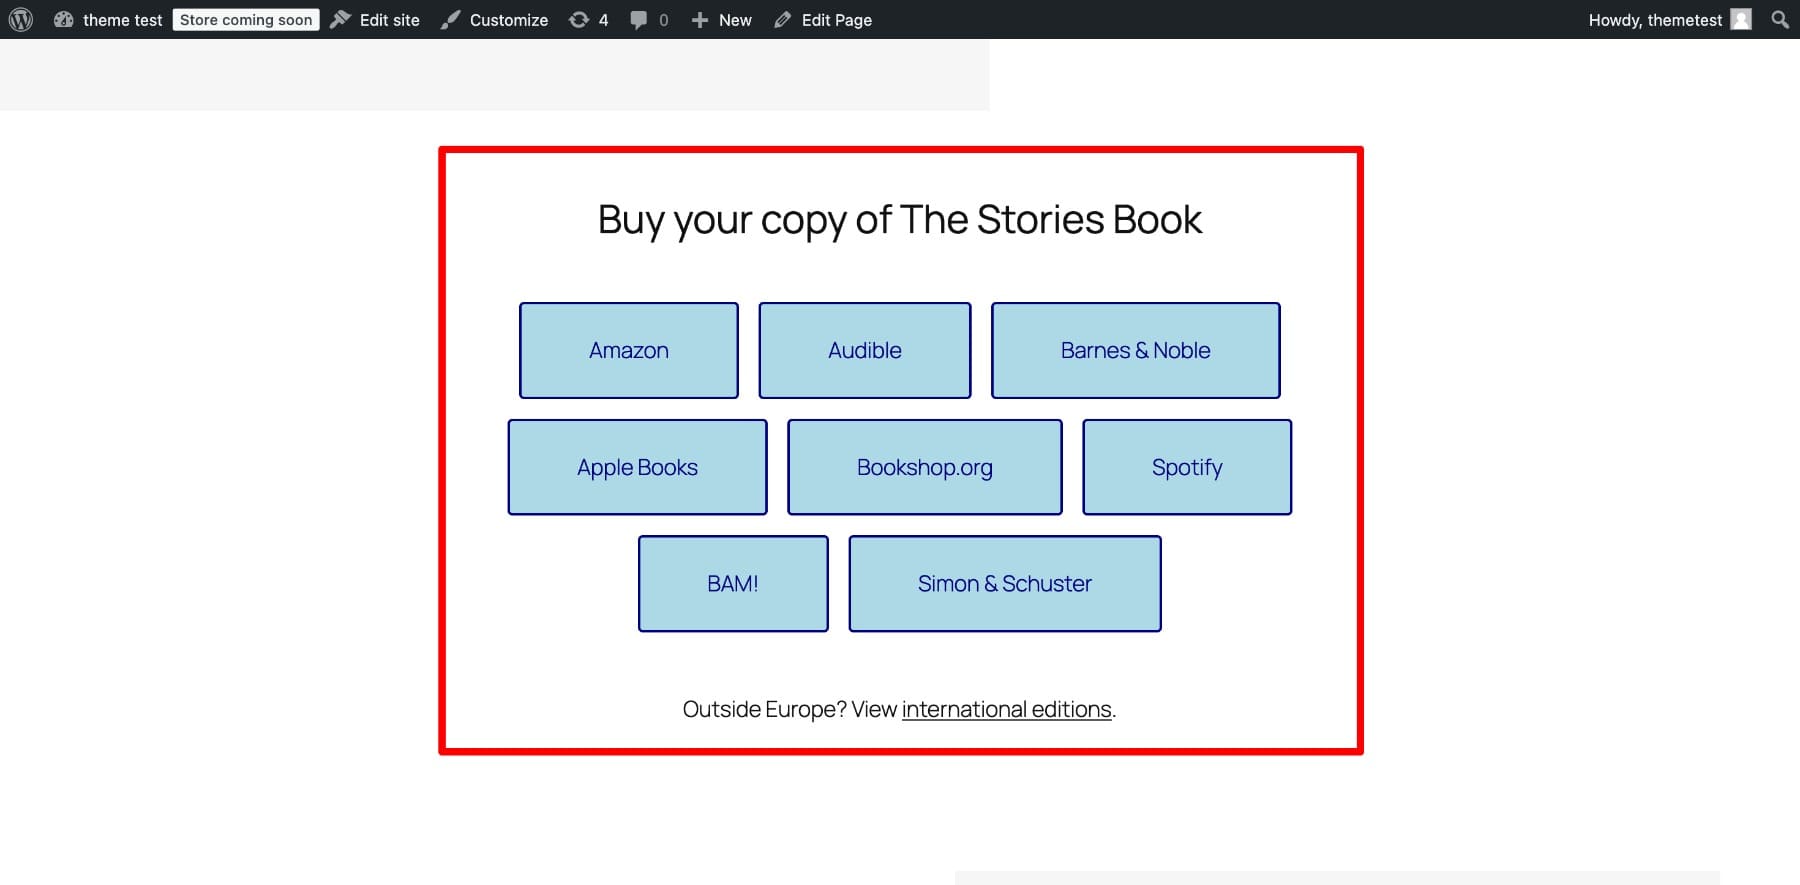
That’s simple—if you know CSS.
WordPress Customizer is also great for making minor changes. However, the problem is that the CSS added there is tied to the theme, which means it may be lost if you switch themes. So, if you like testing different themes on your website, you’ll have to update the code every time you switch to a different theme, which isn’t fun. In that case, installing a plugin to keep your CSS class styles safe is a much better option.
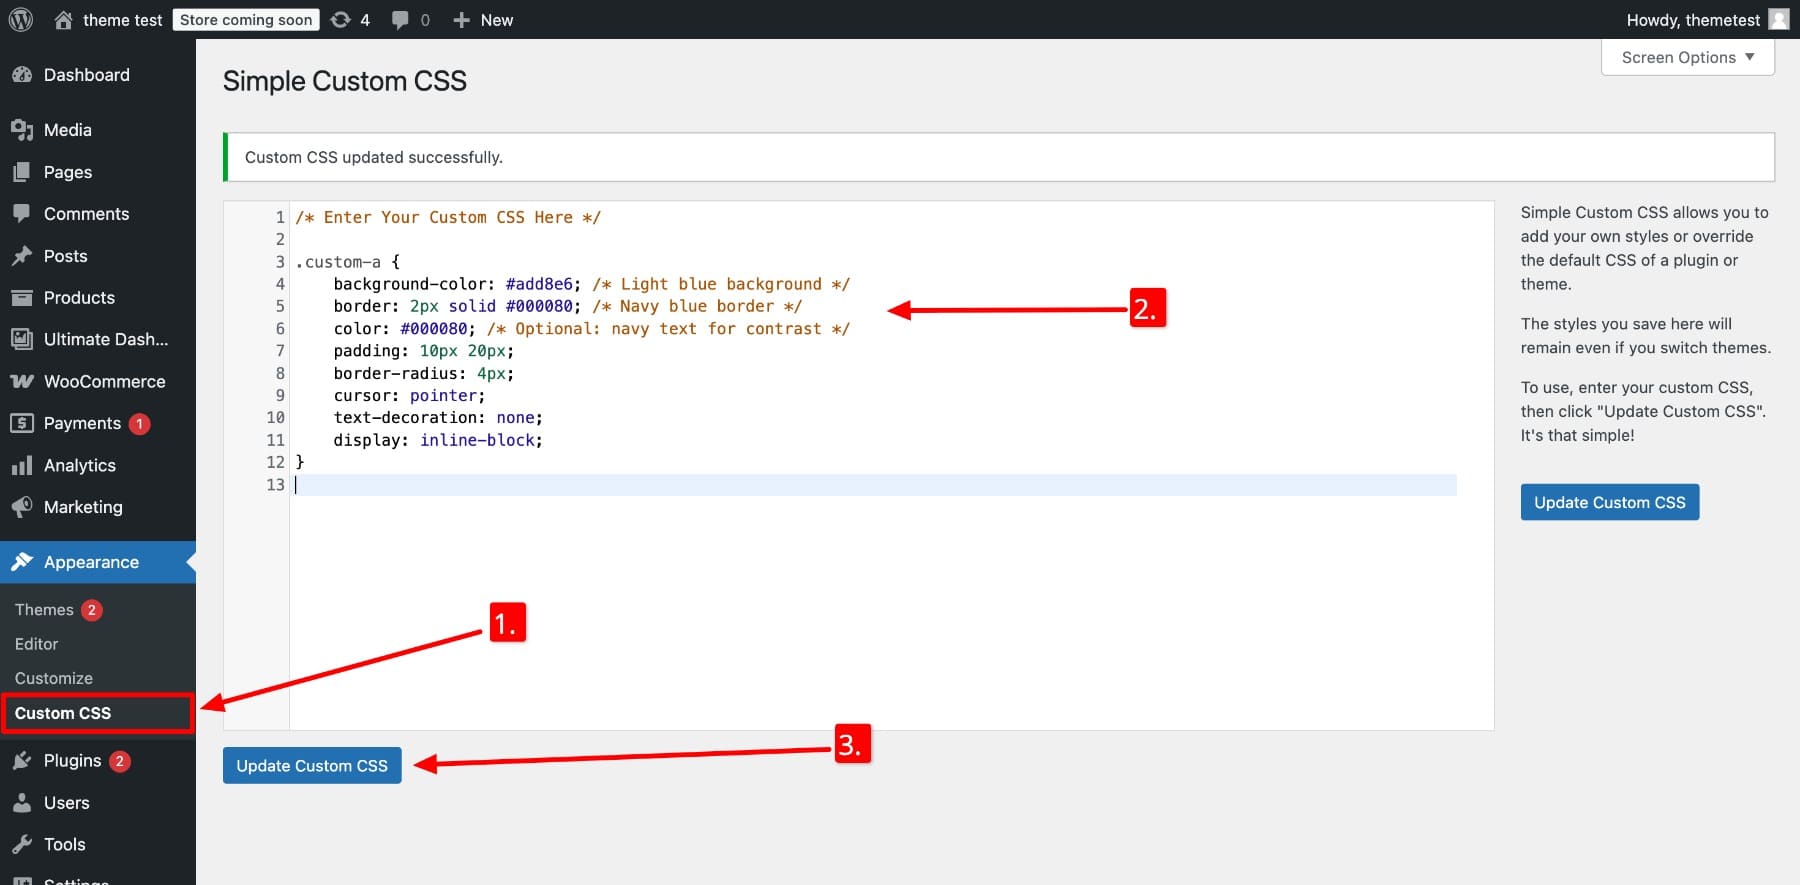
2. Using a Plugin like Simple Custom CSS
Once you install the Simple Custom CSS plugin, the Custom CSS option will be added to the Appearance section. Now you only need to add your CSS code and Update Custom CSS to reflect the changes. (You still need to assign class names to elements that you want to have common styles.)
Plugins like this keep your custom CSS intact, even if you change your theme later. It’s also a bit more organized than WordPress Customizer. However, both methods aren’t scalable as they can easily become cluttered when you save custom CSS for multiple element groups of your entire website.
That’s why, for site-wide styling, the recommended approach is to create a child theme and update its stylesheet. This way, all your changes are kept safe in your child theme, even after theme updates.
Although effective (and recommended by coders), this method can quickly become technical as it still requires manual work—you’ll have to style each element (or multiple elements using CSS classes), which is time-consuming and not beginner-friendly. You’ll also have to keep track of class names—just imagine you want to edit a particular button class, and you’re scrolling through endless strings of code.
So what if you could scale styling without writing a single line of code? That’s where modern drag-and-drop page builders like Divi come in.
3. Using a No-code Website Builder like Divi
The beauty of using a modern no-code website builder like Divi is that you don’t need to write CSS (or any code at all) to apply consistent styles across your site. With a visual interface, you can assign styles to sections, rows, columns, and modules just by selecting and customizing design settings.
In Divi, you create Presets instead of CSS classes. For years, Divi offered module-based presets that let you save and reuse styles for modules like buttons, blurbs, and images. But we’ve launched something even more amazing—Option Group Presets that let you go even further.
Before Option Group Presets, you were only allowed to apply presets across modules. For example, a blurb preset can only be used in another blurb. Now, you can even share settings across modules.
Instead of customizing one element at a time, Option Group Presets lets you save styles for shared settings—like backgrounds, borders, or text styles—and apply them to multiple different elements at once. For example, if a section and a column both use a background color, you can save that style setting as a preset and apply it across all relevant elements to create a cohesive design.
Divi simplifies building and saving styles as presets through drag-and-drop features without any coding, making site-wide design changes faster and more accessible—especially for non-coders.
Let’s see what I mean in more detail below 👇
Divi’s Option Group Presets Make Adding CSS Classes Easier
Divi’s Option Group Presets take the concept of CSS classes and simplify it for non-coders. Instead of manually writing and assigning classes, you can now use Divi’s visual builder to apply shared design styles across different elements with just a few clicks.
These presets work on the option level, meaning they target specific design settings like background colors, borders, or spacing that are shared across multiple element types. So, for example, a section’s background settings can be applied to a column, row, and even text element.
It’s a faster, easier, and more intuitive way to keep your website design consistent. Here’s how:
- Reusable Styles Across Elements: You don’t need to customize every element manually. Save option group styles as presets and apply them to any element.
- Global Updates with a Single Edit: Modify a preset once, and all elements using that preset will automatically update. This makes design adjustments quick and efficient across your entire website.
- Combine Multiple Presets: Layer and mix different presets (e.g., borders, shadows, text styles) on any element for a flexible and creative design combination without starting from scratch.
- Customize Default Presets for Base Styles: Save presets as default to automatically apply them to all relevant elements.
Learn More About Option Group Presets
How to Use Divi to Add CSS Classes to WordPress Without Coding
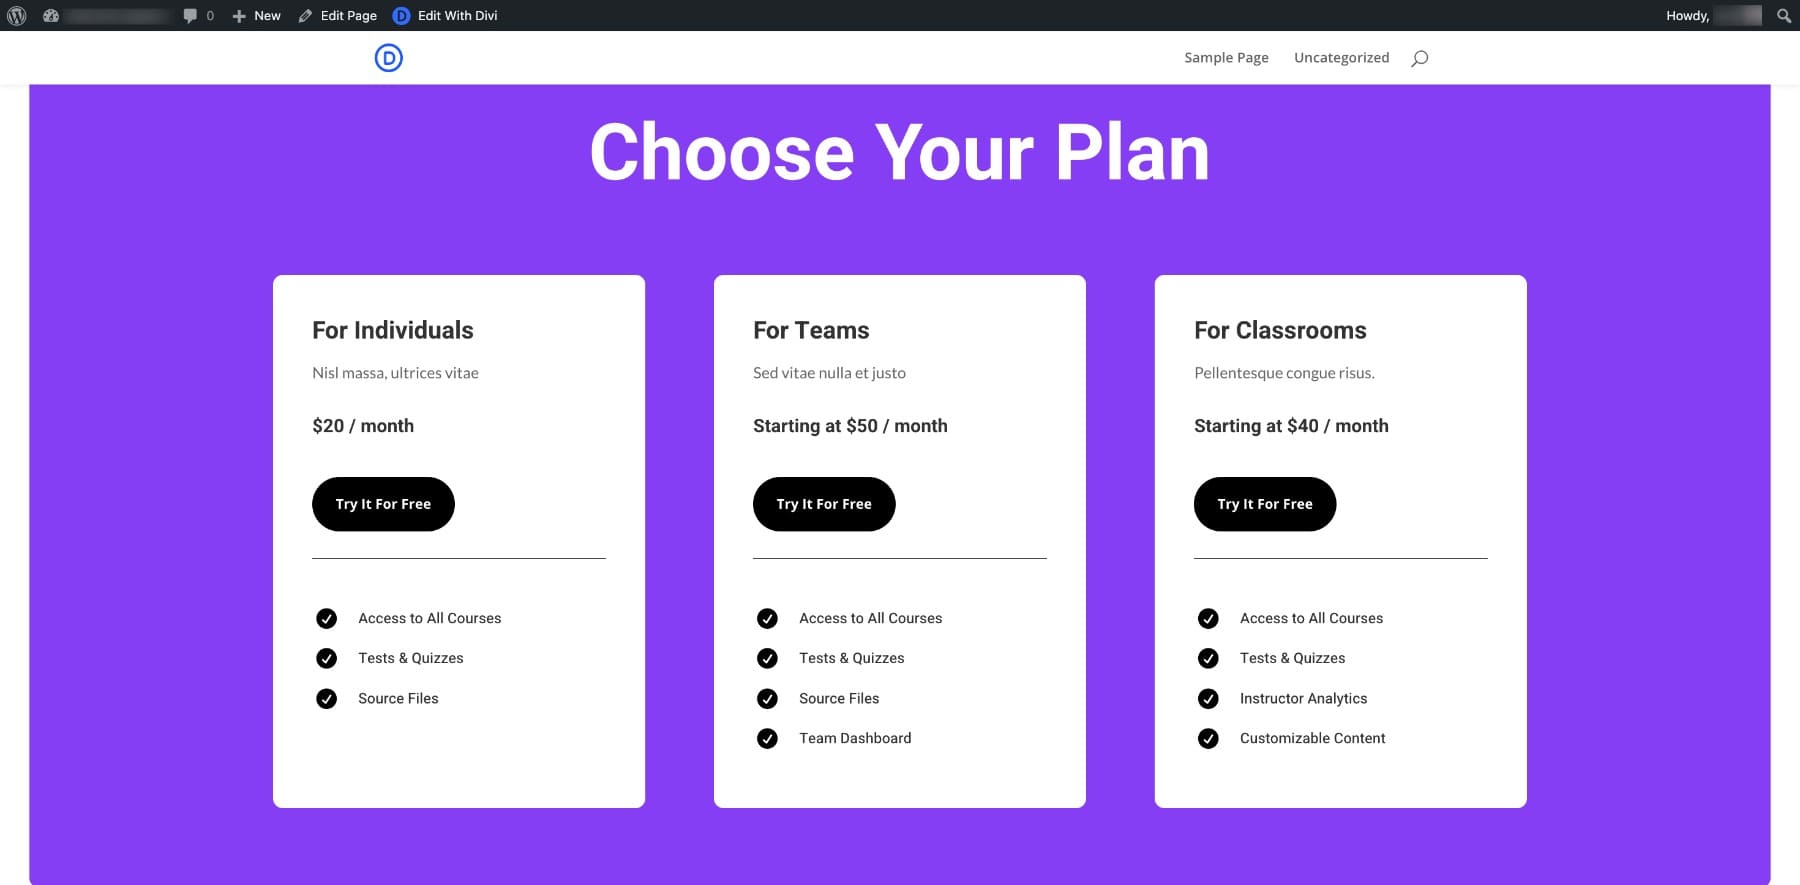
Now that you know what are Divi’s Option Group Presets and that you don’t need to know coding to work with them, I wanted to show you how exactly it works inside the Divi builder. What you need to do to create, save, and apply group presets to any option settings like background, border, box-shadow, etc. For our example, let’s customize a pricing page.
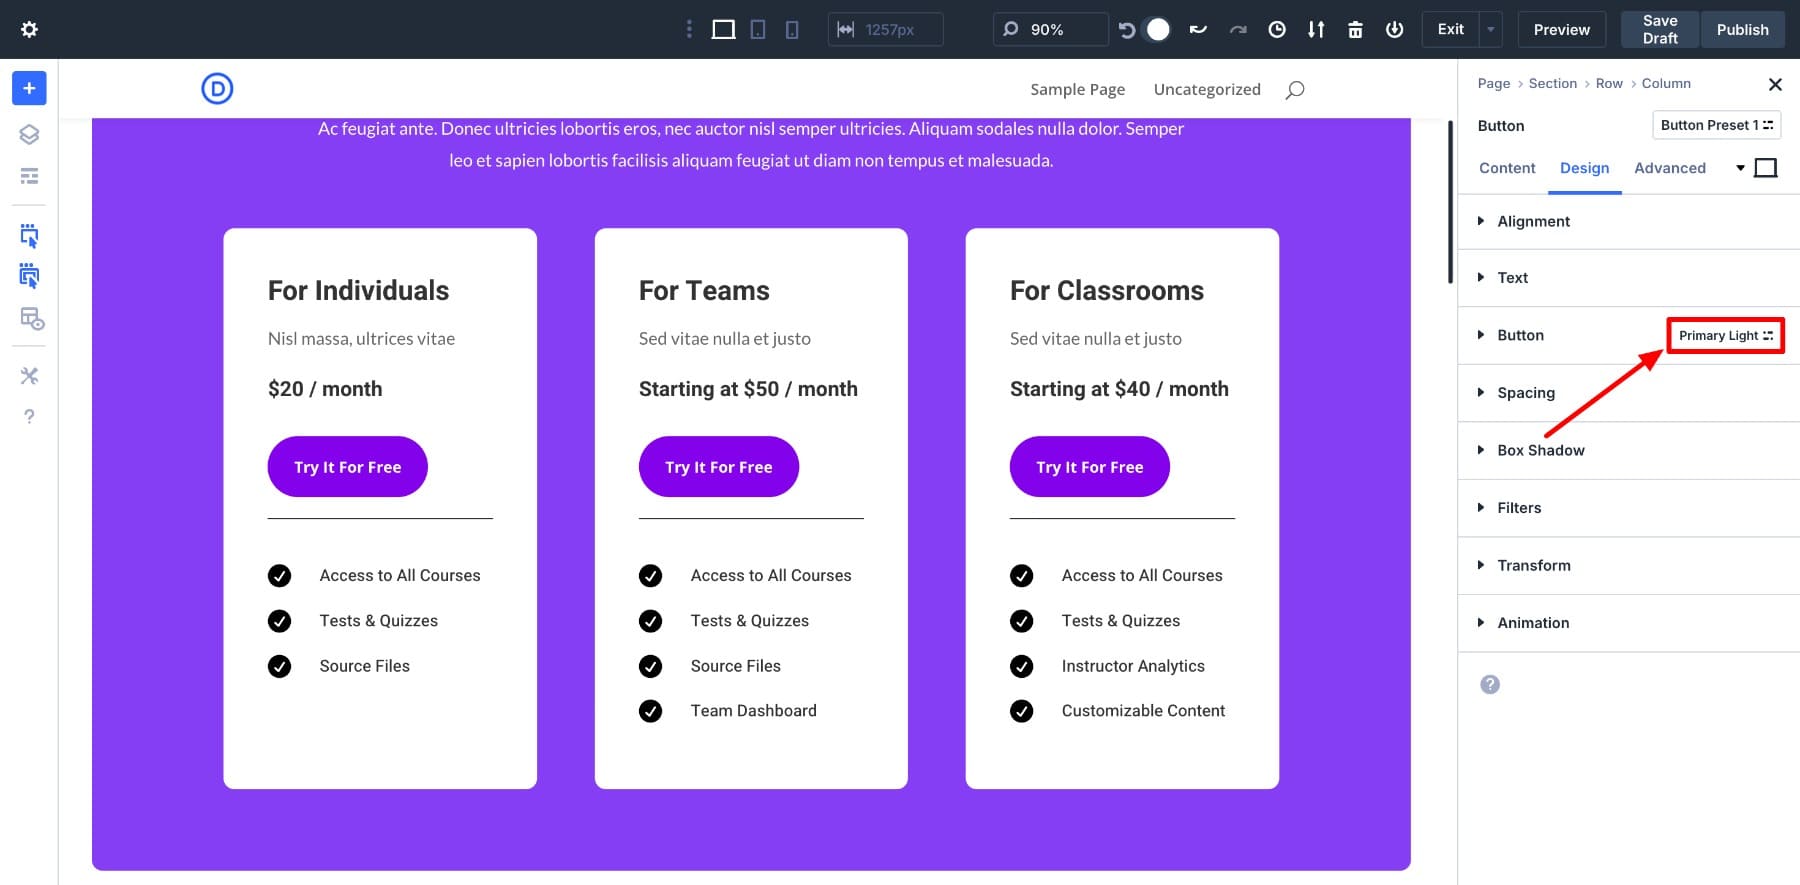
Changing the Button Background
Suppose I want to change the button background to purple to match the page’s color. So, I’ll customize the first column’s button and save the settings as a Primary Light button preset. (The black color in the UI settings shows you’re editing a setting preset. If you’ve selected the dark mode, it’ll be the opposite.)
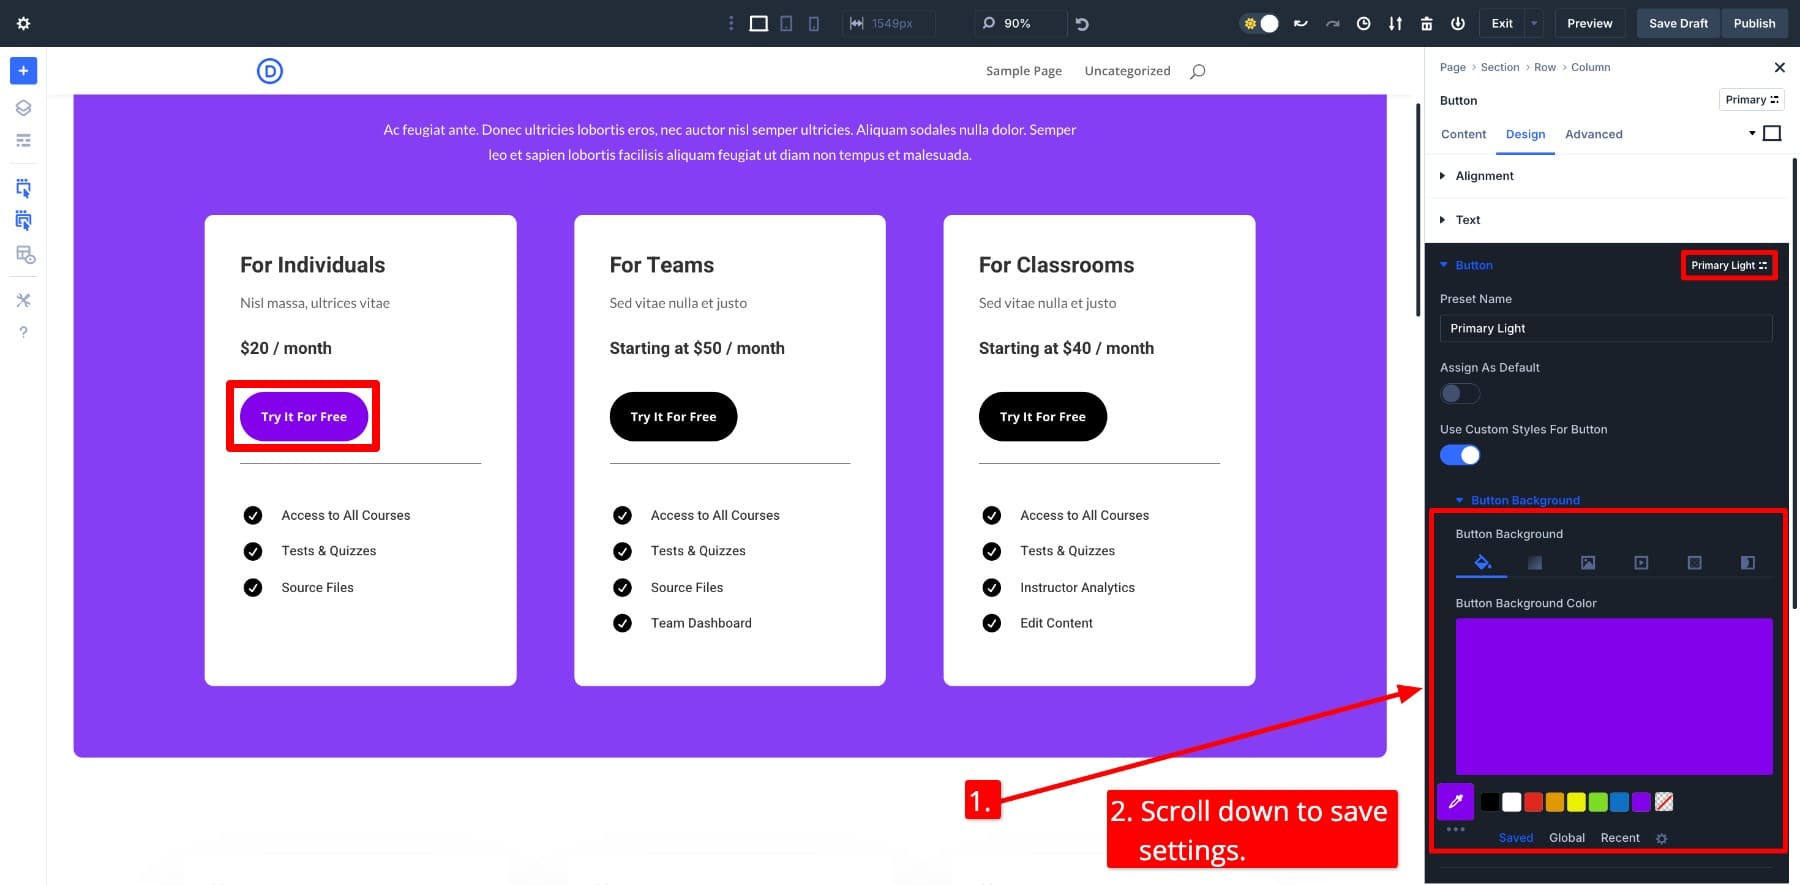
Now, to apply the same settings to the other two buttons, I’ll simply change the Button preset to Primary Light.
Changing a Column’s Shadow
Let’s add a box shadow to all the columns. I’ll add a box shadow to the first column and save it as the Shadow box shadow preset.
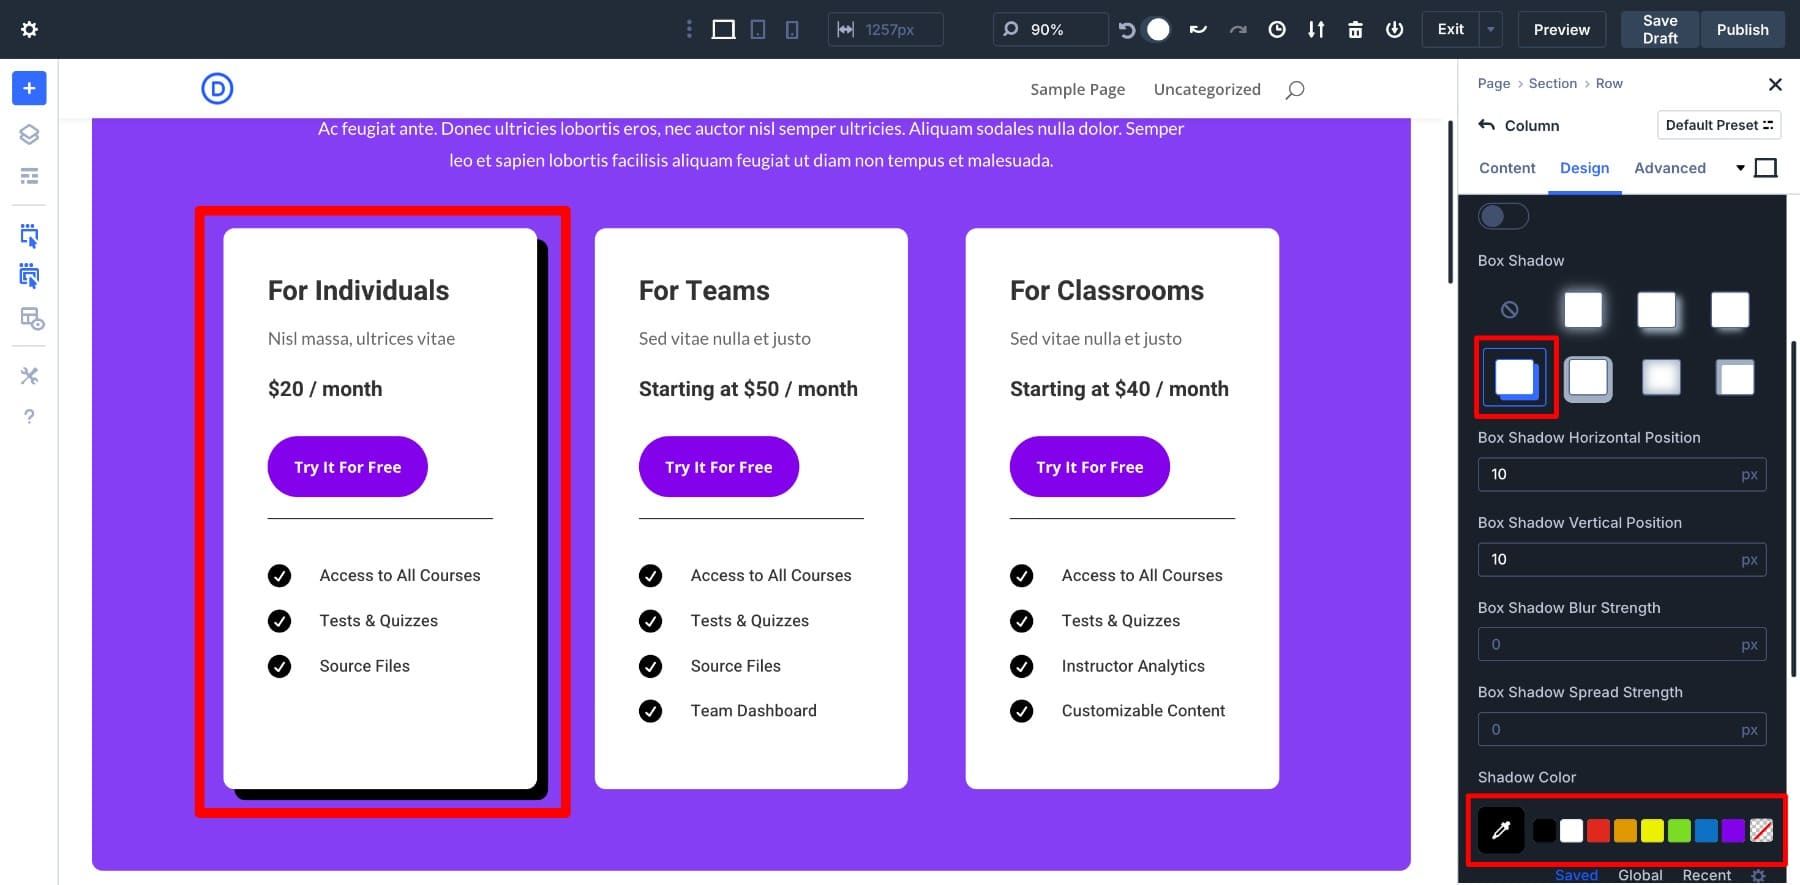
To apply the same shadow on the other two columns, I’ll simply change the Box Shadow preset to Shadow.
Modifying Text Presets
You can also modify styles for text elements, such as H1 and H2s. Here’s how updating the columns H3 preset works:
After saving, here’s how the pricing page will look:
Although I’ve made minor changes to show you how it works, you can imagine the possibilities. With Divi’s Option Group Presets, editing custom styles of groups is as simple as a click of a button. But that’s just the tip of the iceberg. You can also:
- Set default presets for option groups so base elements like headings or buttons inherit your styling automatically across the site. Once you understand how default presets work, you’ll never go back to using old methods.
- Layer Option Group Presets on top of Element Presets to add extra emphasis—like applying a shared background and then stacking a shadow or border style to make certain elements stand out.
We’ve written an entire guide on everything you should know about Divi’s Option Group Presets. Read the full article to get design ideas and advice on how to simplify class-based web design with Divi.
Learn More About Option Group Presets
Divi is a Game Changer for Class-Based Design System
Divi’s Option Group Presets bring the power of CSS classes to everyone. Whether you’re designing solo or collaborating with a team, presets speed up your workflow, scale beautifully as your site grows, and make consistent styling effortless. They’re faster, more efficient, and far more intuitive than traditional CSS workflows.
Get Started With Divi 5 Today
Divi 5 is in full-on update mode. We’re launching new features every week, just like Option Group Presets, it’s a good idea to know about Advanced Units, CSS Design Variables, and many more that change how you approach designing any website.
Divi 5 is a powerful design framework with powerful tools like Divi Dash, Divi Quick Sites, and Divi AI—built to help you create custom, professional websites without touching a single line of code. There’s nothing limiting you, ready to take a test drive into the future of website design?


Leave A Reply