Running a website is a big responsibility and knowing how to create anchor links in WordPress will be an important skill as you create content your visitors love to read. Anchor links will help you direct your readers to the exact place they need to be on your website. Using anchor links can also improve user experience and even give you a slight SEO advantage.
In this article, we’ll show you how to easily create anchor links in WordPress and in what situations you might want to use them.
- 1 What Are Anchor Links?
- 2 Why You Should Create Anchor Links in WordPress?
- 3 Pros and Cons to Using Anchor Links
-
4
How to Create Anchor Links in WordPress: 6 Ways
- 4.1 1. Create Anchor Links Manually with WordPress Block Editor
- 4.2 2. Create Anchor Links Manually in HTML in the WordPress Classic Editor
- 4.3 3. Add Anchor Links Automatically with Table of Contents Plugin
- 4.4 4. Add Anchor Links to Your Navigation Menu
- 4.5 5. Create Anchor Links to External Pages
- 4.6 6. Create Anchor Links in WordPress with Divi
- 5 Conclusion
What Are Anchor Links?
Technically speaking, an anchor link is a link (or hyperlink). In fact, in HTML, the anchor element (represented as the a tag) is common for all links that make the web as we know it possible. That said, the term “anchor link” is commonly synonymous with the term “jump link”, a link that jumps to a specific element on a page. So the main difference between anchor links (or jump links) and regular links is the destination. Traditional hyperlinks send users to a page while anchor links send users to a specific section of a page. Anchor links can link to a section on the same page or a section on a different page. But it seems the former is more prevalent.
Anchor links are often useful for long-form articles. But, they can also be used for single-page navigation menus or for creating a table of contents on posts or pages.
The Anatomy of an Anchor Link
Image Elements by Vector Stock Pro and Paul Craft / shutterstock.com
Similar to any hyperlink in HTML, two major components make an anchor link work.
- An element with a specific anchor ID (the anchor). This is the element you wish to jump to on the page.
- A Link to the element with the corresponding anchor ID (the anchor link). This link will “jump” to the anchor element wherever it is on the page.
To link to a specific piece of content (the anchor), you’re going to have to give that anchor element a unique ID so that the anchor link has a location to jump to.
This is an example HTML snippet for a heading (h2 element) with an anchor ID that we can use for an anchor link (ID in blue):
<h2 id="your-anchor-link-id">Example Heading</h2>
With this, we can create an anchor link that jumps to this heading element. The key to an anchor link is the unique href attribute value. Instead of a normal URL, you must include a pound sign “#” before the corresponding anchor ID. In HTML, that would look like this:
<a href="#your-anchor-link-id">Click Here to Jump to Heading</a>
Notice that when linking to the anchor ID you must include a “#” at the beginning. But when naming the anchor element with an anchor ID you do not include the “#”. Furthermore, the anchor ID name should be the same for both the link and the heading (besides the “#” of course). If it’s not, the link won’t work.
Also, if you wanted to add an anchor link to a specific section of an external page, you would need to include the URL of the page before the anchor ID as follows:
<a href="https://website.com/page/#your-anchor-link-id">Anchor Link</a>
That’s the basics of it.
There are various ways of accomplishing this same effect in WordPress and will depend on the configuration of your site. Before we look into how to create these anchor links (our favorite way being anchor links in the Divi Builder), let’s look at why you’d want to consider using them.
Why You Should Create Anchor Links in WordPress?
We’ll take a closer look at a few major reasons for using Anchor Links in WordPress including:
- Better User Experience
- One Page Navigation Menus
- Table of Contents for Posts and Pages
- SEO Advantages
User Experience
When creating a website, it’s important to think about the user experience (UX). One way to improve UX is by using anchor links.
Anchor links help improve user experience (UX) because they allow users to navigate the page more easily. They help users find specific information on a page with very little effort. When used properly, anchor links can make your website more user-friendly and improve the overall experience for visitors.
Anchor links are commonly used on one-page websites and stand-alone landing pages. There are a few reasons why using anchor links can be beneficial in these instances.
First of all, it can be a little jarring for a visitor to visit a website with no menu navigation. Even on one-page sites. Since people are so used to seeing this element it is a great idea to still include one even though there are no other pages to link to.
Anchor links to the navigation menu are also helpful for getting people down the page to the appropriate content very quickly. Landing pages often employ this to take potential customers to the exact information they believe they are missing.
Anchor links are used as a navigational tool on websites and can improve your website’s click-through rate. CTR is an important metric for website optimization and conversion rate optimization (CRO). By adding anchor links to your website, you can improve the user experience and make it easier for users to find the content they are looking for. This will ultimately lead to improved CTR and ROI for your website.
There are a number of menu plugins that can help you in creating your one-page site navigation menu effectively and beautifully.
Table of Contents for Posts or Pages
Anchor links are used to quickly jump to specific sections within a long document or web page. By clicking on an anchor link, the reader is automatically brought to the section of the page that the link corresponds to. This can be extremely useful when navigating through a table of contents (TOC) with many chapters and subsections.
A table of contents without anchor links helps allow the site visitor to scan the content quickly. But using anchor links on the TOC itself allows them to quickly dip into the content that they need most. Don’t worry. We’ll show you how easy it is to add a table of contents with a plugin.
Overall, anchor links are a helpful tool for organizing and navigating long-form content. By providing quick and easy access to specific sections of a document, anchor links can help make complex information more accessible and user-friendly.
Anything we can do to help out visitors and customers!
SEO Advantages
Anchor links can also play a role in your SEO linking strategy. They are important for SEO content because they provide context for users and search engines and help with understanding the content of a page at a glance.
By using anchor links, you can help users find the content they are looking for more quickly. This may have a positive impact on bounce rate which may improve your website’s overall ranking. The better a page is at capturing the attention of real users, the more SEO-friendly your content becomes. For best results, make sure those anchor links have optimized anchor text so Google will know how to index it properly.
Anchor links may also be used by Google and other search engines to create a more interesting and useful rich snippet for SERPs.

When Google finds that an internal anchor link is helpful to display to searchers, they may include popular anchor links in the search snippet. This lets the visitor have more information when deciding to look at your article or web page.
The more useful Google finds your website, the better it can rank — which is good news for you.
Plus, equipping your page with anchor links gives other sites the option to link to a specific piece of content on your page that is more relevant to their readers. This is perhaps more useful for third parties than providing a link to a long-form blog post that users have to scroll through to find the relevant information. So, in a way, anchor links could aid in your link building strategy for more backlinks.
Pros and Cons to Using Anchor Links
The main consideration in using anchor links is knowing if they’d be helpful to your visitors within a particular piece of content. If it isn’t helpful then the pros and cons of using anchor links do not matter. But, if they would help site visitors navigate your article or page then it is worth knowing the pluses and minuses.
Pros:
- Using Anchor Links makes it easy for visitors to navigate your content
- Using Anchor Links adds more detail for Search Engines to use in understanding your content
- Using Anchor Links makes your content more skimmable
Cons:
- Anchor Links take more time to set up after you are finished writing your content
- Users may get lost in the content if they jumped to a section but did not find what they were looking for
- Displaying Anchor Links without context could confuse site visitors who expected to see a different web page
How to Create Anchor Links in WordPress: 6 Ways
There are different ways of creating anchor links in WordPress.
Below, we’ll explore 5 different ways that you can set up anchor links no matter how your website is configured. We’ll show you how to create them on single pages, across pages, in your navigation, with plugins, and very easily using Divi Builder.
1. Create Anchor Links Manually with WordPress Block Editor
An anchor link is a link that allows you to jump to a specific section on a page. To create an anchor link in the WordPress block editor, you will need to do the following:
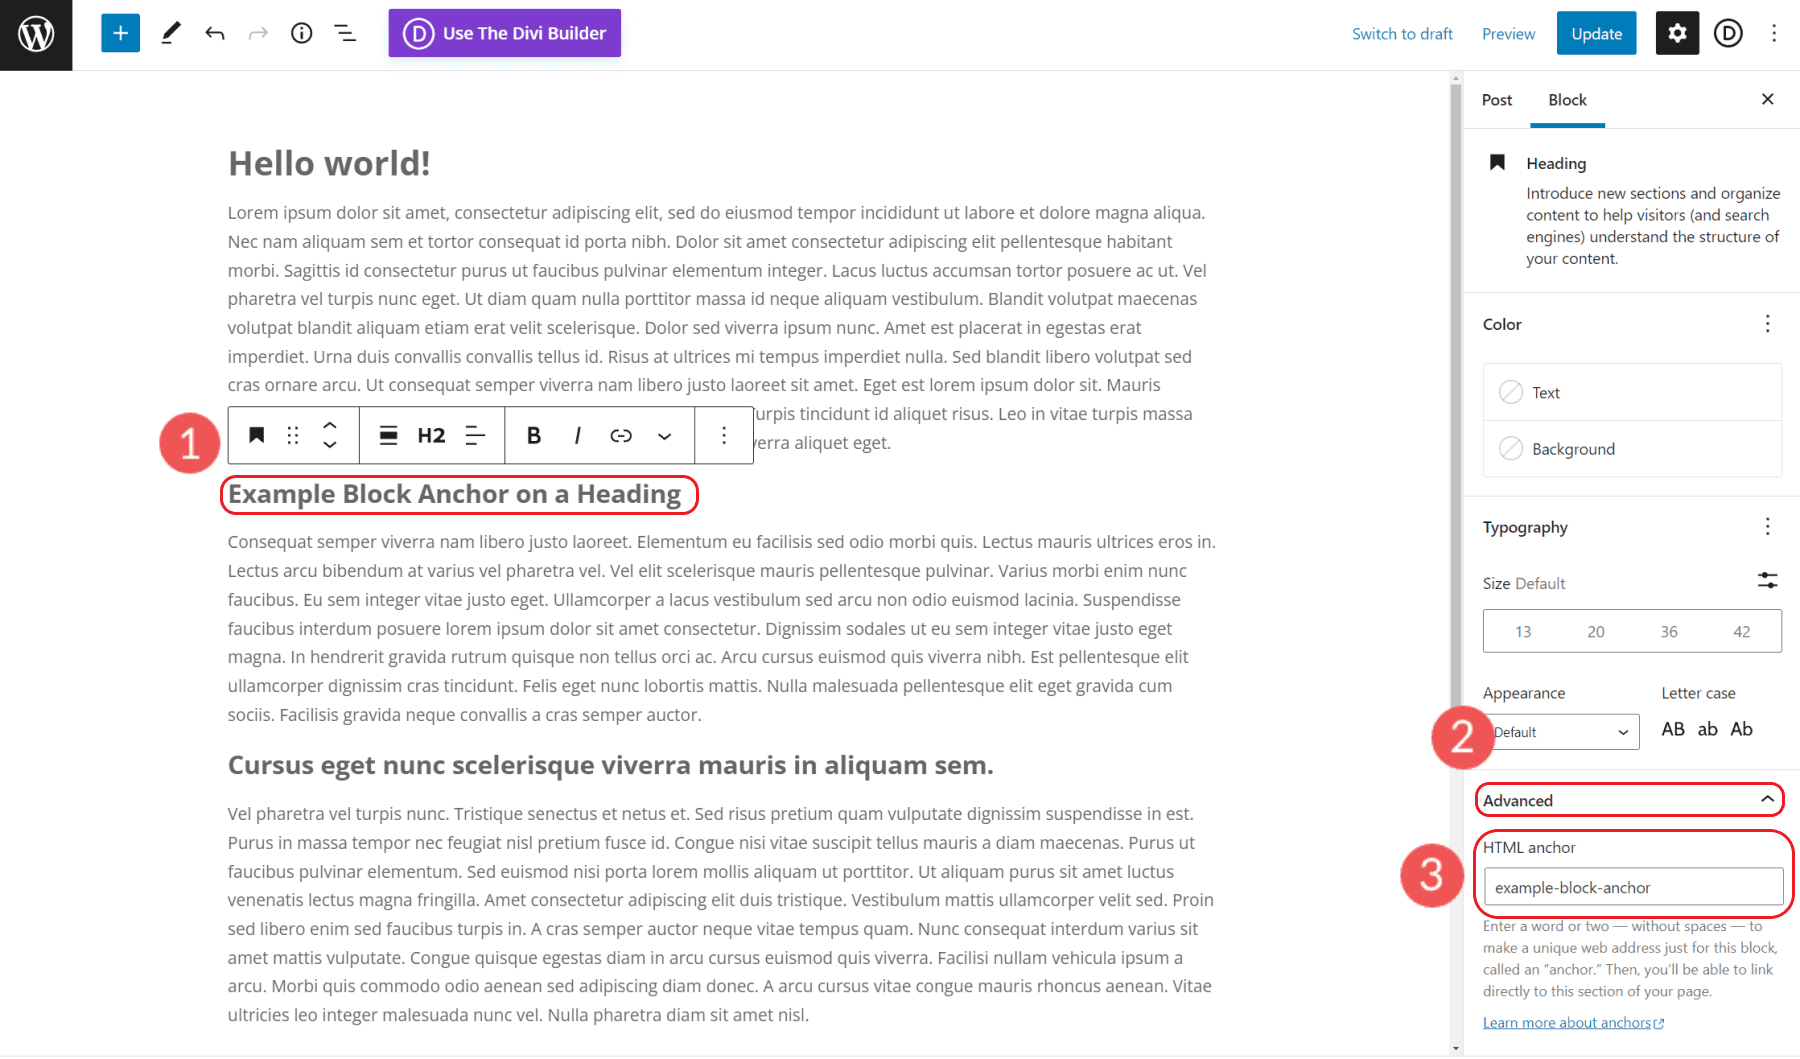
In the WordPress block editor, add a heading block and type in your heading text.
In the heading block settings (found on the Advanced tab of the Headings Block), add an HTML ID to the Heading field. This will be used as the anchor link target.
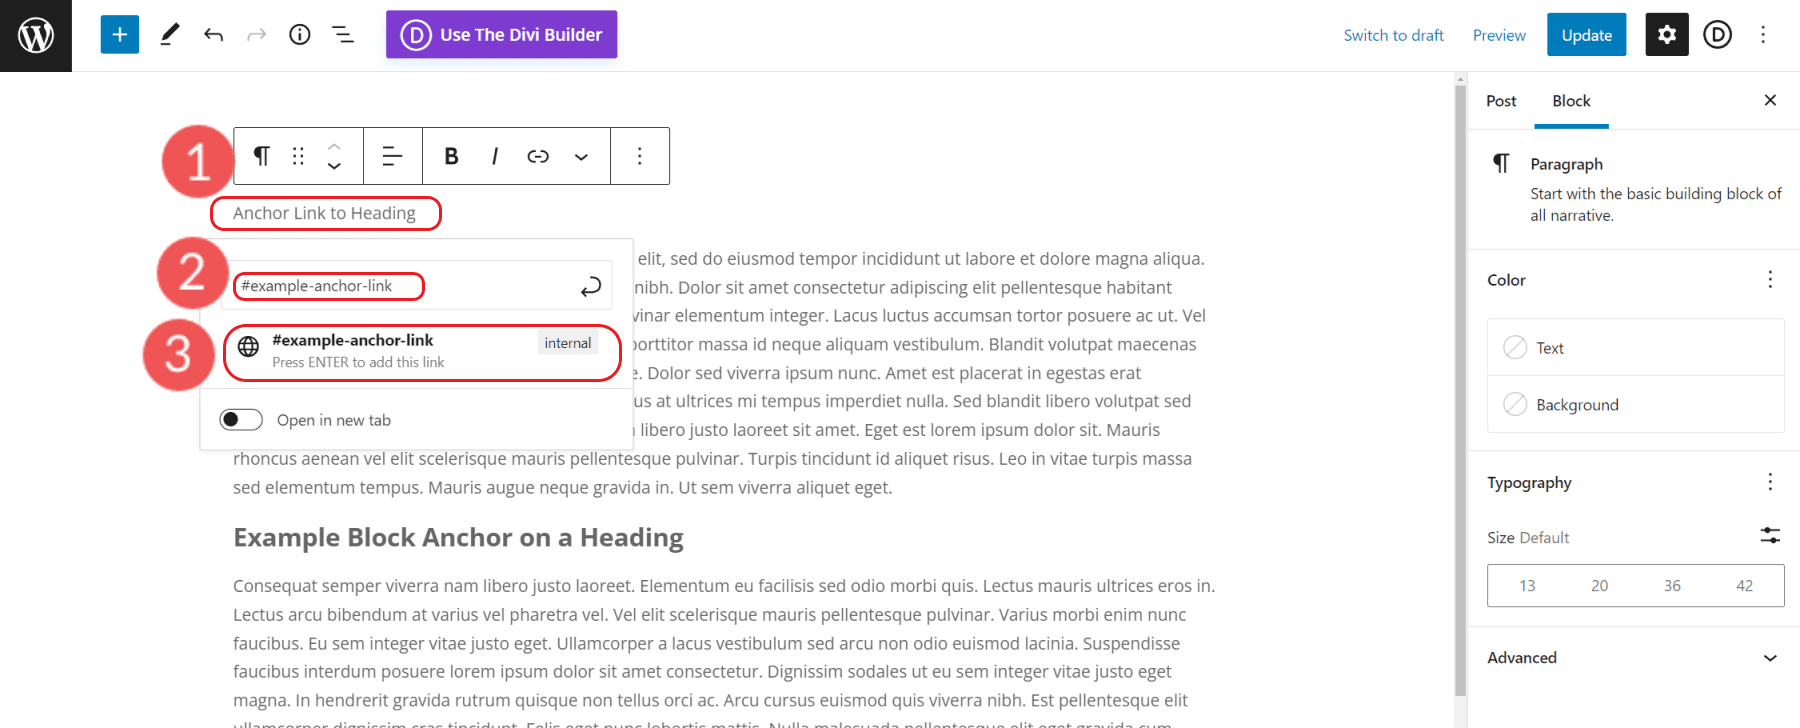
Once the ID for the heading element is set, we can select some text and add a hyperlink. Instead of a web address, we can add a pound sign (#) plus our element ID. Press enter and the link will apply to that text.
Save your changes and preview your page to test out your new anchor link.
2. Create Anchor Links Manually in HTML in the WordPress Classic Editor
If you want to create an anchor link in the WordPress classic editor, you’ll need to add a bit of HTML. But don’t worry, it’s not difficult. First, you’ll need to find the heading you want to link to. In the code for your post or page (text tab next to the visual editor tab), look for the heading tag around the text you want to link to.
For example, if you want to create an anchor link to a header that says “Learn About Me”, you would look for an H2 tag (heading two) around that text.
Look for:
<h2>About Me</h2>
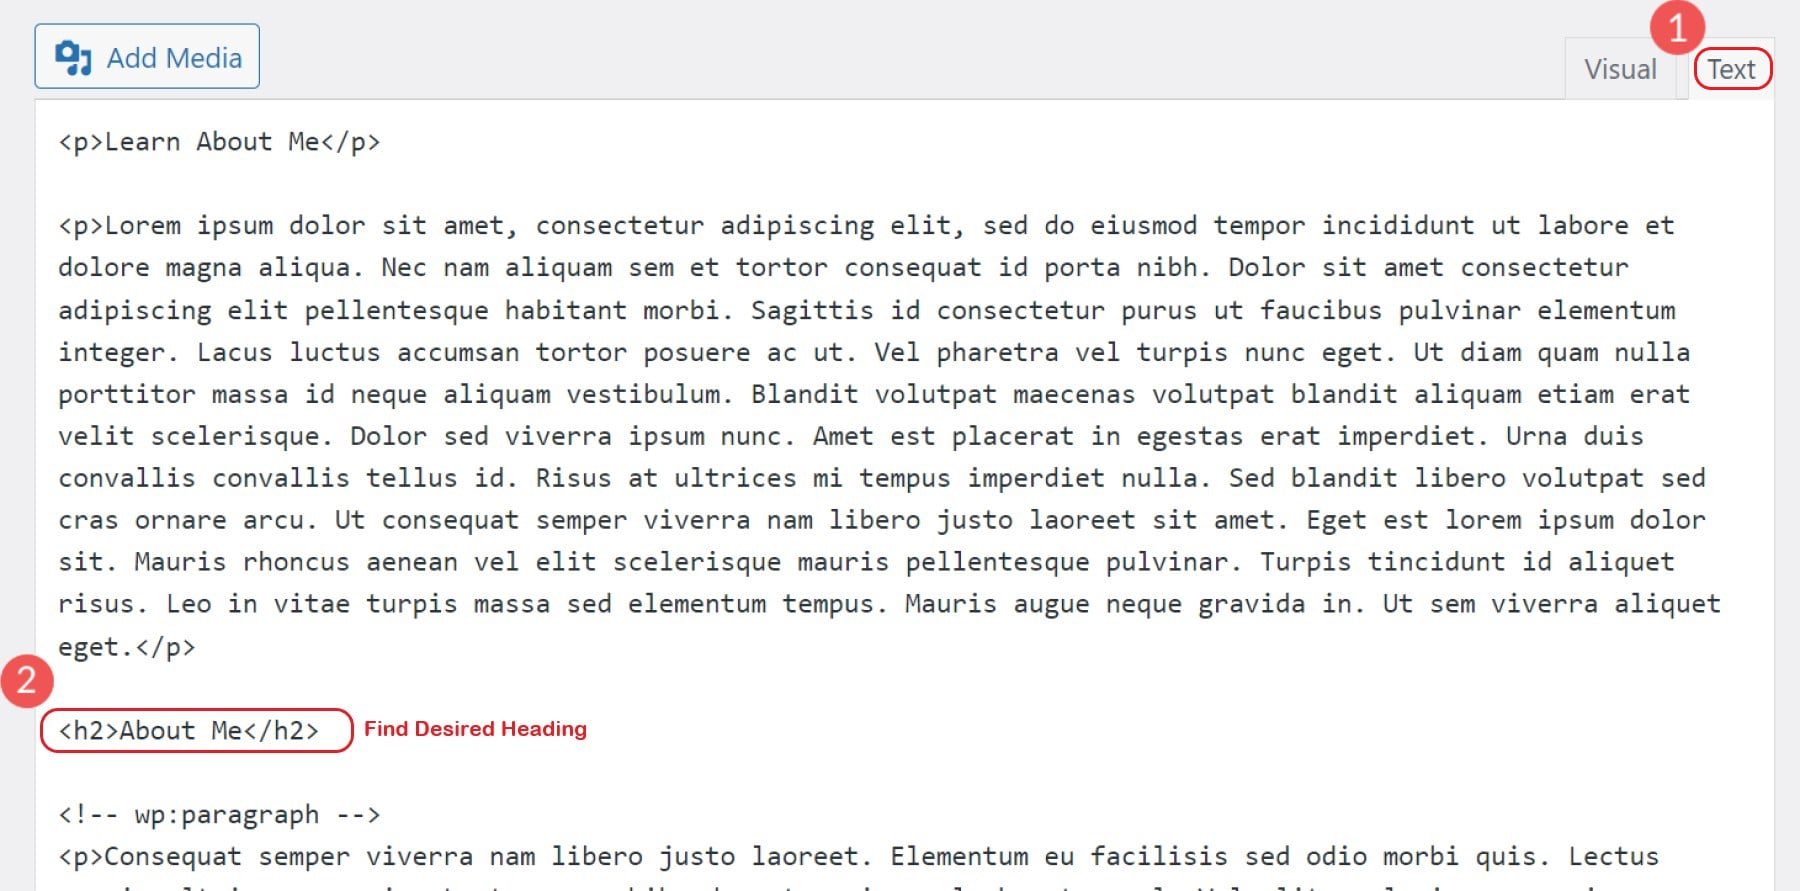
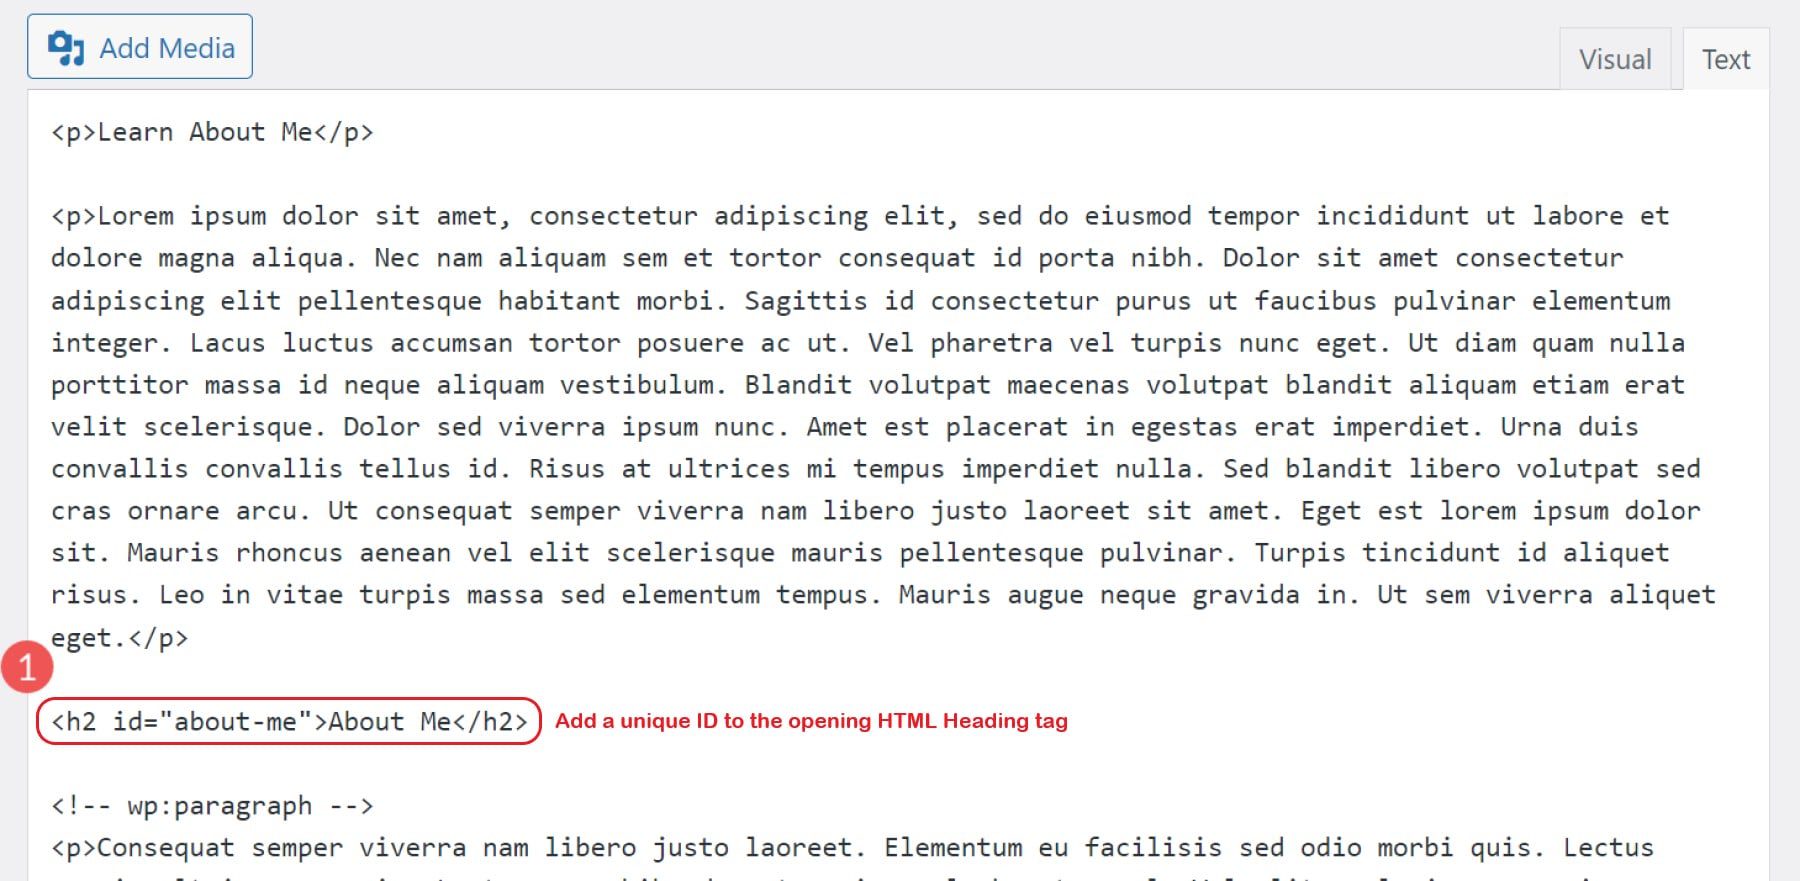
Once you’ve found the heading tag, add an id attribute to it. The value of the id attribute should be unique, so choose something that won’t be used anywhere else on the page. For our example, we’ll use “about-me”.
Change the heading tag to:
<h2 id="about-me">About Me</h2>
Next, you’ll want to find the text that you want your visitors to click on that will take them to your anchored section. You have the option of typing out the HTML for the new anchor link or you can use the Classic Editor to add a link function. We’ll use the WYSIWYG editor found on the Visual tab to quickly create the link.
Select the text (or image) that you wish to add the link to. Click on the chain-link icon in the editor’s toolbar. Add “#about-me” to the link input field and press enter to finish creating the link.
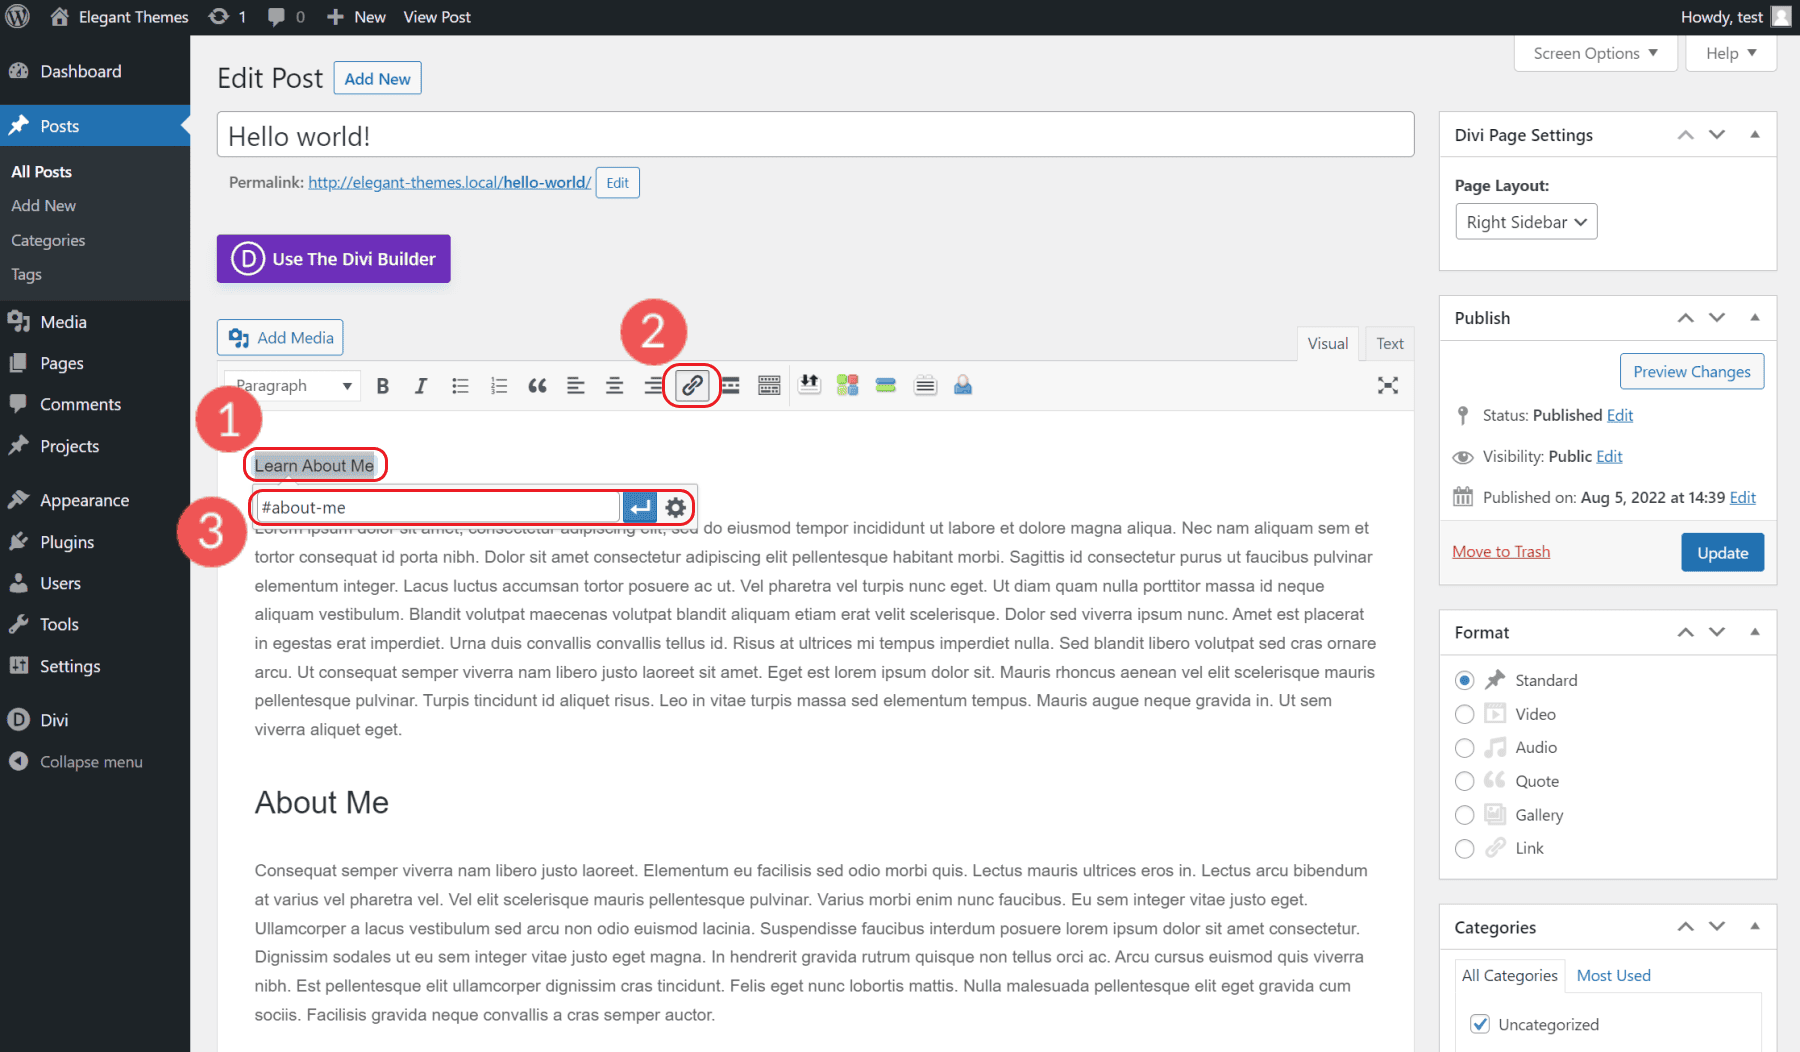
Click “Publish” or “Preview” to see your anchor link in action.
3. Add Anchor Links Automatically with Table of Contents Plugin
There are quite a few plugins that may help you quickly add a Table of Contents with anchor links automatically to your posts or pages. Here are some of the best table of contents plugins you can check out.
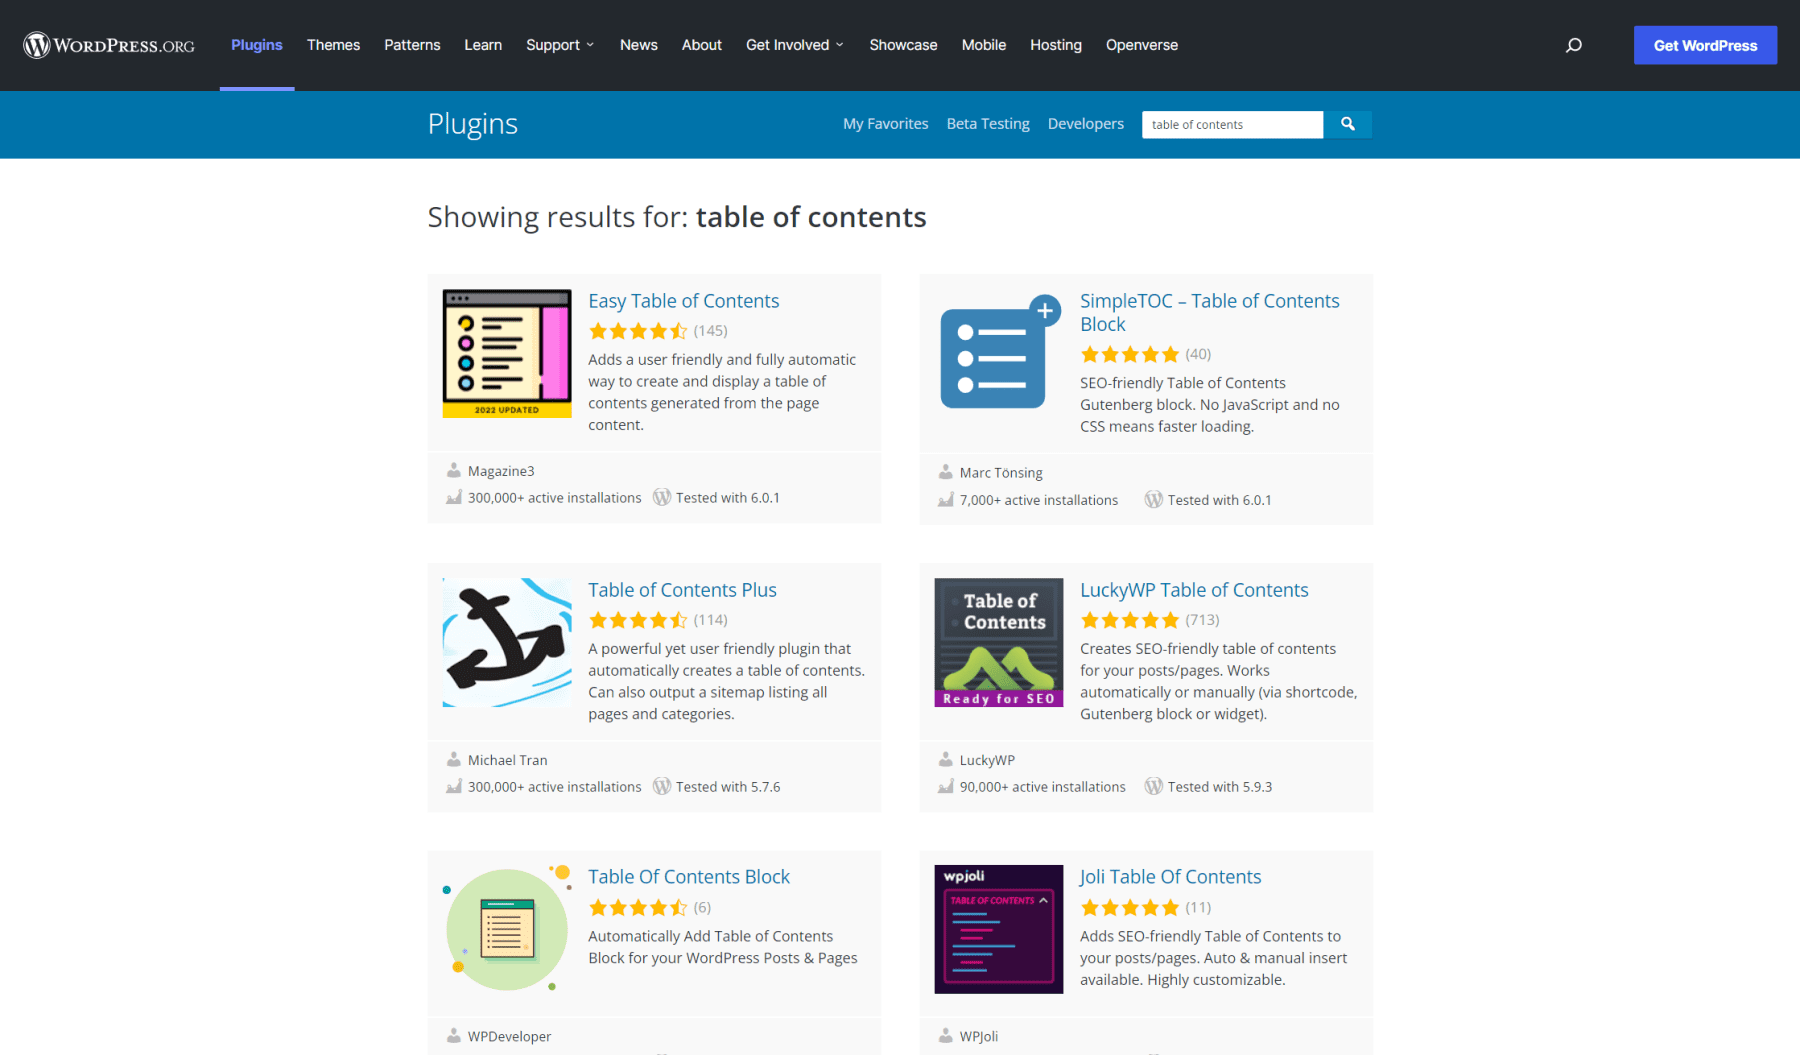
Though you can choose from a few different options, we’ll work through how to use Easy Table of Contents by Magazine3.
Installing Easy Table of Contents right off the bat gives you a Table of Contents based on Page and Post headings. No need to configure any settings to see how it will look. Load up the plugin and then take a look at your most recent post.
After looking at what it can do, it’s smart to jump back into its settings to tailor them to your needs. For most people, only enabling the TOC to show up on Posts is probably all you’ll need. You’ll see that Easy Table of Contents recognizes all your custom post types and various templates which you can toggle on/off for.
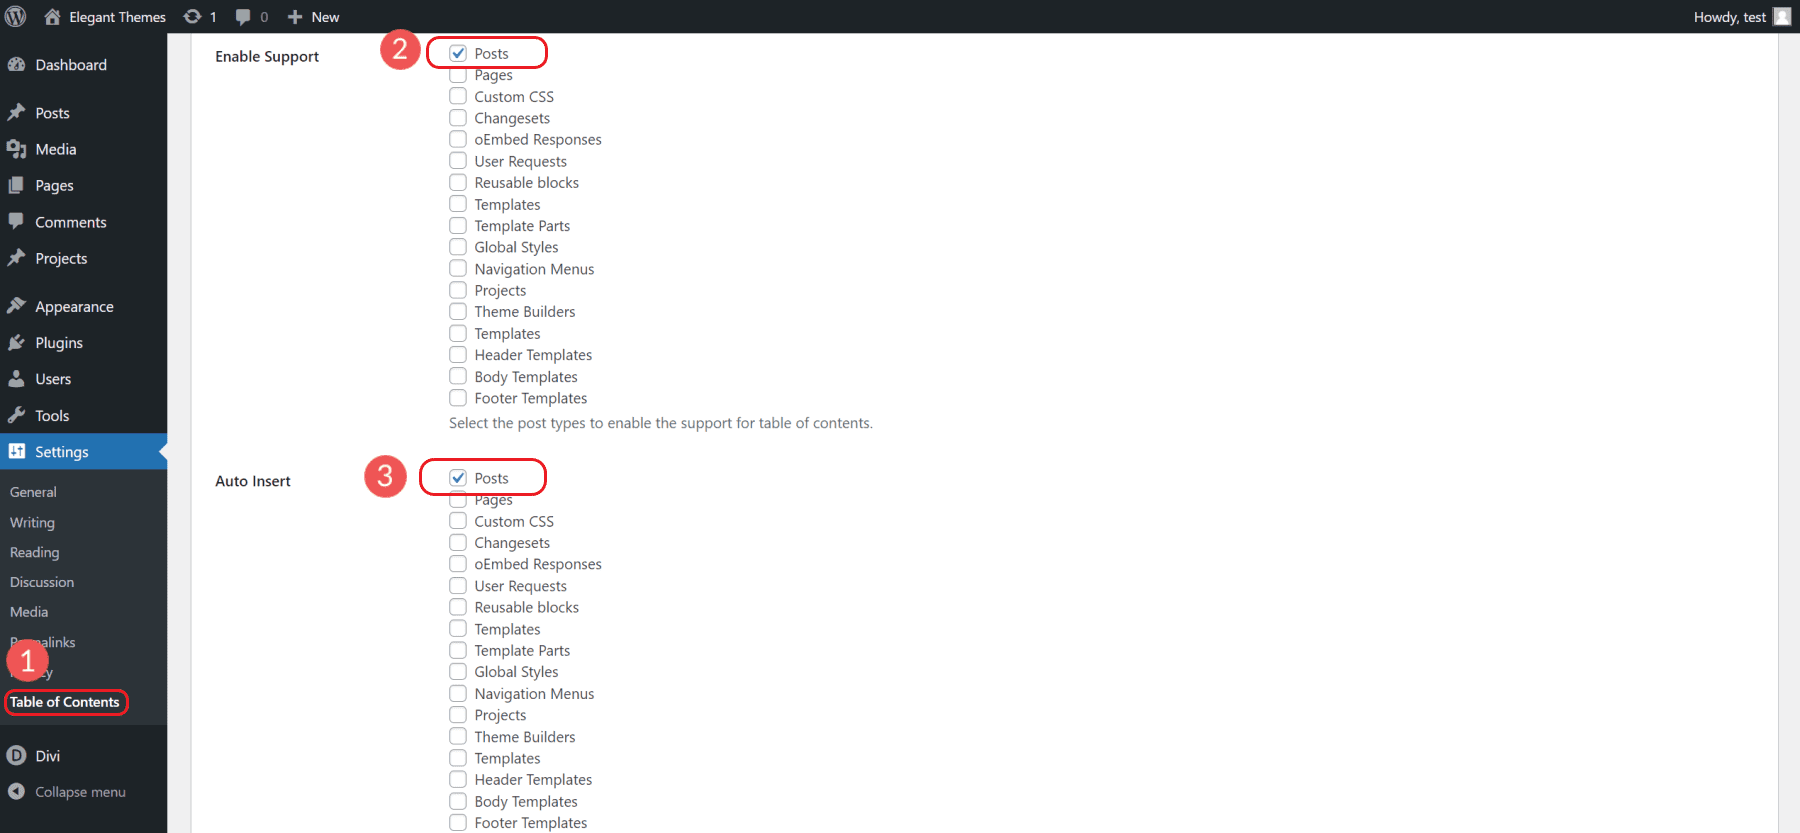
There is a score of other options for you to try out, but that is all dependent on your website and needs. We’d suggest starting by creating TOCs using only H2 through H3 or maybe H4 headings. If there are too many items in the TOC then it won’t be as helpful as you had hoped for.
They offer a pro version with more features. It also works perfectly with Divi!
Again, there are other “Table of Contents” plugins that could serve you well. Do your research and test a few out to get the best features that fit your needs.
One-page websites and landing pages with limited navigation menus can pack a lot of punch. Oftentimes, site masters use anchor links in the navigation menu to jump visitors down the page.
This is very useful when a website doesn’t need many pages but still wants to give the visitor a chance to look at exactly the information they need.
Creating anchor links for navigations is the same as we’ve already worked through except for the actual link. The link will go into your navigation.
Before adding anchor links to your navigation, you will still need to add the anchor ID on the heading (or anchor element) you want to jump to. Reference the how-tos above for inserting an Anchor ID in the WordPress editor.

Once you have that set, you are ready to add your link to the menu navigation.
Open Appearances > Menus to see your site menus. Make sure you are editing the correct menu, then select “Custom Links”. In the URL field, add your first HTML anchor ID preceded by the “#” (#example-anchor-link). Give your menu item a name by filling in the Link Text field. This will be displayed in the menu itself. Click Add to Menu and Save Menu.
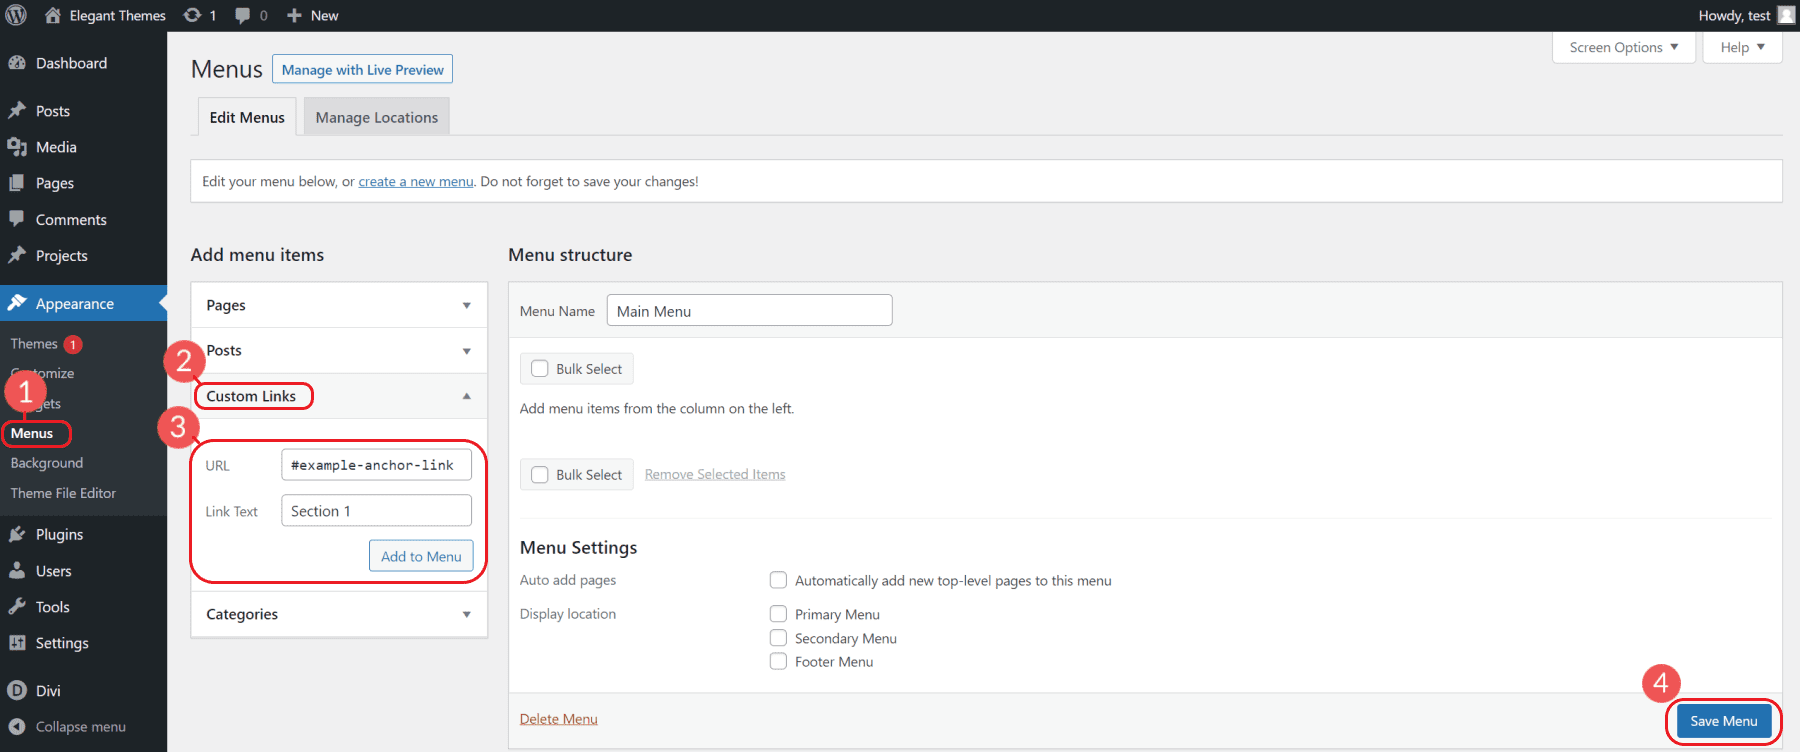
Repeat the process of adding additional unique anchor IDs to headings and anchor links to your menu as needed.
You can see your changes on the front end of your website to see how it looks.
5. Create Anchor Links to External Pages
If you want to add an anchor link to a specific section of an external page you would need to include the entire URL of the page followed by the “#” and the anchor ID.
An anchor link to a specific heading on an external page would need to be structured like this:
<a href="https://website.com/page/#your-anchor-link-id">Anchor Link</a>
This would redirect the user to the page and also to the specific heading on that page.
6. Create Anchor Links in WordPress with Divi
Divi is an incredible theme and page builder that makes it easy to design a website in WordPress. In Divi, you can create anchor links to any element with ease and without having to worry about HTML.
To add anchor links in Divi, open your page editor and Divi’s visual builder. The first thing that we’ll do is assign a section an anchor ID. We do this by opening the section settings, navigating to the Advanced tab, and clicking on “CSS ID & Class”. You can add an anchor ID to any Divi element, but linking to a section can be a better user experience than linking to a header tag.
We’ll add our ID to the CSS ID field and save our changes. For this example, we’ve given our section the ID of “offer”.
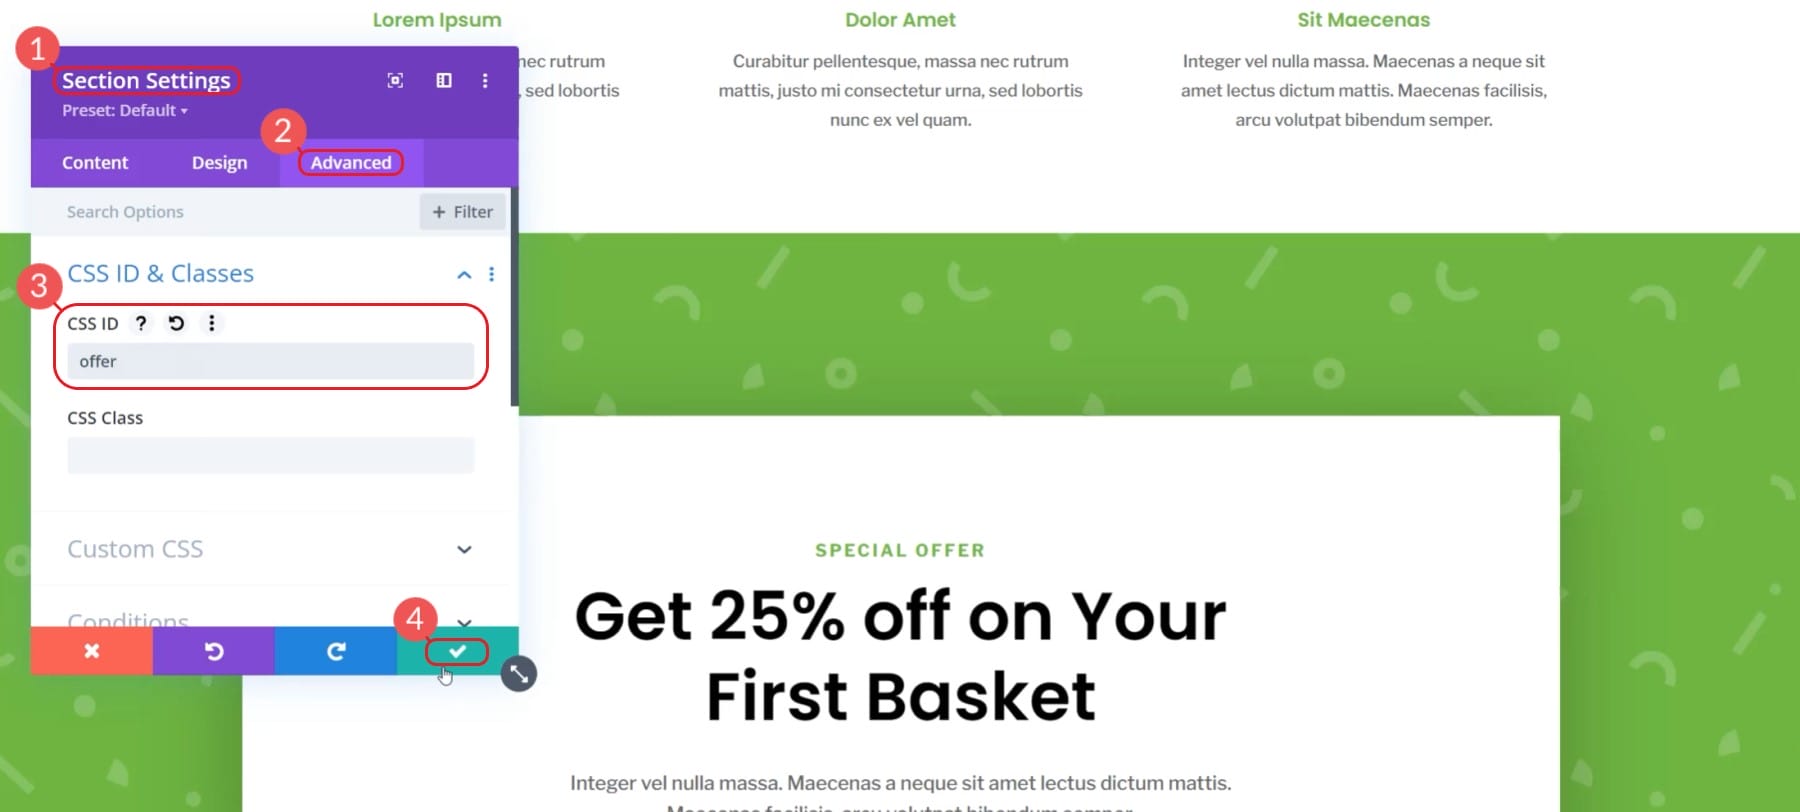
Once we have set up our section with an ID we can link to create our link. In this example, we’re using our main CTA in the hero section. This button will scroll the user down to the “Subscribe for Special Offer” section.
Edit the button and click into the section labeled “Link”. For our link, instead of a URL, we are adding an anchor link. Do this by typing in the pound sign (#) and our wanted CSS ID. For this example, the link will be “#offer”.
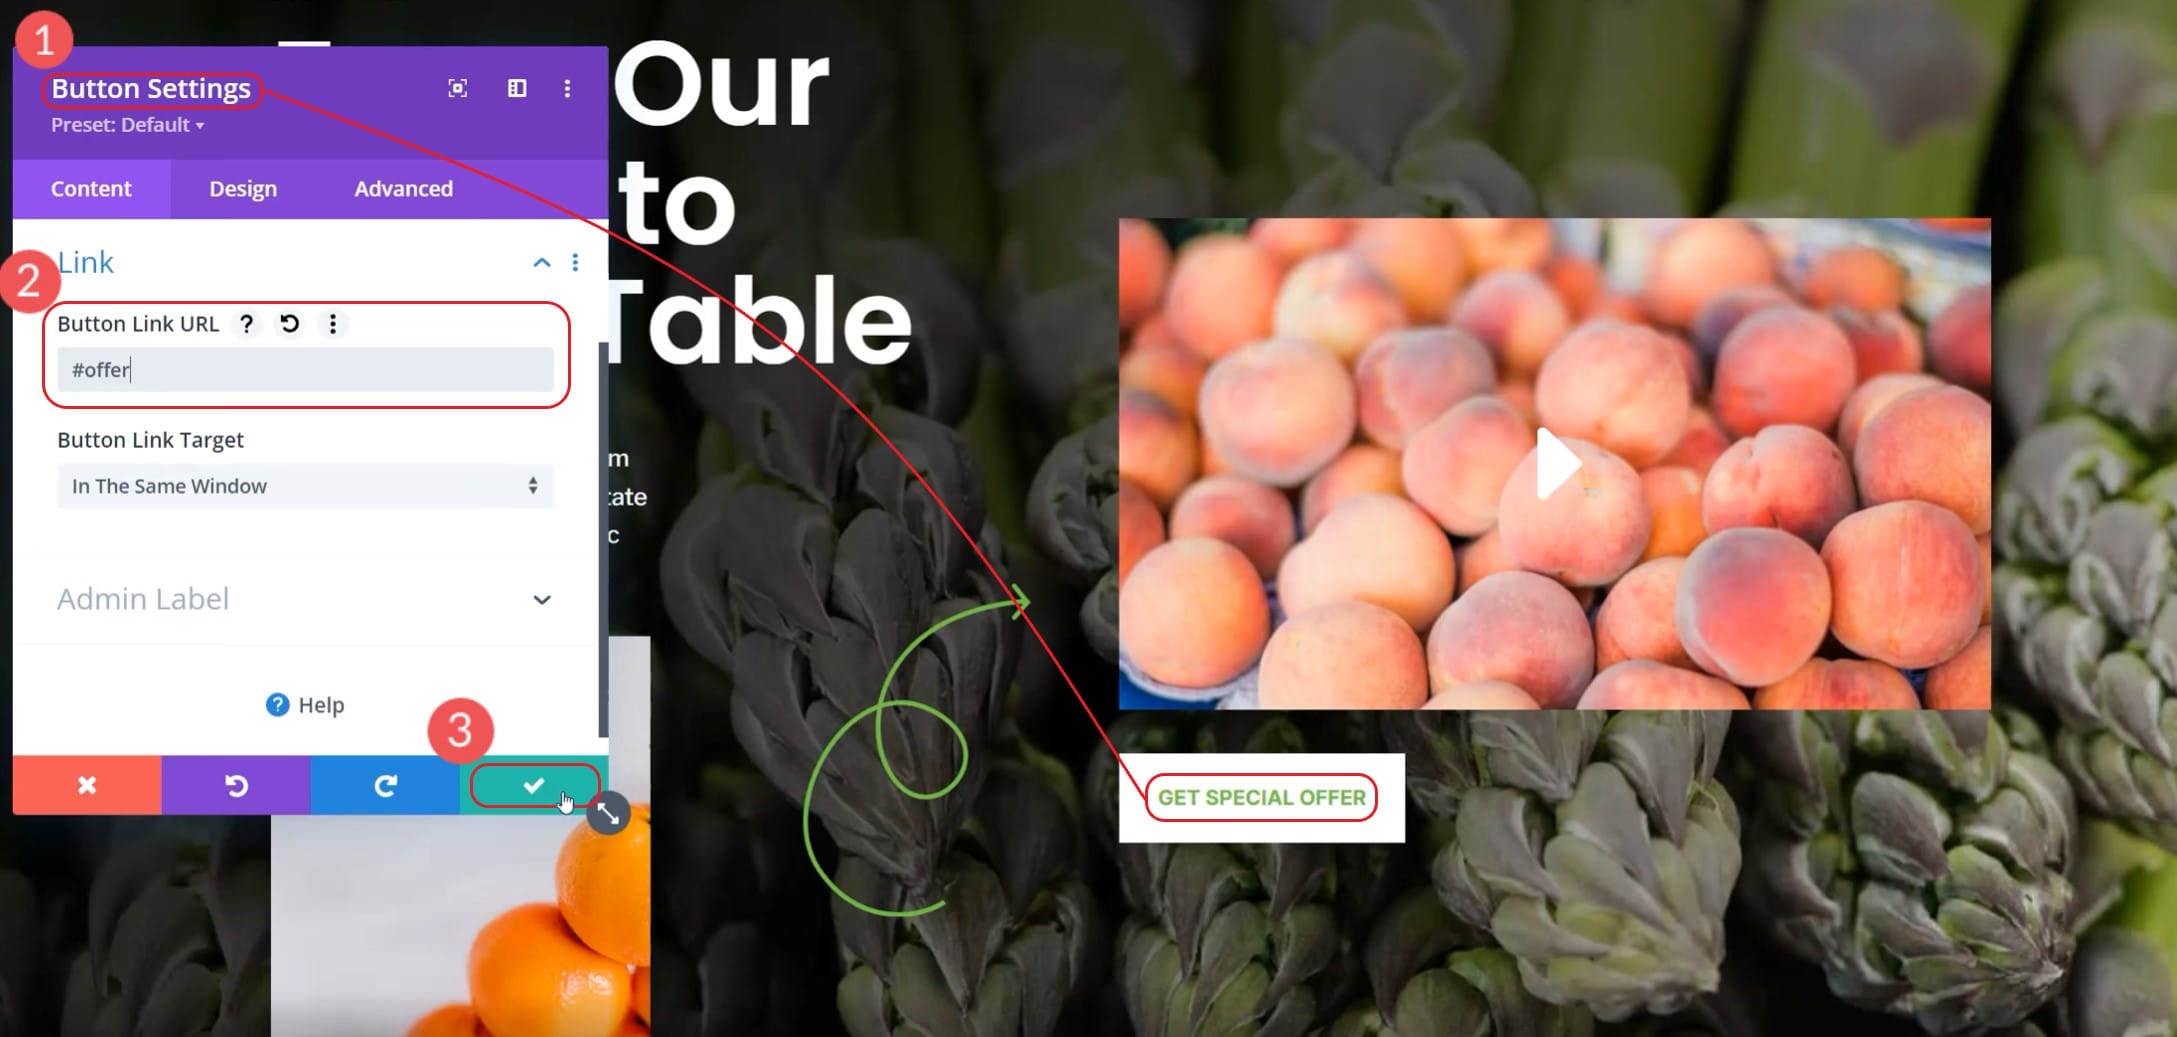
Publish the page changes and then navigate to the page on the front end. You can click your button and watch as it scrolls down to the desired section. Here is our example in action:
As you can see, it is very easy to manage multiple anchor links on a single page with Divi. Assigning sections and individual modules an ID is a snap.
Sometimes the scroll-to position may be inaccurate. Divi has a Theme Option that you can toggle for Divi to use an alternate method. Open up the Theme Options, go to the Navigation Tab, and Toggle the “Alternative Scroll-to-Anchor Method”.
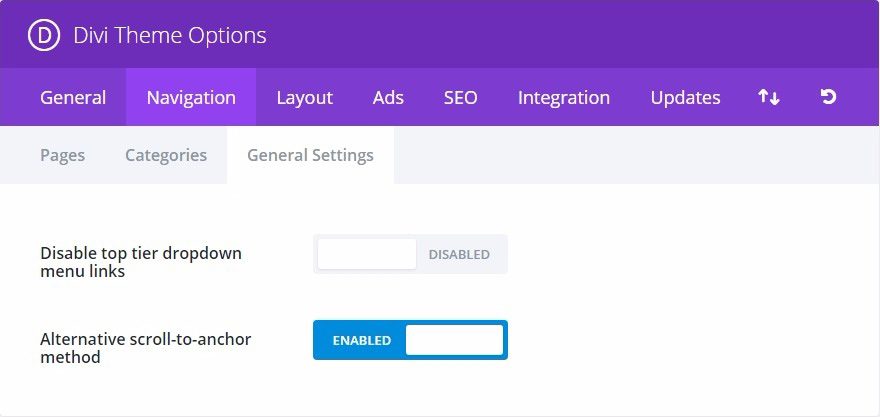
To learn more about what Divi can do with Anchor links, check out these cool things you can do with Anchor Links!
Conclusion
Every second a visitor spends on your website is precious. People have short and demanding attention spans. The competition for all the same attention is constantly growing. You only have but a mere few seconds to hook readers and get them the content they were looking for. Otherwise, you are delivering a forgettable website experience and bouncing traffic.
As we’ve learned, anchor links are a great way to direct your readers to specific parts of your content. You can keep your site visitors’ attention with the content that they want most want to see. These anchor links may even link to other parts of your site, or to external sources that have specified HTML IDs.
You can now create better user experiences for your customers and improve how search engines understand and rank your web pages. And anchor links in WordPress help you do this!
Have you had experience using anchor links in WordPress or have some helpful tips? Let us know in the comments below!
Featured Image via BestForBest / shutterstock.com




Could you provide a little more help on this… scroll-margin-top: 80px. I am not seeing how to implement this.
Hi,
I can’t scroll through an anchor link to the footer, because the footer is fixed. Do you know a way to get this to work, because the contact details are in the footer.
Thanks,
Nathan
I’ve tried this in so many ways but my anchor link just scrolls to the top of the page. Not sure why?
Hi, good article. I have one problem, and actually you do have the same problem here on this page!
When I click the anchor it scrolls down, but the actual point you want as anchor is overlapped by the fix header. So you have to scroll up a little to actually see the headline for example. Not very user friendly.
Is it possible to give the anchor a minus the header or minus some pixel option? So that it actually stops at the perfect spot.
Martin,
You are so right. We will definitely need to update this article with instructions on how to add scroll spacing to those headings or anchors, especially for sites with fixed headers. There are a few ways to do this with JavaScript and CSS. Perhaps the best simple way to do this is to use the “scroll-margin-top” CSS property can be used to add that scroll spacing you need above each heading. In the theme customizer, you can add this CSS:
[id] {scroll-margin-top: 80px;}
This basically applies an 80px top scroll margin above any element with an ID attribute. I also added this CSS to this post to help UX :). Hope that helps for now!
Thanks Martin, our team will check and fix this.