Do your customers often make just one purchase and never return? If so, the default WooCommerce Thank You page could be the missing link in building stronger connections. While it provides a basic confirmation, it lacks the personalized touch that keeps customers coming back.
What if your Thank You page could do more? Imagine turning it into a tool to offer exclusive discounts, recommend relevant products, or encourage social sharing—all designed to leave a lasting impression and drive future sales.
This guide will walk you through the steps to customize your WooCommerce Thank You page effectively and make it work harder for your business. Let’s get started!
- 1 What is a WooCommerce Thank You Page?
- 2 Key Elements of a WooCommerce Thank You Page
- 3 Benefits of Thank You Page Customization?
- 4 Methods of Customizing a WooCommerce Thank You Page
- 5 Why is Divi the best choice for customizing the WooCommerce Thank You Page?
- 6 How to Customize Your WooCommerce Thank You Page with Divi
- 7 Additional Tools to Enhance Your Thank You Pages
- 8 Conclusion
What is a WooCommerce Thank You Page?
The WooCommerce Thank You Page, or the purchase confirmation page, is the final screen a customer sees after purchasing. It provides a reassuring confirmation that their order has been successfully placed. It serves as a receipt and confirmation, giving customers confidence that their transaction is secure and their items are on their way. Thank You pages are post-checkout pages, which means you can find them as the endpoint after placing an order.
By default, WooCommerce automatically generates the Thank You page and redirects customers there after a successful purchase. It doesn’t require specific settings to be enabled to function, as it’s part of the checkout flow.
Key Elements of a WooCommerce Thank You Page
A WooCommerce Thank You Page typically contains several key elements to confirm the order and enhance customer engagement:
- Order Details: This includes the order number, date, list of purchased items with quantities and prices, and total amount paid.
- Billing and Shipping Information: This section displays the billing and shipping addresses provided during checkout, confirming where the items will be delivered.
- Payment Information: Information about the payment method and any relevant transaction details for customer reference.
- Personalized Confirmation Message: A confirmation note adds a personal touch, making customers feel appreciated and valued.
- Newsletter Links: Buttons or links to email newsletter sign-ups encourage customers to stay connected with the brand.
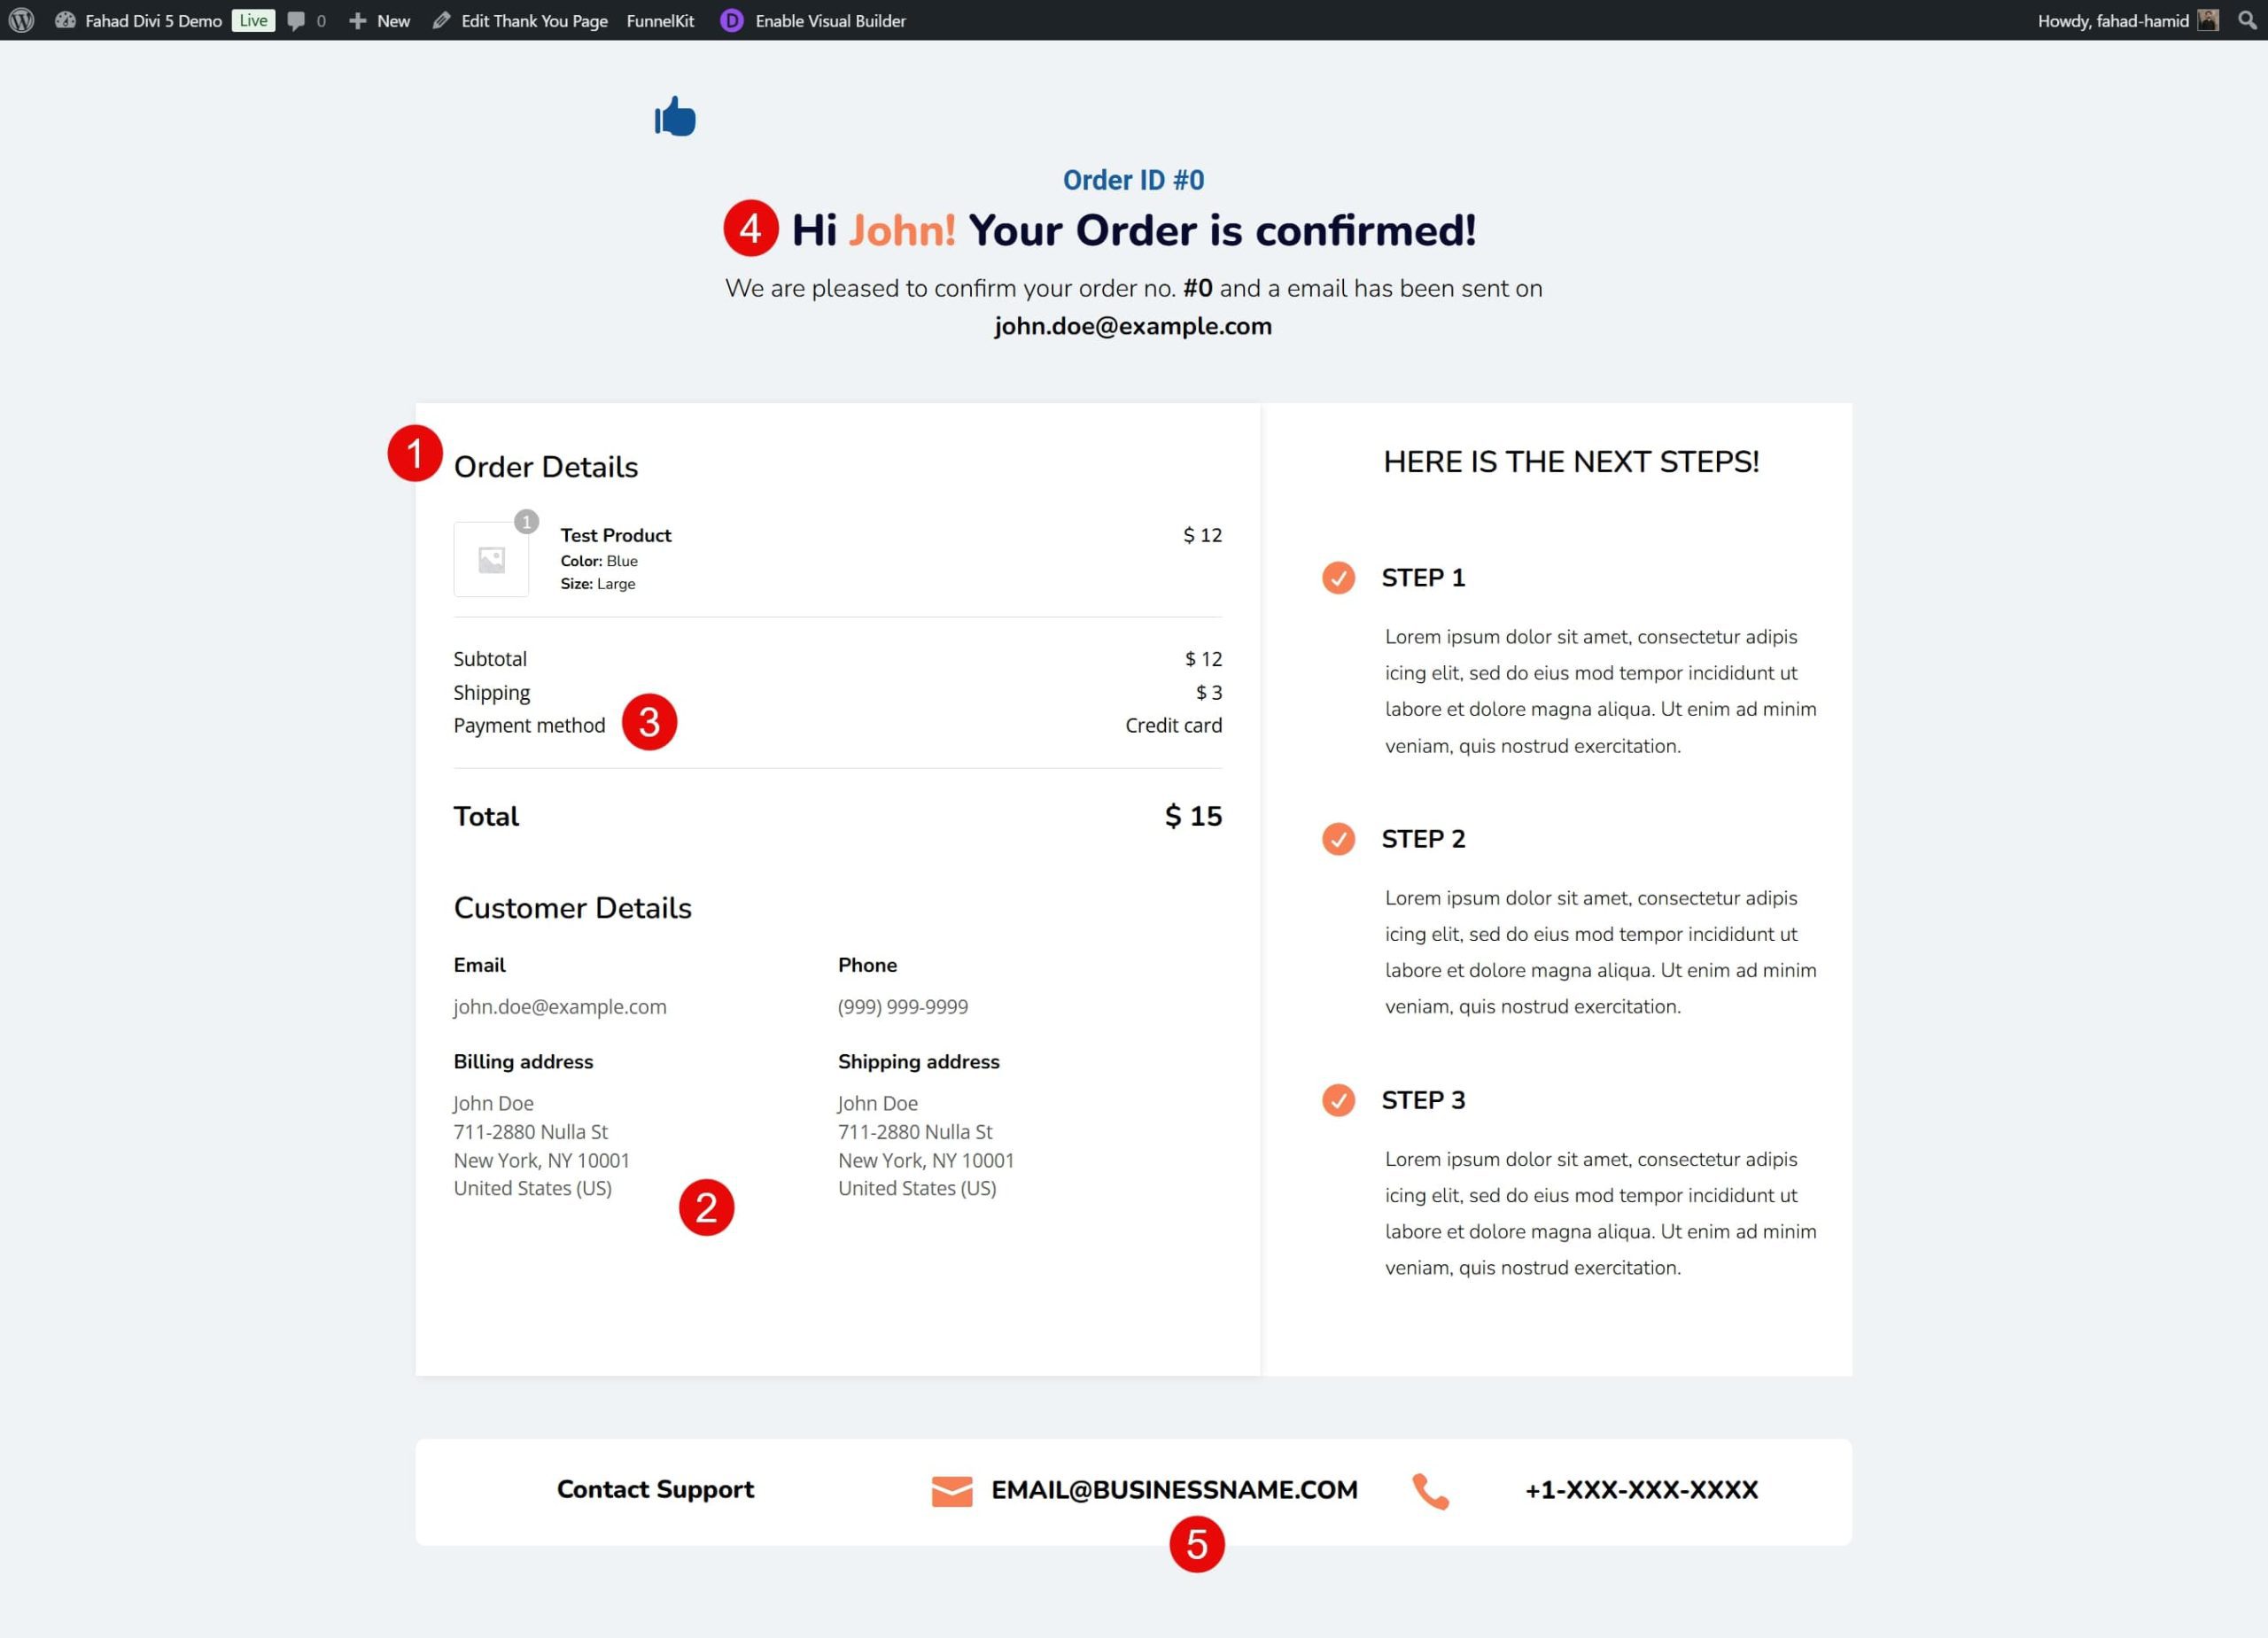
The Thank You Page confirms the purchase, encourages continued engagement, and promotes future sales.
Benefits of Thank You Page Customization?
Customizing the WooCommerce Thank You page offers a range of benefits that enhance the customer experience, increase engagement, and ultimately boost sales. Here’s why it’s worth customizing:
- Boosts Customer Engagement and Loyalty: A personalized Thank You page can make customers feel appreciated. Adding a warm, personalized message and relevant recommendations can make the experience memorable, increasing the likelihood of repeat purchases.
- Cross-Selling and Upselling Opportunities: The Thank You page is a perfect place to suggest related products or services that might interest the customer. Adding these recommendations post-purchase keeps them in the shopping mindset and increases the chances of additional sales.
- Improves Brand Experience and Trust: A tailored Thank You page with a consistent design and brand voice reinforces your store’s identity. Adding trust elements like customer support information, social media links, and company details can help build credibility and make customers feel secure about their purchases.
- Increases Social Sharing and Referrals: Including social media links or a referral program encourages customers to share their experiences, potentially bringing in new customers. This page is an excellent place to ask for reviews or prompt customers to follow your social profiles.
A customized Thank You page is an effective tool for nurturing customer relationships. However, you must understand the traditional methods of its customization to encourage further engagement.
Methods of Customizing a WooCommerce Thank You Page
Before presenting Divi as the easiest solution, let’s first review the common techniques that many store owners use to customize WooCommerce Thank You pages.
1. Use Site Editor and WooCommerce Blocks
With the launch of the WordPress block editor, customizing WooCommerce Thank You pages has become much easier, even for users with little to no coding experience. WooCommerce blocks let you add, arrange, and personalize different elements of your Thank You page directly within the editor. Using these blocks, you can include order details, customer messages, product information, images, and even custom content to enhance the post-purchase experience.
Move to Appearence > Editor from your WordPress dashboard. This will take you to the main menu of your default theme. Then, go to the templates and search for the ‘Order Confirmation’ page.
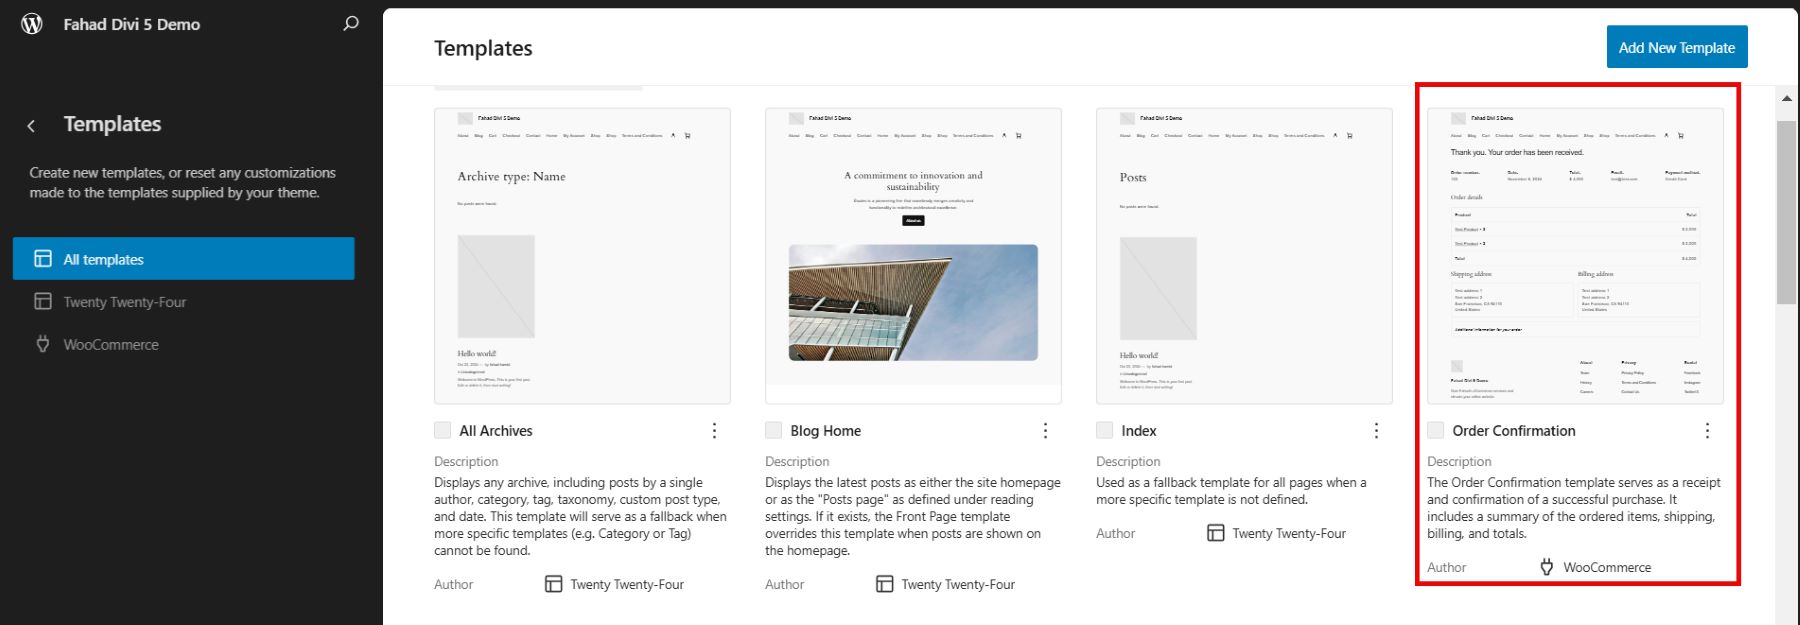
Clicking on it will bring you to the order confirmation page, where you can start the customization through the default editor. To showcase a grid of all modules, click the + icon.
![]()
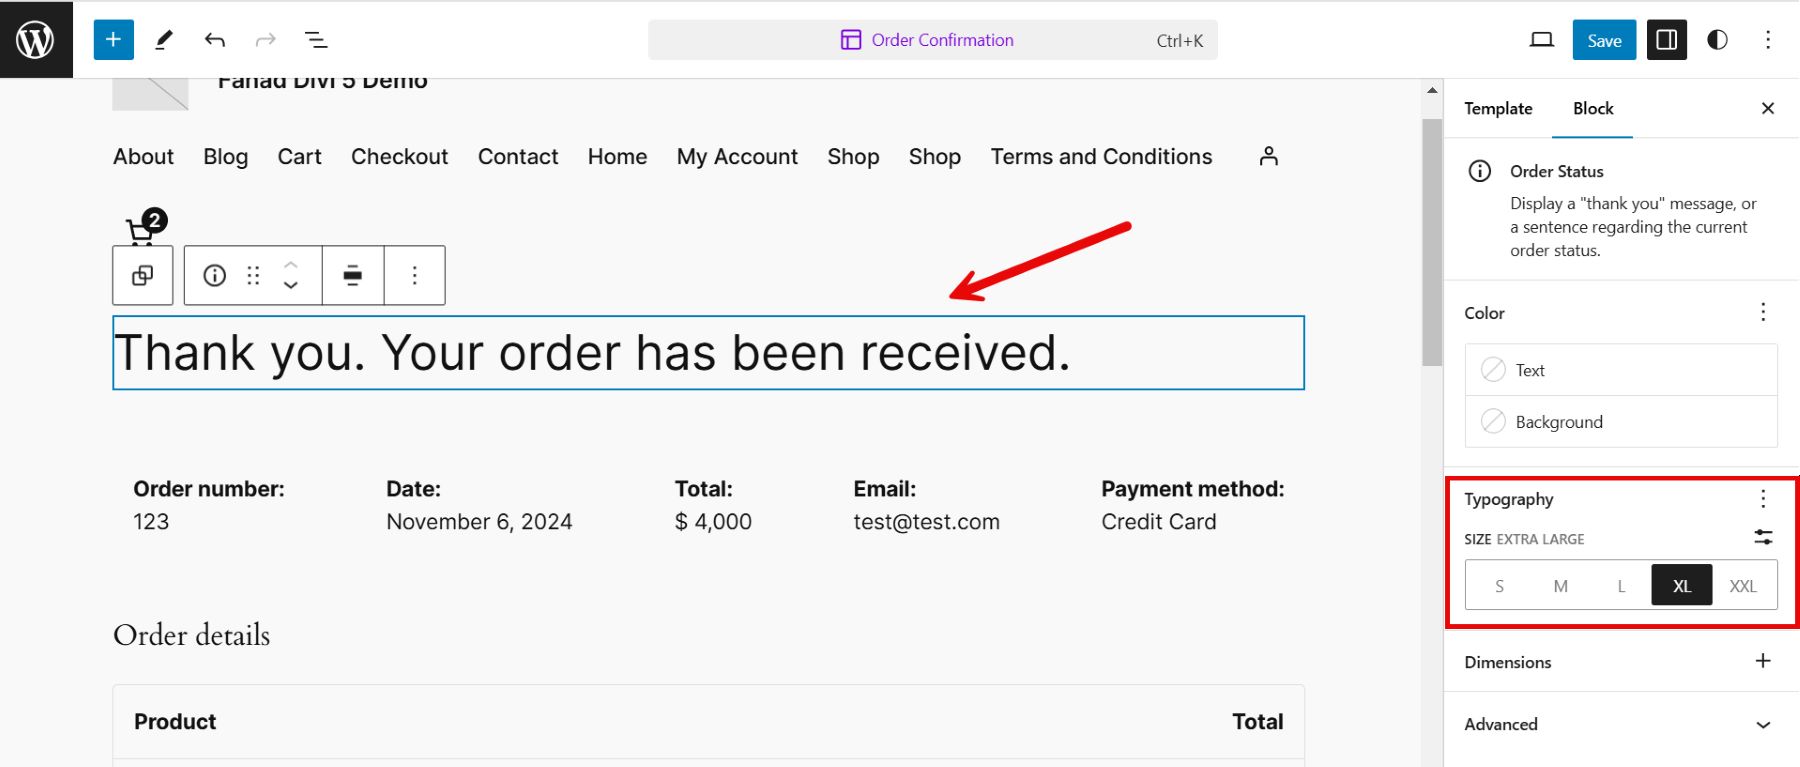
Considering our added template already had all the constituents of an order confirmation page, we decided to customize the added modules. Hence, we chose to enlarge the size of the thank you message.
To learn more, you can go through our guide on how to use the WordPress editor.
2. Use WooCommerce Builder like Divi
WooCommerce builders simplify creating a custom Thank You page for everyone. Divi is an established example that offers a rich library of modules tailored for WooCommerce. These modules let you personalize everything from the order confirmation details to customer messages and follow-up actions.
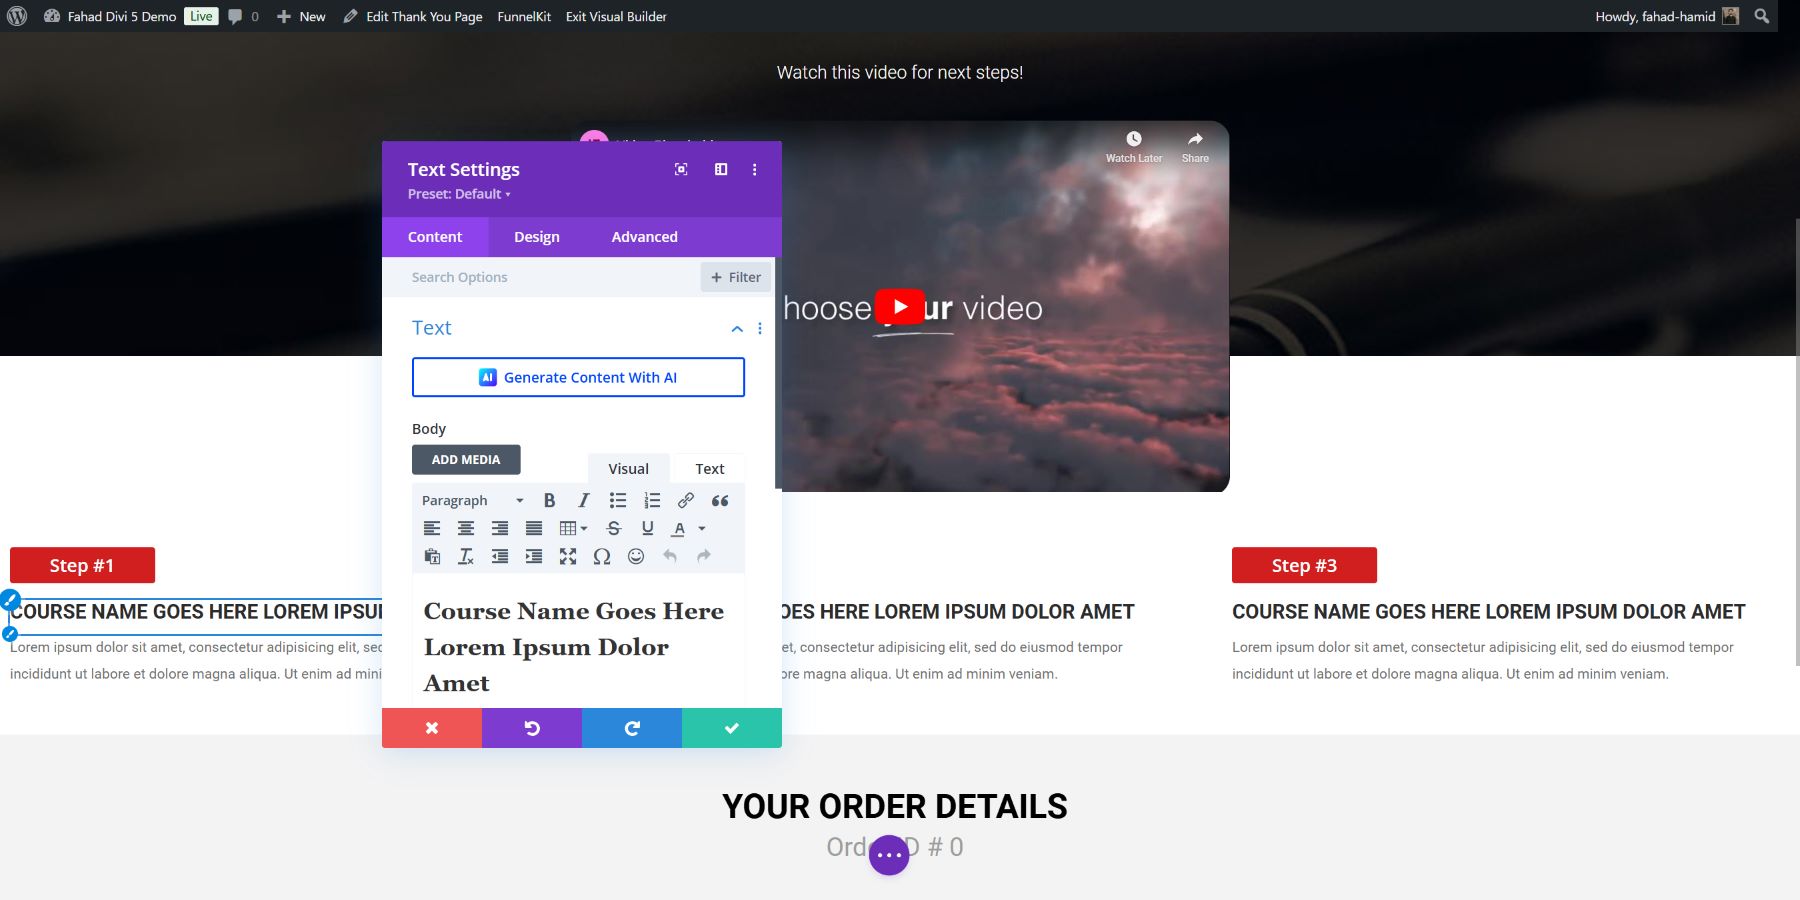
With Divi’s real-time visual builder, you have complete control over the design, allowing you to see and fine-tune changes. This flexibility lets you craft a unique and engaging Thank You page without advanced coding skills. Another impressive feature of Divi is its responsive design capabilities, which let you customize the appearance of your Thank You page for mobile, tablet, and desktop views individually.
3. Use a Third-Party Plugin
Third-party plugins can provide additional customization options beyond the default WooCommerce setup. Here are three popular options:
- FunnelKit: FunnelKit integrates with multiple builders, including Divi, and offers a wide selection of Thank You page templates, making it easy to design pages that engage customers. FunnelKit offers more Divi templates than other plugins, providing flexibility and variety.
- CartFlows: This is a great choice if you use Elementor as your page builder and want advanced funnel-building options.
- WPFunnels: Though it has fewer Divi options compared to FunnelKit, it still provides good customization features that can enhance the Thank You page experience.
Each method offers unique advantages, so you can choose the one that best fits your tools and customization needs. However, Divi sets the benchmark when it comes to customization.
Why is Divi the best choice for customizing the WooCommerce Thank You Page?
Divi is an outstanding choice for customizing WooCommerce thank you pages, offering a unique blend of features, flexibility, and a user-friendly interface. Here are five key reasons why Divi excels at creating personalized thank you pages for WooCommerce:
1. Comprehensive WooCommerce Modules
Divi offers a powerful set of WooCommerce modules that allow you to control the design of your full thank you page, allowing for a personalized and engaging post-purchase experience. These modules are tailored specifically for WooCommerce and include checkout billing, product upsell, and checkout payment.
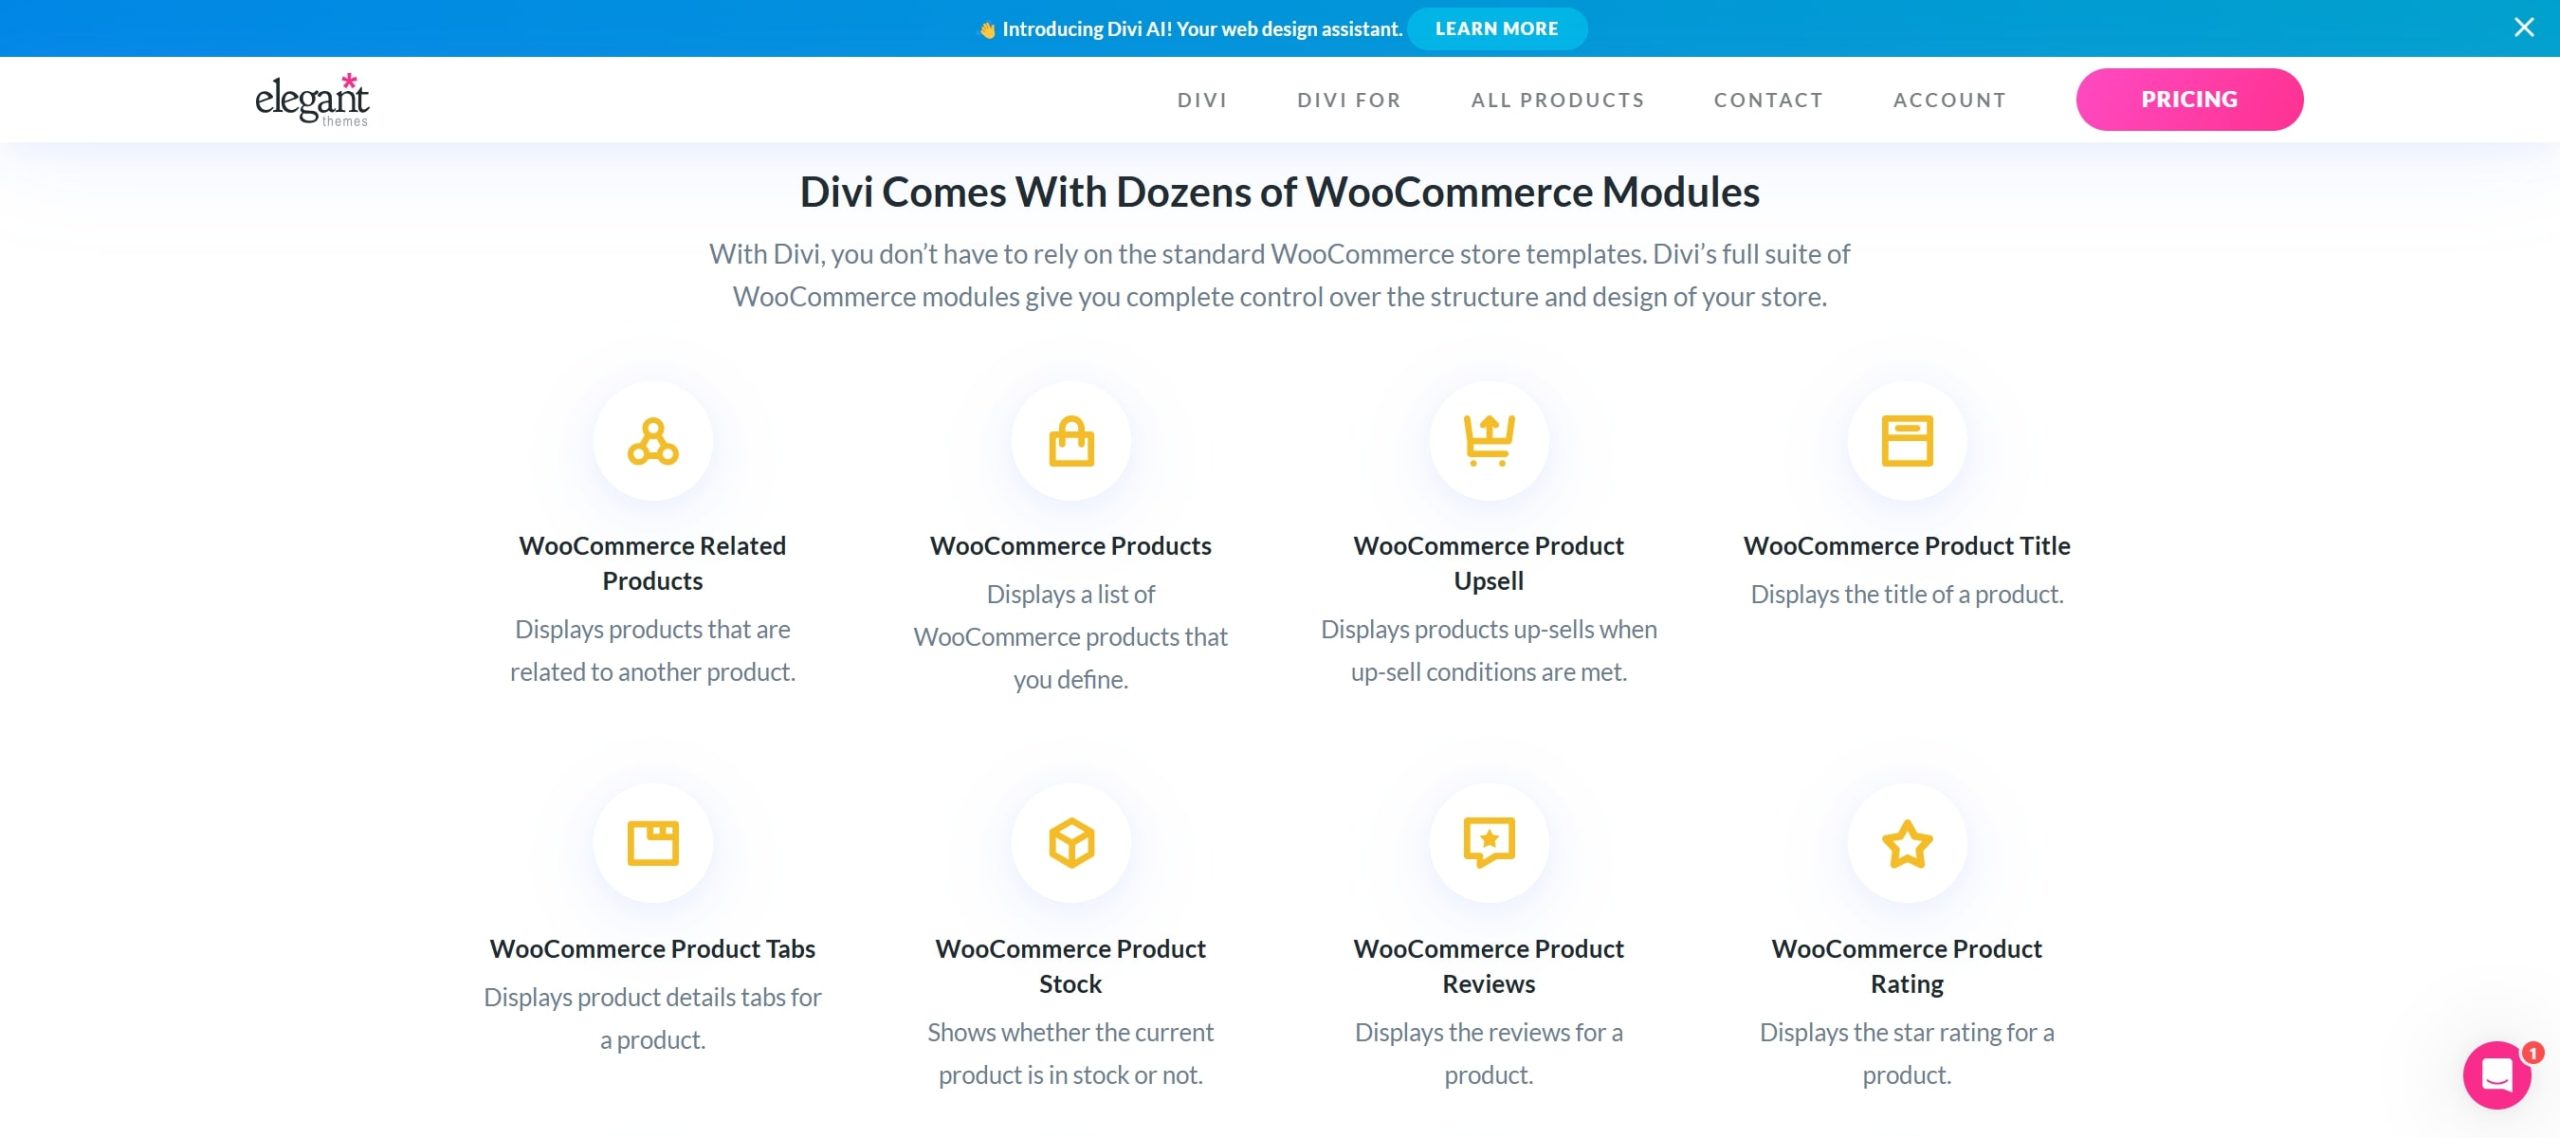
Divi offers dozens of dynamic WooCommerce modules you can integrate throughout your online store. These modules let you spotlight essential product features, incorporate compelling calls to action, and add engaging interactive elements such as hover effects and dynamic filters.
2. Make Template Changes With Divi Builder
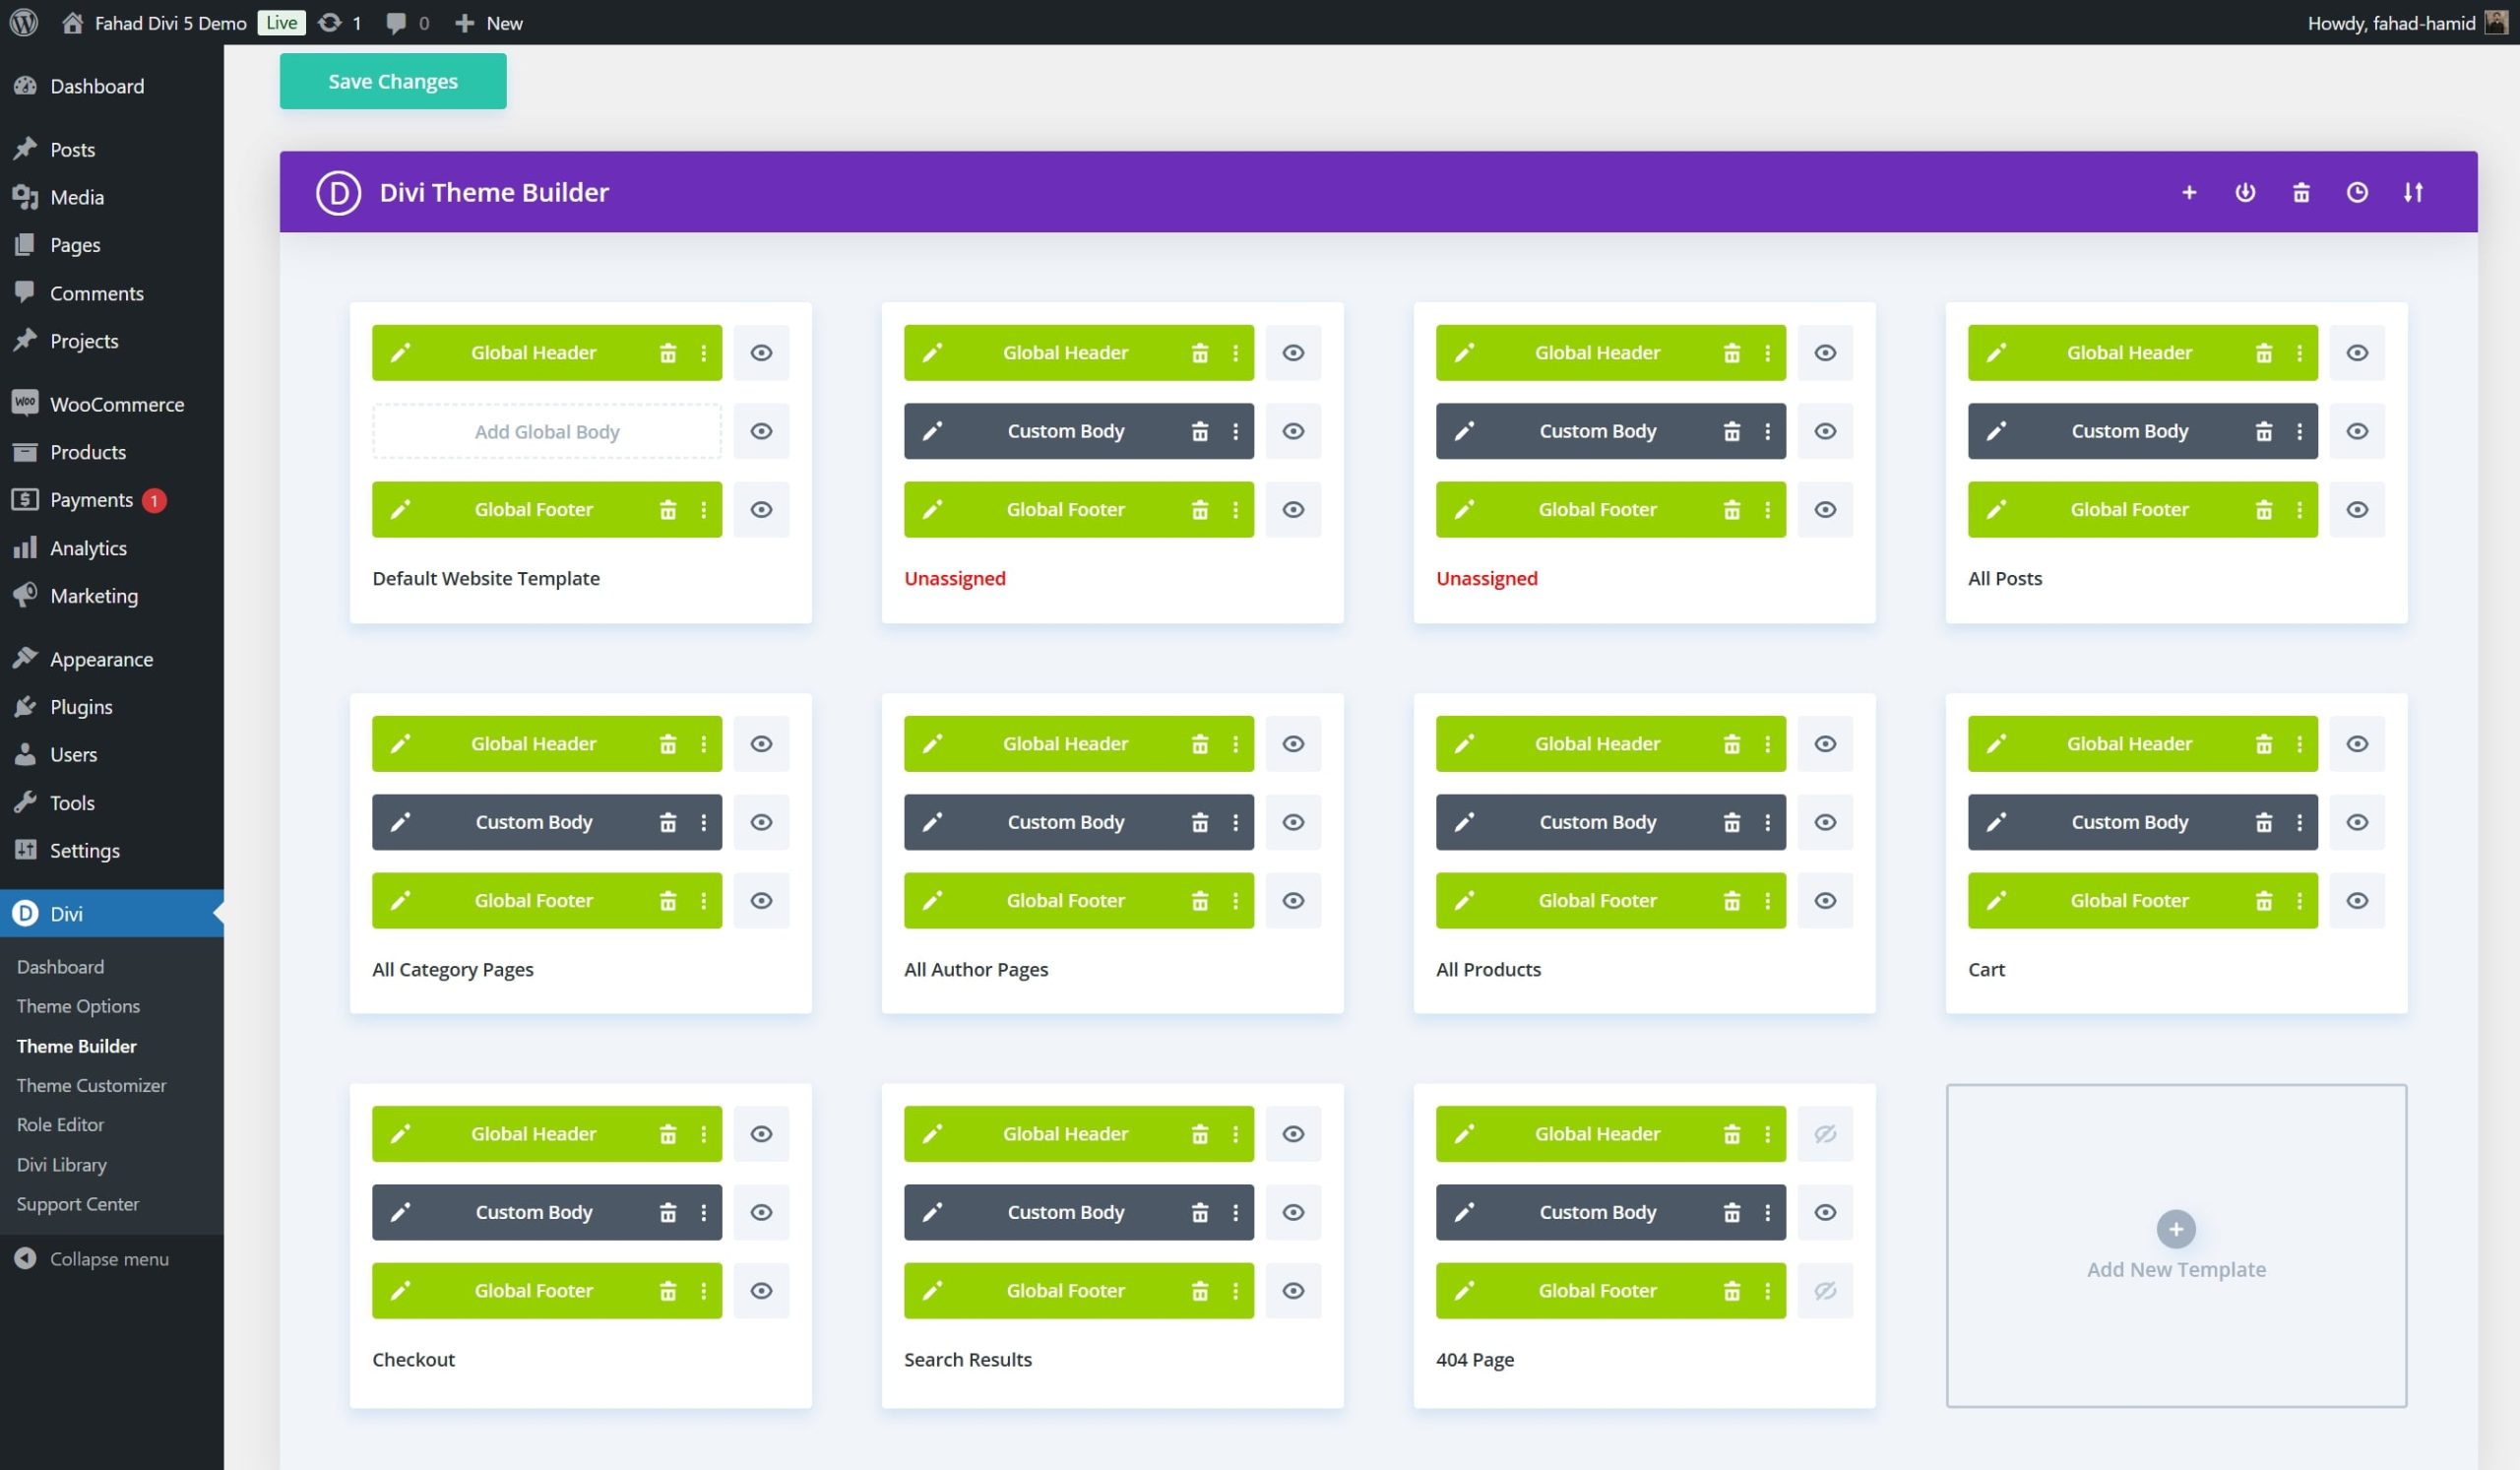
Divi’s Theme Builder goes beyond traditional page builders by allowing you to create custom templates that can be applied site-wide or tailored to specific pages, categories, and individual products. This capability is especially valuable for WooCommerce, enabling a consistent look and feel across your thank you pages.
With the Theme Builder, you can add custom headers, footers, and sidebars to WooCommerce pages. You can also use global modules to update multiple pages instantly. This is ideal for applying cohesive branding elements such as color schemes, fonts, and logos.
3. Built-in Marketing Tools
Divi provides built-in marketing tools to help WooCommerce store owners boost customer engagement and increase conversions. A standout feature is Divi Leads, which lets you conduct split tests (A/B tests) on different design elements and modules. You can test layouts, calls to action, and product displays to see which options drive the most engagement.
Beyond Divi Leads, tools like Bloom and Monarch support your broader marketing strategy. Bloom is an email opt-in plugin that allows you to create targeted pop-ups, fly-ins, and inline forms to capture leads and expand your email list. Monarch is Divi’s social sharing plugin that adds social media buttons to your store pages. This makes it easy for customers to share products on platforms like Facebook, Instagram, and Twitter.
How to Customize Your WooCommerce Thank You Page with Divi
We’re dedicated to creating and customizing a fully-tailored WooCommerce Thank You page. If you’re new to WooCommerce and finding it challenging to grasp its features, check out our beginner’s guide on setting up an online store to get started.
1. Install and Activate Divi
Before diving into the tutorial, ensure Divi is installed and activated on your WooCommerce store.
You can get Divi from Elegant Themes, available with an annual license for $89 or a lifetime license for $249. Once you’ve made your purchase, download the theme and install it on your WordPress site by following these steps:
- Navigate to Appearance > Themes in your WordPress dashboard.
- Click Add New and select Upload Theme.
- Choose the Divi.zip file you downloaded earlier and click Install Now.
- Click Activate and make Divi your active theme.
Watch the video below for more details.
After completing the setup, you’re ready to start building! For more guidance before diving in, check out our Divi Builder tutorial.
Divi’s Generated Thank You Page
With Divi’s extensive library, you can choose a WooCommerce layout, complete the checkout process, and see the Thank You page on your screen.
Divi creates a dynamic WooCommerce Thank You page, which appears right after you place an order.
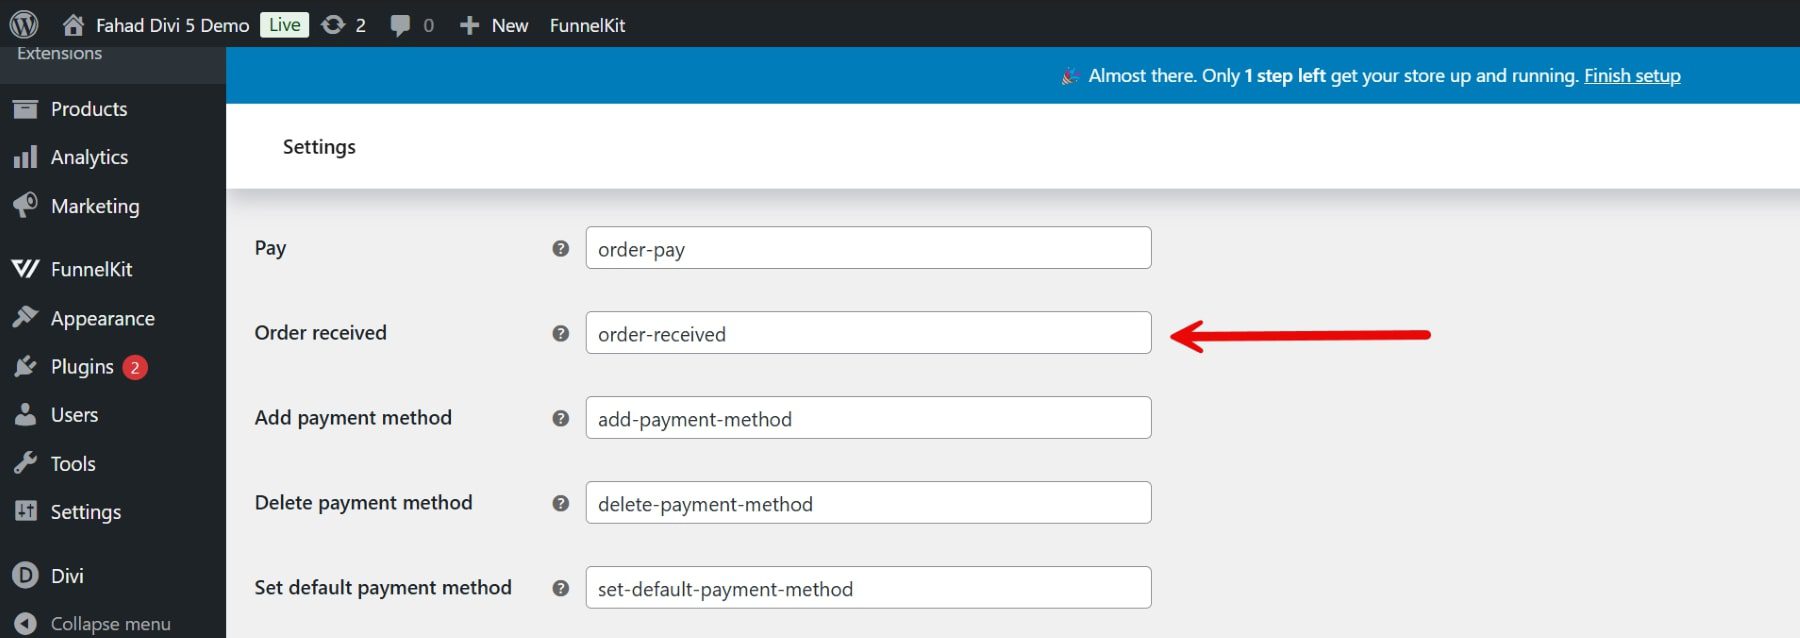
WooCommerce relies on certain URL endpoints for checkout-related actions. Move to WooCommerce > Settings and click on the Advanced Tab. Here, you will see the checkout endpoint for ‘Order Received.’

This confirms that the checkout process will have the Thank you page as the endpoint for the order submission.
While Divi automatically generates a Thank You page after a customer completes an order, customizing the page further can elevate the post-purchase experience. This is where a third-party plugin like FunnelKit comes in handy,
2. Import Pre-Made Layout from FunnelKit
FunnelKit offers a seamless way to import custom Thank You page designs into Divi for those who want more advanced design options or specific layouts. It provides a range of professionally designed thank you page templates for Divi optimized for post-purchase engagement.

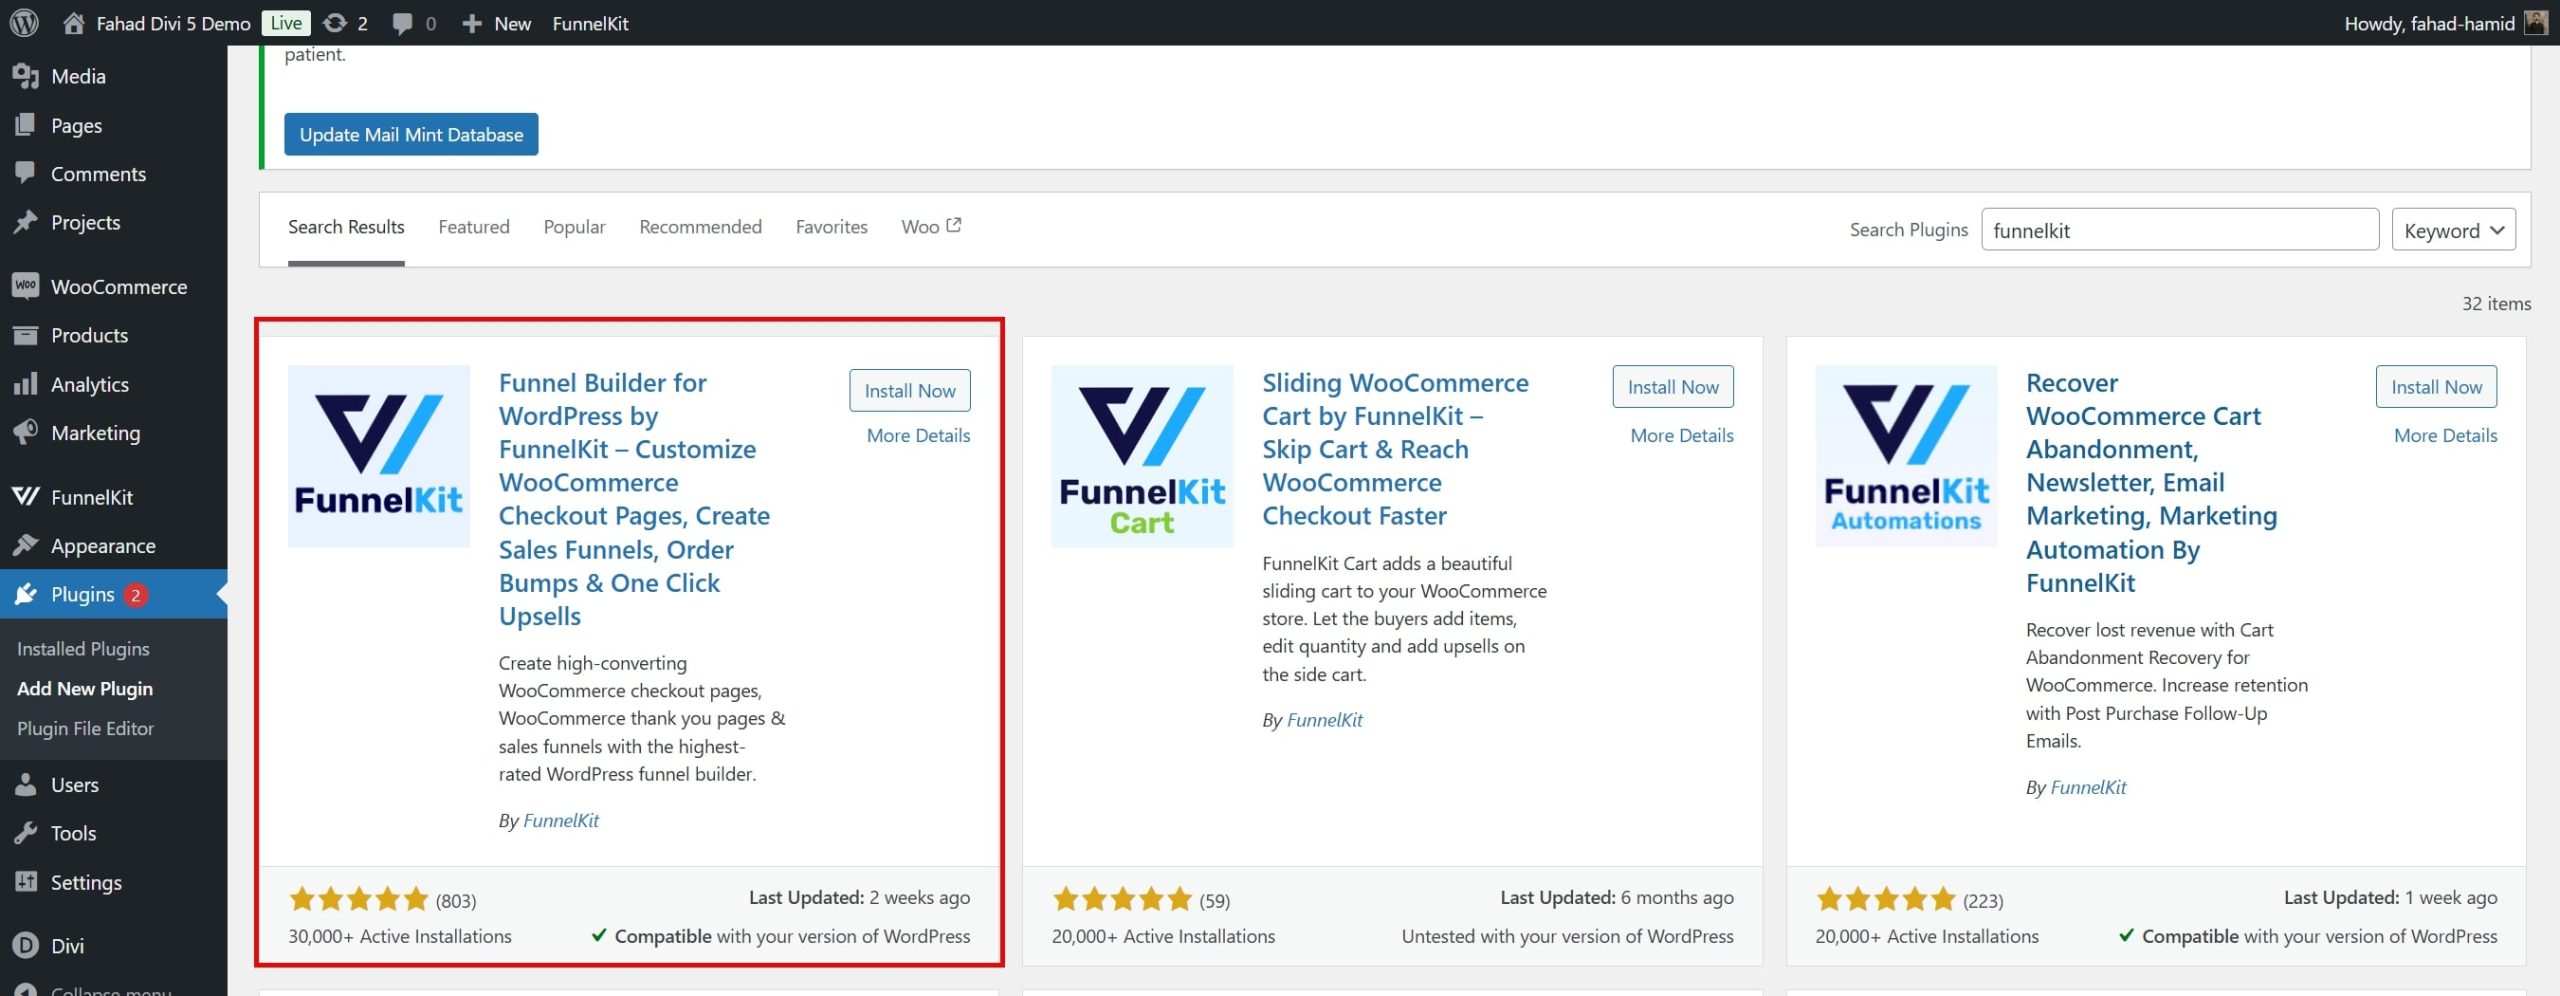
The initial step is to install and activate this plugin. For more information, refer to our detailed guide on installing a WordPress plugin.
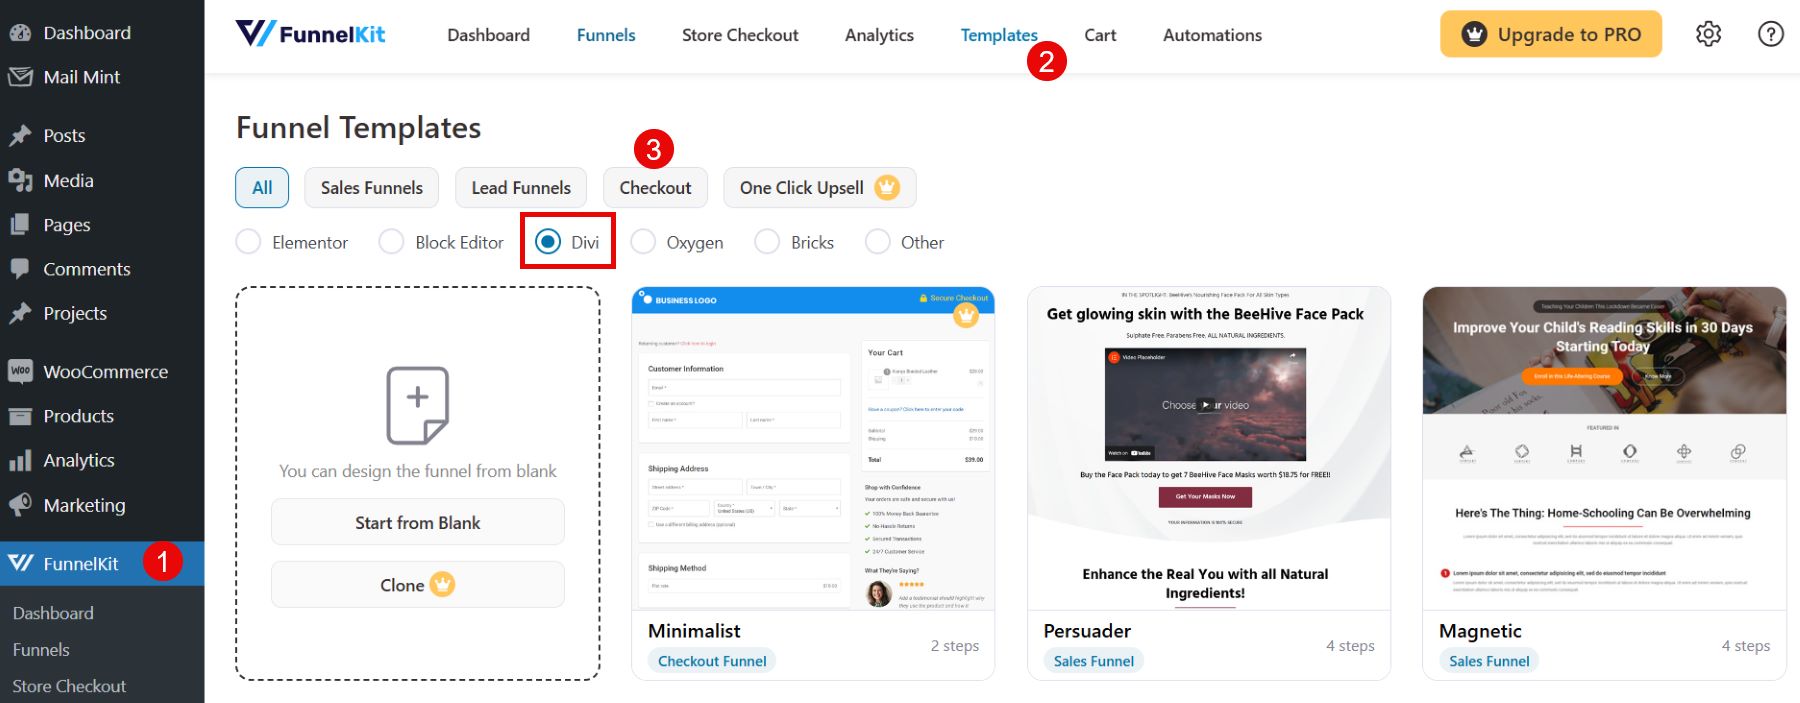
Once activated, navigate to FunnelKit > Templates and select the ‘Checkout’ button. Choose a thank you page layout from the available Divi templates that aligns with your branding and provides sections you want to customize.
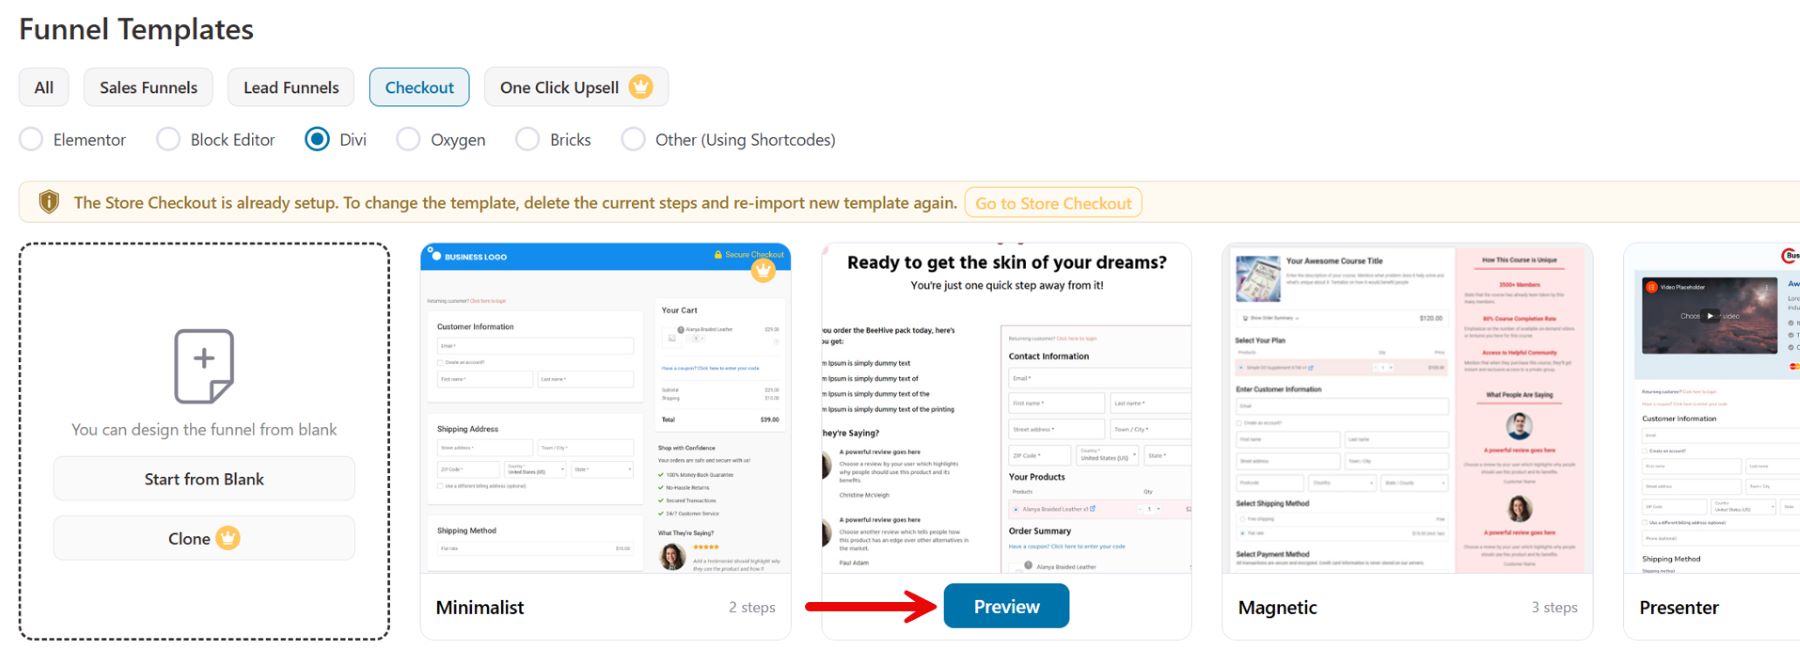
To view a template in more detail, move your cursor toward it and click the ‘Preview’ button when it shows up.
By default, FunnelKit displays a preview of the checkout page. To view the thank you page design, choose ‘Thank You Page’ from the menu on the left.
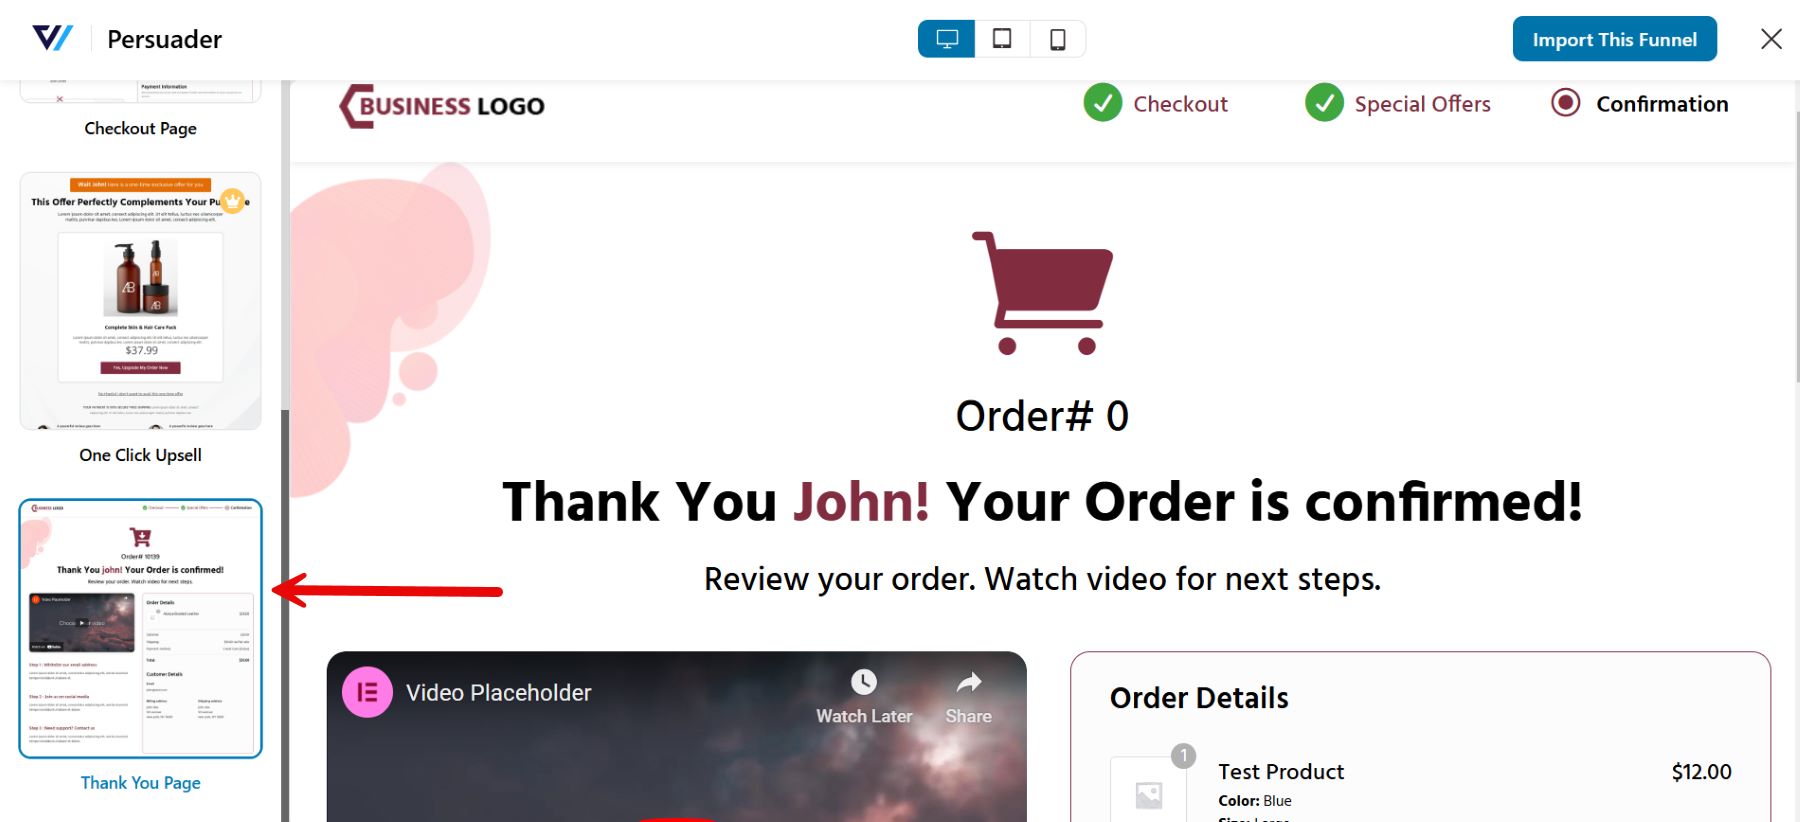
When you decide on a template you’d like to use, click ‘Import This Funnel.’

Next, enter a name for your custom thank you page. This is for your reference, so choose something to help you easily recognize the page in your WordPress dashboard.
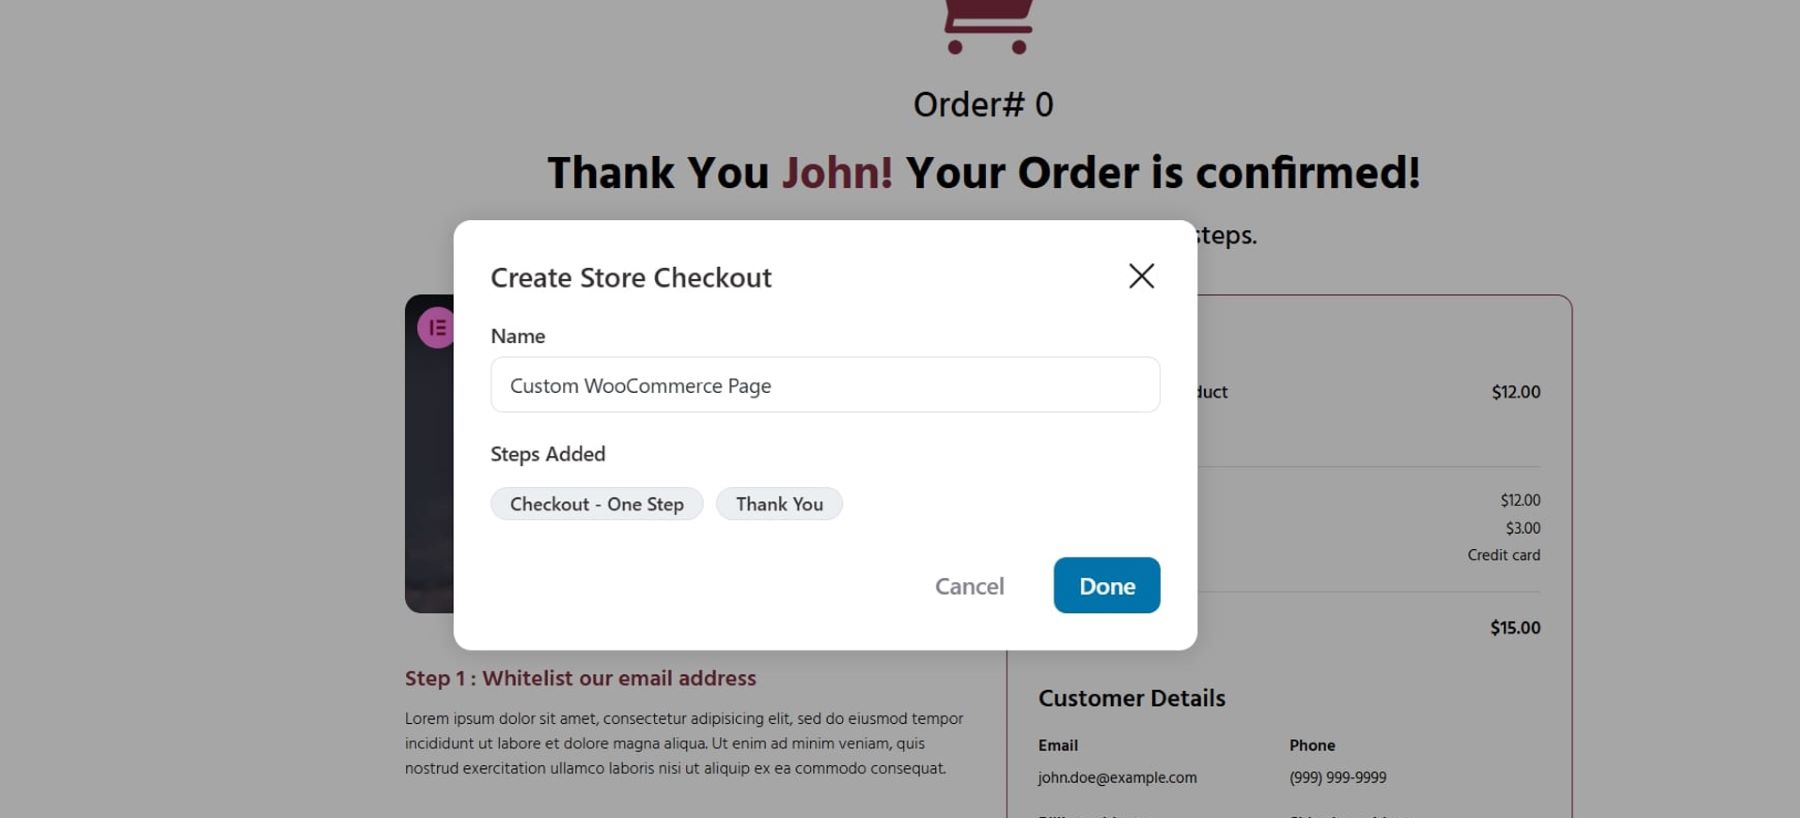
Because you’re using FunnelKit’s free version, the template has a thank you page and a custom WooCommerce checkout page, which must be configured separately.

The Store Checkout is initially disabled. By enabling it, you can replace your current checkout page with the imported Divi template from FunnelKit.
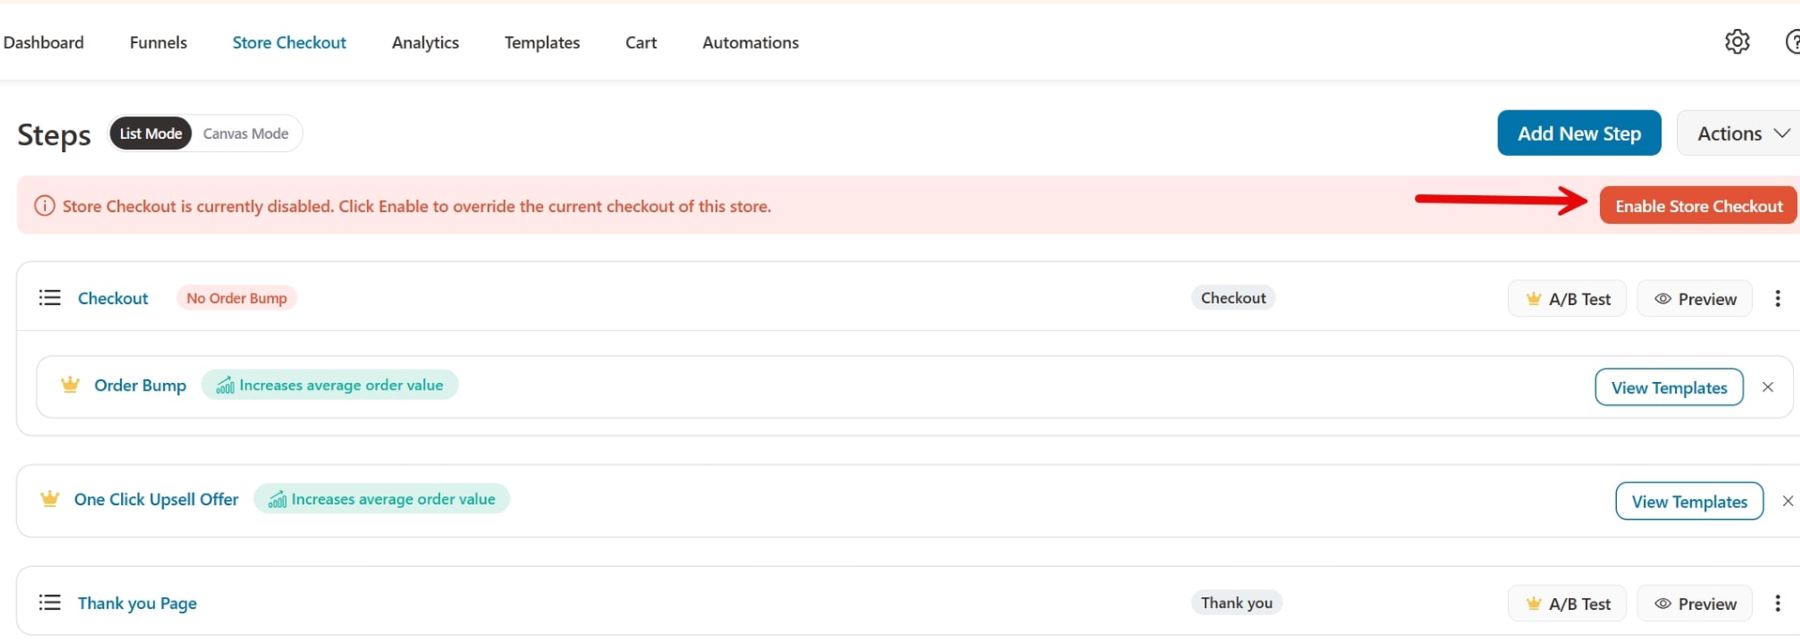
Redirect Confirmation
Before we start the Thank You page customization process, it is important to verify if the imported template is redirected to your original Divi site. For that, we navigate to Additional Settings > Edit.

The details will show that the Thank You page has redirected automatically, with its page URL and slug targeting the original Divi site.
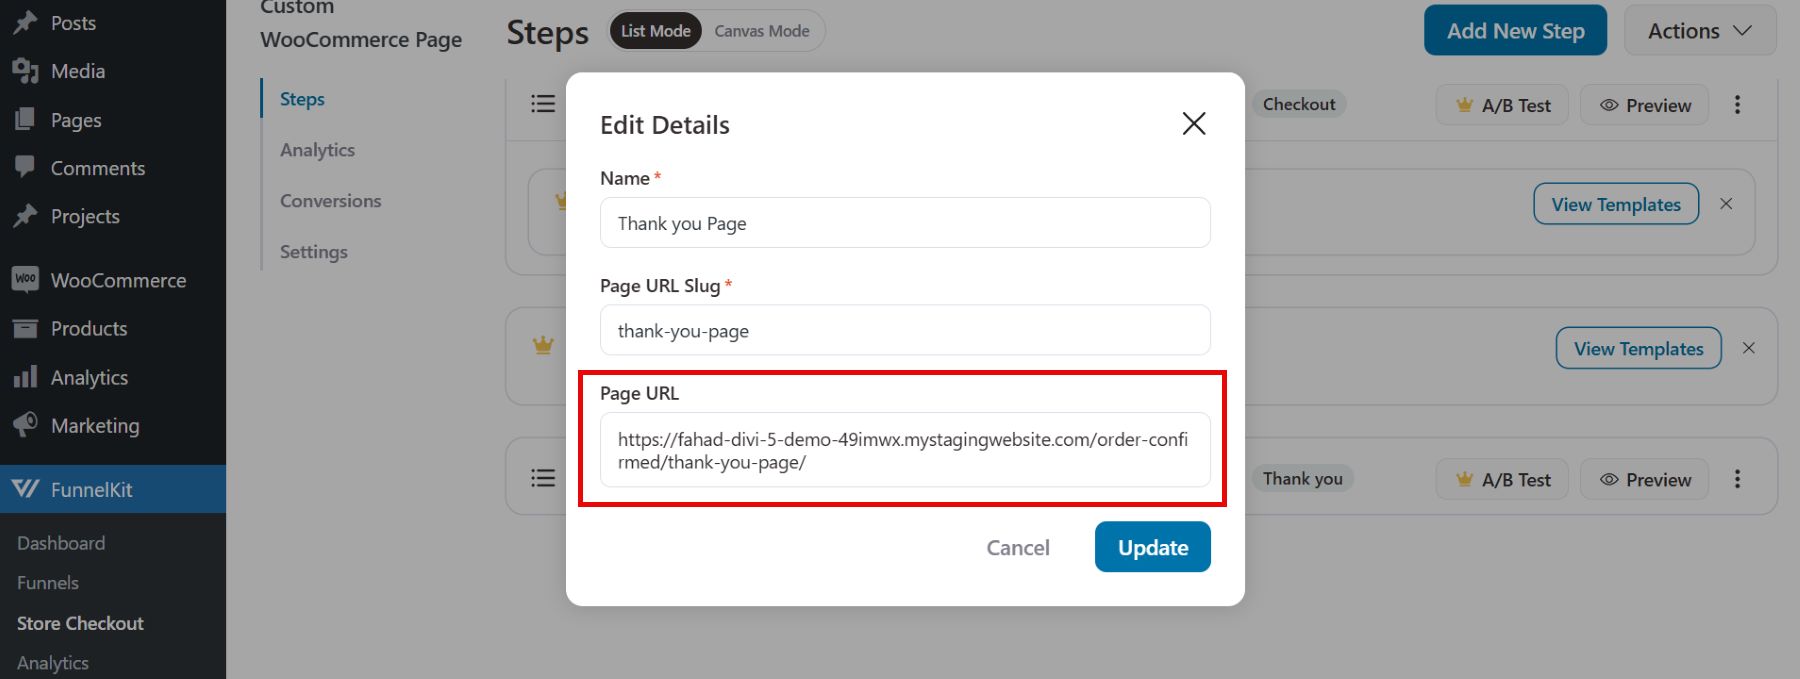
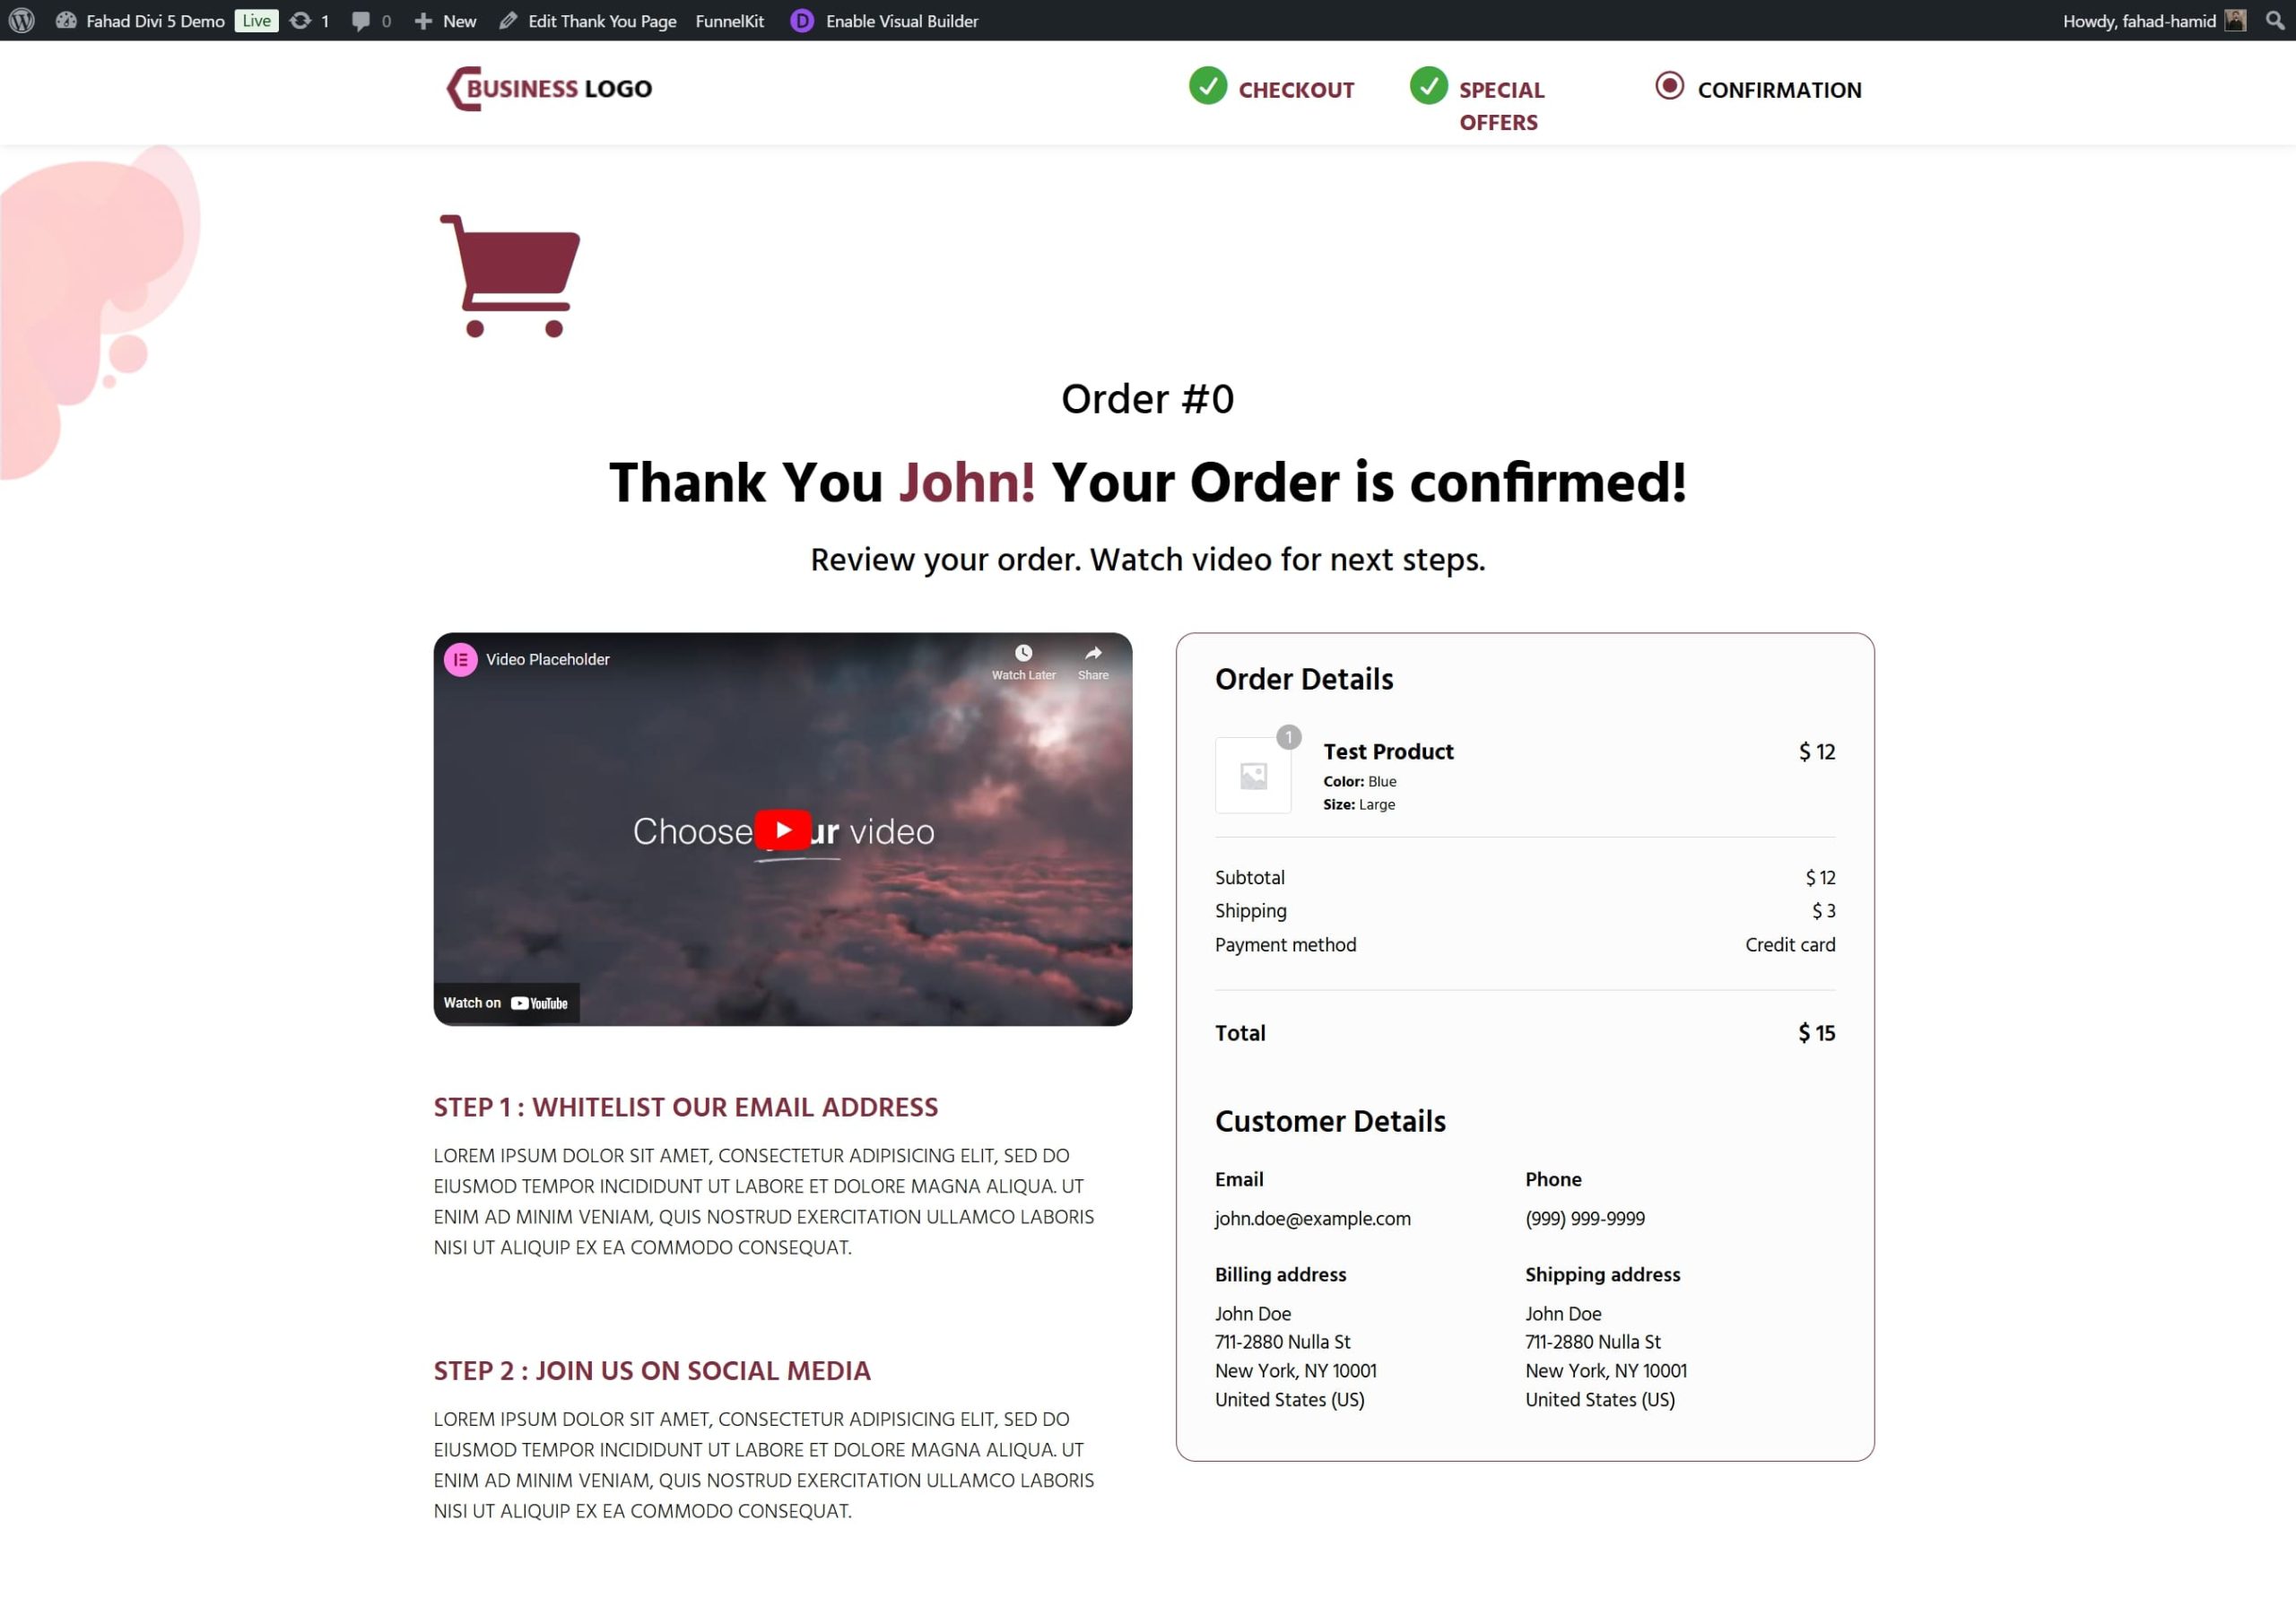
This will ensure that the customers see this thank you page after completing a purchase. Now, without wasting more time, let’s move onto the Thank You page by clicking on preview from FunnelKit’s Store Checkout.

Before moving into the Divi visual builder, you would be able to see the integrated thank you page from FunnelKit.
2. Create a Thank You Page Template
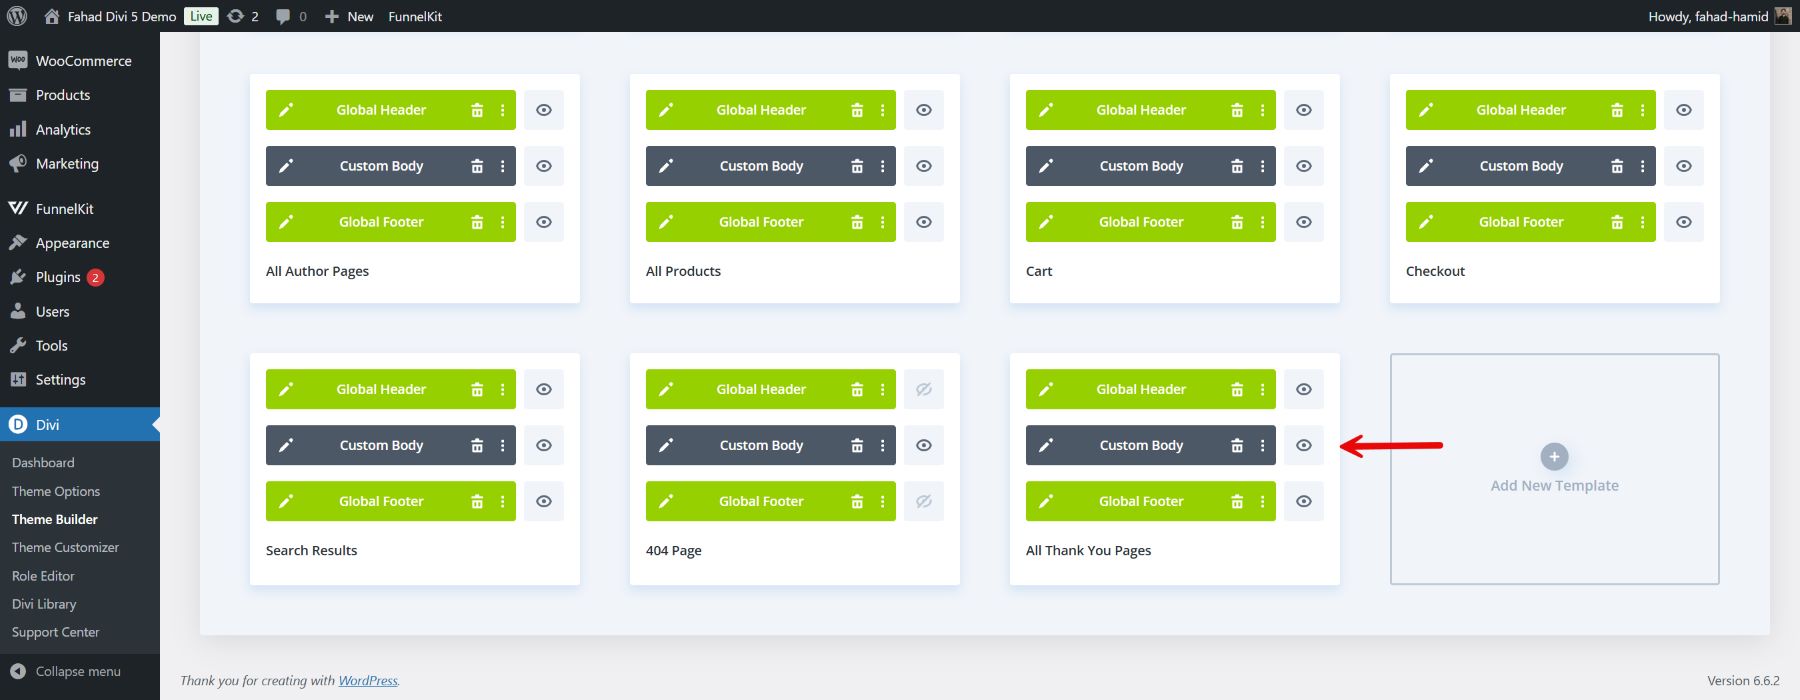
Once you have imported the template, you can move to the Divi Theme Builder and create a custom template for your WooCommerce thank you page. Start by going to the Theme Builder in the Divi menu and setting up a new template specifically for the Thank You page.
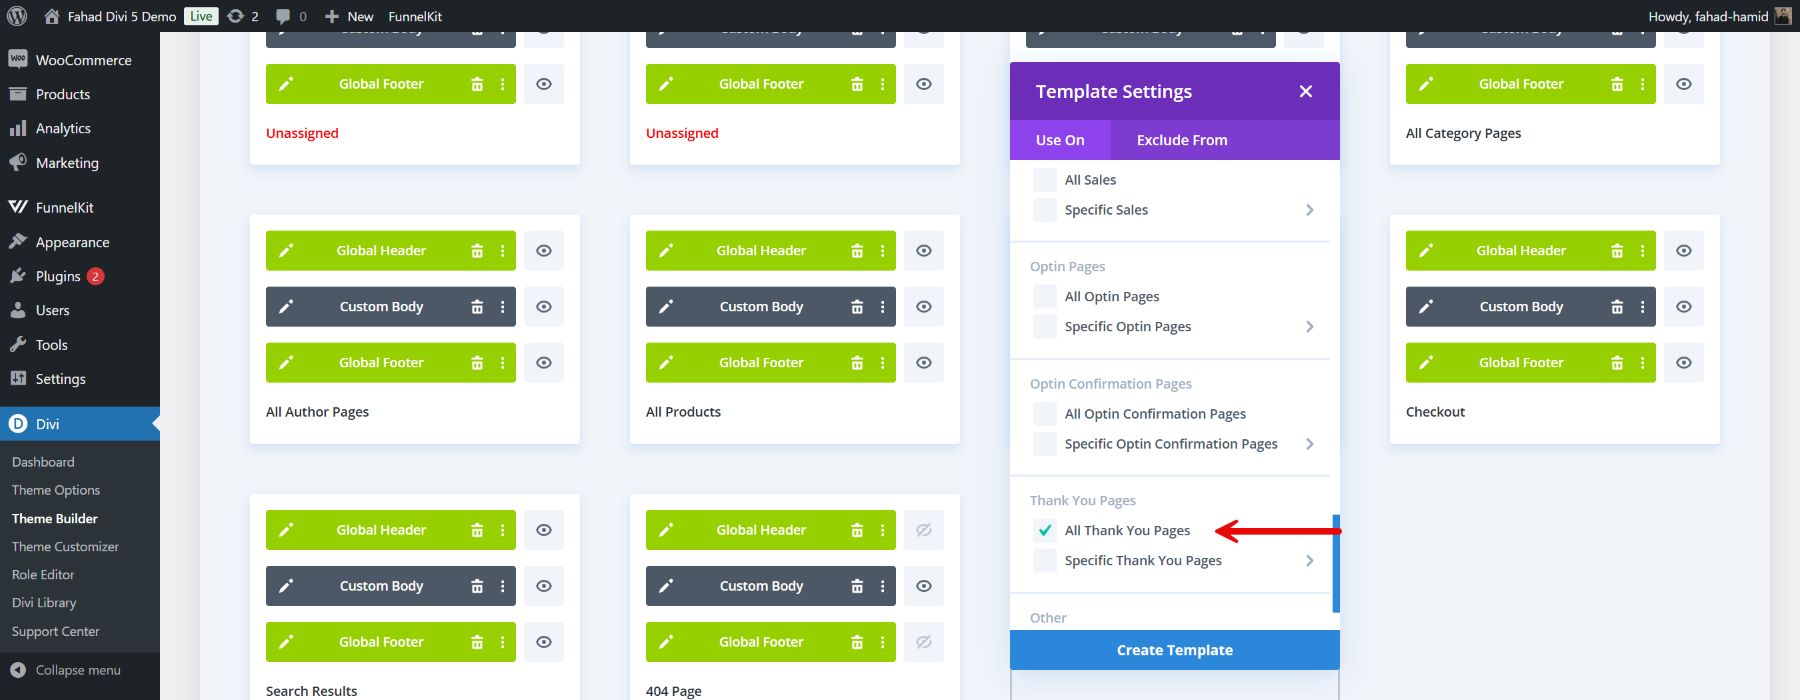
After creating the template, options for adding a custom header, body, and footer will appear. Selecting the custom body will launch the Divi Builder interface.
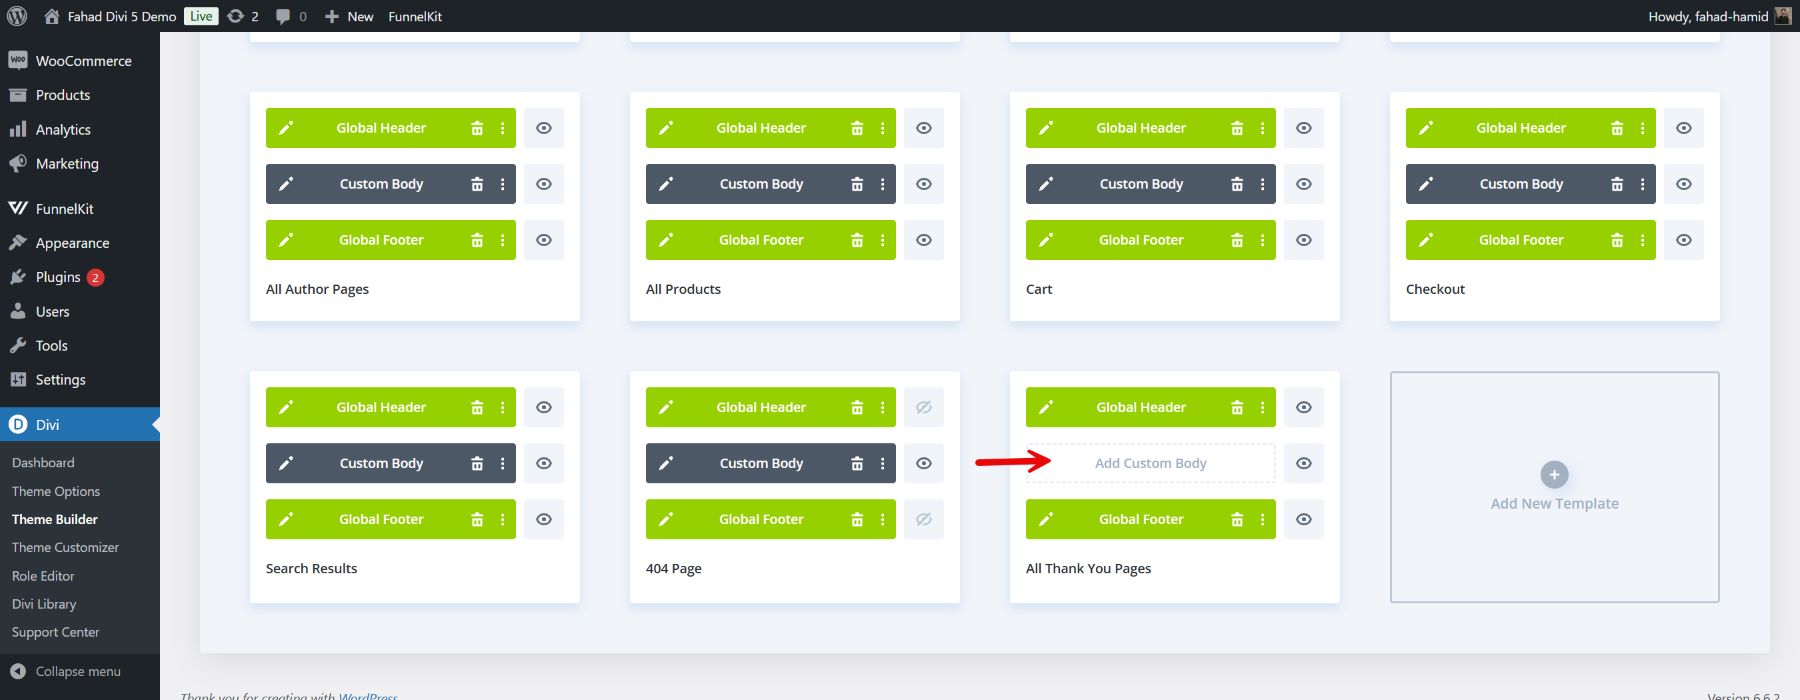
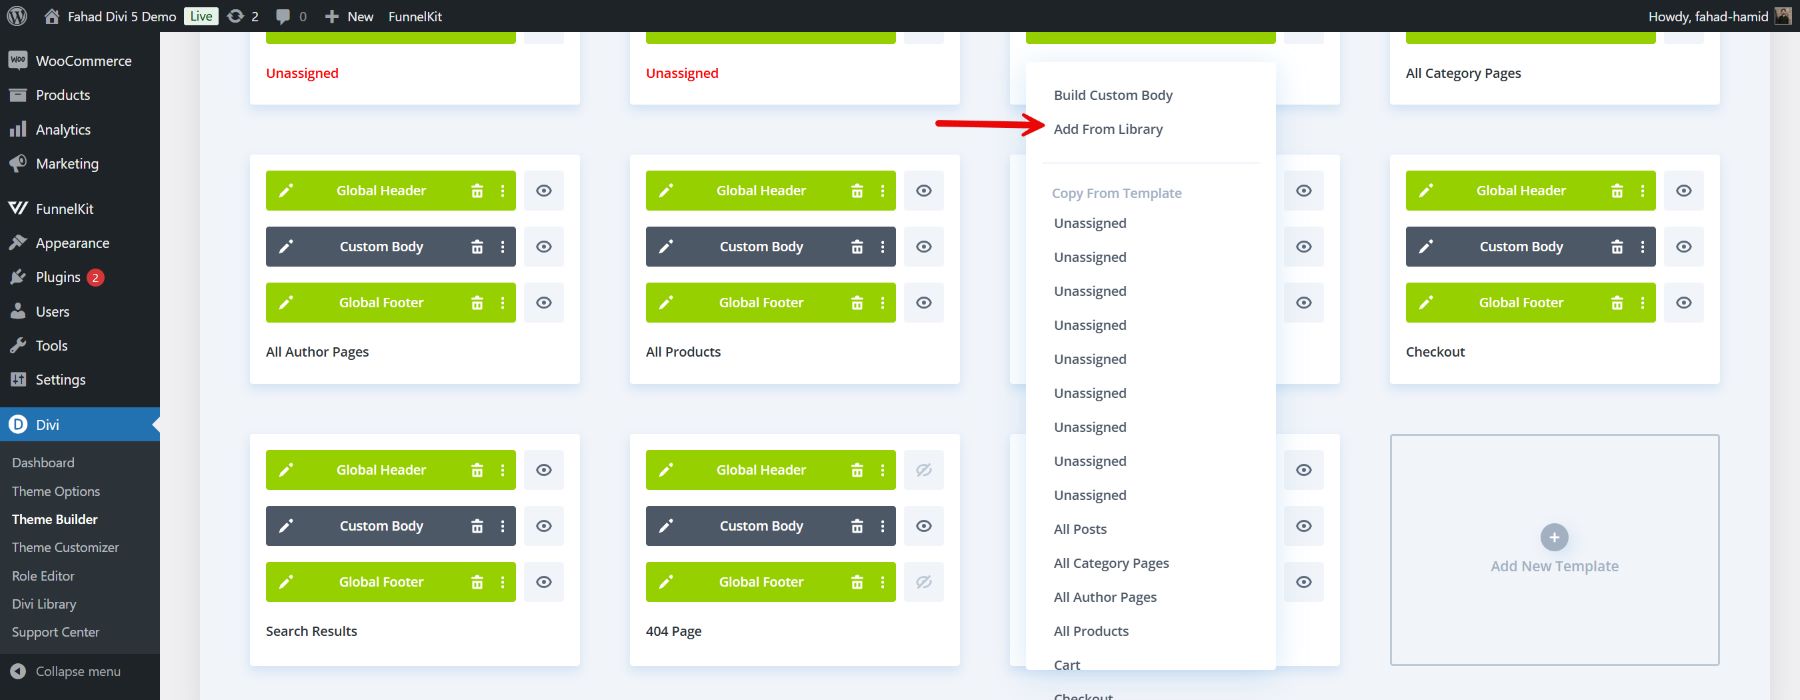
Once you click on the option to add the custom body, you will have the option to add it from the library.
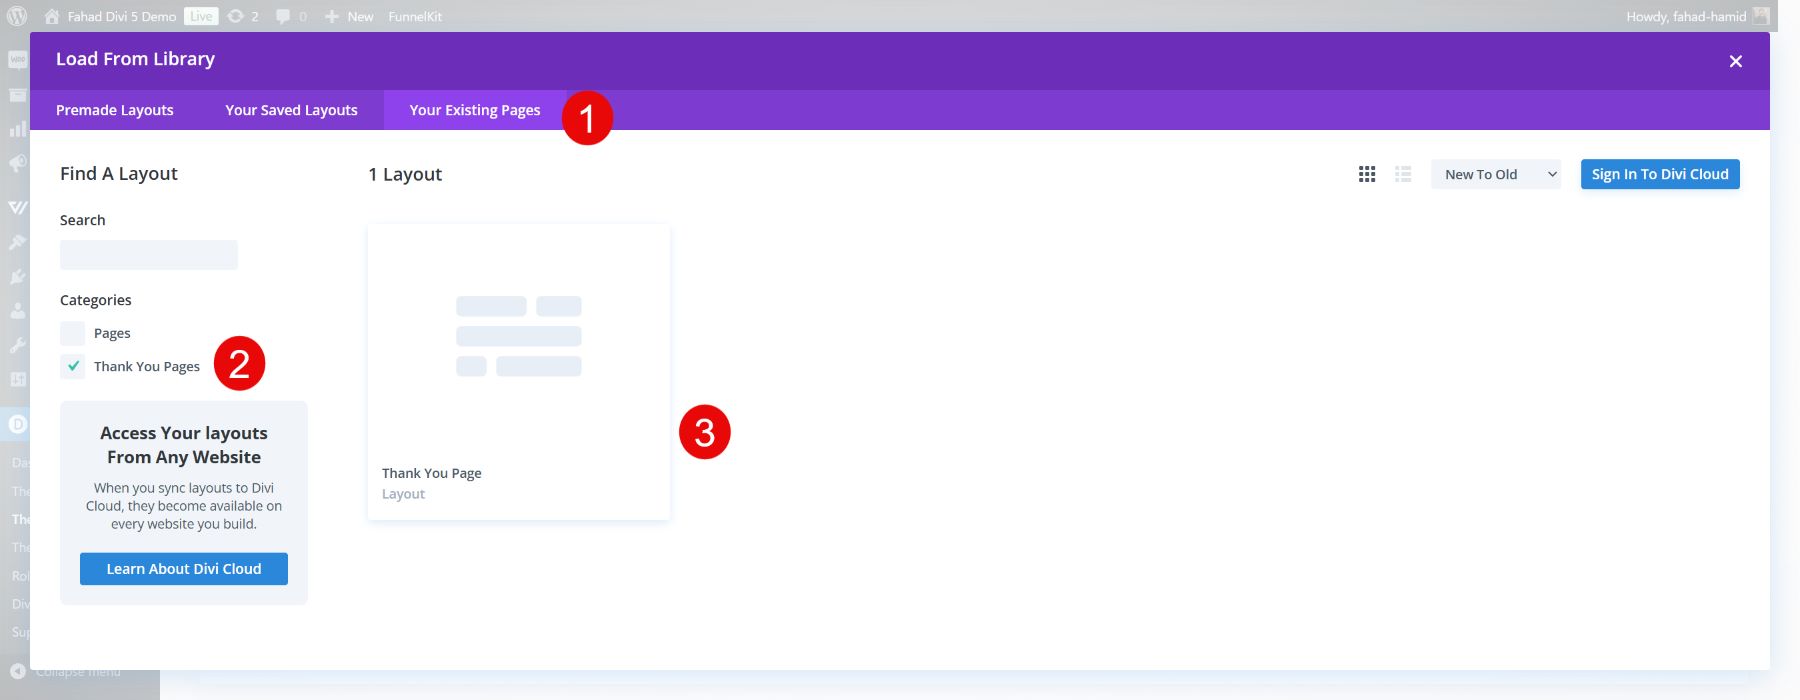
By moving to the library, make sure that you move to the tab of your existing pages. From there, you will find your integrated thank you page.
After importing the layout, it will appear in the body of your created thank you page template.
3. Customize with Divi’s WooCommerce Modules
Divi’s robust module options make it easy to add specific WooCommerce elements that add value and strengthen your brand’s connection with customers. Considering the template has many of the important things added to the thank you page, here is how you can use the WooCommerce modules to customize it further.
Add Upsell Section to Attract More Sales
A powerful way to maximize your thank you page is to use Divi’s Woo Product Upsell Module. This module allows you to showcase additional products that customers might be interested in right after they complete a purchase.
Firstly, you need to link those additional products to the product you ordered. Make sure to link those additional products on the back end.

NOTE: The Divi Woo Product Upsell module will display no content if you don’t add any additional products on the back end.
Once you add the Upsell module, configure the settings. Then, choose which products you want to display as upsells. Customize the number of products, columns, and display settings to align with your design.
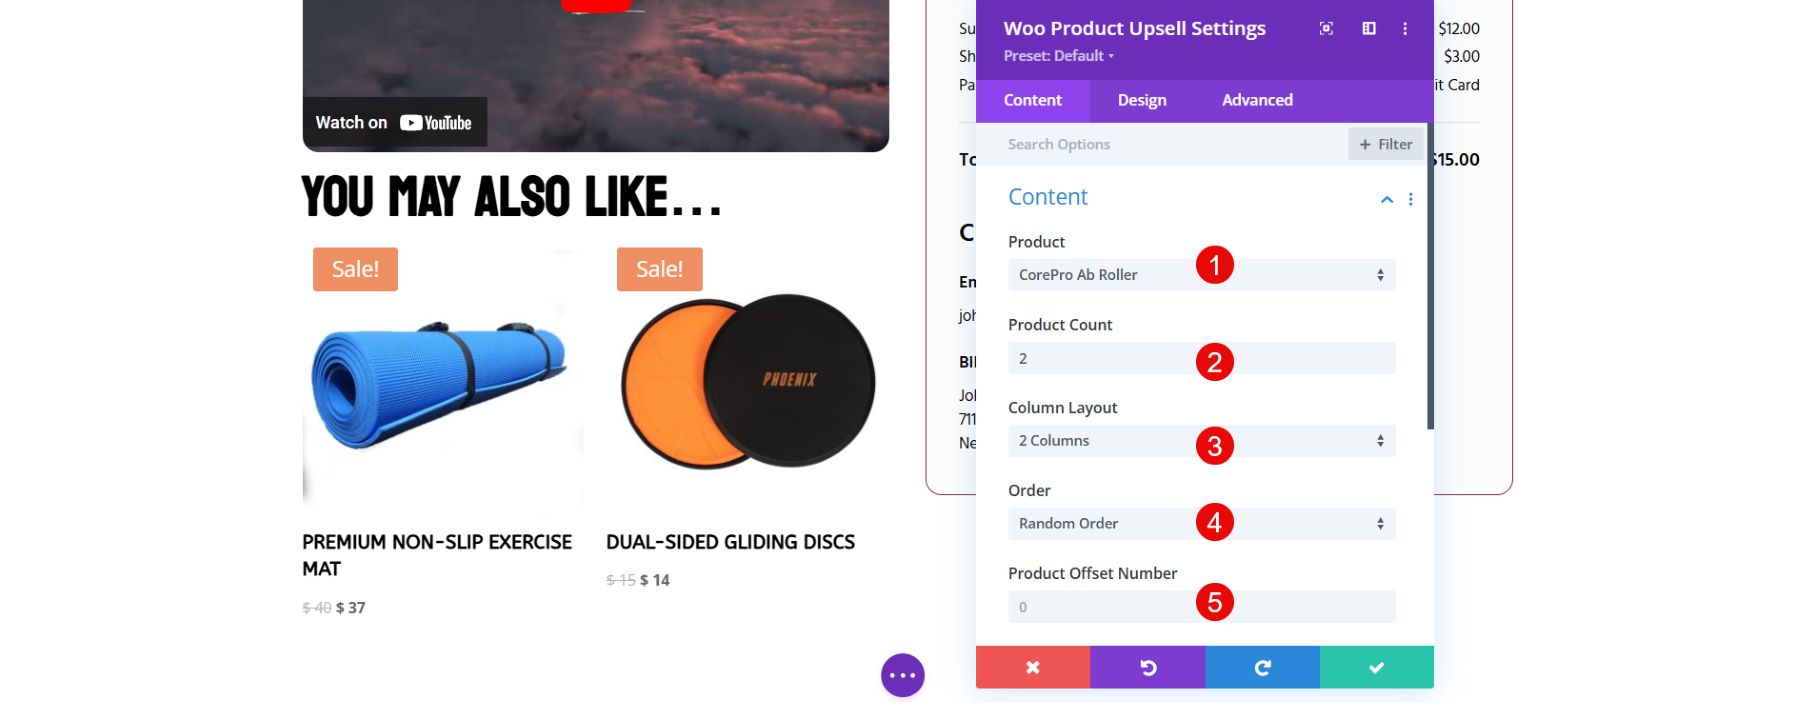
Style the module to match your Thank You page aesthetics using Divi’s built-in customization options. The best choice would be to add the Upsell module to the order details. That would bring attention to the upsell products quickly.
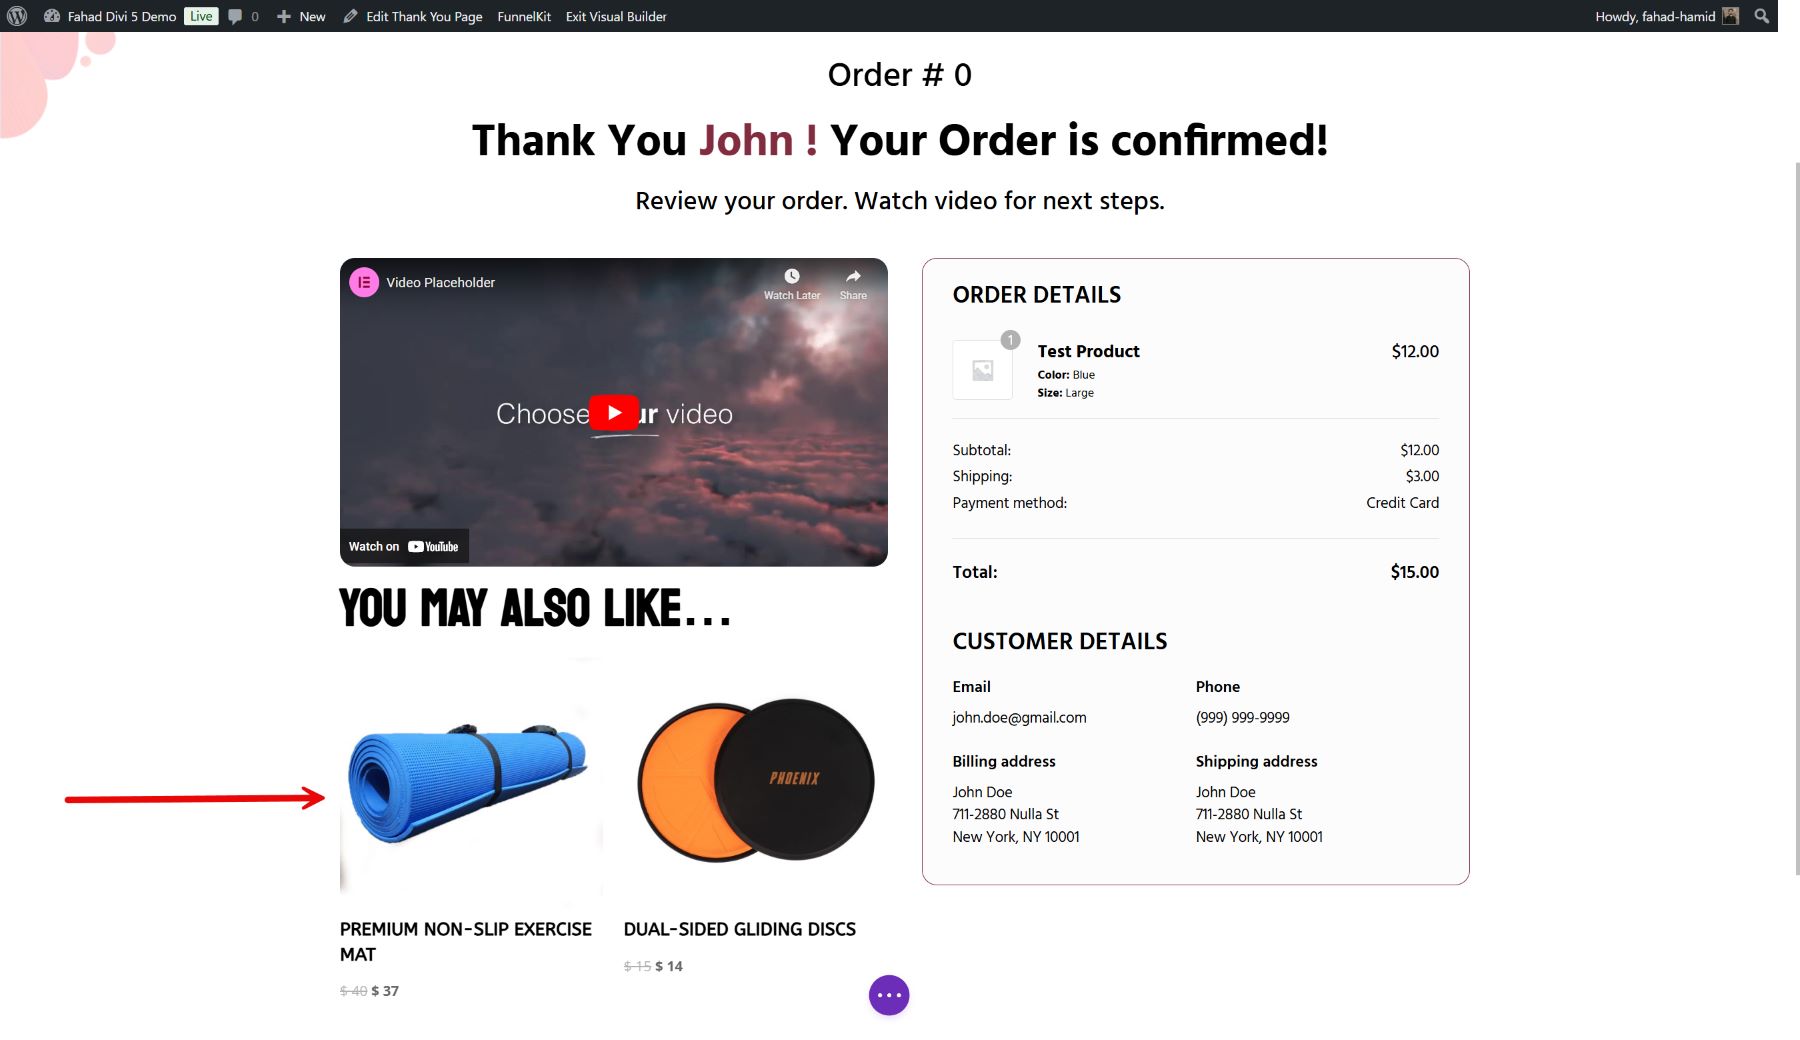
4. Additional Customization Tips and Use Cases
After integrating WooCommerce modules, you can take advantage of some other Divi modules and customize the added modules from FunnelKit to improve the appearance of your Thank You page. Here is how you can customize the added modules:
Customize the Order Details
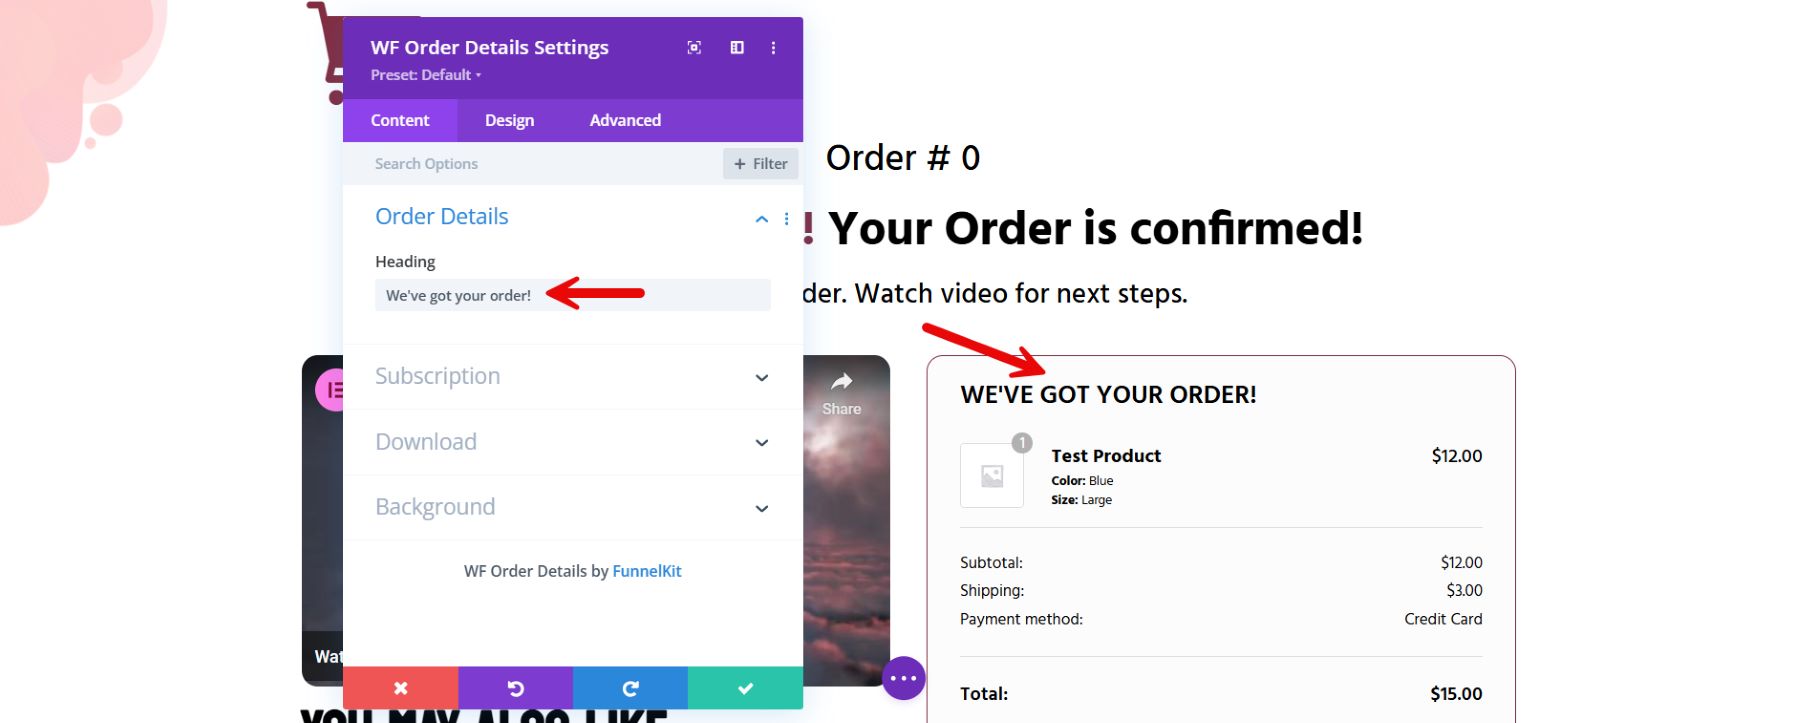
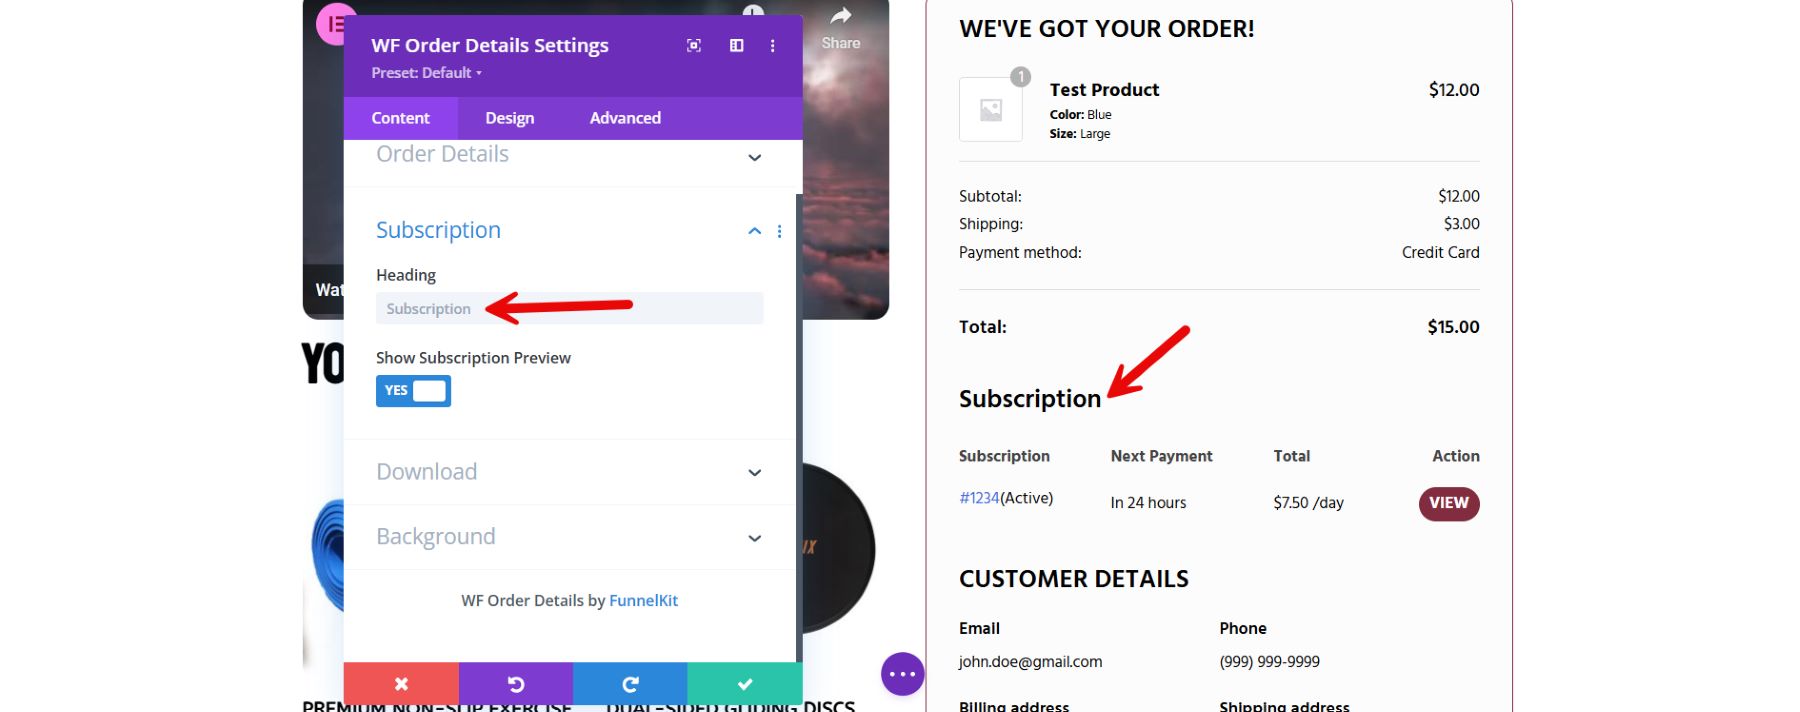
FunnelKit has provided a Divi template containing the Order Details module, referred to as the WF Order Details. This module provides details about the customer’s orders. However, you can optimize this module to match your WooCommerce store’s brand.
First, you can modify the section’s heading by entering text into the ‘Heading’ field.
Do you offer subscriptions for an online site? If so, it can be helpful to display details about the customer’s subscription, like the cost and the date of their next payment.
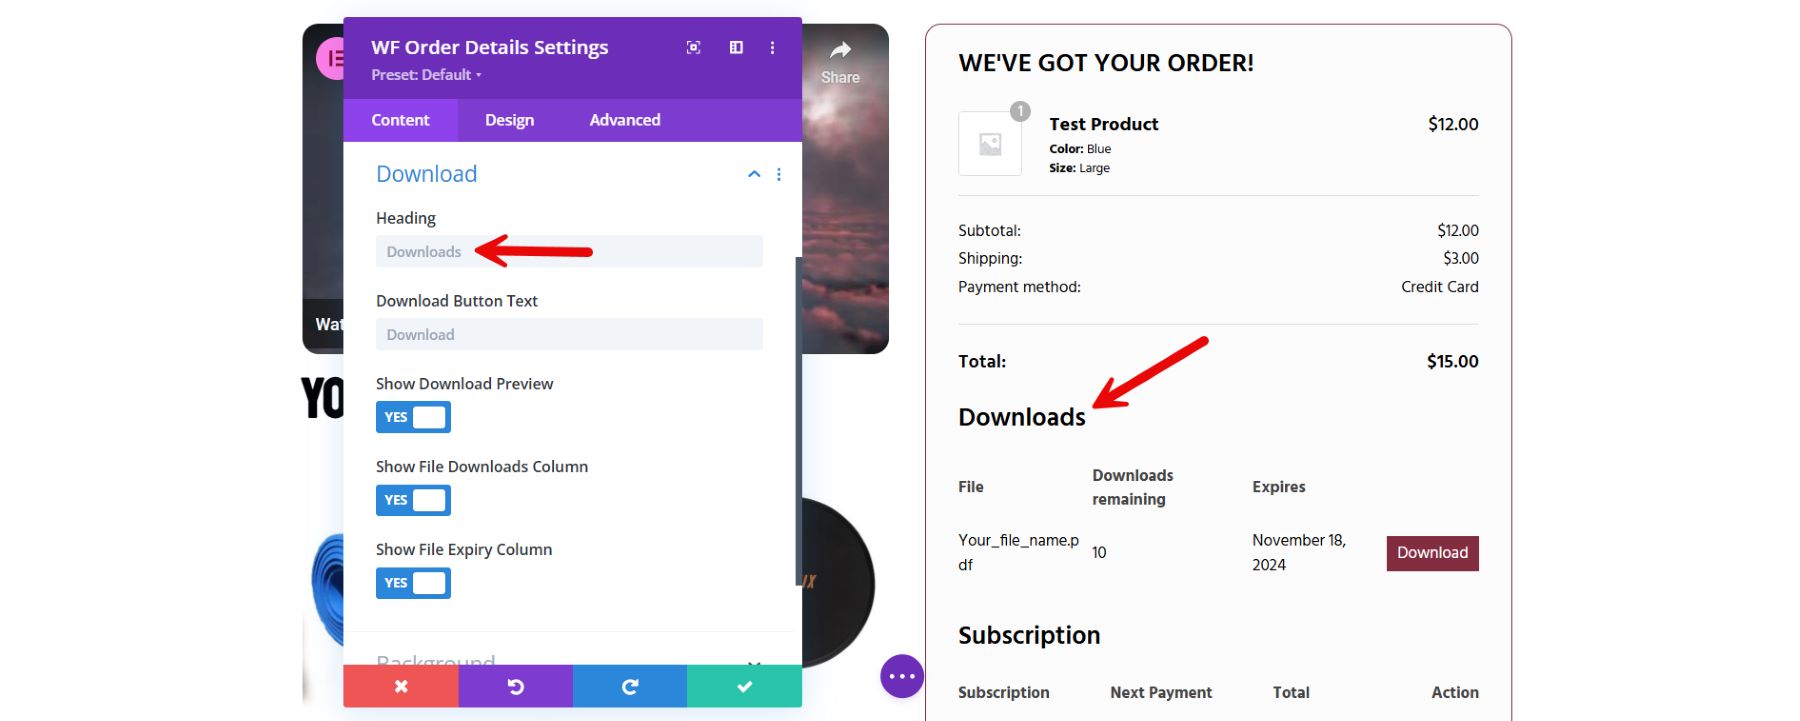
If you offer digital downloads, consider adding a ‘Downloads’ section. This section consists of four columns, i.e., the file name, the number of downloads left, the expiration date, and the download button. You can also include a button that allows customers to download their digital product directly from the custom page.
Customize Customer Details
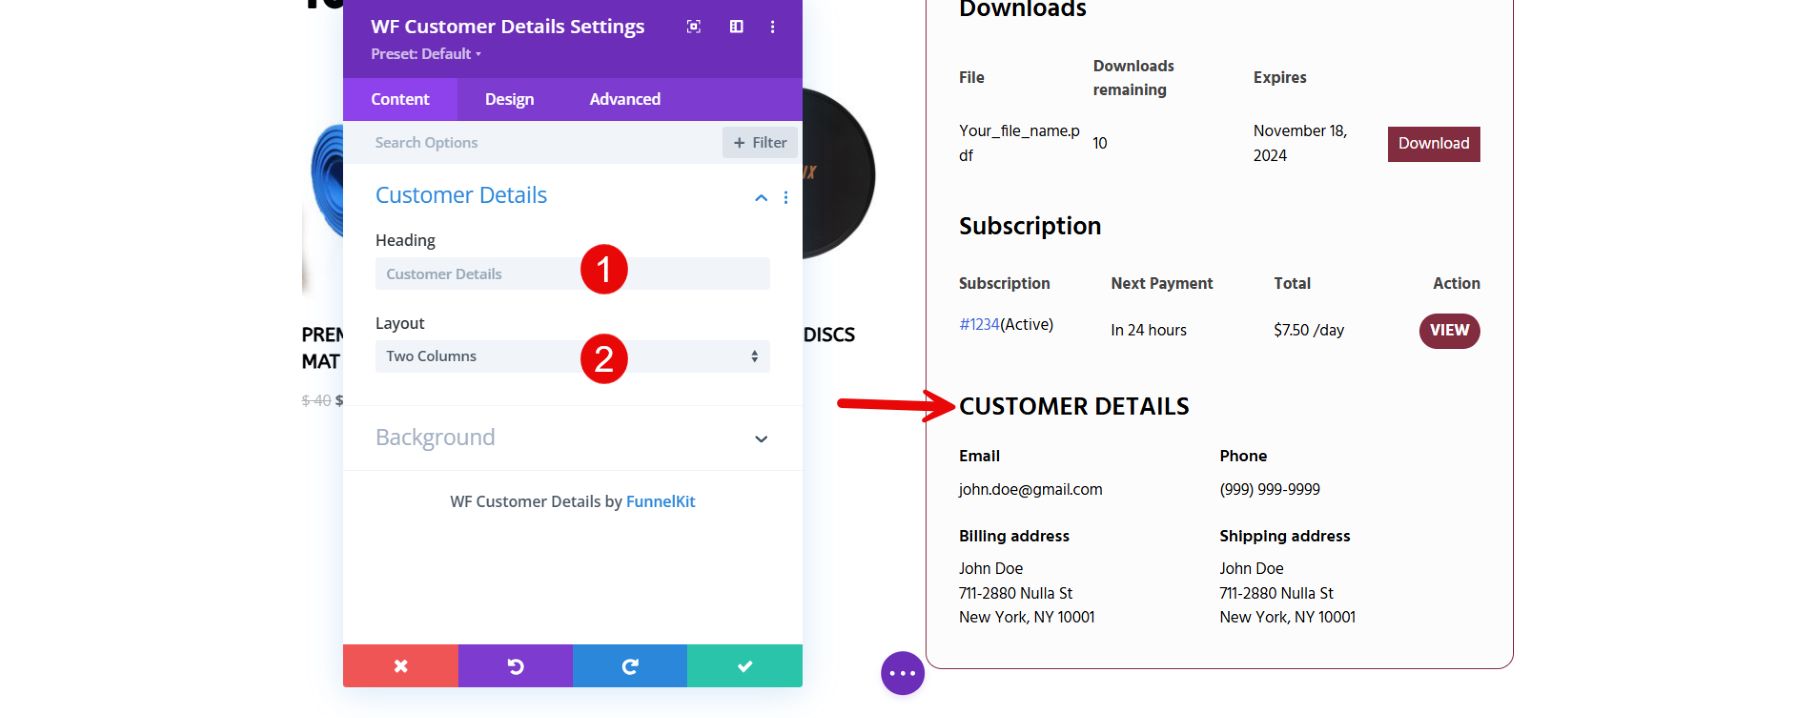
Alongside the Order Details, the Divi template provided by FunnelKit also contains the customer details widget integrated within. To start the customization process, you can move to the settings and, first, make your way to the heading section. You can change the default heading with your own. You can also have multiple columns for your customer details by selecting your preference from the ‘Layout’ dropdown menu.
Additional Tools to Enhance Your Thank You Pages
Beyond Divi and FunnelKit, several tools can help you further enhance your WooCommerce Thank You page. You can add functionality, collect insights, and boost conversions. Here are some valuable additional tools to consider:
- RankMath: Although Thank You pages typically aren’t indexed, RankMath provides insights and SEO recommendations for the entire site, ensuring that all pages—including post-purchase ones—contribute to your store’s overall performance.
- WP-Rocket: By speeding up load times across your site, including the Thank You page, WP-Rocket ensures a smoother, faster customer experience. This is crucial, as a well-performing Thank You page can positively impact customer satisfaction, especially for mobile users.
- Bloom: Bloom by Elegant Themes is a popular email opt-in plugin designed to convert visitors into subscribers. You can use Bloom on your Thank You page to present an attractive opt-in form, offering customers a discount or special content in exchange for joining your email list. This helps capture leads directly after purchase when customers are highly engaged.
- Monarch: Monarch is a social sharing plugin by Elegant Themes that is perfect for encouraging social engagement. Adding Monarch to your Thank You page can offer customers easy options to share their purchases on social media, building organic visibility for your brand. This tool also allows for custom social media placements, increasing the likelihood of social shares.
- OptinMonster: Create targeted pop-ups and opt-in forms. Your Thank You page can display exclusive discounts, loyalty offers, or time-sensitive promotions encouraging repeat purchases. Its advanced targeting options ensure that the message shown aligns with customer interests and behaviors.
These additional tools, along with Divi, help you create a powerful, engaging WooCommerce Thank You page that can drive customer satisfaction, loyalty, and additional sales.
Conclusion
Customizing your WooCommerce Thank You page is essential for creating a memorable post-purchase experience in the competitive eCommerce world. Divi offers a powerful solution, allowing you to utilize the visual builder while maintaining complete control over design. These customization options enable you to enhance the layout, streamline navigation, and add features that encourage repeat purchases and foster customer loyalty.
Looking to create a memorable WooCommerce Thank You page? Try Divi to strengthen customer engagement after every purchase. Explore our curated plugins and tools to add value and personalization to your Thank You page experience.
| Tools | Starting Price | Free Option | ||
|---|---|---|---|---|
| 1 | Divi | $89 per year | ❌ | Visit |
| 2 | FunnelKit | $129 per year | ✔️ | Visit |
| 3 | Cartflows | $129 per year | ✔️ | Visit |
| 4 | WPFunnels | $58.2 per year | ✔️ | Visit |
| 5 | Rank Math | $78.96 per year | ✔️ | Visit |
| 6 | WP-Rocket | $59 per year | ❌ | Visit |
| 7 | Monarch | Provided with Divi subscription ($89 per year) | ❌ | Visit |
| 8 | Bloom | Provided with Divi subscription ($89 per year) | ❌ | Visit |





Leave A Reply