It’s fairly common to sell multiple variations of a single product—this shirt in this or that color, that sticker 2″x2″ or 4″x4″. Whatever product variations you have in mind, WooCommerce allows creating those variations for your product pages. To display product variations on a WooCommerce WordPress site, create attributes like “color” or “size,” set the product type to “Variable product,” and define the variations. This lets customers select options on the product page. You can use plugins to customize their appearance on the shop page or in search results.
In this post, I will cover everything you need to know about how WooCommerce handles product variations and then walk you through how to set them up.
What are WooCommerce Product Variations?
While you may not know the term, you’re probably extremely familiar with product variations. This is when a single item comes in various options, such as different sizes, colors, flavors, or scents.
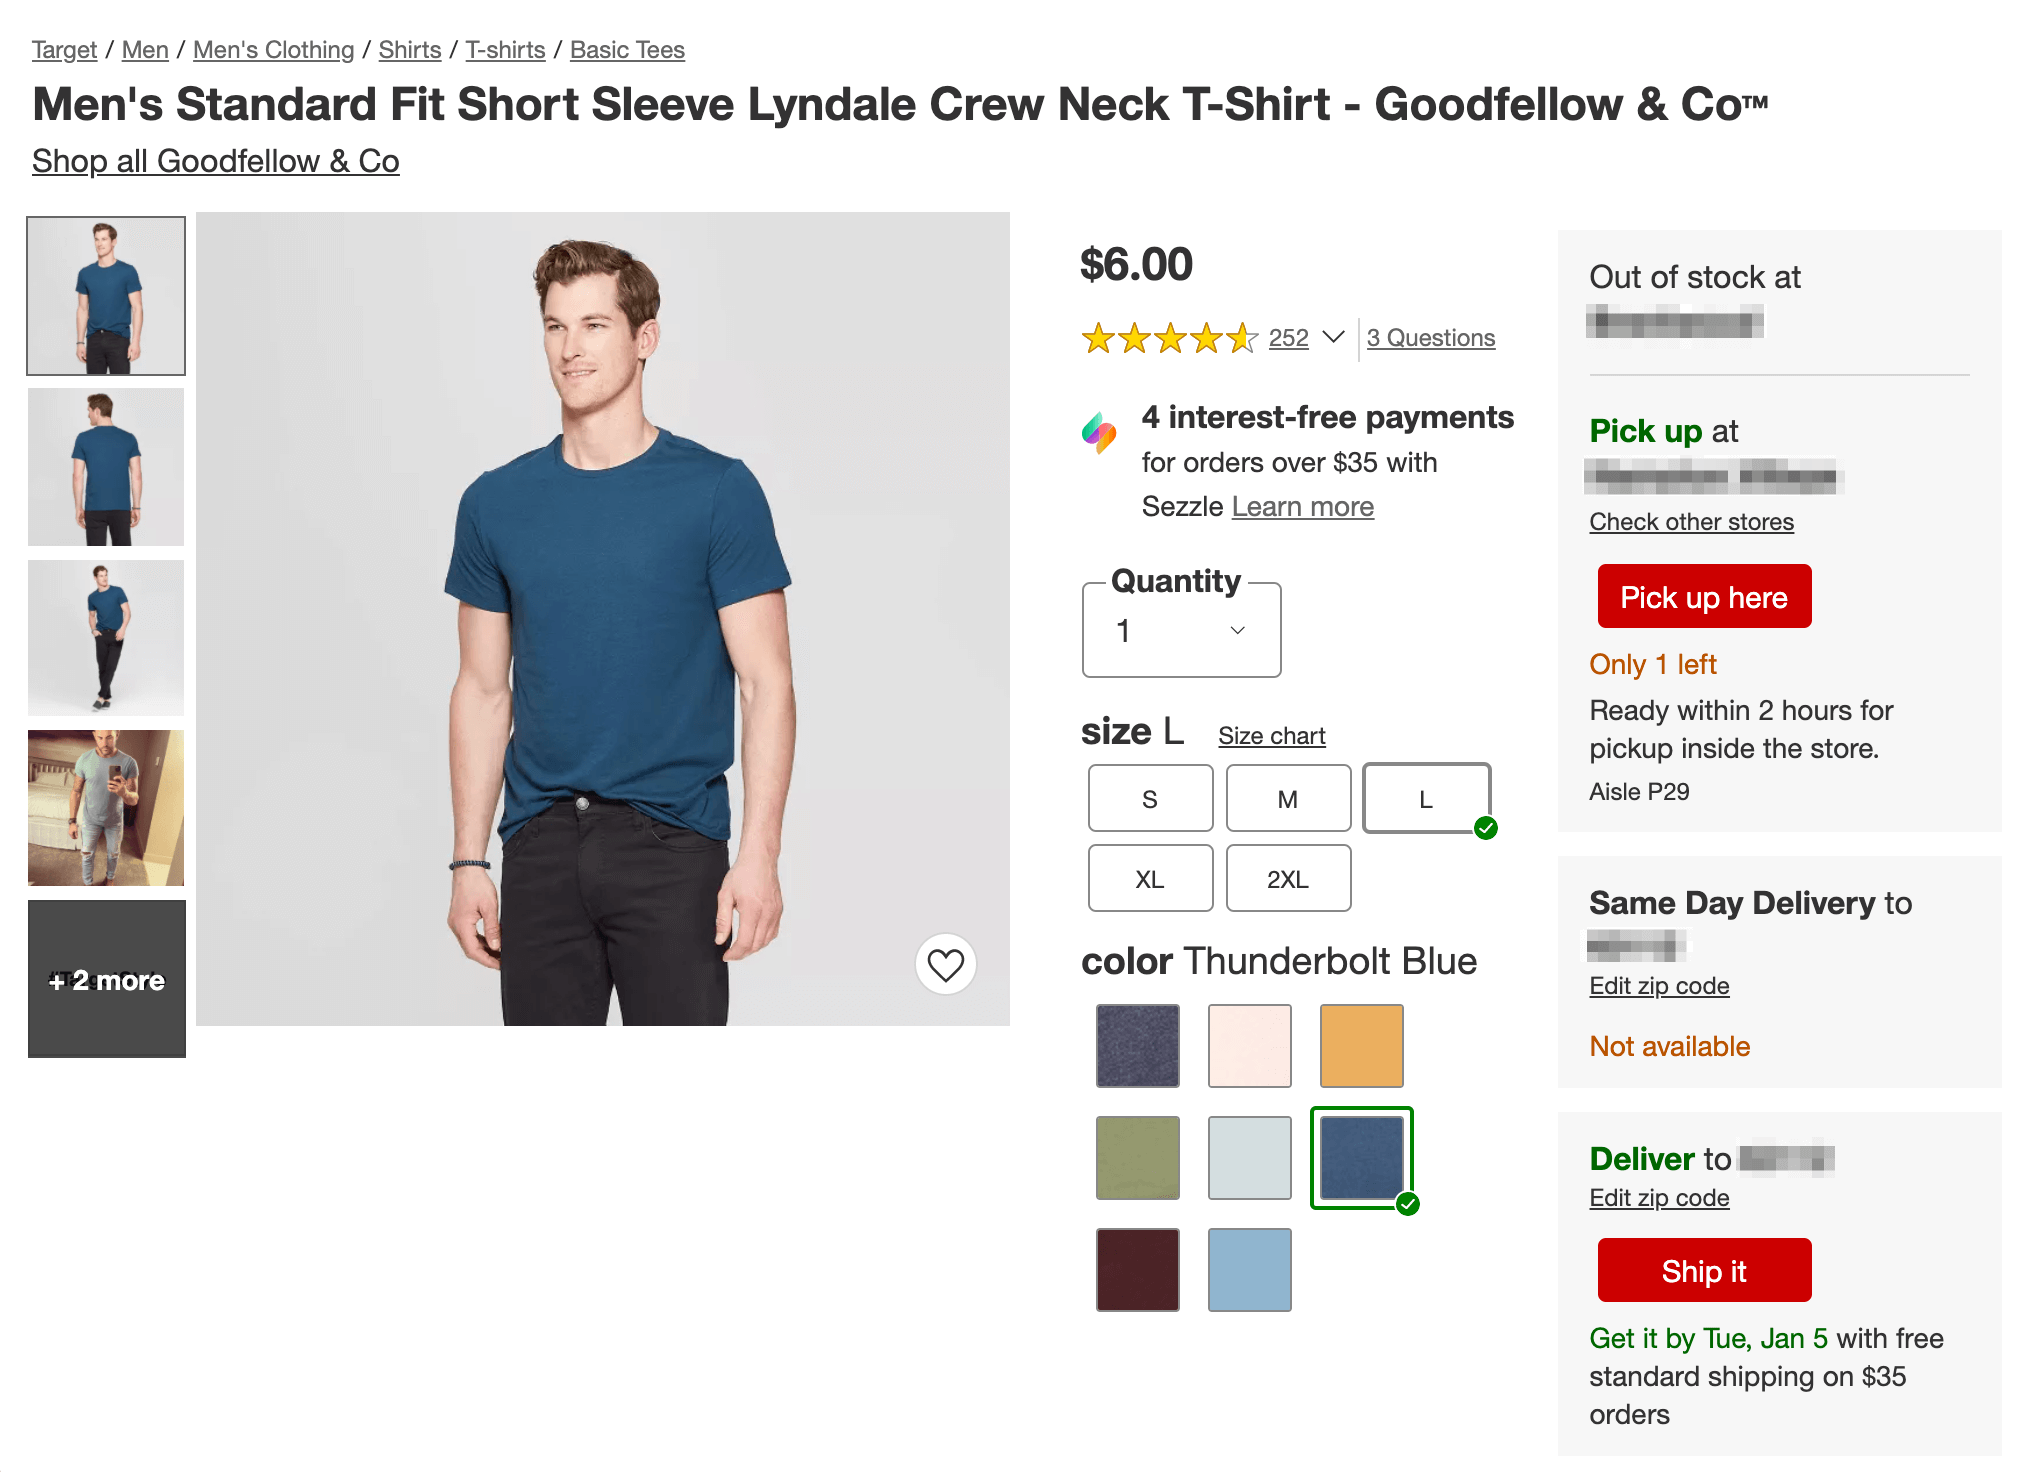
Example of a WooCommerce product with Variations enabled
Each product variation will need its own Stock Keeping Unit (SKU) number to differentiate it from the others. However, variants are often displayed on a single product page, with a selector to minimize confusion and ensure customers see all available options. You don’t want to fill your site with URLs covering the same product in different color and size combinations, right? That’s where variations come in.
Additionally, you can keep the price the same for each variation or adjust the cost depending on customers’ options. For example, this Amazon listing shows different prices for different MacBook Pro hardware but doesn’t adjust the cost for the color. All of these variations are important to your customer, but how you handle them on the backend needs to be catered to your needs.
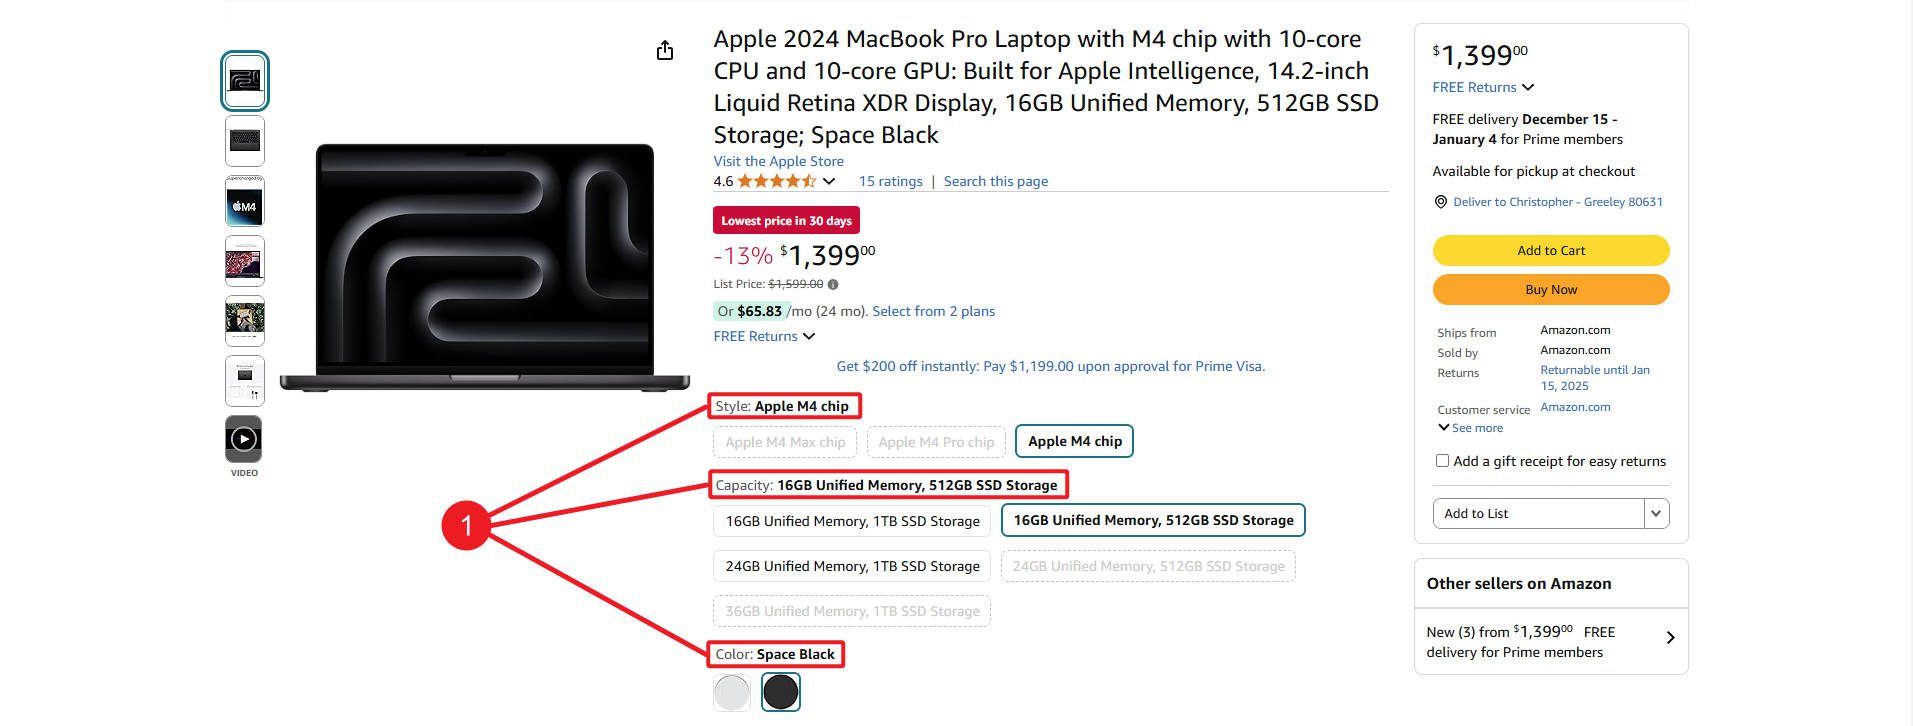
In short, you might want to implement product variations on your WooCommerce site for many different reasons. Fortunately, the popular eCommerce plugin makes it easy to do so.
How to Display Product Variations in WooCommerce (3 Ways)
Displaying product variations in WooCommerce is actually quite simple, especially if you’re already familiar with the plugin. Below, we’ll walk you through the process. However, note that for the purposes of this post, we’ll assume you already have your online store up and running and know how to create and edit simple products in WooCommerce.
Other than that, I’ve done the hard work for you to show you three different ways of adding product variations to your store.
Using WooCommerce’s Built-in Variation Options (Method 1)
This uses WooCommerce’s built-in tooling for assigning Woo attributes to particular products as variations.
Step 1: Create a Variable Product
WooCommerce enables you to set up product variations out of the box. First, you’ll want to add Attributes to your store. Attributes can be applied to any product.
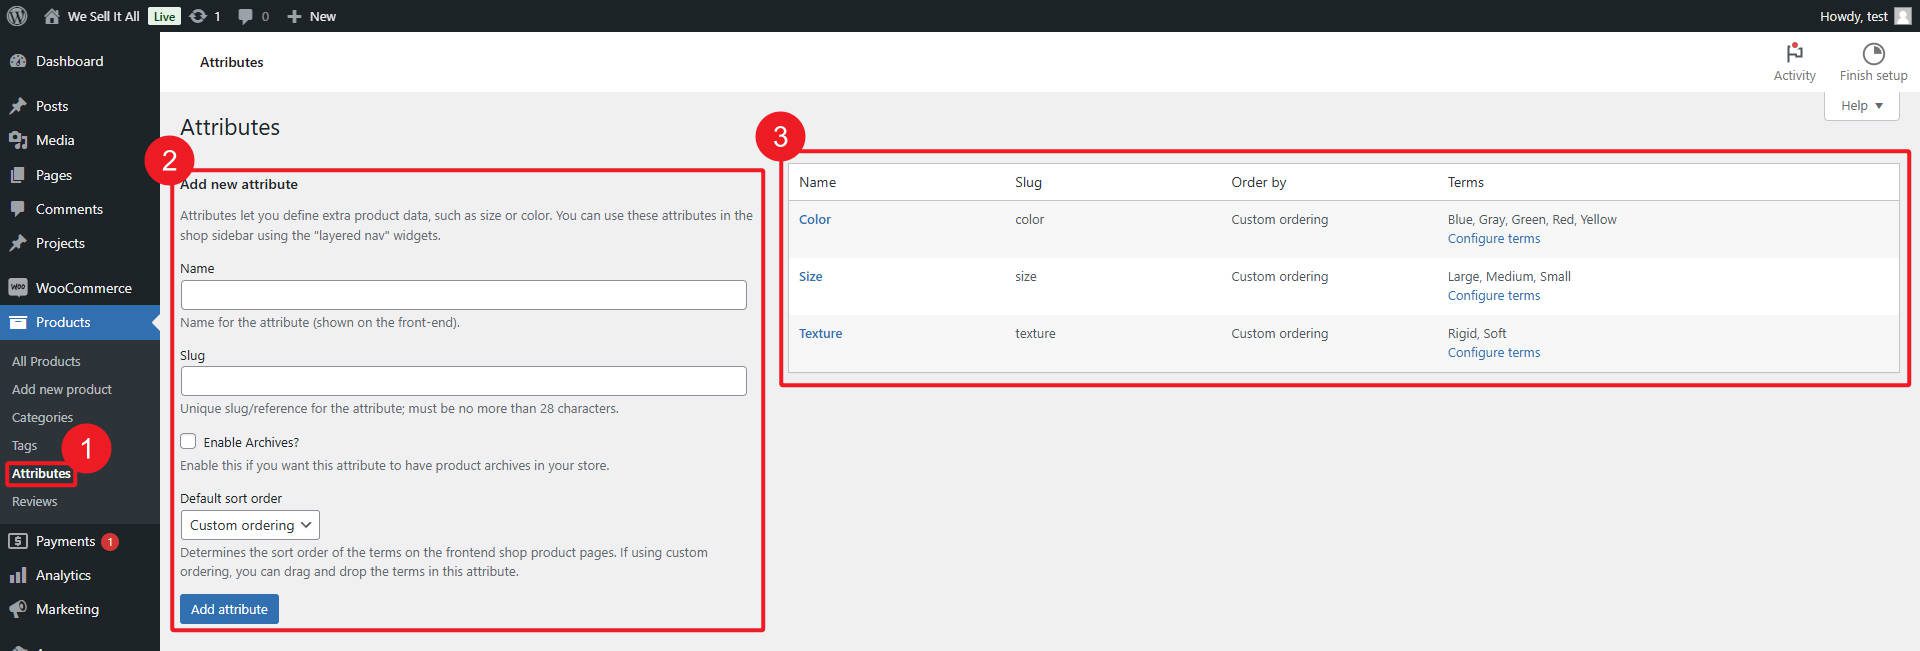
Now, we need to assign attributes to particular products. Select “Products > Add New” to create a new product, or scroll down to the “Product data” section for an existing product. Using the drop-down menu at the top, set the product type as “Variable Product.”

The product options change accordingly. For instance, there’s no longer a field where you can enter the price for the item (you’ll be able to include this information later with the variables).

Step 2: Add Product Attributes
Next, click on the “Attributes” tab. You can either add a “New Attribute” or use the drop-down menu to select an existing one. The default options are color and size, but you can also create custom attributes if you like.

Click on the “Add” button to apply your chosen attribute. Under each Attribute, you can add “Values,” such as specific colors or specific sizes. This adds specific types of your attributes to your product.
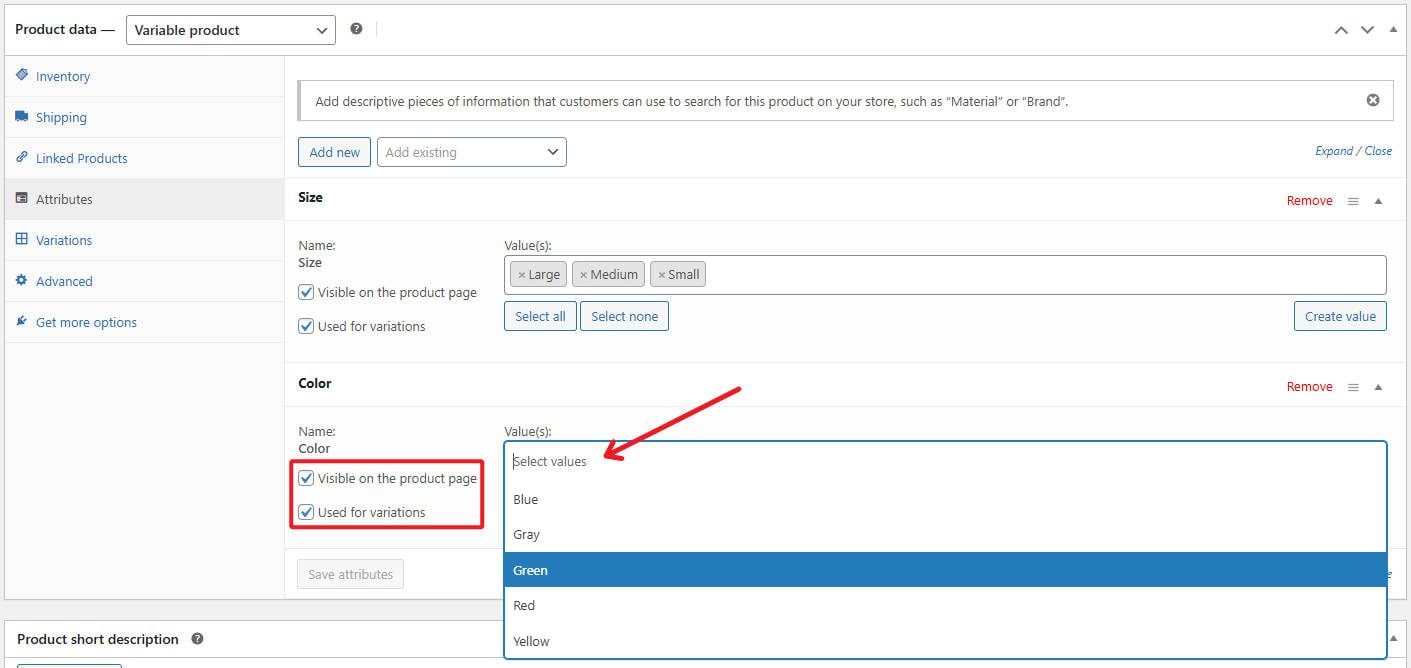
It’s important to enable both the “Visible on the product page” and “Used for variations” options. Then, you can list your attribute values (such as small, medium, and large or red, yellow, and blue) on your actual product page.
Step 3: Generate Your Variations
Now, you can go to the “Variations” tab. There, you can directly apply your new attributes to the product or view the ones you’ve already created. You can add them manually or have every permutation (combination of all your attributes) added to your store.
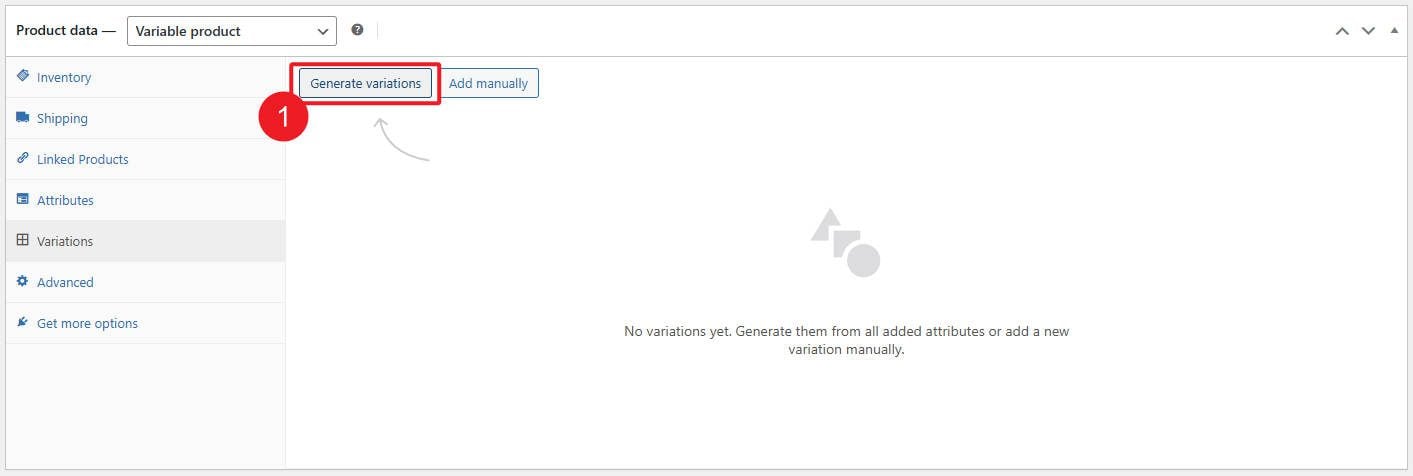
The second option will automatically generate WooCommerce product variations for every possible combination of attributes you’ve specified. For my example, I had 3 sizes and 2 colors, giving me a total of 6 variations. The more attributes (and values) you use on your products, the more variations are created.
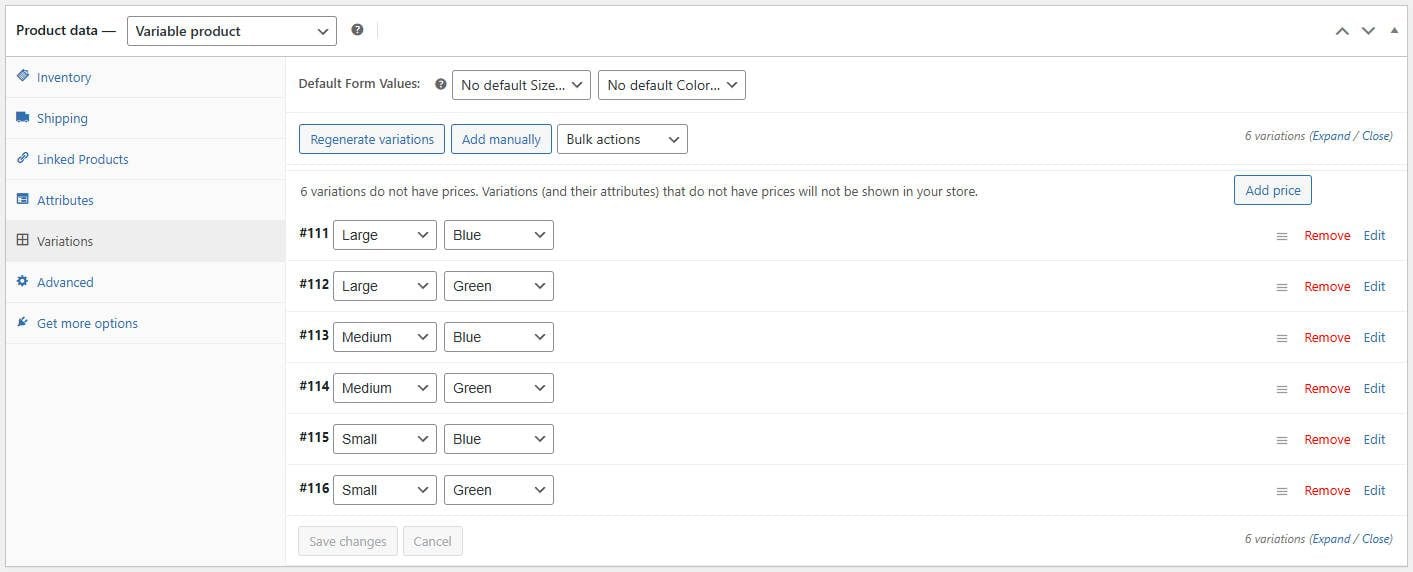
Then, you can fill out the product information for each variation, just as you would if they were distinct items. As we mentioned earlier, each variation will need its own SKU number for inventory management purposes:
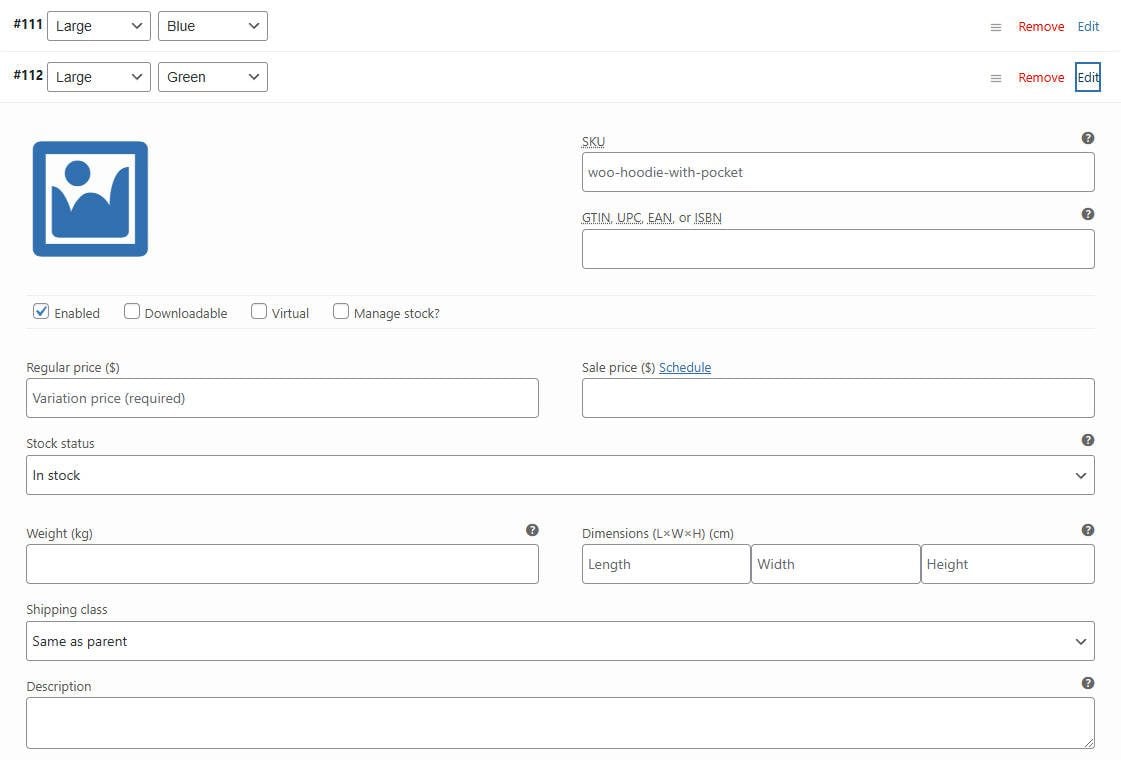
If relevant, you can also specify different prices for each variation and provide shipping and tax information. After doing this for each of your WooCommerce product variations, click “Save Changes.”
Step 4: Preview and Publish Your Variable Product
At this stage, there may be other data you need to add to complete your product page. Once you’re done entering all the relevant information, you can save all your changes and preview the item:
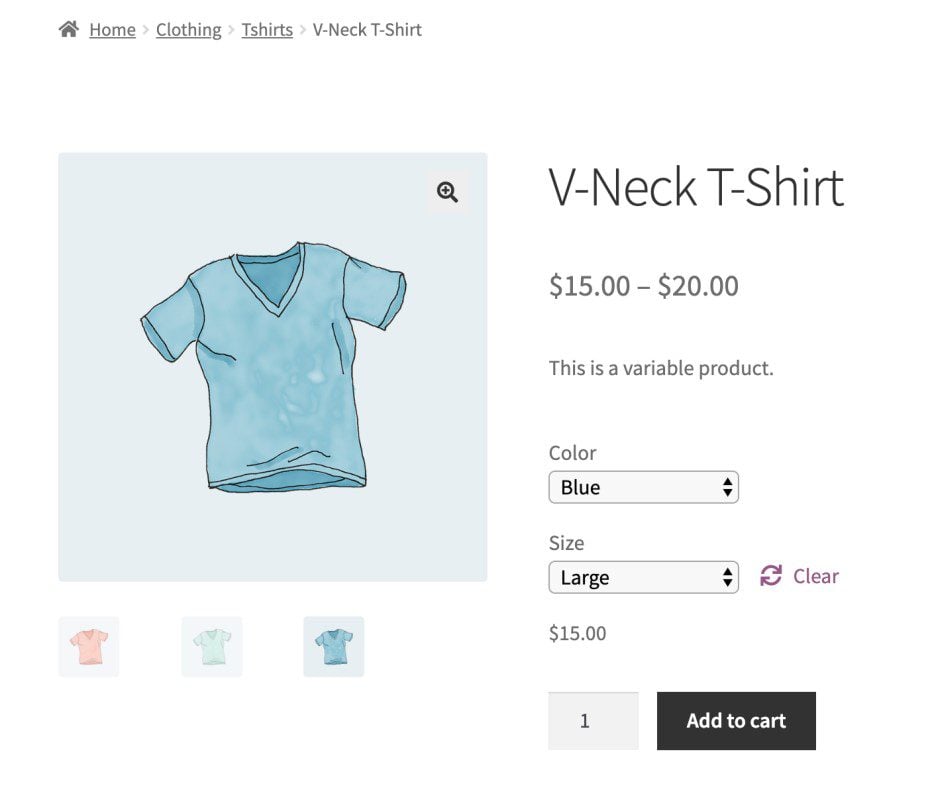
Check the variation selector(s) and make sure all the options exist. If everything looks as it should and you’re ready to start selling this product, you can make the page live by clicking the Publish button in the editor.
Using Store App’s Bulk Variation Plugin (Method 2)
As we’ve seen, WooCommerce includes everything you need to set up product variations. However, as you noticed, if you have a lot of attributes and a lot of values assigned to those attributes, then you can end up with an unruly number of variations to manage acrros your store. For that, we recommend a plugin that can help you manage all that data work.
WooCommerce Bulk Variations Manager makes creating and pricing thousands of product variations super easy. You can save more time and effort by managing everything from a single interface rather than individually setting up prices for each variation. All you have to do is select a base product, set a base price, add attributes, and apply price differences for all variations in one go.
Unlike WooCommerce’s default limit of 50 variations at a time, this plugin allows you to add, update, or delete thousands of variations instantly. For instance, set a base price of $14 for a regular t-shirt, then deduct $0.50 for the white colored and add $1.50 for medium-sized and $3 for large sizes.
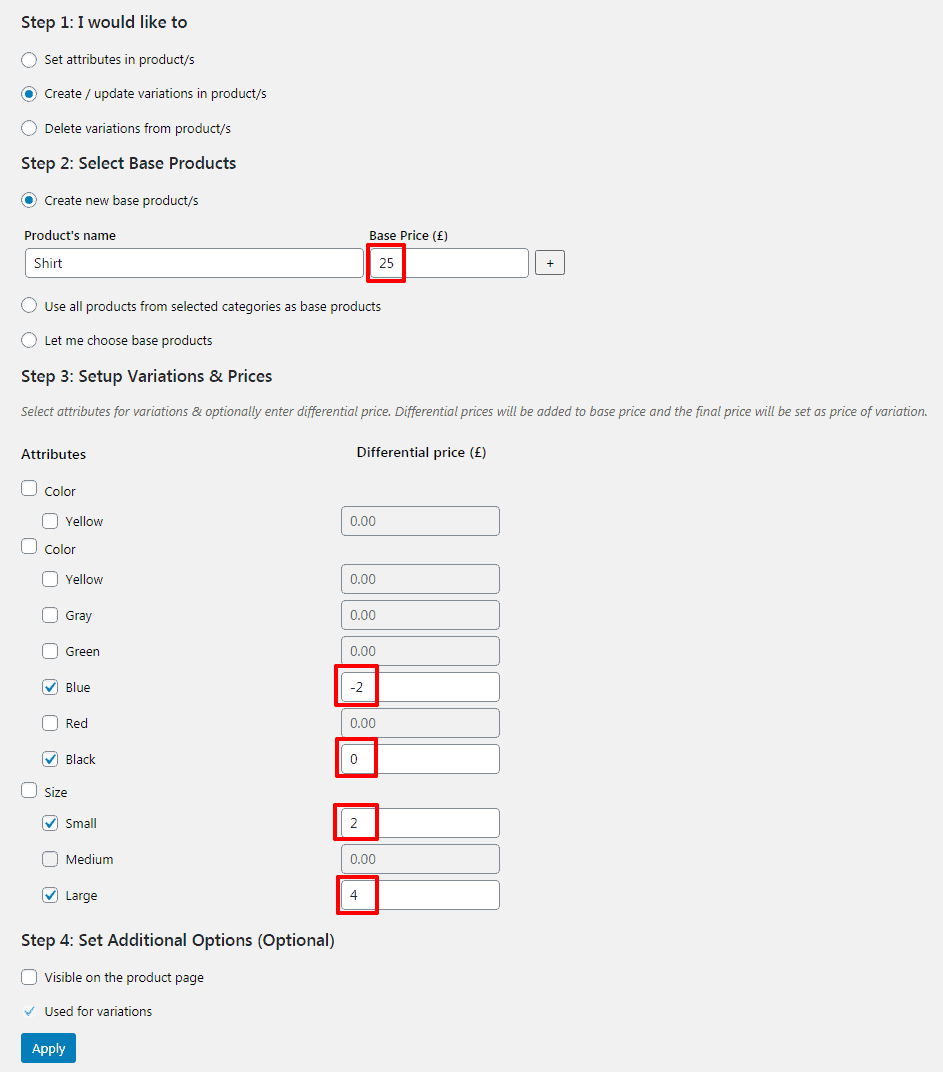
As shown above, you can also use differential pricing to customize prices based on certain attributes. It automatically calculates and changes the final costs for all variations. This helps manage complex variable products quickly, whether apparel, electronics or any other industry needing detailed product options.
If you hate tedious manual tasks, this plugin can be your ideal tool for updating prices, stock, or attributes across multiple variations in seconds. Plus, you can enjoy regular updates and dedicated support – all for just $79 per year. Best of all, it’s developed by StoreApps, an official WooCommerce extension partner.
Get Store App’s Bulk Variation Manager
Using Variation Images Gallery for WooCommerce Plugin (Method 3)
This is another easy and effective method that you may follow to display product variation in your WooCommerce store attractively. Here are all the steps this method requires you to perform.
Step 1: Install Variation Images Gallery for WooCommerce Plugin by RadiusTheme
First, go to your WordPress Admin Dashboard. Then, head to Plugins > Add New Plugin. Afterward, type “Variation Images Gallery for WooCommerce” in the plugin search field. Now, install and activate the plugin. If you want all the features, head over to their product page to grab the pro option.
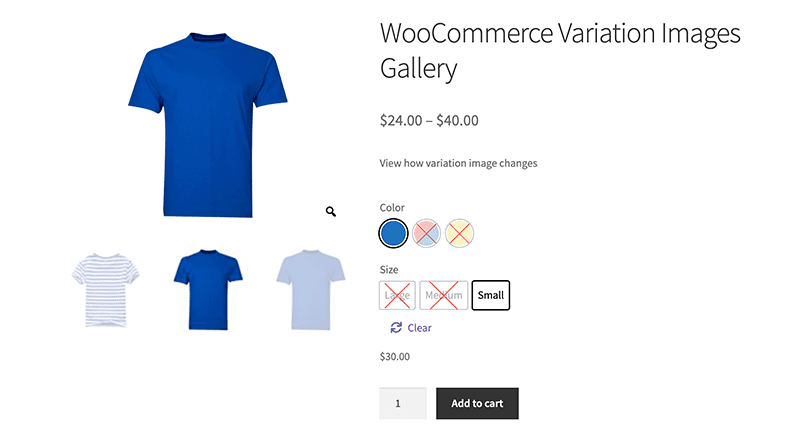
Example Image Gallery of Variations
Step 2: Add Images to a Product Variation
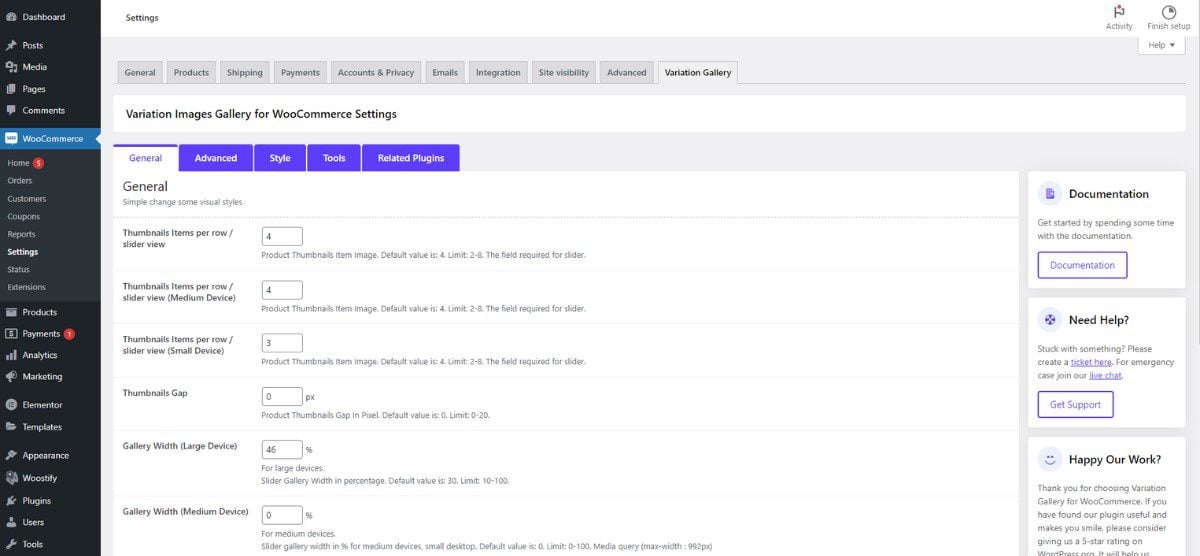
Once you install and activate the Variation Images Gallery for WooCommerce plugin, you’ll notice this plugin’s settings window, as shown in the screenshot below.
You can tweak some settings or leave them as they are, then upload a new variable product or edit the existing one. Since you know how to create attributes and upload a variable product to your WooCommerce store, we won’t repeat that process.
Instead, let’s add some images to each product variation. To do so, upload a new or edit an existing variable product. Then, go to ‘Variations.’
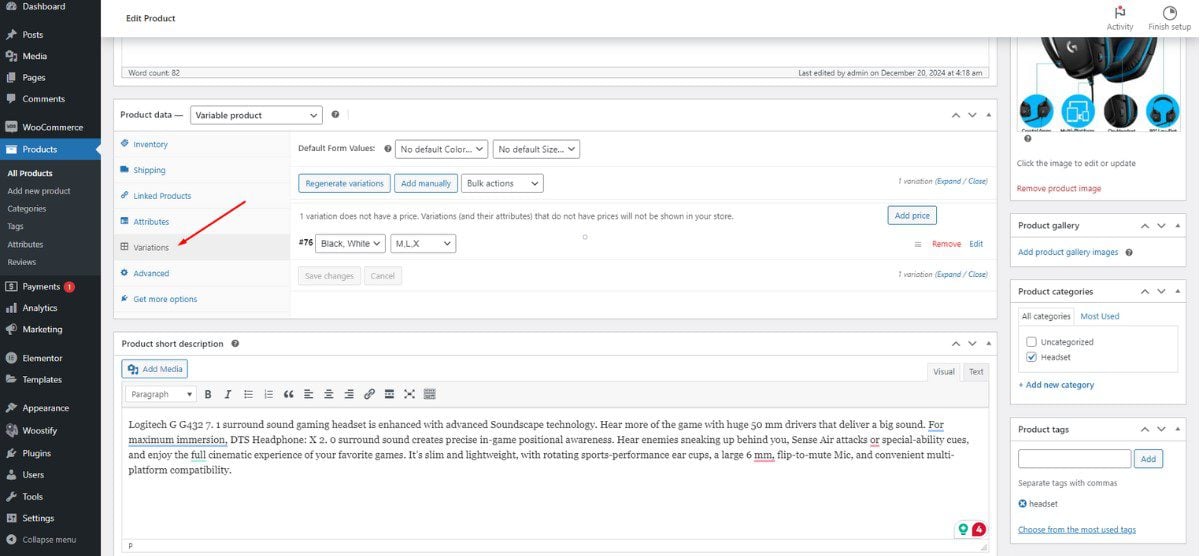
After that, click either the “Generate variations” or the “Add manually” tab to create a product variation.
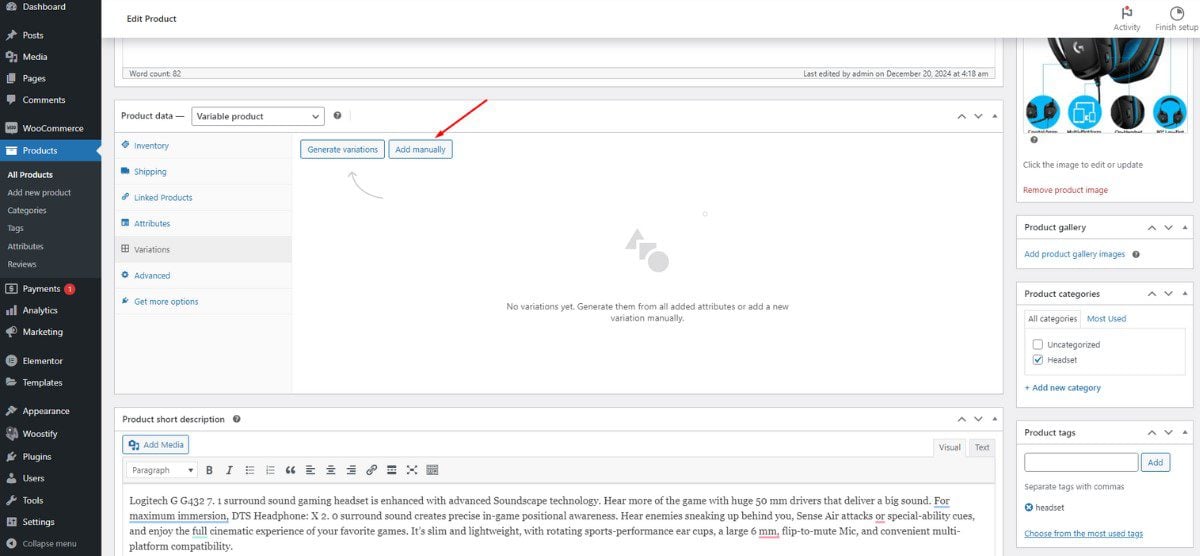
If you’ve clicked on the “Add manually” tab, you need to set product attributes and hit the “Save changes” button.
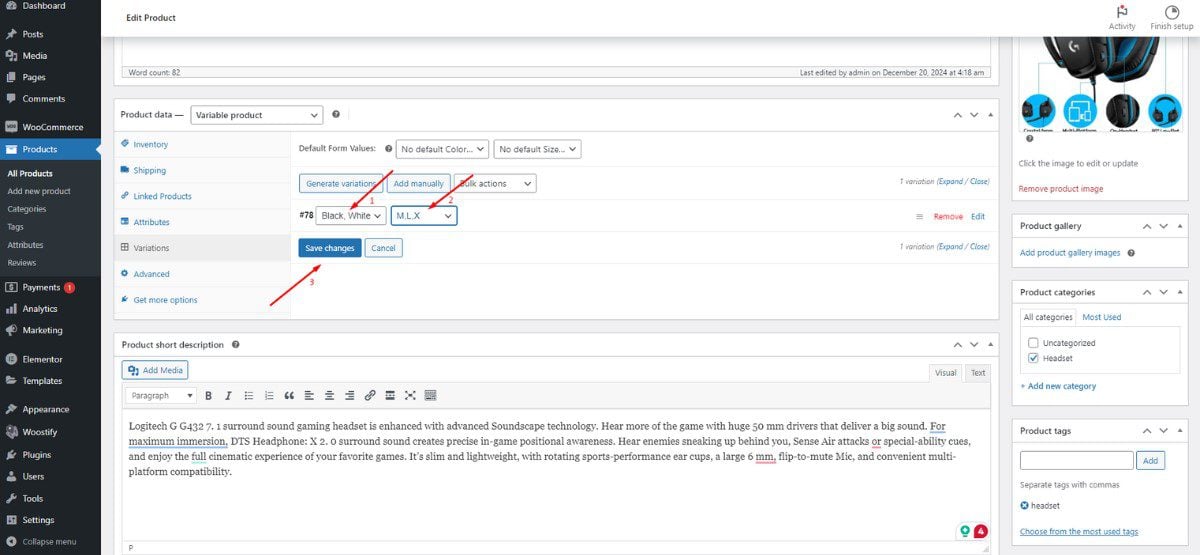
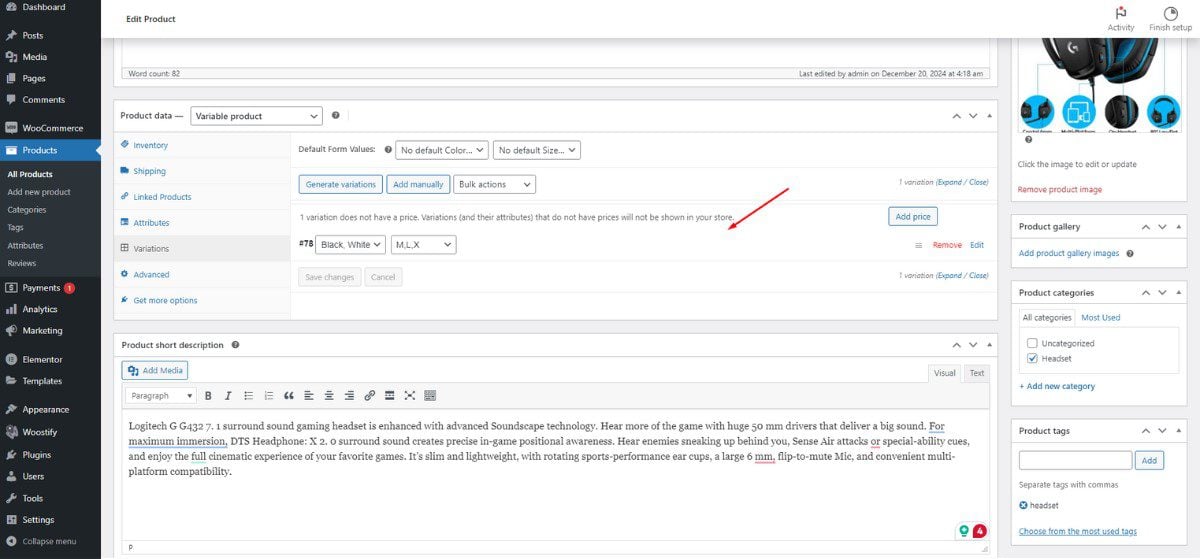
Now, click the product variation to fill in the product information.
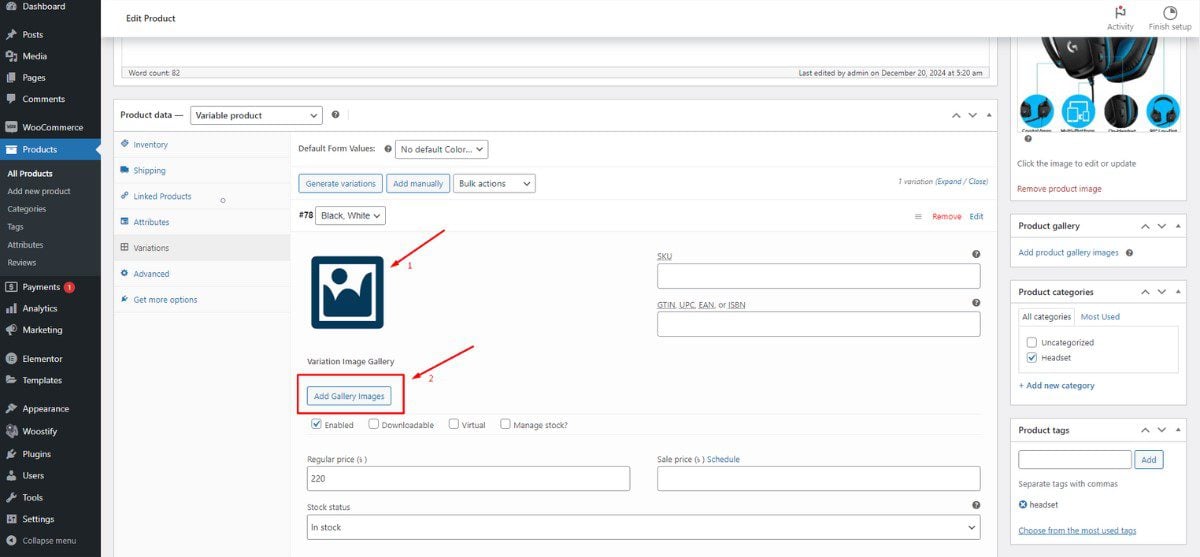
Add a main image to a product variation and click the “Add Gallery Images” button to include a new image of a single product variation. Remember to hit the “Add Gallery Images” button each new image you want to add.
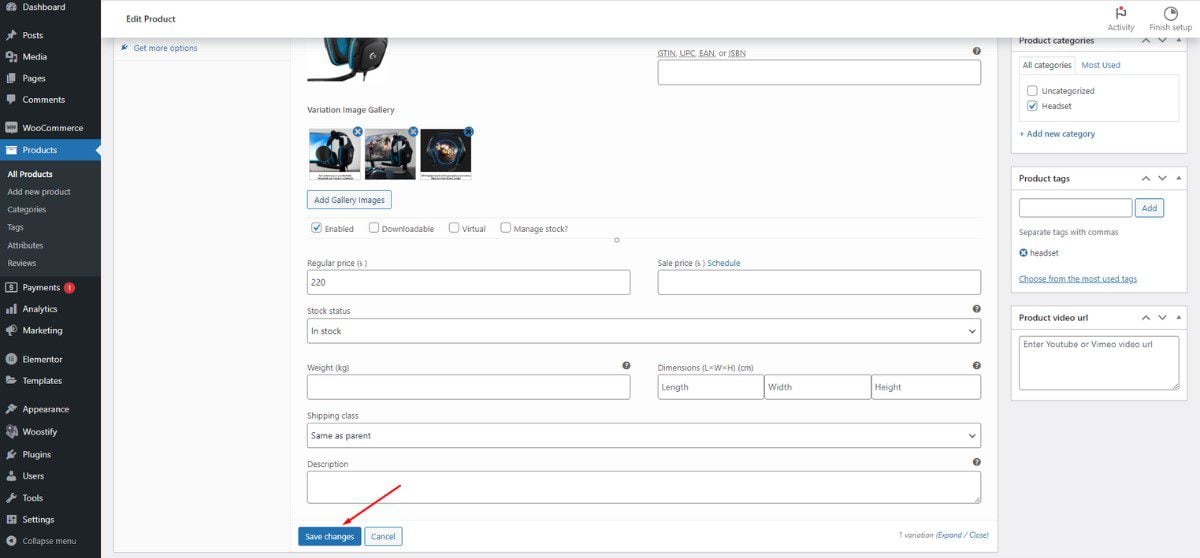
Finally, click the “Save changes” button.
Now, let’s see how our variable product appears with its image variations.
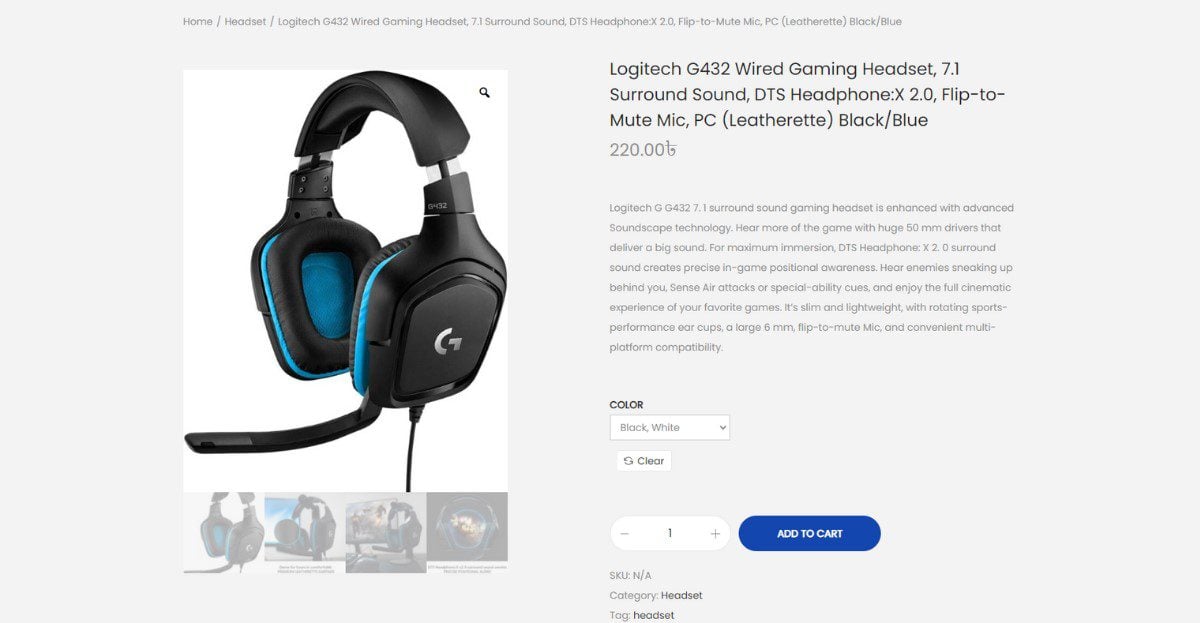
This is a third easy way where you can easily create and display product variations in your WooCommerce store.
Product Variation Swatches
To customize the display of product variations in your WooCommerce store, traditionally, you would use custom WooCommerce hooks (PHP) and custom styles (CSS). This lets you set how variations, such as sizes and colors, are presented on your shop page. However, many store owners don’t have this coding skill set, and eCommerce developers can cost a lot. You do have other options now.
Variation Swatch Plugins
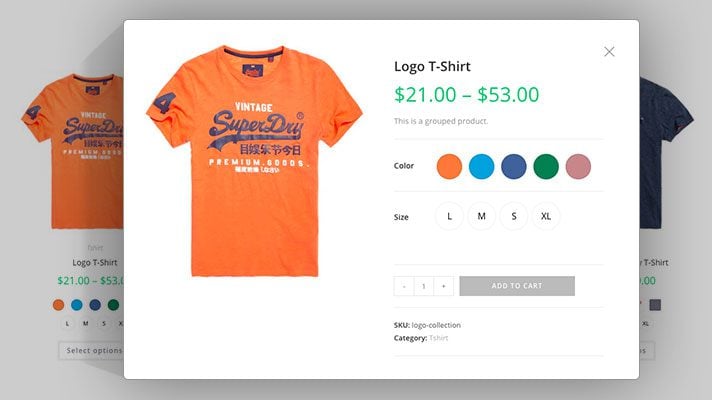
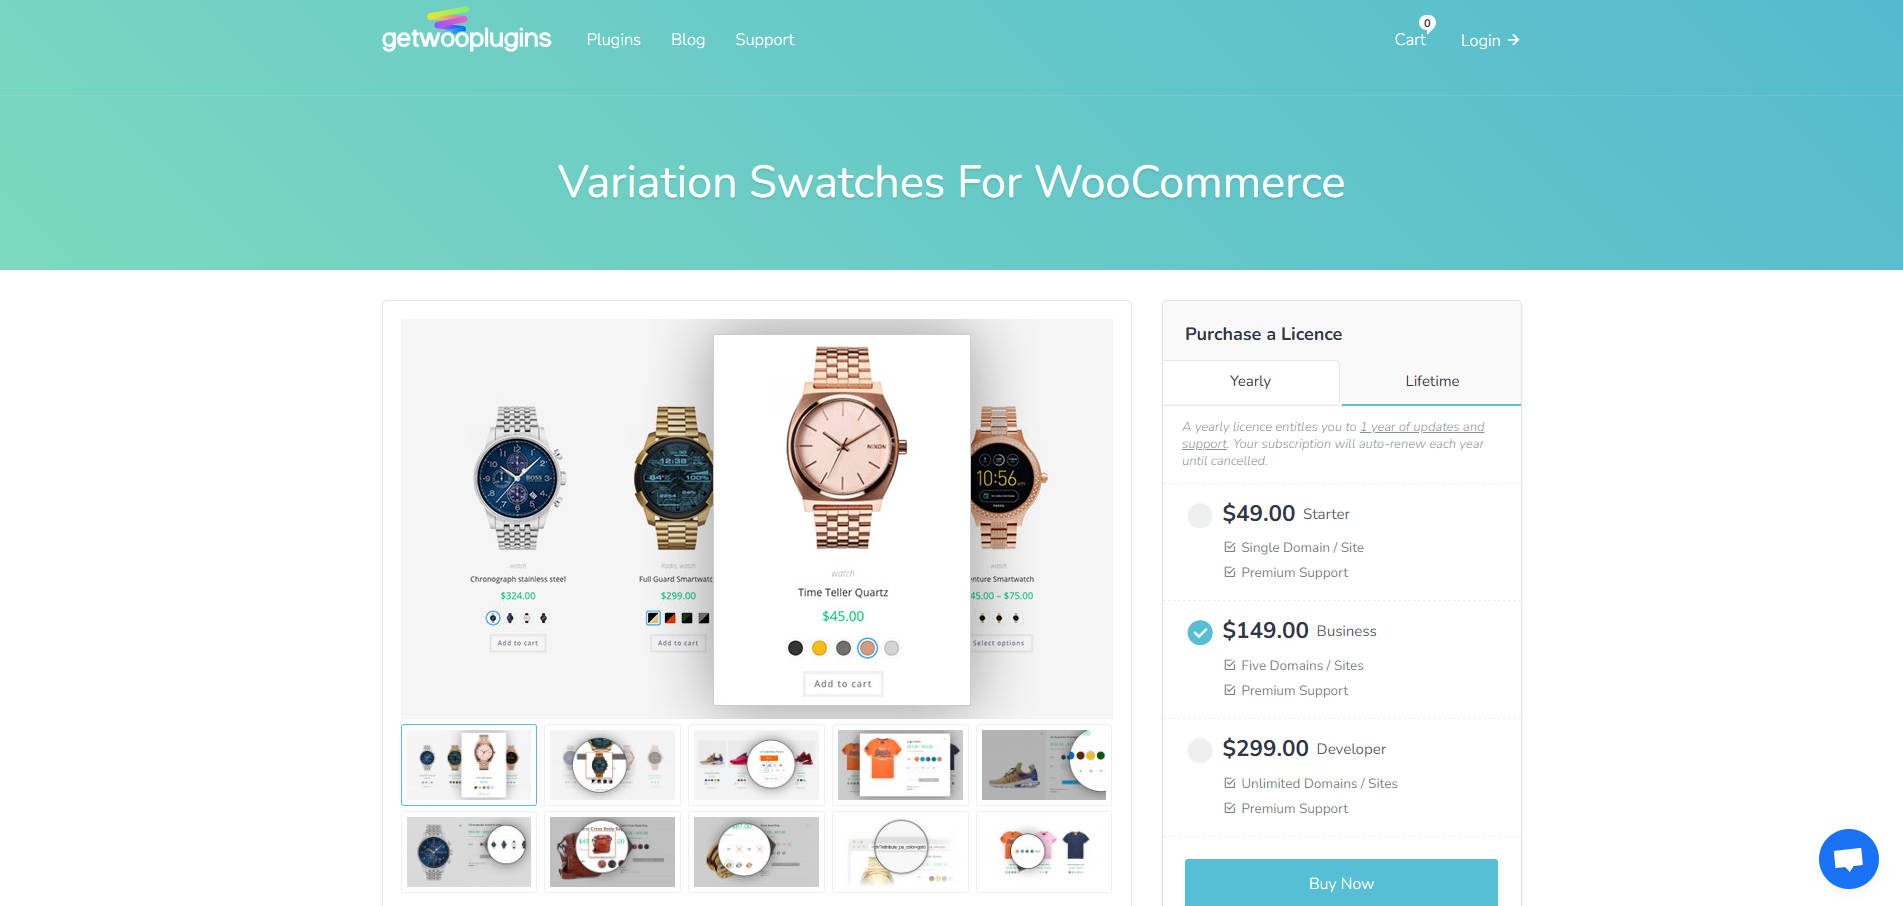
WooCommerce Variation Swatches is among the most popular plugins for attribute variation swatches in the WordPress plugin directory. By default, on the shop page, a variable product will usually display a “Select options” button, prompting the customer to go to the product page to choose variations. This plugin changes that default behavior into something more usable for shoppers.
WooCommerce Variation Swatches is a user-friendly plugin that effectively transforms product attribute select dropdowns into visually appealing swatches, including color, button, radio, and image options. Shoppers no longer need to open a dropdown list to view available variations for variable products—all they need to do is choose their desired variation. WooCommerce Variation Swatches automatically converts the default dropdowns into image swatches if the variation has a featured image set.
Get WooCommerce Variation Swatches
Page Builders
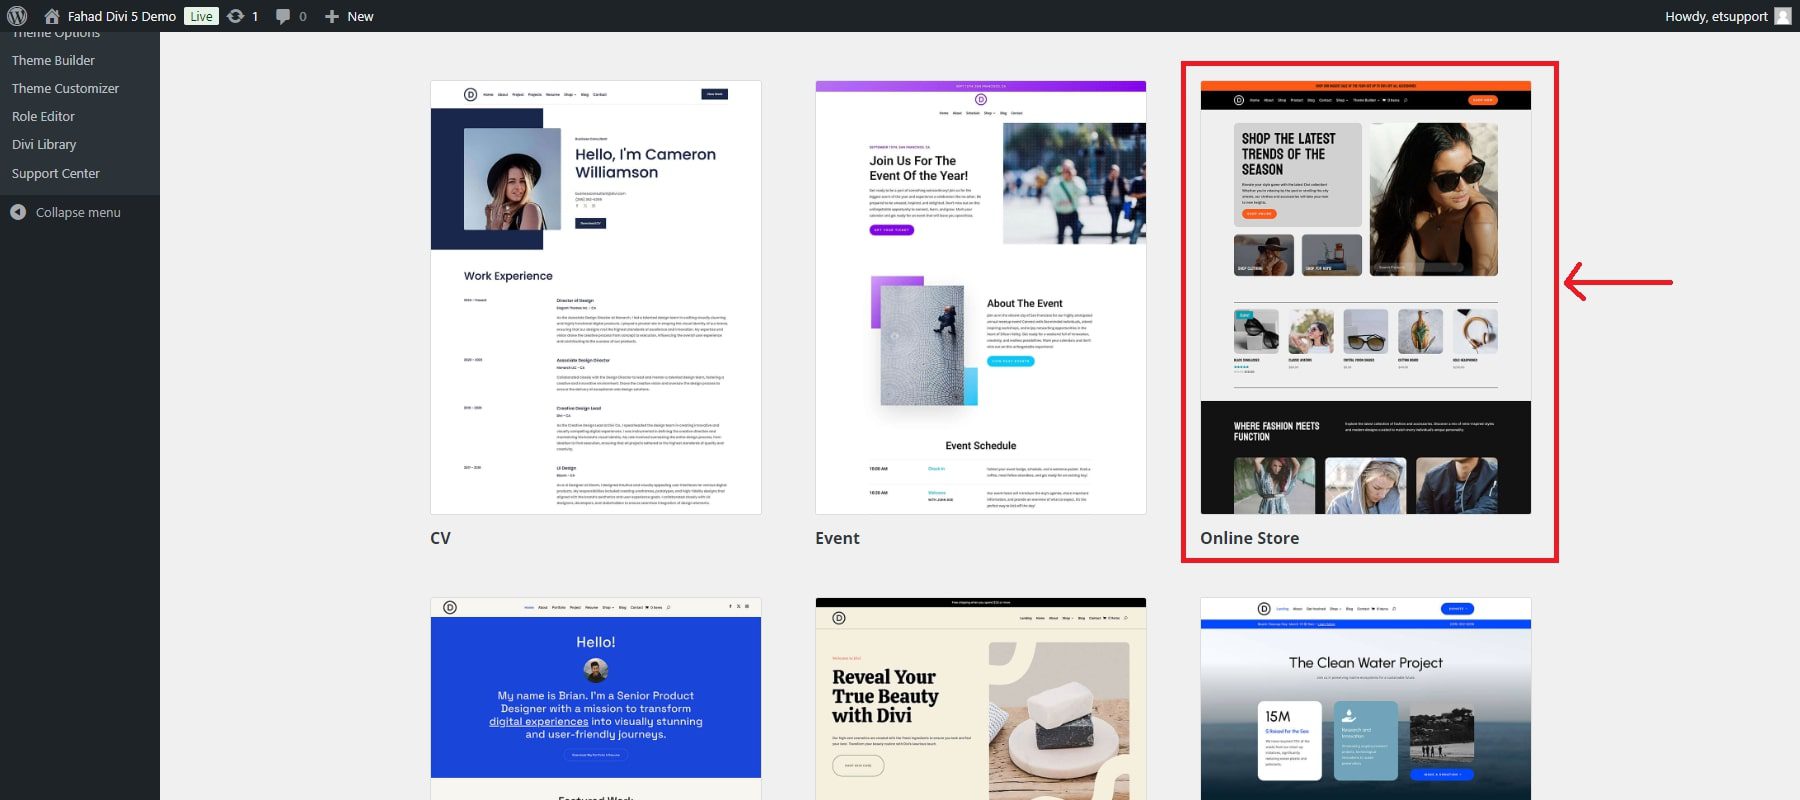
WooCommerce has begun transitioning towards a block-based editor for Woo template modifications, enabling non-coders to tinker with layout design. Many store owners don’t like the Block Editor and are switching to more advanced page builders instead. These page builders, like Divi, allow for more creative freedom, enabling users to build custom shopping experiences. Divi also comes with Starter Sites for WooCommerce stores, giving you a tailored design in minutes.
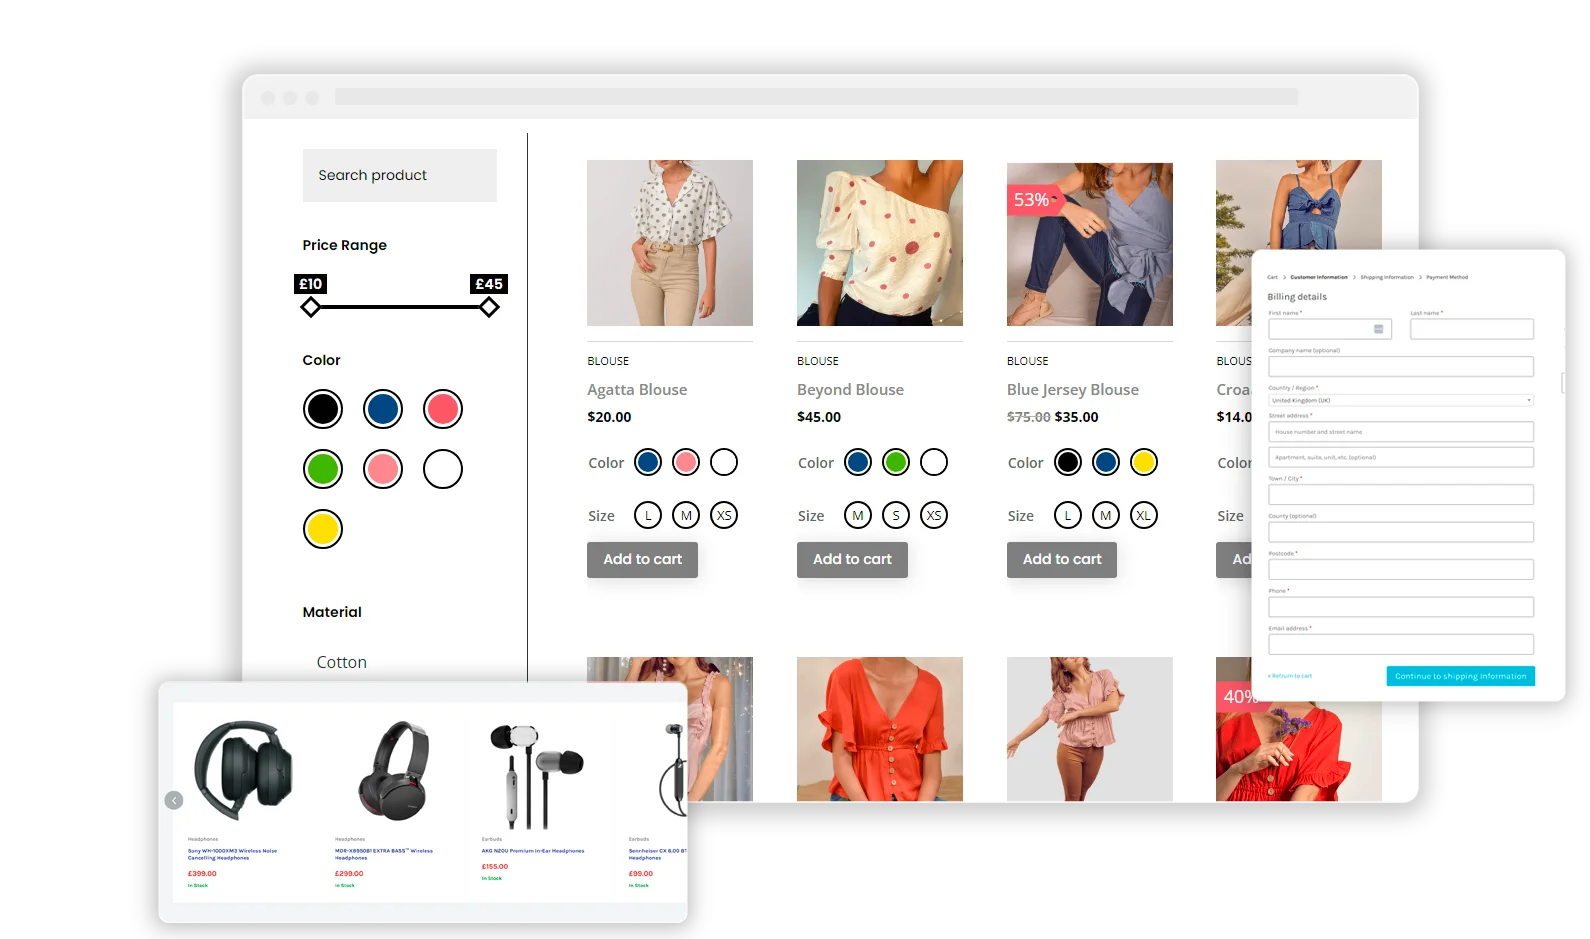
Product variation swatches are a very popular design option because they give shoppers the choice to change between variations in a very visual way. Divi Engine’s BodyCommerce lets you edit the display of product pages even to visually show variations in filterable product grids.
To learn more, see our Divi BodyCommerce review.
Conclusion
Enabling product variations in WooCommerce can give your customers a better online shopping experience and minimize the number of product pages you must create and manage. Fortunately, you can use WooCommerce’s default functionality to set them up in no time. Or, if you want something with a little more flexibility or features, you can try a third-party extension to do it.
In general, displaying product variations in WooCommerce requires just a few steps, no matter the extension:
- Create a variable product.
- Add product attributes (such as size and color).
- Generate your variations so each has a unique SKU number (and price, if applicable).
- Preview and publish your variable product.
- If you need to bulk edit these, including editing pricing, Bulk Variation Manager can help.
Do you have any questions about product variations in WooCommerce? Ask away in the comments section below!




Hi
Is there any to have different product description for each variation. For example if you choose a particular variation, the product description changes in the description tab below the product page layout.
i have a question, this article for product page right?.. if i want to appear the product option on main page?.. you can help me?.. like current landing page nowadays, they have package, i want it can be choose the option, without go to the product page.. choose, and add to cart on the landing page.
Hello Will,
Thanks for great article.
May you also please help me to show swatches (variants) on list page instead of Product Details page.
I am using Woo Products for Divi to show all products.
Thanks
Would greatly appreciate detailed information regarding how to add “customize now button” for customer to: 1. upload instructions 2. Upload images 3. Insert custom price range for custom designs and sizes.
When you click the add to cart button is there a way to keep the page from redirecting to the product page by using this plugin?
Hi Eric,
Based on your question, I’m assuming you have a variable product and an Add to Cart button for it somewhere on your site other than its product page. In this scenario, WooCommerce will redirect customers to the product page when they click on the button so they can select their desired variation(s) before the product is added to the cart. If you wanted to get around this, you would need separate Add to Cart buttons for each variation (which may or may not be feasible, depending on what you’re selling).
So, the short answer to your question is no, there is not a WooCommerce setting you can configure to prevent this from happening. There are Add to Cart redirect settings (WooCommerce > Settings > Products > Add to cart behavior) but these refer to redirection to the cart page, not product pages. There is also an Add to Cart Redirect WooCommerce extension, but it hasn’t been updated in a while and I’m not sure it would be able to help you accomplish your goal.
That’s really all the guidance I can offer here – I hope at least some of it is useful.
Great post! I have worked on both DIVI and Elementor and have always found DIVI best for Woocommerce. Thanks for sharing.
Thank you, Shounak!
Can you tell me what theme you are using in the picture?
It’s Twenty Nineteen.
Great post! I am trying to find these days…if we use variations and there is a case where all of them are out of stock in a product, is there a way to show that directly at the product? By default, we won’t find the product is out of stock until we select each variation. Does Divi have any plugin that enhance this or any other plugin? Thanks for this amazing blog and information! 😉
Thanks for your question, Iciar. First, I’d recommend you check out the post on this blog titled “A Simple Guide to WooCommerce Inventory Management”. We mention several plugins in that article that you may find helpful.
As for the rest – in most cases, shop managers would want to treat each variation and its inventory as a separate product with its own SKU number. For example, if you sell a t-shirt that comes in small, medium, and large sizes, you would want to know when you’re out of large shirts so you can restock them. If you only restock when you’re out of all the sizes, you may have customers who need a size that’s out of stock and can’t buy the variation they need.
However, if you sell a product for which this is not the case, you may want to set up product options rather than product variations. With product options, you have a single item with one SKU number and customers can specify what variable features they want. This is common with handmade products. For instance, if you sell custom screen-printed t-shirts, you might have a field on your product page where shoppers can enter the text they want to have printed on their shirts.
There’s a plugin called Simple Product Options for WooCommerce that can help you set this up. Hope this helps!