Starting your WordPress journey can be exciting yet overwhelming. Whether you’re building a blog, portfolio, or business site, WordPress offers unmatched flexibility and ease of use, especially with themes like Divi. As one of the most popular website platforms, it’s designed to help beginners create stunning, professional websites. In this guide, we’ll simplify your first steps, from downloading WordPress to preparing for a seamless setup.
- 1 What You Should Know Before Downloading WordPress?
- 2 How to Download WordPress Directly
- 3 How to Download And Install WordPress in One-Click (recommended)
- 4 How to Install WordPress Using cPanel (Most Common)
- 5 How to Install WordPress Manually (Advanced)
- 6 Common Issues After Downloading and Installing WordPress
- 7 Setting Up Your First WordPress Site
- 8 Conclusion
What You Should Know Before Downloading WordPress?
Before diving into the download and installation process, it’s essential to understand what WordPress is and why it’s such a powerful tool for creating websites. Here are some key concepts to get you started:
It’s Free and Open Source Software
WordPress is free to download, install, and use. Being open source means that anyone can access its source code, modify it, and even contribute to its development. This fosters a vibrant community of developers who create plugins, themes, and updates, ensuring WordPress stays relevant and secure.
It Requires Hosting (Which May Not Be Free)
WordPress is software that needs to be hosted on a server to be accessible online. For this, you have two main options. Here they are:
You Can Use a Hosting Provider (With Monthly or Yearly Fee)
A hosting provider is a company that offers the infrastructure and services needed to make your website accessible on the Internet. These providers maintain powerful servers to store and deliver websites quickly and reliably. Hosting providers typically handle most of the technical setup for you, offering convenience and ensuring your site is live 24/7. Examples of popular hosting providers include:
You Can Host WordPress Locally (Free)
This allows you to run WordPress on your computer without an internet connection or live server. This is ideal for development, testing themes or plugins, or practicing WordPress installation in a private environment.
To create a local host, you’ll need software that simulates a server environment on your computer. The most common tools include:
Hosting Server Requirements
WordPress requires specific PHP and MySQL (or MariaDB) versions to function correctly. As of 2024, these are the server requirements for the WordPress version.
- PHP 7.4 or higher
- MySQL 8.0 or higher (or MariaDB 10.4 or higher)
- HTTPS support (as most sites now use HTTPS)
- WordPress also suggests using Apache or Nginx, but any server supporting PHP and MySQL is acceptable.
Don’t worry—your hosting provider should already know these requirements and set them up for you. However, it is always good to understand what’s required for installing WordPress effectively, whether for a personal project or a professional website.
How to Download WordPress Directly
After getting all the required tools, let’s not waste any more time and move on to downloading WordPress.
1. Visit the Official WordPress Website

To start, navigate to the official WordPress website. This is the safest and most reliable source for downloading the latest version of WordPress.
2. Download the Latest Version
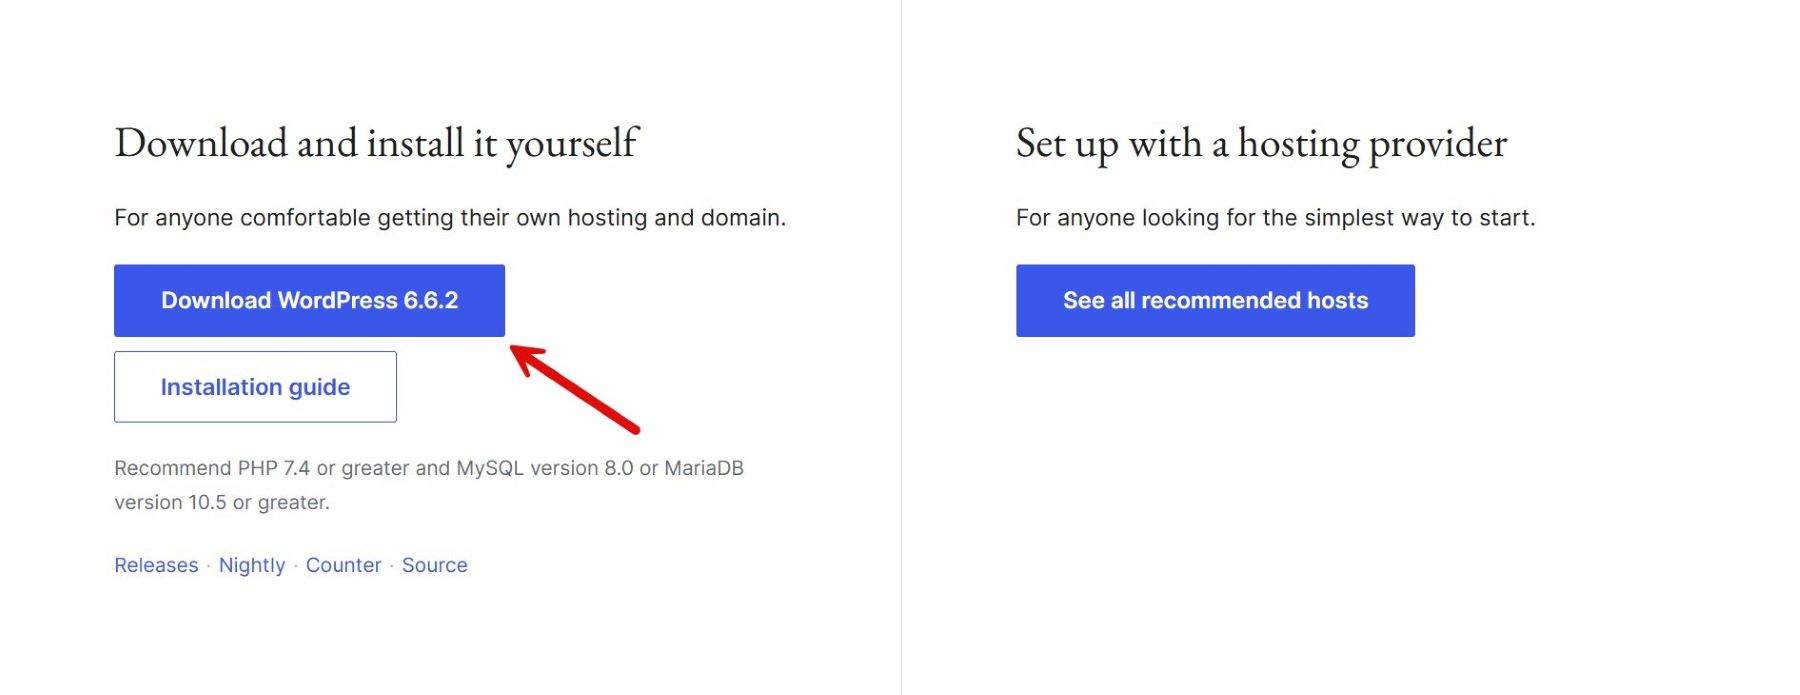
On the homepage, locate the “Get WordPress” button.

Click on it to access the download page, where you’ll see a prominent button labeled “Download WordPress [version number].” Click this button to begin the download.
3. Saving the File to Your Computer
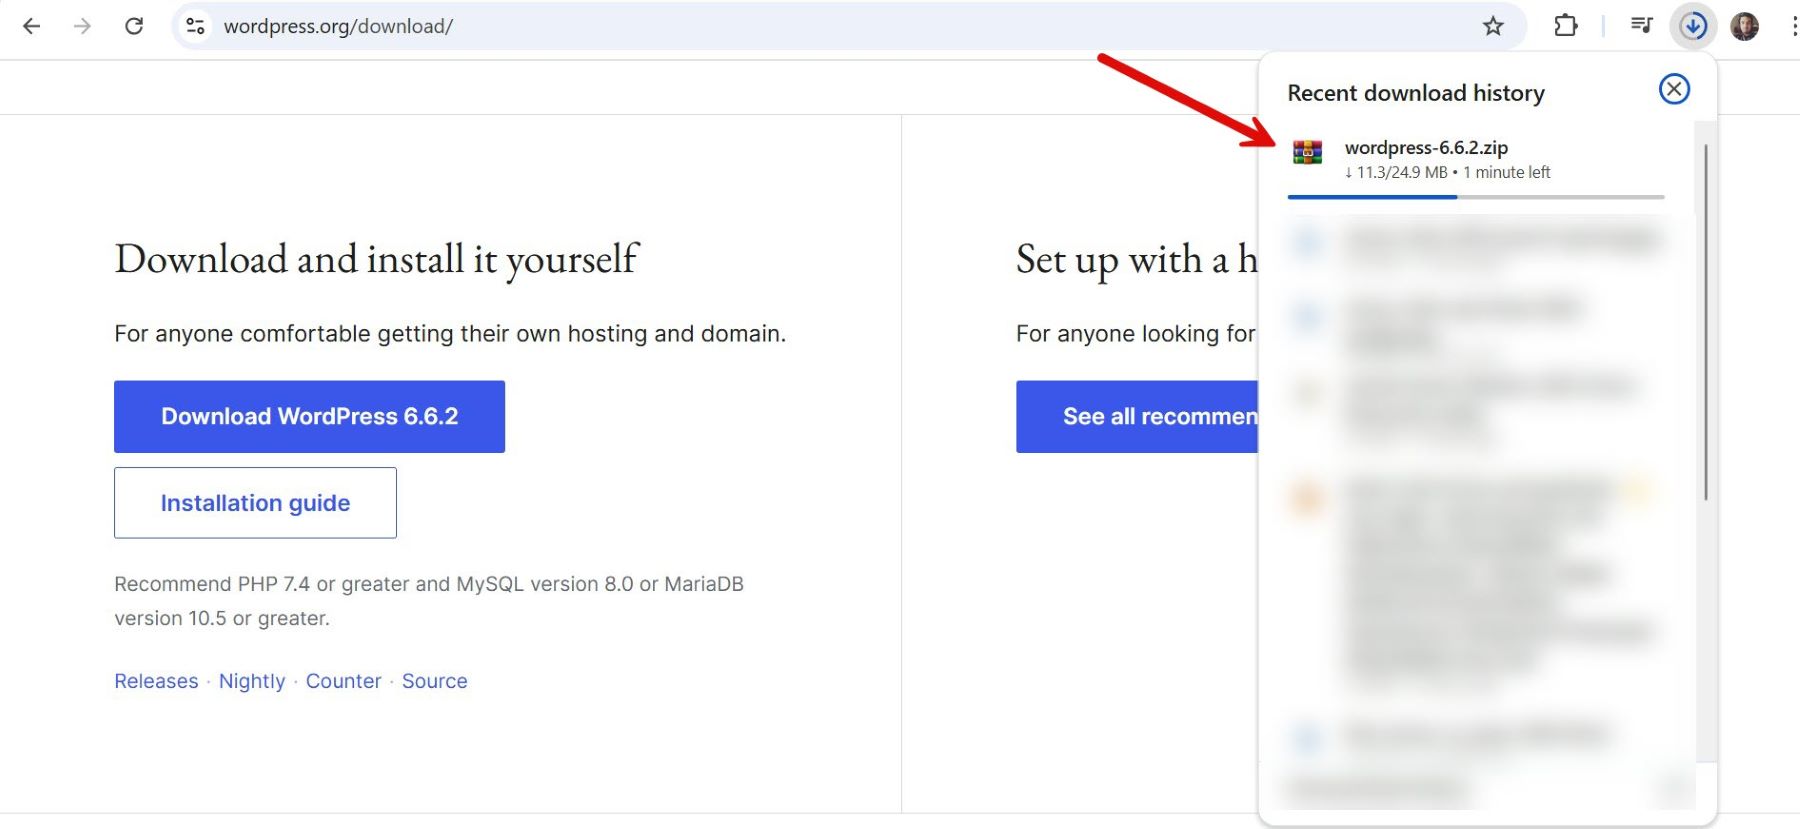
Once the download starts, save the .zip file to a designated folder on your computer. Ensure the folder is easy to locate for the installation process later.
How to Download And Install WordPress in One-Click (recommended)
Many hosting providers simplify setting up WordPress by offering a one-click installation directly from their dashboard. Select a hosting provider specializing in WordPress hosting or offering WordPress as a feature. In this case, we will use SiteGround.
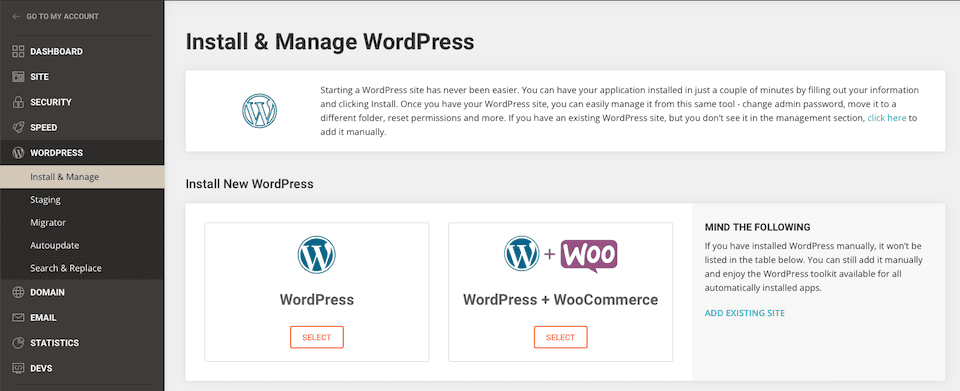
Locate the website you want to manage in your SiteGround account dashboard. Click ‘Site Tools’ next to the domain where you want to install WordPress. Inside ‘Site Tools,’ go to the ‘WordPress’ menu on the left-hand side and select ‘Install & Manage.’ This section allows you to install WordPress on your selected domain.
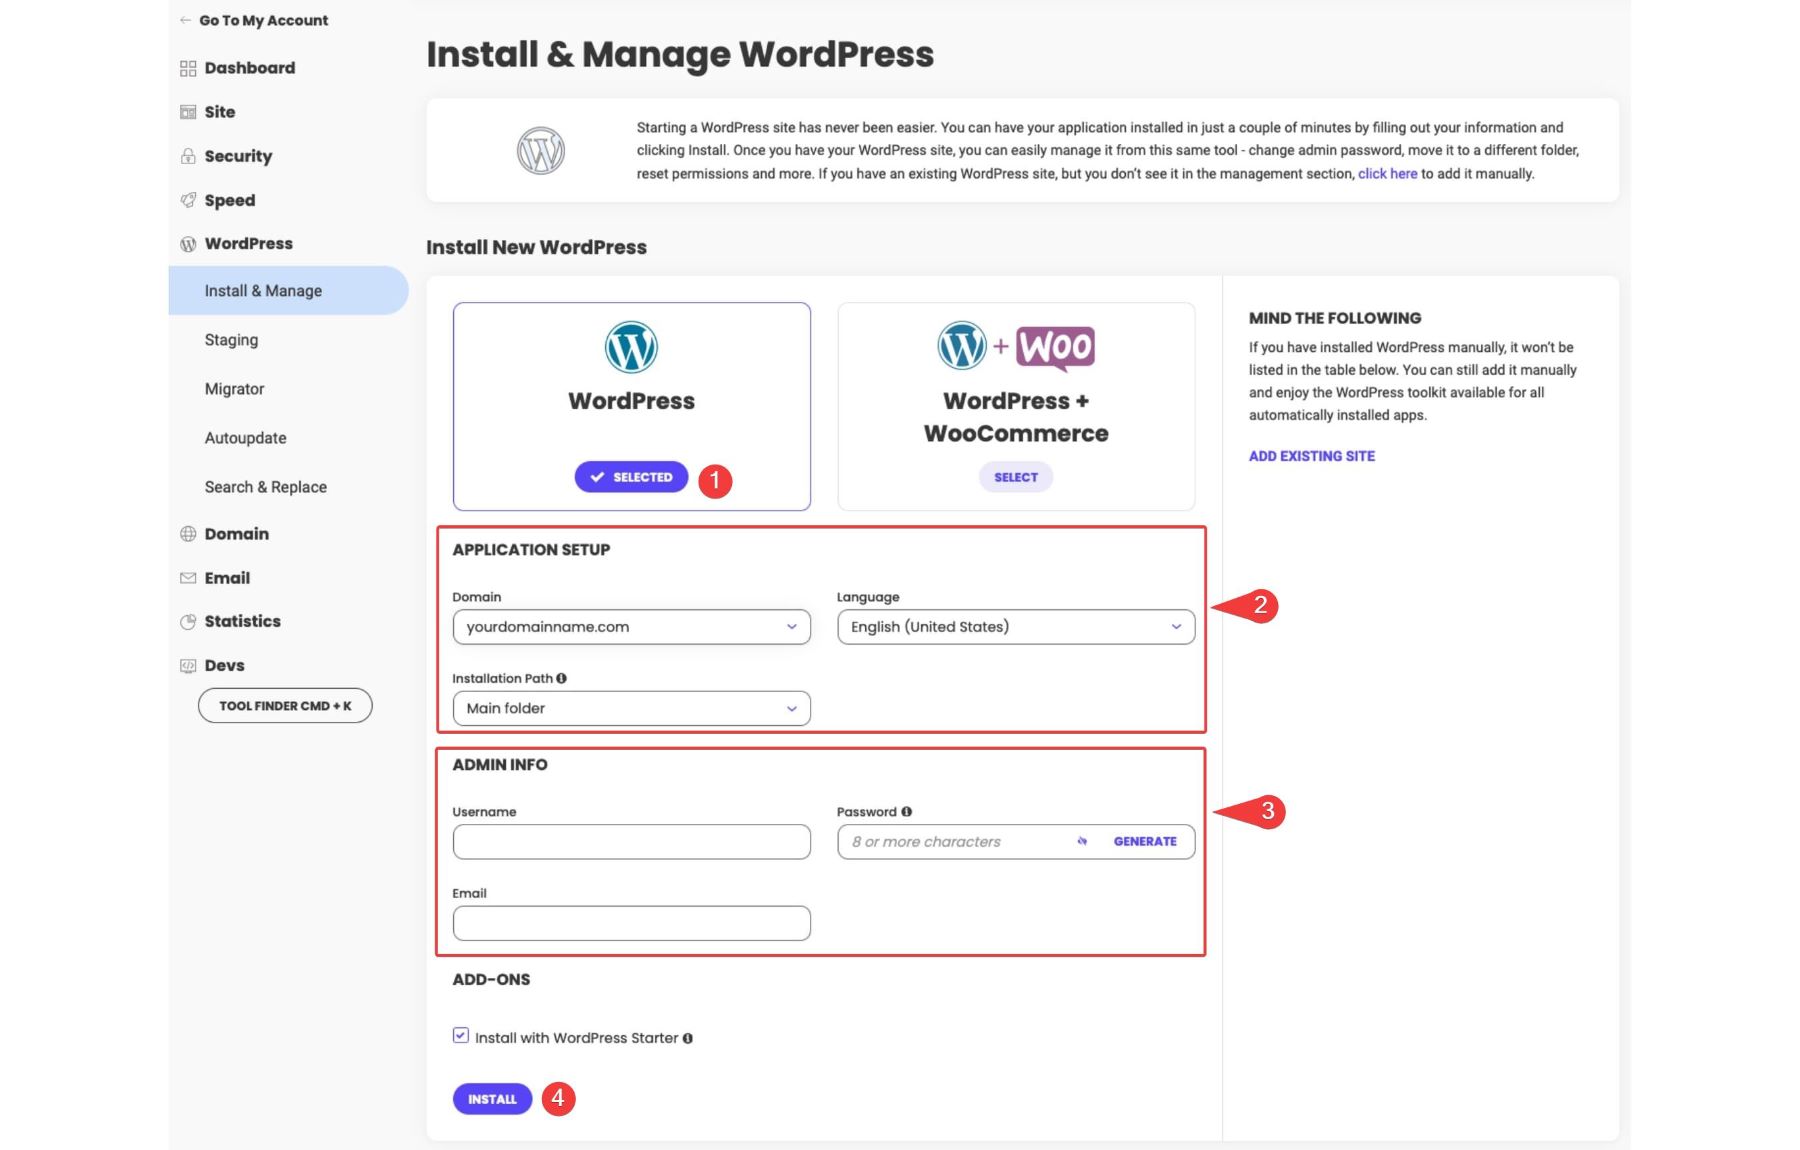
Under the installation section, configure the following details:
- Application: Select “WordPress” from the dropdown menu.
- Protocol: Choose either http:// or https://, depending on whether your domain has an SSL certificate. (SiteGround provides free SSL certificates, so https:// is recommended.)
- Domain: Choose the domain name where you want WordPress installed.
- Language: Select the default language for your WordPress site.
Fill in your WordPress admin account information:
- Admin Email: Provide an email address for account recovery and notifications.
- Username: Create a secure admin username for logging into the WordPress dashboard.
- Password: Set a strong password for your account.
Once you’ve configured all the necessary settings, click the “Install” button. SiteGround will automatically set up WordPress for you, including the database and other configurations.
After the installation, SiteGround will display a confirmation message with your WordPress admin login details. You can access your site by navigating to yourdomain.com/wp-admin and logging in with the credentials you created.
How to Install WordPress Using cPanel (Most Common)
Installing WordPress through cPanel is one of the most widely used methods, as many hosting providers include cPanel as part of their services. Access your hosting provider’s cPanel by navigating to the cPanel login page.
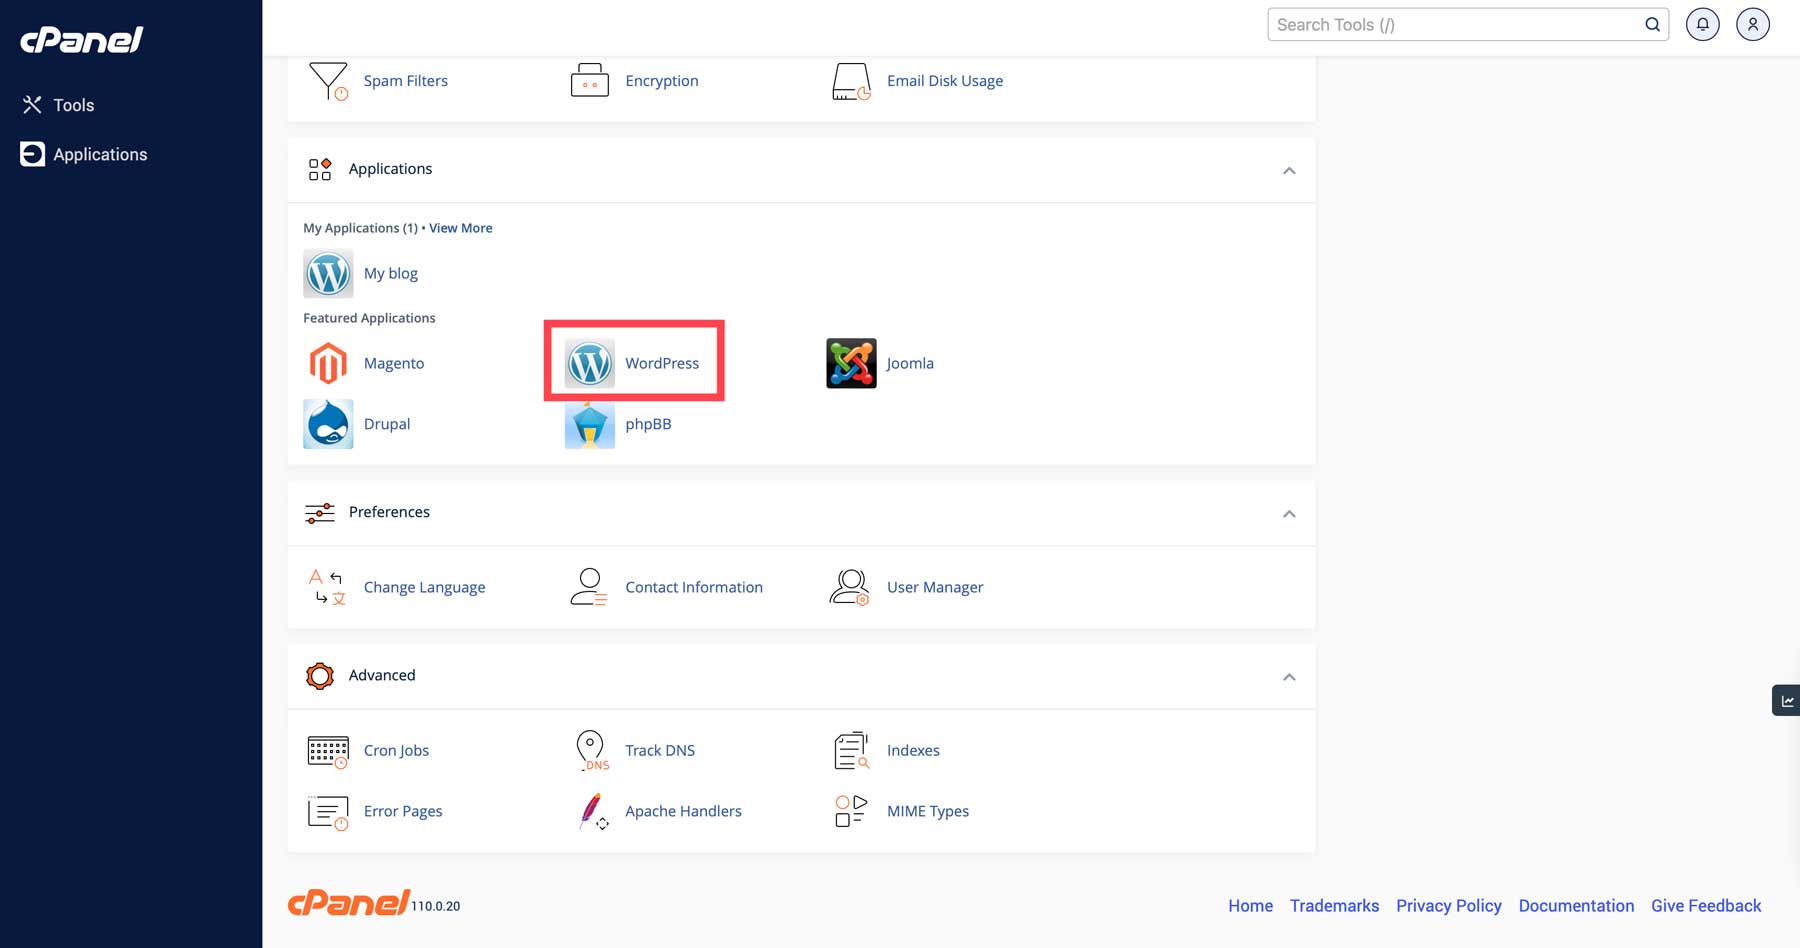
Access your hosting provider’s cPanel by navigating to the cPanel login page. Use the credentials provided by your hosting provider to log in. In the cPanel dashboard, look for the “WordPress Installer” or “Softaculous Apps Installer” section. These tools are designed to simplify the WordPress installation process. In this case, we will use GoDaddy. If you have chosen another hosting provider, there is no need to worry, as almost every installer has the same function.
Click on the WordPress icon to begin.
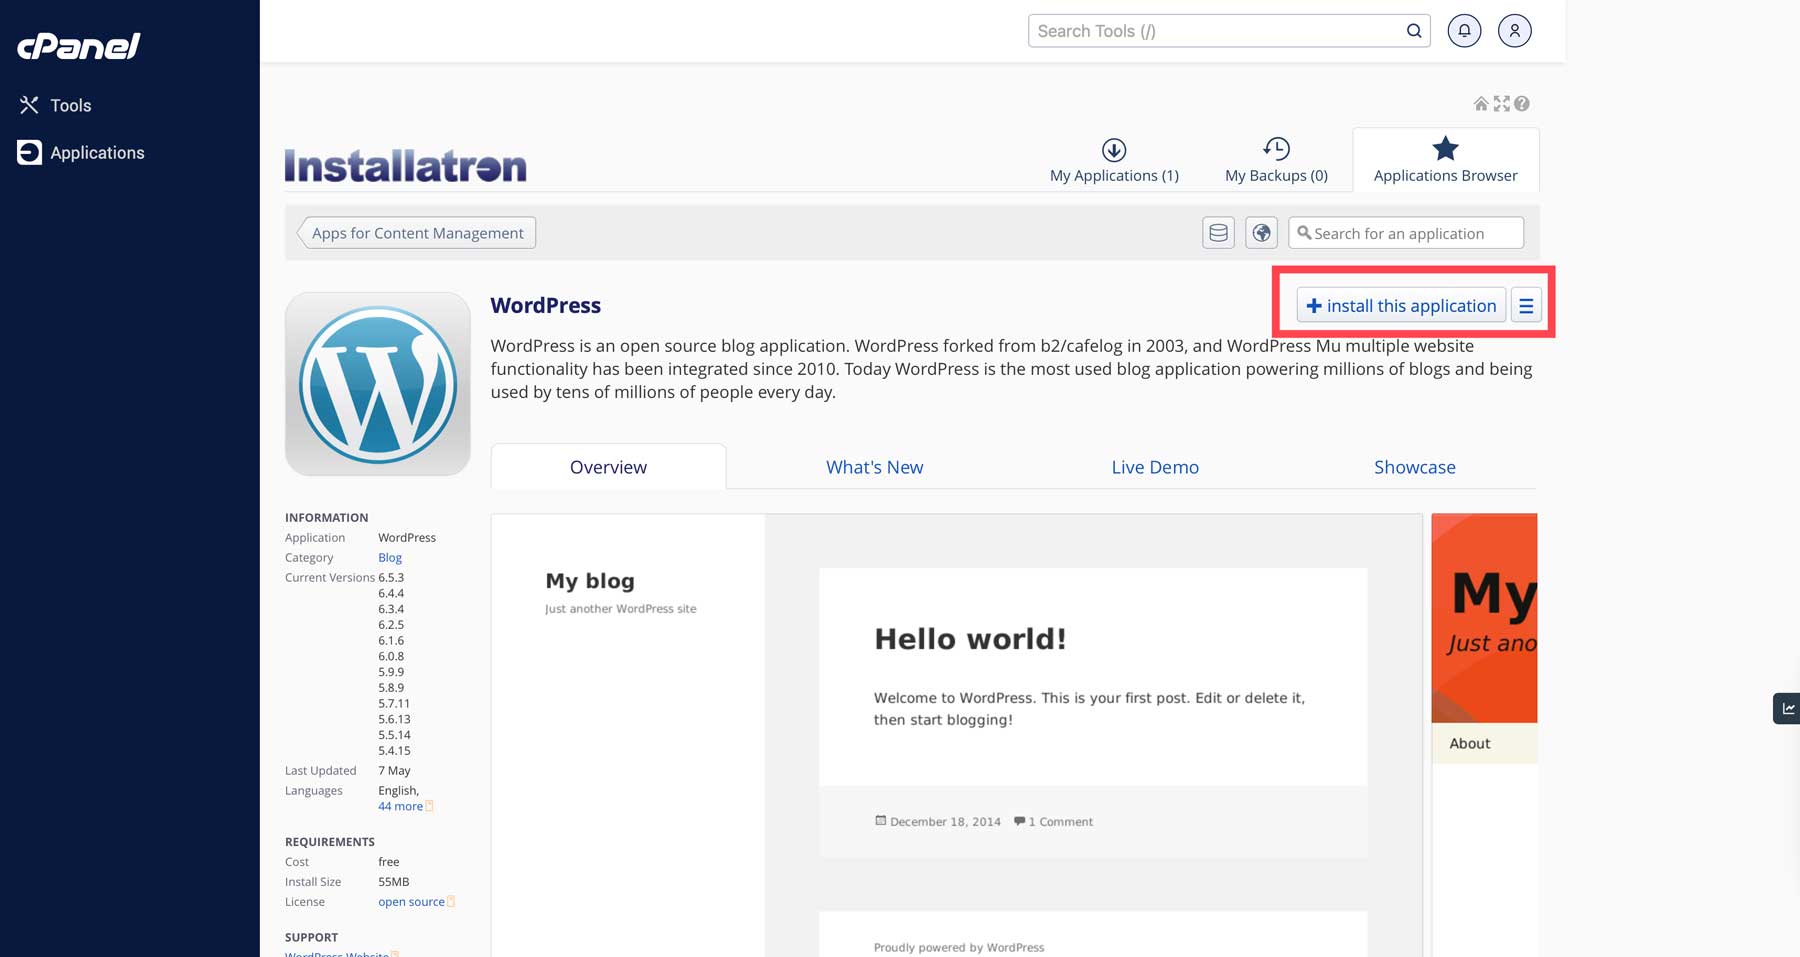
Once the page refreshes, you’ll find the Installatron WordPress installer. Click ‘Install This Application’ to begin the WordPress installation.
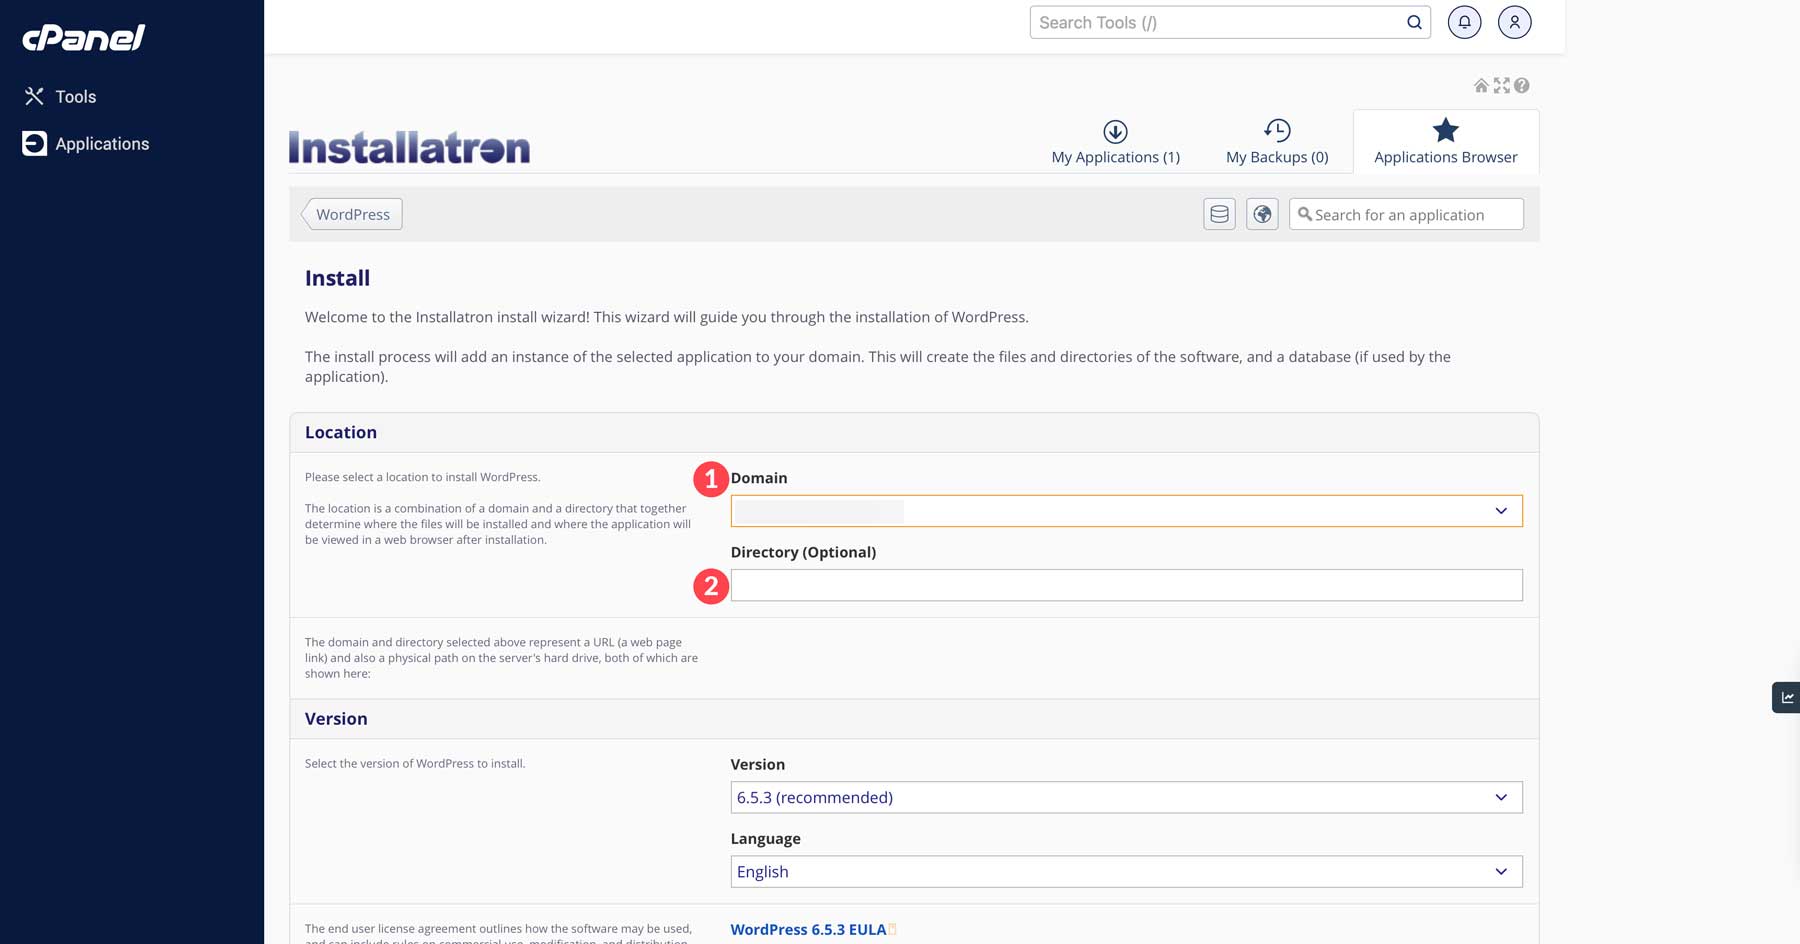
You’ll need to specify a few details, such as:
- Domain: Choose the domain you want to use for the WordPress site (especially if you have multiple domains in your account).
- Site Settings: Enter the site directory, which you can change later.
- Admin Account: Set up your admin username, password, and email, which you’ll use to log in to your WordPress dashboard.
After filling in all the required fields, click Install.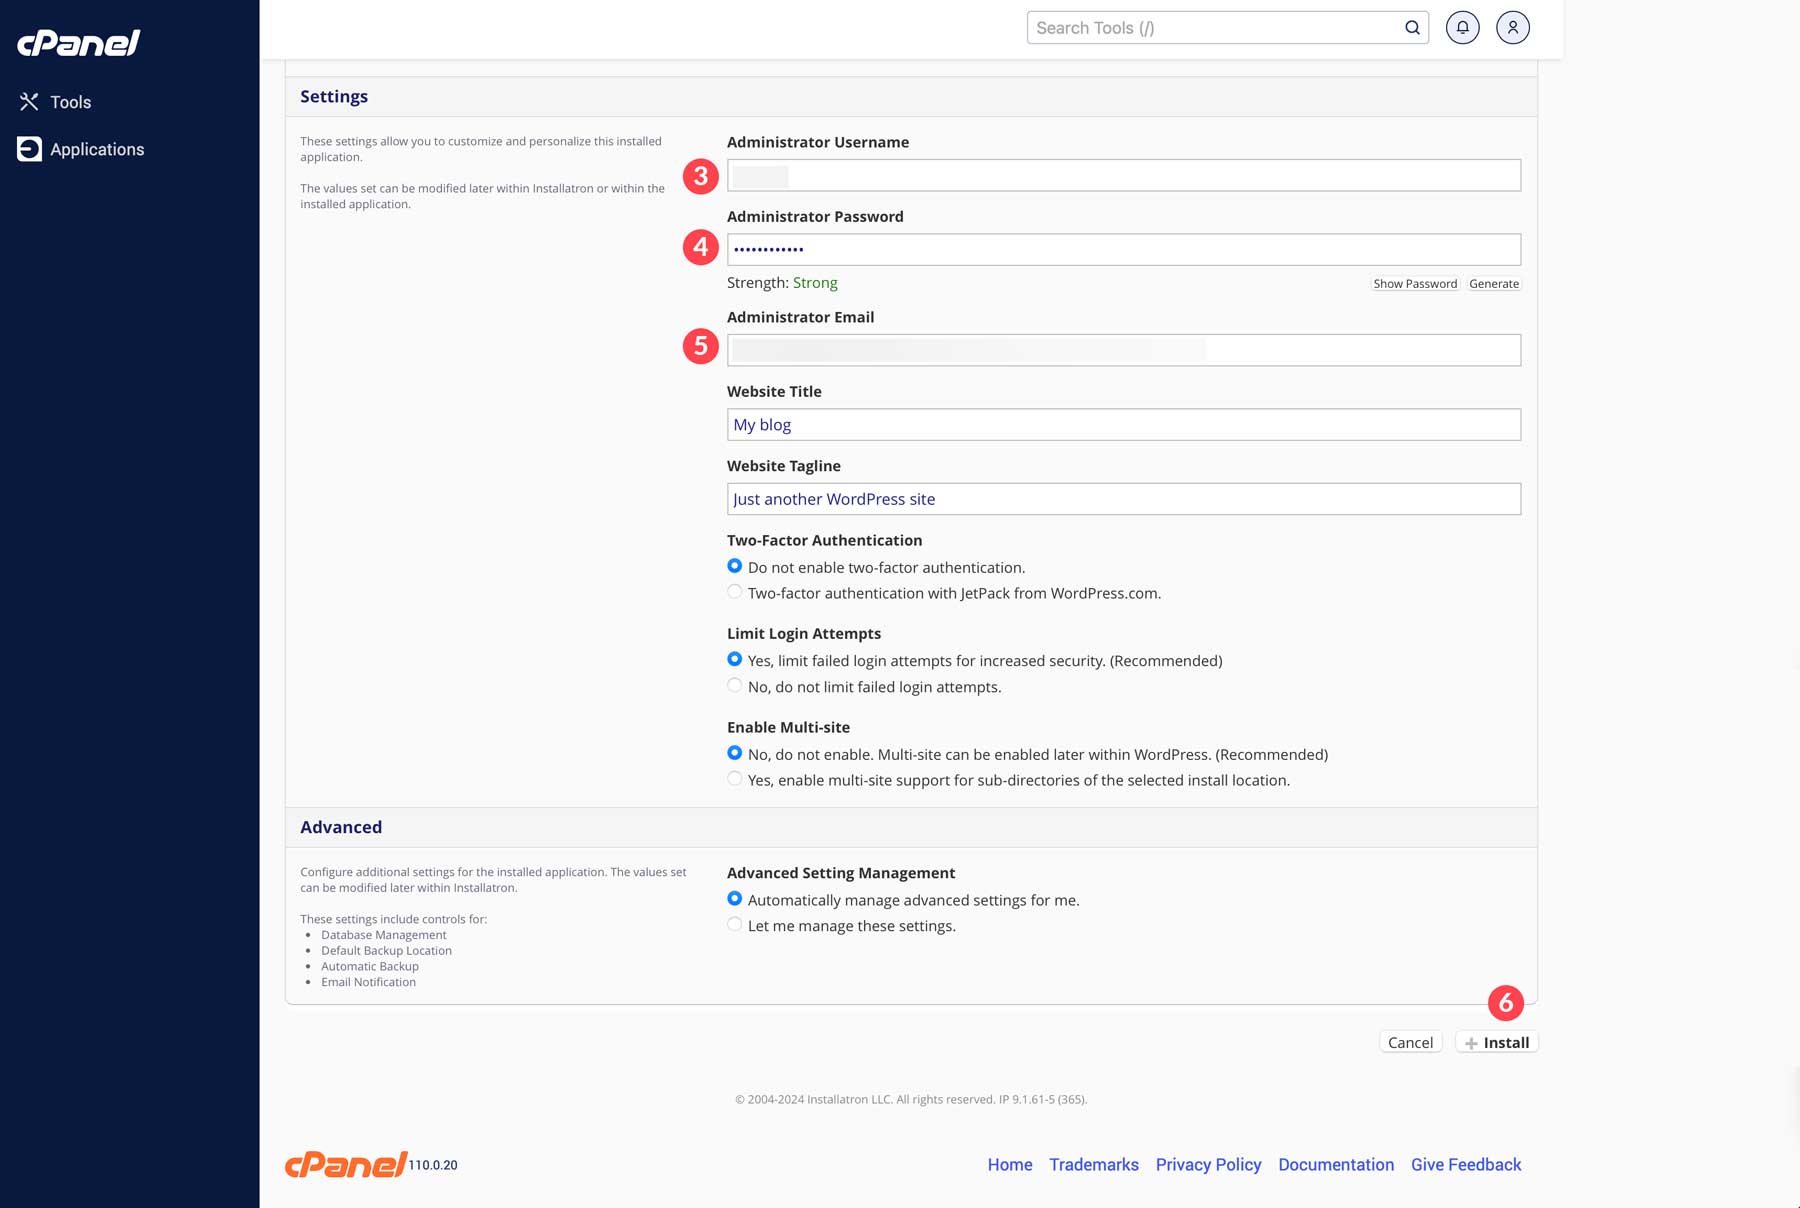
All done! WordPress is now installed. To access your site, open your browser and go to www.yoursite.com/wp-login.php, then log in using the admin username and password you set up during installation.
How to Install WordPress Manually (Advanced)
For advanced users who want complete control over their WordPress installation, installing WordPress manually is an option. Here’s a detailed breakdown of how to install WordPress manually:
Step 1: Download and Unzip Files
First, download the latest version of WordPress from the official website (WordPress.org).
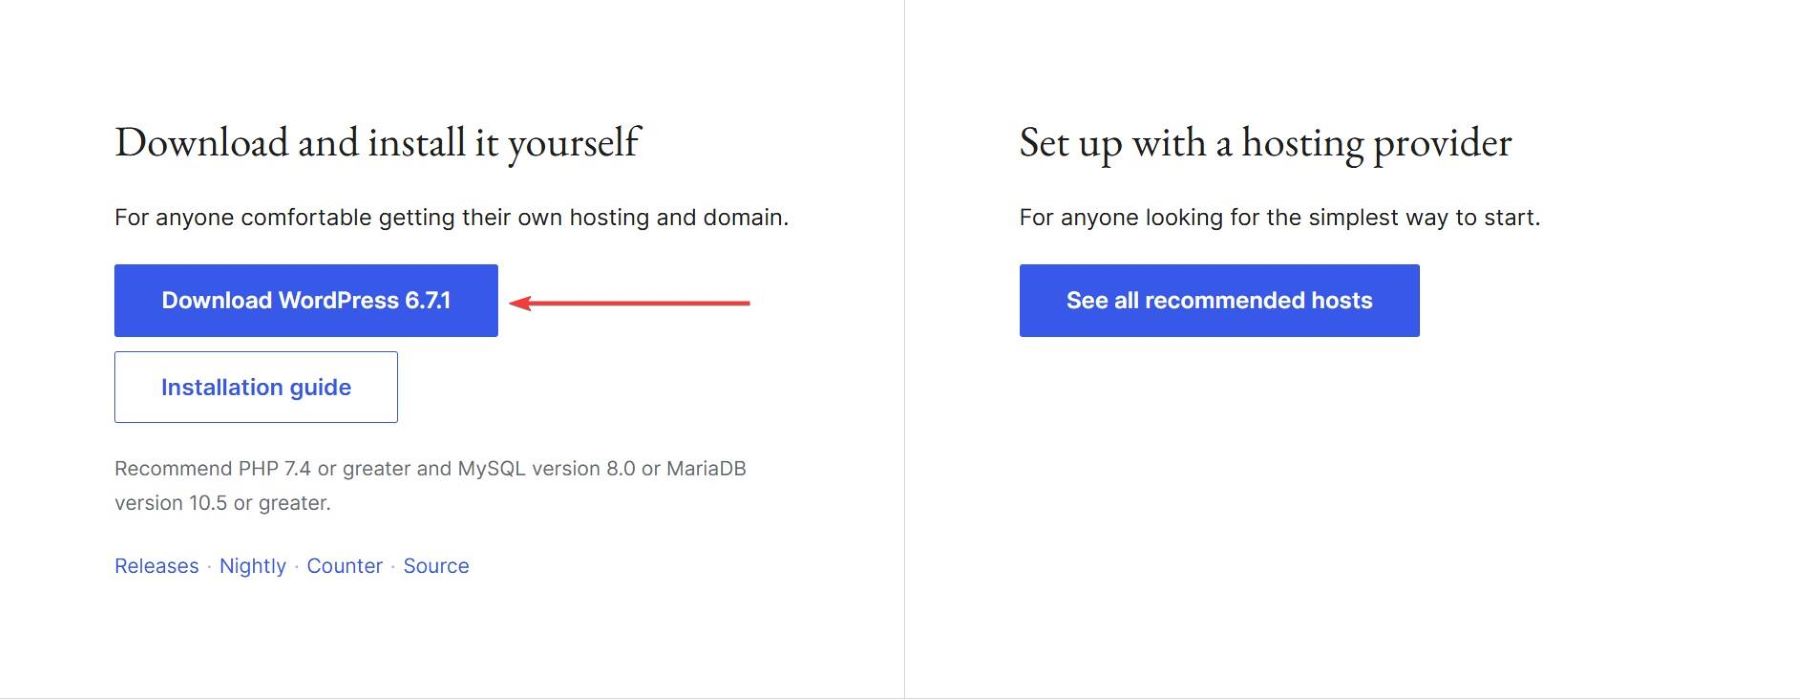
Once downloaded, you’ll have a ZIP file. Unzip it on your computer to extract the WordPress files. The extracted folder will contain several files and directories, including the wp-admin, wp-content, wp-includes directories, and a wp-config-sample.php file, which is essential for configuration.
Step 2: Create a Database
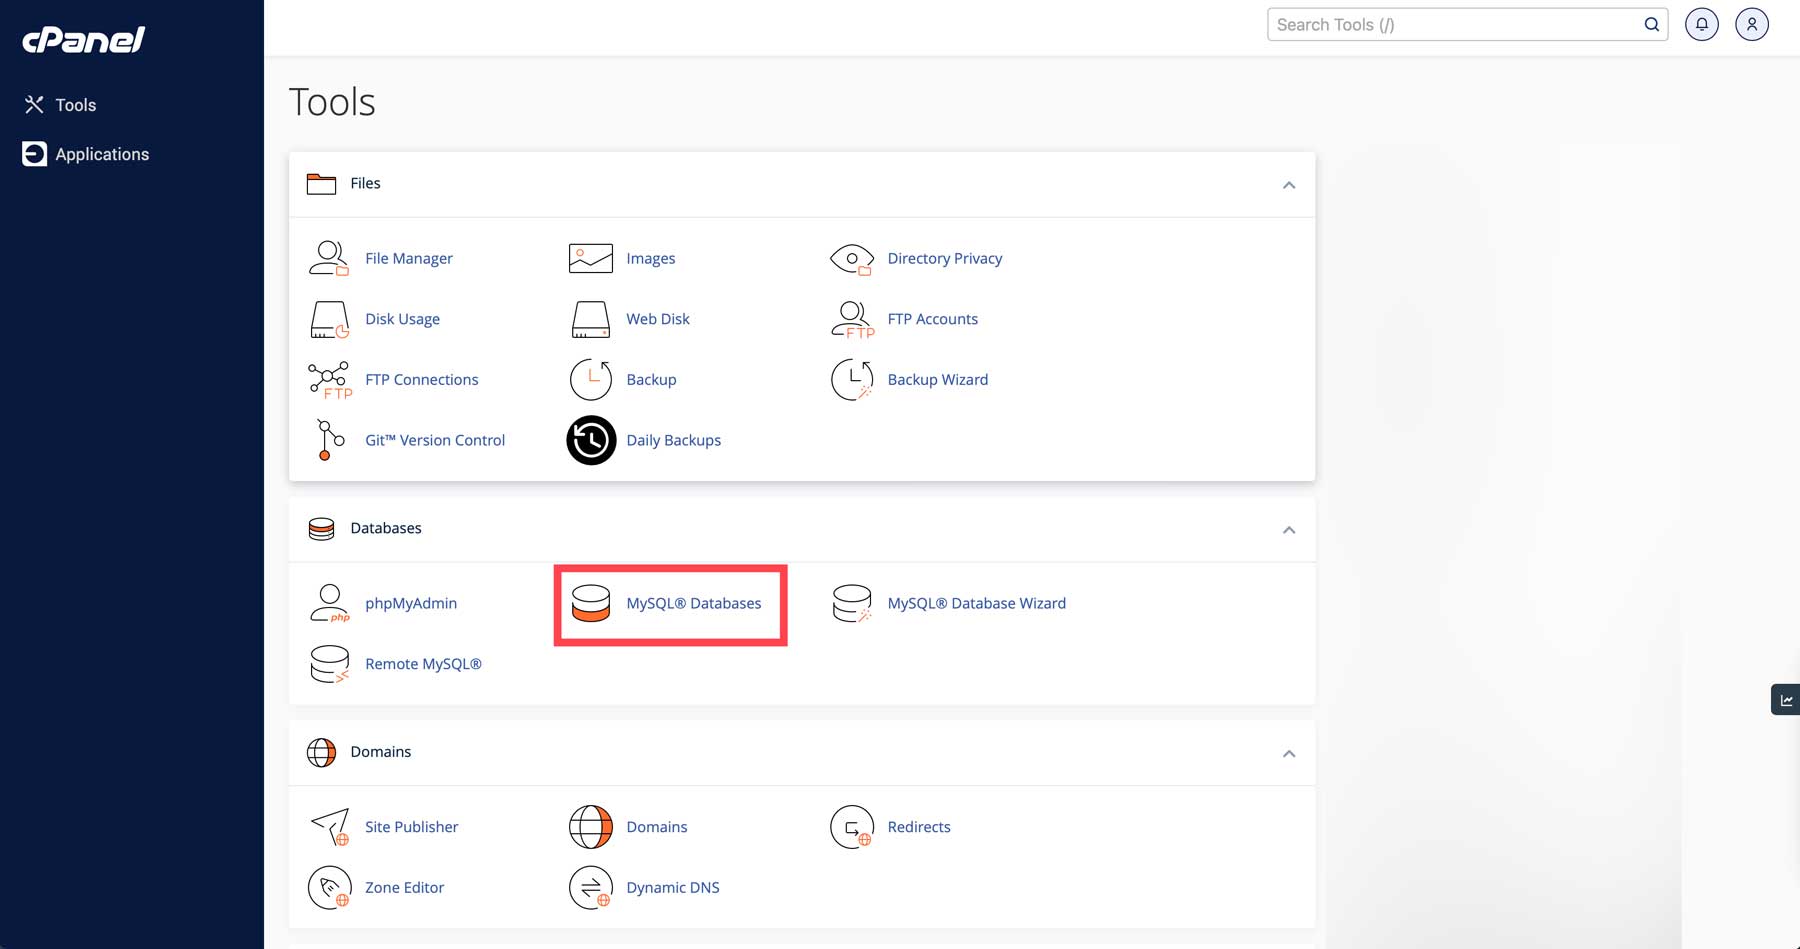
Before installing WordPress on your web server, you must create a database to store WordPress data. Start by logging into your hosting account and accessing cPanel. The layout of cPanel may vary depending on your hosting provider.
Still, if you’re unsure how to find it, you can typically access cPanel by entering your domain followed by “:2082” in your browser’s address bar (e.g., www.yourwebsite.com:2082). Once in the cPanel dashboard, look for MySQL Databases under the Databases section to create a new database.
Here, you’ll need to complete three key steps:
- Set up a new database
- Create a new user for the database
- Link the user to the database
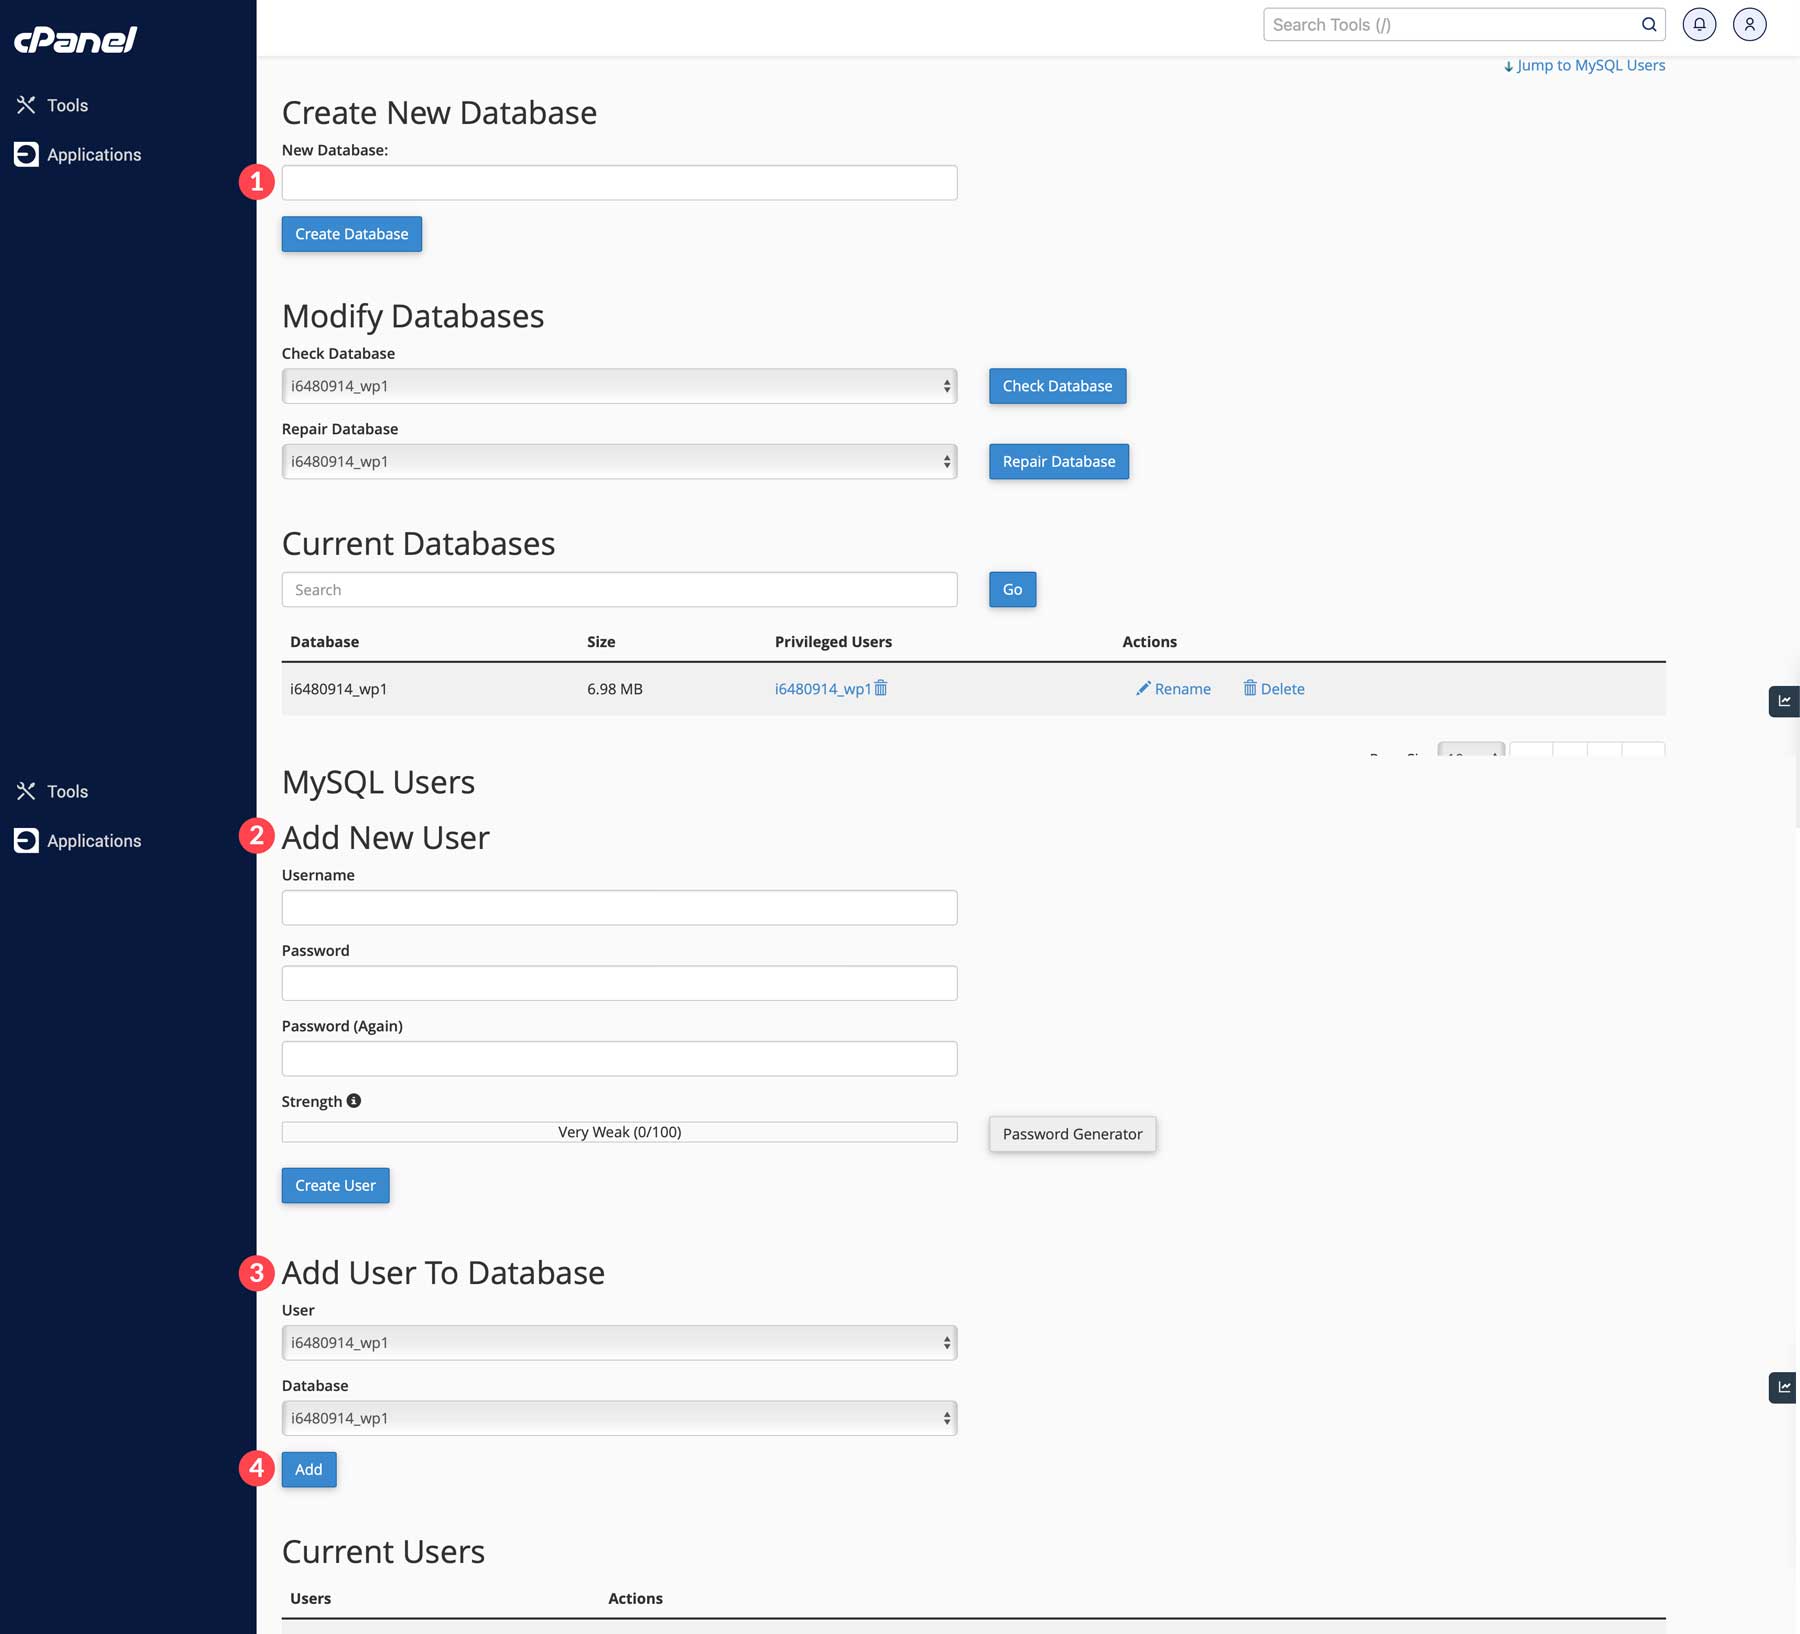
Keep track of your database name, username, and password, as you’ll need them during the WordPress installation. Consider saving this information temporarily for easy access. Once done, you can move your WordPress files to your website.
Step 3: Configure wp-config.php
The wp-config.php file is essential for connecting WordPress to your database. In this case, a good text editor is important for editing configuration files, making code modifications, or customizing your WordPress site.
Notepad++ is a clean, distraction-free text editor known for its elegant design and powerful writing environment.
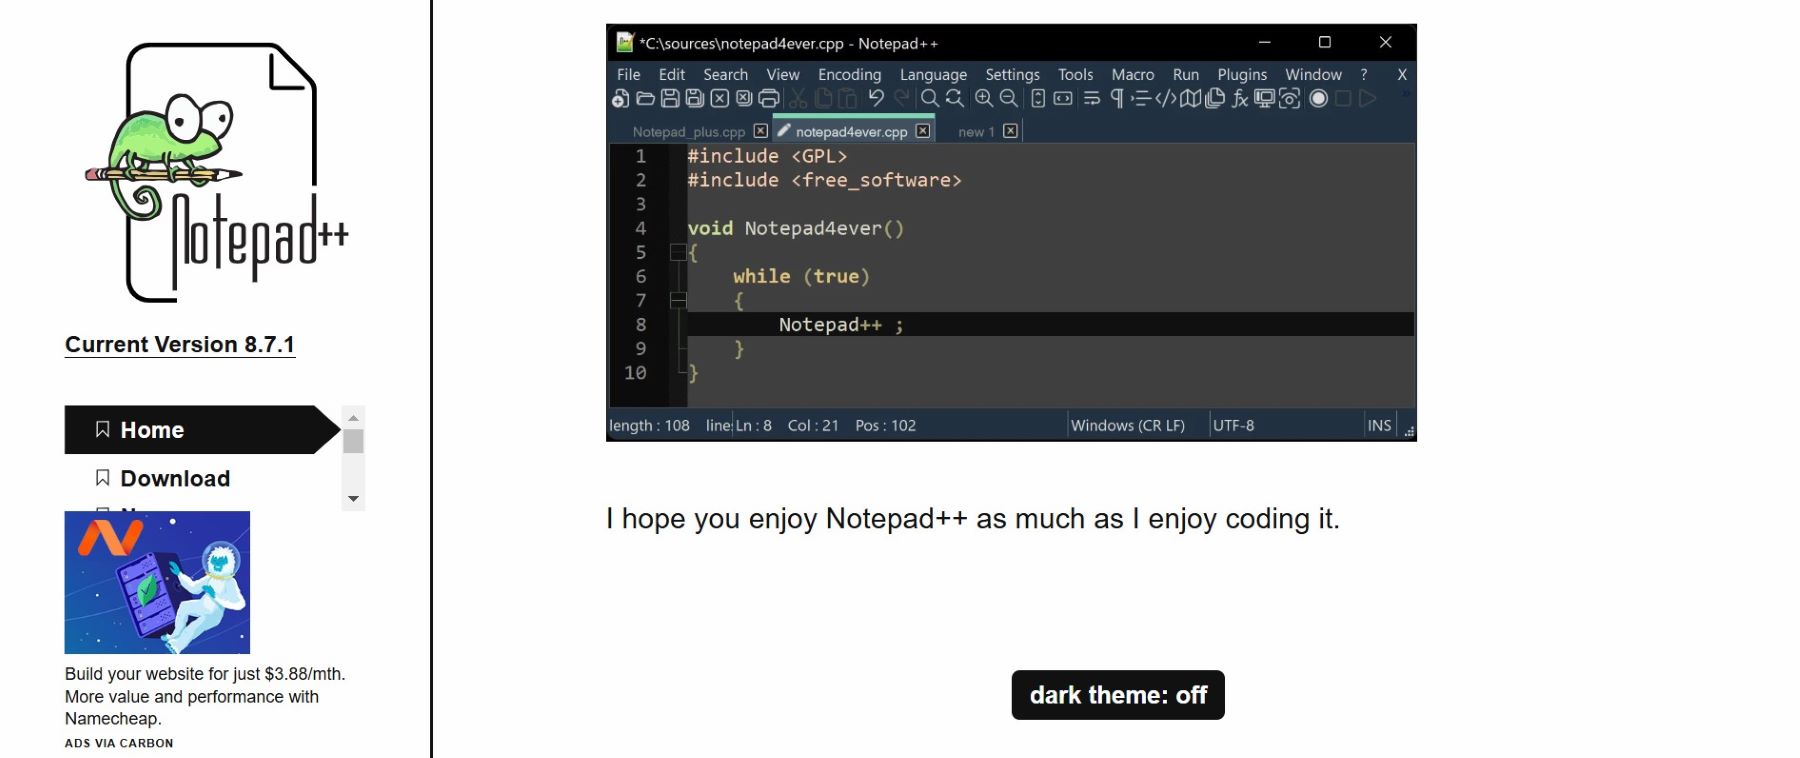
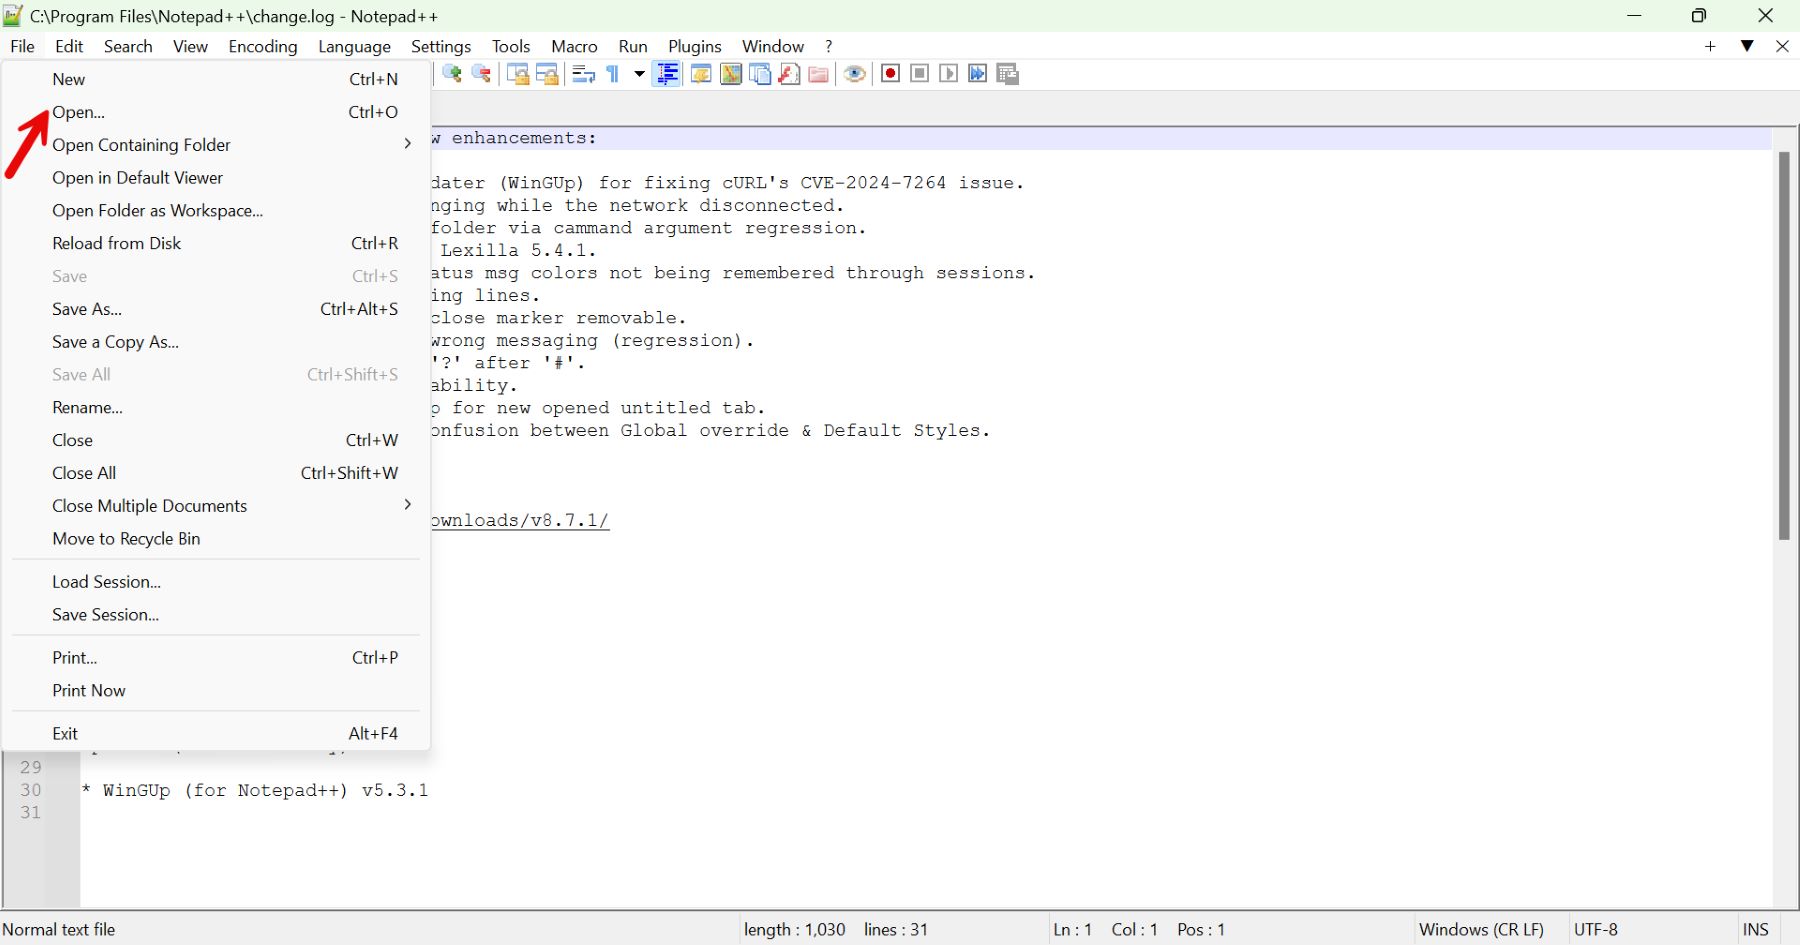
In Notepad++, go to File > Open
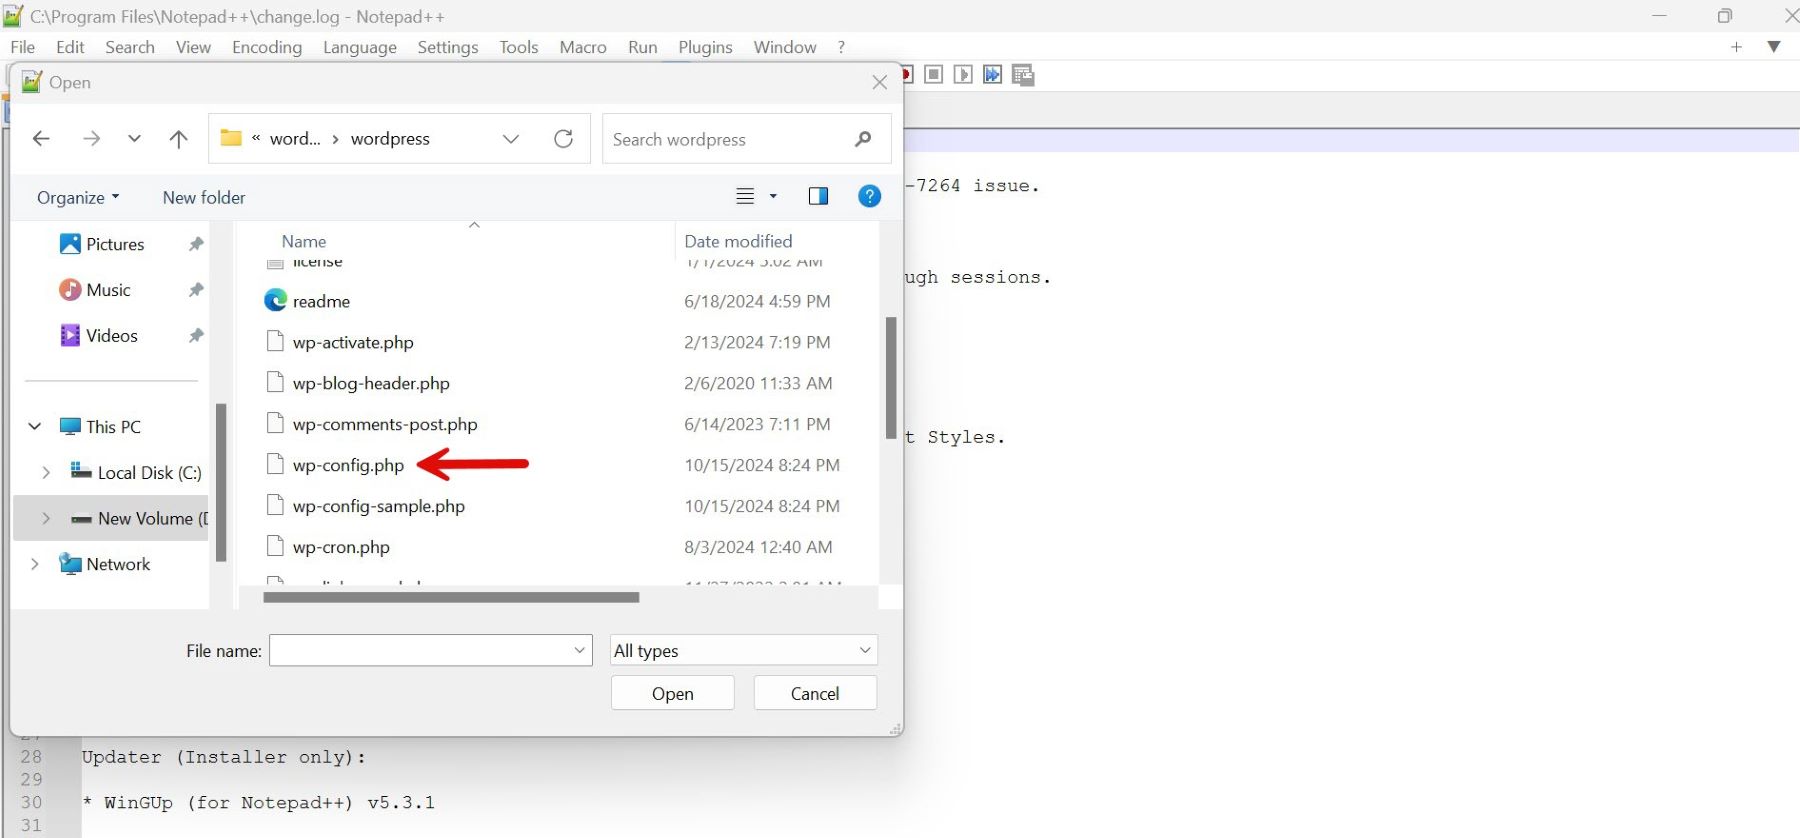
Navigate to the WordPress directory where your wp-config.php file is located. (If you haven’t created one yet, copy wp-config-sample.php, rename it to wp-config.php, and then open it.)
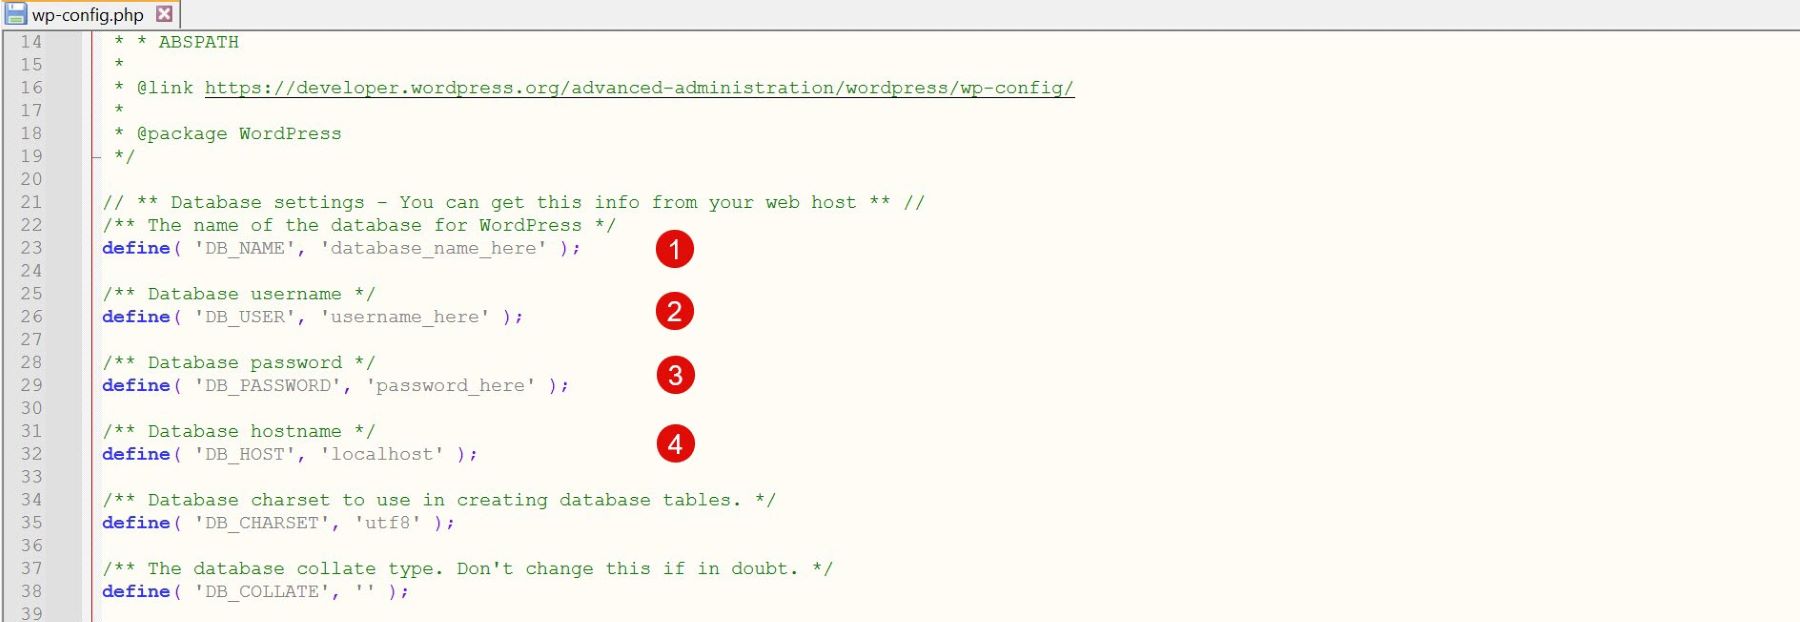
Locate the lines to set up your database connection in Notepad++.
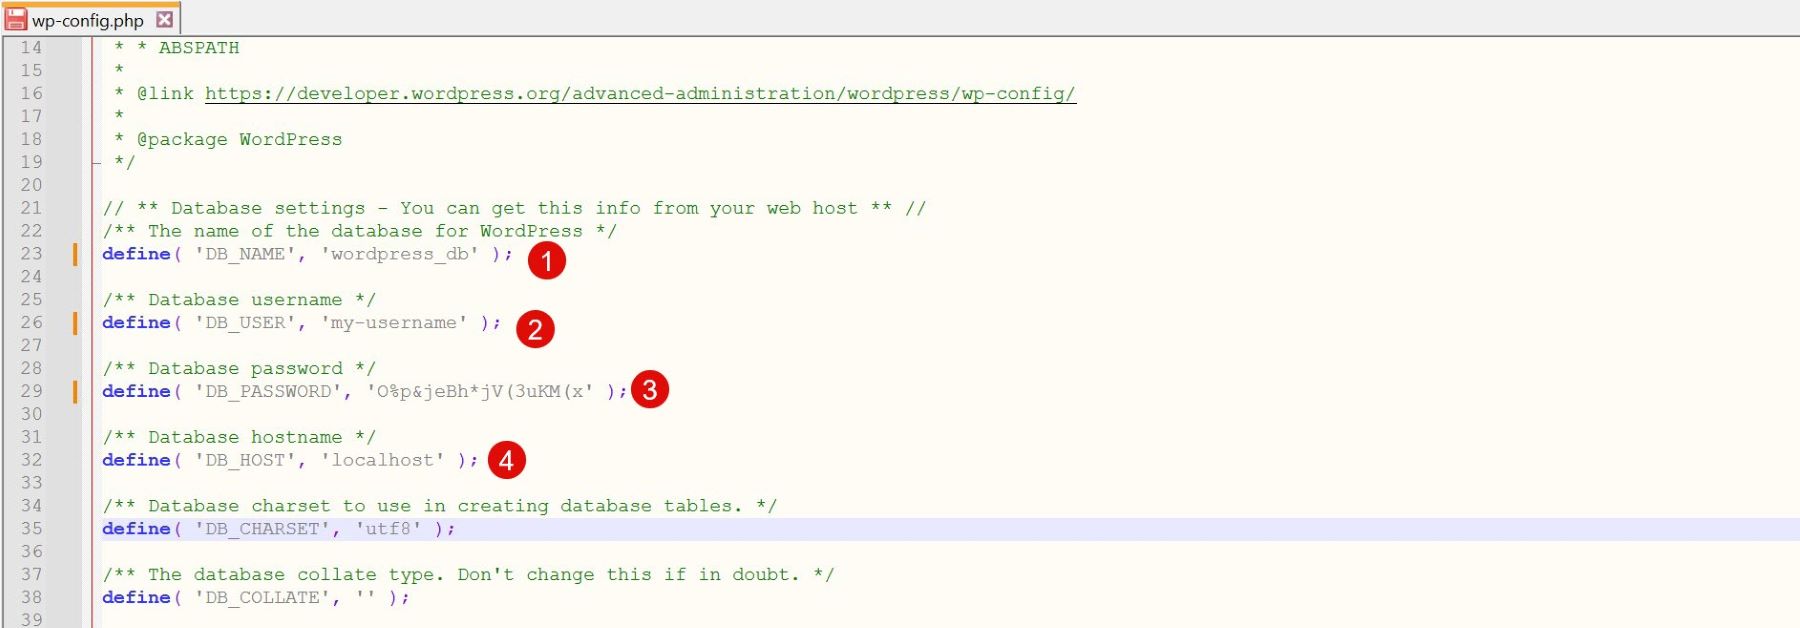
Replace the placeholders with your actual database details.
Scroll down to the section with the security keys and salts.

Visit the WordPress Salt Generator to generate unique values.

Copy and paste these new keys over the existing placeholders in Notepad++.

Save all the changes to complete the configuration process.
Step 4: Upload Files (FTP)
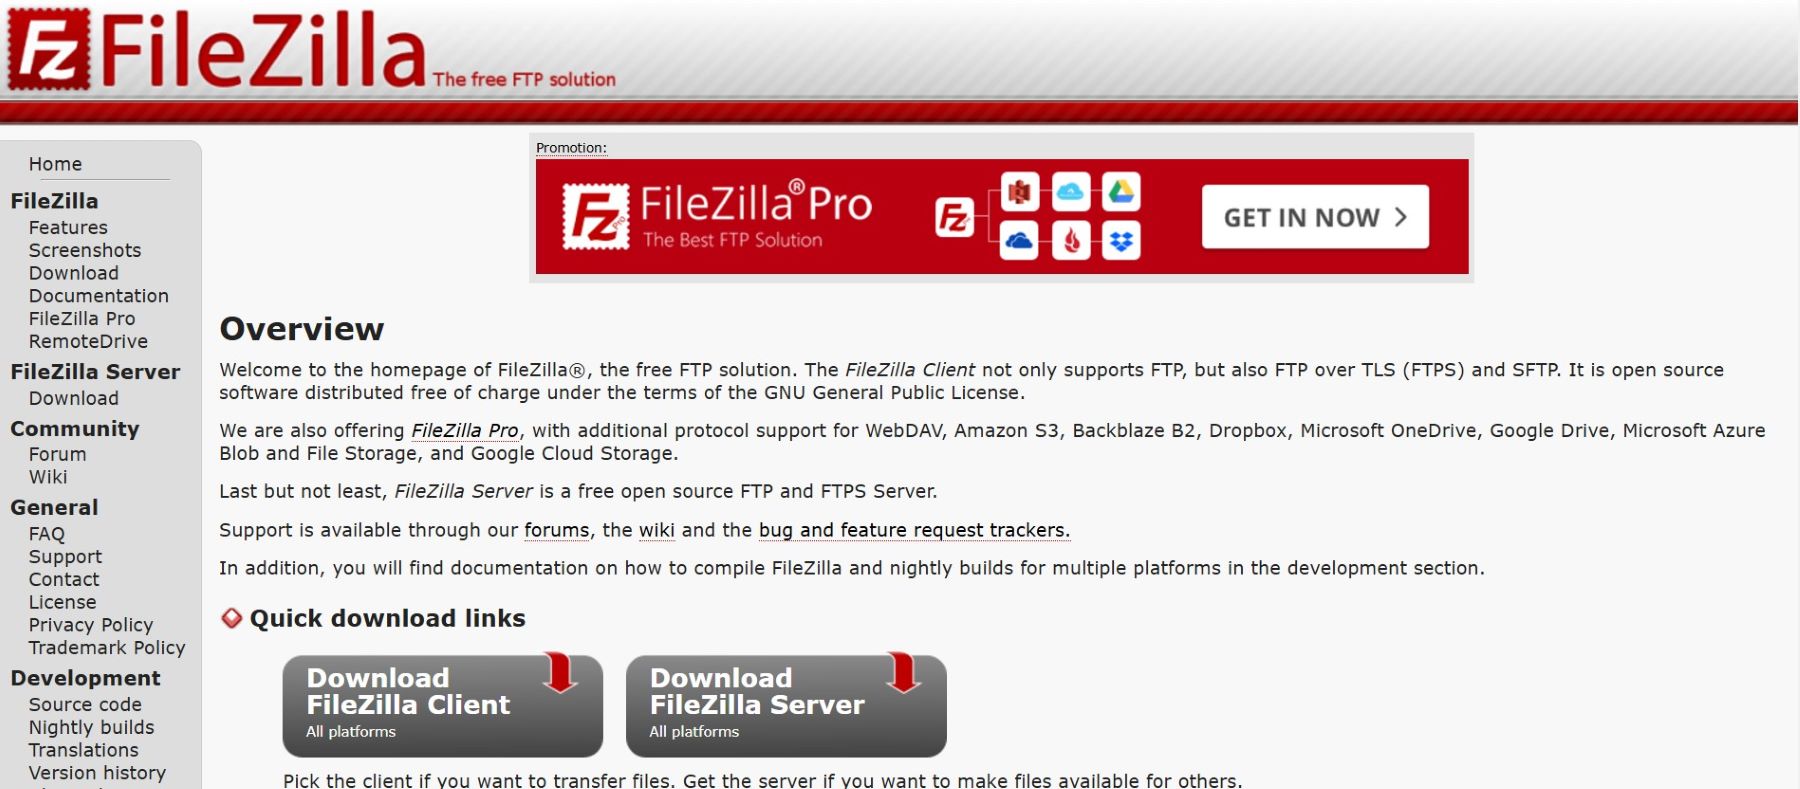
Now that WordPress is configured, it’s time to upload the files to your hosting server using FTP (File Transfer Protocol). For this example, we’ll use FileZilla for demonstration purposes.
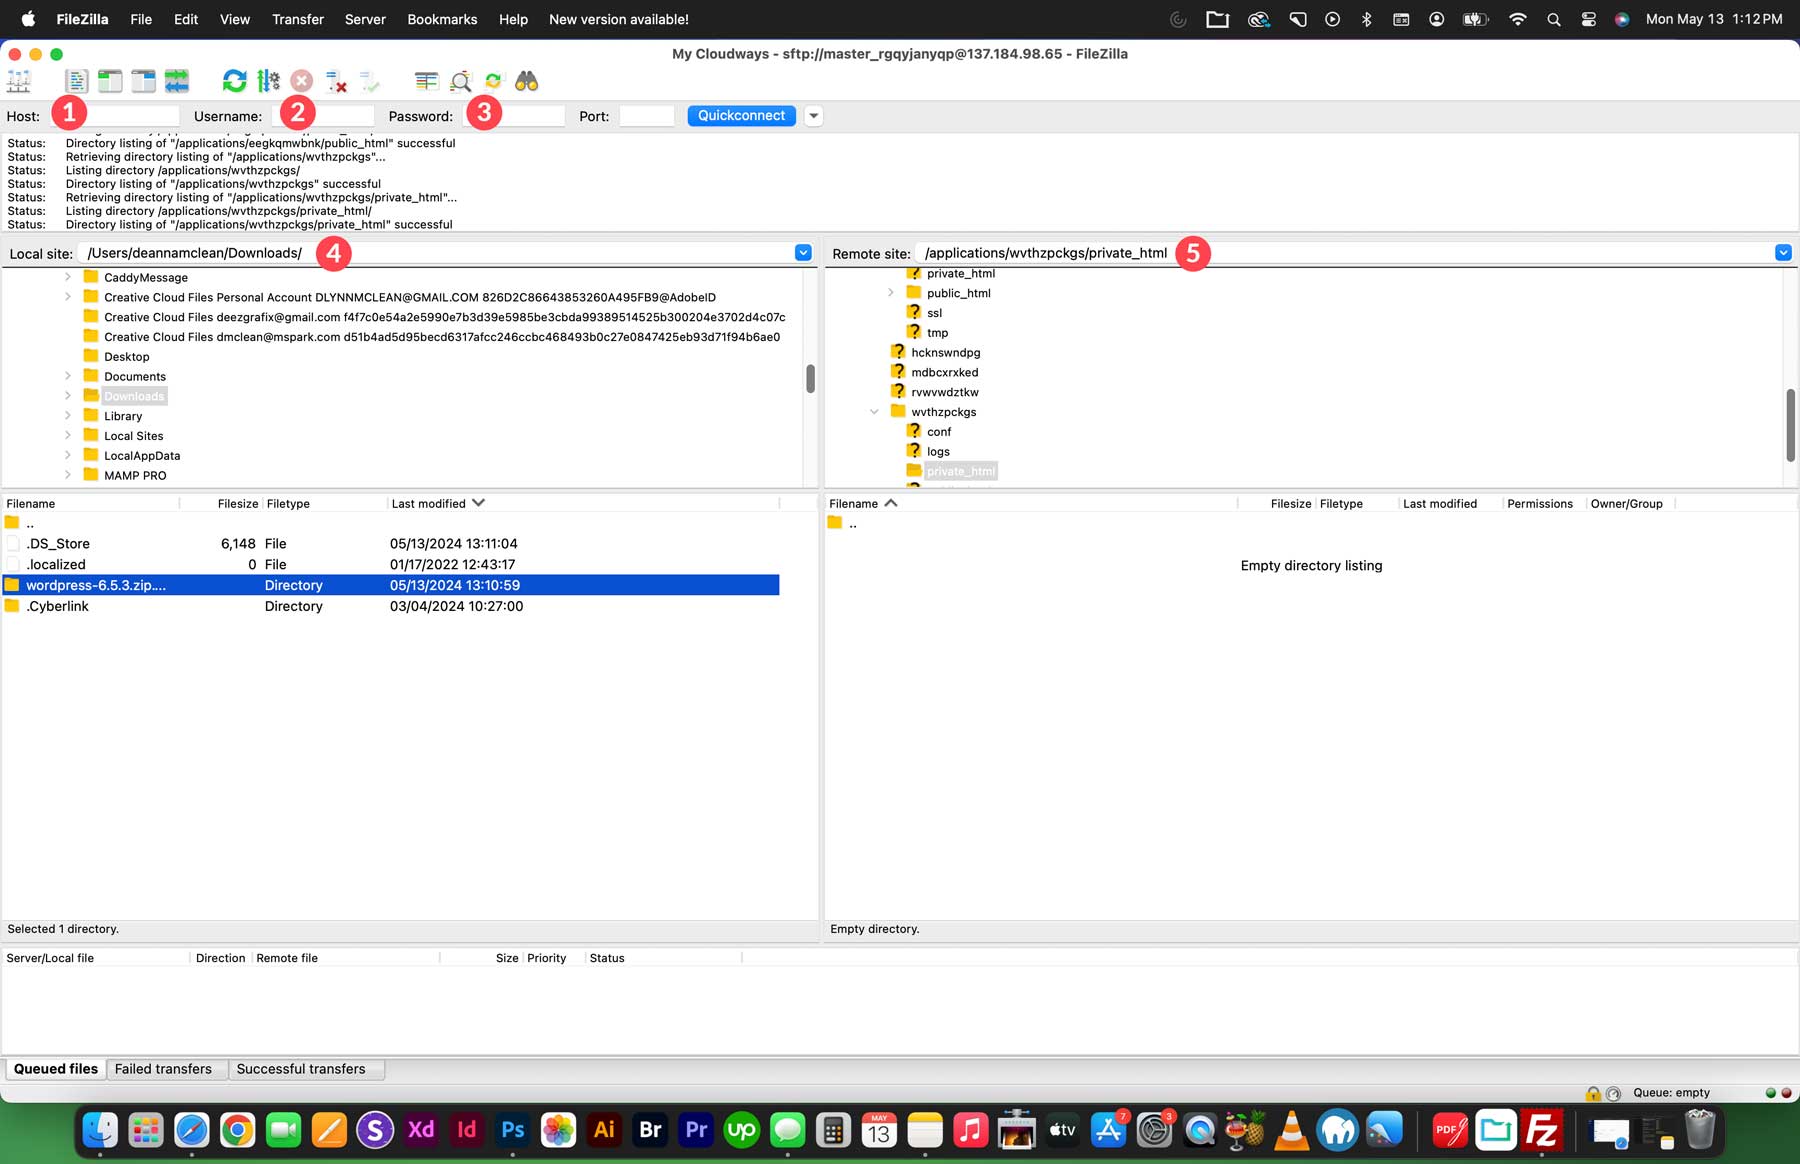
Launch FileZilla and enter the FTP details given by your hosting provider, including the Hostname (server address), Username, Password, and Port (which can usually be left blank). Sometimes, you may need to create a new FTP user on your hosting platform to obtain a username and password for server access.
FileZilla (as with most FTP clients) has two main panels: the left panel shows files on your local computer, and the right panel displays files on your web server. In the left panel, navigate to the WordPress folder you downloaded earlier. In the right panel, open the public_html directory, which serves as the root folder of your website.
Highlight all the WordPress files on the left and drag them into the public_html directory on the right.
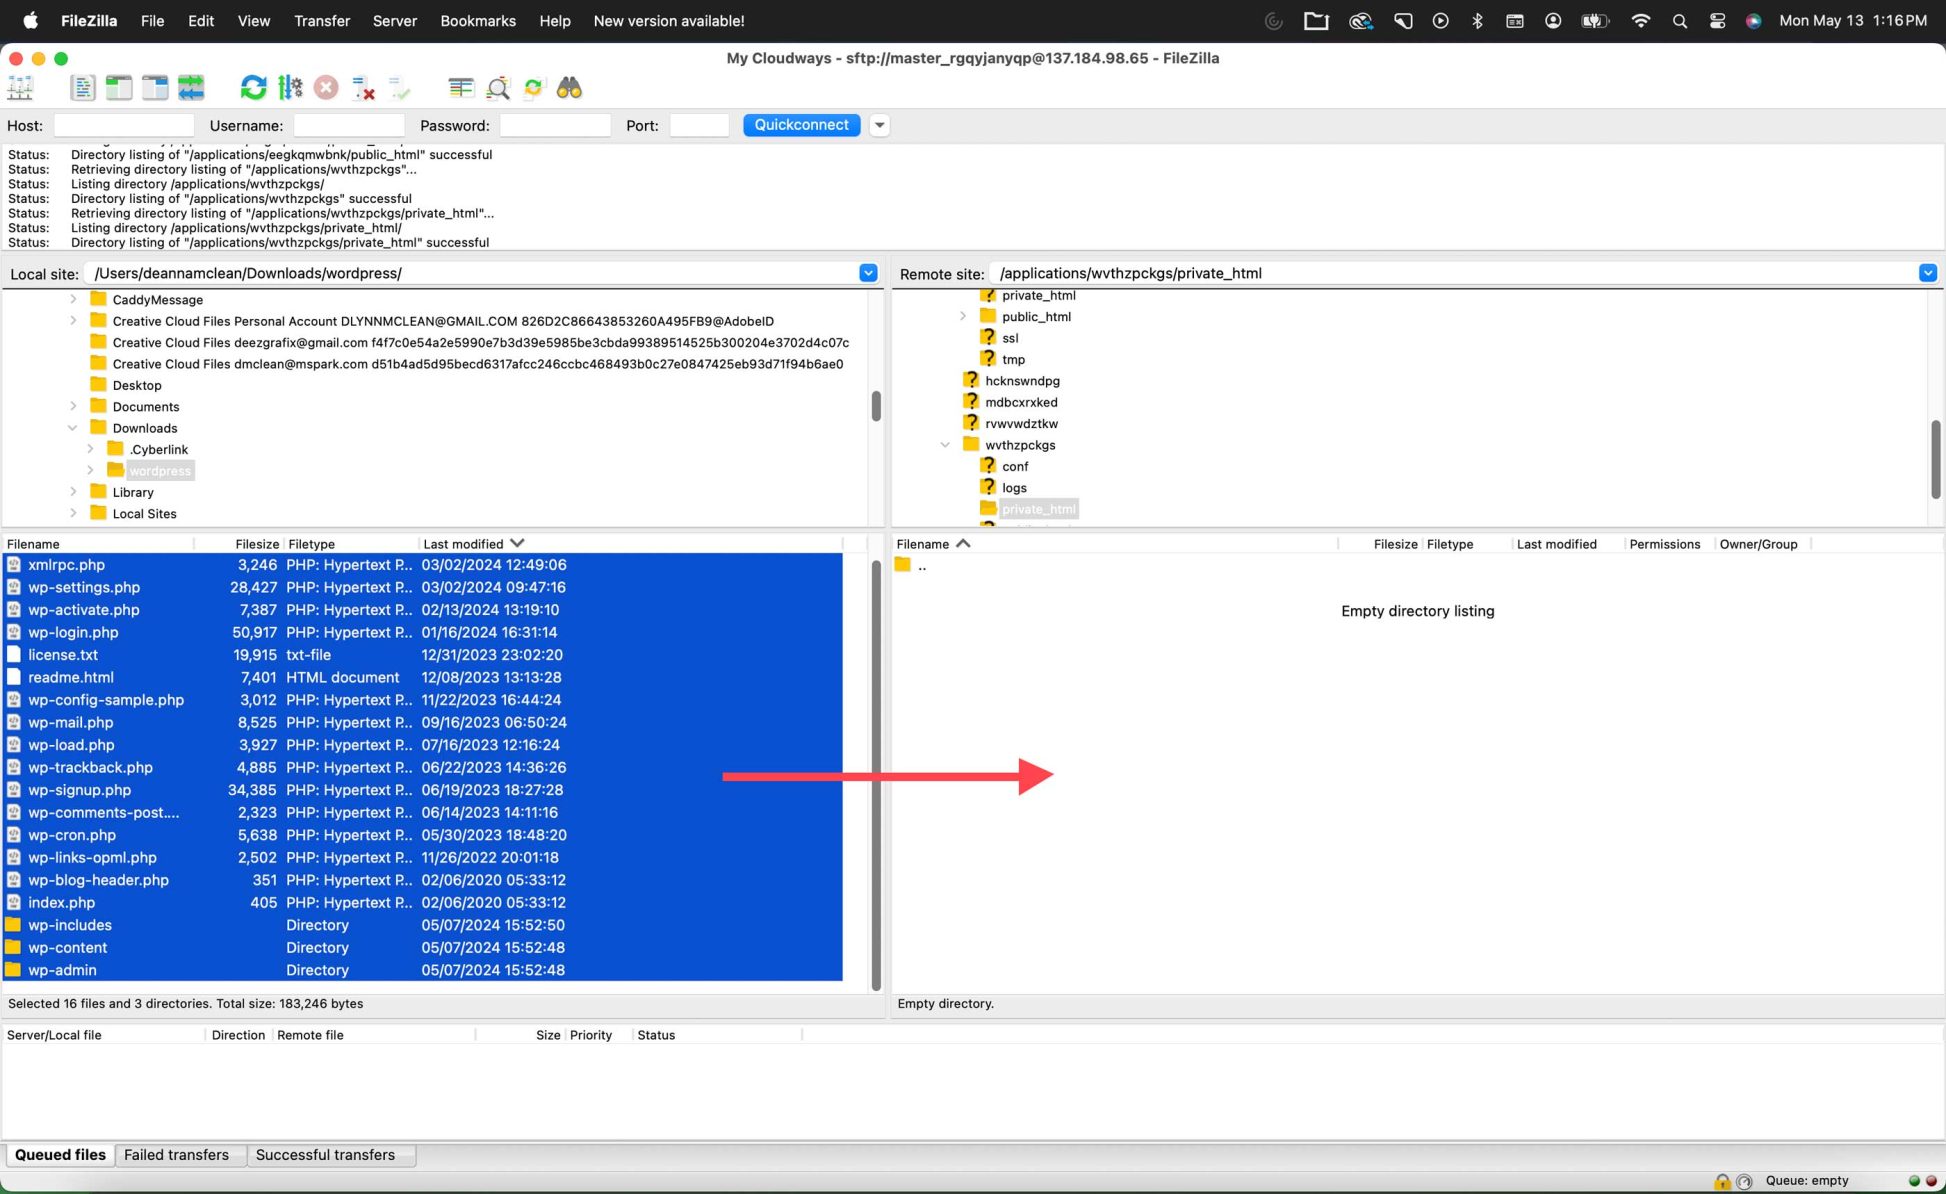
The transfer may take a few minutes. Once it’s finished, you’ll be ready to proceed with the WordPress installation.
For additional information, refer to our comprehensive guide on managing your WordPress website through FTP.
Step 5: Run the WordPress Installer
With the WordPress files now uploaded to the correct directory on your server, you’re ready to begin the quick five-minute WordPress installation process.
Open your web browser and navigate to your website. If WordPress is in the root directory, go to www.yoursite.com. The initial step lets you choose a language.

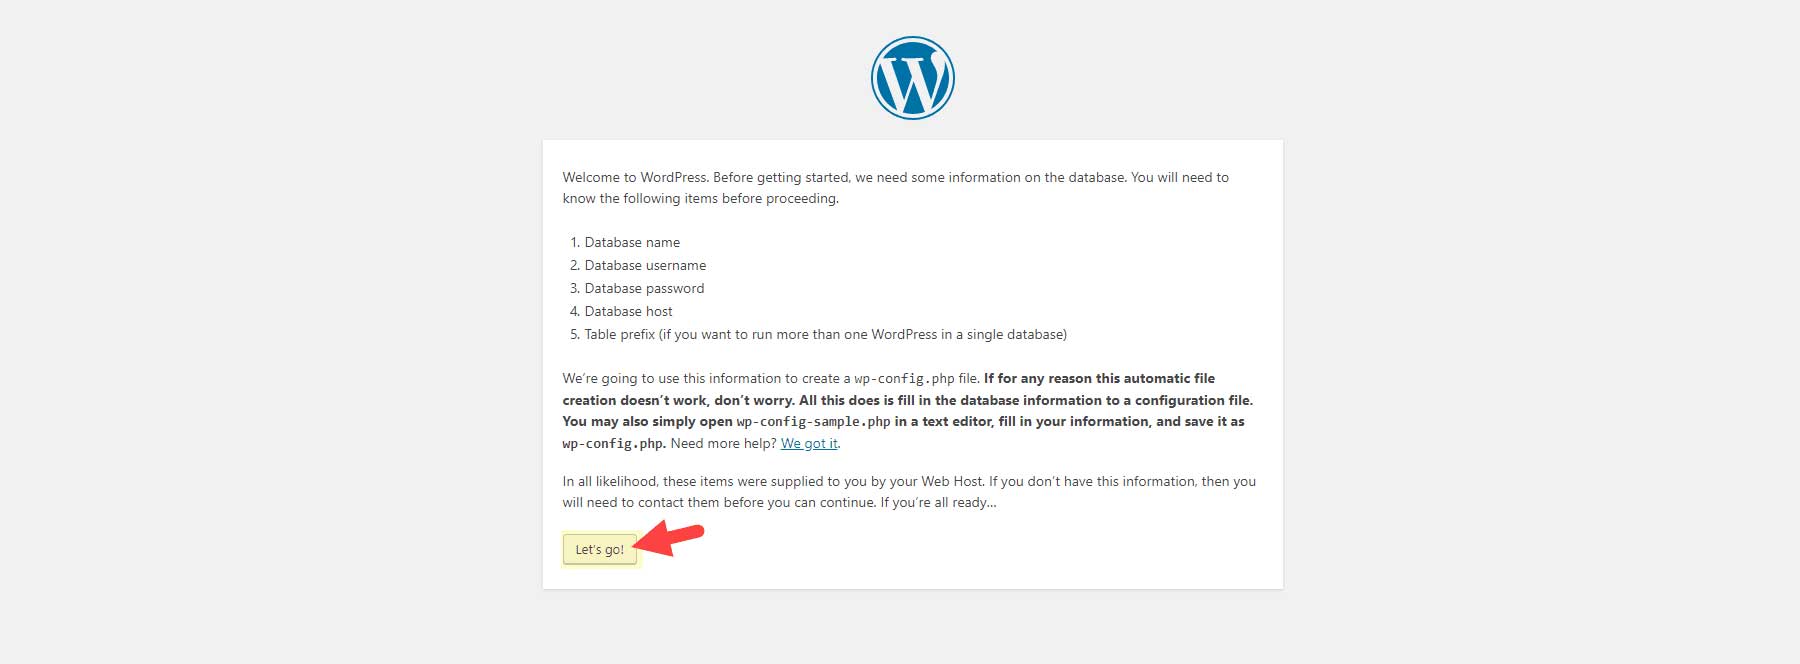
Next, you’ll be asked to gather your database credentials from step 2. Once you have them, click ‘Let’s Go’ to continue.
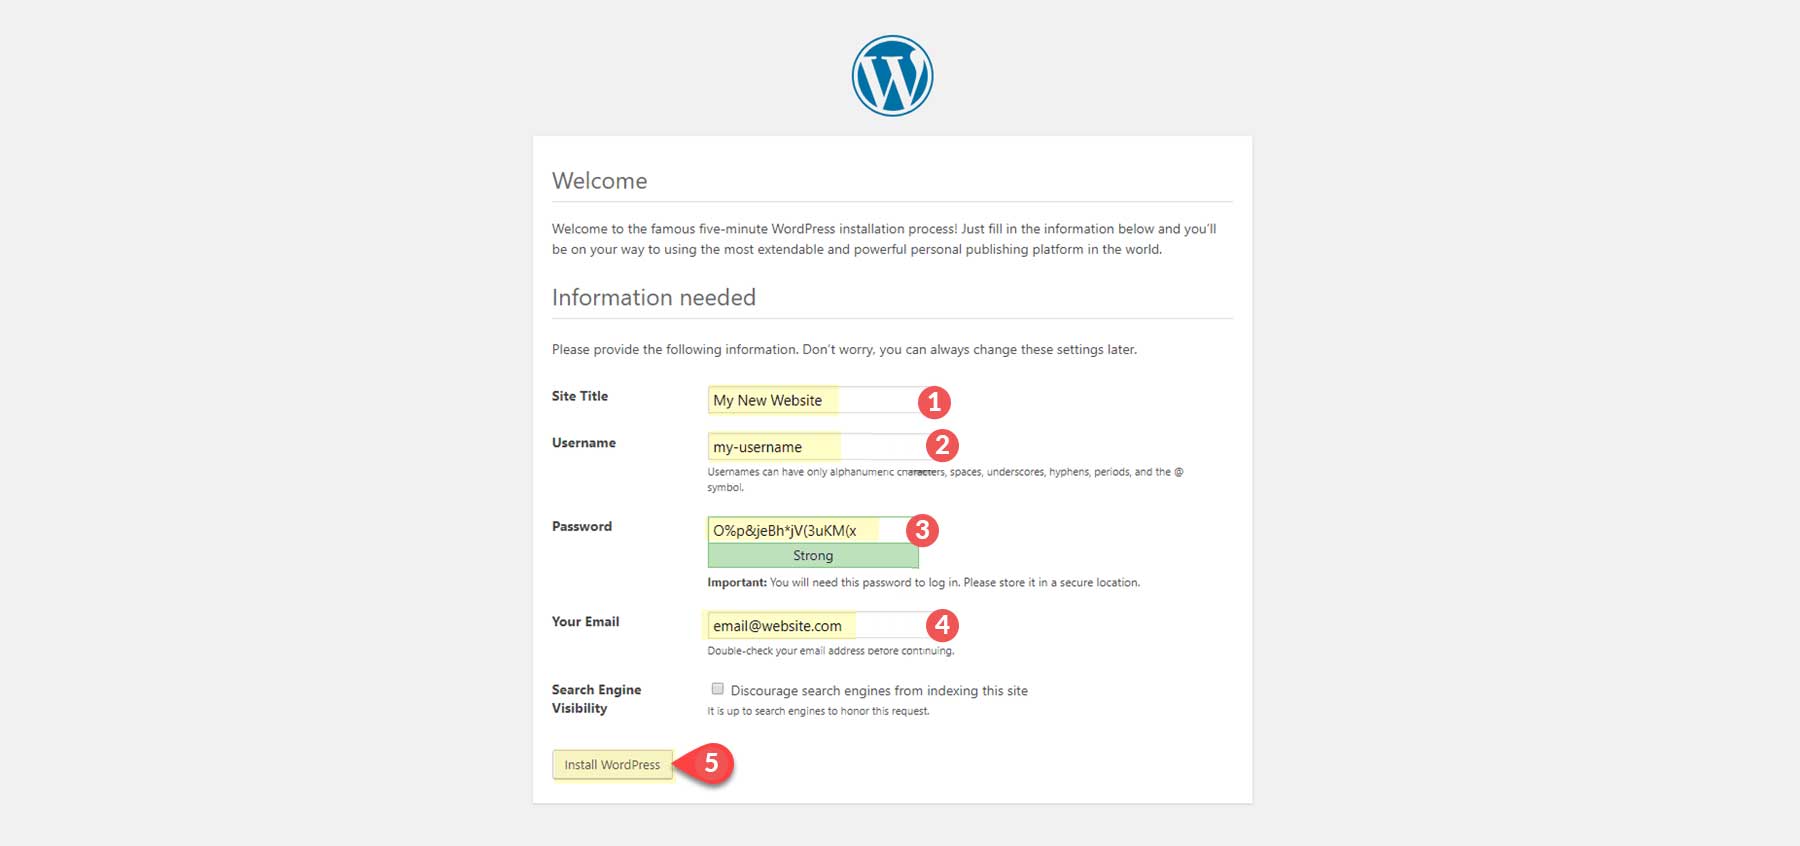
Input the Database Name, Database User, and Database Password. Unless you have specific requirements, you can leave the Database Host as ‘localhost’ and the Table Prefix as ‘wp_.’ Then, click ‘Install WordPress’ to proceed.
A confirmation message will appear, letting you know the installation was successful! Click the ‘Login’ button to continue.

You’ll now arrive at your WordPress site’s login page. Bookmark this page for quick access later. Alternatively, you can visit www.yoursite.com/wp-login.php or www.yoursite.com/admin, which will also direct you to the login screen. Log in using the admin username and password you created during the last step of the WordPress setup under ‘Site Information.’

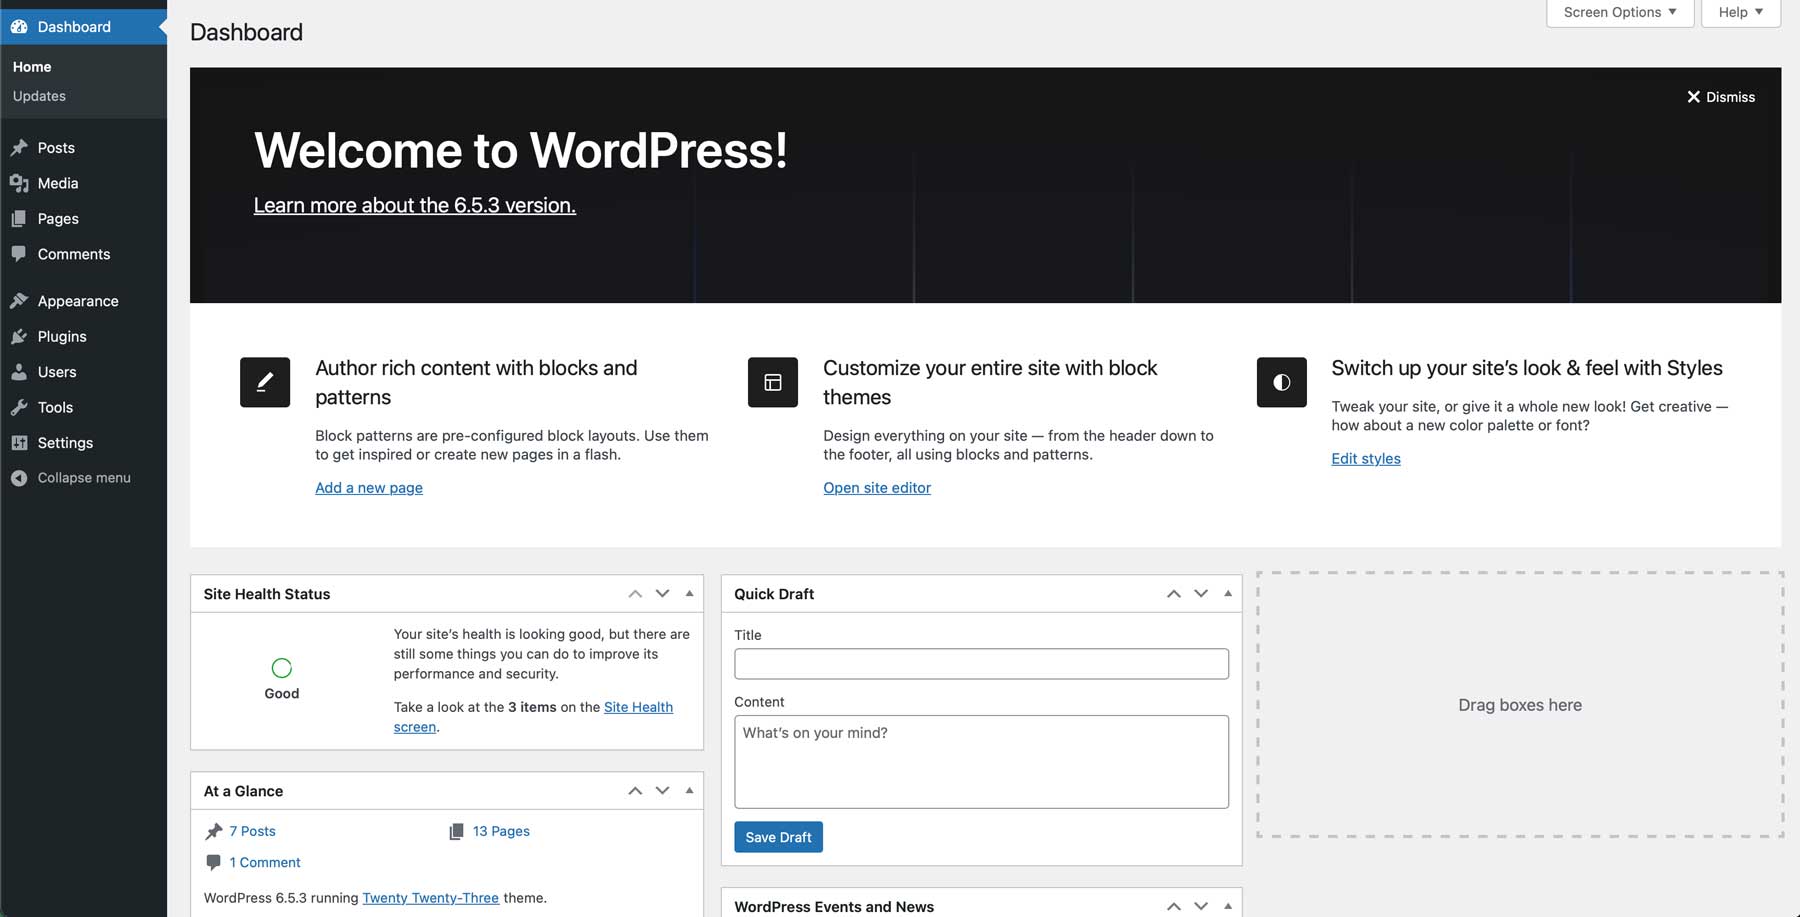
This will take you to your WordPress Dashboard, where you can manage the backend of your site.
Common Issues After Downloading and Installing WordPress
While installing and setting up WordPress is generally straightforward, you may encounter a few common issues. Below are some typical problems users face during WordPress installation, along with solutions to help you troubleshoot and resolve them.
1. WordPress Not Connecting to Database
One of the most common issues during installation is the “Error establishing a database connection” message. This happens when WordPress cannot connect to the database due to incorrect credentials.
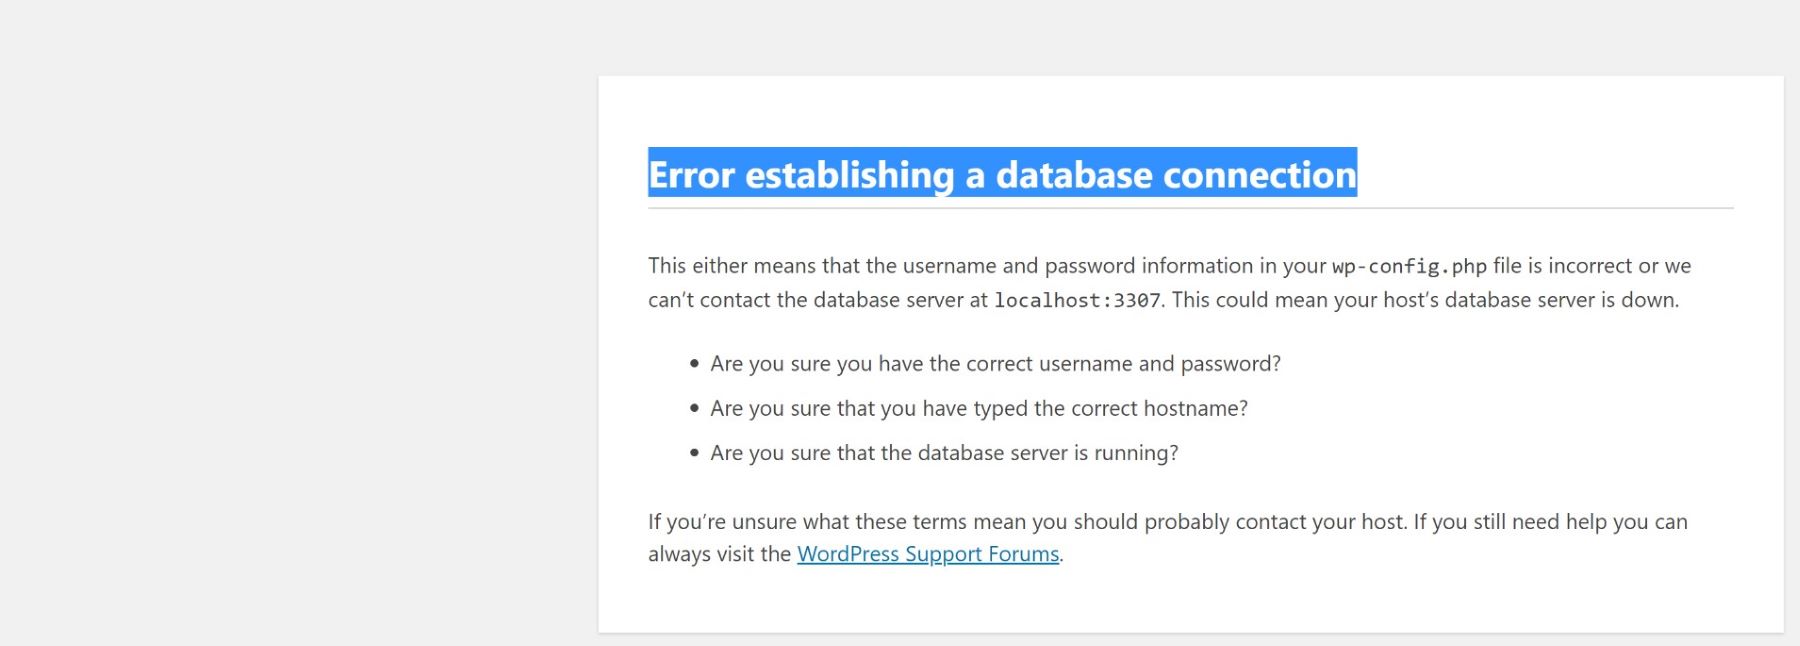
To resolve this issue, check your wp-config.php file to ensure the database name, username, password, and host are correctly set. Verify that your database exists in your hosting account’s MySQL Databases section and that the username and password match. If you’re using a local installation, ensure your local server (like XAMPP or MAMP) is running and MySQL is enabled.
2. White Screen of Death (WSOD)
A blank white screen, commonly called the White Screen of Death (WSOD), can occur during installation or after a WordPress update. This indicates a PHP error, often caused by a theme or plugin conflict or insufficient memory allocated to PHP.
For its solution, check your error logs for clues about which file is causing the problem. You can often find logs in the public_html directory or via your hosting control panel. You can also rename the plugins and themes folders via FTP to deactivate plugins or switch to a default theme (like Twenty-Twenty-Three). This will help identify if the issue is related to the theme or plugin.
3. 404 Errors After Installation
If you’re getting 404 Not Found errors when accessing pages on your WordPress site, it typically means your site’s permalink structure hasn’t been set up correctly.
To resolve this issue, log in to your WordPress dashboard, go to Settings > Permalinks, and select your preferred permalink structure (e.g., Post Name).
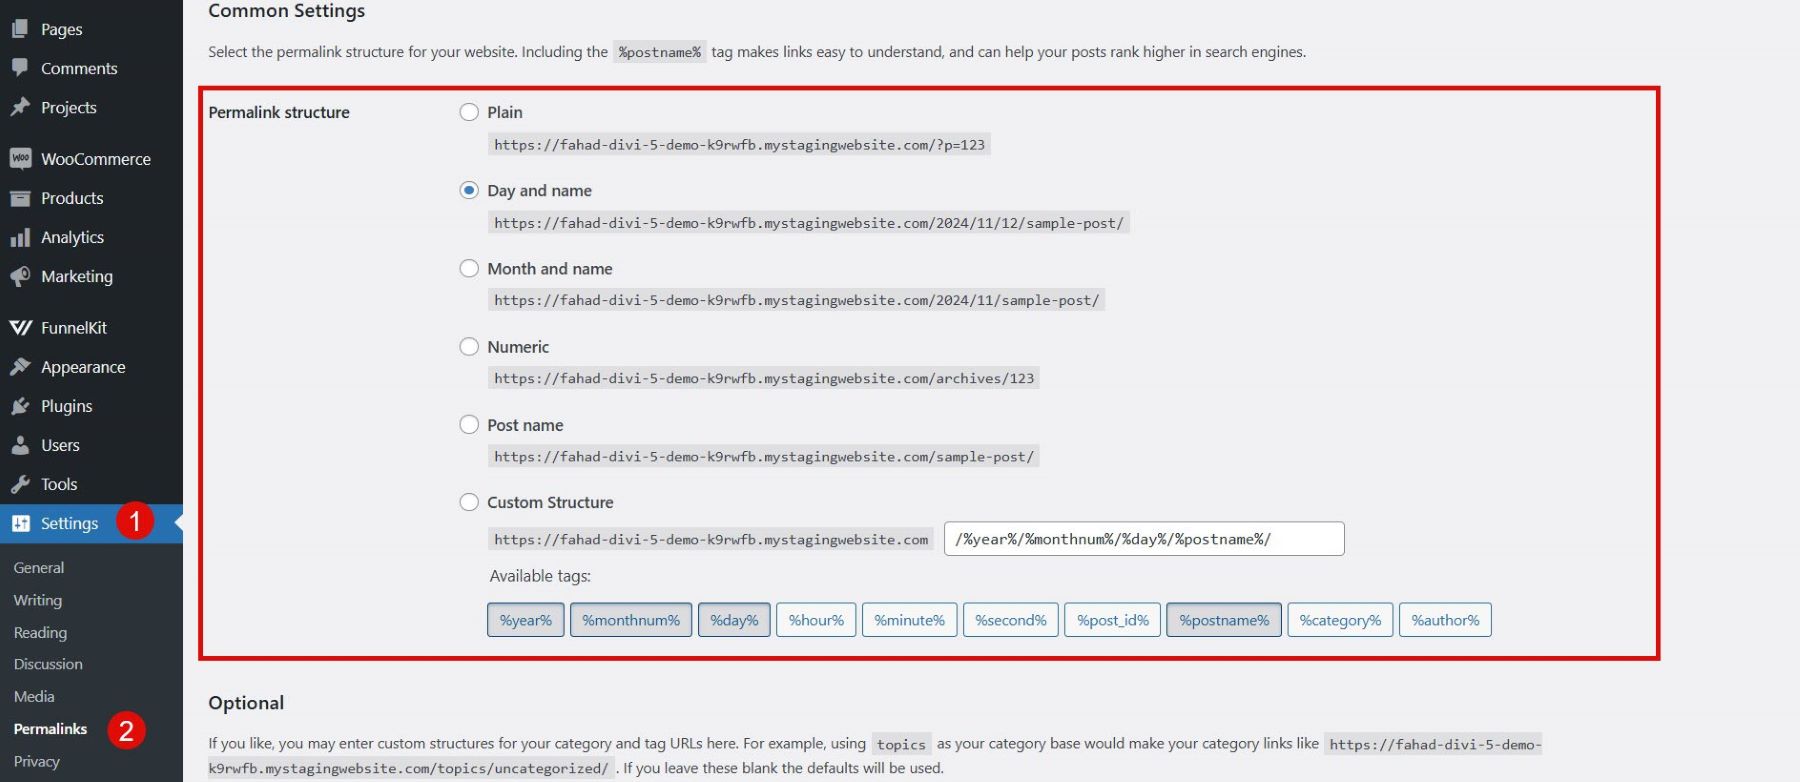
If the problem persists, try resetting your .htaccess file by renaming it and saving the permalinks again. WordPress will regenerate the file automatically.
To learn more about fixing 404 errors on a WordPress site, check out the video below:
Setting Up Your First WordPress Site
Now that you’ve successfully installed WordPress, setting up your first website is time. WordPress makes this easy with a user-friendly dashboard and tons of customization options. Here is a breakdown of this entire setup process.
1. Choosing a Domain
To run a WordPress site that is accessible to others online, you’ll need a domain name (such as www.yourwebsite.com). Domain registrars like Namecheap are popular choices, offering one-click WordPress installations that can simplify the process. If you’re looking for assistance, look at this detailed guide.
2. Choosing a WordPress Theme
WordPress offers free and premium themes catering to different industries and purposes, from blogs to eCommerce stores. If you want more customization options, consider using a premium theme or a builder like Divi. Divi Theme is one of the most widely used WordPress themes, offering easy website customization through its visual page builder. With a membership, you can access over 300 pre-made layout packs at no extra cost. Plus, you can create personalized layouts using the innovative Divi AI, a new artificial intelligence assistant designed to enhance your design process.
3. Include Essential Plugins
Beyond themes, WordPress offers a vast range of plugins that enable you to add various functionalities to your site without needing a developer. It’s impressive how much you can accomplish with WordPress without coding knowledge. Here are some of the plugins you must consider diving into:
To learn more, check out our full review of the best plugins for WordPress.
For a complete guide, check out how to make a WordPress website.
Conclusion
We hope you’ve learned how to download, install, and set up WordPress for your website by the time you get to this point. From selecting the right hosting and theme to troubleshooting common issues and installing essential plugins, you’re well on your way to building a fully functional site. WordPress provides the flexibility and tools to bring your vision to life, whether creating a blog, business site, or online store. Happy building, and don’t hesitate to explore further as you customize and expand your WordPress site!
Want to get started right away? Downloading WordPress is easier than ever. Follow the step-by-step guide to install the latest version, set up your website, and start creating. Plus, explore our recommended tools and plugins to enhance your site immediately.




Leave A Reply