Do you want to refresh the appearance of your existing website? That requires you to install a new theme that aligns with your new design goals. Themes provide the visual design for a WordPress site and much of the base functionality and utility. Whether starting a new blog, redesigning an existing site, or working on a client’s project, the right theme can enhance user experience. This guide will show you step-by-step instructions on how to install a WordPress theme.
- 1 What is a WordPress Theme?
- 2 Benefits of Installing a New WordPress Theme?
- 3 Method 1: Using the WordPress Admin Theme Search
- 4 Method 2: Upload a WordPress Theme Directly From Your Computer
- 5 Method 3: Installing a Theme via FTP
- 6 Method 4: Installing a Theme Using Your Hosting Provider
- 7 Error Messages and How to Fix Them
- 8 How to Update a WordPress Theme?
- 9 Customizing Your Theme
- 10 Conclusion
- 11 Frequently Asked Questions
What is a WordPress Theme?
A WordPress Theme consists of a set of files that collaborate to create a cohesive graphical interface for a website running on WordPress. These files are called template files. Themes can include custom templates, images, stylesheets, and JavaScript files, which control your site’s looks and functions.

WordPress themes enable users to change the look and functionality of a WordPress website without altering the core code or site content. The most popular themes, like Divi, also include built-in website builders that allow users to edit their entire site visually on the front end. Paid and free themes can be added from the WordPress Theme Directory or third-party developers and installed through the WordPress admin panel.
Benefits of Installing a New WordPress Theme?
In today’s digital landscape, refreshing your website’s look and functionality is essential for maintaining relevance and engagement. Whether you aim for a modern aesthetic, seek advanced customization options, or explore a new theme, you can breathe new life into your website and captivate your audience.
- Refreshed Look: Installing a new theme gives your website a fresh appearance. This can be particularly important if your current theme needs to be updated or no longer aligns with your brand image.
- Improved Functionality: New themes often come with updated features and functionalities that enhance user experience and streamline site navigation. For instance, Divi offers advanced customization options to make your website more interactive and engaging for visitors.
- Staying Up to Date: Design trends evolve rapidly, and keeping your website’s theme current ensures it remains visually appealing and relevant to your audience.
- Enhanced Customization: Many new themes provide extensive customization options, allowing you to tailor your website’s appearance and functionality better to suit your needs and preferences. This flexibility enables you to create a unique online presence that stands out from competitors.
- Optimized Performance: Upgrading to a new theme can also improve your website’s performance, including faster loading times and better responsiveness across various devices.
Backup Your Website Before Changing Themes
If you have an existing website, it is crucial to back up your website files and database before changing themes. This is always best practice to ensure you can revert back to your original working site should something go wrong with your new theme install.
We recommend using a popular backup plugin like UpdraftPlus to create your website backup. Or you can have your hosting provider (like Siteground) handle your site backups automatically.
For more, check out our detailed guide on how to back up your WordPress site.
Now, without waiting any further, let’s jump into the methods of installing a WordPress theme.
Method 1: Using the WordPress Admin Theme Search
The WordPress admin panel offers a convenient way to browse and install themes directly from your dashboard. First, log into your WordPress admin area. To do this, navigate to your website’s URL, followed by “/wp-admin,” and enter your username and password.
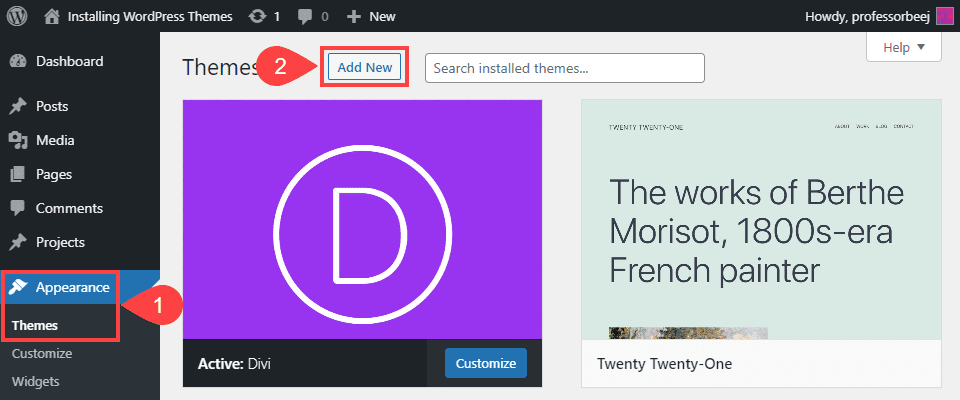
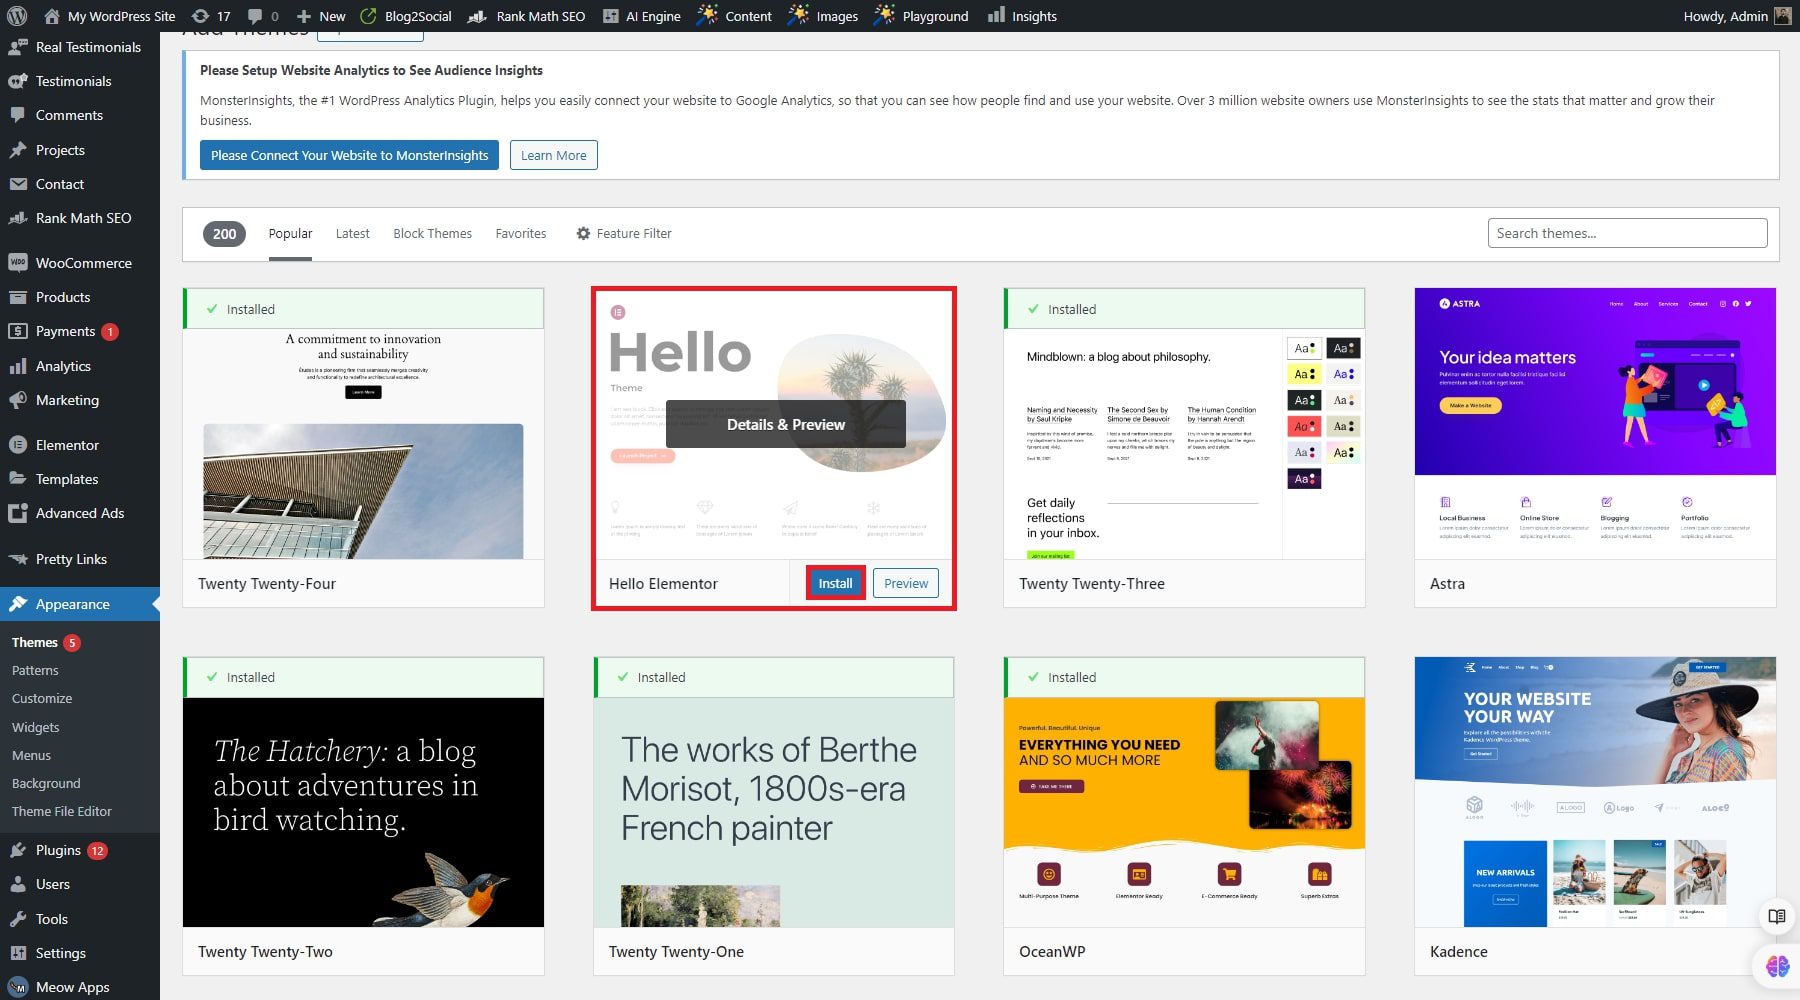
Look for the Appearance option in the left-hand menu. Hover over it, and a submenu will appear. Click on Themes to proceed. Once you enter this page, you will see an Add New button on the top of your screen. Click this button to access the WordPress theme repository to browse and search for new themes.
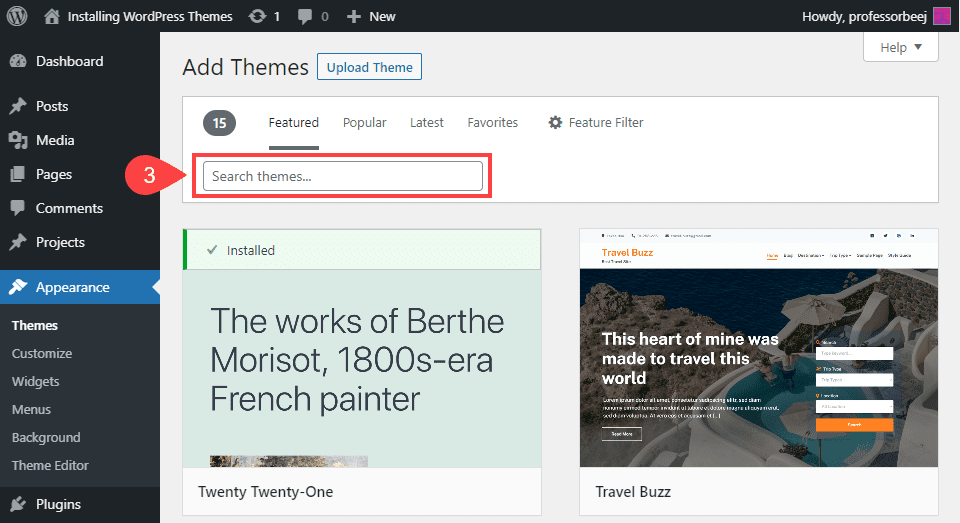
Use the search bar to identify a WordPress theme of your liking. You can search by name or browse through featured, popular, or latest themes. If you have purchased a premium theme like Divi from Elegant Themes, you can upload it by clicking the Upload Theme button at the top. After choosing your theme, click Install to add it to your site. Once installed, you will see an Activate button.
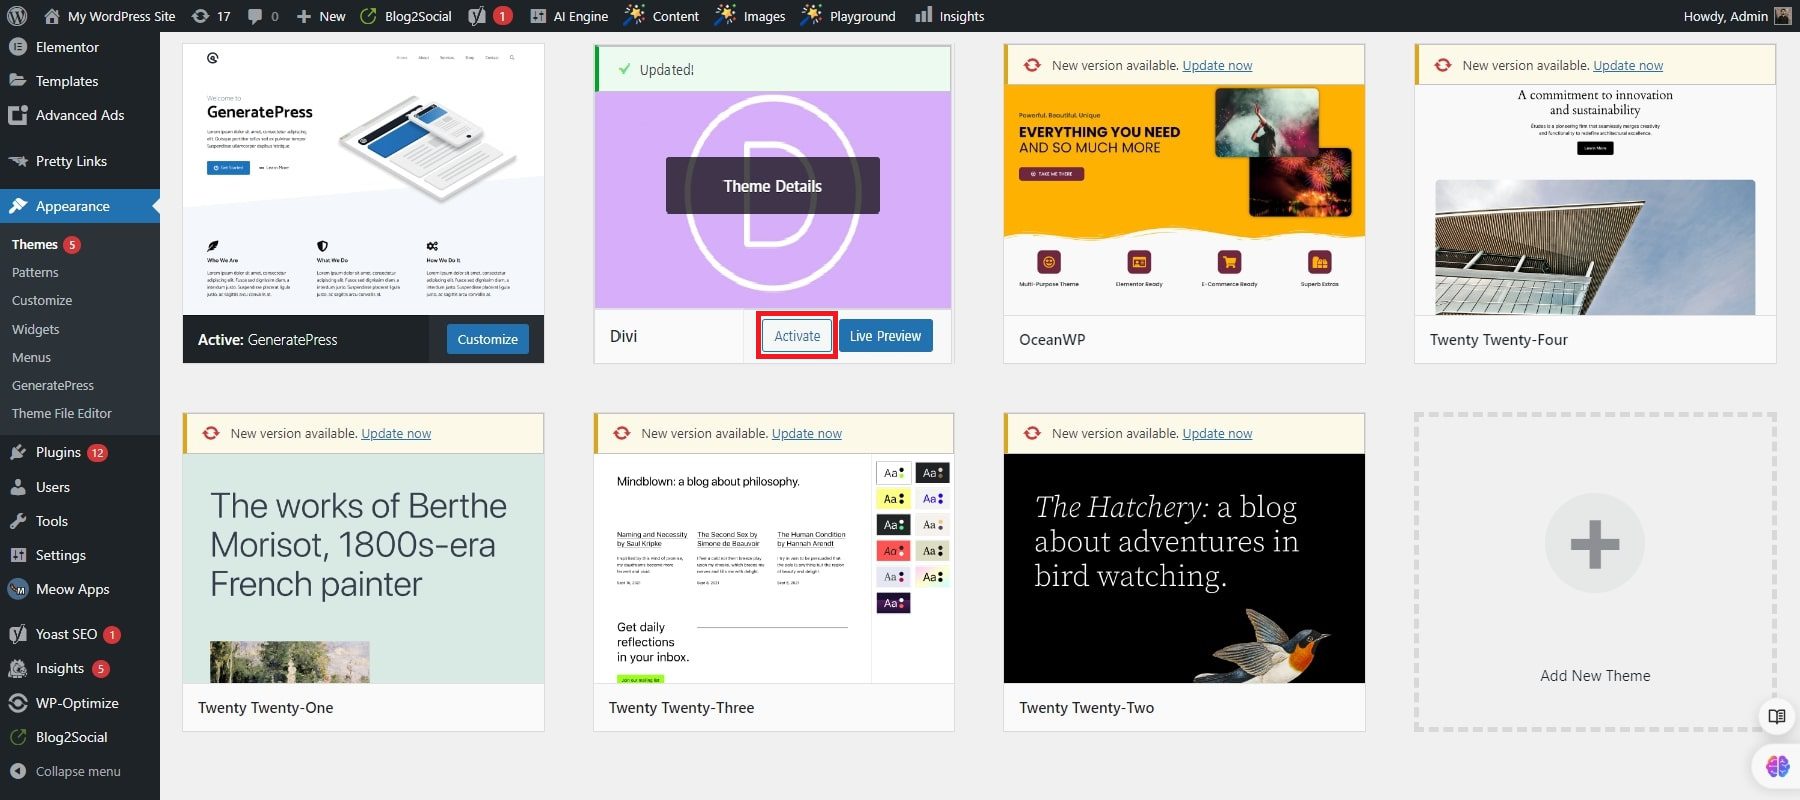
Click on it to make the new theme live on your website. Your site will now use the new theme, giving it a refreshed look and improved functionality. You can easily install a new WordPress theme through the admin dashboard. This process allows you to explore various themes, including premium options like Divi, and enhance your website’s design and performance.
Method 2: Upload a WordPress Theme Directly From Your Computer
Uploading a WordPress theme from your computer is straightforward and allows you to install any theme you’ve downloaded or purchased. This method is especially useful for a premium or custom theme file.
Before uploading a theme to your WordPress site, you must have the theme file ready on your computer. This file should be in a .zip format.
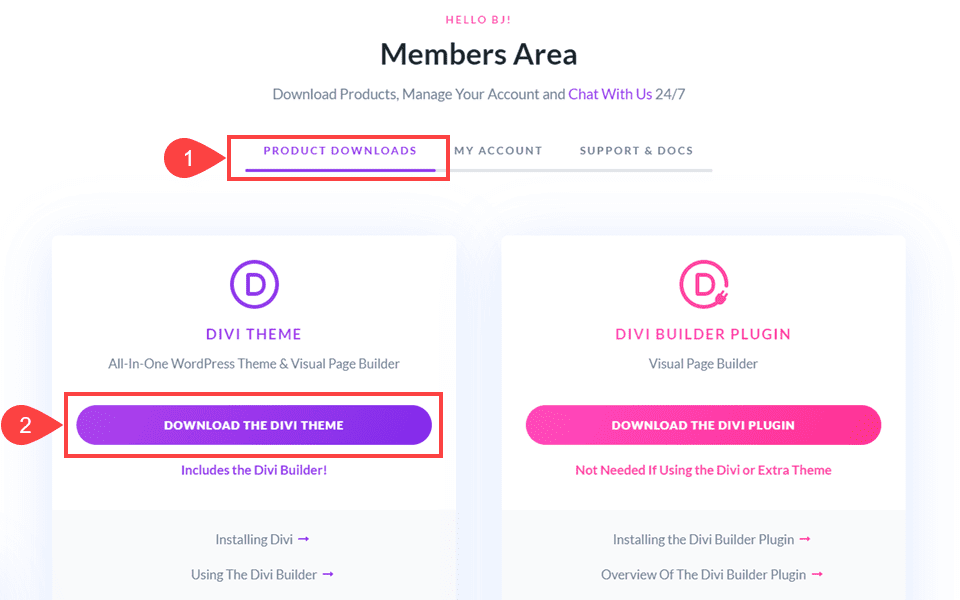
For example, if you’ve purchased the popular Divi theme from Elegant Themes, you will download a zip file containing all the necessary theme files. Usually, there’s a members’ area where you can find all the themes and plugins you’ve purchased at any company. For Divi, you can find it under the Product Downloads tab.
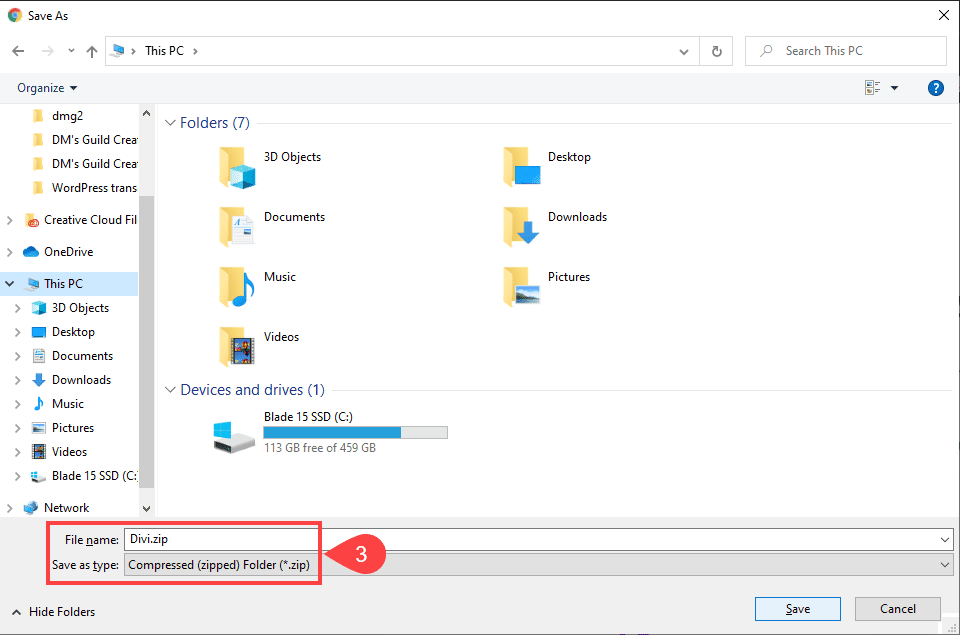
After logging into the WordPress admin dashboard, navigate to Appearance and click Themes. Click the Add New button at the top of the page to go to the theme installation page. Now, it’s time to upload the theme zip file you’ve downloaded.
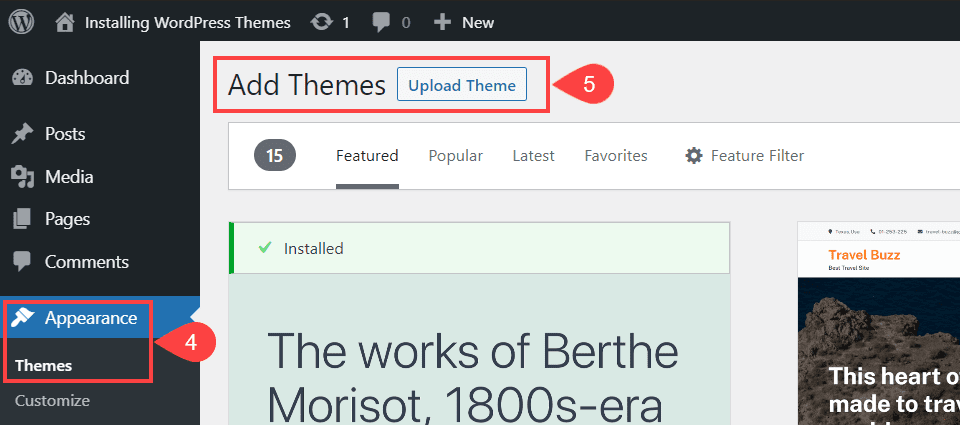
The Upload Theme button is at the top of the Add Themes page, so you must click on that. Navigate to the location where you saved the theme zip file (e.g., divi.zip) and select it. Click the Install Now button to upload the theme to your WordPress site.

Once the theme file has been uploaded, you must install and activate it to use it on your site. Once the upload is complete, WordPress will automatically start installing the theme, which may take a few moments. After you have installed your theme, you will see a success message on your screen. Click on the Activate link to make the newly installed theme your site’s active theme.
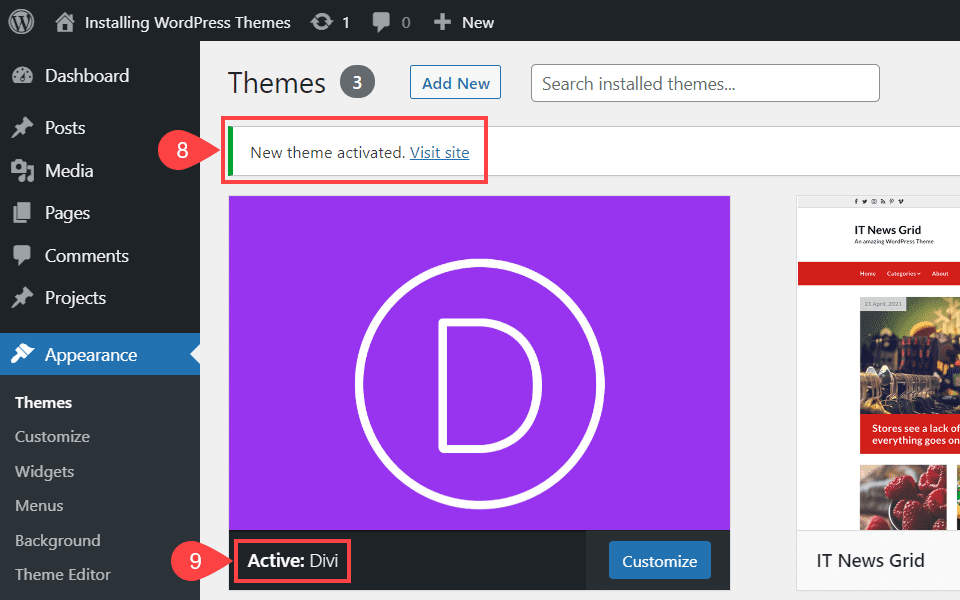
Another confirmation screen shows two verifications that your theme has been activated. And that is all it takes to install a WordPress theme you’ve downloaded elsewhere.
Method 3: Installing a Theme via FTP
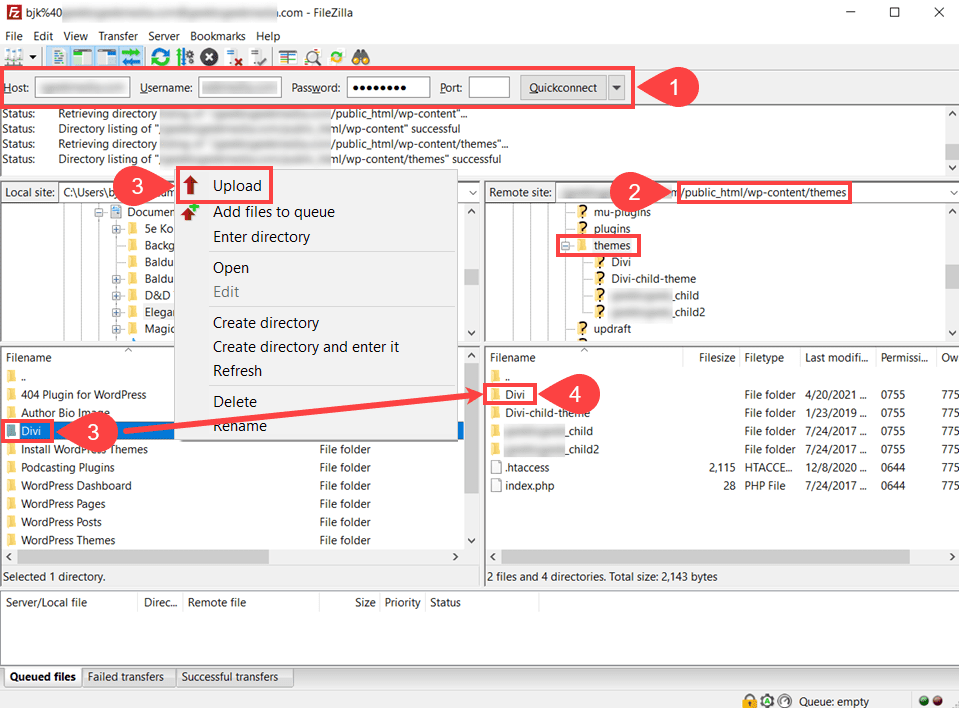
Installing a WordPress theme via FTP (File Transfer Protocol) is useful, especially when dealing with large theme files or when the standard upload method in the WordPress dashboard is not working. To start, you’ll need an FTP client to connect to your WordPress site. A popular and free option is FileZilla. If you don’t have an FTP client, download and install FileZilla from the official website. Your hosting provider usually provides your FTP credentials (hostname, username, and password).
- Open FileZilla and enter your FTP credentials in the top bar to connect to your server. After that, navigate the Quickconnect button to establish the respective connection.
- In the FileZilla interface, locate the wp-content/themes folder in the remote site section.
- Once connected to your site via FTP, navigate to the appropriate directory to upload your theme files. This is the folder that stores all of your respective WordPress themes. In the local site section of FileZilla, navigate to the folder where you have the unzipped theme files. If you’re uploading Divi, you should have a folder named Divi.
- Drag and drop the entire theme folder (e.g., Divi) from the local site section to the /wp-content/themes/ directory in the remote site section. The FTP client will start uploading the files, which may take a few minutes, depending on the size of the theme and the speed of your connection.
After successfully uploading the theme files via FTP, you must activate the theme from the WordPress dashboard. Go to Appearance > Themes in the left-hand menu, and you should see the new theme (e.g., Divi) listed among the available themes. Click on the Activate button under the theme to make it the active theme for your site.
Method 4: Installing a Theme Using Your Hosting Provider
Some hosting providers support installing popular WordPress themes to make it easy to install WordPress and your theme directly from the hosting platform.
For example, when creating a site on Siteground, you can install WordPress and Divi in one easy click. You can even install WooCommerce if you want.
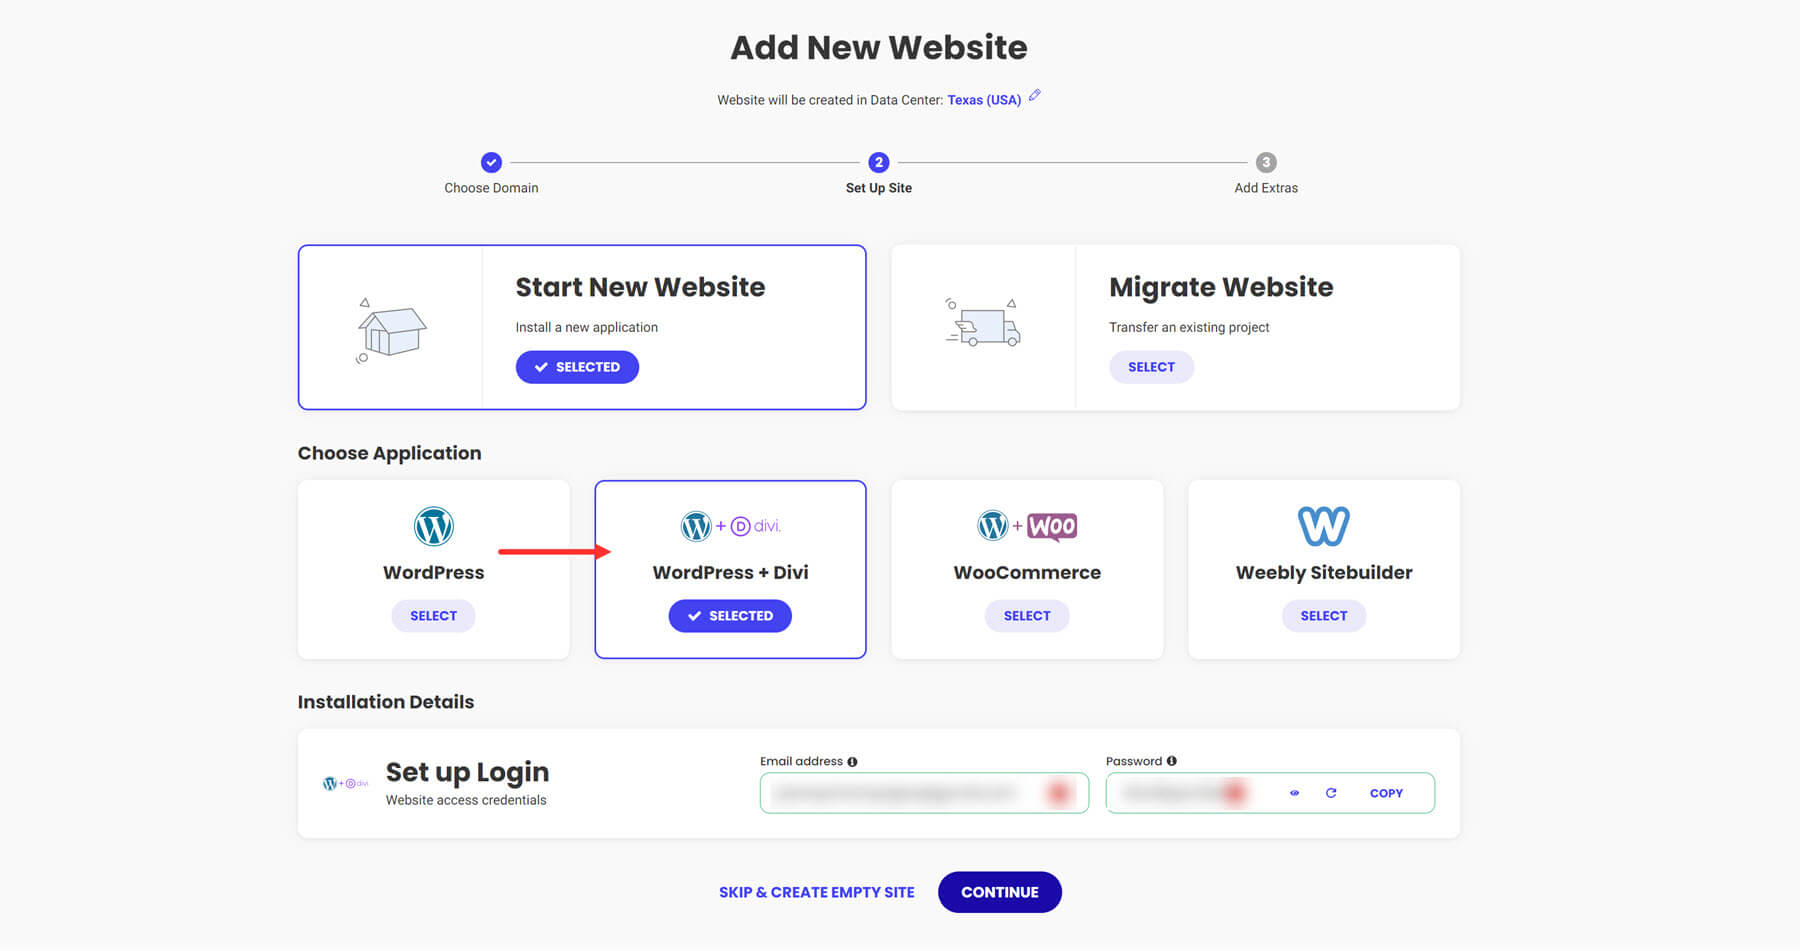
You will need to check with your hosting provider to see if they support your theme during installation.
Error Messages and How to Fix Them
Troubleshooting is a crucial part of any technical guide. When installing and customizing WordPress themes, you may encounter various error messages. This section will address common errors and provide solutions to fix them.
Errors
“The package could not be installed. The theme is missing the style.css stylesheet.” This error typically occurs when the wrong file is uploaded during the theme installation.
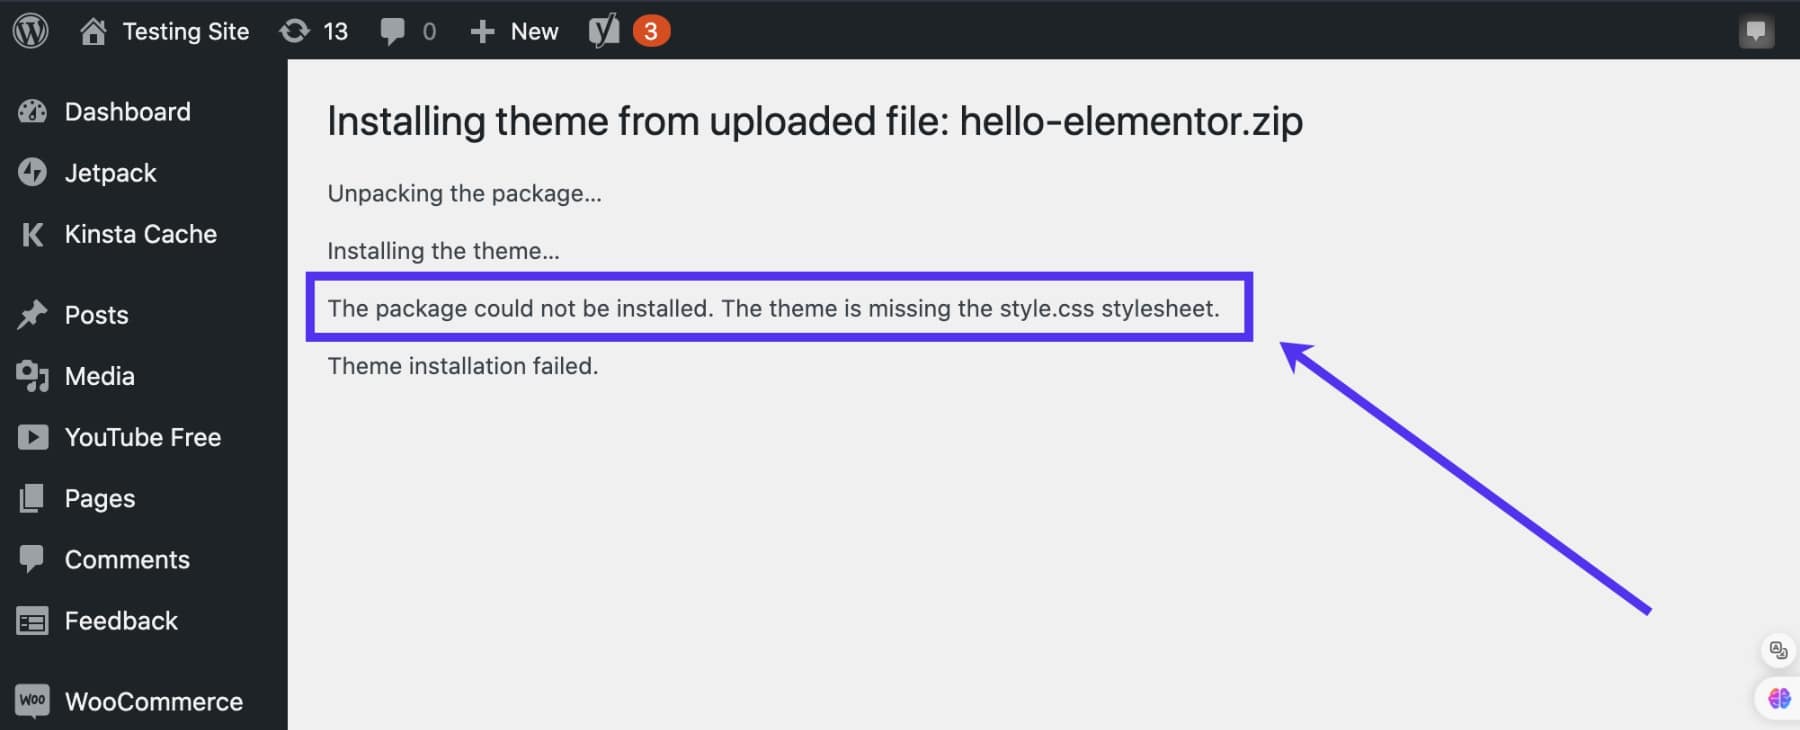
“Theme installation failed.” This often happens when there are missing files, or the theme is incompatible with your WordPress version.
“Allowed memory size exhausted.” This error happens when the theme demands more PHP memory than is currently allocated.
“Could not create directory.” Incorrect file permissions on your WordPress installation directory.
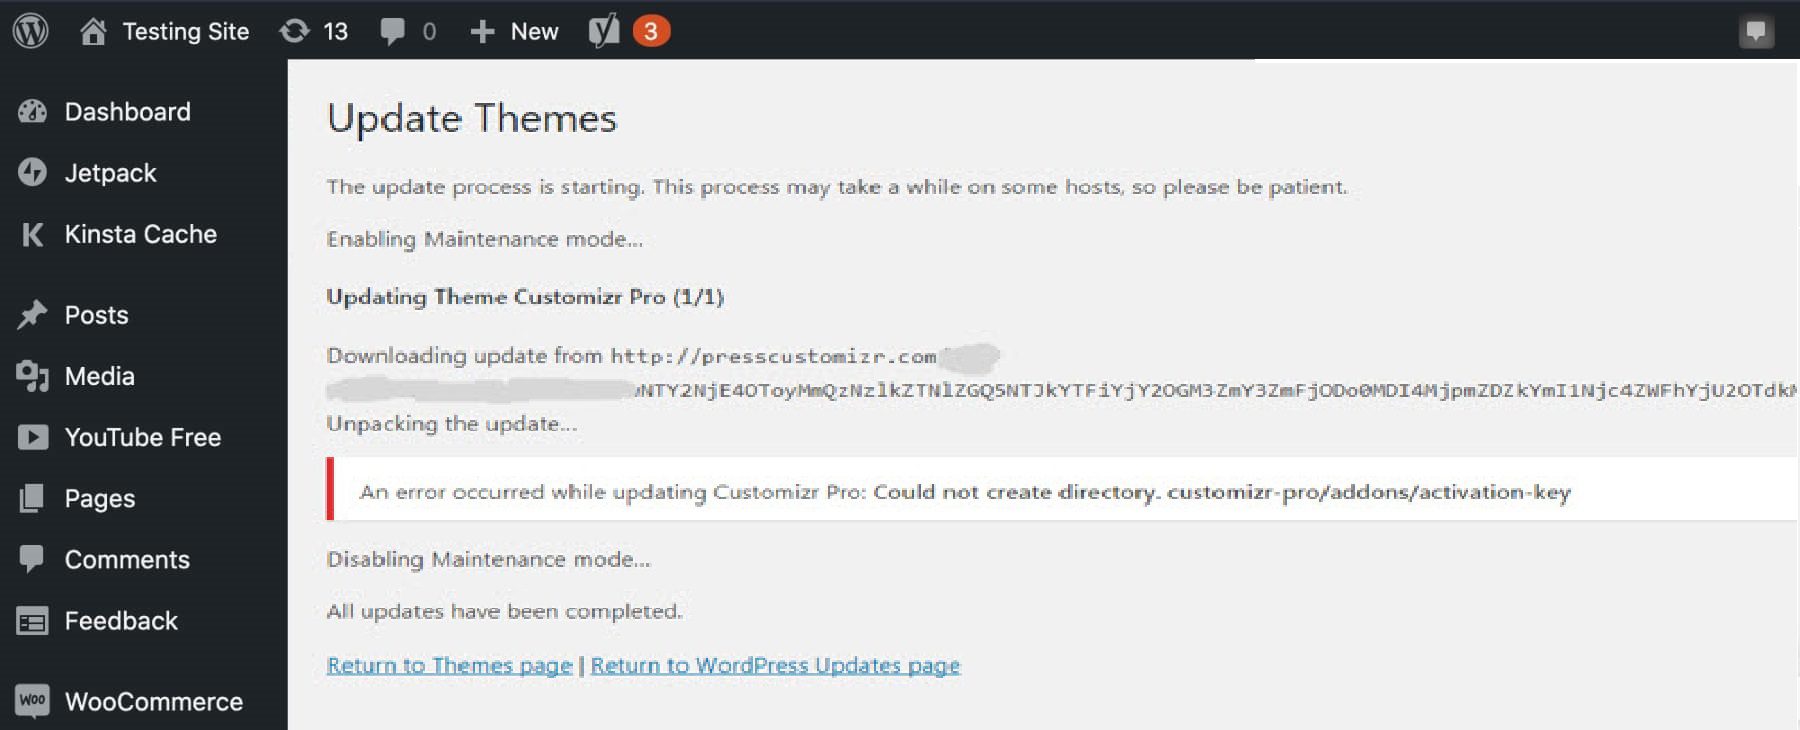
Solutions
- Check File Permissions: Ensure your WordPress directories have the correct file permissions. Typically, directories should have permissions set to 755, while files should be set to 644. You can adjust permissions via your hosting control panel or an FTP client like FileZilla.
- Ensure Compatibility: Verify that the theme is compatible with your version of WordPress. Check the theme’s documentation or the marketplace page for compatibility information. If necessary, update your WordPress installation to the latest version.
- Upload the Correct File: For the “missing stylesheet” error, ensure you upload the correct .zip file. Sometimes, these packages include documentation and other files that must be extracted before uploading. The correct file should contain the style.css stylesheet.
- Check for Complete Files: If you encounter a “broken theme” error, ensure all theme files are uploaded correctly. Compare the uploaded files with the original theme package to check for missing files.
- Consult Documentation and Support: If using a premium theme like Divi, consult the theme’s documentation for troubleshooting tips. Many premium themes also offer dedicated support forums where you can get help from the theme developers and community.
How to Update a WordPress Theme?
Keeping your WordPress themes updated is crucial for maintaining your website’s security, performance, and compatibility. Updates often include important bug fixes, new features, and improvements.
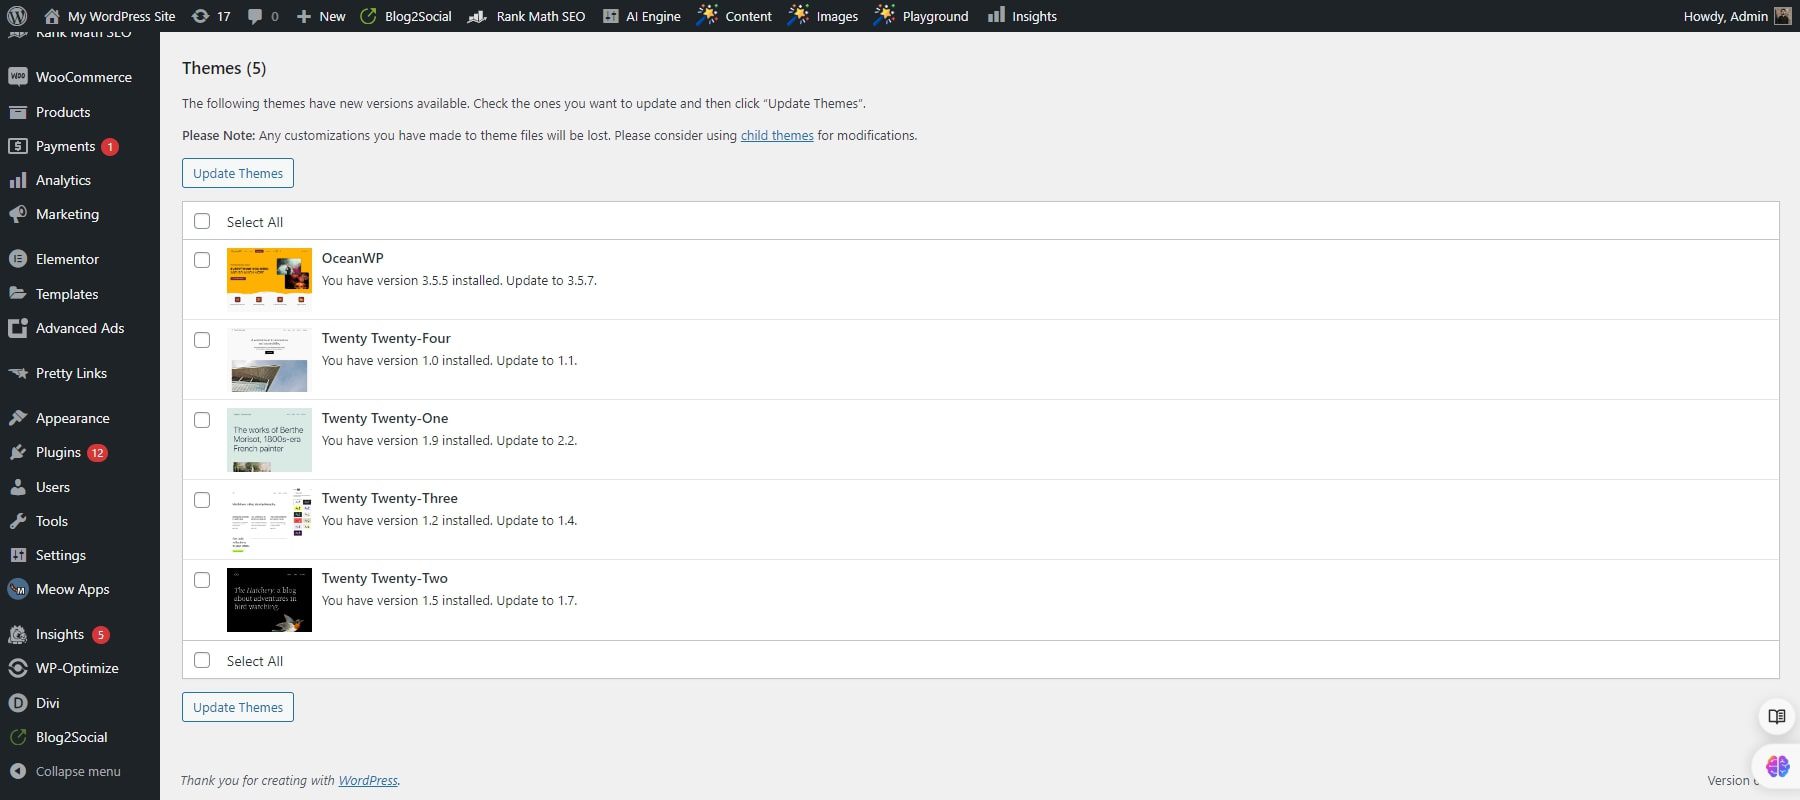
The first step is to see if any updates are available for your installed themes. Log in to your WordPress admin dashboard and go to Dashboard > Updates in the left-hand menu. Here, you will see a list of all available updates for WordPress core, themes, and plugins.

Scroll down to the Themes section. If there are any updates available for a particular WordPress theme, they will be listed here, as you can see in the screenshot below.
There is also a situation where an automatic update fails. In that situation, you can update the theme manually by downloading the latest version of the theme from its source, such as ThemeForest or Elegant Themes.
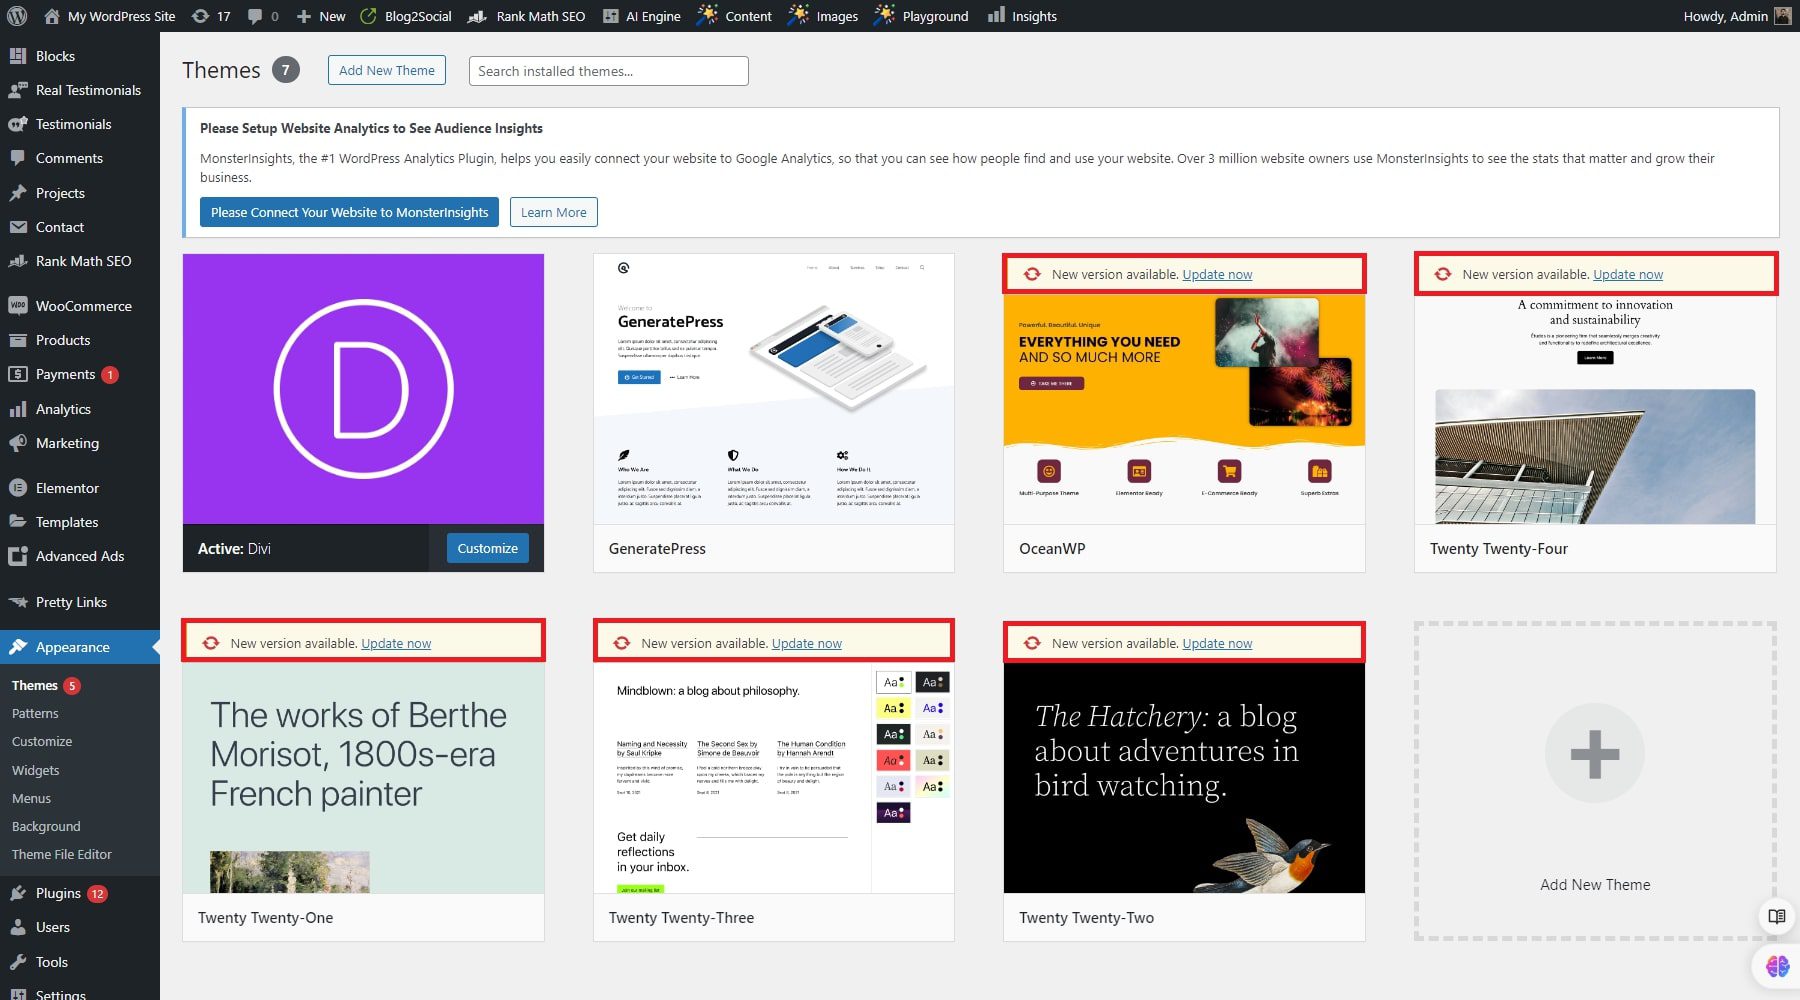
Go to Appearance > Themes. Switch to a default WordPress theme (like Twenty Twenty-One), then delete the old version of the theme you want to update.
Click Add New and then Upload Theme. Choose the new theme .zip file you downloaded and click Install Now. Once installed, click Activate. After completing the update, visit your website to ensure everything functions correctly. Check that your customizations and settings are intact.
Customizing Your Theme
Customizing your WordPress theme lets you personalize your website’s appearance and functionality to match your brand and preferences. Two primary ways to customize your theme are using the WordPress Customizer and accessing theme-specific options. Here’s how to make the most of these customization methods, focusing on the advanced features available in the Divi theme from Elegant Themes.
Full Site Editing with Block Themes
Firstly, let’s jump into full site editing via block themes. As an example, we will focus on the basics of the Twenty Twenty-Two theme. Go to Appearance > Theme to begin. Click on Customize for the theme that is activated on WordPress. When the site editor opens, you’ll see the home page template by default.
To edit other templates, click on the Templates option on the navigation bar. In Twenty Twenty-Two, you can edit templates like 404, page, blank, and search archive.
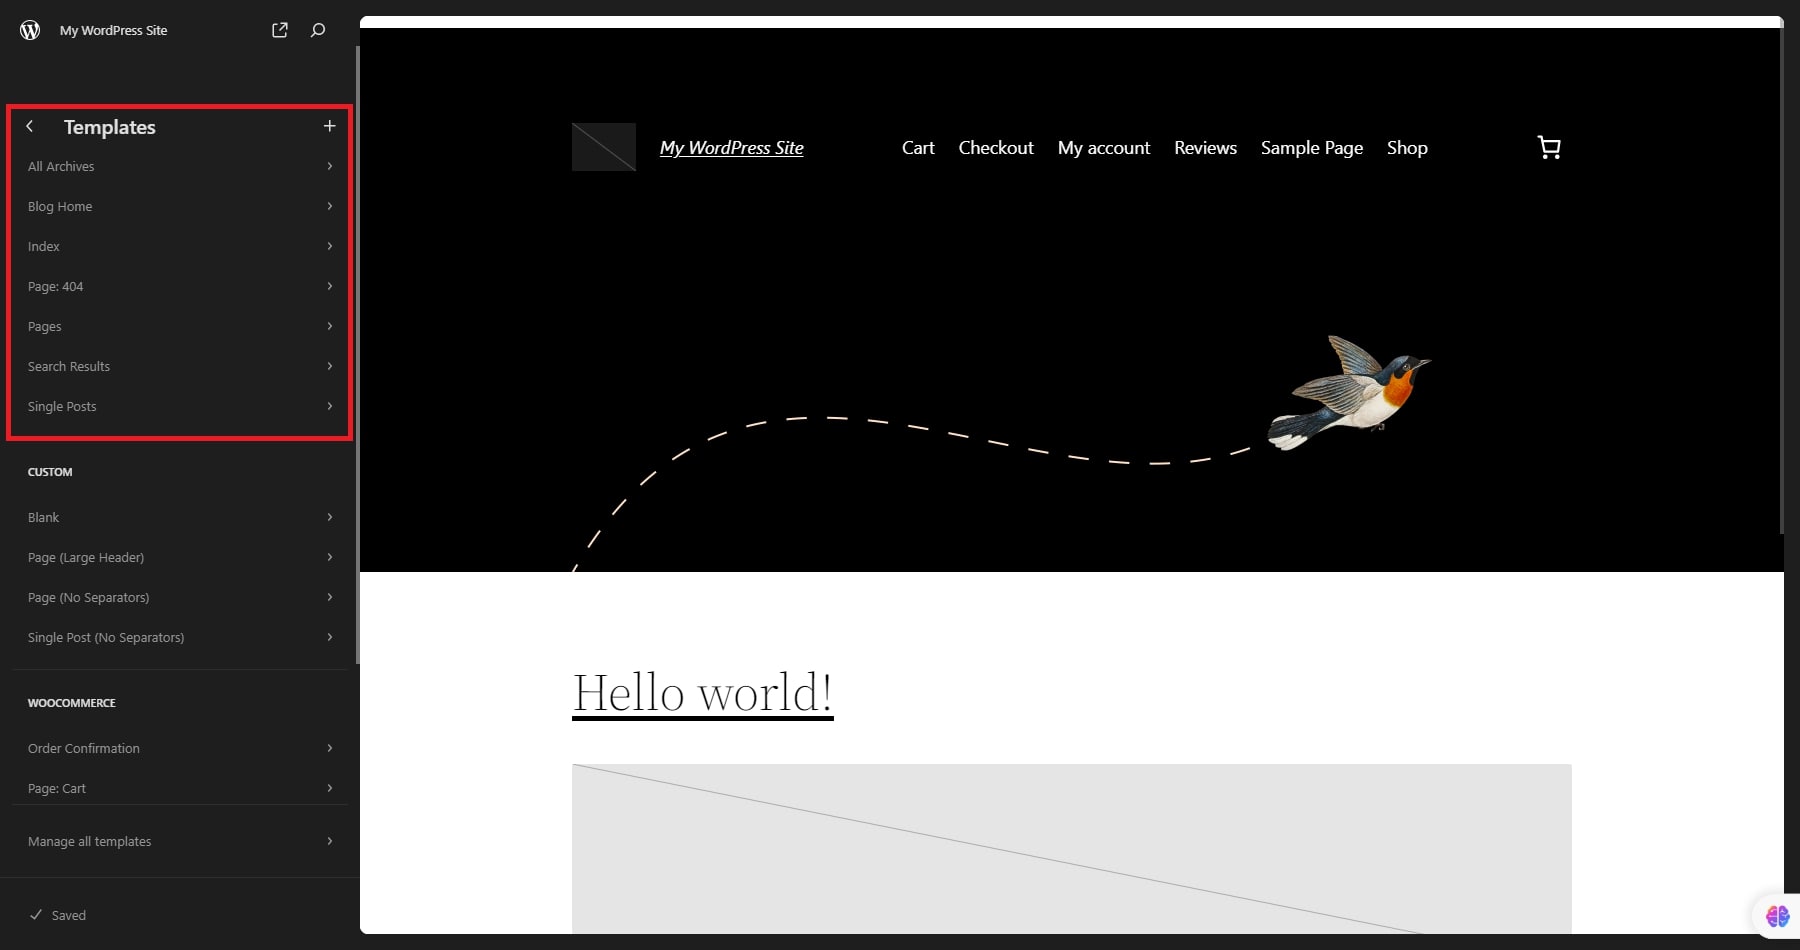 To edit a different template, click on it to open the site editor for that page. You can also create a new template by clicking the Add New button in the top right corner.
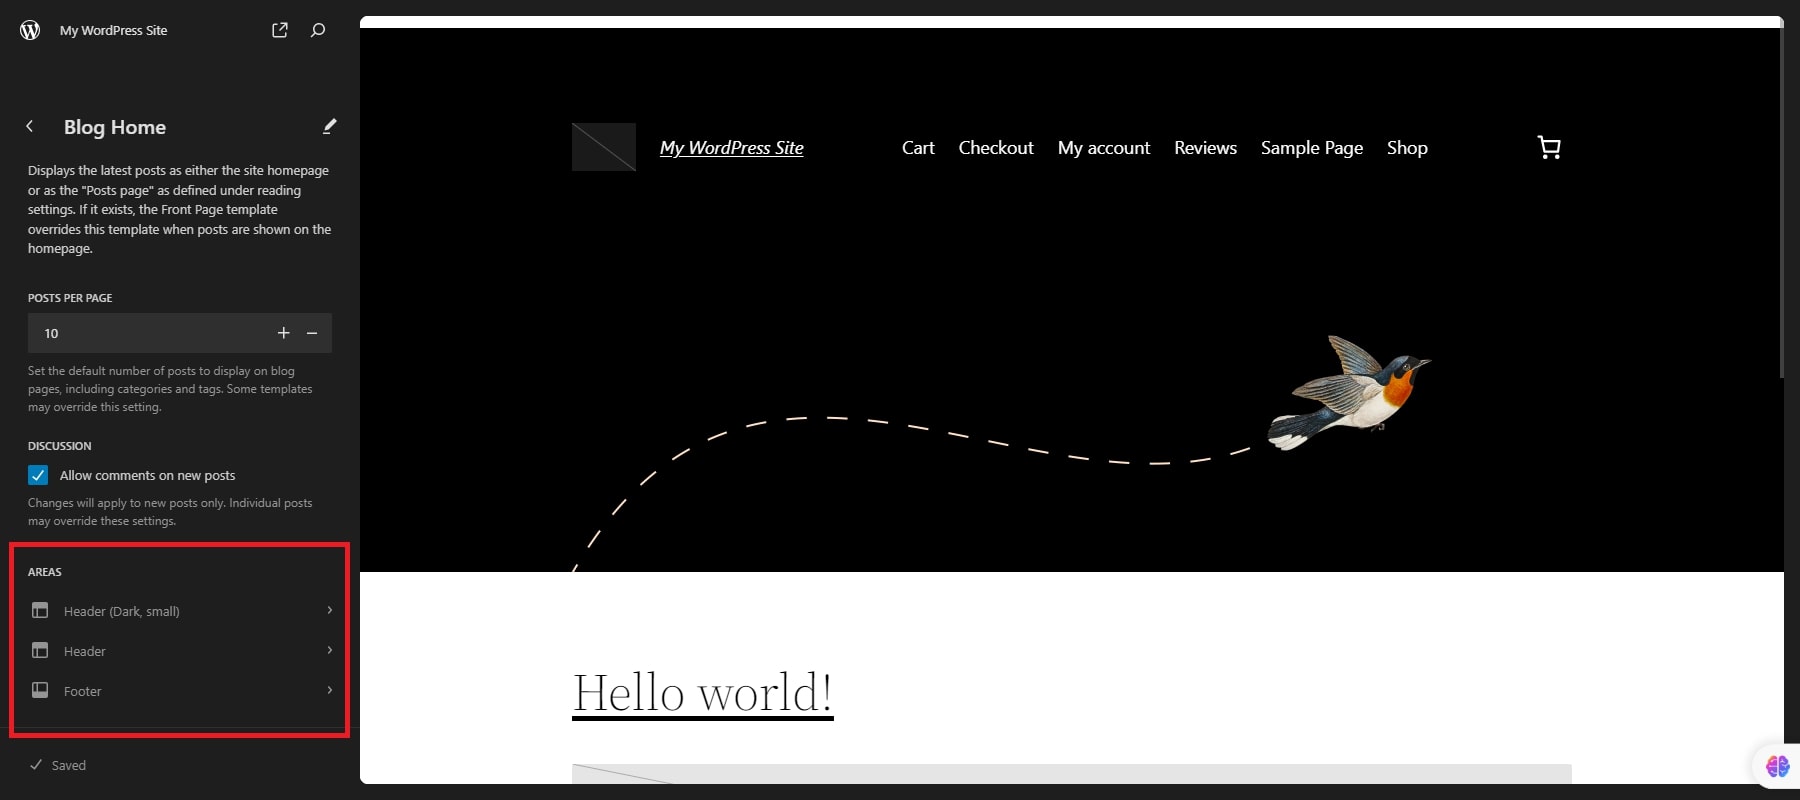
You can choose from several new template options like front page, category, and tag pages. The options available will depend on the theme you selected earlier. In Twenty Twenty-Two, you can also edit template parts such as the header and footer for each template. You can find some templates on this theme, like the home page, which may have additional parts like a blog template part.
WordPress Customizer
The WordPress Customizer is a built-in tool for tweaking various aspects of your theme in a live preview mode. To access the Customizer on WordPress, go to Appearance on the left-hand menu and click Customize.
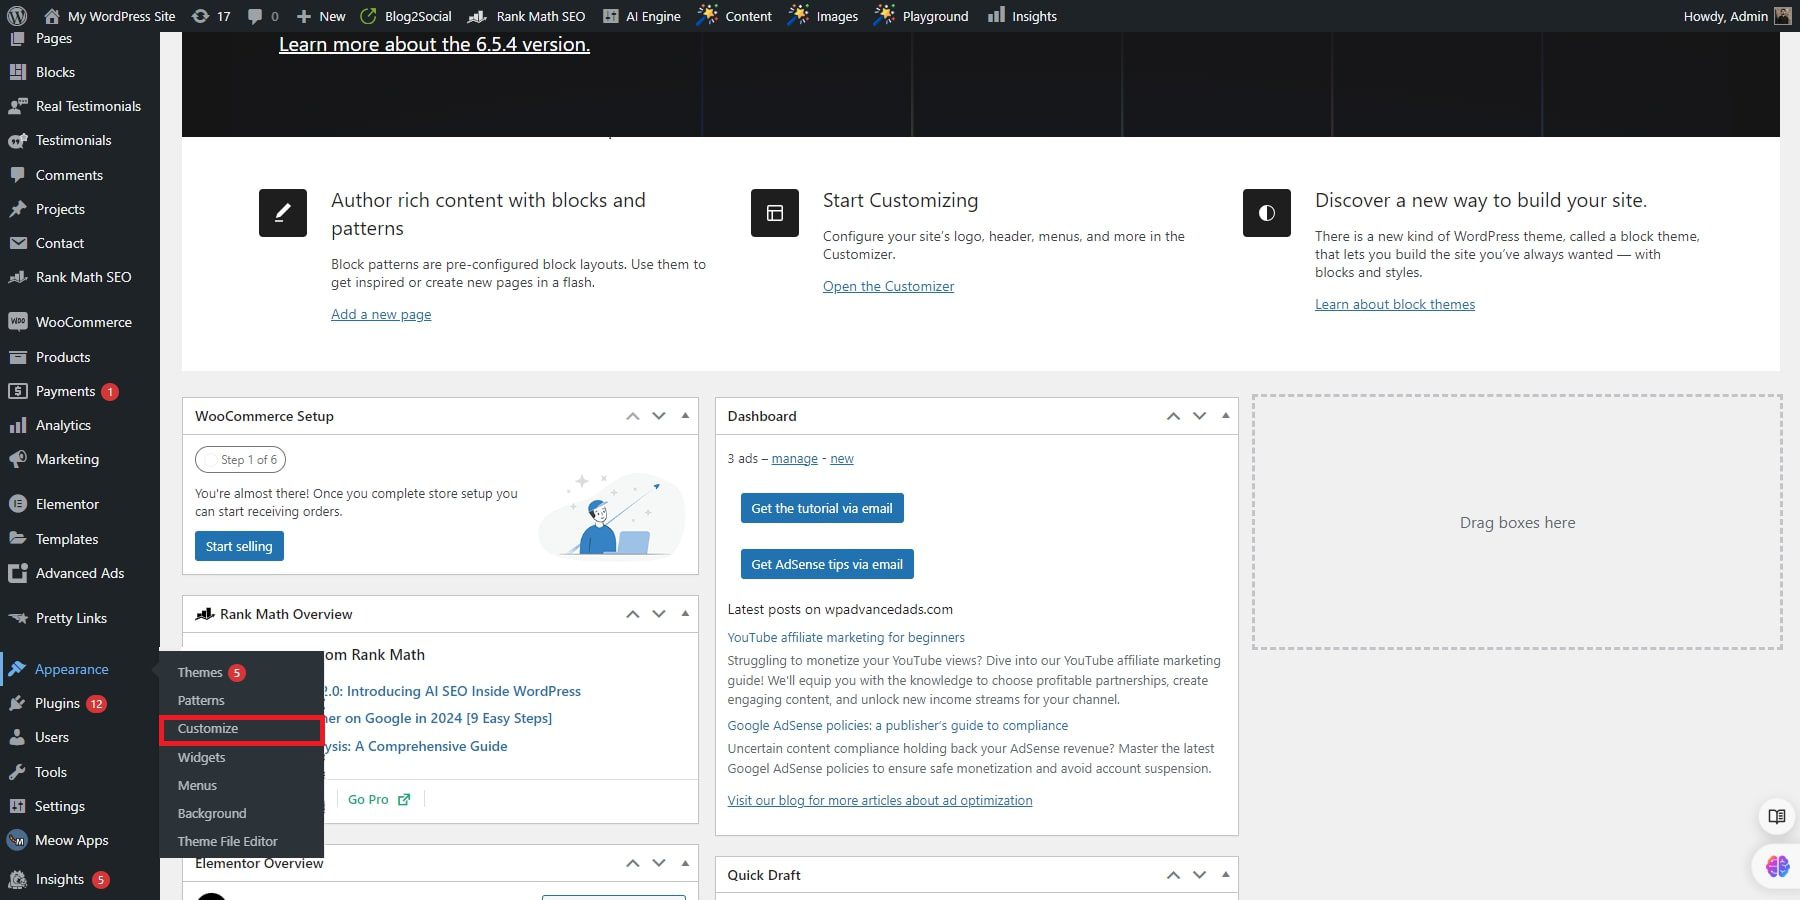
The WordPress Customizer provides a range of options depending on your theme. Common settings include site identity (logo, site title, tagline), colors, typography, header and footer settings, menus, and widgets.
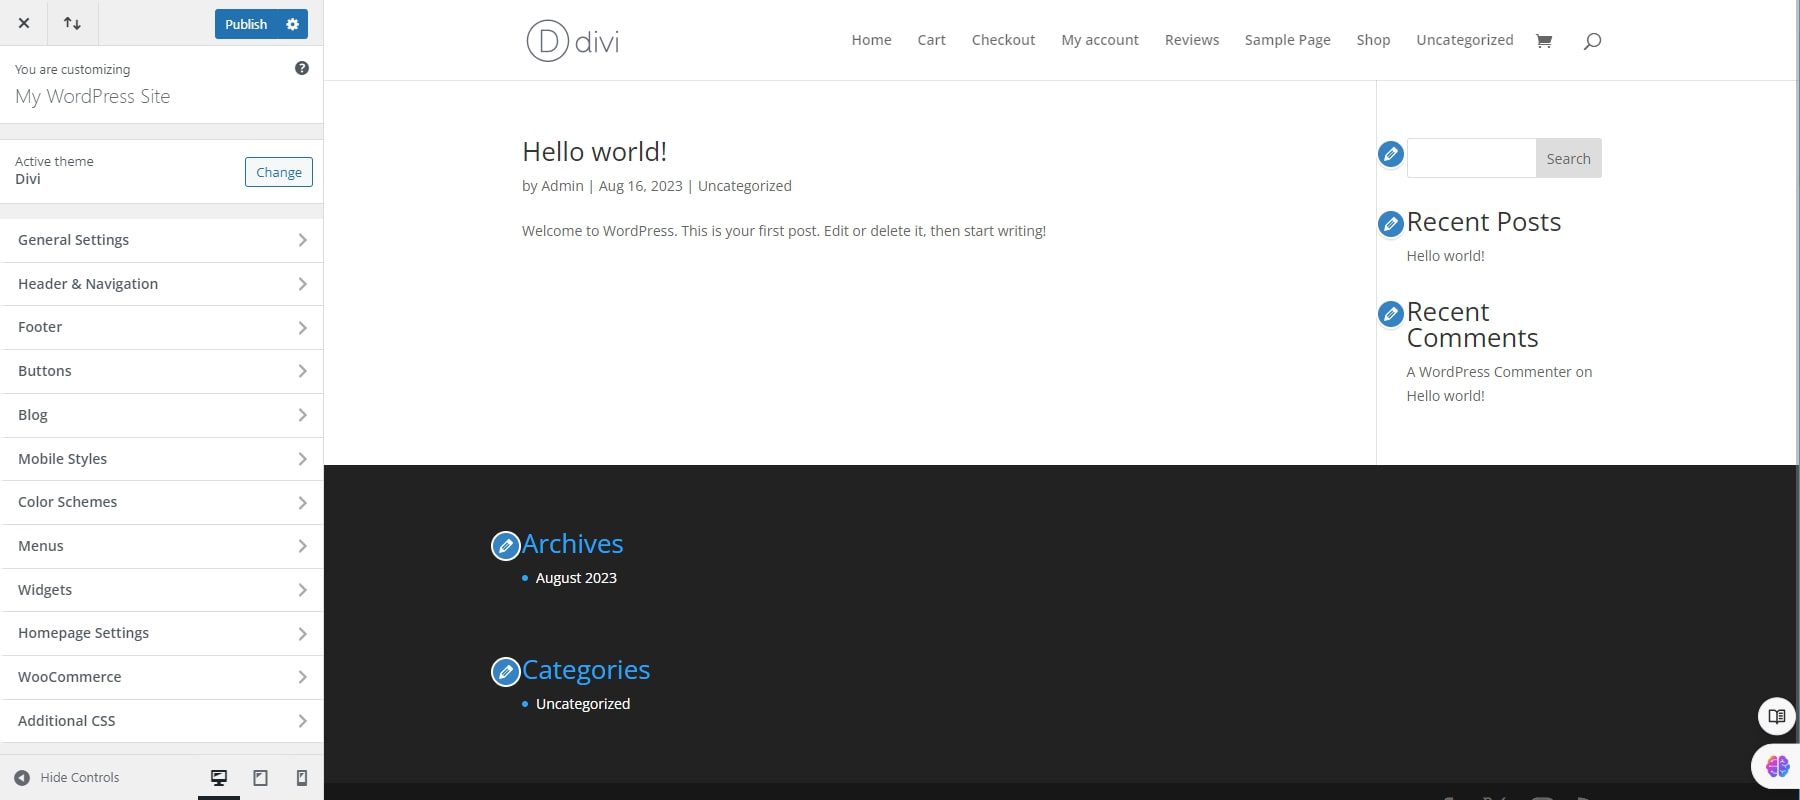
Easy Theme Customization with the Divi Theme Builder
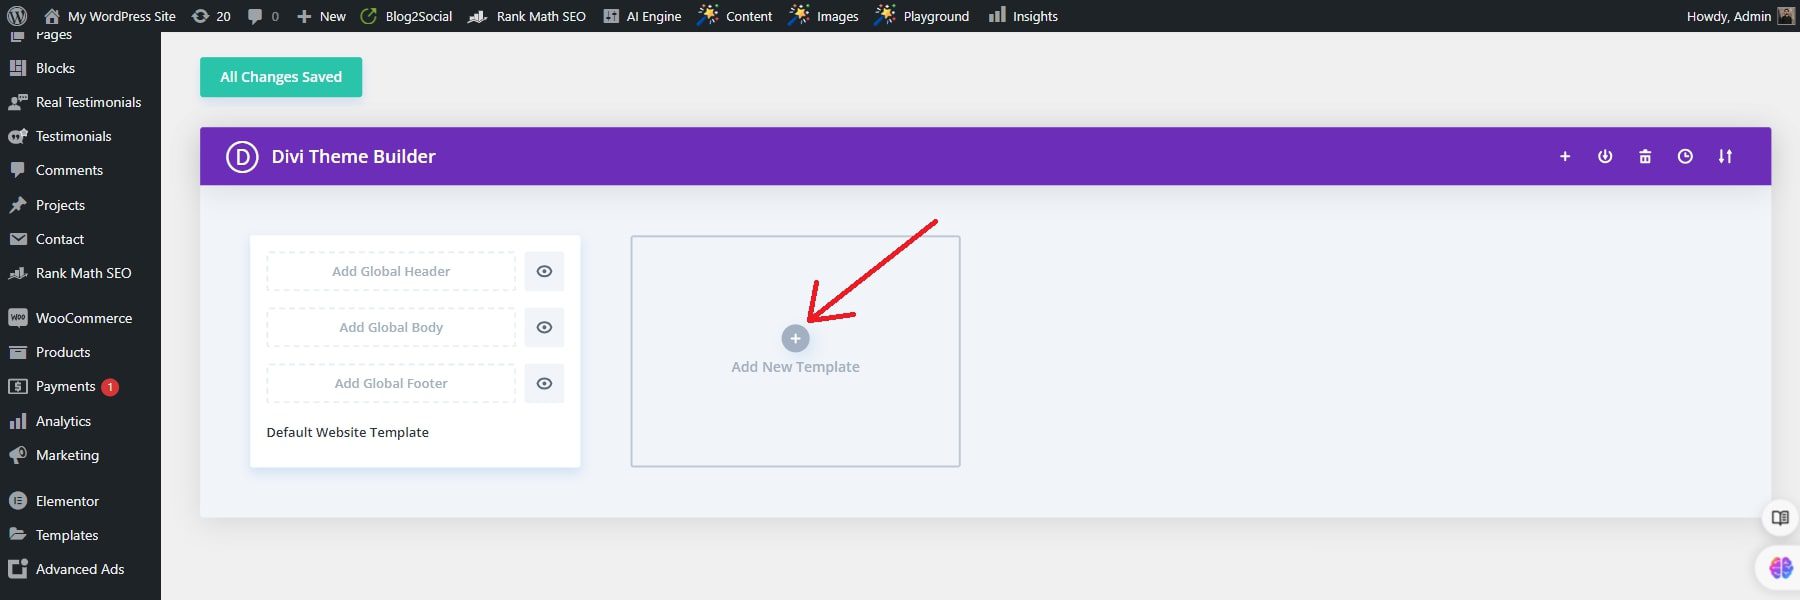
If you use the Divi theme, it has a powerful theme builder for more robust theme customization. The Divi Theme Builder allows you to customize every part of your WordPress site visually. It extends beyond the standard WordPress Customizer, enabling you to build custom headers, footers, and body layouts without coding.
To access the Divi Theme Builder, navigate to your WordPress dashboard and click on Divi > Theme Builder. This opens the Theme Builder interface, where you can see default templates and create new ones.
Advanced Customization
The Divi Theme Builder also supports advanced customization options, allowing you to create dynamic content and custom fields. Here are a few features you can leverage:
- Dynamic Content: Insert dynamic content like post titles and featured images into your templates.
- Custom CSS: Add custom CSS for detailed styling adjustments.
- Theme Builder Packs: Use pre-made Theme Builder Packs from Elegant Themes for a quick start on your design.
Conclusion
Installing a WordPress theme is straightforward and can significantly enhance your website’s appearance and functionality. Whether you’re uploading a theme from your computer, using FTP, or updating a purchased theme, these methods ensure a smooth installation and customization experience. Customizing your theme through the WordPress Customizer and theme-specific options allows you to create a unique and professional site tailored to your needs.
Looking for a top-quality WordPress theme? Explore our Divi theme and Divi Hosting through SiteGround to start customizing your site today. If not, you can check the table below and identify the best themes with their respective pricing details.
| Products Mentioned | Starting Price | Description | ||
|---|---|---|---|---|
| 1 | Siteground | $2.99 per month | Hosting Provider | Visit |
| 2 | Divi | $89 per year | Theme and Page Builder | Visit |
| 3 | UpdraftPlus | $70 per year | Backup Plugin | Visit |




Leave A Reply