Installing an SSL certificate is one of the top security tips you’ll hear over and over if you have a WordPress website. SSL certificates allow for a safe browsing environment, and you can usually tell if a site has it enabled if you spot a padlock in the address bar, before the page’s URL. That padlock means the website has a secure HTTPS connection — and that it’s using an SSL certificate.

On top of providing a safe browsing experience to your visitors by fortifying your site against hackers, SSL can also help with your page rank. Today, most web hosting companies include SSL certificates in their packages, SiteGround included. In this article, we will teach you how to install one manually, as well as the differences between the SiteGround SSL certificates that are available.
What is an SSL Certificate?
Before we get started with the “how,” let’s go over the “what” (and also the “why”). SSL stands for “Secure Sockets Layer,” and an SSL certificate encrypts the data that’s transmitted between a browser and a server. Without SSL, data that’s transmitted is in regular text, and it is very easy to intercept, change, or steal. Once encrypted, though, that text becomes a mishmash of characters that don’t mean much of anything and is super difficult to decrypt.
In addition to the telltale padlock, another sign that a site uses an SSL certificate is if it has HTTPS instead of just HTTP in the URL. It could also be that the site is using TLS, which stands for “Transport Layer Security.” TLS is sort of the newer version of SSL, but aside from the different name, they’re basically the same. In 1999, the Internet Engineering Task Force — or IEFT — updated SSL standards and changed its name. You can learn more in TLS vs. SSL: Which Protocol Should You Use? For the most part, though, the terms are used interchangeably, even if they aren’t quite the same thing.
Why Should You Use an SSL Certificate?
If you collect personal info from visitors, like credit card or medical info, hackers will have a difficult time getting their hands on it to modify or steal it. Also, since 2014, HTTPS is a Google ranking factor. If you have an SSL certificate installed on your site, you’ll do better in search results than non-secure sites. Plus, visitors will feel more comfortable knowing you have SSL installed — many will avoid your site if you don’t have SSL.
SiteGround Site Tools and Security
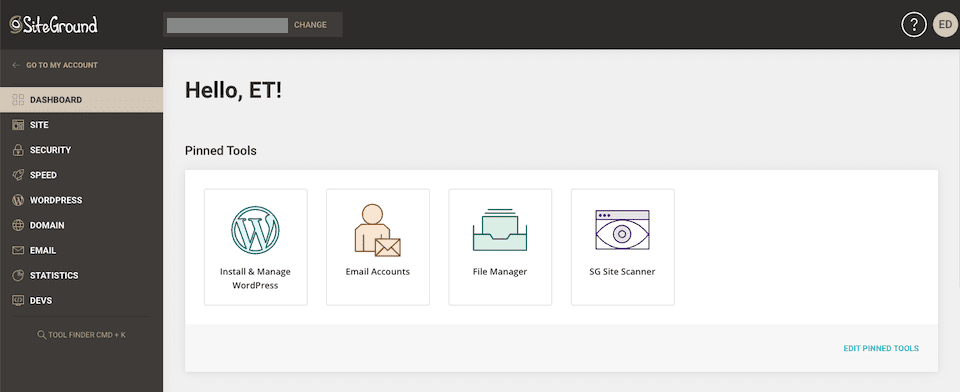
We have a full walk-through of all the Site Tools here, but let’s briefly recap. Site Tools is SiteGround’s streamlined hosting portal that replaced cPanel in 2019. To access Site Tools, log in at SiteGround.com, click Websites at the top, and then select Site Tools to the right of the website you’re working with. You’ll see the Site Tools in the lefthand sidebar.

(If you have been added as a collaborator to a site someone else owns, you will find the site under the Collaborations tab, instead.)
The Security section includes:
- Backups
- SSL Manager
- HTTPS Enforce
- Protected URLs
- Blocked IPs
- SG Site Scanner
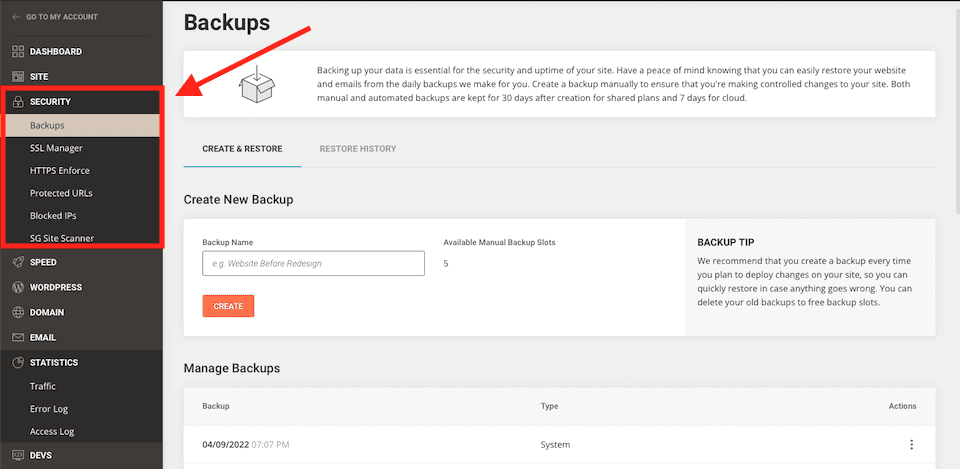
With Backups, you can see and create site backups. In the SSL Manager, you can install or import an SSL certificate. HTTPS Enforce can be toggled on if you want to work over an encrypted connection. In Protected URLs, you can make certain URLs inaccessible and even password-protect them. The Blocked IPs tool lets you prevent an IP from accessing your site, which is useful if you notice suspicious activity. And the SG Site Scanner checks for malware and alerts you if you have a problem.
Types of SiteGround SSL Certificates
SiteGround offers three kinds of SSL certificates:
- Let’s Encrypt SSL
- Let’s Encrypt Wildcard SSL
- Premium Wildcard SSL
The Let’s Encrypt SSL certificate is free, and it’s the standard URL that SiteGround auto-installs on each website. It’s valid for 90 days, but it’s auto-renewed by SiteGround when it expires. This certificate is the best option for small websites. In theory, you won’t ever have a moment without SSL enabled.
The Let’s Encrypt Wildcard SSL is also free and is also valid for 90 days, with SiteGround auto-renewing it for you when it expires. This is the best option for medium-sized websites and sites with subdomains.
The Premium Wildcard SSL requires payment and is valid for one year. It’s issued by GlobalSign and will protect all of your subdomains. Your site will also get a branded seal to showcase how it’s protected. This certificate is recommended for large business websites who deal in large amounts of customer data and sensitive information.
We also wanted to call attention to the primary difference between standard SSLs and wildcard SSLs. Standard SSL certificates protect one domain name, whether that is a subdomain or primary. Wildcard SSL certificates protect the domain name and any subdomain under it.
How to Install SSL Using SiteGround
SiteGround automatically issues a Let’s Encrypt SSL for each website. Once your domain has been registered or it’s been pointed to SiteGround’s name servers, it can take up to 72 hours for the SSL to be installed. You can see if the setup is finished by going to SSL Manager in Site Tools — there should be an Active status to the right of the domain name and certificate name.
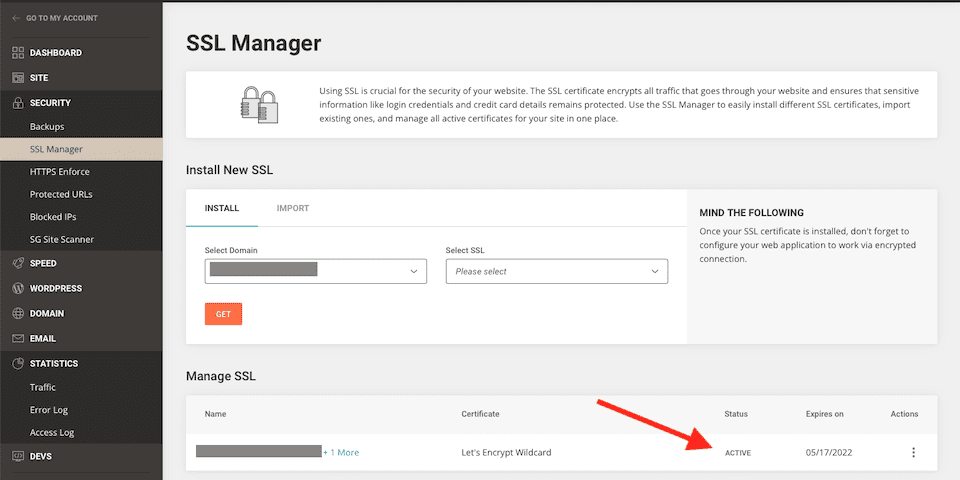
However, if this doesn’t happen automatically within that 72-hour window, you may want to manually issue an SSL certificate instead.
How to Manually Issue an SSL Certificate
Start by heading to Websites > Site Tools > Security > SSL Manager. In the Install New SSL section, first make sure the correct domain name is selected. Then, under Select SSL to the right of that, select the certificate you want to install from the drop-down menu. Next, click the orange Get or Order button (depending on the certificate you chose).
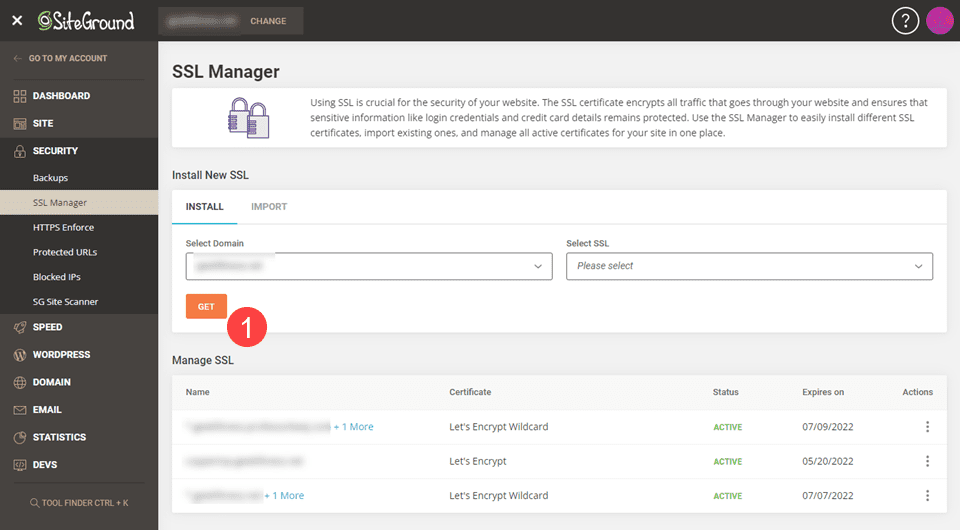
You can also import an external SSL certificate. In the SSL Manager, select Import.
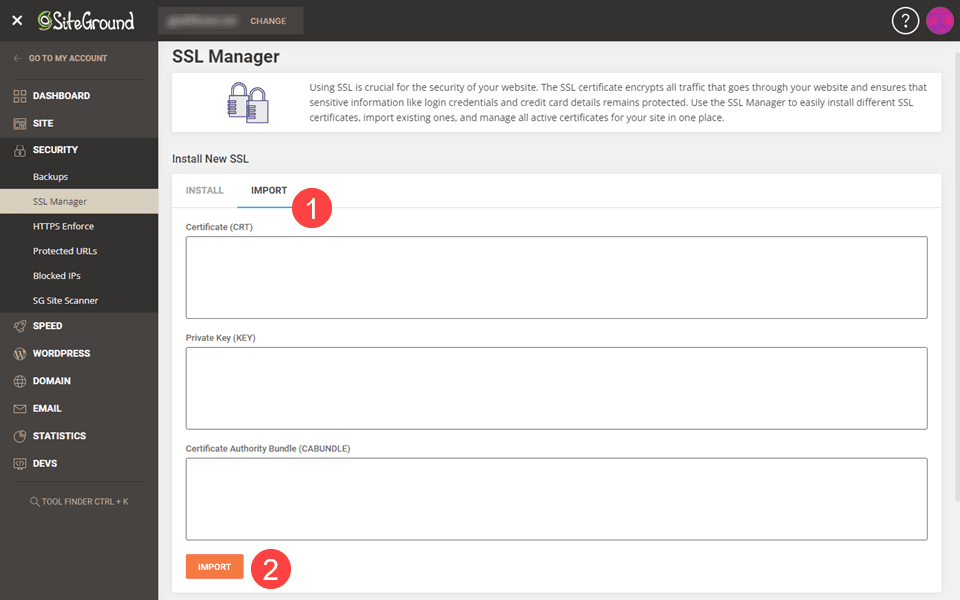
You’ll need to enter the certificate, Private Key, and Certificate Authority Bundle details, then select Import.
Next Steps With WordPress
For your WordPress website to work correctly with your newly installed SiteGround SSL certificate, you have to make a few more tweaks. You can do this through the server by going to the HTTPS Enforce option in Site Tools and turning it on. However, it’s recommended that you do this on the application level — i.e., in WordPress — when possible, which we’ll go over next.

Using the SiteGround Optimizer Plugin
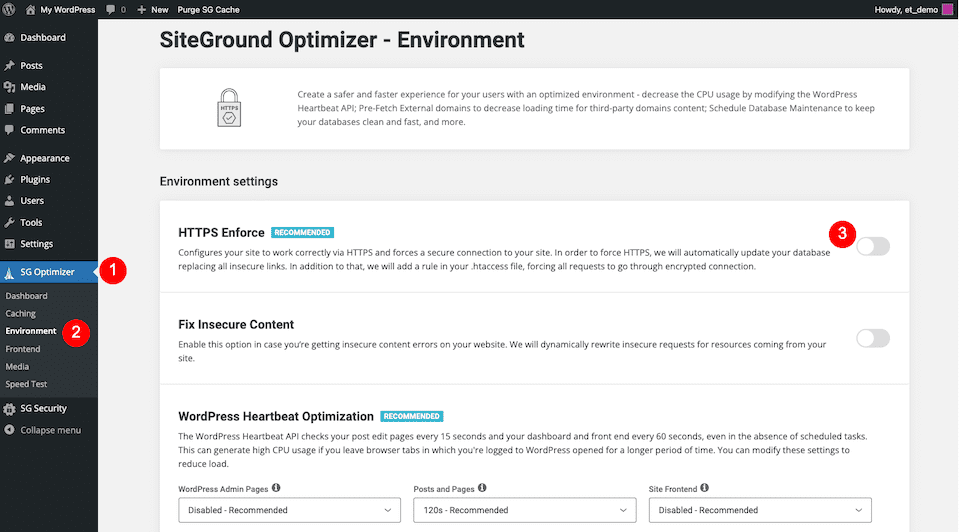
SiteGround suggests using its SG Optimizer plugin to enforce HTTPS. You can find it in your WordPress dashboard (you may need to download it if it wasn’t added automatically). Click SG Optimizer, then Environment from the menu below. On the page that opens, find HTTPS Enforce and toggle it on.
View, Renew, and Delete an SSL Certificate with SiteGround
In this section, we’ll show you how to view SSL certificate details, renew your SSL and delete one you no longer want to use.
View Your SSL Certificate
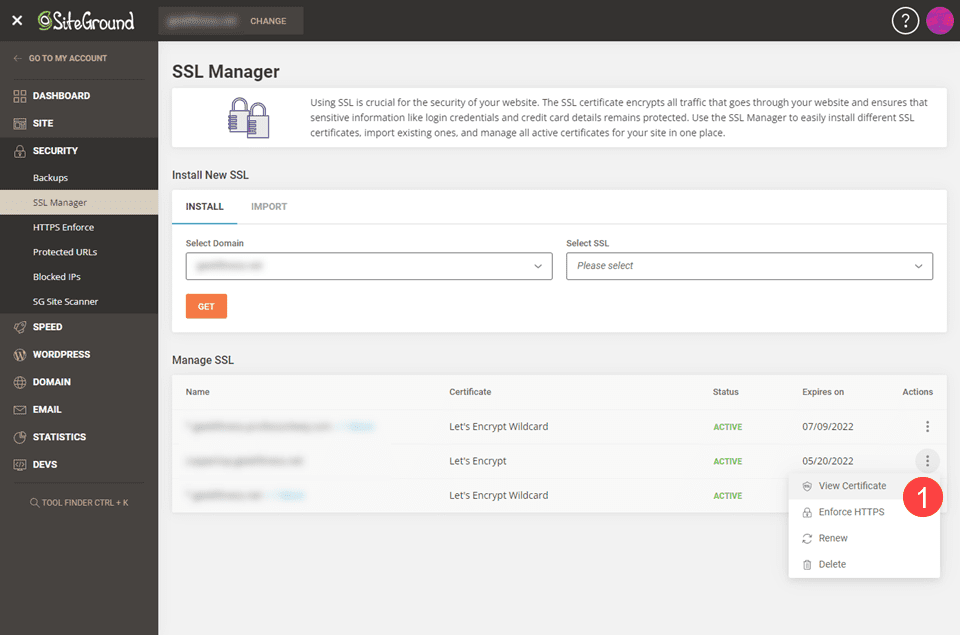
To view an SSL certificate, go to Site Tools > Security > SSL Manager and select the Three-Dot Icon to the right of the certificate. Select View Certificate.
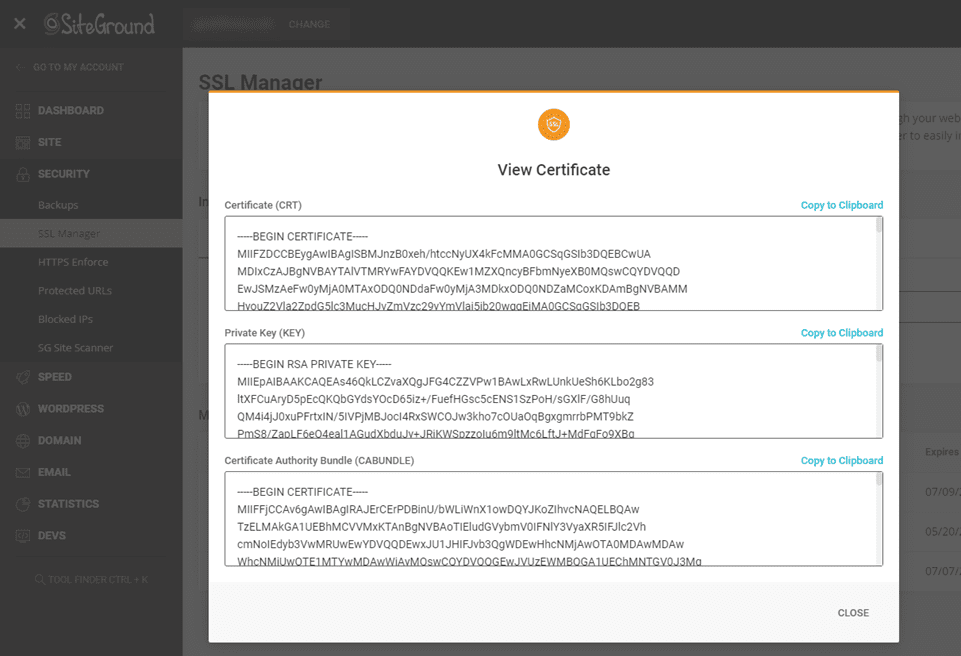
You should see a series of encrypted strings like this:
Renew Your SSL Certificate
The renewal option is only active starting 30 days before the certificate expires. Plus, SiteGround auto-renews Let’s Encrypt SSL certificates 30 days before the 90-day expiration date, so you won’t have to do anything in most circumstances.
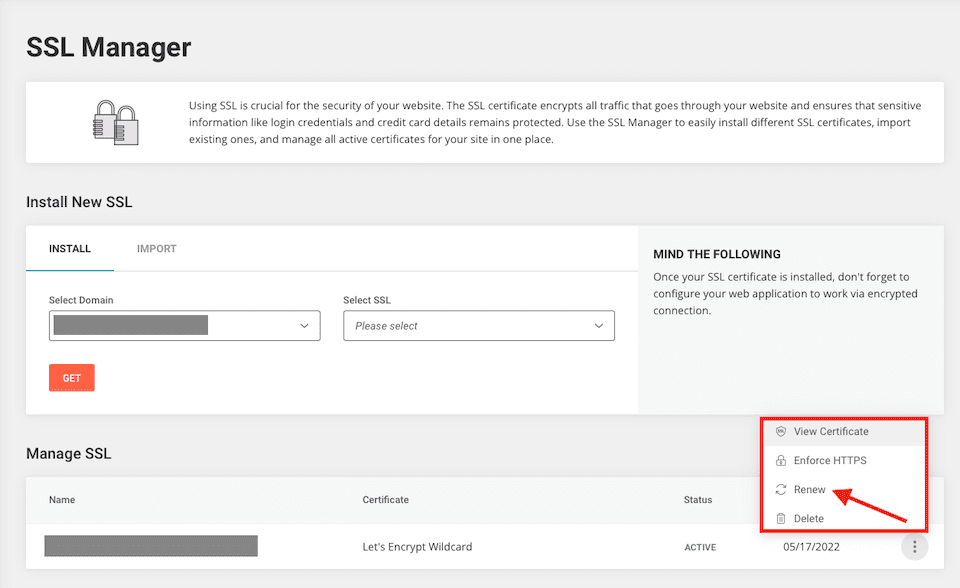
If you have a Premium Wildcard SSL certificate, SiteGround will auto-renew it 15 days before the 12-month expiration date. However, if you want to renew this type of SSL certificate manually, you can go to Billing on the SiteGround homepage and select Renewals.
If you’ve imported an external SSL certificate, you won’t be able to renew it through SiteGround. Instead, visit the issuer’s portal to renew it there.
Delete Your SSL Certificate
If you want to delete a Let’s Encrypt SSL certificate, go to Site Tools > Security > SSL Manager and select the Three-Dot Icon to the right of the certificate. Select Delete.
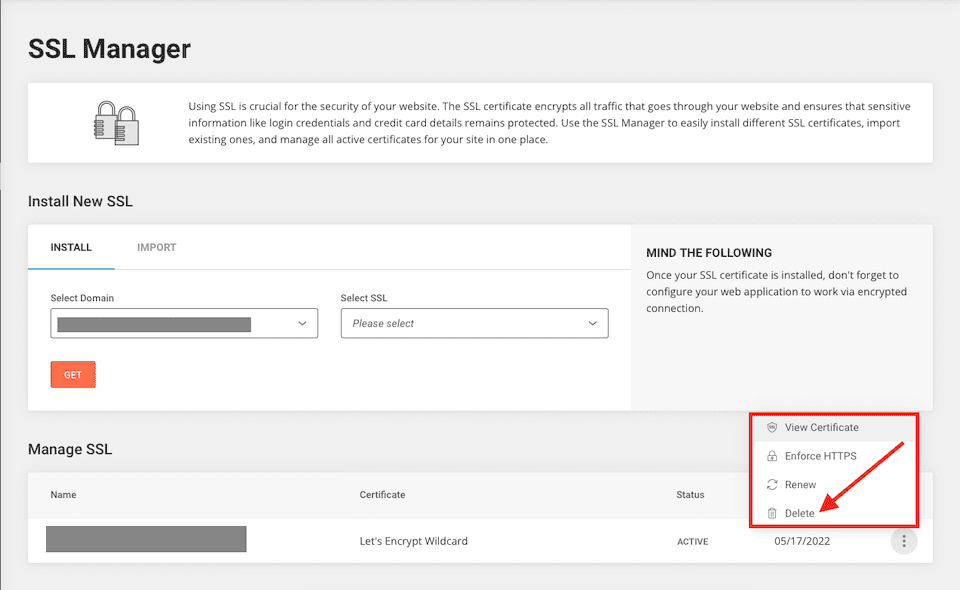
Removing a certificate like this is generally only done in very select circumstances, but may be necessary sometimes. The most common in our experience has been replacing a standard, single-domain certificate with a wildcard.
Final Thoughts About SiteGround SSL
WordPress hosting with SiteGround comes with a lot of perks, including the easy-to-use Site Tools portal, which makes protecting your site a breeze even for beginners. If you want a website that’s safe for your visitors and trusted by Google, an SSL certificate is a must. Luckily, with the freebie options from SiteGround, complete with auto-installation and renewals, you barely have to think about it.
If you’re an Elegant Themes member, you can sign up for Divi Hosting with SiteGround to not only get free SSL and the Site Tools platform, but you also get a Divi-optimized environment tied to your Elegant Themes account for easy setup. And with Divi Cloud, site setup and management is even easier than ever.
What has your experience been with SSL certificates and SiteGround? Let us know in the comments!



Very useful content, Thank you.
Yes this blog is very useful for me because I also want to buy the SSL certificate for my website and very easy steps are given in this blog to acquire SSL certificate for my website and I recommend this website to others also to read this blog especially those people who want to buy SSL certificate for the website.
Thank you
Very Useful and Informative Blog. Looking Forward to more.
You’ve provided excellent information through this article. Thank you for sharing such valuable content with us..
Installing ssl on my SiteGround has been the problem have watched numerous videos but this article broke it down am glad to have come across this please what am yet to findout is were i can add other domains as addon please can you help me on that!
Daniel, you should be able to add another domain in your main SG dashboard. Under the Websites tab, click the New Website button, and the next screen will let you add a new domain. 🙂