Customizing your WordPress website’s header has gotten much easier with the introduction of full site editing. Now, it’s possible to create and customize headers natively in WordPress using the block editor without having to resort to custom code or plugins.
In this post, we’re going to walk through how to create a custom header in WordPress so that you can easily make the changes needed to your own website header. Let’s get started.
What is a WordPress Header
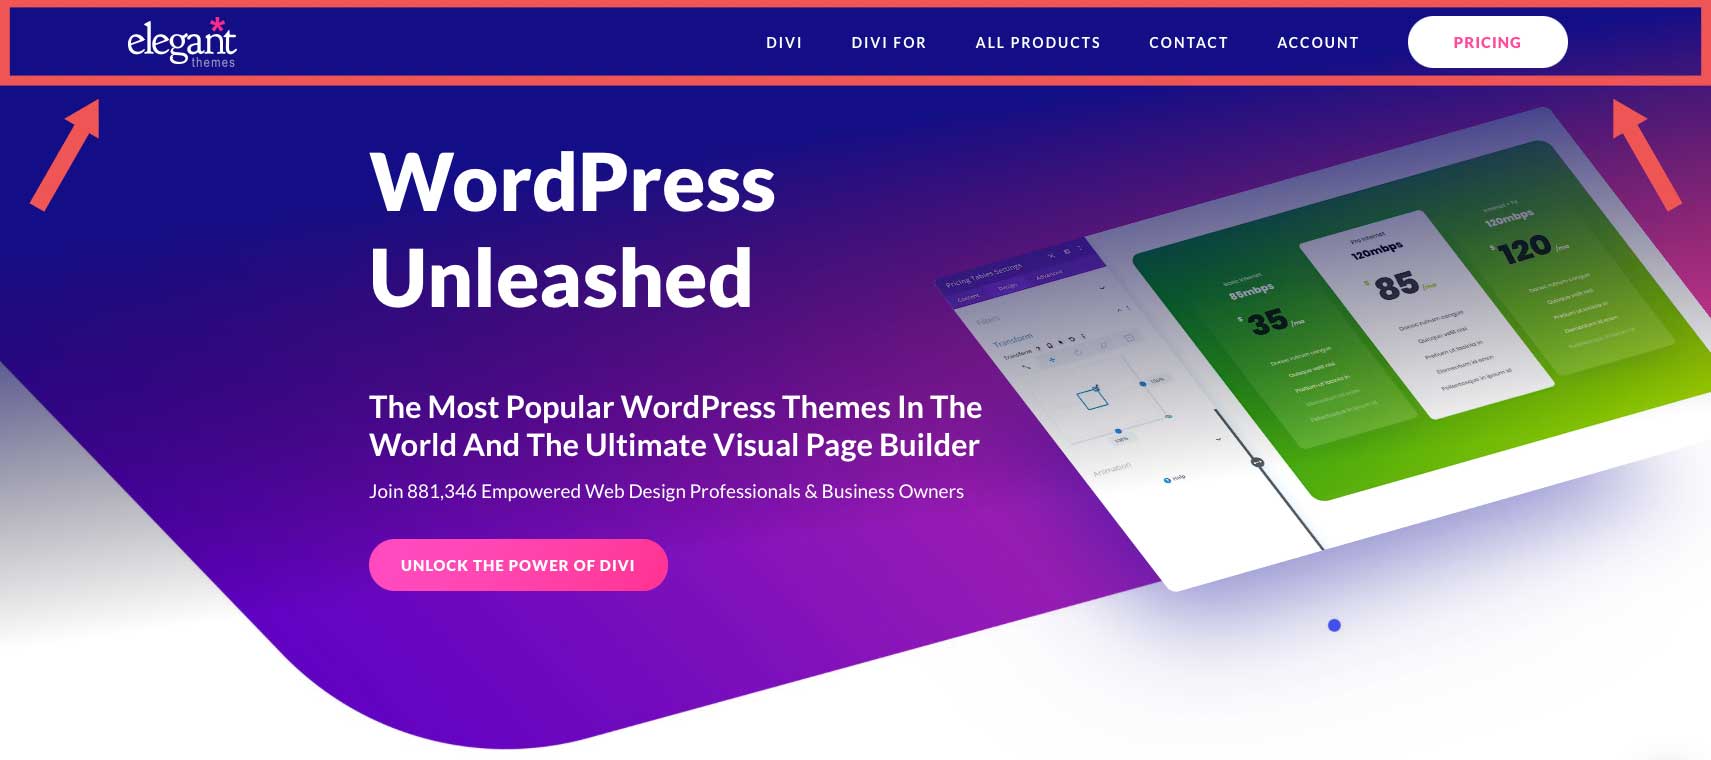
In WordPress, the header is quite possibly the most important element. It houses a navigation menu, a logo, and other important elements such as social media icons, call-to-action buttons, or even business information. Since the WordPress header is the first thing your site visitors see, it’s important to make a good first impression. It should contain everything a visitor needs to see – pages, contact information, branding elements, or other important information.
Thankfully, you are no longer married to the WordPress customizer. With the development of full site editing, it is now possible to design and implement your site’s header, or any other element, in any way you wish.
How to Customize WordPress Header Using Full Site Editing
Full site editing in WordPress is a bit different than the WordPress themes of old. While you can still use the WordPress Theme Customizer, it’s no longer necessary like it once was. The creativity-limiting customizer has been replaced with a new experience – the site editor. While still in beta, it is the future of WordPress customization. For instance, when creating a new header in the Twenty Twenty-Three Theme, the site editor is quite useful for several customization options including your header’s fonts, colors, button styling, and more.
Accessing the WordPress Header in the Site Editor
To access the WordPress header, you’ll need to first navigate to Appearance > Site Editor.

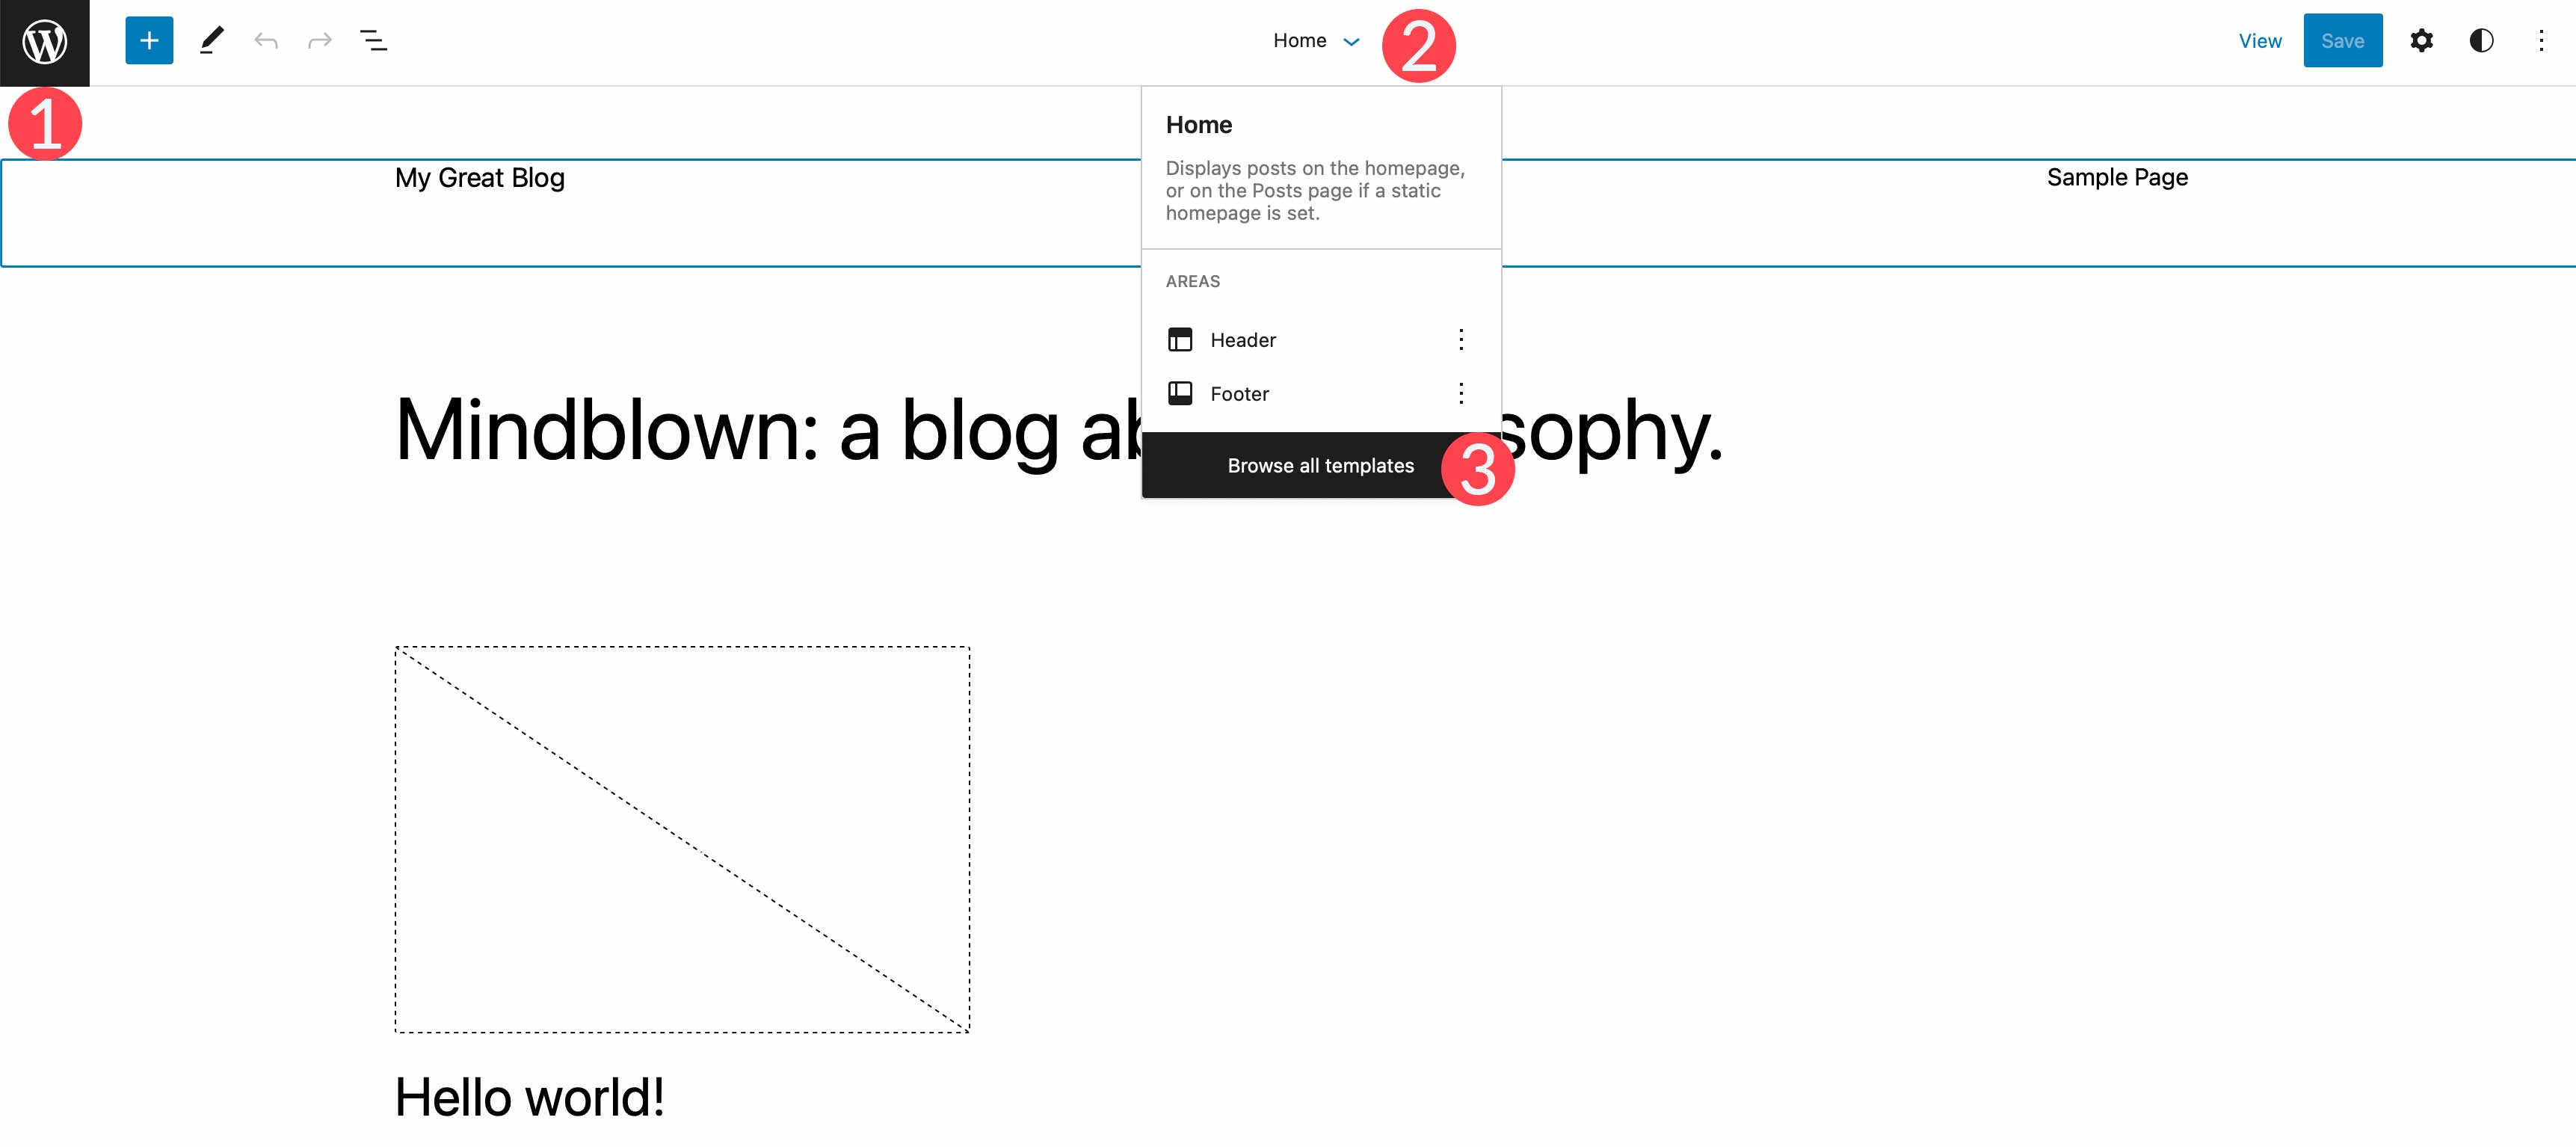
When the editor loads, you’ll be automatically taken to your home settings. To get to the header settings, you can either click the WordPress logo in the upper left corner of the editor or select the dropdown arrow, then choose Browse all templates.
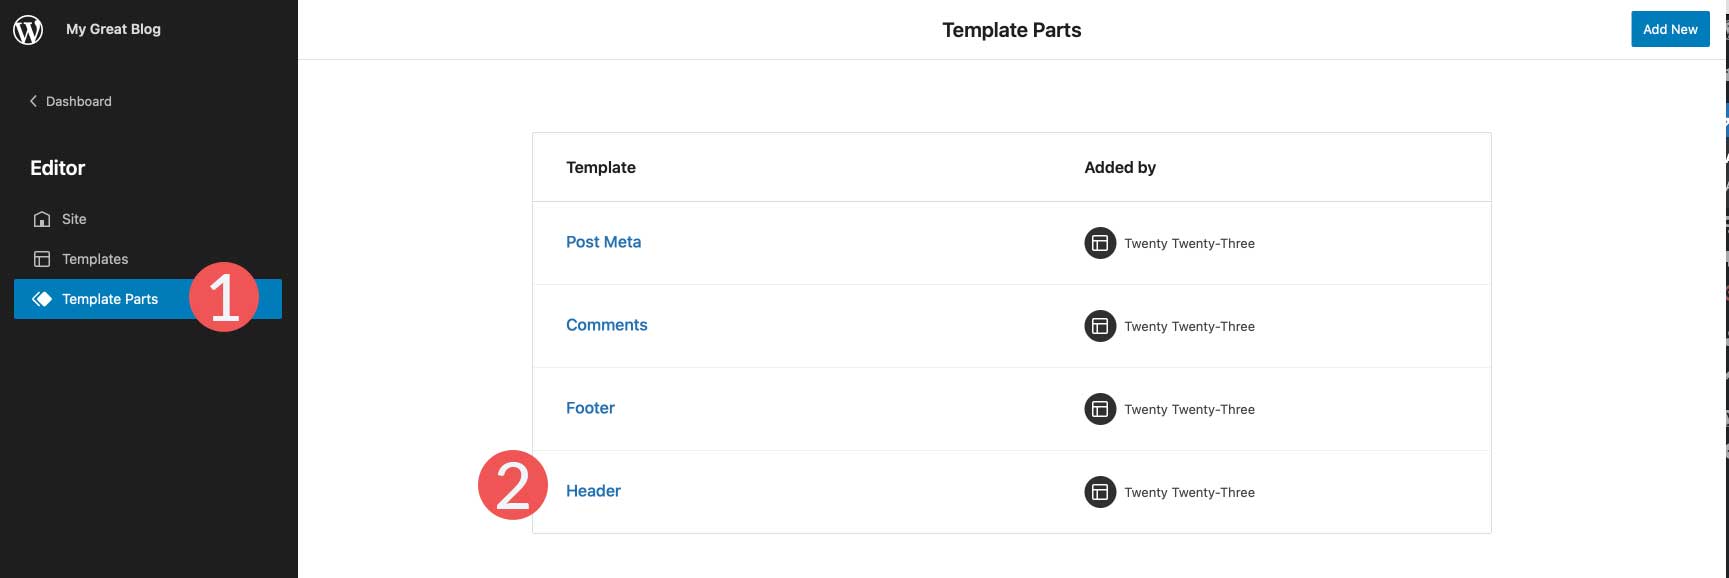
Next, click on template parts in the WordPress menu. Finally, click Header to edit the site’s header.
Styling the Header

In the Twenty Twenty-Three theme, the header is very basic. That being said, you have the option to add or delete any WordPress blocks you’d like. For the sake of this tutorial, we’re going to show you how to edit the header template part of the Twenty Twenty-Three theme to create a simple, yet effective custom header for your website.
To get started, let’s take a look at the header’s structure by clicking the list view icon in the template editor. You’ll see that there is a group block that contains a row with two blocks – the page title and navigation block. The row is already structured the way we want with a centered vertical alignment, and the content is set to full width. So basically all we need to do here is make a couple of changes to this row.

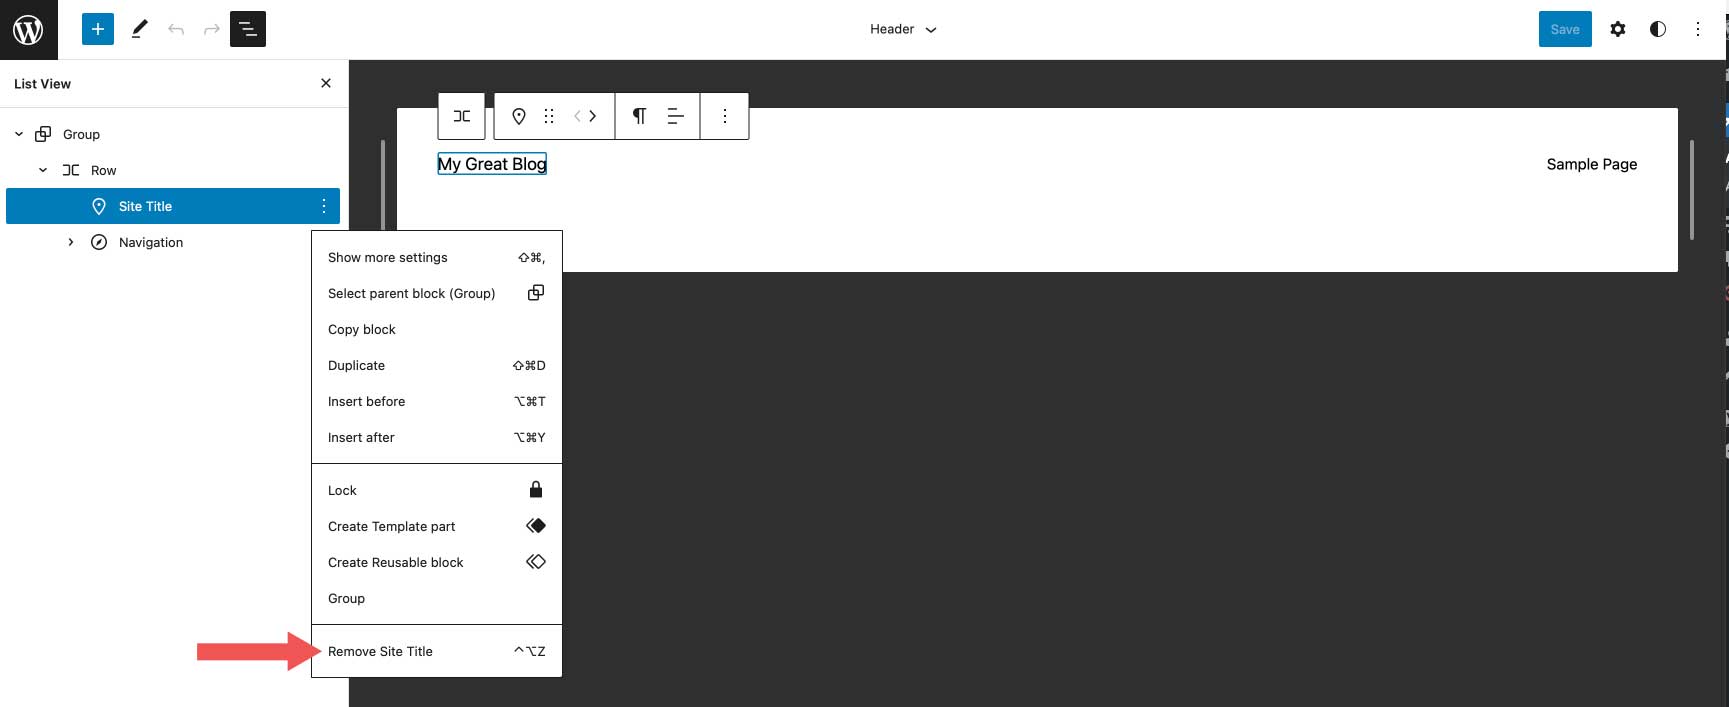
First, we’re going to delete the site title block, then replace it with the social icons block. To do this, simply click on the site title block in the list view, then expand the ellipsis menu.

Finally, click Remove Site Title to delete the block from the header.
Adding The Social Icons Block
The first block we’re going to add is the social icons block. Click the plus icon next to the Page List block, then start typing social icons. Simply click to add it.
![]()
To add an icon, click the plus icon to reveal the modal box. Type Facebook to bring up the Facebook icon. Simply click to add it. Next add the Instagram, YouTube., and TikTok icons repeating the previously mentioned steps.

Styling the Social Icons Block
Next, we’ll style our icons. There are several options with the social media block including which layout style you’d like – either default, which is a logo enclosed in a circle, logos only, or pill shape. Next is layout justification and orientation, which controls whether your blocks will be displayed horizontally or vertically, and how you’d like them to be justified. Then there are link settings. Here you can choose to open the links in a new tab and choose whether to show the labels.
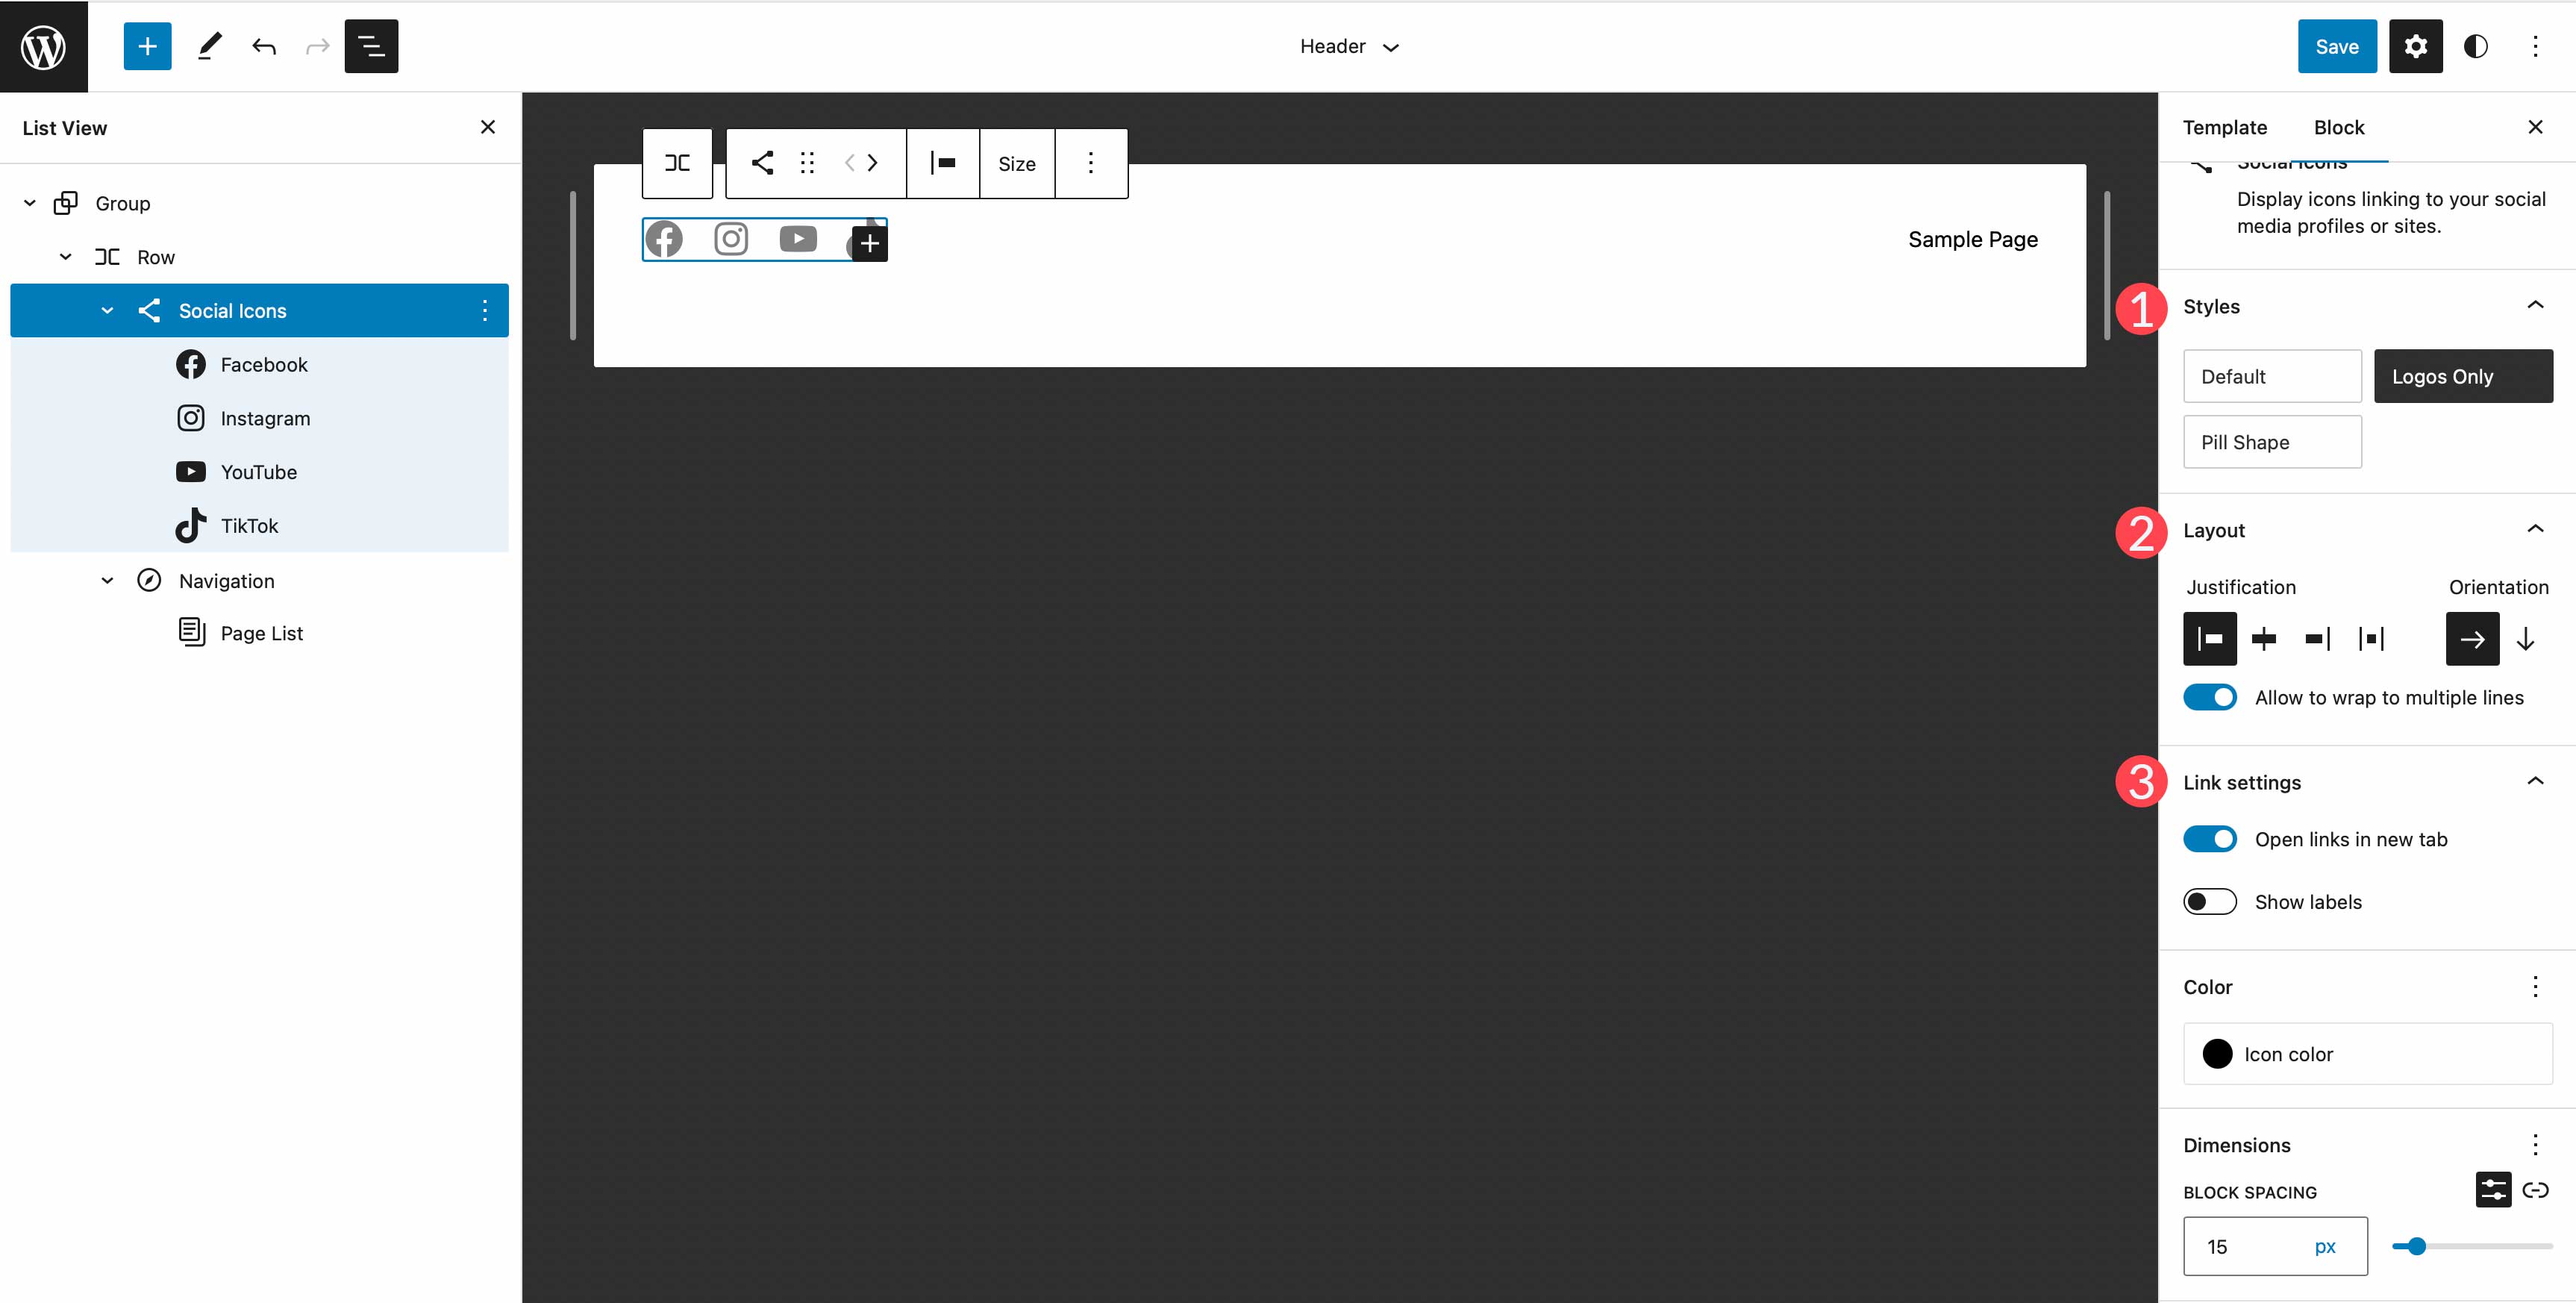
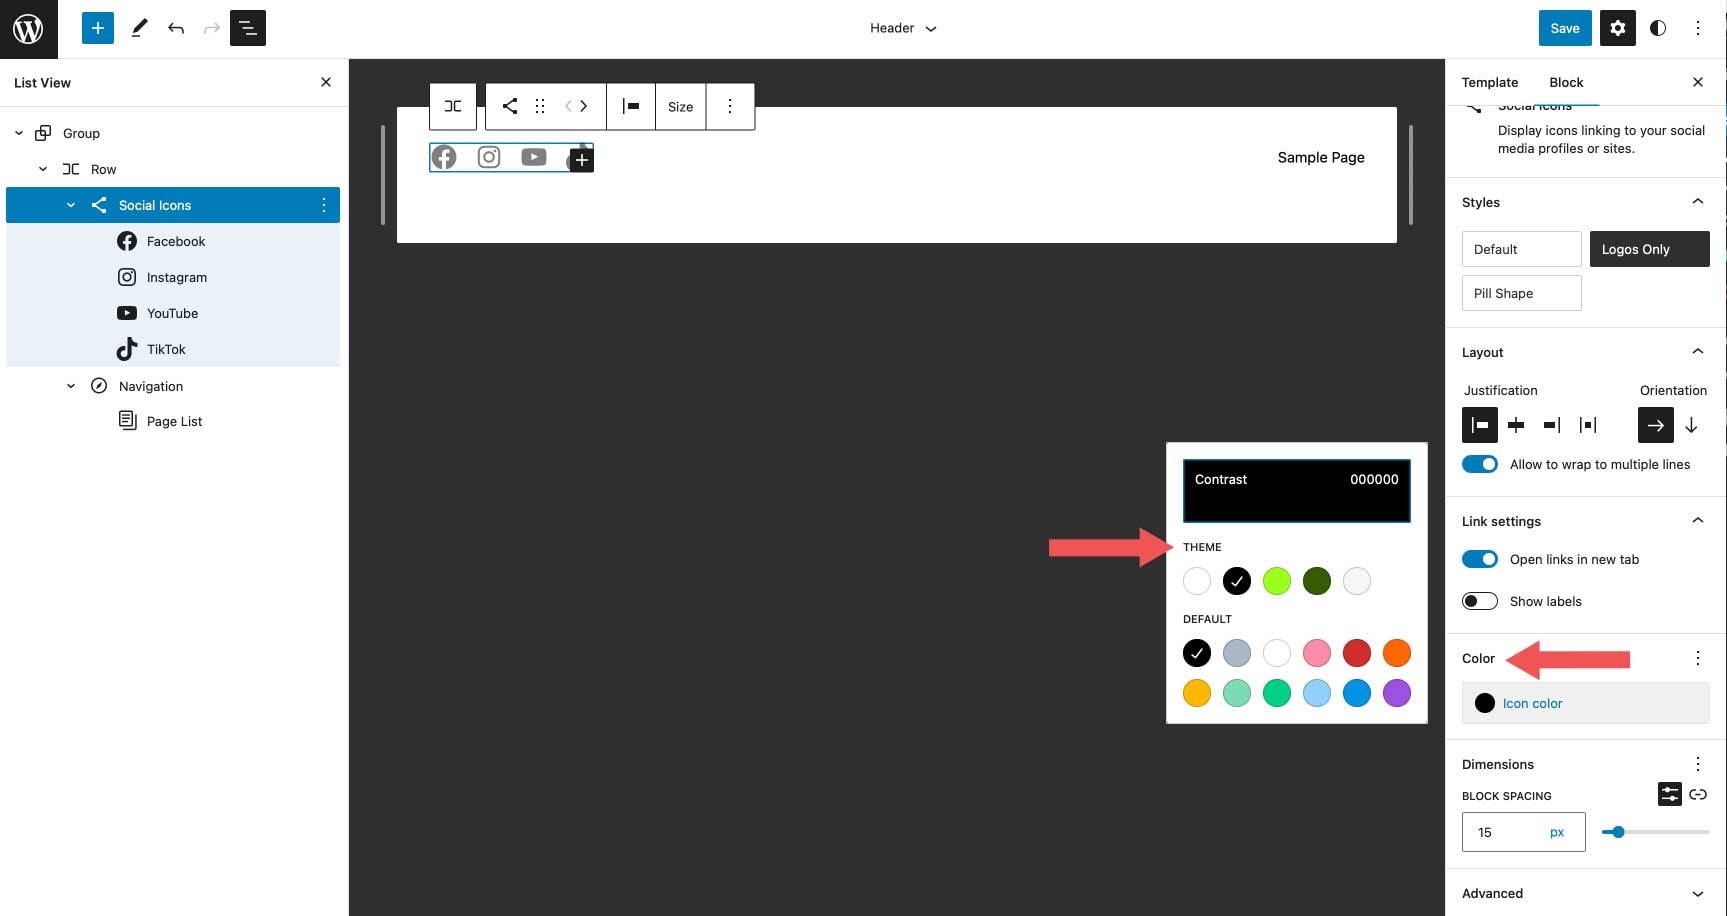
Depending on which layout style you choose, you’ll have different color choices. For example, when selecting logo only, you’ll only be able to add color to the logo itself. If you choose default or pill shape, you can choose both icon color and background color. The available colors are pre-selected in the Twenty Twenty-Three theme. Should you choose to add more, you’ll need to add them to your theme’s theme.json file.
The final settings group is Dimension, which enables you to control how much spacing to set between each social icon.
![]()
In this tutorial, we’re going to choose the logo-only style, set the justification to space between items, and choose the horizontal orientation. This will evenly space our icons, display them horizontally, and show only the icon itself without a background. Under link settings, set it to open links in a new tab. For color, choose white. Finally, add 15px block spacing under the dimension settings.
![]()
Setting A Background Color to the Row
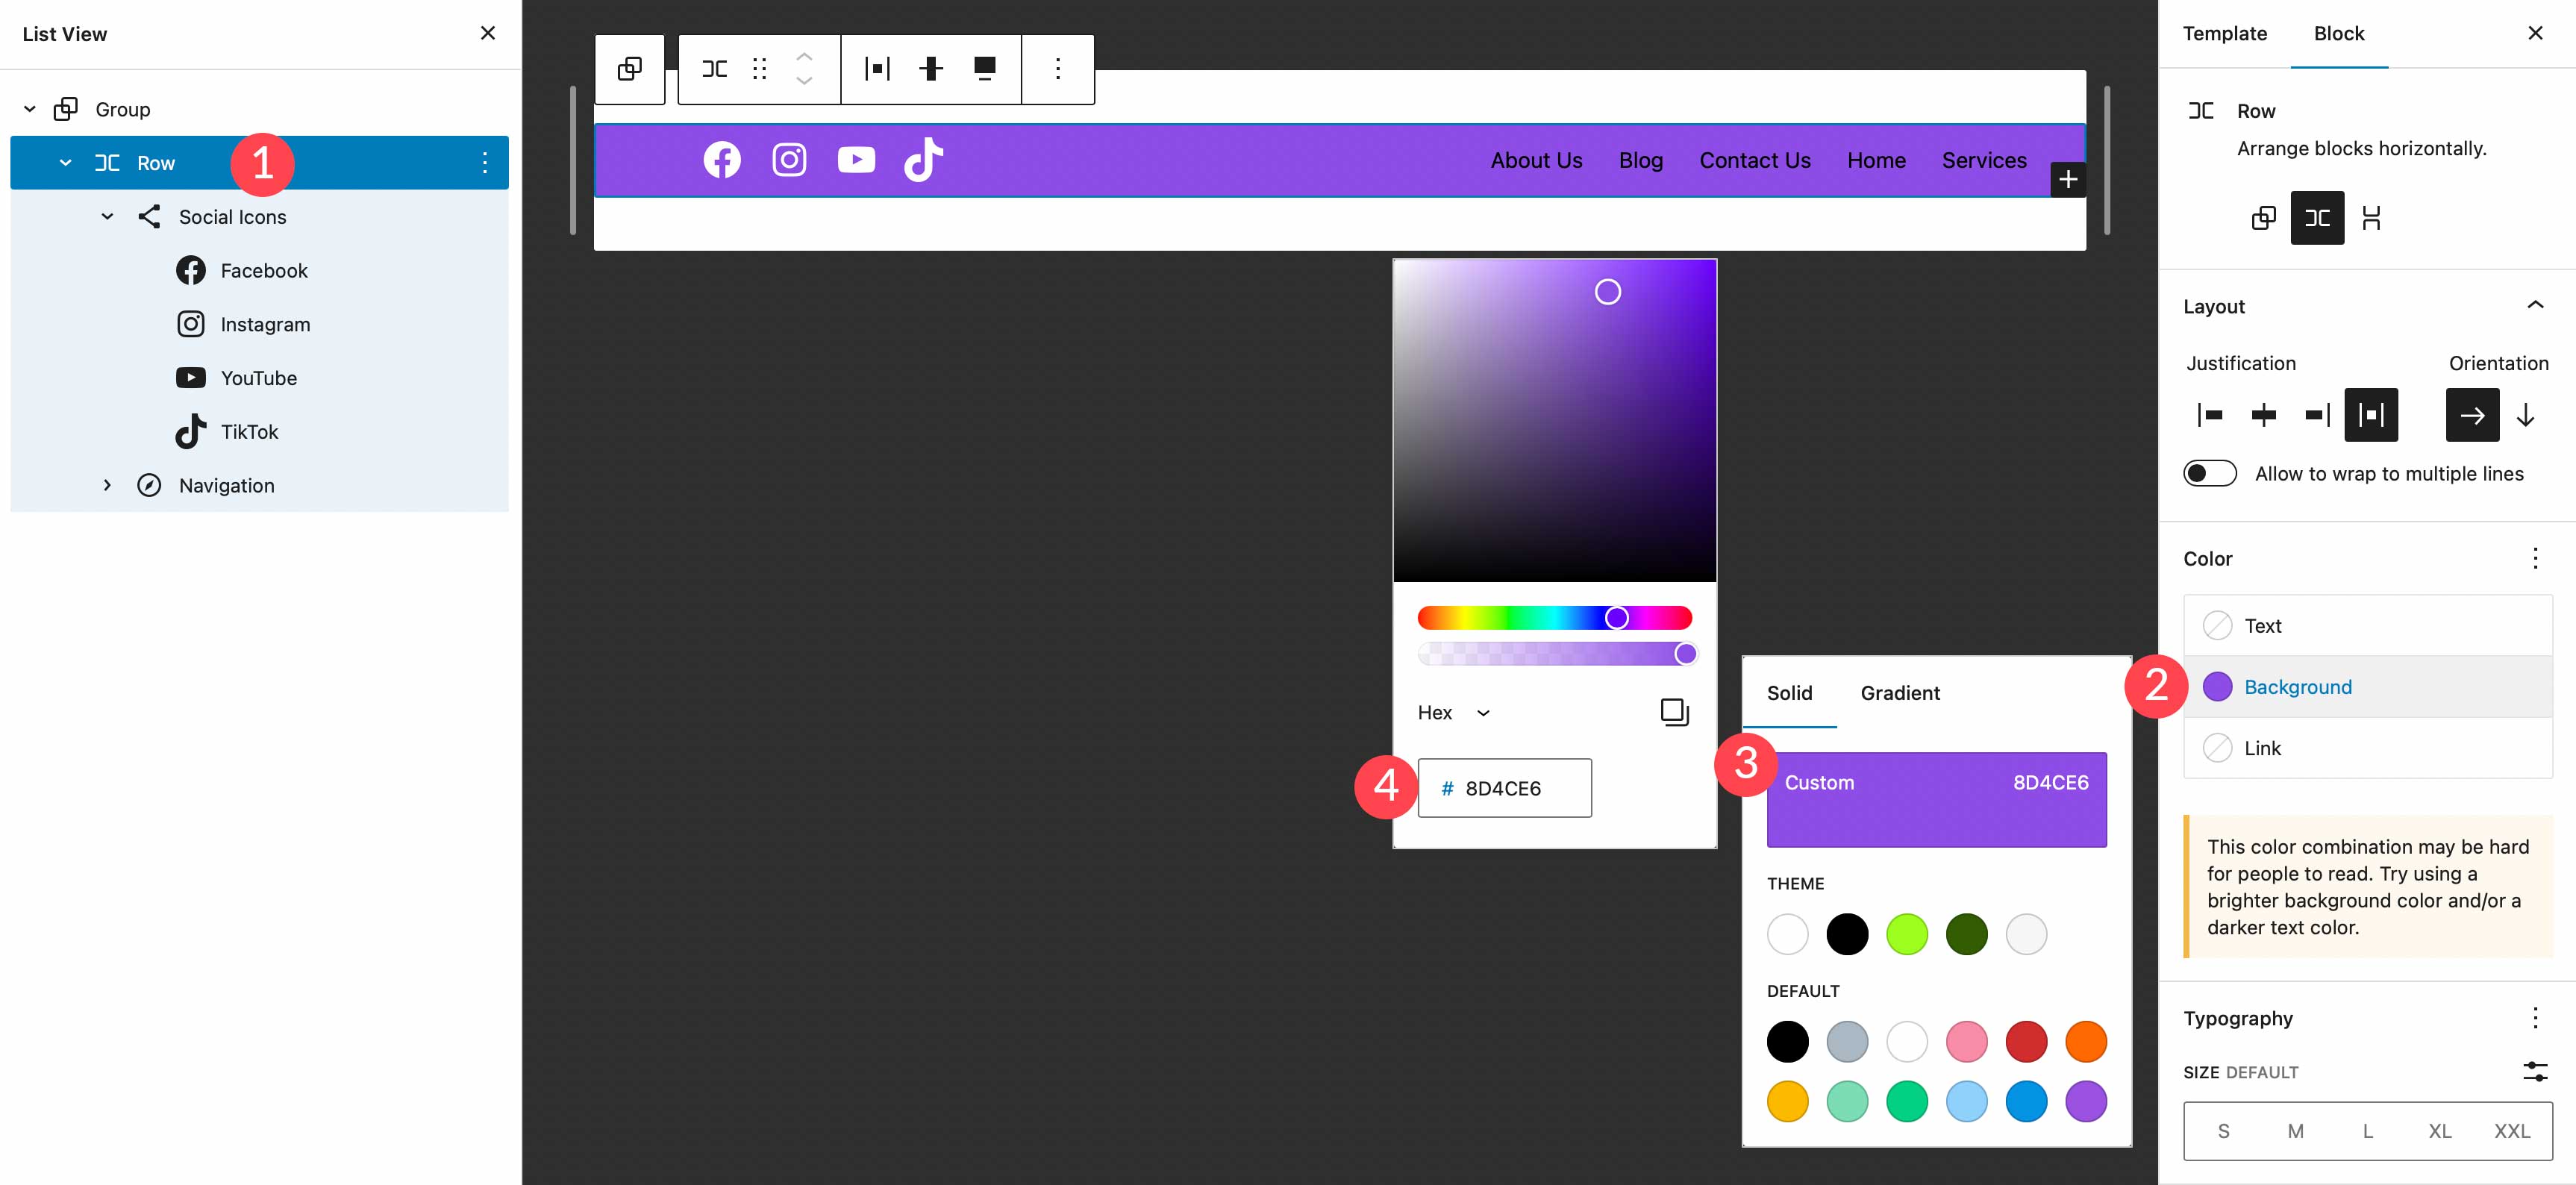
Next, we’re going to add a background color to the row. In the list view, select the row block. In additional settings, locate background under color. Click inside the base box and add #8D4CE6 as the color.
Adding an Additional Row to the Header
Our header requires a new row to be added. We’re going to be adding a site logo block, as well as a call to action button, so we need a place for these to live. It’s good to remember that when creating custom headers, adding rows is a good way to keep your blocks organized.
To add a new row, click on the block inserter icon.

Next, type row into the search bar or /row directly into the page editor to insert a new row.

Moving Blocks Between Rows
For the next step, we are going to move our navigation block to our newly created row. Ultimately, we’ll have social icons and a call to action button in the top row, then a site logo block and navigation block on our second row. To move the navigation block, click on it in the page editor. Click the drag icon in the toolbar settings for the navigation block and drag it to our newly created row.

Add the Button Block
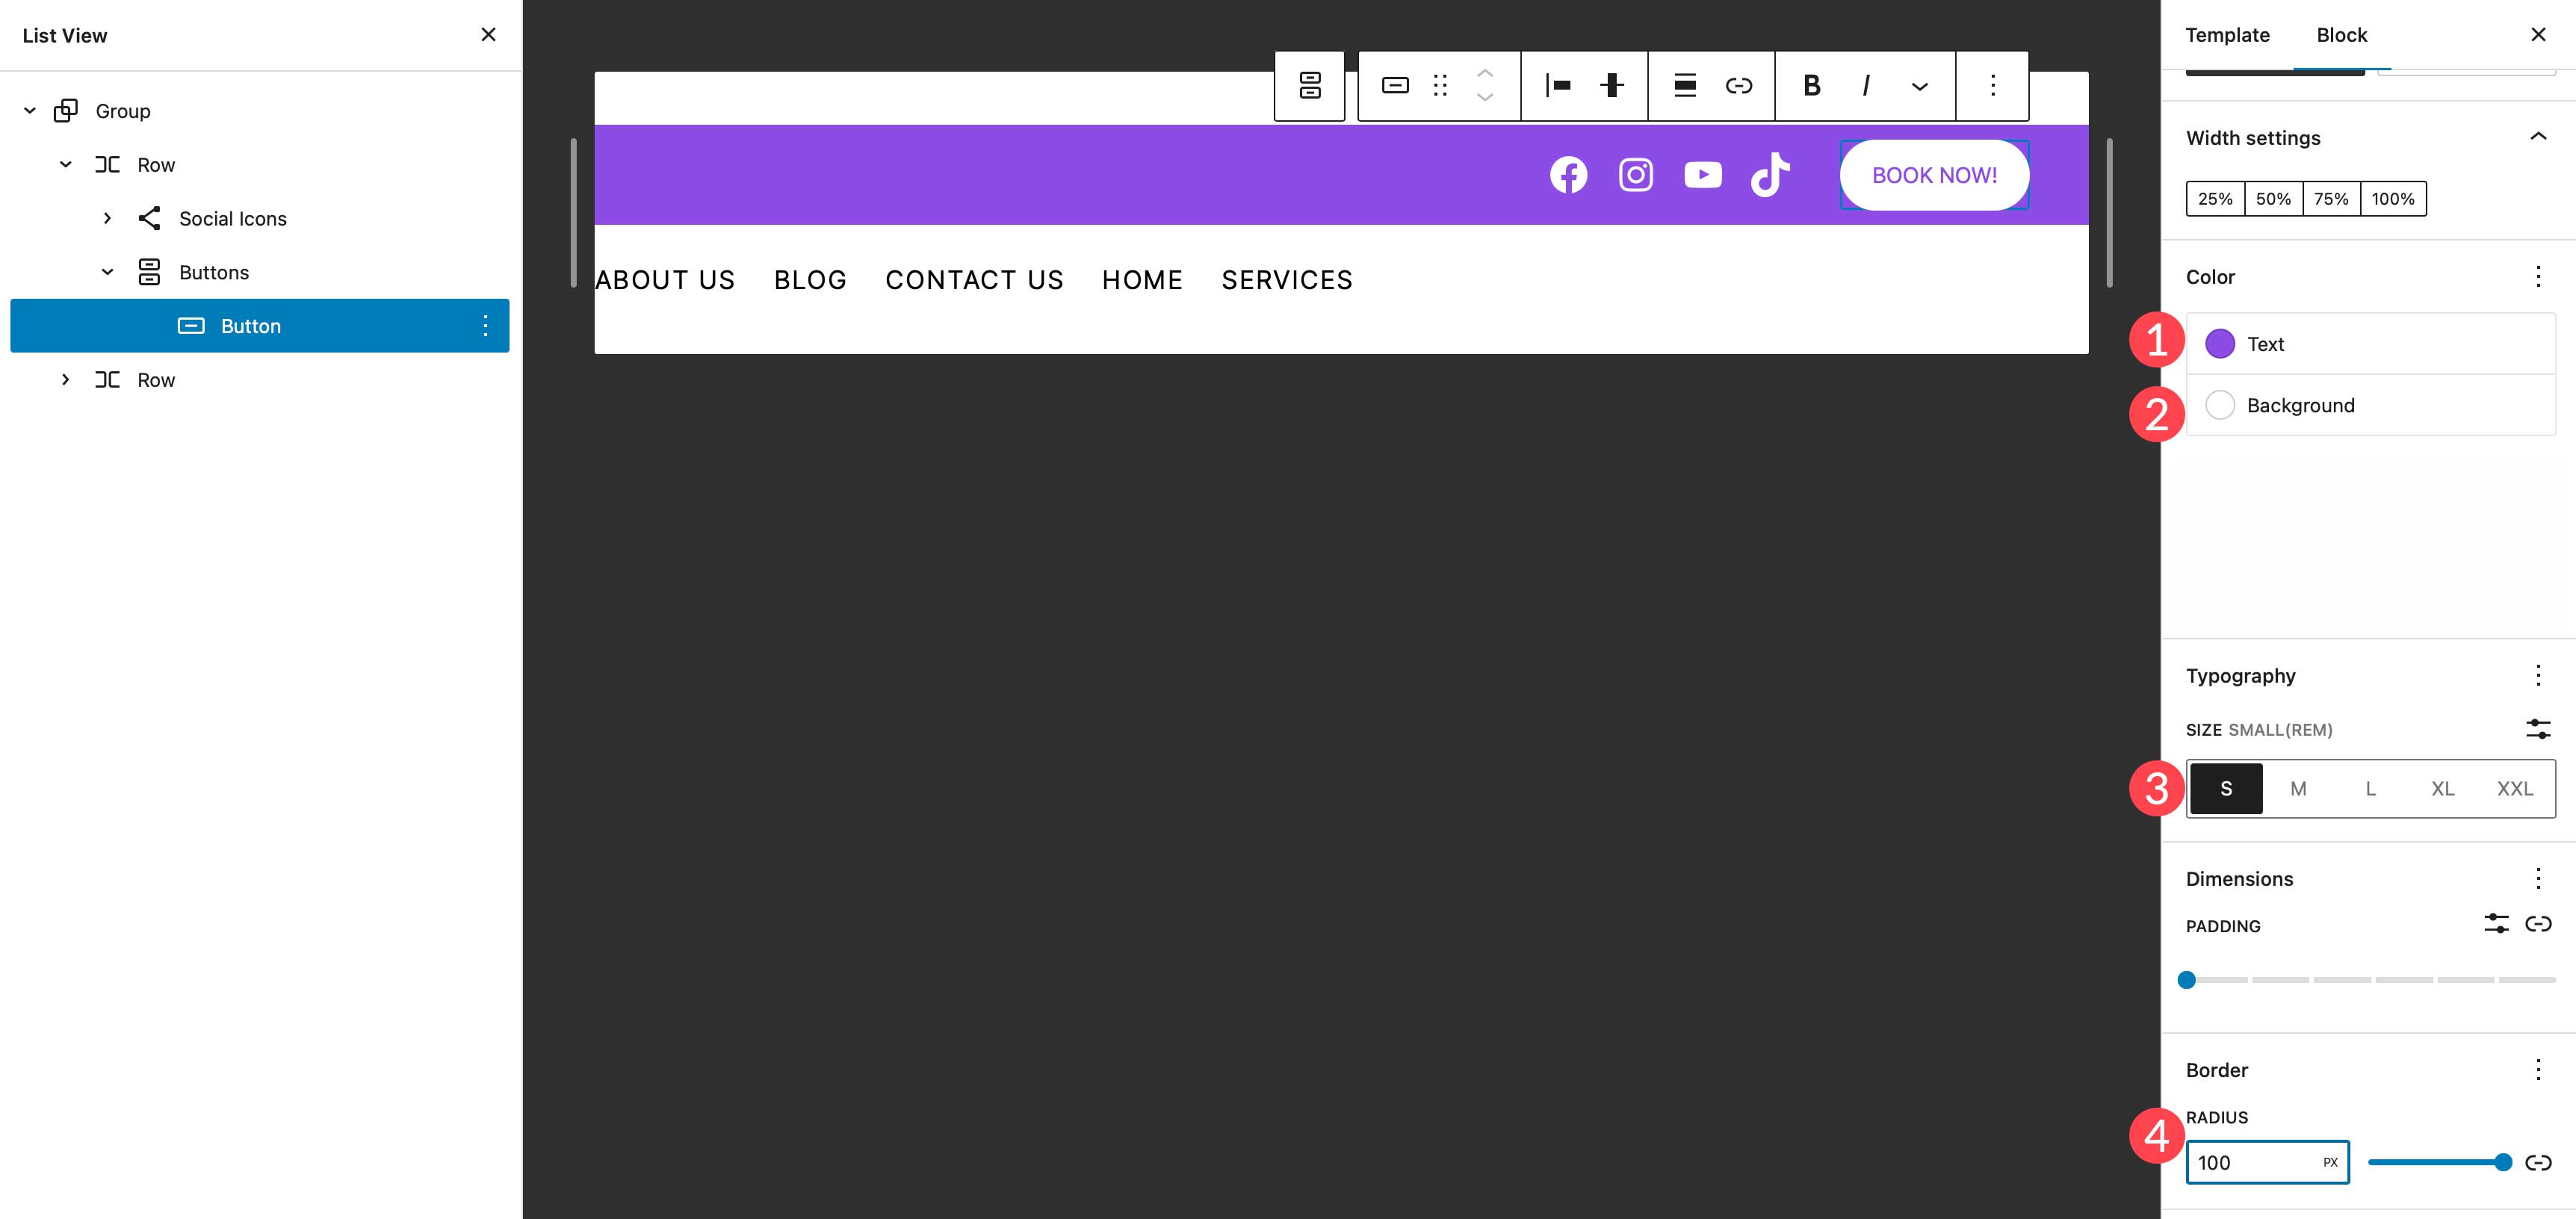
The next step in creating our header is to add the button block to the first row. Click the block inserter, then search for the button block in the search bar. Drag the button block to the first row. We’re going to style our button as follows. Type in BOOK NOW! for the text, then add #8D4CE6 for the text color, assign #ffffff for the button background color, and give the button a border radius of 100px. Leave the button text size set to small. Your button should now look like the screenshot below.
Add the Site Logo Block
The last block we’re going to add is the site logo block. Using the block inserter, search for and select the site logo block. Drag it to the second row of the header.

To add a new logo, click the upload button within the site logo block. You can either choose an image already in your media library or upload a new one.

For the logo settings, ensure that link image to home is enabled, and choose the width for your logo. Optional settings include whether to open the link in a new tab or use the logo as the site icon. Additionally, you can set the margin and padding for the logo under the dimensions settings.
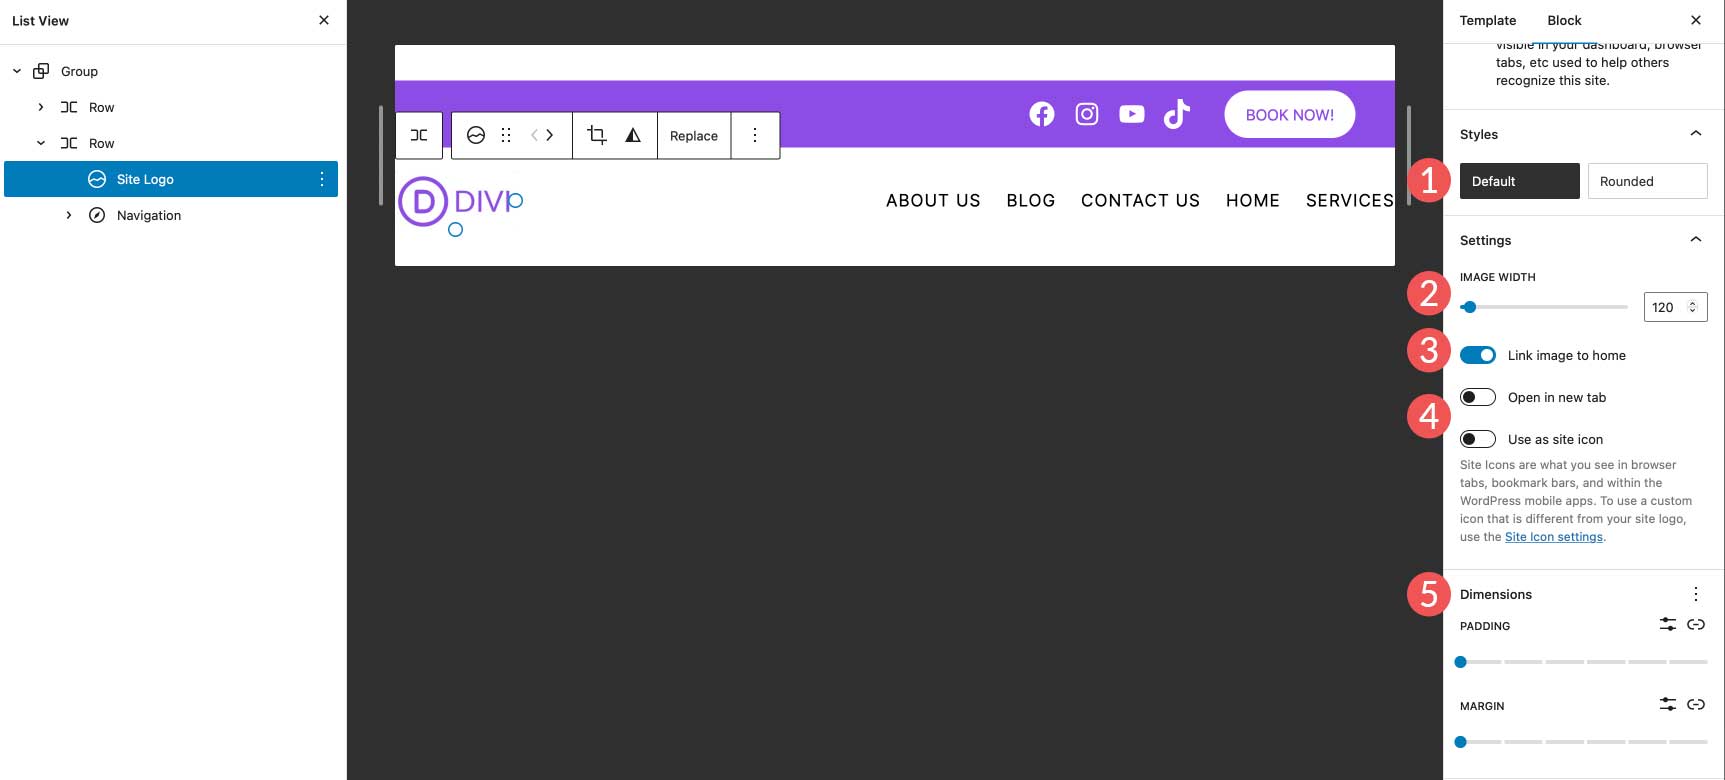
You may also want to consider using the best logo size for your site.
Final Header Settings
Before our header can be completed, there are a few settings we need to check. First, ensure that the 2nd row is set to full width to match our first row. Secondly, make sure that the justification is set to space between items. Lastly, set the row alignment to align middle.

That’s it! As you can see, accessing and customizing your website’s header can be accomplished in a few short steps using the WordPress site editor. Adding, editing, moving, and resizing blocks is simple, and allows you to be creative to create a custom header for your site.
Creating Multiple WordPress Header Template Areas
Another great feature of the WordPress site editor is the ability to create different headers for different templates. Additionally, WordPress offers some pretty unique pre-made headers in the form of block patterns, that make it quick and easy to change the look of your website’s header. Let’s look at how easy it is to create a different header for your site. We’ll use the single template to illustrate how to create a different header that will be applied to posts on the website.
First, navigate to Templates in the site editor. Next, select the Single template.

When you open the single template, you’ll see that the header we created in the last section is currently applied. It’s important to note that you should not edit the header on this template or any other template because changes you make to the header will be applied across the site. Instead, we’ll delete the header we created from this template, then create a new one that will only apply to the template we’re working with.
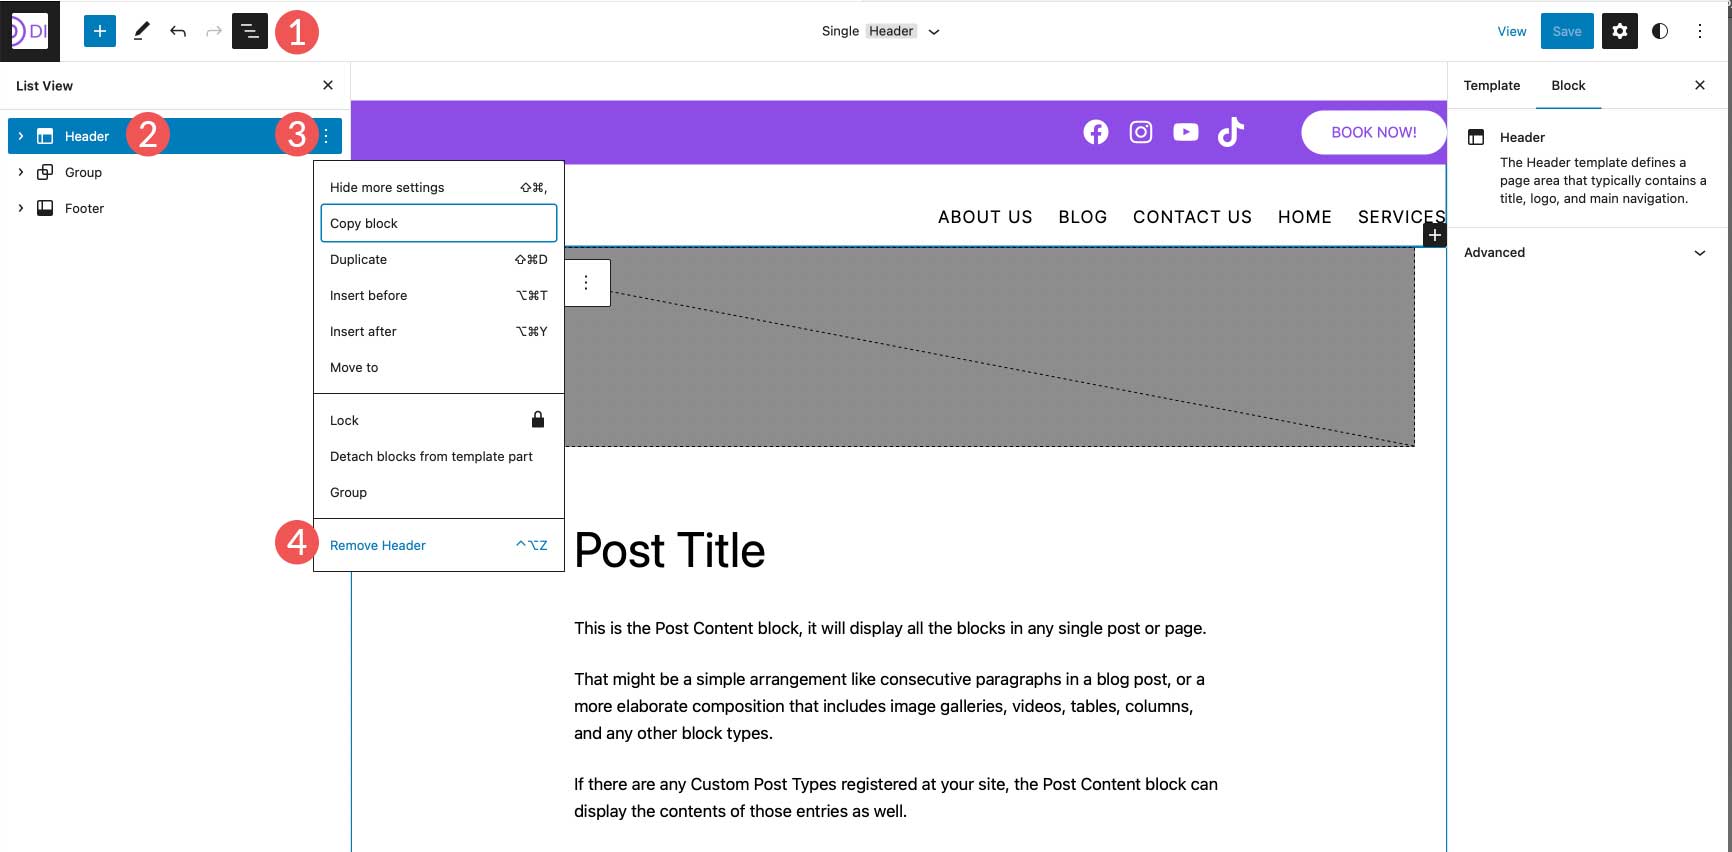
To delete the header, click the list view icon. Next, select the header, then click the ellipsis menu to open the settings. Finally, click remove header.
Adding A New Header To A Template
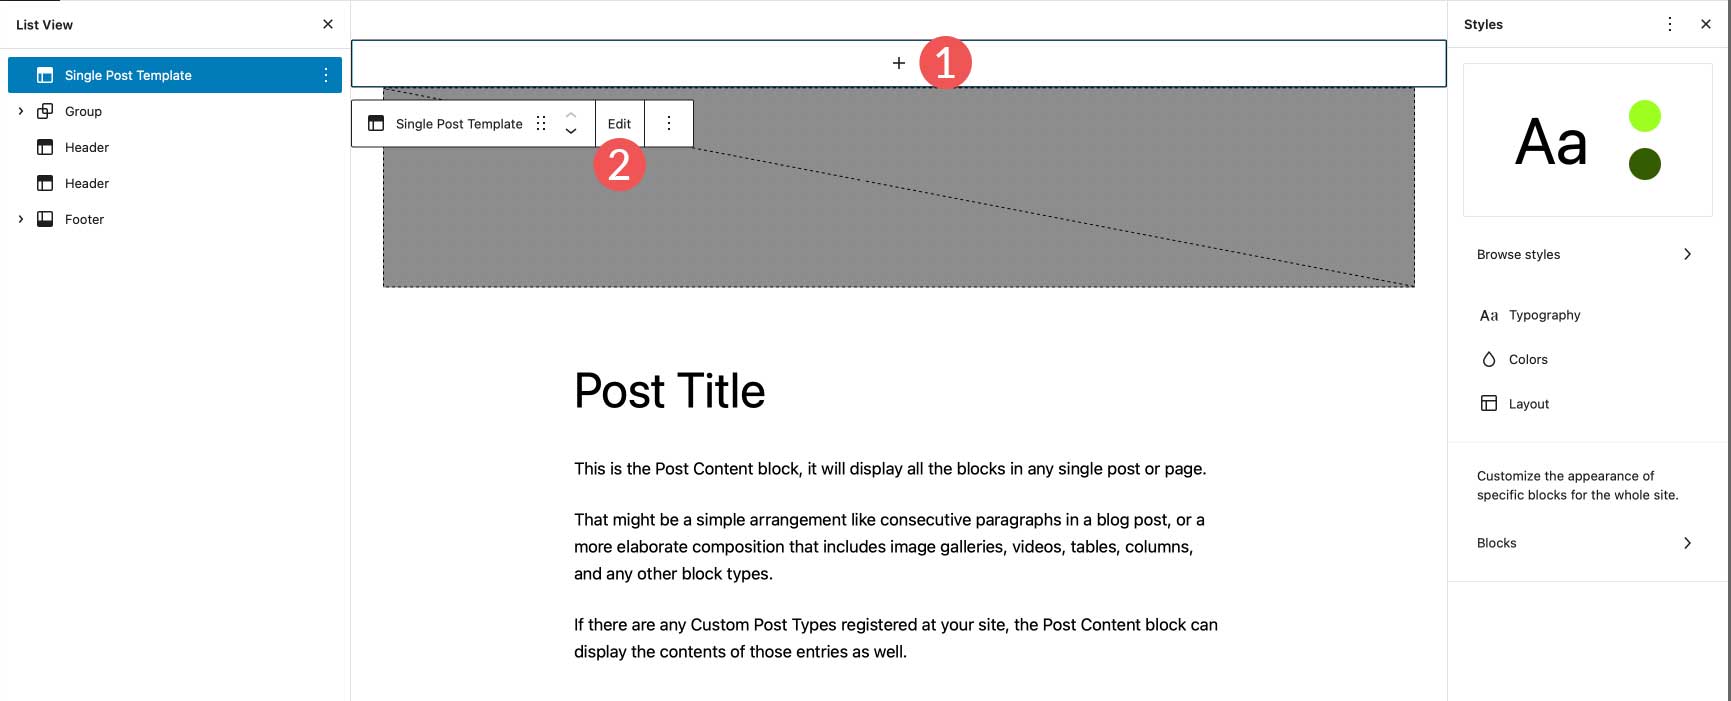
Next, we’re going to add a new header to the single post template. Click the block inserter to add a new block. Next, search for and select the header block to add it to the template.

When creating a new header, there are a couple of options. You can choose from a pre-made pattern, choose a header that you have already created, or create a new one.

Using a Premade Pattern Header
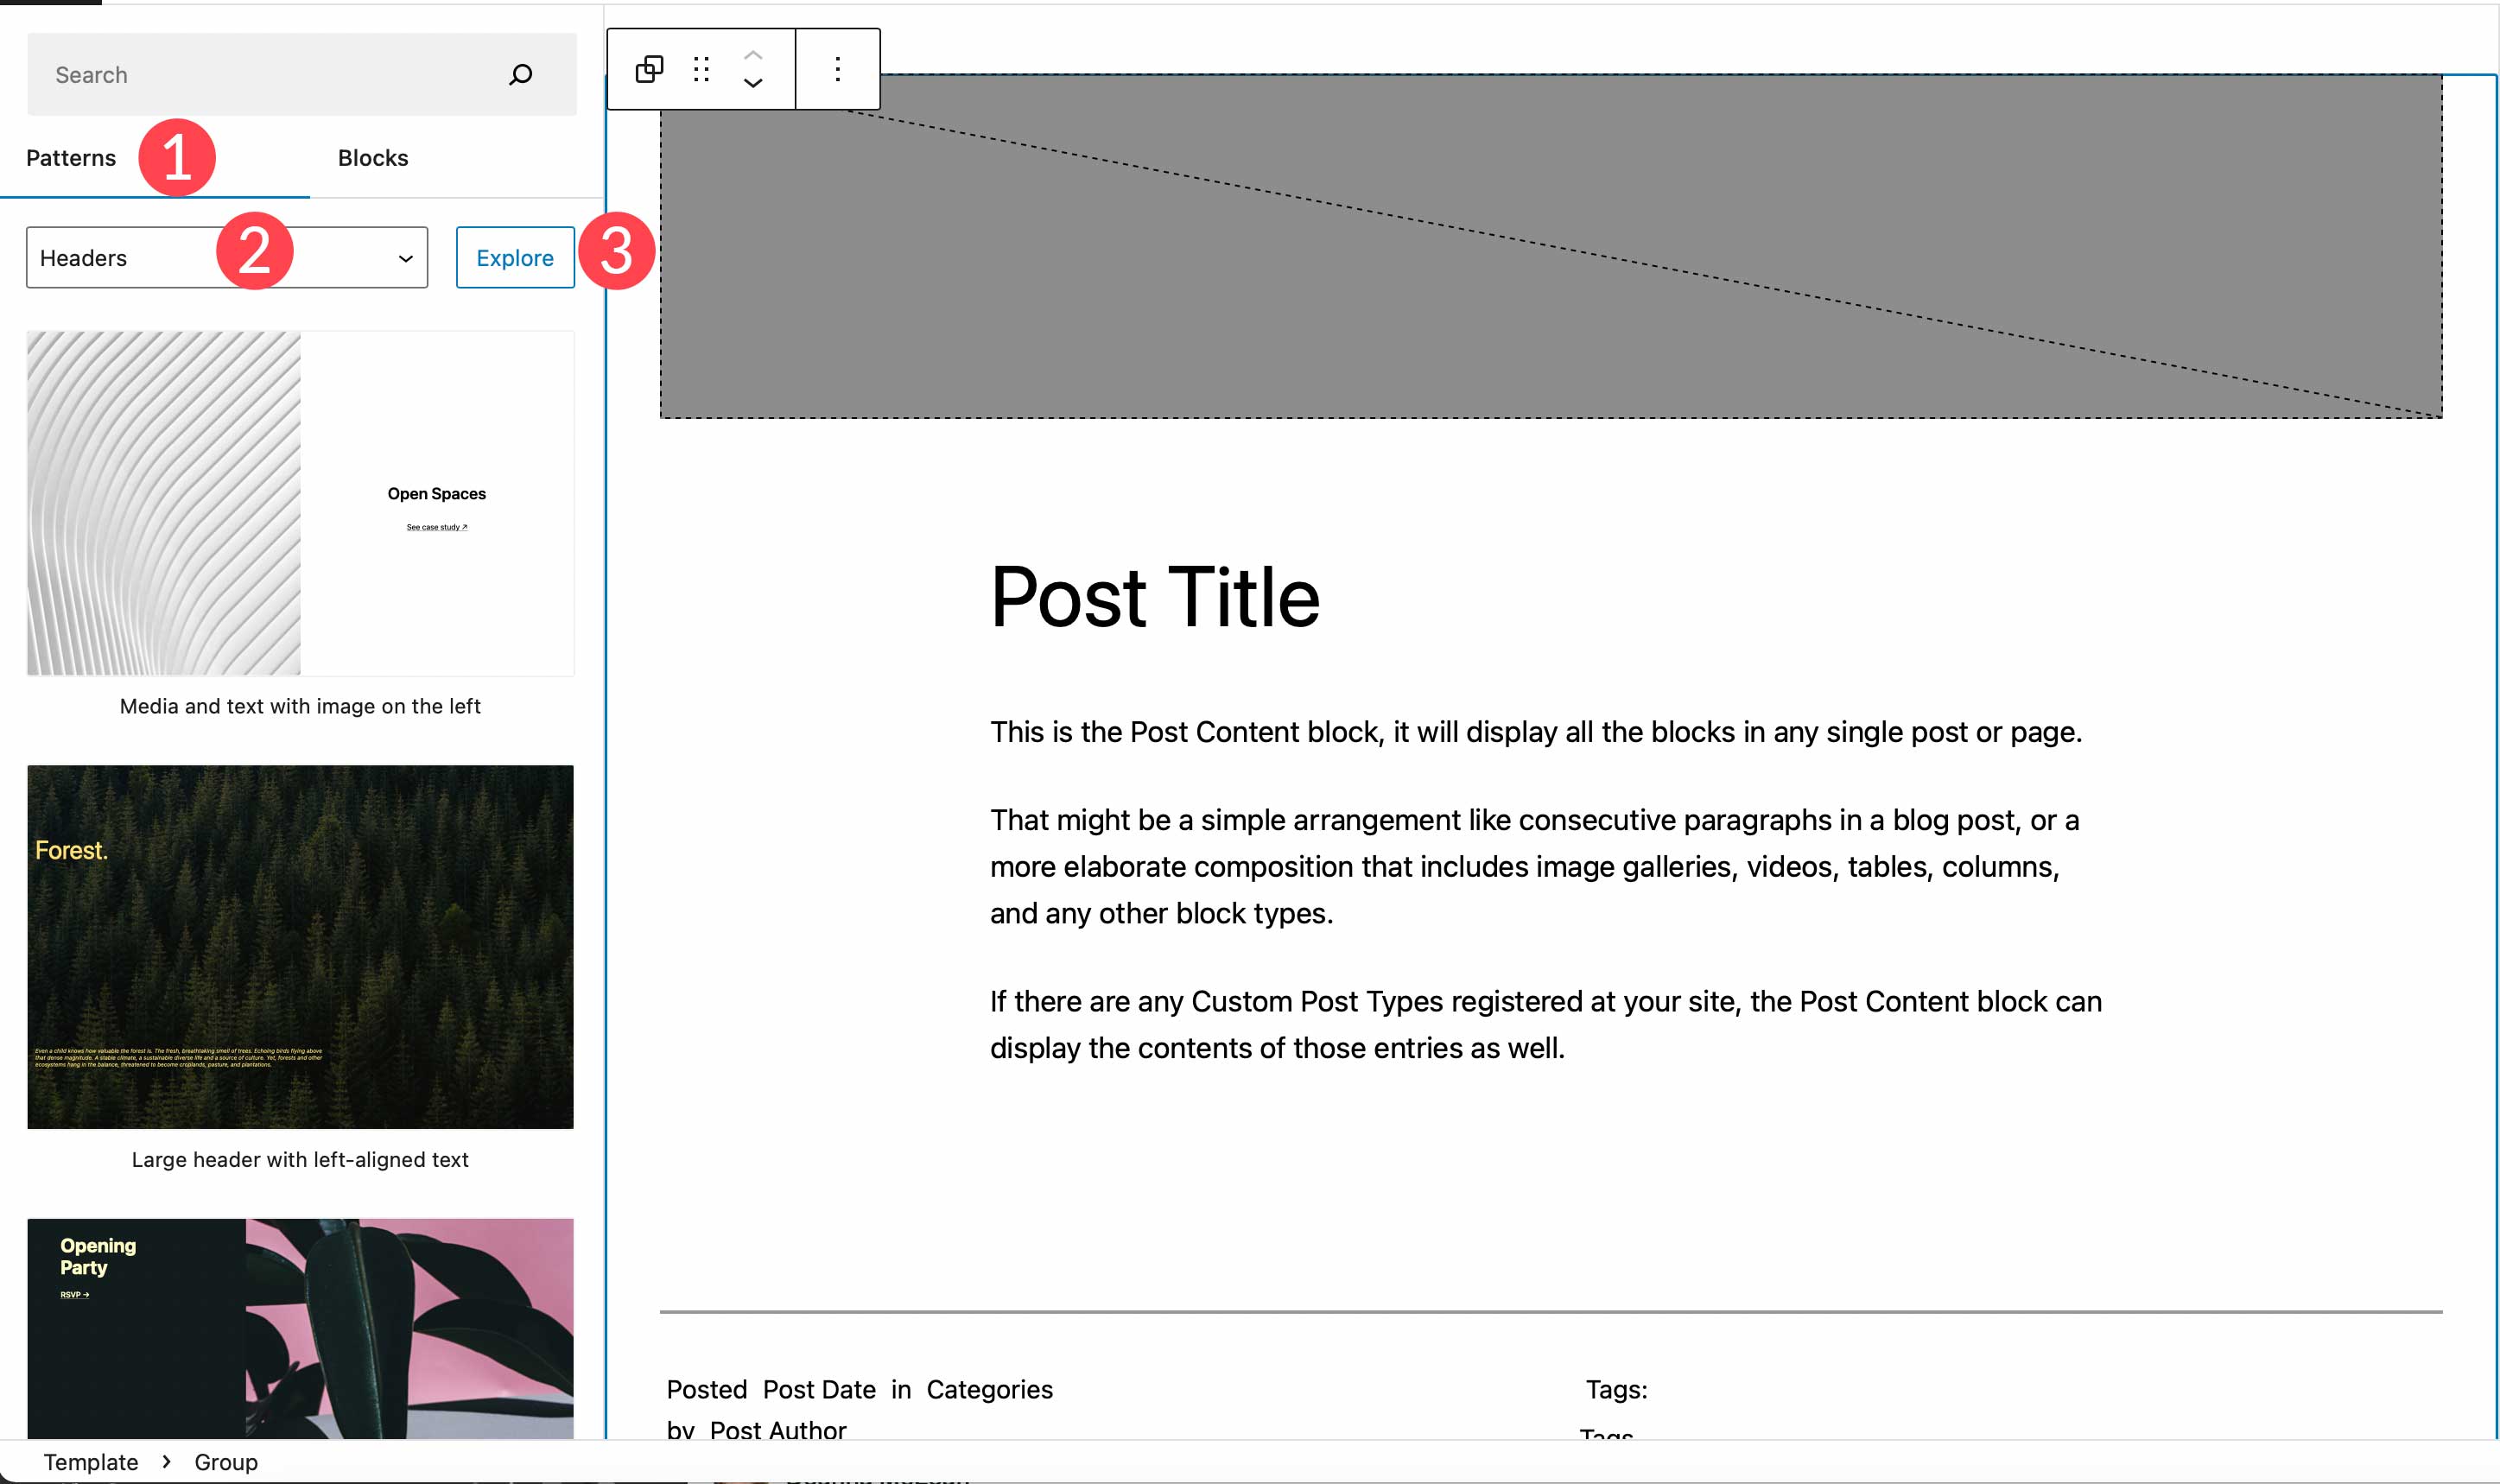
To choose a WordPress block pattern, simply navigate to the patterns tab, then search for headers. All of the available header patterns for the Twenty Twenty-Three theme will be listed there. Alternatively, you can click the explore button to search for and add a header from the WordPress pattern library.
NOTE: Not all header patterns will include navigation/menu elements. You may need to search for navigation patterns or a menu plugin to find what you are looking for.
Creating a New Header From Scratch
If you want to create another header from scratch, rather than use a pattern, you can choose to start with a blank header. By choosing start blank, you’ll be prompted to name your template part. Name it “single post header”, then click create.
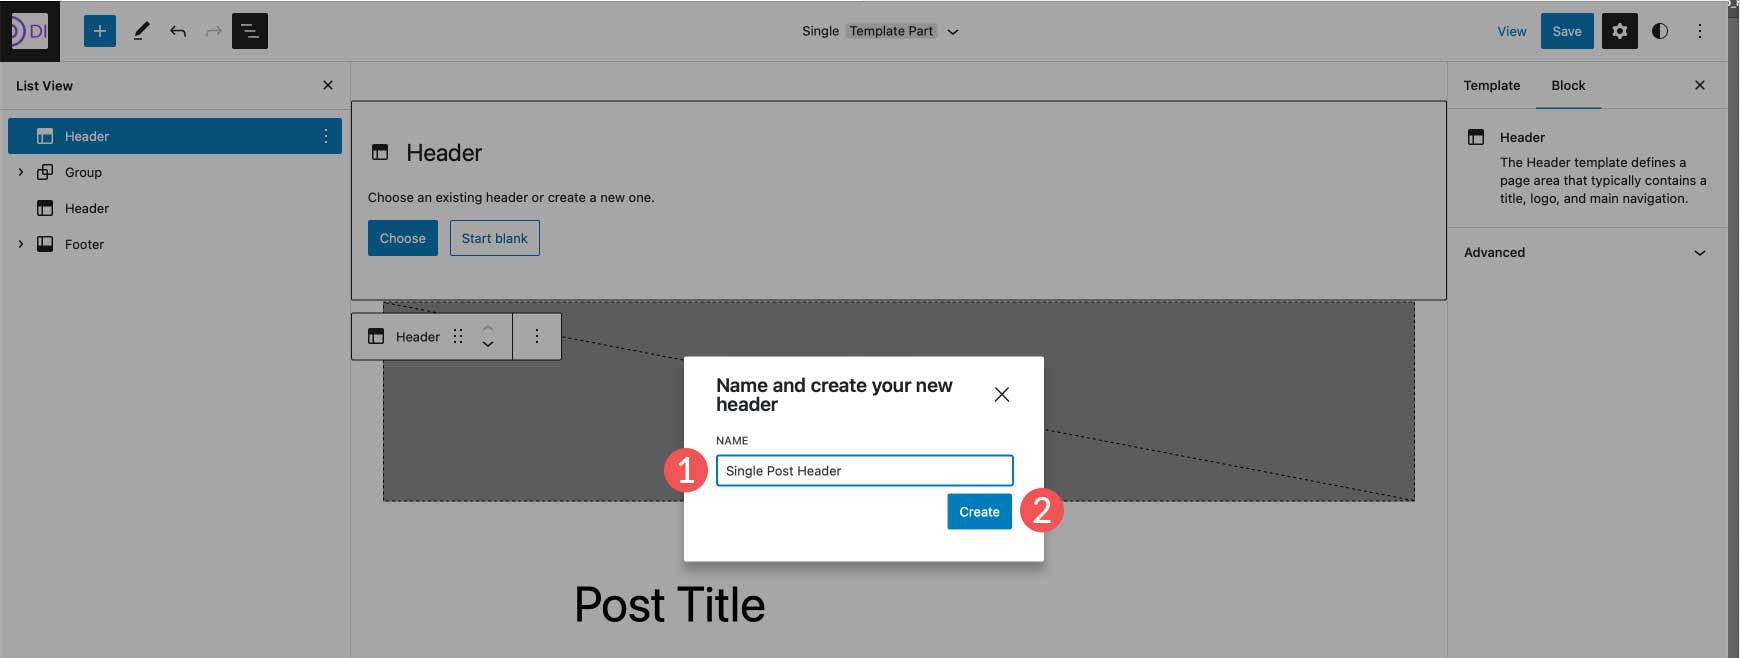
Once your header is in place, simply click on it in the page editor to start adding blocks. Alternatively, you can click the edit button to be taken to the template editor, where you can add any rows or blocks you’d like to create a completely new header.
Using Divi to Add and Customize WordPress Headers

Divi offers a similar way to add custom headers to your WordPress website, but it kicks things up a notch. Divi is the most advanced full site editing theme in the WordPress universe. With over 200 design elements, a fully responsive framework, and the ability to customize every aspect of your site without a single line of code, it is the ultimate web designing experience available.
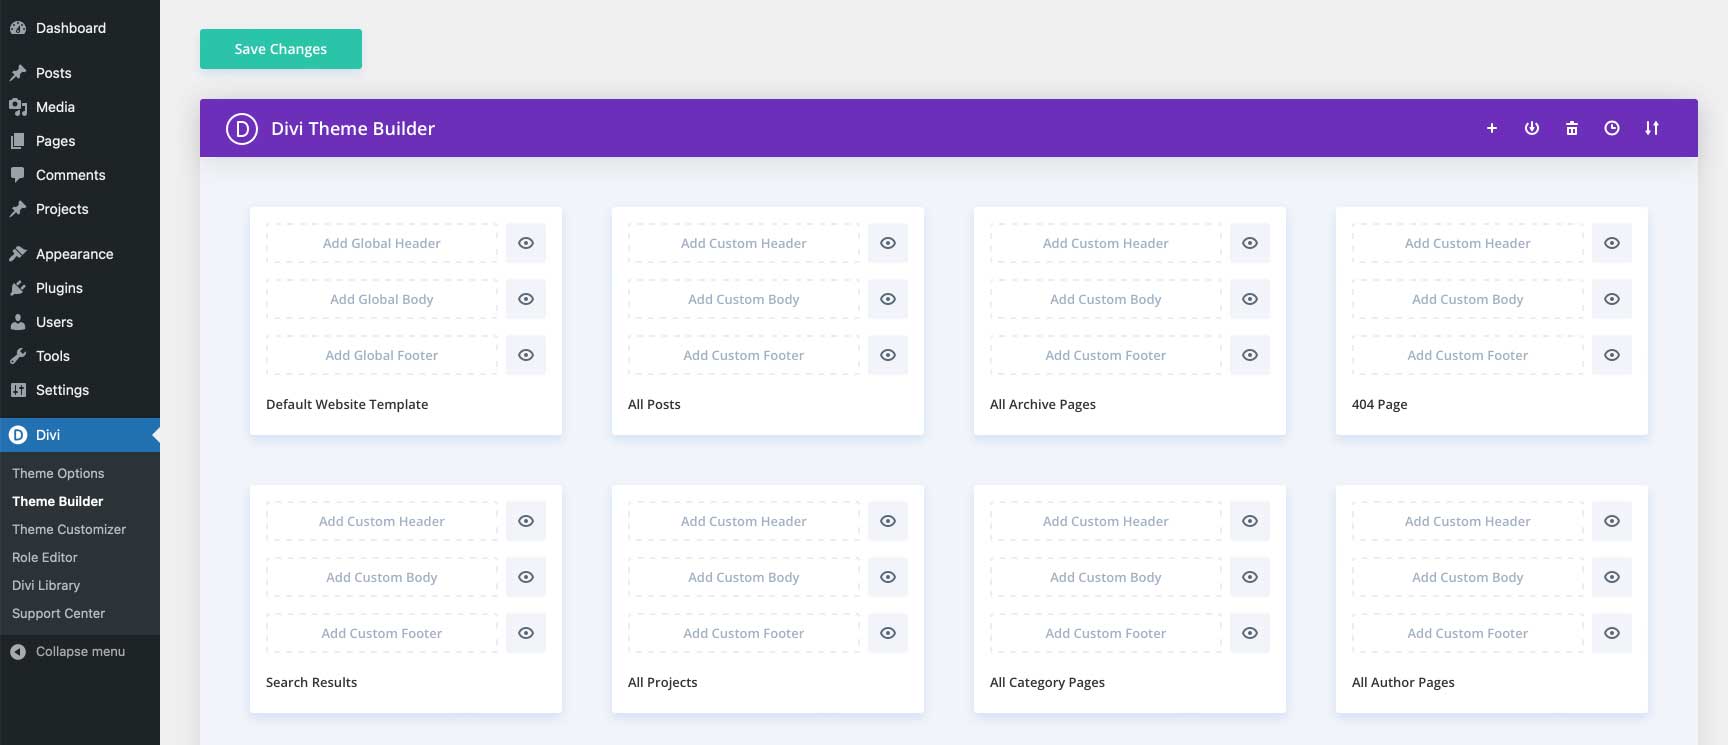
Divi uses the Theme Builder to give you the ability to create custom headers, then apply them to different templates on your website. Headers can be created and applied to your pages, posts, archive pages, 404 pages, search results pages, projects, category pages, author pages, and much more.
For more info, check out these 11 header types you can create with Divi.
FAQs About WordPress Headers
We’ve done our best to be as thorough as possible to give you the knowledge you need to build a custom WordPress header from scratch. That being said, we have put together some common questions regarding WordPress headers to give you a better understanding of how they work.
Will Customizing One Header Affect All Headers Throughout My Site?
Well, it depends. If you create a custom header, then try to change any aspect of it in a different template, then yes, it will be affected wherever that header is in place across your site. That being said, you can create multiple headers on your website and edit them without worry. For example, if you create a header under template parts, that is considered your global header. However, you can create a different header and apply it to certain templates.
As previously mentioned, you can edit the single post template (or any other template), delete the header currently installed, and create a completely new one that is only applied to that template.
How do Header Template Parts Work?
Template parts are sections of your website that are repeated throughout the site. Both headers and footers are considered template parts. Template parts can be global, meaning they apply to a certain section on every page and post on your site, or only apply to sections on certain pages. For example, you can have a header template part that is set globally to apply everywhere, yet another template part that you have assigned only to certain pages, such as the 404 page.
What Kind of Blocks can I use in a WordPress Header?
You can use any block in the WordPress library within a WordPress header. Although some blocks make more sense than others. You should incorporate a navigation block, and site logo block, and consider using others such as social media icons, business contact information, and buttons. For more, see our tutorials on WordPress Blocks.
How do Global Site Styles affect my header style?
Global site styles will automatically be applied to every block within your header. That being said, you can override global block styles in your header by assigning different colors, text sizes, dimensions, and more to the blocks in your header.
Customizing Your Website’s Header Is Easier Than Ever
Thanks to full site editing, it’s possible to make your website’s header look and function any way you’d like. You’re no longer stuck with a boring header where it’s impossible to make even the smallest of changes without a ton of coding. Using a full site editing theme such as Twenty Twenty-Three, or a more robust theme like Divi, gives you more options to style your header to match your branding, add important elements, and make a good first impression.
What tools do you use to customize your website’s header? Let us know by sounding off in the comments below.




Your instructions for customising the WordPress Header cannot be followed because they do not describe a current WP installation.
Today 14/03/24 I installed WordPress on my site amd I am unable to find the menu items you describe in your instructions.